Fuel Pump Trap Door Mod---PICS!
 03-20-2010, 10:00 PM
#1
12 Second Club
Thread Starter
iTrader: (15)
Join Date: Mar 2007
Location: Cheyenne, Wy
Posts: 1,928
Likes: 0
Received 0 Likes
on
0 Posts
I completed my fuel pump trap door mod today on my 1997 Chevrolet Camaro SS T-Top and decided I would do a write-up to answer any questions anyone may have on measurements or how to do this! So here we go!
ITEMS USED:
- 12" x 24" 22 Gauge Stainless Steel Sheet Metal
- #8 x 1/2" Self-Tapping Metal to Metal Screws
- Permatex Orange RTV Silicone
- Cutoff Wheel
- Eye Protection
- Measuring Utensil
- Marking Utensil
- Straight Edge
- Drill w/ Drill Bit & Phillips Bit
- Phillips Screwdriver
PROCESS:
- First, remove all interior plastic from inside the trunk hatch.
- Lay back seat down, then fold carpeting over so its out of the way.
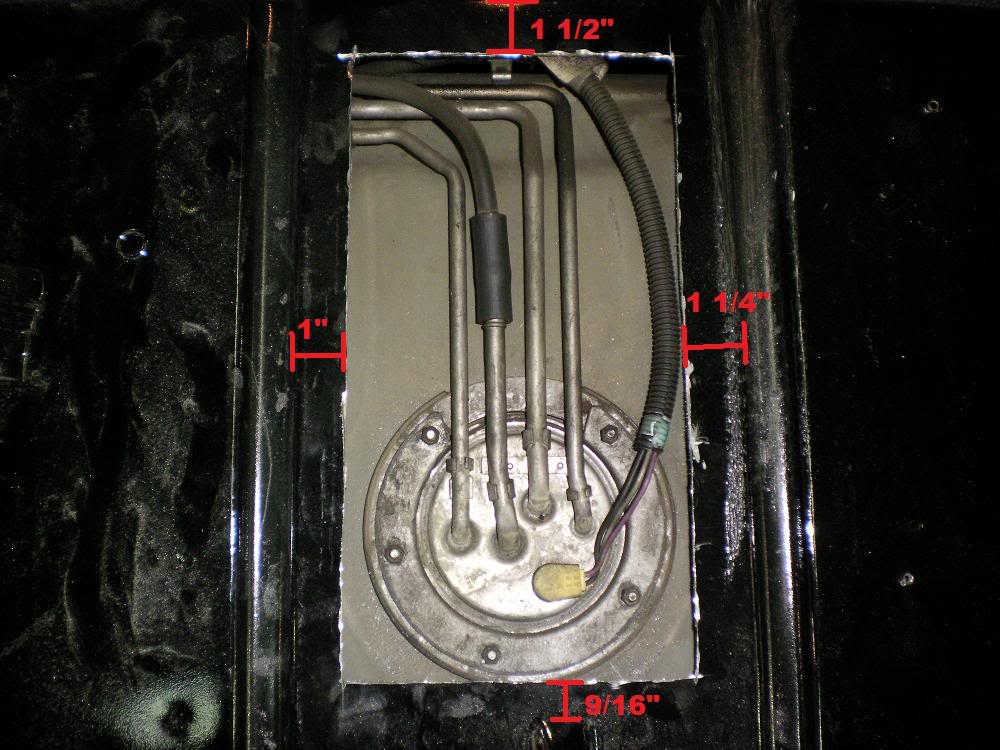
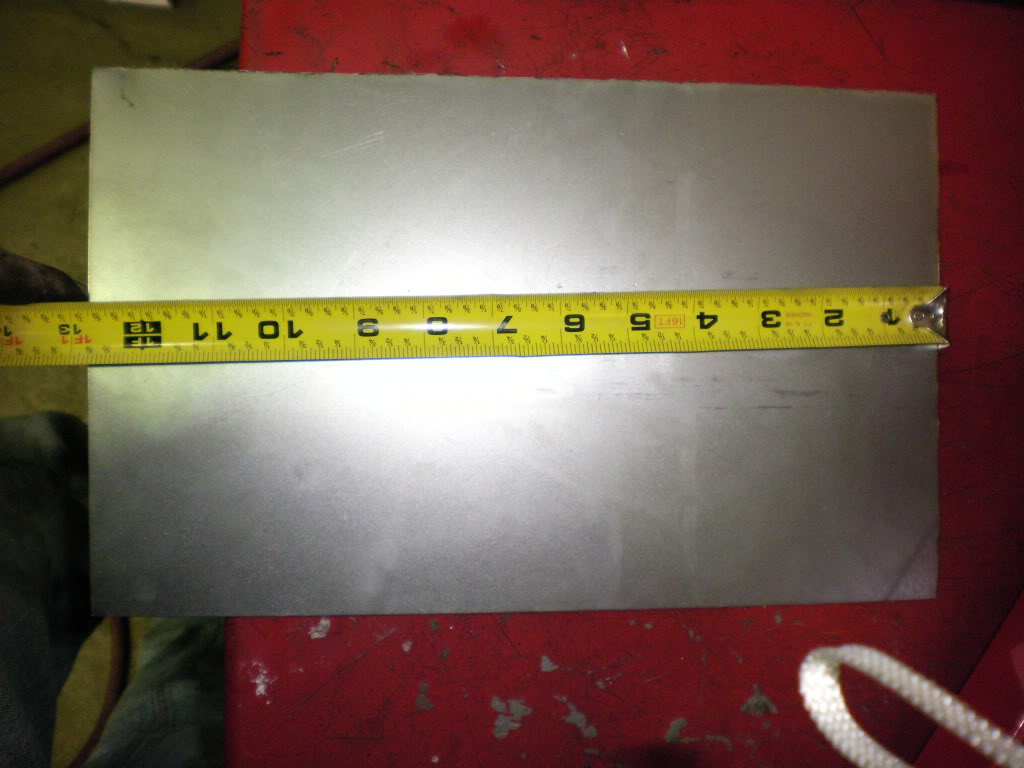
- Measure out your sides for the hole using the dimensions in the picture below:
- Make 2 marks on each side, then use your straight edge and marking utensil to draw a straight line.
- Once hole is marked, use your cutoff wheel and begin cutting along the lines. BE VERY CAREFUL! USE ONLY ENOUGH OF THE WHEEL TO CUT THE METAL BUT DO NOT CUT TOO DEEP OR YOU MAY CUT WIRES AND/OR FUEL LINES! Also when starting your sut, try and avoid creating excess sparks. Remember you are just above the fuel tank and also fumes may have built up above the tank.
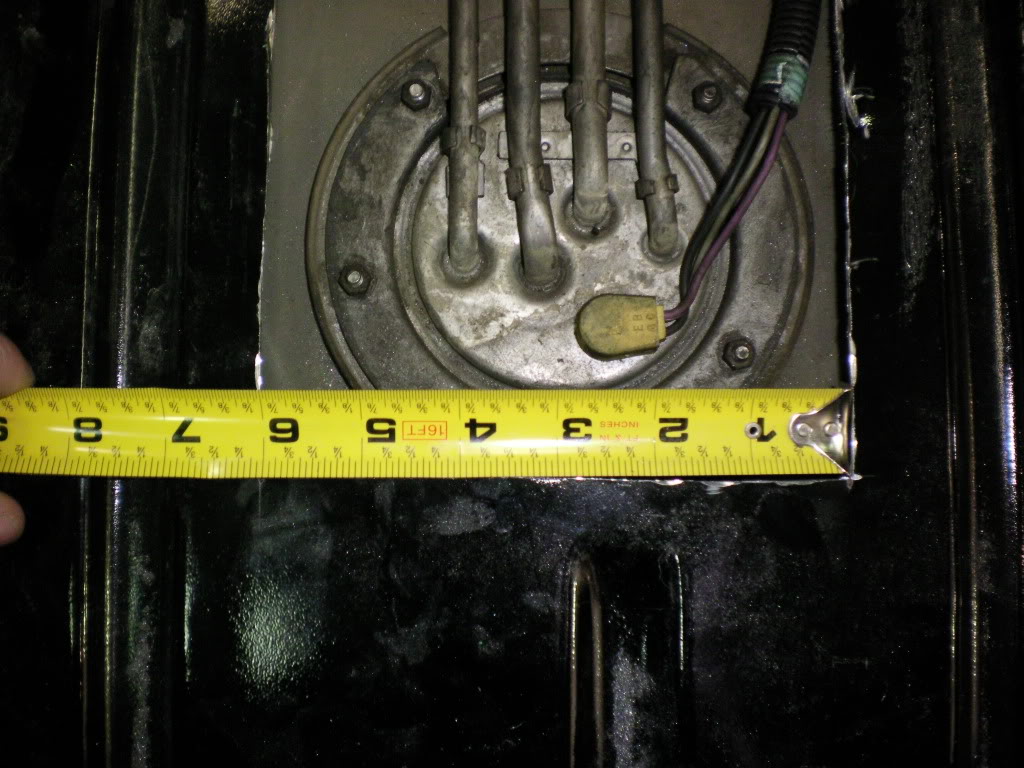
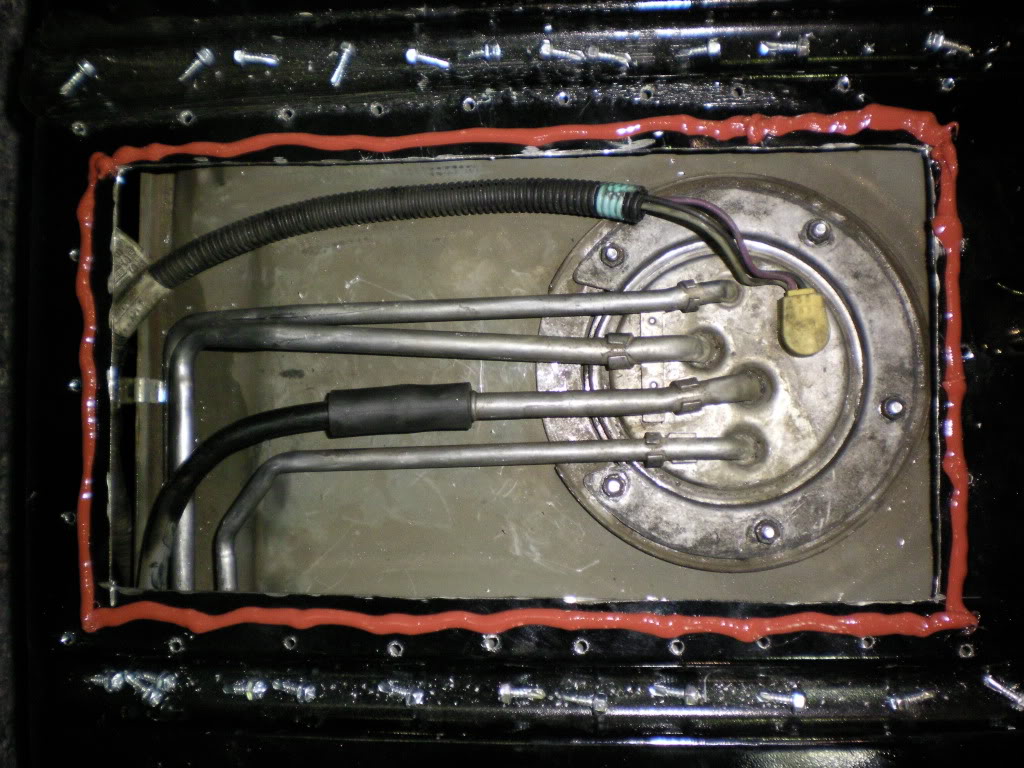
- Once the hole is cut, remove and discard the metal piece left over. The fuel lines and pump are now accessible. The lines are not "easy" to reach, be its DEFINATELY easier than dropping the tank IMO.

- You re now ready to swap out the pump. Follow the correct procedures for changing it out.
- Once complete and new pump is installed it is time to make the cover.
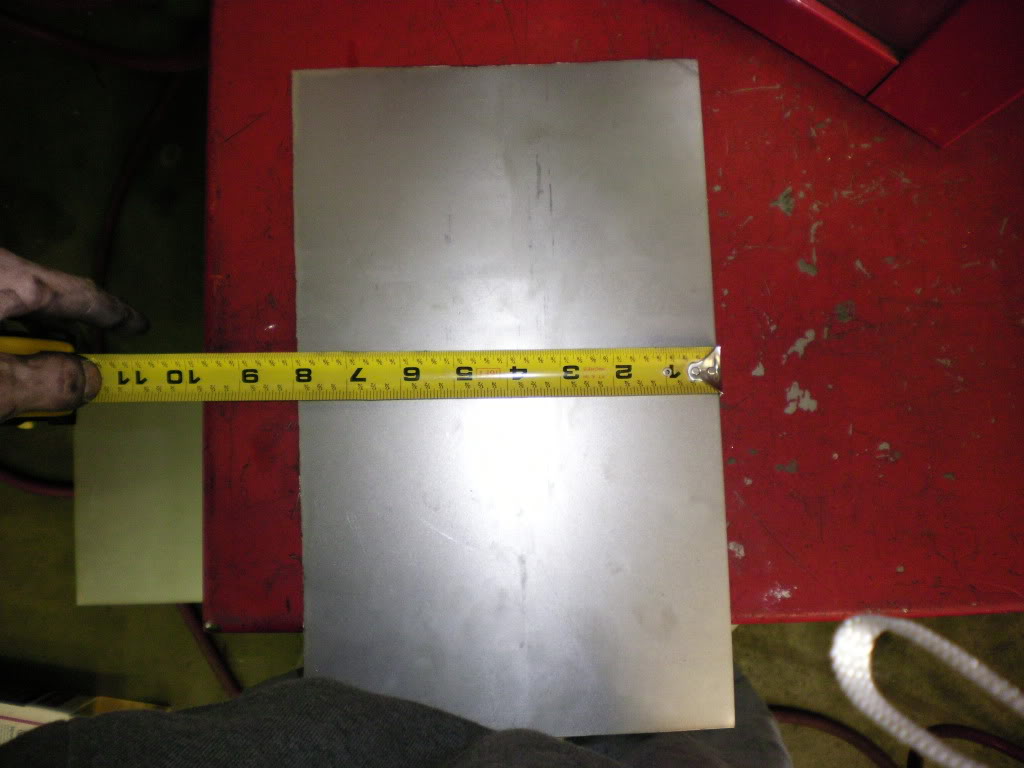
- Take your sheet metal and measure and mark the following dimensions the same way you did for the hole. I made the sides slightly larger to account for the silicone and the screws.
- Once your cover is marked off, cut along the lines with your cutting wheel.
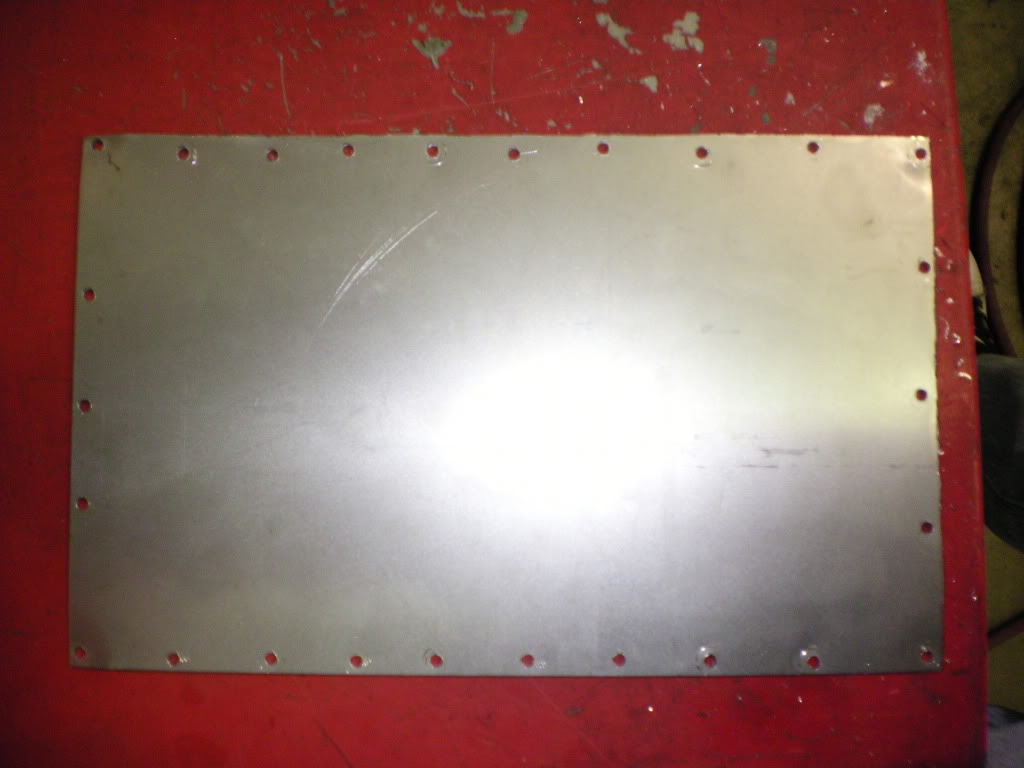
- After you have the cover cut out, take your drill and a bit that is slightly larger than the screws, and drill holes in the COVER ONLY. Distribute them evenly and close to the edge to ensure you get a good seal and have room for the silicone and you dont set a screw inside the hole where it will be useless.
- When all of the holes are drilled BEFORE ADDING THE SILICONE, set the cover over the hole and using your drill with the phillips bit, thread all of your screws, DO NOT TORQUE THEM DOWN. You do this before the silicone to ensure you dont create a mess while trying to apply pressure to set the screws.
- Once all screws are threaded remove the screws and cover and place a bead of silicone INSIDE the screw holes around the edge of the trap door hole.
- When the silicone is set CAREFULLY place the cover over the hole without sliding it around to avoid losing your seal with the silicone.
- Thread all your screws again with your screwdriver but DO NOT TORQUE THEM YET! Once they are ALL threaded, tighten them down switching sides after each is tight to ensure even distribution of pressure to get a good seal.
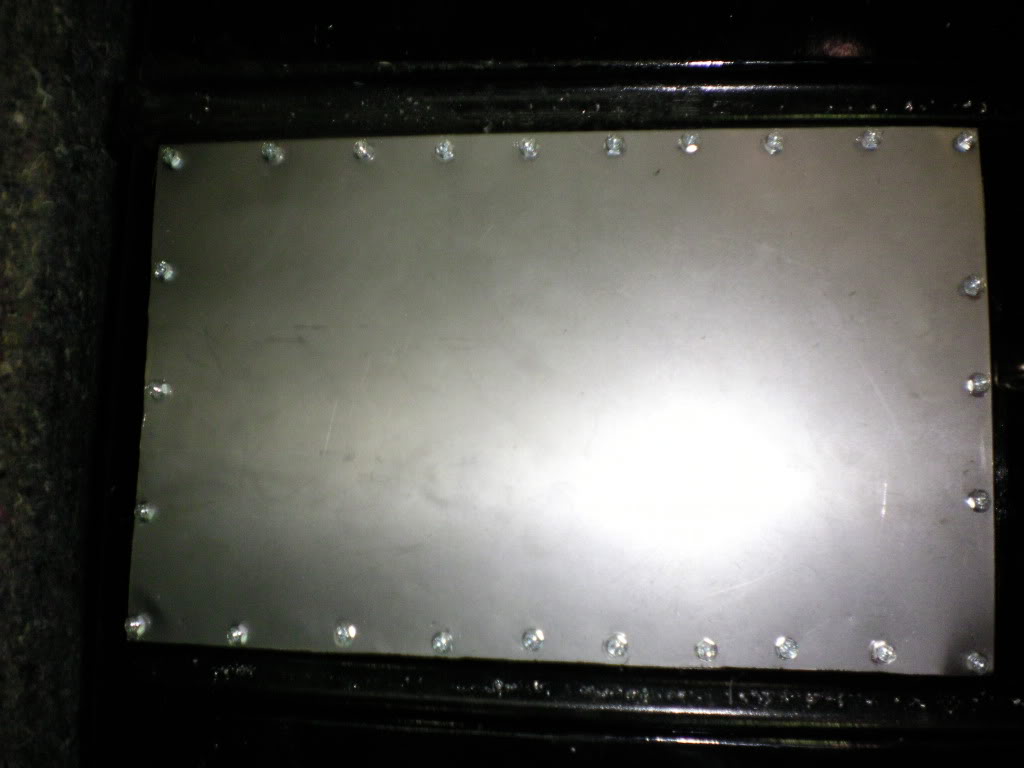
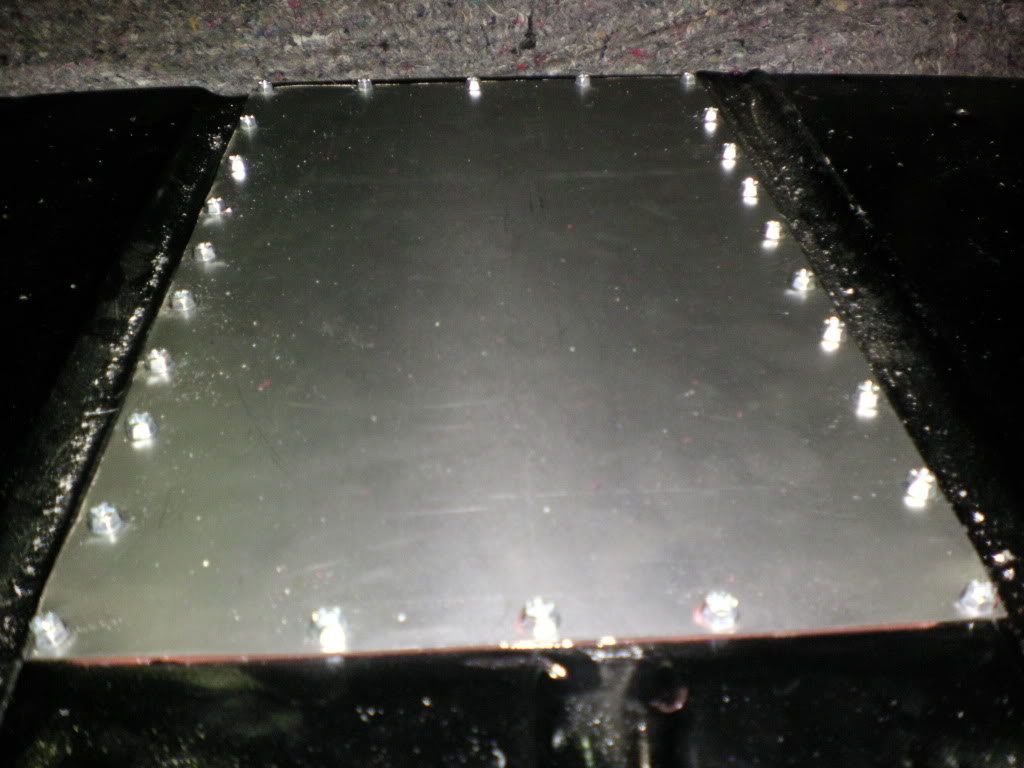
- When all screws are tightened down you are done! Re-install the carpeting and interior plastic, and enjoy!
PRICING:
12" x 24" 22 Gauge Stainless Steel Sheet Metal - $8.47 at Lowes
#8 x 1/2" Metal to Metal Screws - $5.45 at Lowes
Permatex Orange Silicone - $5.95 at Checker Auto (Oreilly's)
TOTAL PRICE: $19.87
ITEMS USED:
- 12" x 24" 22 Gauge Stainless Steel Sheet Metal
- #8 x 1/2" Self-Tapping Metal to Metal Screws
- Permatex Orange RTV Silicone
- Cutoff Wheel
- Eye Protection
- Measuring Utensil
- Marking Utensil
- Straight Edge
- Drill w/ Drill Bit & Phillips Bit
- Phillips Screwdriver
PROCESS:
- First, remove all interior plastic from inside the trunk hatch.
- Lay back seat down, then fold carpeting over so its out of the way.
- Measure out your sides for the hole using the dimensions in the picture below:
- Make 2 marks on each side, then use your straight edge and marking utensil to draw a straight line.
- Once hole is marked, use your cutoff wheel and begin cutting along the lines. BE VERY CAREFUL! USE ONLY ENOUGH OF THE WHEEL TO CUT THE METAL BUT DO NOT CUT TOO DEEP OR YOU MAY CUT WIRES AND/OR FUEL LINES! Also when starting your sut, try and avoid creating excess sparks. Remember you are just above the fuel tank and also fumes may have built up above the tank.
- Once the hole is cut, remove and discard the metal piece left over. The fuel lines and pump are now accessible. The lines are not "easy" to reach, be its DEFINATELY easier than dropping the tank IMO.
- You re now ready to swap out the pump. Follow the correct procedures for changing it out.
- Once complete and new pump is installed it is time to make the cover.
- Take your sheet metal and measure and mark the following dimensions the same way you did for the hole. I made the sides slightly larger to account for the silicone and the screws.
- Once your cover is marked off, cut along the lines with your cutting wheel.
- After you have the cover cut out, take your drill and a bit that is slightly larger than the screws, and drill holes in the COVER ONLY. Distribute them evenly and close to the edge to ensure you get a good seal and have room for the silicone and you dont set a screw inside the hole where it will be useless.
- When all of the holes are drilled BEFORE ADDING THE SILICONE, set the cover over the hole and using your drill with the phillips bit, thread all of your screws, DO NOT TORQUE THEM DOWN. You do this before the silicone to ensure you dont create a mess while trying to apply pressure to set the screws.
- Once all screws are threaded remove the screws and cover and place a bead of silicone INSIDE the screw holes around the edge of the trap door hole.
- When the silicone is set CAREFULLY place the cover over the hole without sliding it around to avoid losing your seal with the silicone.
- Thread all your screws again with your screwdriver but DO NOT TORQUE THEM YET! Once they are ALL threaded, tighten them down switching sides after each is tight to ensure even distribution of pressure to get a good seal.
- When all screws are tightened down you are done! Re-install the carpeting and interior plastic, and enjoy!
PRICING:
12" x 24" 22 Gauge Stainless Steel Sheet Metal - $8.47 at Lowes
#8 x 1/2" Metal to Metal Screws - $5.45 at Lowes
Permatex Orange Silicone - $5.95 at Checker Auto (Oreilly's)
TOTAL PRICE: $19.87

 03-20-2010, 10:13 PM
#5
12 Second Club
Thread Starter
iTrader: (15)
Join Date: Mar 2007
Location: Cheyenne, Wy
Posts: 1,928
Likes: 0
Received 0 Likes
on
0 Posts
I found one for a convertible that was good but not a T-Top or Hardtop....so here it is! lol
 03-20-2010, 10:18 PM
#7
12 Second Club
Thread Starter
iTrader: (15)
Join Date: Mar 2007
Location: Cheyenne, Wy
Posts: 1,928
Likes: 0
Received 0 Likes
on
0 Posts
yeah I thought so lol. Even doing all this work it was MUCH easier and only took me about 3 hours...could have been less but I was BSing with some guys at the shop alot too lol.
It wasnt for "this" swap though...my next pump swap will take maybe an hour...piece of cake...MUCH better than dropping the tank!
It wasnt for "this" swap though...my next pump swap will take maybe an hour...piece of cake...MUCH better than dropping the tank!
Trending Topics
03-20-2010, 10:49 PM
#10
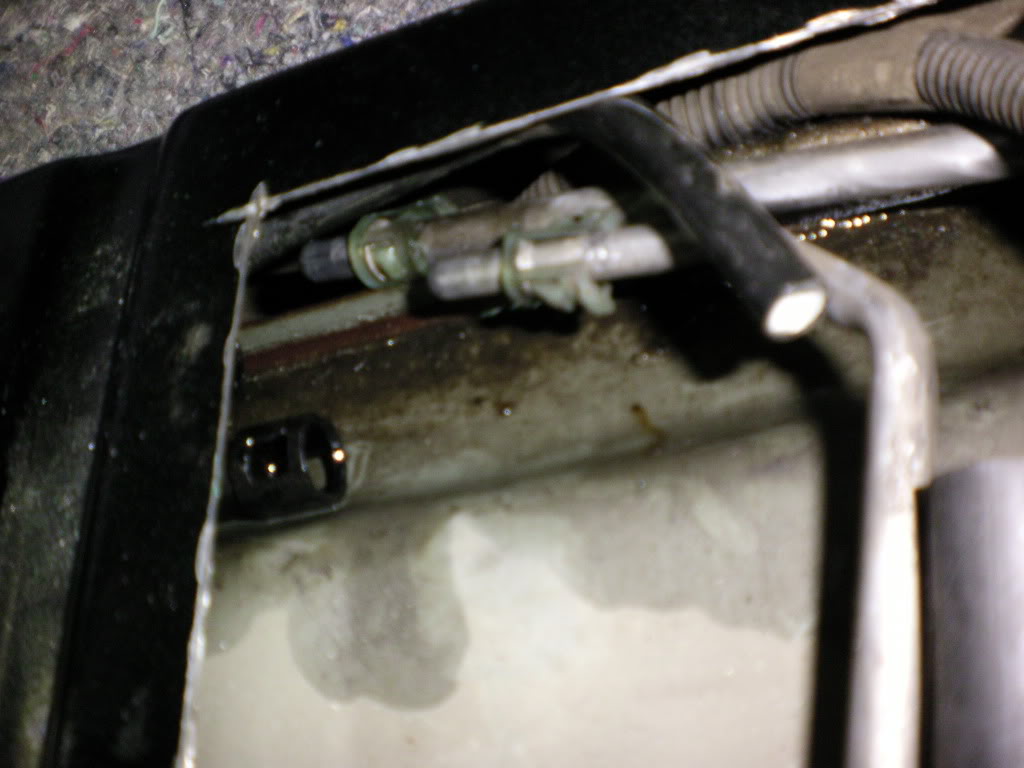
I did this on a friend's TA awhile back and did it this same way, although I think it would have been a bit easier to cut above the quick disconnects so the lines were easier to take apart. Not cut the whole panel that wide but maybe just a small extension on part of the panel. Just my $.02
03-20-2010, 10:52 PM
#11
12 Second Club
Thread Starter
iTrader: (15)
Join Date: Mar 2007
Location: Cheyenne, Wy
Posts: 1,928
Likes: 0
Received 0 Likes
on
0 Posts
I thought about that but there is that indention right there and it would have made it difficult to seal when I put the cover on so I opted not to...
 03-21-2010, 06:36 AM
#15

I also have a HD recorded video I could upload to add a link to your write up. It shows a how to and how easy it was to pull it off with a pair of air powered body cutting shears. Only 5 minutes tops when using your method along with some air tools. We could maybe get this stickied and I would love to add that to your info for f-bod lovers.
03-21-2010, 07:06 AM
#16
I did this to my '97Z 'vert, and even with a 1" extension-cut to the left to help gain access to the quick-disconnects it was still a ROYAL pain in the ***. What tools or techniques did you use to properly disconnect and reconnect the lines? Disconnecting them was hard, but reconnecting them had me thinking about how much easier spark plug jobs on these cars are. I seriously almost gave up on it...
03-21-2010, 08:31 AM
#17
Village Troll 
iTrader: (2)
 03-21-2010, 08:36 AM
#18
Launching!

Join Date: Mar 2003
Location: Michigan
Posts: 284
Likes: 0
Received 0 Likes
on
0 Posts

- Once hole is marked, use your cutoff wheel and begin cutting along the lines. BE VERY CAREFUL! USE ONLY ENOUGH OF THE WHEEL TO CUT THE METAL BUT DO NOT CUT TOO DEEP OR YOU MAY CUT WIRES AND/OR FUEL LINES! Also when starting your sut, try and avoid creating excess sparks. Remember you are just above the fuel tank and also fumes may have built up above the tank.
How would I know how "deep" to run the cut-off wheel without going too deep? I notice you didn't tell us how close the fuel lines are to the sheet metal.
Also, how many sparks would be considered "excessive"? I believe it only takes one or two to ignite gas fumes? Seems to me I'd be setting right on top of a bomb should the tank ignite.
Your write-up is very helpful, and I'm sure will aid a few in doing a fuel pump install. I found a write-up a few years ago that mirrors exactly what you wrote. I opted for a set of tin snips instead of a cut-off wheel though, as I've seen what gas fumes can do when ignited, and the snips worked perfectly.
03-21-2010, 08:39 AM
#19
03-21-2010, 08:57 AM
#20
Launching!
Join Date: Mar 2003
Location: Michigan
Posts: 284
Likes: 0
Received 0 Likes
on
0 Posts
That's what I said I did. I used progressively larger drill bits in the corners and marked the bits so I only went thru just enough to puncture the sheet metal. Made the holes large enough to get snips started. Snips worked quite well, and I lost no hair, developed no blisters, nor did I inhale any smoke.