
4L80E Transbrake Install Instructions
 07-05-2010, 02:43 PM
#1

Anyone have 4L80E Transbrake Install Instructions? Or instructions on how to remove pump, clutches, direct drive, ect.....? Looking for something with pics......or is there like a Haynes manual on re-building a 80?
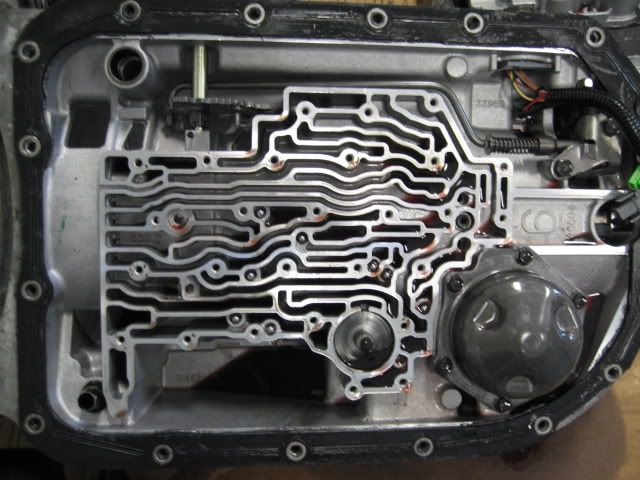
Pan off:
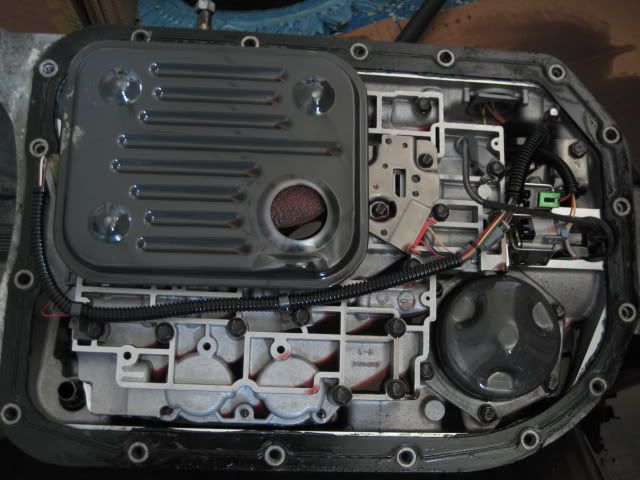
Transbrake:
I have never messed with an auto trans
Pan off:
Transbrake:
I have never messed with an auto trans
 07-05-2010, 03:04 PM
#2
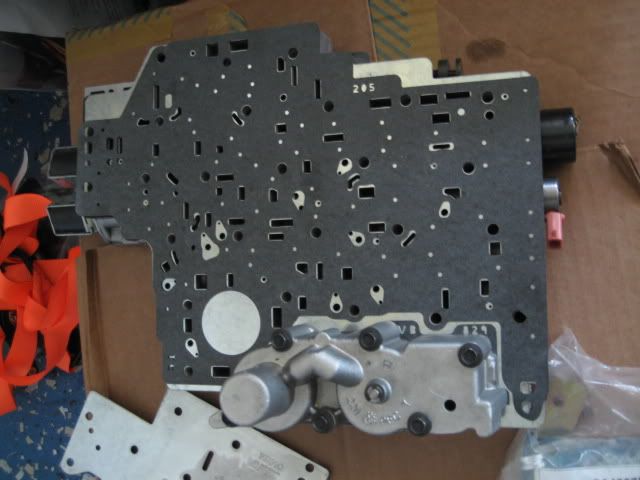
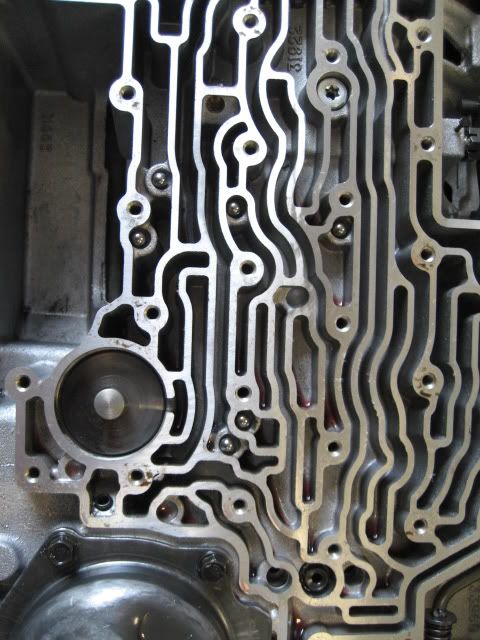
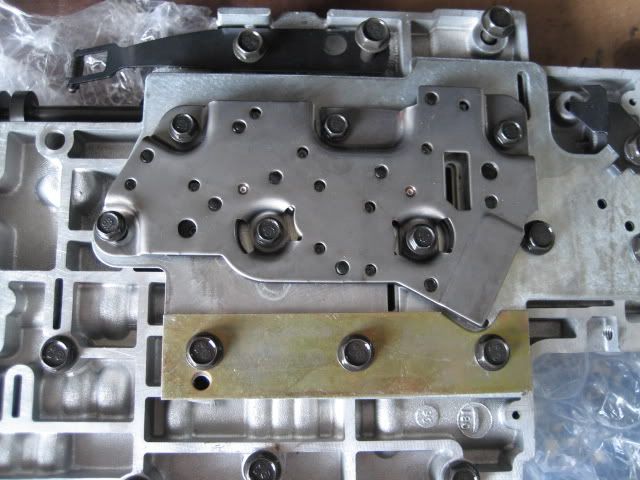
I don't see a trans brake I see a valve body and a trans go plate!  I'm assuming you are installing an hd2 kit from transgo. For what you are doing I would hit up eBay or a parts place like patc and get an atsg manual for the 4l80e. The are cheap and a great reference for the do it yourselfer! Good luck Vince
I'm assuming you are installing an hd2 kit from transgo. For what you are doing I would hit up eBay or a parts place like patc and get an atsg manual for the 4l80e. The are cheap and a great reference for the do it yourselfer! Good luck Vince  07-05-2010, 04:18 PM
#4
Maybe this'll help, it's an old article I posted online and I need to update it and finish it but time has been short.
The 4L80E is a close relative of the TH400. It shares many components. Some of the components look similar but have slight differences so be aware of this when swapping parts between different year 4L80's and TH400's.
Parts that will interchange are the rear band, center support, direct drum (as an assembly), forward and direct clutches and the intermediates are similar. The 4L80E uses 4 intermediate clutch plates instead of 3 like a TH400. It has a thinner intermediate pressure plate, frictions, and steels. I use TH400 and 4L80 intermediate steel plates interchangeably to attain the desired clearance.
The 34 element sprag that is commonly used on a TH400 will fit the 4L80E and should be used on all but a stock rebuild.
I will add some pics and text here specific to a 4L80 rebuild. Other than some minor differences I will show, the rear rebuild is the same as a TH400.
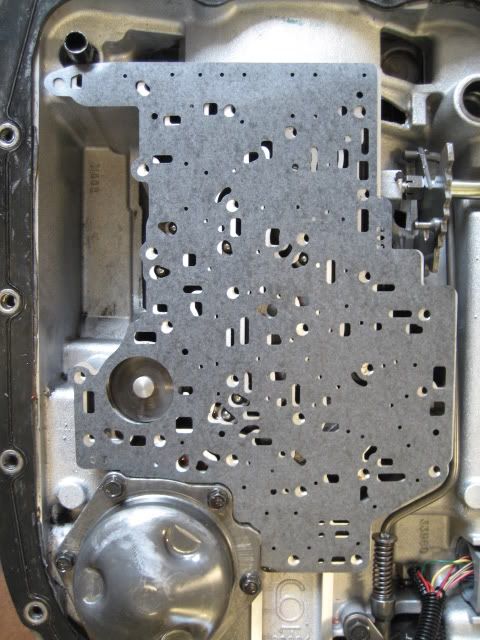
Disassembly is relatively straightforward. Remove the dipstick, shifter lever, input and output speed sensors, tailhousing, pump bolts, and then the pan. Then disconnect the wiring (gently) from the various sensors and solenoids on the VB. Almost all the fasteners in the 4L80E are metric. The center support bolt is an exception and is a 3/8" 12 point, same as a TH400.
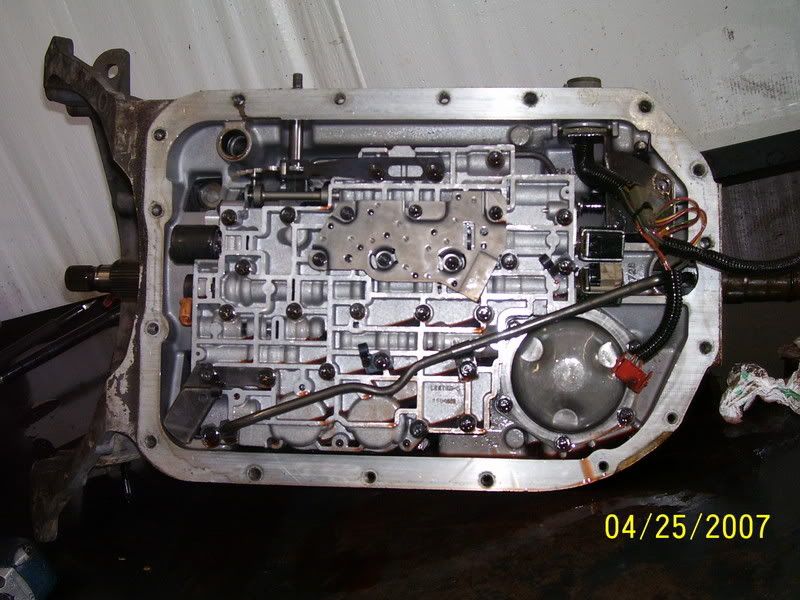
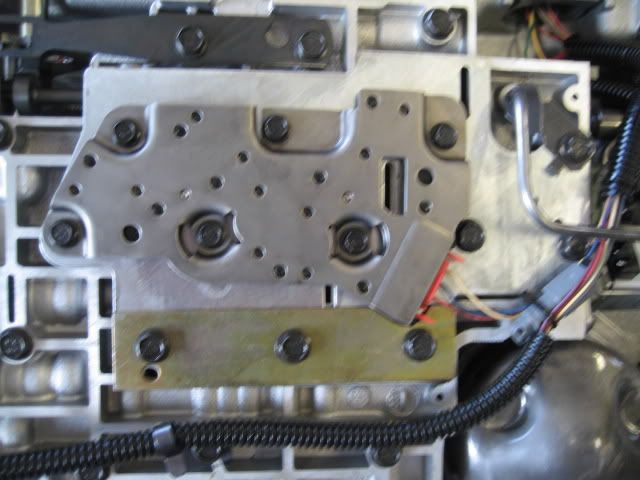
Next remove the valve body, then remove the 3/8" 12 point center support bolt and the Torx bolt for the overdrive section that is closer to the front.
Also remove the rear servo assembly, front servo piston, spring, and pin, parking pawl guide and spring.
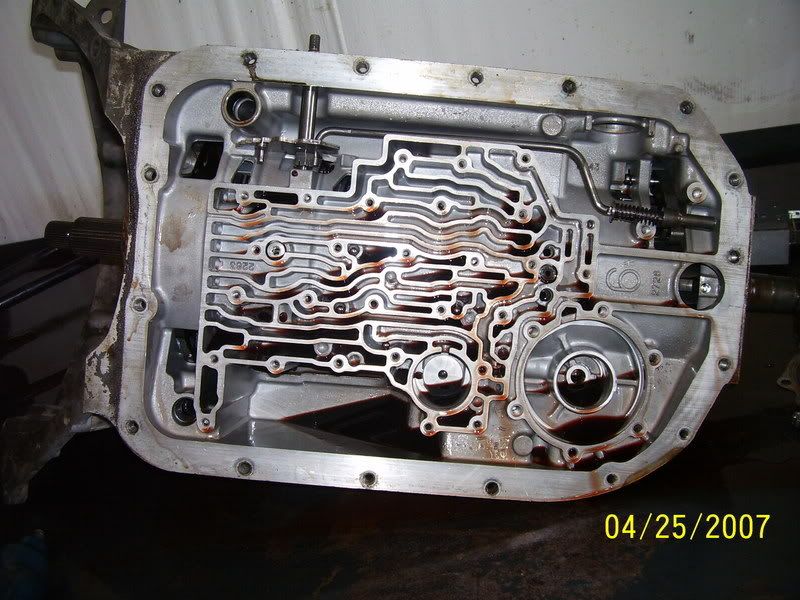
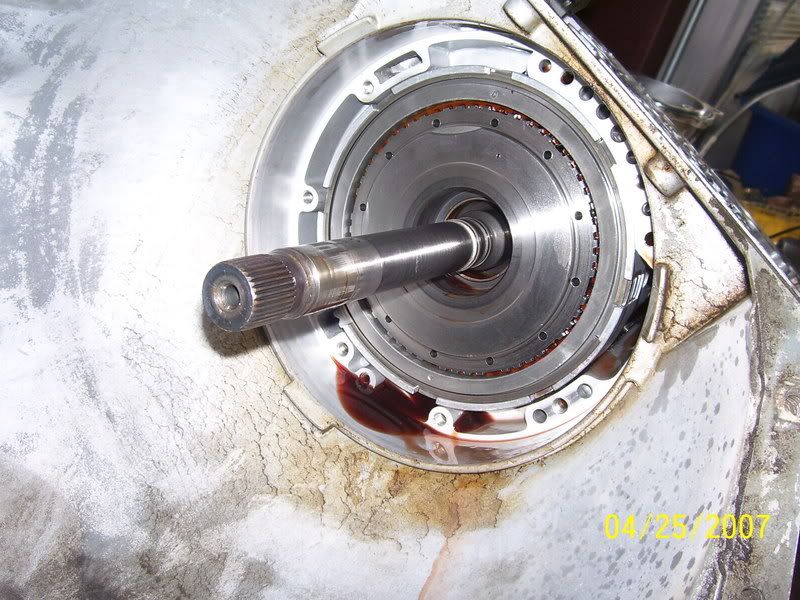
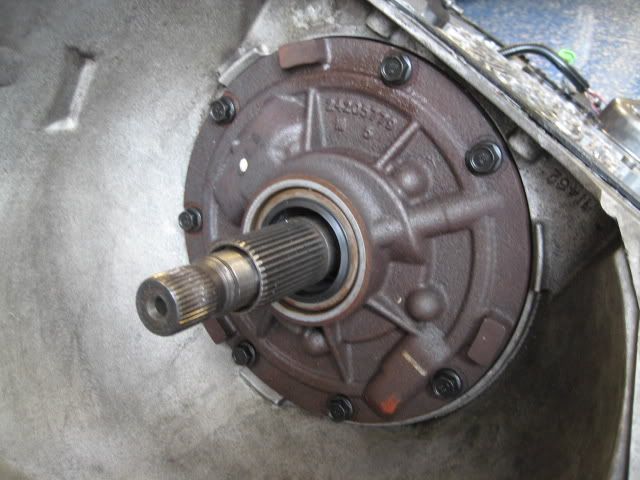
You must remove the rubber o-ring from the input shaft so the pump can slide off, then you can gently pry the pump forward from the case near the valve body and shifter linkage area.
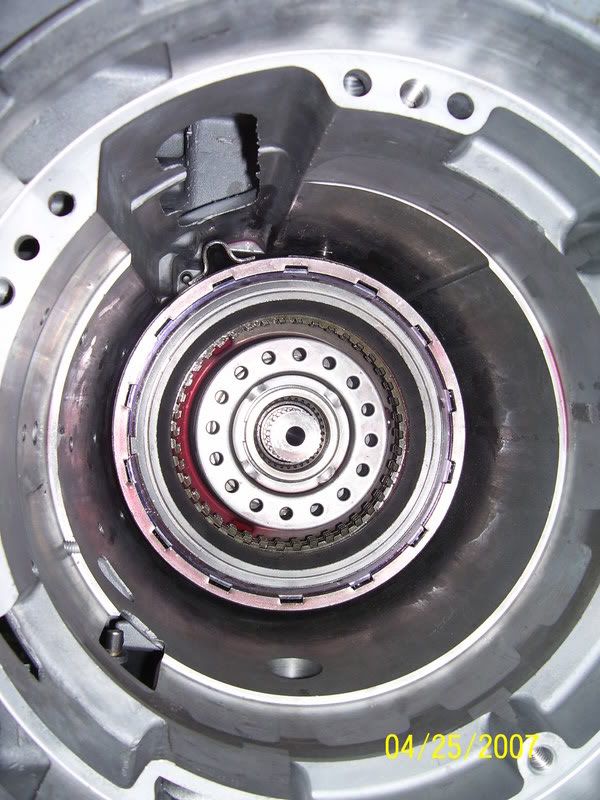
Remove the pump exposing the OD section of the trans.
The 4L80E is a close relative of the TH400. It shares many components. Some of the components look similar but have slight differences so be aware of this when swapping parts between different year 4L80's and TH400's.
Parts that will interchange are the rear band, center support, direct drum (as an assembly), forward and direct clutches and the intermediates are similar. The 4L80E uses 4 intermediate clutch plates instead of 3 like a TH400. It has a thinner intermediate pressure plate, frictions, and steels. I use TH400 and 4L80 intermediate steel plates interchangeably to attain the desired clearance.
The 34 element sprag that is commonly used on a TH400 will fit the 4L80E and should be used on all but a stock rebuild.
I will add some pics and text here specific to a 4L80 rebuild. Other than some minor differences I will show, the rear rebuild is the same as a TH400.
Disassembly is relatively straightforward. Remove the dipstick, shifter lever, input and output speed sensors, tailhousing, pump bolts, and then the pan. Then disconnect the wiring (gently) from the various sensors and solenoids on the VB. Almost all the fasteners in the 4L80E are metric. The center support bolt is an exception and is a 3/8" 12 point, same as a TH400.
Next remove the valve body, then remove the 3/8" 12 point center support bolt and the Torx bolt for the overdrive section that is closer to the front.
Also remove the rear servo assembly, front servo piston, spring, and pin, parking pawl guide and spring.
You must remove the rubber o-ring from the input shaft so the pump can slide off, then you can gently pry the pump forward from the case near the valve body and shifter linkage area.
Remove the pump exposing the OD section of the trans.
07-05-2010, 04:19 PM
#5
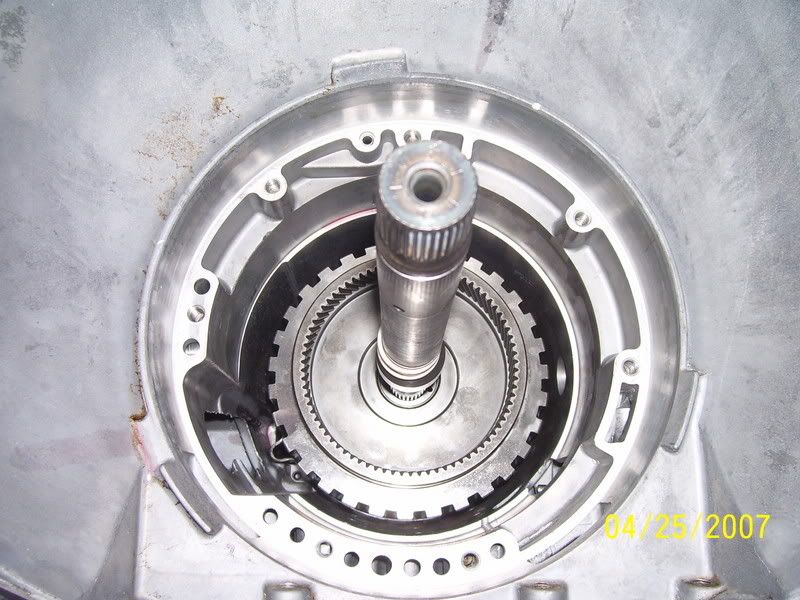
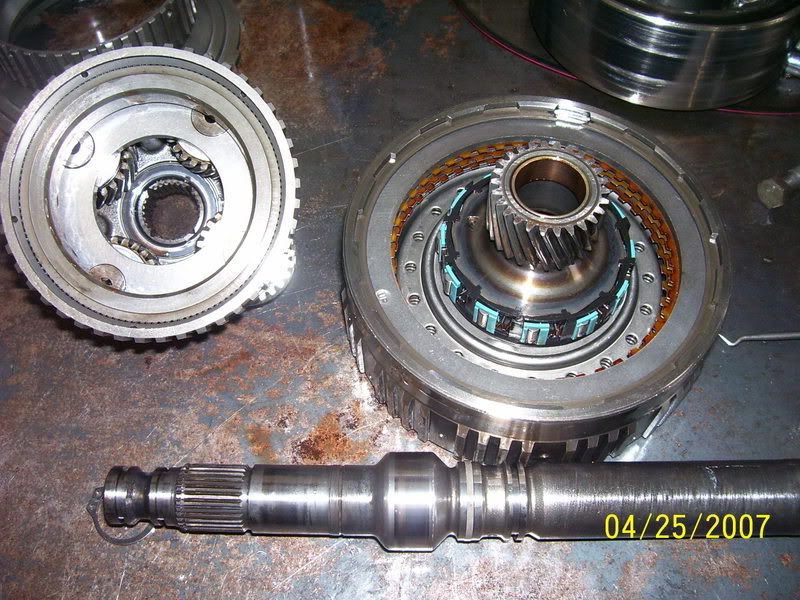
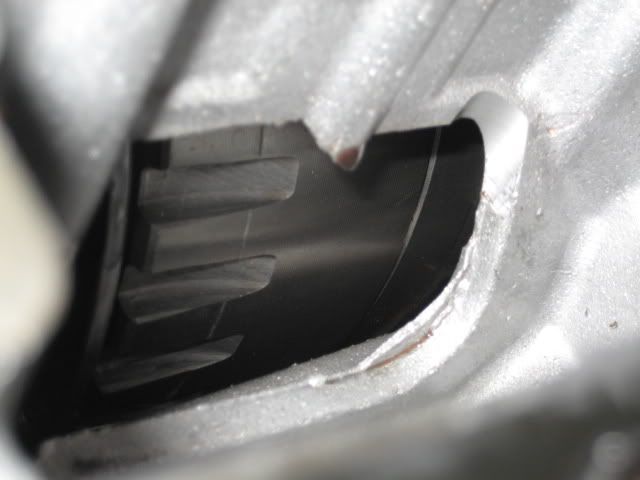
You can then pull the input shaft and OD carrier assembly out. Then the OD clutch assembly comes out complete. The forward and direct drums will also slide out, and the intermediate band can be removed also.
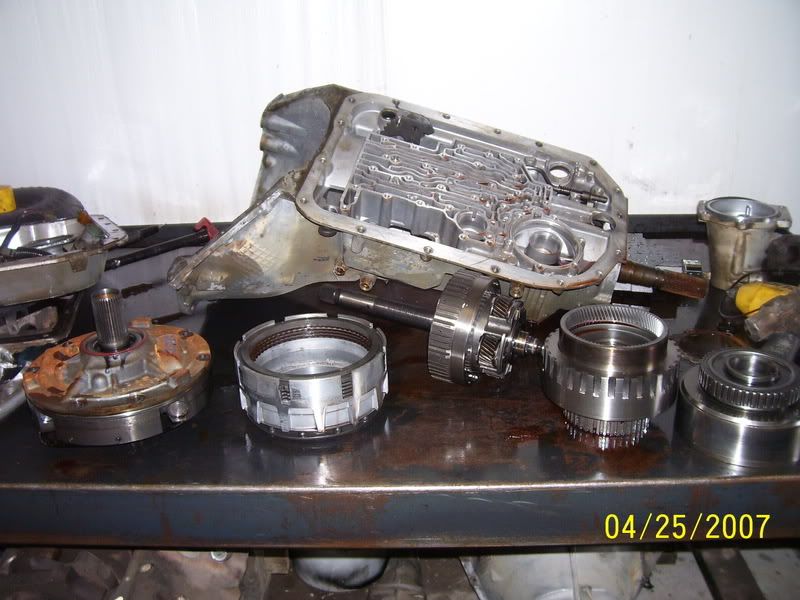
The intermediate clutches and all the rest of the rear drive components can be removed exactly as a TH400.
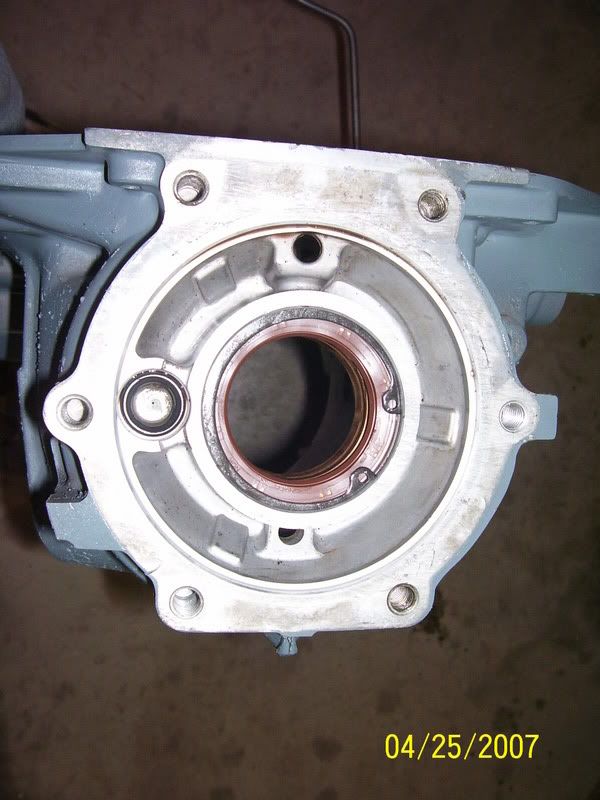
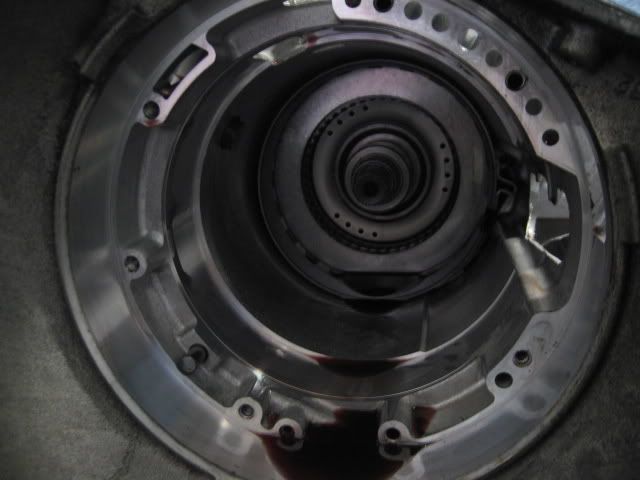
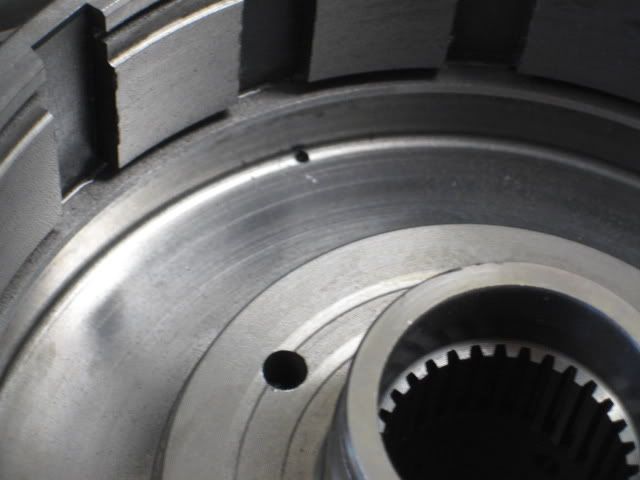
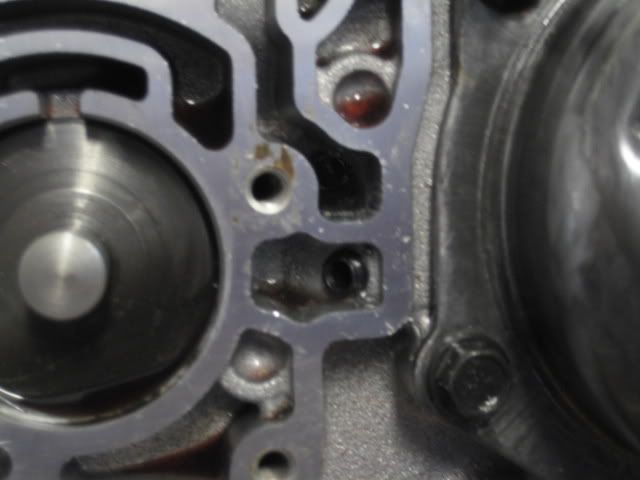
Once the case is bare, you must replace the case bushing and seal. This is slightly different than a TH400. The 4L80E uses a seal to the rear of the case bushing to prevent lube oil from bleeding off. Since it does not use a mechanical speedometer gear setup, there are no gears needing this bleedoff lube. The lack of gears also has the side effect of no splash oiling to the output bushing. This bushing is fed pressurized lube. When replaced the output bushing must be aligned properly so that the lube can feed it from the side of the tailhousing.
Note the large orificed cup plug with rubber seal in the rear of the case. This is where the pressurized lube comes from to pass through the tailhousing passage to the output bushing.
Once the case is prepared for re-assembly, the rear portion re-assembles the same as a TH400. All the way up to the direct drum is the same. The forward drum is similar except that it doesn't have the input shaft attached. It is driven by the OD ring gear. Some will notice this is very similar to the design and function of the 200-4R, but more robust.
The intermediate clutches and all the rest of the rear drive components can be removed exactly as a TH400.
Once the case is bare, you must replace the case bushing and seal. This is slightly different than a TH400. The 4L80E uses a seal to the rear of the case bushing to prevent lube oil from bleeding off. Since it does not use a mechanical speedometer gear setup, there are no gears needing this bleedoff lube. The lack of gears also has the side effect of no splash oiling to the output bushing. This bushing is fed pressurized lube. When replaced the output bushing must be aligned properly so that the lube can feed it from the side of the tailhousing.
Note the large orificed cup plug with rubber seal in the rear of the case. This is where the pressurized lube comes from to pass through the tailhousing passage to the output bushing.
Once the case is prepared for re-assembly, the rear portion re-assembles the same as a TH400. All the way up to the direct drum is the same. The forward drum is similar except that it doesn't have the input shaft attached. It is driven by the OD ring gear. Some will notice this is very similar to the design and function of the 200-4R, but more robust.
07-05-2010, 04:20 PM
#6
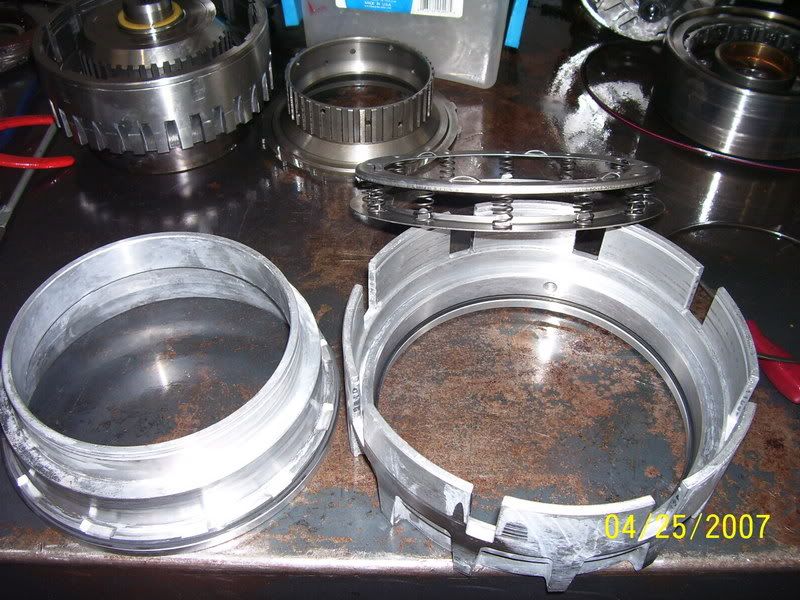
Center support:
The center support contain the apply piston for the intermediate clutches. The seals need to be replaced and once assembled in the case with the intermediate clutch assembly in place, it must be air checked for proper operation. This is accomplished by applying compressed air to the 3/8 12 point bolt in the center rear VB area.
Forward drum rebuild:
Rebuilding of this drum is the same as the TH400, 3 lip seals, two on the piston, one on the drum. The direct drum is also basically the same.
Some use the bonded pistons which is a piston that has rubber bonded to it for seals. The whole piston must be replaced or in the case of the direct drum, can be replaced with a TH400 piston.


Assembled up to the center support, int band installed, ready for the direct drum.

The center support contain the apply piston for the intermediate clutches. The seals need to be replaced and once assembled in the case with the intermediate clutch assembly in place, it must be air checked for proper operation. This is accomplished by applying compressed air to the 3/8 12 point bolt in the center rear VB area.
Forward drum rebuild:
Rebuilding of this drum is the same as the TH400, 3 lip seals, two on the piston, one on the drum. The direct drum is also basically the same.
Some use the bonded pistons which is a piston that has rubber bonded to it for seals. The whole piston must be replaced or in the case of the direct drum, can be replaced with a TH400 piston.
Assembled up to the center support, int band installed, ready for the direct drum.
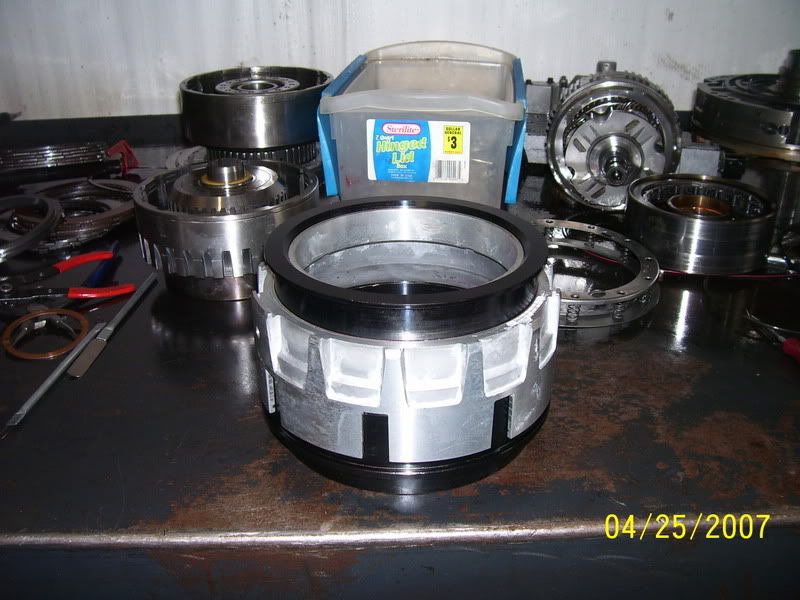
07-05-2010, 04:21 PM
#7
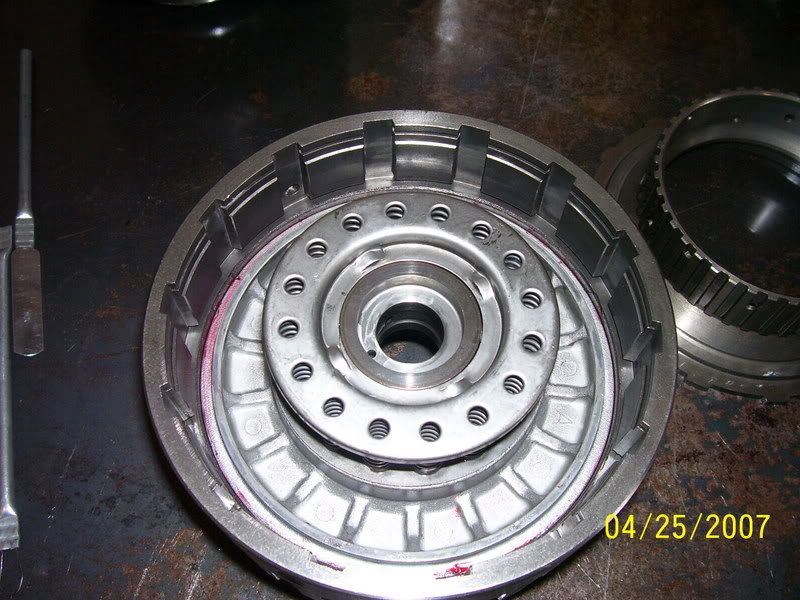
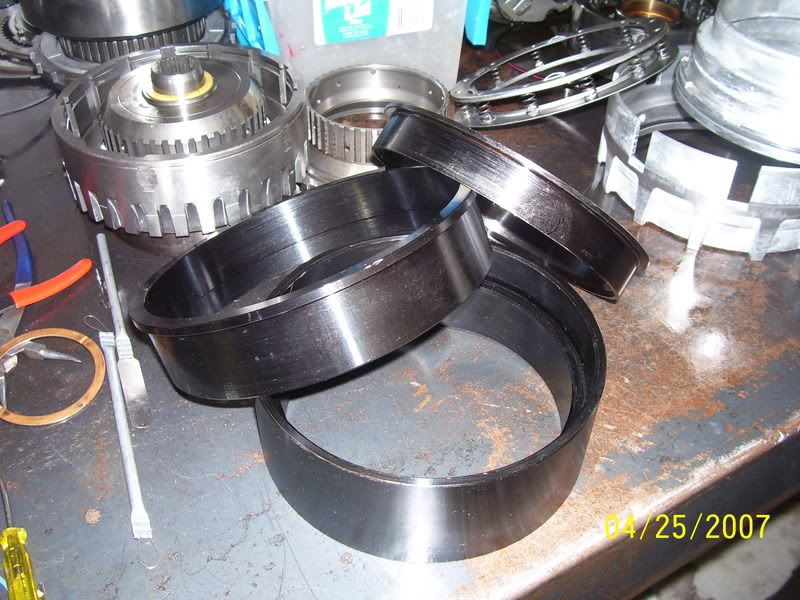
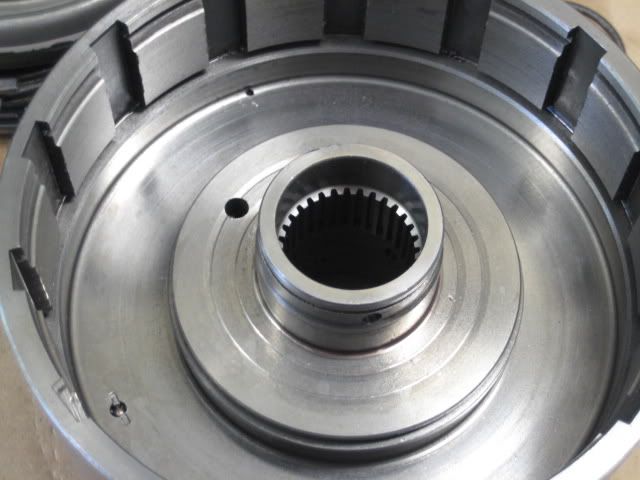
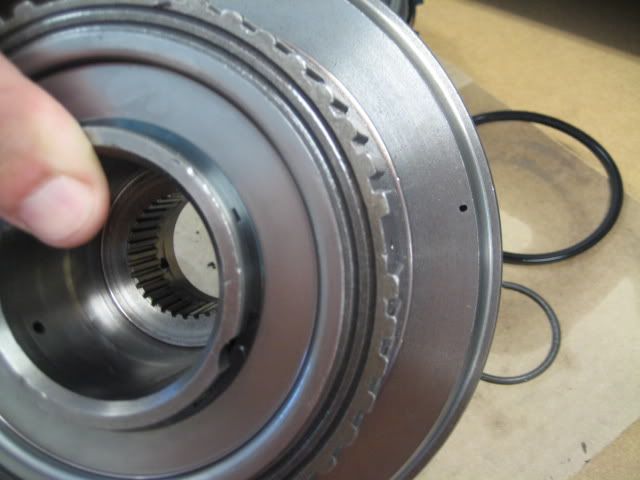
Direct drum installed:
Forward drum installed:
Note the input shaft is temporarily installed to keep the teflon rings sized so it is easier to install the input assembly later.
The overdrive clutch pack is a self contained unit. It can be rebuilt and air checked before ever installing in the case.
The OD apply piston and housing also have lip seals that must be replaced on rebuild. The lip seals cannot easily be worked into place using a lip seal tool or feeler guage. It requires a special tool setup to re-assemble these components.
Here are the necessary tools.
Trending Topics
07-05-2010, 04:21 PM
#8
Once completely reassembled with the return spring it can be flipped over and new steel and friction clutches installed.
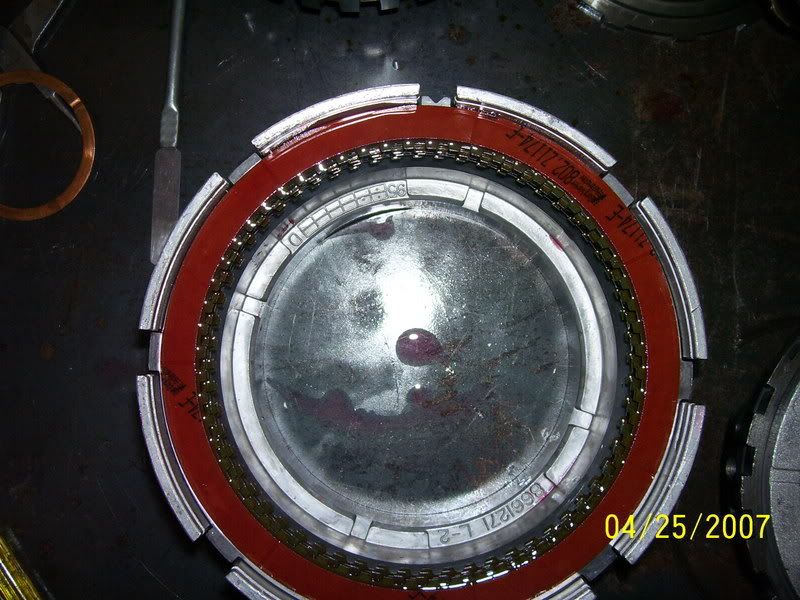
It can then be re-installed in the case and the bolt re-installed. Don't forget to air check it.

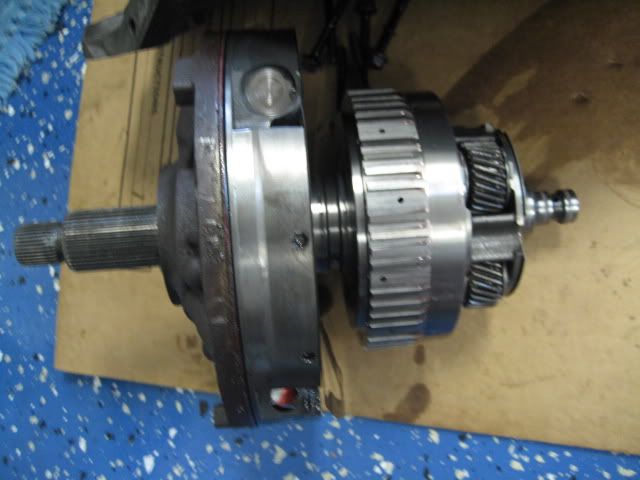
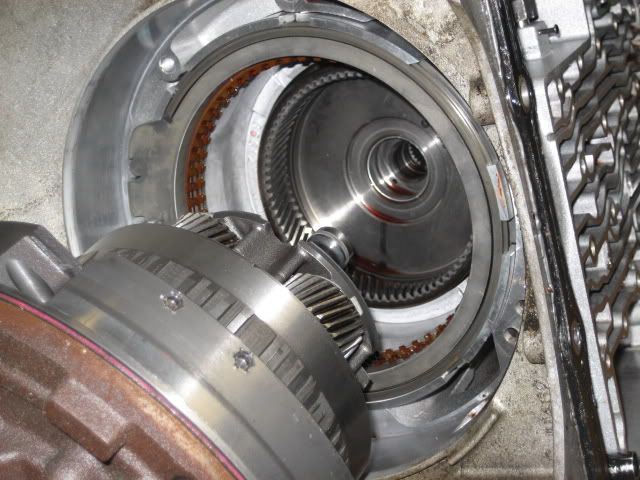
The input shaft and OD section assembly.
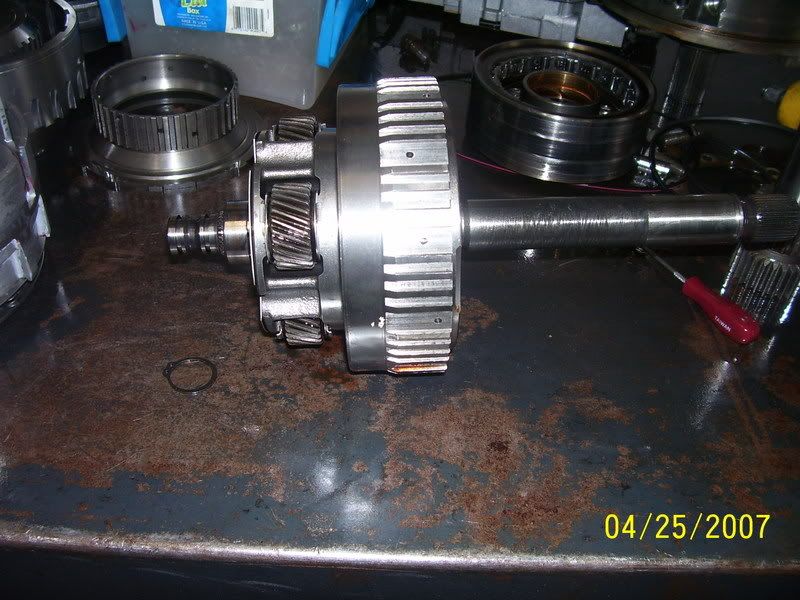
Partially disassembled:
Seen in this picture is the OD sprag (roller clutch), over-run or coasting clutches, input shaft, and OD planet carrier.
It can then be re-installed in the case and the bolt re-installed. Don't forget to air check it.
The input shaft and OD section assembly.
Partially disassembled:
Seen in this picture is the OD sprag (roller clutch), over-run or coasting clutches, input shaft, and OD planet carrier.


 Hope everything works! Going to start installing it this weekend
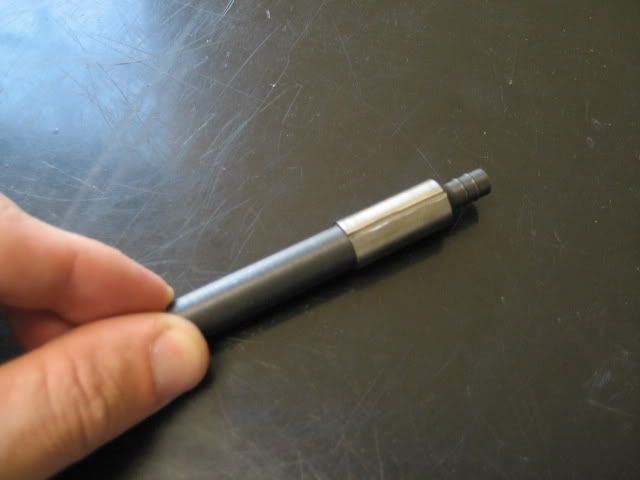


 07-22-2010, 11:27 PM
#17
Up until next week it's the only thing I've ever been afraid to do by myself in my car.
I'll be doing this same rebuild next week (well, with the owner of a tranny shop standing over my shoulder, but still lol).
Thanks for all the great visuals
 07-22-2010, 11:47 PM
#18
"Rebuilding" an automatic transmission isn't really that hard, you take out a bunch of parts that pretty much only fit together one way, eventually as you take things out you will find one or more parts that are burnt, melted, or broken, replace the damaged part(s) and put everything back together.
You don't really need to know how everything works to "rebuild" a transmission.
In my opinion, modifying and improving is what the real pro's do, understanding how all those pieces work together is the real challenge, an even bigger challenge is understanding why part "A" failed, and what changes can prevent it from failing again.
I am not a pro, but I am learning a little more all the time... So far my home built 4L80e is up to 702 rwhp with out blowing its guts out... of course that isn't really that hard with a 4l80e.
07-22-2010, 11:59 PM
#19
"Rebuilding" an automatic transmission isn't really that hard, you take out a bunch of parts that pretty much only fit together one way, eventually as you take things out you will find one or more parts that are burnt, melted, or broken, replace the damaged part(s) and put everything back together.
You don't really need to know how everything works to "rebuild" a transmission.
In my opinion, modifying and improving is what the real pro's do, understanding how all those pieces work together is the real challenge, an even bigger challenge is understanding why part "A" failed, and what changes can prevent it from failing again.
I am not a pro, but I am learning a little more all the time... So far my home built 4L80e is up to 702 rwhp with out blowing its guts out... of course that isn't really that hard with a 4l80e.
You don't really need to know how everything works to "rebuild" a transmission.
In my opinion, modifying and improving is what the real pro's do, understanding how all those pieces work together is the real challenge, an even bigger challenge is understanding why part "A" failed, and what changes can prevent it from failing again.
I am not a pro, but I am learning a little more all the time... So far my home built 4L80e is up to 702 rwhp with out blowing its guts out... of course that isn't really that hard with a 4l80e.
You don't need to know how everything works to do a basic rebuild. However there are lots of places that will "catcha" when you don't really know what you are looking for. So it's good to have an experienced builder watch over your shoulder, especially on these later model units. They get more and more complex. The 6L80's electronics make a 4L60E look like child's play, and the 4L60E's hydraulics make a TH400 seem like some caveman shyt!

If your 4L80E is holding 700+ on a home rebuild, you're doing good. Keep it up.
I did a TH400 for a 1400-1500 HP monster truck 15 yrs ago, put 3 together to make one that ran, I thought I was shyt hot after that for awhile. Automatic transmissions have a way of humbling you sometimes.

Just when you think you're on top of it, you learn something new, the hard way. We'll be on test #3 of my 4L60E transbrake soon, test #1 and 2 were disappointing, but I learned something new.
