
2002 Camaro Morimoto Mini H1 install
 01-13-2012, 10:52 PM
#1
Staging Lane
Thread Starter

Join Date: Sep 2010
Posts: 92
Likes: 0
Received 0 Likes
on
0 Posts

Just got finished installing these on my car. Got the kit from the retrofit source and it was about as straightforward as it can be, as they include the harness and their website has some helpful tips on installing them. They also have excellent customer service.
Gotta thank walter1234, VIP1, and everyone who chimed in on retrofitting HIDs. There is a lot of helpful information in another thread so I won't repeat everything they said, and VIP1's thread "lighting FAQ" is excellent.
In my experience, there are going to be some SNAFUs the first time with any install, and this was no different, but if I had to do it again I'm sure it would be no big deal (and take a lot less time).
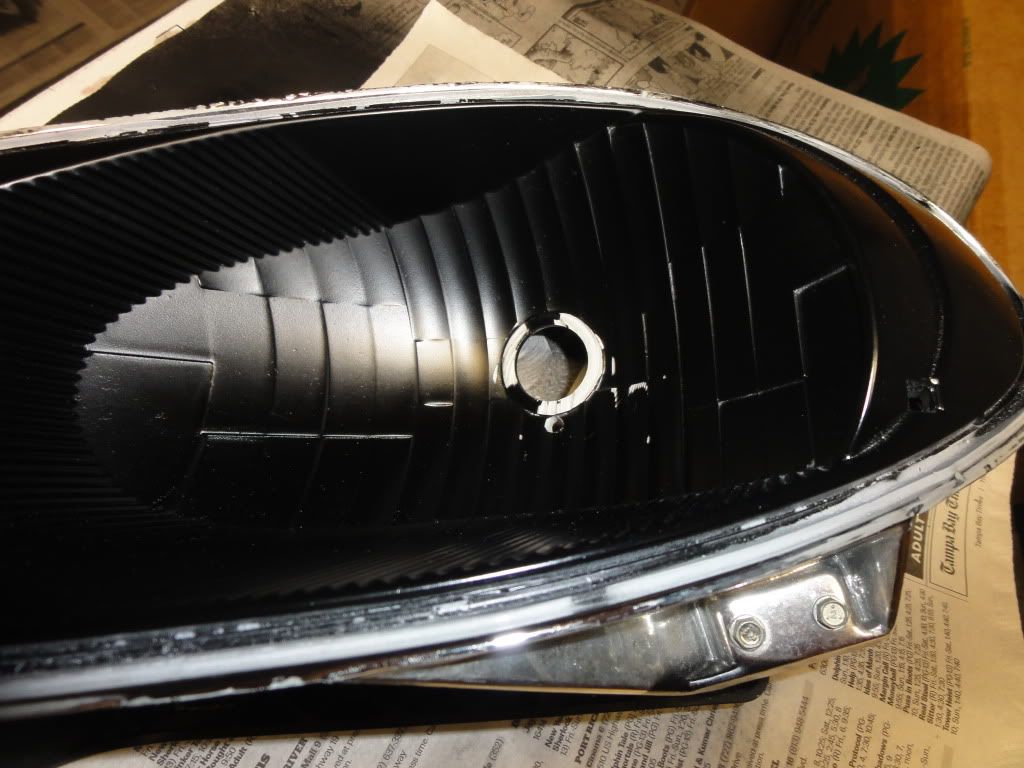
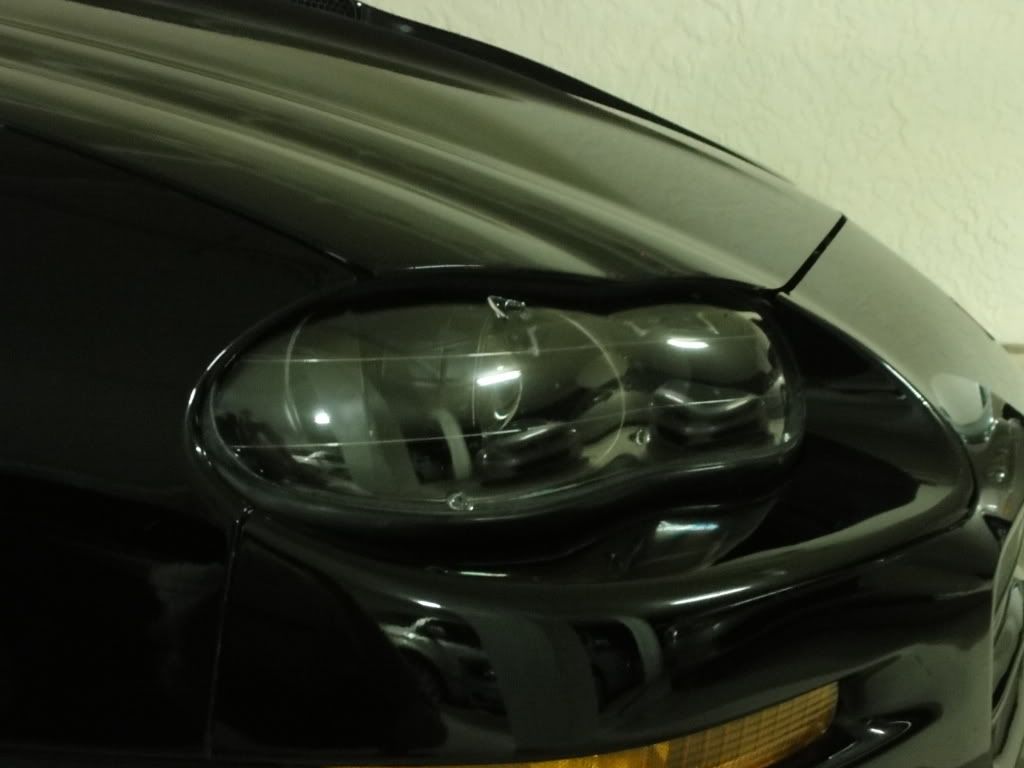
After getting the cover off the headlight assembly, I used 400 grit sandpaper and green scotchbrite pads to scuff all the chrome off. I'm not sure that was completely necessary, as plastic primer does about the same thing as scuffing, but I did it anyway, and it took a couple hours and a lot of elbow grease. I did not scuff the mini gatling gun shrouds, I just painted them with the same paint I used on the headlight assembly, that was satin black general purpose spray paint with primer in it, and they look almost the same as the headlight assembly that I spent a pretty long time prepping for paint. I used some halogen work lights mounted on a tripod to help bake the paint on, and speed up the drying time. Now's probably a good time to let y'all know that I don't expect to win any car shows with this install and I know it's not as "clean" as it could be.
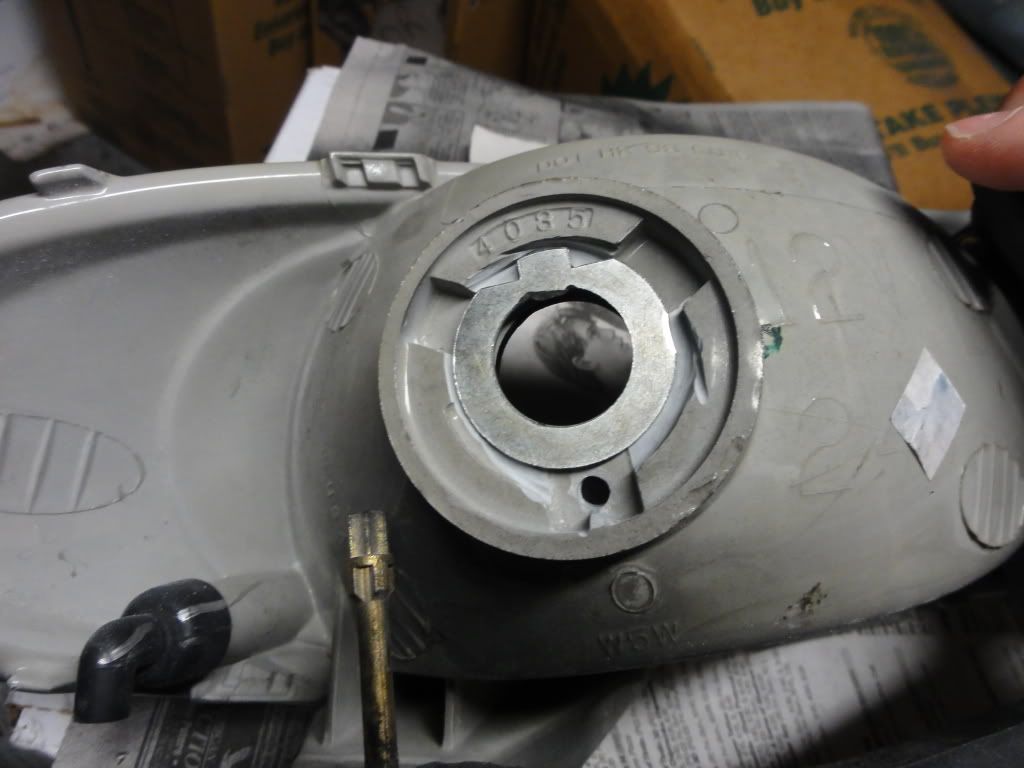
Removing the three tabs on the inside of the headlight assembly allows the projector housing to go further back, which will expose more threads for the locknut in the rear to bite on. I also cut the tabs on the back of the headlight assembly so the washer would have a flat surface to sit on, and this also allows the locknut to have more threads to bite on. You have to drill a small hole under the factory hole for the wires going to the solenoid. The silicone washer that goes on the projector housing should seal the drilled hole pretty well, but I put some silicone sealant in the hole from the back of the assembly just to seal it up a little better. It would have been nice if I had done this stuff before I put the shrouds on the projector housings, as I got a lot of dust on the inner side of the glass from the cutting/drilling.
Putting the covers back on the headlight assemblies, I used butyl tape from NAPA that was about $20 and it's probably enough to do 4 headlights. After getting the covers on, I ran my finger around the edges to seal in the grooves and remove some of the excess. The stuff looks like it is excellent for preventing any water leak issues, and it might be overkill, but I would recommend using it over just trying to use the leftover factory stuff to seal up the headlight assemblies.
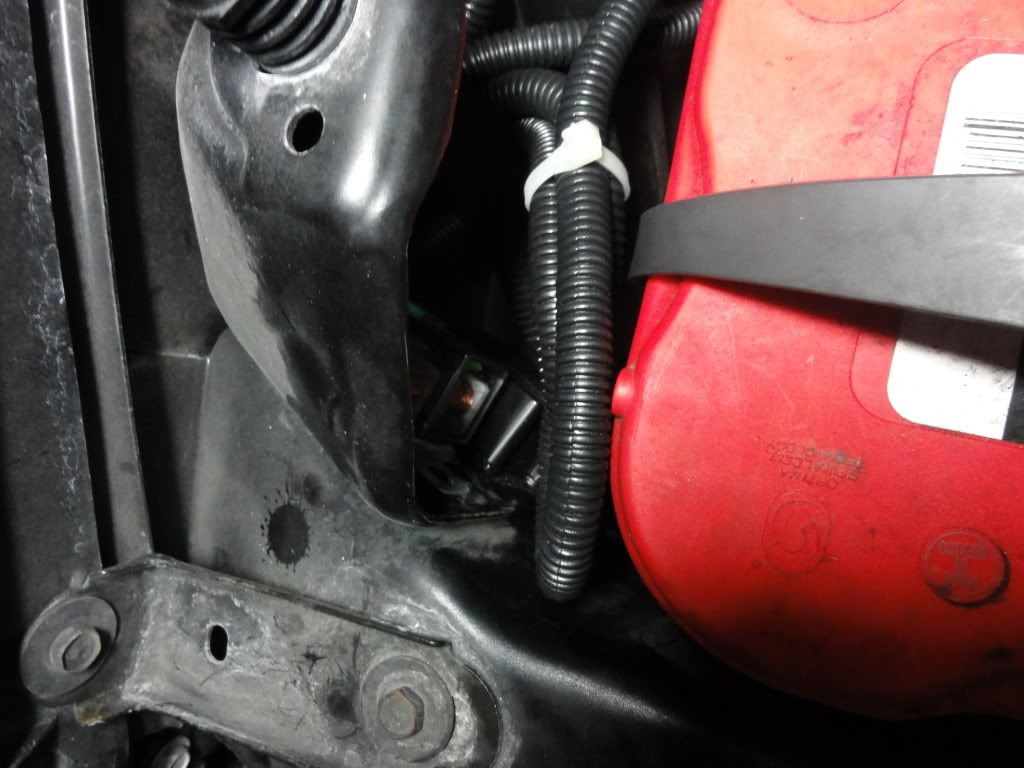
The harness that comes with the kit is nice, but there has to be some strategic placement of the ballasts and the relays to ensure that there is enough wire for all the connectors. I didn't want to drill any holes for the ballasts and relays, so I used industrial strength velcro and cleaned off the areas with paper towels and denatured alcohol before installing the velcro. After some thought, these locations seemed to be the best for all the stuff.

The diode that has to be wired is pretty easy. I Just got the right diode, used a soldering gun and 14 gauge wire, and soldered the diode onto two pieces of wire about 6 inches or so. I tapped into the positive side of the factory high beam and the positive side of the factory low beam with tap-in squeeze connectors. The diode has to be facing the right direction and make sure to you squeeze the metal tap hard to pierce the wires, and finally, seal it with electrical tape. I used some wire loom and electrical tape on the wires to help protect them.
Getting the beams level isn't that big of a deal. I marked on the headlight assembly where 12 o'clock is and when you install the projector housing, the center of the groove on the top of the projector housing is where it should be at 12 o'clock so the cutoff is horizontal. You can adjust it when the headlights are on the car to get it perfect. Use a TORX T20 (?) and the link Walter mentioned to get the final aiming right. I used blue tape and a marker to get them lined up right.
One SNAFU I ran into was after getting everything mounted and wired, the driver side cutoff was making the light in a V shape. Andrew at TRS told me to put a pick in the light bulb hole to pull back the projector cutoff. After bending it some, then putting it back on the car, repeating a few times, it's almost perfect.
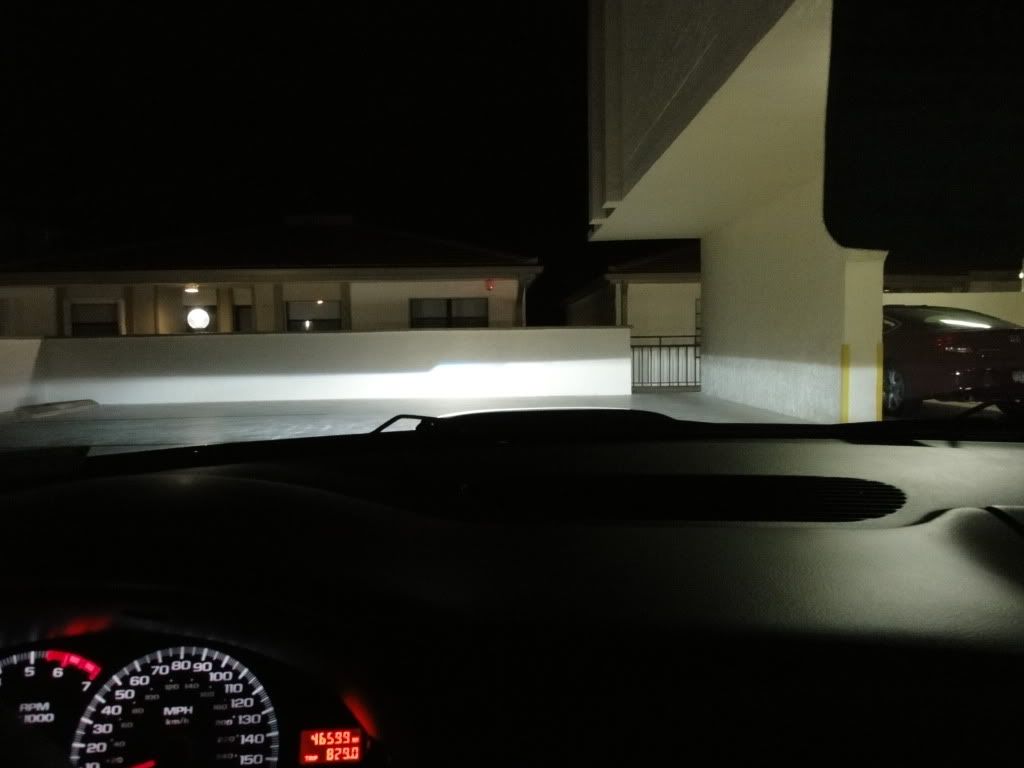
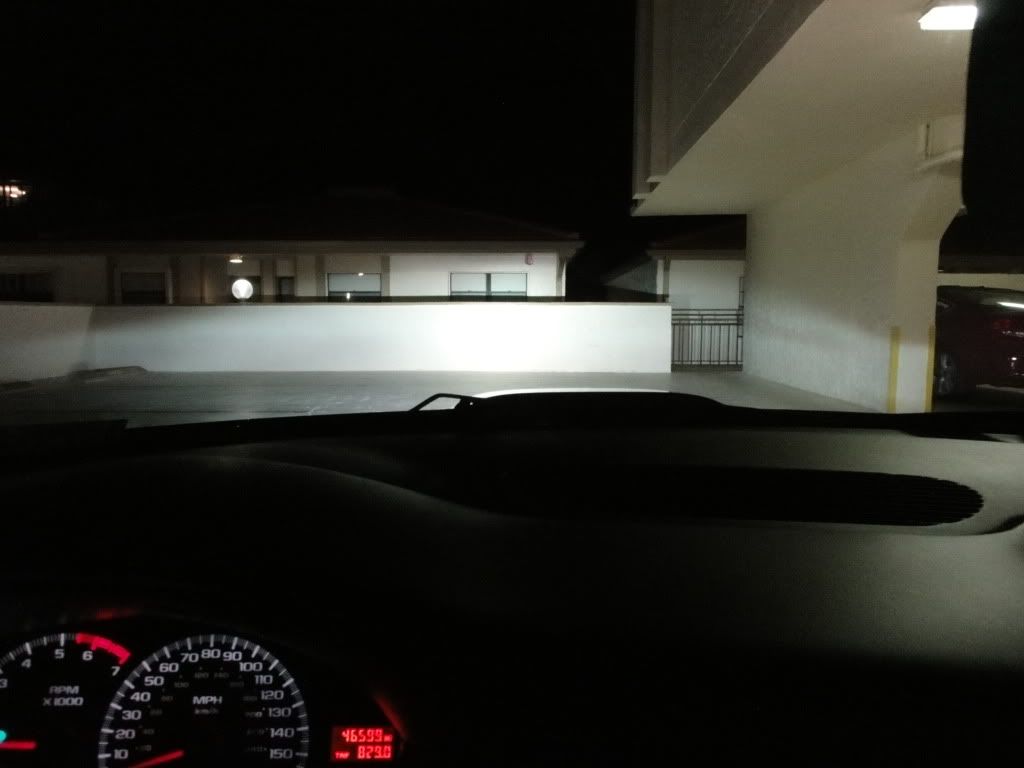
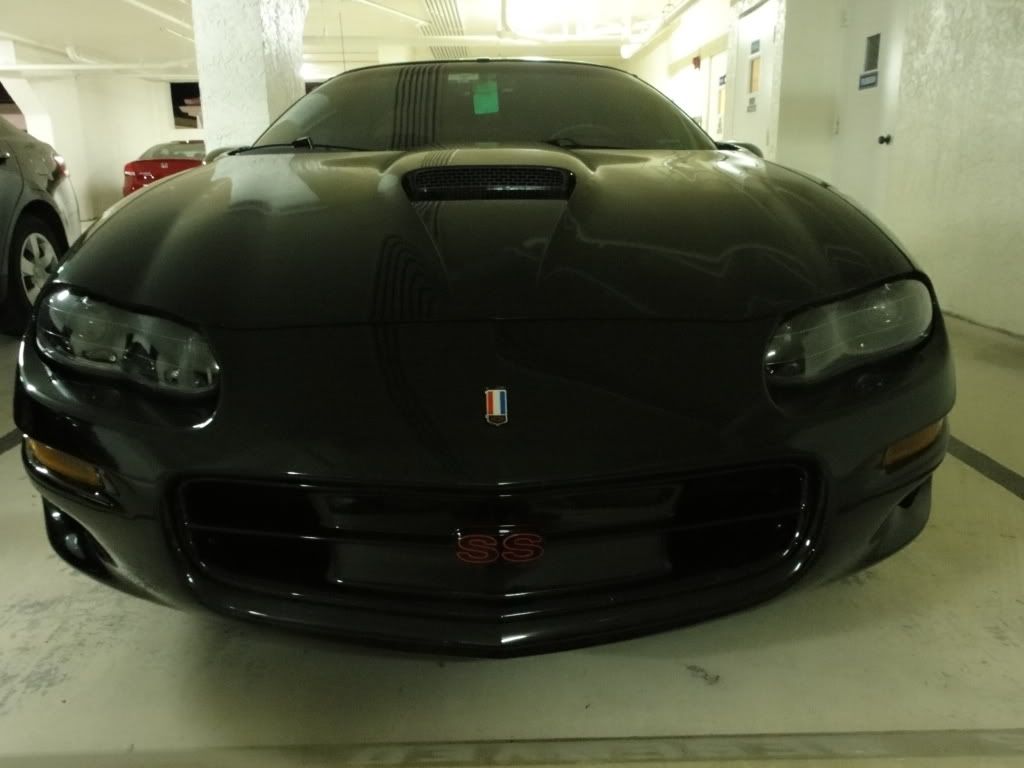
It's a pretty big difference, and it's all pretty basic stuff, just takes some common sense and some patience. The extra/better light really does help at night, even when they're just on the low beams. The high beams are insanely bright, and they make a huge difference driving on real dark roads.
Thanks again, fellas.
Gotta thank walter1234, VIP1, and everyone who chimed in on retrofitting HIDs. There is a lot of helpful information in another thread so I won't repeat everything they said, and VIP1's thread "lighting FAQ" is excellent.
In my experience, there are going to be some SNAFUs the first time with any install, and this was no different, but if I had to do it again I'm sure it would be no big deal (and take a lot less time).
After getting the cover off the headlight assembly, I used 400 grit sandpaper and green scotchbrite pads to scuff all the chrome off. I'm not sure that was completely necessary, as plastic primer does about the same thing as scuffing, but I did it anyway, and it took a couple hours and a lot of elbow grease. I did not scuff the mini gatling gun shrouds, I just painted them with the same paint I used on the headlight assembly, that was satin black general purpose spray paint with primer in it, and they look almost the same as the headlight assembly that I spent a pretty long time prepping for paint. I used some halogen work lights mounted on a tripod to help bake the paint on, and speed up the drying time. Now's probably a good time to let y'all know that I don't expect to win any car shows with this install and I know it's not as "clean" as it could be.
Removing the three tabs on the inside of the headlight assembly allows the projector housing to go further back, which will expose more threads for the locknut in the rear to bite on. I also cut the tabs on the back of the headlight assembly so the washer would have a flat surface to sit on, and this also allows the locknut to have more threads to bite on. You have to drill a small hole under the factory hole for the wires going to the solenoid. The silicone washer that goes on the projector housing should seal the drilled hole pretty well, but I put some silicone sealant in the hole from the back of the assembly just to seal it up a little better. It would have been nice if I had done this stuff before I put the shrouds on the projector housings, as I got a lot of dust on the inner side of the glass from the cutting/drilling.
Putting the covers back on the headlight assemblies, I used butyl tape from NAPA that was about $20 and it's probably enough to do 4 headlights. After getting the covers on, I ran my finger around the edges to seal in the grooves and remove some of the excess. The stuff looks like it is excellent for preventing any water leak issues, and it might be overkill, but I would recommend using it over just trying to use the leftover factory stuff to seal up the headlight assemblies.
The harness that comes with the kit is nice, but there has to be some strategic placement of the ballasts and the relays to ensure that there is enough wire for all the connectors. I didn't want to drill any holes for the ballasts and relays, so I used industrial strength velcro and cleaned off the areas with paper towels and denatured alcohol before installing the velcro. After some thought, these locations seemed to be the best for all the stuff.
The diode that has to be wired is pretty easy. I Just got the right diode, used a soldering gun and 14 gauge wire, and soldered the diode onto two pieces of wire about 6 inches or so. I tapped into the positive side of the factory high beam and the positive side of the factory low beam with tap-in squeeze connectors. The diode has to be facing the right direction and make sure to you squeeze the metal tap hard to pierce the wires, and finally, seal it with electrical tape. I used some wire loom and electrical tape on the wires to help protect them.
Getting the beams level isn't that big of a deal. I marked on the headlight assembly where 12 o'clock is and when you install the projector housing, the center of the groove on the top of the projector housing is where it should be at 12 o'clock so the cutoff is horizontal. You can adjust it when the headlights are on the car to get it perfect. Use a TORX T20 (?) and the link Walter mentioned to get the final aiming right. I used blue tape and a marker to get them lined up right.
One SNAFU I ran into was after getting everything mounted and wired, the driver side cutoff was making the light in a V shape. Andrew at TRS told me to put a pick in the light bulb hole to pull back the projector cutoff. After bending it some, then putting it back on the car, repeating a few times, it's almost perfect.
It's a pretty big difference, and it's all pretty basic stuff, just takes some common sense and some patience. The extra/better light really does help at night, even when they're just on the low beams. The high beams are insanely bright, and they make a huge difference driving on real dark roads.
Thanks again, fellas.
Last edited by NeoLoco; 01-13-2012 at 11:27 PM.

 01-13-2012, 11:39 PM
#5
Staging Lane
Thread Starter
Join Date: Sep 2010
Posts: 92
Likes: 0
Received 0 Likes
on
0 Posts
The old high beams are still hooked up. There is a splitter for each side included in the kit that is a splitter from the factory high beam wire to the factory high beam and to the solenoid for the projector. The factory high beam probably doesn't do much with the HID high beam on, but might as well use it for the extra light.

Trending Topics
01-14-2012, 04:21 AM
#8

Nice clean retro man, it looks killer. Its great to see people doing HID the right way. Im suprised you had to do any movement on the sheild. As critical as sheild placement is, as any slightest movement can COMPLETELY change how sharp the cut off is, I would been pretty disappointed. What did TRS have to say about why it came to you like that? Their customer service is really good, just wondering why it was sent you like that.
01-14-2012, 05:13 PM
#9
11 Second Club
iTrader: (9)

Join Date: Apr 2010
Location: Bay Area, CA
Posts: 978
Likes: 0
Received 0 Likes
on
0 Posts
Probably the cleanest projector I've seen in an LS1 Camaro headlight. It looks very nice, not ricey like the aftermarket junk. Always water to do this when I ha my Camaro.
01-15-2012, 11:08 AM
#13
Staging Lane
Thread Starter
Join Date: Sep 2010
Posts: 92
Likes: 0
Received 0 Likes
on
0 Posts
Thanks y'all.
As critical as sheild placement is, as any slightest movement can COMPLETELY change how sharp the cut off is, I would been pretty disappointed. What did TRS have to say about why it came to you like that? Their customer service is really good, just wondering why it was sent you like that.
I have no idea why it was sent to me like that. It was a little frustrating that the cutoff was off by a lot. Now that I've adjusted it some, the cutoff is pretty good, and I couldn't really tell when I was driving that it is off. If I'm parked directly at a wall I can tell, but it's not out of alignment by much, so it's probably not noticeable on the street.
You're definitely right about how much the light is affected by the angle of the cutoff, as I adjusted it several times and there is no way I can make it perfect like the one on the passenger side, that arrived as it should be. It doesn't really make a lot of sense to not make it perfect, so there is a good possibility that I'll call them and get a replacement. I'll let y'all know how it goes.
It's pretty easy. Just set the projectors on the markings at as close to 12 o'clock as possible, so the cutoff is horizontal, then put the headlight assemblies back together, and finally make adjustments to the up/down and left/right adjustments with the factory adjustment screws. You can still adjust the cutoff once everything is put back together by turning the projector at the locknut with needle nose pliers.
As critical as sheild placement is, as any slightest movement can COMPLETELY change how sharp the cut off is, I would been pretty disappointed. What did TRS have to say about why it came to you like that? Their customer service is really good, just wondering why it was sent you like that.
You're definitely right about how much the light is affected by the angle of the cutoff, as I adjusted it several times and there is no way I can make it perfect like the one on the passenger side, that arrived as it should be. It doesn't really make a lot of sense to not make it perfect, so there is a good possibility that I'll call them and get a replacement. I'll let y'all know how it goes.
It's pretty easy. Just set the projectors on the markings at as close to 12 o'clock as possible, so the cutoff is horizontal, then put the headlight assemblies back together, and finally make adjustments to the up/down and left/right adjustments with the factory adjustment screws. You can still adjust the cutoff once everything is put back together by turning the projector at the locknut with needle nose pliers.
 01-15-2012, 07:35 PM
#15
Thanks y'all.
I have no idea why it was sent to me like that. It was a little frustrating that the cutoff was off by a lot. Now that I've adjusted it some, the cutoff is pretty good, and I couldn't really tell when I was driving that it is off. If I'm parked directly at a wall I can tell, but it's not out of alignment by much, so it's probably not noticeable on the street.
You're definitely right about how much the light is affected by the angle of the cutoff, as I adjusted it several times and there is no way I can make it perfect like the one on the passenger side, that arrived as it should be. It doesn't really make a lot of sense to not make it perfect, so there is a good possibility that I'll call them and get a replacement. I'll let y'all know how it goes.
 Especially since the mini's have a pretty wide razor sharp line.
 GL if you go for a replacement man.