
 04-26-2016, 01:36 PM
Last edit by: IB Advertising
See related guides and technical advice from our community experts:
Browse all: Tire Repair and Maintenance
- Camaro and Firebird: DIY Poor Man's Wheel Alignment
Important information to help you understand your Camaro or Firebird
Browse all: Tire Repair and Maintenance

DIY Poor Mans Wheel Alignment
07-14-2012, 05:51 PM
#1
On The Tree
Thread Starter
iTrader: (11)
Join Date: Jan 2011
Location: The forsaken tundra of Minnesota
Posts: 123
Received 0 Likes
on
0 Posts
It’s not that I don’t trust my alignment shop, it’s just that I can’t pay $75 bucks and take time off work every time I touch my front end. That and I like to do as much of the work on my car as I possibly can. If you are in the same boat read on.
Page 1, important things to know before you start:
Even though I do my alignments with cheap easy to find tools I assure you I take no chances at all with my $275 a piece tires. If I didn’t know beyond a shadow of a doubt that I wasn’t going to wreck anything I would not be doing this. That being said if you get to the end of this post and are at all unsure or feel uncomfortable then do not attempt this. It’s very easy to kill your tires if you mess it up!
The first time you do this figure at least 4 hours. After you do it a few times you will be much faster but pick a day with plenty of time so you can be relaxed and enjoy the process.
This assumes you know what Caster, Camber and Toe are and know your way around an F body well enough to adjust them. In a nutshell pushing the lower control arms out gives my more positive caster and more negative camber.
This is only for camber and toe. You can measure caster using a level, tape measure 4 jack stands and some string but it is a very time consuming PITA and I don’t think it’s worth the effort. Caster is not a tire wearing angle anyway so I usually just crank the rear adjusters all the way out for max positive caster and call it a day. However as much as possible you want to be sure you move your caster adjustments the same on both sides because it will cause a pull if you are very different side to side.
In case you are wondering I’m an autocrosser and track day guy so I usually shoot for about 1.3 negative camber 4.5 positive caster and 0 toe. All the photos you see here are at -1.5 camber. I would NOT recommend that much negative camber on a street or strip car because it WILL wear the inside of your tires. Due to GM build slop most cars would take some grinding on at least one side to get that much negative camber anyway.

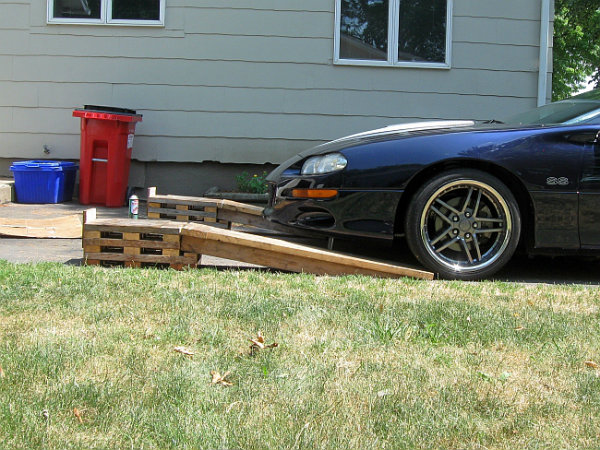
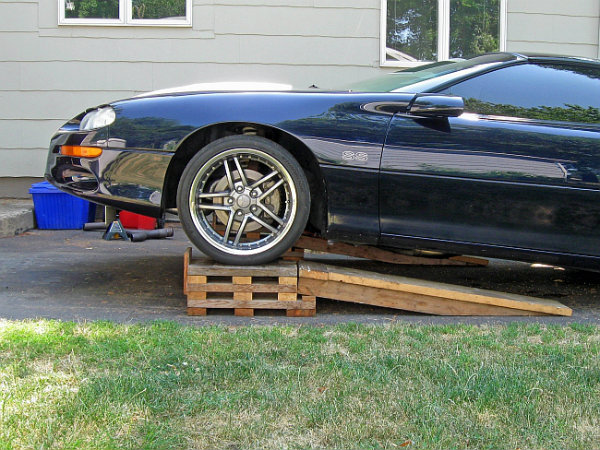
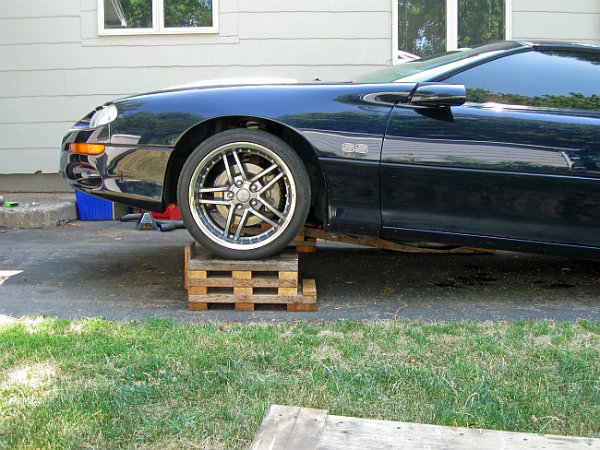
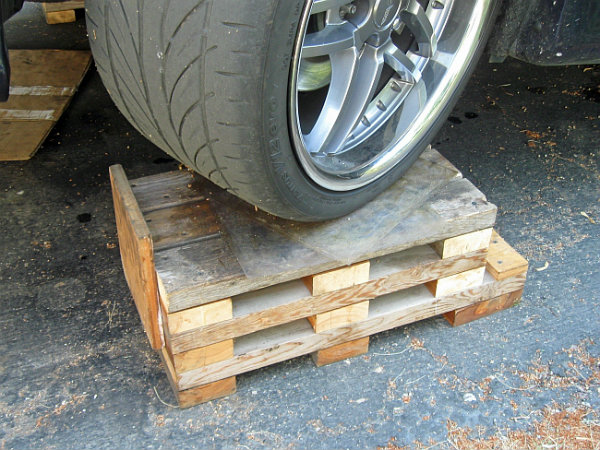
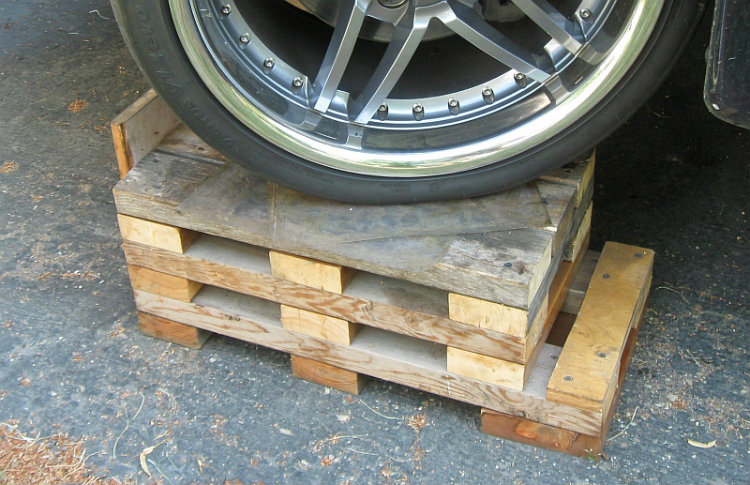
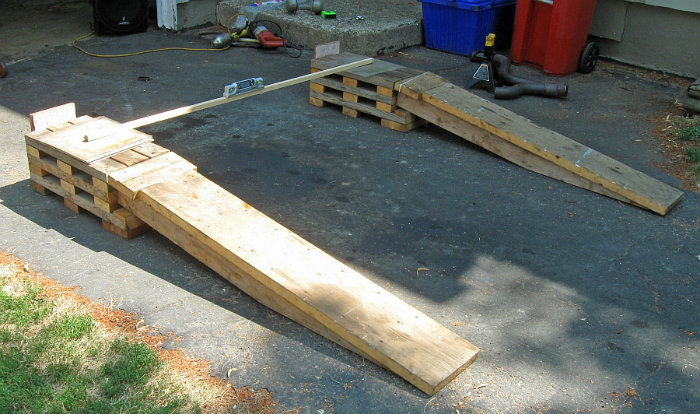
Finally this assumes you have basic hand tools, decent ramps, a jack and jack stands.
(side note, my ramps are awesome DIY ramps and if you have a lowered car with wide tires these are a must have to do alignments)
Page 2, equipment needed you probably don’t already have:
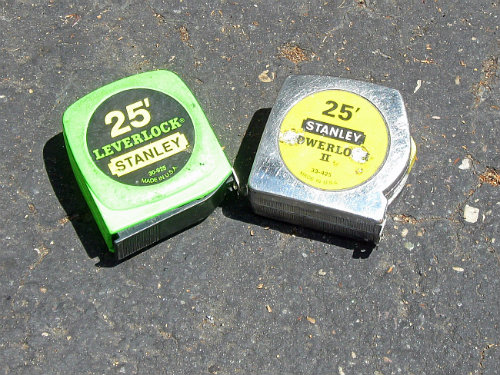
2 tape measures preferably identical.
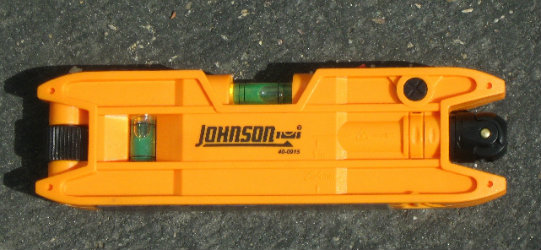
1 digital level
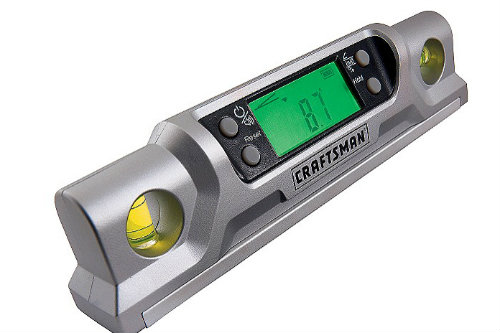
I got mine here:
http://www.sears.com/shc/s/p_10153_1...0Levelingmv=rr
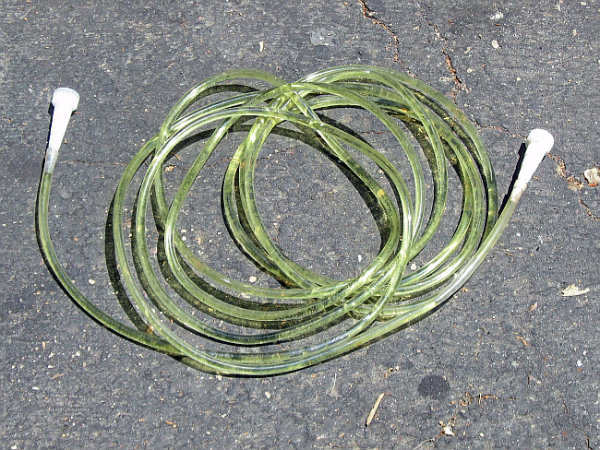
15 feet of plastic tubing. Mine is too small and I would get at least � ID if I was doing it again.
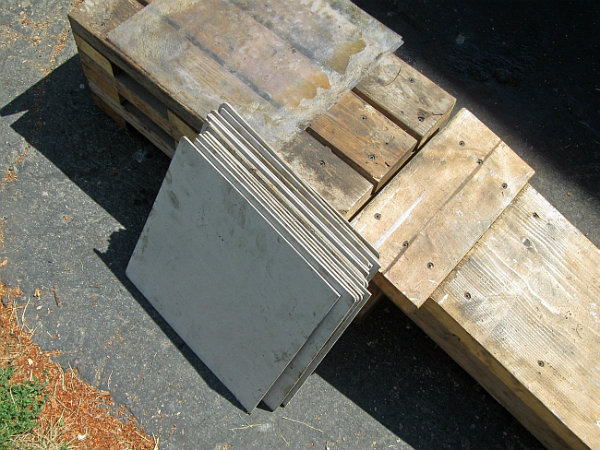
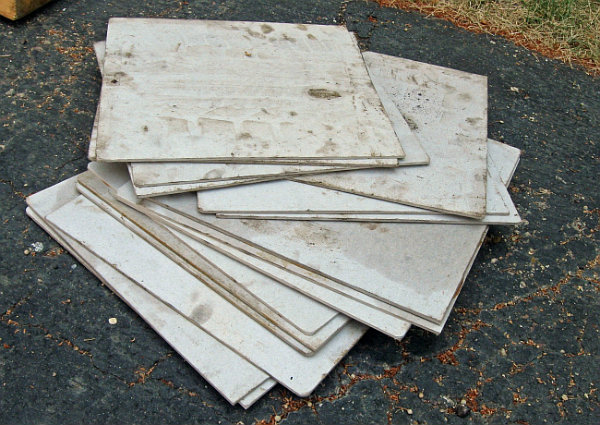
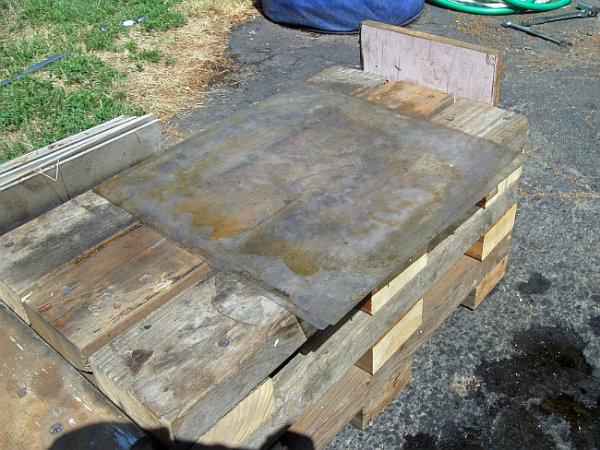
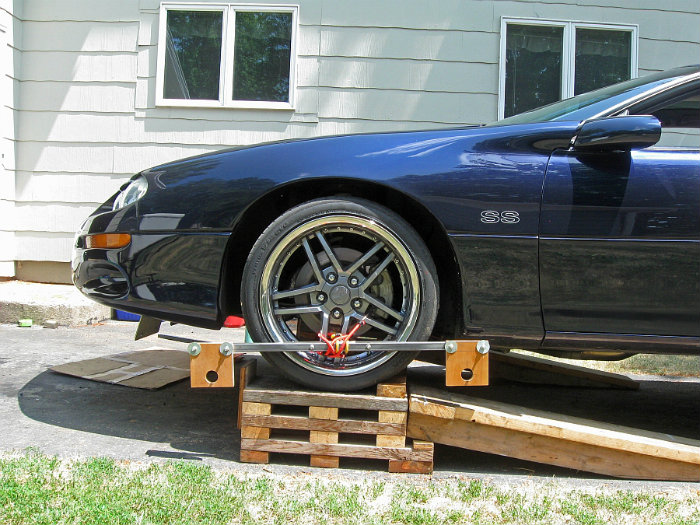
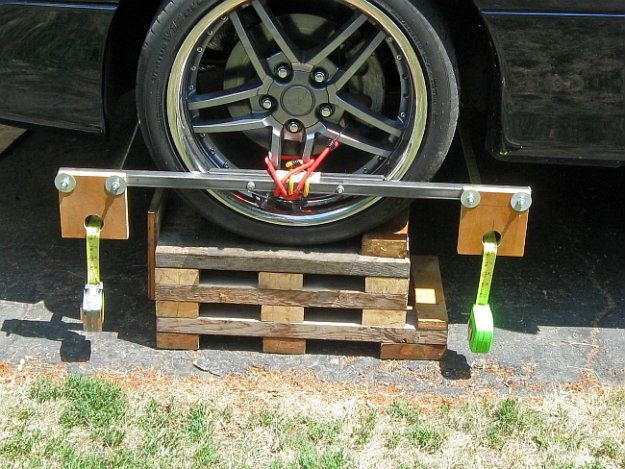
2 inches of shims to put under the tires. (1/8” LuAnn plywood works great or pressed chip like I use.)
2 turn plates. The turn plates can be 2 pieces of your shim material with a little grease in between them. Don’t get carried away with the grease though or it will squish out all over the place and make a mess. (Yep I did that). I used 2 pieces of flat PVC plastic for my plates and they work great.
Now a word of caution here. These turn plates make a very slippery surface for your car to be on and if you give the car a good shove side ways you can push it right off your ramps. I almost dropped a 70 mustang trying to break a bolt loose when it was on my plates. I don’t think you will have any trouble but it is something to be aware of.
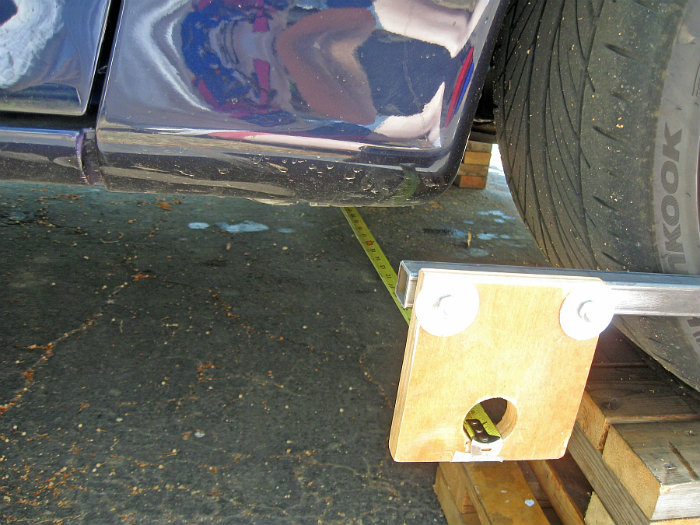
2 optional toe brackets to hold your tape measures. These are handy and, if you make them right, probably more accurate for setting toe, but you can just use another person and measure off the tires too. If you go the tire route it is helpful to have tires with a straight line in the tread to measure from and a non lowered car.

1 or 2 optional hunks of box metal the length of your wheel size. This is handy too and probably more accurate for measuring camber, but I have done many with out it.
You ABSOLUTELY DO NOT NEED the special OTC alignment tool at the books say is needed for F bodies. What it does is push or pull the control arm but it’s no problem at all move the arms without the tool. To move the control arm out you loosen the adjustor and pry it out with a pry bar. To move the arm in you loosen the adjustor and jack the car up from the K member. Gravity will move the control arm in just fine for you.
All the other equipment you’ll need you should have lying around. OK on to the show.
Page 3, leveling the car:
It pays to start with a level floor because the first thing you do is get the car up in the air and get it level. So before you put your car on the ramps put a stick across them and use your shims to get the ramps as close to level as possible. A little care here saves a lot of time later on.
I put my turn plates down before I drive up but if you do that be very careful when you get to the top of the ramps because you will have NO FRONT BRAKES at all. Those turn plates will slide you right off the end of your ramps if you let them.
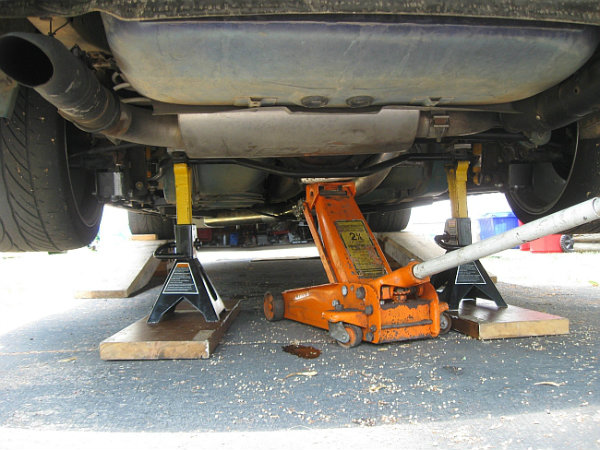
As much as possible leave the suspension loaded like it is going down the road. So put your stands under the rear end and when jacking up the front always bounce the car and turn the wheels to settle the suspension.
With the car up in the air the first thing I do is grab a can of light colored spray paint and paint my adjusters. That way I know where I started and about where the stock alignment should be. That is important so you know how far moving the caster. It is also handy if you ever want to put it back stock. If you don’t want to paint it you can mark them with a scribe later but if you are going to paint them do it now so it can dry.
Next up check the tire pressure in your front tires to be sure they are the same. If the car is sitting on the rears do that in the back too.
Now take that 15’ of tubing and fill it with liquid. I used antifreeze so it is easy to see and I don’t have to drain it in the winter. Your hose is now officially a water level. Hold both ends of the hose up to one wheel so the water stops at the edge of the wheel lip in both hoses. Tape one of the hoses in place.

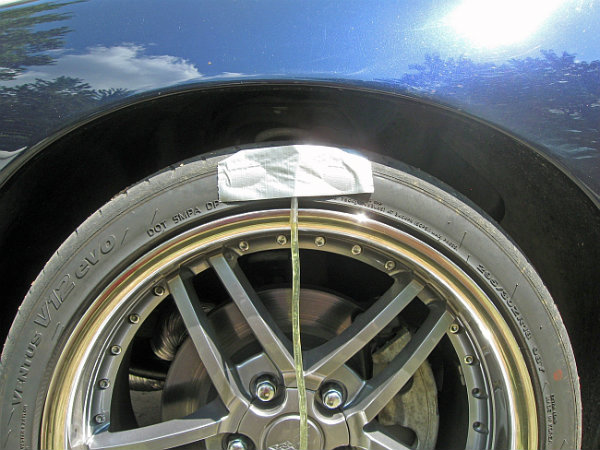
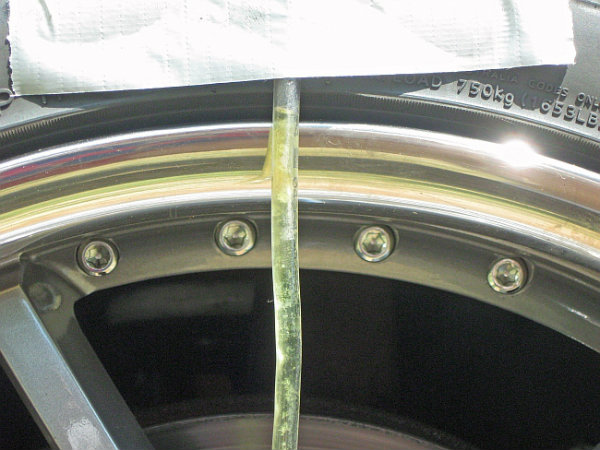
Keep the hose level as you move to the other side and tape the other end on the other wheel in the same place. Now go grab a cold one. With anti freeze in my undersized hose it takes about 20 seconds for it to find its level. If you use a larger hose or a lighter viscosity liquid it levels faster and you can skip the cold one. After they settle start adding shims until the water is exactly at the lip on both wheels. If you did a good job leveling your ramps you won’t have to mess with this much. Remember if you jack up the car to put shims under be sure and turn the wheels and bounce the front end to settle the suspension.
OK with the front level from side to side do the exact same thing in the back. The good news here is you don’t need to settle the suspension in the back after you shim it.
Next take a reading from front to back on both sides of the car. Since we are not messing with Caster this is not a super critical measurement but I like to have it with in about a half inch or so and the same on both sides. If you do need to adjust do it from the back. (Note my first few alignments I leveled it from corner to corner too. It certainly would not hurt you to check that but I really don’t see the need and don’t do it anymore.)
Lastly go back and measure the front side to side again. It should not have changed but I always double check it to be sure. The front is critical that you get it as close as possible to level.
And now you see why it pays to start with a level floor. This leveling process can be annoying and slow but after you do it a few times you will be able to do it in just a few minutes.
Page 1, important things to know before you start:
Even though I do my alignments with cheap easy to find tools I assure you I take no chances at all with my $275 a piece tires. If I didn’t know beyond a shadow of a doubt that I wasn’t going to wreck anything I would not be doing this. That being said if you get to the end of this post and are at all unsure or feel uncomfortable then do not attempt this. It’s very easy to kill your tires if you mess it up!
The first time you do this figure at least 4 hours. After you do it a few times you will be much faster but pick a day with plenty of time so you can be relaxed and enjoy the process.
This assumes you know what Caster, Camber and Toe are and know your way around an F body well enough to adjust them. In a nutshell pushing the lower control arms out gives my more positive caster and more negative camber.
This is only for camber and toe. You can measure caster using a level, tape measure 4 jack stands and some string but it is a very time consuming PITA and I don’t think it’s worth the effort. Caster is not a tire wearing angle anyway so I usually just crank the rear adjusters all the way out for max positive caster and call it a day. However as much as possible you want to be sure you move your caster adjustments the same on both sides because it will cause a pull if you are very different side to side.
In case you are wondering I’m an autocrosser and track day guy so I usually shoot for about 1.3 negative camber 4.5 positive caster and 0 toe. All the photos you see here are at -1.5 camber. I would NOT recommend that much negative camber on a street or strip car because it WILL wear the inside of your tires. Due to GM build slop most cars would take some grinding on at least one side to get that much negative camber anyway.
Finally this assumes you have basic hand tools, decent ramps, a jack and jack stands.
(side note, my ramps are awesome DIY ramps and if you have a lowered car with wide tires these are a must have to do alignments)
Page 2, equipment needed you probably don’t already have:
2 tape measures preferably identical.
1 digital level
I got mine here:
http://www.sears.com/shc/s/p_10153_1...0Levelingmv=rr
15 feet of plastic tubing. Mine is too small and I would get at least � ID if I was doing it again.
2 inches of shims to put under the tires. (1/8” LuAnn plywood works great or pressed chip like I use.)
2 turn plates. The turn plates can be 2 pieces of your shim material with a little grease in between them. Don’t get carried away with the grease though or it will squish out all over the place and make a mess. (Yep I did that). I used 2 pieces of flat PVC plastic for my plates and they work great.
Now a word of caution here. These turn plates make a very slippery surface for your car to be on and if you give the car a good shove side ways you can push it right off your ramps. I almost dropped a 70 mustang trying to break a bolt loose when it was on my plates. I don’t think you will have any trouble but it is something to be aware of.
2 optional toe brackets to hold your tape measures. These are handy and, if you make them right, probably more accurate for setting toe, but you can just use another person and measure off the tires too. If you go the tire route it is helpful to have tires with a straight line in the tread to measure from and a non lowered car.
1 or 2 optional hunks of box metal the length of your wheel size. This is handy too and probably more accurate for measuring camber, but I have done many with out it.
You ABSOLUTELY DO NOT NEED the special OTC alignment tool at the books say is needed for F bodies. What it does is push or pull the control arm but it’s no problem at all move the arms without the tool. To move the control arm out you loosen the adjustor and pry it out with a pry bar. To move the arm in you loosen the adjustor and jack the car up from the K member. Gravity will move the control arm in just fine for you.
All the other equipment you’ll need you should have lying around. OK on to the show.
Page 3, leveling the car:
It pays to start with a level floor because the first thing you do is get the car up in the air and get it level. So before you put your car on the ramps put a stick across them and use your shims to get the ramps as close to level as possible. A little care here saves a lot of time later on.
I put my turn plates down before I drive up but if you do that be very careful when you get to the top of the ramps because you will have NO FRONT BRAKES at all. Those turn plates will slide you right off the end of your ramps if you let them.
As much as possible leave the suspension loaded like it is going down the road. So put your stands under the rear end and when jacking up the front always bounce the car and turn the wheels to settle the suspension.
With the car up in the air the first thing I do is grab a can of light colored spray paint and paint my adjusters. That way I know where I started and about where the stock alignment should be. That is important so you know how far moving the caster. It is also handy if you ever want to put it back stock. If you don’t want to paint it you can mark them with a scribe later but if you are going to paint them do it now so it can dry.
Next up check the tire pressure in your front tires to be sure they are the same. If the car is sitting on the rears do that in the back too.
Now take that 15’ of tubing and fill it with liquid. I used antifreeze so it is easy to see and I don’t have to drain it in the winter. Your hose is now officially a water level. Hold both ends of the hose up to one wheel so the water stops at the edge of the wheel lip in both hoses. Tape one of the hoses in place.
Keep the hose level as you move to the other side and tape the other end on the other wheel in the same place. Now go grab a cold one. With anti freeze in my undersized hose it takes about 20 seconds for it to find its level. If you use a larger hose or a lighter viscosity liquid it levels faster and you can skip the cold one. After they settle start adding shims until the water is exactly at the lip on both wheels. If you did a good job leveling your ramps you won’t have to mess with this much. Remember if you jack up the car to put shims under be sure and turn the wheels and bounce the front end to settle the suspension.
OK with the front level from side to side do the exact same thing in the back. The good news here is you don’t need to settle the suspension in the back after you shim it.
Next take a reading from front to back on both sides of the car. Since we are not messing with Caster this is not a super critical measurement but I like to have it with in about a half inch or so and the same on both sides. If you do need to adjust do it from the back. (Note my first few alignments I leveled it from corner to corner too. It certainly would not hurt you to check that but I really don’t see the need and don’t do it anymore.)
Lastly go back and measure the front side to side again. It should not have changed but I always double check it to be sure. The front is critical that you get it as close as possible to level.
And now you see why it pays to start with a level floor. This leveling process can be annoying and slow but after you do it a few times you will be able to do it in just a few minutes.
Last edited by charchri4; 07-30-2012 at 05:22 AM.
 07-14-2012, 05:52 PM
#2
On The Tree
Thread Starter
iTrader: (11)
Join Date: Jan 2011
Location: The forsaken tundra of Minnesota
Posts: 123
Received 0 Likes
on
0 Posts
Page 4, now for the easy part. Align the car.
If you did not paint your adjustor bolts earlier scrape / trace around them with a scribe or screw driver so you know how much you are moving things.
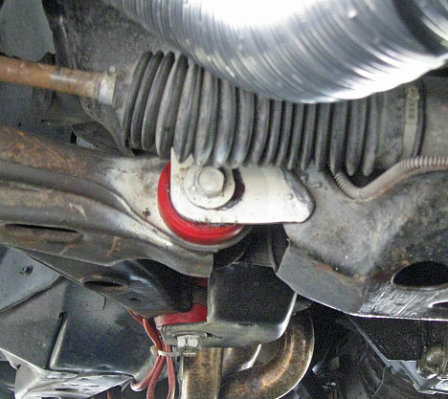
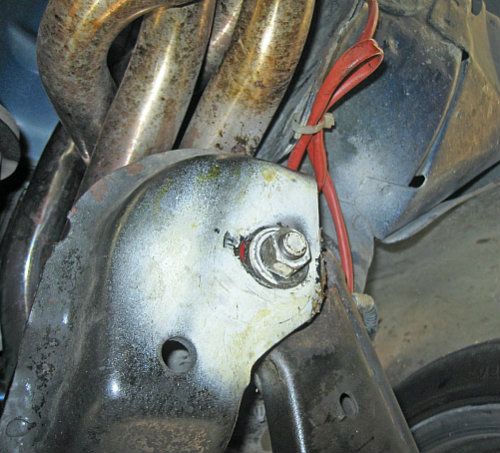
Optional: At this point, with out lifting the car, I usually loosen all 4 adjustors and with a pry bar shove all the adjustments all the way to the out side. As a road race guy I know that is pretty close to where I will end up anyway. However if you are only running on the street or are a straight line guy I would not do that. For you guys since we are not measuring caster your options are to leave the rear control arm bolts alone, or shove them all the way to the outside for max positive caster. If you do move them make sure you move them the same amount on both sides or you could induce a pull. OK so do what you want with that info and then snug up the adjustors ones where you want them. Not tight just snug.
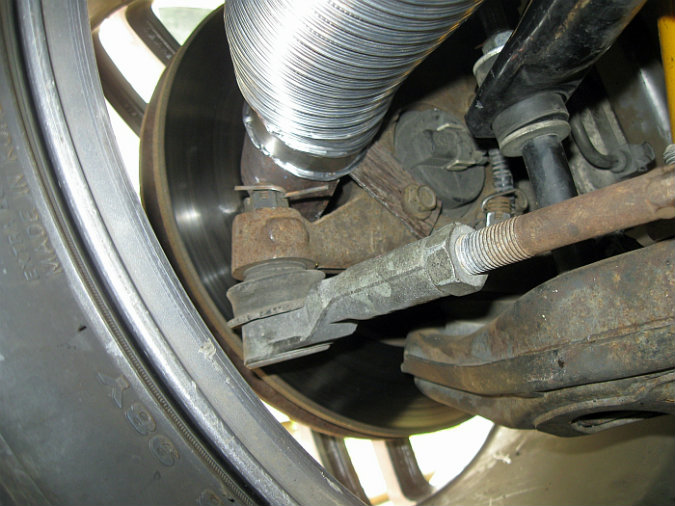
If you have normal wheels take your measurements from the bead of the wheel which is the step right below the lip. That is this area here:
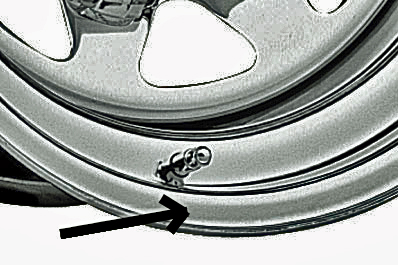
Unfortunately with my wheels I am not able to measure from that step so I have to measure on the lip.
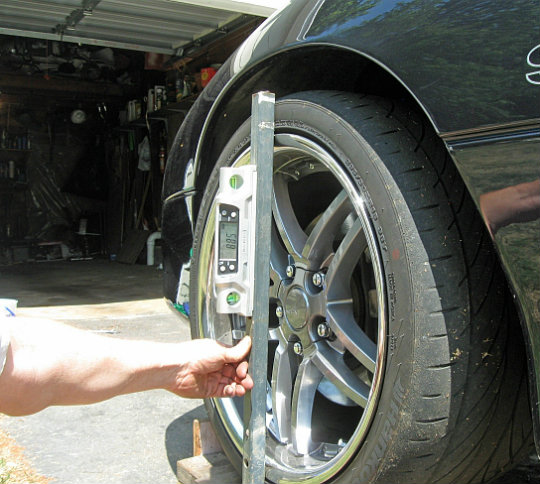
You can place your level directly on the wheel to get a camber reading.

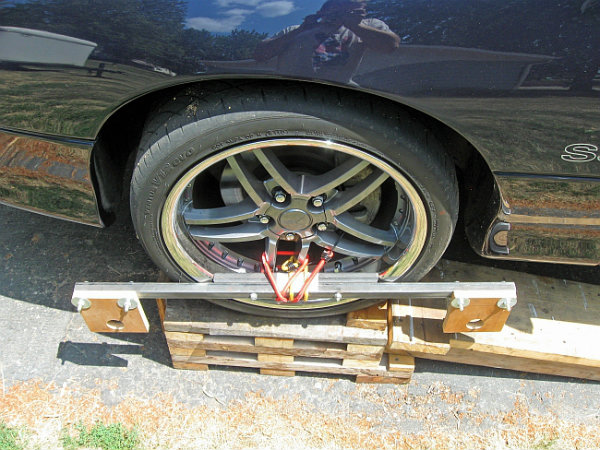
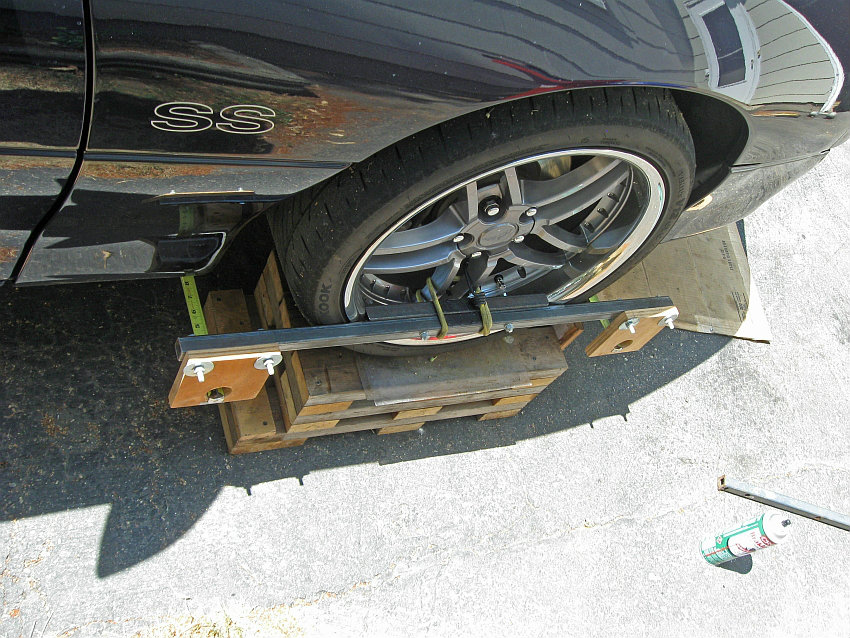
Or you can use that optional hunk of metal that fits inside your wheel lip to take readings. That is the way I do it because it’s probably a bit more accurate and my wheels are stainless so the magnet in the level doesn’t work on them.
Now take the camber reading on both sides just to see where you are at. To add negative camber loosen the front adjustor bolt and pry the arms out. Remember you do not need to raise the car to add negative camber. To reduce negative camber loosen the adjustor and raise the car from the K member until the arm slides back in. You might need to help it some and if it is too tight loosen the rear (caster) adjustor some. Work with this till you get what you want for camber on both sides. My target is 88.7 to get to 1.3 negative camber but you do the math for what you are after. Be sure it is the same on both sides or it will pull. If you want more then the car will give you then you have to grind the slots farther. But don’t get hung up on a few tenths. If you can only get -1.1 but wanted -1.2 it’s not worth the effort to pull the control arms and grind the slots for that last little bit unless you are just fussy and want to.
During this process I leave my water levels on the tires and check them from time to time to be sure I am still dead on level. 10 seconds of double checking them could save your tires and doing this all again. Once you get things where you want it crank the adjustor bolts tight.
With the camber done you can remove the water level and start in on the toe. Be sure the steering wheel right in the center and if you are using toe brackets put them on now.
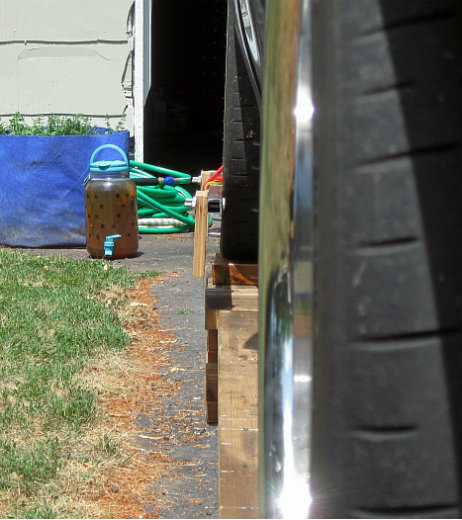
Depending on how much you moved things your toe will either be a mile or a little off. Either way start with sighting down the side of the car and get it close by visual before you bother with the tapes. From the back of the car look forward so your eye sees the front and back of the rear wheel in alignment. With that as your reference point you can see if the front is toed is in or out. Check both sides this way to see where you are at and adjust accordingly.

Once you get it so every thing visually lined up put the tapes on and start dialing it in.
As you measure be very sure your tapes do not hit the car because that will add to the length of them. This is the advantage of the brackets verses measuring off the tread. You get a lot more clearance to the tapes and can effectively measure higher up on the wheel.
Once you get it close, say within 3/8” difference between the front and rear tape you will start doing a round robin of checking things over and over:
1, make sure the steering wheel is centered.
2, sight down the rear wheels again and look to see if the front of the front wheels are out or in.
3, adjust the toe accordingly and check your tapes again.
4, repeat as necessary till your toe is where you want it and every thing looks straight
At this point you need to count turns so you know how far you are moving each adjustor. For example if you are a � toed in and your wheels and steering wheel are straight you need to turn them both adjustors out about � of a turn to get 0. Caution make sure your tie rod ends are to the end of their travel at the spindle and stay there as you make your adjustment or you will end up with an extra half turn on one side. Not a big deal at the ruff adjustment stage but critical when you are fine tuning to spec.
Page 5, the double and triple check:
So now you have your toe and camber to your spec. I know this is **** but trust me and just do it anyway. Don’t skip these next steps - this is the voice of experience speaking to you! Take a little break now to get a cold one and just get away from it for a few minutes. After you have stared at things so long it really pays to come back with a fresh mind and take a fresh look at things. So go clear your head and do whatever that is not car related for a little while
OK now come back and put a wrench on the lower control arm adjusters and pull them tight again. (I skipped this step once and left them just snug and ended up doing it all again!) Next bounce the car and rock the steering wheel side to side to be sure it’s settled. Now check that the wheel is centered and take a fresh look sighting down the side of the car to be sure everything is still straight ahead. Be fussy on this because it’s not that much fun to do it all again. Last check your toe using only one tape to measure this time. This is to be sure there is no discrepancy between your tapes and give it a triple check with the car settled. When you are happy with everything and really did check that toe one last time take her down and go for a spin.
If the steering wheel is not straight don’t sweat it. No need to level it again or put the rear back up in the air. Just run it up on the ramps and adjust accordingly. I usually go in � or � turns depending on how far off I am. Obviously you want to be very sure you turn both sides the same amount and that the tie rod ends are to their limit when you turn the knuckle so you don’t through your toe off.
Centering the wheel is kind of counter intuitive and if you don’t stop and think here you will probably make it worse the first time you change it. To adjust it forget about the relationship of the steering wheel to the car. Instead adjust the wheels into the direction of the steering wheel. So if your wheel is off to the left, you turn the drivers’ side toe out and the passengers’ side toe in to match where the steering wheel is pointing.
It may take several times but once you have road tested it and have the steering wheel straight –you guessed it- put your tape on to check the toe again using just one tape. Toe is a major tire wearing angle so don’t scrimp on checking it. I put the brackets on and check toe about as often as I change the oil. It’s usually on but checking it is cheap insurance for my $275 tires.
Page 6, final notes.
If you are running more then -1 camber and the inside of your tires are wearing you need to either spend more time on the track or back off on your camber.
If you get a pull rotate your tires side to side and see of it pulls the other way now. It’s OK to do this if you have directional tires. If the pull changes to the other direction you do not have an alignment problem. If it doesn’t change start at the top and do it all again to be sure your camber is on. Caster can cause a pull for sure but I have never had any trouble with it.
If you did not paint your adjustor bolts earlier scrape / trace around them with a scribe or screw driver so you know how much you are moving things.
Optional: At this point, with out lifting the car, I usually loosen all 4 adjustors and with a pry bar shove all the adjustments all the way to the out side. As a road race guy I know that is pretty close to where I will end up anyway. However if you are only running on the street or are a straight line guy I would not do that. For you guys since we are not measuring caster your options are to leave the rear control arm bolts alone, or shove them all the way to the outside for max positive caster. If you do move them make sure you move them the same amount on both sides or you could induce a pull. OK so do what you want with that info and then snug up the adjustors ones where you want them. Not tight just snug.
If you have normal wheels take your measurements from the bead of the wheel which is the step right below the lip. That is this area here:
Unfortunately with my wheels I am not able to measure from that step so I have to measure on the lip.
You can place your level directly on the wheel to get a camber reading.
Or you can use that optional hunk of metal that fits inside your wheel lip to take readings. That is the way I do it because it’s probably a bit more accurate and my wheels are stainless so the magnet in the level doesn’t work on them.
Now take the camber reading on both sides just to see where you are at. To add negative camber loosen the front adjustor bolt and pry the arms out. Remember you do not need to raise the car to add negative camber. To reduce negative camber loosen the adjustor and raise the car from the K member until the arm slides back in. You might need to help it some and if it is too tight loosen the rear (caster) adjustor some. Work with this till you get what you want for camber on both sides. My target is 88.7 to get to 1.3 negative camber but you do the math for what you are after. Be sure it is the same on both sides or it will pull. If you want more then the car will give you then you have to grind the slots farther. But don’t get hung up on a few tenths. If you can only get -1.1 but wanted -1.2 it’s not worth the effort to pull the control arms and grind the slots for that last little bit unless you are just fussy and want to.
During this process I leave my water levels on the tires and check them from time to time to be sure I am still dead on level. 10 seconds of double checking them could save your tires and doing this all again. Once you get things where you want it crank the adjustor bolts tight.
With the camber done you can remove the water level and start in on the toe. Be sure the steering wheel right in the center and if you are using toe brackets put them on now.
Depending on how much you moved things your toe will either be a mile or a little off. Either way start with sighting down the side of the car and get it close by visual before you bother with the tapes. From the back of the car look forward so your eye sees the front and back of the rear wheel in alignment. With that as your reference point you can see if the front is toed is in or out. Check both sides this way to see where you are at and adjust accordingly.
Once you get it so every thing visually lined up put the tapes on and start dialing it in.
As you measure be very sure your tapes do not hit the car because that will add to the length of them. This is the advantage of the brackets verses measuring off the tread. You get a lot more clearance to the tapes and can effectively measure higher up on the wheel.
Once you get it close, say within 3/8” difference between the front and rear tape you will start doing a round robin of checking things over and over:
1, make sure the steering wheel is centered.
2, sight down the rear wheels again and look to see if the front of the front wheels are out or in.
3, adjust the toe accordingly and check your tapes again.
4, repeat as necessary till your toe is where you want it and every thing looks straight
At this point you need to count turns so you know how far you are moving each adjustor. For example if you are a � toed in and your wheels and steering wheel are straight you need to turn them both adjustors out about � of a turn to get 0. Caution make sure your tie rod ends are to the end of their travel at the spindle and stay there as you make your adjustment or you will end up with an extra half turn on one side. Not a big deal at the ruff adjustment stage but critical when you are fine tuning to spec.
Page 5, the double and triple check:
So now you have your toe and camber to your spec. I know this is **** but trust me and just do it anyway. Don’t skip these next steps - this is the voice of experience speaking to you! Take a little break now to get a cold one and just get away from it for a few minutes. After you have stared at things so long it really pays to come back with a fresh mind and take a fresh look at things. So go clear your head and do whatever that is not car related for a little while
OK now come back and put a wrench on the lower control arm adjusters and pull them tight again. (I skipped this step once and left them just snug and ended up doing it all again!) Next bounce the car and rock the steering wheel side to side to be sure it’s settled. Now check that the wheel is centered and take a fresh look sighting down the side of the car to be sure everything is still straight ahead. Be fussy on this because it’s not that much fun to do it all again. Last check your toe using only one tape to measure this time. This is to be sure there is no discrepancy between your tapes and give it a triple check with the car settled. When you are happy with everything and really did check that toe one last time take her down and go for a spin.
If the steering wheel is not straight don’t sweat it. No need to level it again or put the rear back up in the air. Just run it up on the ramps and adjust accordingly. I usually go in � or � turns depending on how far off I am. Obviously you want to be very sure you turn both sides the same amount and that the tie rod ends are to their limit when you turn the knuckle so you don’t through your toe off.
Centering the wheel is kind of counter intuitive and if you don’t stop and think here you will probably make it worse the first time you change it. To adjust it forget about the relationship of the steering wheel to the car. Instead adjust the wheels into the direction of the steering wheel. So if your wheel is off to the left, you turn the drivers’ side toe out and the passengers’ side toe in to match where the steering wheel is pointing.
It may take several times but once you have road tested it and have the steering wheel straight –you guessed it- put your tape on to check the toe again using just one tape. Toe is a major tire wearing angle so don’t scrimp on checking it. I put the brackets on and check toe about as often as I change the oil. It’s usually on but checking it is cheap insurance for my $275 tires.
Page 6, final notes.
If you are running more then -1 camber and the inside of your tires are wearing you need to either spend more time on the track or back off on your camber.
If you get a pull rotate your tires side to side and see of it pulls the other way now. It’s OK to do this if you have directional tires. If the pull changes to the other direction you do not have an alignment problem. If it doesn’t change start at the top and do it all again to be sure your camber is on. Caster can cause a pull for sure but I have never had any trouble with it.
Last edited by charchri4; 07-30-2012 at 10:32 AM.
07-14-2012, 06:11 PM
#3
On The Tree
Thread Starter
iTrader: (11)
Join Date: Jan 2011
Location: The forsaken tundra of Minnesota
Posts: 123
Received 0 Likes
on
0 Posts
Page 7, Optional Thrust Angle Check
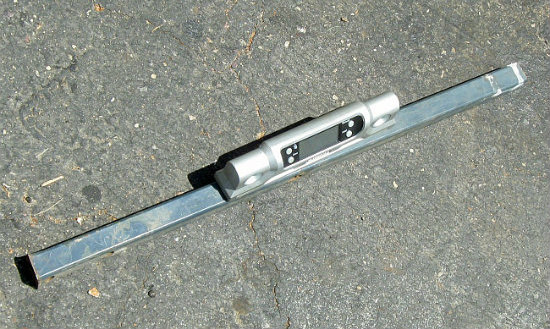
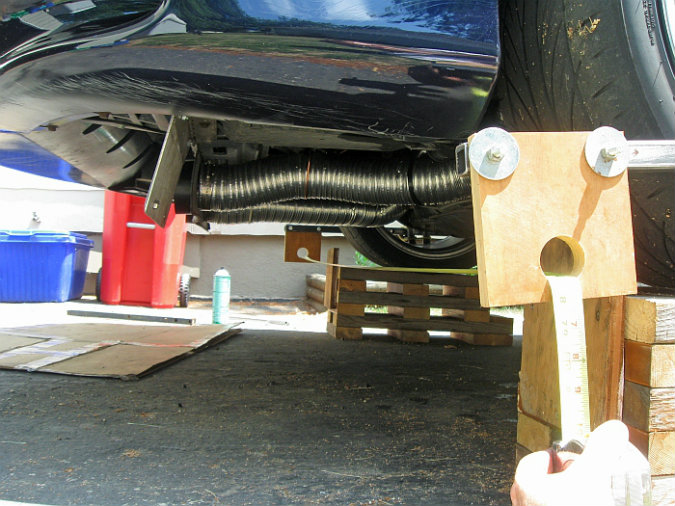
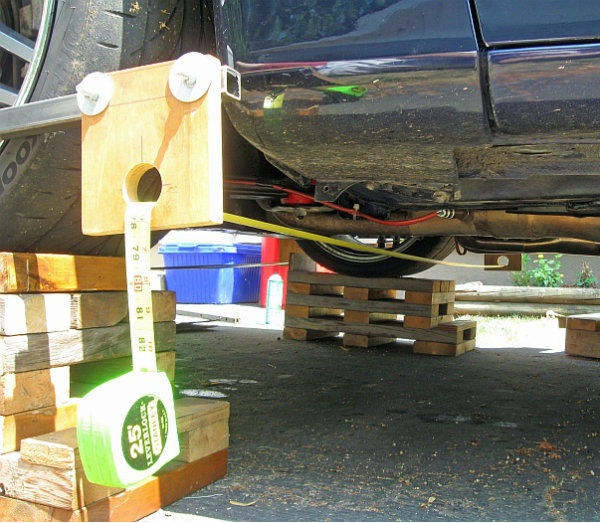
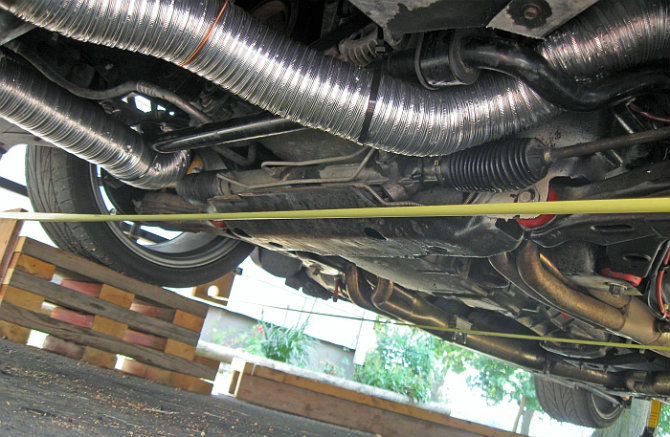
If you have adjustable rear lower control arms you can easily check your thrust angle with a $20 laser level. This is mine
Put the bars that are cut the the width of the wheels on the front and your toe heads on the back. If you didn't make toe heads you can do this with 2 bars just as easy. I have the front one bungied on here for the photo but you can just hold them up and see where the beam hits.
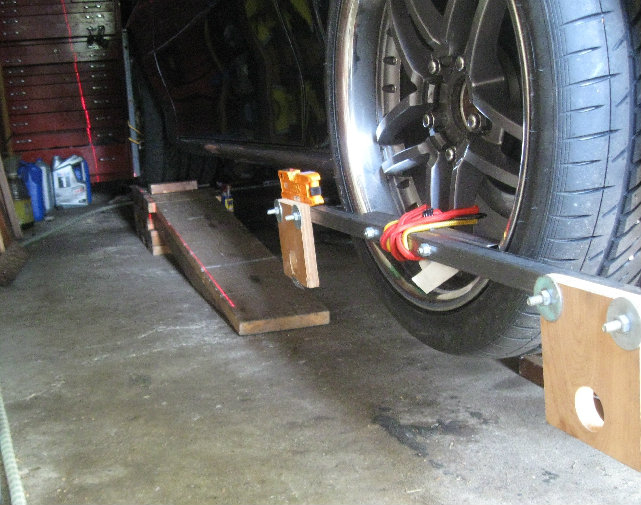
You can see the beam on the tool box is missing the bar by a ton, it was hitting the fender on the other side before I dialed it in. It's very easy to adjust them till they are the same on both sides.
If you have adjustable rear lower control arms you can easily check your thrust angle with a $20 laser level. This is mine
Put the bars that are cut the the width of the wheels on the front and your toe heads on the back. If you didn't make toe heads you can do this with 2 bars just as easy. I have the front one bungied on here for the photo but you can just hold them up and see where the beam hits.
You can see the beam on the tool box is missing the bar by a ton, it was hitting the fender on the other side before I dialed it in. It's very easy to adjust them till they are the same on both sides.
Last edited by charchri4; 07-30-2012 at 10:35 AM.
07-14-2012, 09:54 PM
#4
On The Tree
Thread Starter
iTrader: (11)
Join Date: Jan 2011
Location: The forsaken tundra of Minnesota
Posts: 123
Received 0 Likes
on
0 Posts
I had so many questions and so much interest on the ramps I did a separate write up on them here.
https://ls1tech.com/forums/tools-fab...amps-ever.html
I've had a couple PMs on my brake ducts too. Yep they are poor man DIYs too but I am using a different set up now that what is in the photos here. Go here for details:
https://ls1tech.com/forums/suspensio...l#post16598600
https://ls1tech.com/forums/tools-fab...amps-ever.html
I've had a couple PMs on my brake ducts too. Yep they are poor man DIYs too but I am using a different set up now that what is in the photos here. Go here for details:
https://ls1tech.com/forums/suspensio...l#post16598600
Last edited by charchri4; 08-07-2012 at 10:59 AM.
07-15-2012, 09:36 AM
#6
11 Second Club
iTrader: (8)
Join Date: Jan 2002
Location: SILSBEE TX
Posts: 1,782
Likes: 0
Received 0 Likes
on
0 Posts

Very good write up, easy to see you did a lot of thinking and effert into the write up
Johnny
ps: check your PM
Johnny
ps: check your PM
Last edited by SS SLP2; 07-15-2012 at 09:42 AM.
Trending Topics

 07-16-2012, 02:02 AM
#9
TECH Apprentice
 My ramps are ok but I can't get my car up as high as yours. Great job on the write-up!
07-16-2012, 06:38 AM
My ramps are ok but I can't get my car up as high as yours. Great job on the write-up!
07-16-2012, 06:38 AM
#10
On The Tree
Thread Starter
iTrader: (11)
Join Date: Jan 2011
Location: The forsaken tundra of Minnesota
Posts: 123
Received 0 Likes
on
0 Posts
I don't trust mine. But I didn't figure that out until after I shelled out the $80 for an alignment. It didn't help that the 'tech' who did the job looked like a reject from the show Car Warriors. I searched Frrax and Corner-Carvers for DIY alignment info. Some of my low buck tools differ from yours a bit, but the end results are all that matter. I'll set them up and take some pictures when I get some time. I'm very happy with my results. Tramlining has been greatly reduced. I'm going to 'steal' your ramp and crib idea...if you don't mind... My ramps are ok but I can't get my car up as high as yours. Great job on the write-up!
My ramps are ok but I can't get my car up as high as yours. Great job on the write-up!
 07-17-2012, 02:40 AM
#13
TECH Enthusiast
iTrader: (1)

Join Date: Oct 2005
Location: St. Cloud, MN
Posts: 587
Likes: 0
Received 0 Likes
on
0 Posts
I see you're from MN. So, I have to ask...who do you go to for your alignment if you don't do it yourself? I'm going to need an alignment soon, but I have no idea who to bring it to. I have considered Courtney Truck Service, since he has so much experience with racing. But, I'm not sure if he'd be worth it.
I live in St. Cloud if that helps.
I live in St. Cloud if that helps.
07-17-2012, 04:57 AM
#14
On The Tree
Thread Starter
iTrader: (11)
Join Date: Jan 2011
Location: The forsaken tundra of Minnesota
Posts: 123
Received 0 Likes
on
0 Posts
I see you're from MN. So, I have to ask...who do you go to for your alignment if you don't do it yourself? I'm going to need an alignment soon, but I have no idea who to bring it to. I have considered Courtney Truck Service, since he has so much experience with racing. But, I'm not sure if he'd be worth it.
I live in St. Cloud if that helps.
I live in St. Cloud if that helps.
It's not really that hard and any trained tech with a decent amount of experience should be able to do a good job for you. If in doubt I think I would lean toward a big enough Chevy dealer to have a guy that specializes in front end work. Find a tech that has been doing front end work for at least a decade and he will have seen a ton of F bodies. He will know all the quirks and probably be able to spot things you might miss. The shop rate will be a bit higher at the dealer but to me it would be worth it. He is going to use your alignment specs anyway so really all he has to do is read the machine.
Seriously if I were you I'd get a buddy and a level and give it a shot yourself first. With a little patience you can measure off the tires for toe and do just fine without the brackets. Besides you can buy what you need and build the ramps for less then what you would pay to have it done.
The following users liked this post:
charchri4 (03-24-2020)
The following users liked this post:
charchri4 (03-24-2020)

 07-18-2012, 12:23 AM
#19
TECH Apprentice
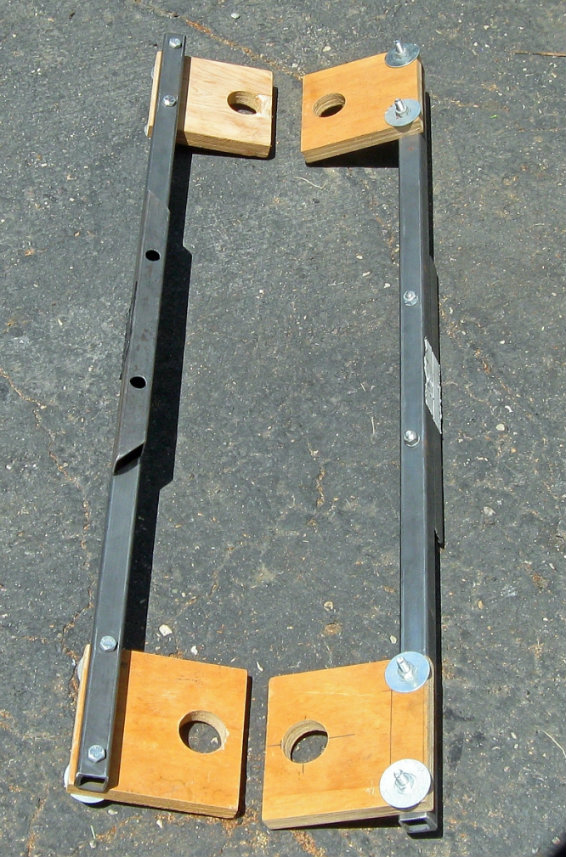
Pictures of my DIY alignment tools. 'Camber gauge' has a square with a bubble level for knowing when my 'gauge' is straight up and down. Angle finder sits on the black steel piece that's bolted to the wood. Bungie cord holds it to the wheel. My ramps were made when my car sat lower. I was using metal ramps, but the are a pain to use because of the overhang on these cars. The stepped ramps are of course, easier to use. The funny looking device hanging off the front of the car is how I check toe. I have another one for the back of the car. They hang down low enough that the conduit that goes through the lower holes are at the wheel centerline. The conduit is several inches wider then the car so that the fishing line does not interfere with the body. Fishing line is stretched from front and rear conduit on both sides. Then measure the fishing line to wheel lip on the back wheels (front and rear wheel lips) and get those measurements equal. Then go to the front and measure those and make adjustments with the tie rods until you get the toe where you want it. What I like about this method is you can roll the car back and forth without have to reset your string, like you would have to do with 4 jackstands and string.
The following users liked this post:
charchri4 (03-24-2020)

