Project "Blasphemy" - LSx Foxbody
 12-01-2012, 10:08 PM
#1

so I have decided to Catalog My Build here.....
I work on the road for a living, so there may be quite a long pause between updates... but I will update it as I make changes.
A Brief History:
It all started with my love for the Muscle Car, and my many muscle cars I have owned. it evolved into buying an LS based 2000 Camaro brand new from the factory, money paid upfront towards it... showed up with 4 miles on the odometer....and so my Love of the LS motor began.
it turned into a car that I modded, then sold because I had some Financial issues, then I bought another, and sold it to get a more "insurance friendly" car(I had a lot of tickets causing my insurance to be expensive..LOL)
then I bought another camaro... went for a crazy daily driver build....sort of... ended up turning it into a mostly race car that I drove when it was nice out......
went to gutting my car to lose weight, and couldnt seem to get enough weight out of it... ended up gutted....not really daily driver friendly at all...no AC, no wipers, and still not fast enough because it weighed 3800lbs
so I gave up on the camaro...
I've always wanted to Build an LSx Foxbody...and I start with a weight considerably less than what I could have ever gotten to on my camaro without some serious cutting.
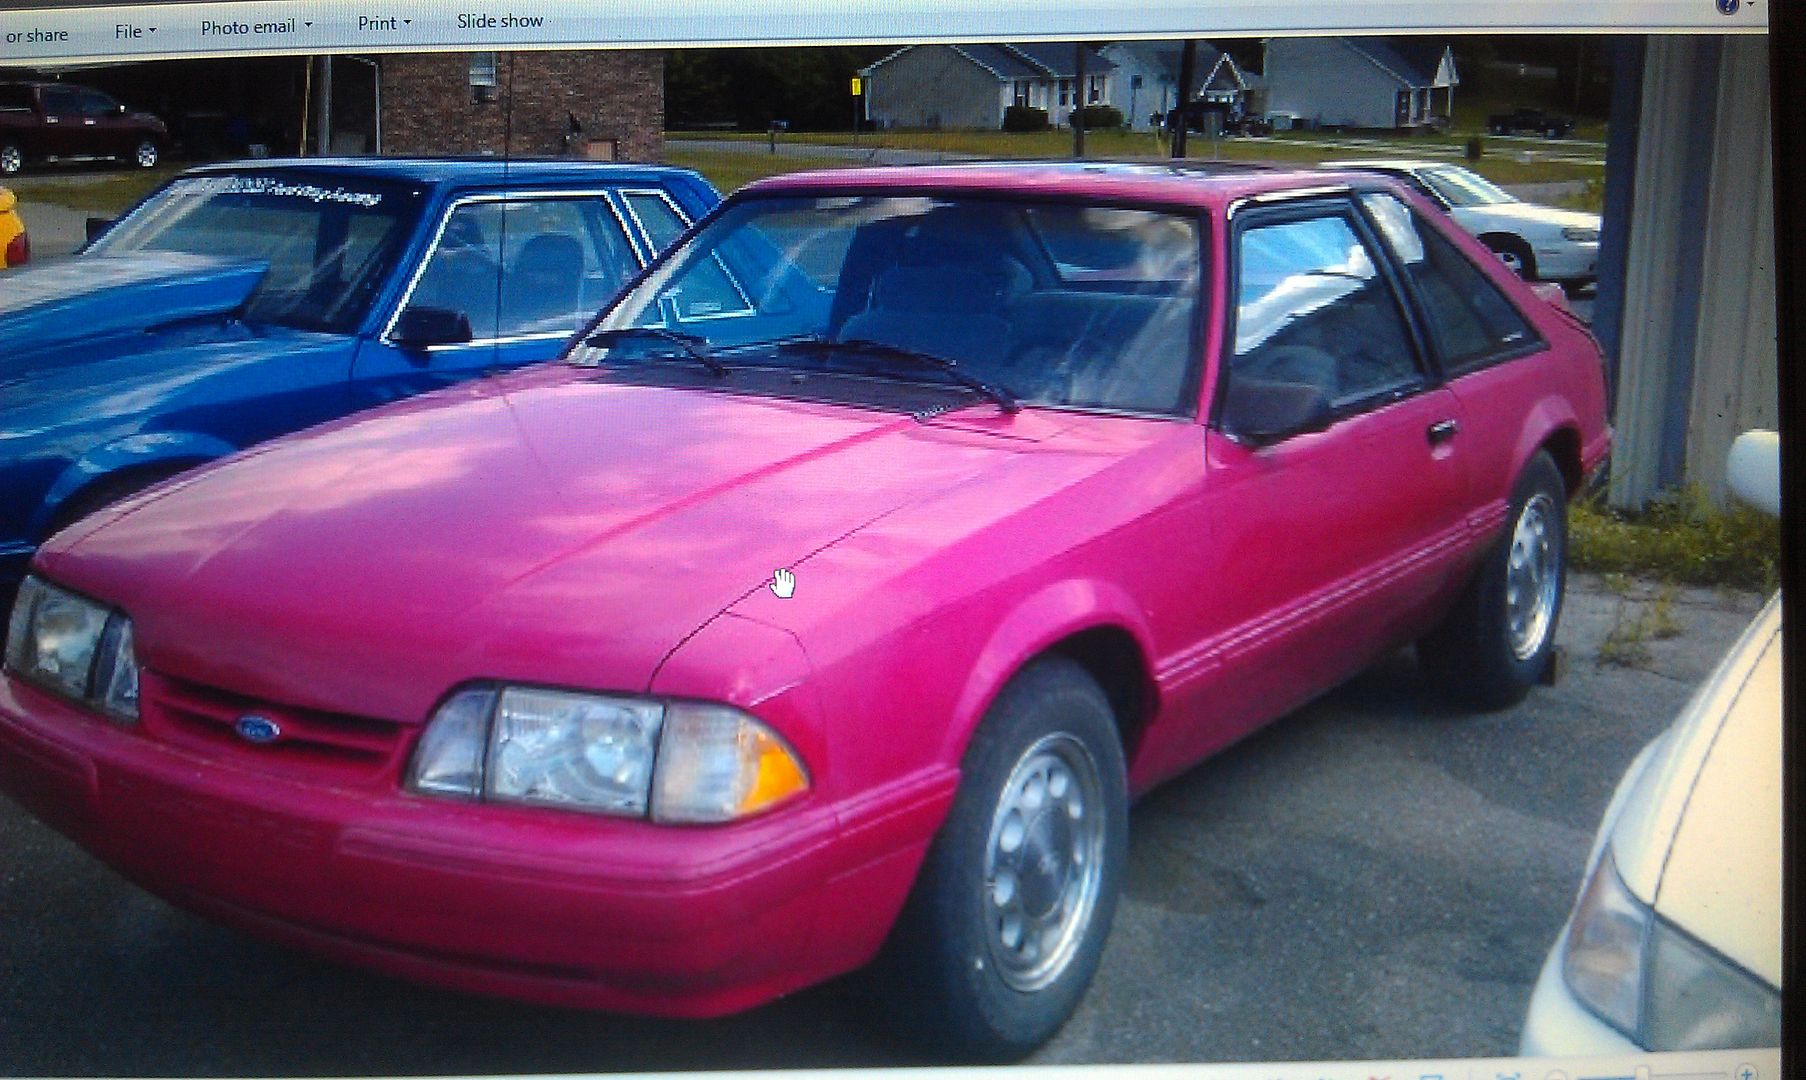
so I started looking for a Foxbody for my project....
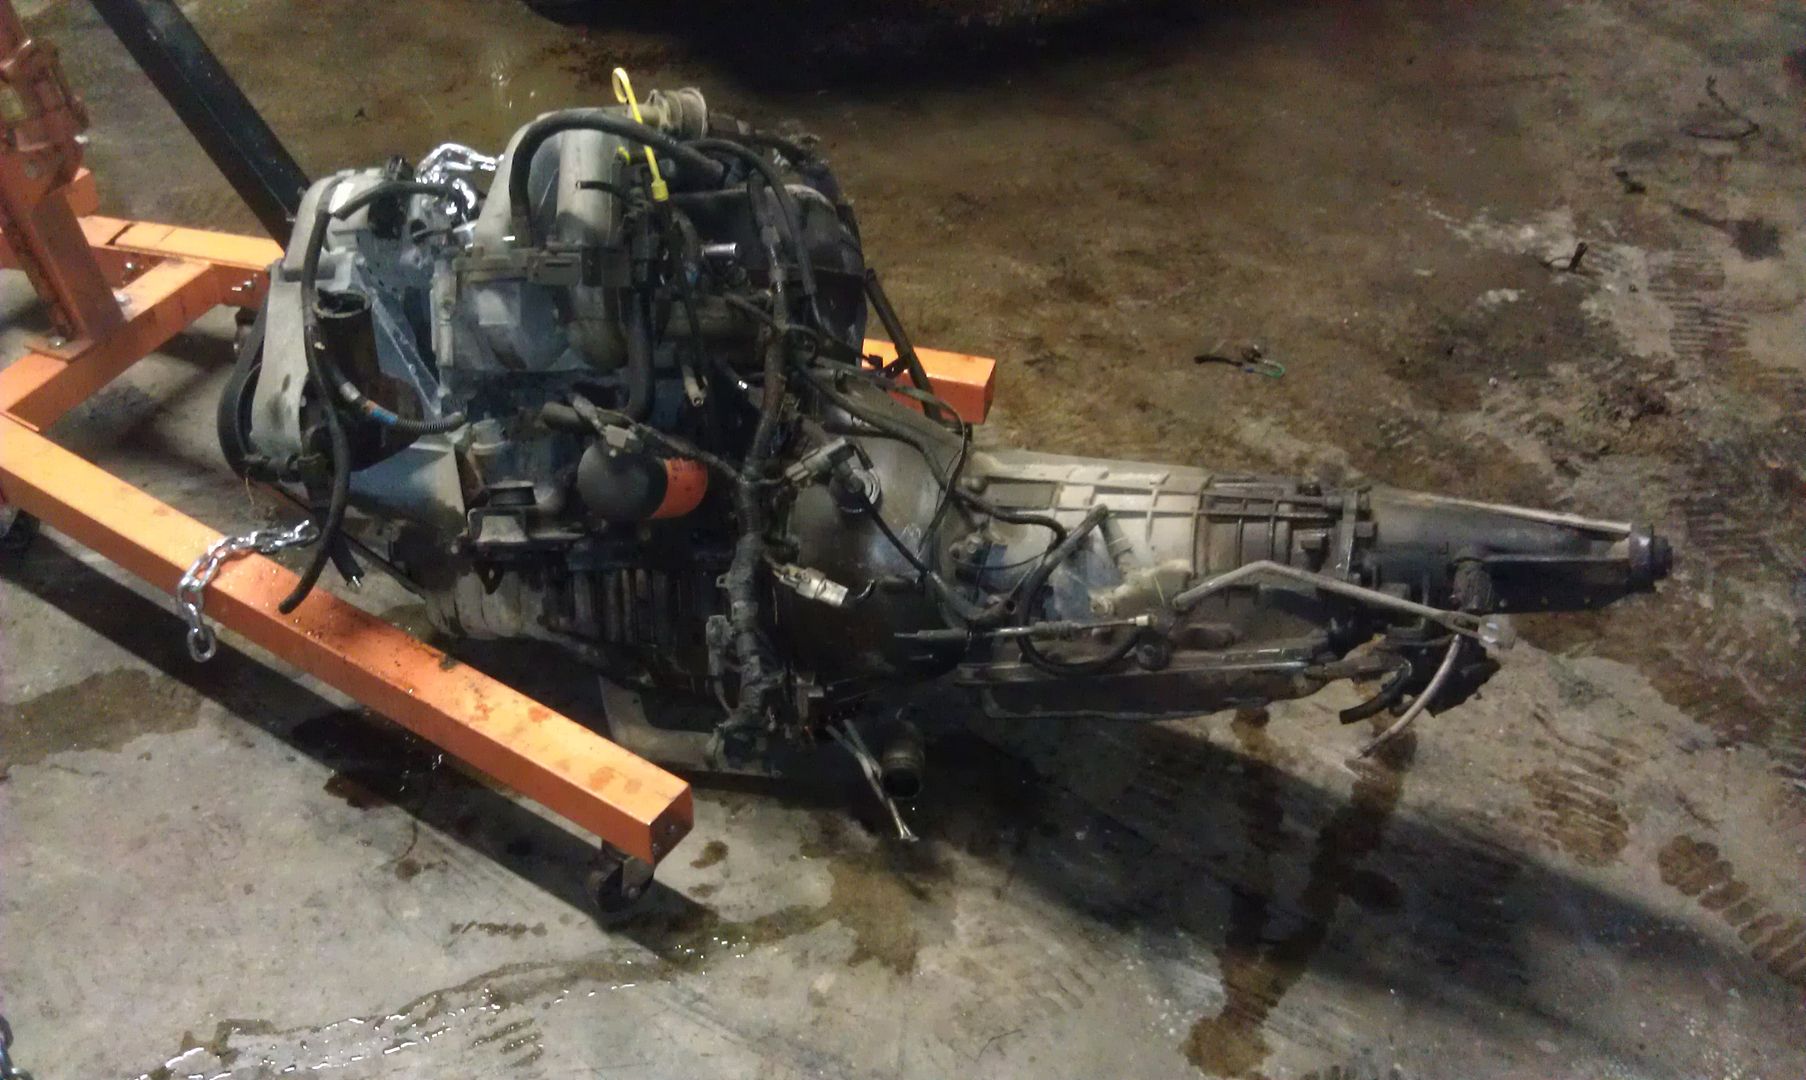
Planned on re-using as much stuff from my heavily modded camaro as possible to save a few dollars(engine, trans, center chunk, rear brake kit, ECU and Trans Controller...etc)
a buddy of mine was selling a Running 4 cylinder Foxbody Hatch for Cheap....so I bought it
Naturally... I commenced to Immediately gutting the thing...
the Motor and Trans came out....by force of course..
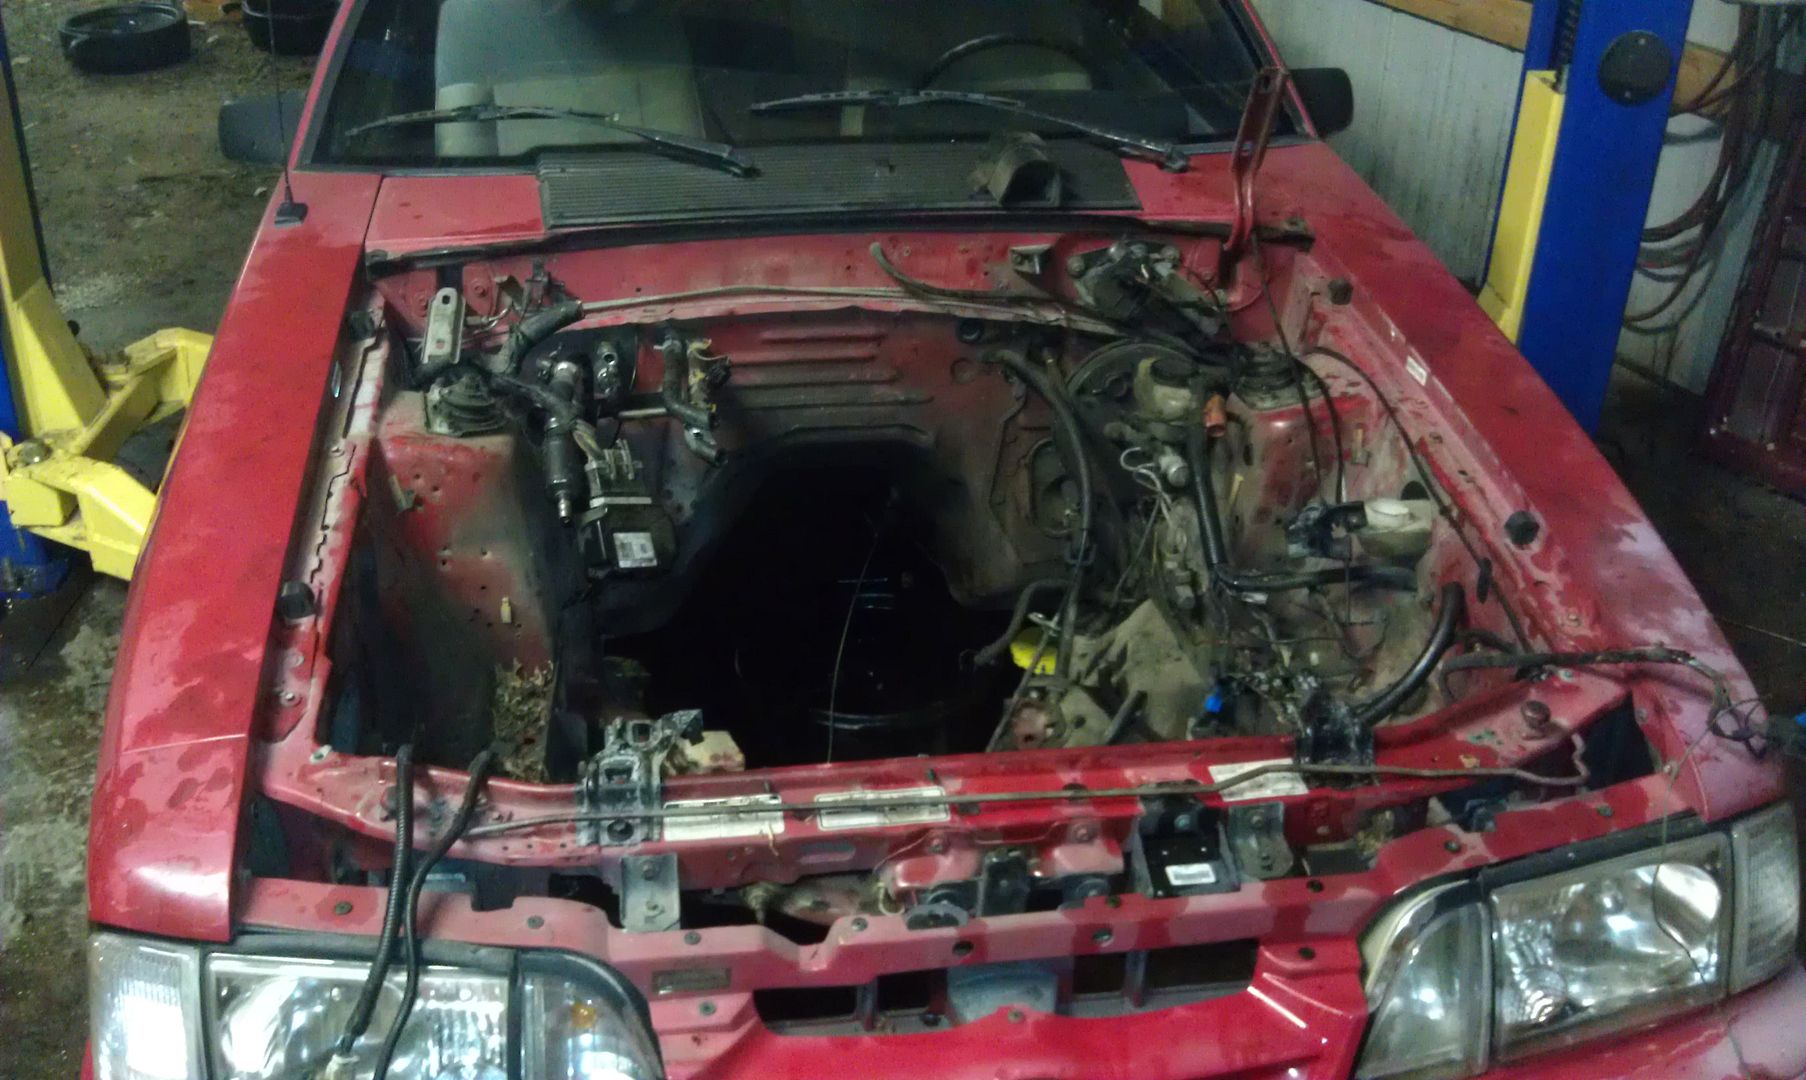
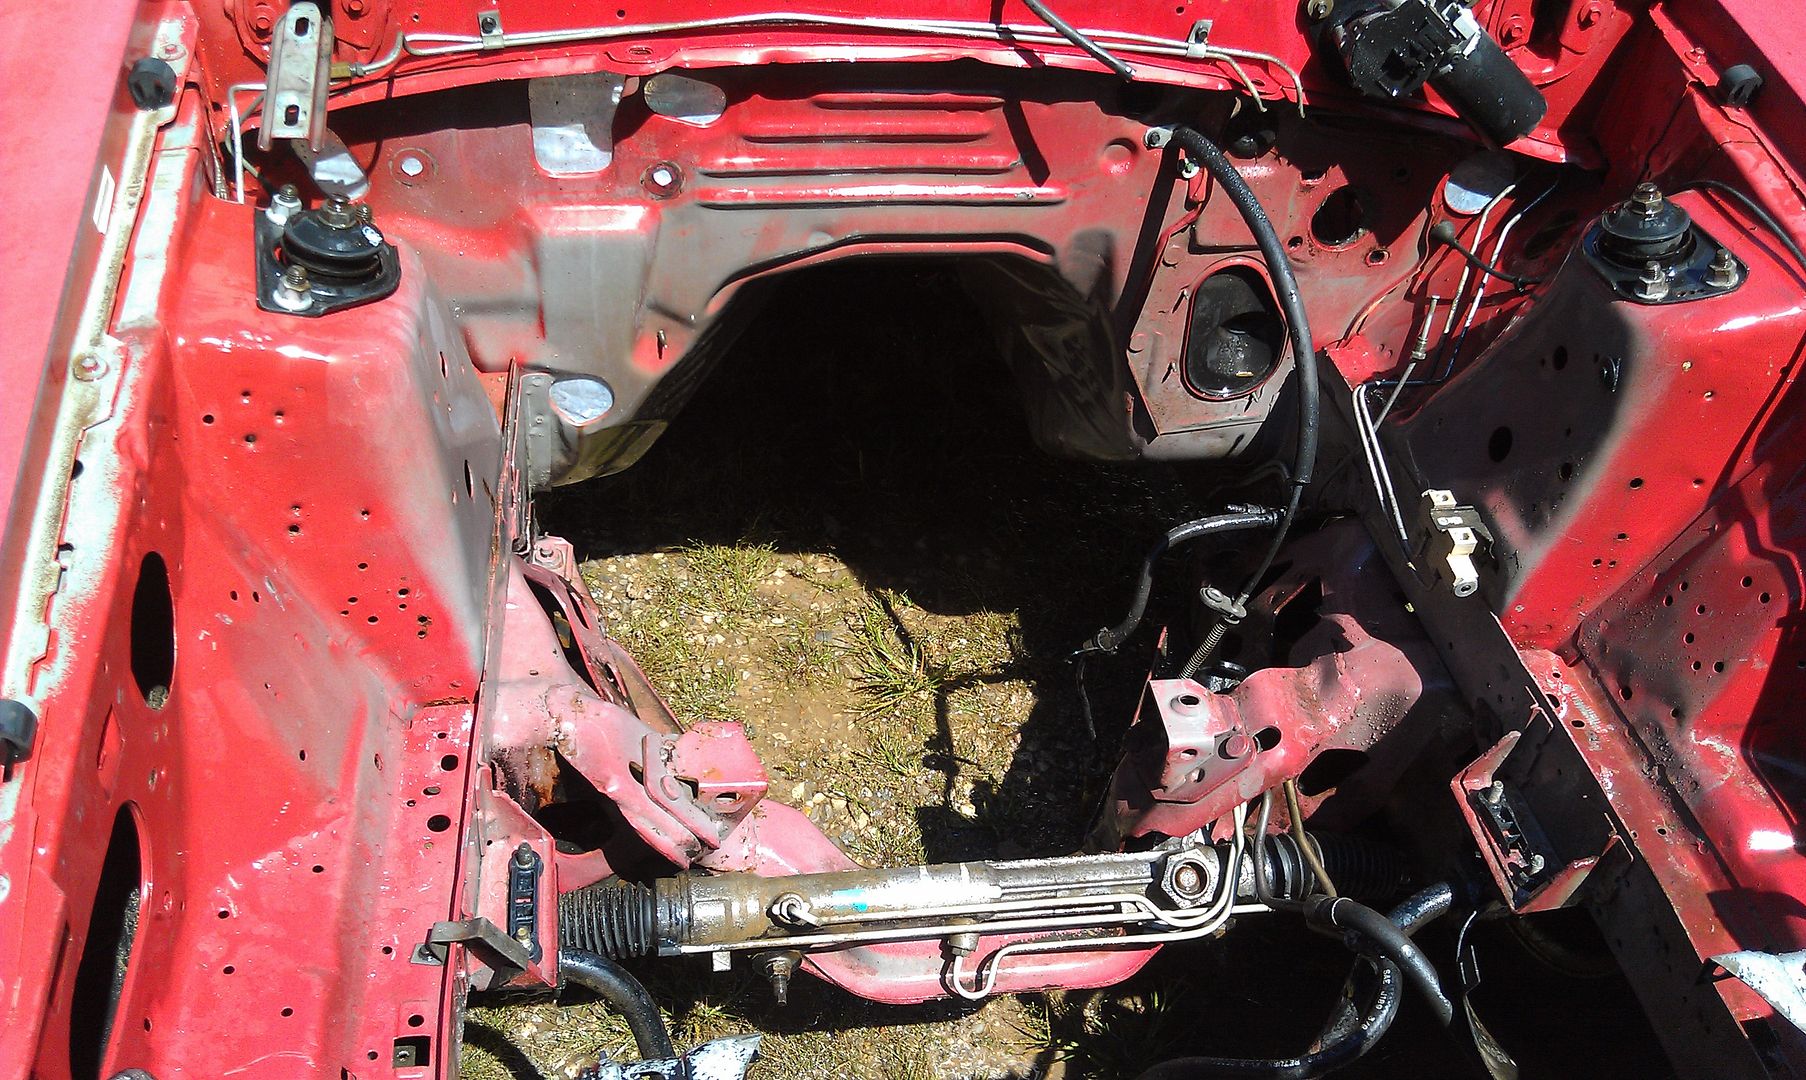
A little Engine Bay Cleanup... degreased, power washed.....
I work on the road for a living, so there may be quite a long pause between updates... but I will update it as I make changes.
A Brief History:
It all started with my love for the Muscle Car, and my many muscle cars I have owned. it evolved into buying an LS based 2000 Camaro brand new from the factory, money paid upfront towards it... showed up with 4 miles on the odometer....and so my Love of the LS motor began.
it turned into a car that I modded, then sold because I had some Financial issues, then I bought another, and sold it to get a more "insurance friendly" car(I had a lot of tickets causing my insurance to be expensive..LOL)
then I bought another camaro... went for a crazy daily driver build....sort of... ended up turning it into a mostly race car that I drove when it was nice out......
went to gutting my car to lose weight, and couldnt seem to get enough weight out of it... ended up gutted....not really daily driver friendly at all...no AC, no wipers, and still not fast enough because it weighed 3800lbs
so I gave up on the camaro...
I've always wanted to Build an LSx Foxbody...and I start with a weight considerably less than what I could have ever gotten to on my camaro without some serious cutting.
so I started looking for a Foxbody for my project....
Planned on re-using as much stuff from my heavily modded camaro as possible to save a few dollars(engine, trans, center chunk, rear brake kit, ECU and Trans Controller...etc)
a buddy of mine was selling a Running 4 cylinder Foxbody Hatch for Cheap....so I bought it
Naturally... I commenced to Immediately gutting the thing...
the Motor and Trans came out....by force of course..
A little Engine Bay Cleanup... degreased, power washed.....
Last edited by soundengineer; 12-27-2012 at 12:44 AM.
 12-01-2012, 10:09 PM
#2
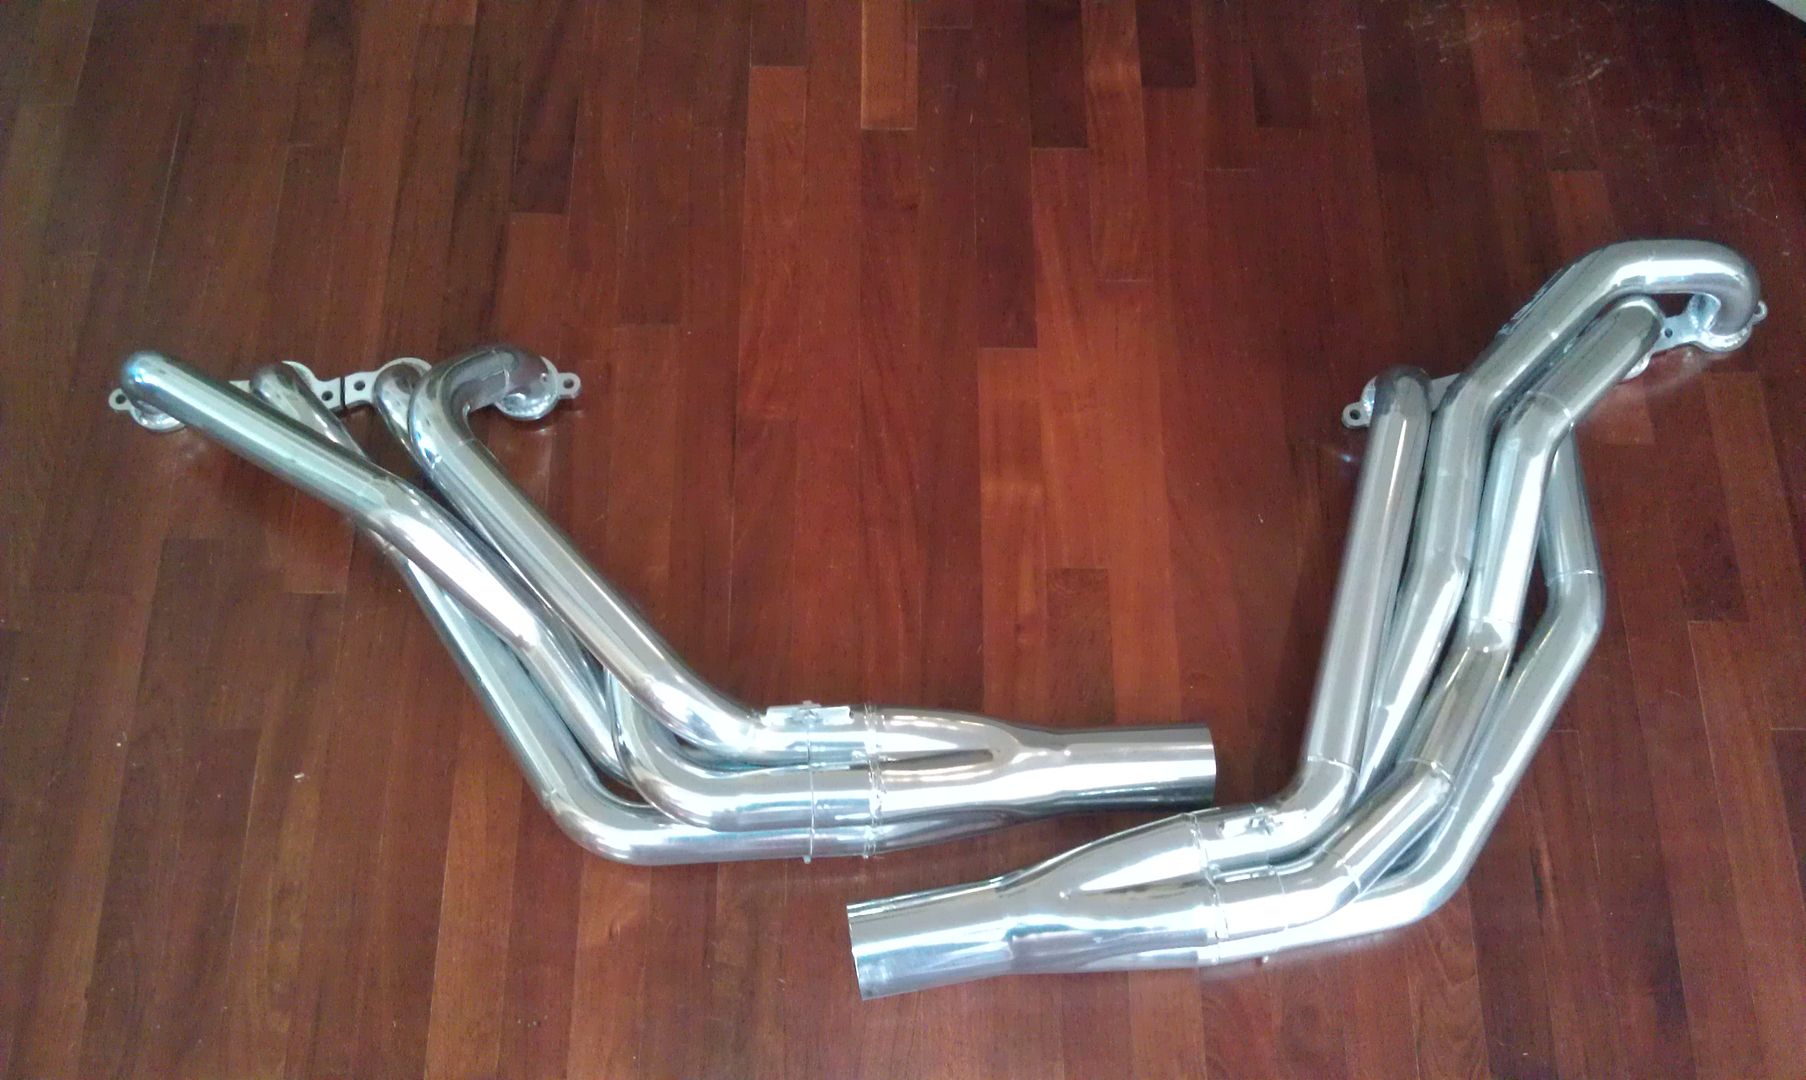
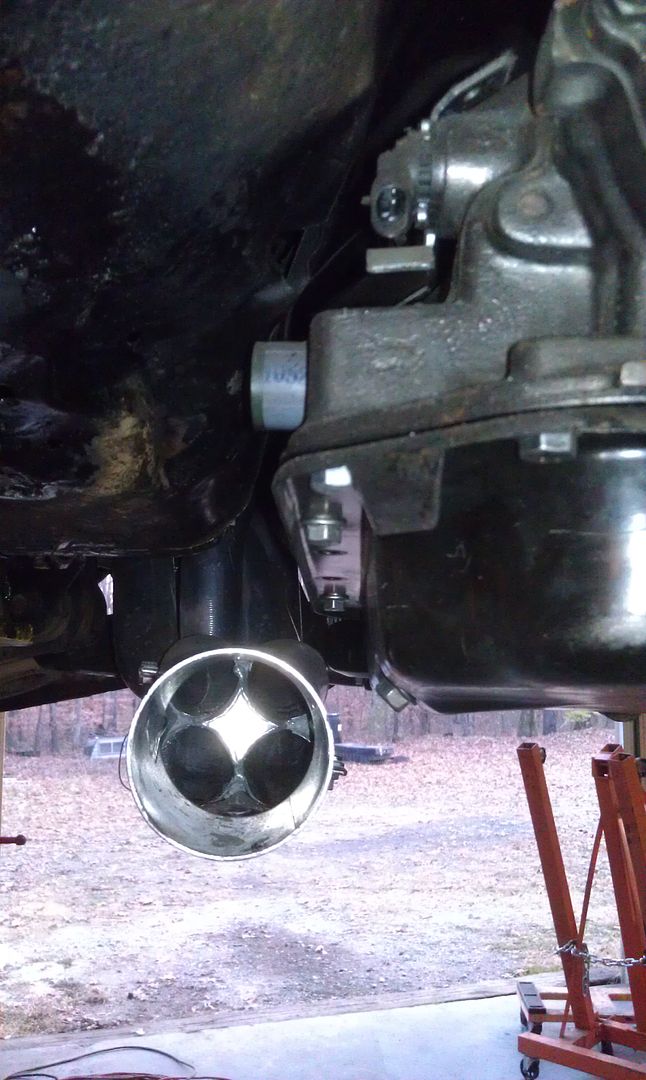
Ordered a Team-Z Metal Matrix K-Member without motor mounts, a Team-Z Lightweight 9" housing, Front Shock Coil Over's, 3/8" Aluminum Motor plate and 12ga Steel Midplate from AEICNC ( www.aeicnc.com ), 2" Heddman LSx swap headers...

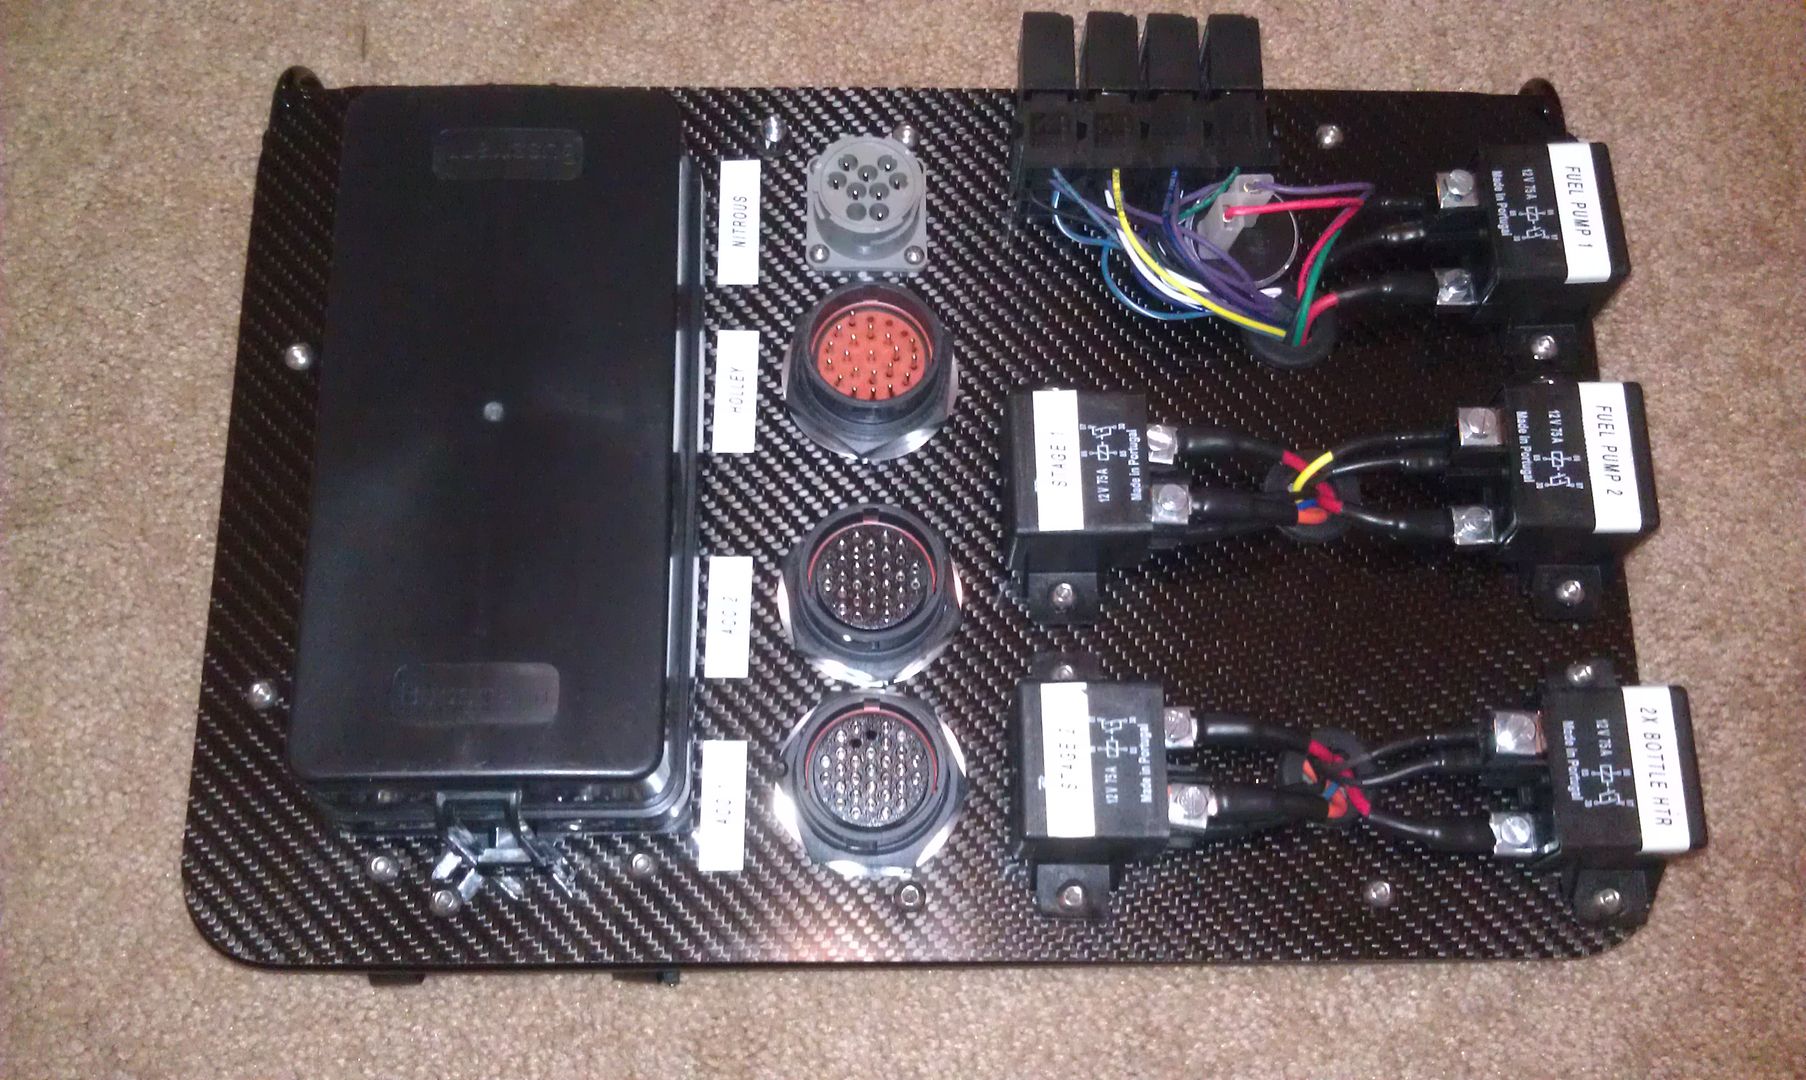
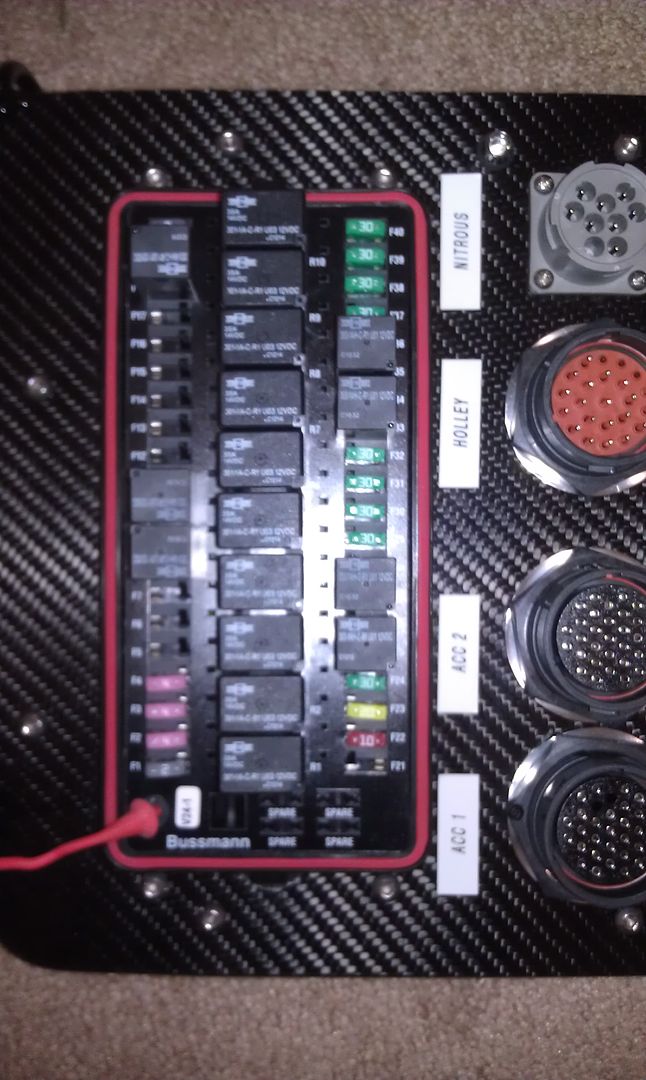
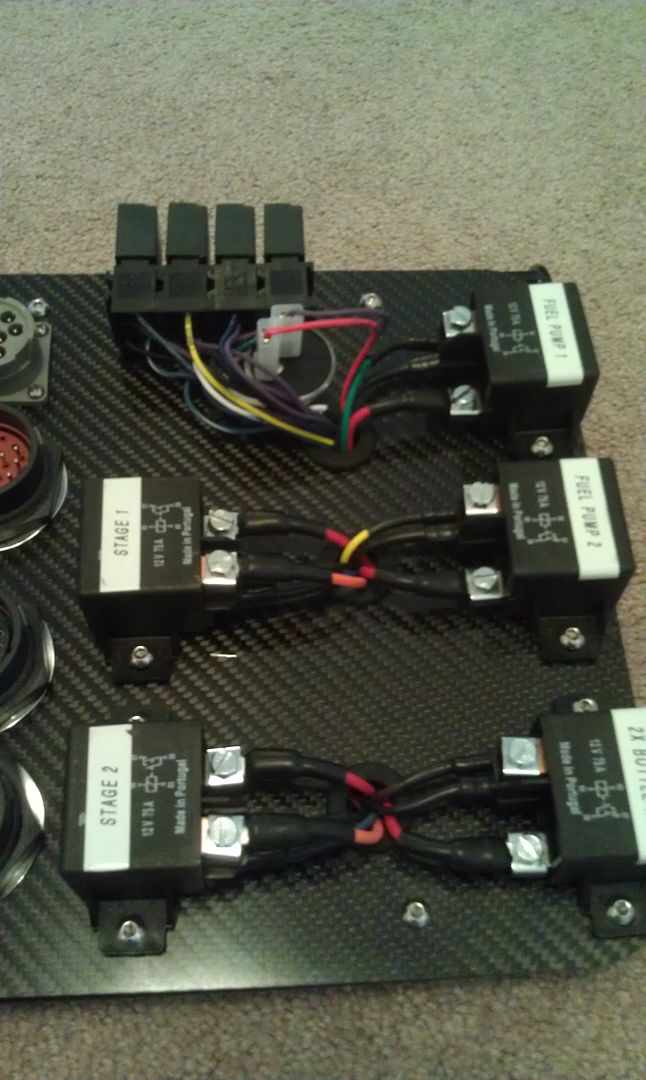
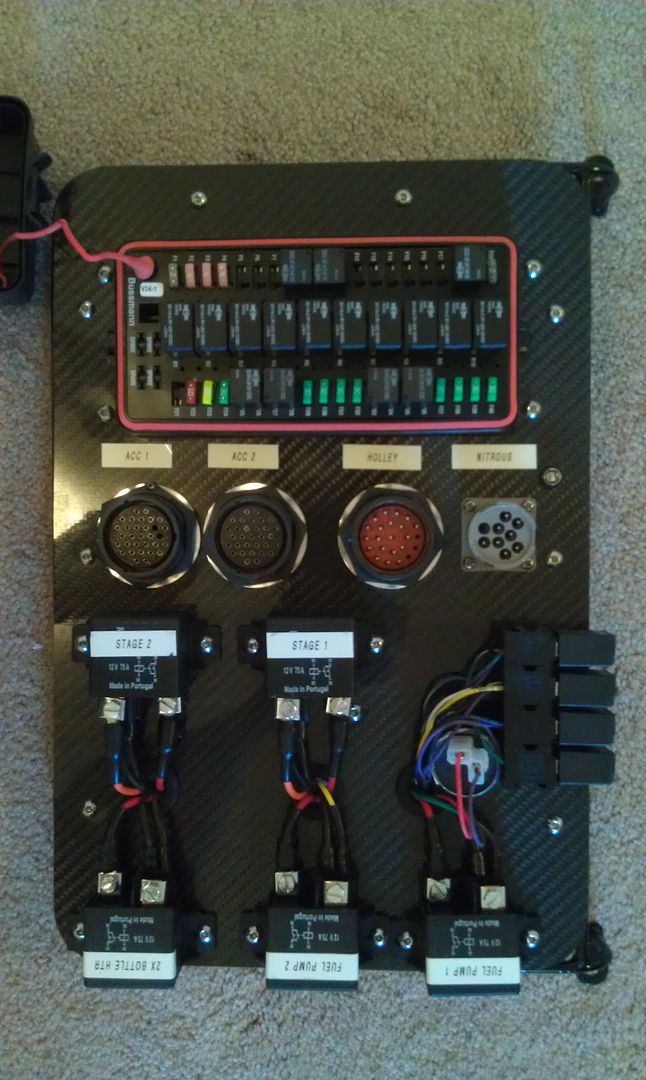
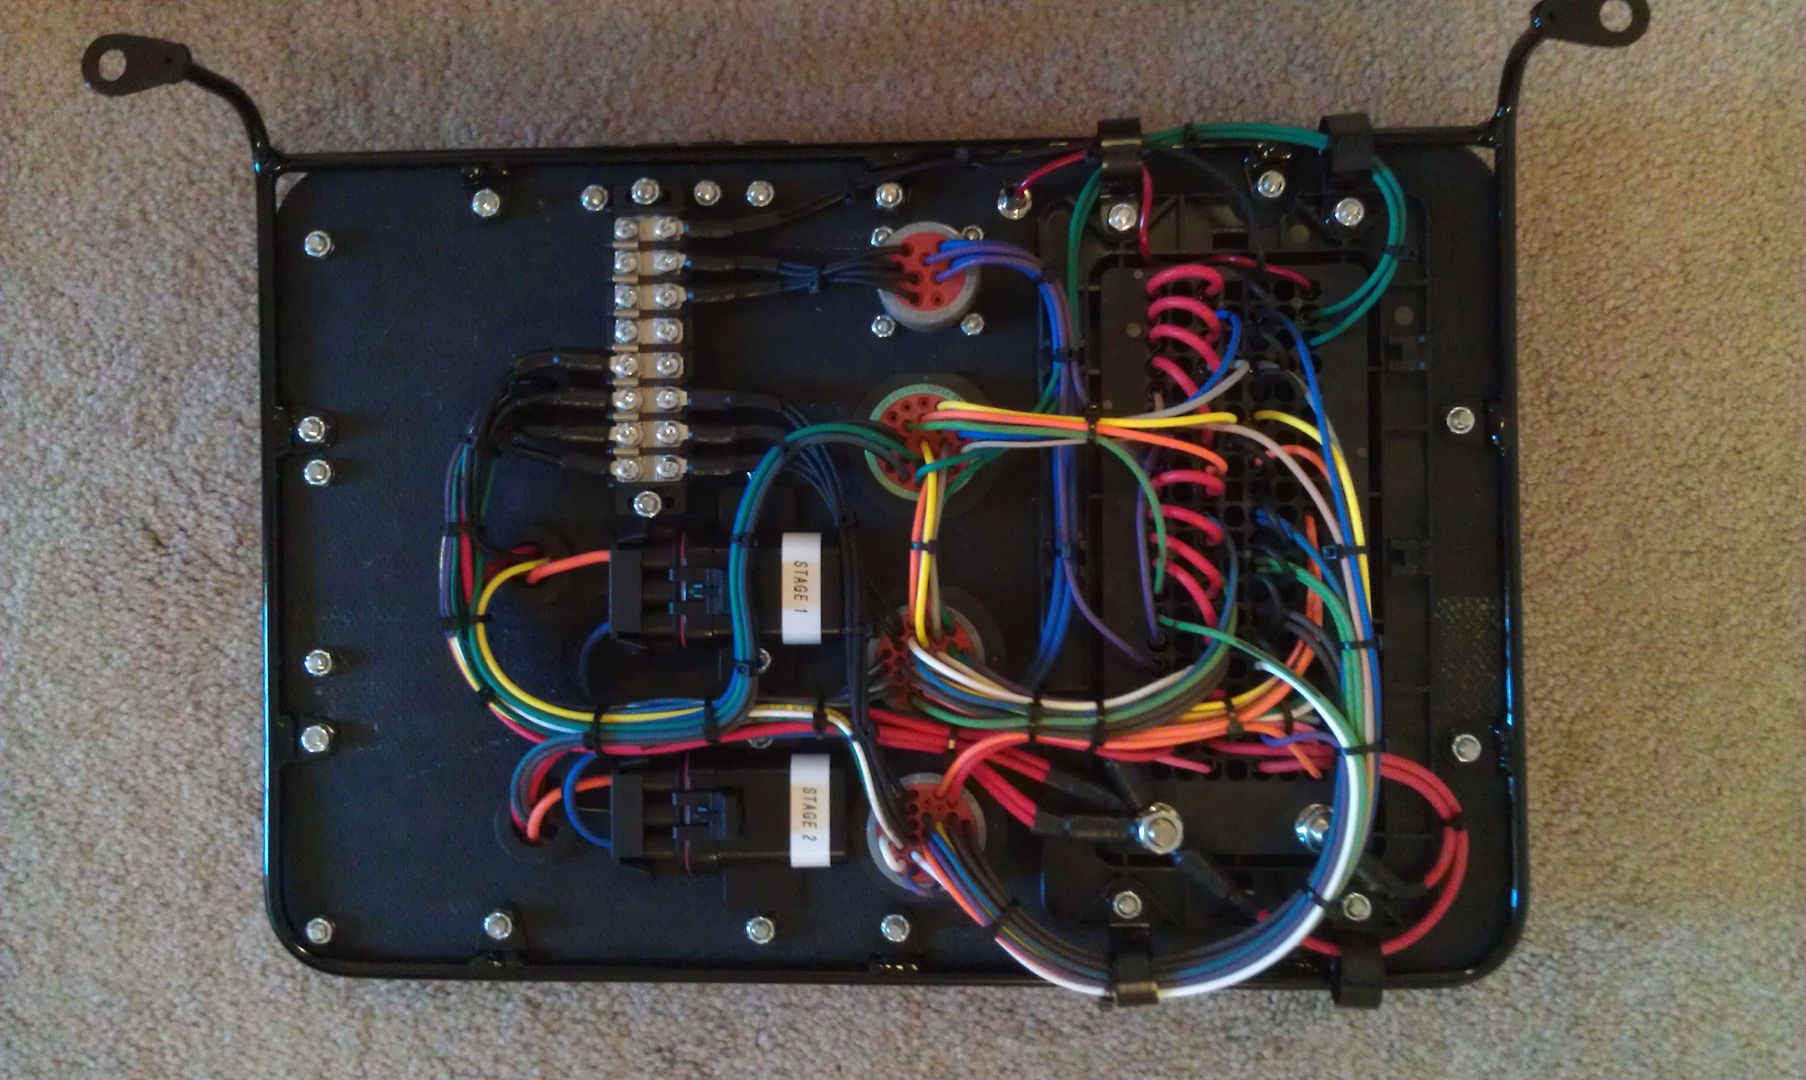
I also ordered a Fuse/Relay Panel from Racewire Solutions....( www.racewiresolutions.com )
Complete bumper to bumper wiring included...and I mean Everything... Headlights/Tail Lights/Hazzards/Turn Signals...all my relays for Nitrous solenoids(with Holley Progressive Drivers), fuel pumps, line lock, meth pump and solenoid, plus a whole slew of other inputs and outputs from the Holley and for the transmission
This Should keep everything nice and Clean... one bundle of wires to the Holley, one Bundle of wires to the Trans Controller, one bundle of wires to the dash, one to the engine, a separate one to the nitrous stuff...bundles to go to the front and to the rear...
Brian was one of the nicest guys to deal with... he's one of the few people in the automotive industry that actually understand what good customer service is...
I have nothing but Good things to say about him, and his product...
He asked questions about anything and everything to be able to design this to suit my needs and when I called him to ask about adding or changing something after I had thought about it all night....he was more than willing to make the change...his answer was always "that is no problem"
Last edited by soundengineer; 12-02-2012 at 12:06 PM.
12-01-2012, 10:11 PM
#3
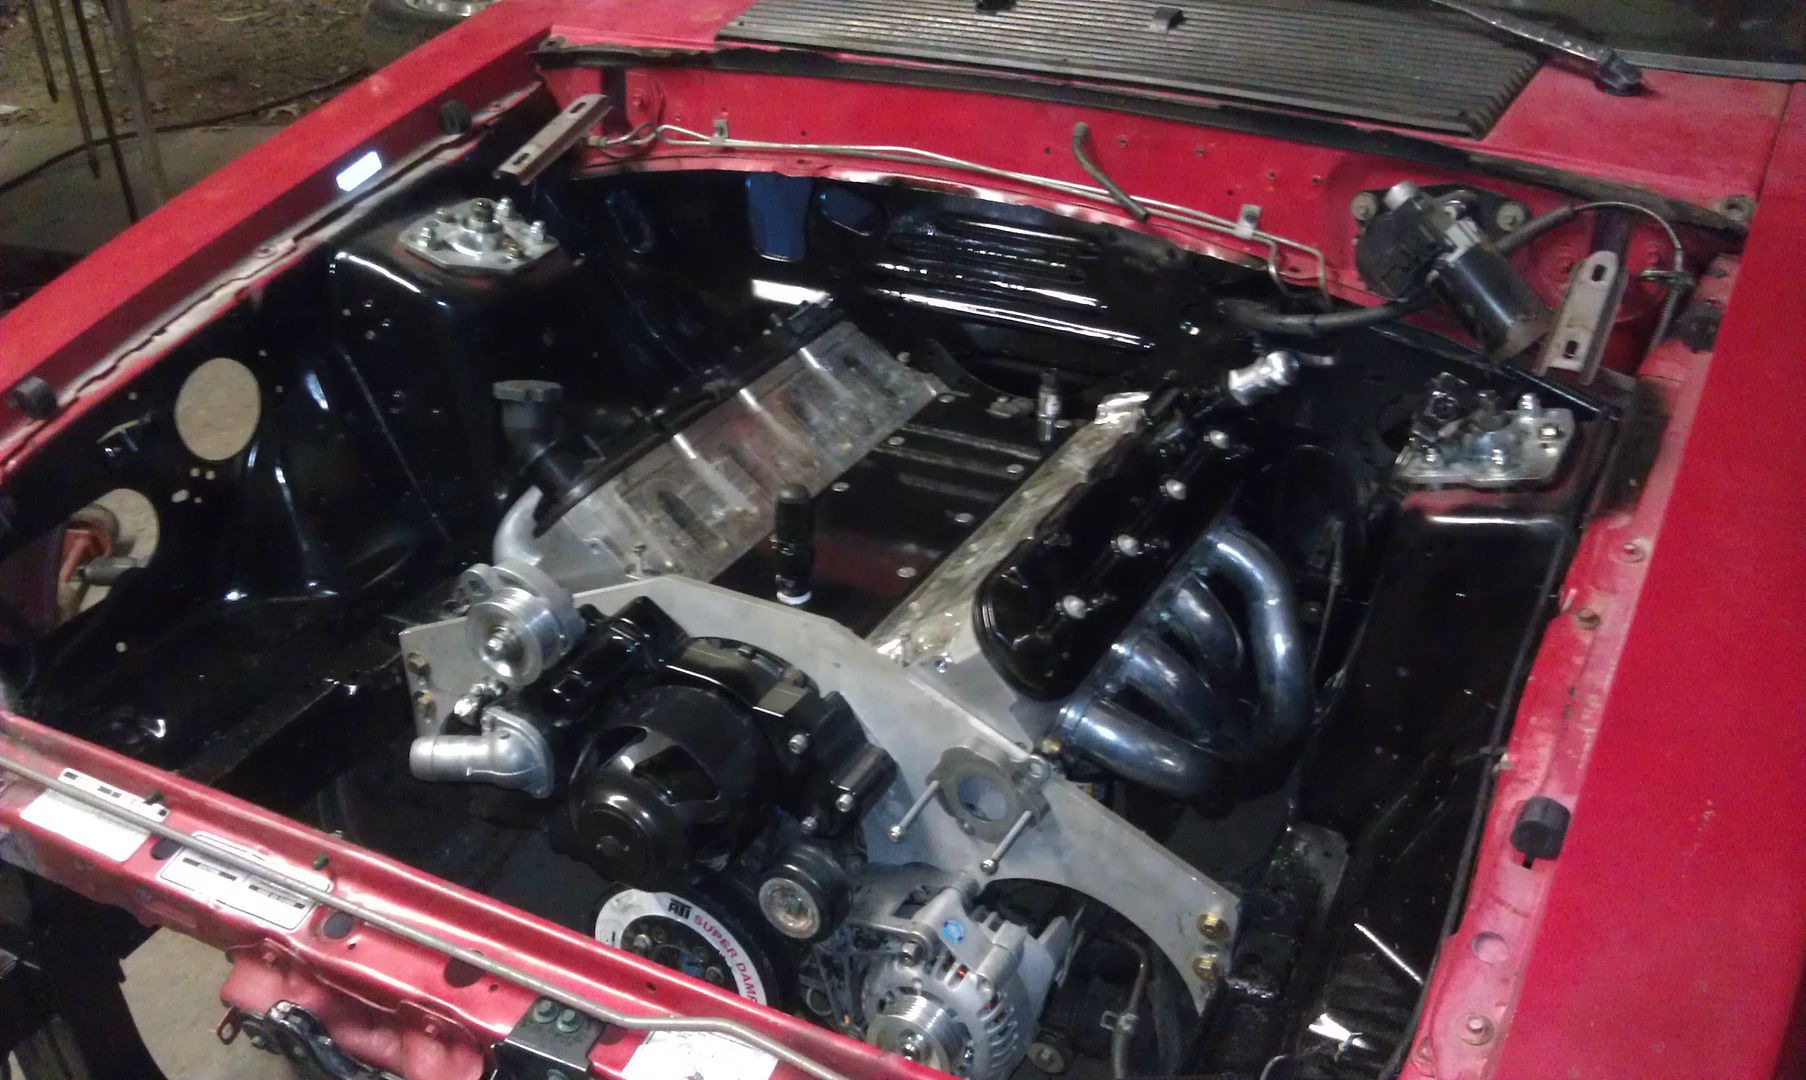
started with a little cutting, gutting, assembly and welding...
Gutting of the interior.....and Removal of the Sound Deadening material

and a quick shot of Black Paint...

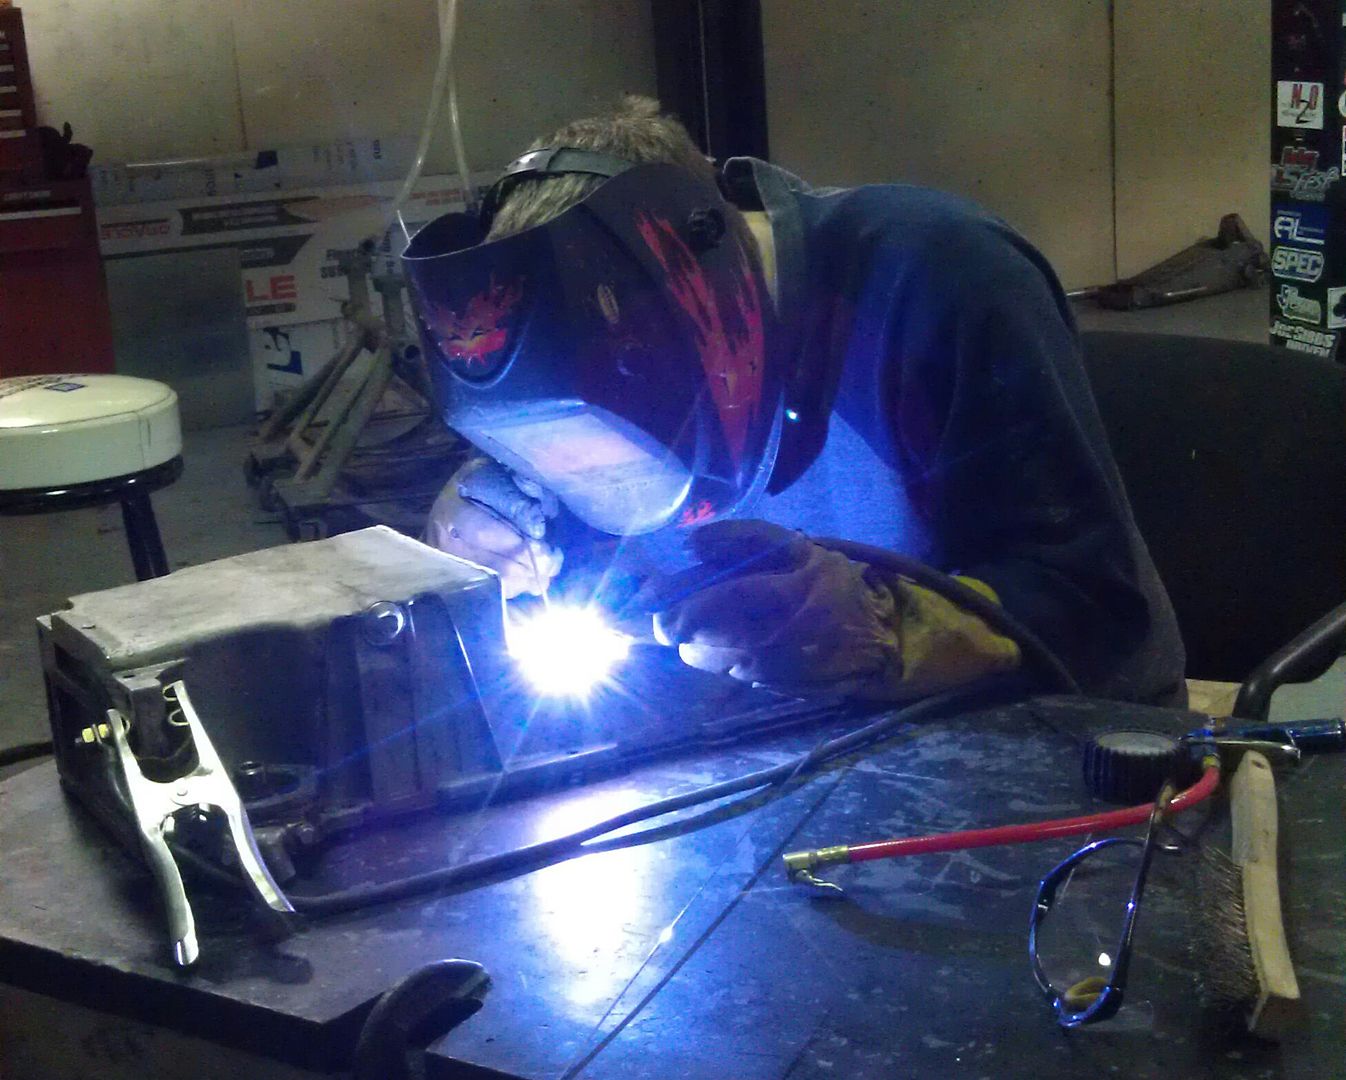
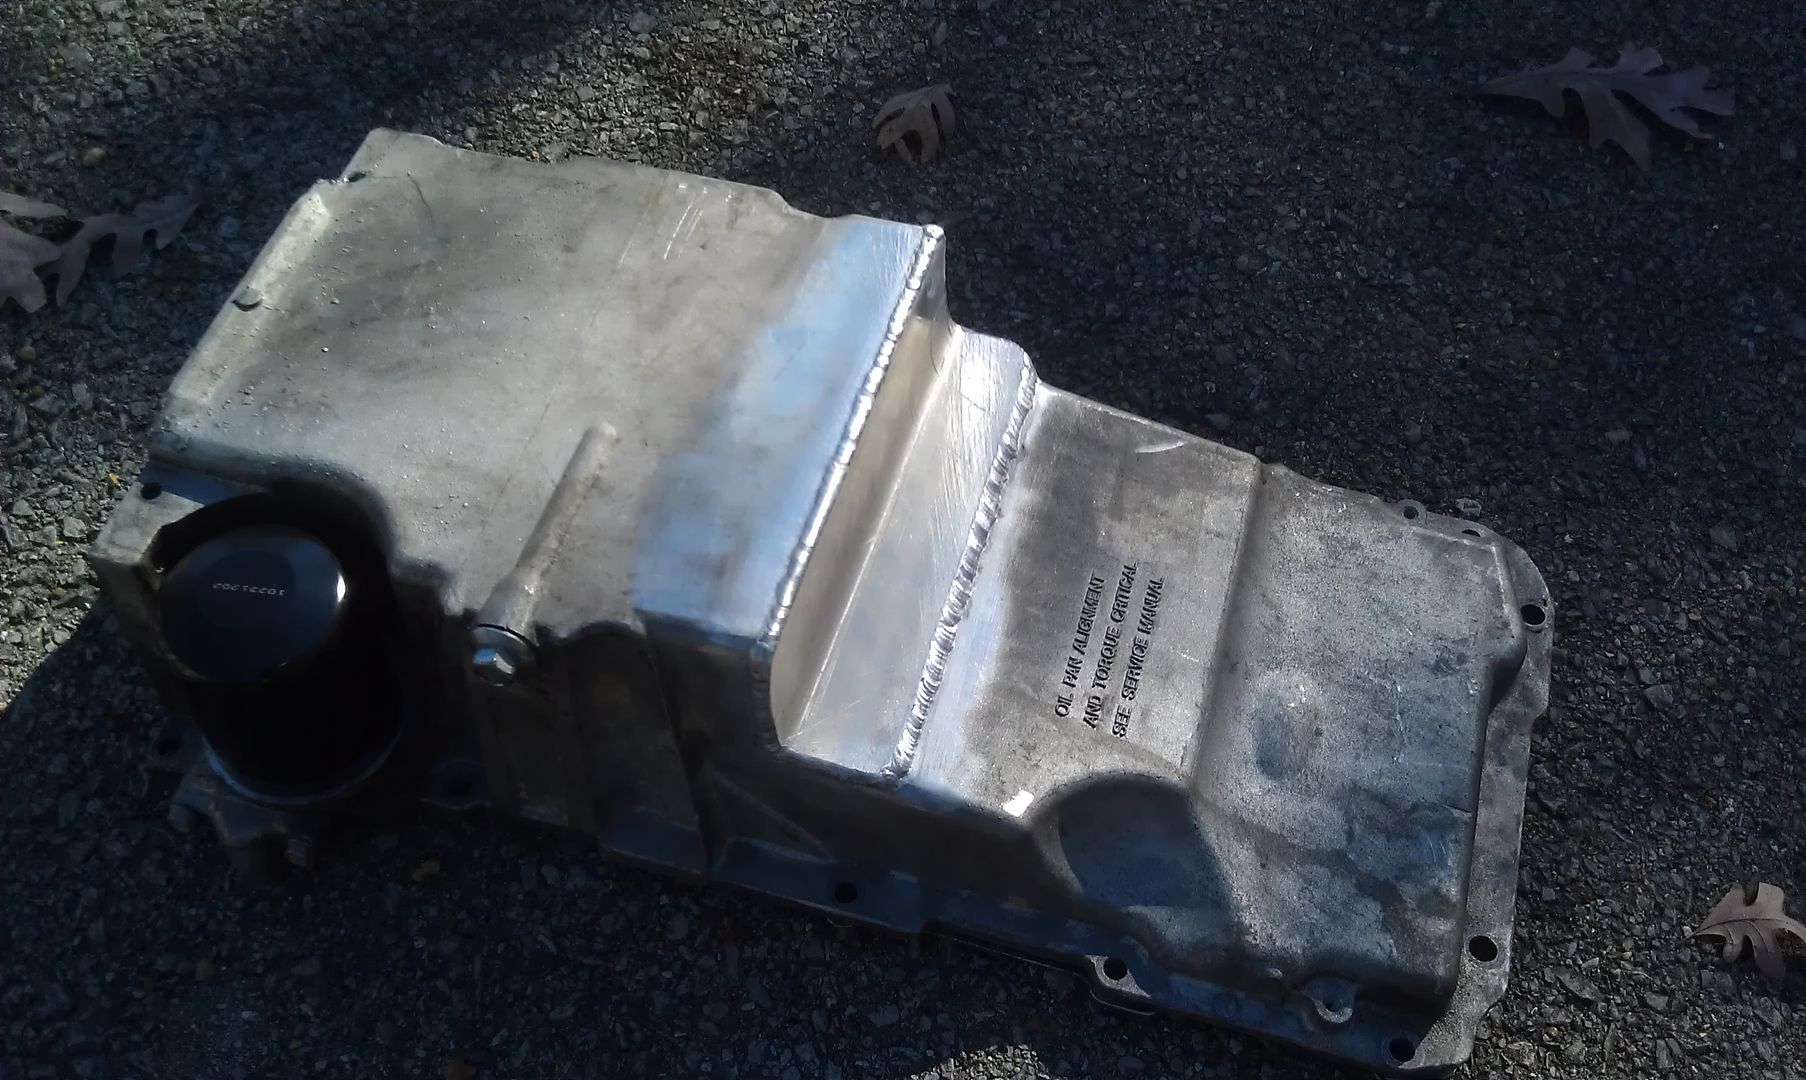
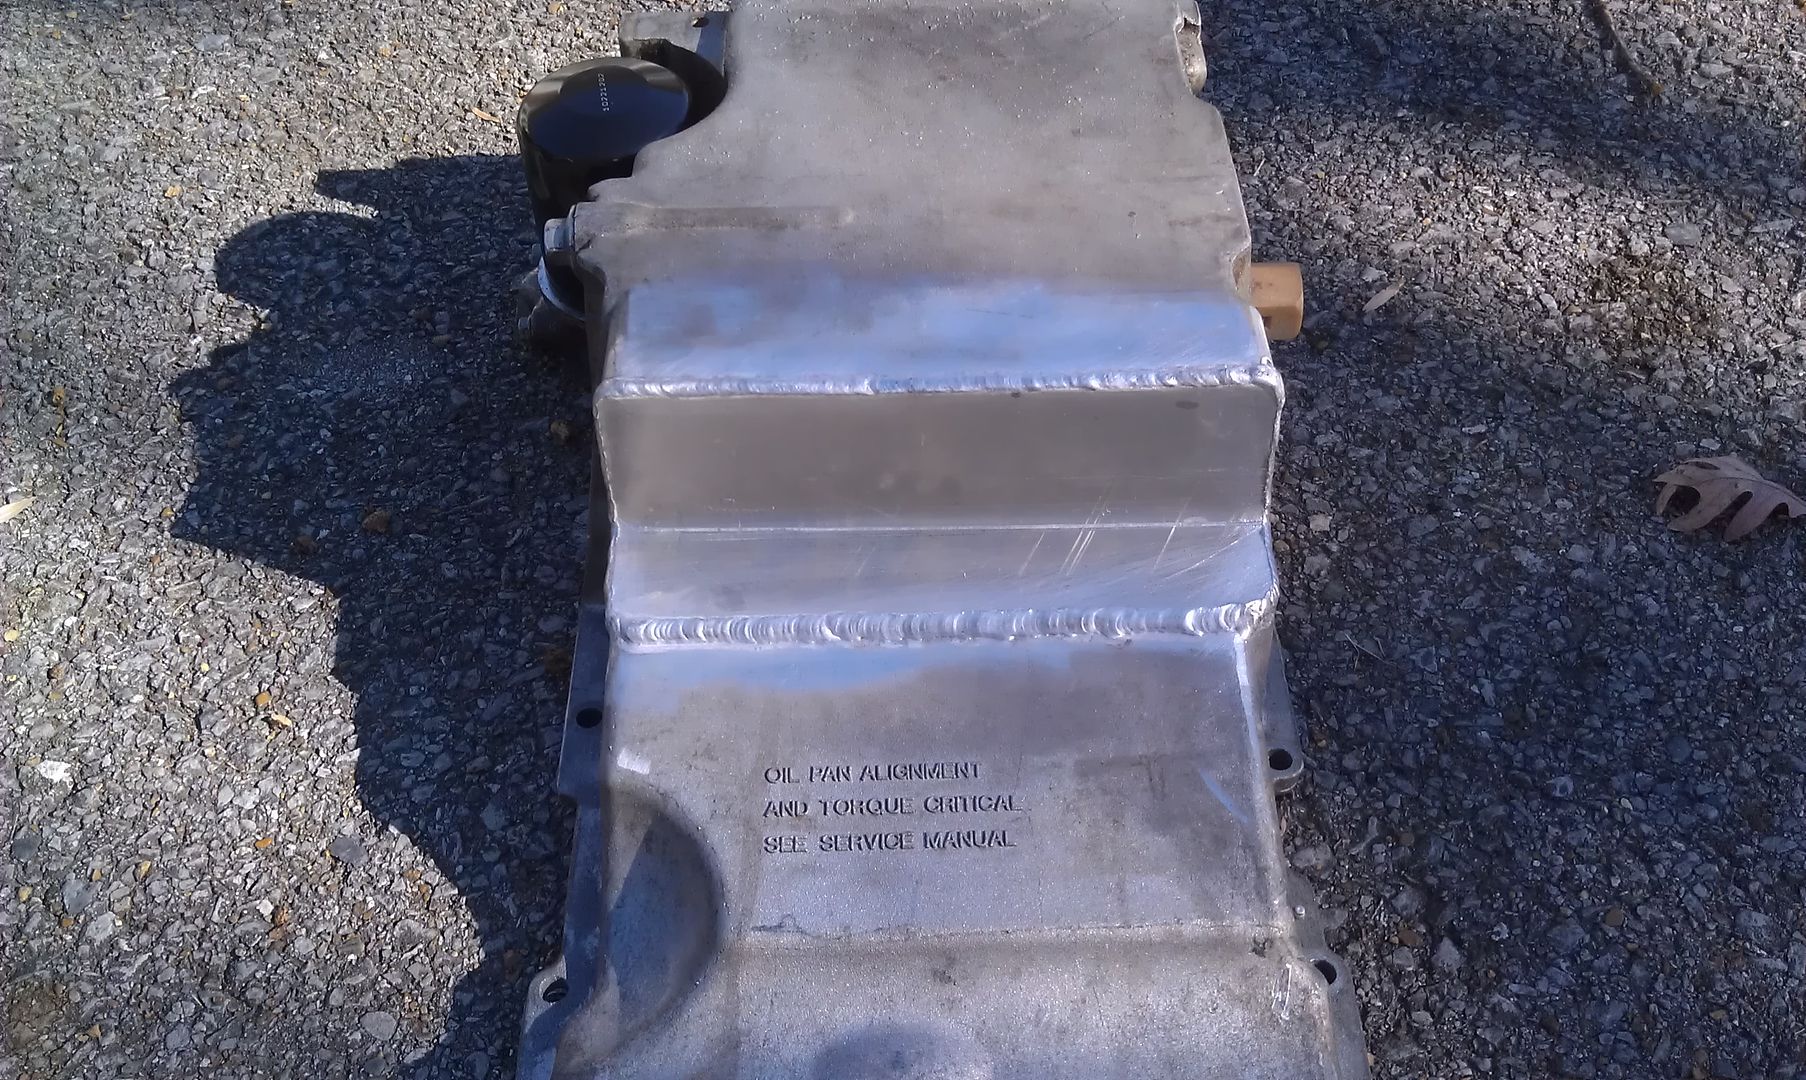
fabbing up the stock Fbody oil pan to clear the K-member
Some Torque Box Enforcement plate install... I also welded them in after I was done
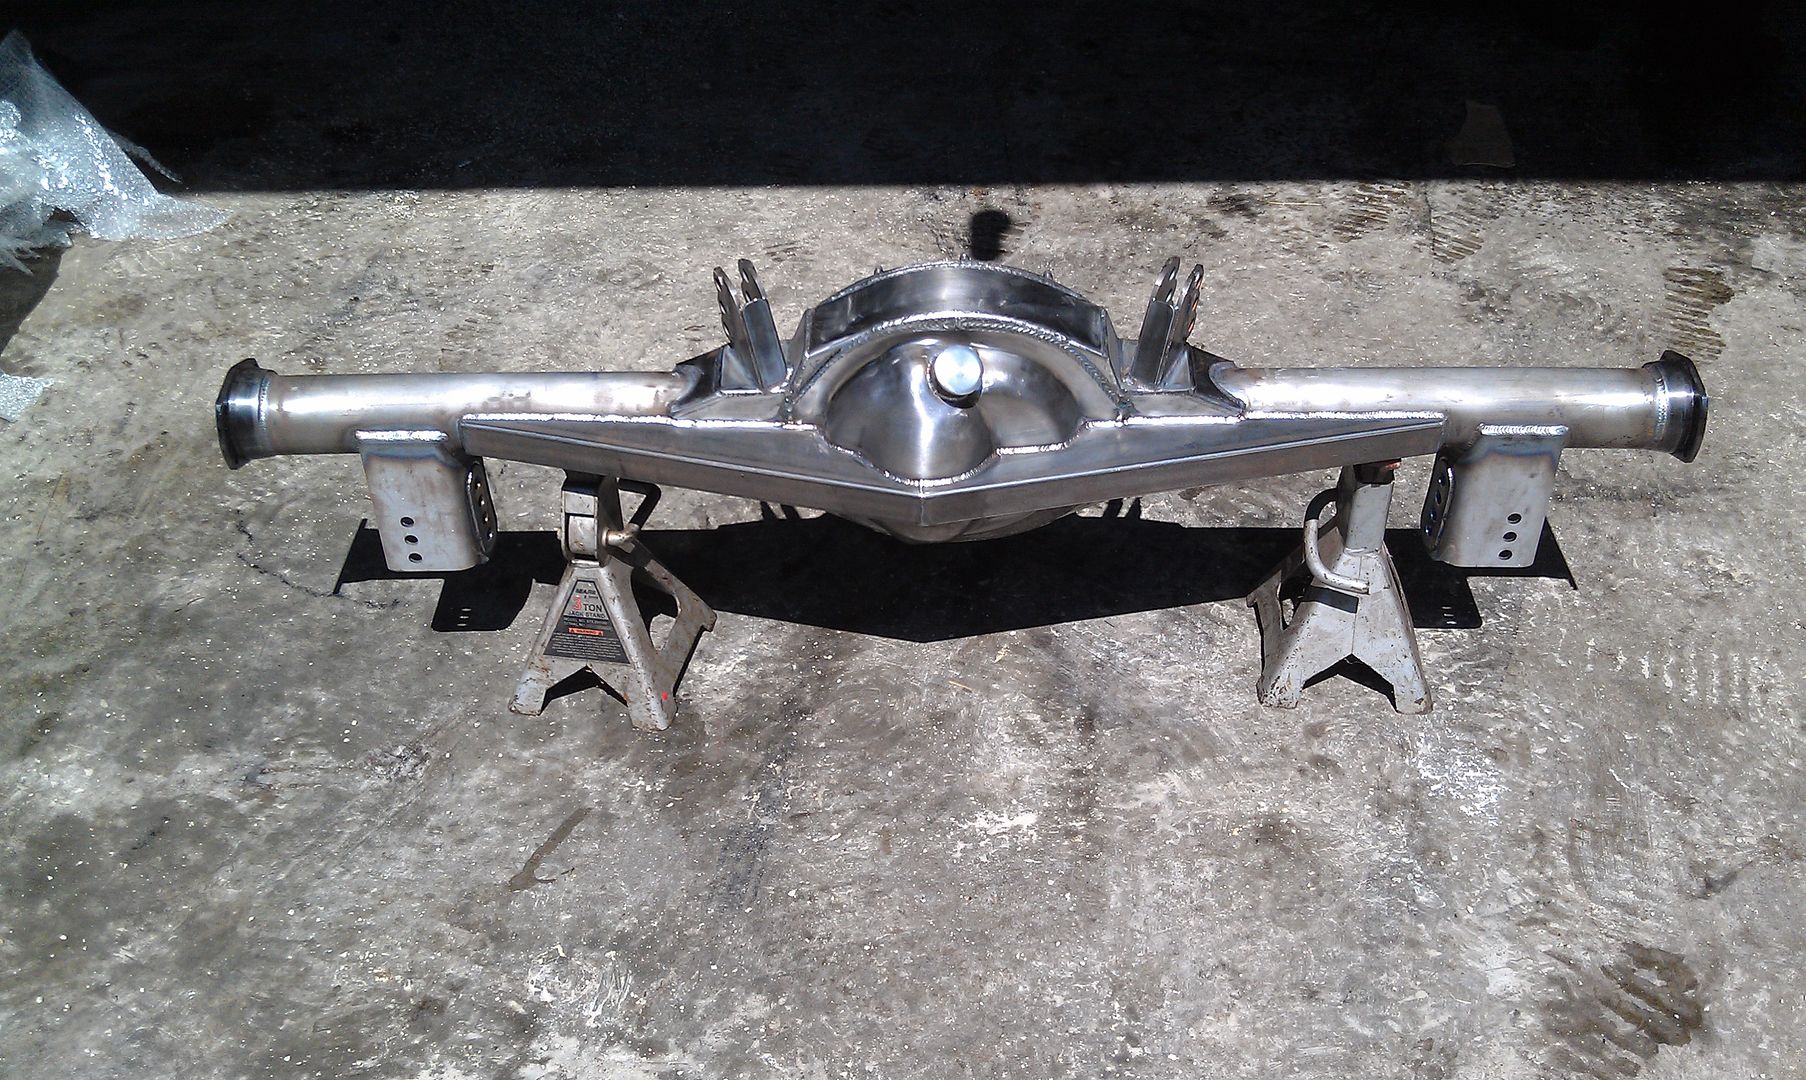
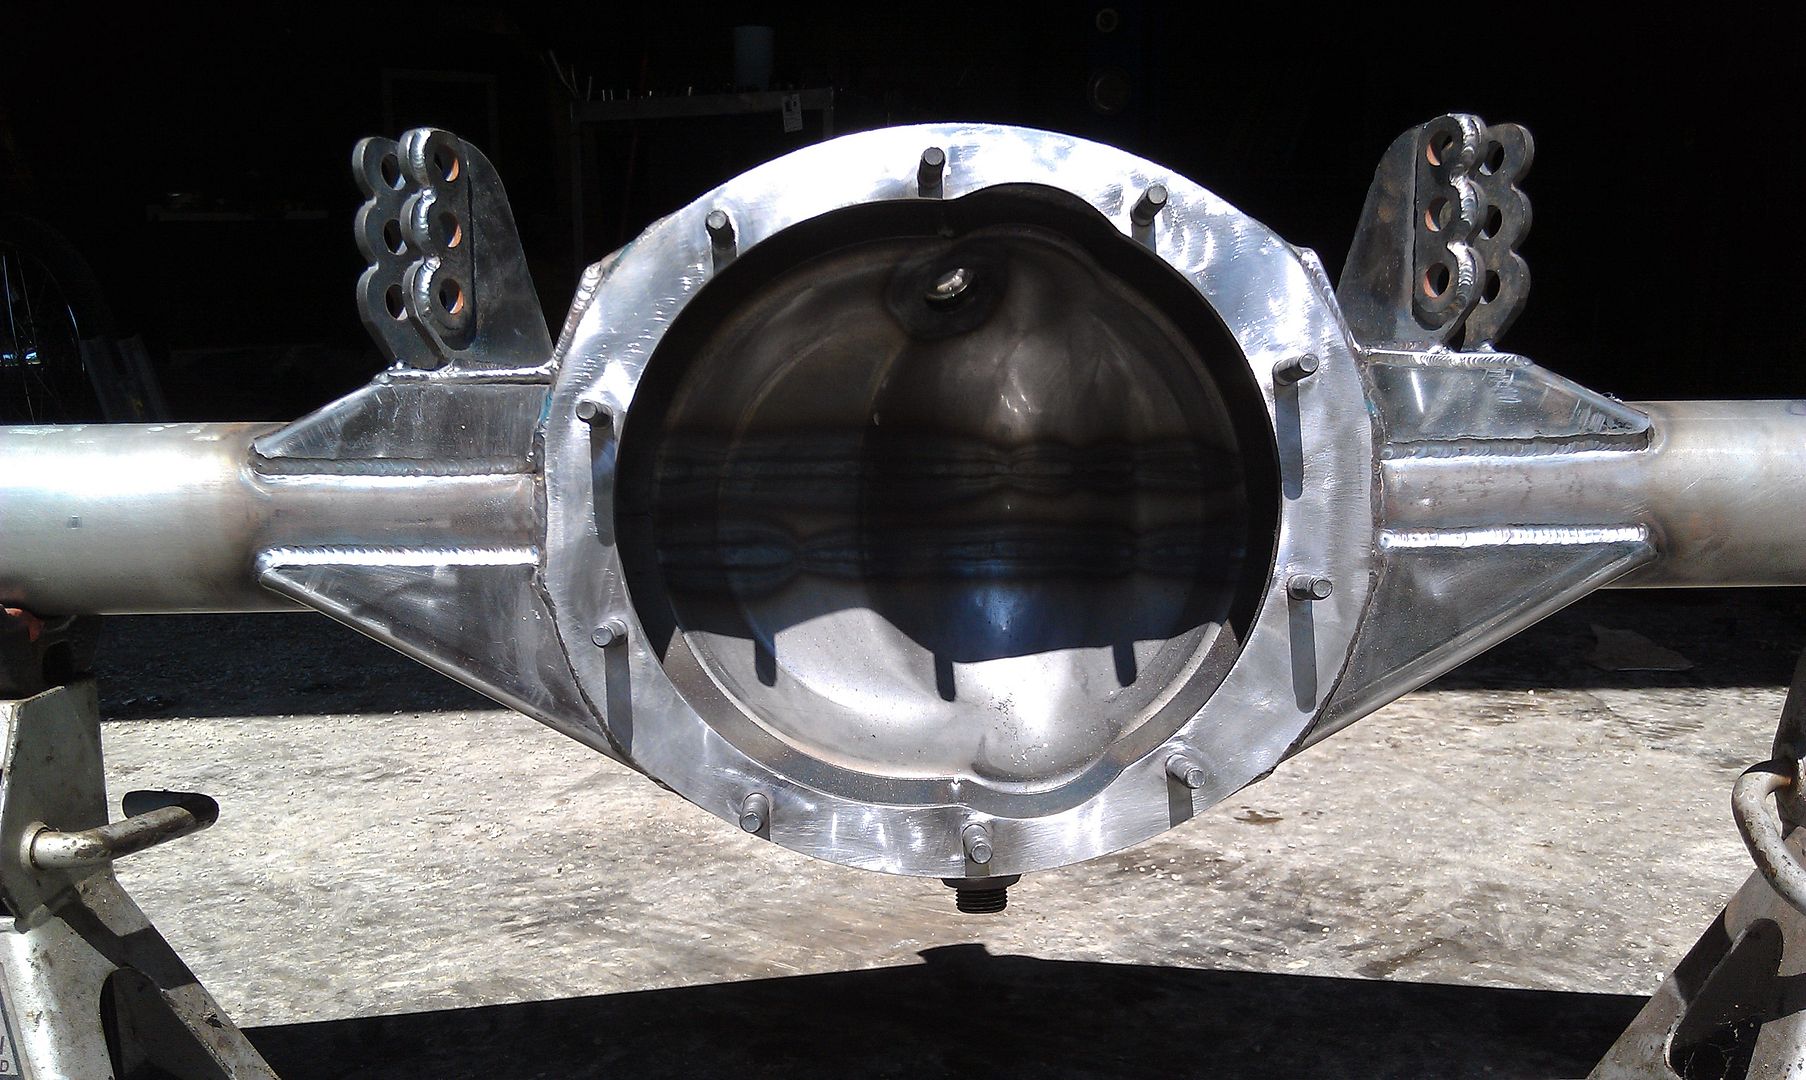
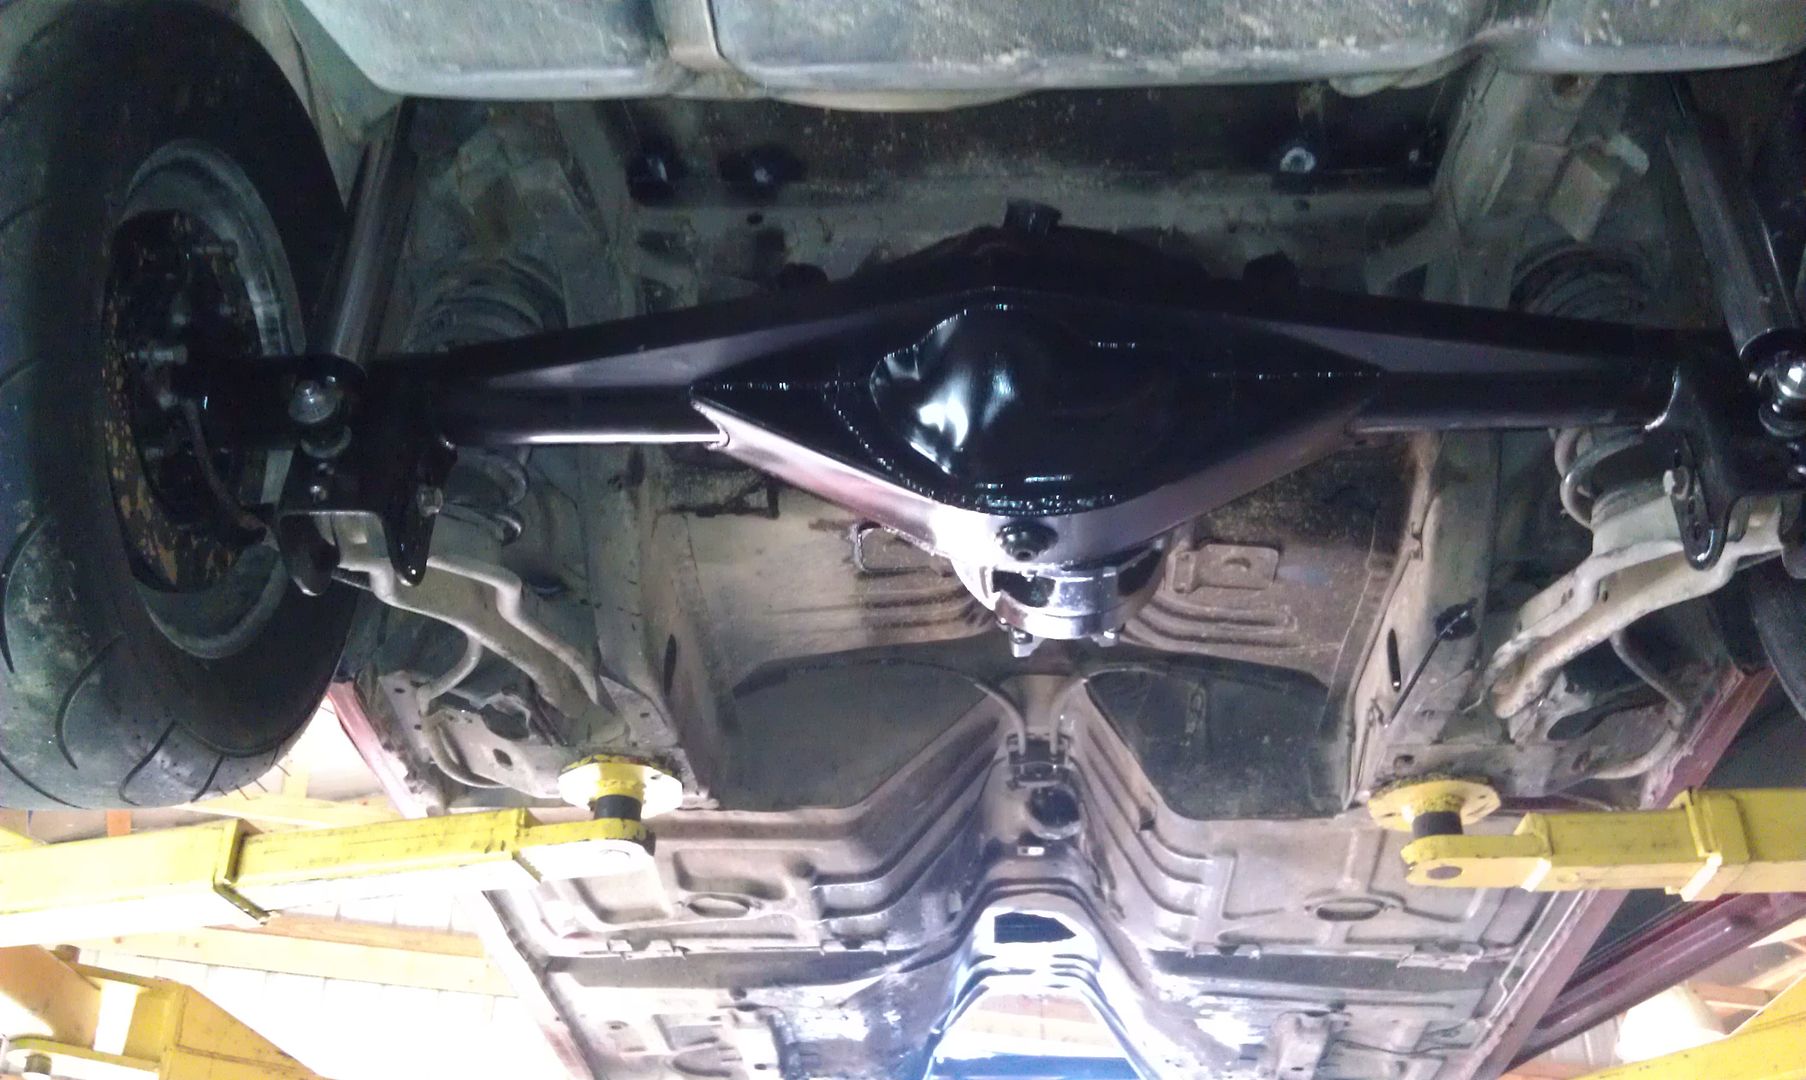
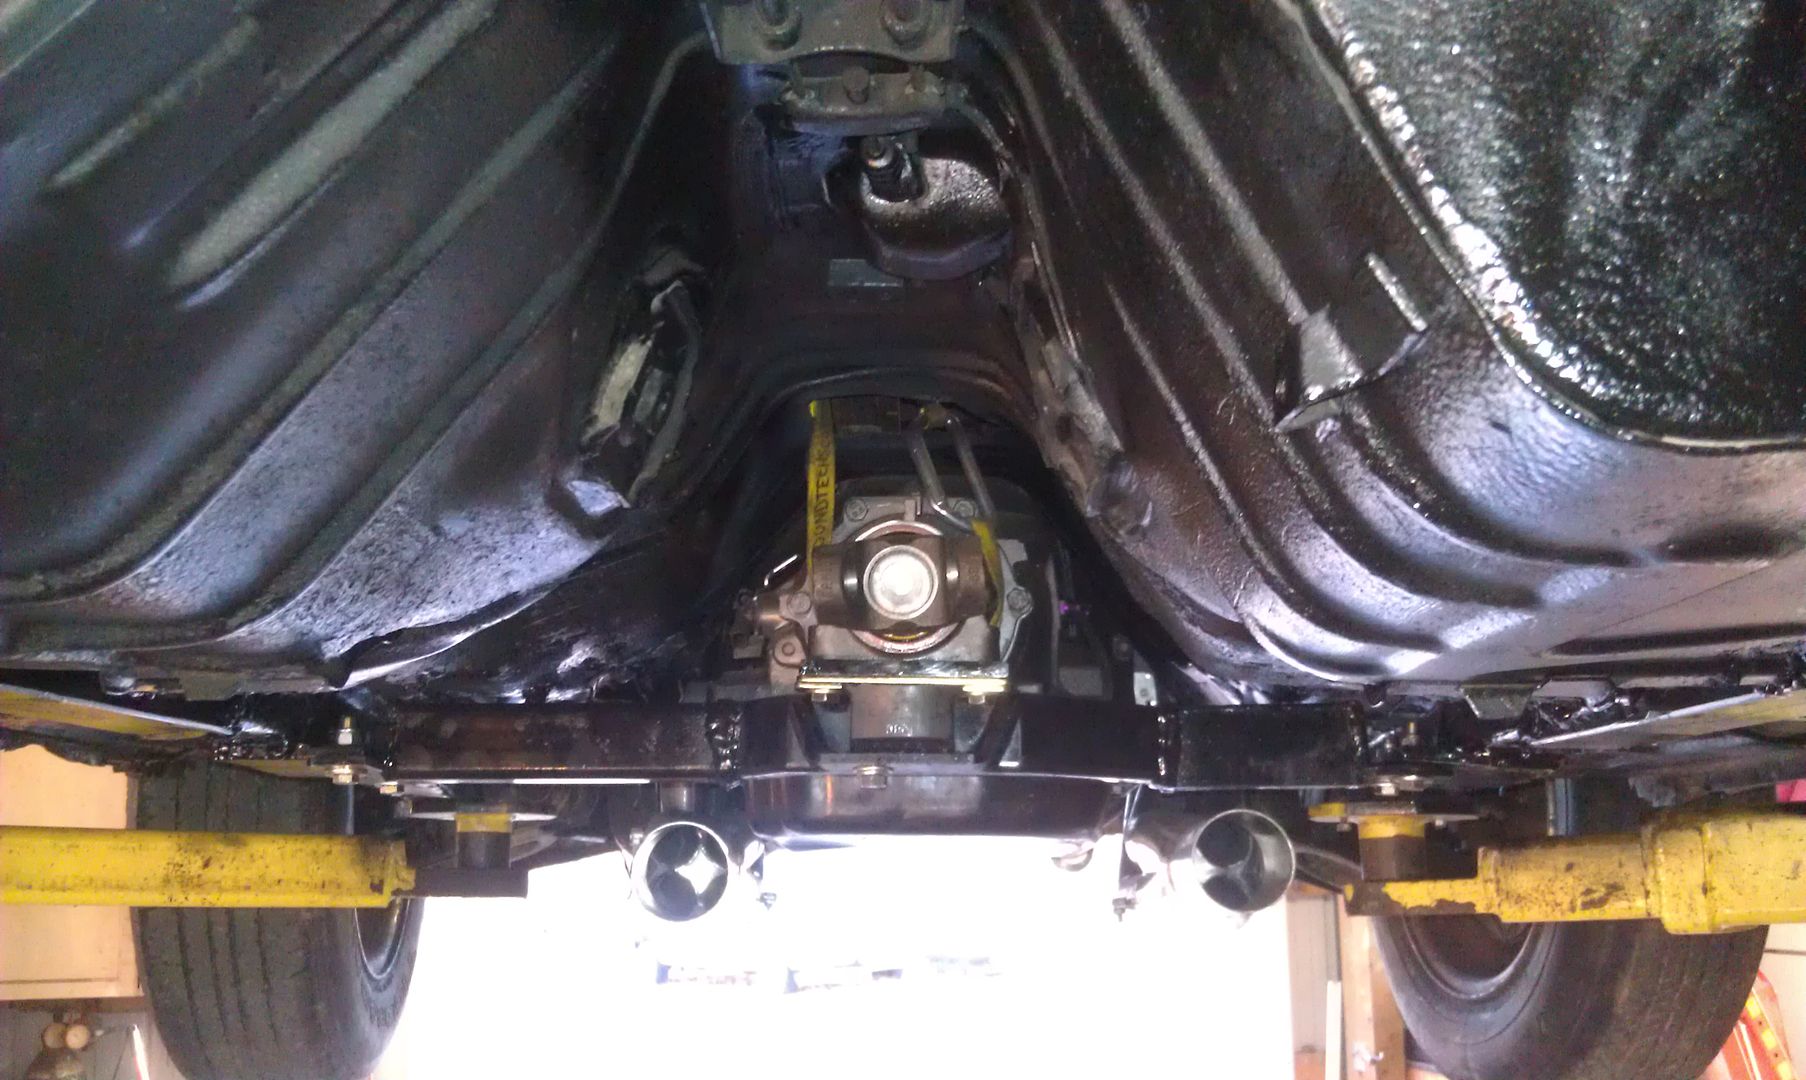
assembled the 9"...Detroit Locker, 3.50 gear, 35 spline Axles...Gm 5x4.75 Bolt pattern

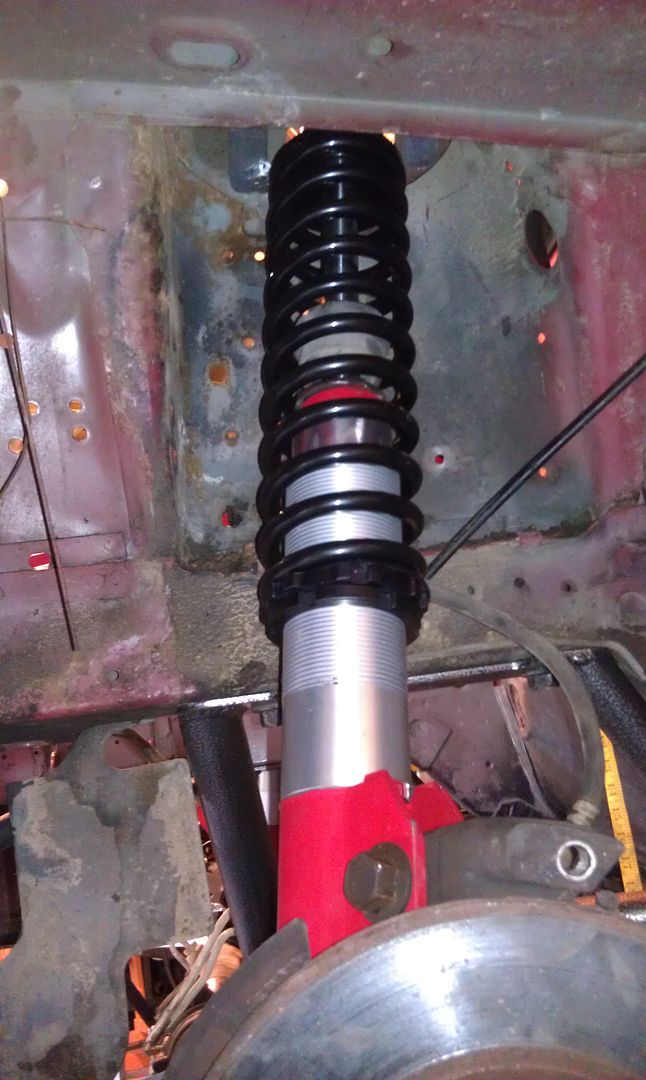
and Installed it...using the Stock Lower Control arms for now, and using Team-Z adjustable uppers made for the rearend.

I was able to Re-use my Qa1's from my camaro....
the Mustangs Use the same series, same style...part # is one digit off....
everything is identical except for the mustang shocks have another 1/2" of maximum travel...I wont miss the 1/2".. so.......
brackets that the Motor plate will bolt to...

I bolted the Motor plate, Motor, Headers, Midplate, and Transmission together to drop it into the car as one giant piece...
many thanks to a buddy of mine who told me to do it this way and then helped me to get it in the car


Gutting of the interior.....and Removal of the Sound Deadening material
and a quick shot of Black Paint...
fabbing up the stock Fbody oil pan to clear the K-member
Some Torque Box Enforcement plate install... I also welded them in after I was done
assembled the 9"...Detroit Locker, 3.50 gear, 35 spline Axles...Gm 5x4.75 Bolt pattern
and Installed it...using the Stock Lower Control arms for now, and using Team-Z adjustable uppers made for the rearend.
I was able to Re-use my Qa1's from my camaro....
the Mustangs Use the same series, same style...part # is one digit off....
everything is identical except for the mustang shocks have another 1/2" of maximum travel...I wont miss the 1/2".. so.......
brackets that the Motor plate will bolt to...
I bolted the Motor plate, Motor, Headers, Midplate, and Transmission together to drop it into the car as one giant piece...
many thanks to a buddy of mine who told me to do it this way and then helped me to get it in the car
12-01-2012, 10:12 PM
#4
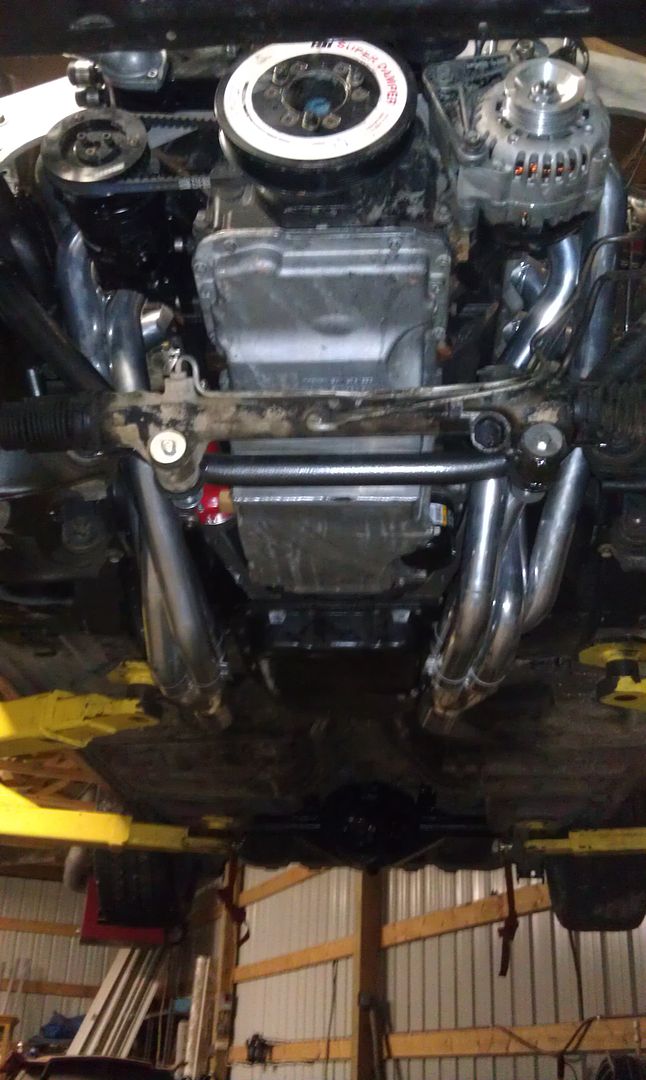
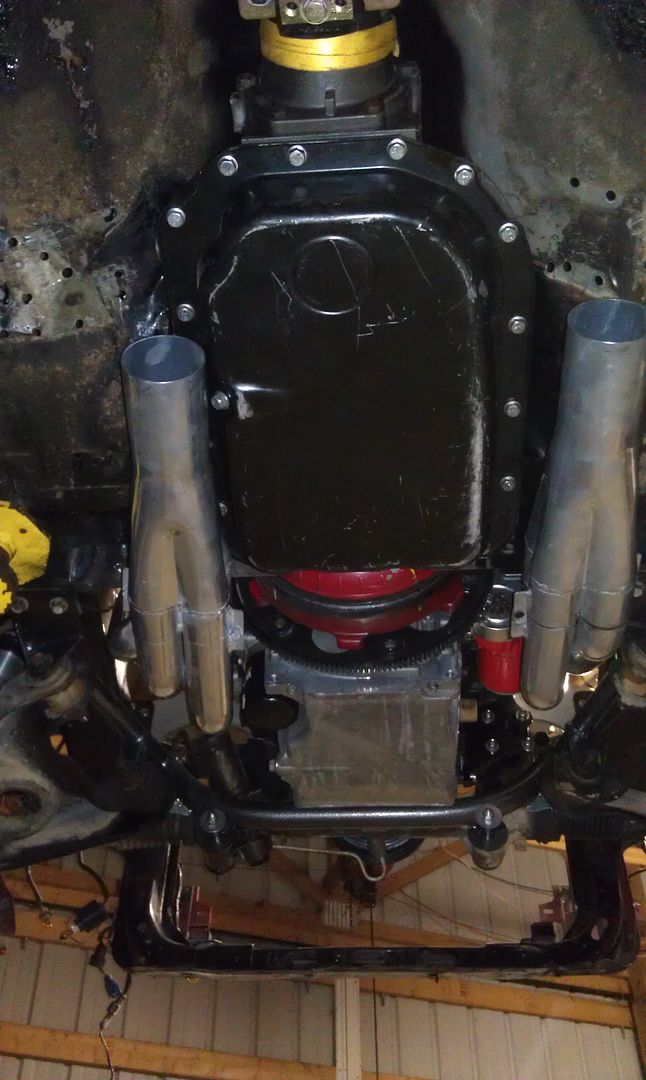
the 2 issues I immediately saw... were how low the headers hang....
BUT.....
I also realized that I had no pressure on the coil overs yet...
they were set as loose as they could go and just barely not have slack....
so setting them tighter to get ride height correct will bring the car up a bit and create more ground clearance
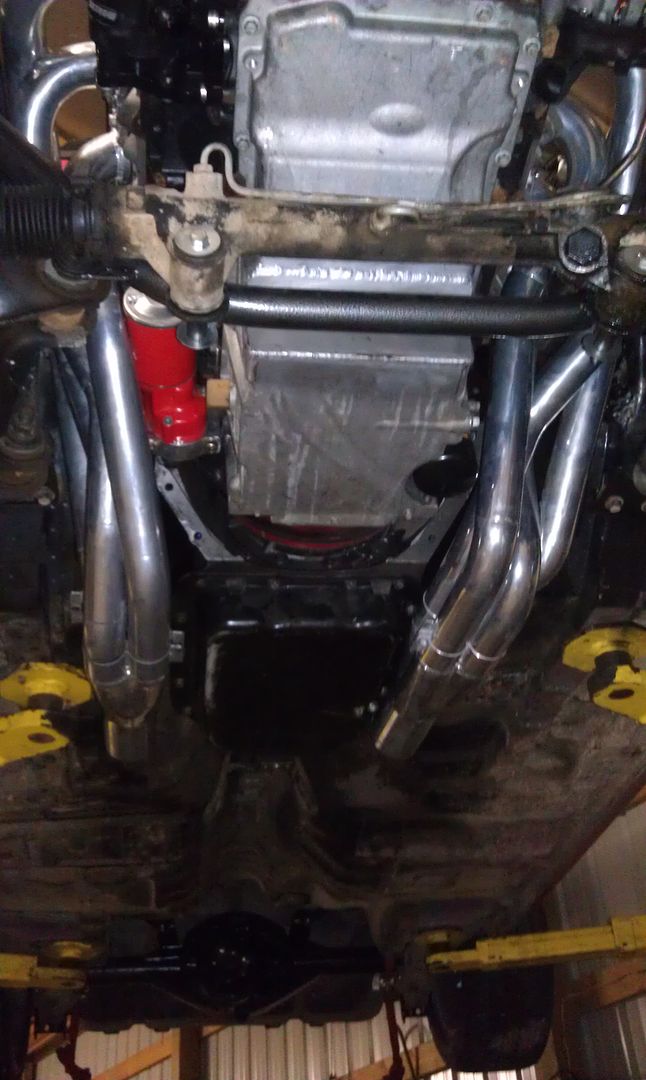
2nd issue, was that the headers come very close to the transmission pan...the drivers side is at such an angle that I almost cant get at the drain plug, and I would have a challenging time getting the shift linkage on.
but I came up with a solution...again, thanks to my buddy who made a great suggestion...
His suggestion was to "flex" the headers outward... he had done this previously on another vehicle that had header issues... they had actually used a hydraulic press to push them outwards and let them flex...the result was pushing them way out, allowed them to bend a little and when they let go, the headers had bent enough to allow more space....
so I did the same...only with a conventional scissor jack
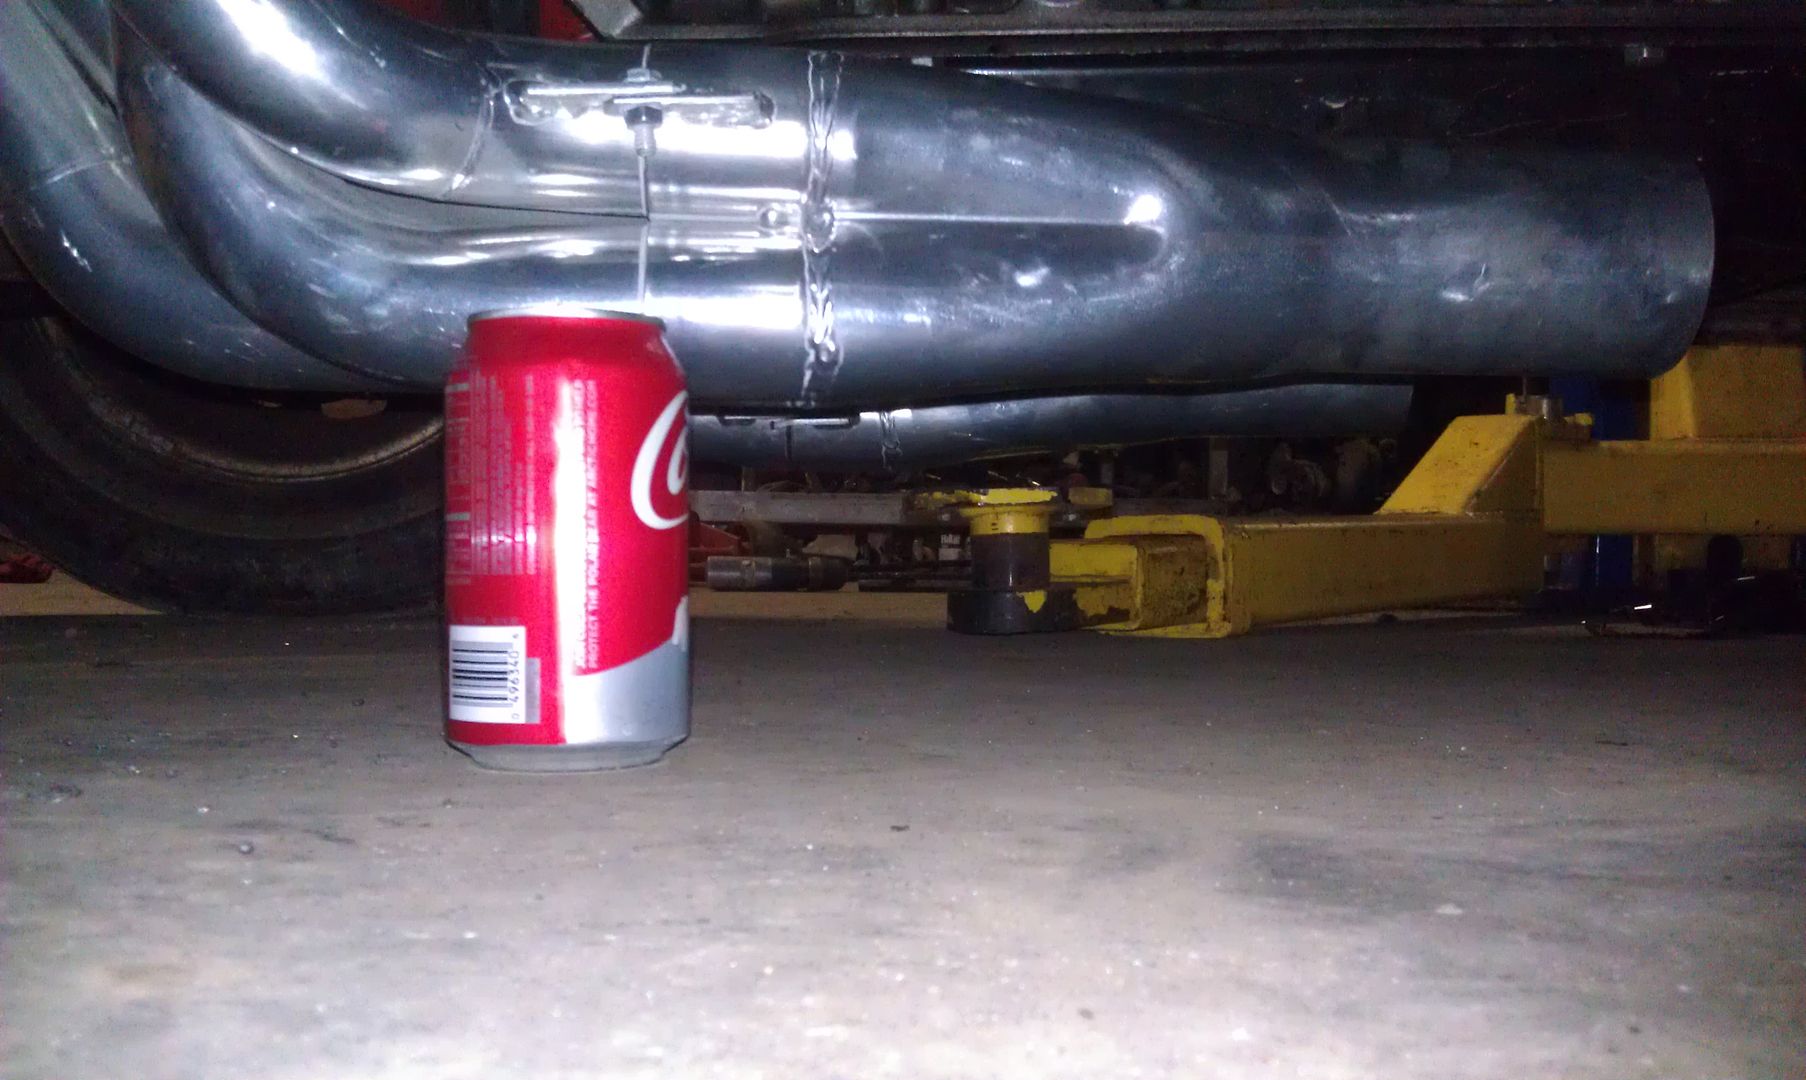
the result was that I now had some space where before it was pretty much touching the drain bolt.
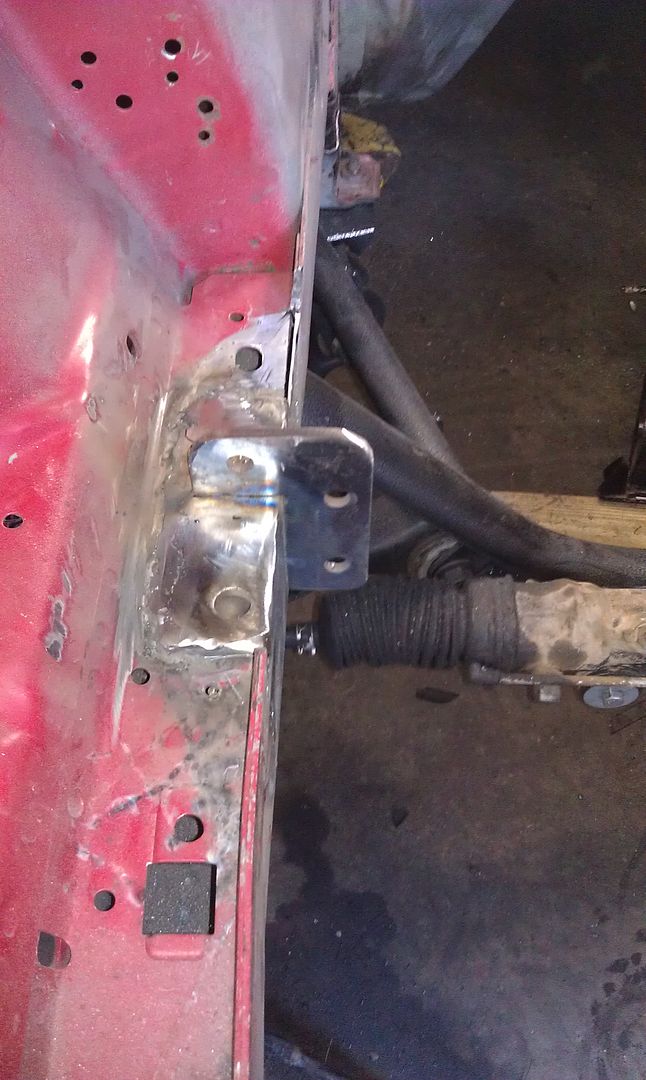
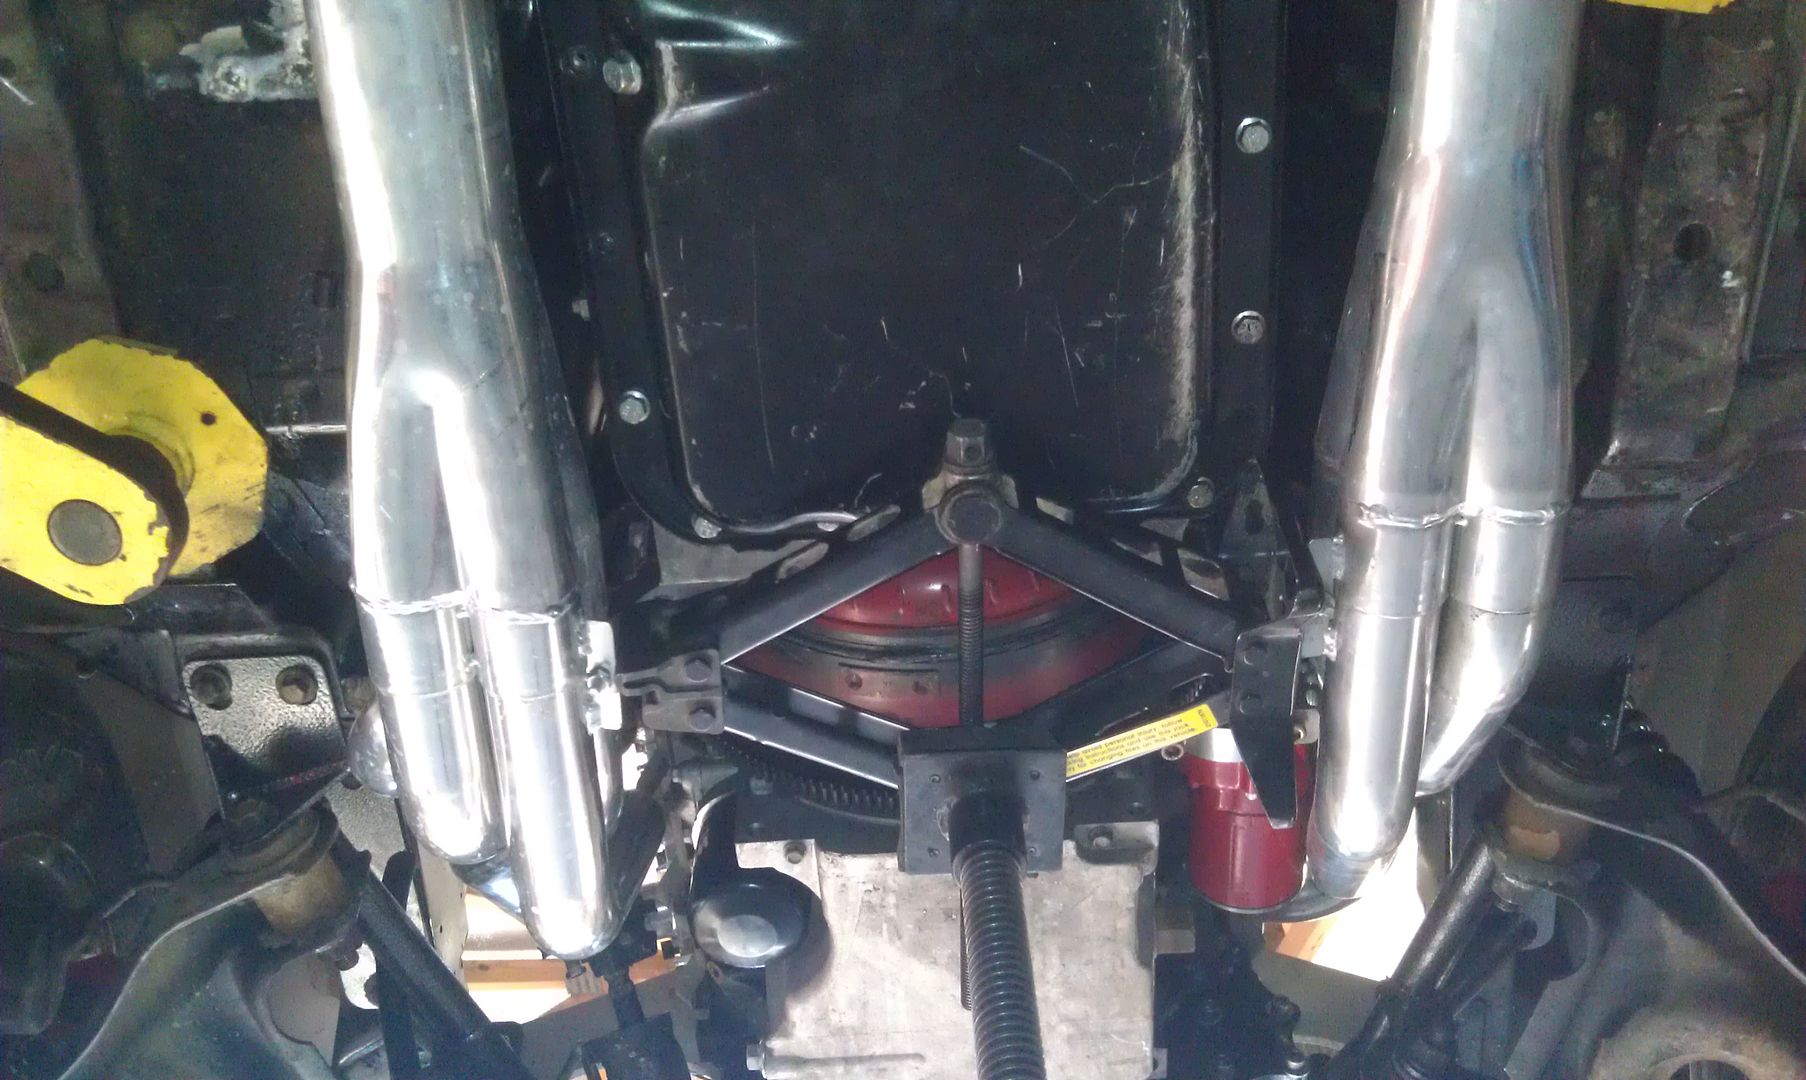
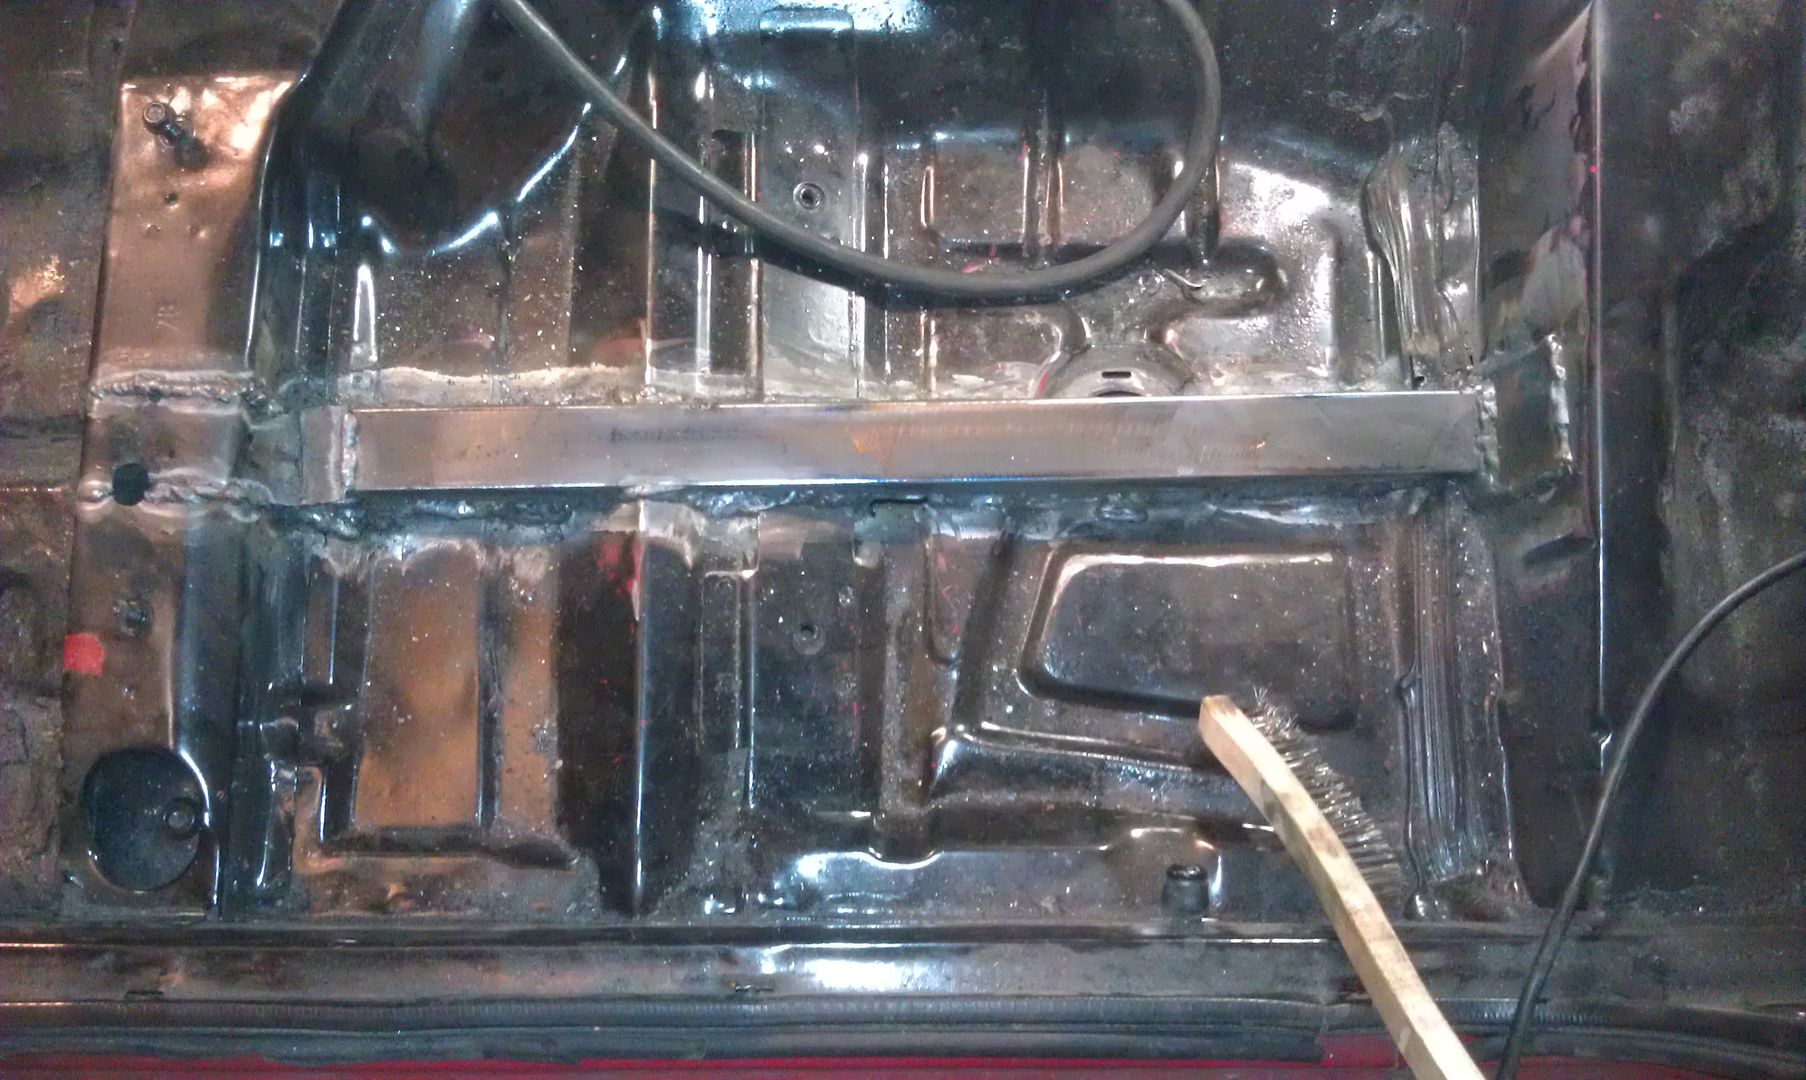
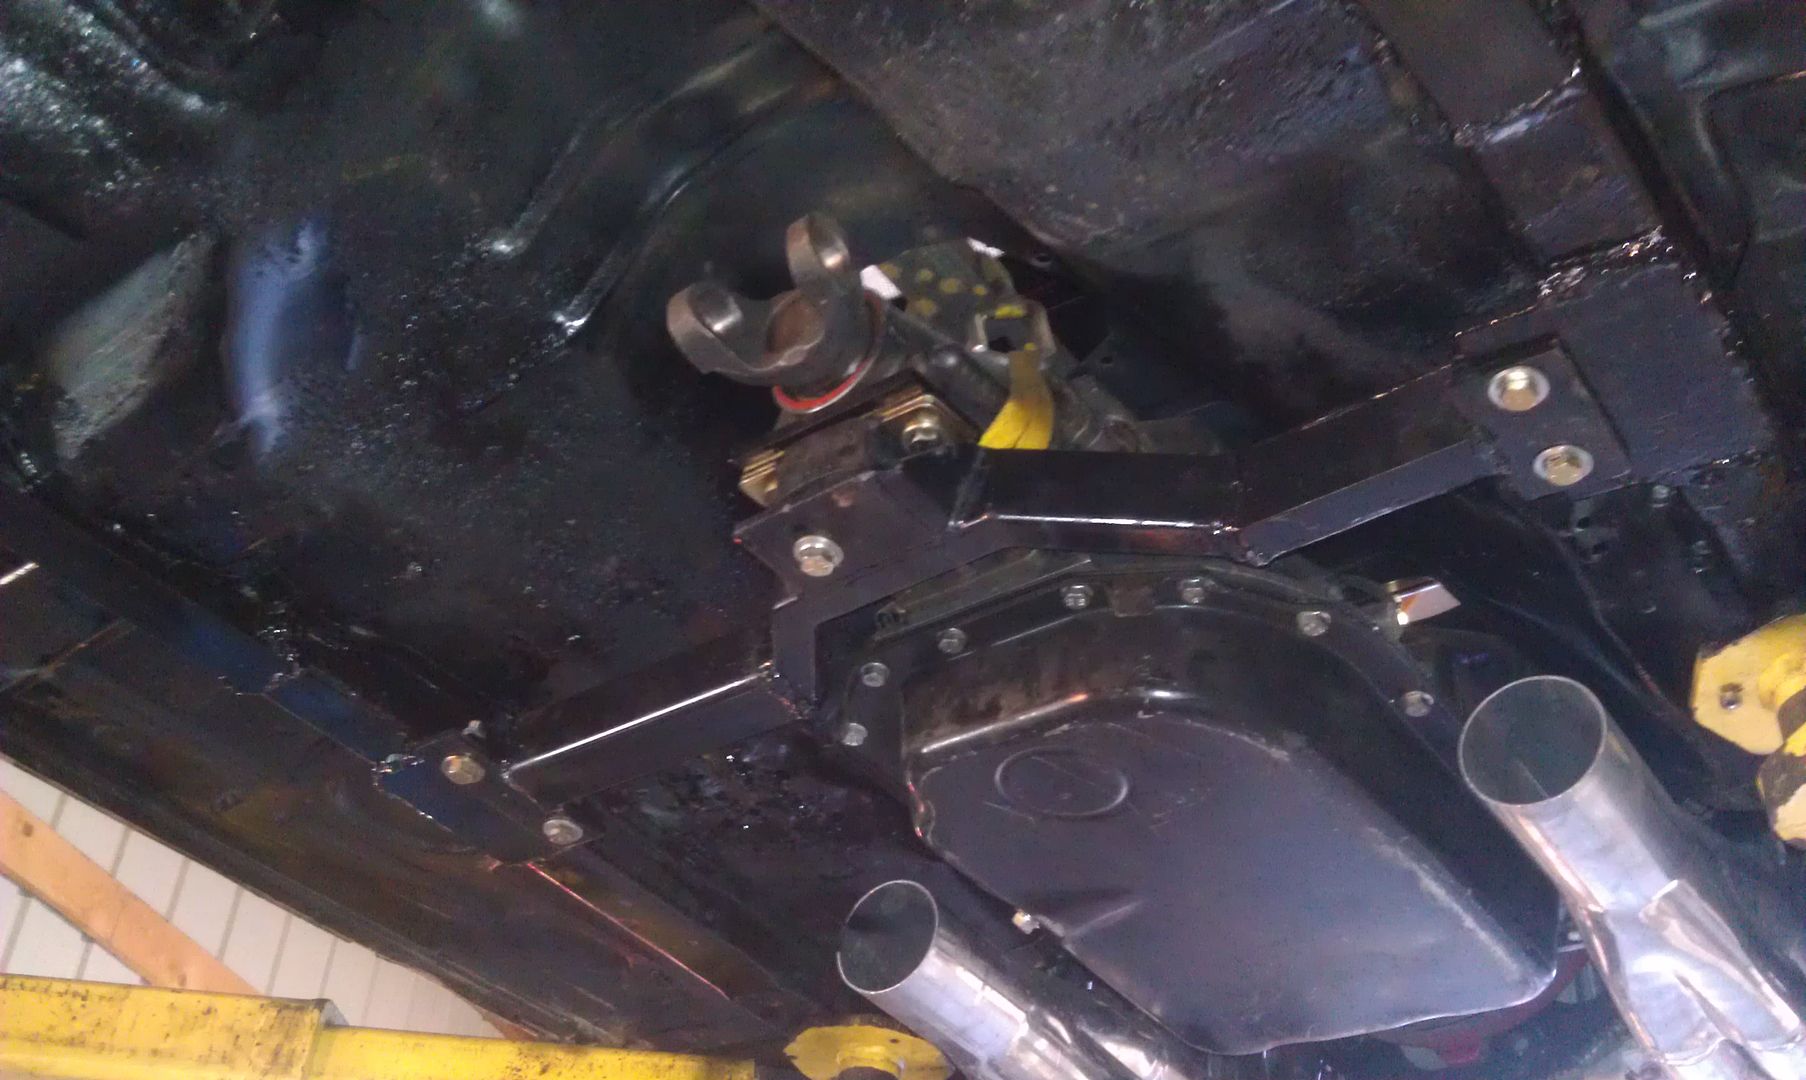
I added some Thru the Floor Subframe Connectors...leaving out the outriggers for now as they will go in when the 10pt cage goes in.
I wasnt sure what I was going to do for a Transmission Crossmember yet as the 4L80 case that my TCI 6x uses is longer than a 4l60...which means that I couldnt just use an off teh shelf ready to go crossmember
was thinking about using the V8 Double Hump and just moving the brackets back... which honestly... seemed too flimsy to me...
then an Idea!
I had my old 4L80/TCI 6x crossmember from my camaro laying around...why not try to re-purpose it...
went to cutting, grinding, welding...
a little fittig testing as I was building it
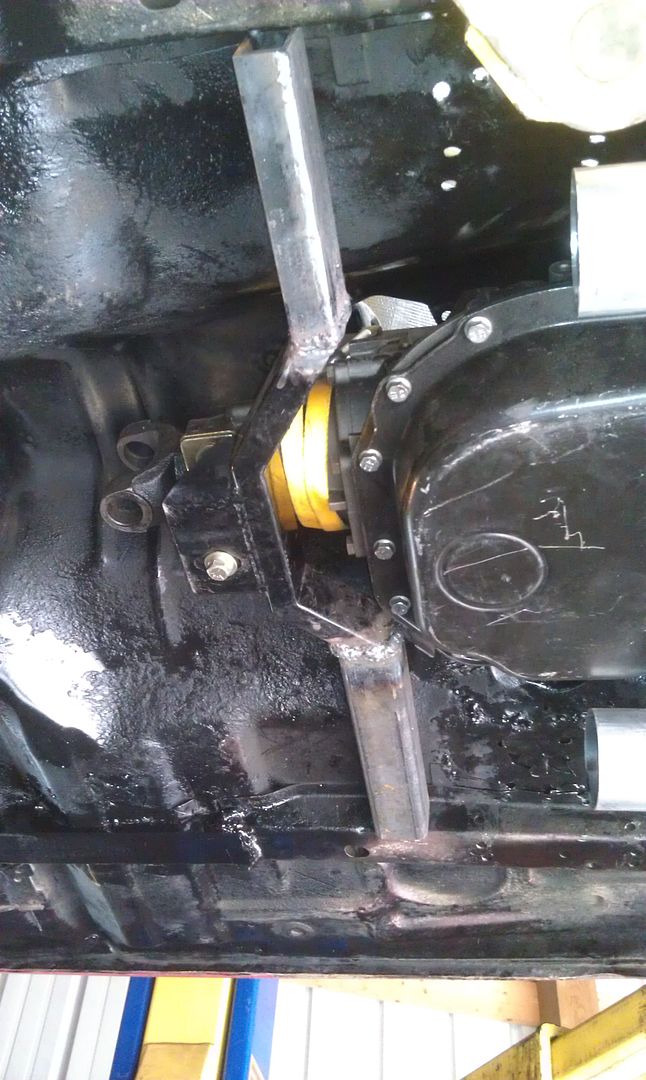
the result....
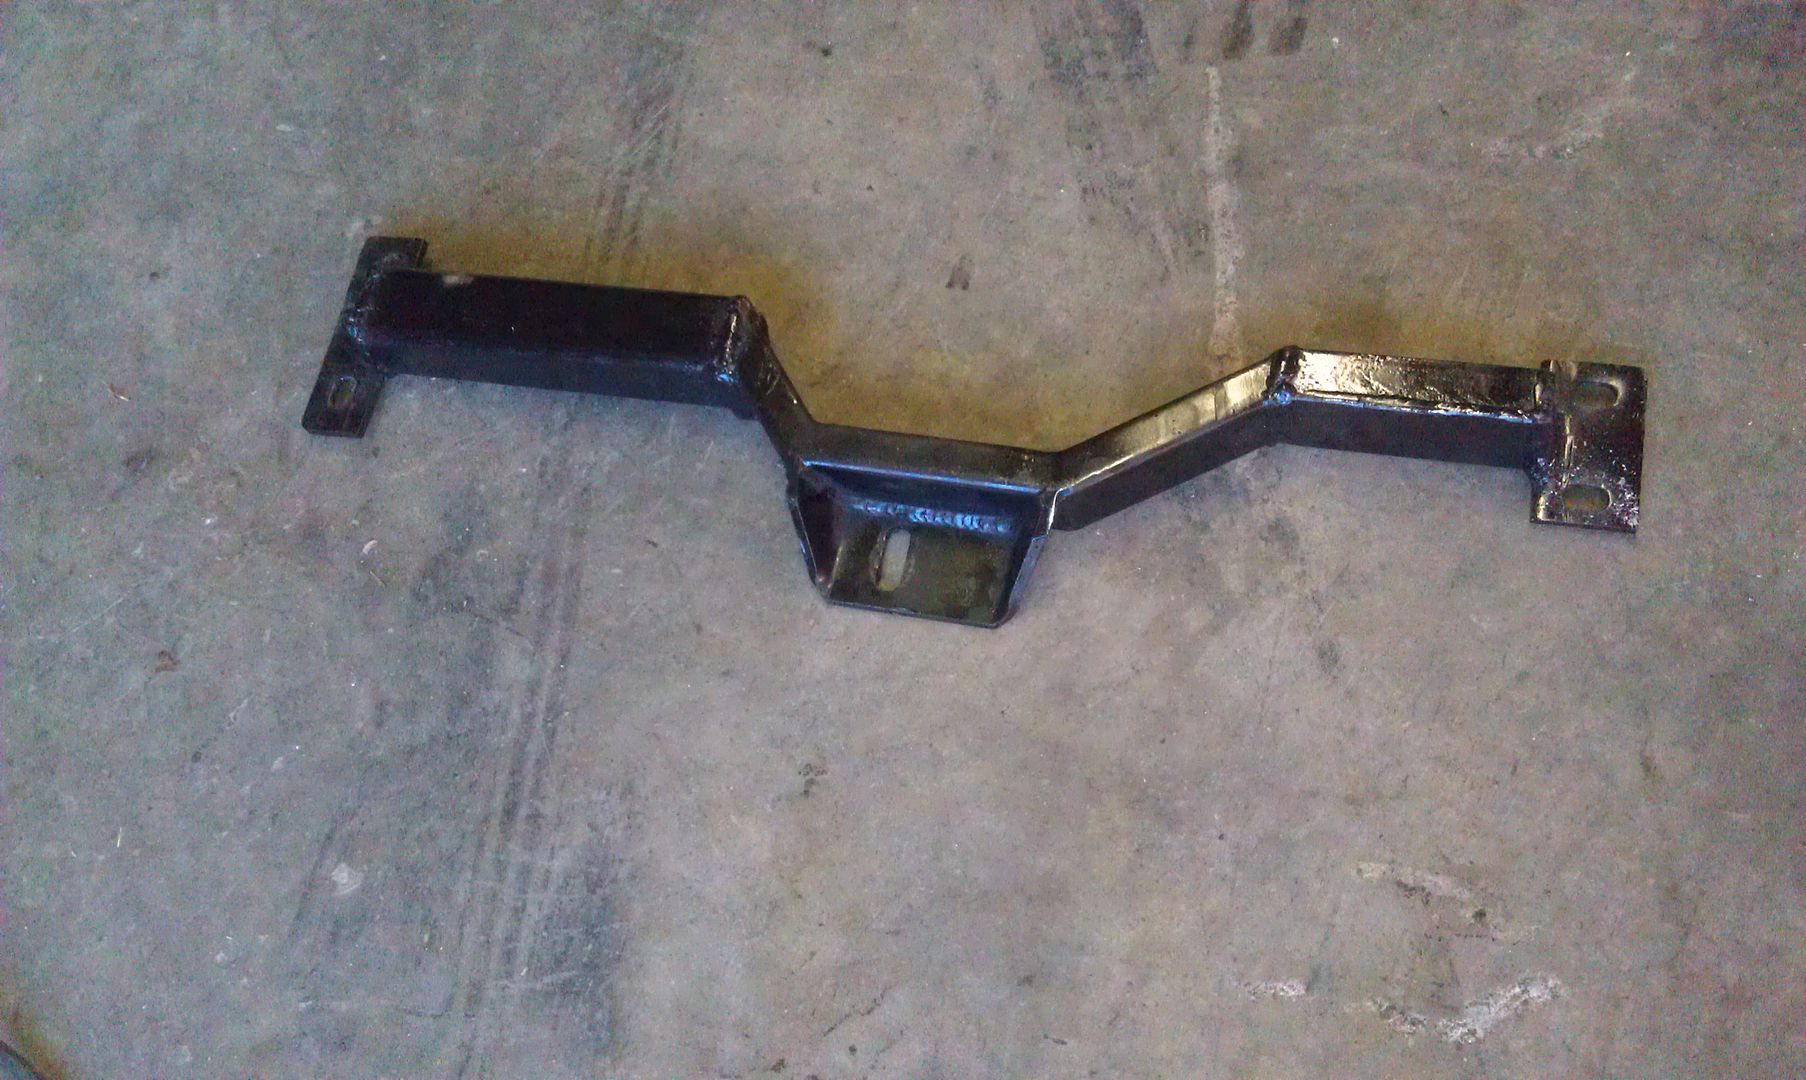
and the Header Clearance...
BUT.....
I also realized that I had no pressure on the coil overs yet...
they were set as loose as they could go and just barely not have slack....
so setting them tighter to get ride height correct will bring the car up a bit and create more ground clearance
2nd issue, was that the headers come very close to the transmission pan...the drivers side is at such an angle that I almost cant get at the drain plug, and I would have a challenging time getting the shift linkage on.
but I came up with a solution...again, thanks to my buddy who made a great suggestion...
His suggestion was to "flex" the headers outward... he had done this previously on another vehicle that had header issues... they had actually used a hydraulic press to push them outwards and let them flex...the result was pushing them way out, allowed them to bend a little and when they let go, the headers had bent enough to allow more space....
so I did the same...only with a conventional scissor jack
the result was that I now had some space where before it was pretty much touching the drain bolt.
I added some Thru the Floor Subframe Connectors...leaving out the outriggers for now as they will go in when the 10pt cage goes in.
I wasnt sure what I was going to do for a Transmission Crossmember yet as the 4L80 case that my TCI 6x uses is longer than a 4l60...which means that I couldnt just use an off teh shelf ready to go crossmember
was thinking about using the V8 Double Hump and just moving the brackets back... which honestly... seemed too flimsy to me...
then an Idea!
I had my old 4L80/TCI 6x crossmember from my camaro laying around...why not try to re-purpose it...
went to cutting, grinding, welding...
a little fittig testing as I was building it
the result....
and the Header Clearance...
12-01-2012, 10:12 PM
#5
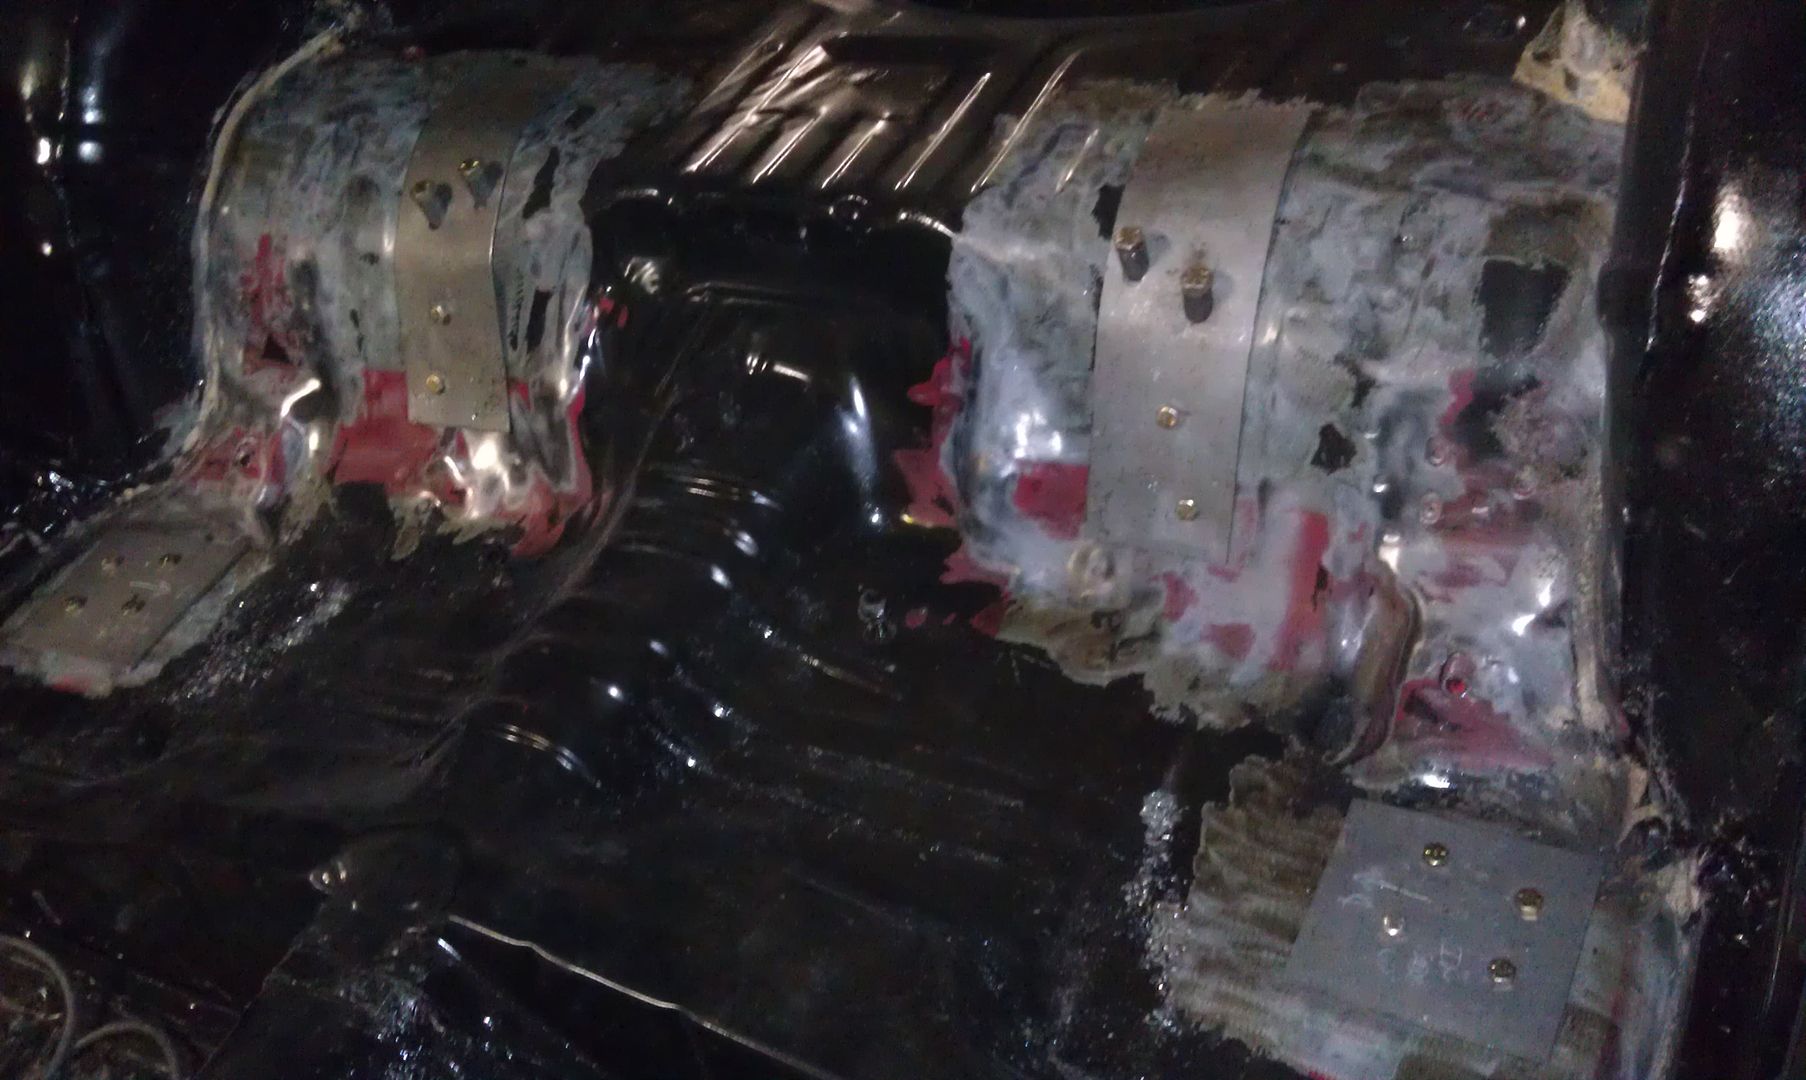
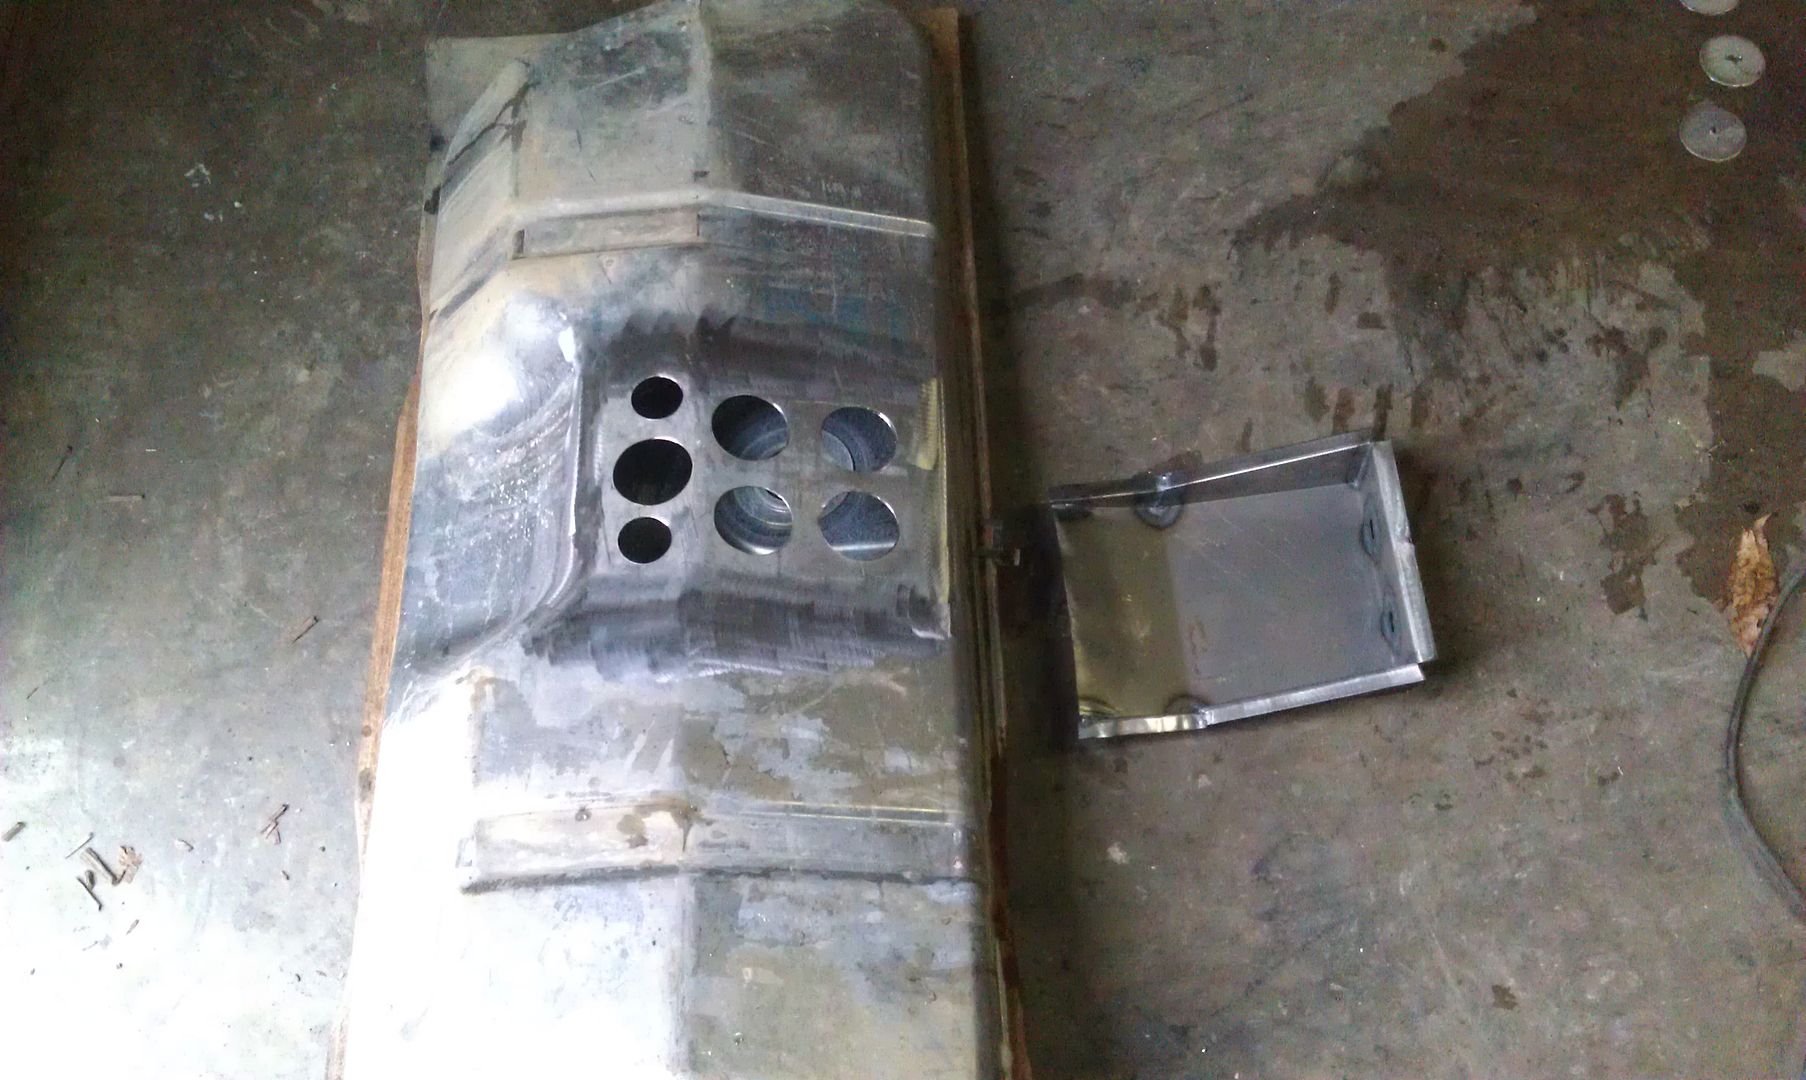
added my Battery Box, Shut off Switch, and Dual Nitrous Bottle Bracket.

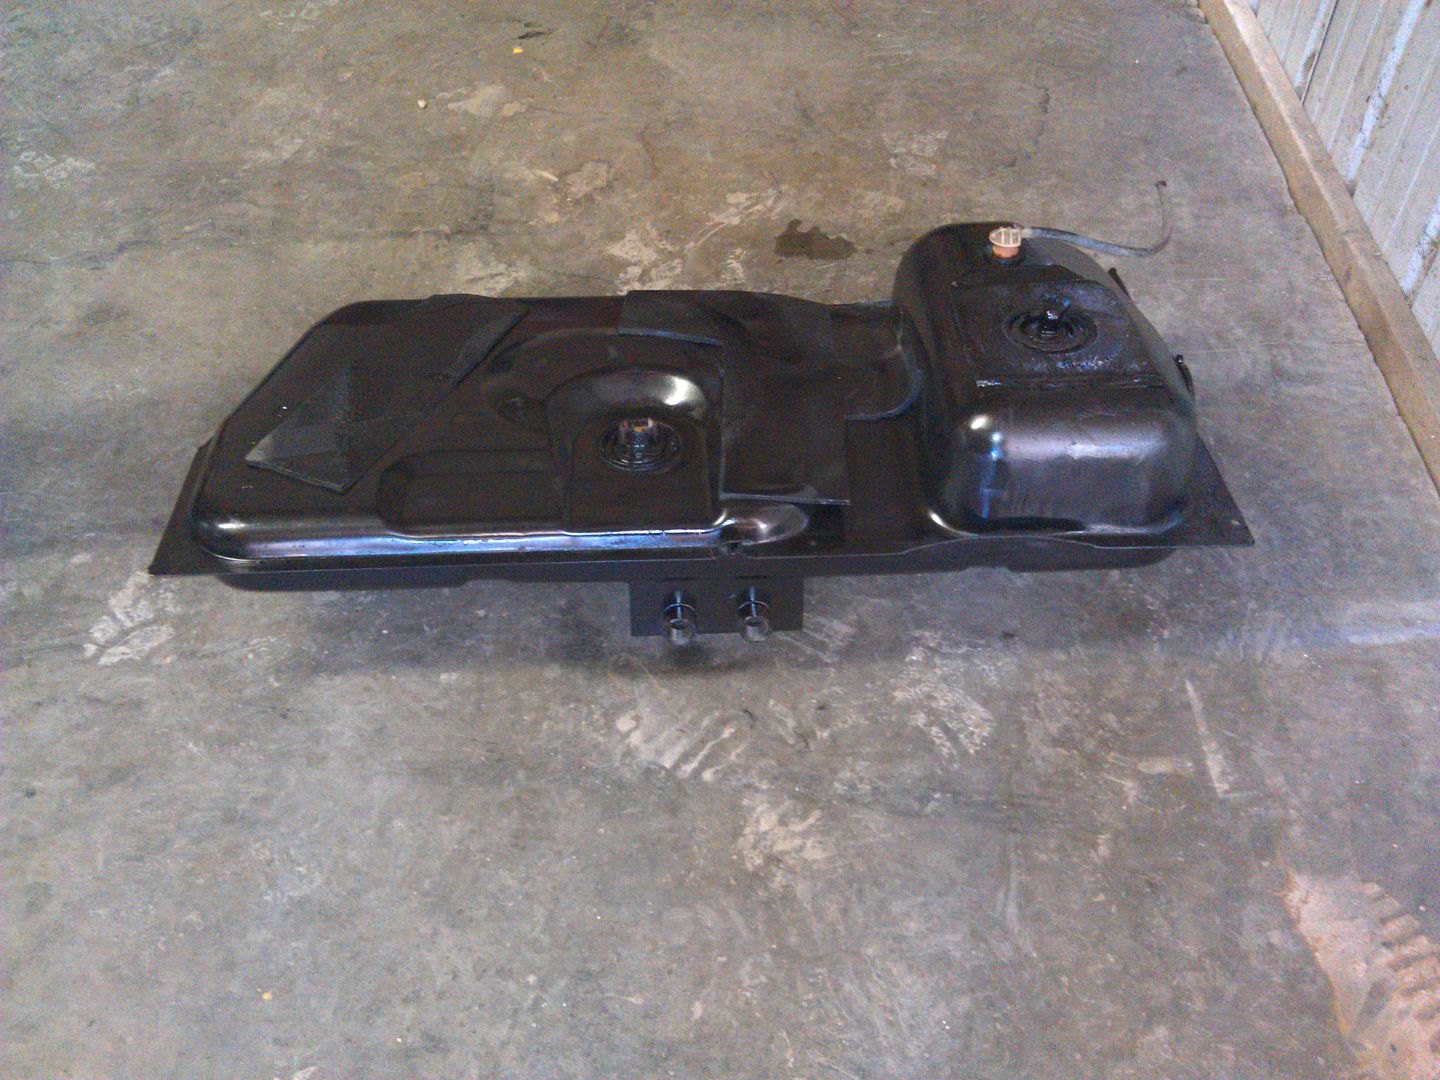
Started in on the Sump for the Gas Tank...still need to add a vent/rollover valve...its on order...
and then I added some panels to mount my Holley Dominator, TCI Trans Controller, and Racewire Solutions Fuse/Relay Center on to....

and thats where I am for now.....
I'm waiting on some parts to show up, and I'm trying to sell some of my camaro stuff that I cant re-use to pay for more parts...
its a slow process... I have a long way to go.
Started in on the Sump for the Gas Tank...still need to add a vent/rollover valve...its on order...
and then I added some panels to mount my Holley Dominator, TCI Trans Controller, and Racewire Solutions Fuse/Relay Center on to....
and thats where I am for now.....
I'm waiting on some parts to show up, and I'm trying to sell some of my camaro stuff that I cant re-use to pay for more parts...
its a slow process... I have a long way to go.
12-02-2012, 09:34 PM
#7
looks good so far, i plan on going motor plate, did you order the sn95 plate or the universal one & cut it? would you happen to have a picture of just the motor plate, im either gonna make one on my plasma cam or have to buy this guys
Trending Topics
12-02-2012, 09:41 PM
#8
SN95 plate... and I modified it slightly...
Bob and I are Friends..so I sent Him my revisions, so you can ask him for an S2H revised plate if you want the same thing I am Using
I also sent him a revised Mid plate that has cuts for the Steering rack and for the Headers.
I think the SN95 plate sits the motor too high in my opinion...but dropping it down the way I did, seems a lot nicer.
My Fbody Pan Doesnt even hang below the K-member...its pretty much right at the exact same bottom spot
12-17-2012, 10:49 AM
#12
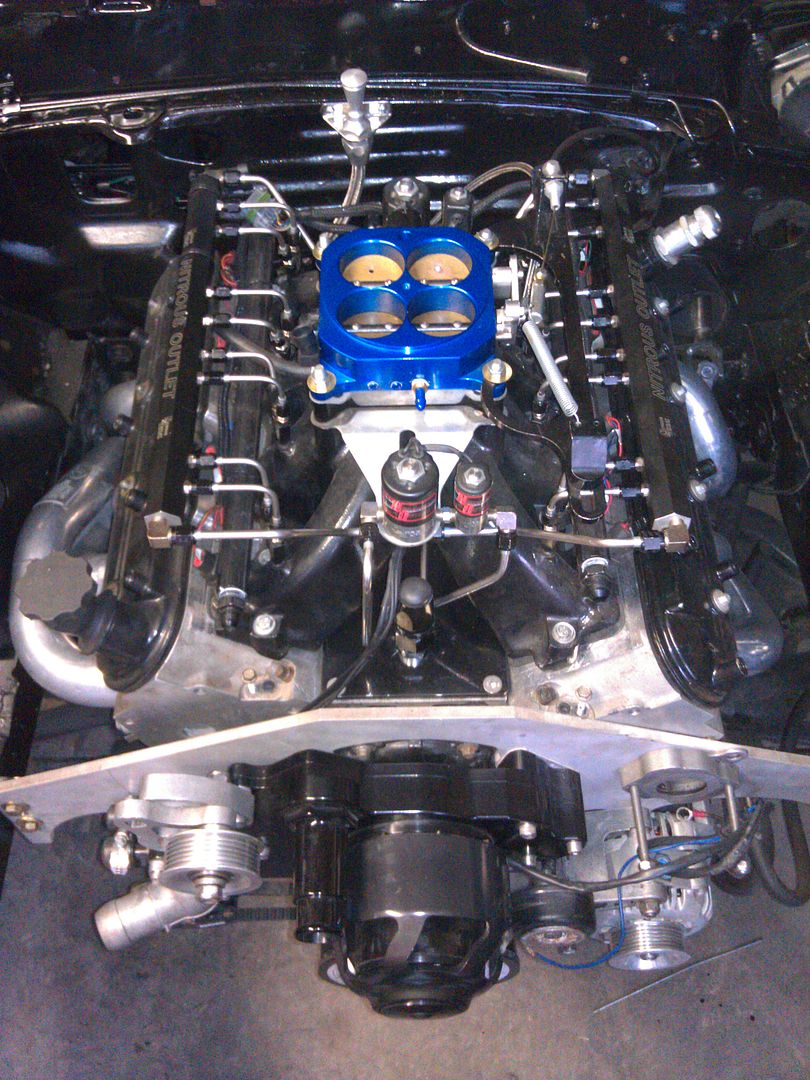
PRC 227 Heads 60cc chambers
cam is Custom From Allan Futral, 252/274 @.050
Super Victor Intake, Custom Carb/TB Spacer, Scorpion 4150 TB
Custom Nitrous Outlet Dual Stage Dry Direct Port system
call the guy and get a custom quote to suit your setup.
I have a feeling that most people would spend far less than I did on their wiring
Last edited by soundengineer; 12-17-2012 at 11:25 AM.
12-19-2012, 12:12 AM
#14
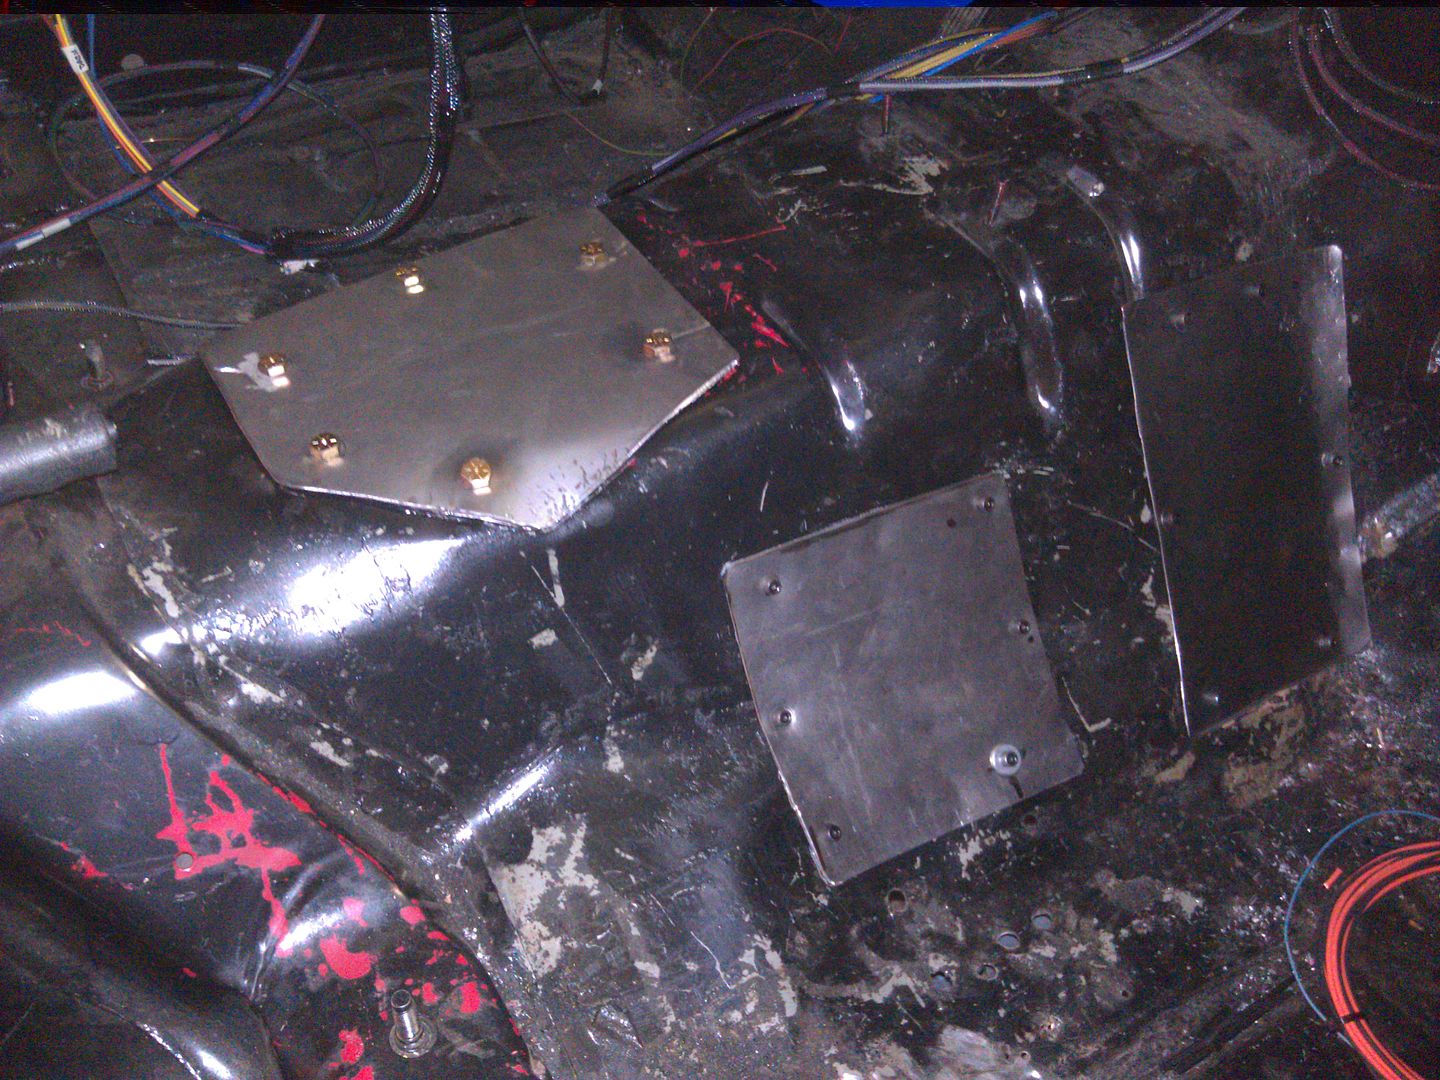
Added some Panels...
2 on the side of the Trans Tunnel for access to the trans cooler Line fittings
and one to cover the hole in the top of the trans tunnel...hopefully going to be able to mount my TCI Outlaw Shifter using that plate
Well Nuts are a Great invention that I decided to use for securing these panels
Mounted the 250 Amp Alternator Shut down relay
For anybody who is not familiar...The Alternator needs to have a direct connection to the Battery or you can fry stuff inside the Alternator(and sometimes it creates a nice spark show and a fire if conditions are right)
so to avoid this problem when you use a Remote Shut off Switch as required by the NHRA, you add a relay to be an interrupt between your alternator and your battery so when you kill the shut off switch, you also break the connection to the alternator, and it keep your system from backfeeding into the alternator and blowing stuff up...
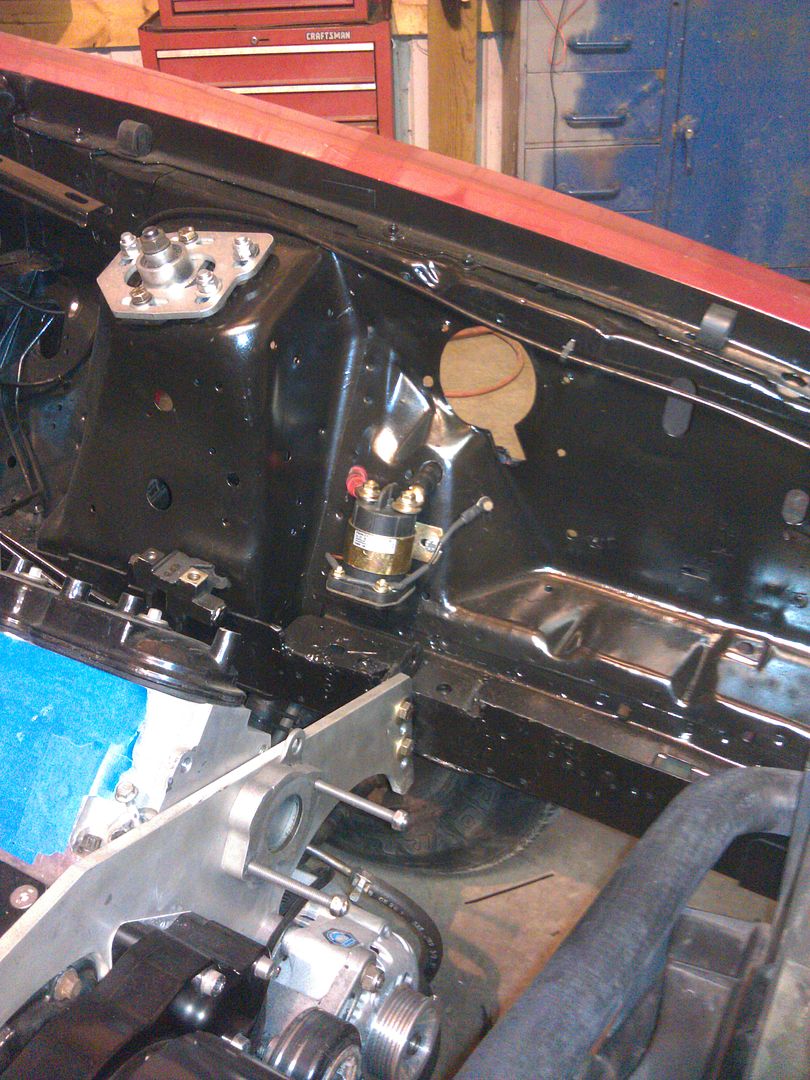
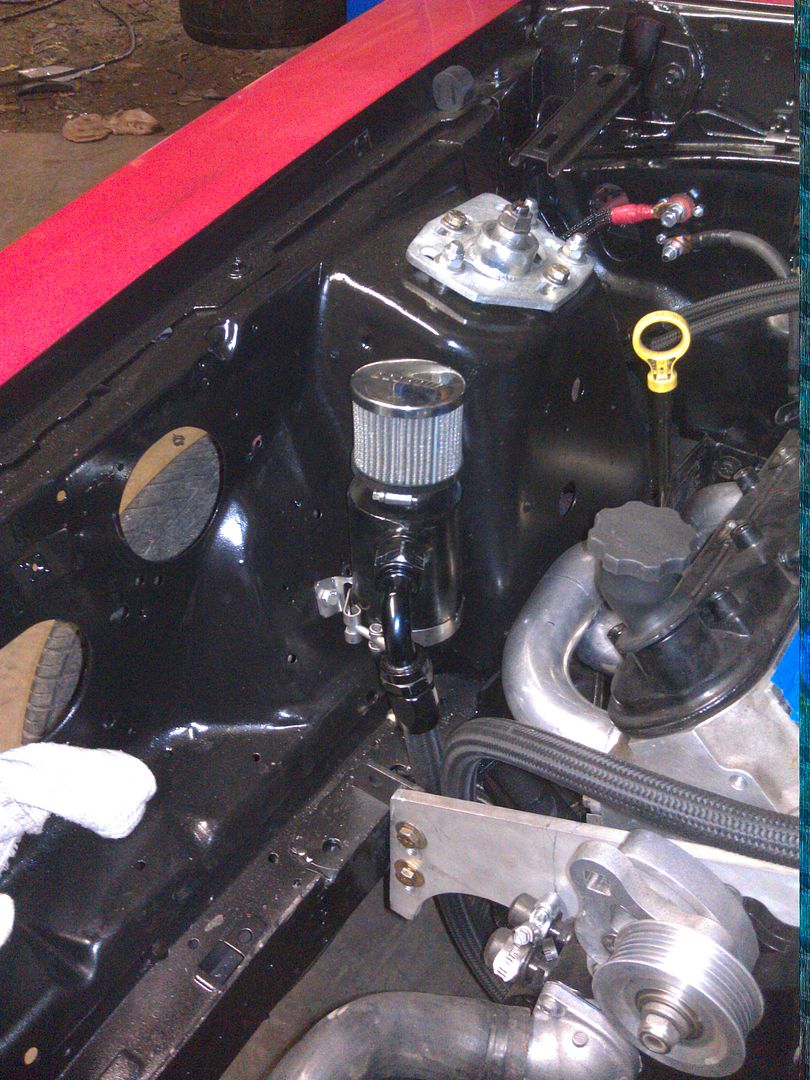
I also mounted the Vacuum Pump Breather/separator can... I have a separate Catch can to mount still...Just havent gotten to it yet...and honestly, cant decide where I want to mount it at exactly..
I also worked on some wiring today...
Got my the rear side lighting done...Parking Lights, Brake Lights. Turn Signals, and, and Backup Lights...
wired up the Water Pump and the Fans today as well.
2 on the side of the Trans Tunnel for access to the trans cooler Line fittings
and one to cover the hole in the top of the trans tunnel...hopefully going to be able to mount my TCI Outlaw Shifter using that plate
Well Nuts are a Great invention that I decided to use for securing these panels
Mounted the 250 Amp Alternator Shut down relay
For anybody who is not familiar...The Alternator needs to have a direct connection to the Battery or you can fry stuff inside the Alternator(and sometimes it creates a nice spark show and a fire if conditions are right)
so to avoid this problem when you use a Remote Shut off Switch as required by the NHRA, you add a relay to be an interrupt between your alternator and your battery so when you kill the shut off switch, you also break the connection to the alternator, and it keep your system from backfeeding into the alternator and blowing stuff up...
I also mounted the Vacuum Pump Breather/separator can... I have a separate Catch can to mount still...Just havent gotten to it yet...and honestly, cant decide where I want to mount it at exactly..
I also worked on some wiring today...
Got my the rear side lighting done...Parking Lights, Brake Lights. Turn Signals, and, and Backup Lights...
wired up the Water Pump and the Fans today as well.
 12-19-2012, 08:38 AM
#18
Lokar - I bought a 36" Long one for the Camaro...
I cut it down to use it in the mustang.
Remove one set screw, and basically trim it like AN Hose...
you have to be a little smarter about cutting the dipstick...
you cut it 15/16 longer than the hose basically
http://www.jegs.com/i/Lokar/625/TD-3...rentProductId=
I cut it down to use it in the mustang.
Remove one set screw, and basically trim it like AN Hose...
you have to be a little smarter about cutting the dipstick...
you cut it 15/16 longer than the hose basically
http://www.jegs.com/i/Lokar/625/TD-3...rentProductId=
12-29-2012, 12:26 AM
#19
well... My Waste Oil Heater in the Garage quit working, no oil pumping up to the furnace portion... not sure why...and its been too cold to figure it out since the pump and oil container are both outside the garage.
so between Christmas, and the Cold weather we have been having here in Nashville....I havent gotten much done....
but I managed to do a few things with my limited semi warm time during the afternoon on the "nicer" days
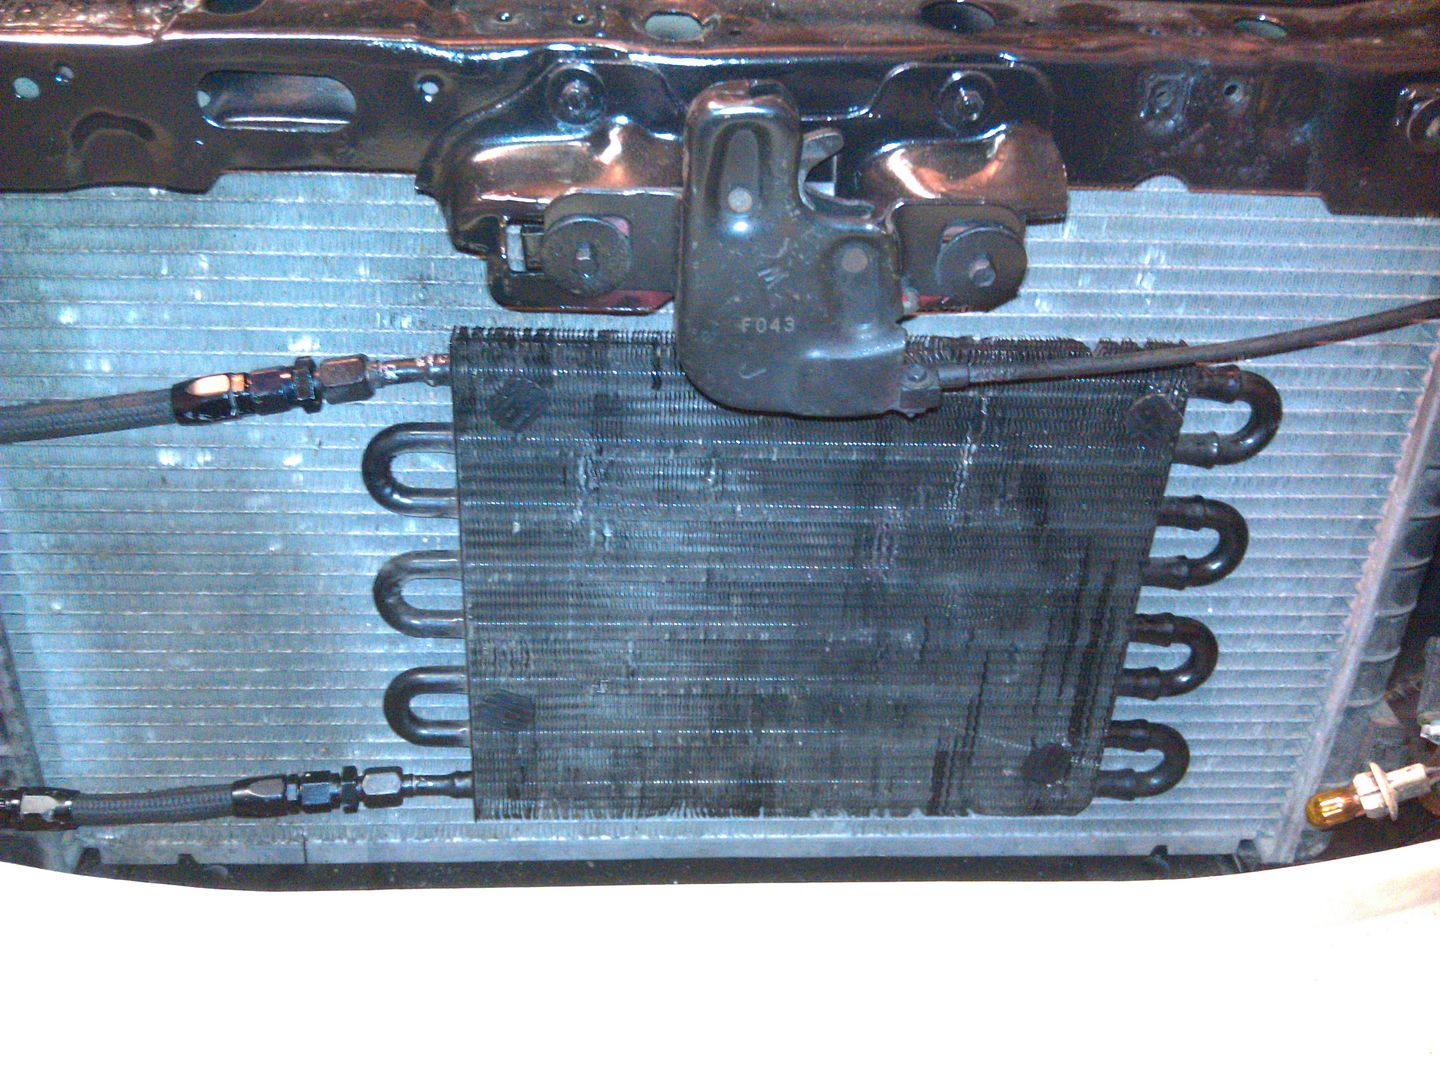
Trans Cooler Mounted, and plumbing done

Fan Wiring Harness Complete

I also did my Headlight/Turn signal/Parking light wiring up front, and my Tail Light/Turn Signal/Backup Light wiring done in the rear.
and I worked on making my wiring inside the car look better....still looking for a way to make it better... not that it matters a lot because it will be well hidden by the dash....but still...I'll know its there.
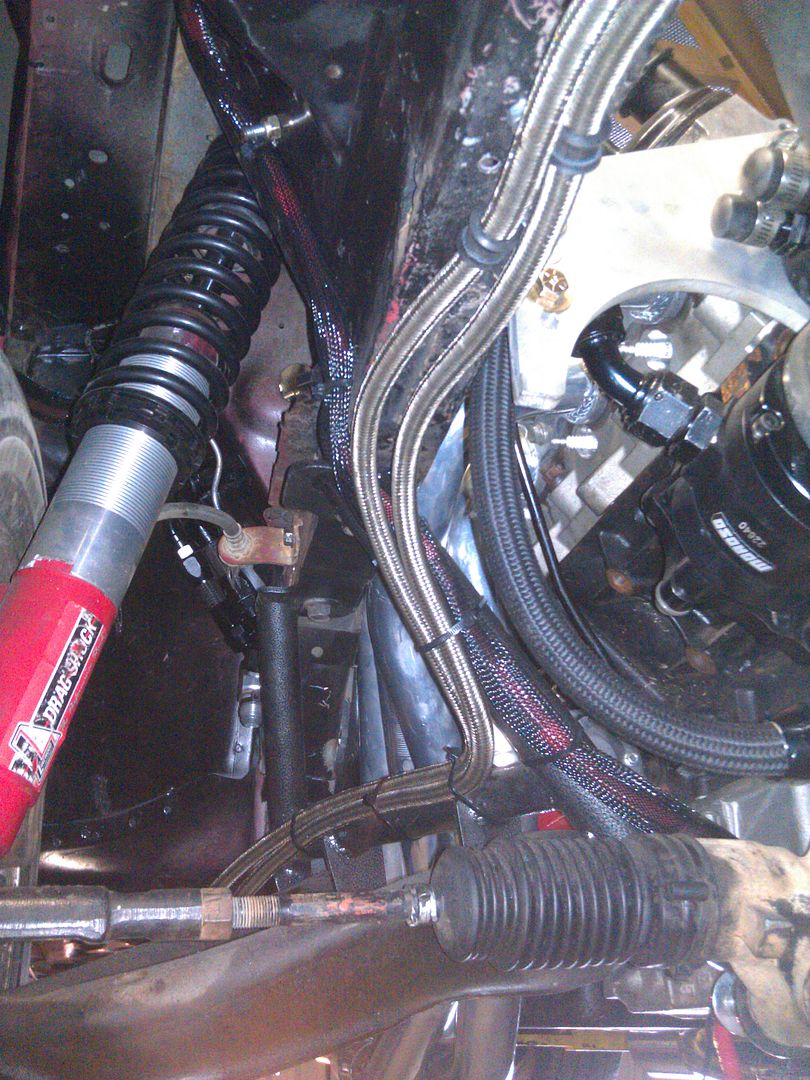
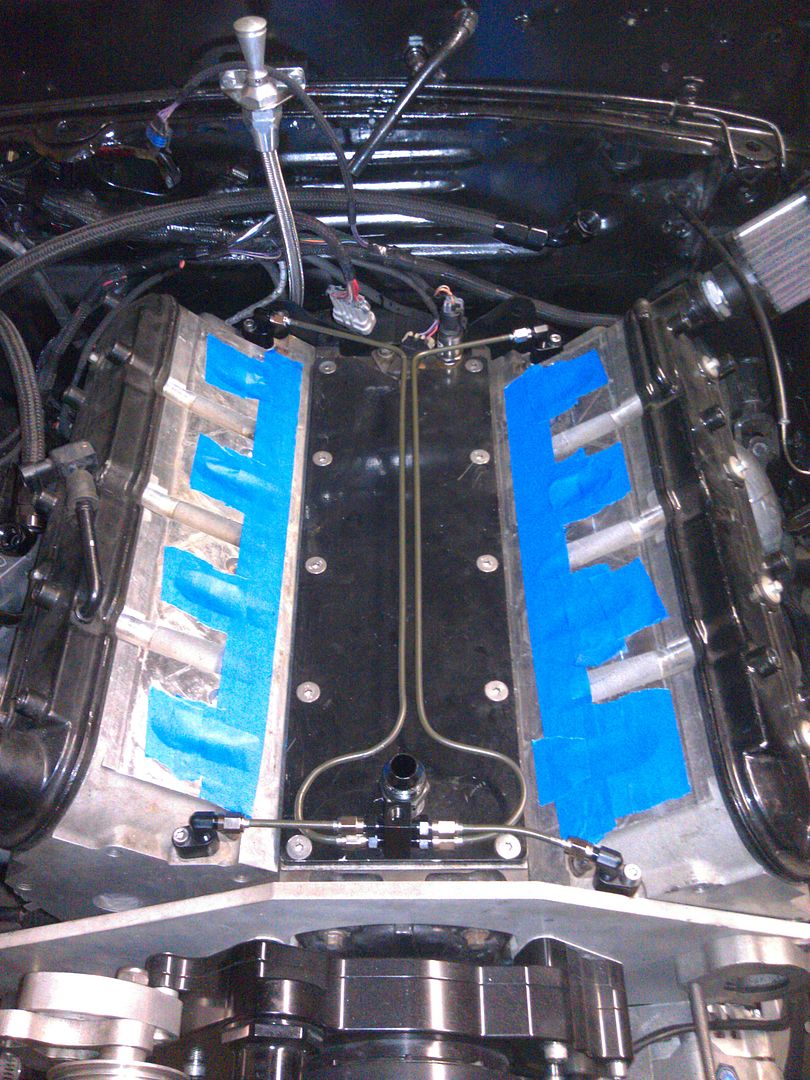
and today I made a Coolant Crossover kit for my setup
I considered buying the kit that Nitrous Outlet makes, but My intake has a bunch of Nitrous plumbing running under it, and there is just not any room for the way they have the distribution block in the middle....so I built my own version of it custom fit to my setup
so between Christmas, and the Cold weather we have been having here in Nashville....I havent gotten much done....
but I managed to do a few things with my limited semi warm time during the afternoon on the "nicer" days
Trans Cooler Mounted, and plumbing done
Fan Wiring Harness Complete
I also did my Headlight/Turn signal/Parking light wiring up front, and my Tail Light/Turn Signal/Backup Light wiring done in the rear.
and I worked on making my wiring inside the car look better....still looking for a way to make it better... not that it matters a lot because it will be well hidden by the dash....but still...I'll know its there.
and today I made a Coolant Crossover kit for my setup
I considered buying the kit that Nitrous Outlet makes, but My intake has a bunch of Nitrous plumbing running under it, and there is just not any room for the way they have the distribution block in the middle....so I built my own version of it custom fit to my setup