Gonna test this new carb spacer....what do y'all think?


Trending Topics
 01-12-2013, 07:30 PM
#8
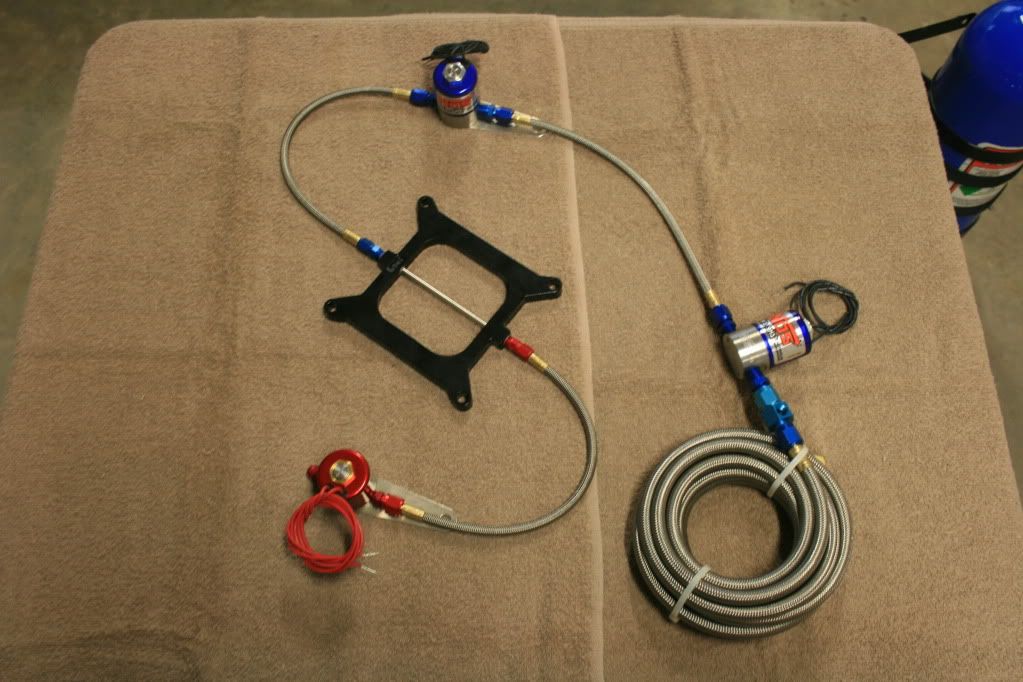
I worked on getting the system plumbed up this afternoon. I started by laying out all of the underhood parts and mocking all the fittings and hoses loosely together to get an idea of how everything would go together. The second large nitrous solenoid nearest the main feed line will serve as a redundant safety back up. This will be important once I install a progressive controller and start cycling the main solenoids on a regular basis. During the progressive cycling the redundant solenoid will remain open and won’t take all the abuse.
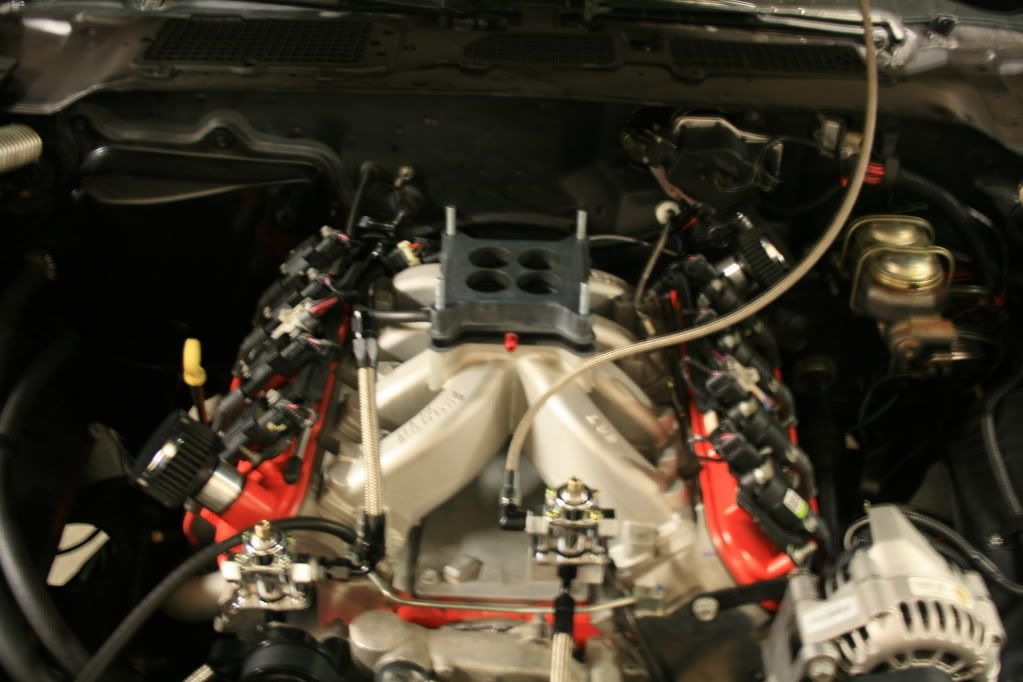
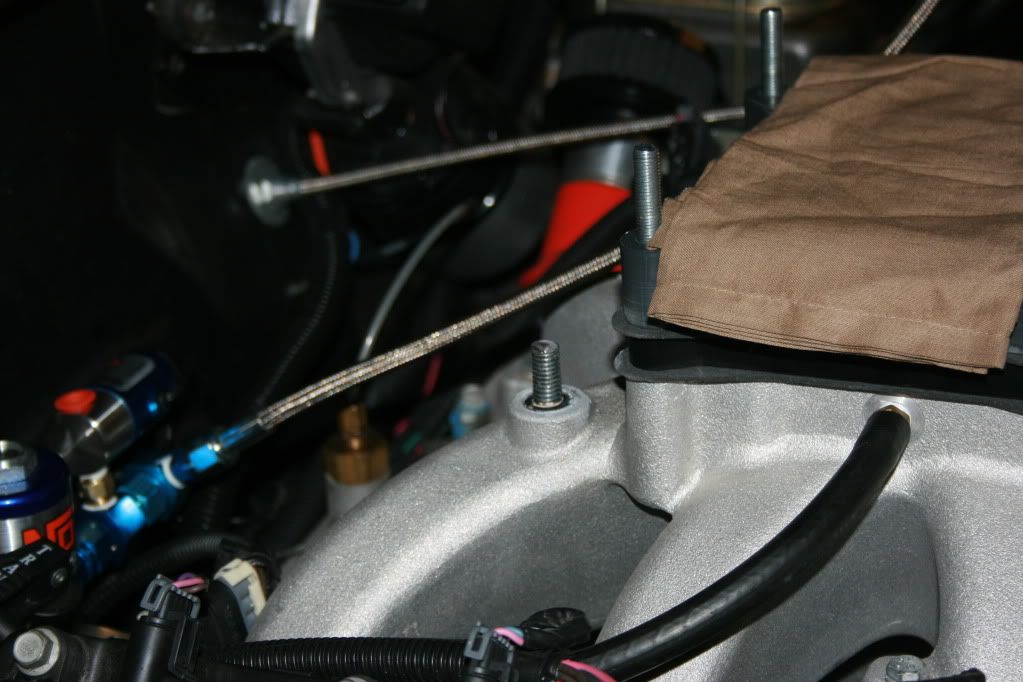
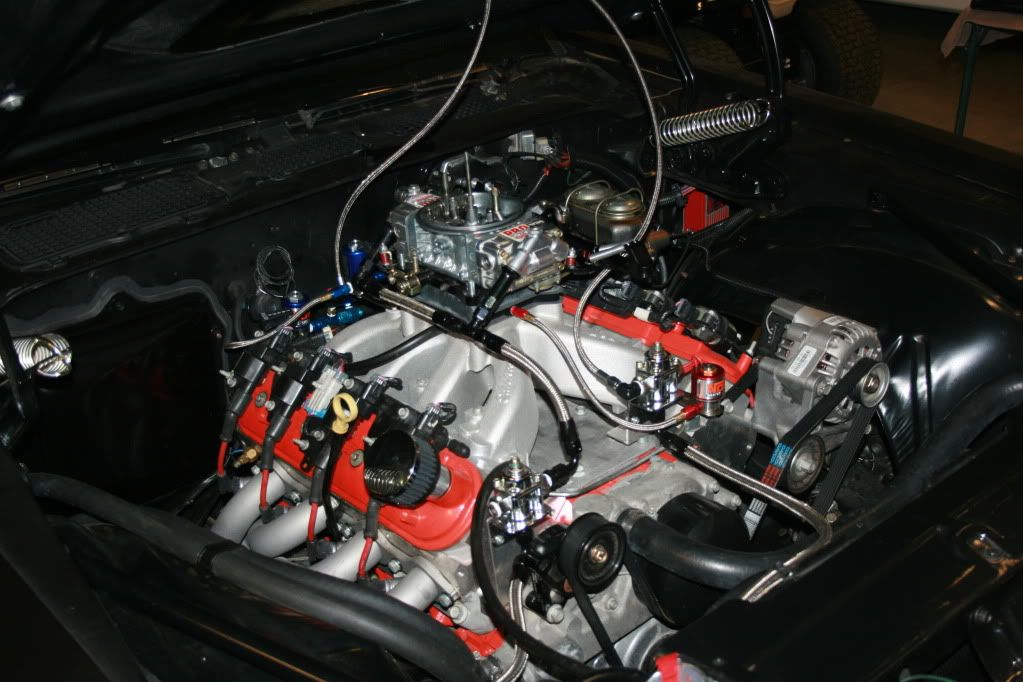
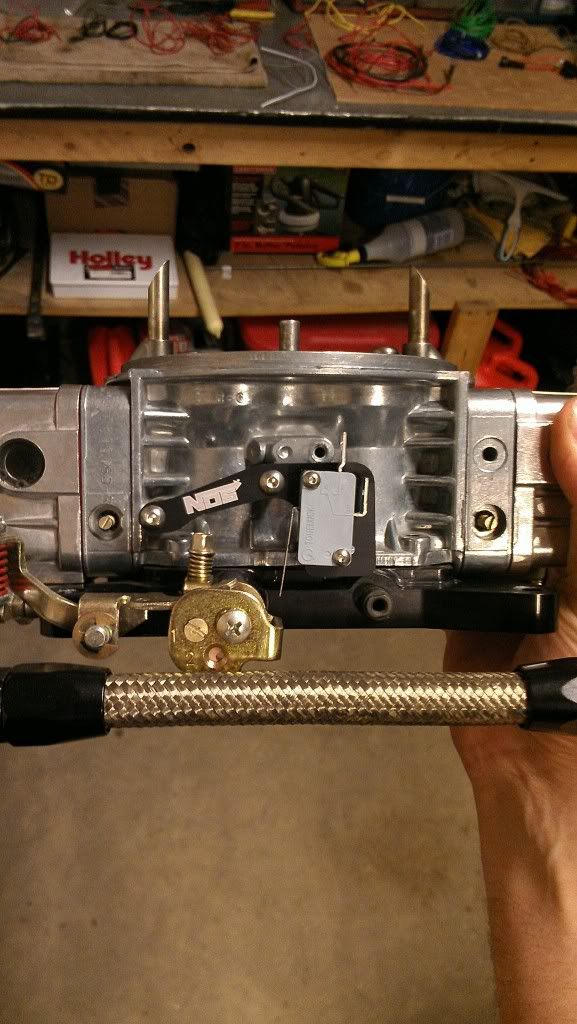
Next I pulled the carb and HVH carb spacer off, put the N2O plate on the bottom next to the manifold, and stacked the HVH back on top of it with new gaskets top and bottom. I didn’t need to install the longer carb studs that were included with the kit since I had installed long studs back when I first put on the HVH.
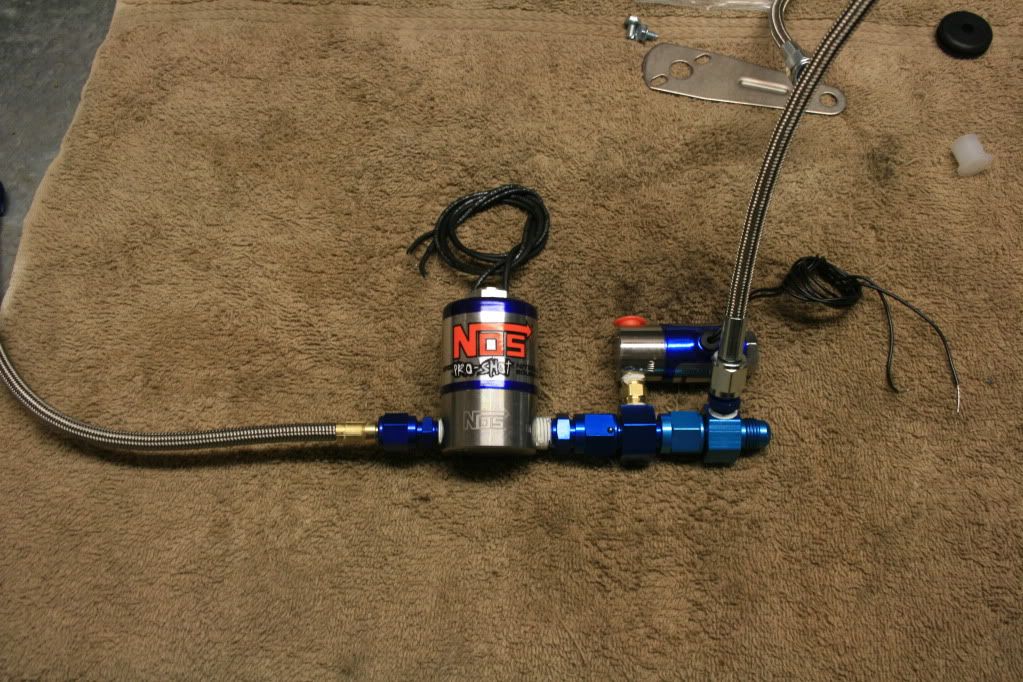
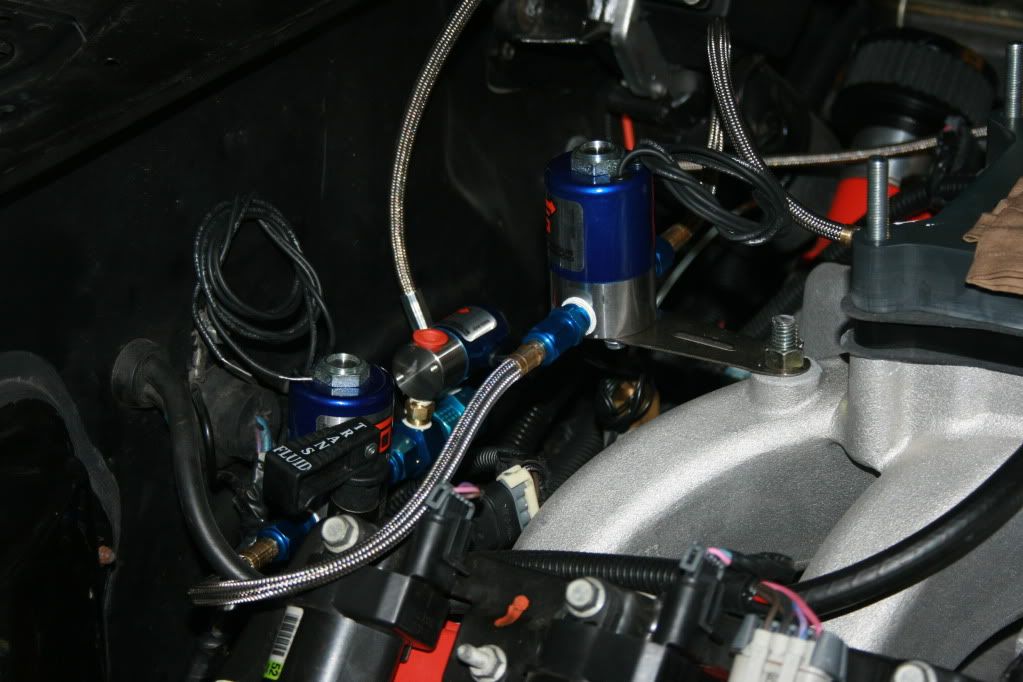
After messing around with a few solenoid mounting locations I decided it would be best to first assemble and mount the redundant solenoid, purge solenoid, and gauge adapter as a unit. Here it is assembled on the bench.
And here it is mounted from the rear-most passenger-side intake manifold bolt. The main nitrous feed line will ultimately be routed across the firewall and connect to the system just before the purge and pressure gauge adapters.
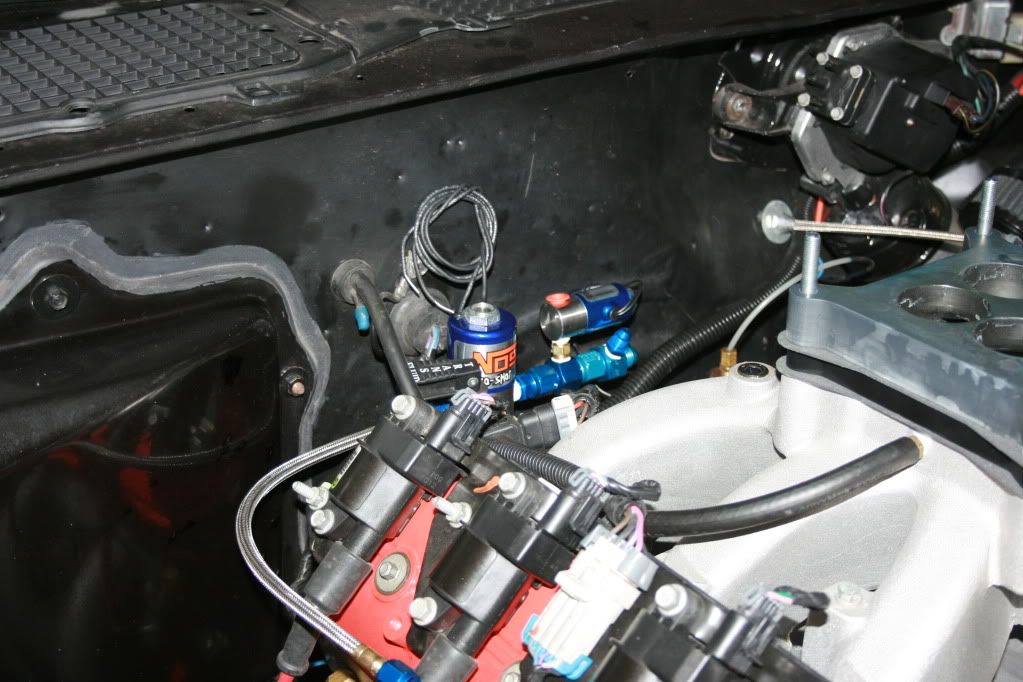
Next I needed a spot to mount the main nitrous solenoid. My mounting options were limited and it turned out the place the bracket really wanted to be when all the lines were hooked up was right at this 3/8th pipe plug in the number 8 manifold runner.
So I decided to improvise myself a mounting stud. I had a spare steel 3/8th pipe plug laying around so I drilled and tapped it to 3/8th and screwed a length of all-thread into it. The yellow paint you see is on the end all-thread stud.
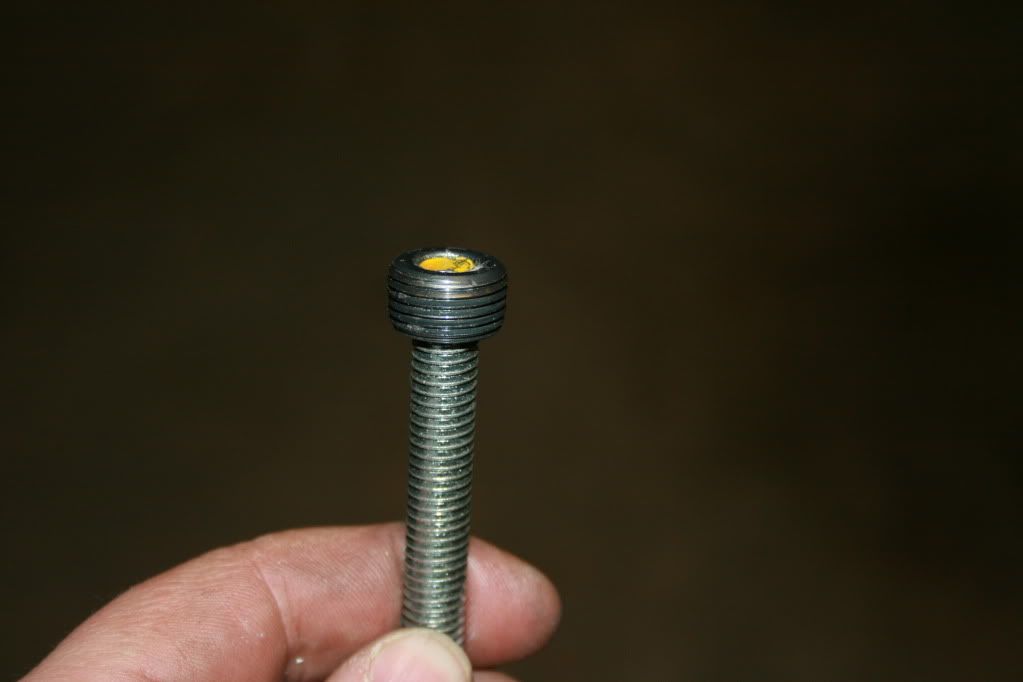
To seal the plug off from potential vacuum leaks and to ensure the stud wouldn’t come loose I welded the stud and plug together at the bottom. Then I ground my welds to clean up the job.
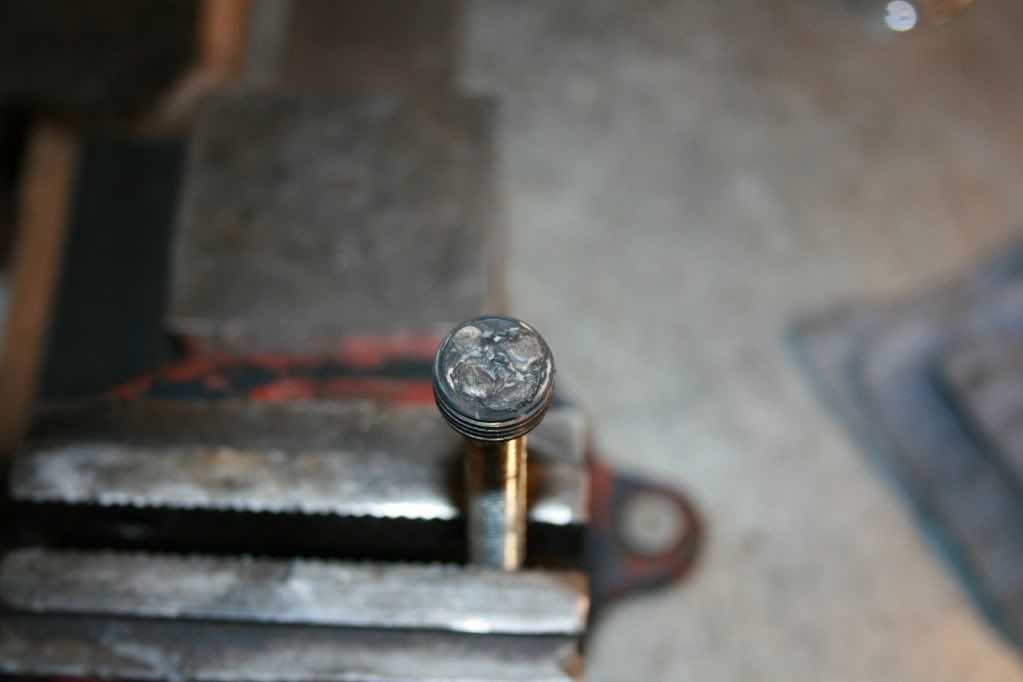

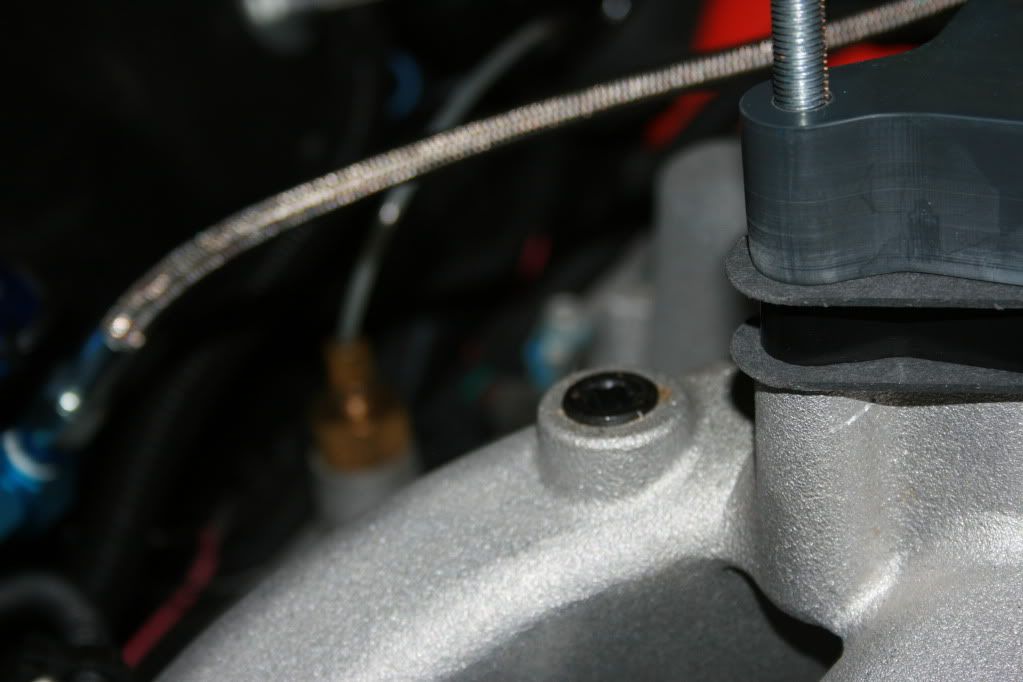
Finally I cut the stud to length and installed my new stud/plug combo into the manifold runner. I now have a convenient place to mount my solenoid. I left the stud long enough so I can double-nut it to install and/or remove the plug if necessary.
Next I mounted the fuel solenoid on the driver’s side front manifold bolt. I didn’t order any parts to plumb fuel from the regulator to the solenoid because I wanted to figure out my mounting location first. Now that the fuel solenoid is in place, I just need a 3/8th NPT to 4 AN fitting for the regulator and a 8 or 9-inch long 4 AN hose to connect the solenoid to the regulator.
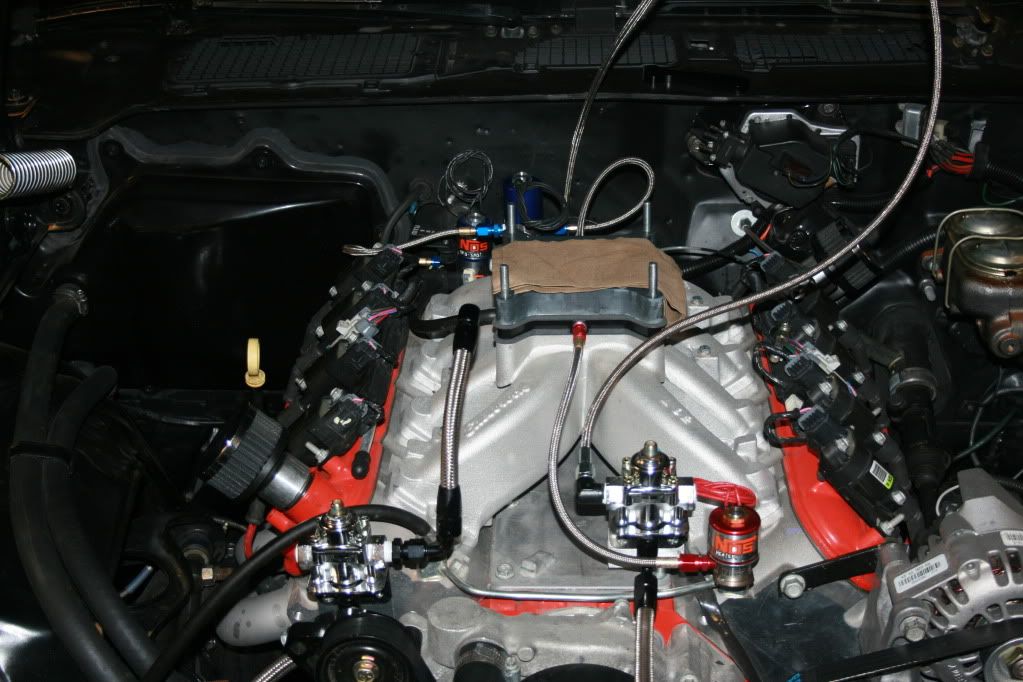
Here’s a pic with the carb sitting in place (not bolted down). After this picture I also installed the air cleaner and verified that the hood clearance was still good with the nitrous plate installed. It’s DAMN close......but it clears.
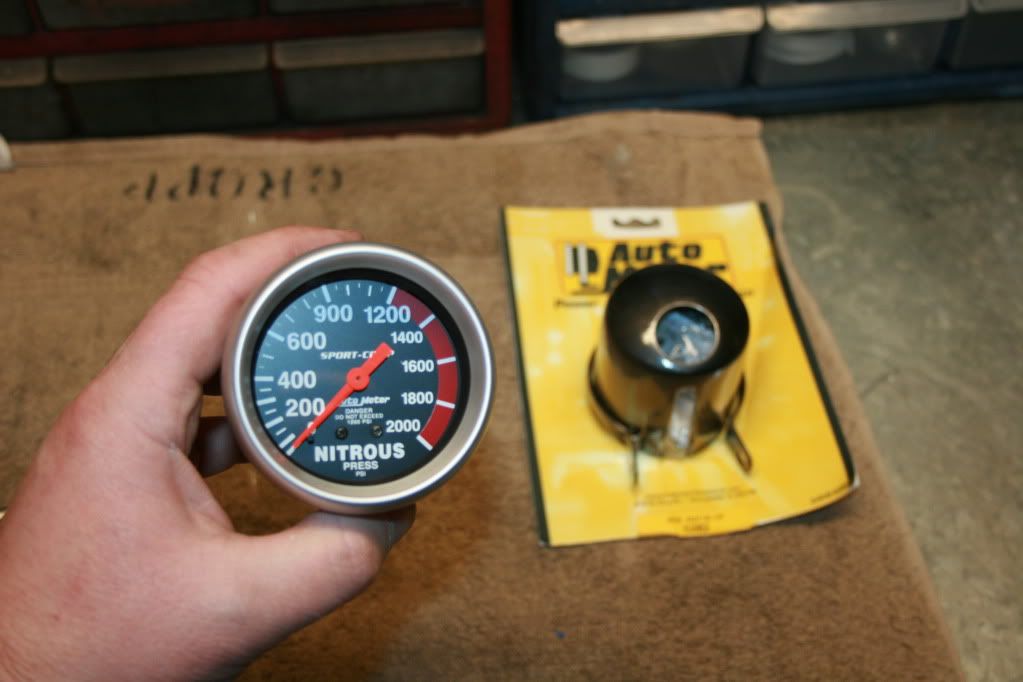
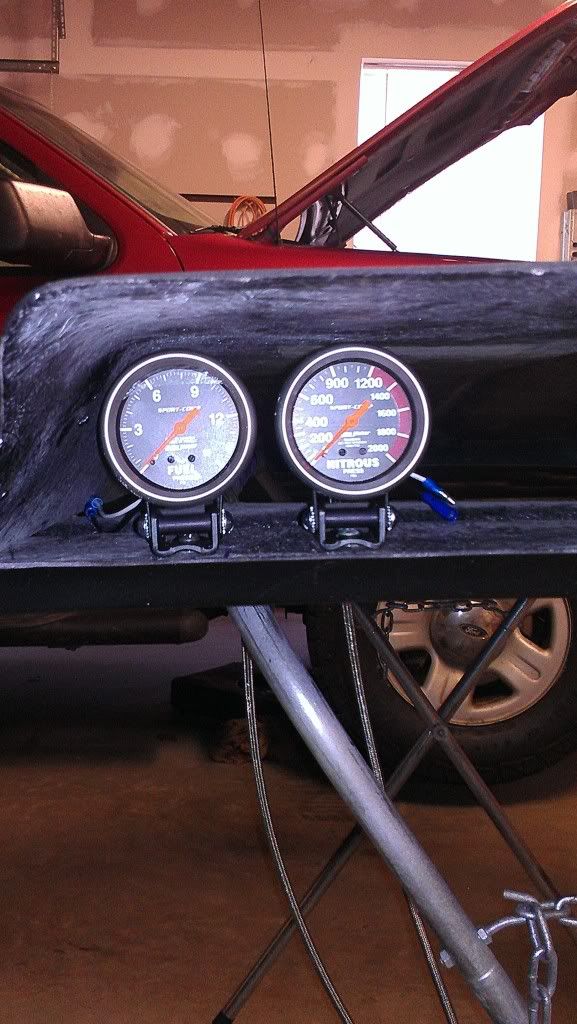
Above you can see an additional braided line going up under the hood cowl. That is the feed line for this nitrous pressure gauge that will ultimately be mounted next the fuel pressure gauge I installed in my cowl a few weeks ago.
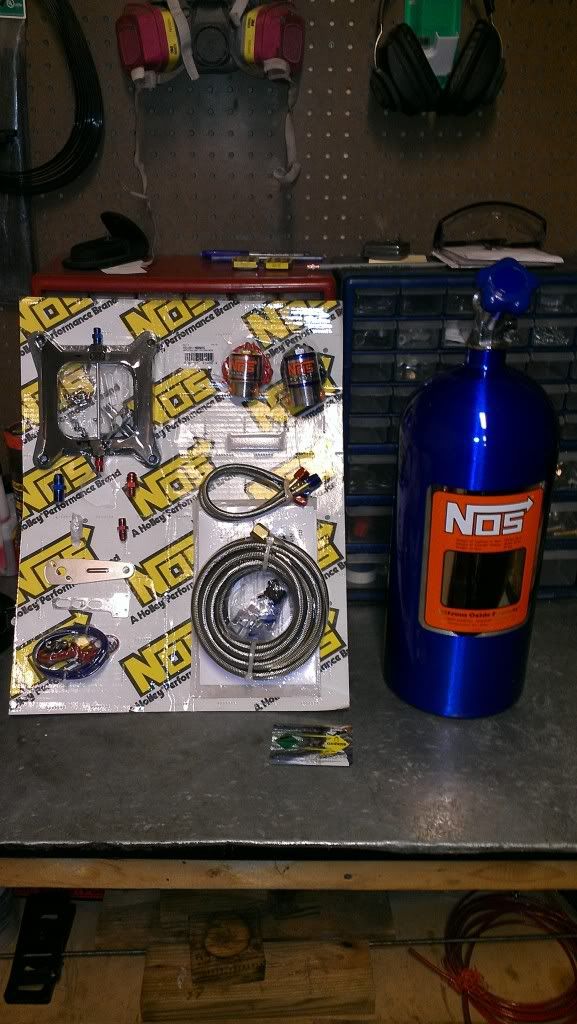
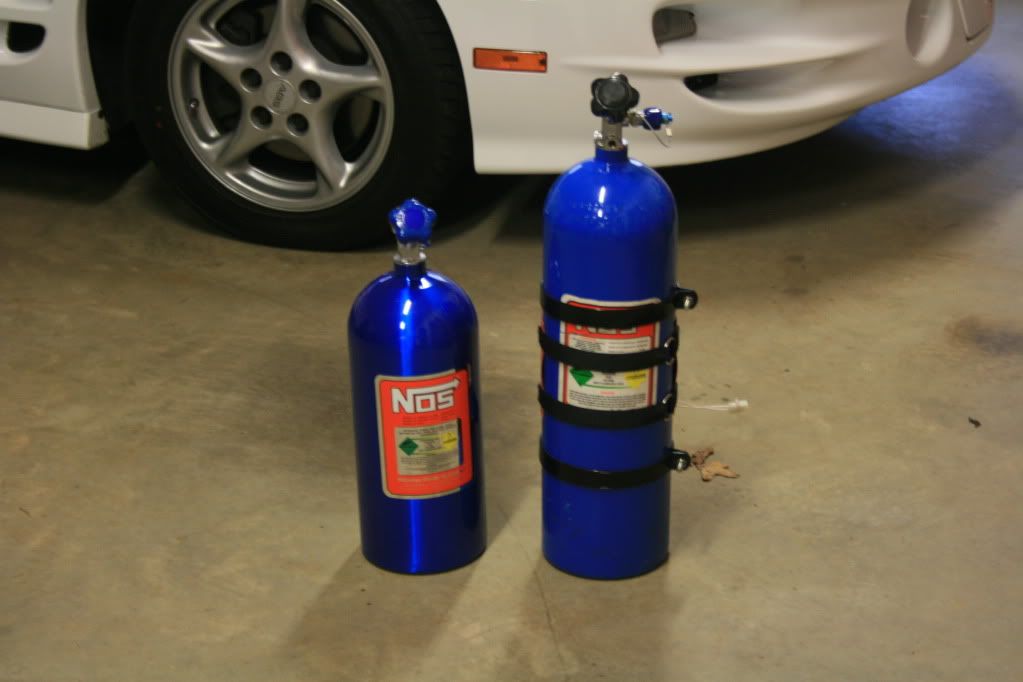
Here are Little Boy and Fat Man (if you don’t get that reference, go read a history book….LOL). The 10 lb’er came with the new kit and the 15 lb’er is out of my Trans Am. I’ll be making good use of both bottles, but not both at the same time. One will be in the car and the other will be my spare. There is an NX bottle warmer currenlty installed on the 15lb bottle. I’ll be repurposing that in this car as well so there was no need to buy a new one.
Well, that’s as far as I’ve gotten for now. Next I’ll probably mount the bottle in the trunk and route the main feed line to the front. After that I’ll still need to mount the nitrous pressure gauge under the cowl, finish plumbing the purge valve, finish plumbing the fuel side, and do ALL the wiring. I’m sure I’m forgetting something but those are the main items.
Next I pulled the carb and HVH carb spacer off, put the N2O plate on the bottom next to the manifold, and stacked the HVH back on top of it with new gaskets top and bottom. I didn’t need to install the longer carb studs that were included with the kit since I had installed long studs back when I first put on the HVH.
After messing around with a few solenoid mounting locations I decided it would be best to first assemble and mount the redundant solenoid, purge solenoid, and gauge adapter as a unit. Here it is assembled on the bench.
And here it is mounted from the rear-most passenger-side intake manifold bolt. The main nitrous feed line will ultimately be routed across the firewall and connect to the system just before the purge and pressure gauge adapters.
Next I needed a spot to mount the main nitrous solenoid. My mounting options were limited and it turned out the place the bracket really wanted to be when all the lines were hooked up was right at this 3/8th pipe plug in the number 8 manifold runner.
So I decided to improvise myself a mounting stud. I had a spare steel 3/8th pipe plug laying around so I drilled and tapped it to 3/8th and screwed a length of all-thread into it. The yellow paint you see is on the end all-thread stud.
To seal the plug off from potential vacuum leaks and to ensure the stud wouldn’t come loose I welded the stud and plug together at the bottom. Then I ground my welds to clean up the job.
Finally I cut the stud to length and installed my new stud/plug combo into the manifold runner. I now have a convenient place to mount my solenoid. I left the stud long enough so I can double-nut it to install and/or remove the plug if necessary.
Next I mounted the fuel solenoid on the driver’s side front manifold bolt. I didn’t order any parts to plumb fuel from the regulator to the solenoid because I wanted to figure out my mounting location first. Now that the fuel solenoid is in place, I just need a 3/8th NPT to 4 AN fitting for the regulator and a 8 or 9-inch long 4 AN hose to connect the solenoid to the regulator.
Here’s a pic with the carb sitting in place (not bolted down). After this picture I also installed the air cleaner and verified that the hood clearance was still good with the nitrous plate installed. It’s DAMN close......but it clears.
Above you can see an additional braided line going up under the hood cowl. That is the feed line for this nitrous pressure gauge that will ultimately be mounted next the fuel pressure gauge I installed in my cowl a few weeks ago.
Here are Little Boy and Fat Man (if you don’t get that reference, go read a history book….LOL). The 10 lb’er came with the new kit and the 15 lb’er is out of my Trans Am. I’ll be making good use of both bottles, but not both at the same time. One will be in the car and the other will be my spare. There is an NX bottle warmer currenlty installed on the 15lb bottle. I’ll be repurposing that in this car as well so there was no need to buy a new one.
Well, that’s as far as I’ve gotten for now. Next I’ll probably mount the bottle in the trunk and route the main feed line to the front. After that I’ll still need to mount the nitrous pressure gauge under the cowl, finish plumbing the purge valve, finish plumbing the fuel side, and do ALL the wiring. I’m sure I’m forgetting something but those are the main items.
01-13-2013, 12:05 PM
#11
Launching!
iTrader: (1)
Join Date: Jul 2009
Location: Missouri
Posts: 209
Likes: 0
Received 0 Likes
on
0 Posts
Really a nice install. You are going to have a ball, if you have never used that kind of spacer before. Yuk,Yuk. I'm old and when my full size pickup runs in the 10's I feel a lot younger. Thanks to one of those spacers..........My mounting is similar altho yours looks a little cleaner.
Can't wait to here and see your results, good luck .......
Can't wait to here and see your results, good luck .......
01-13-2013, 03:59 PM
#12
Thanks! I've been putting these updates in my build thread as well, but I figured the carb guys around here would enjoy seeing this stuff on a carb'd motor.
Really a nice install. You are going to have a ball, if you have never used that kind of spacer before. Yuk,Yuk. I'm old and when my full size pickup runs in the 10's I feel a lot younger. Thanks to one of those spacers..........My mounting is similar altho yours looks a little cleaner.
Can't wait to here and see your results, good luck .......
Can't wait to here and see your results, good luck .......
 01-13-2013, 04:02 PM
#13
Launching!
iTrader: (1)
Join Date: Jul 2009
Location: Missouri
Posts: 209
Likes: 0
Received 0 Likes
on
0 Posts
you sure have! I just hope i have as good results as you have. My converter is looser so that could hurt or help me....most likely hurt though as shots get to 150hp or more. But my motor is almost a point and a half less compression than yours so i think from that aspect it's really gonna wake it up! When my ta was stock cam and stock compression the gains on the spray were much greater for a given hit. I know some of that was due to the cam, but i'm hoping some of it was compression related as well.
Thanks! I've been putting these updates in my build thread as well, but i figured the carb guys around here would enjoy seeing this stuff on a carb'd motor.
Thanks steve! I've messed with dry n2o shots on my ta quite a bit but this is my first wet plate system. Your truck runs great and your install looks great as well. 10's in that truck is awesome! I'm sure you suprise quite a few people with it! I'm sure i'm gonna have a lot of fun with this thing as long as i don't get too greedy. I'm gonna have to pick your brain about your 200 shot tune up........but not yet. Damn it.....it's happening already.......
01-13-2013, 08:25 PM
#14
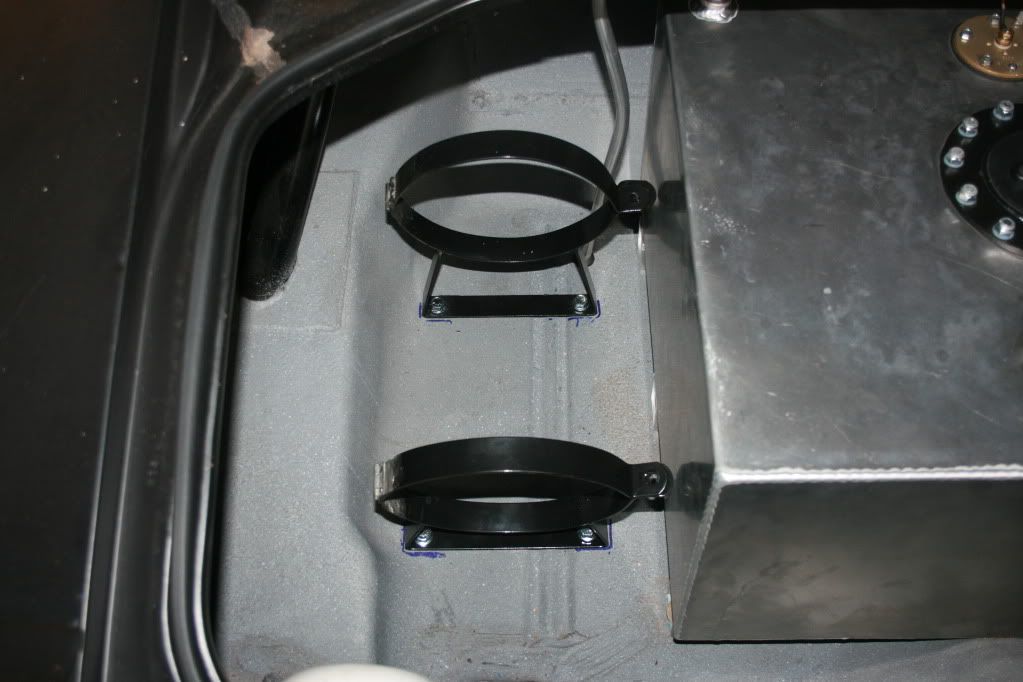
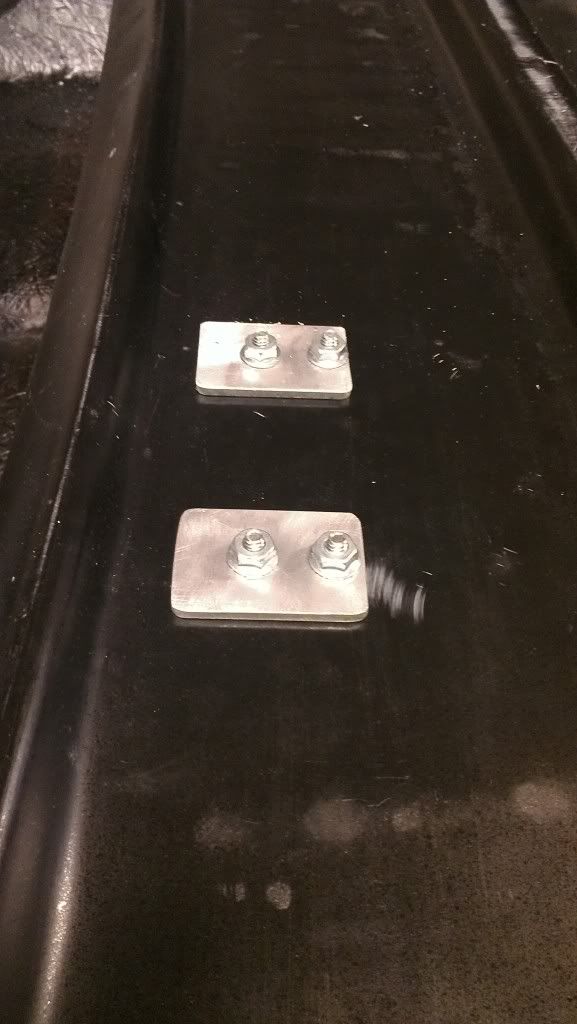
I didn’t have a lot of time today but I slipped away into the garage for a few hours to work on mounting my bottle(s). One thing I recognized months ago when mocking in my 15lb bottle is that space is tight in my trunk and it was going to be difficult to change bottles in a traditional manner with stock bottle brackets. I already had some ideas for remedying that, but first I needed to place and mark the brackets in the trunk in preparation for drilling the mounting holes. In placing the brackets I needed to consider the ability to use both bottle sizes. Here’s where they ended up.
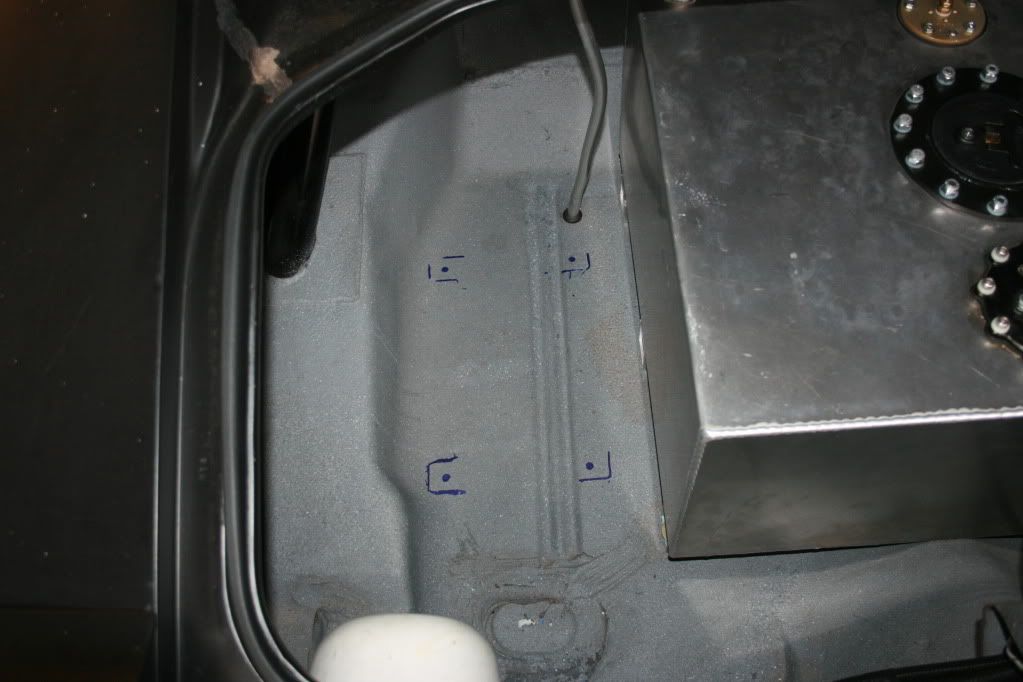
This gives you an idea of why my bottles can not be side loaded into these brackets due to being next to the fuel cell, nor can they be loaded from the rear because of being so close to the tail panel/tail light buckets. Obviously the same goes for loading them from the front.
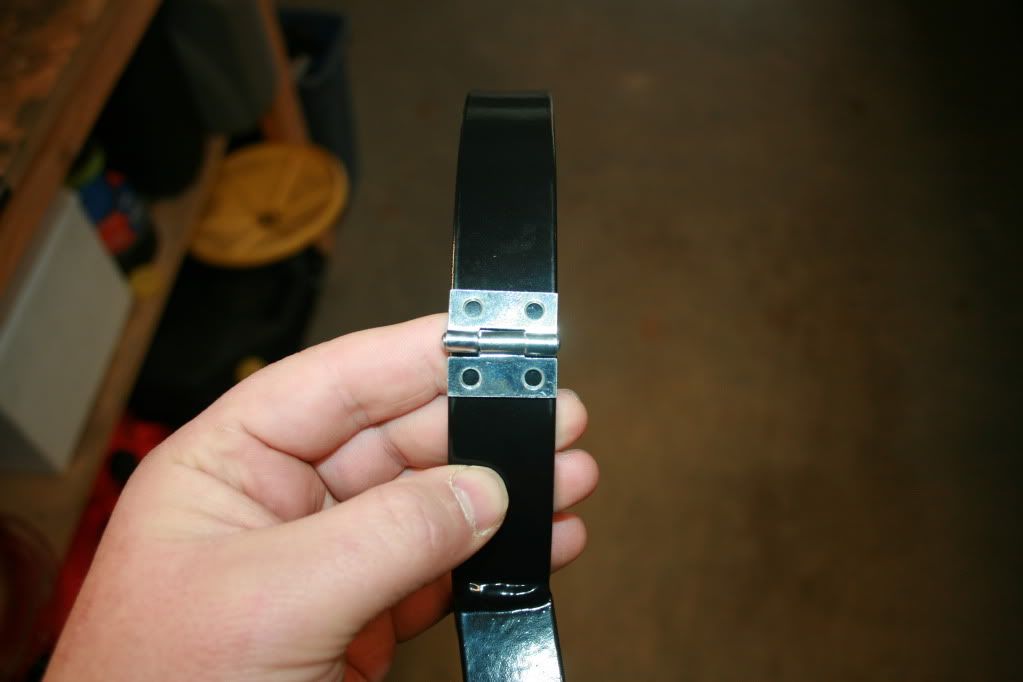
So my solution was to pick up these 1 inch hinges from Lowes. All that’s needed is to cut the brackets on the left hand side and weld in the hinges so the brackets will open up and allow a bottle to be loaded from the top. I’d like to say this is an original idea but I’ve seen it done somewhere before.
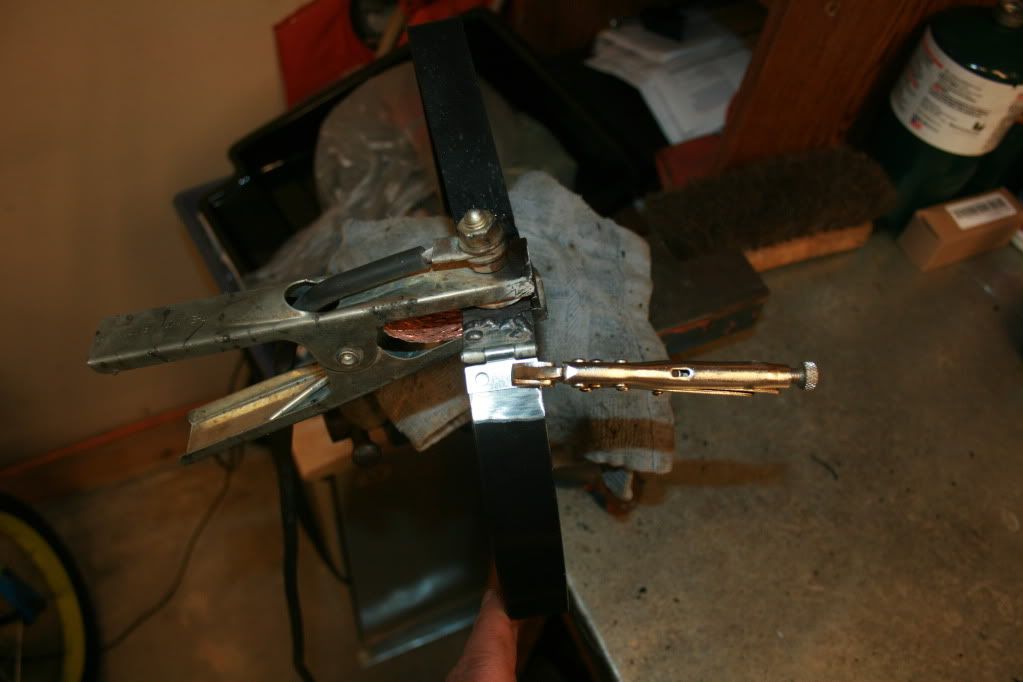
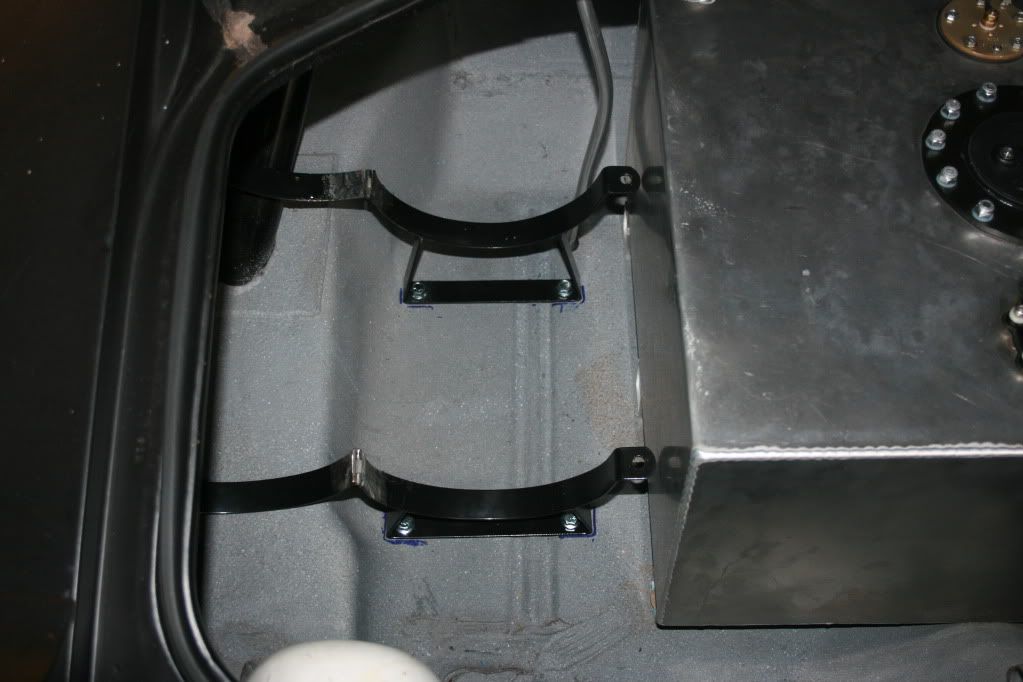
I wanted to be consistent in my hinge placement so I laid the bottle brackets on top of one another to make my mark. Turns out the opening on the right hand side is clocked differently on both brackets with relation to the bottom mounting points so….so much for consistency. I just made the cut in same spot on the left side of both brackets despite the difference on the right side.
Once the sparks of cutting and welding start flying I often forget to stop and take pictures. However here’s an in-progress shot of the second bracket just before I finished welding it up. Excuse my poor welds. I blame the erratic wire feeding of this damn machine. I should buy stock in grinding wheels.
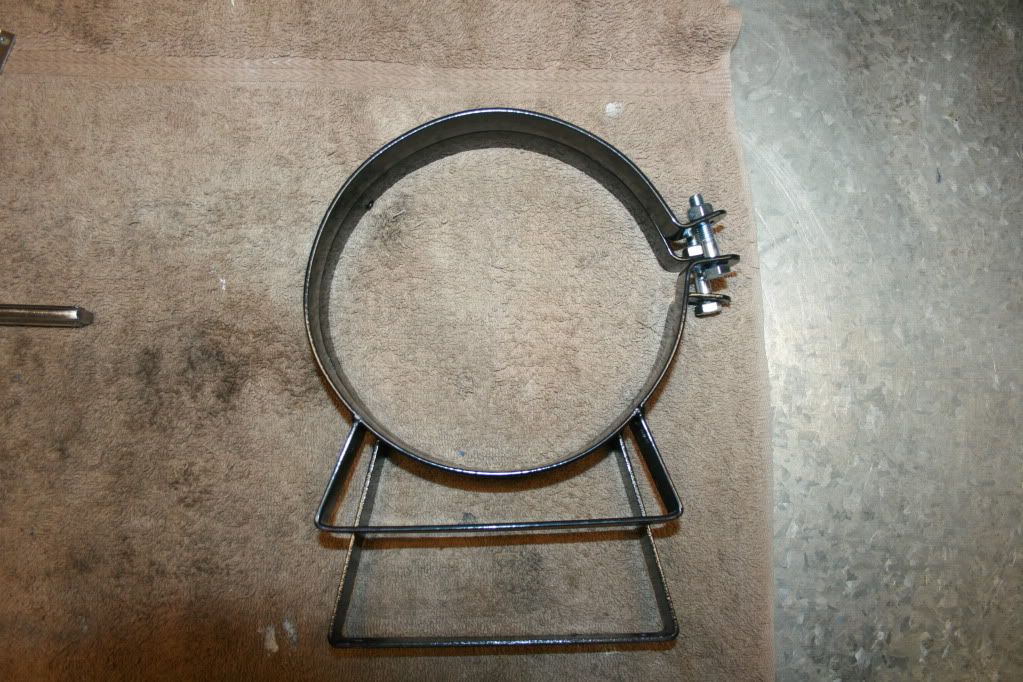
And here is the ‘almost’ finished product in place. I say almost because I still need to clean up my welds with a grinder and repaint the brackets. In fact, the powder coat NOS puts on these brackets is so poorly done, I think I’m going to completely strip them and paint the whole things rather than just touch up the spots I ground/burnt off. Anyway, there not bolted in…..just sat them in there with the bolts dropped through the holes for the pic.
This gives you an idea of why my bottles can not be side loaded into these brackets due to being next to the fuel cell, nor can they be loaded from the rear because of being so close to the tail panel/tail light buckets. Obviously the same goes for loading them from the front.
So my solution was to pick up these 1 inch hinges from Lowes. All that’s needed is to cut the brackets on the left hand side and weld in the hinges so the brackets will open up and allow a bottle to be loaded from the top. I’d like to say this is an original idea but I’ve seen it done somewhere before.
I wanted to be consistent in my hinge placement so I laid the bottle brackets on top of one another to make my mark. Turns out the opening on the right hand side is clocked differently on both brackets with relation to the bottom mounting points so….so much for consistency. I just made the cut in same spot on the left side of both brackets despite the difference on the right side.
Once the sparks of cutting and welding start flying I often forget to stop and take pictures. However here’s an in-progress shot of the second bracket just before I finished welding it up. Excuse my poor welds. I blame the erratic wire feeding of this damn machine. I should buy stock in grinding wheels.
And here is the ‘almost’ finished product in place. I say almost because I still need to clean up my welds with a grinder and repaint the brackets. In fact, the powder coat NOS puts on these brackets is so poorly done, I think I’m going to completely strip them and paint the whole things rather than just touch up the spots I ground/burnt off. Anyway, there not bolted in…..just sat them in there with the bolts dropped through the holes for the pic.
01-14-2013, 02:54 PM
#16
Yeah....for sure. I think I may tack weld the bolt heads to the lower portion of the bracket so they don't need to be held from spinning, which should greatly simplify things. The one thing I'll need to test first is whether the bolts are so long that the uppers wont want to swing over them as they come closed. If so, I may have to shorten them a bit......which may make it harder to get the nuts started while holding downard pressure on the bracket. An alternative may be to weld the nuts to the bottom and thread the fulle length bolts in from the top. I guess I just haven't had enough time to stand and scratch my head over it yet as I've only been home on the weekends lately and my time then is limited. Just another project for next weekend I guess.
 02-09-2013, 08:53 PM
#18
It seems like I never have time to work on the car any more and when I do it’s usually only for an hour or so at a time. So I’ve been saving up some updates for a while now.
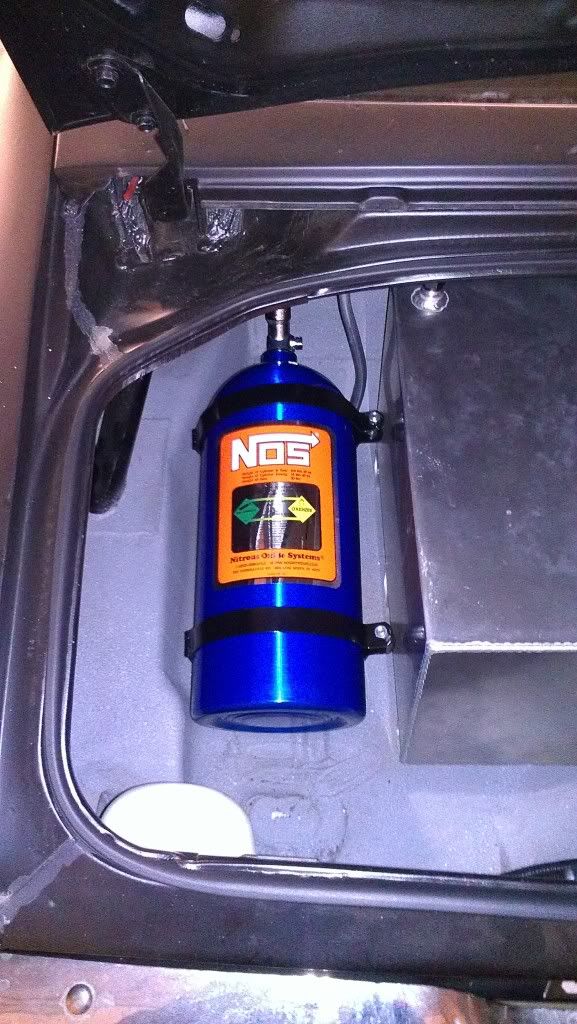
First of all I finally bolted in my modified bottle brackets after looking at them sitting on the bench for quite a while all painted up. I’m real happy with how they work. A single socket and ratchet is all it takes to change the bottle now and the bottle goes in and out with no hassle. The only thing I’m not happy with is that I bolted the front bracket in a little crooked. I made the holes in the trunk pan large enough to give me some adjustability specifically so I could get them straight but without a helper on the top side of the car when I bolted them in.......it’s gonna take a couple trys.
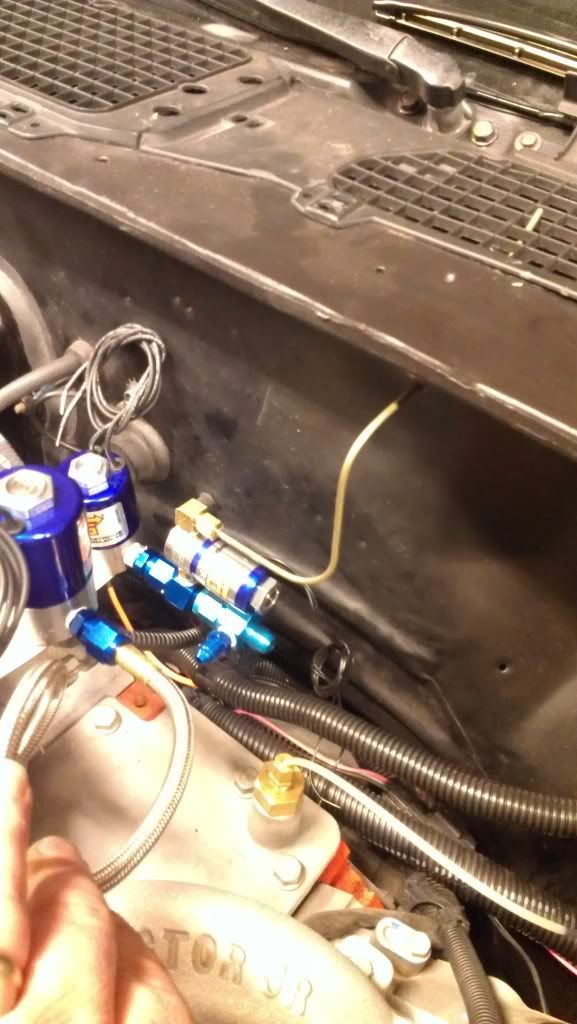
I got some small parts from Summit early last week so one of the first things I did when they arrived was to finish plumbing my fuel solenoid to the regulator.
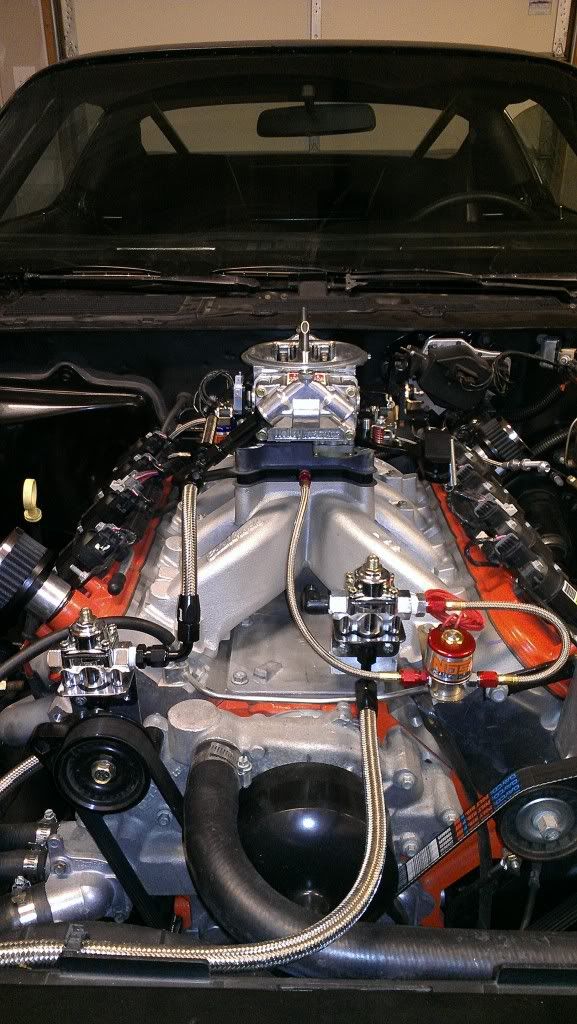
Another trinket in my Summit order was a WOT switch bracket. This thing was probably not necessary as I could have fabbed something myself but I just wanted a simple, no hassle, bolt-on way to set up my WOT switch. Well……all’s well that ends well but this thing definitely didn’t just bolt on. It’s for a specifically for a 4150 Holley main body and since mine is a 4150 HP I already knew I'd have to tap the choke bracket holes to bolt it on......no sweat. But the aftermarket secondary linkage on my Pro Systems carb wouldn’t clear the bracket without me first grinding down the spacers on the back of it. Then I had to significantly shorten the rear idle speed screw and spring so the screw would be short enough to engage the switch arm rather than just hit the top of the switch body and keep the seconaries from opening. None of this was really a big deal to do, but by the time I was done dicking around I could have probably fabbed my own bracket or used the one that came with the kit. $40 lesson learned. Oh well....it looks cool.
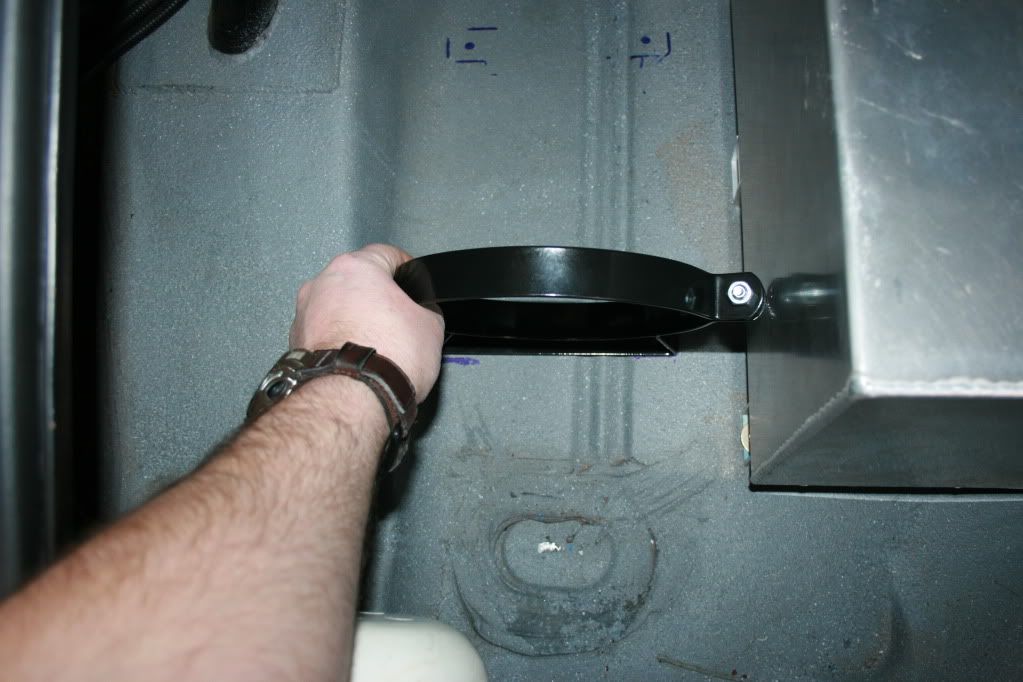
Today I pulled the hood off the car and worked on mounting the nitrous pressure gauge next to the fuel pressure gauge under the cowl. This was pretty easy since I had already done it once before. I’ll spare you the details and just show a pic of the aluminum braces I made for the underside of the hood and then the finished position of the gauges.
Since the hood was off I figured it would be a great time to plumb the business end of the purge valve. This was another simple job that really just consisted of bending up the tube and drilling a hole in the firewall to route it through. From there the tube routes up through the cowl drain grate. That should be good for now. I may have to adjust the tube's position though after I've tried it out.
After the purge was done I started to route the main nitrous feed line. I started up front and got it routed through the firewall grommet and into the car. From there it will be routed under the door sill plate and ultimately route into the trunk with the bottle. None of the routing will be terribly photo worthy so I may not have many pics of that. Once that job is complete I can start the tedious work of wiring it all up.
First of all I finally bolted in my modified bottle brackets after looking at them sitting on the bench for quite a while all painted up. I’m real happy with how they work. A single socket and ratchet is all it takes to change the bottle now and the bottle goes in and out with no hassle. The only thing I’m not happy with is that I bolted the front bracket in a little crooked. I made the holes in the trunk pan large enough to give me some adjustability specifically so I could get them straight but without a helper on the top side of the car when I bolted them in.......it’s gonna take a couple trys.
I got some small parts from Summit early last week so one of the first things I did when they arrived was to finish plumbing my fuel solenoid to the regulator.
Another trinket in my Summit order was a WOT switch bracket. This thing was probably not necessary as I could have fabbed something myself but I just wanted a simple, no hassle, bolt-on way to set up my WOT switch. Well……all’s well that ends well but this thing definitely didn’t just bolt on. It’s for a specifically for a 4150 Holley main body and since mine is a 4150 HP I already knew I'd have to tap the choke bracket holes to bolt it on......no sweat. But the aftermarket secondary linkage on my Pro Systems carb wouldn’t clear the bracket without me first grinding down the spacers on the back of it. Then I had to significantly shorten the rear idle speed screw and spring so the screw would be short enough to engage the switch arm rather than just hit the top of the switch body and keep the seconaries from opening. None of this was really a big deal to do, but by the time I was done dicking around I could have probably fabbed my own bracket or used the one that came with the kit. $40 lesson learned. Oh well....it looks cool.
Today I pulled the hood off the car and worked on mounting the nitrous pressure gauge next to the fuel pressure gauge under the cowl. This was pretty easy since I had already done it once before. I’ll spare you the details and just show a pic of the aluminum braces I made for the underside of the hood and then the finished position of the gauges.
Since the hood was off I figured it would be a great time to plumb the business end of the purge valve. This was another simple job that really just consisted of bending up the tube and drilling a hole in the firewall to route it through. From there the tube routes up through the cowl drain grate. That should be good for now. I may have to adjust the tube's position though after I've tried it out.
After the purge was done I started to route the main nitrous feed line. I started up front and got it routed through the firewall grommet and into the car. From there it will be routed under the door sill plate and ultimately route into the trunk with the bottle. None of the routing will be terribly photo worthy so I may not have many pics of that. Once that job is complete I can start the tedious work of wiring it all up.
02-10-2013, 06:19 AM
#19
10 Second Club
Looks good so far 
Thats where I wanted to mount my guages too....but not enough room, so now I'm looking at a bracket to mount them on and still see the guages in the cowl.
Thats where I wanted to mount my guages too....but not enough room, so now I'm looking at a bracket to mount them on and still see the guages in the cowl.

