The truck ignition coil upgrade
 03-05-2010, 07:39 AM
#1

The truck ignition coil upgrade:
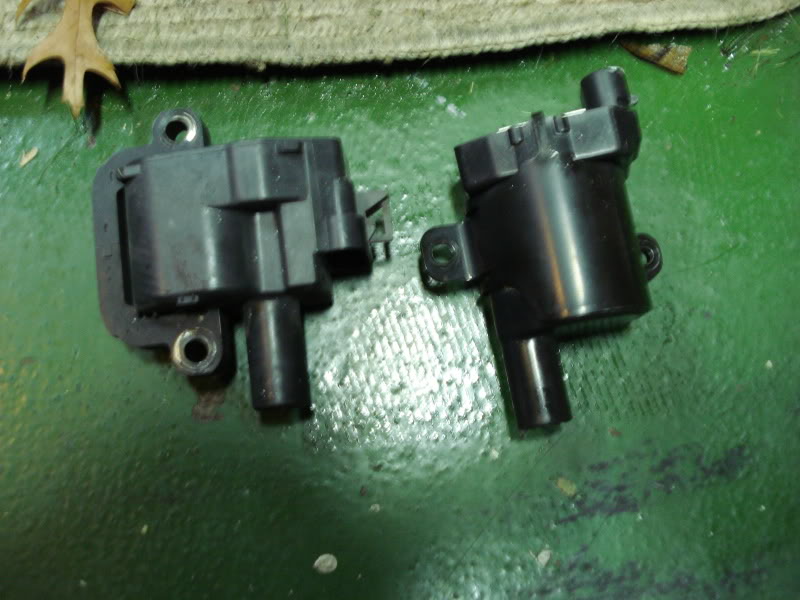
Many GM trucks come with a different, more powerful ignition coil. These coils have round bodies and an aluminum heat sink on one end.
Swapping these coils into a LS1 equipped engine in a Camaro/Firebird has shown improvements in horsepower and torque. The same improvements should be seen in a Corvette or even a GTO. Some car owners who�ve done this swap have also reported better throttle response, engine smoothness and fuel economy. A few have done back to back dyno pulls to document the results. Power improvement results can vary from an increase high of 9 rwhp/18 rwtq to a low of 6 rwhp/2 rwtq. One shop showed no improvements at all. Obviously, results will vary and may be affected by other modifications done to the vehicle or the engine�s overall condition. Turbo shops have been using these coils for a few years, it�s even noted in the excellent publication "How To Build High-Performance Chevy LS1/LS6 V-8s" (you do have a copy of this book, right?)
Doing the swap:
The coils are 10457730 (GM part number) (AC Delco part number D585), eight coils needed.
The coil mounting brackets are 10457736 (GM part number), two brackets needed.
The coil harnesses are 12601824 (GM part number) two harnesses needed.
Many GM trucks had these setups BUT NOT ALL. You might find them in a salvage/junk yard. A visual inspection that they have the exposed heat sinks will confirm your find. They�ve been found on all engines even the lowly 4.8 liter. Most, if not all, Express/Savana full size vans and van-based chassis/cabs (busses, box trucks, etc.) have the correct parts. You�ll want to take the coils mounted on the brackets with the wiring harnesses as complete units.
Used coils with miles on them should work fine as long as they are functioning coils. Ignition coils have no moving parts to wear out and reduce their performance. They either work or don�t work. Perhaps a good cleaning/de-greasing might be in order.
If purchasing new, be aware that there are cheep junk coils on the market (ebay?) that don�t have the abilities/qualities/performance/reliableties/longevity that The Real Deal GM coils do.
Accel makes a yellow (of course) "high output" replacement coil that is definitely not a painted GM coil HOWEVER, some folks who�ve tried them had pre-detonation/pinging issues. The GM coils appear to work the best.
1997 through 1998 engines have perimeter bolt valve covers with the coils mounted directly to them without a coil bracket. To do the swap on these cars, you�ll need to devise your own method to mount the new coils.
1999 and up cars have center bolt valve covers and the coils are mounted to coil brackets. These coil brackets are mounted to the valve covers. There were several different ignition coils used, each with it�s own coil bracket. They�ll all mount to any stock center bolt valve cover.
The pin outs and keying on the coil plugs are different. Two types of coil harnesses here, LS1/LS6 and everything else. The "everything else" would be LS2, LS3, LS7, LQ4, LQ9, etc all use the "LS2" style coil plug which is what you�ll need. Therefore, if you�re doing this swap on a LS2 GTO or Corvette, you�ll be able to use your existing coil harness. These harnesses are mounted to the coil brackets and connect to the engine harness with a large plug located in the center of the coil bracket.
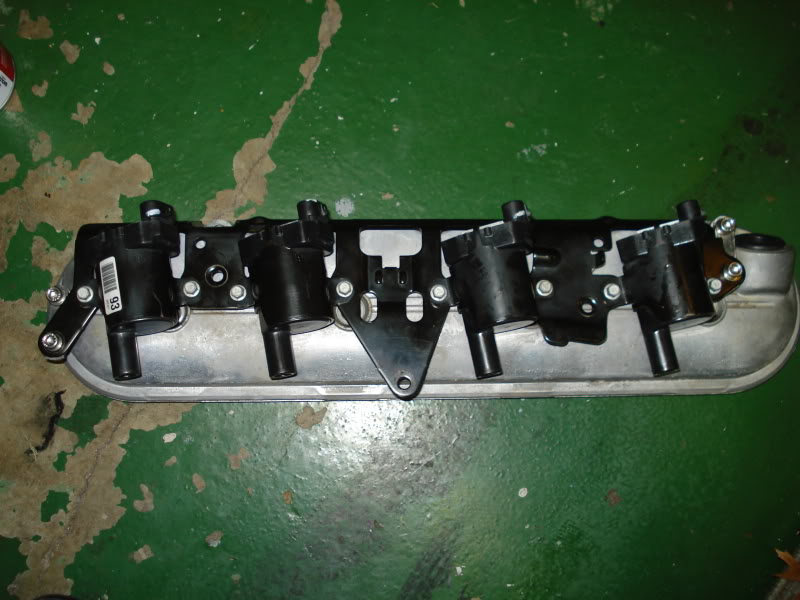
Removing the stock setup is pretty straightforward. Start with a cold car/engine. Have other wheels or a bud to run you to the store to get that widget you might discover you need. DISCONNECT THE BATTERY because you know you�ll drop some metal something on a positive voltage something. Unplug the spark plug wires at the plugs and the engine to coil harness plug. Using a deep 10 mm socket, remove the five bolts through each bracket to the valve covers, they look like studs. Remove the coil packs with the brackets, harnesses and plug wires as one piece.
Assemble your new coils and harnesses onto the new brackets. Compare the harness routing/affixing method to the originals.
Mounting the brackets:
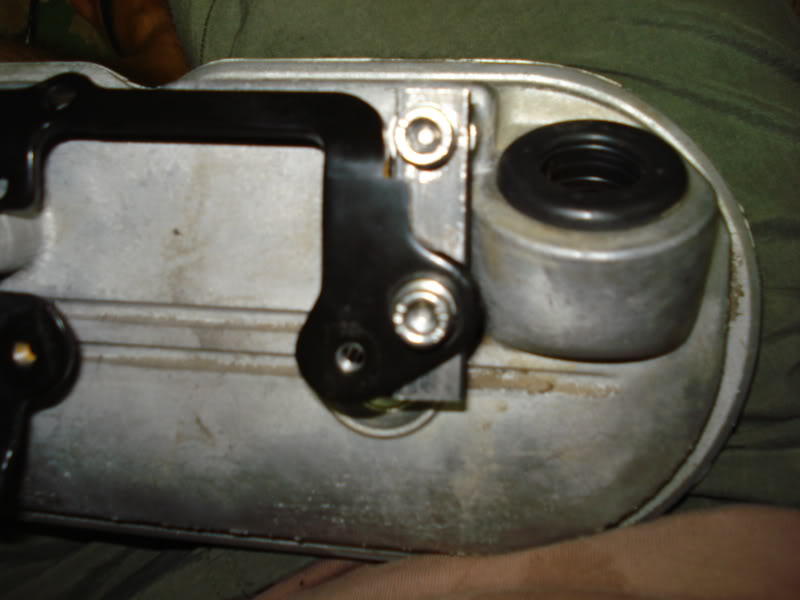
Be careful tightening the bracket bolts into the valve covers as the valve cover bolt stand-offs strip easily. The coil brackets and coils are taller than the originals and will interfere with a few things.
On Camaro/Firebird applications on the right side, the PCM wiring loom next to the heater box will need to have one clip removed so the loom can be moved rearwards. You may need to finagle the A.I.R. tubes a bit, if you have them and they�re still in place.
On the left side, you�ll need to re-locate the evap return solenoid and hose/harness as it will be in the way. Moving to the fender well or next to the throttle body works. The fuel line will need to be gently nudged upwards until it clears the number five coil plug. It�ll be easier to bend if the first welded tab on the fuel line was cut. Go slow, don�t bust anything that you�ll need to fix later.
As of this writing, nobody has reported on doing the swap on a GTO or Corvette or any other car. If you do so, send me a write-up and it�ll be added in.
Spark plug wires:
LS7 wires fit perfectly. LS1 wires may not be long enough although some have reported that they fit fine. Test & fit as you go along.
PCM:
While this is a plug and play job and there�s no need to mess with the PCM, there may be some improvements to be gained by using the dwell/timing tables from a truck PCM. A good programmer can do the change but it�s recommended that you do some dyno testing to see if your changes helped. Be aware that dwell/timing changes may cause pre-detonation (knocking) and this is bad, very bad. Make baby step changes.
Go slow, use the correct parts, be careful, measure twice and cut once.
Good luck! Paul Bell
Many GM trucks come with a different, more powerful ignition coil. These coils have round bodies and an aluminum heat sink on one end.
Swapping these coils into a LS1 equipped engine in a Camaro/Firebird has shown improvements in horsepower and torque. The same improvements should be seen in a Corvette or even a GTO. Some car owners who�ve done this swap have also reported better throttle response, engine smoothness and fuel economy. A few have done back to back dyno pulls to document the results. Power improvement results can vary from an increase high of 9 rwhp/18 rwtq to a low of 6 rwhp/2 rwtq. One shop showed no improvements at all. Obviously, results will vary and may be affected by other modifications done to the vehicle or the engine�s overall condition. Turbo shops have been using these coils for a few years, it�s even noted in the excellent publication "How To Build High-Performance Chevy LS1/LS6 V-8s" (you do have a copy of this book, right?)
Doing the swap:
The coils are 10457730 (GM part number) (AC Delco part number D585), eight coils needed.
The coil mounting brackets are 10457736 (GM part number), two brackets needed.
The coil harnesses are 12601824 (GM part number) two harnesses needed.
Many GM trucks had these setups BUT NOT ALL. You might find them in a salvage/junk yard. A visual inspection that they have the exposed heat sinks will confirm your find. They�ve been found on all engines even the lowly 4.8 liter. Most, if not all, Express/Savana full size vans and van-based chassis/cabs (busses, box trucks, etc.) have the correct parts. You�ll want to take the coils mounted on the brackets with the wiring harnesses as complete units.
Used coils with miles on them should work fine as long as they are functioning coils. Ignition coils have no moving parts to wear out and reduce their performance. They either work or don�t work. Perhaps a good cleaning/de-greasing might be in order.
If purchasing new, be aware that there are cheep junk coils on the market (ebay?) that don�t have the abilities/qualities/performance/reliableties/longevity that The Real Deal GM coils do.
Accel makes a yellow (of course) "high output" replacement coil that is definitely not a painted GM coil HOWEVER, some folks who�ve tried them had pre-detonation/pinging issues. The GM coils appear to work the best.
1997 through 1998 engines have perimeter bolt valve covers with the coils mounted directly to them without a coil bracket. To do the swap on these cars, you�ll need to devise your own method to mount the new coils.
1999 and up cars have center bolt valve covers and the coils are mounted to coil brackets. These coil brackets are mounted to the valve covers. There were several different ignition coils used, each with it�s own coil bracket. They�ll all mount to any stock center bolt valve cover.
The pin outs and keying on the coil plugs are different. Two types of coil harnesses here, LS1/LS6 and everything else. The "everything else" would be LS2, LS3, LS7, LQ4, LQ9, etc all use the "LS2" style coil plug which is what you�ll need. Therefore, if you�re doing this swap on a LS2 GTO or Corvette, you�ll be able to use your existing coil harness. These harnesses are mounted to the coil brackets and connect to the engine harness with a large plug located in the center of the coil bracket.
Removing the stock setup is pretty straightforward. Start with a cold car/engine. Have other wheels or a bud to run you to the store to get that widget you might discover you need. DISCONNECT THE BATTERY because you know you�ll drop some metal something on a positive voltage something. Unplug the spark plug wires at the plugs and the engine to coil harness plug. Using a deep 10 mm socket, remove the five bolts through each bracket to the valve covers, they look like studs. Remove the coil packs with the brackets, harnesses and plug wires as one piece.
Assemble your new coils and harnesses onto the new brackets. Compare the harness routing/affixing method to the originals.
Mounting the brackets:
Be careful tightening the bracket bolts into the valve covers as the valve cover bolt stand-offs strip easily. The coil brackets and coils are taller than the originals and will interfere with a few things.
On Camaro/Firebird applications on the right side, the PCM wiring loom next to the heater box will need to have one clip removed so the loom can be moved rearwards. You may need to finagle the A.I.R. tubes a bit, if you have them and they�re still in place.
On the left side, you�ll need to re-locate the evap return solenoid and hose/harness as it will be in the way. Moving to the fender well or next to the throttle body works. The fuel line will need to be gently nudged upwards until it clears the number five coil plug. It�ll be easier to bend if the first welded tab on the fuel line was cut. Go slow, don�t bust anything that you�ll need to fix later.
As of this writing, nobody has reported on doing the swap on a GTO or Corvette or any other car. If you do so, send me a write-up and it�ll be added in.
Spark plug wires:
LS7 wires fit perfectly. LS1 wires may not be long enough although some have reported that they fit fine. Test & fit as you go along.
PCM:
While this is a plug and play job and there�s no need to mess with the PCM, there may be some improvements to be gained by using the dwell/timing tables from a truck PCM. A good programmer can do the change but it�s recommended that you do some dyno testing to see if your changes helped. Be aware that dwell/timing changes may cause pre-detonation (knocking) and this is bad, very bad. Make baby step changes.
Go slow, use the correct parts, be careful, measure twice and cut once.
Good luck! Paul Bell
Last edited by Paul Bell; 01-02-2014 at 10:27 AM. Reason: title

The following users liked this post:
SweetJohnny (07-22-2023)
 03-06-2010, 11:43 AM
#3
I believe there has been more than just 1 shop show no dyno gains. I saw 1 that showed a power LOSS. Seems to be more a case of +/- error of the dyno than anything.
I tried them and it was easy to get excited and the car seemed to be running and responding a little better. Did some EFI live logs and switched back and realized the car felt the same and I could see no results in any EFI live data.
I got mine for free from a salvage yard so I had nothing in them but a couple minutes to try them out. Ended up selling them on here for $140.
I do not recommend spending the money or time on this swap unless you get them for free or have a problem with a stock coil to start with. There might be a benefit for a FI car but anything less and the stock coils are just so hot to start with I don't even see how anyone could expect a difference.
Think about all the big blocks running on a single coil with the same or less power than a single ls1 coil. Just my $.02
The following users liked this post:
SweetJohnny (07-22-2023)
09-16-2012, 10:43 PM
#6
Teching In
iTrader: (1)

Join Date: May 2008
Location: orlando, fl
Posts: 49
Likes: 0
Received 0 Likes
on
0 Posts
Originally Posted by Paul Bell
The truck ignition coil upgrade.
Many GM trucks come with a different, more powerful ignition coil. These coils have round bodies and an aluminum heat sink on one end.
Swapping these coils into a LS1 equipped engine in a Camaro/Firebird has shown improvements in horsepower and torque. The same improvements should be seen in a Corvette or even a GTO. Some car owners who’ve done this swap have also reported better throttle response, engine smoothness and fuel economy. A few have done back to back dyno pulls to document the results. Power improvement results can vary from an increase high of 9 rwhp/18 rwtq to a low of 6 rwhp/2 rwtq. One shop showed no improvements at all. Obviously, results will vary and may be affected by other modifications done to the vehicle or the engine’s overall condition. Turbo shops have been using these coils for a few years, it’s even noted in the excellent publication "How To Build High-Performance Chevy LS1/LS6 V-8s" (you do have a copy of this book, right?)
Doing the swap:
The coils are 10457730 (GM part number) (AC Delco part number D585), eight coils needed.
The coil mounting brackets are 10457736 (GM part number), two brackets needed.
The coil harnesses are 12601824 (GM part number) two harnesses needed.
Many GM trucks had these setups BUT NOT ALL. You might find them in a salvage/junk yard. A visual inspection that they have the exposed heat sinks will confirm your find. They’ve been found on all engines even the lowly 4.8 liter. Most, if not all, Express/Savana full size vans and van-based chassis/cabs (busses, box trucks, etc.) have the correct parts. You’ll want to take the coils mounted on the brackets with the wiring harnesses as complete units.
Used coils with miles on them should work fine as long as they are functioning coils. Ignition coils have no moving parts to wear out and reduce their performance. They either work or don’t work. Perhaps a good cleaning/de-greasing might be in order.
If purchasing new, be aware that there are cheep junk coils on the market (ebay?) that don’t have the abilities/qualities/performance/reliableties/longevity that The Real Deal GM coils do.
Accel makes a yellow (of course) "high output" replacement coil that is definitely not a painted GM coil HOWEVER, some folks who’ve tried them had pre-detonation/pinging issues. The GM coils appear to work the best.
1997 through 1998 engines have perimeter bolt valve covers with the coils mounted directly to them without a coil bracket. To do the swap on these cars, you’ll need to devise your own method to mount the new coils.
1999 and up cars have center bolt valve covers and the coils are mounted to coil brackets. These coil brackets are mounted to the valve covers. There were several different ignition coils used, each with it’s own coil bracket. They’ll all mount to any stock center bolt valve cover.
The pin outs and keying on the coil plugs are different. Two types of coil harnesses here, LS1/LS6 and everything else. The "everything else" would be LS2, LS3, LS7, LQ4, LQ9, etc all use the "LS2" style coil plug which is what you’ll need. Therefore, if you’re doing this swap on a LS2 GTO or Corvette, you’ll be able to use your existing coil harness. These harnesses are mounted to the coil brackets and connect to the engine harness with a large plug located in the center of the coil bracket.
Removing the stock setup is pretty straightforward. Start with a cold car/engine. Have other wheels or a bud to run you to the store to get that widget you might discover you need. DISCONNECT THE BATTERY because you know you’ll drop some metal something on a positive voltage something. Unplug the spark plug wires at the plugs and the engine to coil harness plug. Using a deep 10 mm socket, remove the five bolts through each bracket to the valve covers, they look like studs. Remove the coil packs with the brackets, harnesses and plug wires as one piece.
Assemble your new coils and harnesses onto the new brackets. Compare the harness routing/affixing method to the originals.
Mounting the brackets:
Be careful tightening the bracket bolts into the valve covers as the valve cover bolt stand-offs strip easily. The coil brackets and coils are taller than the originals and will interfere with a few things.
On Camaro/Firebird applications on the right side, the PCM wiring loom next to the heater box will need to have one clip removed so the loom can be moved rearwards. You may need to finagle the A.I.R. tubes a bit, if you have them and they’re still in place.
On the left side, you’ll need to re-locate the evap return solenoid and hose/harness as it will be in the way. Moving to the fender well or next to the throttle body works. The fuel line will need to be gently nudged upwards until it clears the number five coil plug. It’ll be easier to bend if the first welded tab on the fuel line was cut. Go slow, don’t bust anything that you’ll need to fix later.
As of this writing, nobody has reported on doing the swap on a GTO or Corvette or any other car. If you do so, send me a write-up and it’ll be added in.
Spark plug wires:
LS7 wires fit perfectly. LS1 wires may not be long enough although some have reported that they fit fine. Test & fit as you go along.
PCM:
While this is a plug and play job and there’s no need to mess with the PCM, there may be some improvements to be gained by using the dwell/timing tables from a truck PCM. A good programmer can do the change but it’s recommended that you do some dyno testing to see if your changes helped. Be aware that dwell/timing changes may cause pre-detonation (knocking) and this is bad, very bad. Make baby step changes.
Go slow, use the correct parts, be careful, measure twice and cut once.
Good luck! Paul Bell
Posted from LS1Tech.com App for Android
Trending Topics
10-08-2012, 03:48 PM
#8
Registered User

Join Date: Aug 2012
Posts: 2
Likes: 0
Received 0 Likes
on
0 Posts
Originally Posted by Paul Bell
The truck ignition coil upgrade.
Many GM trucks come with a different, more powerful ignition coil. These coils have round bodies and an aluminum heat sink on one end.
Swapping these coils into a LS1 equipped engine in a Camaro/Firebird has shown improvements in horsepower and torque. The same improvements should be seen in a Corvette or even a GTO. Some car owners who’ve done this swap have also reported better throttle response, engine smoothness and fuel economy. A few have done back to back dyno pulls to document the results. Power improvement results can vary from an increase high of 9 rwhp/18 rwtq to a low of 6 rwhp/2 rwtq. One shop showed no improvements at all. Obviously, results will vary and may be affected by other modifications done to the vehicle or the engine’s overall condition. Turbo shops have been using these coils for a few years, it’s even noted in the excellent publication "How To Build High-Performance Chevy LS1/LS6 V-8s" (you do have a copy of this book, right?)
Doing the swap:
The coils are 10457730 (GM part number) (AC Delco part number D585), eight coils needed.
The coil mounting brackets are 10457736 (GM part number), two brackets needed.
The coil harnesses are 12601824 (GM part number) two harnesses needed.
Many GM trucks had these setups BUT NOT ALL. You might find them in a salvage/junk yard. A visual inspection that they have the exposed heat sinks will confirm your find. They’ve been found on all engines even the lowly 4.8 liter. Most, if not all, Express/Savana full size vans and van-based chassis/cabs (busses, box trucks, etc.) have the correct parts. You’ll want to take the coils mounted on the brackets with the wiring harnesses as complete units.
Used coils with miles on them should work fine as long as they are functioning coils. Ignition coils have no moving parts to wear out and reduce their performance. They either work or don’t work. Perhaps a good cleaning/de-greasing might be in order.
If purchasing new, be aware that there are cheep junk coils on the market (ebay?) that don’t have the abilities/qualities/performance/reliableties/longevity that The Real Deal GM coils do.
Accel makes a yellow (of course) "high output" replacement coil that is definitely not a painted GM coil HOWEVER, some folks who’ve tried them had pre-detonation/pinging issues. The GM coils appear to work the best.
1997 through 1998 engines have perimeter bolt valve covers with the coils mounted directly to them without a coil bracket. To do the swap on these cars, you’ll need to devise your own method to mount the new coils.
1999 and up cars have center bolt valve covers and the coils are mounted to coil brackets. These coil brackets are mounted to the valve covers. There were several different ignition coils used, each with it’s own coil bracket. They’ll all mount to any stock center bolt valve cover.
The pin outs and keying on the coil plugs are different. Two types of coil harnesses here, LS1/LS6 and everything else. The "everything else" would be LS2, LS3, LS7, LQ4, LQ9, etc all use the "LS2" style coil plug which is what you’ll need. Therefore, if you’re doing this swap on a LS2 GTO or Corvette, you’ll be able to use your existing coil harness. These harnesses are mounted to the coil brackets and connect to the engine harness with a large plug located in the center of the coil bracket.
Removing the stock setup is pretty straightforward. Start with a cold car/engine. Have other wheels or a bud to run you to the store to get that widget you might discover you need. DISCONNECT THE BATTERY because you know you’ll drop some metal something on a positive voltage something. Unplug the spark plug wires at the plugs and the engine to coil harness plug. Using a deep 10 mm socket, remove the five bolts through each bracket to the valve covers, they look like studs. Remove the coil packs with the brackets, harnesses and plug wires as one piece.
Assemble your new coils and harnesses onto the new brackets. Compare the harness routing/affixing method to the originals.
Mounting the brackets:
Be careful tightening the bracket bolts into the valve covers as the valve cover bolt stand-offs strip easily. The coil brackets and coils are taller than the originals and will interfere with a few things.
On Camaro/Firebird applications on the right side, the PCM wiring loom next to the heater box will need to have one clip removed so the loom can be moved rearwards. You may need to finagle the A.I.R. tubes a bit, if you have them and they’re still in place.
On the left side, you’ll need to re-locate the evap return solenoid and hose/harness as it will be in the way. Moving to the fender well or next to the throttle body works. The fuel line will need to be gently nudged upwards until it clears the number five coil plug. It’ll be easier to bend if the first welded tab on the fuel line was cut. Go slow, don’t bust anything that you’ll need to fix later.
As of this writing, nobody has reported on doing the swap on a GTO or Corvette or any other car. If you do so, send me a write-up and it’ll be added in.
Spark plug wires:
LS7 wires fit perfectly. LS1 wires may not be long enough although some have reported that they fit fine. Test & fit as you go along.
PCM:
While this is a plug and play job and there’s no need to mess with the PCM, there may be some improvements to be gained by using the dwell/timing tables from a truck PCM. A good programmer can do the change but it’s recommended that you do some dyno testing to see if your changes helped. Be aware that dwell/timing changes may cause pre-detonation (knocking) and this is bad, very bad. Make baby step changes.
Go slow, use the correct parts, be careful, measure twice and cut once.
Good luck! Paul Bell
Many GM trucks come with a different, more powerful ignition coil. These coils have round bodies and an aluminum heat sink on one end.
Swapping these coils into a LS1 equipped engine in a Camaro/Firebird has shown improvements in horsepower and torque. The same improvements should be seen in a Corvette or even a GTO. Some car owners who’ve done this swap have also reported better throttle response, engine smoothness and fuel economy. A few have done back to back dyno pulls to document the results. Power improvement results can vary from an increase high of 9 rwhp/18 rwtq to a low of 6 rwhp/2 rwtq. One shop showed no improvements at all. Obviously, results will vary and may be affected by other modifications done to the vehicle or the engine’s overall condition. Turbo shops have been using these coils for a few years, it’s even noted in the excellent publication "How To Build High-Performance Chevy LS1/LS6 V-8s" (you do have a copy of this book, right?)
Doing the swap:
The coils are 10457730 (GM part number) (AC Delco part number D585), eight coils needed.
The coil mounting brackets are 10457736 (GM part number), two brackets needed.
The coil harnesses are 12601824 (GM part number) two harnesses needed.
Many GM trucks had these setups BUT NOT ALL. You might find them in a salvage/junk yard. A visual inspection that they have the exposed heat sinks will confirm your find. They’ve been found on all engines even the lowly 4.8 liter. Most, if not all, Express/Savana full size vans and van-based chassis/cabs (busses, box trucks, etc.) have the correct parts. You’ll want to take the coils mounted on the brackets with the wiring harnesses as complete units.
Used coils with miles on them should work fine as long as they are functioning coils. Ignition coils have no moving parts to wear out and reduce their performance. They either work or don’t work. Perhaps a good cleaning/de-greasing might be in order.
If purchasing new, be aware that there are cheep junk coils on the market (ebay?) that don’t have the abilities/qualities/performance/reliableties/longevity that The Real Deal GM coils do.
Accel makes a yellow (of course) "high output" replacement coil that is definitely not a painted GM coil HOWEVER, some folks who’ve tried them had pre-detonation/pinging issues. The GM coils appear to work the best.
1997 through 1998 engines have perimeter bolt valve covers with the coils mounted directly to them without a coil bracket. To do the swap on these cars, you’ll need to devise your own method to mount the new coils.
1999 and up cars have center bolt valve covers and the coils are mounted to coil brackets. These coil brackets are mounted to the valve covers. There were several different ignition coils used, each with it’s own coil bracket. They’ll all mount to any stock center bolt valve cover.
The pin outs and keying on the coil plugs are different. Two types of coil harnesses here, LS1/LS6 and everything else. The "everything else" would be LS2, LS3, LS7, LQ4, LQ9, etc all use the "LS2" style coil plug which is what you’ll need. Therefore, if you’re doing this swap on a LS2 GTO or Corvette, you’ll be able to use your existing coil harness. These harnesses are mounted to the coil brackets and connect to the engine harness with a large plug located in the center of the coil bracket.
Removing the stock setup is pretty straightforward. Start with a cold car/engine. Have other wheels or a bud to run you to the store to get that widget you might discover you need. DISCONNECT THE BATTERY because you know you’ll drop some metal something on a positive voltage something. Unplug the spark plug wires at the plugs and the engine to coil harness plug. Using a deep 10 mm socket, remove the five bolts through each bracket to the valve covers, they look like studs. Remove the coil packs with the brackets, harnesses and plug wires as one piece.
Assemble your new coils and harnesses onto the new brackets. Compare the harness routing/affixing method to the originals.
Mounting the brackets:
Be careful tightening the bracket bolts into the valve covers as the valve cover bolt stand-offs strip easily. The coil brackets and coils are taller than the originals and will interfere with a few things.
On Camaro/Firebird applications on the right side, the PCM wiring loom next to the heater box will need to have one clip removed so the loom can be moved rearwards. You may need to finagle the A.I.R. tubes a bit, if you have them and they’re still in place.
On the left side, you’ll need to re-locate the evap return solenoid and hose/harness as it will be in the way. Moving to the fender well or next to the throttle body works. The fuel line will need to be gently nudged upwards until it clears the number five coil plug. It’ll be easier to bend if the first welded tab on the fuel line was cut. Go slow, don’t bust anything that you’ll need to fix later.
As of this writing, nobody has reported on doing the swap on a GTO or Corvette or any other car. If you do so, send me a write-up and it’ll be added in.
Spark plug wires:
LS7 wires fit perfectly. LS1 wires may not be long enough although some have reported that they fit fine. Test & fit as you go along.
PCM:
While this is a plug and play job and there’s no need to mess with the PCM, there may be some improvements to be gained by using the dwell/timing tables from a truck PCM. A good programmer can do the change but it’s recommended that you do some dyno testing to see if your changes helped. Be aware that dwell/timing changes may cause pre-detonation (knocking) and this is bad, very bad. Make baby step changes.
Go slow, use the correct parts, be careful, measure twice and cut once.
Good luck! Paul Bell
Posted from LS1Tech.com App for Android
 11-02-2012, 07:25 PM
#10
Hey jdman70, welcome to LS1tech! Search will be your best friend around here!
Sorry for the delayed response, I've had limited internet access.
The better heat-sinked coil will plug but not bolt up. You'll need to get the above mentioned coil brackets.
Sorry for the delayed response, I've had limited internet access.
The better heat-sinked coil will plug but not bolt up. You'll need to get the above mentioned coil brackets.
06-30-2013, 11:08 PM
#13
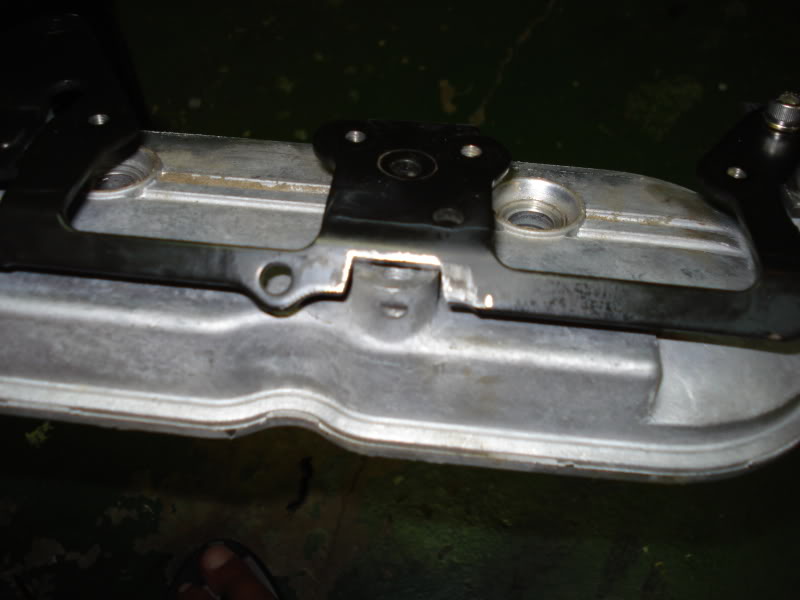
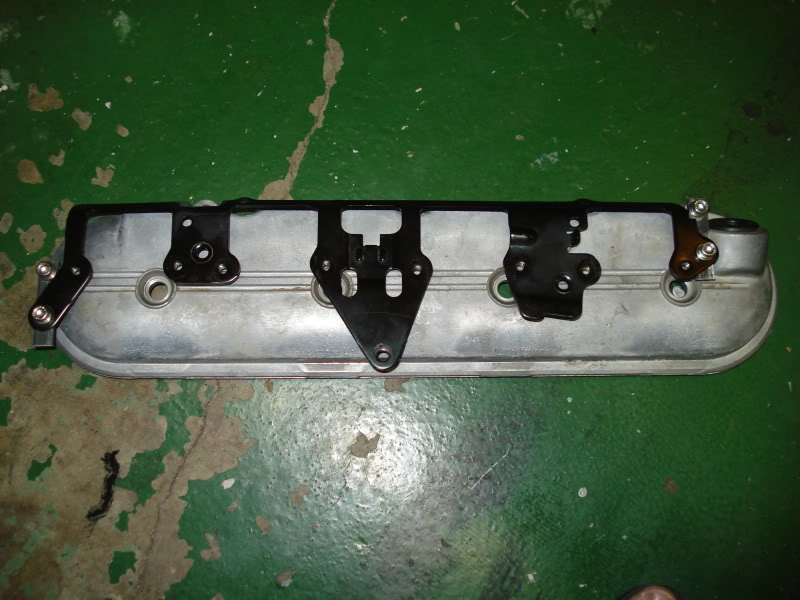
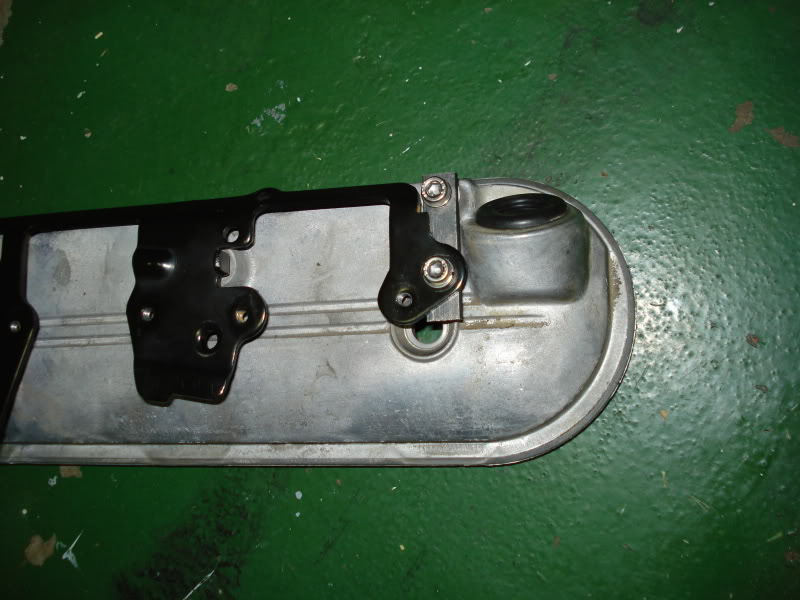
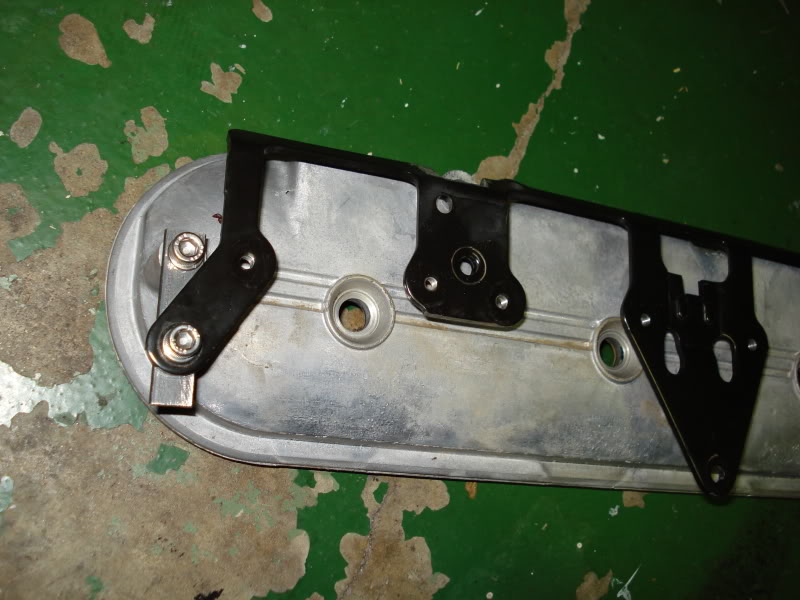
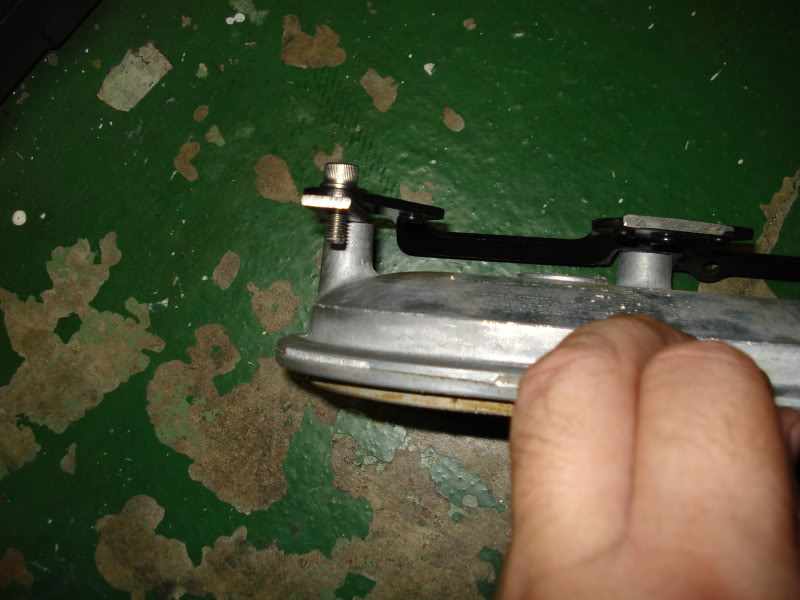
re reading this i found it lacked some info on how to mount the truck bracket on the valve cover
I dont know how you did yours paul.....but here is mine
the truck bracket puts the coils to high......so they need to be a little lower
i spaced them down with some 1/4 inch ( memory serves me bad....its been awhile ) flat stock i got from lowes
i think i spaced them down about a inch
I dont know how you did yours paul.....but here is mine
the truck bracket puts the coils to high......so they need to be a little lower
i spaced them down with some 1/4 inch ( memory serves me bad....its been awhile ) flat stock i got from lowes
i think i spaced them down about a inch