any pictures of how to remove seats
 09-01-2009, 07:43 AM
#1
On The Tree
Thread Starter

Join Date: Sep 2008
Posts: 132
Likes: 0
Received 0 Likes
on
0 Posts
hey guys
do u have any pictures of how to remove 2002 camaro leather seats
and which tools i need to use
i want to change my front n rear seats
coz i bought clean used camaro seats
any idea or pictures plzzz
do u have any pictures of how to remove 2002 camaro leather seats
and which tools i need to use
i want to change my front n rear seats
coz i bought clean used camaro seats
any idea or pictures plzzz
 09-01-2009, 10:42 AM
#2
TECH Regular
iTrader: (7)

Join Date: Jul 2005
Location: Little Creek, VA
Posts: 401
Likes: 0
Received 0 Likes
on
0 Posts

no pictures but its pretty straightforward.
the front seats have 4 bolts holding them to the floor. i dont remember what size socket, id guess 13 or 15mm. just unscrew the seatbelt guides and pull them out.
the rear seats are a little bit harder. the two buckets come out seperate and then the back support comes out in one piece. the buckets just have one bolt holding the front of them to the body.
you have to unbolt the seat belt assembly in the rear hatch, to get the back support out. it should have one bolt on the bottom of each side, and then pull the release handle on each side to unhook it. it should just pull out after that.
its been awhile since ive done it so i may have missed something.
edit: actually thinking about it, i think the rear back support has a seatbelt guide screwed to it just like the front, so you wouldnt need to remove the seatbelt assembly.
Last edited by wowsers; 09-01-2009 at 10:55 AM.
09-01-2009, 06:57 PM
#3
like he said....its real easy..... just look for bolts....and take them out.
there are 4 13mm bolts holding down each of the front seats. remove the seat belt guides at the headrest.
two bolts at the front of the rear seat cushions.
two nuts at the bottom of each side of the rear back rest. and two torx bits holding the seat belts to the back board.
reverse for install and have a beer after knowing you accomplished something.
ps: you dont need big bold letters to get our attention

 09-02-2009, 05:50 PM
#7
TECH Addict
iTrader: (75)
Join Date: Aug 2005
Location: South Jersey (15 miles from Atlantic City)
Posts: 2,167
Likes: 0
Received 1 Like
on
1 Post
You will need a torx to remove the rear black clips that hold the rear seatbelts onto the seat. Like the other stated the fronts are only held in for 4 bolts per seat. Did my whole interior in like 35 min
Trending Topics
 09-02-2009, 10:13 PM
#9
TECH Regular
iTrader: (7)
Join Date: Jul 2005
Location: Little Creek, VA
Posts: 401
Likes: 0
Received 0 Likes
on
0 Posts
Thats why i took out the whole seatbelt assembly. i couldnt remember why i did it that way. i didnt have a torx bit to fit the guides in the back and didnt feel like going anywhere to buy one.
09-02-2009, 11:19 PM
#11
On The Tree
Thread Starter
Join Date: Sep 2008
Posts: 132
Likes: 0
Received 0 Likes
on
0 Posts
id like to change my old seats coz its black and leather
the new is black and red and in better condition
it will look better with my car coz its red
thx guys and today didnt have time coz i have too much work
the new is black and red and in better condition
it will look better with my car coz its red
thx guys and today didnt have time coz i have too much work
09-03-2009, 11:27 AM
#12
TECH Junkie
iTrader: (2)
Join Date: May 2006
Location: somewhere that doesn't get snow
Posts: 3,455
Likes: 0
Received 2 Likes
on
2 Posts
I have some pics on my photobucket from when i reupholstered my seats but i don't think i took pics of hte actual removal. its 4 bolts under each front seat covered by plastic caps and then an electrical connector. the rear seats have one bolt at the front of each lower seat and then they come right out. the uppers you have to remove the Torx bits (T30 i think it was) on the back. there are 2 on each side that hold the seat belt on, and then there is one bolt on each side on the bottom holding the seat to the car.
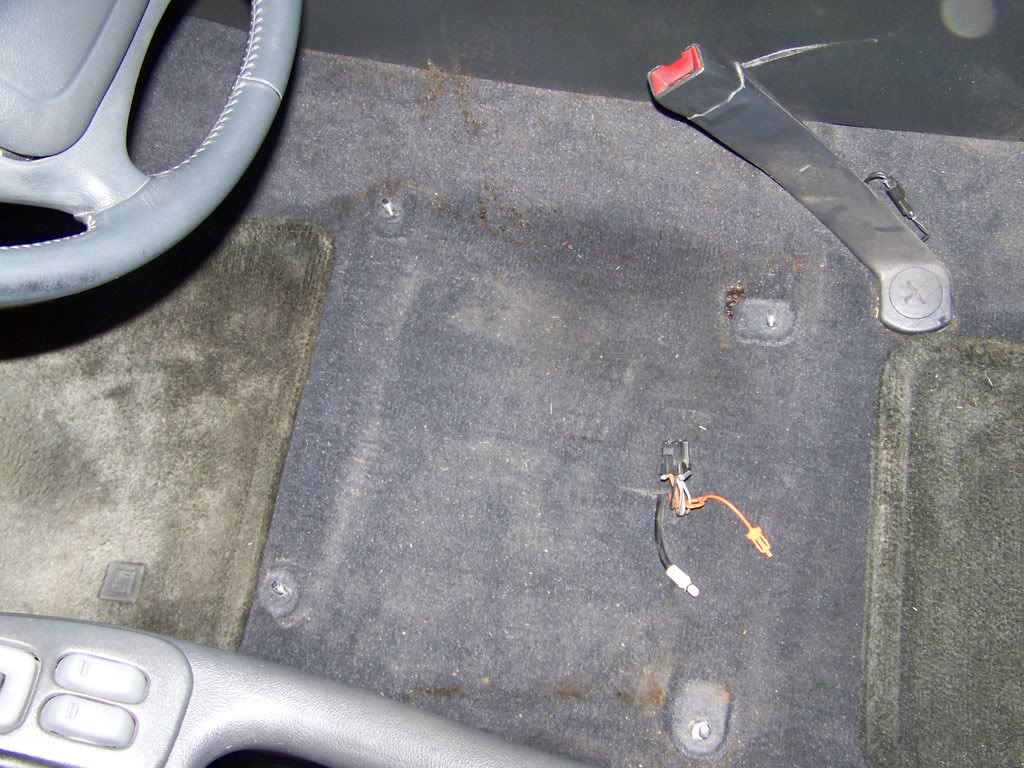
you can see the 4 bolts here for the front seat. IIRC all the bolts are either 13MM (seats) T30 (back seat seatbelt plates on the seat back) or T47 (large bolt that seperates the top and bottom of the front seat
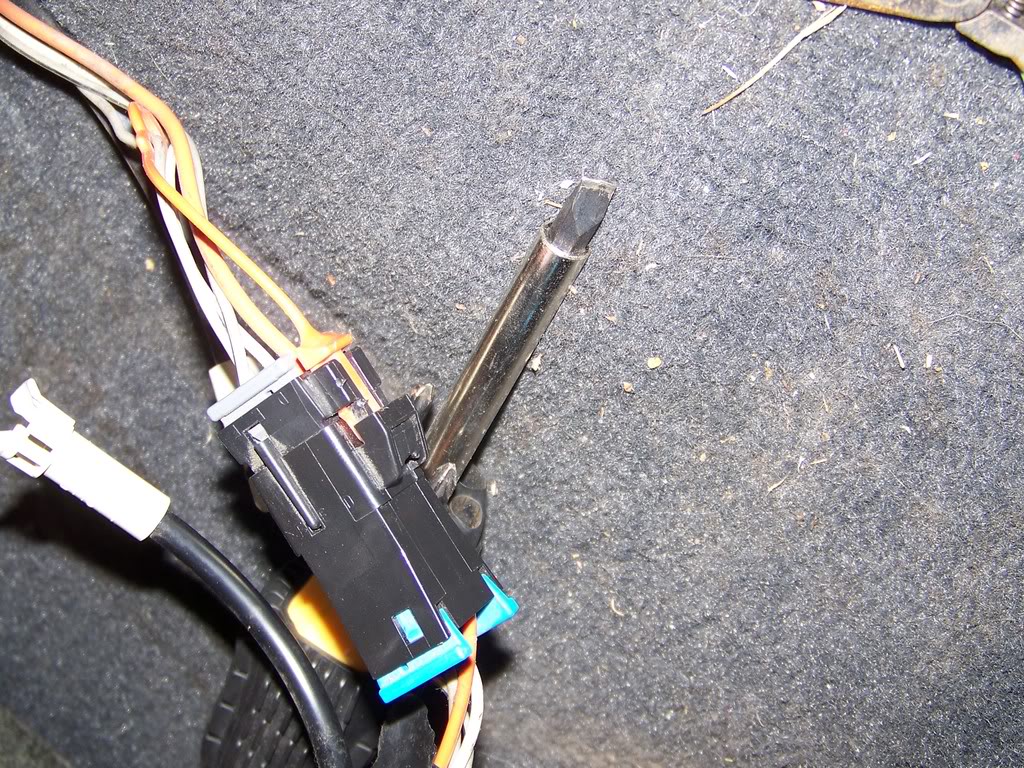
the connector was kind of a PITA because i didn't realize you have to slip out that orange piece first. it prevents the cable from coming apart on its own
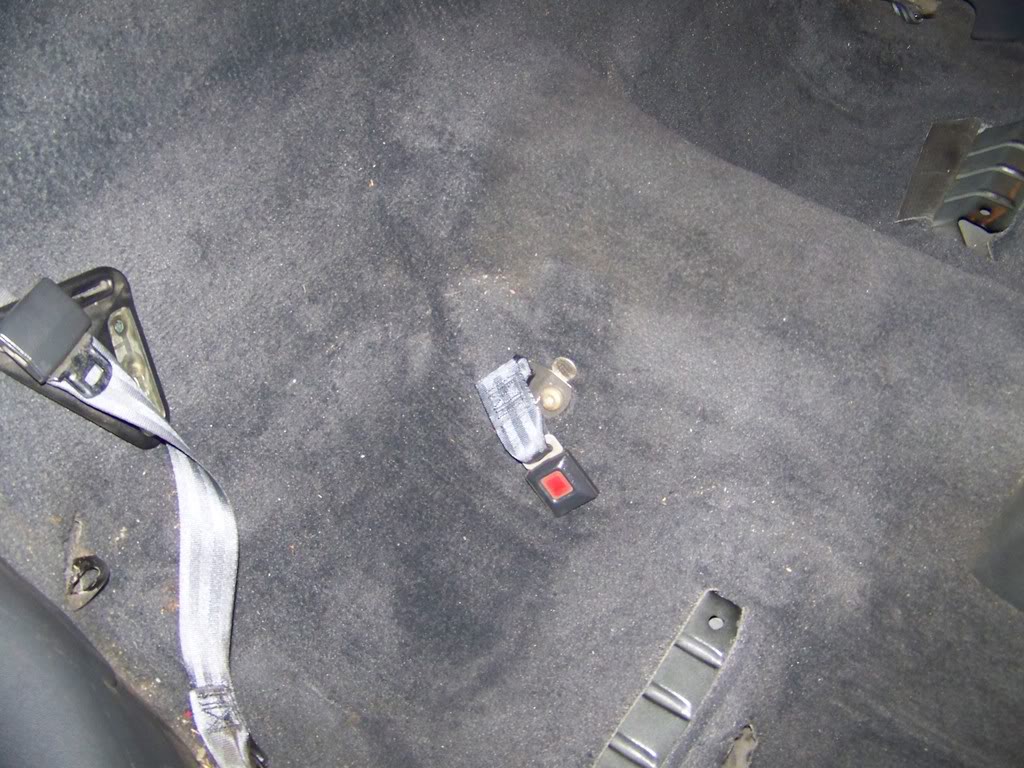
rear seat area. that little eyelet on the left in the pic is where the top of the back seat goes. you put the nolt through the eyelet and then attatch the nut. that area in the bottom right with the steel showing is where the bolt for the lower seat goes. it goes into the hole in the carpet down by the floormat.
you can see the 4 bolts here for the front seat. IIRC all the bolts are either 13MM (seats) T30 (back seat seatbelt plates on the seat back) or T47 (large bolt that seperates the top and bottom of the front seat
the connector was kind of a PITA because i didn't realize you have to slip out that orange piece first. it prevents the cable from coming apart on its own
rear seat area. that little eyelet on the left in the pic is where the top of the back seat goes. you put the nolt through the eyelet and then attatch the nut. that area in the bottom right with the steel showing is where the bolt for the lower seat goes. it goes into the hole in the carpet down by the floormat.
03-04-2013, 09:44 PM
#13
Teching In

Join Date: Oct 2012
Location: SW Michigan
Posts: 5
Likes: 0
Received 0 Likes
on
0 Posts
I know this is an old thread, but I just wanted to add a little information for those who are looking for simple answers prior to doing this.
I just pulled the driver's seat from my '02 WS6 TA, and had a couple minor quirks. The front bolts are covered by a plastic cover which requires a phillips or square head screwdriver to remove (shouldn't be a big deal, just warning the normally not mechanically inclined). The front bolts will easily come out with a 13mm socket with extension.
The back bolts on my TA were not accessible with a socket. I don't know if there's something wrong with my seat or if it was designed that way (I doubt it, as no assembler would put up with that), but I had to use a box end wrench to get to it. Just a warning.
10-20-2013, 08:53 PM
#14
Teching In

Join Date: Jul 2012
Location: MD
Posts: 1
Likes: 0
Received 0 Likes
on
0 Posts
I went to take the passenger seat out of my 2002 SS Convertible to replace the upholstery, but the two back bolts turn when I put a 13mm socket on the nuts. Any input n how I can fix that? They don't seem to be accessible from uderneath the car.
Thanks
Thanks
11-07-2013, 04:57 PM
#15
Teching In

Join Date: Nov 2013
Posts: 7
Likes: 0
Received 0 Likes
on
0 Posts
Hi,
I have just obtained a 2002 Formula Firebird and because I'm very tall want to move the front seats back for more leg room. From the pictures I see here, it looks like the 4 bolts that hold the seats in place are only screwed into holes that are tapped and drilled in the floor pan. Is that it? No nuts under the floor or extra thick brackets to screw into? Maybe there's more I don't see? Thanks for any help.
I have just obtained a 2002 Formula Firebird and because I'm very tall want to move the front seats back for more leg room. From the pictures I see here, it looks like the 4 bolts that hold the seats in place are only screwed into holes that are tapped and drilled in the floor pan. Is that it? No nuts under the floor or extra thick brackets to screw into? Maybe there's more I don't see? Thanks for any help.
11-08-2013, 01:05 AM
#16
Copy & Paste Moderator
The studs protruding up go though a reinforced rib.
There is a thread on here with a title something like "taller drivers will appreciate this" where someone made brackets to sit the seat a bit further back.
Also, for those having trouble reaching the bolts.....
1.) Slide the seat all the way back to remove the front bolts.
2.) Slide the seat all the way forward to remove the rear bolts.
Done. Easy.
11-08-2013, 02:34 AM
#17
TECH Addict
iTrader: (1)

Join Date: Apr 2012
Location: Ellijay, GA
Posts: 2,769
Likes: 0
Received 0 Likes
on
0 Posts
The studs protruding up go though a reinforced rib.
There is a thread on here with a title something like "taller drivers will appreciate this" where someone made brackets to sit the seat a bit further back.
Also, for those having trouble reaching the bolts.....
1.) Slide the seat all the way back to remove the front bolts.
2.) Slide the seat all the way forward to remove the rear bolts.
Done. Easy.
There is a thread on here with a title something like "taller drivers will appreciate this" where someone made brackets to sit the seat a bit further back.
Also, for those having trouble reaching the bolts.....
1.) Slide the seat all the way back to remove the front bolts.
2.) Slide the seat all the way forward to remove the rear bolts.
Done. Easy.

