
Red Halos in Sonars
 08-07-2010, 12:11 AM
#1
TECH Addict
Thread Starter
iTrader: (3)
Join Date: Oct 2007
Location: Orange County
Posts: 2,543
Likes: 0
Received 0 Likes
on
0 Posts
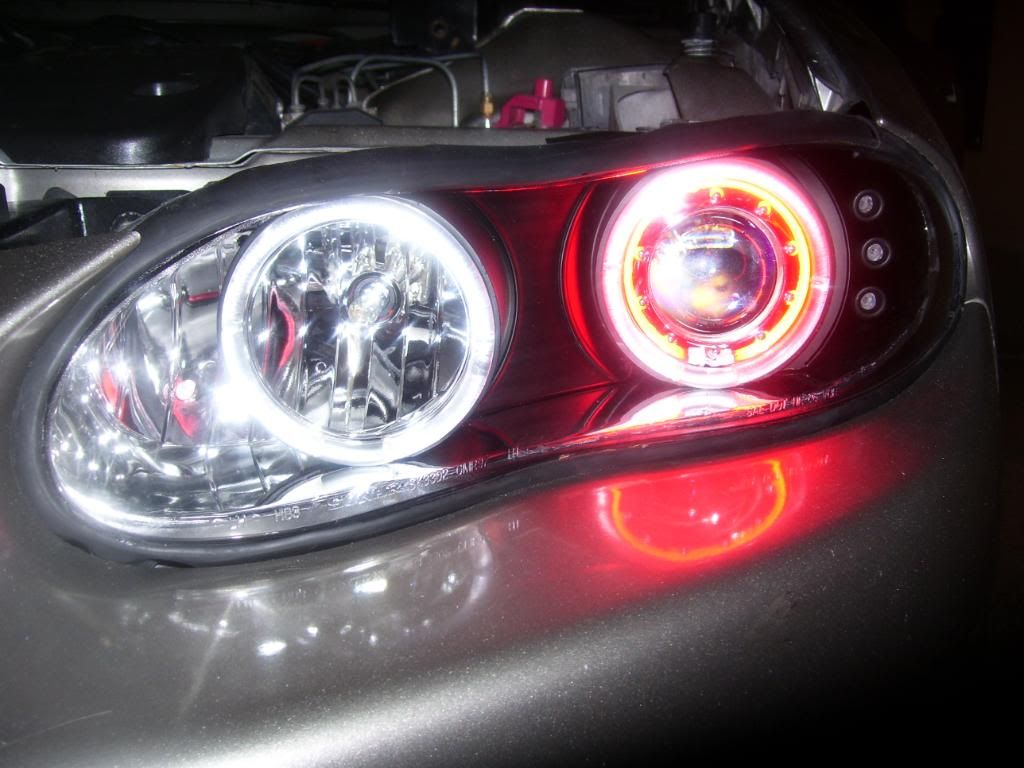
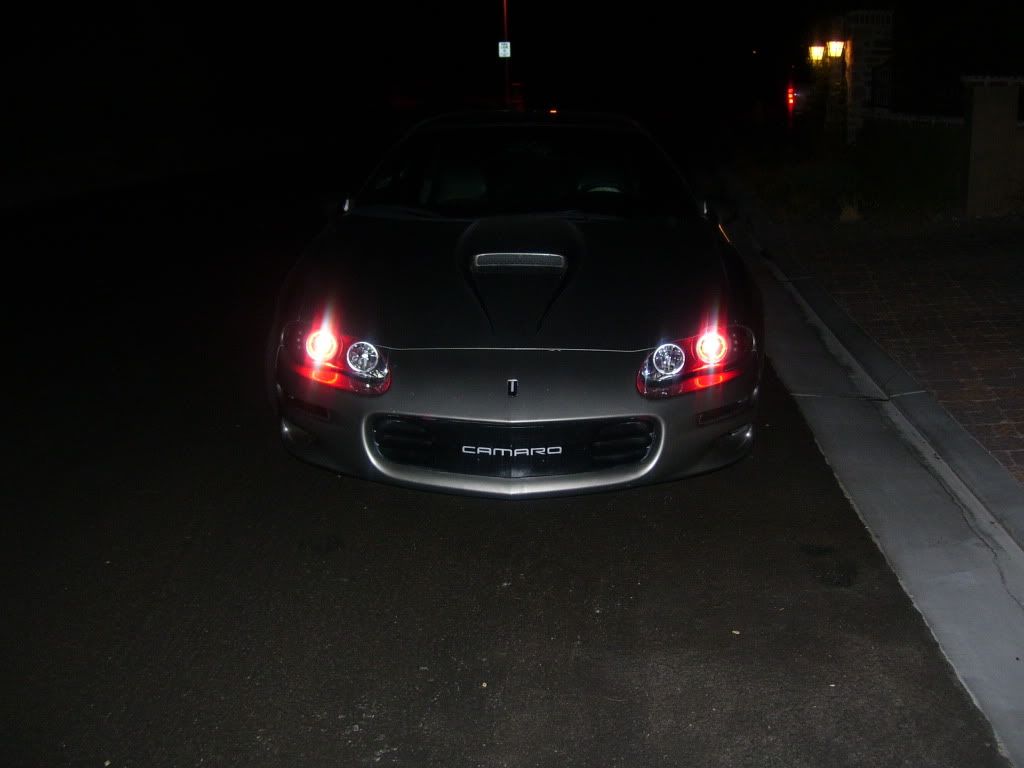
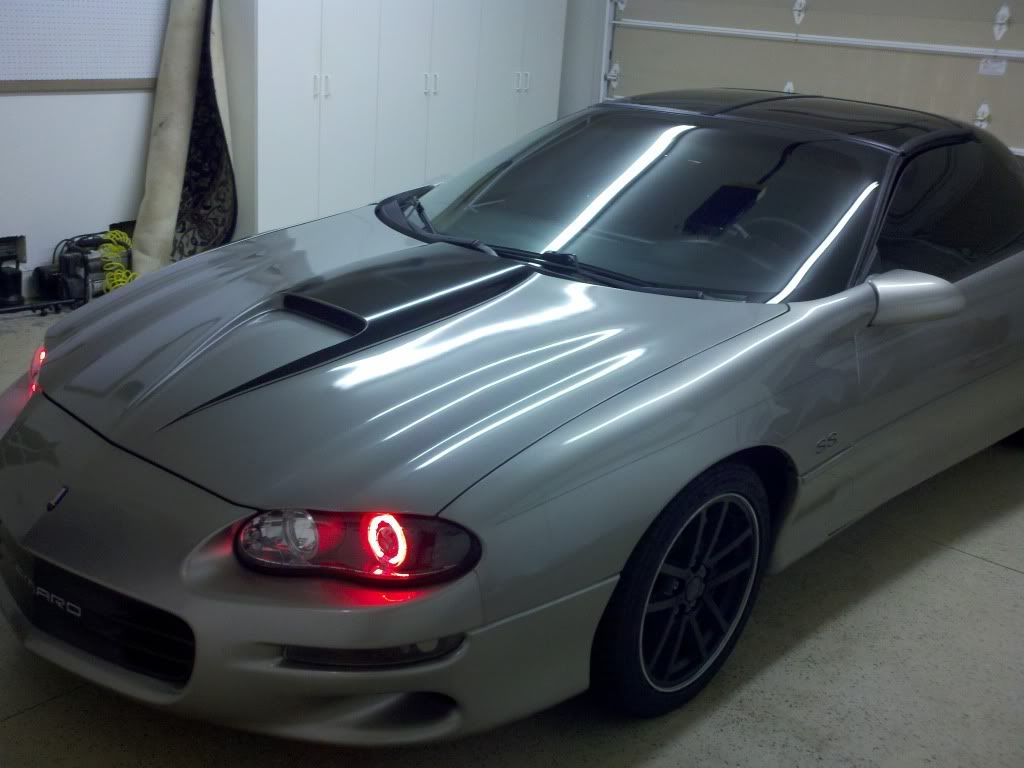
Make your Camaro look evil, with Red halos!
Original build thread is here: https://ls1tech.com/forums/appearanc...headlights-90-
completed.html
I wanted to make this how-to a little easier to go through. Thanks to Sparky and haystack for the help
Preview videos (the quality is better than the pictures):
http://www.youtube.com/watch?v=kszzKNSW-Gs quick red halo lights preview (white LED halos are on as well)
http://www.youtube.com/watch?v=MrShjgLy40E
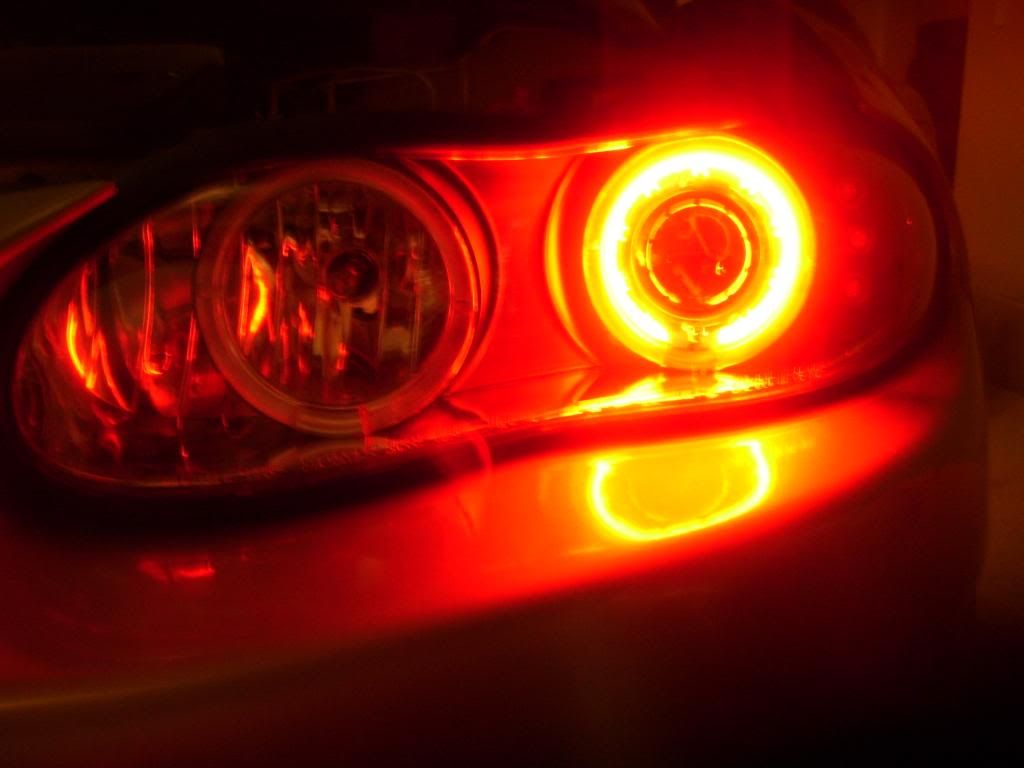
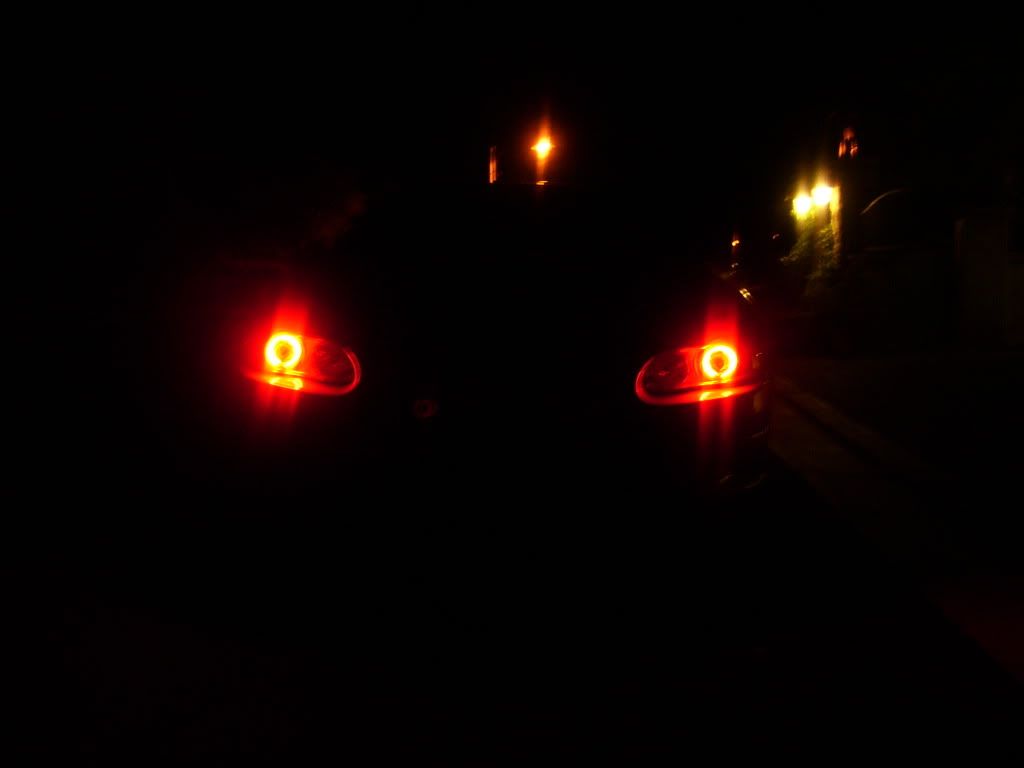
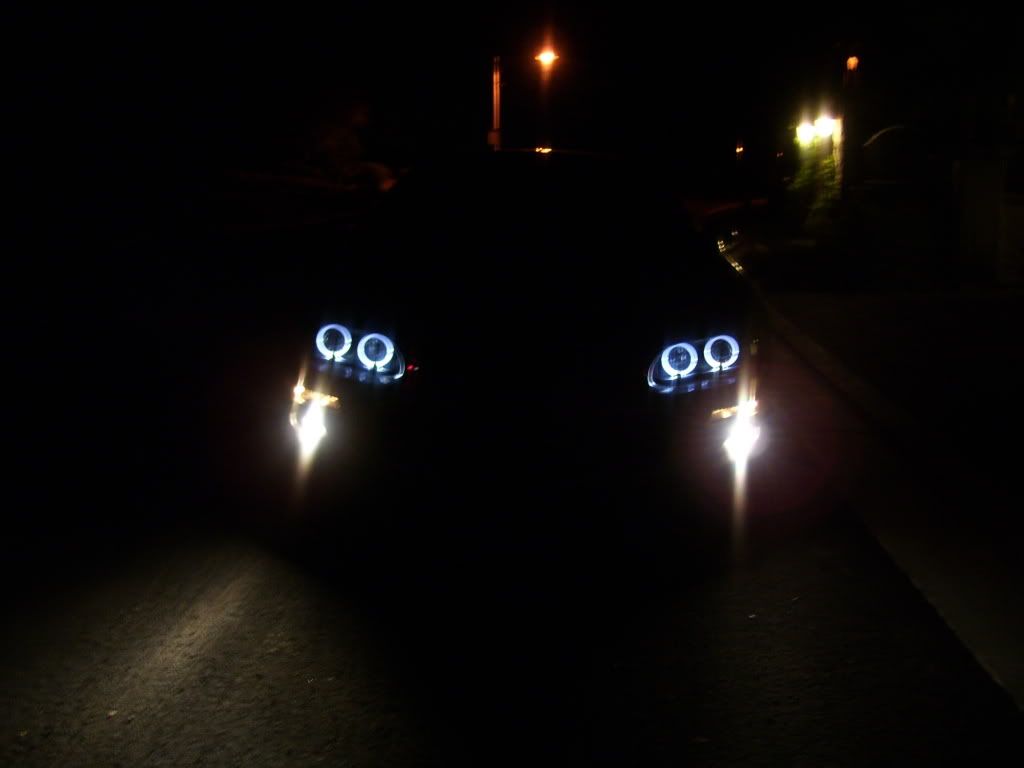
Preview pictures:
Part I.
So first is first, pick up a set of projector headlights. I bought the new Sonars that came with the blinker housings (yay!) for about $170 shipped to my door.
Headlight specs: Projectors (H1), two LED white halos, and some LEDs on the side.
Projector choice is all yours, I won't get into detail about that here, but I bought the ebay HID kit, 6000k ($45 shipped)
Now, pick your Halo color. I picked red. Do a google search for them... Nothing came up, huh? After literally days of prowling the internet like a horny 16 year old boy looking for his dad's 1980's playboys, I finally found these: [IMG]http://www.chiefpick.com/v/vspfiles/photos/CF-CCF80RD-2T.jpg
[/IMG]
http://www.chiefpick.com/ProductDeta...Show=TechSpecs
Yes, these are actually 80mm computer fans with real CCFL halo rings and they are less than $6 (sweet).
When your halo/fans come in, there are 4 screws holding the ring in place on the fan, remove those and remove the halo. There will be a plastic ring protector around the glass halo ring, take that apart and do what you please with it. Put the new fans into your computer, it will thank you.
Now it's time to bake your headlights. There are a lot of different ways people do this, this was my way. Baking your brand new, uninstalled, new smelling headlights will make you depressed, drink some beer (I went with Sam Adam's summer ale, but you can pick Guinness or Stella Artois if you prefer).
-Oven at 250, I had a cookie sheet, a sheet of tin foil on that, and a towel on that.
Put them in for 25 minutes (take of those 5 metal clips of course), and take a butter knife to start prying them apart. After a minute of progress, stick them back in for another 10 minutes. You will finally get them apart. Some
people put them in for hotter, for longer, it's up to you. (Please don't message me if your mom/gf/wife/or significant other beats you for making a mess in his/her oven).
Now you have your headlights apart!
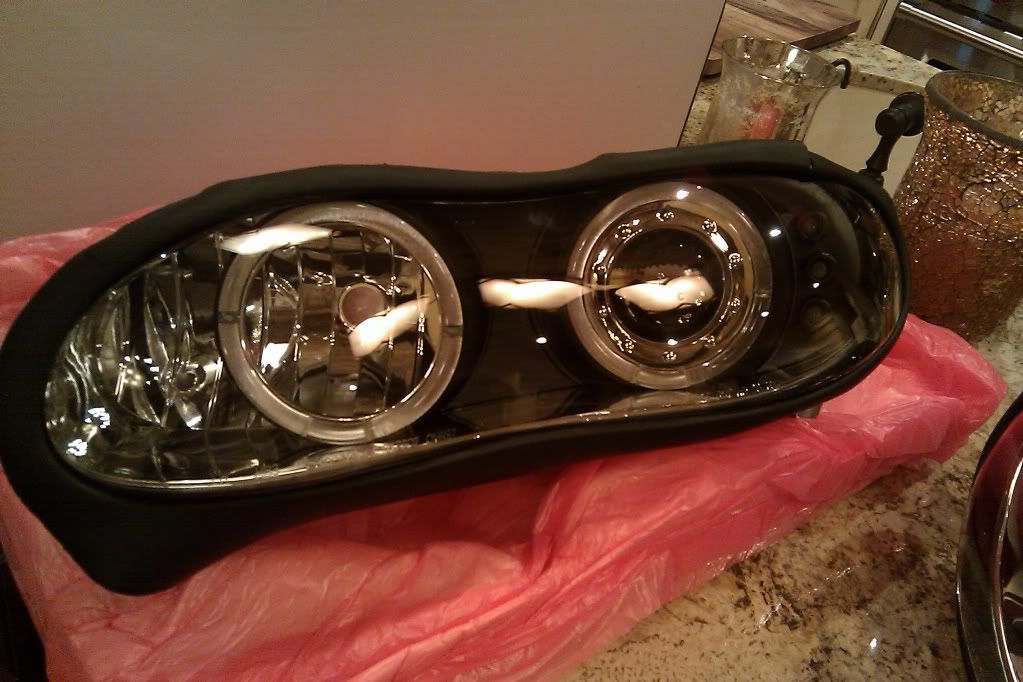
You will notice these actually have three sections (unlike the stock headlights). They have the back and lens which you just pulled apart, and they have that black (or chrome if you bought chrome) inner thing holding the white halo rings and the LEDs on the side.
This is held on by 4 screws in the back (you need to take off one side of the actual headlight bracket to get to one of the screws)
Once that is done, pull it out along with some of the wires that come through a harness.
There will be two screws on the back of the white halo ring (the one around the projector lens) that you need to remove, and then you take the white halo out and place is somewhere.
Next, grab a dremel and expand that slot in the chrome ring where the white halo's wires just came out, this is where your new red halo wires will also go. We also need to make room for the ends of the red halo. Do a test fit of
the red halo, and the white halo, they should fit perfectly together, the red halo going inside the white.
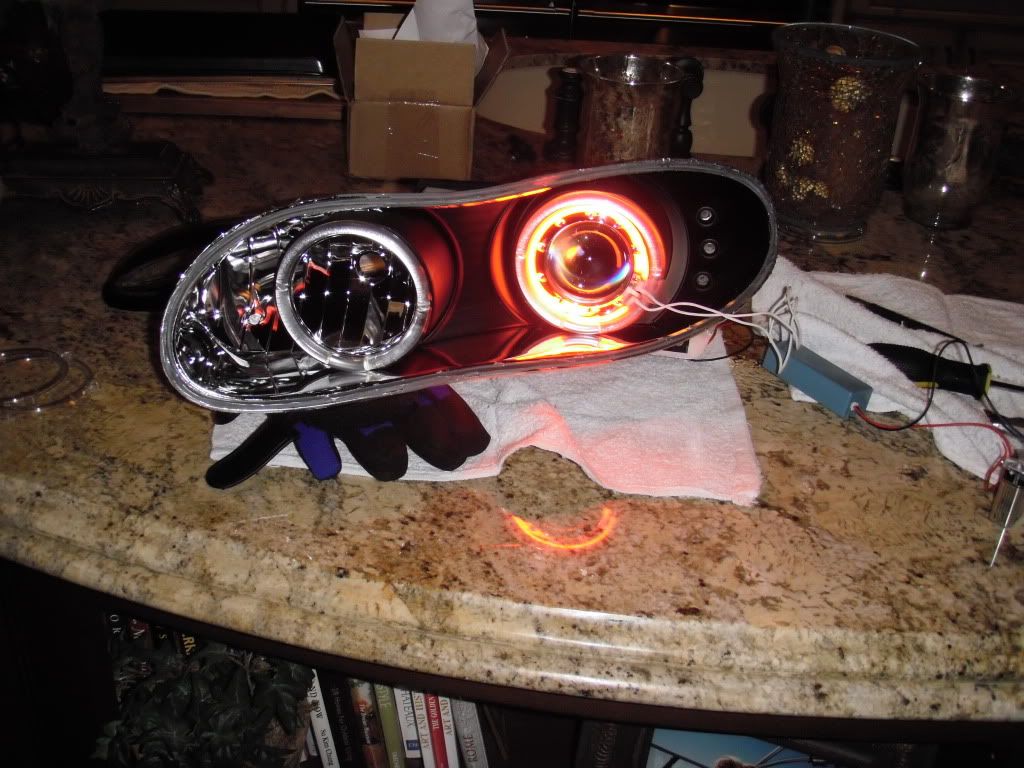
Grab some high temp expoxy, mix it up and put some on the back of the red halo ring, then stick it to the chrome ring, it should be solid in a few minutes. Put the white halo back and screw that back in.
Hopefully you have tested your red halos,
For this next part, there are two options for you. You can either scrape out all the glue from the headlight and lens, or you can heat everything back up, then stick it back together using the original glue.
I chose to scrape it all out. If you do this, grab some more beer, get the oven hot and prepare to spend a few hours getting all that glue out.
When that is done, you are going to reassemble the headlight.
Feed the red halo wires, and the other wires for the white halos through the grommet in the back. The rubber stretches pretty easily, so they should all fit if you double up the wires with two of the holes.
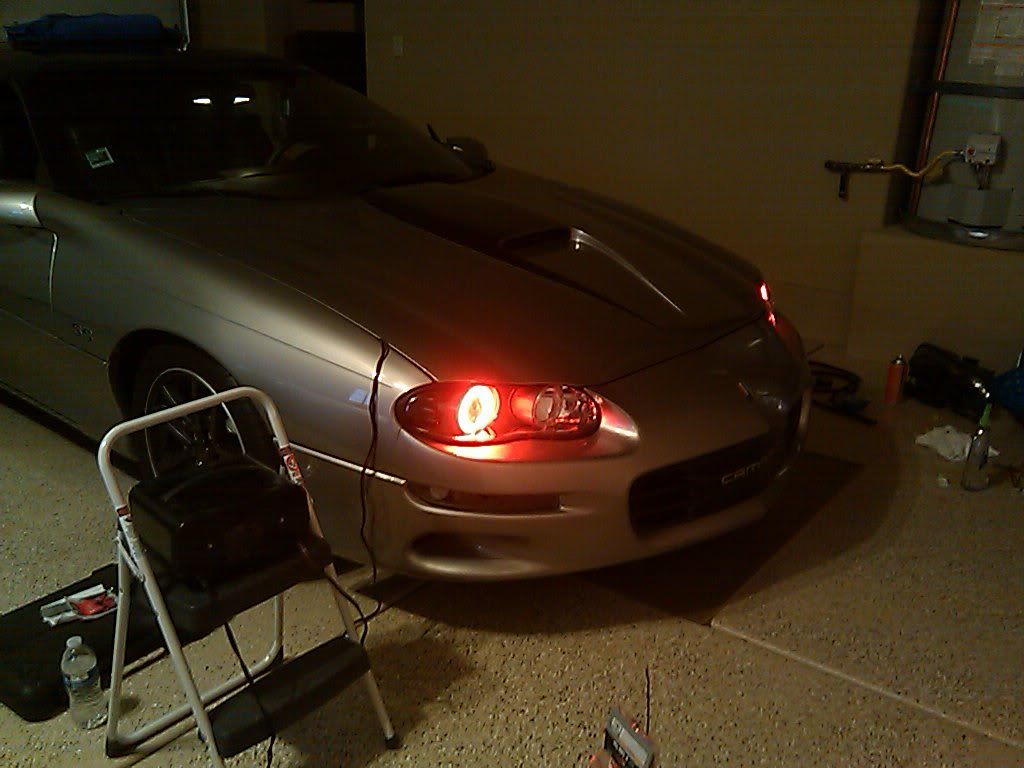
Put those fours screws back in to secure the middle piece. Do another test of all the lights, PLEASE. I used one of those little rectangular batteries (what the hell are those things called?) and you can just put the + and - wires to it and test everything.
If you scraped out the glue, pick yourself up some black, high temp rtv gasket maker ($7.95). Put a generous bead around the outside of
the headlight lens, and a medium side bead in the "pocket" of the housing. Put the two halves together and then put the clips back on. I also taped the ends so they had more pressure while the rtv dried.
Presto, admire your brand new, custom projector headlights with red halos (or another color of your choice) and join the ranks of us elite few that have them on 4th gens.
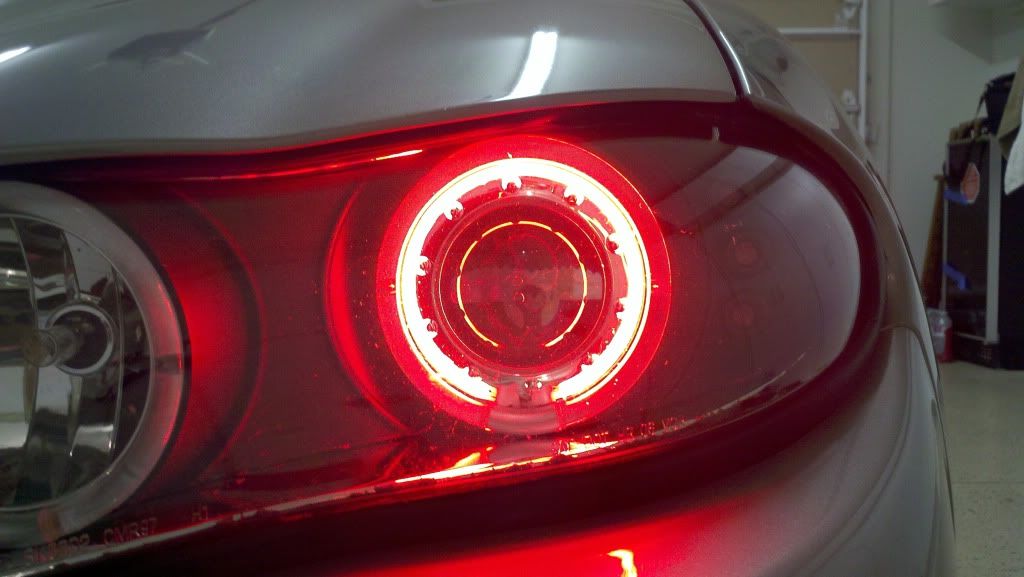

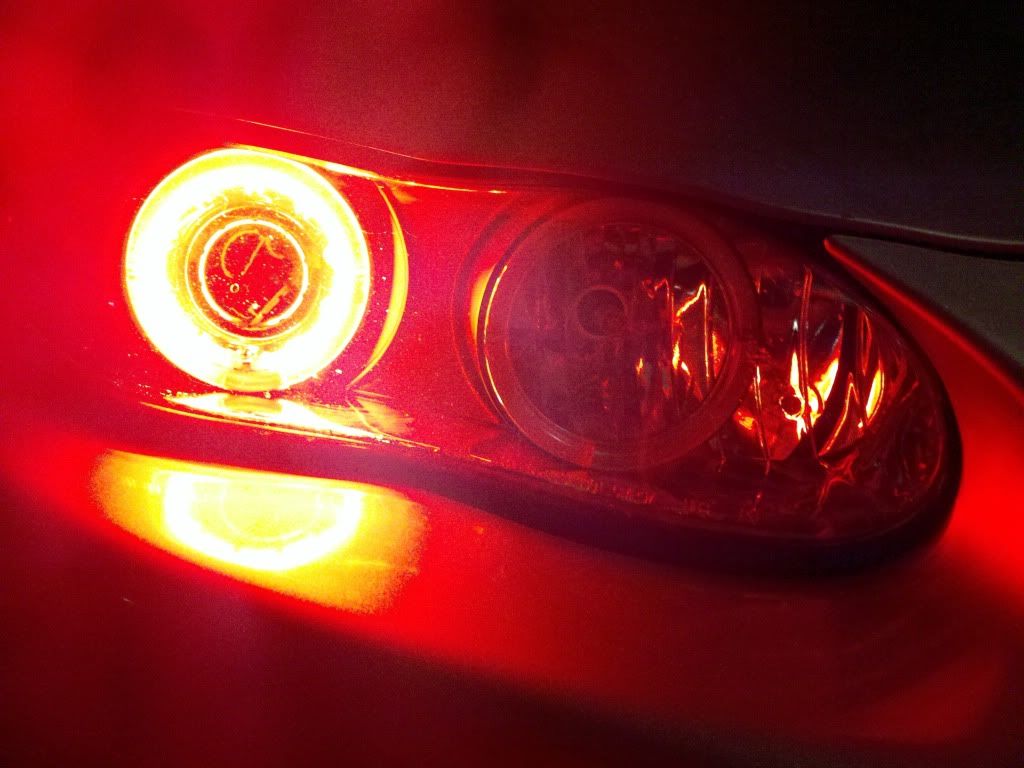
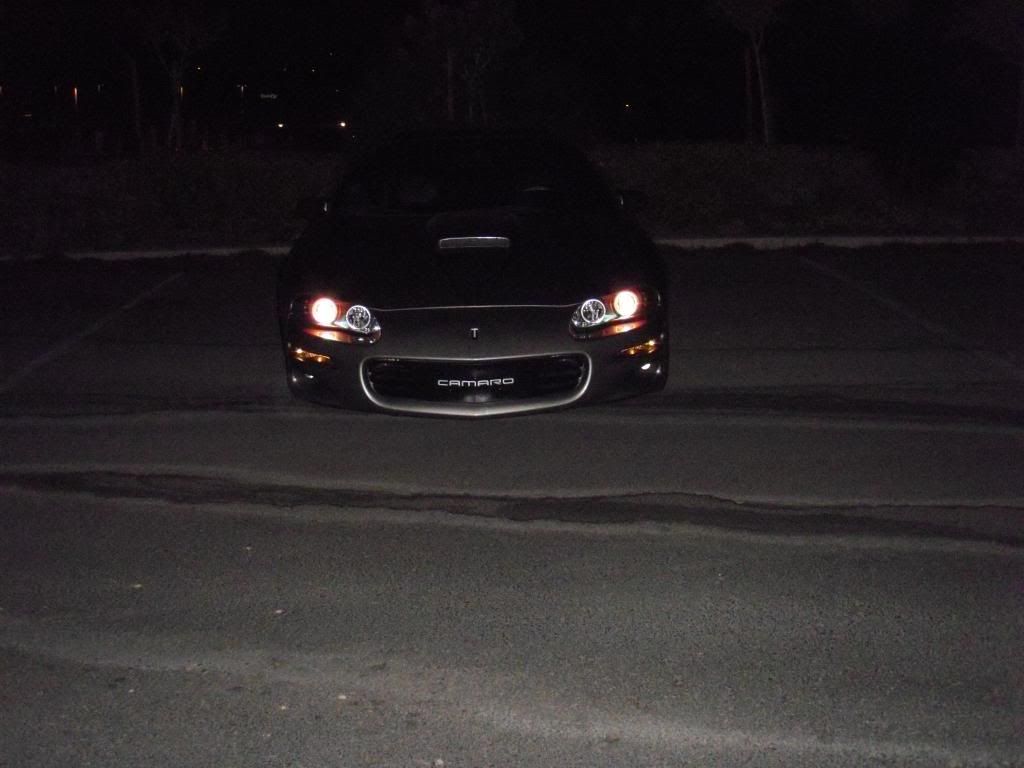
These pictures are horrible; the rings are actually quite defined.

Original build thread is here: https://ls1tech.com/forums/appearanc...headlights-90-
completed.html
I wanted to make this how-to a little easier to go through. Thanks to Sparky and haystack for the help
Preview videos (the quality is better than the pictures):
http://www.youtube.com/watch?v=kszzKNSW-Gs quick red halo lights preview (white LED halos are on as well)
http://www.youtube.com/watch?v=MrShjgLy40E
Preview pictures:
Part I.
So first is first, pick up a set of projector headlights. I bought the new Sonars that came with the blinker housings (yay!) for about $170 shipped to my door.
Headlight specs: Projectors (H1), two LED white halos, and some LEDs on the side.
Projector choice is all yours, I won't get into detail about that here, but I bought the ebay HID kit, 6000k ($45 shipped)
Now, pick your Halo color. I picked red. Do a google search for them... Nothing came up, huh? After literally days of prowling the internet like a horny 16 year old boy looking for his dad's 1980's playboys, I finally found these: [IMG]http://www.chiefpick.com/v/vspfiles/photos/CF-CCF80RD-2T.jpg
[/IMG]
http://www.chiefpick.com/ProductDeta...Show=TechSpecs
Yes, these are actually 80mm computer fans with real CCFL halo rings and they are less than $6 (sweet).
When your halo/fans come in, there are 4 screws holding the ring in place on the fan, remove those and remove the halo. There will be a plastic ring protector around the glass halo ring, take that apart and do what you please with it. Put the new fans into your computer, it will thank you.
Now it's time to bake your headlights. There are a lot of different ways people do this, this was my way. Baking your brand new, uninstalled, new smelling headlights will make you depressed, drink some beer (I went with Sam Adam's summer ale, but you can pick Guinness or Stella Artois if you prefer).
-Oven at 250, I had a cookie sheet, a sheet of tin foil on that, and a towel on that.
Put them in for 25 minutes (take of those 5 metal clips of course), and take a butter knife to start prying them apart. After a minute of progress, stick them back in for another 10 minutes. You will finally get them apart. Some
people put them in for hotter, for longer, it's up to you. (Please don't message me if your mom/gf/wife/or significant other beats you for making a mess in his/her oven).
Now you have your headlights apart!
You will notice these actually have three sections (unlike the stock headlights). They have the back and lens which you just pulled apart, and they have that black (or chrome if you bought chrome) inner thing holding the white halo rings and the LEDs on the side.
This is held on by 4 screws in the back (you need to take off one side of the actual headlight bracket to get to one of the screws)
Once that is done, pull it out along with some of the wires that come through a harness.
There will be two screws on the back of the white halo ring (the one around the projector lens) that you need to remove, and then you take the white halo out and place is somewhere.
Next, grab a dremel and expand that slot in the chrome ring where the white halo's wires just came out, this is where your new red halo wires will also go. We also need to make room for the ends of the red halo. Do a test fit of
the red halo, and the white halo, they should fit perfectly together, the red halo going inside the white.
Grab some high temp expoxy, mix it up and put some on the back of the red halo ring, then stick it to the chrome ring, it should be solid in a few minutes. Put the white halo back and screw that back in.
Hopefully you have tested your red halos,
For this next part, there are two options for you. You can either scrape out all the glue from the headlight and lens, or you can heat everything back up, then stick it back together using the original glue.
I chose to scrape it all out. If you do this, grab some more beer, get the oven hot and prepare to spend a few hours getting all that glue out.
When that is done, you are going to reassemble the headlight.
Feed the red halo wires, and the other wires for the white halos through the grommet in the back. The rubber stretches pretty easily, so they should all fit if you double up the wires with two of the holes.
Put those fours screws back in to secure the middle piece. Do another test of all the lights, PLEASE. I used one of those little rectangular batteries (what the hell are those things called?) and you can just put the + and - wires to it and test everything.
If you scraped out the glue, pick yourself up some black, high temp rtv gasket maker ($7.95). Put a generous bead around the outside of
the headlight lens, and a medium side bead in the "pocket" of the housing. Put the two halves together and then put the clips back on. I also taped the ends so they had more pressure while the rtv dried.
Presto, admire your brand new, custom projector headlights with red halos (or another color of your choice) and join the ranks of us elite few that have them on 4th gens.
These pictures are horrible; the rings are actually quite defined.
Last edited by hlaalu; 07-18-2011 at 10:55 PM.

 08-07-2010, 01:33 AM
#3
TECH Fanatic
iTrader: (13)
Join Date: Aug 2006
Location: Chicago, IL
Posts: 1,173
Likes: 0
Received 0 Likes
on
0 Posts

Great write-up. I guess the transformer(little blue box) on one of my headlights went out or got disconnected so I have to open up mine soon, might try adding the 2nd CCFL in there.
08-09-2010, 02:16 PM
#4
Staging Lane
iTrader: (5)
Join Date: Feb 2010
Location: Houston TX
Posts: 96
Likes: 0
Received 0 Likes
on
0 Posts
how much brighter were the red halos compared to the blue (stock) halos? i want to get some new headlights with halos but have a few friends who have them and are basically not visible at all. And are yours the ccfl halos to begin with or just the leds? these are the ones im looking at. HOPEFULLY i wont need to mod the halos to make them brighter
http://cgi.ebay.com/ebaymotors/98-01...Q5fAccessories
http://cgi.ebay.com/ebaymotors/98-01...Q5fAccessories
08-09-2010, 05:46 PM
#5
TECH Addict
Thread Starter
iTrader: (3)
Join Date: Oct 2007
Location: Orange County
Posts: 2,543
Likes: 0
Received 0 Likes
on
0 Posts
The stock ones are just LEDs, they don't even compare to the red ccfl halo in there lol Not sure how bright those ccfl halos would be in that link you posted though.

Trending Topics
08-09-2010, 06:16 PM
#8
TECH Enthusiast
iTrader: (4)
Join Date: Mar 2009
Location: Louisville, KY
Posts: 678
Likes: 0
Received 0 Likes
on
0 Posts
[QUOTE=hlaalu;13702769]Detailed wiring instructions to a fog light switch will come soon.
Patiently waiting on that one,
everything else seems pretty cut and dry......
GREAT MOD......
Patiently waiting on that one,
everything else seems pretty cut and dry......
GREAT MOD......
08-11-2010, 12:38 AM
#9
TECH Addict
Thread Starter
iTrader: (3)
Join Date: Oct 2007
Location: Orange County
Posts: 2,543
Likes: 0
Received 0 Likes
on
0 Posts
Okay, the fog light switch wiring is easier than you think. Grab yourself a fog light switch, I bought two from ebay for $10 shipped.
The three main wires are
brown - power in, I took power from my radio, so the lights only come on with the key in the car.
black - ground, connect this with the other fog light switch.
purple - this will go to one of the wires of the halo, simply run a wire from the halos inside your cab, I have a tiny hole by my clutch pedal were my line lock wire comes through. Then run the wire up behind the radio (it's really easy, just shine a flashlight behind your radio and you will see what I'm talking about).
The rest of the wires just splice into the stock fog light switch.
yellow and green are for the illumination, and the little orange light on the side of the switch that comes on when the switch is turn on.
And for the other halo wire, splice it into a ground wire to one of the other lights, I went into my parking light wire.
So to simplify it, you have a ground wire, from your parking light, going into your halo, then you have the non ground wire coming from your halo, into your cab, into the purple of the fog light switch. Then you have the brown wire from the fog light switch going to a power source.
If your new fog light switch doesn't come with the wires (mine came with them snipped from the previous car they were on) then just compare the holes to your current fog light switch.
 08-11-2010, 09:17 AM
#13
So, tell if I'm right here.. The normal (white) halo rings go in with the parking lamps? And you wire the RED halo to another switch, and just flip that on when the parking lamps are off?
I was confused as to why you had the red one INSIDE the white one at first. Cool writeup man.
Where'd you grab power for the CCFL's from?
I was confused as to why you had the red one INSIDE the white one at first.
Where'd you grab power for the CCFL's from?
08-11-2010, 01:23 PM
#15

looks good I did my car with red halos about 1 year ago I have a total of 6 red halos 3 on each side looks bad *** I did not post pic cause I dont no how so if you tell me how I will give it a try
08-11-2010, 03:04 PM
#17
TECH Addict
Thread Starter
iTrader: (3)
Join Date: Oct 2007
Location: Orange County
Posts: 2,543
Likes: 0
Received 0 Likes
on
0 Posts
So, tell if I'm right here.. The normal (white) halo rings go in with the parking lamps? And you wire the RED halo to another switch, and just flip that on when the parking lamps are off?
I was confused as to why you had the red one INSIDE the white one at first. Cool writeup man.
Where'd you grab power for the CCFL's from?
I was confused as to why you had the red one INSIDE the white one at first.
Where'd you grab power for the CCFL's from?
