When you click on links to various merchants on this site and make a purchase, this can result in this site earning a commission. Affiliate programs and affiliations include, but are not limited to, the eBay Partner Network.
How To: S2000 seats in Fbody, LOTS OF PICS (NOVEMBER 2020 Update)
I’ve gotten some PMs and DMs here, on Facebook and Instagram (Dont_tread_on_z) about how to put these seats in. I sent people here but because PhotoBucket is the worst ever, all the pics are gone.
Needless to say, I didn’t have the pics anywhere except on PB, so I had to pay them the $15 or whatever to get these back. Hopefully they help someone.
This unfortunately isn't a full complete write up, because i'm not documenting it from the start, rater this is just some pics of how it went together to give an idea for those trying to do the same.
That said, if anyone in the Northern VA/ DC/ MD area wants to do the mod, I will gladly help and do a full write up then.
To start:
Thoughts on the seats. 1000 times better than stock f body seats. WAY more supportive, leather is of a much higher quality, and the seats themselves are much taller in the back, giving a full head rest, which is great on longer trips. Ive driven these on a 9 hour drive with no pain at all, outside the normal stresses of being in a car that long.
Advantages over other popular aftermarket seats:
A: There is a provision for a seat belt guide. I cant over state how important this is. Anyone who has ever had a seat without that guide knows how bad it blows.
B: Parts are available at any honda dealer. Factory quality OE seat.
C: high quality leather. After having them in my car just for the drive home with them in the back seat, i couldn't stop sniffing the sweet smell of their leather. I know its not world class, but compared to gm pleather, its a whole different world.
D: small one, but there are map pockets behind the seat. These come in handy sometimes, but wouldn't put that as a reason to buy them.
E: MOST IMPORTANT, maintains all aspects of a stock seat. Sliders work, tilt works. It maintains usability sometimes lost in stationary aftermarket seats. Maintained the same height as well, very important in the cramped cockpit of these cars
Disadvantages of Seats:
The only one i can think of is that they dont do a full tilt forward like stock f body seats. I can still put the seat forward on the slider, tilt forward, and crawl in back. Honestly though, ive never had anyone ride in the back of this car yet. dont think it will ever happen, but if it need to, i guess it could.
Difficulty of install:
If you've never done this mod and where flying blind as i was, it is a 9 of 10 on hardness. Trying to get the seats in a position that was at the right height and didnt require total mutilation of the interior was seemingly impossible at first. I dumb lucked my way into figuring it out.
With these pics, its still a 6 of 10, but doable for most with hand tools and a welding shop near by.
So here are some pics of the seats in the car. These are a few months old, havent gotten any new ones. The car now has Ebony door panels with custom matched leather, and now a complete Ebony dash. It looks much better now, but you'll get the idea.
There is the the fun pretty stuff, on the hardware that makes them work.
Last edited by ssjason232; 11-16-2020 at 11:08 AM.
Reason: Updated pictures
This pic is from the side. You can see the bolt and nut used to hold the flat stock in place. The bolts were left in after welding. They add extra strength and don't hinder the sliders in any way.
Here are pics of the driver side rails:
DRIVER RIGHT SIDE RAIL, COMPLETE
you can see in this pic the angle that the front mount had to be set at to reach the factory stud.
That concludes the drivers seat. The only modification i made to the car to make this fit was to do some massaging of the factory seat rail "rib" and to weld in another stud on the front.
The seat "rib" is the piece of raised metal that the seat studs attach to. because of the way that the s2k rails are (mounted on the outside of the seat, rather than under, as the stock fbody ones are) the inside rail would hit the rib as it made its turn to meet up with the transmission tunnel. This can be done with a big hammer, or a slight cut with a reciprocating saw. does not affect the structure of the car or seat whatsoever. The passenger side clears with out a problem.
The stud was welded it for the front outside rail. It wasnt necessary but allowed for a cleaner install. Without it, i would have to had a "L" shaped bracket to make it over to the factory stud. If you did the “L” bracket- it would look like this:
I left the factory stud in place just in case.
Convieniently enough, there is a factory drilled hole on the front seat "rib", so what i did was take a piece of the flat stock used for the front mounts of the drivers seat, cut it square, drill a hole in it, weld a bolt to the plate from the bottom side, and dropped it over the hole. The head of the bolt goes right into the hole, the plate is welded and you have a stud with minimal effort.
PASSENGER SIDE
This side takes less fabrication so to speak, but was much more difficult to figure out the install.
what you will need is additional flat stock for the front mounts, and a piece of angle iron (also available at home depot). I believe it was 2 1/4 or 2 1/2 width angle iron, ill try to double check that.
this is the iron you need;
With the angle iron, what I did was cut two pieces about 5 inches long. I inverted them together.
Once together, drill a hole thorough both pieces on the side closest to the front of the car. But a bolt and nut through both pieces, this will allow you to set an angle of the plates based on this pivot.
drill a hole through the top of the plate and attach to the seat rail, same as drivers through the factory rivet hole where the "feet" once were, and attach with an allen bolt and nut.
Create some mounting tabs out of the flat stock, same as drivers (with a slight bend) and attach to factory studs.
Once again, I created another stud to not have to run an oversize L shaped bracket.
Pics speak 1000 words.
Here you can see the two pieces of angle iron bolted together. you will see two bolts in the side of it. Use the first one to set the angle. Once you get the angle where you want it, drill and put another bolt through so it doesnt move. I welded everything after.
Passenger side outer rail
In this pic, you can see how the one plate is the "seat" for the rail to sit on, and the other attaches to mount it down to the stud.
I welded everything in place, then painted it all so it would last. Im sure this could all be done without welding, but its a bit safer. I tend to over do things.
LASTLY,
making the seat belt guide.
Since s2ks are converts, the belt is mounted low and the stock guide does not work.
I made a thin plate out of wood the same shape as the stock guide and covered it in leather bought from Jo Ann Fabrics, called Whisper Black.
This plate is purely cosmetic, as the factory guide leaves an imprint in the leather, and looks unsightly with out it.
I then took a factory seat belt guide, cut the rear tab off where the screws go through, then two step drilled two new holes the same spacing as the sk2 mounts were.
but hopefully this helps get you in the ball park if you want to try this mod.
i think its well worth it.
Last edited by ssjason232; 11-16-2020 at 11:52 AM.
Reason: Photos.
i got mine for free from a good friend who put sparcos in his car. sun shines on a dogs *** every now then, i know.
Ive seen them go for as little as 400 a pair, to 1200 a pair, depending on who is selling them and what condition they are in.
best place to check is the honda message forums. like s2ki.com. they even came in some cool colors like blue and red. Im sure there is probably aftermarket covers available for them as well.
thanks guys. I wish i would have documented it as i put them in. Problem was it go so frustrating trying to make them fit, i wasnt even thinking about doing a write up.
I might look to get another set of these seats, or at least the rails and do a better "how to".
If someone gets a set, send me the rails and i can mock them up and do the write up then.
just searched ebay, there are a few sets of these seats on. most people are way too proud of them, but i did see a set for about 400 for sale for the pair.
okay guys, due to several PMs on how to do this, I brought this back from the dead. I just finished uploading some pics of this to photobucket as it appears that webshots is dead.
Its been a few years since I did this mod, but I'll post up a bunch of the pics that I still have. I'll try to do another write up if there is a lot of interest.
[IMG][/IMG]
[IMG][/IMG] Passenger side left
[IMG][/IMG]
[IMG][/IMG] Drivers side Right rail
[IMG][/IMG] Use bolts to mock things up and hold them in place before you weld.
[IMG][/IMG] Passenger side left. Use two pieces of angle iron, bolt them together to allow for a pivot. You want to mock up the rails off the seat and make both rails parallel and LEVEL before you weld. If you snug the bolts just tight enough, you can rotate and move things into position. Once there, tighten the hell out of everything and then take it to weld.
[IMG][/IMG] Passenger side RIGHT
[IMG][/IMG] Pass rails mocked up
[IMG][/IMG] Passenger side left (4 1/2 inches is the length of the flat stock
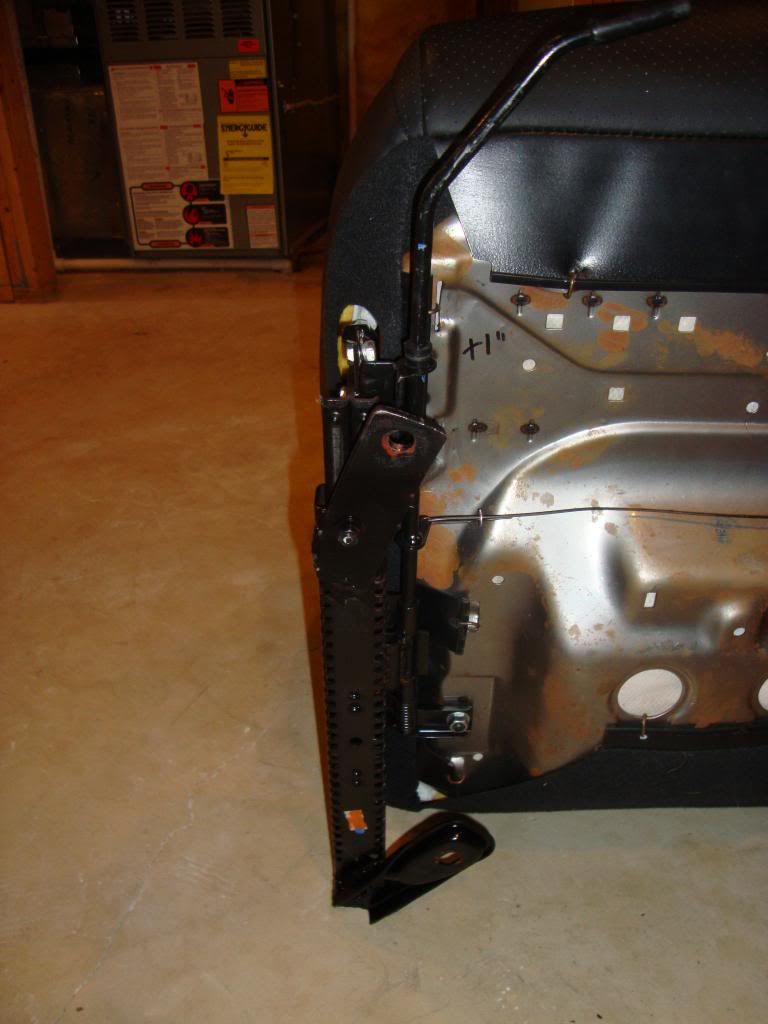
[IMG][/IMG] Passenger left mocked up in the car
[IMG][/IMG] quick measure of where I stuck the bolt hole. I'm 6 feet tall and this is perfect for me. If your super tall add a half inch to an inch

 12-11-2010, 04:48 PM


 [/IMG]
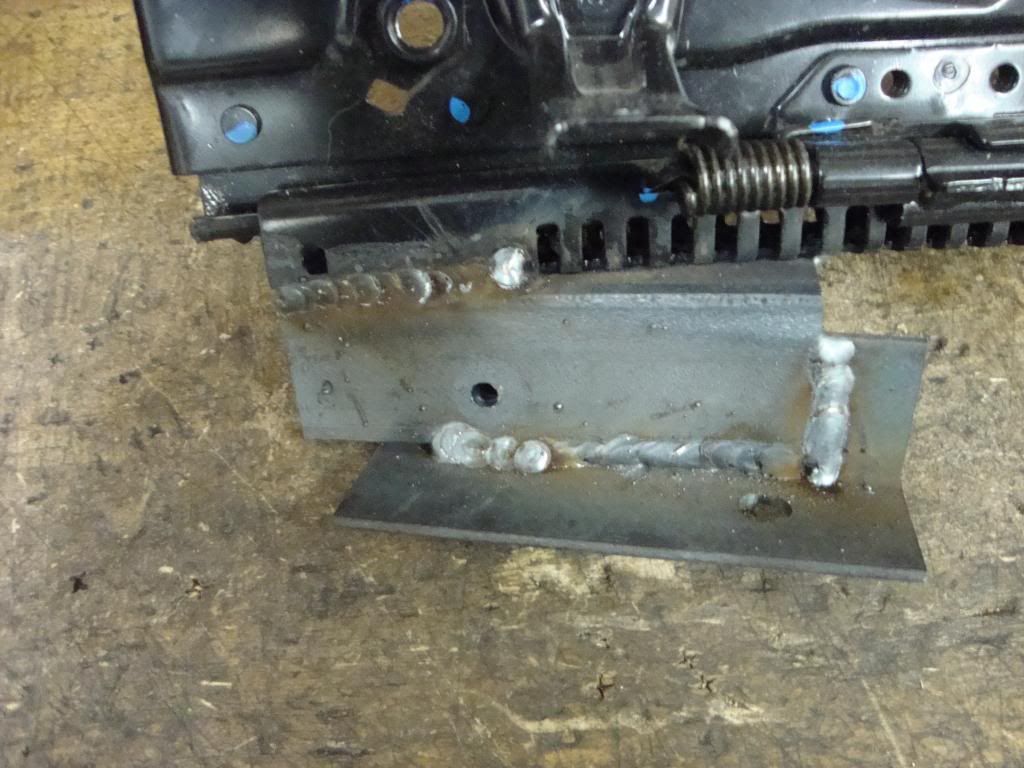 [/IMG] Passenger side left
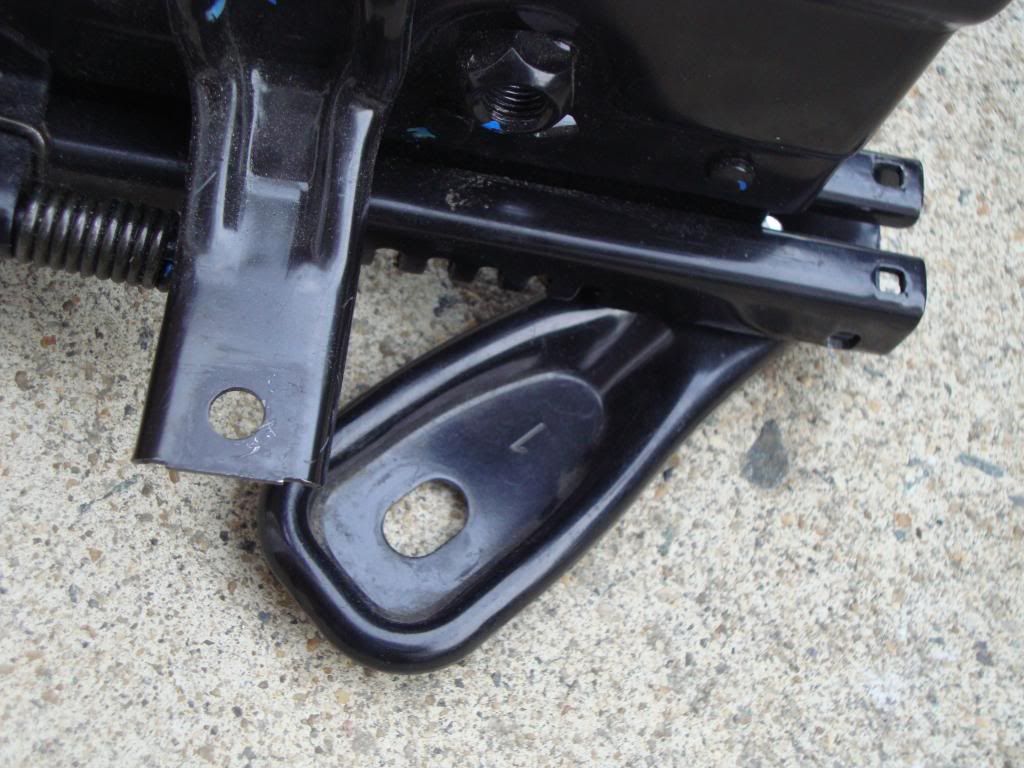 [/IMG]
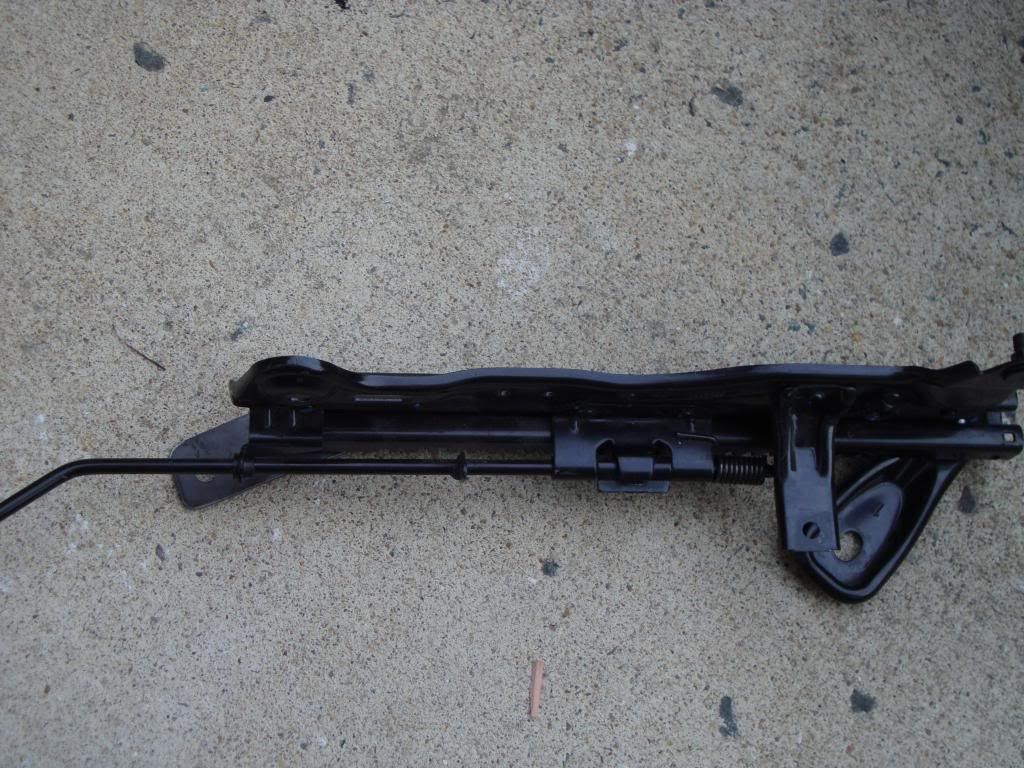 [/IMG] Drivers side Right rail
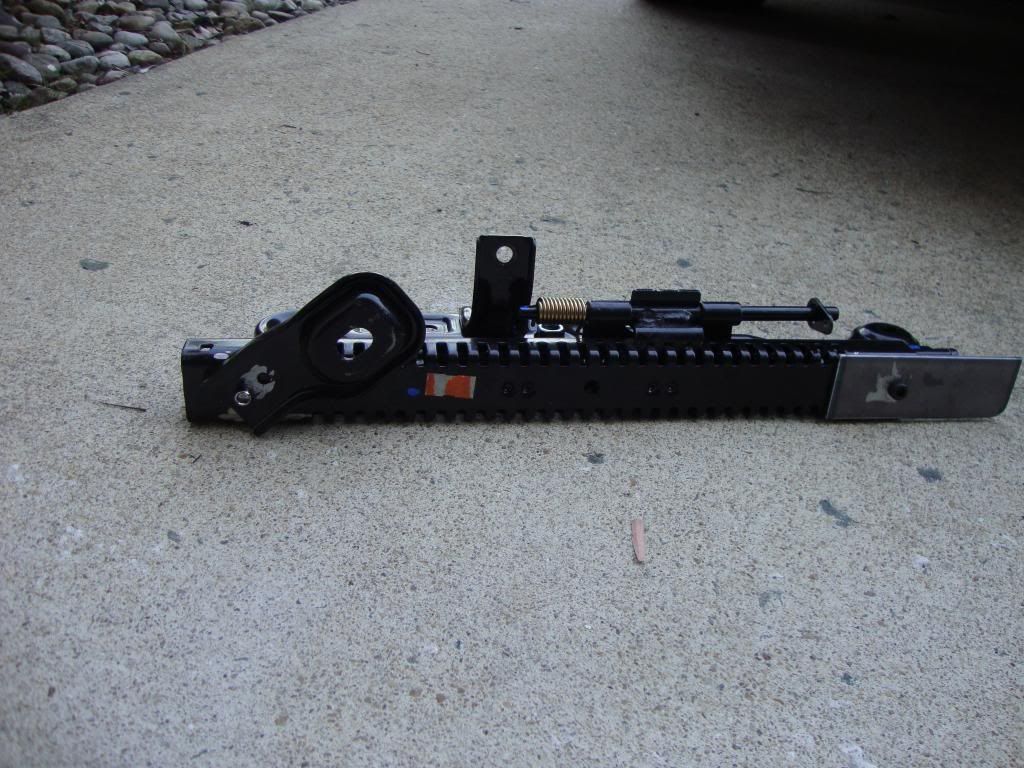 [/IMG] Use bolts to mock things up and hold them in place before you weld.
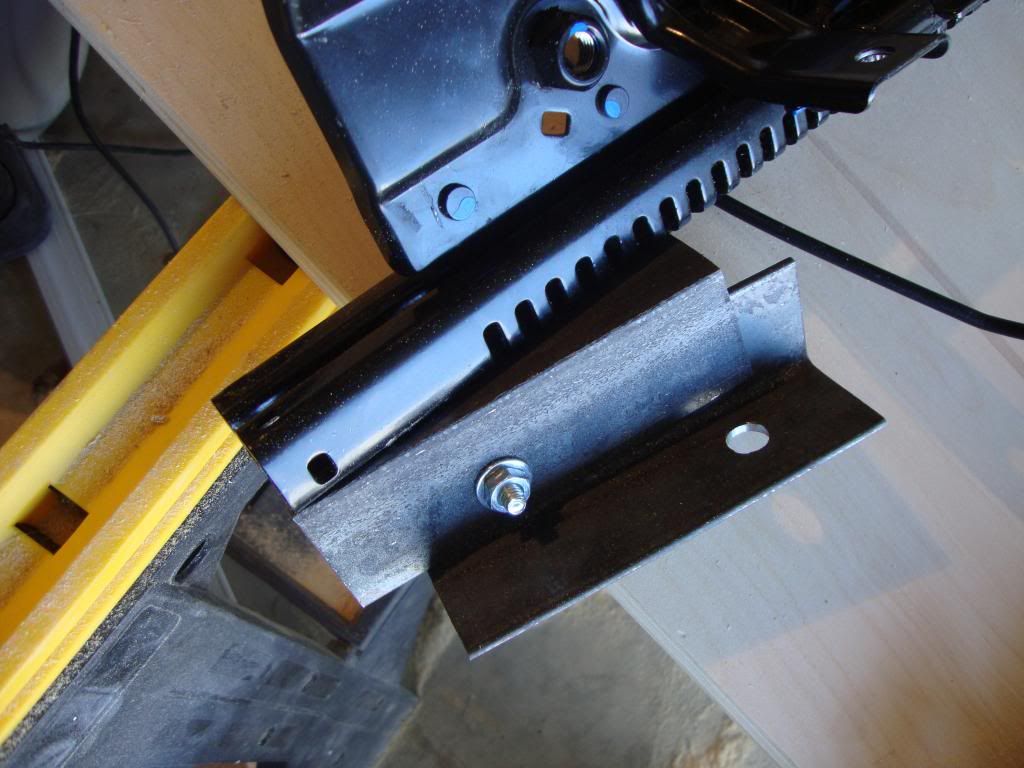 [/IMG] Passenger side left. Use two pieces of angle iron, bolt them together to allow for a pivot. You want to mock up the rails off the seat and make both rails parallel and LEVEL before you weld. If you snug the bolts just tight enough, you can rotate and move things into position. Once there, tighten the hell out of everything and then take it to weld.
  [/IMG] Passenger side RIGHT
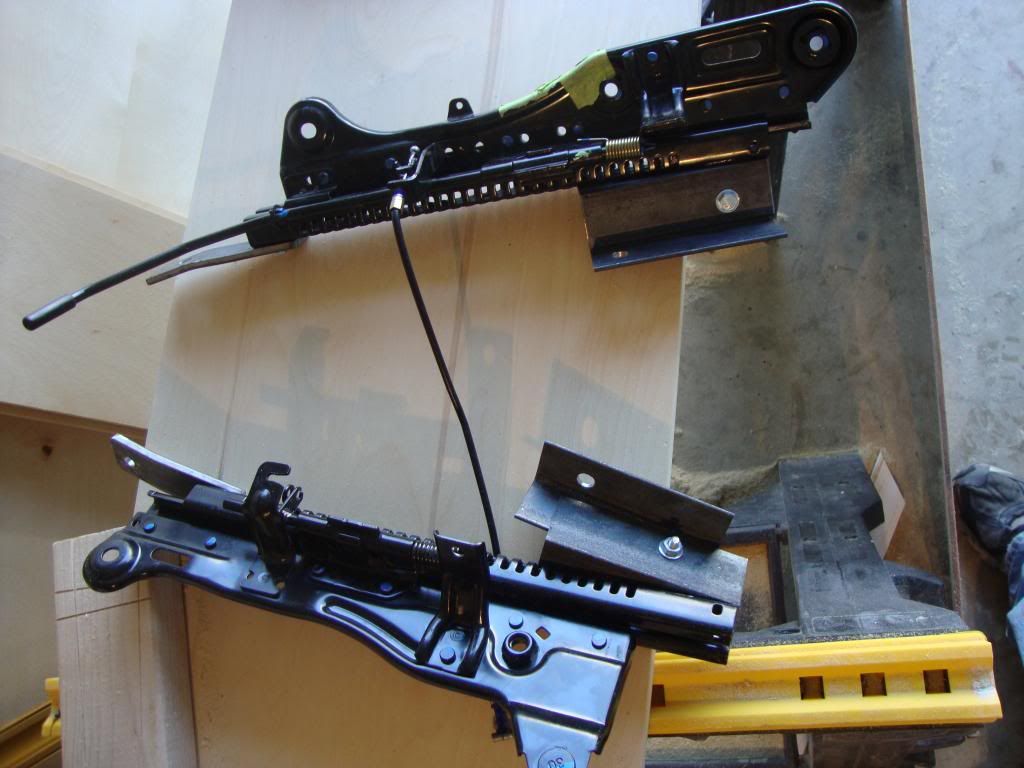 [/IMG] Pass rails mocked up
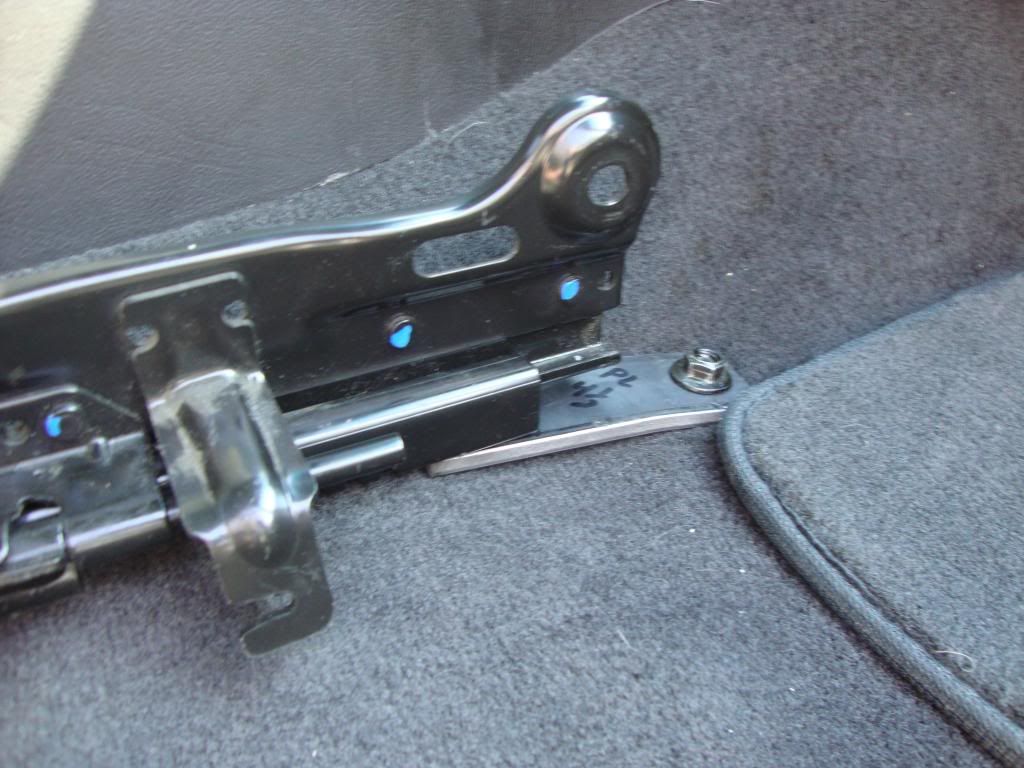 [/IMG] Passenger side left (4 1/2 inches is the length of the flat stock
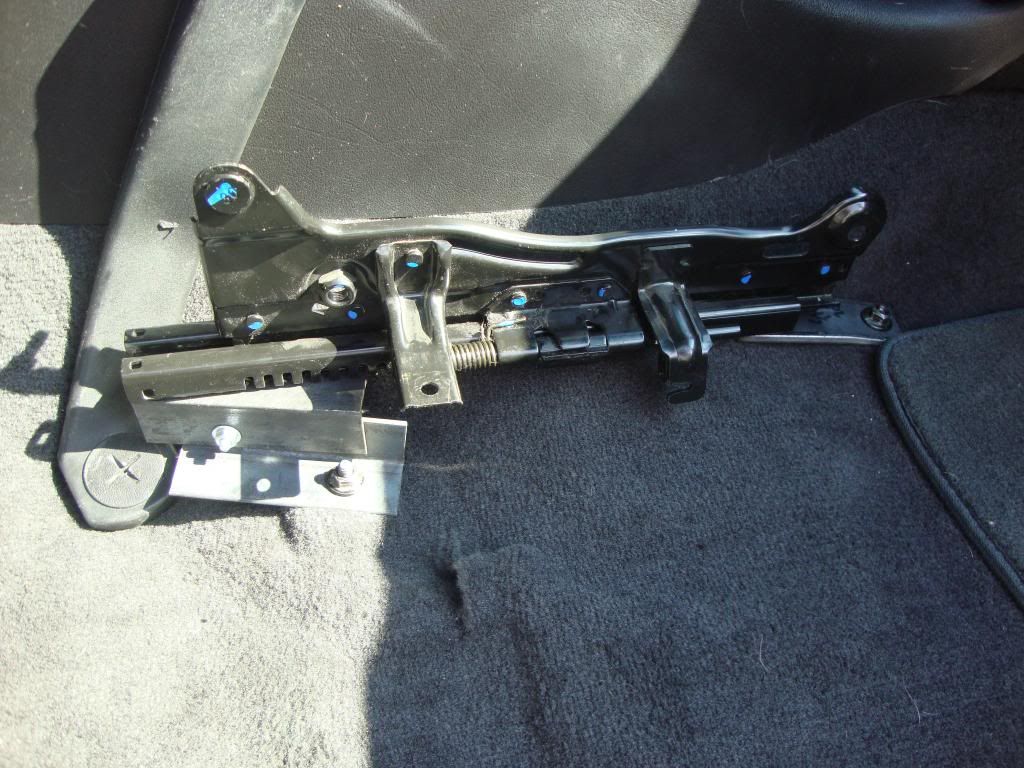 [/IMG] Passenger left mocked up in the car
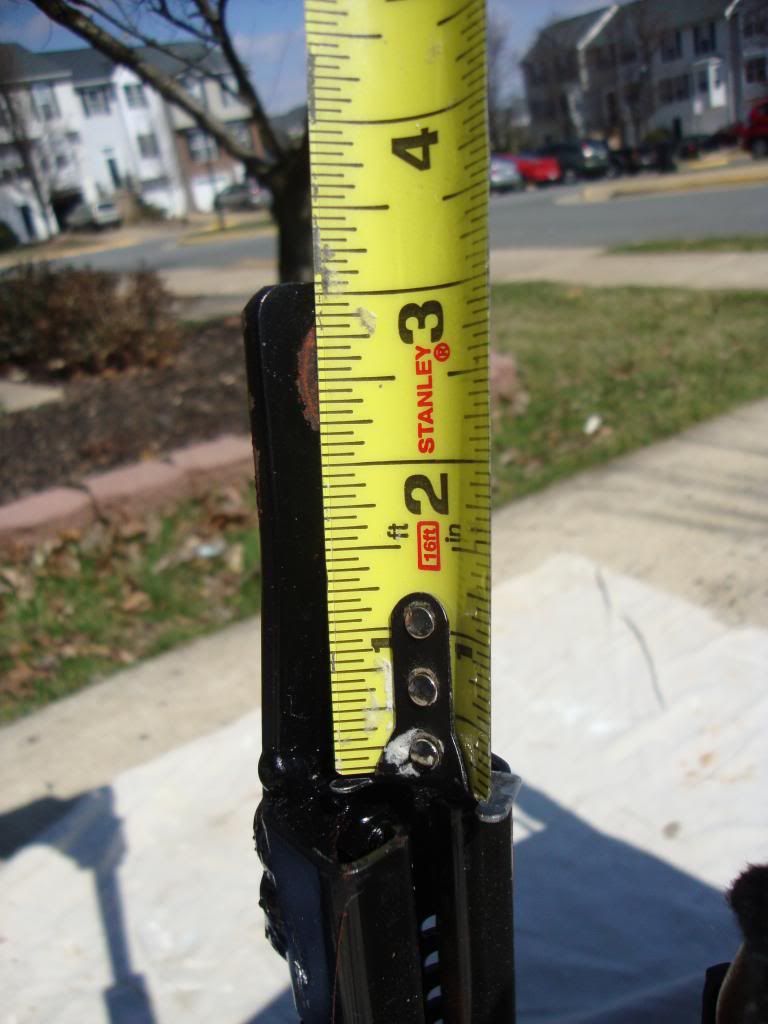 [/IMG] quick measure of where I stuck the bolt hole. I'm 6 feet tall and this is perfect for me. If your super tall add a half inch to an inch
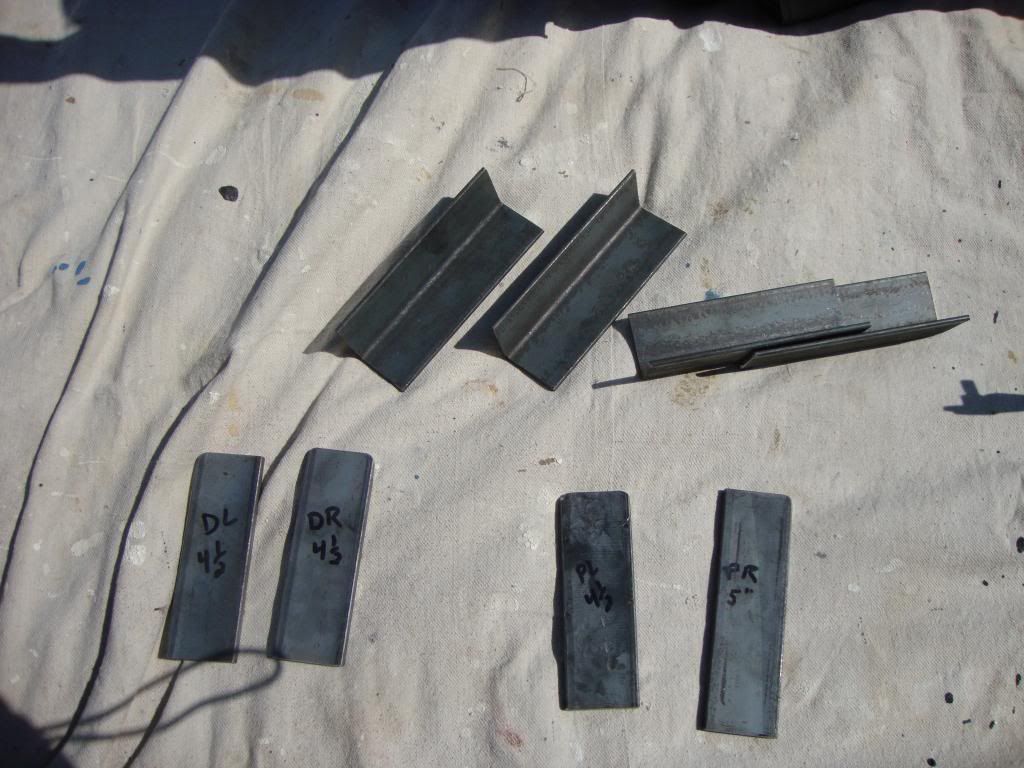 [/IMG] Raw parts
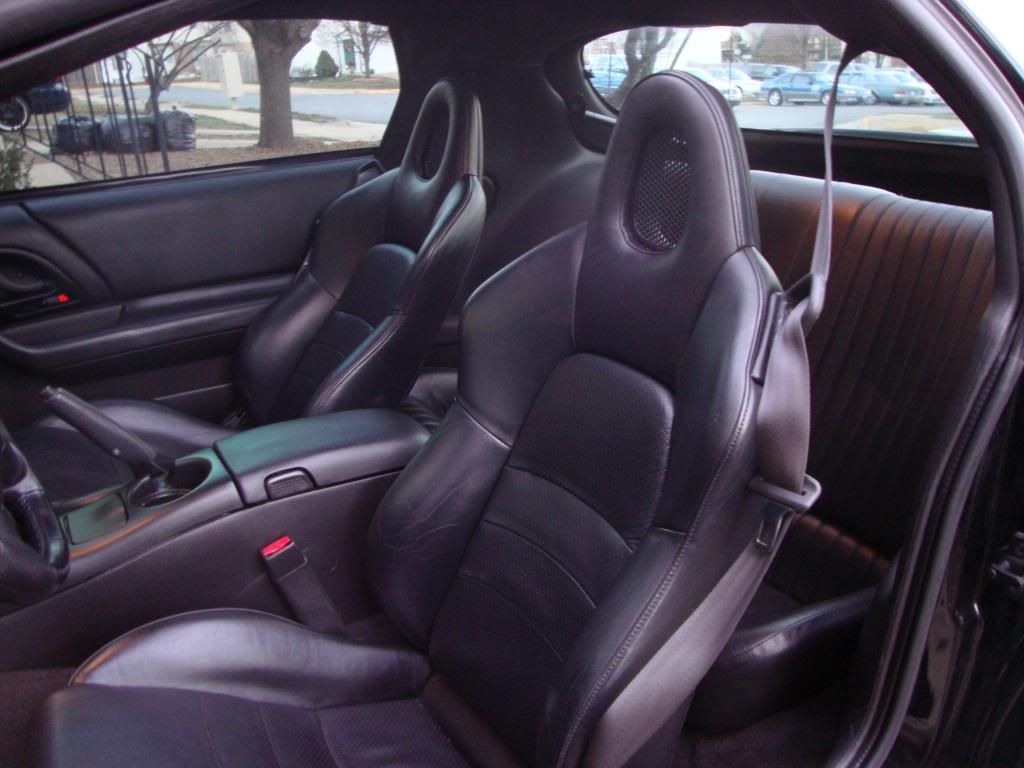 [/IMG] Finished Product
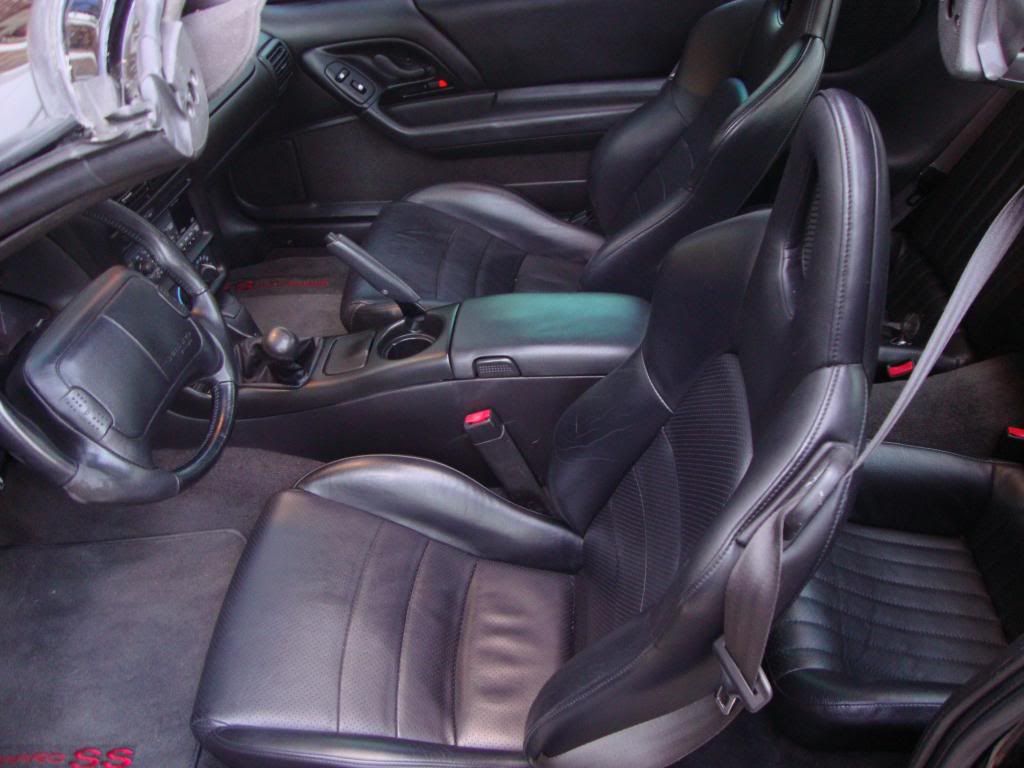 [/IMG]
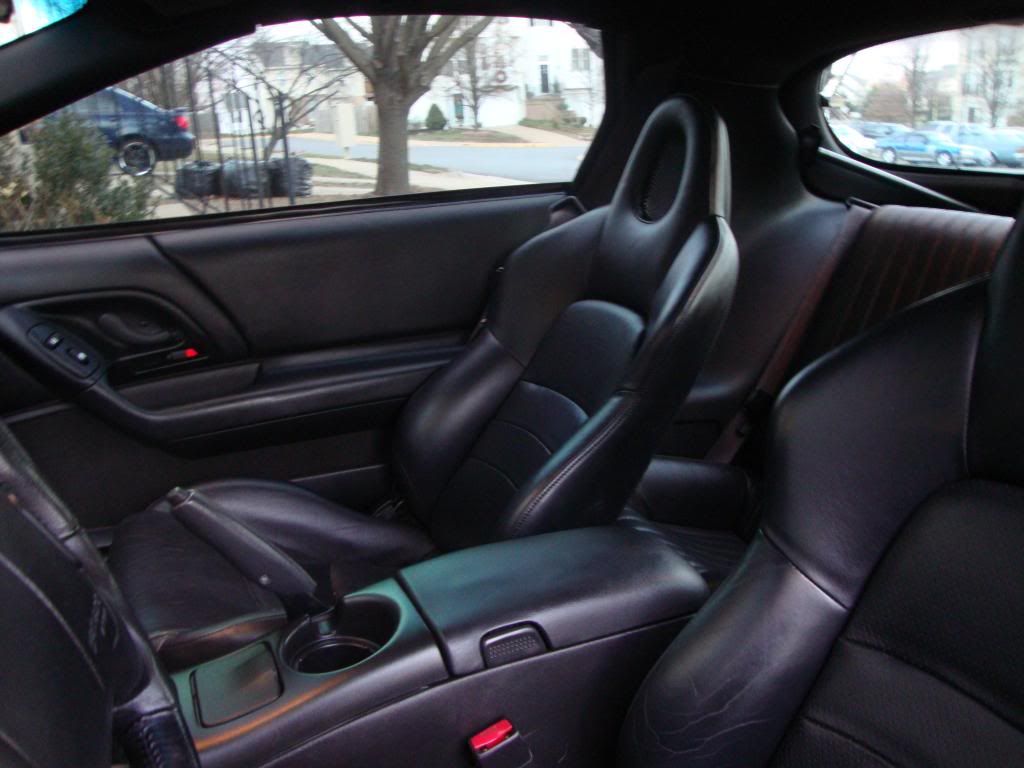 [/IMG]
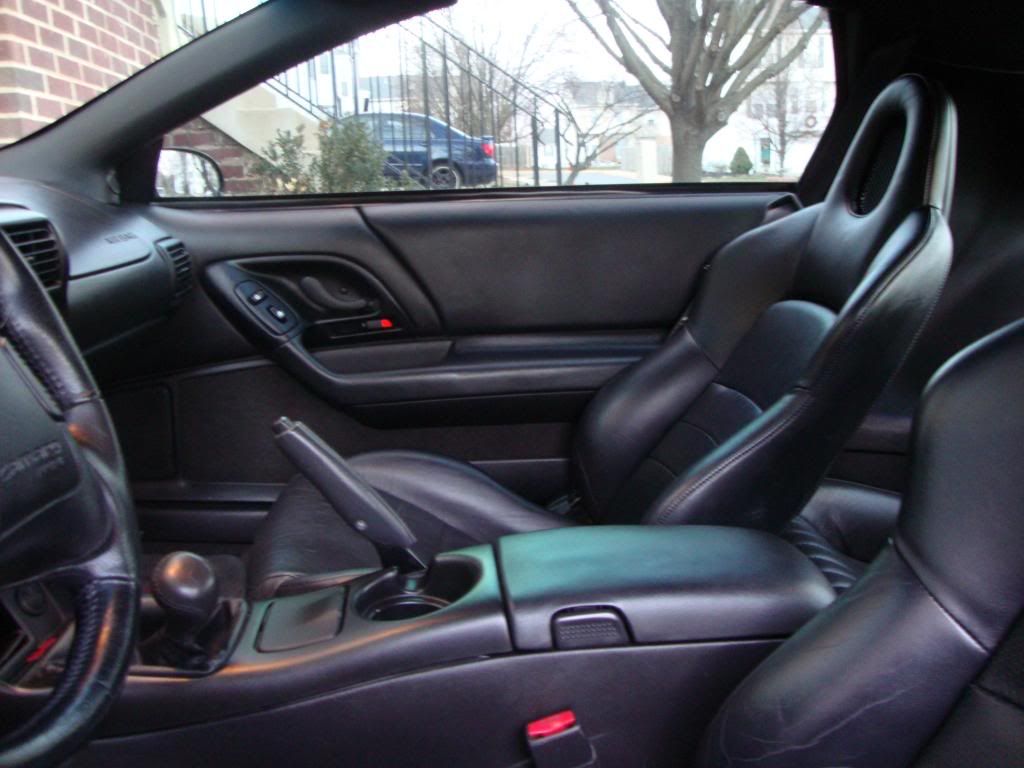 [/IMG]
  [/IMG]
 [/IMG] Passenger side left
 [/IMG]
 [/IMG] Drivers side Right rail
 [/IMG] Use bolts to mock things up and hold them in place before you weld.
 [/IMG] Passenger side left. Use two pieces of angle iron, bolt them together to allow for a pivot. You want to mock up the rails off the seat and make both rails parallel and LEVEL before you weld. If you snug the bolts just tight enough, you can rotate and move things into position. Once there, tighten the hell out of everything and then take it to weld.
  [/IMG] Passenger side RIGHT
 [/IMG] Pass rails mocked up
 [/IMG] Passenger side left (4 1/2 inches is the length of the flat stock
 [/IMG] Passenger left mocked up in the car
 [/IMG] quick measure of where I stuck the bolt hole. I'm 6 feet tall and this is perfect for me. If your super tall add a half inch to an inch
 [/IMG] Raw parts
 [/IMG] Finished Product
 [/IMG]
 [/IMG]
 [/IMG]