Appearance & Detailing Interior & Exterior Appearance Modifications
Sponsored by:
Sponsored by: DashLynx

POR-15'd Underbody & Coated Headers - pics!

Thread Tools
 
Search this Thread
 
Old 03-18-2011, 12:39 AM
  #1  
11 Second Club
Thread Starter
iTrader: (20)
 
98 WS6's Avatar
 
Join Date: May 2008
Location: New York
Posts: 3,767
Likes: 0
Received 1 Like on 1 Post

Default POR-15'd Underbody & Coated Headers - pics!

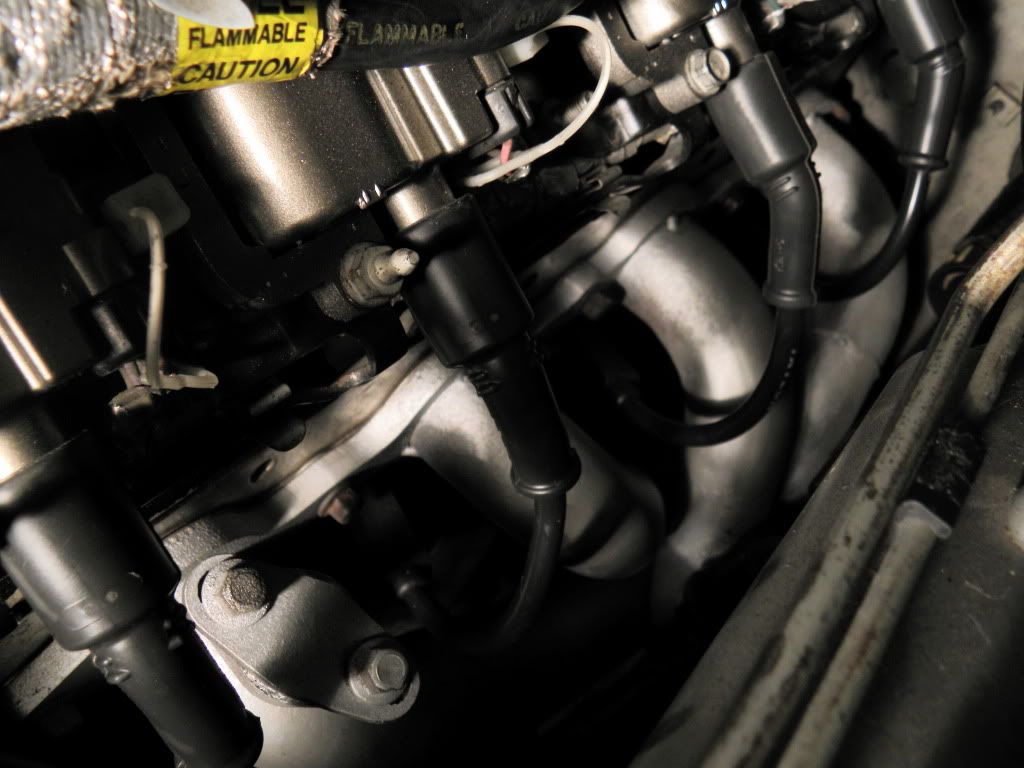
So the only thing I have a before of are the headers Keep in mind there was Pewter under that POR 15!


Before: (look at headers, yuck)
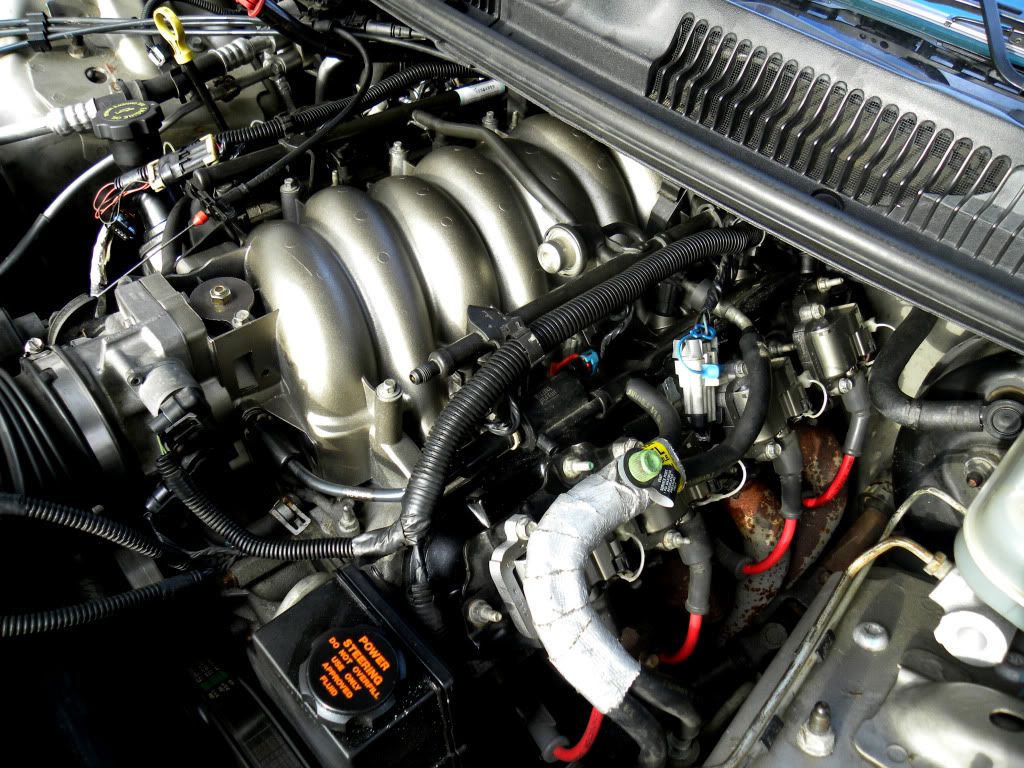


Everything now:


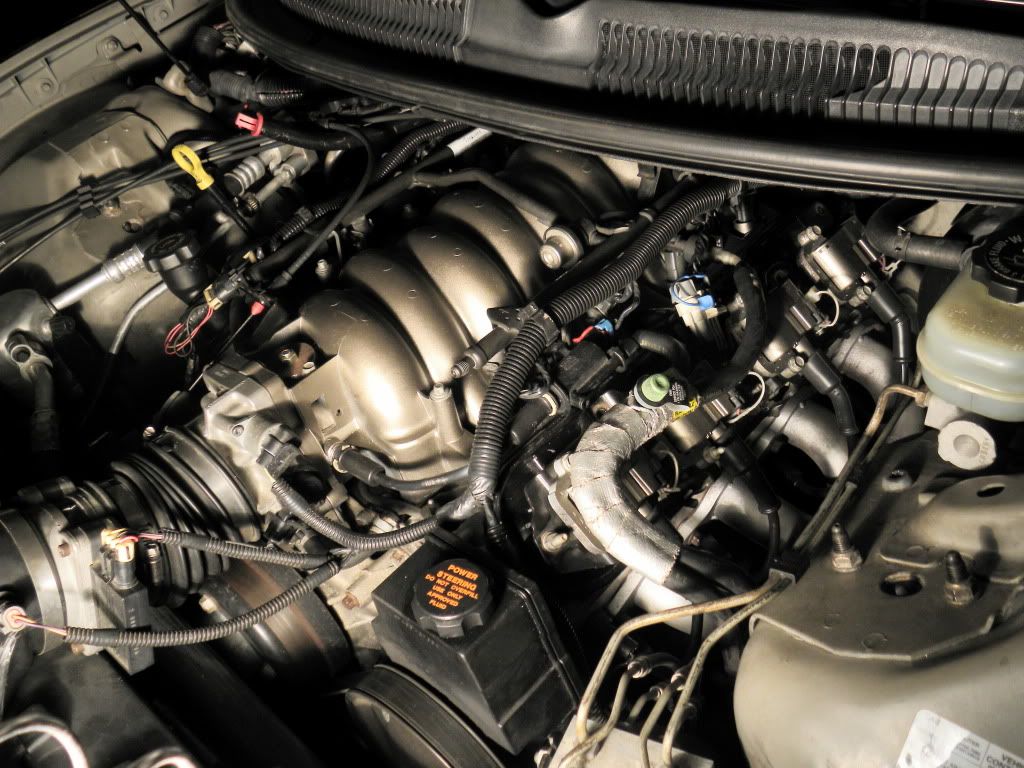
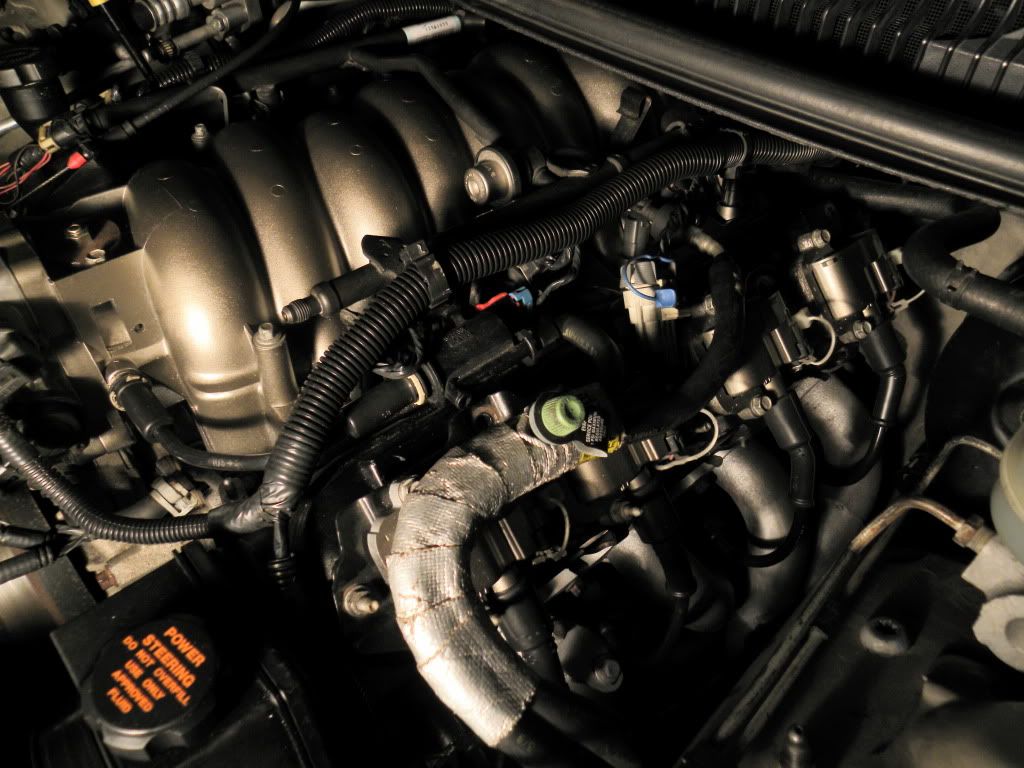
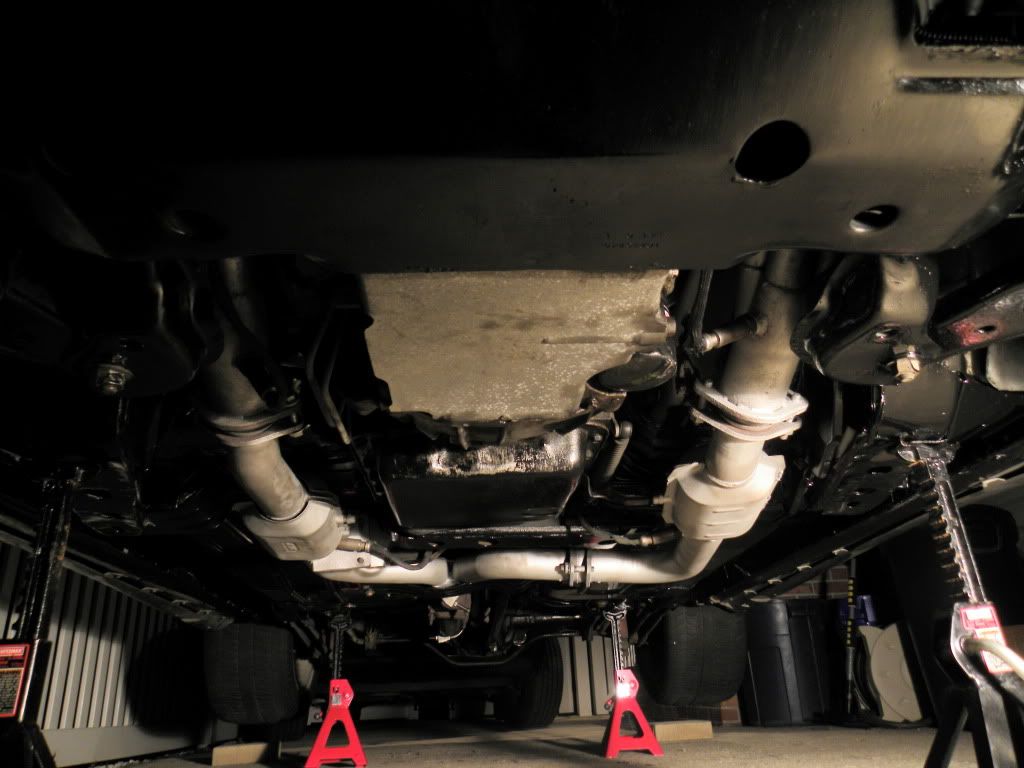
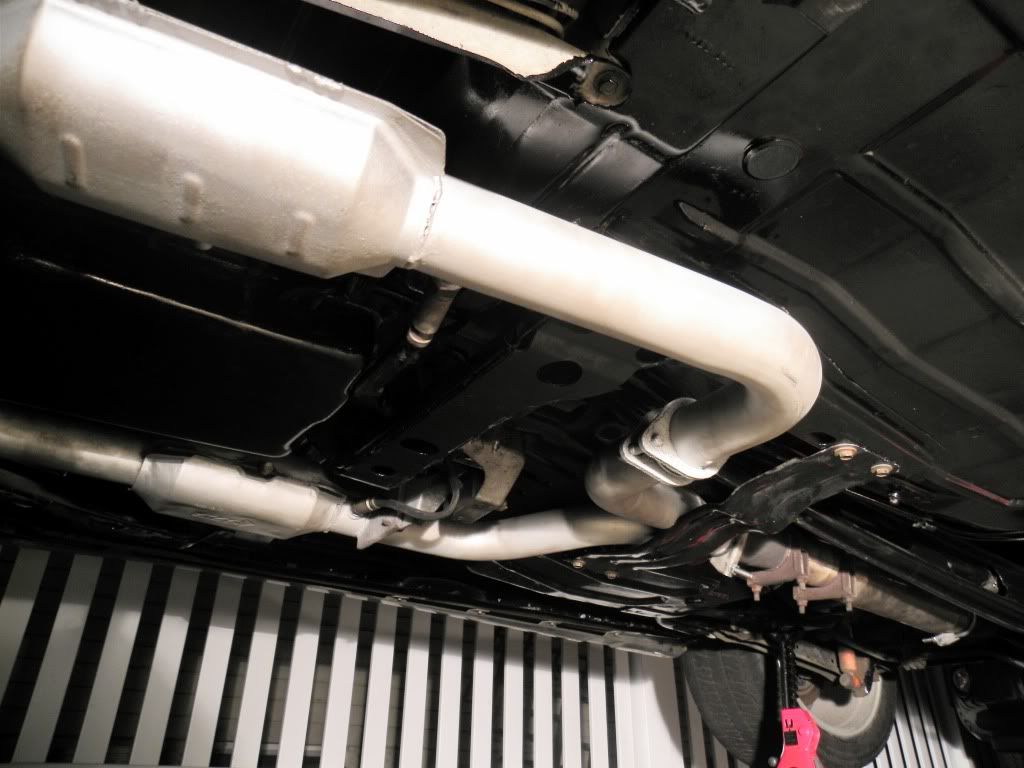
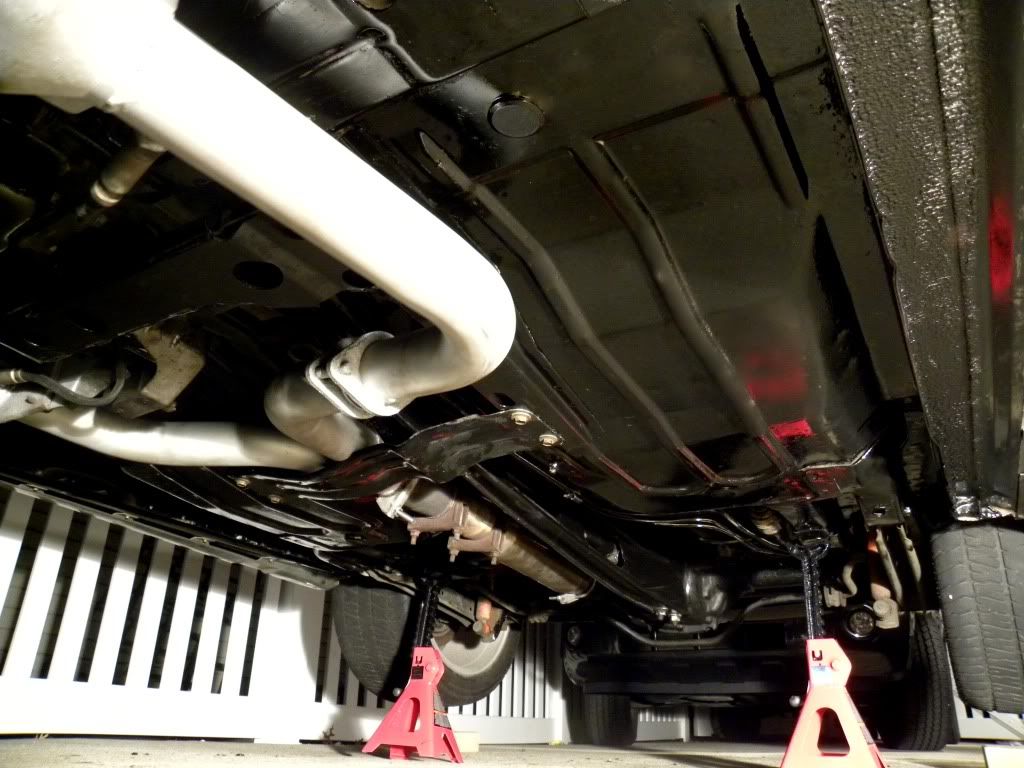
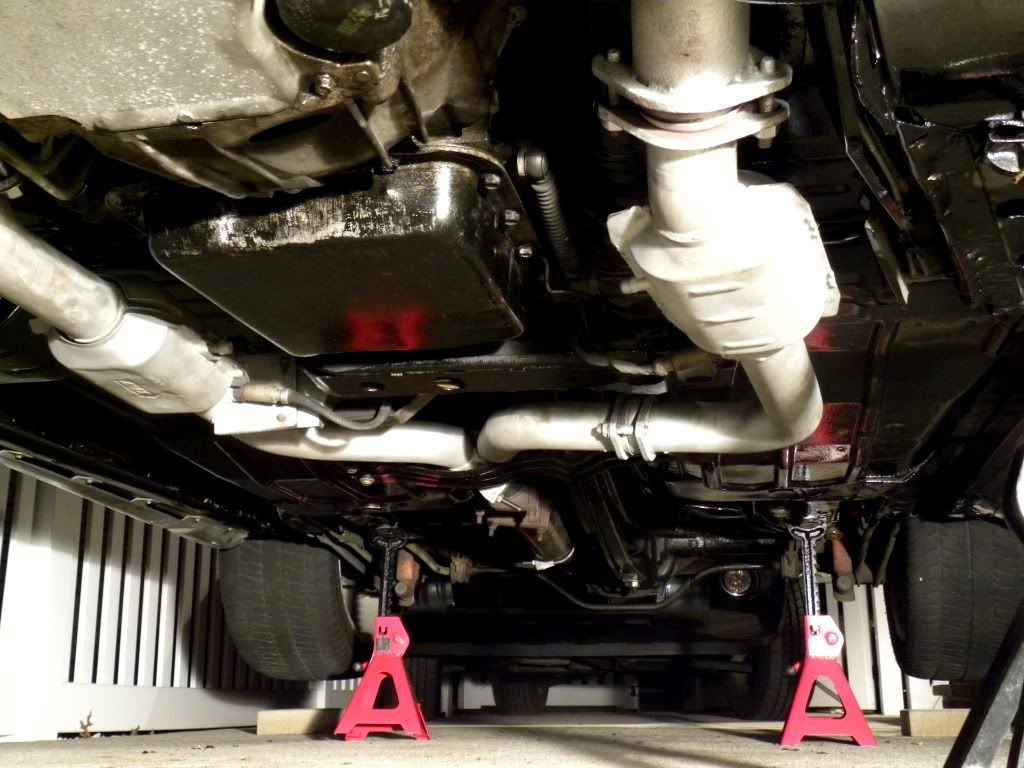
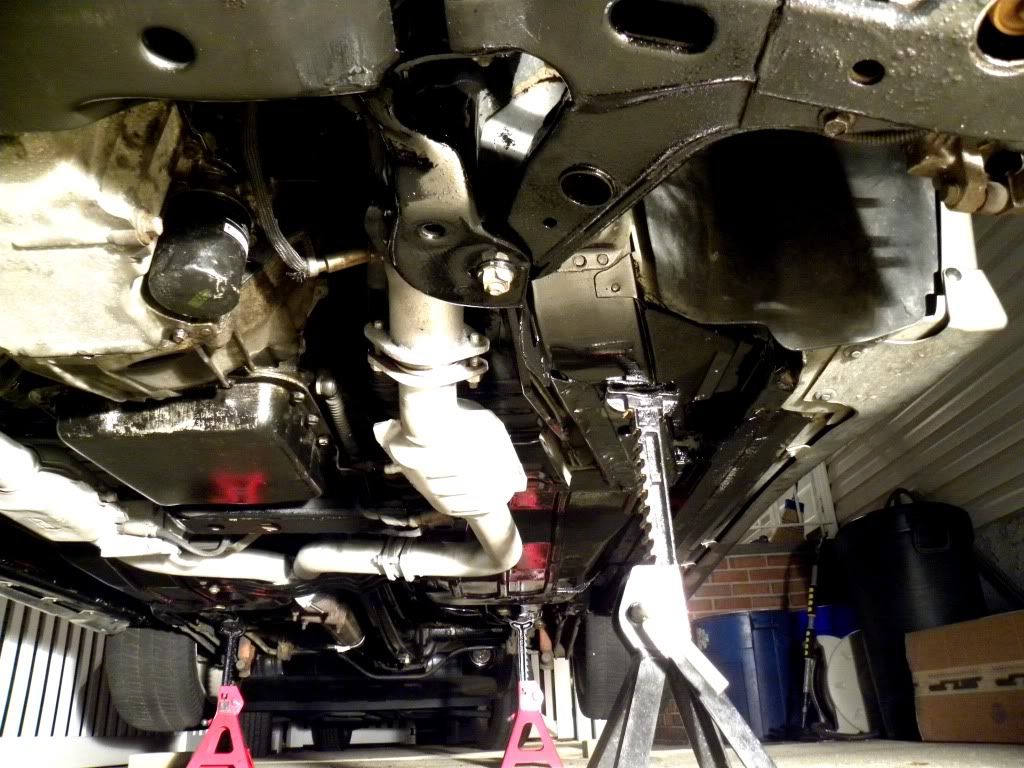
I'm absolutely loving the way everything came out.
Old 03-18-2011, 01:02 AM
  #2  
TECH Addict
iTrader: (57)
 
99'CajunFirehawk157's Avatar
 
Join Date: Jun 2007
Location: USA
Posts: 2,772
Received 18 Likes on 13 Posts

Default

Brush or spray?
Seems like a ton of work, how long did the underbody take?
Just prep (clean) the area and apply?
How much product did that take for the underbody?

Kudos on the effort!
Old 03-18-2011, 01:57 AM
  #3  
11 Second Club
Thread Starter
iTrader: (20)
 
98 WS6's Avatar
 
Join Date: May 2008
Location: New York
Posts: 3,767
Likes: 0
Received 1 Like on 1 Post

Default

Originally Posted by 99'CajunFirehawk157
Brush or spray?
Seems like a ton of work, how long did the underbody take?
Just prep (clean) the area and apply?
How much product did that take for the underbody?

Kudos on the effort!
I brushed it on. I ordered a quart, and I didn't even use half of it. For prep, sprayed the hell out of the underbody with "Purple Power" degreaser and brake cleaner, several times, and scrubbed it really well. After all that I rinsed everything good with the hose and let it air dry. Then I took a wire brush on a drill and cleaned up any surface materials, followed by a wipedown with rust neutralizer. Let it air dry again, then brushed it on.

I was outside painting for around 2/3 hours I'd say. I already had all my exhaust and everything else removed.
Old 03-18-2011, 02:47 AM
  #4  
TECH Senior Member
iTrader: (39)
 
TORCHD 02 TA's Avatar
 
Join Date: May 2006
Location: Chicago
Posts: 7,883
Likes: 0
Received 2 Likes on 2 Posts
Default

God to be young and single again.. If I had all that damn time, and with how **** I am Brian my Trans Am would prolly look like Robbies
Old 03-18-2011, 06:06 AM
  #5  
TECH Addict
iTrader: (57)
 
99'CajunFirehawk157's Avatar
 
Join Date: Jun 2007
Location: USA
Posts: 2,772
Received 18 Likes on 13 Posts

Thumbs up

Thanks for the info...looks very nice!
Originally Posted by 98 WS6
I brushed it on. I ordered a quart, and I didn't even use half of it. For prep, sprayed the hell out of the underbody with "Purple Power" degreaser and brake cleaner, several times, and scrubbed it really well. After all that I rinsed everything good with the hose and let it air dry. Then I took a wire brush on a drill and cleaned up any surface materials, followed by a wipedown with rust neutralizer. Let it air dry again, then brushed it on.

I was outside painting for around 2/3 hours I'd say. I already had all my exhaust and everything else removed.
Old 03-18-2011, 08:39 AM
  #6  
12 Second Club
iTrader: (116)
 
BIG_MIKE2005's Avatar
 
Join Date: Jun 2005
Location: Skiatook, OK
Posts: 5,222
Received 1 Like on 1 Post

Default

I didnt know POR made a silver coating that would stand up to the temps that LT's see. That in itself could make a set of Pacesetters last alot longer.
Old 03-18-2011, 08:55 AM
  #7  
TECH Senior Member
iTrader: (34)
 
DopeFedZ's Avatar
 
Join Date: Apr 2002
Location: Houston TX
Posts: 5,230
Received 19 Likes on 13 Posts

Default

Good work. I just painted my underbody yesterday. That crap was not fun.
Old 03-18-2011, 09:13 AM
  #8  
TECH Fanatic
iTrader: (39)
 
therobman's Avatar
 
Join Date: Oct 2006
Location: Nyc
Posts: 1,768
Likes: 0
Received 2 Likes on 2 Posts

Default

looks awsome if i only had the time and patience
Old 03-18-2011, 09:41 AM
  #9  
TECH Junkie
iTrader: (35)
 
Spd-Kilz's Avatar
 
Join Date: Nov 2005
Location: Rack City
Posts: 3,427
Likes: 0
Received 5 Likes on 5 Posts

Default

Looks good Brian! Lots of hard work!


Originally Posted by TORCHD 02 TA
God to be young and single again.. If I had all that damn time, and with how **** I am Brian my Trans Am would prolly look like Robbies
Amen to that. Wish I had the time.
Old 03-18-2011, 09:48 AM
  #10  
Launching!
 
joe77's Avatar
 
Join Date: Sep 2009
Location: Toronto, Ontario, Canada
Posts: 266
Likes: 0
Received 0 Likes on 0 Posts

Default

You must work quick or didnt have much rust, tried to do this on my 85 ta, and took me days, and its only half done lol.
Old 03-18-2011, 11:53 AM
  #11  
11 Second Club
Thread Starter
iTrader: (20)
 
98 WS6's Avatar
 
Join Date: May 2008
Location: New York
Posts: 3,767
Likes: 0
Received 1 Like on 1 Post

Default

Originally Posted by BIG_MIKE2005
I didnt know POR made a silver coating that would stand up to the temps that LT's see. That in itself could make a set of Pacesetters last alot longer.
The headers are actually coated with VHT's high temp coating. I used it on my last TA, it came out even better this time. Even with slamming them around the engine bay getting them back in, not a scratch!

Thanks everyone! I was working pretty quickly to be honest, and it wasn't too bad under there to begin with. And Dope, you got that right.. it isn't fun lol. I finished this 6 days ago and some of the POR-15 JUST peeled off my face.
Old 03-18-2011, 12:01 PM
  #12  
TECH Fanatic
iTrader: (39)
 
therobman's Avatar
 
Join Date: Oct 2006
Location: Nyc
Posts: 1,768
Likes: 0
Received 2 Likes on 2 Posts

Default

since you only used half if you feel the urge to do it again im always around
Old 03-18-2011, 12:40 PM
  #13  
TECH Addict
iTrader: (12)
 
chavez885's Avatar
 
Join Date: Dec 2005
Location: Concord, CA
Posts: 2,382
Likes: 0
Received 1 Like on 1 Post

Default

So only 3 hours total? Or 3 hours just for the por15...how long to prep bud?

Looks fantastic and worth the effort.
Old 03-18-2011, 01:56 PM
  #14  
SRZ
TECH Fanatic
iTrader: (14)
 
SRZ's Avatar
 
Join Date: Nov 2002
Location: FL
Posts: 1,168
Received 11 Likes on 9 Posts

Default

Looks good! When I buy some new LT's, I think I'll do this while I'm down there. Again, good job.
Old 03-18-2011, 01:59 PM
  #15  
TECH Regular
iTrader: (5)
 
Screamin_99's Avatar
 
Join Date: Oct 2006
Posts: 434
Likes: 0
Received 0 Likes on 0 Posts
Default

That looks really damn good man you did a great job on it.. You should at least put together a list of materials with pictures of the products and a small half-assed writeup.

I wanna do this to my Jeep and my Firebird (if I keep it that is)
Old 03-18-2011, 02:24 PM
  #16  
TECH Fanatic
iTrader: (5)
 
lees02WS6's Avatar
 
Join Date: Mar 2004
Location: Lansdale, PA
Posts: 1,735
Received 146 Likes on 118 Posts

Default

I just did the same thing to the underside of my mother's jeep. Looks great, will keep the rust away, but a real pig to brush on. If I had the time and patience I'd remove the axles, linkage, gas tank, and exhaust, mask things off, and use my paint gun. Definitely a good deal of work right there.
Old 03-18-2011, 10:28 PM
  #17  
TECH Enthusiast
 
Smoke Em's Avatar
 
Join Date: Mar 2009
Location: RI
Posts: 723
Likes: 0
Received 0 Likes on 0 Posts

Default

i just did the underside of my camaro a couple weeks ago, def the best thing i could have done to the underside, makes it look 100x better. its alot of work but definitely worth it.

looks great OP!!
Old 03-18-2011, 10:42 PM
  #18  
On The Tree
iTrader: (6)
 
BenLaz's Avatar
 
Join Date: Mar 2007
Location: Windsor,Ontario
Posts: 151
Likes: 0
Received 0 Likes on 0 Posts

Default

Originally Posted by BIG_MIKE2005
I didnt know POR made a silver coating that would stand up to the temps that LT's see. That in itself could make a set of Pacesetters last alot longer.
Its called POR-20... didnt work so well on mine.... flaked off.
Old 03-19-2011, 01:37 AM
  #19  
11 Second Club
Thread Starter
iTrader: (20)
 
98 WS6's Avatar
 
Join Date: May 2008
Location: New York
Posts: 3,767
Likes: 0
Received 1 Like on 1 Post

Default

Originally Posted by chavez885
So only 3 hours total? Or 3 hours just for the por15...how long to prep bud?

Looks fantastic and worth the effort.
3 or so hours of actually painting it on. At a sloooow pace and taking breaks every so often. I finished around.. 5PM and I went outside to start cleaning/wire brushing/prep a little after 12 noon. Keep in mind all the waiting for it to air dry (while I was doing other things) so it wasn't bad at all. Thanks man, it was definitely worth it.

Originally Posted by SRZ
Looks good! When I buy some new LT's, I think I'll do this while I'm down there. Again, good job.
You should, you won't be disappointed. Thanks!

Originally Posted by Screamin_99
That looks really damn good man you did a great job on it.. You should at least put together a list of materials with pictures of the products and a small half-assed writeup.

I wanna do this to my Jeep and my Firebird (if I keep it that is)
I'll keep that in mind, my good man. Maybe I could grab some old part laying around and show the whole process on that one piece.

Originally Posted by lees02WS6
I just did the same thing to the underside of my mother's jeep. Looks great, will keep the rust away, but a real pig to brush on. If I had the time and patience I'd remove the axles, linkage, gas tank, and exhaust, mask things off, and use my paint gun. Definitely a good deal of work right there.
iiiiii hear that!

Originally Posted by Smoke Em
i just did the underside of my camaro a couple weeks ago, def the best thing i could have done to the underside, makes it look 100x better. its alot of work but definitely worth it.

looks great OP!!
It really does man. I was doing some work under the car today with a buddy of mine, and all we kept saying is how great it looked.

Originally Posted by BenLaz
Its called POR-20... didnt work so well on mine.... flaked off.
After all the abuse of putting my headers back in, scraping them along the driveway, and the beating one side got today IN the engine bay, there isn't even so much as a scrape or a mark on them. Granted that doesn't say anything for longevity but they can damn sure take a punch.

This is all I used, and if you didn't notice, I did my headers as well as the y-pipe with one can.


Thanks again everyone. Like I said I'm loving it more and more as I see it. I'll definitely keep that writeup idea in mind if you guys would really like one. I have more!
Old 03-19-2011, 07:40 AM
  #20  
TECH Enthusiast
iTrader: (7)
 
MasterV8's Avatar
 
Join Date: Jul 2005
Location: UK
Posts: 603
Likes: 0
Received 4 Likes on 3 Posts

Default

What happened to all the heat shields, did you take them out to paint?


Quick Reply: POR-15'd Underbody & Coated Headers - pics!


All times are GMT -5. The time now is 12:19 AM.