Appearance & Detailing Interior & Exterior Appearance Modifications
Sponsored by:
Sponsored by: DashLynx

Trans Am Gauge Bezel with Gauge pods *Finished Pics*

Thread Tools
 
Search this Thread
 
Old 10-29-2011, 08:41 PM
  #1  
TECH Fanatic
Thread Starter
iTrader: (9)
 
Swiat34's Avatar
 
Join Date: May 2007
Location: Jackson, TN
Posts: 1,527
Likes: 0
Received 3 Likes on 3 Posts

Talking Trans Am Gauge Bezel with Gauge pods *Finished Pics*

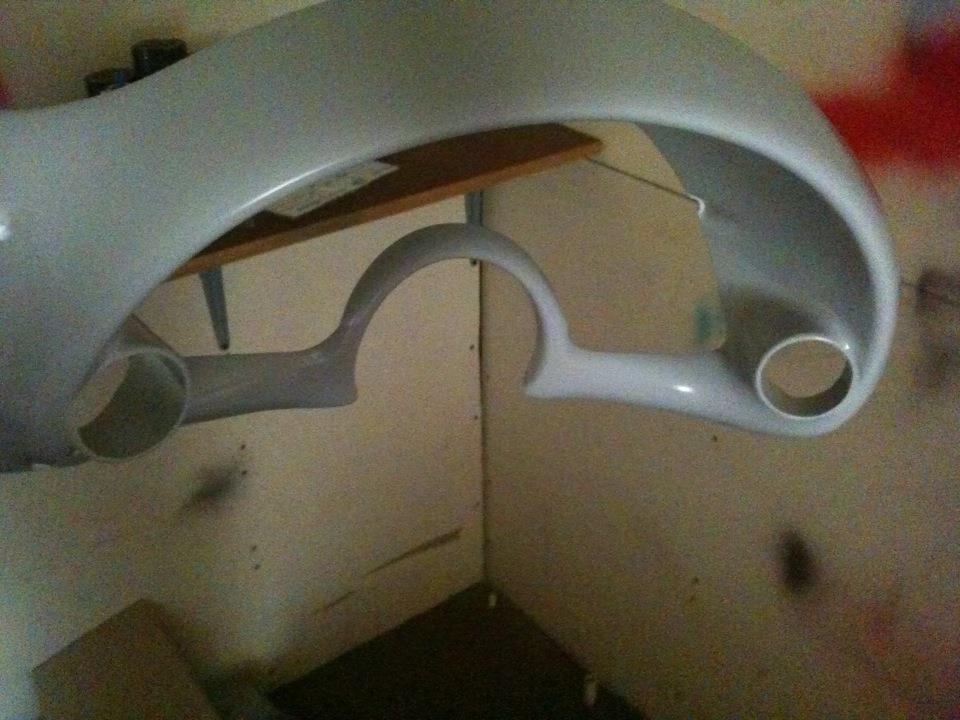
So I had a bit of a brain storm thinking about how much I don't like the look of pillar pods and came up with this. I used 2" PVC and borrowed an old Trans Temp gauge from a friend for test fitting. After deciding on placement, I cut the bezel and PVC then used JBStick epoxy to keep it in place. It's a VERY strong bond! I used my dremel to grind away the excess epoxy before contouring with a lightweight body filler. I shaped it by hand sanding. It got a coat of Spotting and Glazing putty to fill small imperfections. I sanded over the entire bezel to eliminate the factory texture before getting the coat of sandable primer. That'll get wet sanded and finally coated with a Dupont Semi-gloss black. So here's the pics!

Attached Thumbnails Trans Am Gauge Bezel with Gauge pods *Finished Pics*-img_1925.jpg   Trans Am Gauge Bezel with Gauge pods *Finished Pics*-img_1928.jpg   Trans Am Gauge Bezel with Gauge pods *Finished Pics*-img_1953.jpg   Trans Am Gauge Bezel with Gauge pods *Finished Pics*-bezel-primer-2.jpg  

Last edited by Swiat34; 11-03-2011 at 05:22 PM.
The following users liked this post:
guessohw (09-22-2020)
Old 10-29-2011, 08:52 PM
  #2  
TECH Addict
iTrader: (7)
 
Blackbirdws6's Avatar
 
Join Date: Mar 2005
Location: Piscataway, NJ
Posts: 2,161
Received 3 Likes on 3 Posts

Default

I like the idea and I think you did a nice job with it, just appears difficult to read the gauges past the wheel.
Old 10-29-2011, 08:58 PM
  #3  
TECH Fanatic
Thread Starter
iTrader: (9)
 
Swiat34's Avatar
 
Join Date: May 2007
Location: Jackson, TN
Posts: 1,527
Likes: 0
Received 3 Likes on 3 Posts

Default

Originally Posted by Blackbirdws6
I like the idea and I think you did a nice job with it, just appears difficult to read the gauges past the wheel.
Thanks! And it's not too bad to see em. The wheel covers em a little bit when your seat is far back but for those who are a bit closer it won't be an issue. Nothing that a little movement of the head can't quickly solve! Now a smaller aftermarket wheel might cause a visibility issue.
Old 10-29-2011, 09:07 PM
  #4  
TECH Addict
iTrader: (41)
 
TransWS6Am's Avatar
 
Join Date: Feb 2007
Location: Battlecreek, MI / Mansfield, OH
Posts: 2,007
Received 2 Likes on 2 Posts

Default

awsome job man! I think it looks great.
The following users liked this post:
guessohw (09-22-2020)
Old 10-29-2011, 11:23 PM
  #5  
12 Second Club
iTrader: (72)
 
RyanSws6's Avatar
 
Join Date: Jan 2008
Posts: 827
Likes: 0
Received 1 Like on 1 Post
Default

Damn I feel just like you! I hate the ricey gauge pods! When I bought my SS that was the first thing I replaced with a new A pillar trim. I've seen some of the trim that summit makes for the stangs and asked why didn't they use one for the F bods...

I'm all about clean looks and you've got a page of one of my ideas.

I did something similar but to the TA guage bezel from a C5.
Old 10-30-2011, 12:13 AM
  #6  
TECH Fanatic
Thread Starter
iTrader: (9)
 
Swiat34's Avatar
 
Join Date: May 2007
Location: Jackson, TN
Posts: 1,527
Likes: 0
Received 3 Likes on 3 Posts

Default

I wouldn't call em "ricey" but the pillar pods look SO aftermarket. I just like a cleaner OEM-ish look. Since I plan on installing an Autometer Gauge panel, the two I place here should look well at home. And because of the slight steering wheel interference, they'll be somewhat less important gauges like Trans Temp or Voltage or the like.
Old 10-30-2011, 01:44 AM
  #7  
TECH Fanatic
 
vikingramair's Avatar
 
Join Date: Jun 2004
Location: Sweden
Posts: 1,034
Received 18 Likes on 14 Posts

Default

Very nice work done!!
Old 10-30-2011, 09:16 AM
  #8  
TECH Regular
iTrader: (23)
 
NXPRSS's Avatar
 
Join Date: Aug 2006
Location: CT
Posts: 444
Received 1 Like on 1 Post

Default

looks very good!
Old 10-30-2011, 11:08 AM
  #9  
TECH Apprentice
iTrader: (27)
 
91rs355's Avatar
 
Join Date: Jul 2006
Posts: 362
Likes: 0
Received 0 Likes on 0 Posts

Default

nice work bud, looks good
Old 10-30-2011, 12:03 PM
  #10  
TECH Fanatic
Thread Starter
iTrader: (9)
 
Swiat34's Avatar
 
Join Date: May 2007
Location: Jackson, TN
Posts: 1,527
Likes: 0
Received 3 Likes on 3 Posts

Default

Thanks guys!
Old 10-30-2011, 12:49 PM
  #11  
TECH Apprentice
iTrader: (4)
 
1quickTransAm's Avatar
 
Join Date: Apr 2008
Posts: 393
Likes: 0
Received 0 Likes on 0 Posts

Default

Very, very nice work! Can't wait to see it finished and in the car. It really looks great.
Old 10-30-2011, 06:13 PM
  #12  
TECH Enthusiast
iTrader: (9)
 
firemech21's Avatar
 
Join Date: Feb 2009
Location: Langley AFB (Hampton VA)
Posts: 663
Likes: 0
Received 1 Like on 1 Post

Default

I really like this setup, I have been wanting to add a couple extra gauges but hate how the pods along the A-pillar look. Might have to try this myself.
Old 10-30-2011, 06:54 PM
  #13  
TECH Senior Member
iTrader: (127)
 
NemeSS's Avatar
 
Join Date: Sep 2005
Location: Houston,TX
Posts: 6,886
Received 7 Likes on 7 Posts

Default

Looks good, gonna try same thing on my ta. I h8 pillar pods and monster tachs on deck
Old 10-30-2011, 07:11 PM
  #14  
TECH Junkie
iTrader: (28)
 
whytryz28's Avatar
 
Join Date: Feb 2007
Location: Hawaii
Posts: 3,758
Likes: 0
Received 1 Like on 1 Post

Default

Mustang wanna be. Looks good, lets see finished installed pictures.
Old 11-02-2011, 02:32 AM
  #15  
On The Tree
iTrader: (10)
 
CUR4VNM's Avatar
 
Join Date: May 2011
Location: Bay Area,CA
Posts: 162
Received 3 Likes on 3 Posts

Default

That looks really good cant wait to see the finish product!
Old 11-02-2011, 10:26 PM
  #16  
TECH Fanatic
Thread Starter
iTrader: (9)
 
Swiat34's Avatar
 
Join Date: May 2007
Location: Jackson, TN
Posts: 1,527
Likes: 0
Received 3 Likes on 3 Posts

Default

Well I got it painted today and took a couple iPhone pics. Tomorrow I'll put it in the car and take a couple more and load everything onto my laptop so I can post em up here in a couple days when I get online. Thanks for following me through the little project!
Old 11-02-2011, 10:31 PM
  #17  
On The Tree
iTrader: (3)
 
Blasko's Avatar
 
Join Date: Feb 2011
Location: FL
Posts: 146
Likes: 0
Received 0 Likes on 0 Posts

Default

Thats Awesome!
Old 11-03-2011, 03:21 PM
  #18  
TECH Resident
iTrader: (8)
 
camaroboy14's Avatar
 
Join Date: Oct 2009
Location: spangdahlem/bruch germany
Posts: 881
Likes: 0
Received 0 Likes on 0 Posts
Default

Looks great OP ..
Old 11-03-2011, 05:21 PM
  #19  
TECH Fanatic
Thread Starter
iTrader: (9)
 
Swiat34's Avatar
 
Join Date: May 2007
Location: Jackson, TN
Posts: 1,527
Likes: 0
Received 3 Likes on 3 Posts

Thumbs up

So here's the finished piece! I used a semi-gloss black from Dupont. I didn't get ANY in-car pics due to the crappy weather but when I get some I'll add em to this. Until then, the project is finished. Thanks for your praise guys! And to those looking to do this, good luck and keep this in mind: the fiber reinforced dash frame may look like its in the way (near the headlight switch and the radio) but this demo gauge fit without touching either side. Maybe deeper gauges might require a little cutting in these areas but a Dremel can easily take care of that! Pics attached, enjoy!
Attached Thumbnails Trans Am Gauge Bezel with Gauge pods *Finished Pics*-img_2154.jpg   Trans Am Gauge Bezel with Gauge pods *Finished Pics*-img_2155.jpg   Trans Am Gauge Bezel with Gauge pods *Finished Pics*-img_2156.jpg  
Old 11-03-2011, 05:54 PM
  #20  
TECH Resident
iTrader: (32)
 
1badWS6's Avatar
 
Join Date: Nov 2005
Location: Chicago, IL
Posts: 909
Likes: 0
Received 0 Likes on 0 Posts

Default

I like it man, looks clean.


Quick Reply: Trans Am Gauge Bezel with Gauge pods *Finished Pics*


All times are GMT -5. The time now is 01:20 AM.