Write Up: C6 Steering Wheel in an F-body

 02-14-2013, 08:18 PM
#63
TECH Addict
iTrader: (1)

Join Date: Apr 2012
Location: Ellijay, GA
Posts: 2,769
Likes: 0
Received 0 Likes
on
0 Posts
have you seen what happened to ANGRY BIRD's Firebird: http://www.fullthrottlev6.com/forums...-Rest-In-Peace...
His airbags didn't deploy.
02-19-2013, 03:00 PM
#65
Ok, update time guys, back from Motorama and back on the project. Ill actually be starting the physical work tomorrow evening but Ive been doing some research and found a great write up thats worth the read if your going to attempt this swap. More to come tomorrow!
http://www.crankshaftcoalition.com/w...ck_Rebuild.pdf
http://www.crankshaftcoalition.com/w...ck_Rebuild.pdf
 02-25-2013, 03:00 AM
#70
FYI, if you still want the passenger side airbag to work you still need the airbag control system to think the driverside airbag is still there. When the airbag light is on both airbags are inoperable until the fault is corrected. I know for a 99 ls1 camaro you need to wire in at least a 2 ohm resistor, but no greater than a 6 ohm, Don't forget to factor in the (5% or 1%) tolerance. I used 2.2 ohm 1w flameproof resistors w/5% tolerance.
http://i523.photobucket.com/albums/w...psc5b6520c.jpg
http://i523.photobucket.com/albums/w...ps3aacdc01.jpg
http://i523.photobucket.com/albums/w...ps01e2bcfa.jpg
http://i523.photobucket.com/albums/w...psc5b6520c.jpg
http://i523.photobucket.com/albums/w...ps3aacdc01.jpg
http://i523.photobucket.com/albums/w...ps01e2bcfa.jpg
Last edited by 99Bluz28; 02-25-2013 at 03:07 AM.
02-25-2013, 12:53 PM
#71
Last night as I was driving home I was thinking about the ancient design of our entire columns (turn signal stalk from a 80s truck lol) and started wondering about what it would take to swap out the entire thing for one from a newer GM car to get the nicer switches and stuff.
02-25-2013, 02:53 PM
#72
Last night as I was driving home I was thinking about the ancient design of our entire columns (turn signal stalk from a 80s truck lol) and started wondering about what it would take to swap out the entire thing for one from a newer GM car to get the nicer switches and stuff.
I wonder which column would be the most aesthetically appealing while also being fully functional
02-25-2013, 03:36 PM
#73

As some point you have to face the fact these are 15yo cars. You just have to appreciate what they are for what they are. I did the pro touring thing with my 87 Grand national and with suspension and power to give a new z06 a run for the money you can't update everything. I'm doing a lot to my Ta but not trying to turn it into a 2015 corvette because it will never be. These cars will be "classics" before you know it and people will be trying to restore them back to stock.
02-25-2013, 06:34 PM
#75
As some point you have to face the fact these are 15yo cars. You just have to appreciate what they are for what they are. I did the pro touring thing with my 87 Grand national and with suspension and power to give a new z06 a run for the money you can't update everything. I'm doing a lot to my Ta but not trying to turn it into a 2015 corvette because it will never be. These cars will be "classics" before you know it and people will be trying to restore them back to stock.
 02-25-2013, 07:35 PM
#77
Ok guys, as promised here goes. Were not done but were getting close. Ran out of daylight tonight but heres what i got so far.
1)first and foremost, disconnect your battery, I cant stress this enough. Last thing you want is an airbag to deploy while your working on it.
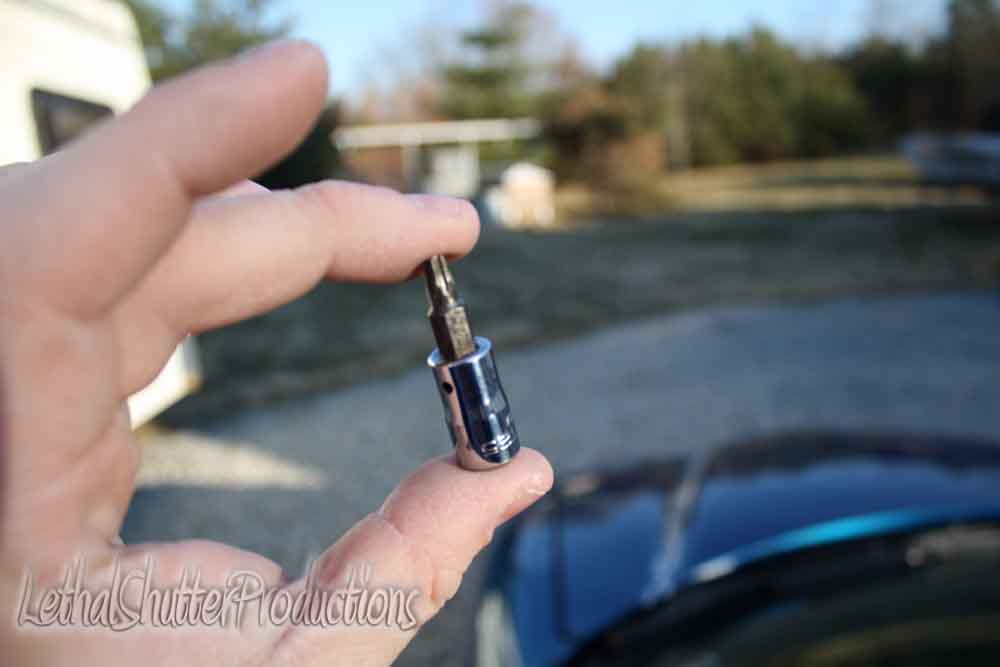
2)remove the airbag. You'll need a torx bit (t25) to loosen the two nuts that are behind the wheel.
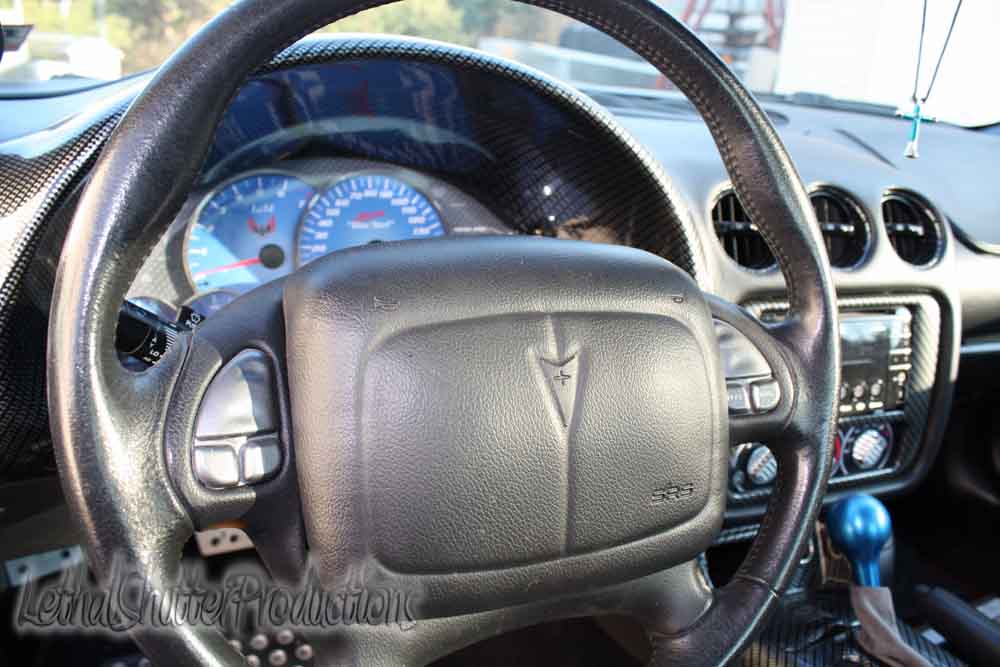
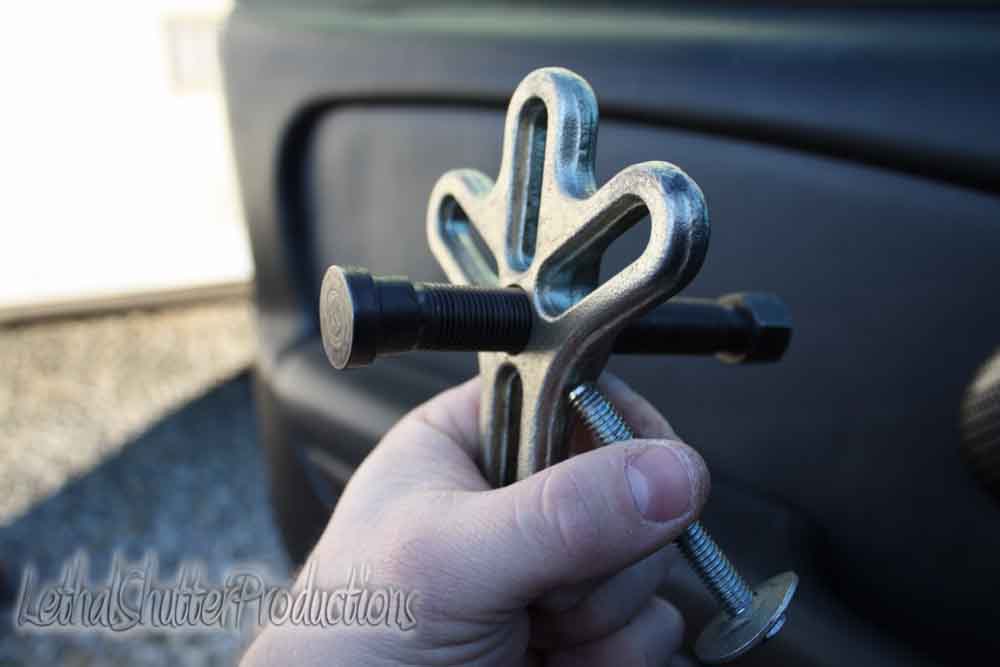
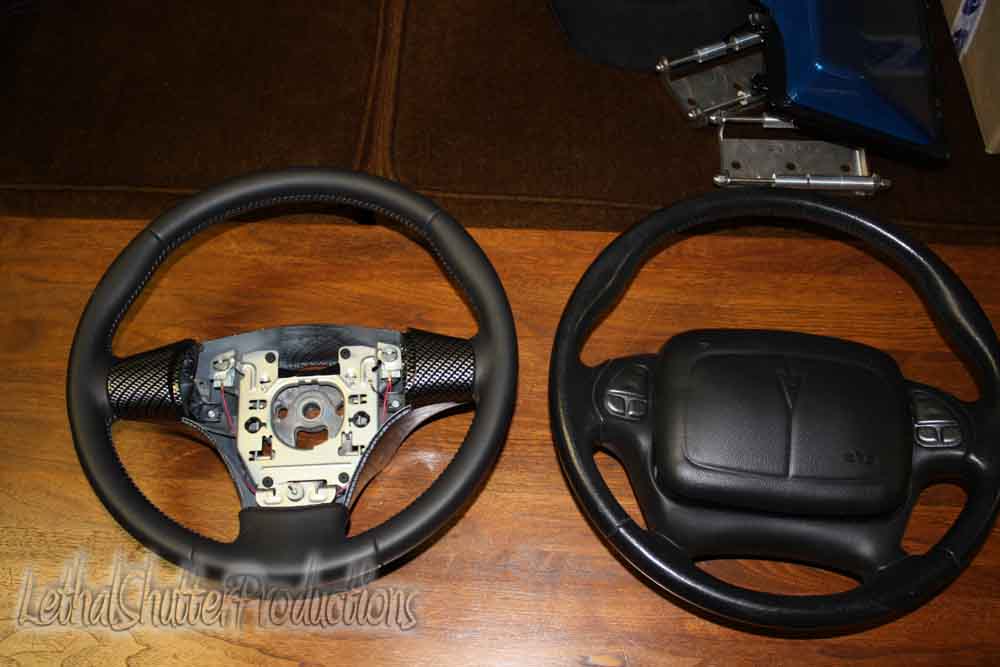
3)Next youll have to remove the wheel itself. Youll need a puller for this. You can rent one at any autozone. Start by removing the 21mm nut that holds the wheel in place. Theres two places to put bolts in the wheel for the puller (i cant quote you on exact size, youll have to play around a bit like i did). Set the two bolts in your puller and extract the wheel as seen here
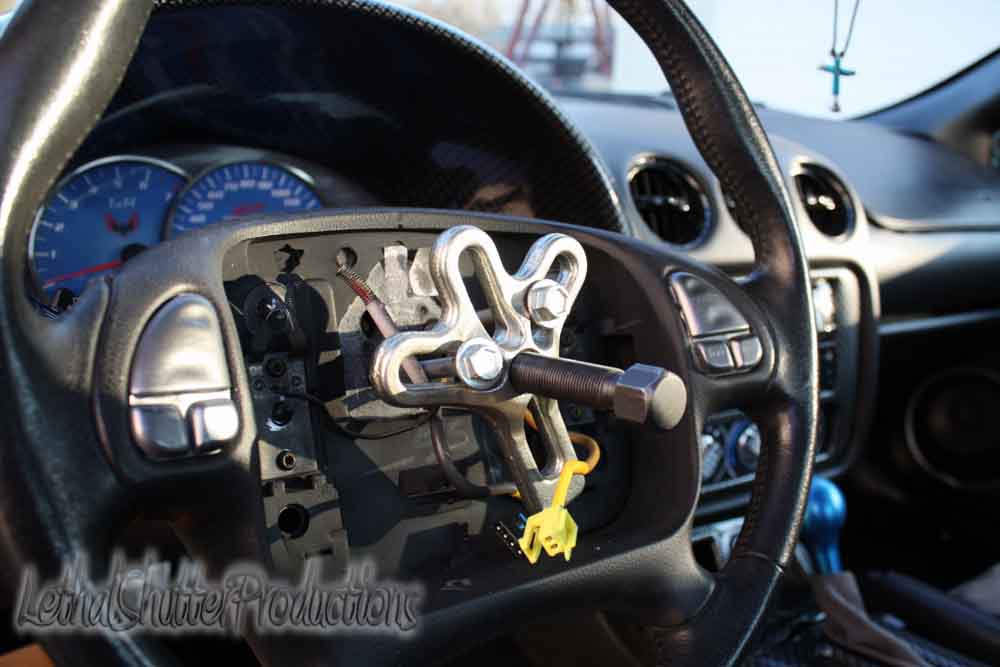
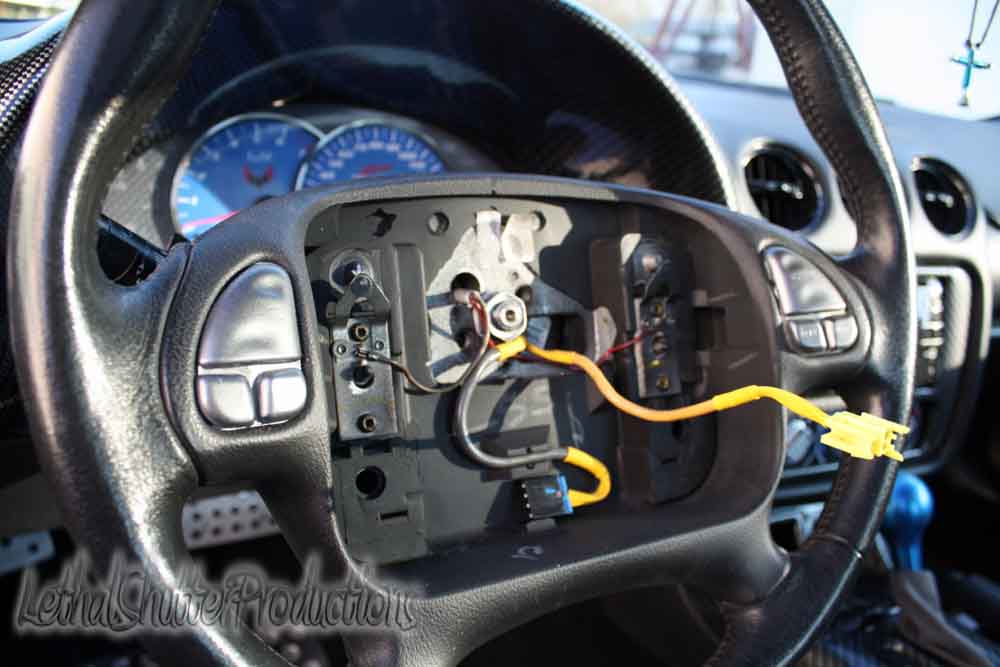
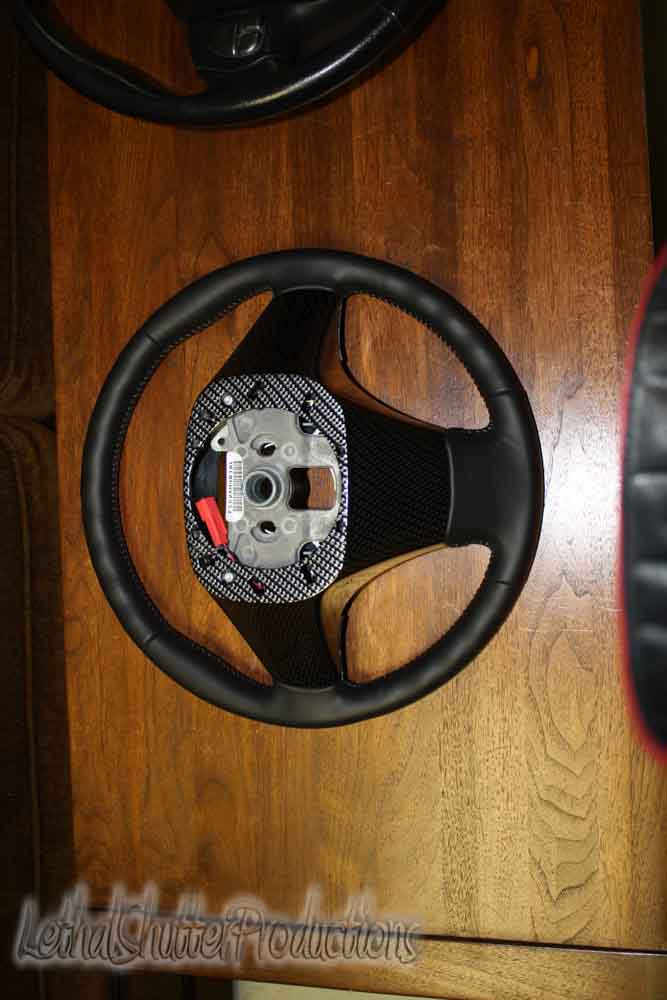
4)once the wheel is off take close observation. Dont throw it on ebay just yet because your going to need a piece of it if you want the horn to fit. Set this aside for later but take note to how the horn works through the clock spring. Im pointing at the piece in the next picture
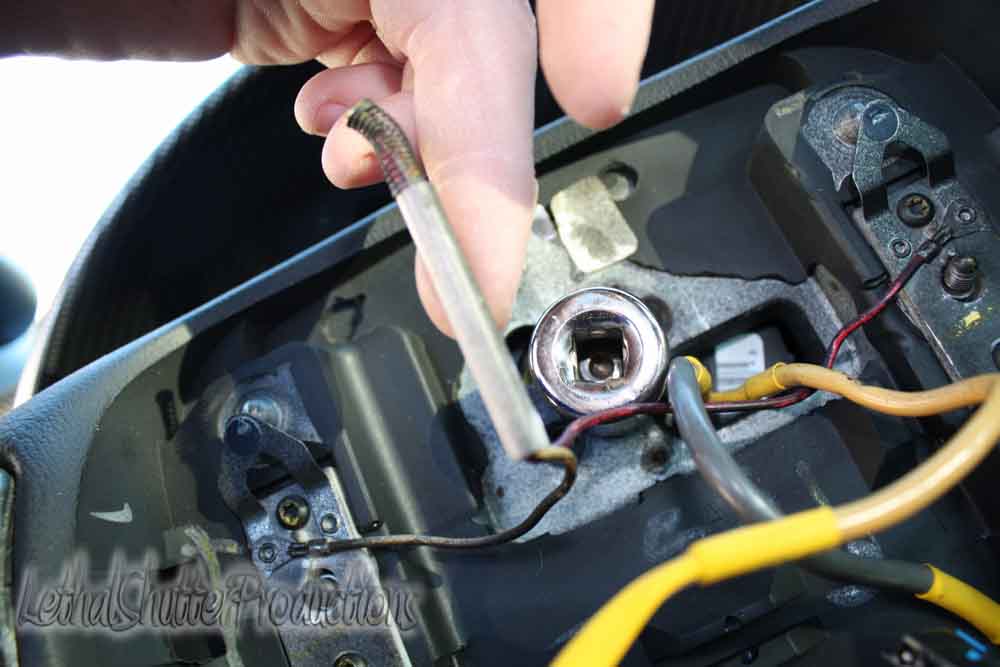
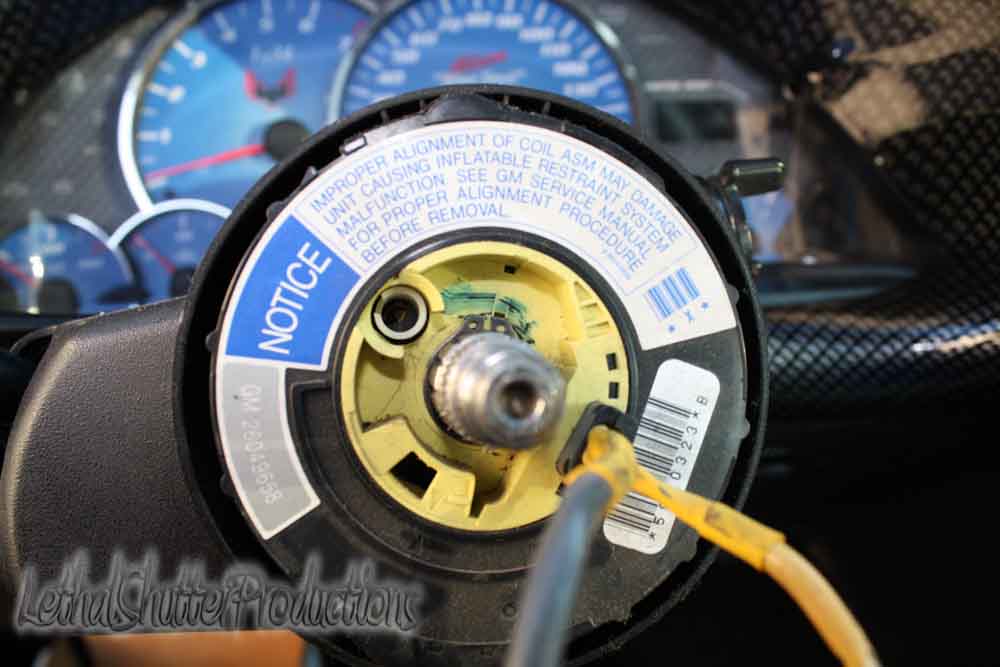
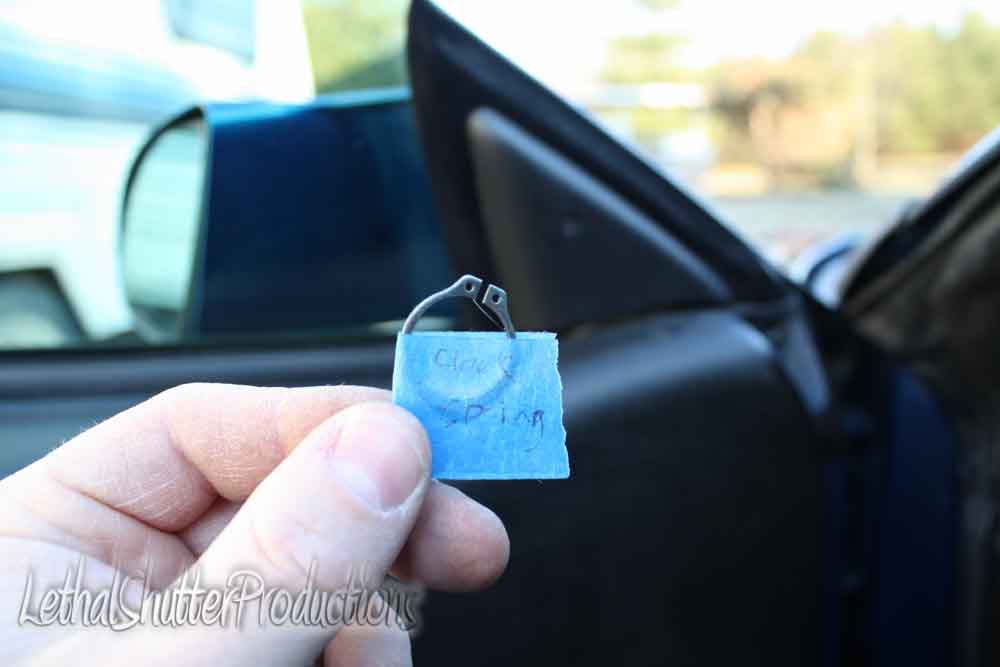
5) Next step is the remove the clock spring. Its held on by a snap ring. Take extra care here as it is a fragile piece. Im not 100% certain this needs to be reinstalled yet but bear with me. Once the snap ring is removed it should come right off. Dont disconnect the wiring though, just let it hang off to the side. make sure you mark any snap rings or retainer clips as you take them out as there will be alot of them.

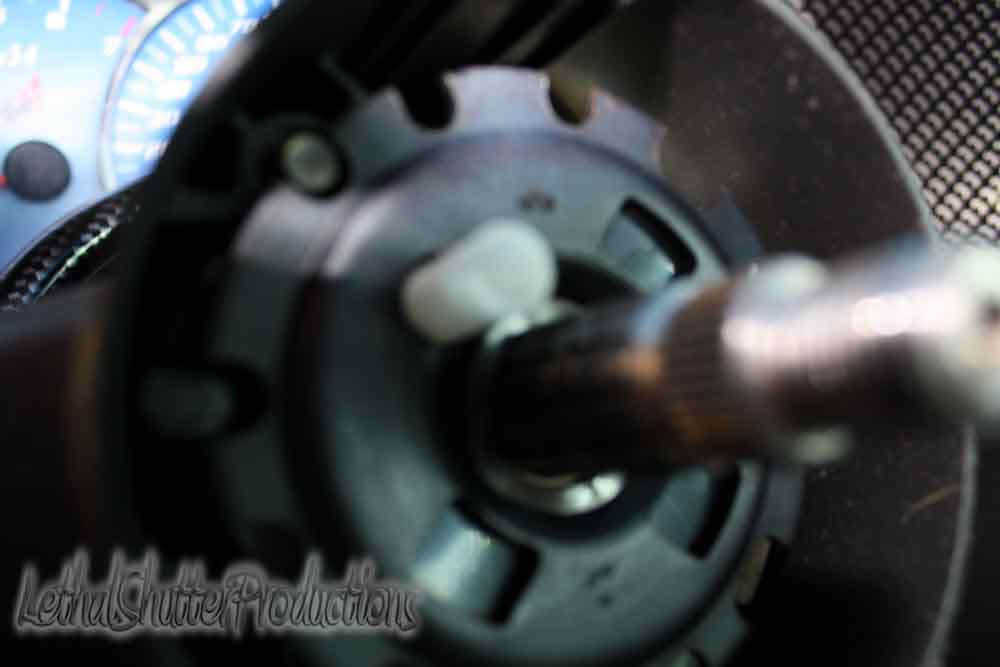
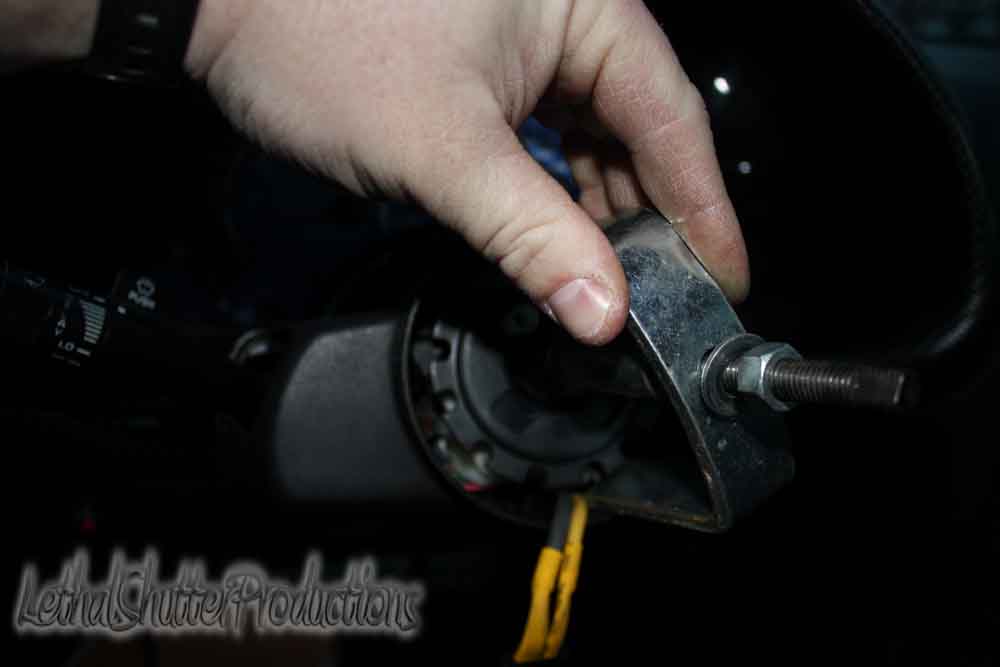
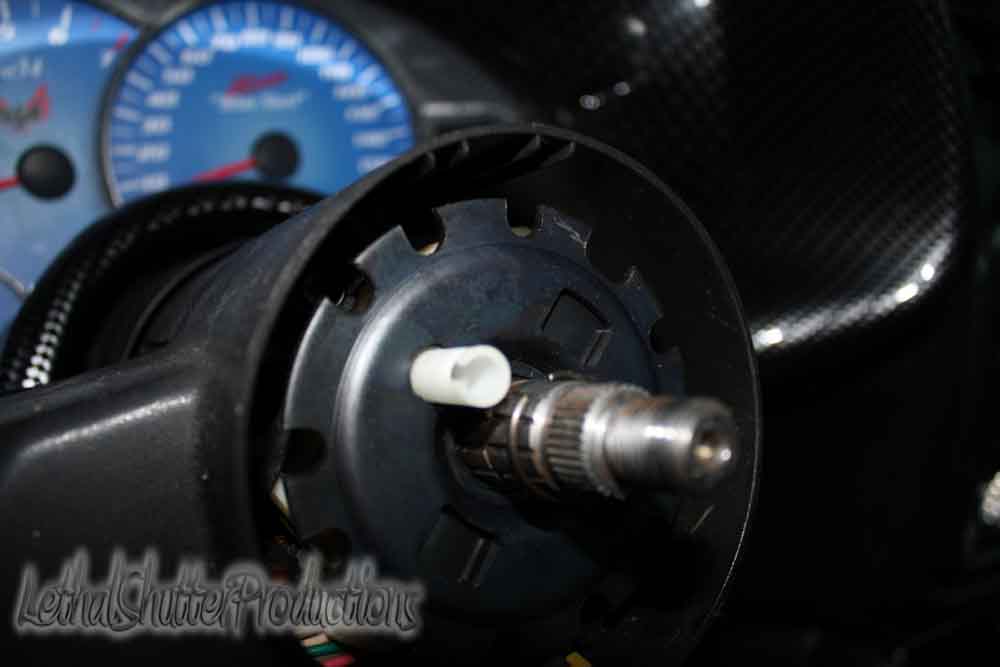
6)Next youll want to release the steering wheel lock. Turn your key to the on position to release the lock lever. Now youll need a reverse puller to press down the lock ring and remove the retainer clip. I recomend using a pick to get the ring out. Once its out remove the pushing mechanism and ittl pop right off.
Unfortunately this is as far as i got tonight before the lights went down. More to come tomorrow on the dis-assembly. I can tell you however what i can see so far the shaft is going to work.
Update on the steering end however. I was able to weigh both wheels. The results were quite surprising. The stock wheel is roughly 6 pounds where the new one is 3... heres a few pics to compare
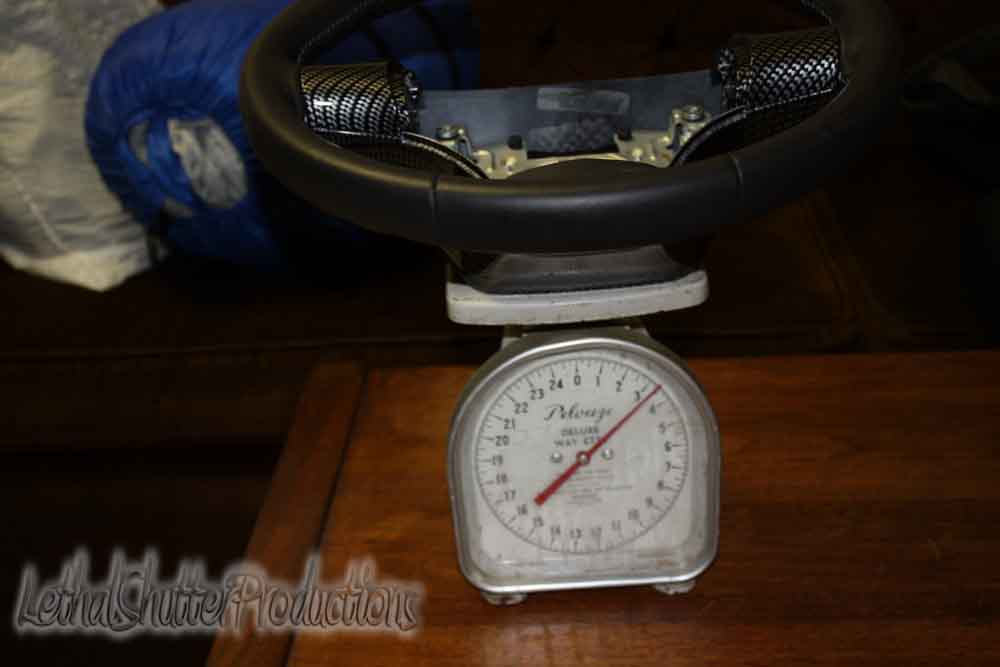
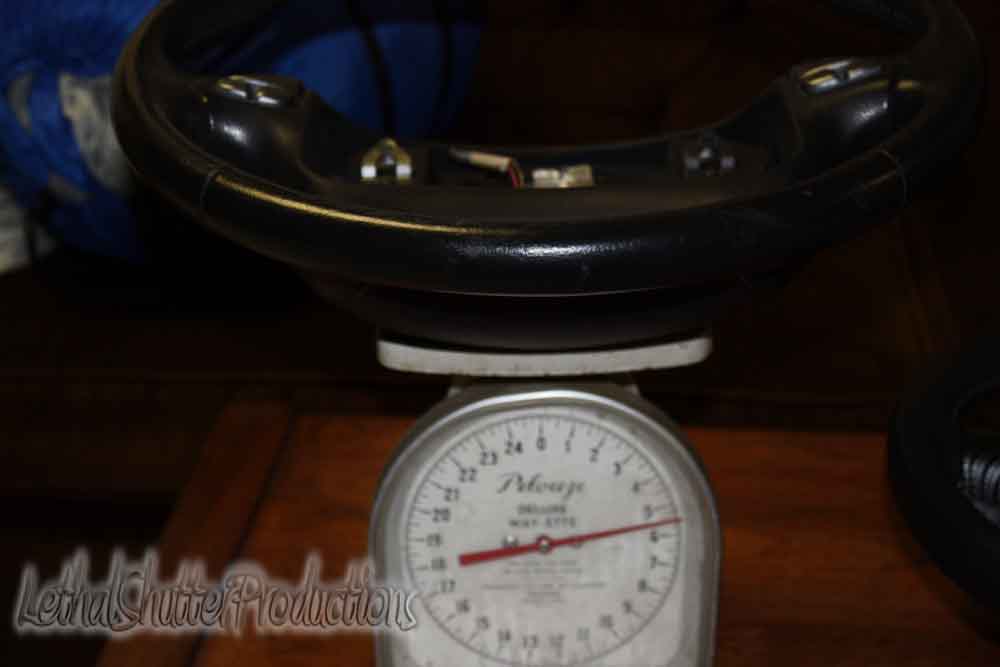
I appolagize for the low quality photos, i dumbed them down in lightroom so they would upload fast, ill make sure i bump the quality up on the next batch.
Almost there folks!
1)first and foremost, disconnect your battery, I cant stress this enough. Last thing you want is an airbag to deploy while your working on it.
2)remove the airbag. You'll need a torx bit (t25) to loosen the two nuts that are behind the wheel.
3)Next youll have to remove the wheel itself. Youll need a puller for this. You can rent one at any autozone. Start by removing the 21mm nut that holds the wheel in place. Theres two places to put bolts in the wheel for the puller (i cant quote you on exact size, youll have to play around a bit like i did). Set the two bolts in your puller and extract the wheel as seen here
4)once the wheel is off take close observation. Dont throw it on ebay just yet because your going to need a piece of it if you want the horn to fit. Set this aside for later but take note to how the horn works through the clock spring. Im pointing at the piece in the next picture
5) Next step is the remove the clock spring. Its held on by a snap ring. Take extra care here as it is a fragile piece. Im not 100% certain this needs to be reinstalled yet but bear with me. Once the snap ring is removed it should come right off. Dont disconnect the wiring though, just let it hang off to the side. make sure you mark any snap rings or retainer clips as you take them out as there will be alot of them.
6)Next youll want to release the steering wheel lock. Turn your key to the on position to release the lock lever. Now youll need a reverse puller to press down the lock ring and remove the retainer clip. I recomend using a pick to get the ring out. Once its out remove the pushing mechanism and ittl pop right off.
Unfortunately this is as far as i got tonight before the lights went down. More to come tomorrow on the dis-assembly. I can tell you however what i can see so far the shaft is going to work.
Update on the steering end however. I was able to weigh both wheels. The results were quite surprising. The stock wheel is roughly 6 pounds where the new one is 3... heres a few pics to compare
I appolagize for the low quality photos, i dumbed them down in lightroom so they would upload fast, ill make sure i bump the quality up on the next batch.
Almost there folks!
02-25-2013, 07:39 PM
#78
As some point you have to face the fact these are 15yo cars. You just have to appreciate what they are for what they are. I did the pro touring thing with my 87 Grand national and with suspension and power to give a new z06 a run for the money you can't update everything. I'm doing a lot to my Ta but not trying to turn it into a 2015 corvette because it will never be. These cars will be "classics" before you know it and people will be trying to restore them back to stock.
 02-25-2013, 07:48 PM
#79
As some point you have to face the fact these are 15yo cars. You just have to appreciate what they are for what they are. I did the pro touring thing with my 87 Grand national and with suspension and power to give a new z06 a run for the money you can't update everything. I'm doing a lot to my Ta but not trying to turn it into a 2015 corvette because it will never be. These cars will be "classics" before you know it and people will be trying to restore them back to stock.
 So by your logic people shouldnt modify 69 camaros either right? I apprieciate my car for what it is, a hobby. When i stop wanting to mod it and enjoy working on it the hobbys kinda lost for me. To each there own but alot of us arent ready to give up on modifying these cars. Its part of the fun of it for alot of us.
02-25-2013, 08:10 PM
So by your logic people shouldnt modify 69 camaros either right? I apprieciate my car for what it is, a hobby. When i stop wanting to mod it and enjoy working on it the hobbys kinda lost for me. To each there own but alot of us arent ready to give up on modifying these cars. Its part of the fun of it for alot of us.
02-25-2013, 08:10 PM
#80
Launching!
iTrader: (3)

Join Date: Apr 2004
Location: Greenville, SC
Posts: 221
Likes: 0
Received 0 Likes
on
0 Posts

Did you weigh both wheels with airbags? Looked like the vette was without. Curious.
Awesome write up man! So far I am with you and considering this!.... If the story ends well...
Awesome write up man! So far I am with you and considering this!.... If the story ends well...