Lamborghini Gallardo Spyder ADV.1s - 4-day resto/correction - Immaculate Reflections
 05-06-2013, 04:09 AM
#1

Finished this Gallardo this week, after it had been victimized by another local detailer who didn't know how to handle things. This car had a bit of everything...swirls, holograms, RIDS, deep scratches, marring on clear film, and a few strike-throughs on edges. A lot of care was exercised and a lot of taping as well to ensure safety on this correction. Ryan was out to help me again with this car and we pulled some late nights on the car over the course of 4 days.
After washing and claying, pics were taken of its condition that the previous "detailer" had left it in...


"Hack" detailer had burned through the clear here. I found several other spots where damage like this had been done.

RIDS, swirls, holograms, scratches, overspray....it had pretty much everything.


Bad swirls on the clear film


A hair under the clear film......really? I've seen some odd things, but this was a first.

Heavy swirls on the clear film....

Lower portion compounded, upper portion untouched. Final polishing would restore clarity to the film.

Medium polishing on the driver's door, which had some of the softest paint I've ever worked on...making things a little frustrating. In the end it came out great though.

Looking better. Final polishing still to be done.

After a couple passes of compounding the film was looking better. Took a little more time to remove what still remained.

Driver's side rocker panel

Looking better


After washing and claying, pics were taken of its condition that the previous "detailer" had left it in...
"Hack" detailer had burned through the clear here. I found several other spots where damage like this had been done.
RIDS, swirls, holograms, scratches, overspray....it had pretty much everything.
Bad swirls on the clear film
A hair under the clear film......really? I've seen some odd things, but this was a first.
Heavy swirls on the clear film....
Lower portion compounded, upper portion untouched. Final polishing would restore clarity to the film.
Medium polishing on the driver's door, which had some of the softest paint I've ever worked on...making things a little frustrating. In the end it came out great though.
Looking better. Final polishing still to be done.
After a couple passes of compounding the film was looking better. Took a little more time to remove what still remained.
Driver's side rocker panel
Looking better
 05-06-2013, 04:10 AM
#2
Passenger side rocker


Ryan doing some medium polishing on the clear film

Getting ready to work on the back end, but taking readings with the DeFelsko 200 first to make sure there is enough material to safely work with...


Side by side on the slats after compounding


At first I thought these were streaks from drying, but compounding was the only thing that would take them off. Again, this was acceptable work to the previous detailer......not good enough.

Making progress, but still many hours to go....

More issues...


Making progress on rear quarter

But still plenty of other spots needing work....

Before

After compounding


Engine cover lifted to correct all the way into the corner by the intake, an area that is recessed and isolated by the quarter panel.

New lift sure makes this part easier!


ADV.1 wheels dismounted, cleaned, waxed and then torqued to spec.


Glossy!

Rear wheels looking slick


Ryan doing some medium polishing on the clear film
Getting ready to work on the back end, but taking readings with the DeFelsko 200 first to make sure there is enough material to safely work with...
Side by side on the slats after compounding
At first I thought these were streaks from drying, but compounding was the only thing that would take them off. Again, this was acceptable work to the previous detailer......not good enough.
Making progress, but still many hours to go....
More issues...
Making progress on rear quarter
But still plenty of other spots needing work....
Before
After compounding
Engine cover lifted to correct all the way into the corner by the intake, an area that is recessed and isolated by the quarter panel.
New lift sure makes this part easier!
ADV.1 wheels dismounted, cleaned, waxed and then torqued to spec.
Glossy!
Rear wheels looking slick
05-06-2013, 04:10 AM
#3


Calipers also cleaned and waxed

Bumper had its share of issues. A good amount of 3M Fine Line tape used to work around the edges, as there were compromised sections nearby, courtesy of the last shop....


After compounding, looking better, and a little TRON-ish...
All grills/trim front and rear were removed, hand cleaned, dressed and reinstalled for a clean, uniform look.


Plenty of issues behind the tires too...

Lift utilized to help get the underside of the rockers looking better. They were totally overlooked by the previous detailer.

 05-06-2013, 04:10 AM
#4
All painted underbody areas cleaned, clayed, polished, and waxed.

Ryan helping out in the early a.m. wiping off the last of the 85RD

After 4 days, here are the finished pics out in the sun.


Glossy!


Interior got a nice cleanup as well


Thanks for looking!
Ryan helping out in the early a.m. wiping off the last of the 85RD
After 4 days, here are the finished pics out in the sun.
Glossy!
Interior got a nice cleanup as well
Thanks for looking!
 05-06-2013, 06:54 AM
#7

Trending Topics
05-06-2013, 10:18 AM
#10
damn someone i'm guessing washed with sand paper the first time 
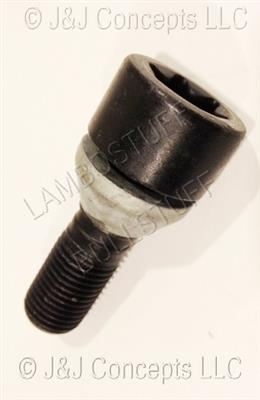
side question (i know this is very random) how are the wheel studs and lug nuts? I noticed on the rotors the studs aren't there, are they like a whole assembly or somthing stud/nut? lol
side question (i know this is very random) how are the wheel studs and lug nuts? I noticed on the rotors the studs aren't there, are they like a whole assembly or somthing stud/nut? lol
05-06-2013, 10:35 AM
#11
Insane work as always Jeff.
When you have a minute, can you PM me some additional information about that new lift? I've been looking at a few options, but am having a tough time deciding on which type would be best for my circumstances. Thanks!
When you have a minute, can you PM me some additional information about that new lift? I've been looking at a few options, but am having a tough time deciding on which type would be best for my circumstances. Thanks!


 05-18-2013, 05:22 PM
#19
Great work on that paint!
I can answer this. I've worked on a lot of Lambo's. The wheels are held on by a bolt, like a Mercedes, Audi or VW. The LP-570 SL gets titanium bolts at a price of $165 each. 
Couple this with having huge brakes and a very nicely painted and highly visible caliper, along with a close fitting wheel, and it's scary as hell putting the wheels on or off the car with no studs to hang the wheel on. Carbon brakes are even bigger.
Couple this with having huge brakes and a very nicely painted and highly visible caliper, along with a close fitting wheel, and it's scary as hell putting the wheels on or off the car with no studs to hang the wheel on. Carbon brakes are even bigger.
Last edited by Monzsta; 05-20-2013 at 07:06 AM.