
Submitted for your approval, yet another FAST LSX Duplicolor Paintjob (many pix)
 08-11-2006, 09:05 PM
#1
12 Second Club
Thread Starter
iTrader: (8)
Join Date: Jul 2004
Location: Vancouver, BC
Posts: 708
Likes: 0
Received 0 Likes
on
0 Posts

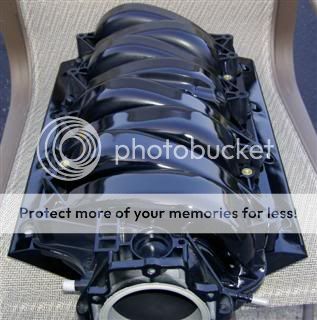
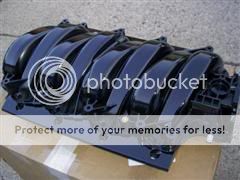
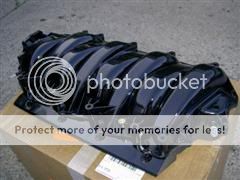
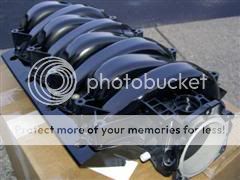
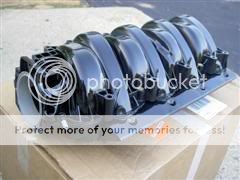
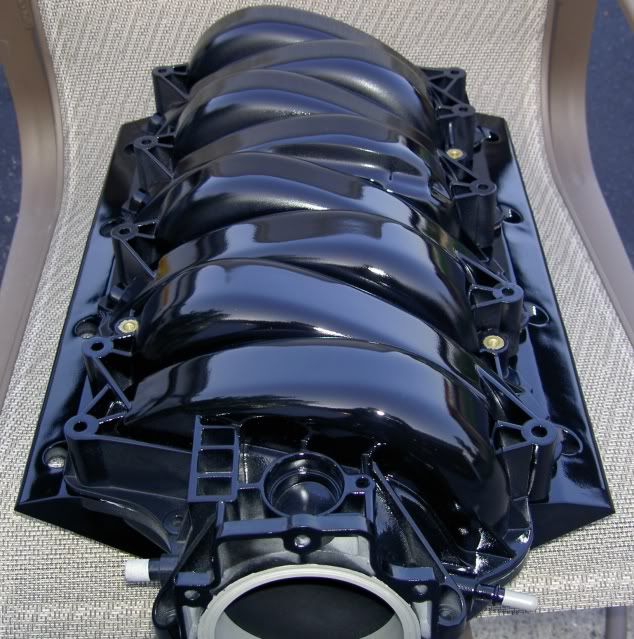
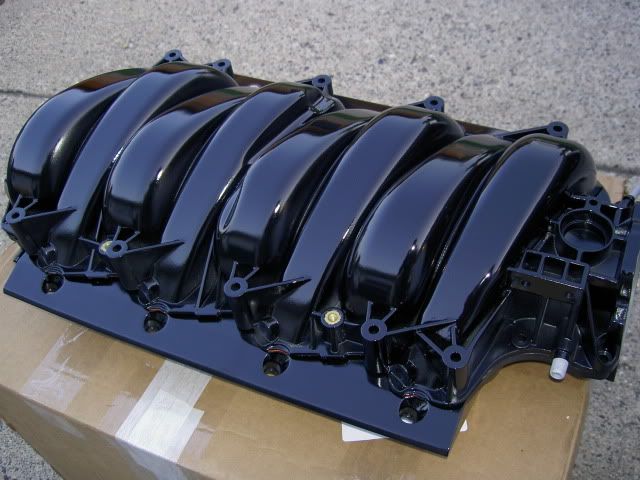
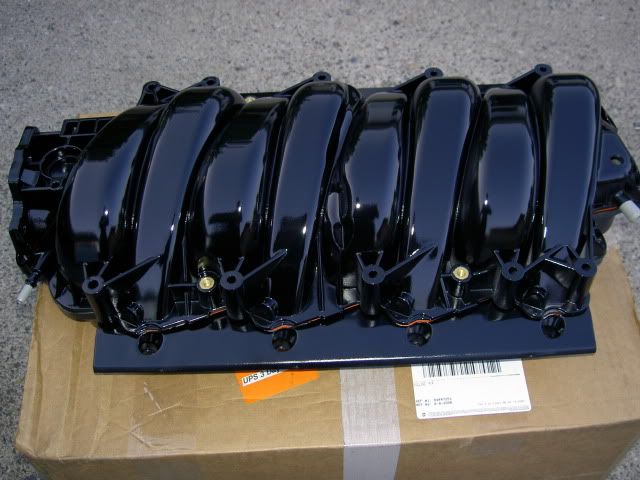
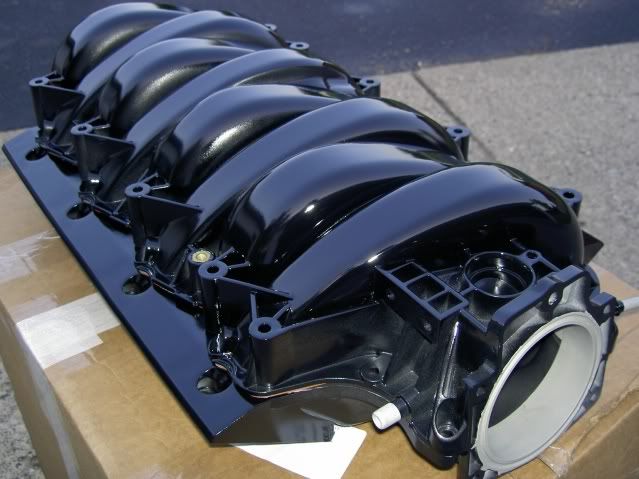
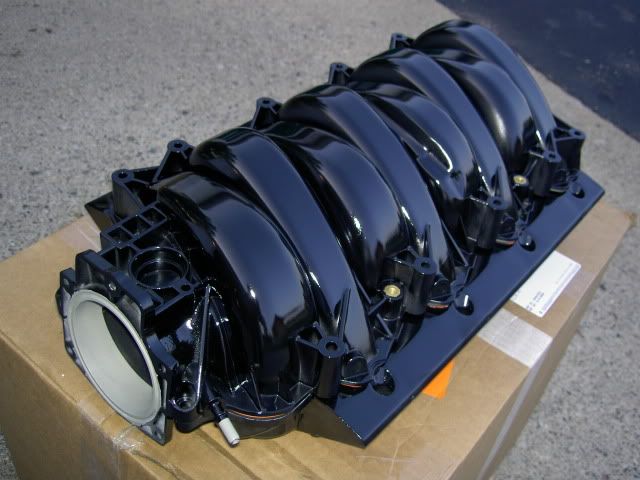
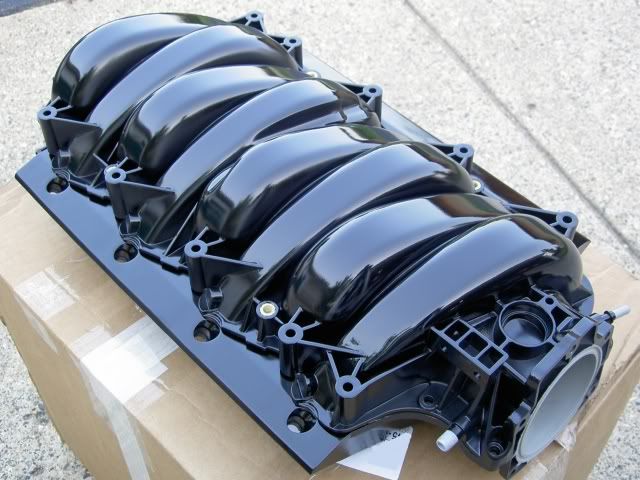
So after a long concerted effort I decided to post the final product.
The work on this thing took me what feels like forever, and overall I'm about 90% satisfied with how it came out.
Some of the tighter areas like between the bolt holes and such didn't take the clearcoat as well, so they look a bit "fuzzy" but they're not as visible as the runners in the end anyway so im ok with them.
I considered leaving it factory but, I'm glad I spent the time I did on it, cause it adds that personal touch that the factory one just doesn't have.
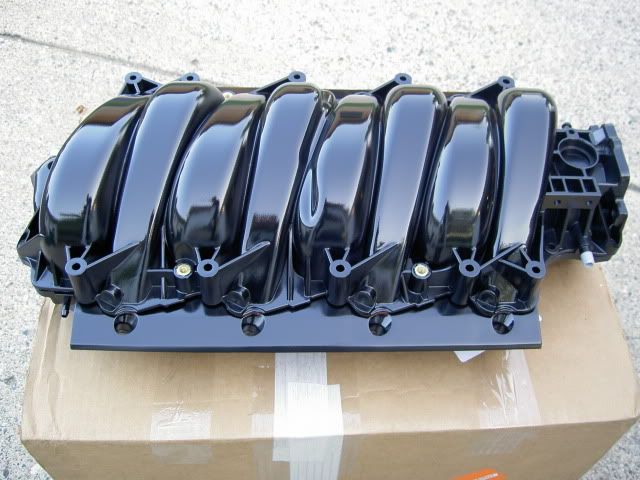
I'ma try and go with an even match of red/black on the engine bay, with maybe some polished areas so i'm hoping it works out.
Process was all gleaned from tips, and posts on this site so I gotta give props to the LS1 tech community.
Big thanks to parbreak, the painting guide he posted was what I followed and I think it worked out pretty well.
Anyways...
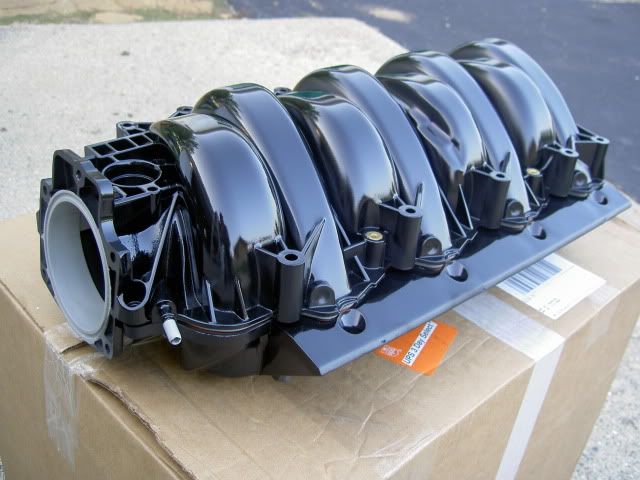
(as always thumbnails click to higher resolution pix)

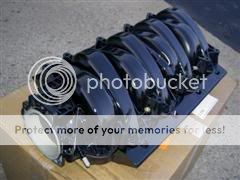
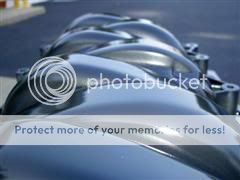

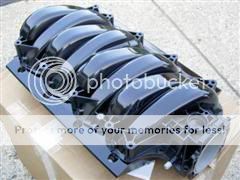
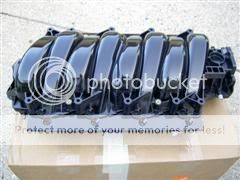

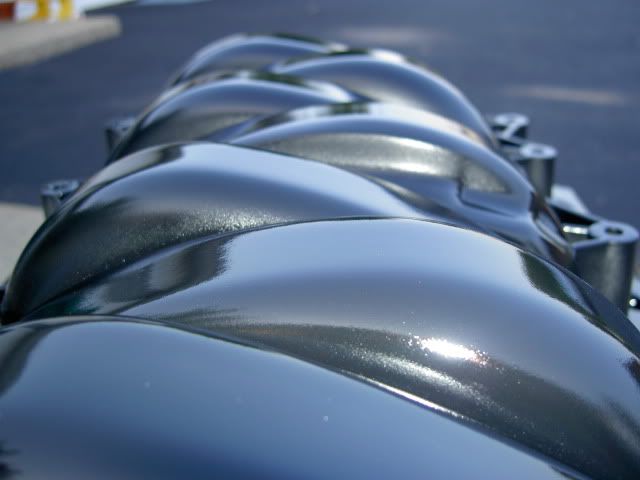
I really like pic #9
Thanks for any comments,
Tom
The work on this thing took me what feels like forever, and overall I'm about 90% satisfied with how it came out.
Some of the tighter areas like between the bolt holes and such didn't take the clearcoat as well, so they look a bit "fuzzy" but they're not as visible as the runners in the end anyway so im ok with them.
I considered leaving it factory but, I'm glad I spent the time I did on it, cause it adds that personal touch that the factory one just doesn't have.
I'ma try and go with an even match of red/black on the engine bay, with maybe some polished areas so i'm hoping it works out.
Process was all gleaned from tips, and posts on this site so I gotta give props to the LS1 tech community.
Big thanks to parbreak, the painting guide he posted was what I followed and I think it worked out pretty well.
Anyways...
(as always thumbnails click to higher resolution pix)

I really like pic #9
Thanks for any comments,
Tom
Last edited by DirtyJohn; 08-11-2006 at 09:23 PM.


 08-12-2006, 06:12 PM
#7
12 Second Club
Thread Starter
iTrader: (8)
Join Date: Jul 2004
Location: Vancouver, BC
Posts: 708
Likes: 0
Received 0 Likes
on
0 Posts
Thanks for the comments folks.
I put in ALOT of time on this sucker, but the experience made it worth it.
I'm pretty sure I inhaled about an oz. of composite plastic from all the sanding.
And similar in paint, next time prob should use a mask.
Hope it spices up the engine bay a bit once it goes in.
thanx again.
DJ
I put in ALOT of time on this sucker, but the experience made it worth it.
I'm pretty sure I inhaled about an oz. of composite plastic from all the sanding.
And similar in paint, next time prob should use a mask.
Hope it spices up the engine bay a bit once it goes in.
thanx again.
DJ
Trending Topics
08-12-2006, 06:31 PM
#8
TECH Addict
iTrader: (17)

Join Date: Dec 2002
Location: Hanover, MD
Posts: 2,190
Likes: 0
Received 0 Likes
on
0 Posts
Have you installed it yet??? If not I would consider sanding the paint off the very top of the bolt holes. First one I did, I didn't do that and the paint crinkled on the bolt posts from tightening it down. Second one I did, I didn't paint the very top of the posts and no problems at all.
Bryan
parbreak
Bryan
parbreak
08-12-2006, 09:12 PM
#11
12 Second Club
Thread Starter
iTrader: (8)
Join Date: Jul 2004
Location: Vancouver, BC
Posts: 708
Likes: 0
Received 0 Likes
on
0 Posts
Originally Posted by parbreak
Have you installed it yet??? If not I would consider sanding the paint off the very top of the bolt holes. First one I did, I didn't do that and the paint crinkled on the bolt posts from tightening it down. Second one I did, I didn't paint the very top of the posts and no problems at all.
Bryan
parbreak
Bryan
parbreak
No I havn't installed it yet, might wait till I decide on a cam, or get enough $$ for H/C.
Do you mean sand all the way to the plastic?
I could do that, I do have alot of sandpaper left.. lol.
I'd sell it, but id have to break even, which means shipping, retail cost, paint and sandpaper. I still want it, but I'd love to do it again knowing the shortcuts and techniques I learned from doing it the first time.
Could prob do it again in half the time.
oh well, thanx yall.
DJ
08-13-2006, 10:25 AM
#16
12 Second Club
Thread Starter
iTrader: (8)
Join Date: Jul 2004
Location: Vancouver, BC
Posts: 708
Likes: 0
Received 0 Likes
on
0 Posts
Thanks folks,
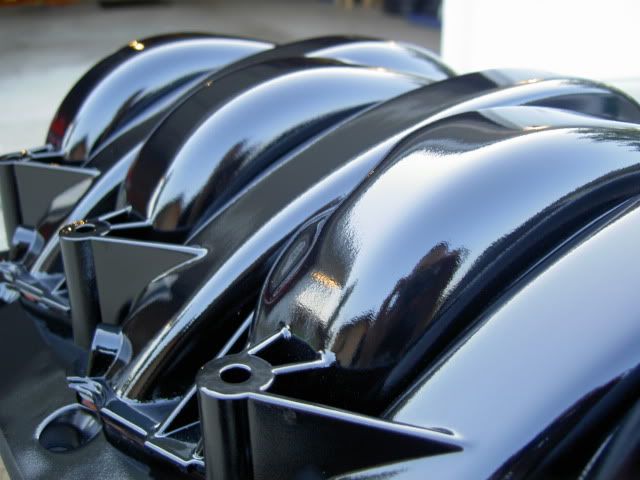
Nope no wetsanding or buffing after clearcoat, just about 4 base coats and about 3 clear coats.
I tried wetsanding on both the base and clear coats with 1000 but that just dulls it up and looks wrong. It ruins the whole glassy effect. I just tried it in a small area and it takes away the shine and turns it dull.
Who knows maybe im doing it wrong.
I think ill leave it the way it is.
Hell I took off the basecoat from the whole thing once alread and re-did it cause I was unhappy with the results.
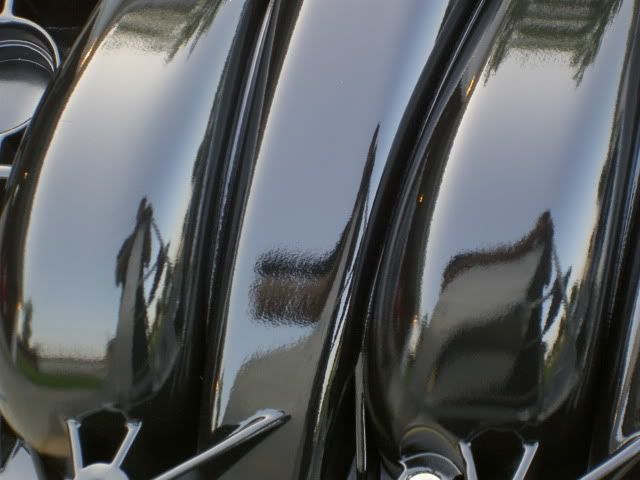
There's a little scratch on the top of the first runner (doh!) that I wish I could buff out , but im sure ill ding it up plenty putting it in.
thanx again.
DJ
Nope no wetsanding or buffing after clearcoat, just about 4 base coats and about 3 clear coats.
I tried wetsanding on both the base and clear coats with 1000 but that just dulls it up and looks wrong. It ruins the whole glassy effect. I just tried it in a small area and it takes away the shine and turns it dull.
Who knows maybe im doing it wrong.
I think ill leave it the way it is.
Hell I took off the basecoat from the whole thing once alread and re-did it cause I was unhappy with the results.
There's a little scratch on the top of the first runner (doh!) that I wish I could buff out , but im sure ill ding it up plenty putting it in.
thanx again.
DJ
08-13-2006, 10:29 AM
#17
TECH Addict
iTrader: (17)
Join Date: Dec 2002
Location: Hanover, MD
Posts: 2,190
Likes: 0
Received 0 Likes
on
0 Posts
Originally Posted by DirtyJohn
Thanks, that's good to know.
No I havn't installed it yet, might wait till I decide on a cam, or get enough $$ for H/C.
Do you mean sand all the way to the plastic?
I could do that, I do have alot of sandpaper left.. lol.
I'd sell it, but id have to break even, which means shipping, retail cost, paint and sandpaper. I still want it, but I'd love to do it again knowing the shortcuts and techniques I learned from doing it the first time.
Could prob do it again in half the time.
oh well, thanx yall.
DJ
Yes, take it right down to the plastic. The intake bolts will cover that up for you.
08-13-2006, 10:34 AM
#18
Originally Posted by DirtyJohn
Thanks folks,
Nope no wetsanding or buffing after clearcoat, just about 4 base coats and about 3 clear coats.
I tried wetsanding on both the base and clear coats with 1000 but that just dulls it up and looks wrong. It ruins the whole glassy effect. I just tried it in a small area and it takes away the shine and turns it dull.
Who knows maybe im doing it wrong.
DJ
 It looks like total crap after wet sanding, but after buffing it back to a shine it's totally worth it. I'd be very curious to see how your intake would turn out after doing that, considering it looks so damn good already.
08-13-2006, 10:36 AM
It looks like total crap after wet sanding, but after buffing it back to a shine it's totally worth it. I'd be very curious to see how your intake would turn out after doing that, considering it looks so damn good already.
08-13-2006, 10:36 AM
#19
Originally Posted by DirtyJohn
I tried wetsanding on both the base and clear coats with 1000 but that just dulls it up and looks wrong. It ruins the whole glassy effect. I just tried it in a small area and it takes away the shine and turns it dull.
Who knows maybe im doing it wrong.
Who knows maybe im doing it wrong.
Regardless, looks great
!
08-13-2006, 10:37 AM
#20
Originally Posted by ArcticZ28
You gotta use a polishing compound afterwards to shine it back up It looks like total crap after wet sanding, but after buffing it back to a shine it's totally worth it. I'd be very curious to see how your intake would turn out after doing that, considering it looks so damn good already.
It looks like total crap after wet sanding, but after buffing it back to a shine it's totally worth it. I'd be very curious to see how your intake would turn out after doing that, considering it looks so damn good already. ! You must have beat me to it by under a minute
  !
!