
4l60e
 06-04-2014, 09:59 PM
#1
Teching In
Thread Starter

Join Date: Jun 2014
Posts: 26
Likes: 0
Received 0 Likes
on
0 Posts
I have a 94 gmc seirra with 4l60e. The trans was rebuilt for me by someone recommended . It made it 50 miles at most. It runs great in 1-2 but when it goes to shift from 2-3 it acts like it goes into neutral, rpms go up and it wont go past 40 mph. I tore the trans apart and surprisingly the 3-4 clutch pack doesn't appear to be burnt. It actually looks better then the other clutch packs. This is only my second time opening up a trans. I dropped the pan took out the electronics and solenoids. Got the pump out, there are pieces broken off of the housing around the bushing on the outside. The pan had little to no metal shavings in it or on the magnet. I dont have the money to have someone else rebuild it. . Not sure what the problem is id like to fix it my self being that all of the parts are supposed to be new i dont see getting a full rebuild kit.
Any one got any ideas? Info or advice would be greatly appreciated. Thank you for your time.
Any one got any ideas? Info or advice would be greatly appreciated. Thank you for your time.
 06-05-2014, 10:37 PM
#3
Moderator

It sounds like you have a serious leak in the 3/4 clutch circuit.
1. Check ball capsule in the 3rd accumulator, behind the servo.
2. Teflon rings on the input drum.
3. Leak between input shaft and input drum.
4. Leak in orifice or check ball in the input drum.
5. Leak in the 3/4 piston or seal.
6. A few other places too, including from between the pump halves.
After the input drum is fully assembled it needs to be inserted in the pump (upside down) for an air test.
06-05-2014, 11:47 PM
#4
Teching In
Thread Starter
Join Date: Jun 2014
Posts: 26
Likes: 0
Received 0 Likes
on
0 Posts
thanks for the heads up iam going to work on it tomorrow. I will put the input drum back together and in the pump and do the air test. look at the servo and all that like you said and get back to you with my findings thank you for the advice keep it coming. Also if i do have to buy a kit rebuild or shift, any recommendations?
Last edited by bluntman; 06-06-2014 at 12:38 AM.
06-06-2014, 01:30 PM
#5
Moderator
In case you are not sure how to air test with the drum in the pump, here is a picture with the nozzle on the 3/4 clutch feed. I am just using a sturdy 8"x8"x8" carboard box to support the pump and have room for the input shaft.
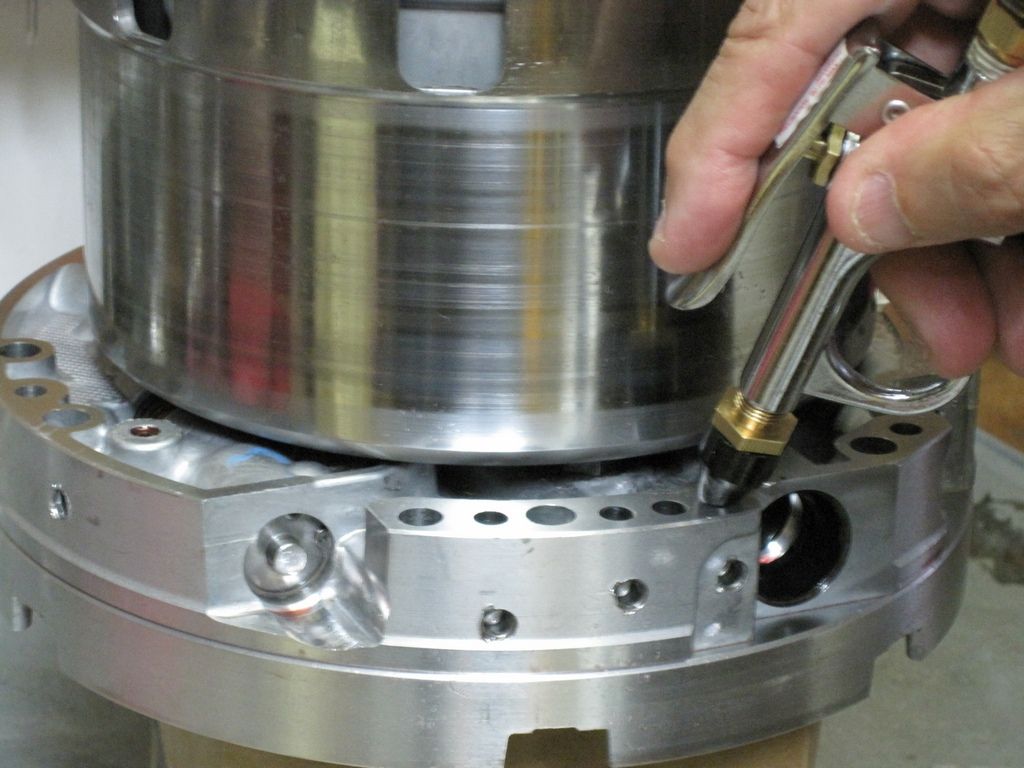
Ideally this test should be preformed BEFORE you disassembly the input drum. Then, depending upon whether the air test fails here you will know where to concentrate your efforts. It is so easy to overlook something in the tricky and finicky 3/4 clutch circuits.
Note there will be some air loss from between the pump halves, but all the clutches should firmly apply.
Also, the 3/4 clutch has a small air-bleed orifice in the input drum which will "hiss" with air loss, but again the clutch should firmly apply.
The rebuild kits are all pretty much the same with only slight difference in whether BorgWarner or Raybestos clutches are used. I always tell people to get at least a 4L65E rebuilt kit as it will come with 7 frictions (instead of 6) for the 3/4 clutch. Shop around and even ask your local trans shop; IIRC their cost is less than $150 for a kit with new input drum pistons and all frictions.
There are only two shift kits to consider - the Transgo HD2 is by far the most popular; the Sonnax Performance Pack is another excellent one and includes the desirable pinless pistons for the accumulators.
06-06-2014, 06:30 PM
#6
Teching In
Thread Starter
Join Date: Jun 2014
Posts: 26
Likes: 0
Received 0 Likes
on
0 Posts
All I did when taking apart the input drum was take it out of the pump and take out the top set of clutch's to look at them. I put them back in put the pump on and did the air test it seemed to be fine. Top clutch's applied very well. The bottom set not so much but they did apply. Not as much as the top but I think they had less to travel. thank you for your help. Going to go look at the Check ball capsule in the 3rd accumulator, behind the servo.
06-06-2014, 09:38 PM
#7
Teching In
Thread Starter
Join Date: Jun 2014
Posts: 26
Likes: 0
Received 0 Likes
on
0 Posts
took off the servo, and this is what i found. dont think these holes are supposed to be here. also whats supposed to be in the hole in the other pic. where to go from here? thanks for your help mrvedit very informative.
Trending Topics
06-07-2014, 01:43 PM
#9
Teching In
Thread Starter
Join Date: Jun 2014
Posts: 26
Likes: 0
Received 0 Likes
on
0 Posts
i will try to get you better pics all i have is my cell phone. The first pic is of inter housing on the 2nd apply piston if i am correct. It has jagged holes in it pretty sure they dont belong there. The next pic is where i took the hole pen assembly out. On the left side of the pic there is a brass colored hole. Not sure what goes there. It was full of dirty junk before i cleaned it out. but there was no part there. trying to figure out how the holes got in the 2nd apply piston, and if this would effect the no 3-4. Thanks again for your time.
06-08-2014, 09:57 PM
#11
Moderator
Yes someone cut those slots into the 2nd servo piston. I just disassembled a spare servo to see if I could understand it. I "think" (not sure) the intention was to prevent hydraulic lock in the internal chamber where the springs are. If true and there are no other mods, this should not hurt.
The brass plug you mentioned is from the factory; it appears to have a small bleed hole in it. Hydraulic circuits (like your brakes) work better without air in them. Therefore there are lots of little bleed holes to let the air out.
The brass plug you mentioned is from the factory; it appears to have a small bleed hole in it. Hydraulic circuits (like your brakes) work better without air in them. Therefore there are lots of little bleed holes to let the air out.
 06-08-2014, 10:13 PM
#14
Moderator
06-08-2014, 10:31 PM
#15
Teching In
Thread Starter
Join Date: Jun 2014
Posts: 26
Likes: 0
Received 0 Likes
on
0 Posts
Ya 4th is in the cover. There was no inner housing, and besides the missing part the part of the servo with the holes was supposed to be pointing in toward the trans and it was pointing outward. Should i just order a new corvette servo? Do you think this would fix my problem?
Last edited by bluntman; 06-08-2014 at 10:44 PM.
06-09-2014, 12:22 AM
#16
Moderator
A "Corvette servo" only includes the 2nd servo piston and matching inner housing. It will not include the "servo cushion spring retainer" which has the slots cut in it. Makes me wonder what else is missing. You might want to buy another complete servo plus the $15 Corvette servo. Check on ebay; ebay seller "powertrainpartsplus" generally has such parts.
06-09-2014, 05:58 AM
#17
Teching In
Thread Starter
Join Date: Jun 2014
Posts: 26
Likes: 0
Received 0 Likes
on
0 Posts
not seeing much on a full set. What about http://www.ebay.com/itm/NEW-COMPLETE-CORVETTE-BILLET-SECOND-THIRD-FOURTH-700R4-4L60-4L60E-4L65E-SERVO/251151306031?_trksid=p2047675.c100005.m1851&_trkparms=aid%3D222008%26algo%3DSIC.MOTORS%26ao%3D1%26asc%3D22695%26meid%3D7495148813215711637%26pid%3D100005%26prg%3D9176%26rk%3D1%26rkt%3D6%26sd%3D291163779970&rt=nc or http://www.ebay.com/itm/700R4-4L60E-COMPLETE-CORVETTE-SERVO-SETUP-/291163779970?pt=Motors_Car_Truck_Parts_Accessories&hash=item43cab6b382&vxp=mtr
06-09-2014, 08:04 AM
#18
Moderator
The first one at $150 does not mention a brand and does not include a servo pin; makes me think it is a cheap no-brand clone. In contrast for $160 (from hptransparts) you can purchase the genuine Sonnax 2nd and 4th servos which includes a new pin; with billet servos the pin often needs to be longer and ground for the properly end play.
The 2nd one at $65 seems to be a complete GM Corvette servo with pin. I would get that.
The 2nd one at $65 seems to be a complete GM Corvette servo with pin. I would get that.
06-09-2014, 02:31 PM
#19
Teching In
Thread Starter
Join Date: Jun 2014
Posts: 26
Likes: 0
Received 0 Likes
on
0 Posts
Alright i bought that complete servo. Now on a rebuild kit. http://www.ebay.com/itm/TRUTECH-LEVE...-/251264623755 Only one on ebay that seems to fit my 94 what do you think of this kit? Do you think i could do better for price? Or should i just by pump & input drum shaft seals? Thanks for your time your a big help mrvedit.
06-09-2014, 02:39 PM
#20
Moderator
I have often recommended TruTech here as a good source of rebuild kits.
However, instead of choosing a pre-packaged kit, call the owner (Jeff) and he will put together an exact kit based on your needs and desires.
However, instead of choosing a pre-packaged kit, call the owner (Jeff) and he will put together an exact kit based on your needs and desires.