
 05-18-2016, 02:01 PM
Last edit by: IB Advertising
See related guides and technical advice from our community experts:
Browse all: Tranmission Guides
- Camaro and Firebird: Torque Specs and Information for Installing Clutch and Flywheel
Important information to help you understand your Camaro or Firebird
Browse all: Tranmission Guides

More LS7/Any Clutch, Slave and Flywheel Install Tips
08-04-2012, 02:04 AM
#1
I wanted to compile a list of tips I found/discovered during my LS7 clutch/pressure plate/Ram Flywheel/ LS7 Slave install. I’ve tried to group my tips by like ideas, but my mind is a little random and keeps thinking of new things, if you are planning on doing this install, take a read through them all before you start and hopefully it helps you prepare better, or know what to expect:
Buy a transmission jack! Get one that has an angle adjustable table on it, Harbor freight has one as their second cheapest trans jack that seems well worth the extra $30-40. (http://www.harborfreight.com/800-lb-...jack-3185.html)
With the adjustable angle on the jack I was able to get the transmission to slide out with just a few tugs, it came out nicely. Re-installing it was much easier being able to adjust the angle so that it slid in.
When you drop the transmission be aware that there is a vent line that goes to the shifter plate, keep an eye on this before you lower it all the way so you don’t damage the metal tube on the transmission.
When removing the bell housing, remove the starter, or at least pull it out of the bell housing area, it gives you enough room to turn the bell housing around and get it out. (You disconnected the battery before doing this correct?)
If you see conflicting reports of the torque for the flywheel bolts, one with sequences of torques, and the other with a final turn angle, the turn angle is for the base CTS, use the torque sequences. The correct torque per the FSM is 1st pass 15 lbft, 2nd pass 37 lb ft, and third pass 74 lbft
Buy a mityvac or a power bleeder of some type before you start. Bleeding the clutch at the end of the install will take a few hours… yes a few hours, even with a power bleeder, you don’t want to be pumping the pedal that long, for ~$40 buy a mityvac (and better yet order it from amazon beforehand and get it cheaper than your local parts store…)
You will have NO clutch pedal until the very end of bleeding, the pedal will snap to the floor and stay there. It will even pump fluid out like you would expect for quite a while, just no pedal at all. You will know that you are close when it doesn’t snap to the floor quite as hard, bleed for another little while, then pump the pedal ~50-100 times and see if it starts returning to the top on its own. If it does not, keep bleeding and come back.
Plan on having plenty of brake fluid around. If you are swapping to a higher dollar fluid, plan on putting that in once you have a good pedal. You go through so much fluid that I recommend reusing it after you know you have clean fluid coming out of the clutch. There is no reason to waste so much fluid when you are only trying to remove air.
If you have not caught on yet, bleeding the clutch after you are done is the single longest part of the entire project.
Did I mention to buy a remote bleeder yet. If you pull the trans and don’t put a remote bleeder in you are crazy.
If you buy from thelapd.com, call them. I ordered online and paid with paypal and found out that there system does not process paypal orders right. Also I put in the online comments that I wanted a straight bleeder for the CTS-V, they sent the bent bleeder. Just call and make sure they repeat to you it is for a CTS-V and is the straight bleeder.) (NOTE I can only talk to the correct bleeder with the LS7 slave. If you are installing a spacer with your stock slave the bent bleeder MAY be what is needed)
When you are bleeding the clutch, route the remote bleeder up to the engine compartment so you can watch the master cylinder and keep it full at all times, with a power bleeder, it can empty quickly. Even bleeding old school a few pumps can empty it. (Then you get to start over)
With a remote bleeder with the speed bleeder on the end and the mityvac it seemed like I needed at least 15inHg of vacuum to get the bleeder to start letting fluid out.
The speed bleeder is very cool, just loosen it ~1/4 turn, then when you pump the pedal it pushed fluid out then a check valve automatically closes to keep the air out. Good if you are not using any pressure bleeding.
Before you remove the retainer clip from the slave to master cylinder connection, notice how the clip installs. I had a brain fart and tried to install it through the hole, not over the plastic ledge. It installs over the ledge. On the LS7 slave there is a little flat spot where you can pry it off. Once you have it in the correct orientation and figure out how to keep pressure on the two halves to keep it together, the clip slides right in.
When you get your LS7 slave, the pressure line is way longer and way different looking than the stock slave, this is ok. You will have to notch the bellhousing a little to make it fit; this region does not really have any load paths through it so it is ok (some may have bent it around to miss this, but I prefer minimal bending). However, you will have to bend the metal line carefully once you get it in the car so that it does not hit the tunnel. Make sure it is not tight to the car and can move some when you install it.
A personal note, but worthwhile, verify that all the bolts on the front of the transmission (once the transmission is out, and you are staring at the front of it you see the bolts that hold the front of the transmission cover) are torqued to 26 lb ft. When the dealer worked on the car before I owned it I believe they did not torque one of these properly, it came out, and I got a good excuse to upgrade my flywheel.
When re-installing the transmission, get some bolts that are the same thread as the mounting bolts but are longer than stock (all thread will work too) remove the bolt head and round it off, use this as an alignment rod to get the transmission reinstalled. (I knew about this before I started and didn’t do it, it would have simplified things)
Change your transmission fluid while everything is out. It is much easier to get new fluid in when you can pour into the transmission instead of pumping up into it.
If you are planning on doing the diff bushing or diff block, do it now, you will have the driveshaft and exhaust removed. I shortened the bolt that holds the front of the diff on ~1”, it made it much easier to install and has no effect on the function (verify before you remove yours how much is hanging out the backside of the nut that you can remove)
Same for a short throw shifter (I highly recommend PISNUOFF’s shifter) and the creative steel shifter bushings, they make it shift so much better, and you are right there anyways. (https://creative-steel.com/store/ind...ct_detail&p=37)
I did the home depot PVC box adaptor mod at the other end of the shifter rails. It seems to be a little tighter, but beware you will need some basic tools to make it work. You need to be able to cut the end of the adaptors off, sand the outside face, and enlarge the center hole (a dremel tool worked well for this) (Original thread for this https://ls1tech.com/forums/cadillac-...m-shifter.html) Be very careful when testing fitting this in, the outside flange is a thin cast piece which can be brittle, do not force it in, you want the rails to fit in snug, but not too tight.
I also installed the brass shifter bushing from Brian that install at the other end of the shift rail. This was not a bad install, but too some work. The stock bushing is a molded in place ceramic piece (or something like that) you have to break it to get it out, so there is no turning back. I had to use a dremel to clean up the hole in the shifter to get Brain’s bushings to fit in there and allow the clip to be mounted back on. Just a heads up if you are considering this as well. There was some slop here stock that is now removed.
If you plan on taking the transmission out from under the car on the jack, be sure you have the back of the car raised on jackstands. You will probably also need a piece of wood for your jack on the front to get it high enough to just get it out. (you can leave the transmission under the car if you want)
I bought a new plastic shift cup fits inside the shifter assembly, but when I took mine out, it was still really tight (only had ~33k miles on it). The replacement had an additional flange on the top that the stock shifter did not, so I decided not to mess with it. For $6 it may be worth buying one and checking the status of yours while you have the transmission out.
When you remove the driveshaft from the transmission the factory service manual calls out to not remove the rubber adaptor from the driveshaft, but the adaptor from the transmission. I am not sure that it makes a difference, but the manual calls this out several times, so somebody thought it was important (or possibly because its part number is an assembly with the driveshaft), but easy enough to decide which three bolts to remove.
If you like keeping your garage floor clean/oil free be careful when you remove the driveshaft from the differential, there is a little cover that keeps the grease in there that may fall out, and like buttered bread it falls grease side down.
As stated other places, make sure you have plenty of 3/8” extensions ( I would plan on having at least 18” worth, and a good universal joint)
You have a torque wrench right? You will want one for this job, and really most jobs. (you don’t want to risk haveing to do it again)
Loosen the bolts that hold the top of the bell housing to the engine before you jack the car up, it is much easier when the car is at ground level.
This job is doable with one person, I did it, but if you have a friend there are times it would be helpful.
 08-04-2012, 02:04 AM
#2
Replace the pilot bearing while you are in there, you can rent a puller from your local parts store (or have a good excuse to add a useful tool to your collection) the bearings don’t often wear out, but they are under $10, and easy to replace. Do not use the white bread or grease trick to try to press the bearing out, there is a freeze plug behind the bearing which can be pushed in.
Before you separate the transmission from the car too far remove the slave cylinder bolts, and separate the slave from the tranny. If you don’t it is hard to remove the transmission without bending the pressure line (not a big deal if you are trashing the slave)
When you reinstall the bolt in the bottom of the shifter, use something to lock the nut in place. I used a dab of RTV on the bolt head and on the nut, Loctite probably works just as well and is easier to rework. Be careful not to over tighten this bolt, check your shifter several times along the way. If too tight the shifter becomes notchy and difficult to shift.
Start the car with the catback off… I don’t think I have to explain why…
Make sure the wiring harness that runs over the bell housing is out of the way, at most of the stages you will be moving this around, and trying to keep it out of your way. I found it helpful to pull it over the bottom of the headers/cats to keep them sort of out of the way.
Some part numbers for reference:
ARP Flywheel Bolts: 330-2802
ARP Pressure Plate Bolts: 134-2201
LS7 Slave Part Number: 24237634
Torque Values (for reference only, use at your own risk!!!):
Flywheel: 1st pass 15 lb ft, 2nd pass 37 lb ft, and third pass 74 lb ft
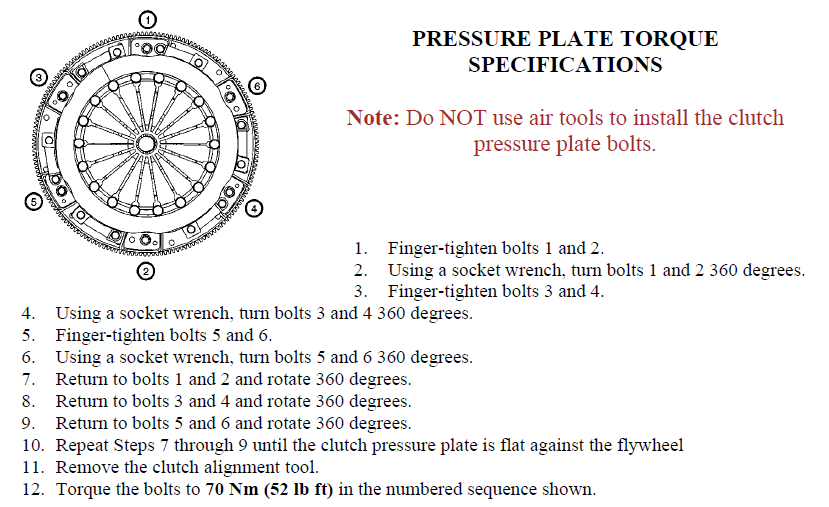
Pressure Plate: 52 lb ft take your time increment up to this in at least 4 patterns)
Bell Housing to Engine: 37 lb ft
Slave Cylinder Bolts: 106 lb in
Transmission to bellhousing: 35 lb ft
Driveshaft to Trans: 63 lb ft
Driveshaft to diff: 44 lb ft
Carrier bearing to car: 37 lb ft
Before you separate the transmission from the car too far remove the slave cylinder bolts, and separate the slave from the tranny. If you don’t it is hard to remove the transmission without bending the pressure line (not a big deal if you are trashing the slave)
When you reinstall the bolt in the bottom of the shifter, use something to lock the nut in place. I used a dab of RTV on the bolt head and on the nut, Loctite probably works just as well and is easier to rework. Be careful not to over tighten this bolt, check your shifter several times along the way. If too tight the shifter becomes notchy and difficult to shift.
Start the car with the catback off… I don’t think I have to explain why…
Make sure the wiring harness that runs over the bell housing is out of the way, at most of the stages you will be moving this around, and trying to keep it out of your way. I found it helpful to pull it over the bottom of the headers/cats to keep them sort of out of the way.
Some part numbers for reference:
ARP Flywheel Bolts: 330-2802
ARP Pressure Plate Bolts: 134-2201
LS7 Slave Part Number: 24237634
Torque Values (for reference only, use at your own risk!!!):
Flywheel: 1st pass 15 lb ft, 2nd pass 37 lb ft, and third pass 74 lb ft
Pressure Plate: 52 lb ft take your time increment up to this in at least 4 patterns)
Bell Housing to Engine: 37 lb ft
Slave Cylinder Bolts: 106 lb in
Transmission to bellhousing: 35 lb ft
Driveshaft to Trans: 63 lb ft
Driveshaft to diff: 44 lb ft
Carrier bearing to car: 37 lb ft
08-04-2012, 03:52 AM
#3
TECH Enthusiast
Join Date: Jun 2011
Location: New Haven, CT
Posts: 654
Likes: 0
Received 0 Likes
on
0 Posts
Lots of great tips! Would have been really nice to have all of these combined when I worked on mine few months ago. Only thing I have to say is several hours to bleed the clutch? I bled mine with a mitvac in 15 min. 
Last edited by etcts-v; 08-04-2012 at 04:00 AM.
12-08-2013, 05:11 PM
#6

Revival of an old thread here, which another member pointed me to. Why isn't this thing a sticky?? I would say the LS7 clutch swaps are becoming more and more common, and a comprehensive list of "tips" like this could be very useful to a lot of people!
One thing I'll mention though ... through the hundreds and hundreds of threads that I've read on this topic over the past year or so, including some very recent ones, I think it's all but decided that the pressure plate torque values are very important to be success of you install. I'm referencing FuzzyLog1c for the most part here, but also other members that have been through issues with torquing these bolts too much. These folks have taught me that ~48 ft/lb is what you want your final pass value to be. More than that, and you may (or may not) have issues with the clutch not disengaging properly, as well as the infamous very low pedal action that many complain of.
Another thing I've learned that I didn't read here... If you use one of the F1 eBay kits, you cannot use ARP flywheel to pressure plate bolts. Apparently some members here learned the hard way that these bolts are a tad too long for that particular flywheel.
Last edited by wes8398; 12-09-2013 at 12:53 AM.
Trending Topics
12-08-2013, 09:49 PM
#8
I think it's all but decided that the FW torque values posted by the OP are incorrect. I'm referencing FuzzyLog1c for the most part here, but also other members that have been through issues with torquing these bolts to ~75 ft/lb. These folks have taught me that ~48 ft/lb is what you want your final pass value to be.
If you use ARP flywheel bolts, they have their own torque values, which I believe is 85 lb/ft.
It is the pressure plate torque values that can vary.
I hope you didn't torque your flywheel to 48 lb/ft.
12-08-2013, 10:34 PM
#9
Launching!
iTrader: (2)

Join Date: Oct 2012
Location: Seattle, WA
Posts: 252
Likes: 0
Received 0 Likes
on
0 Posts
You have to follow this step by step. I used the stock flywheel bolt spec and 48lbs ft for the pp bolts. Here is a link to my thread and conclusions during my clutch install
https://ls1tech.com/forums/cadillac-...ff-mounts.html
Last edited by TeamSorad; 12-08-2013 at 10:40 PM.
12-09-2013, 12:36 AM
#10
The FW torque values are correct, assuming you are using new stock flywheel bolts.
If you use ARP flywheel bolts, they have their own torque values, which I believe is 85 lb/ft.
It is the pressure plate torque values that can vary.
I hope you didn't torque your flywheel to 48 lb/ft.
If you use ARP flywheel bolts, they have their own torque values, which I believe is 85 lb/ft.
It is the pressure plate torque values that can vary.
I hope you didn't torque your flywheel to 48 lb/ft.
Last edited by wes8398; 12-09-2013 at 12:42 AM.
12-09-2013, 10:38 AM
#11
On The Tree

Join Date: Mar 2013
Location: VA
Posts: 185
Likes: 0
Received 0 Likes
on
0 Posts
I am not understanding where all the conflict is coming from. I went up to the shop and asked my guy about the conflicting torque values for the cts-v set up vs the vette set up. He pulled them up in ALLDATA and they are 52 for both. I know fuzzy said some people torqued their PP to 75 but they must have been reading the FW torque value and not understanding they are two differnent things. My guy couldnt understand why anyone would torque a PP to 75 ft lbs.
01-10-2014, 12:13 AM
#13
I am not understanding where all the conflict is coming from. I went up to the shop and asked my guy about the conflicting torque values for the cts-v set up vs the vette set up. He pulled them up in ALLDATA and they are 52 for both. I know fuzzy said some people torqued their PP to 75 but they must have been reading the FW torque value and not understanding they are two differnent things. My guy couldnt understand why anyone would torque a PP to 75 ft lbs.

 11-06-2014, 01:16 AM
#17
TECH Apprentice
iTrader: (4)
Join Date: Feb 2006
Location: Md.
Posts: 398
Likes: 0
Received 0 Likes
on
0 Posts

Put in a complete LS7 GM flywheel,pilot bearing, pressure plate,disc, and shorter LS7 SLAVE and would not engage properly.. good pedal but just would not give me all the gears...Also had drag..Bought TICK spacers and used the thinnest one .018. which left me .005 clearance between fingers and slave.. What a difference...Clutch shifts great..Can even get reverse without putting into 3rd or 5th first....Still breaking the clutch in and loving it..GREG O.

