Group Buy - philistine aftermarket clutch master cylinder.
 07-23-2016, 11:48 PM
#321
TECH Addict
iTrader: (19)
Join Date: Aug 2007
Location: Where the Navy tells me to go
Posts: 2,397
Received 106 Likes
on
88 Posts

I wish I could tell you this helped but it didn't. Try and count the number of turns on the rod you make so you can put it back the way it was. I lost track after attempt number 4 or 5 to adjust my way out of this and I'm wondering if the rod adjustment has now affected the cylinders ability to fully disengage the clutch.
Here's where I was to begin with:
I pulled the CPS off, then marked the pushrod with a red paint pen before disconnecting the rod from the pedal (newly acquired pick did the job on the e-clip). I unthreaded the rod back to the "default" red mark to see how they compared - I was 8 or 9 half-turns past the default mark. (Hard to be exact due to the visual parallax of looking up at an angle with my head on the floorboard.)
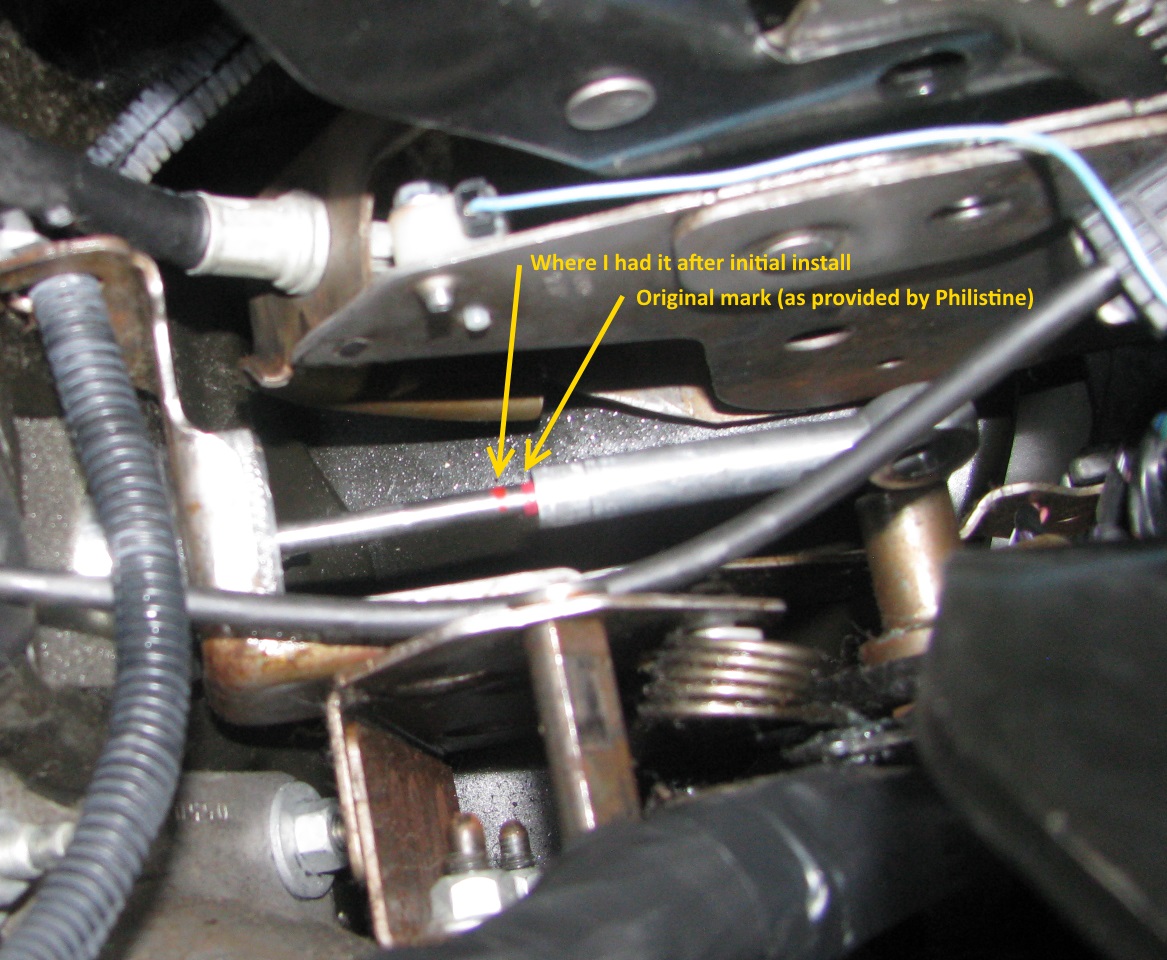
Going back in time a few months, when I installed the PMC initially I ended up at that 8 or 9 half-turns by following the instuctions - push the pedal down to see if it contacts the hard stop, if not, adjust the pushrod length and try again. I used a piece of paper on the hard stop and checked each time to see if I could pull the paper out. Today, after adjusting the pushrod back to the default red mark, I did the check again and found that the pedal was hitting the hard stop.
I took it out for a spin and was able to use the cruise control, which was my test to see if the ECU was happy with the clutch position switch. I'm taking a longer drive tomorrow morning (30min or so, including some highway time) so we'll see how that goes.
On the down side, now my clutch pick-up point is higher than I like. Annoyingly high, like rev-the-engine-too-high-like-I've-never-driven-stick-before-because-I'm-expecting-the-clutch-to-have-already-engaged-by-now too high. I think the fix to that would be to remove the pushrod, trim off ~1/4" (the difference between the red marks), then reinstall it to the default red mark. That should give me the same clutch pick-up point that I had before, but would keep the CPS happy.
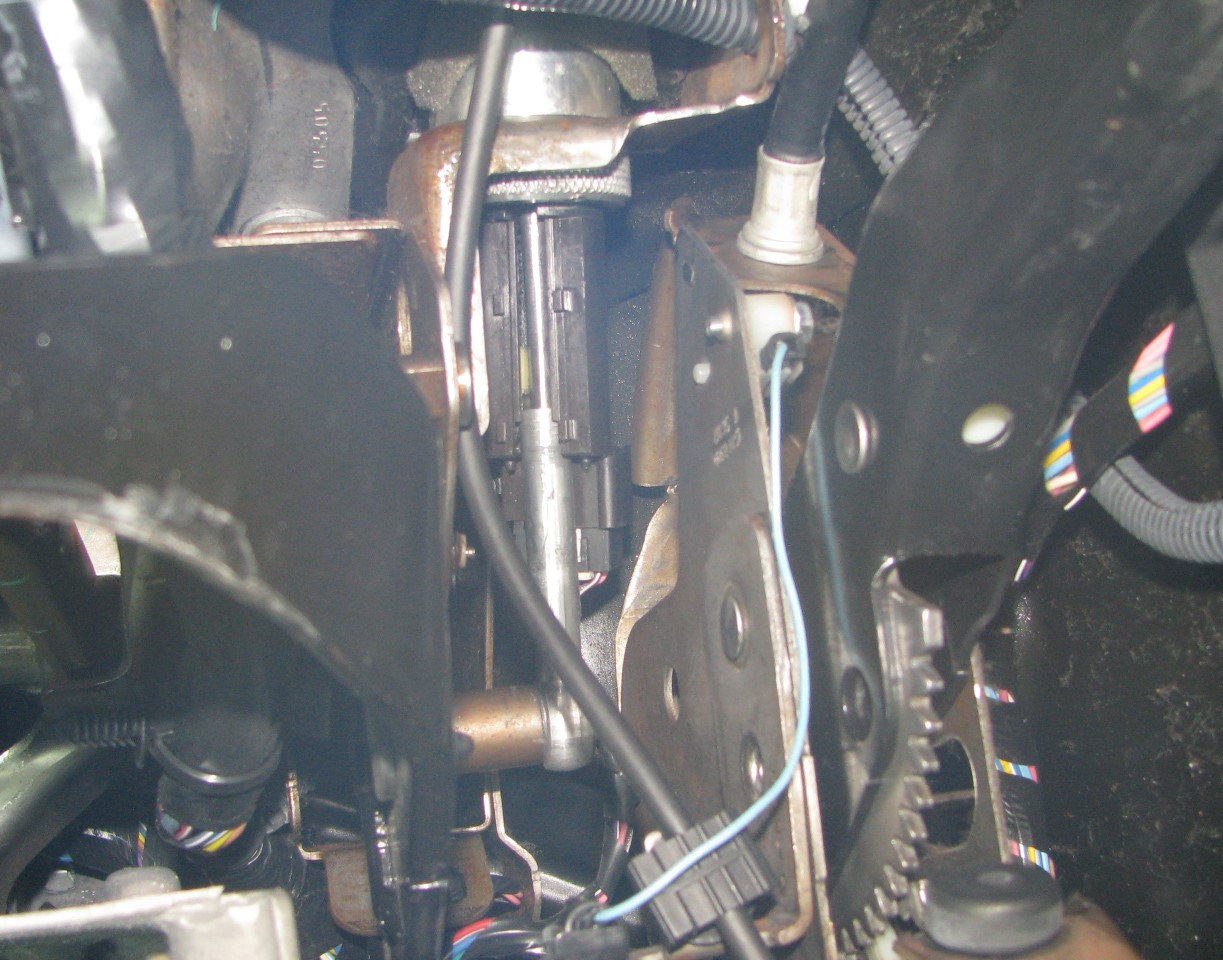
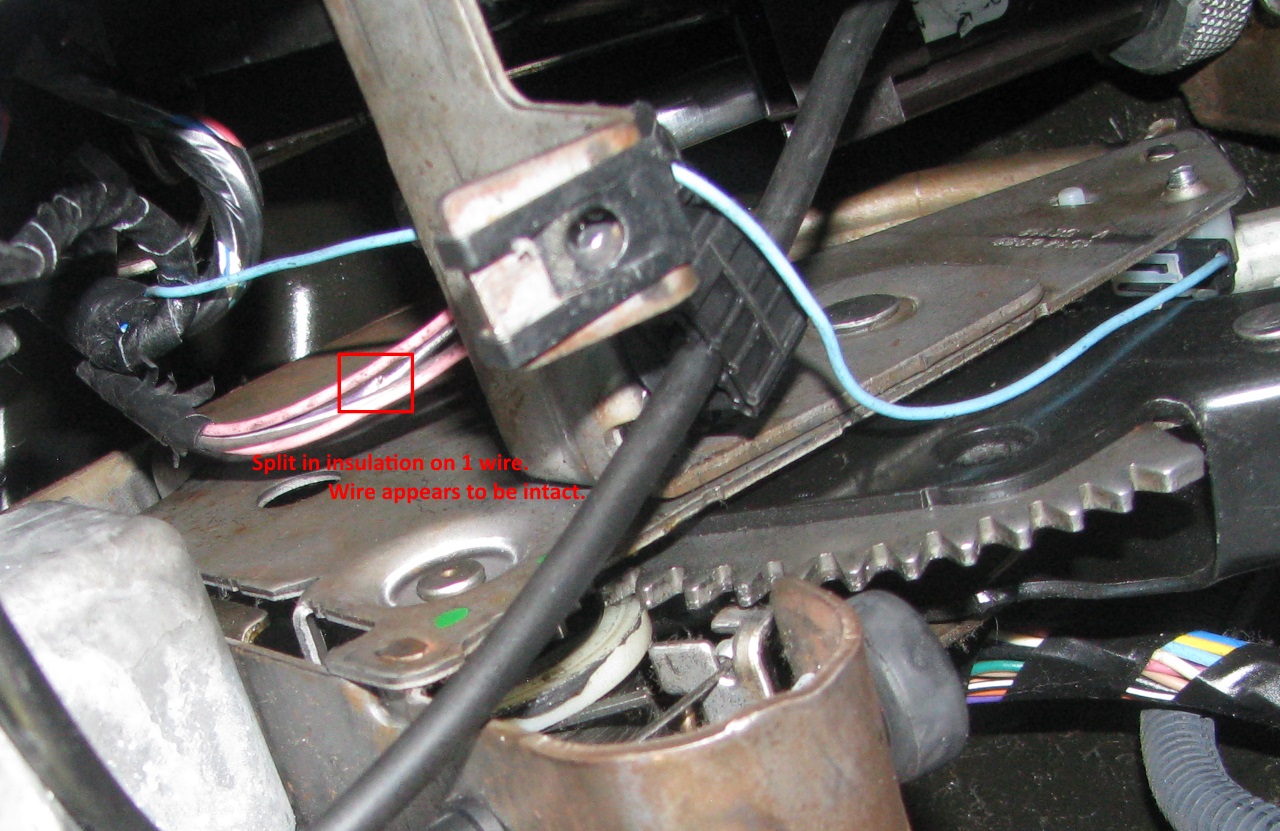
Oh, and I also found that one of the wires to the CPS got pinched or something at some point, so the insulation is cut. The wire inside seems OK. I didn't do anything to try to fix it - there's just no frickin' way I can get my hands up in there to even wrap some tape around it, let alone accomplish an actual fix. There's not enough slack in the wiring to pull it down to access the bad spot, and I can't reach the wiring bundle the harness disappears into to try and cut away some tape to get more slack. For now it'll just have to stay as-is.
Old slave or old master? I've had 2 slave cylinders die, and those are both long gone. I'm not sure if I kept my stock master or not - I think I tossed it, but I'll check again if that's what you're looking for.
Last edited by AAIIIC; 07-23-2016 at 11:54 PM.
 07-24-2016, 07:03 AM
#322

Thanks for doing the detective work on this! I've adjusted the rod a several times but haven't gone into the detail you have here. Guess I'll have to suck it up and dive back into it.
I could readjust the rod and the light would go out for a while but come back on after 200 to 500 miles.
I'll need to reread about the hard stop. I guess I'm confused as I'd think you'd want it hitting the hard stop under the dash so you don't bottom the cylinder out internally. I think it's already been addressed in this thread somewhere. Is your cylinder currently stopping short of the hard stop on the pedal assembly?
I'm with you on access to the connector. That was one reason I was going to wait until I have the dash apart for something else to mess with it further. If you could easily access it, it would be a lot easier to figure out what the car is thinking. Just stick a dab of silicon on the wire nick.
Tall pedal height would be more annoying the SES light and I meant to say clutch master. I didn't save mine but kinda wished I had at this point.
07-26-2016, 01:48 PM
#323
TECH Addict
iTrader: (19)
Join Date: Aug 2007
Location: Where the Navy tells me to go
Posts: 2,397
Received 106 Likes
on
88 Posts
Thanks for doing the detective work on this! I've adjusted the rod a several times but haven't gone into the detail you have here. Guess I'll have to suck it up and dive back into it.
I could readjust the rod and the light would go out for a while but come back on after 200 to 500 miles.
I'll need to reread about the hard stop. I guess I'm confused as I'd think you'd want it hitting the hard stop under the dash so you don't bottom the cylinder out internally. I think it's already been addressed in this thread somewhere. Is your cylinder currently stopping short of the hard stop on the pedal assembly?
Originally Posted by PMC install instructions
13. Gently press the clutch pedal all the way to the floor. If the clutch pedal travel stops before the factory �hard stops� on the clutch pedal, tighten the threads on the rod-arm (#15) by one complete rotation and recheck. If the clutch pedal travel stops and there is no gap on the factory �hard stops�, loosen the threads on the rod-arm (#15) by one complete rotation and recheck.
a. The idea is to have full travel of the clutch pedal and NOT bottom out the new master cylinder stroke e.g. if the clutch pedal stops short of the factory �hard stops� then the new master cylinder is being over-stroked and could cause damage with prolonged use.
b. The final setting should be clutch pedal fully depressed at factory �hard stops� with full travel of the new master cylinder.
c. It is acceptable to stroke the Tilton master cylinder a few times without damage as it comes with internal lubricant for protection. It is not advisable to stroke the Tilton master cylinder excessively. The Tilton master cylinder should only be stroked for adjusting the rod-arm (#15).
I'm with you on access to the connector. That was one reason I was going to wait until I have the dash apart for something else to mess with it further. If you could easily access it, it would be a lot easier to figure out what the car is thinking. Just stick a dab of silicon on the wire nick.
07-26-2016, 05:32 PM
#324

Silicon will do it, here's what I've used in the past in similarly tight areas: http://www.harborfreight.com/4-fl-oz...ape-36821.html
 07-27-2016, 07:38 AM
#326
Plasti-dip makes the stuff in clear if you don't want a black blob under there. I think it is in a spray can but spray on small brush and brush on likely works fine..also maybe a spray tube. Then again, if clear, overspray under the dash will likely never be noticed. Just practice on your face out of the car before in the car under the dash so you know how much you want on your face.  I have personally used the spray stuff and it is fantastic. I used it regularly to cover the battery connections on my 4-wheelers that saw big time mud. Eventually cures to a sort of stiffness you get after good tape has been heated a few times. Just stiff enough to be able to nick and edge with your thumbnail and peel it back--seemed to come off clean, too.
I have personally used the spray stuff and it is fantastic. I used it regularly to cover the battery connections on my 4-wheelers that saw big time mud. Eventually cures to a sort of stiffness you get after good tape has been heated a few times. Just stiff enough to be able to nick and edge with your thumbnail and peel it back--seemed to come off clean, too. Last edited by Mercier; 07-27-2016 at 07:44 AM.
 LMAO!
08-10-2016, 11:10 PM
LMAO!
08-10-2016, 11:10 PM
#328
TECH Addict
iTrader: (19)
Join Date: Aug 2007
Location: Where the Navy tells me to go
Posts: 2,397
Received 106 Likes
on
88 Posts
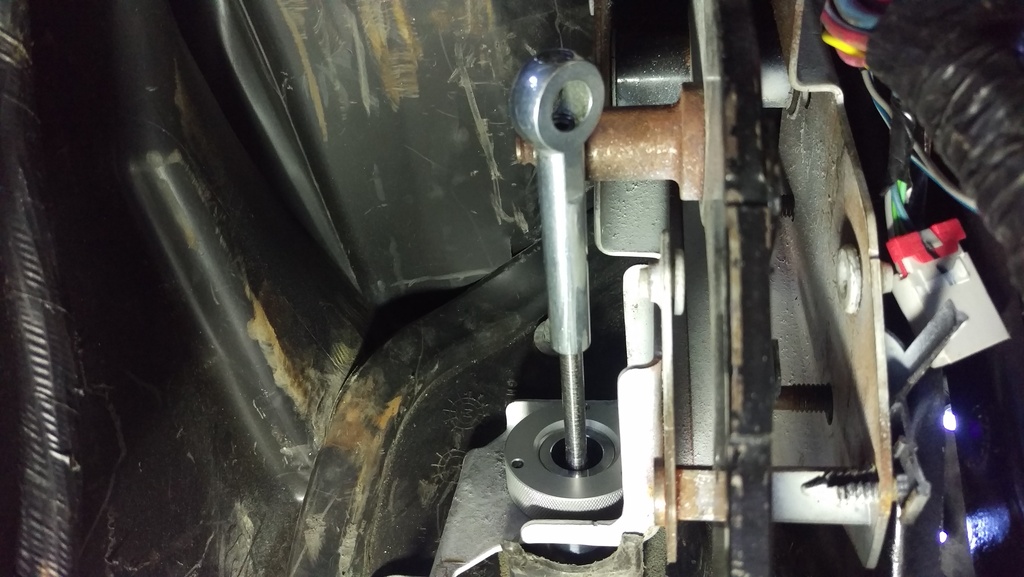
Got the new design pushrod (with the locking set screw) and went through the multiple hour drill of swapping the pushrods out. I was somewhat concerned the old pushrod, without the set screw, could change position over time, so I contacted Philistine and had him send me the new version. (My thinking was that the P0833 codes may have started because the pushrod was gradually changing length as the pedal was cycled thousands of times over thousands of miles, until it got to the point the clutch position switch wasn't making proper contact at the top of the stroke.)
It was definitely a challenge to get the set screw tight. Just hard to line things up to get the allen wrench into the set screw while holding the pushrod in position. I ended up pulling the pushrod back off, getting a rough measurement of how much thread engagement there would be, then threaded the set screw into about the right position and reinstalled the pushrod. My first attempt was a little off - pushrod was too long - so I took it back off, threaded the set screw in a few more turns and tried again. Got it that time, then just had to put the allen wrench in to put a little torque on the set screw (rather than having to thread the set screw in multiple turns).
One nice side benefit of adjusting the pushrod to clear the P0833 codes is that the shifting is better now. Apparently with the pushrod threaded on a bit too far the pedal wasn't stroking the master far enough. Everything feels a bit smoother, and getting into reverse is significantly easier.
08-11-2016, 02:36 PM
#329
The setting of the master cylinder comes with a nominal indicator on the pushrod. This ensures that you are 90-95% of full stroke of the master cylinder. The clutch pedal stop is another good indicator - if the pedal never meets the stop after full stroke then the master cylinder is fully extended. Since it's adjustable, turn the rod-arm and make the length shorter - this lowers the pedal height so the pedal can meet the pedal stop. At this point, make adjustments in small increments by turning the rod-arm to find the proper disengagement setting for your clutch combination. Lengthening the pushrod too much can damage the pressure plate so it's very important to properly adjust the pushrod - takes time to get the proper setting.
08-12-2016, 07:21 AM
#331
I was hoping I would have enough "grace" in the adjustment to turn the light off without upsetting clutch performance but that's doesn't seem to be the case. How much luck has anyone had adjusting the rod length to change engagement height without affecting the clutch?
AAIIC, Let us know if the light comes back on.
You didn't take pics of the new rod did you???
AAIIC, Let us know if the light comes back on.
You didn't take pics of the new rod did you???
08-12-2016, 08:24 AM
#332
TECH Addict
iTrader: (19)
Join Date: Aug 2007
Location: Where the Navy tells me to go
Posts: 2,397
Received 106 Likes
on
88 Posts
I didn't take any pics of the new one. I know Philistine said it's got a different surface finish, but to my eye it looks the same as the old one. The obvious exception, of course, is that there's a hole in the top of the "eye" of it and it's threaded all the way through to allow for the set screw.
08-17-2016, 10:45 AM
#333
I didn't take any pics of the new one. I know Philistine said it's got a different surface finish, but to my eye it looks the same as the old one. The obvious exception, of course, is that there's a hole in the top of the "eye" of it and it's threaded all the way through to allow for the set screw.
Since the rod-arm seats inside the clutch position sensor switch, there is a friction surface with the rod-arm and the switch as it is cycled. The idea is to mitigate the friction for smoother action. The 7075 aluminum rod-arm only comes into contact with the plastic surface of the clutch switch so there is essentially no wear to the rod-arm. Once the rod-arm is properly positioned, there is good agreement with the contact surfaces to glide easily in/out with essentially no wear to either component.
The new surface finish is not a requirement for proper engagement. I was experimenting with anodizing on a different project and decided to augment the rod-arm. It's an optimization process for the clutch master kits.
On a side note, I hope you installed the spring washer I sent along with the new rod-arm. Every kit now comes with the spring washer and I've sent a dozen or so of those free of charge to anyone that wants it. A few experienced some unwanted "clicking" noise from cycling the clutch pedal and the spring washer is the cure. It really snugs the rod-arm to the clutch pedal pivot component. The suggestion came from a fellow V member and am thankful for the feedback - you guys help make this kit better!
Thanks!
08-17-2016, 09:48 PM
#334
TECH Addict
iTrader: (19)
Join Date: Aug 2007
Location: Where the Navy tells me to go
Posts: 2,397
Received 106 Likes
on
88 Posts
I did install the spring washer. I haven't noticed any change as far as those goes - I get noise from the clutch pedal, but I'm fairly certain it's the spring, and it's loud enough that if the rod-arm was clicking I would never hear it.
08-28-2016, 09:08 PM
#335

I finally got around to installing this mc an wanted to share a tip that made the install a lot easier, not sure if anyone did this but, I removed the E-brake pedal and set it to the side. This freed up a lot of space to work with. I had no trouble putting on the collar an also tightening the set screws which are clearly visible. Also connecting the rod arm to the pedal was a breeze.


 05-21-2017, 12:27 AM
#339
TECH Addict
iTrader: (19)
Join Date: Aug 2007
Location: Where the Navy tells me to go
Posts: 2,397
Received 106 Likes
on
88 Posts
Coming back to this one months later...
Your car must be built differently than mine, because there's no way my parking brake pedal is coming out with just a couple nuts!
Your car must be built differently than mine, because there's no way my parking brake pedal is coming out with just a couple nuts!

