Lorenzen's Progress Thread

 02-01-2016, 08:31 AM
#43
On The Tree
Thread Starter

Thanks...Plasti-dip. Came out really well but it was a lot of work. Accents are all chrome/silver...for now. Planning on changing that next weekend I think.
02-01-2016, 02:22 PM
#45
On The Tree
Thread Starter
Yes. I borrowed my friends DYC sprayer system which is essentially the same thing as the wagner. It came out smoother than expected, especially after applying dip coat. I used about 4.5 gallons in total. (bought 5) 3 gallons of Gunmetal Grey (base) and 2 gallons of Anthracite Grey. Probably a little more than you need but it should come back off very nicely and had very little color variation.
I will try to get my roommate to bring out his DSLR this next weekend to get some quality pics.
I will try to get my roommate to bring out his DSLR this next weekend to get some quality pics.
02-03-2016, 05:09 AM
#46
TECH Regular
I would made the opposite of it, plasti dip on accents and vinyl or paint over hole car!
Is it now only hand wash, heard about peel off on edges, because of brushes from a automatic wash box?!
Good luck, matte colour looks great on a V1
Best regards,
Ronald
Is it now only hand wash, heard about peel off on edges, because of brushes from a automatic wash box?!
Good luck, matte colour looks great on a V1
Best regards,
Ronald
02-03-2016, 08:25 AM
#47
On The Tree
Thread Starter
I dipped the entire car for $350 total...Otherwise I would've considered vinyl or actually painting the whole car. I will eventually paint the whole car when the dip goes bad...or just re dip it...we'll see when the time comes.
I always hand wash my car anyways, but I don't imagine a brushed automatic carwash would do the dip well. It is surprisingly sturdy though. My friend sprayed his stang about a year ago and it still looks the same as it did the day we did it and he doesn't exactly take care of it well. Another friend did his 370 and it came out looking like ****...Dip can be tricky sometimes.
I always hand wash my car anyways, but I don't imagine a brushed automatic carwash would do the dip well. It is surprisingly sturdy though. My friend sprayed his stang about a year ago and it still looks the same as it did the day we did it and he doesn't exactly take care of it well. Another friend did his 370 and it came out looking like ****...Dip can be tricky sometimes.
02-10-2016, 03:09 PM
#49
On The Tree
Thread Starter
Thanks OD.
So I've successfully wrecked a set of tires in 3 months....The inside walls are shot from the amount of camber I'm at and some amount of hoonerie involved.
On the plus side, I got new TPMS today so I can now use competition mode and turn stability completely off...
So I've successfully wrecked a set of tires in 3 months....The inside walls are shot from the amount of camber I'm at and some amount of hoonerie involved.
On the plus side, I got new TPMS today so I can now use competition mode and turn stability completely off...
02-10-2016, 08:42 PM
#50
TECH Enthusiast
Thanks OD.
So I've successfully wrecked a set of tires in 3 months....The inside walls are shot from the amount of camber I'm at and some amount of hoonerie involved.
On the plus side, I got new TPMS today so I can now use competition mode and turn stability completely off...
So I've successfully wrecked a set of tires in 3 months....The inside walls are shot from the amount of camber I'm at and some amount of hoonerie involved.
On the plus side, I got new TPMS today so I can now use competition mode and turn stability completely off...
Unless you were just doing standing burnouts... then well, yeah.
02-11-2016, 07:07 AM
#51
TECH Resident
iTrader: (4)
Join Date: Oct 2011
Location: heading South East on Bakalakadaka street
Posts: 819
Likes: 0
Received 1 Like
on
1 Post
Thanks OD.
So I've successfully wrecked a set of tires in 3 months....The inside walls are shot from the amount of camber I'm at and some amount of hoonerie involved.
On the plus side, I got new TPMS today so I can now use competition mode and turn stability completely off...
So I've successfully wrecked a set of tires in 3 months....The inside walls are shot from the amount of camber I'm at and some amount of hoonerie involved.
On the plus side, I got new TPMS today so I can now use competition mode and turn stability completely off...
I took all mine off and wrapped em up in aluminum foil. When I'm at the track, I don't have to worry about the tire light on when my pressure is at 20 or lower.
02-11-2016, 11:17 AM
#52
On The Tree
Thread Starter
Toe is as follows. Do you think it would be worth going with the CS toe rods?
FRONT
Left:0.10�
Right: 0.10�
Total: 0.20�
REAR
Left: 0.10�
Right 0.05�
Total: .15�
Camber -2.4/2.7 Front, -3/2.4 Rear
That was as of 3 months ago...I've done new bushings since and I'm going to try to go get another alignment tomorrow to see if they can get it a bit better. Only 1 standing burnout, just to test the bushings out haha.
OD, I considered that but I won't be going to the drag strip until I get myself a CS 8.8.... I do a lot of highway driving so if I get a screw in a tire (like last week) getting a notification that the tire is going flat before its totally there is nice.
FRONT
Left:0.10�
Right: 0.10�
Total: 0.20�
REAR
Left: 0.10�
Right 0.05�
Total: .15�
Camber -2.4/2.7 Front, -3/2.4 Rear
That was as of 3 months ago...I've done new bushings since and I'm going to try to go get another alignment tomorrow to see if they can get it a bit better. Only 1 standing burnout, just to test the bushings out haha.
For what it's worth, you should check your toe settings. I've been running pretty aggressive -2� up front and -2.3� rear for camber and spin the tires quite often without any significant wear on the inside.
Unless you were just doing standing burnouts... then well, yeah.
Unless you were just doing standing burnouts... then well, yeah.
02-11-2016, 11:30 AM
#53
TECH Fanatic
iTrader: (16)

Join Date: Apr 2005
Location: baltimore, MD
Posts: 1,413
Likes: 0
Received 0 Likes
on
0 Posts

good looking job. i like the stance. what is bringing the ride height down?
****edit, nevermind i went back to page one and saw they are H&Rs. i read it a while ago and just didnt notice the stance until your latest pics. keep up the good work.
****edit, nevermind i went back to page one and saw they are H&Rs. i read it a while ago and just didnt notice the stance until your latest pics. keep up the good work.
Last edited by bigti99a; 02-11-2016 at 02:49 PM.
02-11-2016, 12:53 PM
#54
The alignment and camber don't seem too extreme. Not enough to eat tires in 3 months.
If it's just the rears you can blame the burnouts or any hooning. My fronts usually wear faster than my rears considering I don't do much hooning.
You can improve that rear camber in one of two ways.
1. Raise the ride height. This can be done with a different spring or a spring spacer. I used a 3/8" piece of rubber I cut to fit underneath the rear H&R springs. I didn't care for the tucked look and my DSR tire was rubbing the fender lip on hard turns.
or
2. Detach the control arm from the subframe and extend the slot that the arm bolts into on the backside (toward the center of that car). A small grinding wheel similar to a dremel or rotozip can work. You'll see that the current position is maxed out against the backside of that slot. Extending this will let you bring the lower arm farther back adding positive camber.
Last edited by BudRacing; 02-11-2016 at 12:58 PM.
02-14-2016, 09:58 AM
#55
On The Tree
Thread Starter
Thanks Bigt...
Bud, im planning on doing option 2 when I get some time on a weekend. I picked up a junk set of tires to hold me over until I get to it. I've considered raising the car a smidge since I very ocasionally scrape the fender well as well but I enjoy the stance it has currently.
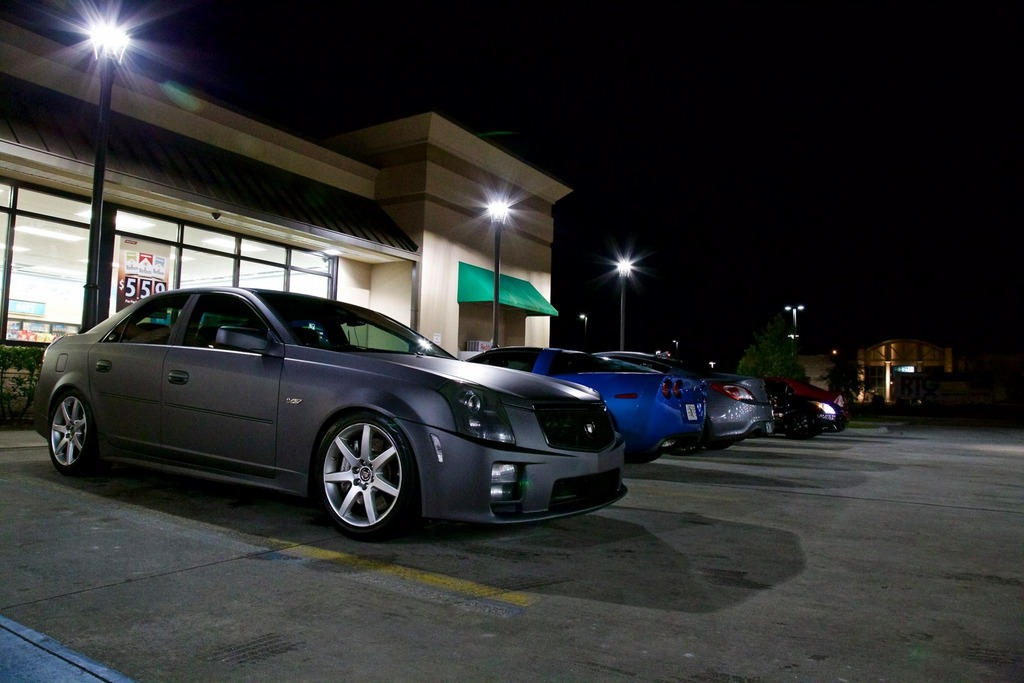
A cool shot from Brevard Motorsports this weekend on our cars and coffee cruise.
Bud, im planning on doing option 2 when I get some time on a weekend. I picked up a junk set of tires to hold me over until I get to it. I've considered raising the car a smidge since I very ocasionally scrape the fender well as well but I enjoy the stance it has currently.
A cool shot from Brevard Motorsports this weekend on our cars and coffee cruise.

The alignment and camber don't seem too extreme. Not enough to eat tires in 3 months.
If it's just the rears you can blame the burnouts or any hooning. My fronts usually wear faster than my rears considering I don't do much hooning.
You can improve that rear camber in one of two ways.
1. Raise the ride height. This can be done with a different spring or a spring spacer. I used a 3/8" piece of rubber I cut to fit underneath the rear H&R springs. I didn't care for the tucked look and my DSR tire was rubbing the fender lip on hard turns.
or
2. Detach the control arm from the subframe and extend the slot that the arm bolts into on the backside (toward the center of that car). A small grinding wheel similar to a dremel or rotozip can work. You'll see that the current position is maxed out against the backside of that slot. Extending this will let you bring the lower arm farther back adding positive camber.
If it's just the rears you can blame the burnouts or any hooning. My fronts usually wear faster than my rears considering I don't do much hooning.
You can improve that rear camber in one of two ways.
1. Raise the ride height. This can be done with a different spring or a spring spacer. I used a 3/8" piece of rubber I cut to fit underneath the rear H&R springs. I didn't care for the tucked look and my DSR tire was rubbing the fender lip on hard turns.
or
2. Detach the control arm from the subframe and extend the slot that the arm bolts into on the backside (toward the center of that car). A small grinding wheel similar to a dremel or rotozip can work. You'll see that the current position is maxed out against the backside of that slot. Extending this will let you bring the lower arm farther back adding positive camber.
02-15-2016, 11:24 AM
#57
On The Tree
Thread Starter
Thanks OD. I'm going to wait till I get an 8.8 (Hopefully this years black Friday sale) until I hit the strip. I'm planning on trying to get in a couple AutoX events this springs though.
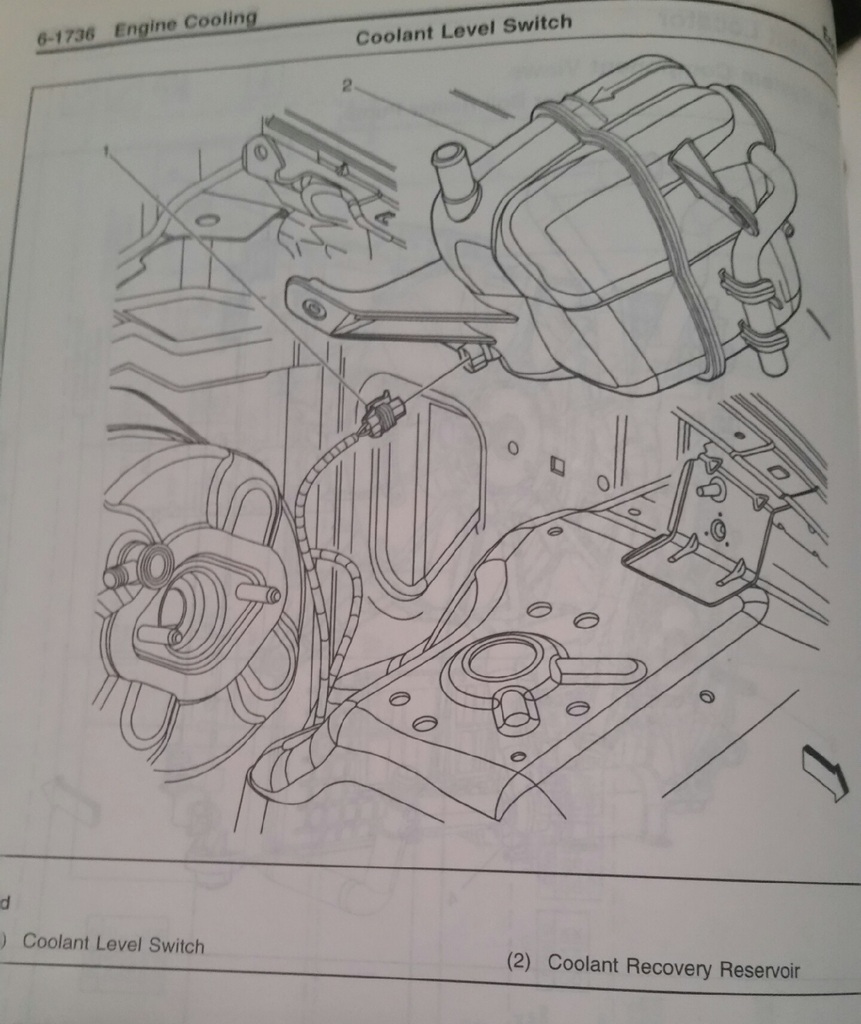
Anyone have any pictures of the wire that connects to the bottom of the coolant reservoir? Mine is disconnected and I cannot find the wire anywhere....
Anyone have any pictures of the wire that connects to the bottom of the coolant reservoir? Mine is disconnected and I cannot find the wire anywhere....