B&M shifter
 03-05-2012, 01:38 AM
#21
well doing more digging...found some pics of f-body cups and some mustang t-5 pics...I GUESS the inner liner of our cup will come out?... but I still don't see how the brass bushing would help. I still can't find pics of the shifter shaft on these yet but I would assume it's a straight piece and the new brass bushing accommodates this?...but ours is a bell shaped piece, so I don't see how it would snap in?....

the gto guys can fix theirs- see below- but again not sure what their little arm looks like

interesting perspective

tr6060 from new camaro, looks to have the same arm...wonder if theres a bushing for it, if so, it might be the ticket.

looks like it might have a notch in the bottom for that bell to snap into.........................

this is the shift lever that's going into that cup....so looking promising.

more cups and the shifters, looks the same.


the gto guys can fix theirs- see below- but again not sure what their little arm looks like
interesting perspective
tr6060 from new camaro, looks to have the same arm...wonder if theres a bushing for it, if so, it might be the ticket.
looks like it might have a notch in the bottom for that bell to snap into.........................
this is the shift lever that's going into that cup....so looking promising.
more cups and the shifters, looks the same.

 03-05-2012, 08:06 PM
#24
after reading more on the net, it seems the cup is essentially the same for the t5,t45,t56, etc.
When I got home I just decided to try and pull it out. Not sure why I didn't do this in the first place. It slipped out fairly easily. It's made of plastic, pretty high strength. Mine was not really worn out. The shift lever bottoms out and sort of swivels around in it. As of now, there's not really any play in it but it has 'given' some over the years.
I don't know if I want to replace it with the brass- that might introduce more vibes/buzz than I want...delrin, or perhaps even another new stock bushing might be the ticket.
Since they are relatively cheap, I'll buy one and see how it feels anyway.
Here are some pics
03-06-2012, 09:49 AM
#25

Question for you Cadzilla...
All those hollow pins, PVC bushings, shoulder bolts, etc etc that you scrounged up in post 20...would you happen to have some numbers, applications, etc to help us out so we can find them as well? Or did you have to do some machining to make them all fit?
Great work up by the way. Even better photos!!
03-06-2012, 03:26 PM
#27
I just spoke to thegearbox.com and they said the same thing.. I'm going to order their bronze bushing as well as a new stock plastic one, just in case. It's a bit too late for me to worry about vibration at this point, I've replaced every rubber part with stiffer rubber, pvc, or brass, as well as fused the only other part that offered any separation from the trans vibration with jbweld.
03-06-2012, 03:31 PM
#28
I just spoke to thegearbox.com and they said the same thing.. I'm going to order their bronze bushing as well as a new stock plastic one, just in case. It's a bit too late for me to worry about vibration at this point, I've replaced every rubber part with stiffer rubber, pvc, or brass, as well as fused the only other part that offered any separation from the trans vibration with jbweld.
When you fused the two parts together with the JB Weld, did you reinsert the pin or filled that hole with the JB Weld as well?
Also, the 2 piece bronze bushings, where did you get them?
Last edited by 9t8z28; 03-07-2012 at 09:23 AM.
03-06-2012, 03:48 PM
#29

First off this is such a great thread and it should be a sticky!!
So I was thinking, why cant we make a bracket to hold the shifter assembly/linkage straight to the transmission instead of the plastic console piece (the one with the two bolts)? That would remove the chance of the shifter alignment going bad.
It just seems under hard acceleration that the shifter assembly/linkage could get out of alignment and possibly make shifts "harder". (maybe the cause for sucky drivers to miss third gear. LOL)
This linkage system sucks!! Most of the other GM cars I see the shifter is hooked straight to the trans!!!
I'm going to try this and see.
03-06-2012, 08:01 PM
#30
TECH Fanatic
iTrader: (1)
Join Date: Jan 2008
Location: West Chester, PA
Posts: 1,249
Likes: 0
Received 0 Likes
on
0 Posts
This side to side slop has really been bugging me recently and I didn't have any idea what to do about it. Nice work!
Any way we can come up with a full list of all these replacements parts and where to buy them? I'm ready to spend some money!
EDIT....
I guess there really isn't too much to list, but:
Bronze Shifter Bushing / Shift Cup Isolator
http://www.thegearbox.org/T56.html
$22
Side Linkage Bushings - Trans Connection side
Home Depot - electrical PVC pieces (Size???)
$$??
Center Linkage Bushing - Trans Connection side
pisnuoff/brian/07-ctsv -Forum Member (Is he prepared to sell these or is there another supplier?)
$$??
JB Weld for center linkage pin
get it anywhere...
Last edited by CTSV_510; 03-06-2012 at 08:25 PM.
03-06-2012, 09:22 PM
#31
Not to thread hi-jack, but I had my tranny rebuilt, and suddenly it pops out of first gear, and reverse. It's still at the tranny shop (SNL Performance), but they've had it for nearly a month and haven't figured it out yet. I'm afraid they're about to give up on it and then I'm screwed. It wasn't popping out of 1st gear before the tranny rebuild, although it was popping out of reverse.
Any ideas?
Any ideas?
03-07-2012, 09:28 AM
#32
Not to thread hi-jack, but I had my tranny rebuilt, and suddenly it pops out of first gear, and reverse. It's still at the tranny shop (SNL Performance), but they've had it for nearly a month and haven't figured it out yet. I'm afraid they're about to give up on it and then I'm screwed. It wasn't popping out of 1st gear before the tranny rebuild, although it was popping out of reverse.
Any ideas?
Any ideas?
Do they have any experience with rebuilding T56's ?
Did they shim the trans to get the proper end play ?
They could have broken the synchronizer rings when putting the front cover back together?
And finally, what did they put new in the tranny?
03-07-2012, 01:20 PM
#33
All new internals for a 'level 2' transmission, and a brand spanking new GM shifter (we thought it was a problem with the shifter).
I'm getting nervous... I spent a whole lot of money to turn around and have a problem like this!
03-07-2012, 01:36 PM
#34
SNL Performance = Monster clutch company. They definitely know the T56 and I feel pretty confident they got all of that part right! The reason I posted in this thread is that they think it's a linkage problem. When they're under the car and disconnect the shifter from the linkage and shift the car from the bottom, everything seems fine. When they reconnect the shifter, it starts happening.
All new internals for a 'level 2' transmission, and a brand spanking new GM shifter (we thought it was a problem with the shifter).
I'm getting nervous... I spent a whole lot of money to turn around and have a problem like this!
All new internals for a 'level 2' transmission, and a brand spanking new GM shifter (we thought it was a problem with the shifter).
I'm getting nervous... I spent a whole lot of money to turn around and have a problem like this!
03-07-2012, 01:52 PM
#35

SNL are badasses - I'm sure they won't do you wrong - if they did it would be the first time I had ever heard of a less than stellar experience with them.
As far as the OP is concerned - B&M issue here upon install as well. I isolated it to the bolts that tighten the linkage to the car. For whatever reason - still makes no sense to me... I loosened them and ran through the gears with no issues - tightened them all the way - and it wouldn't let me in to 1st, 6th, or reverse. Loosened again - no issues. Then I got wise and tightened them a few turns at a time while checking for binding entering the gears (few turns, run through the gears - few more turns - run through) low and behold - tightened all the way down and had full range in the stick.
No issues since then. The nature of the shifter config just doesn't make sense to me why that would have caused a problem, but it surely did.
You might give it a try... OP and 1BAD.
03-07-2012, 01:55 PM
#36
First off this is such a great thread and it should be a sticky!!
So I was thinking, why cant we make a bracket to hold the shifter assembly/linkage straight to the transmission instead of the plastic console piece (the one with the two bolts)? That would remove the chance of the shifter alignment going bad.
It just seems under hard acceleration that the shifter assembly/linkage could get out of alignment and possibly make shifts "harder". (maybe the cause for sucky drivers to miss third gear. LOL)
This linkage system sucks!! Most of the other GM cars I see the shifter is hooked straight to the trans!!!
I'm going to try this and see.
So I was thinking, why cant we make a bracket to hold the shifter assembly/linkage straight to the transmission instead of the plastic console piece (the one with the two bolts)? That would remove the chance of the shifter alignment going bad.
It just seems under hard acceleration that the shifter assembly/linkage could get out of alignment and possibly make shifts "harder". (maybe the cause for sucky drivers to miss third gear. LOL)
This linkage system sucks!! Most of the other GM cars I see the shifter is hooked straight to the trans!!!
I'm going to try this and see.
All of this won’t hurt anything. The whole assembly can still flex vertically so that is all you need. Otherwise, it will only be an issue when you’re trying to find second in a powerslide.
This side to side slop has really been bugging me recently and I didn't have any idea what to do about it. Nice work!
Any way we can come up with a full list of all these replacements parts and where to buy them? I'm ready to spend some money!
EDIT....
I guess there really isn't too much to list, but:
Bronze Shifter Bushing / Shift Cup Isolator
http://www.thegearbox.org/T56.html
$22
Side Linkage Bushings - Trans Connection side
Home Depot - electrical PVC pieces (Size???)
$$??
Center Linkage Bushing - Trans Connection side
pisnuoff/brian/07-ctsv -Forum Member (Is he prepared to sell these or is there another supplier?)
$$??
JB Weld for center linkage pin
get it anywhere...
Any way we can come up with a full list of all these replacements parts and where to buy them? I'm ready to spend some money!
EDIT....
I guess there really isn't too much to list, but:
Bronze Shifter Bushing / Shift Cup Isolator
http://www.thegearbox.org/T56.html
$22
Side Linkage Bushings - Trans Connection side
Home Depot - electrical PVC pieces (Size???)
$$??
Center Linkage Bushing - Trans Connection side
pisnuoff/brian/07-ctsv -Forum Member (Is he prepared to sell these or is there another supplier?)
$$??
JB Weld for center linkage pin
get it anywhere...
I have one of those home depot things somewhere but cant find it right now. They are on the electrical isle about eye level near the end in the area with the small bins. Looks like mini plumbing parts. Take your linkage up there with you and you’ll find which one fits easily. You have to cut about 40% off the width so 2 of them sandwich and fill the sleeve on the linkage. There is a silver sleeve that slips into the hole in the pvc bushings, that unit slips onto the trans, and there is a pin that holds it in place.
Center linkage bushings, yes, there are two and they fit in either side. I got mine from Brian, I think they were around $50 and I think they were brass. They fit perfect at first, but now there’s a bit of play since I had to really force them to come apart for this latest venture(I really never intended for that center linkage to come out again). I’ll probably just have the welder hit this too. When I remove the trans I leave the linkage on anyway.
Jb weld, yes 95%. I am going the extra mile with the regular welding but I really think the JB would be fine. It’s fused in there!
Question for you Cadzilla...
All those hollow pins, PVC bushings, shoulder bolts, etc etc that you scrounged up in post 20...would you happen to have some numbers, applications, etc to help us out so we can find them as well? Or did you have to do some machining to make them all fit?
Great work up by the way. Even better photos!!
All those hollow pins, PVC bushings, shoulder bolts, etc etc that you scrounged up in post 20...would you happen to have some numbers, applications, etc to help us out so we can find them as well? Or did you have to do some machining to make them all fit?
Great work up by the way. Even better photos!!
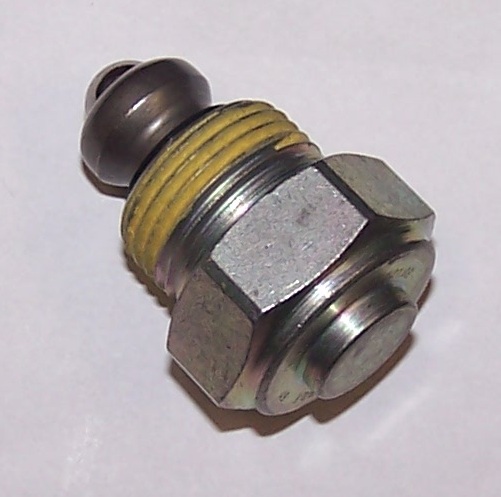
Below that is the shoulder/carriage bolt I used in place of the stock threaded bolt, just below that. The shoulder bolt is going through my b&m sleeve.
The pic below that shows the difference between my b&m linkage sleeve and the Brian’s stock sleeve.
Look further down and that pic with the linkage and the rubber bushings etc—basically you can see where I’ve removed the black stock sleeve (notice how the one up top was torn), and the silver linkage sleeve. You cut those home depot bushings (there is a dotted line on mine where I cut), put them into the linkage, and put that sleeve in the hole, then install on the trans. It fits perfect. Shots below that are the linkage complete and then installed on the trans. Below that, a shot of the linkage in stock form.
----------
I have the bronze isolator cup on the way now, hopefully will arrive Friday.
Last night I mocked up the shifter again so I could test the effect of the jbweld. Excellent from that perspective, no more play from that pin. Only 1/8 to 3/16 or so of play left altogether so I went hunting that down...
First I found unexpected play in the bushings connecting my center linkage to the arm of the trans. I had to twist and hit them too much to remove for the jbweld job, which irreparably opened the (center) just enough to allow a bit of play.

I may just get a new set from Brian. On initial install it was perfect with no play. I am contemplating jb weld/and or welding this too, but I am not keen on removing the ability of the linkage to flex at that point. Maybe I’ll just have them tap it, strong enough to hold for shifting but little enough that a larger force would snap it free…
Second, there is a bit of play in the base of my b&m. It’s very minimal but worth 1/32 inch of play for sure. I’ll be taking it apart and replacing the snap rings on top and bottom.
I took the shifter back apart except for the middle linkage piece. While moving it with my hand I noticed that there was still play inside the trans. I removed the shift plate to look inside again.

Yes, a small bit of the remaining play might be coming from that plastic cup sleeve/isolator being worn out, but there is clearly play in the rod that houses the shifter cup itself. From there I noticed play in something called the “shift detent”. In the pic just above, the skipshift solenoid is on the left and the detent is on the top right.. below is a close up of the detent and below that, a diagram.


This is basically a spring loaded mechanism that holds your shifter “upright”. I could tell that there was a bit of play in this piece, which was allowing the play in the rod that holds the cup… so I plan to remove it and check it out (when I find my 1” socket), see if it can be tightened up. Tick sells this detent for about $60, as well as replacement springs for $3…so not sure which route I’m taking but I assume replacing this will help take away the last bit of play and firm that on-center feel again. Note- this play was while in neutral, where we feel most of our play today. I will mention that when in gear, there was absolutely no play at all….
In the end, we may not be able to have it rock solid (in neutral), depending on the results of that detent modification and improvement (if any) from stock plastic to bronze for the cup isolator.
I found a t56 service manual pdf too which has helped.

Last edited by Cadzilla; 03-07-2012 at 02:18 PM.
03-07-2012, 02:10 PM
#37
TECH Fanatic
iTrader: (1)
Join Date: Jan 2008
Location: West Chester, PA
Posts: 1,249
Likes: 0
Received 0 Likes
on
0 Posts
well, depends on what you�ve done already. You�d need to add improved linkage bushings at the bottom of the shifter stalk (if you were still stock) and the UUC/CS bushings for the side linkage.
I have one of those home depot things somewhere but cant find it right now. They are on the electrical isle about eye level near the end in the area with the small bins. Looks like mini plumbing parts. Take your linkage up there with you and you�ll find which one fits easily. You have to cut about 40% off the width so 2 of them sandwich and fill the sleeve on the linkage. There is a silver sleeve that slips into the hole in the pvc bushings, that unit slips onto the trans, and there is a pin that holds it in place.
If you happen to come across the extra one you have an can take an inner & outer diameter measurement it would be much appreciated! Thanks again for all the info and pictures!
03-07-2012, 10:50 PM
#39
The offset lever does have a tiny bit of play that seems to connect deep in the trans, and we may never find it.
It it's safe to say that after I get the bronze isolator in there, fix my shifter base, fix the center linkage bushings, and maybe replace the detent, I'll be splitting hairs..
03-08-2012, 08:31 AM
#40
So here is something that might interest you all. When I bought shifters from a GM parts vendor I was given the whole shifter assembly. When I bought it he told me my car had to have a certain code (I think it was MV4?) for this shifter to work but I didnt care b/c all I needed was the shifter stalk.
Now to my point. I have only seen in pictures that the shifter arm is round and only attaches to one side which looks a little flimsy to me. The arms that I have connect to both sides of the tran link. Also it is flat bent heavy guage metal instead of the round arm.
I have attached a pic to show you what I talking about. I really dont know if it will help but by the look of it it will IMO.
You can see in the pic there is one end with no bushing that connects to the lower part of your shifter stalk while the other end with hard "plastic" bushings connects to the trans.
I have about ten of these laying around so send me an offer if you want one of these.