ATI Super Damper Install on LS2 V1
 08-24-2012, 03:14 PM
#1
Gentlemen,
I ordered the ATI Super Damper, ARP bolt and Goodyear Gatorback belt online. They should all arrive tomorrow, in time for a Sunday install.
Here is the thread where I asked for advice and ultimately selected the ATI:
https://ls1tech.com/forums/cadillac-...ampner-v1.html
I'm still in noob territory, though gaining knowledge by the day. I am about to ask many noobish questions, so I ask for your forbearance. I just replaced my radiator, so at least I know how to take that thing on and off now, lol.
I rented a 3-jaw 5-ton puller from Autozone. I'm pretty sure this will work to remove the stock damper. However, what I am not sure about AT ALL is whether I need a special tool to install the ATI Super Damper. I simply don't have one. A friend of mine who's done a lot of work on LS1s seems to think that the extra length of the ARP bolt will be enough to catch the threads and pull the ATI on there, without the need for a special tool. Is that right? Will it work that way on the LS2?
If I do need a special tool, does anyone know where I can get one?
Many thanks,
DAC
 08-24-2012, 04:02 PM
#2
This is what I did with my ATI,I heated the ATI at 350f in the oven for 15 to 20mins. and cool off the crankshaft,this will make the install ez and only thing u have to do is push in.u will not need a balancer installer tool but u will need a flywheel holder tool and a torque and angle wrench to torque the balancer bolt
note: I did try to use a balancer installer tool but it's hard to install,it's seem like i was braken the crankshaft and DO NOT use the balancer bolt for installing the ATI.U will damage the crankshaft threads.hop this will help u out
note: I did try to use a balancer installer tool but it's hard to install,it's seem like i was braken the crankshaft and DO NOT use the balancer bolt for installing the ATI.U will damage the crankshaft threads.hop this will help u out
08-24-2012, 05:03 PM
#3
If the ARP bolt is long enough, great. I seriously doubt it though. The OEM balancer bolt is WAY too short, so I can't imagine that the ARP bolt will help unless it's several inches longer.
Autozone rents the following tool (which you can keep--you just won't get your deposit back) that contains a tool that is supposed to pull harmonic balancers onto crank snouts.

http://www.autozone.com/autozone/acc...er=391373_0_0_
Unfortunately, it's not suited to the task at hand, but you can make it work. The problem is twofold: the threads inside the crank snout are deeply recessed, and the SuperDamper hub's ring (the part that the installer tool uses to press the pulley onto the crank) is also deeply recessed.
You'll need a Sawzall with a metal blade to cut the fat, threaded part of the installer to 3.5", blue locktite, and 6-8 small 1/4" sockets to act like rollerbearings. Essentially, the steps are:
1. Cut the flat end of the fat, threaded portion of installer tool off. Then cut off as many threads of the other end as necessary to reduce the overall length of the part to 3.5". I've looked for longer bolts so that you don't have to cut, but Home Depot and Sears don't sell them. So you have to cut, unless you have the hook-up at some specialty hardware store.
This allows you to get that M16x2.0 bolt into the crank far enough to thread. I recommend using locktite on that M16x2.0 attachment to keep the installer from coming apart inside the crank when you pull out the tool. Happened to me, once.
2. Thread the A/C section of the SuperDamper over the crank and get the hub started on the crank snout. Thread the installer kit into the crank, slide the washer bearing down, and thread the big nut. Pull the hub in as far as you can. Eventually, you'll have to stop because you're out of threads for the big nut to ride on.
3. Back off on the big nut and use the space to insert as many 1/4" sockets as you can into the Superdamper hub (see picture below). Crank the installer tool down until the hub is as far as you can get it.

There's a lot of debate about how to finish the installation off. Some people recommend against utilizing the old balancer bolt to tighten down the SuperDamper, and some do. Personally, I used it. I think that the concerns about breaking the threads off the old bolt are old wives' tales--I did a bunch of online research and couldn't find a single first-hand account of someone that had a problem doing it.
Autozone rents the following tool (which you can keep--you just won't get your deposit back) that contains a tool that is supposed to pull harmonic balancers onto crank snouts.
http://www.autozone.com/autozone/acc...er=391373_0_0_
Unfortunately, it's not suited to the task at hand, but you can make it work. The problem is twofold: the threads inside the crank snout are deeply recessed, and the SuperDamper hub's ring (the part that the installer tool uses to press the pulley onto the crank) is also deeply recessed.
You'll need a Sawzall with a metal blade to cut the fat, threaded part of the installer to 3.5", blue locktite, and 6-8 small 1/4" sockets to act like rollerbearings. Essentially, the steps are:
1. Cut the flat end of the fat, threaded portion of installer tool off. Then cut off as many threads of the other end as necessary to reduce the overall length of the part to 3.5". I've looked for longer bolts so that you don't have to cut, but Home Depot and Sears don't sell them. So you have to cut, unless you have the hook-up at some specialty hardware store.
This allows you to get that M16x2.0 bolt into the crank far enough to thread. I recommend using locktite on that M16x2.0 attachment to keep the installer from coming apart inside the crank when you pull out the tool. Happened to me, once.
2. Thread the A/C section of the SuperDamper over the crank and get the hub started on the crank snout. Thread the installer kit into the crank, slide the washer bearing down, and thread the big nut. Pull the hub in as far as you can. Eventually, you'll have to stop because you're out of threads for the big nut to ride on.
3. Back off on the big nut and use the space to insert as many 1/4" sockets as you can into the Superdamper hub (see picture below). Crank the installer tool down until the hub is as far as you can get it.
There's a lot of debate about how to finish the installation off. Some people recommend against utilizing the old balancer bolt to tighten down the SuperDamper, and some do. Personally, I used it. I think that the concerns about breaking the threads off the old bolt are old wives' tales--I did a bunch of online research and couldn't find a single first-hand account of someone that had a problem doing it.
Last edited by FuzzyLog1c; 08-24-2012 at 05:17 PM.
08-24-2012, 05:10 PM
#4
This is what I did with my ATI,I heated the ATI at 350f in the oven for 15 to 20mins. and cool off the crankshaft,this will make the install ez and only thing u have to do is push in.u will not need a balancer installer tool but u will need a flywheel holder tool and a torque and angle wrench to torque the balancer bolt
note: I did try to use a balancer installer tool but it's hard to install,it's seem like i was braken the crankshaft and DO NOT use the balancer bolt for installing the ATI.U will damage the crankshaft threads.hop this will help u out
note: I did try to use a balancer installer tool but it's hard to install,it's seem like i was braken the crankshaft and DO NOT use the balancer bolt for installing the ATI.U will damage the crankshaft threads.hop this will help u out
I found it impossible to get the hub over the crank via heat alone. During my installation last month, I heated my SuperDamper hub to 500 F for two hours to try to get it to fit over the LS2 crank snout. Twice. Didn't help in the slightest. You absolutely need an installer tool to get the thing started.
Last edited by FuzzyLog1c; 08-24-2012 at 05:15 PM.
08-24-2012, 08:05 PM
#5
I have no idea what a "flywheel holder tool" is, and why you used an angle wrench to torque the balancer bolt.
I found it impossible to get the hub over the crank via heat alone. During my installation last month, I heated my SuperDamper hub to 500 F for two hours to try to get it to fit over the LS2 crank snout. Twice. Didn't help in the slightest. You absolutely need an installer tool to get the thing started.
I found it impossible to get the hub over the crank via heat alone. During my installation last month, I heated my SuperDamper hub to 500 F for two hours to try to get it to fit over the LS2 crank snout. Twice. Didn't help in the slightest. You absolutely need an installer tool to get the thing started.
08-24-2012, 08:18 PM
#6
After researching the cost to make my own I just bought this install tool from a guy on the forum. Found it in this thread
https://ls1tech.com/forums/generatio...tion-tool.html

http://www.coloradospeed.com/index.p...ducts_id=10976
I'd like to know what tool you guys are using to remove the pulley. I bent the extension rod from the autozone tool in my crank. Now I'm looking for one that actually utilizes the crank threads in the same manner that my install tool does.
https://ls1tech.com/forums/generatio...tion-tool.html
http://www.coloradospeed.com/index.p...ducts_id=10976
I'd like to know what tool you guys are using to remove the pulley. I bent the extension rod from the autozone tool in my crank. Now I'm looking for one that actually utilizes the crank threads in the same manner that my install tool does.
Trending Topics
08-25-2012, 08:52 PM
#8
I ruined the one I rented.. Maybe they offer more than one version of the 3 jaw.. Even with the longest extension I didn't have enough threads left to pull off the pulley.
That was the second time I tried to replace it and failed.
Can't you just put it in 4th to tighten down the crank bolt?
That was the second time I tried to replace it and failed.
Can't you just put it in 4th to tighten down the crank bolt?
08-25-2012, 08:55 PM
#9
I ruined the one I rented.. Maybe they offer more than one version of the 3 jaw.. Even with the longest extension I didn't have enough threads left to pull off the pulley.
That was the second time I tried to replace it and failed.
Can't you just put it in 4th and tighten down the crank bolt?
That was the second time I tried to replace it and failed.
Can't you just put it in 4th and tighten down the crank bolt?
08-26-2012, 02:51 AM
#11
TECH Enthusiast
iTrader: (13)

Join Date: Sep 2007
Location: SC
Posts: 666
Likes: 0
Received 0 Likes
on
0 Posts

I have no idea what a "flywheel holder tool" is, and why you used an angle wrench to torque the balancer bolt.
I found it impossible to get the hub over the crank via heat alone. During my installation last month, I heated my SuperDamper hub to 500 F for two hours to try to get it to fit over the LS2 crank snout. Twice. Didn't help in the slightest. You absolutely need an installer tool to get the thing started.
I found it impossible to get the hub over the crank via heat alone. During my installation last month, I heated my SuperDamper hub to 500 F for two hours to try to get it to fit over the LS2 crank snout. Twice. Didn't help in the slightest. You absolutely need an installer tool to get the thing started.
ATI hubs are more of an interference fit I think. They're machined to fit TIGHT! Measure the inner diameter of it vs the stock crank pulley, and you'll see what I'm talking about.
08-27-2012, 01:40 AM
#12
TECH Apprentice
iTrader: (4)
Join Date: Feb 2006
Location: Md.
Posts: 398
Likes: 0
Received 0 Likes
on
0 Posts
So, will this work? Saw in on fleabay....
http://www.ebay.com/itm/370642121809...84.m1423.l2649
ps:also the 9bolts on the front face MUST have blue loctite on them..An installer did mine and now over half of them broke or came out doing about 15 dyno pulls.. I still haven't got around to pulling it off yet...
http://www.ebay.com/itm/370642121809...84.m1423.l2649
ps:also the 9bolts on the front face MUST have blue loctite on them..An installer did mine and now over half of them broke or came out doing about 15 dyno pulls.. I still haven't got around to pulling it off yet...
Last edited by GREG O.; 08-27-2012 at 01:46 AM.
08-27-2012, 02:31 AM
#13
TECH Enthusiast
iTrader: (13)
Join Date: Sep 2007
Location: SC
Posts: 666
Likes: 0
Received 0 Likes
on
0 Posts
Ideally this is what you want. The stud that you listed Greg O. works with this kit to install the balancer. There are other ways, but I found it easiest using the tool they designed for it. If I was back in the states, I'd definitely rent it out to all who needed it, for a small fee.
http://www.ebay.com/itm/ATI-Damper-P...ht_1598wt_1037
Also, one of the guys (he works on racecars...like classic McLaren V12 racecars) on my other forum did his this way when putting an LS7 in his Caprice Wagon.
http://www.ebay.com/itm/ATI-Damper-P...ht_1598wt_1037
Also, one of the guys (he works on racecars...like classic McLaren V12 racecars) on my other forum did his this way when putting an LS7 in his Caprice Wagon.
08-27-2012, 07:46 AM
#14
I just did this, and used a 3 jaw puller. It worked perfectly. Get a longer bolt though.
Fastenal: M16 X 2.0 pitch x 120 mm long. It makes the install SOOOOO much easier.
Fastenal: M16 X 2.0 pitch x 120 mm long. It makes the install SOOOOO much easier.
08-27-2012, 06:37 PM
#15
Well guys, I'm stumped. I spent all day just trying to get the damn pulley off. I broke the end of the arm of a rented autozone puller, then with another one i had trouble getting a good grip and it would slip off. Then I rented a 5-ton puller, but there was not room for the big hands inside the pulley, so i put them around the outside. All I succeeded in doing was separating the outer ring from the inner ring. It's actually pulled out a half inch more on one side than the other:
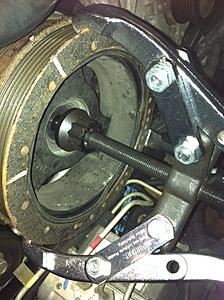
So, what are my options. Can you guys recommend an awesome quality puller that will get the job done? I am done with this autozone crap.

So, what are my options. Can you guys recommend an awesome quality puller that will get the job done? I am done with this autozone crap.
08-28-2012, 11:17 AM
#16

I never go for the outer lip, and hook through the spokes.
http://www.trafficjams.ca/Performanc...all/Main45.JPG
works everytime, very fast, easy.
use an extension drive and put in crank (bottom out in the crank snout) and push as indicated in picture. I never push on a threaded bolt either... when an extension works very slick. Also means you can do the remove in one go.. rather than undoing the setup, un-threading a bit, then move crank pulley, then un-threading some more etc.
when done, I use a longer crank bolt (dont have pn here - but Lolly has the info probably is the same?) and just press on... eventually will bottom out, then switch to your new GM bolt with loctite. (or ARP) - Done.
Last edited by vmapper; 08-28-2012 at 11:28 AM.
08-28-2012, 11:24 AM
#17
I never go for the outer lip, and hook through the spokes. (claws inward)
http://www.trafficjams.ca/Performanc...all/Main45.JPG
works everytime, very fast, easy.
use an extension drive and put in crank (bottom out in the crank snout) and push as indicated in picture. I never push on a threaded bolt either... when an extension works very slick.
when done, I use a longer crank bolt (dont have pn here) and just press on... eventually will bottom out, then switch to your new GM bolt with loctite. (or ARP) - Done.
here's what it looks like:
 08-28-2012, 11:26 AM
#18
Also, pushing on the socket extension prevents any slipping off the bolt head if your using that method.
The above may work, 60+ bucks though.. ouch. - I prefer to use the socket extension way, it works in the same way as the above pic.
Good luck either way!
The above may work, 60+ bucks though.. ouch. - I prefer to use the socket extension way, it works in the same way as the above pic.
Good luck either way!
08-28-2012, 11:31 AM
#19
with the 5-ton puller, i was pushing off the ARP bolt, which is deeply concave and doesn't let the bolt run around-- almost like it was designed for just this use.
i already broke a couple of rented kits. it was either this or pay 1K to have a mechanic do it.
i don't have much experience, so i need tools that will work with minimal macgyvering
08-28-2012, 12:01 PM
#20
you mean, pushing off the socket extension, with the socket extension braced against the crank snout? i tried that approach with the smaller, 2-ton 3-jaw puller, and it worked OK. --the issue there was that the autuzone 3-jaw puller teeth bent backwards and just few out.
with the 5-ton puller, i was pushing off the ARP bolt, which is deeply concave and doesn't let the bolt run around-- almost like it was designed for just this use.
i already broke a couple of rented kits. it was either this or pay 1K to have a mechanic do it.
i don't have much experience, so i need tools that will work with minimal macgyvering
Ive done this way, a good dozen times, never had an issue. The puller bolt sits IN the 1/2" drive where the socket would attach to. The socket extension is IN the crank. Its exactly the same as your purchased image above...
Not really mcgyver... hope that makes sense