
 05-18-2016, 01:45 PM
Last edit by: IB Advertising
See related guides and technical advice from our community experts:
Browse all: Exterior Guides
- Chevrolet Camaro 2010-2015: How to Plasti-Dip Your Rims
Step by step instructions for do-it-yourself repairs
Browse all: Exterior Guides

DIY Plastidip
04-28-2014, 03:36 PM
#1
Teching In
Thread Starter
Join Date: Feb 2014
Location: Bay Area
Posts: 44
Likes: 0
Received 0 Likes
on
0 Posts
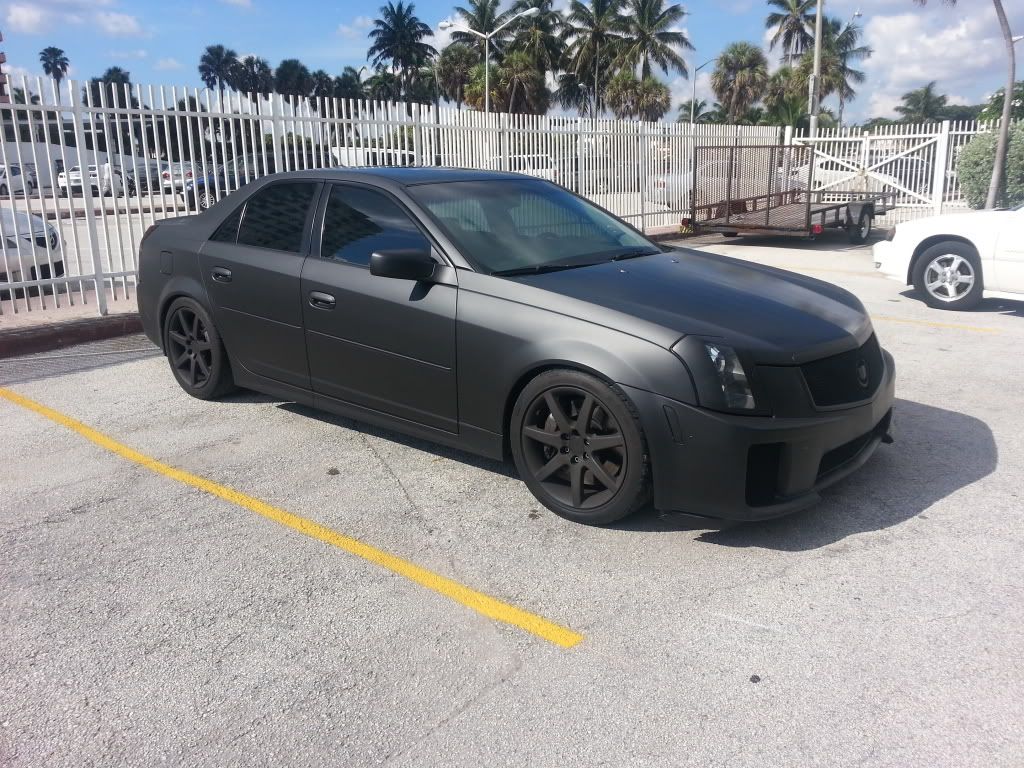
I decided to dip my car this weekend. Decision being that the paint wasn't very good. The trunk had clear coat sun damage. The front bumper and rear was replaced due to an accident. The front wasn't painted well and paint chipped off it really easily. The rear bumper was a shade too light in color.
Here's a write up on how I did it. I did NOT order the kit from dipyourcar because they won't sell gallons of dip to CA Residents.
I instead bought 18 rattle cans of Plasti-Dip from two different Lowes. I got them 5.98 each. Price varies from location to location I think. I also ordered in bulk 18 cans from Home Depot but they didn't arrive in time for the weekend, so I'll end up getting them returned. I would recommend ordering online if you can wait.
Materials:
18+ Cans of Plasti-Dip, color of your choice. ( I would get more than 18, I left some areas thinly covered and I would go over later on. CTS-Vs are big cars with large surface areas)
Masking Tape
Newspapers / Large Trashbags / Small Bags
Sharp Razor Blade
Microfiber Cloth
Optional: Handle Grip for Rattle Cans - my fingers hurt bad and I alternated between the handle and nozzles
Hot Water / Heat Gun - to warm up the spray cans
Goo Gone - helps with cleaning overspray
Steps:
Before everything, make sure your car is clean. I had not washed my car for like 2 weeks. I went on two 600 mile round trip road trips and my car was filthy. It rained the day before I did this, and it cleaned the car a bit. I took my car through a $6 car wash and then wiped it down the best I could. That's all the prep work I did.
You CAN spray it over a waxed car if you're concerned about protecting the factory paint. Last I waxed my car was a few months ago so I'm not sure if I even have any on the car still.
Best place to do it is in a garage. I had to do it outside in the back yard of a friend's house. No wind, calm night, 50 degrees. Not too bad. Moisture DID condense on the car, and I wiped it off when the coat was dry before continuing. Some bugs and dust did get on it too, but I wiped it off.
1. Masking - 1.5 Hours
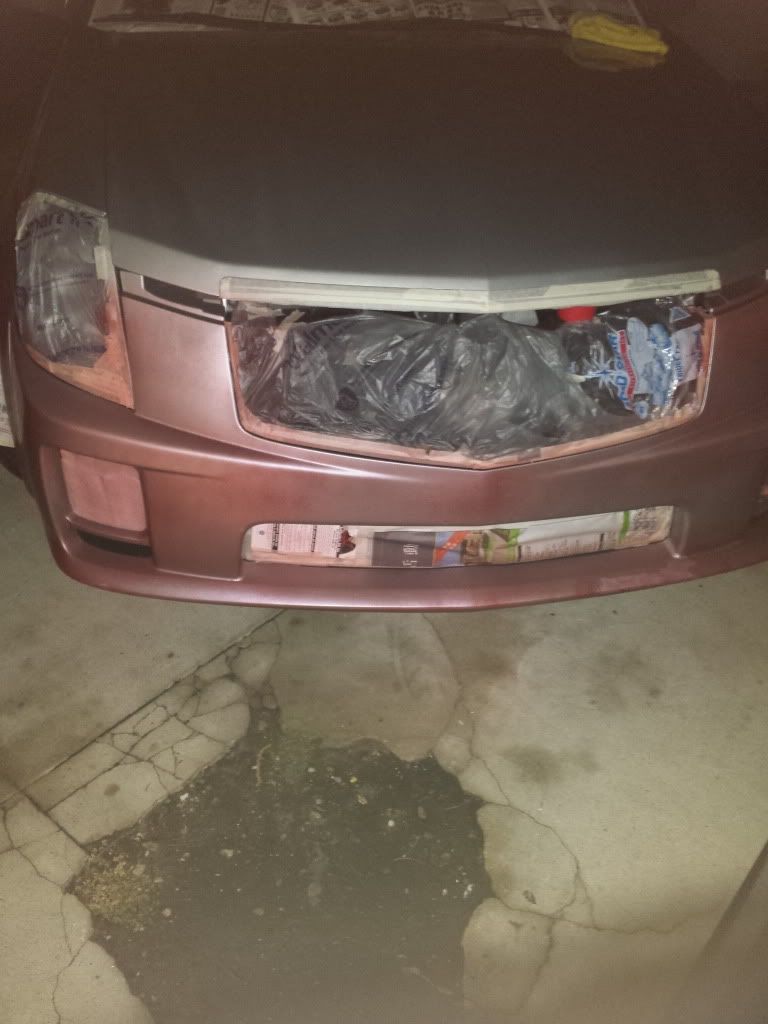
Mask off the car as if you were painting it. If you watch some dip vids on YT, they give you a good idea of how to mask for dip because of the nature of the dip peeling off instead of paint breaking off.
Here's some advice I have just for the V. For the front and back windows, mask up to the glass. Where the roof meets glass, there is a rubber seal. You don't have to mask that. Reason being that where the roof meets glass, there's a curve to the roof. If you mask up to the rubber seal and when you spray, the masking tape can deform and sort of bubble up and get in the way of you spraying onto that sharp curved portion that goes into the glass.
For around the mirrors, it may seem a pain to mask because of the triangle and rubber area, but if you find a screwdriver or just use your fingers and softly push the rubber around the mirror, you can see it creates a gap between the two. Slide in the masking tape in the gap so the tape is under the mirror.
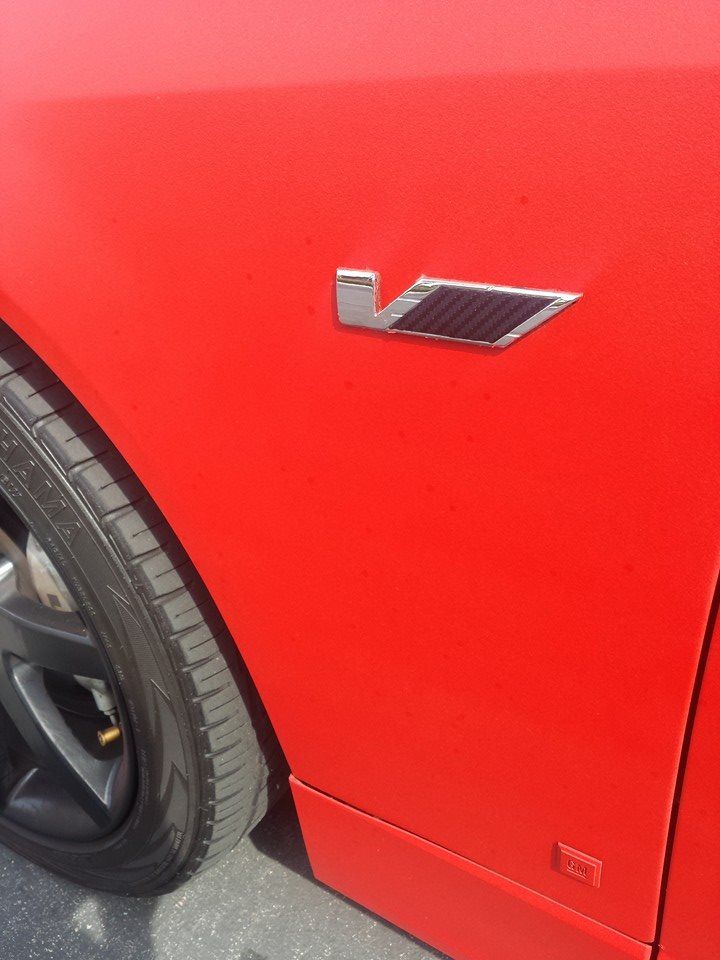
Don't have to mask any logos unless they're dipped or vinyl wrapped like mine. Peel them off later.
You can choose to mask your lights / markers or not. I masked mine because my tails and side markers were smoked dipped and my headlights had scratches on them and I wasn't sure if the dip would stay in the scratches.
If you had a friend to help, it would be lots quicker. Took me 1.5 hrs
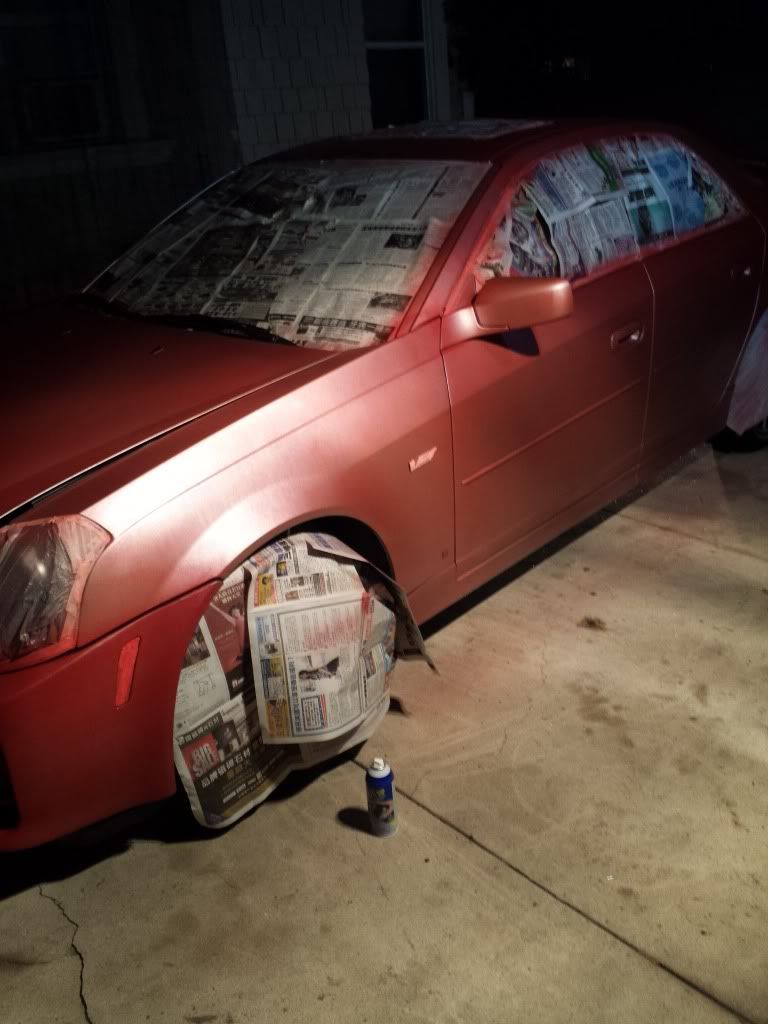
2. Spraying - 6-8 Hours
Shake the can up well. The can also sprays better when warm, so I took a heat gun to mine for about 20-30 seconds each time while shaking it up too.
Note: The nozzles in the can do clog up and it will start "spitting." When this occurs, flip the can upside down and spray it until it begins to spray a fine mist like before to clear the can. What I also did was just keep swapping tips from a good can or whatever. Some new tips spray bad as well. Test on something else first!
So, anyway here's the process.
Initially, spray about 6 inches away. Anything more, you'll have textured finish. Anything more and it WILL blotch up.
A. 1 Light Coat on the WHOLE car. It should appear as if the car is dusty.
Wait 5 minutes
B. Another LIGHT coat ALL over the whole car.
It is imperative you start light, otherwise you will have a very uneven finish throughout. You should've used up 2 cans or so for the first two light coats.
After the first 2 coats, you then will start working on the car, one panel at a time. This is the order I went: Front Bumper, Hood, Fender, Door, Rear Door, Roof, Quarter, Back Bumper, (Other Side) Quarter, Back Door , Front Door, Fender. By the time you arrive back at the panel you started from, the coat should be dry, if not almost. Still wait 5-10 minutes before continuing.
C. Start building up the coats. You can progressively add more spray each coat. Light to Medium to Somewhat heavy. Still try to maintain a distance of 6" The dip should gradually build into a solid color. Patience is key. If you hurry and if you mess up, its hard to fix.
I lost track of how many coats I had. But I used up all 18 cans, but my roof and hood was still not covered well enough.
Things to note while spraying:
Side Mirror: It's hard to get the area between the mirror and A pillar. I would do it from inside the car another time with the windows down.
Where the A pillar recedes into the front fender, spray from the inside over the windshield.
Make sure you get some dip under the front bumper lip and the back as well. Those areas are easily missed and forgotten.
Sometimes the inevitable happens and the nozzle does happen to "spit" a bubble or two on the car. Don't panic. Take a piece of CLEAN paper. Fold it to create a stiff edge. Then lightly "brush" the bubble up and down to spread it flat. Do it too hard and you risk taking the lower coats off. Your additional coats can help hide the mistake. Also once it cures, it flattens out completely, but only if you flatten it with the paper.
Once again patience is key. I worked throughout the night into the morning for this...
3. Unmasking and Cleaning - 1 hour
Unmasking is pretty straight forward. Just of places where the plastidip from the car sticks onto the masking tape / material. Like the window rubber at the door. Take your razor blade and slide it under the rubber to cut the dip from the trim and masking material. Do this everywhere you see the dip from the car is sticking onto the masking material. Cut it. Otherwise, you will take off the dip from the car too. Patience is key here as well. Unmask everything slowly to watch for accidental peeling from the body.
If there is overspray, take your microfiber cloth and RUB hard. Places like rubber molding, glass, antenna, glass squirter, cowl panel, it should come off. If not apply some Goo Gone to assist with removal.
-------------------------------------
Patience and hard work pays off. . Took me 8 hours. No texture. I rushed a bit unmasking so the edges aren't perfect in places. I'm going to go over the edges, roof and hood another weekend when I have the time.
Initial coats should look like this:
Then eventually:

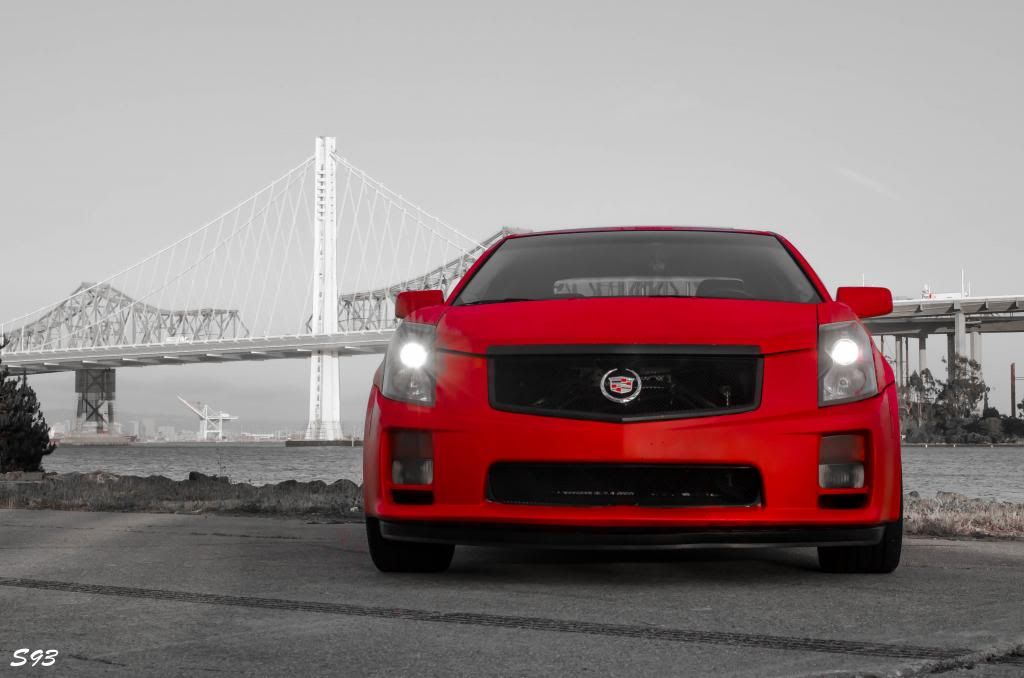
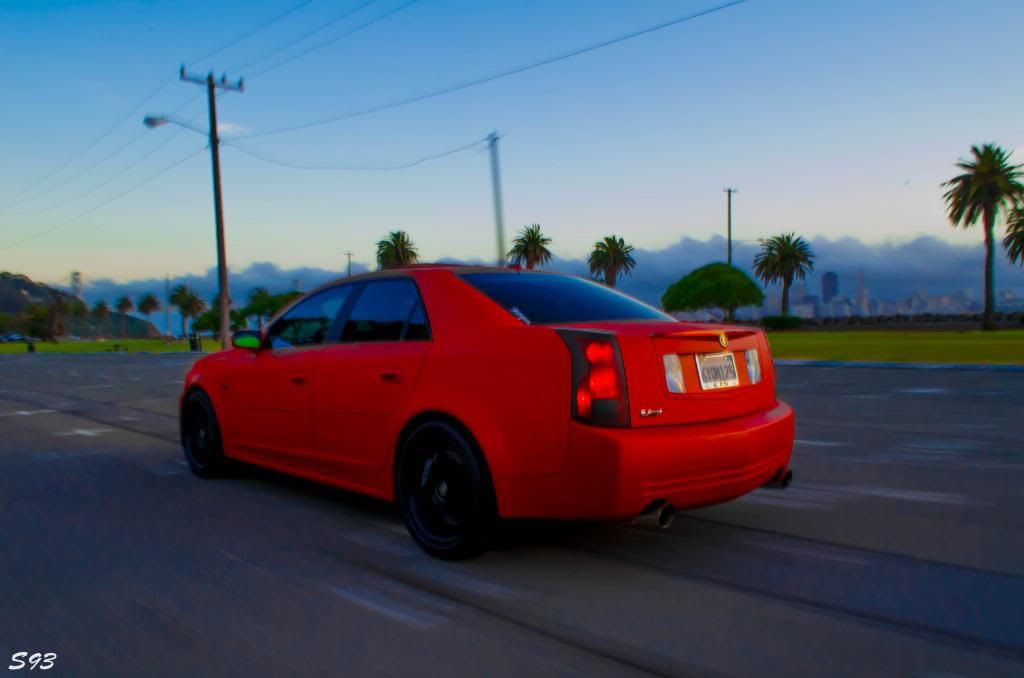
Here's how the Matte Red turned out for me.
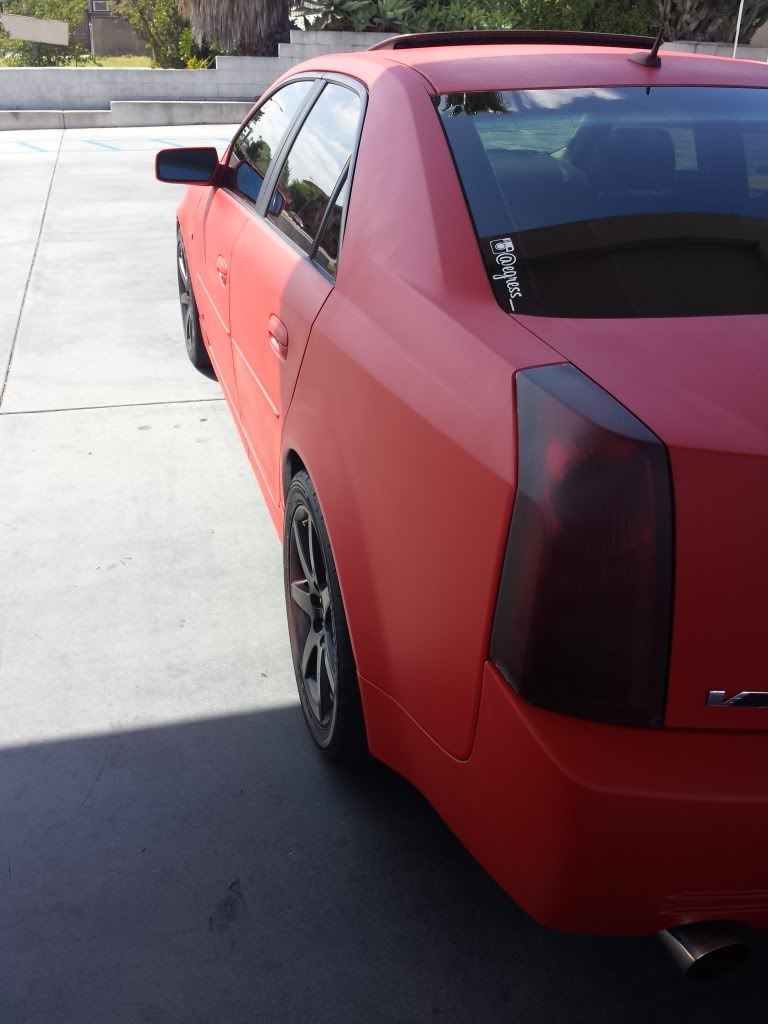
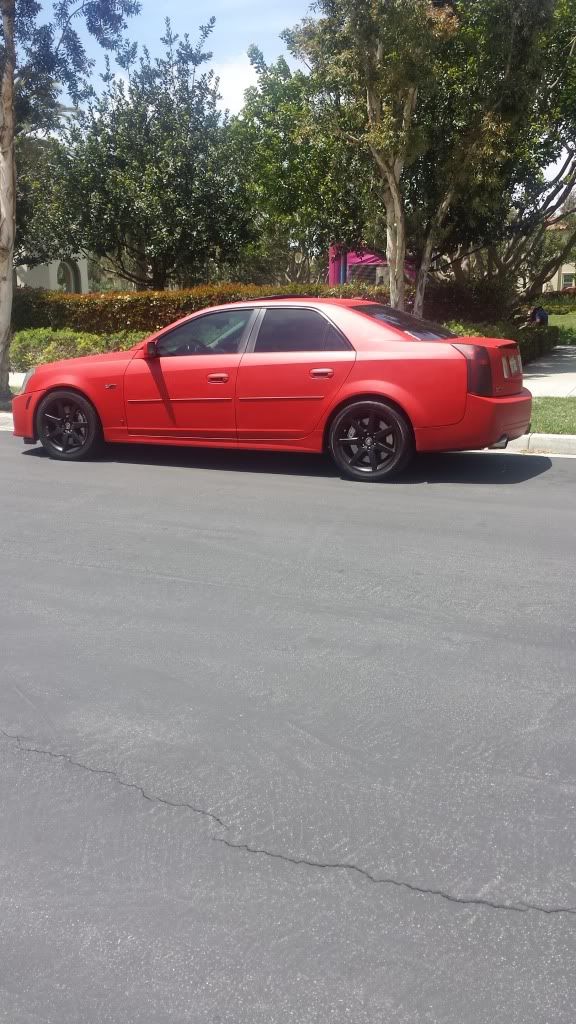
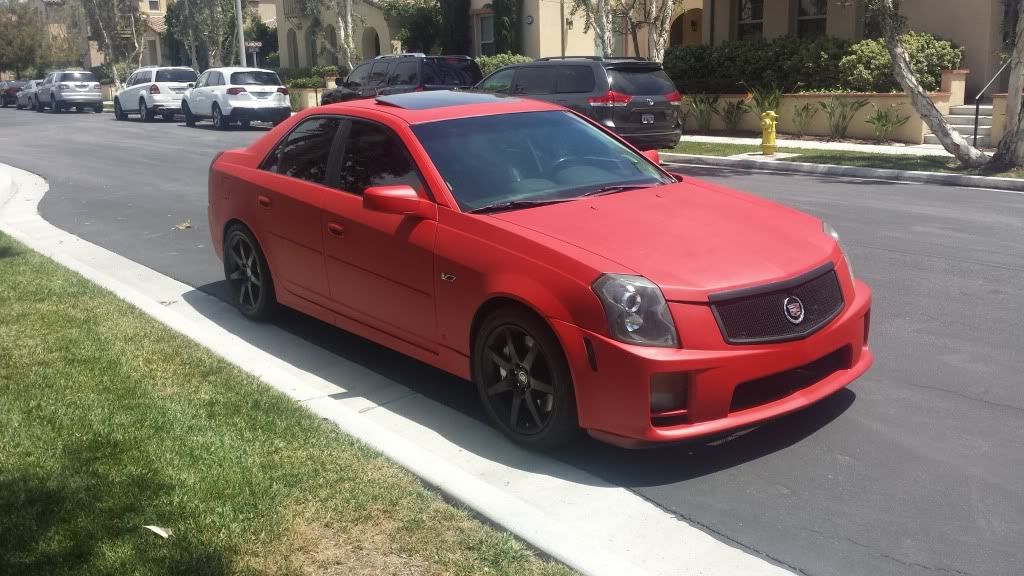
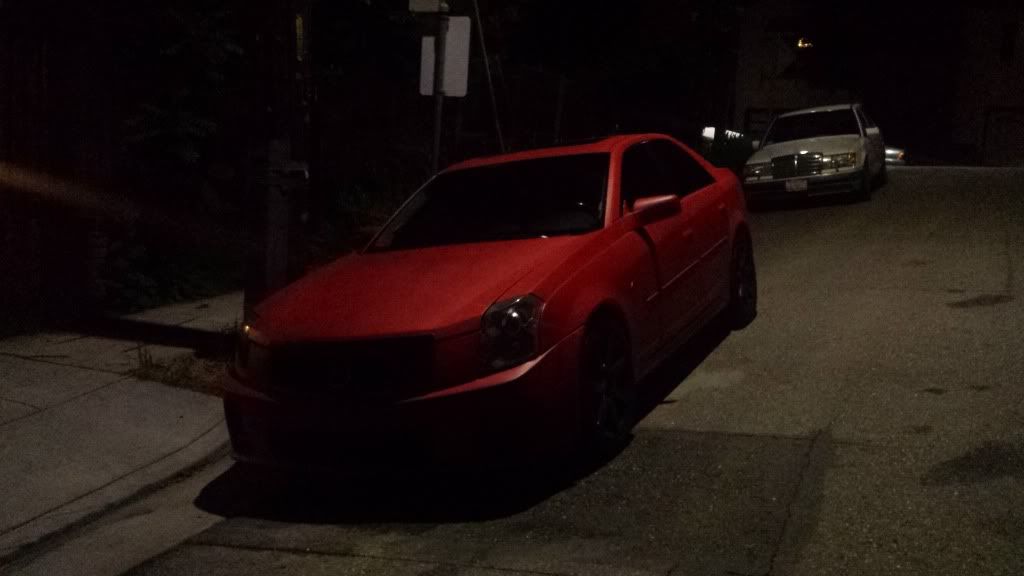
Nice and smooth. No texturing. Those are just dirty spots.
Costed me ~ $150 and 8 hours. Worth it in my time.
Or you could spend more money on the Pro Kit and do it the "right" way, but I'll just leave this here for those interested in doing it the rattlecan way.

Here's a write up on how I did it. I did NOT order the kit from dipyourcar because they won't sell gallons of dip to CA Residents.
I instead bought 18 rattle cans of Plasti-Dip from two different Lowes. I got them 5.98 each. Price varies from location to location I think. I also ordered in bulk 18 cans from Home Depot but they didn't arrive in time for the weekend, so I'll end up getting them returned. I would recommend ordering online if you can wait.
Materials:
18+ Cans of Plasti-Dip, color of your choice. ( I would get more than 18, I left some areas thinly covered and I would go over later on. CTS-Vs are big cars with large surface areas)
Masking Tape
Newspapers / Large Trashbags / Small Bags
Sharp Razor Blade
Microfiber Cloth
Optional: Handle Grip for Rattle Cans - my fingers hurt bad and I alternated between the handle and nozzles
Hot Water / Heat Gun - to warm up the spray cans
Goo Gone - helps with cleaning overspray
Steps:
Before everything, make sure your car is clean. I had not washed my car for like 2 weeks. I went on two 600 mile round trip road trips and my car was filthy. It rained the day before I did this, and it cleaned the car a bit. I took my car through a $6 car wash and then wiped it down the best I could. That's all the prep work I did.
You CAN spray it over a waxed car if you're concerned about protecting the factory paint. Last I waxed my car was a few months ago so I'm not sure if I even have any on the car still.
Best place to do it is in a garage. I had to do it outside in the back yard of a friend's house. No wind, calm night, 50 degrees. Not too bad. Moisture DID condense on the car, and I wiped it off when the coat was dry before continuing. Some bugs and dust did get on it too, but I wiped it off.
1. Masking - 1.5 Hours
Mask off the car as if you were painting it. If you watch some dip vids on YT, they give you a good idea of how to mask for dip because of the nature of the dip peeling off instead of paint breaking off.
Here's some advice I have just for the V. For the front and back windows, mask up to the glass. Where the roof meets glass, there is a rubber seal. You don't have to mask that. Reason being that where the roof meets glass, there's a curve to the roof. If you mask up to the rubber seal and when you spray, the masking tape can deform and sort of bubble up and get in the way of you spraying onto that sharp curved portion that goes into the glass.
For around the mirrors, it may seem a pain to mask because of the triangle and rubber area, but if you find a screwdriver or just use your fingers and softly push the rubber around the mirror, you can see it creates a gap between the two. Slide in the masking tape in the gap so the tape is under the mirror.
Don't have to mask any logos unless they're dipped or vinyl wrapped like mine. Peel them off later.
You can choose to mask your lights / markers or not. I masked mine because my tails and side markers were smoked dipped and my headlights had scratches on them and I wasn't sure if the dip would stay in the scratches.
If you had a friend to help, it would be lots quicker. Took me 1.5 hrs
2. Spraying - 6-8 Hours
Shake the can up well. The can also sprays better when warm, so I took a heat gun to mine for about 20-30 seconds each time while shaking it up too.
Note: The nozzles in the can do clog up and it will start "spitting." When this occurs, flip the can upside down and spray it until it begins to spray a fine mist like before to clear the can. What I also did was just keep swapping tips from a good can or whatever. Some new tips spray bad as well. Test on something else first!
So, anyway here's the process.
Initially, spray about 6 inches away. Anything more, you'll have textured finish. Anything more and it WILL blotch up.
A. 1 Light Coat on the WHOLE car. It should appear as if the car is dusty.
Wait 5 minutes
B. Another LIGHT coat ALL over the whole car.
It is imperative you start light, otherwise you will have a very uneven finish throughout. You should've used up 2 cans or so for the first two light coats.
After the first 2 coats, you then will start working on the car, one panel at a time. This is the order I went: Front Bumper, Hood, Fender, Door, Rear Door, Roof, Quarter, Back Bumper, (Other Side) Quarter, Back Door , Front Door, Fender. By the time you arrive back at the panel you started from, the coat should be dry, if not almost. Still wait 5-10 minutes before continuing.
C. Start building up the coats. You can progressively add more spray each coat. Light to Medium to Somewhat heavy. Still try to maintain a distance of 6" The dip should gradually build into a solid color. Patience is key. If you hurry and if you mess up, its hard to fix.
I lost track of how many coats I had. But I used up all 18 cans, but my roof and hood was still not covered well enough.
Things to note while spraying:
Side Mirror: It's hard to get the area between the mirror and A pillar. I would do it from inside the car another time with the windows down.
Where the A pillar recedes into the front fender, spray from the inside over the windshield.
Make sure you get some dip under the front bumper lip and the back as well. Those areas are easily missed and forgotten.
Sometimes the inevitable happens and the nozzle does happen to "spit" a bubble or two on the car. Don't panic. Take a piece of CLEAN paper. Fold it to create a stiff edge. Then lightly "brush" the bubble up and down to spread it flat. Do it too hard and you risk taking the lower coats off. Your additional coats can help hide the mistake. Also once it cures, it flattens out completely, but only if you flatten it with the paper.
Once again patience is key. I worked throughout the night into the morning for this...
3. Unmasking and Cleaning - 1 hour
Unmasking is pretty straight forward. Just of places where the plastidip from the car sticks onto the masking tape / material. Like the window rubber at the door. Take your razor blade and slide it under the rubber to cut the dip from the trim and masking material. Do this everywhere you see the dip from the car is sticking onto the masking material. Cut it. Otherwise, you will take off the dip from the car too. Patience is key here as well. Unmask everything slowly to watch for accidental peeling from the body.
If there is overspray, take your microfiber cloth and RUB hard. Places like rubber molding, glass, antenna, glass squirter, cowl panel, it should come off. If not apply some Goo Gone to assist with removal.
-------------------------------------
Patience and hard work pays off. . Took me 8 hours. No texture. I rushed a bit unmasking so the edges aren't perfect in places. I'm going to go over the edges, roof and hood another weekend when I have the time.
Initial coats should look like this:

Then eventually:


Here's how the Matte Red turned out for me.


Nice and smooth. No texturing. Those are just dirty spots.

Costed me ~ $150 and 8 hours. Worth it in my time.
Or you could spend more money on the Pro Kit and do it the "right" way, but I'll just leave this here for those interested in doing it the rattlecan way.
 04-28-2014, 04:06 PM
#3
Teching In

Join Date: Sep 2013
Location: Houston
Posts: 40
Likes: 0
Received 0 Likes
on
0 Posts
Hey man, nice write up. Good info for those willing to do this.
Did you put any clear on top to kind of seal in the plastidip or is that step even necessary? I did 2-3 clear coats the second time I did my wheels black and it seems to be holding on better.
It's kind of interesting to see that shade of red on the V (or CTS in general) and looks pretty cool with the blacked out stuff.
04-28-2014, 04:12 PM
#4
Teching In
Thread Starter
Join Date: Feb 2014
Location: Bay Area
Posts: 44
Likes: 0
Received 0 Likes
on
0 Posts
Hey man, nice write up. Good info for those willing to do this.
Did you put any clear on top to kind of seal in the plastidip or is that step even necessary? I did 2-3 clear coats the second time I did my wheels black and it seems to be holding on better.
It's kind of interesting to see that shade of red on the V (or CTS in general) and looks pretty cool with the blacked out stuff.
Did you put any clear on top to kind of seal in the plastidip or is that step even necessary? I did 2-3 clear coats the second time I did my wheels black and it seems to be holding on better.
It's kind of interesting to see that shade of red on the V (or CTS in general) and looks pretty cool with the blacked out stuff.
No clear. Makes it harder to peel off. It should last a few years. I don't plan on keeping it red forever anyways. Wheels with clear is better because it does last longer and wheels are more subject to being rashed and stuff.
 04-28-2014, 07:04 PM
#5

Thats mine. I did it with the spray gun they sell, only took about 3 hours. Your crazy doing it with rattle cans, your index finger must be huge now! Lol. I like the red too, other cars ive seen attempt the red ended up coming out kind of pinkish.
Edit: just read u cant buy gallons in CA. Definitely came out great for the cans!

Trending Topics


 04-30-2014, 08:56 AM
#10
Teching In
Join Date: Sep 2013
Location: Houston
Posts: 40
Likes: 0
Received 0 Likes
on
0 Posts
Too much black or too much awesome? To each his own.
I've seen that combo before and it looked pretty cool on cars that had other items like side markers, fogs, and wheels black out too.
It'll definitely make the crome border and crest pop. At least it's cheap and reversible if you don't like it.
I've seen that combo before and it looked pretty cool on cars that had other items like side markers, fogs, and wheels black out too.
It'll definitely make the crome border and crest pop. At least it's cheap and reversible if you don't like it.


 05-01-2014, 04:21 AM
#15
On The Tree
Join Date: Apr 2014
Posts: 107
Likes: 0
Received 0 Likes
on
0 Posts
Too much black or too much awesome? To each his own.
I've seen that combo before and it looked pretty cool on cars that had other items like side markers, fogs, and wheels black out too.
It'll definitely make the crome border and crest pop. At least it's cheap and reversible if you don't like it.
I've seen that combo before and it looked pretty cool on cars that had other items like side markers, fogs, and wheels black out too.
It'll definitely make the crome border and crest pop. At least it's cheap and reversible if you don't like it.
 05-01-2014, 07:07 AM
#17
great thread OP, I thought i would hate flat red but i like it. Anyone mess around with the "Glossifier" for plastidip??
White V1s looks killer. platidip looks great from 10 feet but getting up close and personal with it reveals defects.
White V1s looks killer. platidip looks great from 10 feet but getting up close and personal with it reveals defects.
05-05-2014, 12:27 AM
#20
Teching In
Thread Starter
Join Date: Feb 2014
Location: Bay Area
Posts: 44
Likes: 0
Received 0 Likes
on
0 Posts
Nice dipped bikes and and Vs! Each to their own. Some people love it. Some people hate it. But it's your car and you can do what you want to it. Though I must admit it is ghetto as hell to rattle can...
The coats I have are too thin. I don't have time to go over it again actually. I think I'll take it to a shop to matte black over the red to get a consistent coat when I get tired of the red.
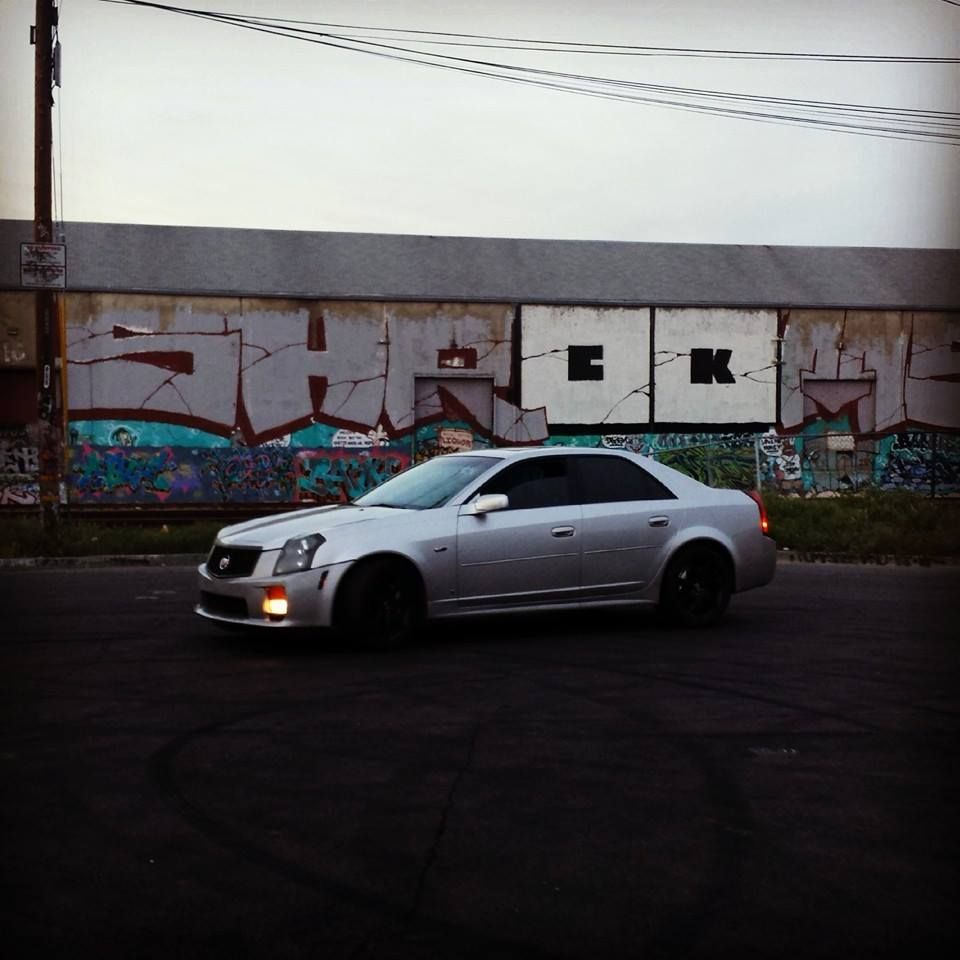
Got a chance to meet up with a local photographer (@s93photography on Instagram) and snag some action shots!


The coats I have are too thin. I don't have time to go over it again actually. I think I'll take it to a shop to matte black over the red to get a consistent coat when I get tired of the red.
Got a chance to meet up with a local photographer (@s93photography on Instagram) and snag some action shots!


