Waking up my 2000 Z28, I hope
 02-19-2012, 02:28 PM
#1
On The Tree
Thread Starter
Join Date: Aug 2011
Location: Fitchburg, MA
Posts: 105
Likes: 0
Received 0 Likes
on
0 Posts

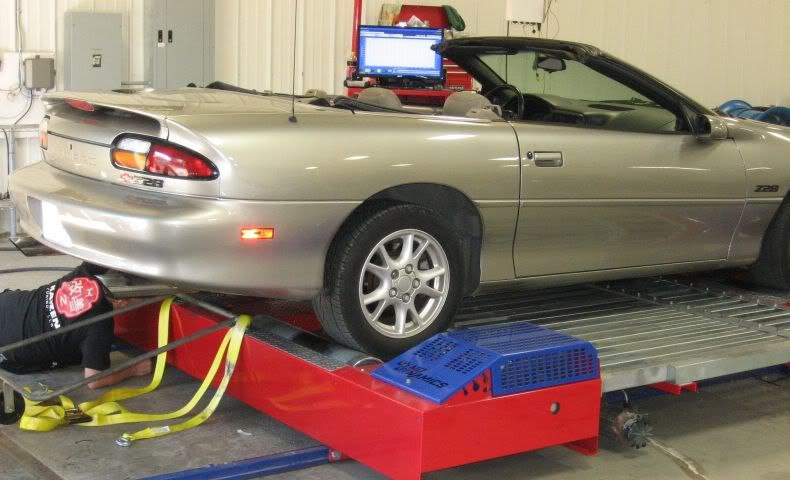
OK, so I bought a 2000 Z28 convertible this past Summer in an attempt to replace the motorcycles I’ll no longer ride after a horrendous dismount a few years back. The car was stone stock other than a horrible set of weld-on megaphone tips that were 6” off center, and reasonably fun (I had an ’01 Z28 t-top car as a DD for a couple of years, so I knew what I was getting) to wheel around, but, let’s be honest, these cars don’t have a ton of power. We pulled her on the dyno, and with a little tune, she laid down 276RWHP.
Since the car is a convertible and is just a cruise night toy, I figured that 400RWHP or thereabouts and a nasty idle attitude was all I needed to put a smile on my face. To this end, my compadres Jason, Scott, and I talked things over and decided that ported stock heads and a fairly aggressive cam paired with the typical bolt-ons (headers, ORY, free-flowing 1-into-2 cat back, lid, 85mm MAF) should get me where I want to be.
Before getting started on the "serious" work, it was time to attack the easy stuff.
The lid and MAF, obviously, don’t require a ton of explanation. First, we removed the AIR system from the car to unclutter the engine compartment some; be aware that the screws attaching the AIR flanges to the exhaust manifold are too long to use with many eBay block-off plates. We needed to put a couple of thick washers (maybe .12-.150” total thickness) under the screw heads to get a good seal.
The only other major pain is the vacuum connection at the back of the intake manifold; I wish we had already decided to pull the engine before we did this step, because it would’ve taken [5] seconds with the engine out instead of [10] minutes with my eyes closed laying across the engine trying to “see” with my fingers.
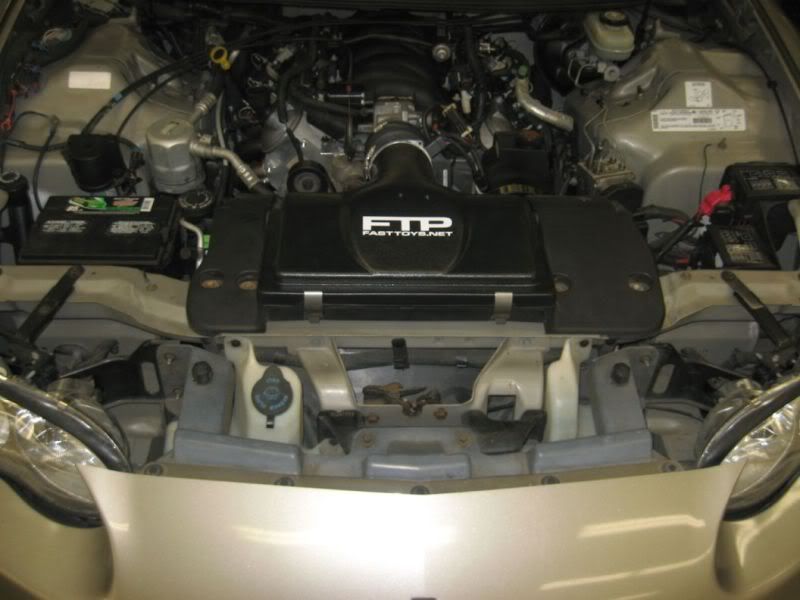
Next, we installed the Fast Toys 98mm lid and the Delco 85mm MAF and used the Fast Toys two-into-one wiring harness to convert the stock separate IAT and MAF connectors to work with the single connector on the new MAF. Scott is a PCM wiz, so after he handled the necessary computer work, the car fired right up.
The last operation at this step was to pull the DynoMAX cat-back out of Scott’s ’02 T/A and put it in my car in place of the stock setup and horrible tips. Scott’s car then got the Kook’s true dual system, which sounds fantastic but is too rich for my blood right now.
Dyno pulls are hard on a car, so I elected not to make another at this point, but I would guess that we’re running 10hp stronger for sure.
So, after the easy stuff was out of the way, the next step was the head work and camshaft.
I poked around here a lot, looked on some other forums, and asked around on a couple of CNC machining forums (which is what I do for a living, so I had some ideas on where to look) about who did high-quality CNC porting of stock GM heads. The name that kept coming back was Advanced Induction.
I went to their website, checked out some pricing, and decided that I liked what I saw; after talking to Ron and Phil down there a bit, I was even more convinced that I was heading in the right direction. I decided that I would send my 853s (yes, shocking I know) down for the full CNC package along with new seals and some PSI beehive springs to handle the lift of a new cam.
Ah, the cam; is there any component more misunderstood and more often improperly spec’d than a camshaft? I don’t think so. I had no experience with fuel injected or computer controlled cars to this point, so I really felt in the dark ages on camshaft technology.
I had a lot of discussions with a lot of players in the cam world (thanks to Comp Cams, Texas Speed, Thunder Racing, and Advanced Induction for tolerating all of my dumbass questions) and was about 99% set on a TSP 228R on a 110LSA because the numbers looked right, those guys are cool, and there is an absolutely badass video on YouTube of a car with that stick in it, BUT then I thought about the whole heads / cam / pushrods /piston-to-valve deal and decided to go with an AI cam instead.
My apologies to Texas Speed, you guys are great and seem to have a good product, but I went for the safe option (in my mind) by sticking with Advanced Induction for the whole deal.
So now the time had come to get the heads off and cam out of the car, tear out the remaining factory exhaust, and replace the not-so-stout clutch (had some excess slippage, you’ll see why if you keep reading) with a factory LS7 setup; the question was, how?
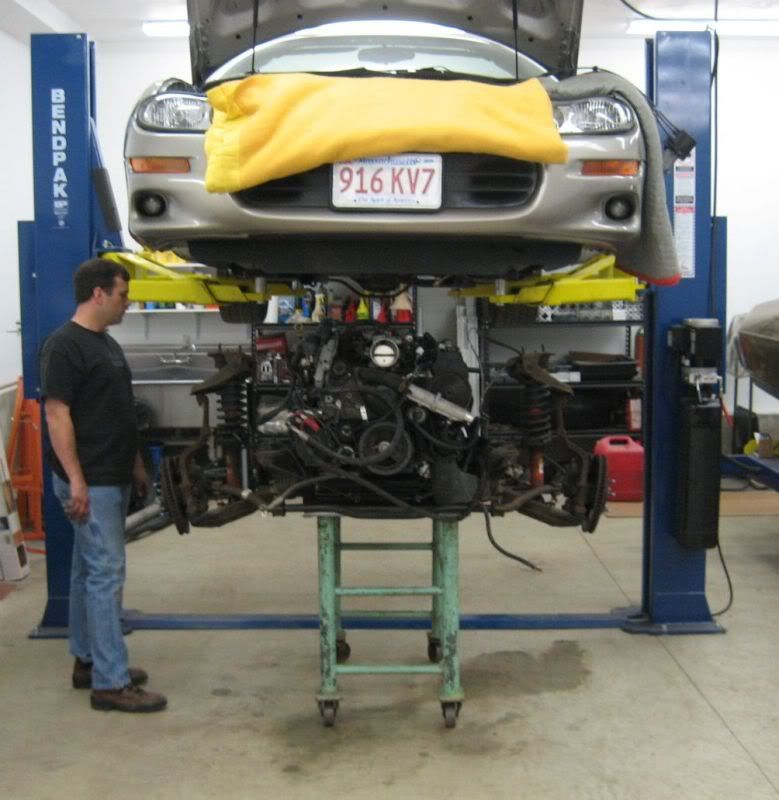
I knew that we could do the work with the engine in the car, but I didn’t want to deal with that because I am 6’6” and my back hurts just thinking about it. I knew we could take the engine out through the hood opening if we were REALLY determined, because I had talked with some guys who have done it. I didn’t know much about “dropping the cradle” but my buddy Jason had done a little research and thought it might be a good way to go.
In the end, since my friend Scott has (in my best Jeff Spicoli voice) the ULTIMATE garage, with a 2-post frame lift and a 4-post, plus tools and parts galore, and my buddy Jason had seen some positive stories regarding the removal of F-body engines and transmissions from the underside of the car, we figured that we’d take a shot at it.
We found lots of info on the ‘net about it, but the video and website linked below were very good to us. If the link to the website doesn’t work, I have a Word document with the contents of it; shoot me an email and it is yours.
www.keliente.com/engine.htm
Ctrl and click below link to launch video:
http://bowlingss.com/DownLoads/Video...20_removal.avi
I am not going to rehash the whole process here, but there are some things we made, some things we did, some problems we had, that you may be interested in.
Some concerns we had, before starting, were: how to best hold the trans and engine up at a reasonable height to work on after we got it out of the car, how to guide the car back down onto the cradle when lowering the car back down, how to align the subframe back on the car the way it came out, what to do about keeping the brake system in the car relatively air free while it was apart, and how to move the car around Scott’s garage with the steering disconnected and no engine.
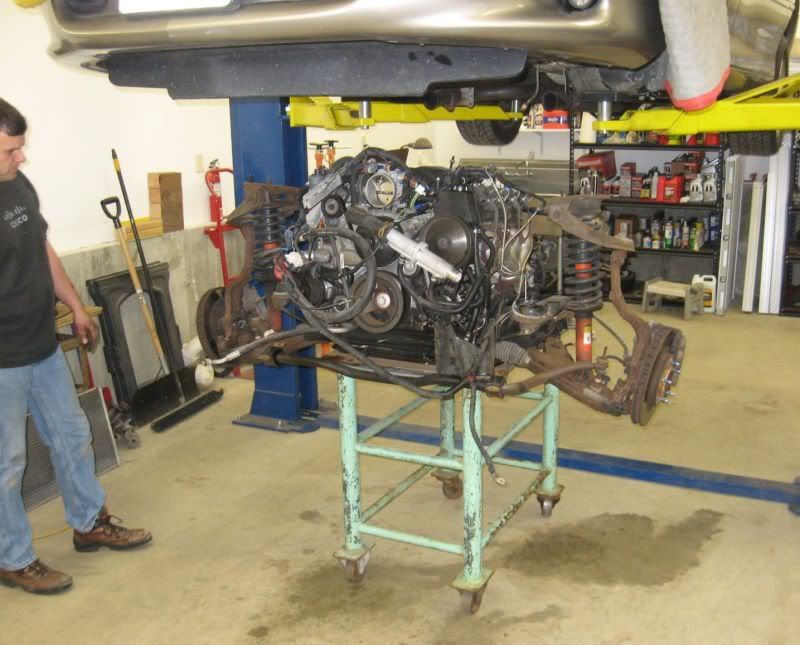
To keep the engine and trans up off the floor, we borrowed a nice rugged steel rolling table from friend Tony’s machine shop; this had things at a comfortable standing height for all of the engine work. You can see the table holding things up in the photos above.
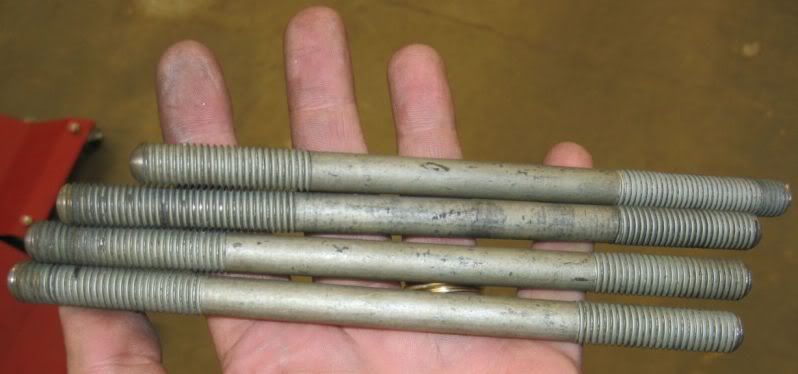
We figured that lowering the car back onto the cradle assembly would be a lot less exciting if we could align things roughly long before the shock towers and such got close to "home." To achieve this, we got some studs about eight inches long and machined a spherical radius on each end. This was a real benefit and kept my underwear from being completely ingested by my sphincter when dropping the car back on the cradle.
The finer alignment of the front k-member back into the car was something that caused us a bit of concern. While I was totally expecting to have to bring the car to an alignment shop once we got it reassembled, I didn't want the engine and transmission in the car at a 10 degree angle. We talked this one over long and hard and finally decided to magic-marker the car around the k-frame connections and scribe some lines in an attempt to get things back in there where they came from.
All of this work and worry was for nothing, it turns out, because there are alignment dowels in the cradle that pick up holes in the car; not nuclear precision, but close enough (and better, I'd think, than our magic marker and scribe technique).
More to come...
Since the car is a convertible and is just a cruise night toy, I figured that 400RWHP or thereabouts and a nasty idle attitude was all I needed to put a smile on my face. To this end, my compadres Jason, Scott, and I talked things over and decided that ported stock heads and a fairly aggressive cam paired with the typical bolt-ons (headers, ORY, free-flowing 1-into-2 cat back, lid, 85mm MAF) should get me where I want to be.
Before getting started on the "serious" work, it was time to attack the easy stuff.
The lid and MAF, obviously, don’t require a ton of explanation. First, we removed the AIR system from the car to unclutter the engine compartment some; be aware that the screws attaching the AIR flanges to the exhaust manifold are too long to use with many eBay block-off plates. We needed to put a couple of thick washers (maybe .12-.150” total thickness) under the screw heads to get a good seal.
The only other major pain is the vacuum connection at the back of the intake manifold; I wish we had already decided to pull the engine before we did this step, because it would’ve taken [5] seconds with the engine out instead of [10] minutes with my eyes closed laying across the engine trying to “see” with my fingers.
Next, we installed the Fast Toys 98mm lid and the Delco 85mm MAF and used the Fast Toys two-into-one wiring harness to convert the stock separate IAT and MAF connectors to work with the single connector on the new MAF. Scott is a PCM wiz, so after he handled the necessary computer work, the car fired right up.
The last operation at this step was to pull the DynoMAX cat-back out of Scott’s ’02 T/A and put it in my car in place of the stock setup and horrible tips. Scott’s car then got the Kook’s true dual system, which sounds fantastic but is too rich for my blood right now.
Dyno pulls are hard on a car, so I elected not to make another at this point, but I would guess that we’re running 10hp stronger for sure.
So, after the easy stuff was out of the way, the next step was the head work and camshaft.
I poked around here a lot, looked on some other forums, and asked around on a couple of CNC machining forums (which is what I do for a living, so I had some ideas on where to look) about who did high-quality CNC porting of stock GM heads. The name that kept coming back was Advanced Induction.
I went to their website, checked out some pricing, and decided that I liked what I saw; after talking to Ron and Phil down there a bit, I was even more convinced that I was heading in the right direction. I decided that I would send my 853s (yes, shocking I know) down for the full CNC package along with new seals and some PSI beehive springs to handle the lift of a new cam.
Ah, the cam; is there any component more misunderstood and more often improperly spec’d than a camshaft? I don’t think so. I had no experience with fuel injected or computer controlled cars to this point, so I really felt in the dark ages on camshaft technology.
I had a lot of discussions with a lot of players in the cam world (thanks to Comp Cams, Texas Speed, Thunder Racing, and Advanced Induction for tolerating all of my dumbass questions) and was about 99% set on a TSP 228R on a 110LSA because the numbers looked right, those guys are cool, and there is an absolutely badass video on YouTube of a car with that stick in it, BUT then I thought about the whole heads / cam / pushrods /piston-to-valve deal and decided to go with an AI cam instead.
My apologies to Texas Speed, you guys are great and seem to have a good product, but I went for the safe option (in my mind) by sticking with Advanced Induction for the whole deal.
So now the time had come to get the heads off and cam out of the car, tear out the remaining factory exhaust, and replace the not-so-stout clutch (had some excess slippage, you’ll see why if you keep reading) with a factory LS7 setup; the question was, how?
I knew that we could do the work with the engine in the car, but I didn’t want to deal with that because I am 6’6” and my back hurts just thinking about it. I knew we could take the engine out through the hood opening if we were REALLY determined, because I had talked with some guys who have done it. I didn’t know much about “dropping the cradle” but my buddy Jason had done a little research and thought it might be a good way to go.
In the end, since my friend Scott has (in my best Jeff Spicoli voice) the ULTIMATE garage, with a 2-post frame lift and a 4-post, plus tools and parts galore, and my buddy Jason had seen some positive stories regarding the removal of F-body engines and transmissions from the underside of the car, we figured that we’d take a shot at it.
We found lots of info on the ‘net about it, but the video and website linked below were very good to us. If the link to the website doesn’t work, I have a Word document with the contents of it; shoot me an email and it is yours.
www.keliente.com/engine.htm
Ctrl and click below link to launch video:
http://bowlingss.com/DownLoads/Video...20_removal.avi
I am not going to rehash the whole process here, but there are some things we made, some things we did, some problems we had, that you may be interested in.
Some concerns we had, before starting, were: how to best hold the trans and engine up at a reasonable height to work on after we got it out of the car, how to guide the car back down onto the cradle when lowering the car back down, how to align the subframe back on the car the way it came out, what to do about keeping the brake system in the car relatively air free while it was apart, and how to move the car around Scott’s garage with the steering disconnected and no engine.
To keep the engine and trans up off the floor, we borrowed a nice rugged steel rolling table from friend Tony’s machine shop; this had things at a comfortable standing height for all of the engine work. You can see the table holding things up in the photos above.
We figured that lowering the car back onto the cradle assembly would be a lot less exciting if we could align things roughly long before the shock towers and such got close to "home." To achieve this, we got some studs about eight inches long and machined a spherical radius on each end. This was a real benefit and kept my underwear from being completely ingested by my sphincter when dropping the car back on the cradle.
The finer alignment of the front k-member back into the car was something that caused us a bit of concern. While I was totally expecting to have to bring the car to an alignment shop once we got it reassembled, I didn't want the engine and transmission in the car at a 10 degree angle. We talked this one over long and hard and finally decided to magic-marker the car around the k-frame connections and scribe some lines in an attempt to get things back in there where they came from.
All of this work and worry was for nothing, it turns out, because there are alignment dowels in the cradle that pick up holes in the car; not nuclear precision, but close enough (and better, I'd think, than our magic marker and scribe technique).
More to come...
 02-20-2012, 07:36 AM
#3
On The Tree
Thread Starter
Join Date: Aug 2011
Location: Fitchburg, MA
Posts: 105
Likes: 0
Received 0 Likes
on
0 Posts
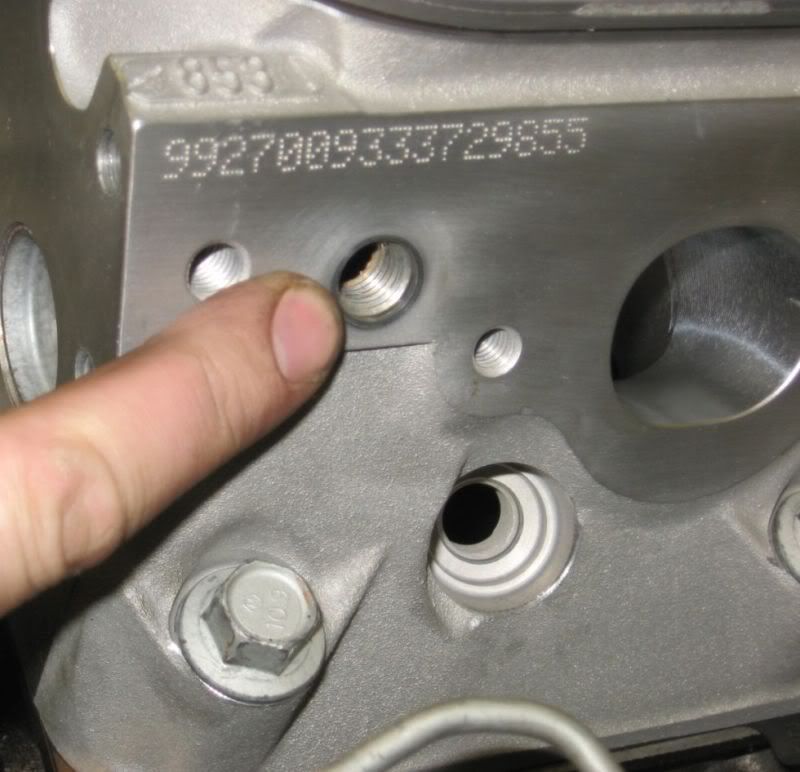
My heads got the same port job that you plan on; because the lobe separation on my cam was tighter than 'normal' I ended up with about 10.6:1 on compression instead of the 11:1 they typically go for. The work was very nicely done, as you can see here:
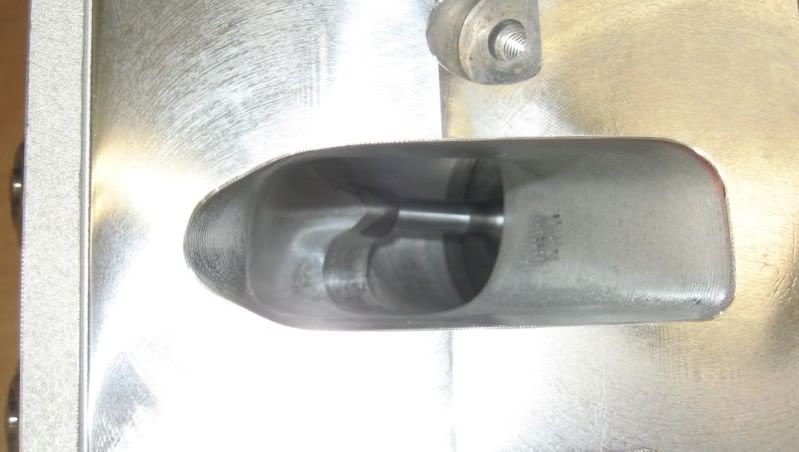
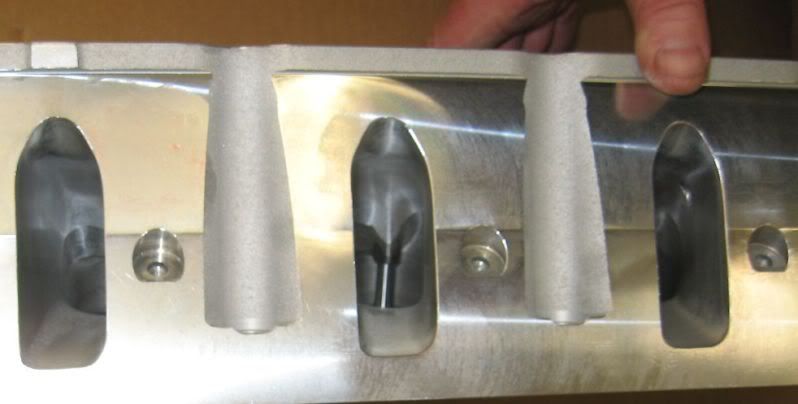
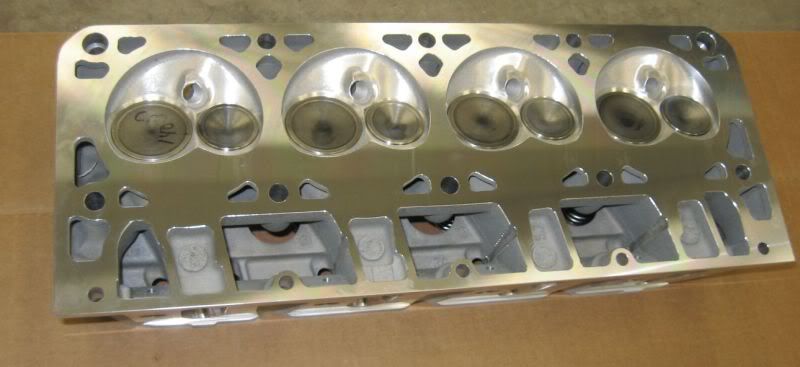
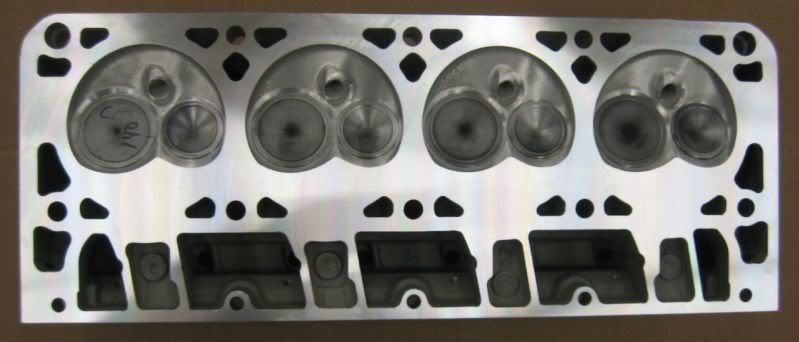
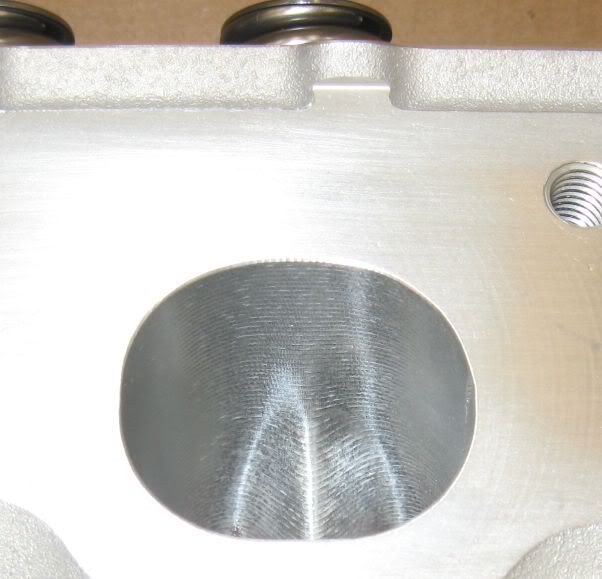

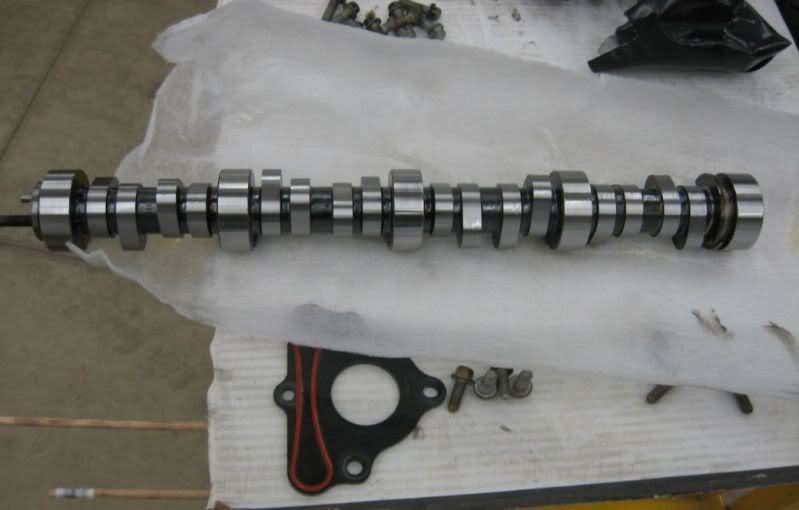
The cam is .600/.600, 226/230, with a 110LSA because I wanted a nasty idle lope.
I also bought pushrods with the package, but have no pics of those (pushrods aren't very sexy anyway)
C
The cam is .600/.600, 226/230, with a 110LSA because I wanted a nasty idle lope.
I also bought pushrods with the package, but have no pics of those (pushrods aren't very sexy anyway)
C
 02-21-2012, 08:21 AM
#6
On The Tree
Thread Starter
Join Date: Aug 2011
Location: Fitchburg, MA
Posts: 105
Likes: 0
Received 0 Likes
on
0 Posts
Sweet98, I have the motor buttoned back up and hopefully back in the car for the last time. This coming Sunday we hope to have one more day in the garage and get it all done and running. I'll post up some more details this week to bring the thread up to date.
Autoz, I bought the convertible because I had never owned one and figured the lack of a roof would encourage me to keep the horsepower under control. More enjoyable for the family, too.
C
Autoz, I bought the convertible because I had never owned one and figured the lack of a roof would encourage me to keep the horsepower under control. More enjoyable for the family, too.
C
Last edited by smokeshow72; 02-21-2012 at 03:48 PM. Reason: Spelling error
02-21-2012, 03:45 PM
#7
On The Tree
Thread Starter
Join Date: Aug 2011
Location: Fitchburg, MA
Posts: 105
Likes: 0
Received 0 Likes
on
0 Posts
OK, so the real idea behind this thread was to take some of the mystery out of the engine removal and disassembly process. It took us (three guys, two with pretty comprehensive mechanical knowledge and one (me) with basic skills and some 20-year-old moderate experience) approximately 3 hours and change to go from a running car to an engine and transmission on a rolling table. That's no BS: fluids drained; A/C discharged, A/C system removed; radiator / fans / etc removed; PCM, wiring harness, etc disconnected; cradle out of the car in three, maybe four (MAX) hours.
This is something that you can do, non-factory-trained LS1Tech readers, if you take your time and follow the magic footprints. The factory service manual helped in a couple of places and some experience helped in others, but this was not the impossible undertaking that it may seem to many of you.
Some points of interest:
1) For openers, removing the A/C system from under the hood is the way to go on this; nothing dangling in the way, nothing to get bent or mangled or hooked on something when the engine drops out. Luckily for me, Scott’s brother is a Ford tech, has his own A/C machine, and didn’t need it for a couple of months. Bing, bang, refrigerant was removed and the A/C system popped right out of the car. This took about fifteen “extra” minutes and was SO worth it.
2) For a manual trans (like mine), don’t worry about the fact that the shifter **** is damned near impossible to get off; two screws inside the center console and the whole shifter-surround pops up. Two bolts hold the stick to the shifter on the transmission; done. Make sure the car is in neutral before it goes up in the air or you will be swearing when you try to get the u-joints disassembled. For the same reason, leave the E-brake OFF.
3) Get a tailshaft plug for the transmission. Pull the driveshaft out, throw the tailshaft plug in, no tranny fluid puking everywhere. We didn't leak a drop and had the trans on and off the engine twice for a clutch change and again for a new slave that we didn't have ready the first time.
4) Reattach the u-joint clamps when you have the driveshaft out; pushing the car with the clamps loosely hanging from one bolt = BAD. Yes, we did this and bent the **** out of the clamps.
5) Take the torque arm out of the car if you are working on a lift. The thread I linked, and I think the video, say to leave the torque arm attached to the rear end; this is an unnecessary pain in the *** in my opinion. Take the damned thing out so you don’t have to work around it the rest of the way. Be a good idea if you put it back in BEFORE you button up your exhaust, though…
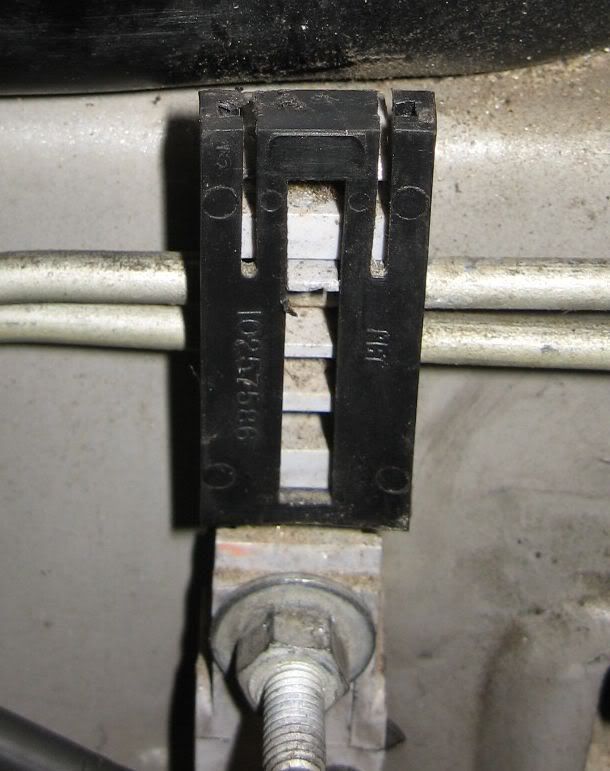
6) This clip, on the left inner fender, is a pain in the *****. Push the black portion away from the fender at the top (toward the engine) and pull the black part UP to the sky to release the brake lines. It took ten minutes to figure out how this doggone thing opened while we were taking the car apart.
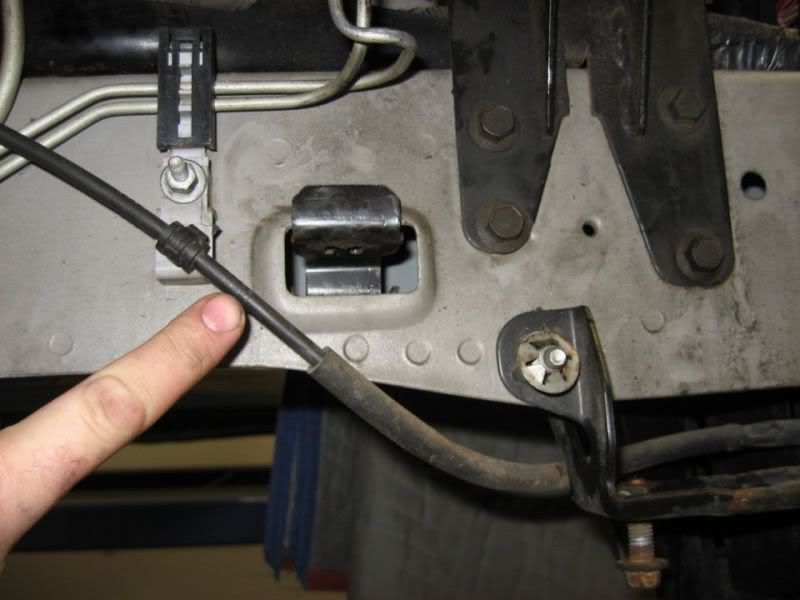
7) This fine-looking cable is the hood release, and stays with the car; I must've looked at this ten times while we lifted the car thinking "is that going to be OK?" Yes, it is OK.
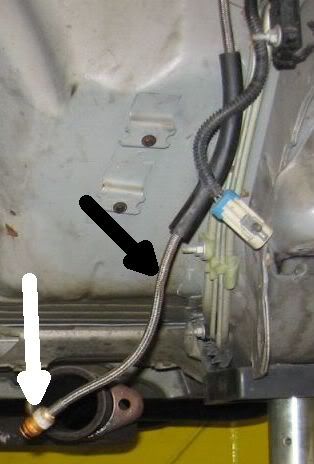
8) The "quick" release fitting for the transmission slave cylinder (white arrow in pic below) can be a real pain in the ***. The website I linked, and most of the written descriptions of this process, say to push the white ring toward the transmission with a couple of screwdrivers or similar flat tools, and the hose will "pop out." Yeah, right; I was five seconds from cutting through the hydraulic line with a hedge clipper because the sonofabitching thing was damned near welded in transmission. I pulled on that thing like a 13 year old boy with his first Playboy and it finally let loose, but "pop out" it did not.
Turns out I should've cut the SOB to begin with and saved myself about 5 minutes of continuous profanity, because the line was crushed (black arrow) and had to be replaced anyway. This must've happened somehow before I owned the car, because nothing got anywhere near the line when we dropped the engine and trans out. It does explain, however, the chattery clutch engagement I experienced from time to time and the smell of clutch at odd times while driving.
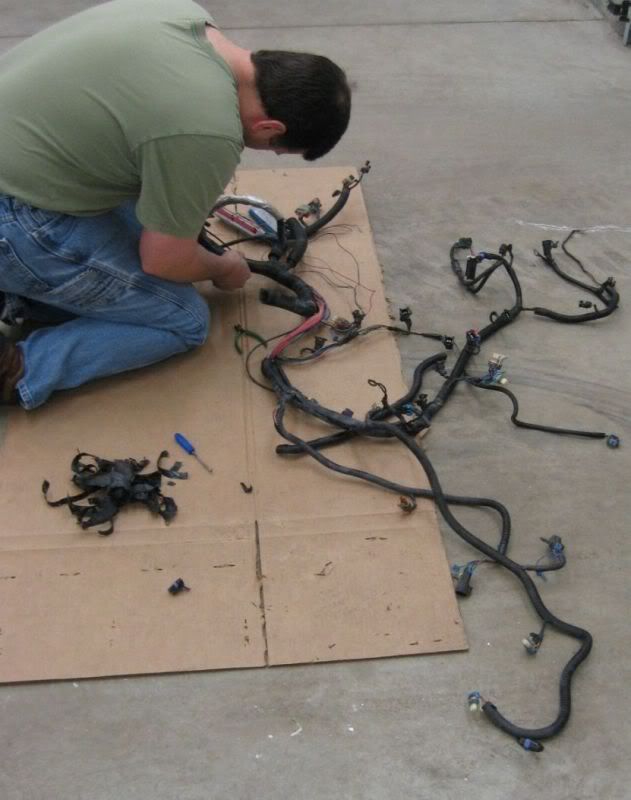
9) Have a guy who isn't afraid of Medusa's hairdo as part of your crew. The engine and PCM wiring harnesses scare the crap out of me, but my man Scott LOVES that stuff. While Jason and I swapped in the LS7 clutch, Scott stripped the AIR and EGR wiring out of the harnesses because both of those systems are gone, as well as rewiring the rear O2 sensors to act as the fronts (because the wires on the fronts aren't long enough to reach the header collectors, you can also buy O2 sensor extensions from Kook's, or Maryland Speed, or whatever) and stripping out the rears because I am not going to run cats.
10) This thing is a fantastic time saver, plug in your desired angle, slap it on the extension from your breaker bar, zero it out, and turn the wrench until it goes "beep-beep-beep-beep." We torqued all of the TTY fasteners with this and it worked slicker than slick

This is something that you can do, non-factory-trained LS1Tech readers, if you take your time and follow the magic footprints. The factory service manual helped in a couple of places and some experience helped in others, but this was not the impossible undertaking that it may seem to many of you.
Some points of interest:
1) For openers, removing the A/C system from under the hood is the way to go on this; nothing dangling in the way, nothing to get bent or mangled or hooked on something when the engine drops out. Luckily for me, Scott’s brother is a Ford tech, has his own A/C machine, and didn’t need it for a couple of months. Bing, bang, refrigerant was removed and the A/C system popped right out of the car. This took about fifteen “extra” minutes and was SO worth it.
2) For a manual trans (like mine), don’t worry about the fact that the shifter **** is damned near impossible to get off; two screws inside the center console and the whole shifter-surround pops up. Two bolts hold the stick to the shifter on the transmission; done. Make sure the car is in neutral before it goes up in the air or you will be swearing when you try to get the u-joints disassembled. For the same reason, leave the E-brake OFF.
3) Get a tailshaft plug for the transmission. Pull the driveshaft out, throw the tailshaft plug in, no tranny fluid puking everywhere. We didn't leak a drop and had the trans on and off the engine twice for a clutch change and again for a new slave that we didn't have ready the first time.
4) Reattach the u-joint clamps when you have the driveshaft out; pushing the car with the clamps loosely hanging from one bolt = BAD. Yes, we did this and bent the **** out of the clamps.
5) Take the torque arm out of the car if you are working on a lift. The thread I linked, and I think the video, say to leave the torque arm attached to the rear end; this is an unnecessary pain in the *** in my opinion. Take the damned thing out so you don’t have to work around it the rest of the way. Be a good idea if you put it back in BEFORE you button up your exhaust, though…
6) This clip, on the left inner fender, is a pain in the *****. Push the black portion away from the fender at the top (toward the engine) and pull the black part UP to the sky to release the brake lines. It took ten minutes to figure out how this doggone thing opened while we were taking the car apart.
7) This fine-looking cable is the hood release, and stays with the car; I must've looked at this ten times while we lifted the car thinking "is that going to be OK?" Yes, it is OK.
8) The "quick" release fitting for the transmission slave cylinder (white arrow in pic below) can be a real pain in the ***. The website I linked, and most of the written descriptions of this process, say to push the white ring toward the transmission with a couple of screwdrivers or similar flat tools, and the hose will "pop out." Yeah, right; I was five seconds from cutting through the hydraulic line with a hedge clipper because the sonofabitching thing was damned near welded in transmission. I pulled on that thing like a 13 year old boy with his first Playboy and it finally let loose, but "pop out" it did not.
Turns out I should've cut the SOB to begin with and saved myself about 5 minutes of continuous profanity, because the line was crushed (black arrow) and had to be replaced anyway. This must've happened somehow before I owned the car, because nothing got anywhere near the line when we dropped the engine and trans out. It does explain, however, the chattery clutch engagement I experienced from time to time and the smell of clutch at odd times while driving.
9) Have a guy who isn't afraid of Medusa's hairdo as part of your crew. The engine and PCM wiring harnesses scare the crap out of me, but my man Scott LOVES that stuff. While Jason and I swapped in the LS7 clutch, Scott stripped the AIR and EGR wiring out of the harnesses because both of those systems are gone, as well as rewiring the rear O2 sensors to act as the fronts (because the wires on the fronts aren't long enough to reach the header collectors, you can also buy O2 sensor extensions from Kook's, or Maryland Speed, or whatever) and stripping out the rears because I am not going to run cats.
10) This thing is a fantastic time saver, plug in your desired angle, slap it on the extension from your breaker bar, zero it out, and turn the wrench until it goes "beep-beep-beep-beep." We torqued all of the TTY fasteners with this and it worked slicker than slick
Last edited by smokeshow72; 03-03-2012 at 03:50 PM. Reason: Added pics, fix error on number of shifter bolts
Trending Topics
02-22-2012, 02:12 PM
#8
On The Tree
Thread Starter
Join Date: Aug 2011
Location: Fitchburg, MA
Posts: 105
Likes: 0
Received 0 Likes
on
0 Posts
Some things we didn’t think of, or did wrong, or could’ve done better:
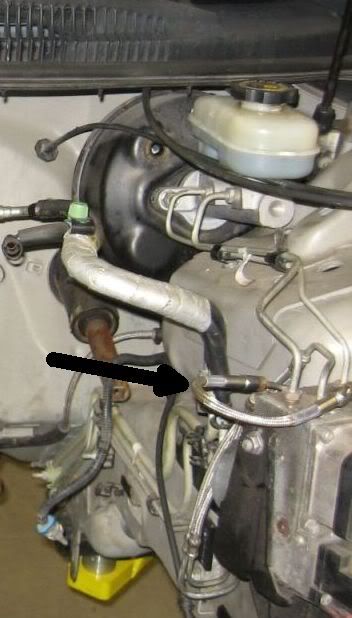
1) We (Jason) made a loop hose for the broken brake connections in the car; you can see it in this picture (arrow), it is just a short hose connecting the two open lines to keep the car from weeping brake fluid everywhere. While this was a good idea, the loop of hose kept grabbing everything when trying to drop the engine. If we did this again we’d make up some caps for the brake lines instead.
2) Remove the coolant from the engine before breaking the head bolts loose or figure a better way to manage the coolant. We drained and removed the radiator, and drained as much from the hoses as possible, but still ended up with coolant everywhere, which is not so much fun. We were planning on using a vacuum pump to suck more coolant out of the block, but got ahead of ourselves and removed the head bolts first; no head seal = no suction.
3) Enlist a couple more guys when putting the cradle back into the car; three guys was OK but four or five would've been better. There is a lot going on and a lot to worry about, particularly when trying to get the shock towers back home while seating the car on the subframe; we ended up wrecking one of the soft brake lines when the car had to come back up a little on the lift, allowing the shock tower to drop out of the holes and swing out until the brake line stopped it.
02-22-2012, 02:21 PM
#9
On The Tree
Thread Starter
Join Date: Aug 2011
Location: Fitchburg, MA
Posts: 105
Likes: 0
Received 0 Likes
on
0 Posts
So, for the reassembly:
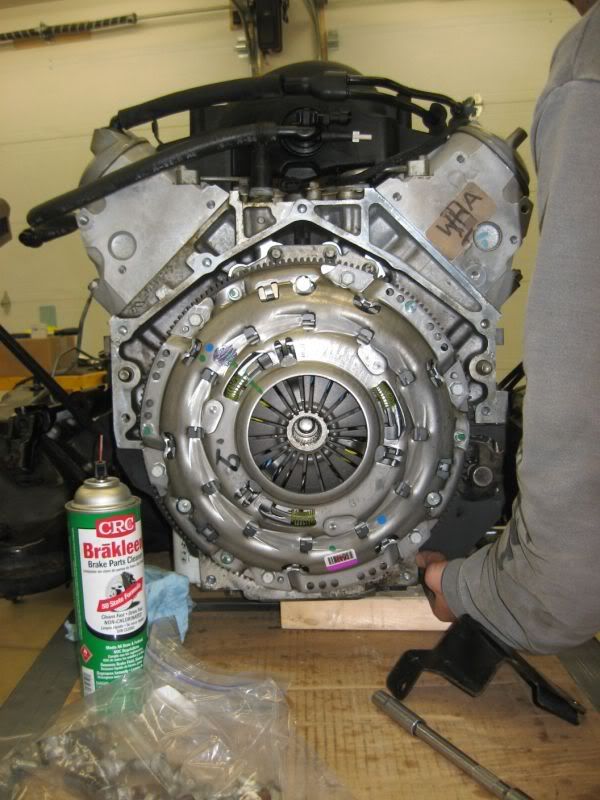
When we disassembled the engine, we took the time to install the LS7 clutch kit offered by the WS6 Store. The kit consisted of flywheel, clutch disc, and pressure plate, all factory GM parts; I also purchased new flywheel and pressure plate bolts from the same place to complete the assembly. While we had it apart, we found the damaged hydraulic line and decided to replace the clutch master cylinder (which includes said line) and slave cylinder, which I bought from my local Chevy store. The clutch install itself was easy-breezy.
While the heads were in NC at Advanced Induction, I bought the Comp rocker arm trunnion kit (something like $140 from Texas Speed) and installed that in my rockers. My employer conveniently has a nice Assembly room with about ten arbor presses in it, so this was a piece of cake. A couple of pieces of drill rod and a 7/8 deep socket were all I needed to press out the factory shafts and bearings, and the kit came with everything I needed to assemble the new pieces. I dropped one of the new bearings when installing, of course, which spit a roller and was unusable; luckily Gab Ray from Comp Cams rode to the rescue with a replacement and I was able to finish it up. Disassembly, cleaning, and reassembly probably took a total of about three hours and was very straightforward.
More to come...
02-26-2012, 07:52 PM
#10
On The Tree
Thread Starter
Join Date: Aug 2011
Location: Fitchburg, MA
Posts: 105
Likes: 0
Received 0 Likes
on
0 Posts
IT'S ALIVE!!!!!!!!!!
Another [10] hours in the garage today and she fired right up! Bleeding the clutch was a real bitch, but other than that no real problems. Took her for about a 40-mile shakedown cruise back to my house and didn't skip a beat! Can't even tell you how relieved I was when the motor fired and didn't blow up. Car has a really conservative tune right now and still feels really strong; it'll be interesting to see where we end up when the tuning is all done.
C
03-03-2012, 03:14 PM
#11
On The Tree
Thread Starter
Join Date: Aug 2011
Location: Fitchburg, MA
Posts: 105
Likes: 0
Received 0 Likes
on
0 Posts
OK, so some other things that I wanted to bring up, but forgot:
1) Take pictures of various stages as you pull the car apart and make good notes about things to remember when the car goes back together. We had [2] full months between the time we disassembled and the time the car went back together; we're smart guys and have reasonable memories, but if I had a dollar for every "where did this come from?" or "dammit, we should've done THIS before THAT" moment during final assembly, I would be drinking for free tonight. With wives, families, other lives, we were more interested in getting it done quick than in documentation and reflection; it worked out OK, but could've been smoother if we'd shifted down a gear or two in a couple of spots.
2) Manage your hardware. This is even more important when you have [3] guys working, at times, on three different sections of the car. I am a "put the hardware back in the hole for storage" kinda guy, but the other guys aren't, and sometimes you can't really do that. Add to this the fact that some hardware is replaced with new and you end up comparing head sizes and grimyness to figure out what bolt came out of what hole; then you have a handful of screws left over (factory exhaust stuff, old clutch hardware, EGR and AIR stuff you don't need) which is never the greatest feeling just before you go ripping down the highway.
3) DON'T THROW ANYTHING AWAY. I am no neat freak, but I still have a tendency to want to hurl "old" stuff in the trash when I think I will have no use for it; FIGHT THIS URGE! For one, the "old" crank pulley bolt is necessary to reinstall the pulley after the cam swap before torquing with the new bolt. Old O2 sensors are also very handy as plugs for your Y-pipe after you forget to pick up the real plugs...
4) Bleeding a dry slave cylinder is a royal pain in the *****. We pumped and bled and pumped and bled for about a friggin hour and really never got the pedal where I thought it'd be; I finally resorted to the "pump the pedal furiously for 30 seconds and then let it sit for a couple of minutes, repeat" method and that seemed to get us where I wanted to be after a few reps.
5) Watch your coolant temps at initial startup. We had a big air pocket in the cooling system somewhere that spiked the cylinder head temp up to about 230 before we noticed it and shut her down. As the engine cooled, the cooling system required a long and slow "fill and burp" cycle until it seemed reasonably full; the motor held a nice 200 or so for the hour warm-up and ride home after this.
6) Speaking of coolant temp; you know the tapped hole that is open in one of your heads and plugged in the other one? Yeah, that's the coolant temp sensor hole. When you think "do I care which head I put on which side?" it is important to remember that the answer is YES. We, of course, forgot this, and I then proceeded to suck my undershorts right up into the old sphincter because the head of the plug on the other head was 1/2 rounded out and I thought for sure we were going to have to drill it out. The heads were already torqued, you see, so the gaskets and bolts would've been junk, and we didn't have any replacements... Luckily a pipe wrench on the OD of the plug and impact on the hex socket head got the damned plug out of the head, and my boxers out of my bunghole.
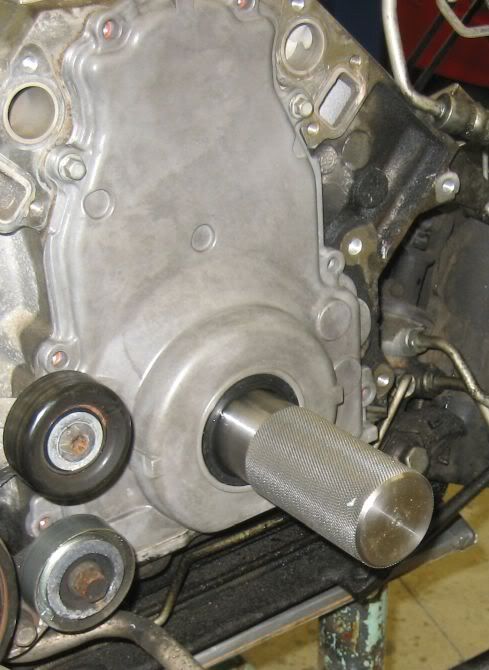
7) The front cover flops all over the place without the crank pulley to line it up and must be aligned with the crank snout unless you want to prematurely wear out the seal. I think that most guys just leave the screws loose and wind the crank pulley on to pilot the cover, then tighten the screws. Of course, we had to do it a different way; I turned this alignment tool out of stainless for the job (basically a bushing with the ID .010 over the crank snout diameter and the OD .010 under the crank pulley snout diameter). Overkill? You betcha, but it did the job perfectly. Email me if you're interested in a sketch.
1) Take pictures of various stages as you pull the car apart and make good notes about things to remember when the car goes back together. We had [2] full months between the time we disassembled and the time the car went back together; we're smart guys and have reasonable memories, but if I had a dollar for every "where did this come from?" or "dammit, we should've done THIS before THAT" moment during final assembly, I would be drinking for free tonight. With wives, families, other lives, we were more interested in getting it done quick than in documentation and reflection; it worked out OK, but could've been smoother if we'd shifted down a gear or two in a couple of spots.
2) Manage your hardware. This is even more important when you have [3] guys working, at times, on three different sections of the car. I am a "put the hardware back in the hole for storage" kinda guy, but the other guys aren't, and sometimes you can't really do that. Add to this the fact that some hardware is replaced with new and you end up comparing head sizes and grimyness to figure out what bolt came out of what hole; then you have a handful of screws left over (factory exhaust stuff, old clutch hardware, EGR and AIR stuff you don't need) which is never the greatest feeling just before you go ripping down the highway.
3) DON'T THROW ANYTHING AWAY. I am no neat freak, but I still have a tendency to want to hurl "old" stuff in the trash when I think I will have no use for it; FIGHT THIS URGE! For one, the "old" crank pulley bolt is necessary to reinstall the pulley after the cam swap before torquing with the new bolt. Old O2 sensors are also very handy as plugs for your Y-pipe after you forget to pick up the real plugs...
4) Bleeding a dry slave cylinder is a royal pain in the *****. We pumped and bled and pumped and bled for about a friggin hour and really never got the pedal where I thought it'd be; I finally resorted to the "pump the pedal furiously for 30 seconds and then let it sit for a couple of minutes, repeat" method and that seemed to get us where I wanted to be after a few reps.
5) Watch your coolant temps at initial startup. We had a big air pocket in the cooling system somewhere that spiked the cylinder head temp up to about 230 before we noticed it and shut her down. As the engine cooled, the cooling system required a long and slow "fill and burp" cycle until it seemed reasonably full; the motor held a nice 200 or so for the hour warm-up and ride home after this.
6) Speaking of coolant temp; you know the tapped hole that is open in one of your heads and plugged in the other one? Yeah, that's the coolant temp sensor hole. When you think "do I care which head I put on which side?" it is important to remember that the answer is YES. We, of course, forgot this, and I then proceeded to suck my undershorts right up into the old sphincter because the head of the plug on the other head was 1/2 rounded out and I thought for sure we were going to have to drill it out. The heads were already torqued, you see, so the gaskets and bolts would've been junk, and we didn't have any replacements... Luckily a pipe wrench on the OD of the plug and impact on the hex socket head got the damned plug out of the head, and my boxers out of my bunghole.
7) The front cover flops all over the place without the crank pulley to line it up and must be aligned with the crank snout unless you want to prematurely wear out the seal. I think that most guys just leave the screws loose and wind the crank pulley on to pilot the cover, then tighten the screws. Of course, we had to do it a different way; I turned this alignment tool out of stainless for the job (basically a bushing with the ID .010 over the crank snout diameter and the OD .010 under the crank pulley snout diameter). Overkill? You betcha, but it did the job perfectly. Email me if you're interested in a sketch.
Last edited by smokeshow72; 03-03-2012 at 03:22 PM.
 03-04-2012, 08:34 AM
#14
On The Tree
Thread Starter
Join Date: Aug 2011
Location: Fitchburg, MA
Posts: 105
Likes: 0
Received 0 Likes
on
0 Posts
It snowed about a foot here this week, so I haven't had any wheel time since the first "drive it home" cruise. The car felt strong, even with a soft tune and 3.42 rear, pulled from 80 to 100 in 4th gear in a flash, so it is making some good power. I have some street tuning to do when the snow and sand are gone off the ground before we roll onto the chassis dyno, so I don't imagine it'll be before May til it gets a dyno tune.
If you are concerned with bang for your buck on the AI work, send them an email: sales@advancedinduction.com and talk to Ron or Phil. I spent two grand with them, and I hate spending, so you know that I was very impressed with their knowledge and responses.
C
If you are concerned with bang for your buck on the AI work, send them an email: sales@advancedinduction.com and talk to Ron or Phil. I spent two grand with them, and I hate spending, so you know that I was very impressed with their knowledge and responses.
C
03-04-2012, 10:43 AM
#16
On The Tree
Thread Starter
Join Date: Aug 2011
Location: Fitchburg, MA
Posts: 105
Likes: 0
Received 0 Likes
on
0 Posts
If you don't mind, post up your thoughts and your results when you get your motor back together and I'l do the same. Dynos are sort of a WAG when it comes to numbers anyway, but I am always interested. The numbers you have in your sig are pretty doggone impressive, i have to say.
C
C
03-05-2012, 11:55 AM
#17
On The Tree
Thread Starter
Join Date: Aug 2011
Location: Fitchburg, MA
Posts: 105
Likes: 0
Received 0 Likes
on
0 Posts
OK, although I have a bunch more random thoughts I could throw in this thread, until I get some tuning and dyno pulls done I think it is time to let this thread rest.
Thanks for reading, I'll be back when I have some power numbers.
Before I take a hiatus, though, I would like to thank those who helped along the way:
1) My friends, Scott Peitzsch and Jason Doughty, for taking time away from their lives and families to work on my rig.
2) My wife, Karen, for not being pissed while I worked on my rig.
3) "Kelly" who authored the website that I linked above; your descriptions and photos were right on the money and helped us a ton.
4) Phil and Ron from Advanced Induction for the excellent machine work and for politely answering the 50,000 questions I had along the way.
5) Jake Keeling at Texas Speed for helping me with cam selection, even though I didn't buy the 228R
6) Drew Amitrano at Kook's for helping me sort through their offerings to make sure I got the right product. And for convincing me it is pronounced "cooks."
7) Gabe Ray at Comp Cams for helping me understand modern camshafts and for hooking me up with a quick bearing replacement after I dropped one of my trunnion bearings on the floor and trashed it.
8) Colonial West Chevrolet in Fitchburg, MA, for all of the help getting necessary parts.
9) Hawks Third Generation for the great deal on gaskets and bolts.
10) The WS6 Store for the nicely-done clutch kit.
11) Anybody else who helped, thanks a million