
1972 Chevelle, LQ4 6.0l/4l80e single turbo
 10-29-2008, 08:44 PM
#1
TECH Fanatic
Thread Starter
iTrader: (9)
Join Date: Mar 2004
Location: CANADA!
Posts: 1,347
Likes: 0
Received 0 Likes
on
0 Posts

This is for reference. If anyone has quesitons please feel free. I never did post the build and figured it could be handy.
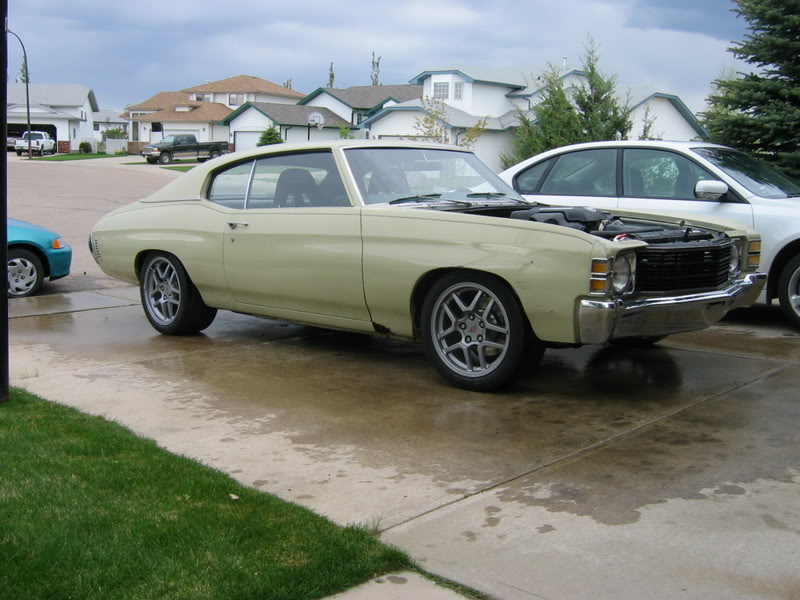
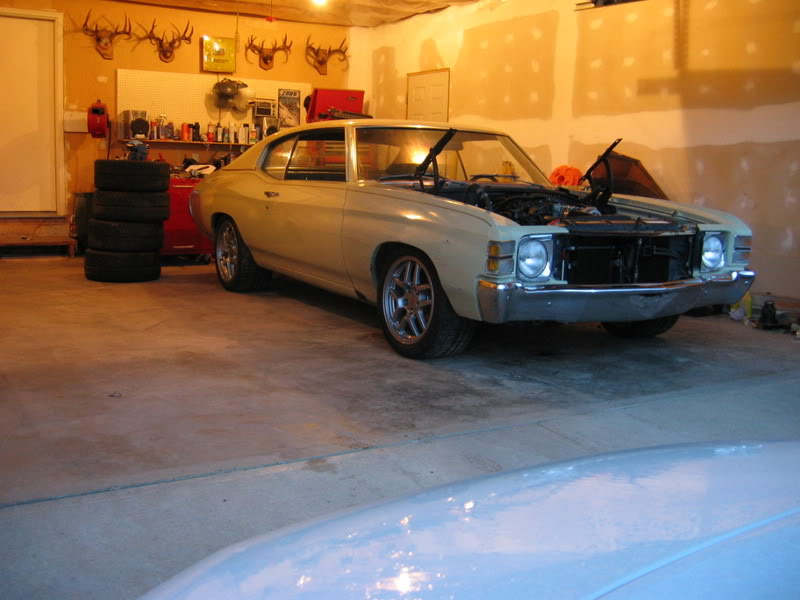
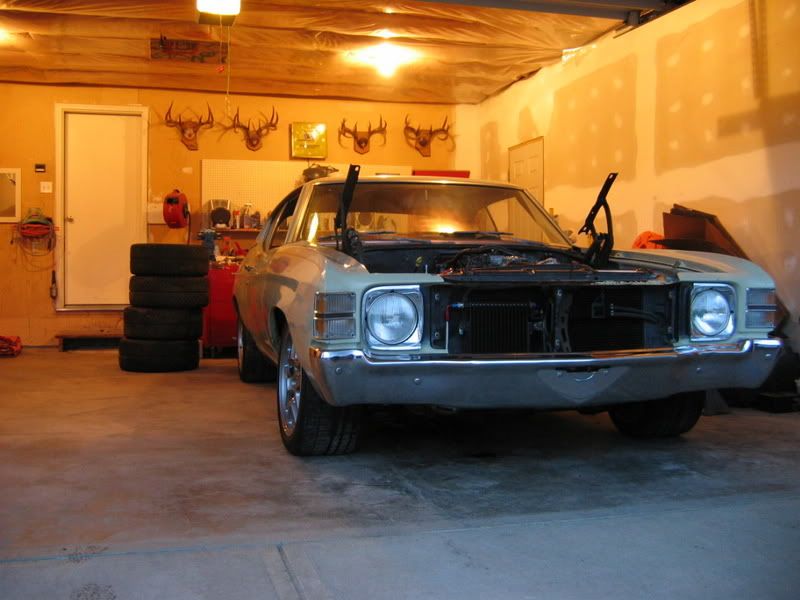
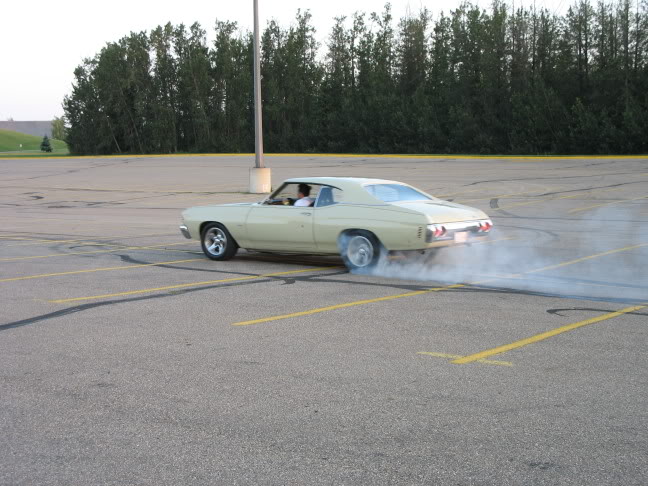
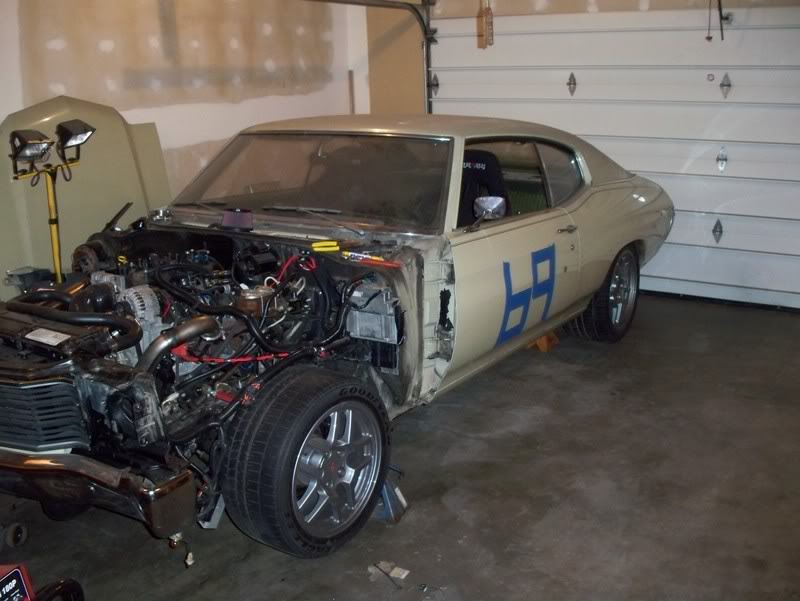
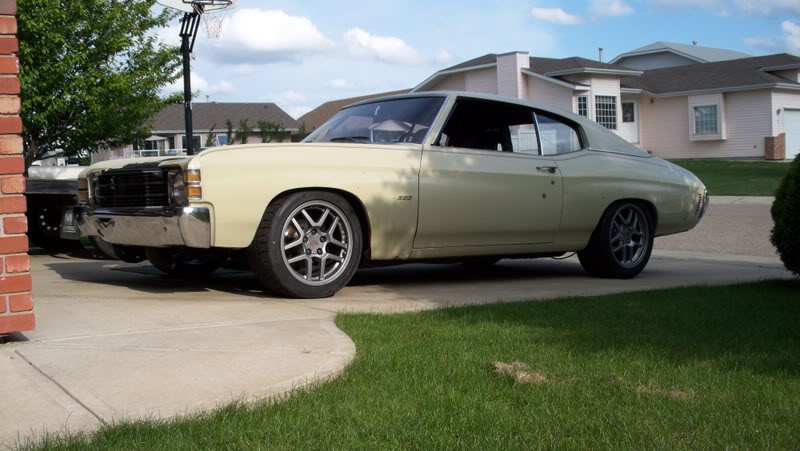
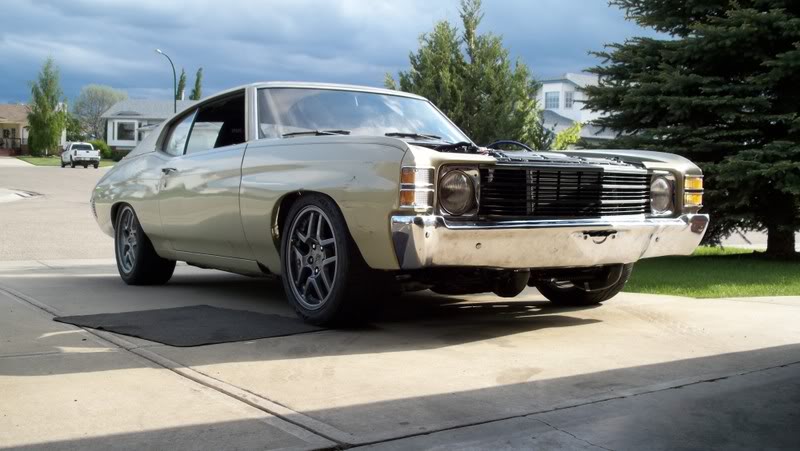
Heres my girl. I exploit her, I beat her, she's purpose built. If it turns out sorta pretty then no complaints. I drive it hard, no $10,000 paint jobs here.
Last year
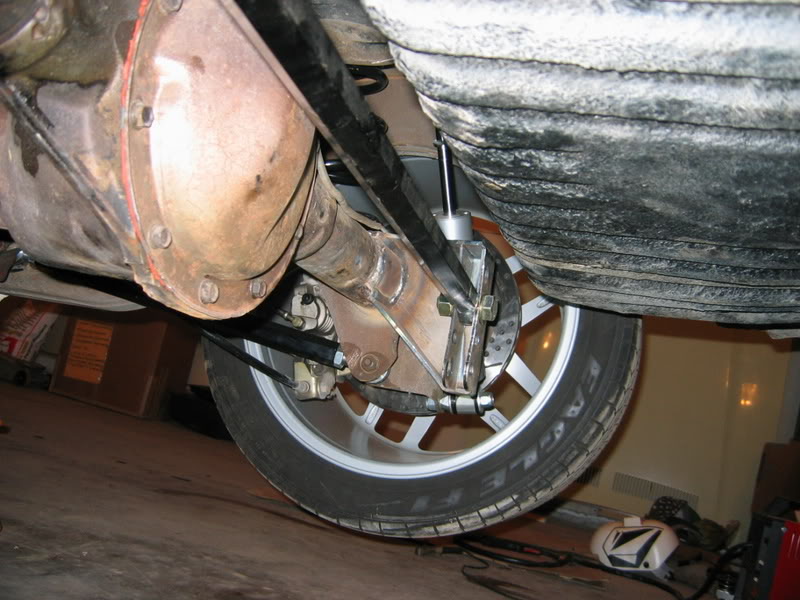
old 10 bolt with panhard bar. new 12 bolt is in with panhard bar
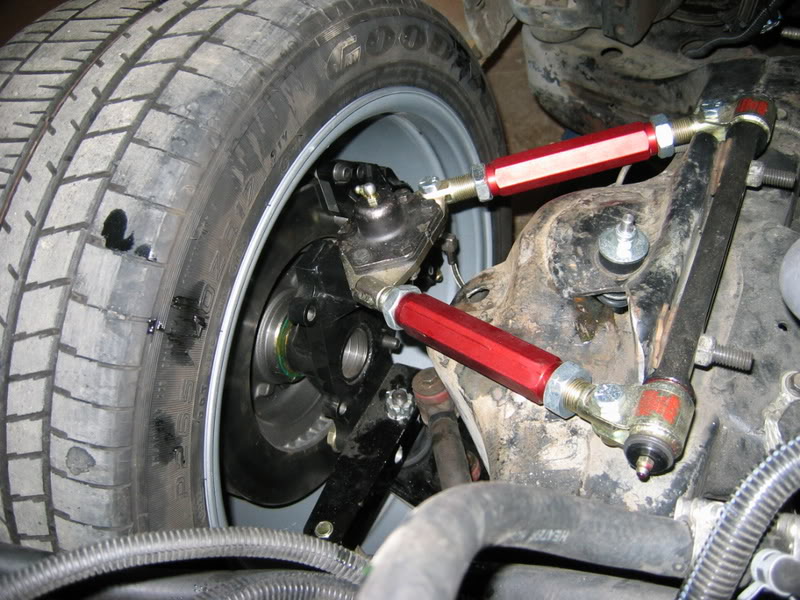
front suspension.
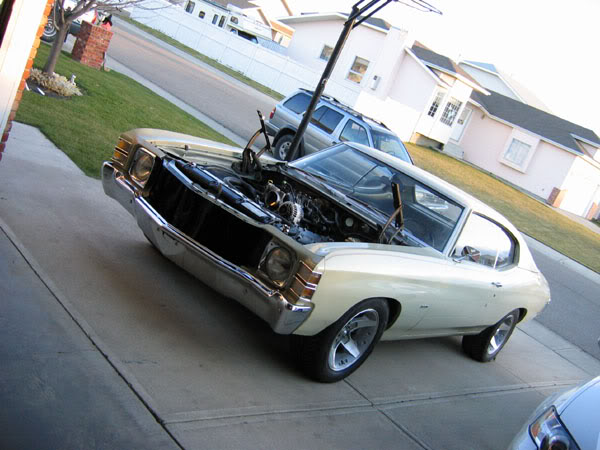
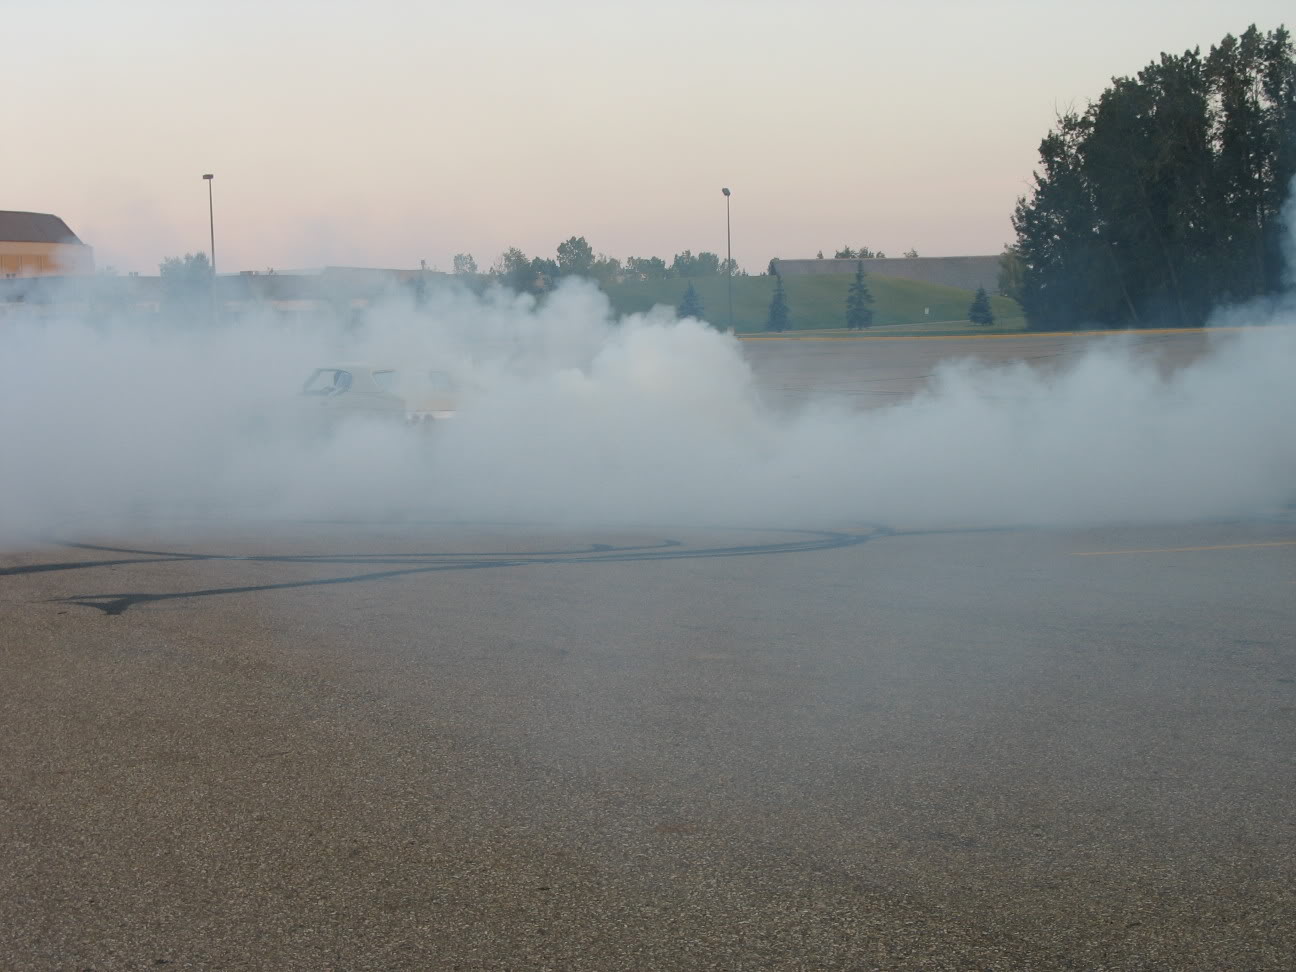
wet bitch.
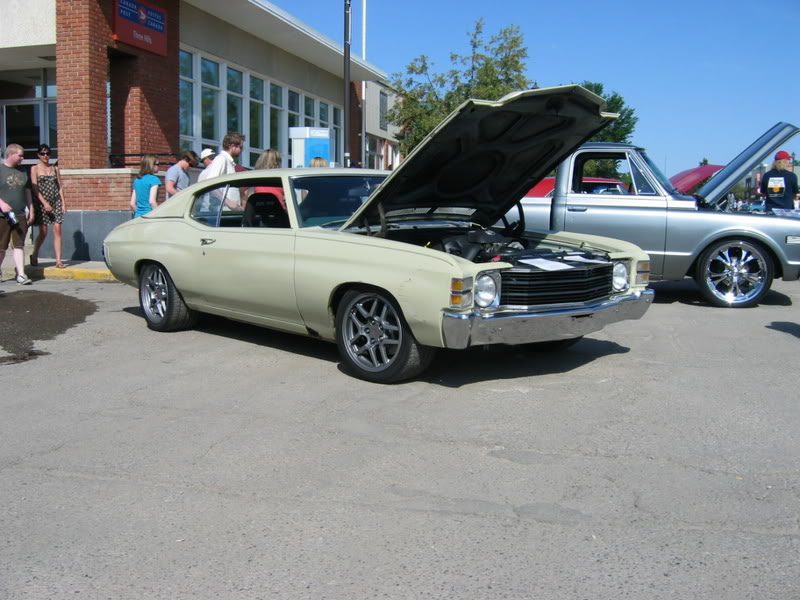
car show.
Start out as a bone stock 72 Chevelle malibu from my grandfather(he bought it brand new). 4 wheel drums, 350, turbo 350 tranny, 10 bolt, power nothing, 1 speaker am radio.
I first put true duals on it, rebuilt the heads, cleaned them up, slapped a cam, LT headers, and some carb adjustments and ran it for a year. Also had S10 ZQ8 wheels on it(the 5 spoke style)
I then installed the following within the next 3 years(all major suspension was done winter of 06). I put some on in the winter, drove it a summer, took it apart that winter, and drove it a summer, etc.
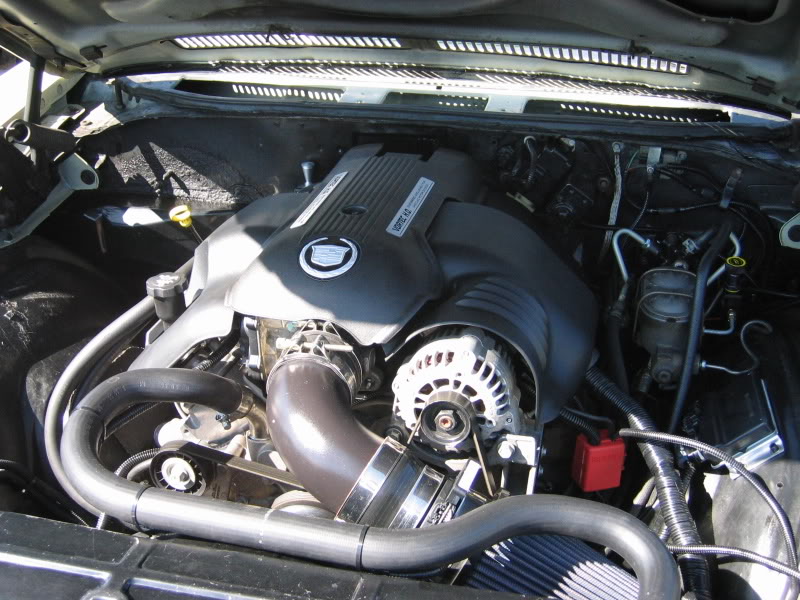
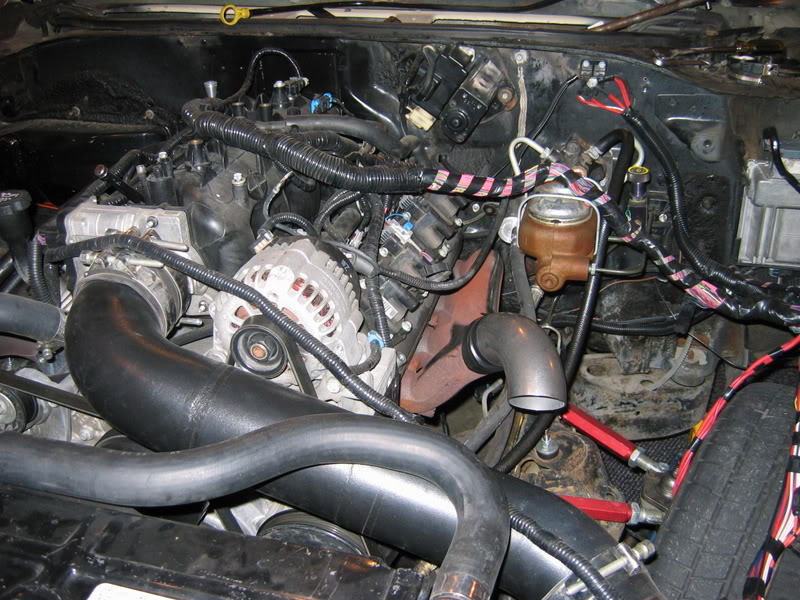
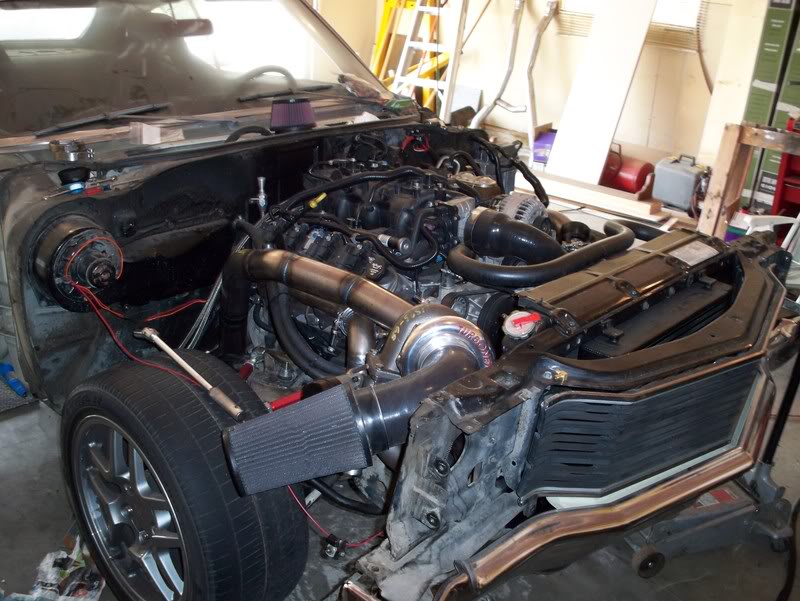
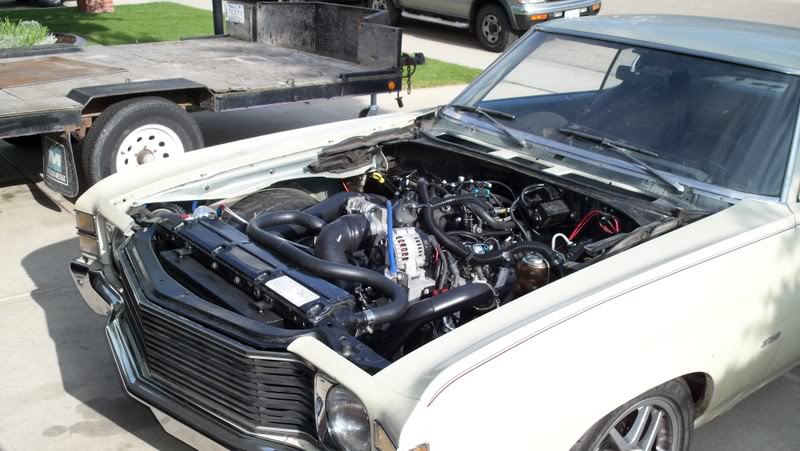
Engine: - 2003 Chevrolet 6.0l. 364ci. �Throttle by Wire�
- 2002 Camaro Hooker Super Comp LT headers
- Harness modified by Wait4Me Performance.
- All emissions and torque management removed
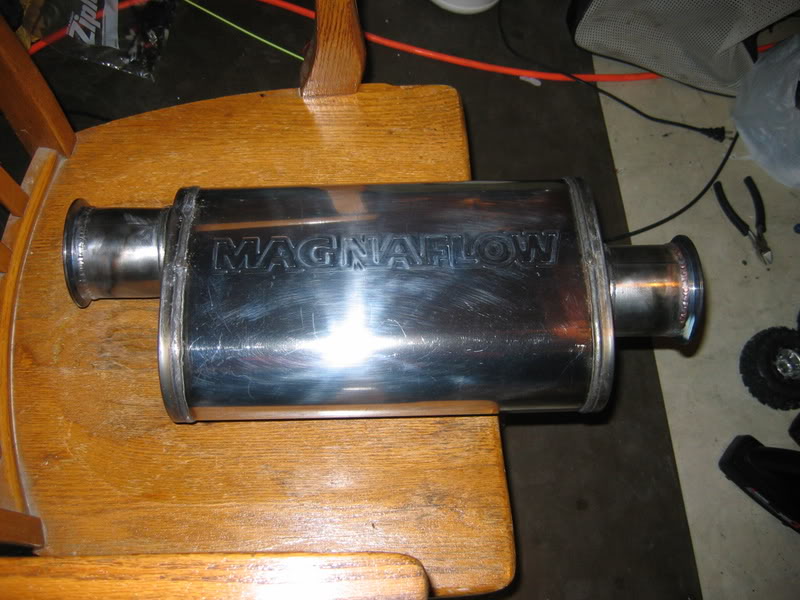
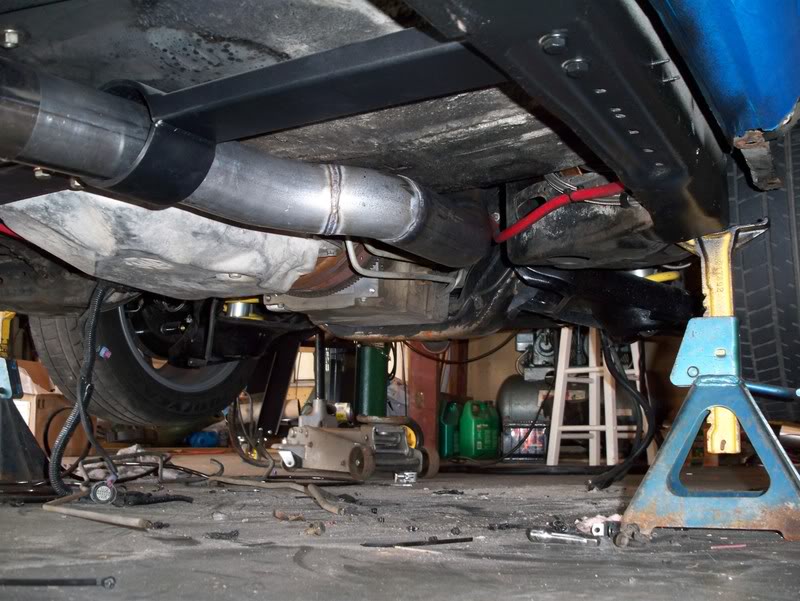
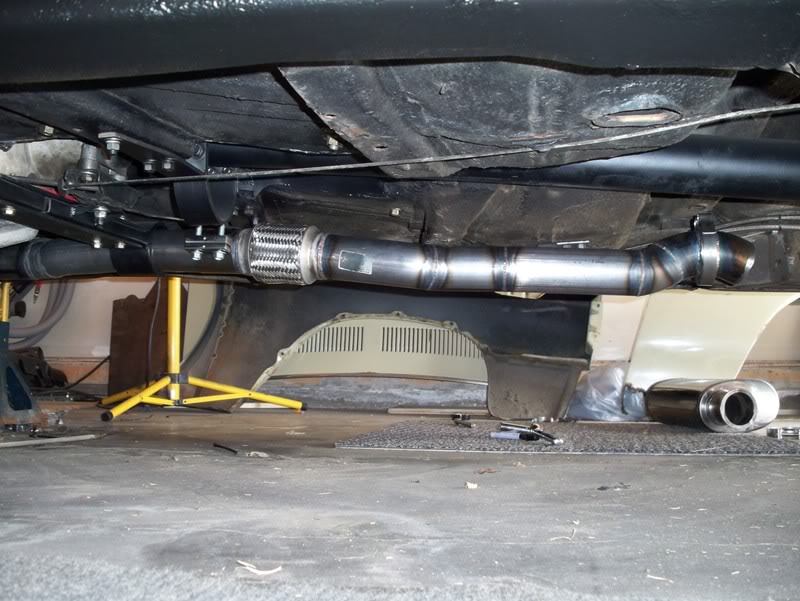
Exhaust System: - Magnaflow 3� Stainless Steel Mufflers
- Custom 3� exhaust by Tim MacNeil
Fuel System: - Tanks Inc intank walbro 255 pump w/ mini sump
- Stainless Steel Braided fuel lines assembled
Cooling System: - 4 core high efficiency radiator re-cored by Hi-Tech Radiator
- Lincoln Mark VIII Cooling fan
- Delta Control, fan controller
Transmission: - 2003 GM 4L80E
- B&M Super Cooler Transmission Cooler w/ fan
Electrical: - Low/High headlights on relays
- Complete M.A.D. electrical conversion (firewall forward)
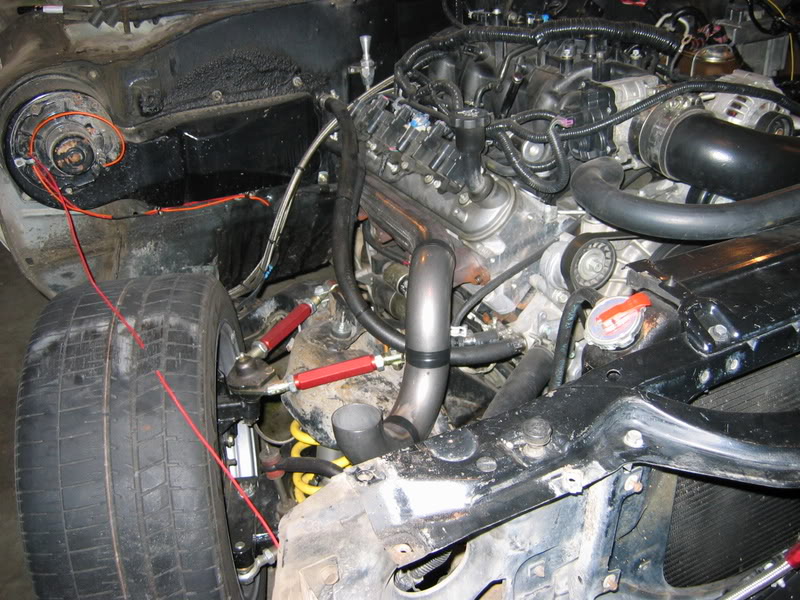
Steering: - 1999 Jeep Grand Cherokee Power Steering box 12.5:1 Ratio
- Heim joint outer tie rod ends
- Bump Steer adjusters
- Rag joint on steering shaft, Flaming River FLA-FR1728DD
Suspension:
Front: - Coleman Racing Fabricated 9� Impala spindles
- Impala hubs, bearings, seals and dust caps
- SPC Performance fully adjustable upper control arms
- Afco Racing steel/nylon lower control arm bushings
- VariShocks revalved by Alston/Chassisworks, 16 position adjustable
- Braced and Strapped factory lower control arms
- 650lb rate springs
- Speedway Motors �tall adjusters�
- Factory small block sway bar
Rear: - 12 bolt. Auburn posi w/ 4:10 gears, aluminum diff cover with supports
- Speedway Motors axle side Panhard bar mount
- Custom frame side Panhard bar mount
- Panhard bar made w/ AllStar hex tubing w/ QA1 Heim Joint
- Lower Control arms made w/ AllStar hex tubing w/ QA1 Heim Joints
Brakes: - 2003 Cadillac Escalade Hydroboost brake assist
Front: - Outlaw Billet Aluminum 4 pot calipers
- Wilwood Caliper adapter
- Impala 12� rotors
Rear: - BAER 12� rotors
- BAER single pot calipers w/ park brake
Wheels:
Front: - 2004 Corvette Z06 17� x 9.5�
Rear: - 2004 Corvette Z06 18� x 10.5�
Tires:
Front: - Falken RT615 275/40/17
Rear: - MT ET streets 305/45/18
Wheel Adapters: Custom machined by Trevor at Colecraft.
Interior:
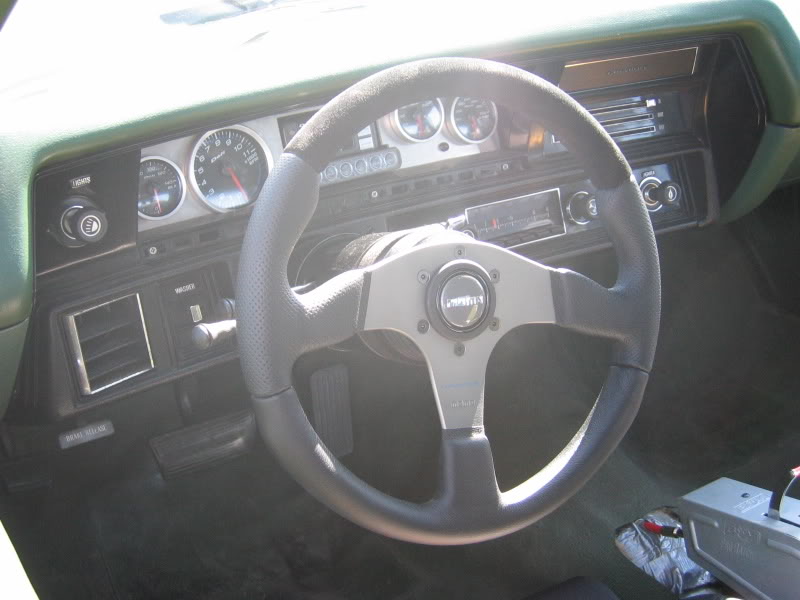
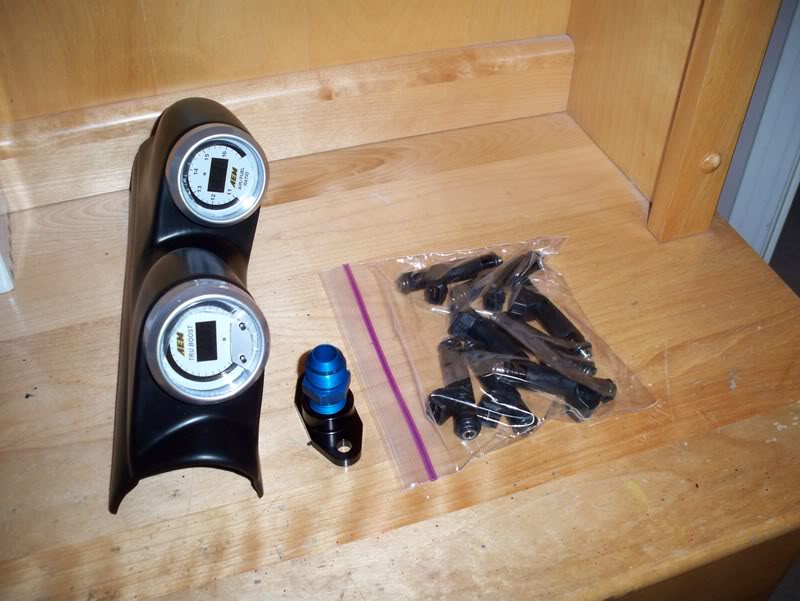
Gauges: - Complete Defi Gauges mounted in custom bezel
Shifter: - B&M Pro Ratchet Shifter
Seats: - Megan Racing
Transmission Tunnel: - Custom fabricated by Greg @ HD Ornamental Iron Ltd.
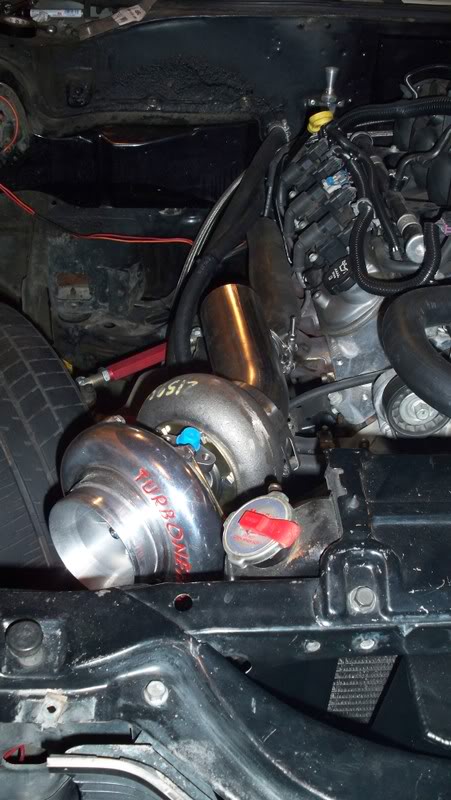
Hair Dryer combo.
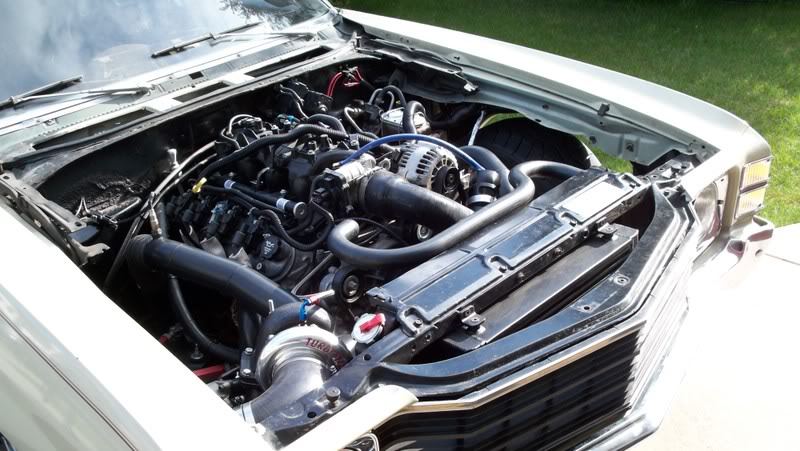
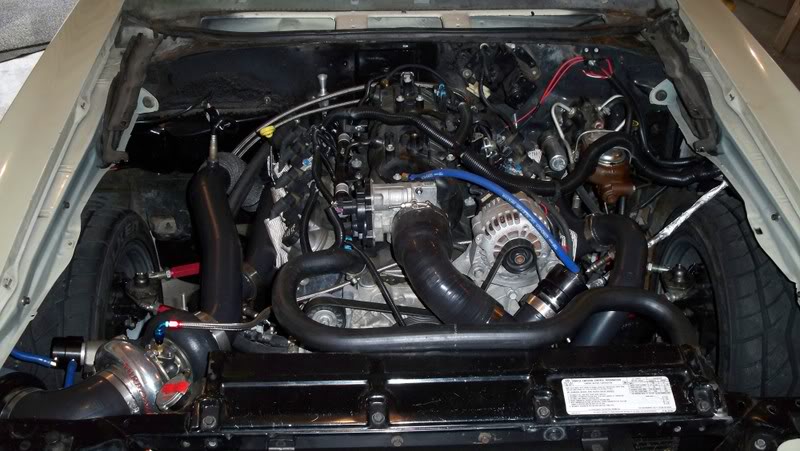
- Turbonetics t76 with f1 wheel
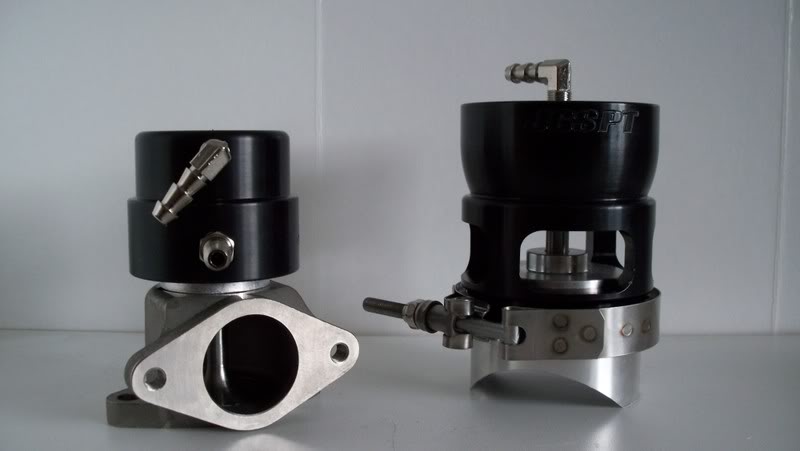
- JGS 56mm bov
- JGS 40mm gate
- 60lb injectors
- 2.5" hot side 3.0" cold side
- extreme turbo system built v mount intercooler
Here are a couple shots of the car.
old wheels.
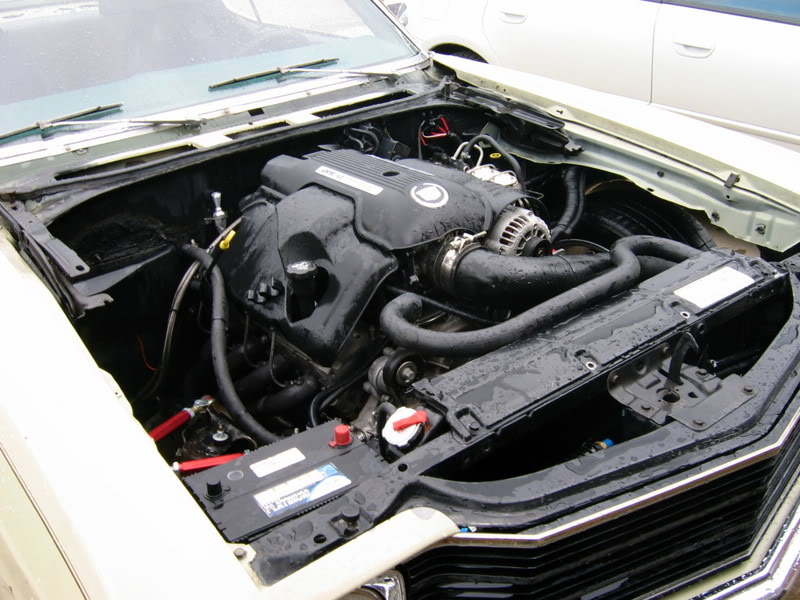
First year with engine in the car.

Dash.
At a show.
Eh.
Near the end lol.
From the rear.
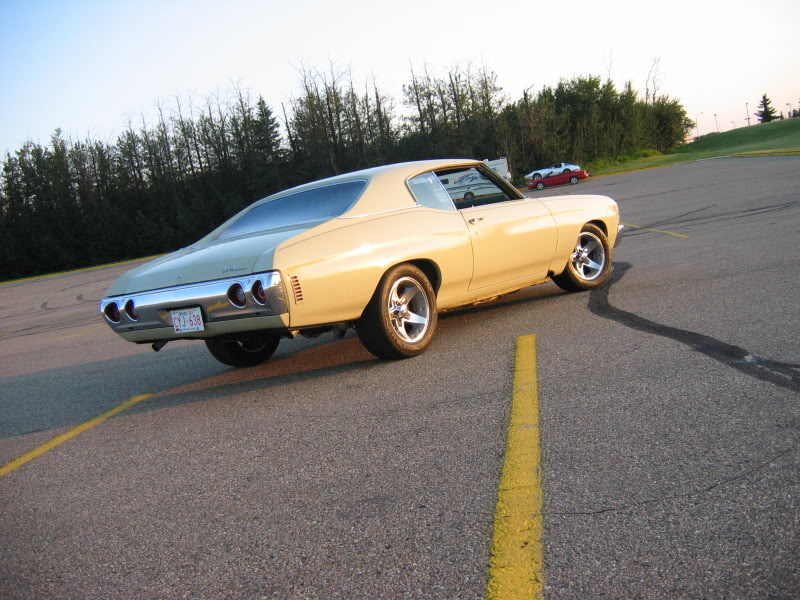
Heres my girl. I exploit her, I beat her, she's purpose built. If it turns out sorta pretty then no complaints. I drive it hard, no $10,000 paint jobs here.
Last year
old 10 bolt with panhard bar. new 12 bolt is in with panhard bar
front suspension.
wet bitch.
car show.
Start out as a bone stock 72 Chevelle malibu from my grandfather(he bought it brand new). 4 wheel drums, 350, turbo 350 tranny, 10 bolt, power nothing, 1 speaker am radio.
I first put true duals on it, rebuilt the heads, cleaned them up, slapped a cam, LT headers, and some carb adjustments and ran it for a year. Also had S10 ZQ8 wheels on it(the 5 spoke style)
I then installed the following within the next 3 years(all major suspension was done winter of 06). I put some on in the winter, drove it a summer, took it apart that winter, and drove it a summer, etc.
Engine: - 2003 Chevrolet 6.0l. 364ci. �Throttle by Wire�
- 2002 Camaro Hooker Super Comp LT headers
- Harness modified by Wait4Me Performance.
- All emissions and torque management removed
Exhaust System: - Magnaflow 3� Stainless Steel Mufflers
- Custom 3� exhaust by Tim MacNeil
Fuel System: - Tanks Inc intank walbro 255 pump w/ mini sump
- Stainless Steel Braided fuel lines assembled
Cooling System: - 4 core high efficiency radiator re-cored by Hi-Tech Radiator
- Lincoln Mark VIII Cooling fan
- Delta Control, fan controller
Transmission: - 2003 GM 4L80E
- B&M Super Cooler Transmission Cooler w/ fan
Electrical: - Low/High headlights on relays
- Complete M.A.D. electrical conversion (firewall forward)
Steering: - 1999 Jeep Grand Cherokee Power Steering box 12.5:1 Ratio
- Heim joint outer tie rod ends
- Bump Steer adjusters
- Rag joint on steering shaft, Flaming River FLA-FR1728DD
Suspension:
Front: - Coleman Racing Fabricated 9� Impala spindles
- Impala hubs, bearings, seals and dust caps
- SPC Performance fully adjustable upper control arms
- Afco Racing steel/nylon lower control arm bushings
- VariShocks revalved by Alston/Chassisworks, 16 position adjustable
- Braced and Strapped factory lower control arms
- 650lb rate springs
- Speedway Motors �tall adjusters�
- Factory small block sway bar
Rear: - 12 bolt. Auburn posi w/ 4:10 gears, aluminum diff cover with supports
- Speedway Motors axle side Panhard bar mount
- Custom frame side Panhard bar mount
- Panhard bar made w/ AllStar hex tubing w/ QA1 Heim Joint
- Lower Control arms made w/ AllStar hex tubing w/ QA1 Heim Joints
Brakes: - 2003 Cadillac Escalade Hydroboost brake assist
Front: - Outlaw Billet Aluminum 4 pot calipers
- Wilwood Caliper adapter
- Impala 12� rotors
Rear: - BAER 12� rotors
- BAER single pot calipers w/ park brake
Wheels:
Front: - 2004 Corvette Z06 17� x 9.5�
Rear: - 2004 Corvette Z06 18� x 10.5�
Tires:
Front: - Falken RT615 275/40/17
Rear: - MT ET streets 305/45/18
Wheel Adapters: Custom machined by Trevor at Colecraft.
Interior:
Gauges: - Complete Defi Gauges mounted in custom bezel
Shifter: - B&M Pro Ratchet Shifter
Seats: - Megan Racing
Transmission Tunnel: - Custom fabricated by Greg @ HD Ornamental Iron Ltd.
Hair Dryer combo.
- Turbonetics t76 with f1 wheel
- JGS 56mm bov
- JGS 40mm gate
- 60lb injectors
- 2.5" hot side 3.0" cold side
- extreme turbo system built v mount intercooler
Here are a couple shots of the car.
old wheels.
First year with engine in the car.
Dash.
At a show.
Eh.
Near the end lol.
From the rear.
Last edited by ls1_chevelle; 04-15-2014 at 03:37 PM.
 10-29-2008, 08:47 PM
#2
TECH Fanatic
Thread Starter
iTrader: (9)
Join Date: Mar 2004
Location: CANADA!
Posts: 1,347
Likes: 0
Received 0 Likes
on
0 Posts
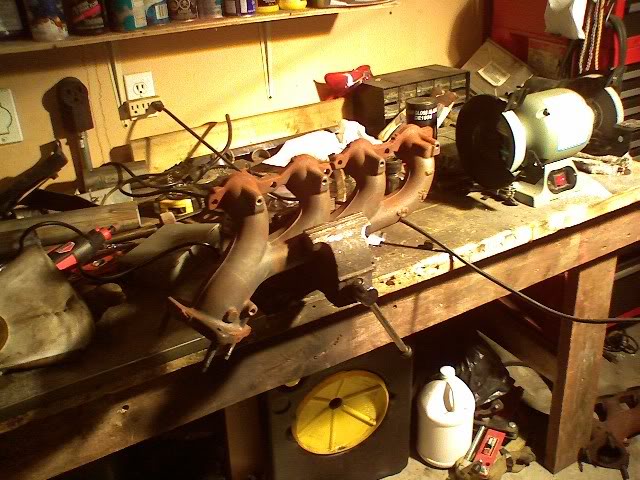
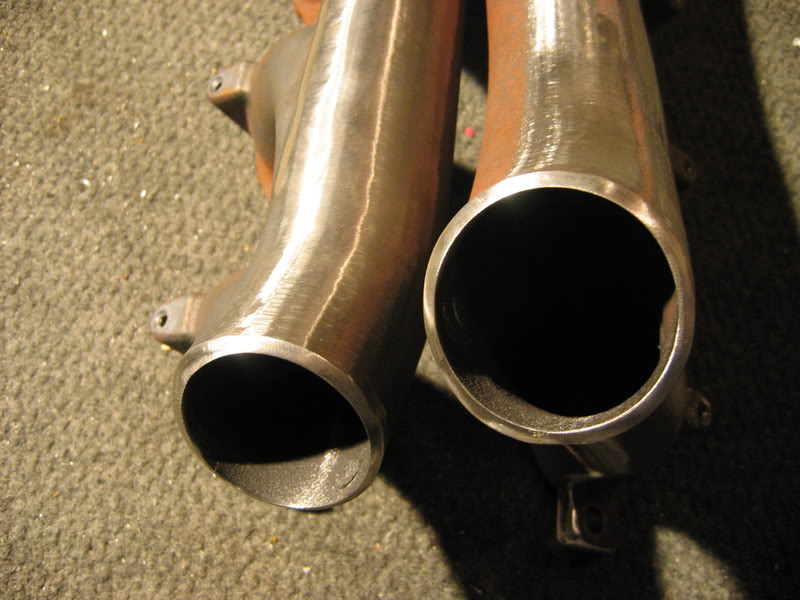
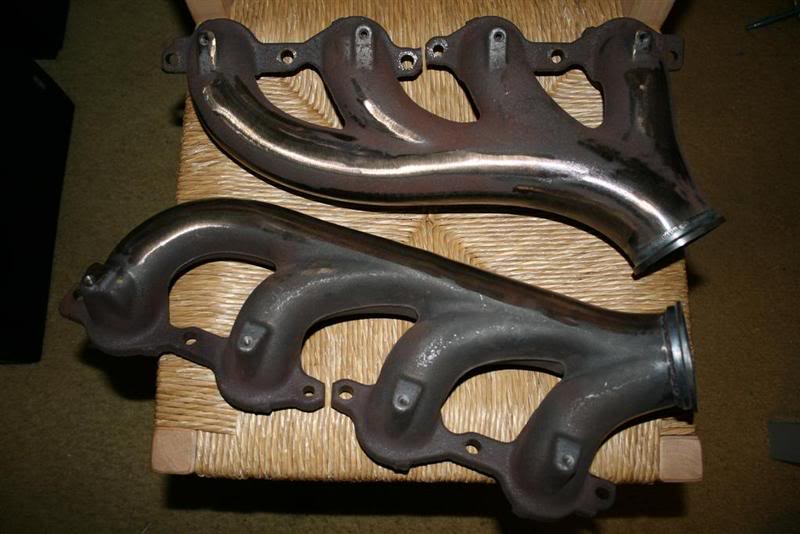
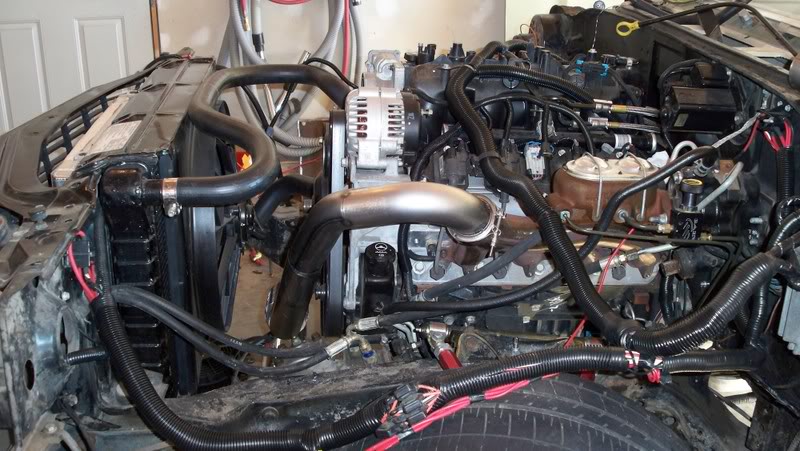
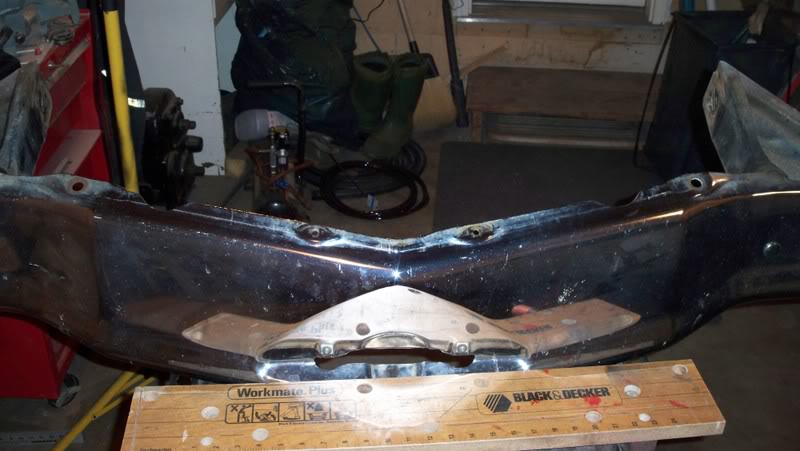
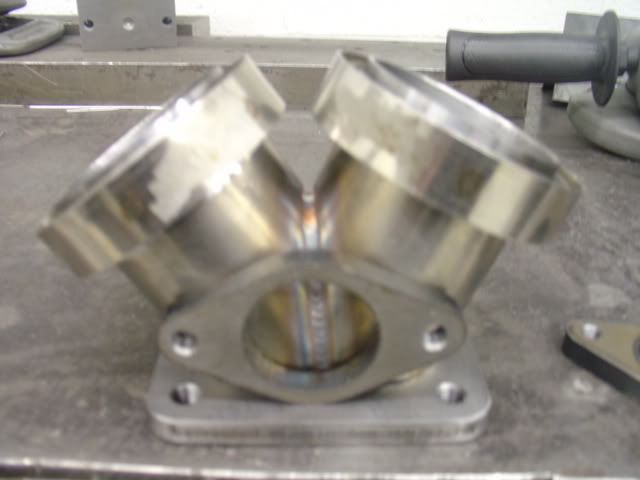
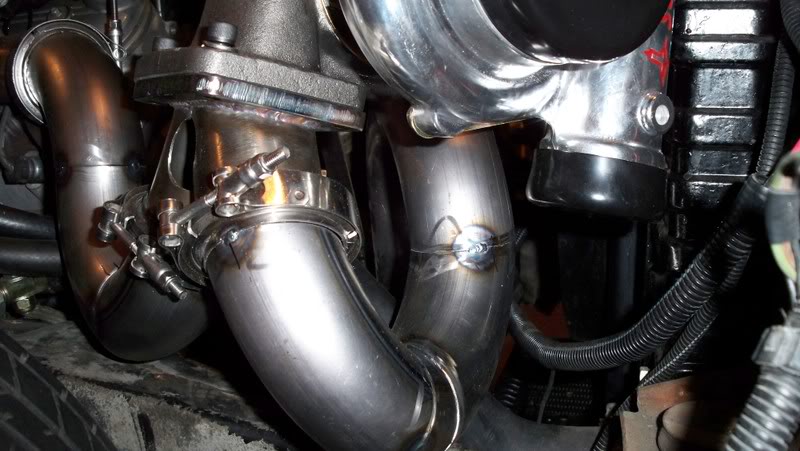
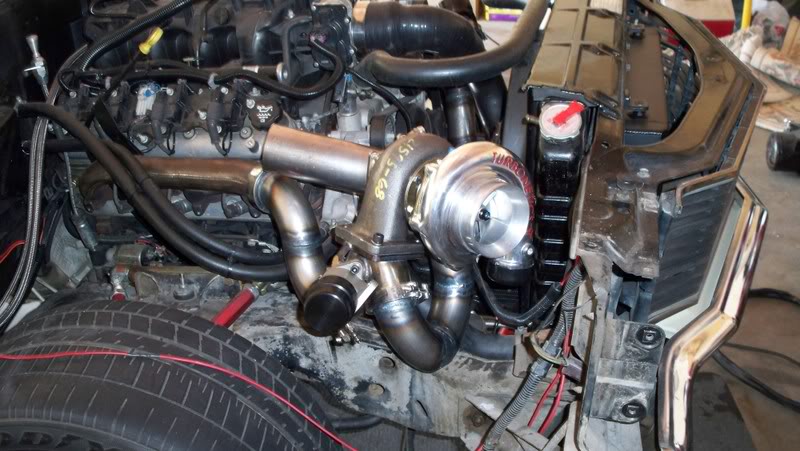
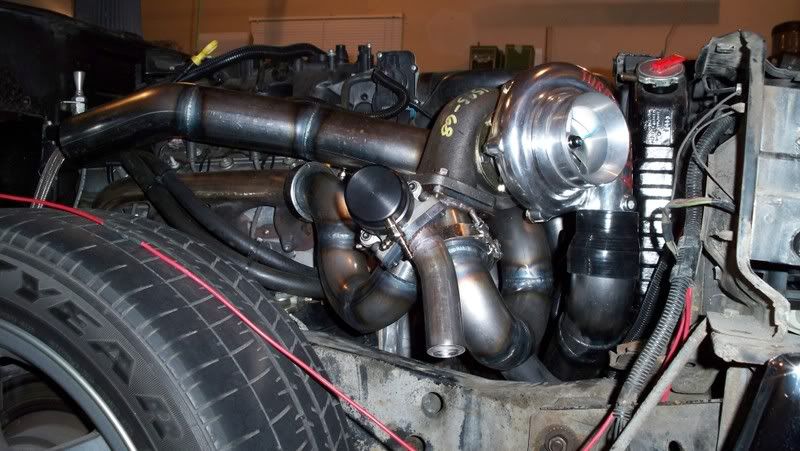
Got my 6.0l manifolds. Cut the stock flange off, cut and ground smooth casting lines, numbers, etc. Cleans them up a bunch. Got them mounted and mocked some piping up. Waiting on Turbo and money for more piping. Sorry for the camera phone pics.
What the manifolds started out as. You can see the mostly finished product in the pics.
Drivers side. Hot side will go down under harmonic balancer then back up.
Front shot.
Passenger side. Essentially where the turbo is going to sit.
Passenger side again.
And what the manifolds look like cleaned up. They will get blasted then coated.
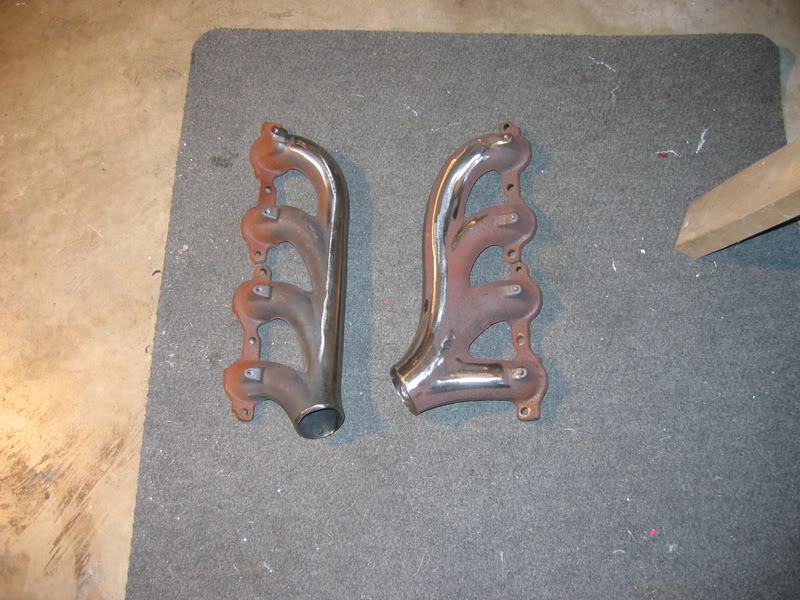
bevel ready for my buddy.
manifolds are done.
What the manifolds started out as. You can see the mostly finished product in the pics.
Drivers side. Hot side will go down under harmonic balancer then back up.
Front shot.
Passenger side. Essentially where the turbo is going to sit.
Passenger side again.
And what the manifolds look like cleaned up. They will get blasted then coated.
bevel ready for my buddy.
manifolds are done.
10-29-2008, 08:49 PM
#3
TECH Fanatic
Thread Starter
iTrader: (9)
Join Date: Mar 2004
Location: CANADA!
Posts: 1,347
Likes: 0
Received 0 Likes
on
0 Posts
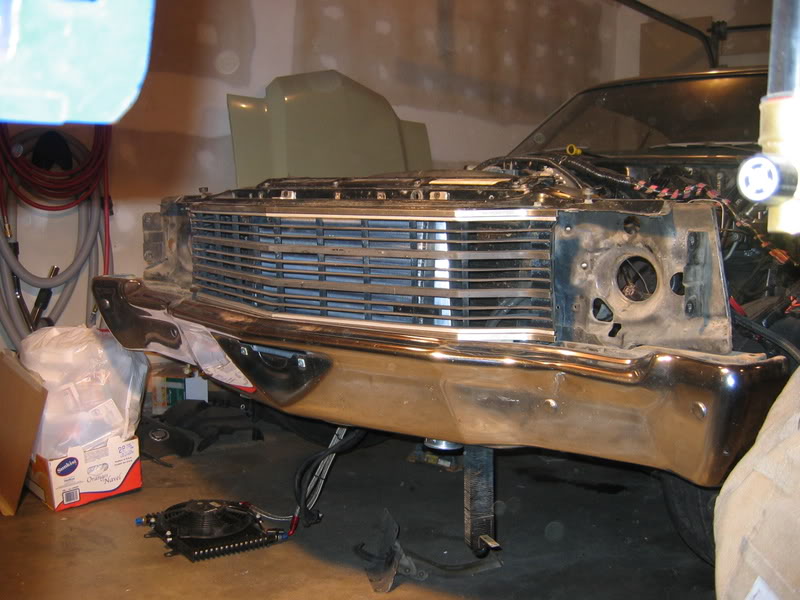
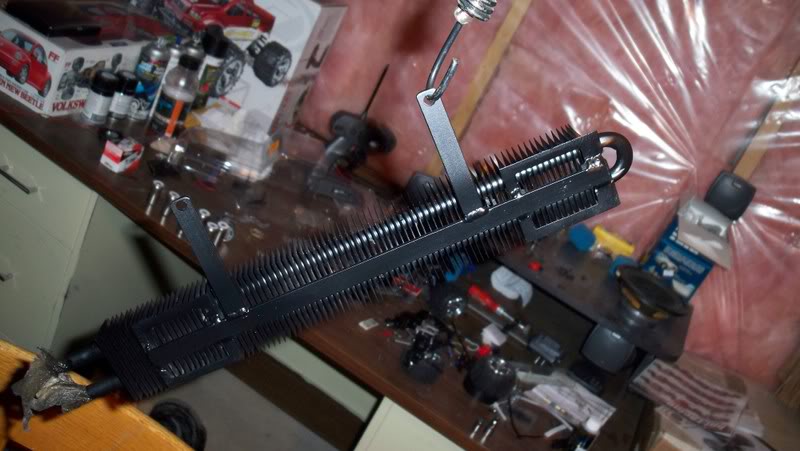
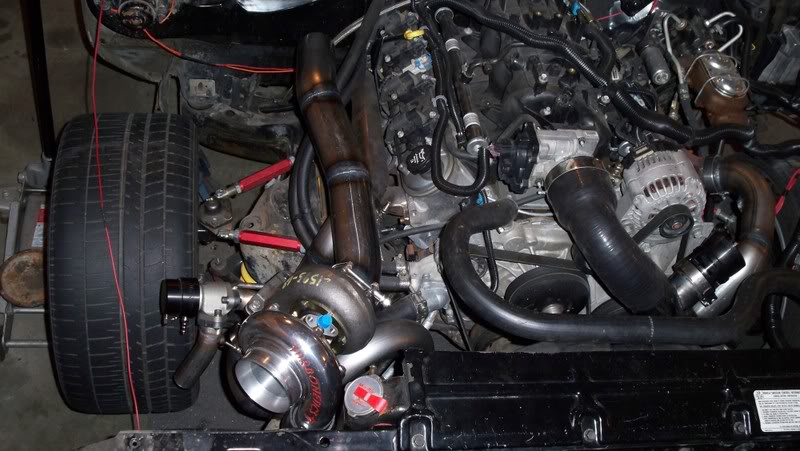
Custom intercooler from ETS. Worth every penny. IATs are at ambient to below abient when cruising!
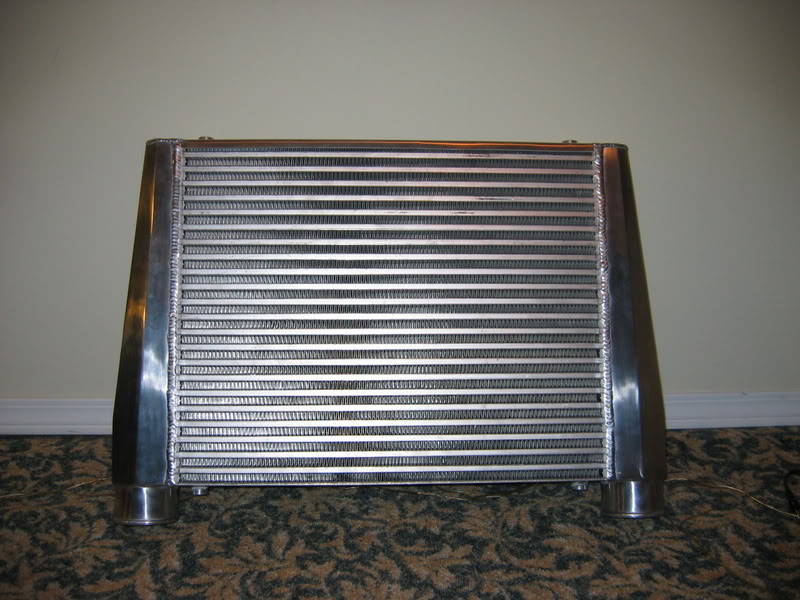
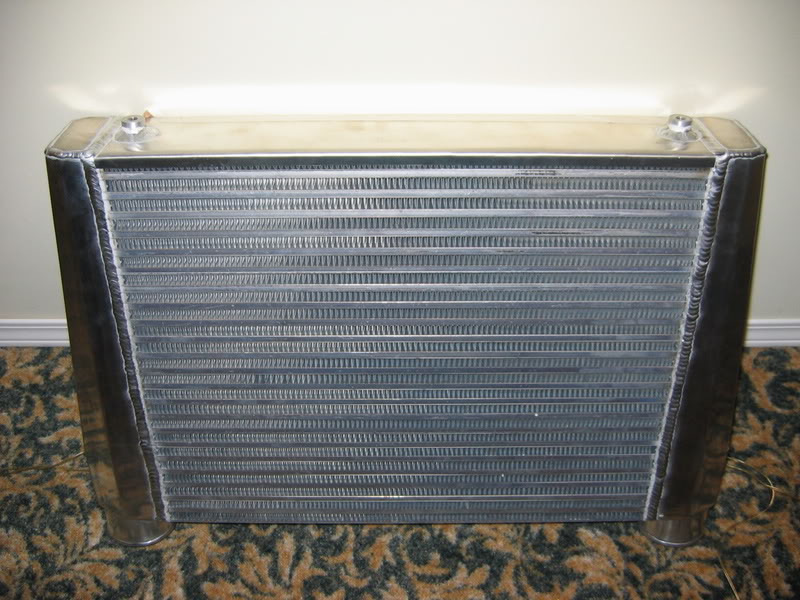
Got the intercooler hanging now. I will clean up the mounts, and get them coated with everything else when the time comes. Brackets were super simple. Chopped down 1" aluminum angle. Counter sunk allen head bolts.
Quick shot of the mounts. Very sturdy.
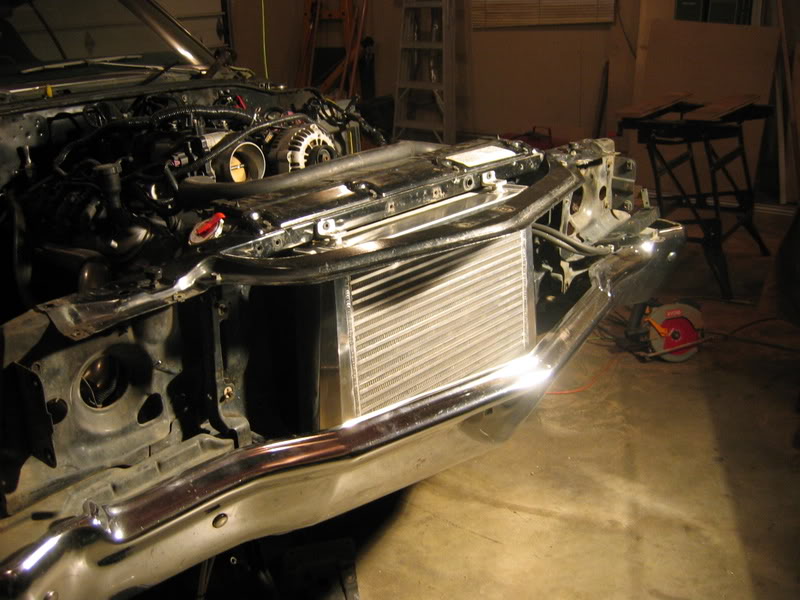
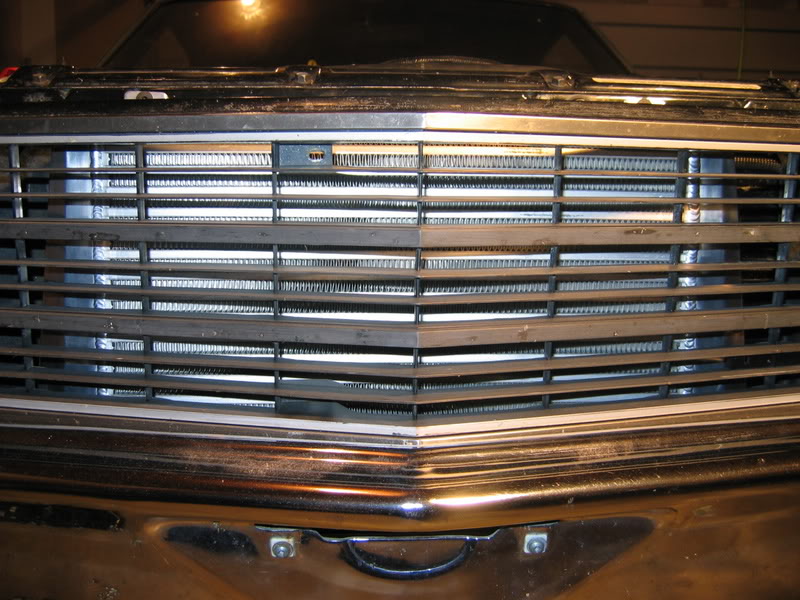
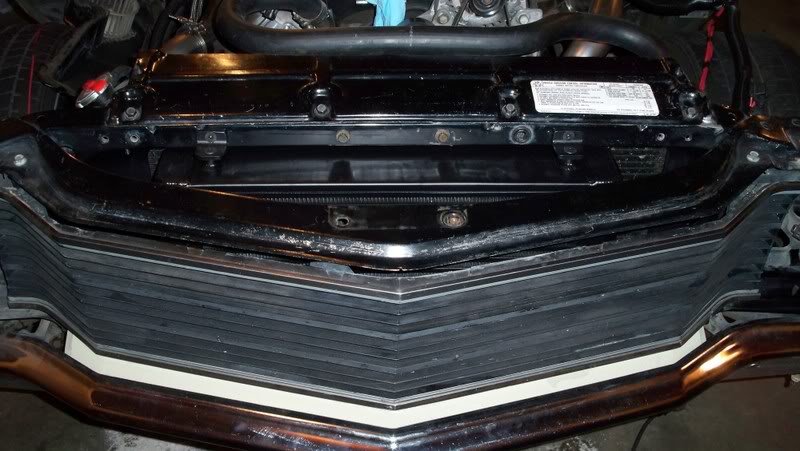
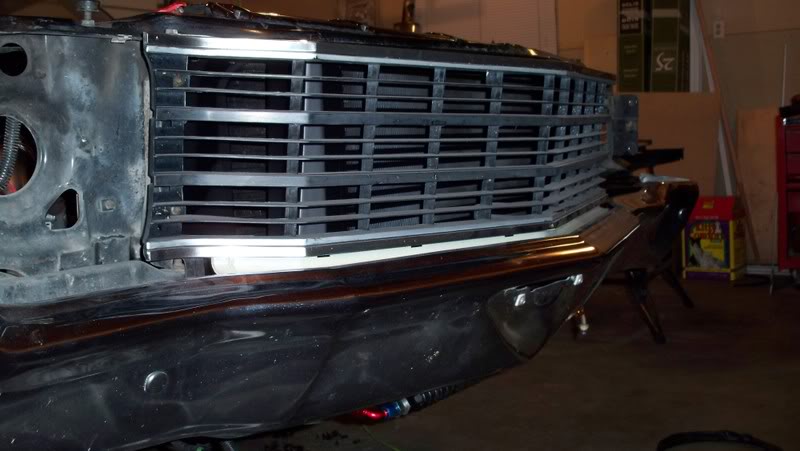
Straight on with the grill in.
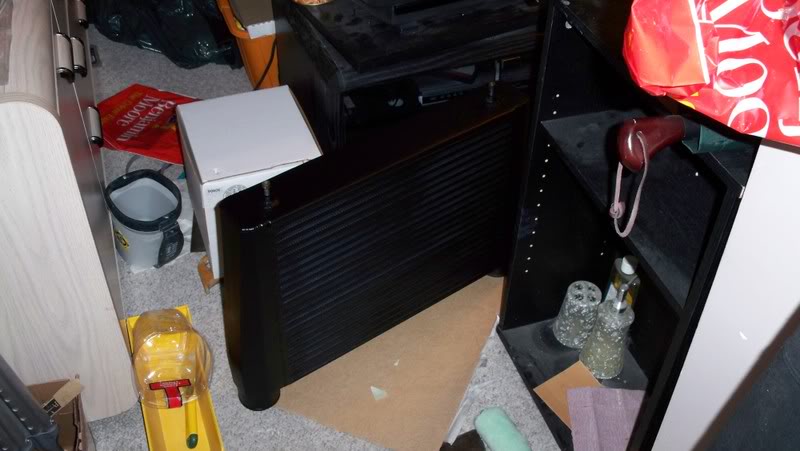
From the side. Camera flash, without flash its barely visable but I am going to paint the intercooler semi gloss black.
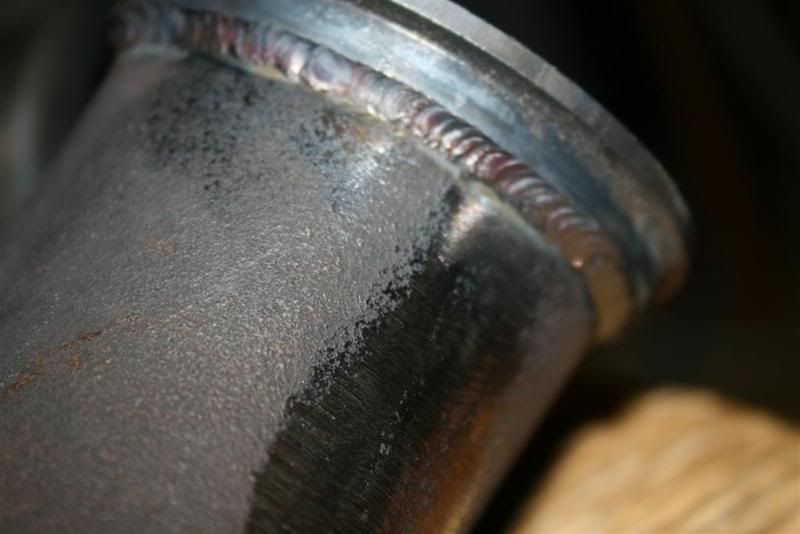
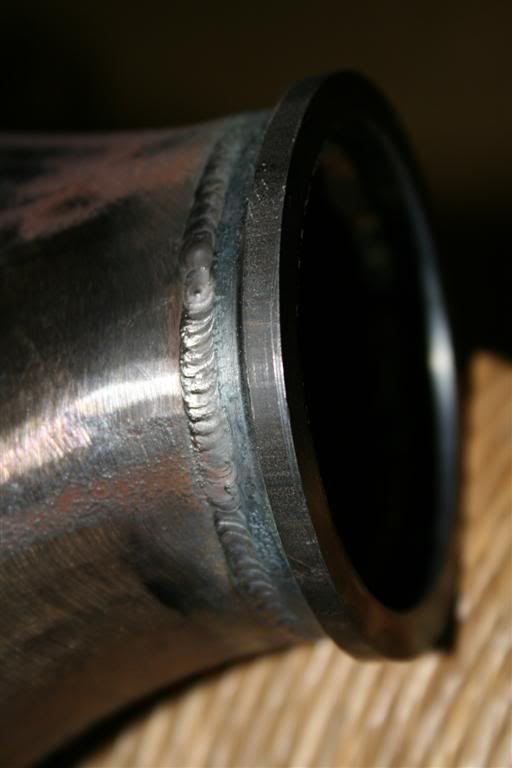
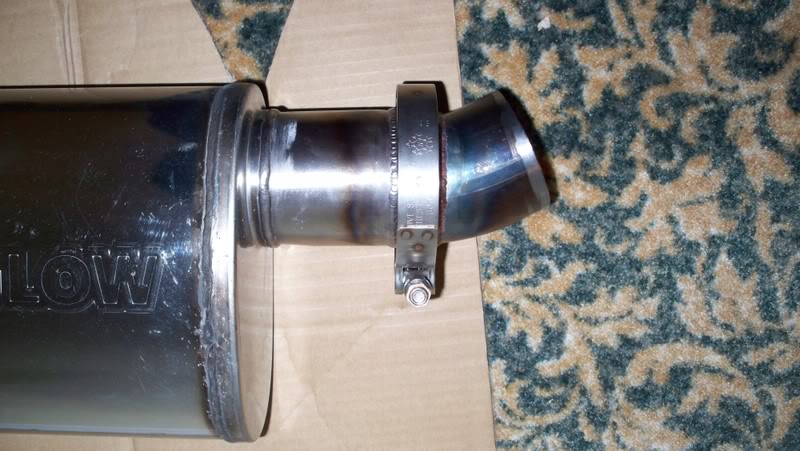
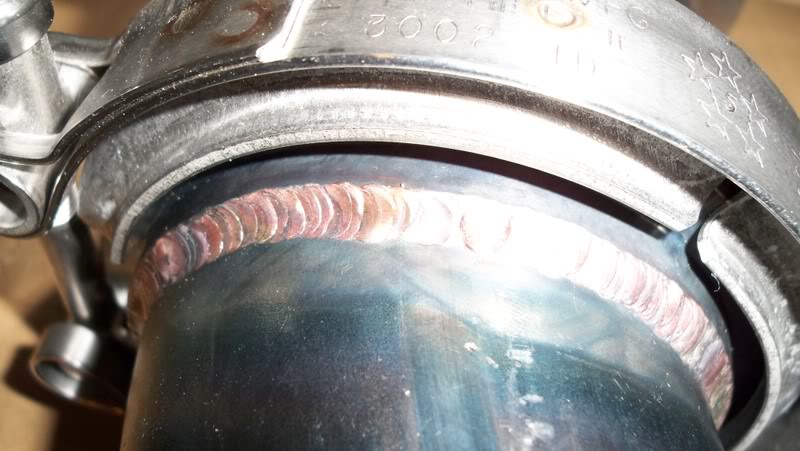
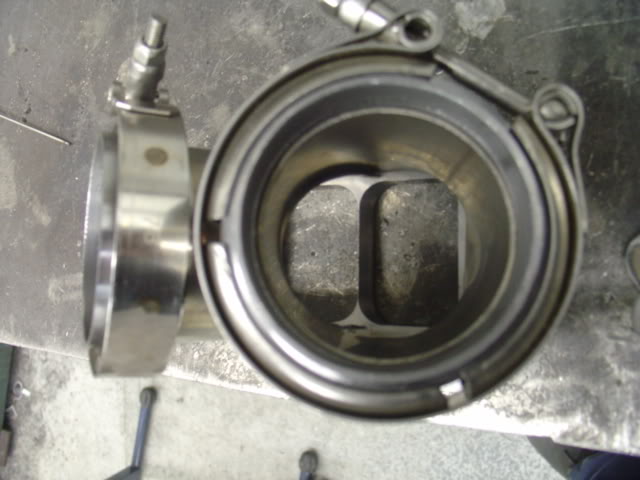
I welded some v bands onto my magnaflow muffler tonight. Reason for doing it is I really hate the looks of cut outs so my muffler will mount to my downpipe via a v band, then the other end of the muffler with have a turn down tip with a v band aswell. That way I can run a muffler if I want or take the turn down off the muffler and put it on the downpipe running no muffler. :y :8
Mufflers not brand new. Its seen a year of abuse, car too low scrapin on speed bumps, etc. my welds are coming, need more consistancy though. :6
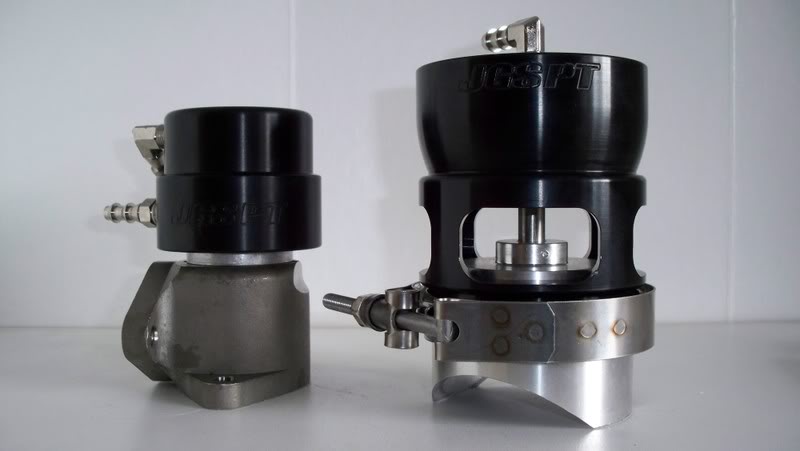
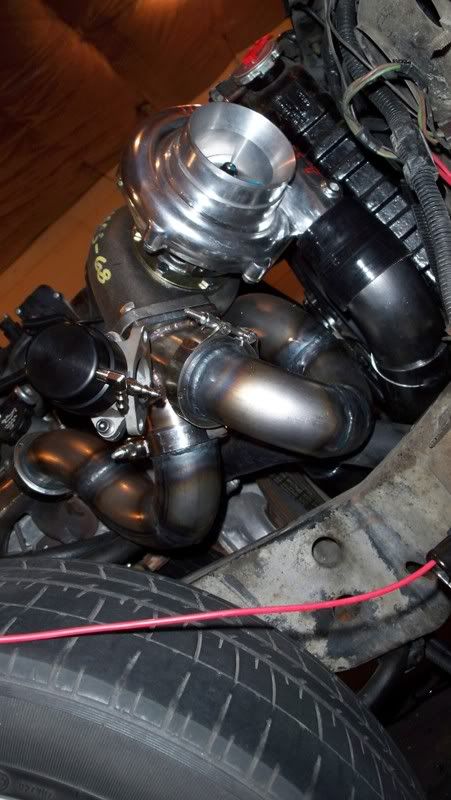
JGS 56mm BOV and 40mm wastegate.
Got the intercooler hanging now. I will clean up the mounts, and get them coated with everything else when the time comes. Brackets were super simple. Chopped down 1" aluminum angle. Counter sunk allen head bolts.
Quick shot of the mounts. Very sturdy.
Straight on with the grill in.
From the side. Camera flash, without flash its barely visable but I am going to paint the intercooler semi gloss black.
I welded some v bands onto my magnaflow muffler tonight. Reason for doing it is I really hate the looks of cut outs so my muffler will mount to my downpipe via a v band, then the other end of the muffler with have a turn down tip with a v band aswell. That way I can run a muffler if I want or take the turn down off the muffler and put it on the downpipe running no muffler. :y :8
Mufflers not brand new. Its seen a year of abuse, car too low scrapin on speed bumps, etc. my welds are coming, need more consistancy though. :6
JGS 56mm BOV and 40mm wastegate.
10-29-2008, 08:51 PM
#4
TECH Fanatic
Thread Starter
iTrader: (9)
Join Date: Mar 2004
Location: CANADA!
Posts: 1,347
Likes: 0
Received 0 Likes
on
0 Posts
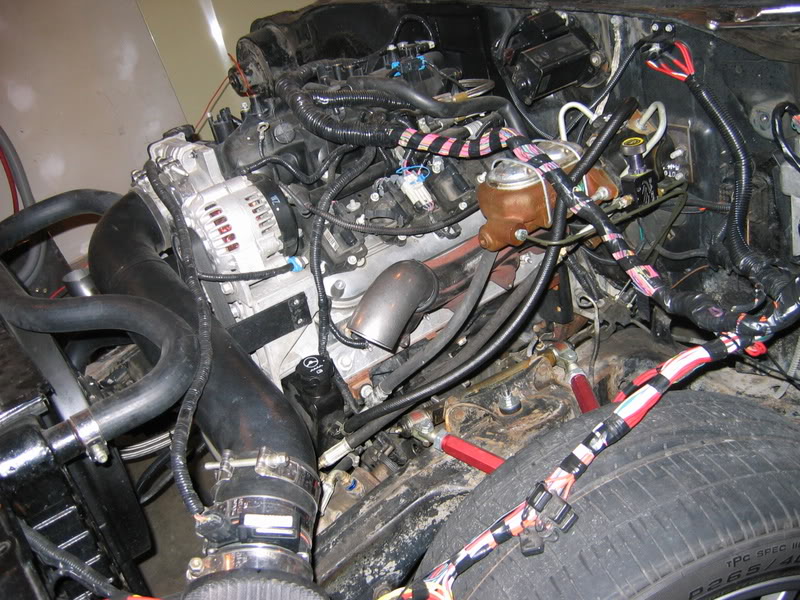
Starting to make some nice progress here.
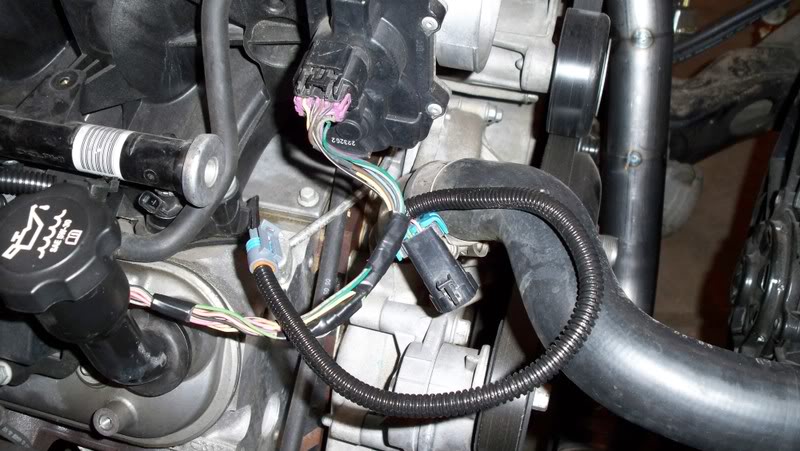
I managed to get all of the injector clips converted over to ls1 car style for the motron 60lb injectors.
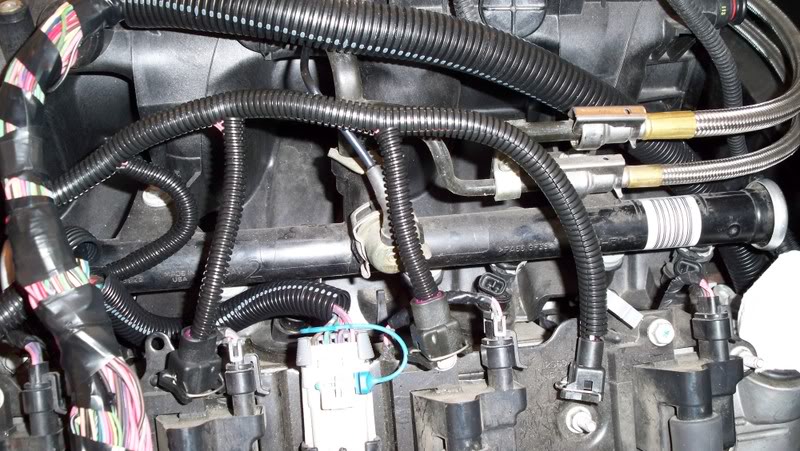
Also got the harness/car converted from MAF to Speed Density. IAT is now wired in and have the fast log IAT sensor.
Got my metal order in from Racing Solutions.
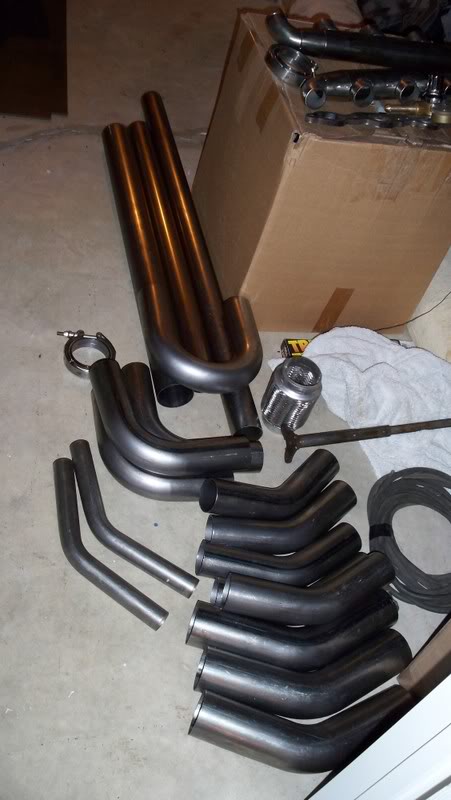
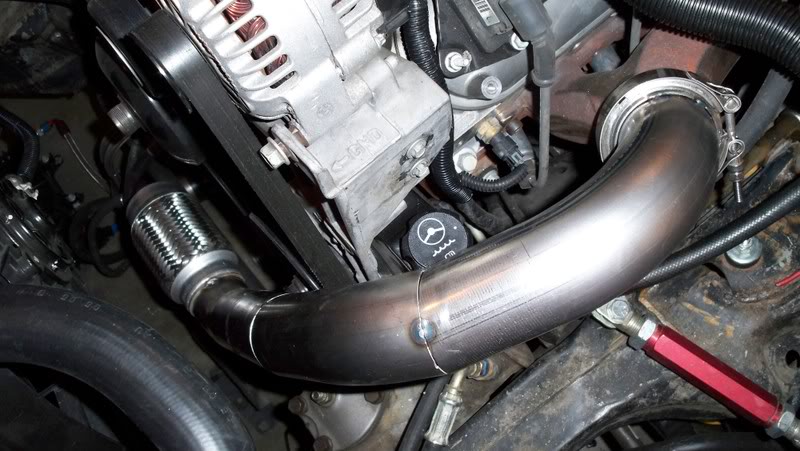
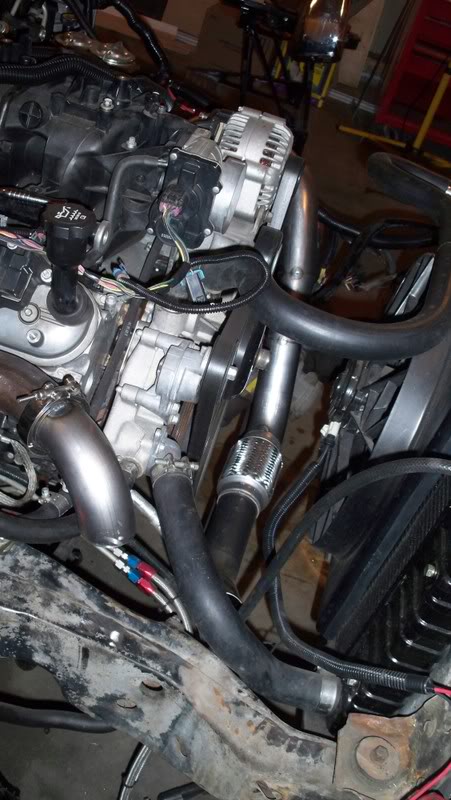
I got some of the drivers side hot side down today. Tacked up.
Another shot.
I welded up the turn down for my muffler today. Waiting for my merge collector and turbo. Then I can lay some more pipe.

coped out the bumper for the intercooler outlets/inlets to allow for some wiggle room. Have to move my PS cooler so I will do that tomorrow and make some mounts for it. And just another shot of the hot side.
I managed to get all of the injector clips converted over to ls1 car style for the motron 60lb injectors.
Also got the harness/car converted from MAF to Speed Density. IAT is now wired in and have the fast log IAT sensor.
Got my metal order in from Racing Solutions.
I got some of the drivers side hot side down today. Tacked up.
Another shot.
I welded up the turn down for my muffler today. Waiting for my merge collector and turbo. Then I can lay some more pipe.
coped out the bumper for the intercooler outlets/inlets to allow for some wiggle room. Have to move my PS cooler so I will do that tomorrow and make some mounts for it. And just another shot of the hot side.
10-29-2008, 08:56 PM
#5
TECH Fanatic
Thread Starter
iTrader: (9)
Join Date: Mar 2004
Location: CANADA!
Posts: 1,347
Likes: 0
Received 0 Likes
on
0 Posts
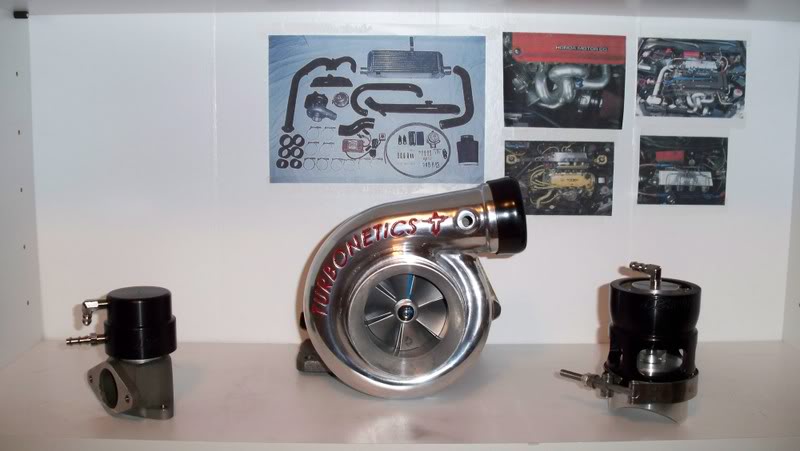
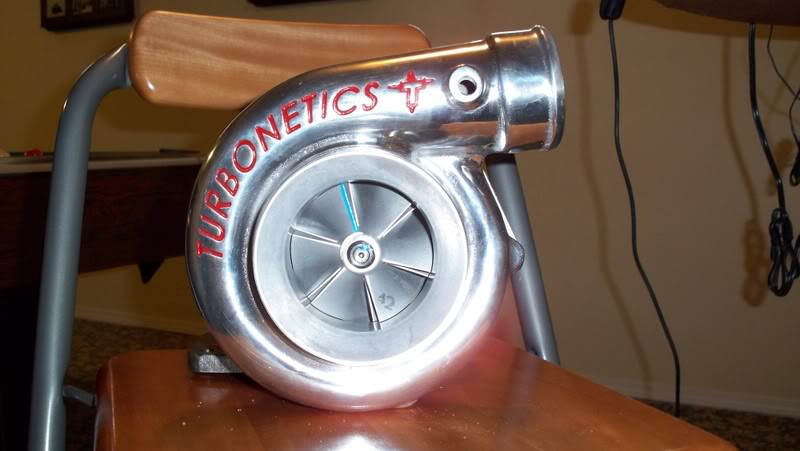
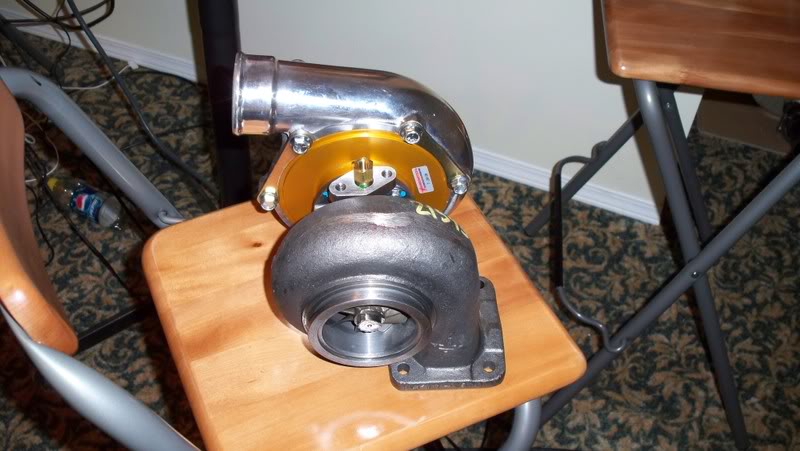
Cat drug this in.
T76, .96 a/r, F1 wheel.
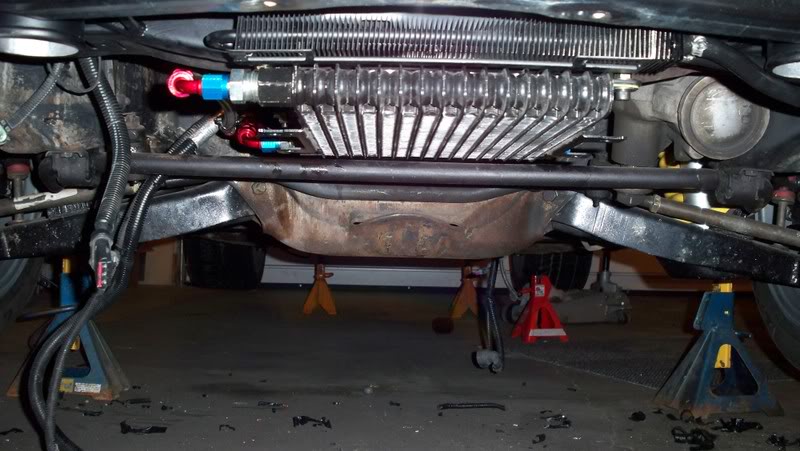
And my oil cooler mount. This is mounted under my rad with my tranny cooler. just used a 2 bolts, through the bottom of the rad support.
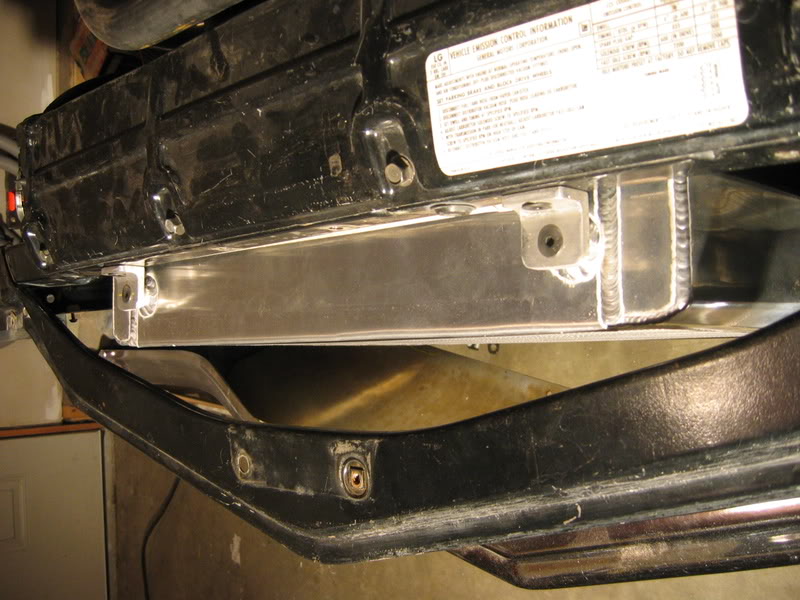
Christ, Moving **** and making brackets is getting tiresome lol. Got the PS and Tranny cooler mounted up, painted, lines ran, etc. Got the intercooler painted. Much more stealthy. Made mounts for the bottom of the intercooler, Now its super solid and tucked up nice against the rad.
With flash. Can barely see the sucker
Tranny cooler.
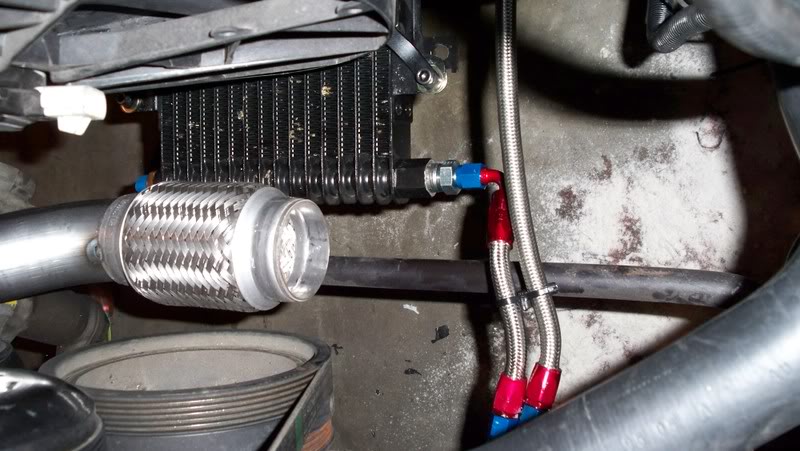
Tranny and PS cooler.
Wastegate hole will go there, but a pipe will be welded moving the gate slightly outwards.
Welded the intercooler to TB today. Cut the hole for my BOV. waiting for my flange to show up. Got the IAT sensor bung welded in.
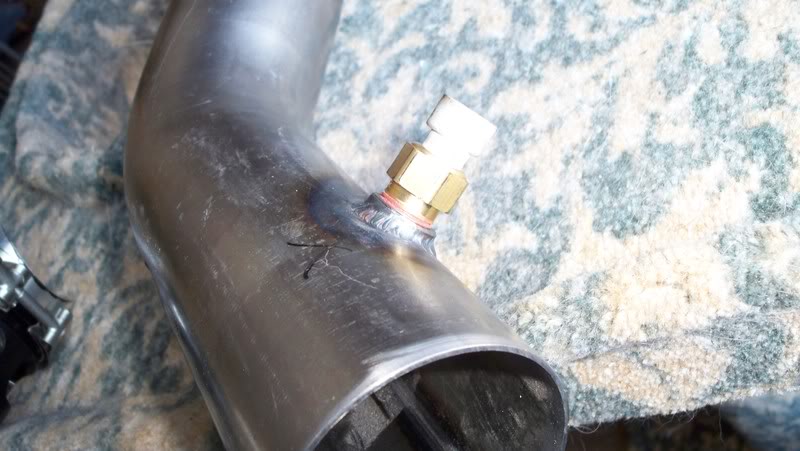
Also got the drivers side hot side welded up. O2 sensor bung welded in aswell.
I'm using the smiley 225 dollar shipped to my door tig lol. What happens when you have parts and get banned from
HMT for a couple days? this.
Got the rest of the hotside done, aside from the wastegate and dump tube. Thats on tomorrows list if I get the hotside all welded out.
T76, .96 a/r, F1 wheel.
And my oil cooler mount. This is mounted under my rad with my tranny cooler. just used a 2 bolts, through the bottom of the rad support.
Christ, Moving **** and making brackets is getting tiresome lol. Got the PS and Tranny cooler mounted up, painted, lines ran, etc. Got the intercooler painted. Much more stealthy. Made mounts for the bottom of the intercooler, Now its super solid and tucked up nice against the rad.
With flash. Can barely see the sucker
Tranny cooler.
Tranny and PS cooler.
Wastegate hole will go there, but a pipe will be welded moving the gate slightly outwards.
Welded the intercooler to TB today. Cut the hole for my BOV. waiting for my flange to show up. Got the IAT sensor bung welded in.
Also got the drivers side hot side welded up. O2 sensor bung welded in aswell.
I'm using the smiley 225 dollar shipped to my door tig lol. What happens when you have parts and get banned from
HMT for a couple days? this.
Got the rest of the hotside done, aside from the wastegate and dump tube. Thats on tomorrows list if I get the hotside all welded out.
10-29-2008, 08:59 PM
#6
TECH Fanatic
Thread Starter
iTrader: (9)
Join Date: Mar 2004
Location: CANADA!
Posts: 1,347
Likes: 0
Received 0 Likes
on
0 Posts
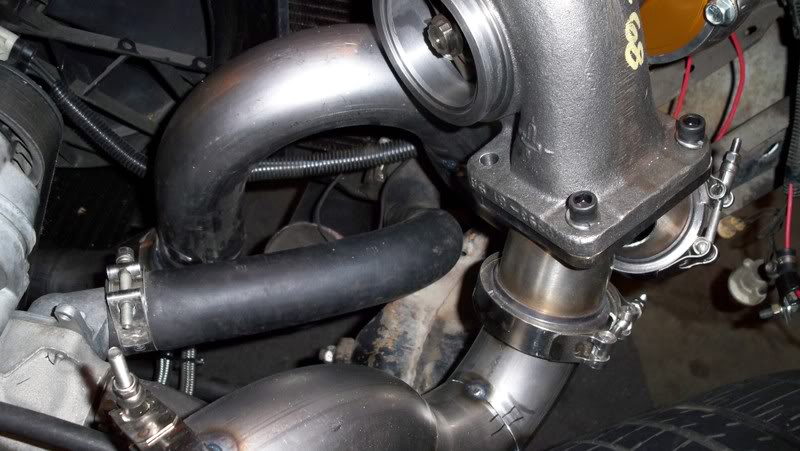
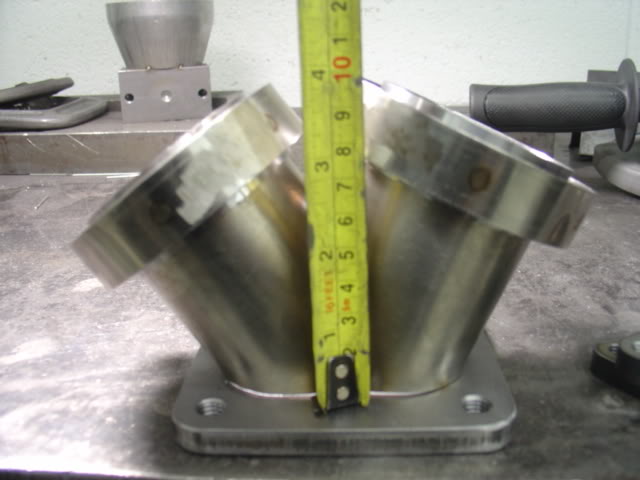
wastegate is braced and welded to the merge.
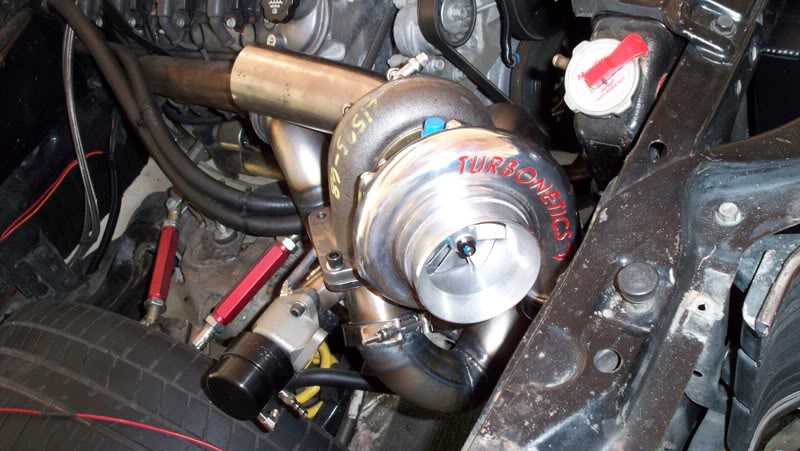
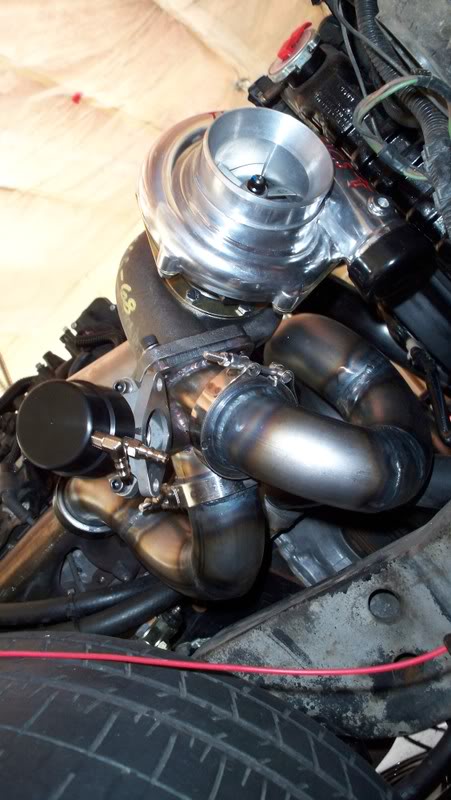
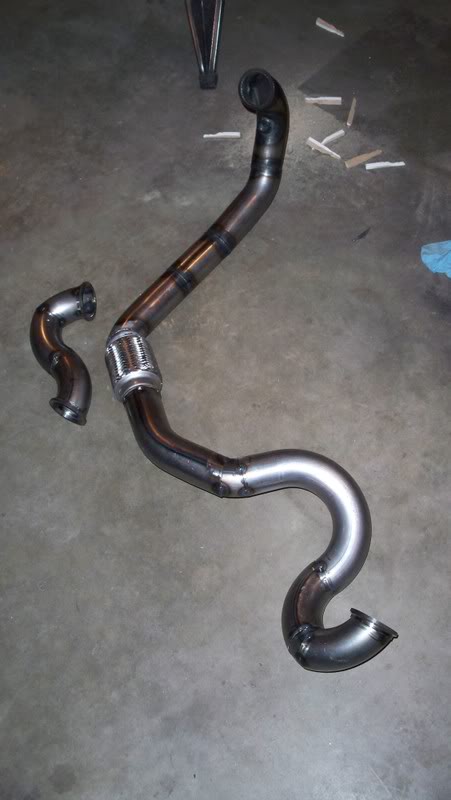
got all of the cold side done. Not welded in pics but now welded. All I need to do now is run the downpipe once I get more material! super stoked.
[IMG]http://i19.photobucket.com/albums/b183/syko_mini/000_0145.jpg[/img
Got the dump tube done and some downpipe action but ran out of bends. gaaaaaay.
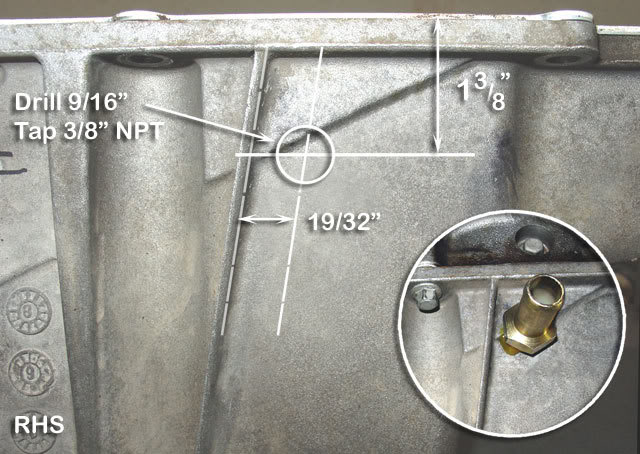
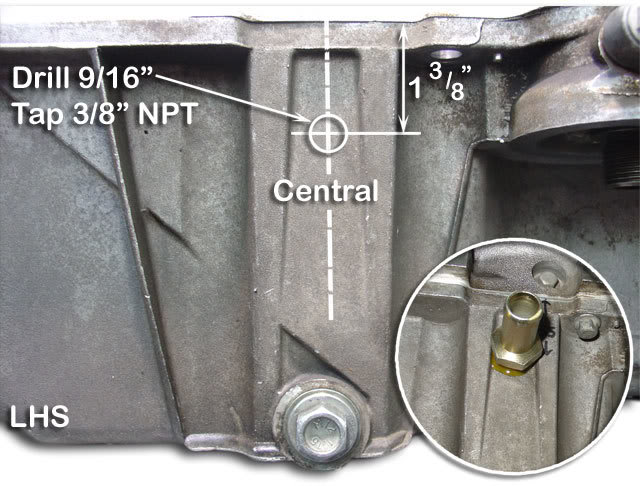
This is personally where I tapped my pan for the return. -10 return, -4 feed. Passenger side is where I went. Feed was from the spot above the filter, remove, drill, tap, done.
Got the downpipe done. Can run it open or with the muffler(using v bands). Wideband bung in... And list of parts I ordered
Auburn Posi stuffed with 342 gears, alum diff cover with main cap supports.
AEM tru boost and Uego.
60lb motron injectors are now installed
All braided feed and return oil lines in the mail
Billet hood pins ordered
ARP rod bolts are here
Falken 615 tires in the mail
custom taylor plug wires on order
Brake lines in the mail
Battery relocated to trunk with battery cut off switch installed
Sure I'm missing some.
 10-29-2008, 09:01 PM
#7
TECH Fanatic
Thread Starter
iTrader: (9)
Join Date: Mar 2004
Location: CANADA!
Posts: 1,347
Likes: 0
Received 0 Likes
on
0 Posts
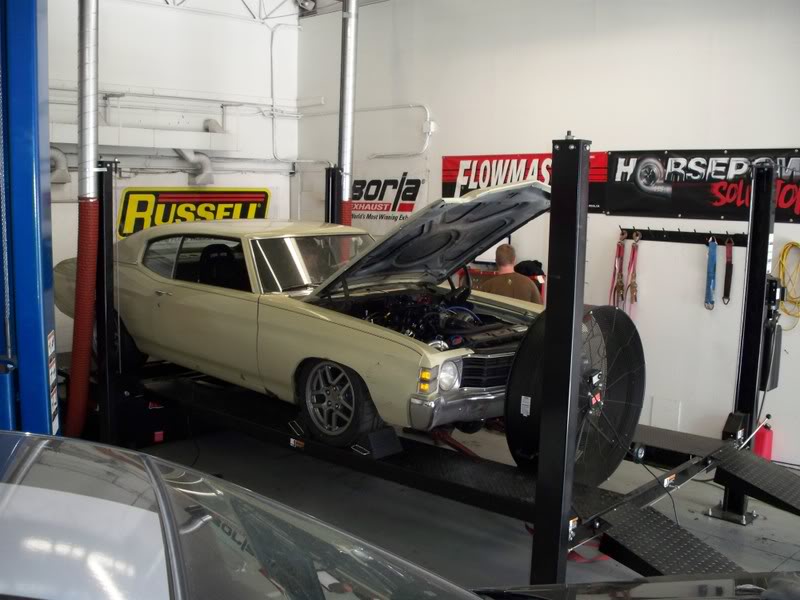
Hows this for an update. All it needs is a tune. Gears in, posi in, everything coated, Boost gauge works, Wideband works, blah blah blah.
Pictures!!!!
Alrighty guys. She hit the rollers yesturday. Have to sort out some crank case venting issues. Its gangster rigged right now, but works and I have pretty parts on the way.
With **** pump 91, and oil shooting into the intake we settled at 475rwhp and 570ftlbs @ 6.8psi. I will have a dyno video up and a ripper vid once photofucket loads this ****.
heres one pull
little fun, the tires were warm here. They hook very well.
http://videos.streetfire.net/video/7...lle_166579.htm
Little video of its traction issues.
http://www.youtube.com/watch?v=cUS8wHTzOk4
Trending Topics
10-29-2008, 09:02 PM
#8
TECH Fanatic
Thread Starter
iTrader: (9)
Join Date: Mar 2004
Location: CANADA!
Posts: 1,347
Likes: 0
Received 0 Likes
on
0 Posts
I guess I can add to this, for this winters mods...
So far I'm changing up the suspension a bit. C6 Z06 brakes all around. 14" front rotors, 13" rears. Possibly a cam and pushrods, I'd also like to get a cage in the car.
So far I'm changing up the suspension a bit. C6 Z06 brakes all around. 14" front rotors, 13" rears. Possibly a cam and pushrods, I'd also like to get a cage in the car.
 10-29-2008, 11:13 PM
#11
TECH Fanatic
Thread Starter
iTrader: (9)
Join Date: Mar 2004
Location: CANADA!
Posts: 1,347
Likes: 0
Received 0 Likes
on
0 Posts
I am using the stock torque converter. Reason being I have built the car to outhandle most cars on the roads today. I may step up to a name brand 24-2600.
the 4l80e is also getting a shift kit this winter. Forgot that. It handled it well this year but I felt some 3rd gear slip with the drag radials.
the 4l80e is also getting a shift kit this winter. Forgot that. It handled it well this year but I felt some 3rd gear slip with the drag radials.
10-30-2008, 11:48 AM
#12
NICE THREAD. I've seen a couple teaser pics of your car here and there, but it's awesome to finally see a nice juicy thread.
And sweet intake by the way
Also, those are some ridiculous tires on the front. Overall a sick build that I have to keep an eye on...
And sweet intake by the way
Also, those are some ridiculous tires on the front. Overall a sick build that I have to keep an eye on...
Last edited by frojoe; 10-30-2008 at 11:55 AM.
10-30-2008, 12:11 PM
#13
On The Tree
iTrader: (6)
Join Date: Feb 2008
Location: Knoxville
Posts: 180
Likes: 0
Received 0 Likes
on
0 Posts
simply beautiful, thanks for the idea about the manifolds. Your car is sick. Im not usually a fan of the 70s models novas and chevelles but man this thing is nice. Great Work.
10-30-2008, 12:48 PM
#15
Damn. Next time keep us posted along the way. Looks badass. You running stock pistons and compression? I wonder whats in store for my car over the next couple years. Looks like fun. 

My bro and I recently started the no paint posse. Looks like you are a candidate as well.
My bro and I recently started the no paint posse. Looks like you are a candidate as well.
10-30-2008, 01:51 PM
#17
Damn. Next time keep us posted along the way. Looks badass. You running stock pistons and compression? I wonder whats in store for my car over the next couple years. Looks like fun.
My bro and I recently started the no paint posse. Looks like you are a candidate as well.
My bro and I recently started the no paint posse. Looks like you are a candidate as well.
10-30-2008, 02:20 PM
#18

Great job to see that home built turbo ride.
Did you fabricate the merge collector for the turbo flange.... if not where did you buy it? Looks sharp!
Can you elaborate what the process was for welding the Vbands onto the stock 5.3/6.0 exhaust manifolds? ie did you heat them up with a torch and then weld on the Vbands to prevent cracking? I've heard that cast iron can be a PITA to weld onto.
Is that a 3" downpipe or larger? It'll rip with some tuning and high octane. I'm sure it does already in its current form.
How much do you have into the 4L80E conversion? Very key to the build up to keep it streetable.
10-30-2008, 10:30 PM
#20
TECH Fanatic
Thread Starter
iTrader: (9)
Join Date: Mar 2004
Location: CANADA!
Posts: 1,347
Likes: 0
Received 0 Likes
on
0 Posts

