
LS1 into a 1972 MGB GT
 02-12-2009, 07:29 PM
#41
On The Tree
Thread Starter
iTrader: (1)
Join Date: Aug 2008
Location: Colorado
Posts: 100
Likes: 0
Received 0 Likes
on
0 Posts
Since the car didn't have a frame in front of the firewall, building from the frame out wasn't really an option  The suspension is nowhere near finished, there's going to be a lot more reinforcement going in there.
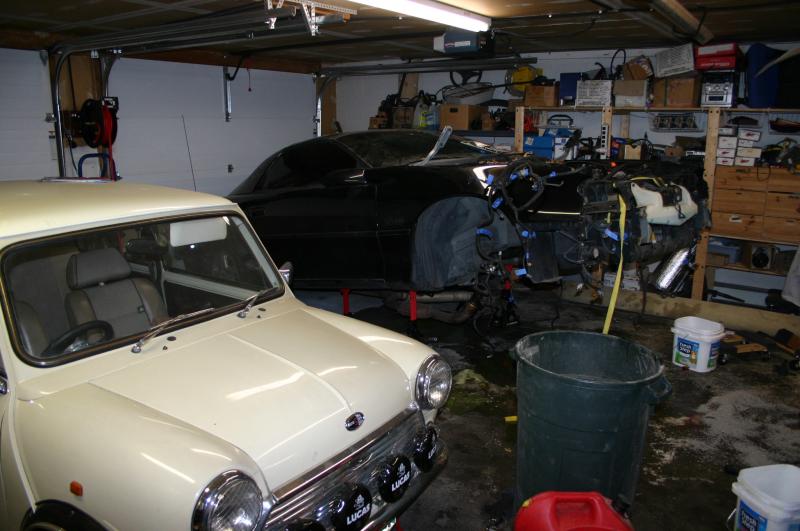
Okay, some pictures for those who aren't watching the build site. Love that foam engine. Here's the final engine location. The engine's moved back a couple of inches and down about 1" from my previous plans. This puts the trans in a good place- and back and down is good for engine placement too.
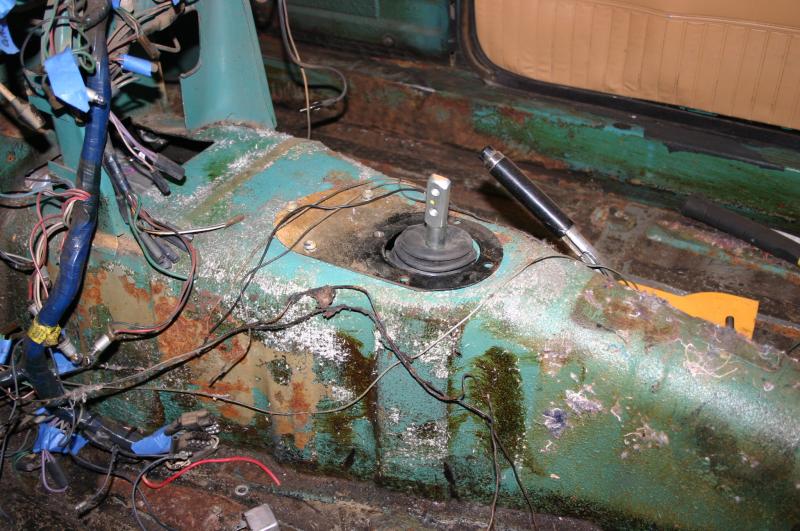
Shifter location. I had to cut out some of the tunnel to get it in, but so far it's actually pretty good. I am going to have to do something about the T56 reverse lockout, though. Has anyone ever replaced it with a simple spring to gain more clearance? I want to bring it flush with the side of the transmission.
I tried to use a motor mount designed for a Miata swap. Umm, nope. Not without some really tight clearance on the motor mount.
There are some modifications being made to the footwell - but the pedal is at WOT in this picture, so there's actually no loss of room in the cockpit. Weird.
I don't have any good pictures of the suspension right now. Plans changed, and I didn't use the Miata subframe. I ended up rebuilding the whole frame with the suspension mounted directly to it.
I'm thinking I really should have the full drivetrain before I build motor mounts. Just to make sure I don't put the PS pump into the steering pinion or something. Which means the Camaro has to come apart. And it's big now, but it'll take up a huge amount of room when it's disassembled. So, before I do that, I think I'll work on the rear of the car and build my three-link setup.
The suspension is nowhere near finished, there's going to be a lot more reinforcement going in there.Okay, some pictures for those who aren't watching the build site. Love that foam engine. Here's the final engine location. The engine's moved back a couple of inches and down about 1" from my previous plans. This puts the trans in a good place- and back and down is good for engine placement too.
Shifter location. I had to cut out some of the tunnel to get it in, but so far it's actually pretty good. I am going to have to do something about the T56 reverse lockout, though. Has anyone ever replaced it with a simple spring to gain more clearance? I want to bring it flush with the side of the transmission.
I tried to use a motor mount designed for a Miata swap. Umm, nope. Not without some really tight clearance on the motor mount.
There are some modifications being made to the footwell - but the pedal is at WOT in this picture, so there's actually no loss of room in the cockpit. Weird.
I don't have any good pictures of the suspension right now. Plans changed, and I didn't use the Miata subframe. I ended up rebuilding the whole frame with the suspension mounted directly to it.
I'm thinking I really should have the full drivetrain before I build motor mounts. Just to make sure I don't put the PS pump into the steering pinion or something. Which means the Camaro has to come apart. And it's big now, but it'll take up a huge amount of room when it's disassembled. So, before I do that, I think I'll work on the rear of the car and build my three-link setup.
 02-12-2009, 09:37 PM
#42
TECH Fanatic
iTrader: (9)
Join Date: Aug 2007
Location: Rocky Mtn thin air & snow...
Posts: 1,237
Likes: 0
Received 1 Like
on
1 Post

Holy power-to-weight Batman! This is gonna be NEAT when it's done! 
A few years ago, I used to attend the vintage races held at Seattle Raceway, & immediately fell in love with the Sunbeam Tigers - looks like this is going to be a kindred soul to those beautiful cars...
You sure got that right - I'm not going to know what to do with the room I'll have once all of my parts are installed again on the car...
Oh yeah - my wife wants to park in the garage again...

A few years ago, I used to attend the vintage races held at Seattle Raceway, & immediately fell in love with the Sunbeam Tigers - looks like this is going to be a kindred soul to those beautiful cars...
Originally Posted by Keith Tanner
...Which means the Camaro has to come apart. And it's big now, but it'll take up a huge amount of room when it's disassembled.
Oh yeah - my wife wants to park in the garage again...
 12-23-2009, 05:34 PM
#45
On The Tree
Thread Starter
iTrader: (1)
Join Date: Aug 2008
Location: Colorado
Posts: 100
Likes: 0
Received 0 Likes
on
0 Posts
Thread, resurrected.
One of the way I pay for this sort of foolishness is by writing books, and that's what I've been working on for the past months. It's all done and off at the publishers, so I dug back into the MG.
In the last installment, our hero had a front end built (more or less). Since I'm trying to finish as much as I can before tearing in to the Camaro, I started work on the rear. A 2000 S-10 Blazer 4wd supplied the rear end. First step was to cut off all the brackets and clean it up.

Moser Engineering put together some custom axles for me with a 4x100 bolt pattern so I can match the pattern on the front, and with a flange that fits the brakes from a Miata. Very fast build time and they fit perfectly. Well, they did once we figured out the buttons on the ends were for an 8.5" diff and I have a 7.625". Moser took care of their mistake immediately. Every company makes mistakes once in a while, it's how they deal with those mistakes that sets a company apart.
I decided to go with a 3-link rear. It's fairly easy to get right for a guy who's always dealt with independent suspension and I have some good photos of a similar setup in an MG. So, some new brackets on the shell and a bunch of new brackets on the axle and voila, I have a rear end that's attached to the car! The lower brackets are actually 2x2x.25 bar welded to the bottom of the floor, joining up with the new frame rails on the front. The car's getting stiffer! And heavier, but that's not a huge concern.
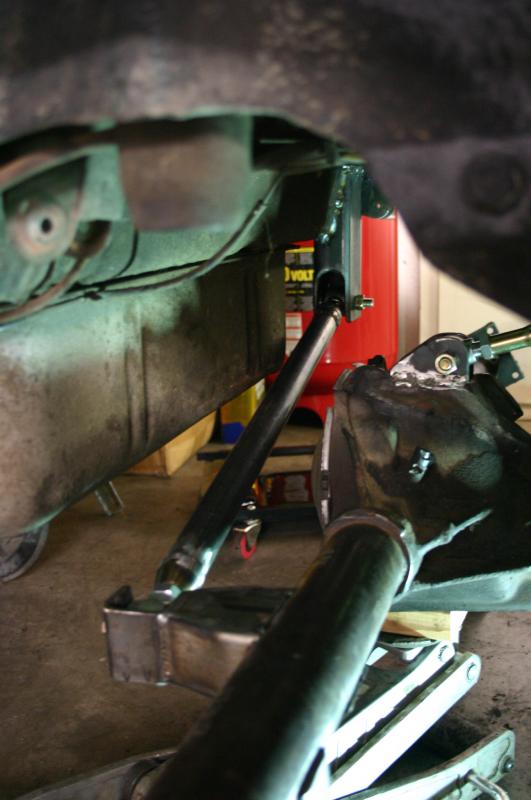
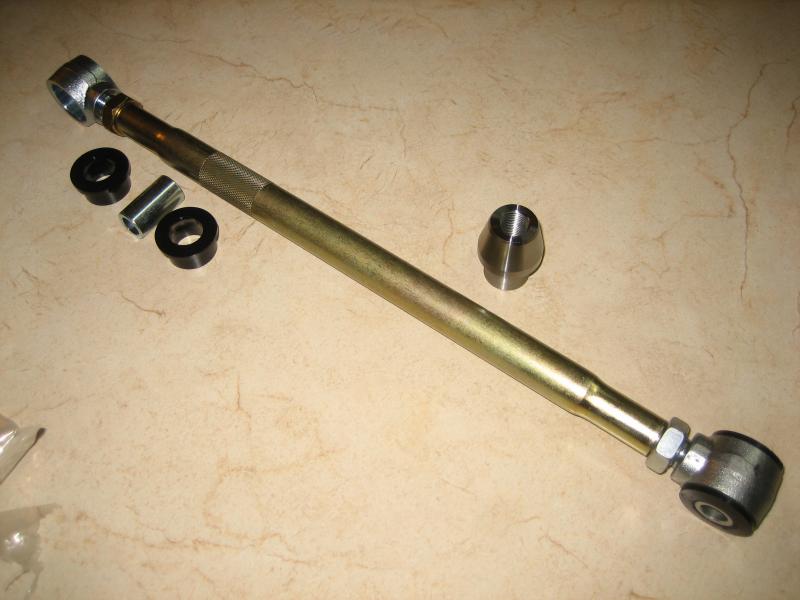
The ends of the arms (I'm pretty sure "trailing arm" is the correct terminology) are some nice 4-bar ends from Mr Roadster, chosen because they have nylon bushings instead of rod ends. They're attached to swedged tubes. The Panhard bar is a 1" tube with inserts welded in.
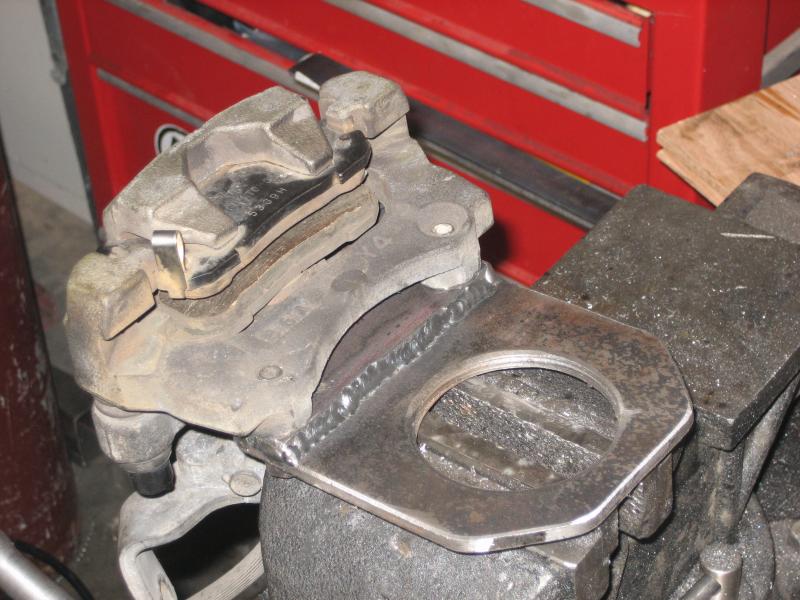
Adapting the brakes to the new rear end was pretty easy. A simple bracket and voila! To make sure the positioning was perfect, I used the caliper adjuster to crank down the pads on the rotor and hold it in place while I tack-welded.
I had to do a little tweaking to the body to get all the suspension linkage to fit, but once the interior is reassembled nobody should be able to tell.
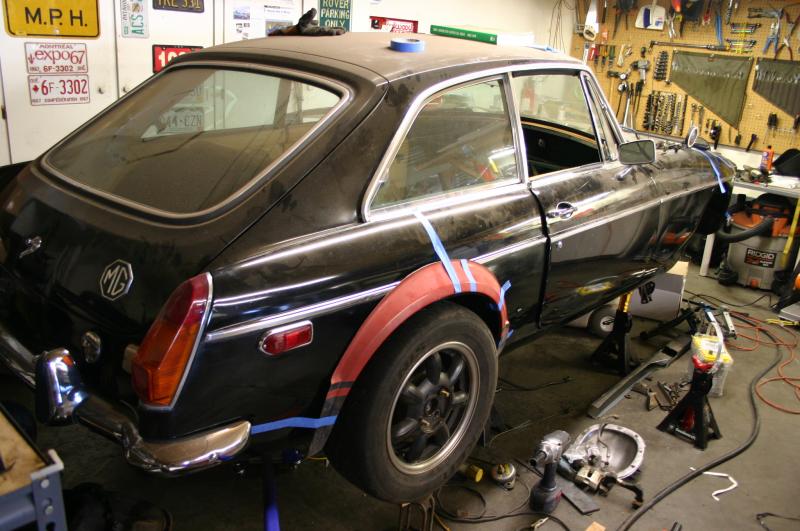
So, what will the car look like with wheels on? Here's a rough idea. In case I didn't mention before, I'm using flares from a VW Rabbit on the body. They'll be blended in of course. Box flares are another option, but I'm not sure they'd look right on the body. And yes, that's my work space.
One of the way I pay for this sort of foolishness is by writing books, and that's what I've been working on for the past months. It's all done and off at the publishers, so I dug back into the MG.
In the last installment, our hero had a front end built (more or less). Since I'm trying to finish as much as I can before tearing in to the Camaro, I started work on the rear. A 2000 S-10 Blazer 4wd supplied the rear end. First step was to cut off all the brackets and clean it up.
Moser Engineering put together some custom axles for me with a 4x100 bolt pattern so I can match the pattern on the front, and with a flange that fits the brakes from a Miata. Very fast build time and they fit perfectly. Well, they did once we figured out the buttons on the ends were for an 8.5" diff and I have a 7.625". Moser took care of their mistake immediately. Every company makes mistakes once in a while, it's how they deal with those mistakes that sets a company apart.
I decided to go with a 3-link rear. It's fairly easy to get right for a guy who's always dealt with independent suspension and I have some good photos of a similar setup in an MG. So, some new brackets on the shell and a bunch of new brackets on the axle and voila, I have a rear end that's attached to the car! The lower brackets are actually 2x2x.25 bar welded to the bottom of the floor, joining up with the new frame rails on the front. The car's getting stiffer! And heavier, but that's not a huge concern.
The ends of the arms (I'm pretty sure "trailing arm" is the correct terminology) are some nice 4-bar ends from Mr Roadster, chosen because they have nylon bushings instead of rod ends. They're attached to swedged tubes. The Panhard bar is a 1" tube with inserts welded in.
Adapting the brakes to the new rear end was pretty easy. A simple bracket and voila! To make sure the positioning was perfect, I used the caliper adjuster to crank down the pads on the rotor and hold it in place while I tack-welded.
I had to do a little tweaking to the body to get all the suspension linkage to fit, but once the interior is reassembled nobody should be able to tell.
So, what will the car look like with wheels on? Here's a rough idea. In case I didn't mention before, I'm using flares from a VW Rabbit on the body. They'll be blended in of course. Box flares are another option, but I'm not sure they'd look right on the body. And yes, that's my work space.
Last edited by Keith Tanner; 12-23-2009 at 10:28 PM.
12-23-2009, 05:45 PM
#46
On The Tree
Thread Starter
iTrader: (1)
Join Date: Aug 2008
Location: Colorado
Posts: 100
Likes: 0
Received 0 Likes
on
0 Posts
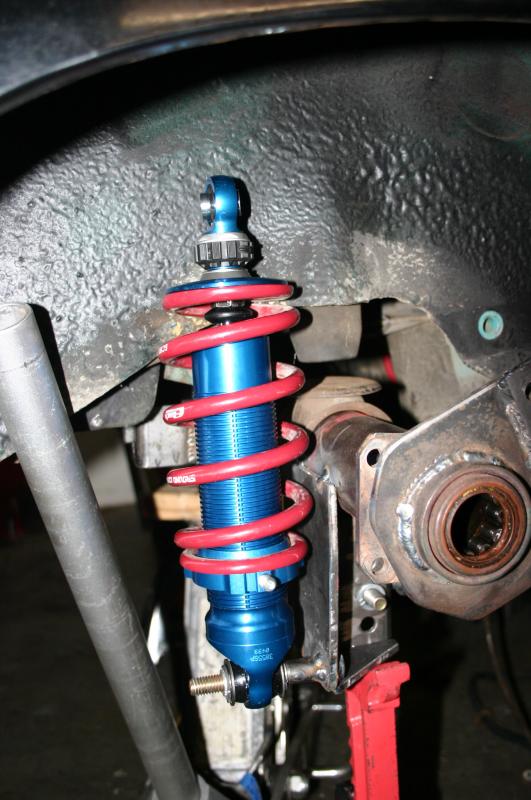
The shocks are here as well, which means I could plausibly have this thing sitting on its wheels before the new year. The shocks are some custom-build AFCO T2s. I've dealt with AFCO quite a bit in the past, and I've always been treated really well. I can speak to their chief engineer and ask stupid questions, and he gives me good answers. Although I do try to do my homework ahead of time!
The shocks are adjustable for rebound only. I can add in separate compression adjustment later if I want to, but I have the compression valving set based on my experience with Miata suspensions. In the front, I'm basically using that Miata setup with a slightly different upper mount. The rear is a straight coilover with 5" of travel. The goal is for the GT to be, well, a GT. Able to leap long distances in a single bound, comfortable and equipped with excellent performance in mountain passes. So good shocks are a must. I know I'll be swapping springs around during my testing, so the ability to adjust the shock is critical. One nice thing about these AFCOs is the upper spring perch design, I can get the spring off in seconds.
The shock is going to mount inside the wheel well, of all places. It does eat up some tire room, but because my axle is quite a bit wider than stock I have room to spare. This car is going to be under-tired, this I know. The solution would actually be a narrower rear axle and a staggered setup. But since it's not a track car or drag car, I'll just use good rubber. I'll start off with the Falken Azenis RT615 - not my favorite tire, but with the wheels I'm using at first they're one of the few choices I have. That plus I got the set of four for $176 shipped thanks to Discount Tire Direct!
So, I have a design for a rear shock mount on the axle. It's not elegant, but it should be strong enough. In the picture, I'm trying to determine the perfect place to put the upper mount. The front is easy.
If I get the shock mounts done over the next couple of days, I'll dig the Camaro out of the snowbank outside and yank that LS1 out. It's time.
12-23-2009, 06:41 PM
#48
Talk about Fun with a capital F!
I must have been dozing in physics class... I keep putting medium sized engines in somewhat large and slightly heavy cars whilst people like you are putting medium sized engines in small, light cars.
What are you doing for brakes up front? Do you think you can get large enough brakes behind those wheels?

 12-23-2009, 10:29 PM
#50
On The Tree
Thread Starter
iTrader: (1)
Join Date: Aug 2008
Location: Colorado
Posts: 100
Likes: 0
Received 0 Likes
on
0 Posts
The front brakes will be those from a 1994 Miata, with good pads, fluids and ducting. Not a huge setup - I think it's a 10" rotor - but it'll be sufficient for the street. I'm also going to have an adjustable proportioning valve in the car to make sure the braking is balanced.
Enough brakes for hard track work? Probably not. It's not meant to be a track car. But they'll do fine for any street driving. If I do end up swapping the 14" wheels out for 15", I have some pretty good options for brakes at my disposal.
One of the reasons I'm using Miata stuff is that I know the cars pretty well and this way I'll have four cars that can share a lot of parts - including track rubber, should it come to that.
12-26-2009, 01:58 PM
#51
On The Tree
Thread Starter
iTrader: (1)
Join Date: Aug 2008
Location: Colorado
Posts: 100
Likes: 0
Received 0 Likes
on
0 Posts
It's time to take apart the Camaro. I'm taking a break from pulling the engine.
But I have a dilemma. It looks like it would be a lot easier to pull the drivetrain from this critter if I cut the radiator support off so I could simply drop the engine down a bit and pull it straight forward. No messing around with removing the intake manifold or swearing at bellhousing bolts.
But the shell of this car would probably make a decent drag race platform for someone. Drop in a carbureted big block and a 12-bolt and voila. I'm not interested in that at all - I'm too fond of corners - but I'm trying to decide if I should avoid being destructive so I can sell the roller. It's probably worth more to me as parts although it would be more of a hassle.
Thoughts? Does this sound like a plausible way to pull the drivetrain?
 12-26-2009, 03:00 PM
#53
TECH Apprentice
iTrader: (10)
Join Date: Aug 2008
Location: Winnipeg, Manitoba
Posts: 310
Likes: 0
Received 0 Likes
on
0 Posts
I would agree that pulling it out the bottom can be easier if you have the means and the height! You might be able to sell it as a roller but you may also make more cash for your swap by selling parts.
Tough call. the car looks fairly strait but if it's just your parts car and do not care about what happens to it in the end, hack away!
The other thing is you could put a local feeler out to see if you can spark any interest. This may create a sale and make up your mind for you.
Enough break time! Get back to work and show some updates!
12-26-2009, 03:44 PM
#54
On The Tree
Thread Starter
iTrader: (1)
Join Date: Aug 2008
Location: Colorado
Posts: 100
Likes: 0
Received 0 Likes
on
0 Posts
But I was just looking at it, and I think I could lift the front of the car high enough with the cherry picker to be able to get the drivetrain and front subframe out from below. Kinda like an old Mini. Looks straightforward enough, and if I don't have enough height in the garage I'll just roll the F-body out into the driveway. This is my first time laying a wrench on a Camaro of any sort, so please forgive me if I'm just finding the obvious solution that everyone knows about
Updates to come - although the current pictures would be just Camaro carnage. I need to pick up some steel on Monday, then I'll finish up the suspension on the MG.
12-26-2009, 09:56 PM
#55
On The Tree
Thread Starter
iTrader: (1)
Join Date: Aug 2008
Location: Colorado
Posts: 100
Likes: 0
Received 0 Likes
on
0 Posts
It's out! I took the engine, transmission and subframe out from below, and I didn't cut anything on the car. I took the front bumper off to save my back and let me get closer to the important stuff. Man, there are a couple of sensors on the back of the engine that you could only access by removing the engine. Chevy hates their mechanics for some reason. I had four jackstands under the front of the car just in case something went wrong, and I didn't get underneath at all. The car is quite stable but I'll be much happier when it's back on the wheels. The blue things are labels on the wiring harness so I know how to put everything back together. Hopefully soon.
Tomorrow, the subframe goes back under the car and I'll push it back out into the snowbank until I need some more parts. That was a pretty long, hard day of work. The Camaro did not want to give up the prize, and of course I was making things up as I went along so it took some time.
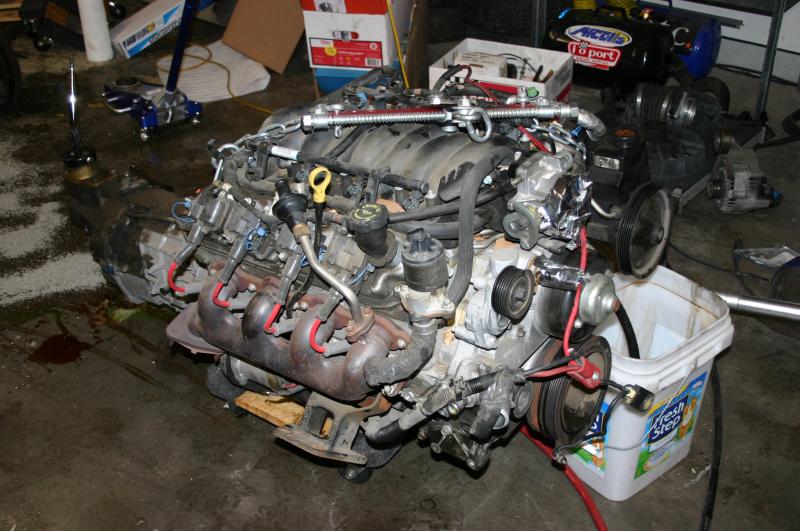
And the obligatory engine shot. Yup, just an LS1/T56. But it's my LS1/T56. Soon we'll see how the complete setup fits in the MG. Will it work? Tune in next week for the exciting conclusion!
Tomorrow, the subframe goes back under the car and I'll push it back out into the snowbank until I need some more parts. That was a pretty long, hard day of work. The Camaro did not want to give up the prize, and of course I was making things up as I went along so it took some time.
And the obligatory engine shot. Yup, just an LS1/T56. But it's my LS1/T56. Soon we'll see how the complete setup fits in the MG. Will it work? Tune in next week for the exciting conclusion!
12-26-2009, 10:22 PM
#56
TECH Apprentice
iTrader: (10)
Join Date: Aug 2008
Location: Winnipeg, Manitoba
Posts: 310
Likes: 0
Received 0 Likes
on
0 Posts
yup the picker is your best friend!
Glad to see it worked out. I have done this a few times. I don't have a lift either however, a couple of 36" jackstands and the picker does wonders!
If I was closer to CO, i would take that roller off your hands!
Glad to see it worked out. I have done this a few times. I don't have a lift either however, a couple of 36" jackstands and the picker does wonders!
If I was closer to CO, i would take that roller off your hands!
12-31-2009, 10:30 PM
#57
On The Tree
Thread Starter
iTrader: (1)
Join Date: Aug 2008
Location: Colorado
Posts: 100
Likes: 0
Received 0 Likes
on
0 Posts
Well, we decided to finish off the year with some visible progress. I've spent the last few days pulling the wiring harness out of the Camaro - I'm thinking a Painless harness would have been a lot easier and may possibly have saved some money in the long run, but oh well - and I wanted to do something big and obvious. The engine was sitting beside the MG, so what else was I supposed to do?
My wife (and car owner) Janel gave me a hand.
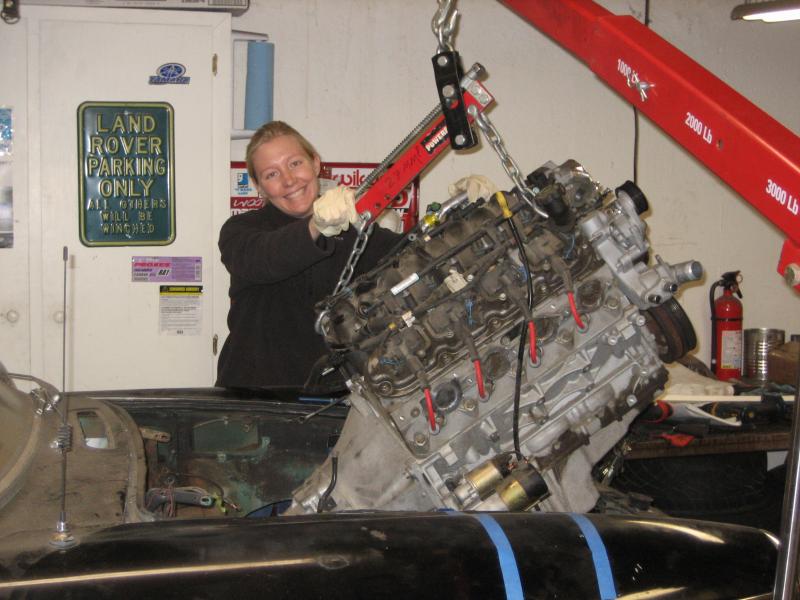
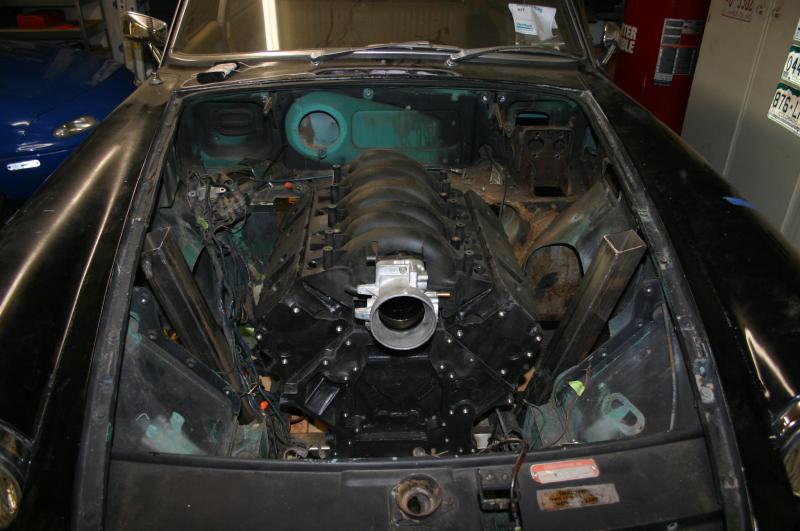
After a bit of extra cutting and trimming, it's in! It's sitting a bit crooked on the jack underneath, but the point is made. I still have to trim a bit off the transmission tunnel, but the engine is right where I want it after lots of careful tilting and moving to wiggle it into the little car.
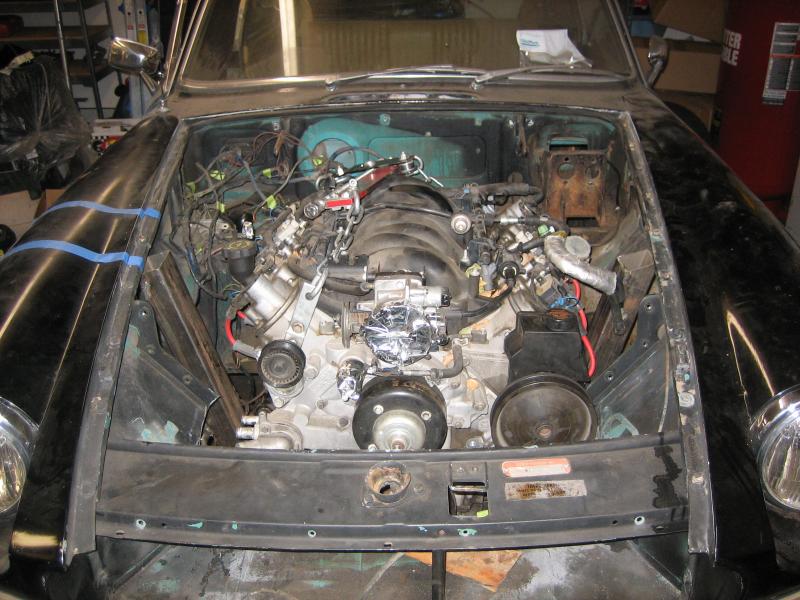
It's going to come out again so I can weld up a few parts that are only tacked into place and also stiffen up the front frame, but it feels good to see how it looks. The shifter is in the perfect place as well, right where it belongs. I'm stoked.
My wife (and car owner) Janel gave me a hand.
After a bit of extra cutting and trimming, it's in! It's sitting a bit crooked on the jack underneath, but the point is made. I still have to trim a bit off the transmission tunnel, but the engine is right where I want it after lots of careful tilting and moving to wiggle it into the little car.
It's going to come out again so I can weld up a few parts that are only tacked into place and also stiffen up the front frame, but it feels good to see how it looks. The shifter is in the perfect place as well, right where it belongs. I'm stoked.
01-01-2010, 10:36 AM
#58

Looking good !!!
01-01-2010, 02:40 PM
#59
On The Tree
Thread Starter
iTrader: (1)
Join Date: Aug 2008
Location: Colorado
Posts: 100
Likes: 0
Received 0 Likes
on
0 Posts
Looking at it further, I have a lot of work ahead of me. Packaging the radiator is going to be a challenge, and the exhaust is going to require some real creativity. On the plus side, with a bit more alteration, I think I can get the engine back another 3/4" which will put the exhaust ports of the front cylinders pretty much on the axle line. That'll give me a touch more clearance for my steering rack with an unmodified oil pan.
Next step, pull the engine out again. Sigh.
Next step, pull the engine out again. Sigh.
01-01-2010, 07:48 PM
#60
TECH Apprentice
iTrader: (10)
Join Date: Aug 2008
Location: Winnipeg, Manitoba
Posts: 310
Likes: 0
Received 0 Likes
on
0 Posts
i can't count how many times i've pulled engines and put them back in to find I didn't make enough clearance and have to do it all over again.
It's all part of the deal but the reward at the end of a job well done and FINISHED is the best part!
Good job and keep it up!
It's all part of the deal but the reward at the end of a job well done and FINISHED is the best part!
Good job and keep it up!