
Pro-Touring 68 Acadian (Nova) with L92
 04-17-2011, 12:03 AM
#101
Teching In

Join Date: Jul 2005
Posts: 14
Likes: 0
Received 0 Likes
on
0 Posts

Awesome build! Have you checked that cupholder location with the stick bolted to the shifter and something large in the cupholder? Fourth Gen Camaros have the cupholder in pretty much the same location, and it's unusable for anything larger than a 12 oz can. You hit everything with the shifter when you shift into 2nd or 4th.
 06-23-2011, 09:08 PM
#102
On The Tree
Thread Starter
iTrader: (4)

Join Date: Mar 2009
Location: British Columbia, Canada
Posts: 132
Likes: 0
Received 0 Likes
on
0 Posts
Awesome build! Have you checked that cupholder location with the stick bolted to the shifter and something large in the cupholder? Fourth Gen Camaros have the cupholder in pretty much the same location, and it's unusable for anything larger than a 12 oz can. You hit everything with the shifter when you shift into 2nd or 4th.
Well time for an update. It's been a while. Unfortunately I haven't actually gotten much done on the car. Been working a ton of overtime (good for parts though) and other things going on. I took two weeks off from work to spend time working on the car. I go back to work on Saturday and I ended up working on the car about 6 hours during my holidays. Oh well, here's what I did get done.
Started stripping the trunk lid. I want to start working on the gaps.
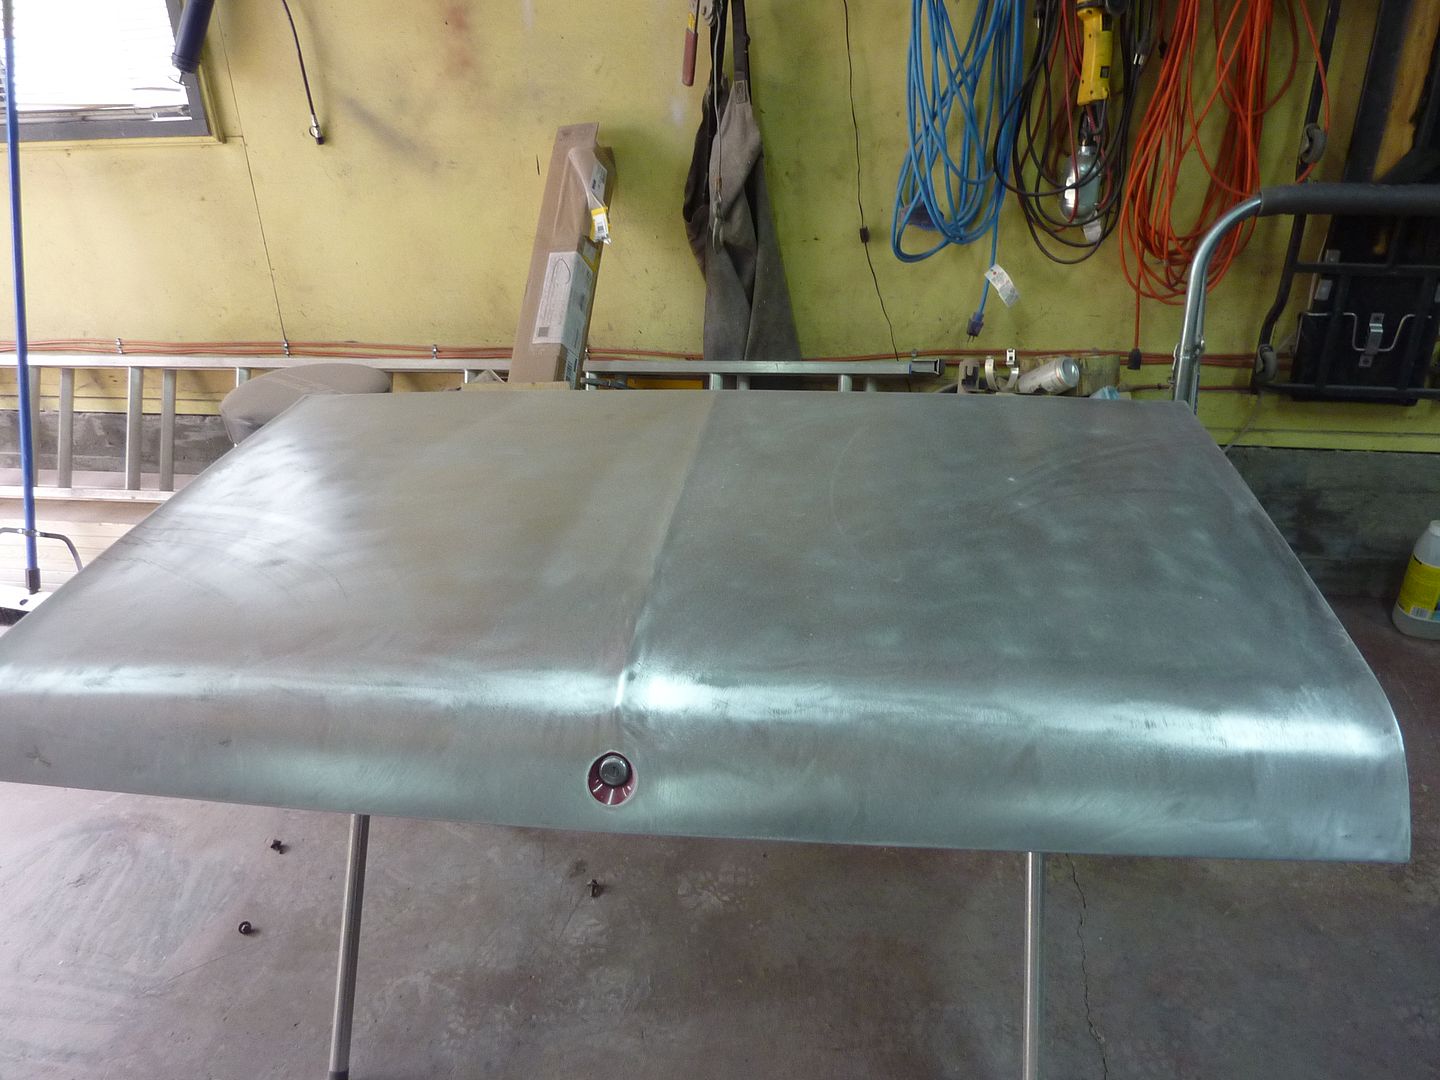
The trunk was in really good shape with only a little rust starting along the top where it would sit near the window channel.
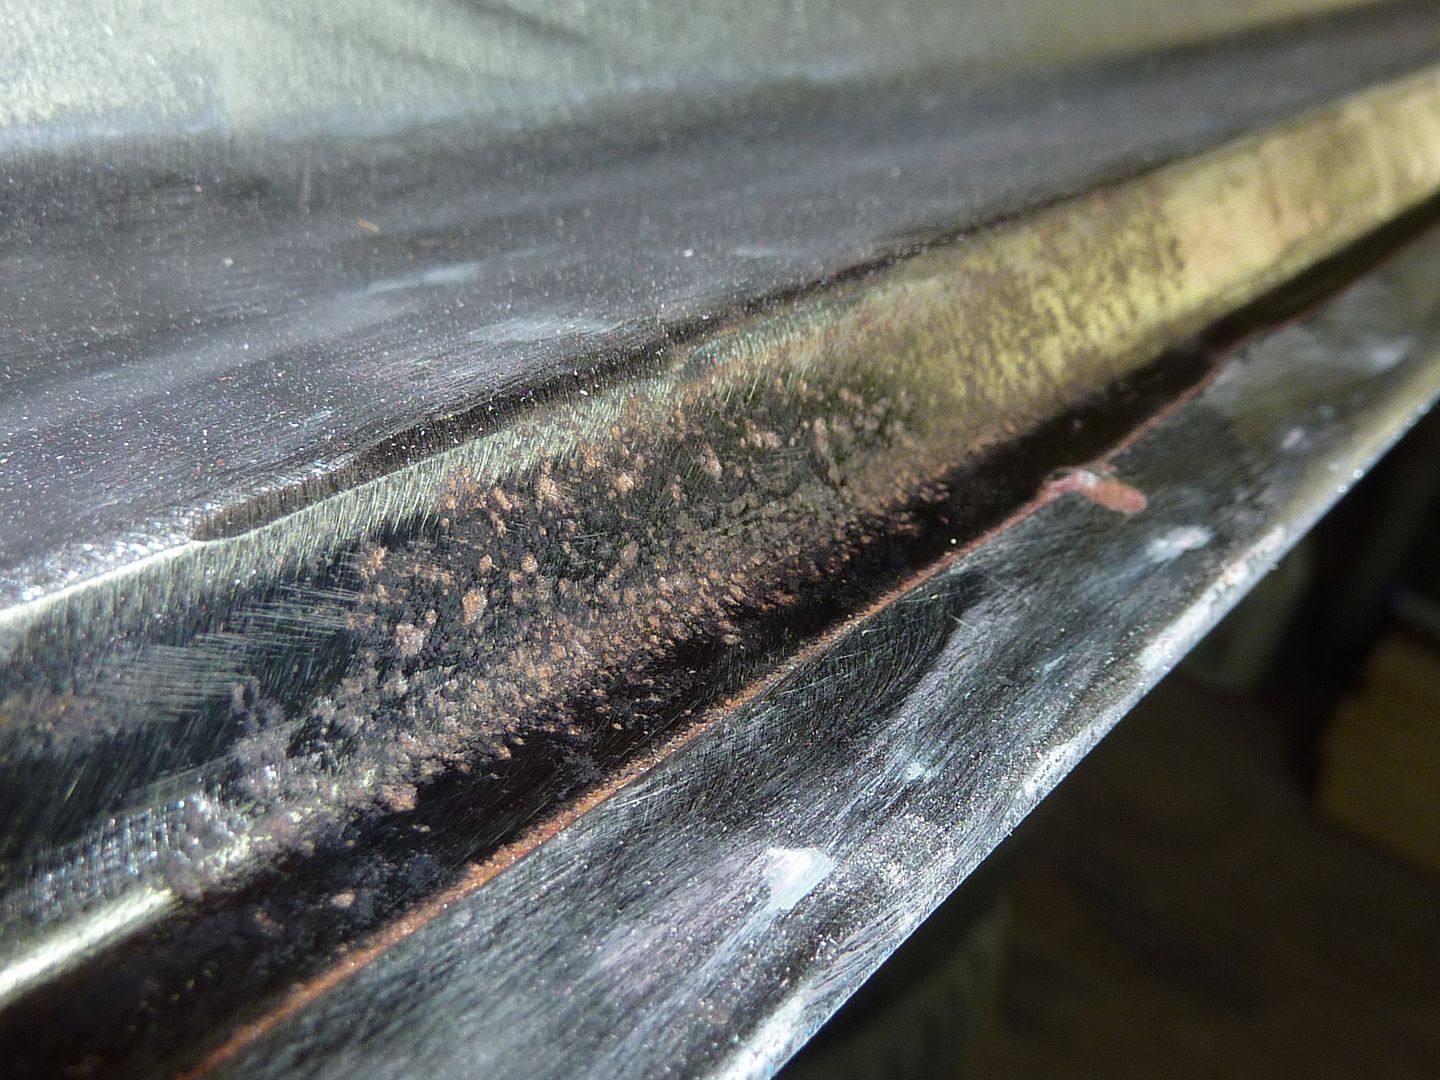
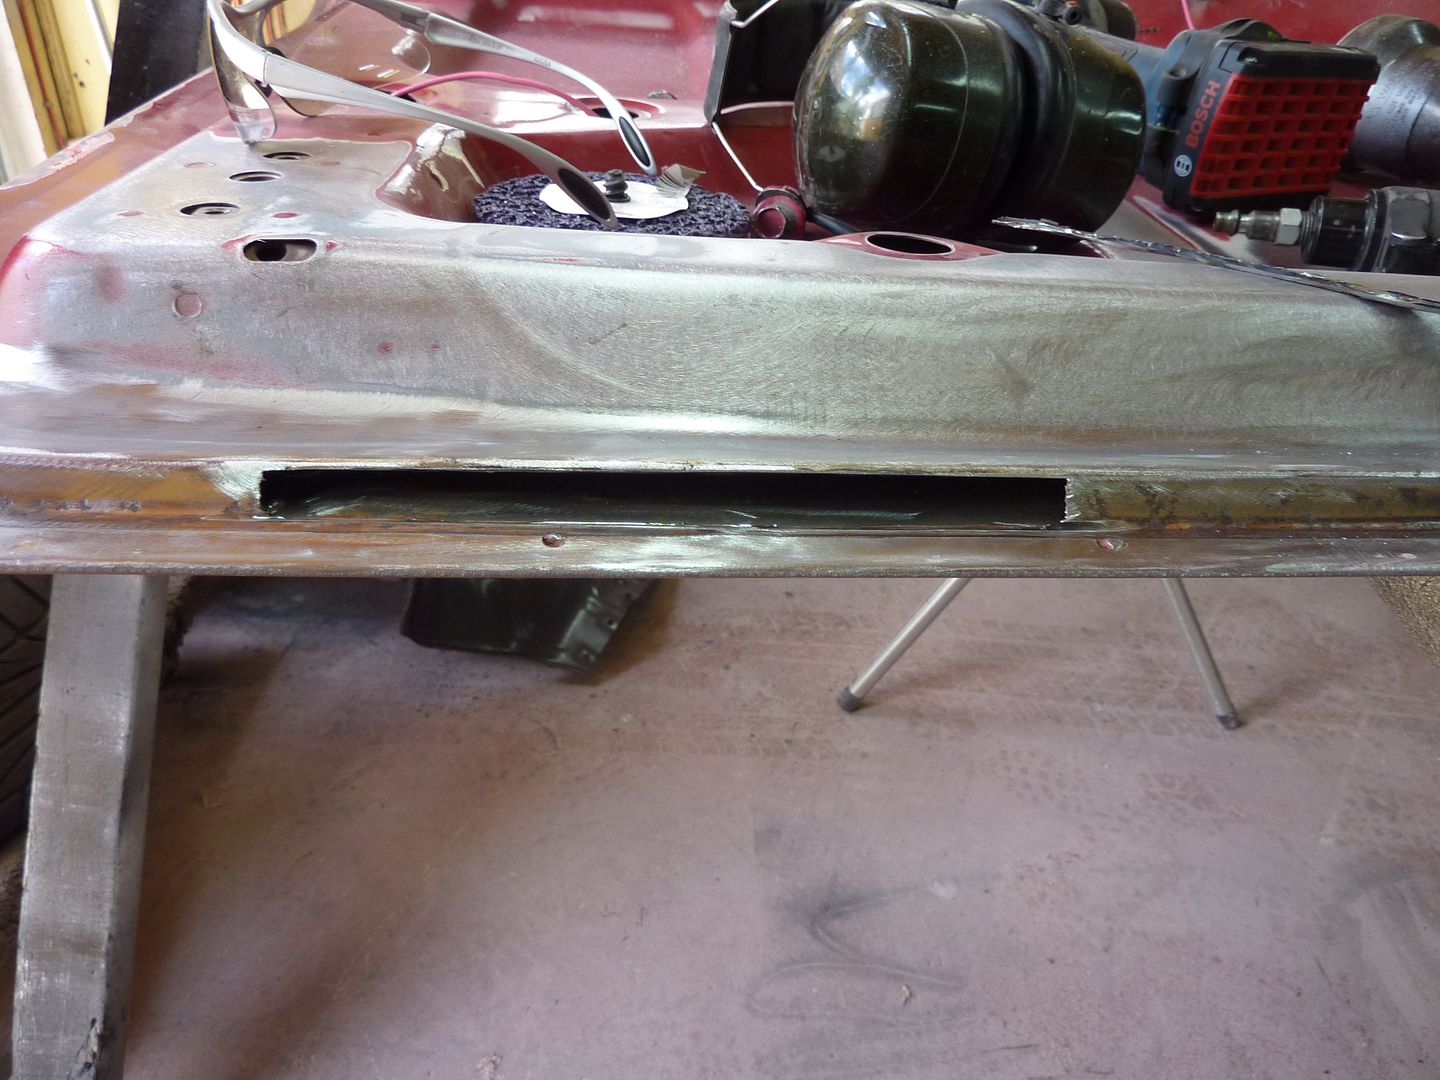
So I cut out a couple spots and welded in new metal. The rest cleaned up with the die grinder.
And that's all I've gotten done.

I sold the stock doors from car (thanks again Jeff). Now I'm committed to going with doors from a 73 or 74. Still trying to find a pair that aren't really expensive. I also sold the door skins that I bought (thanks again Tyler)
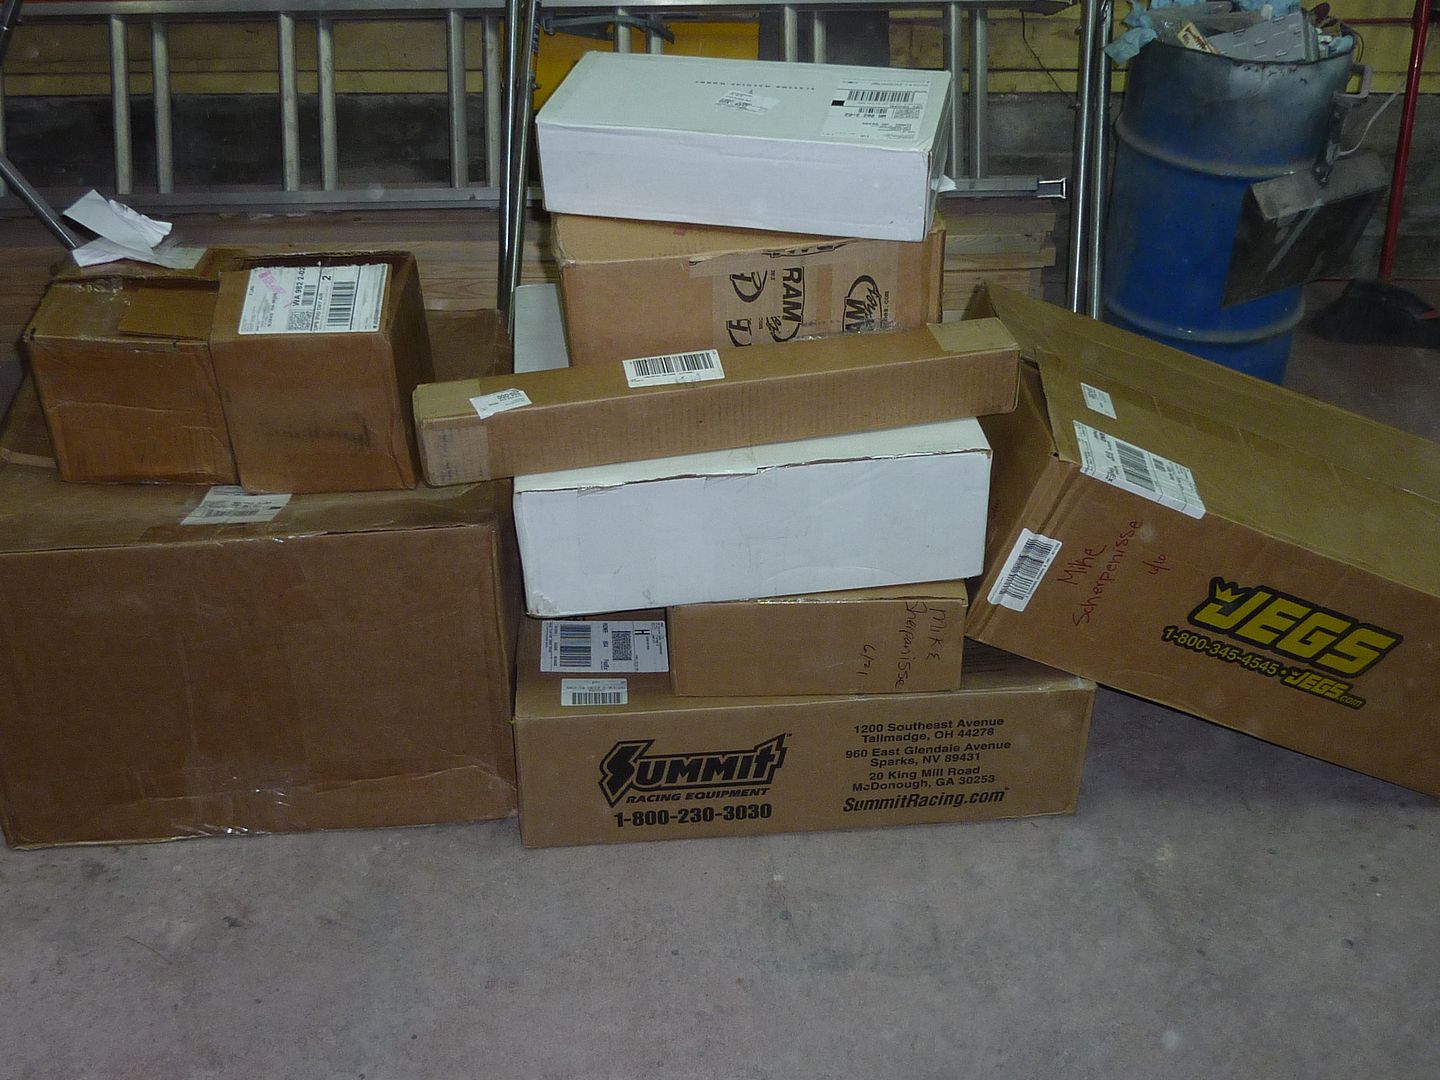
But onto the good part of the update. It was that time of the year again. PARTS RUN!!!!! I got a few of the parts over the past week and the rest I picked up today.
Here's today's haul:
Finally got my stainless bolt kit from Prodigy Customs. Better late than never. Pretty thorough kit.

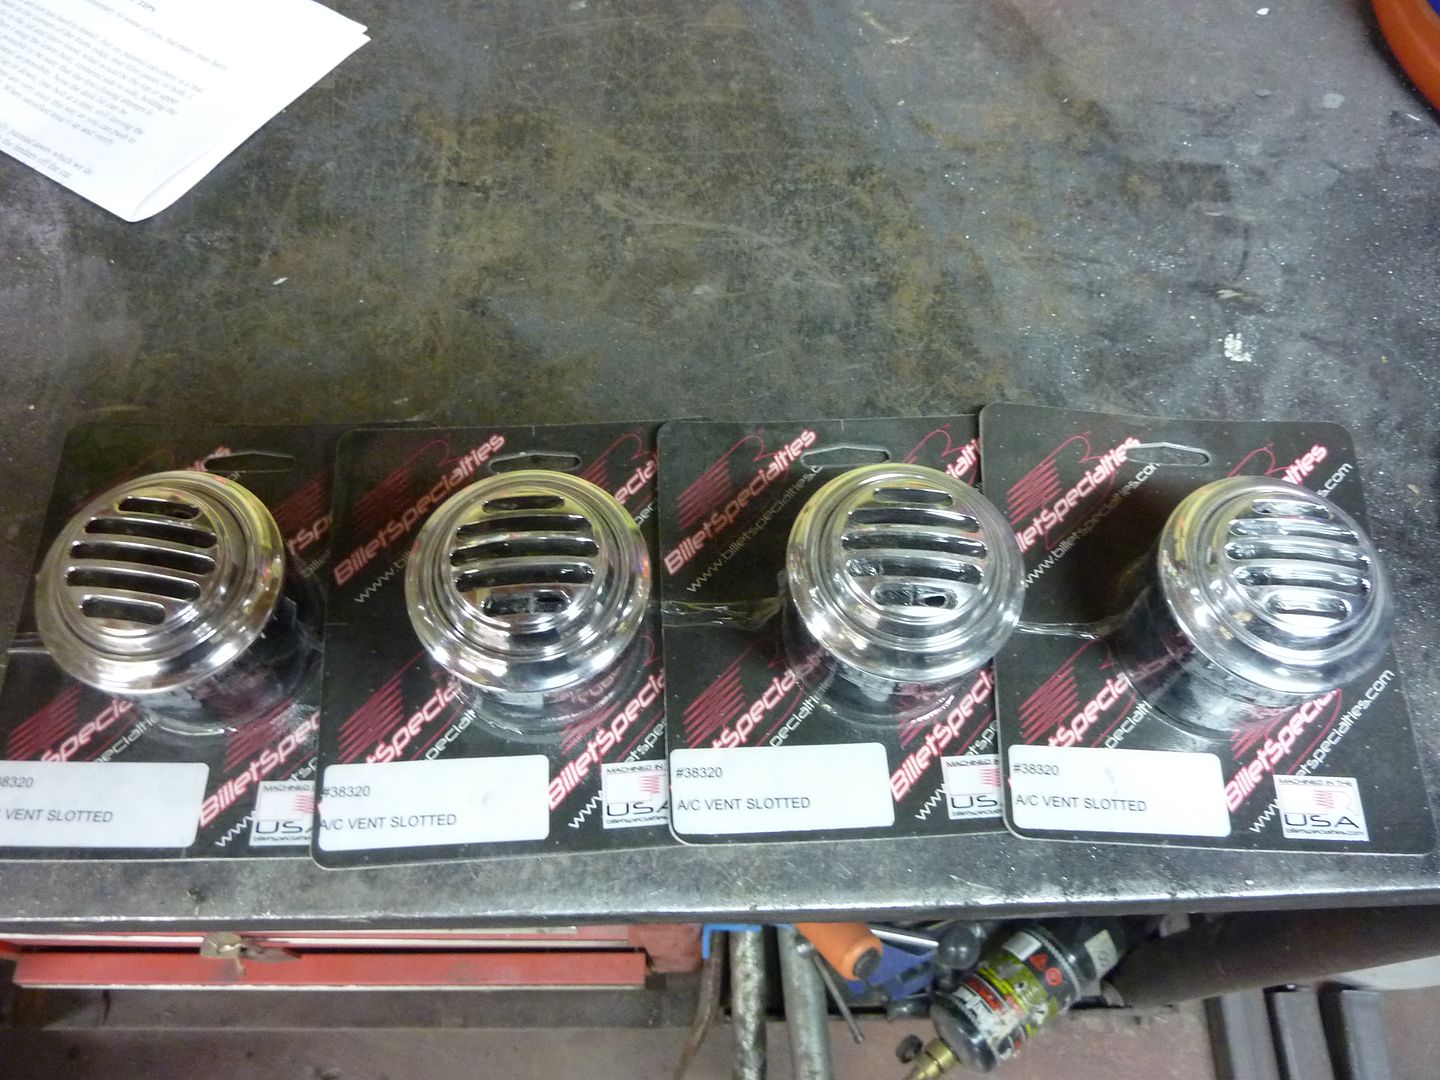
Billet Specialties a/c louvers
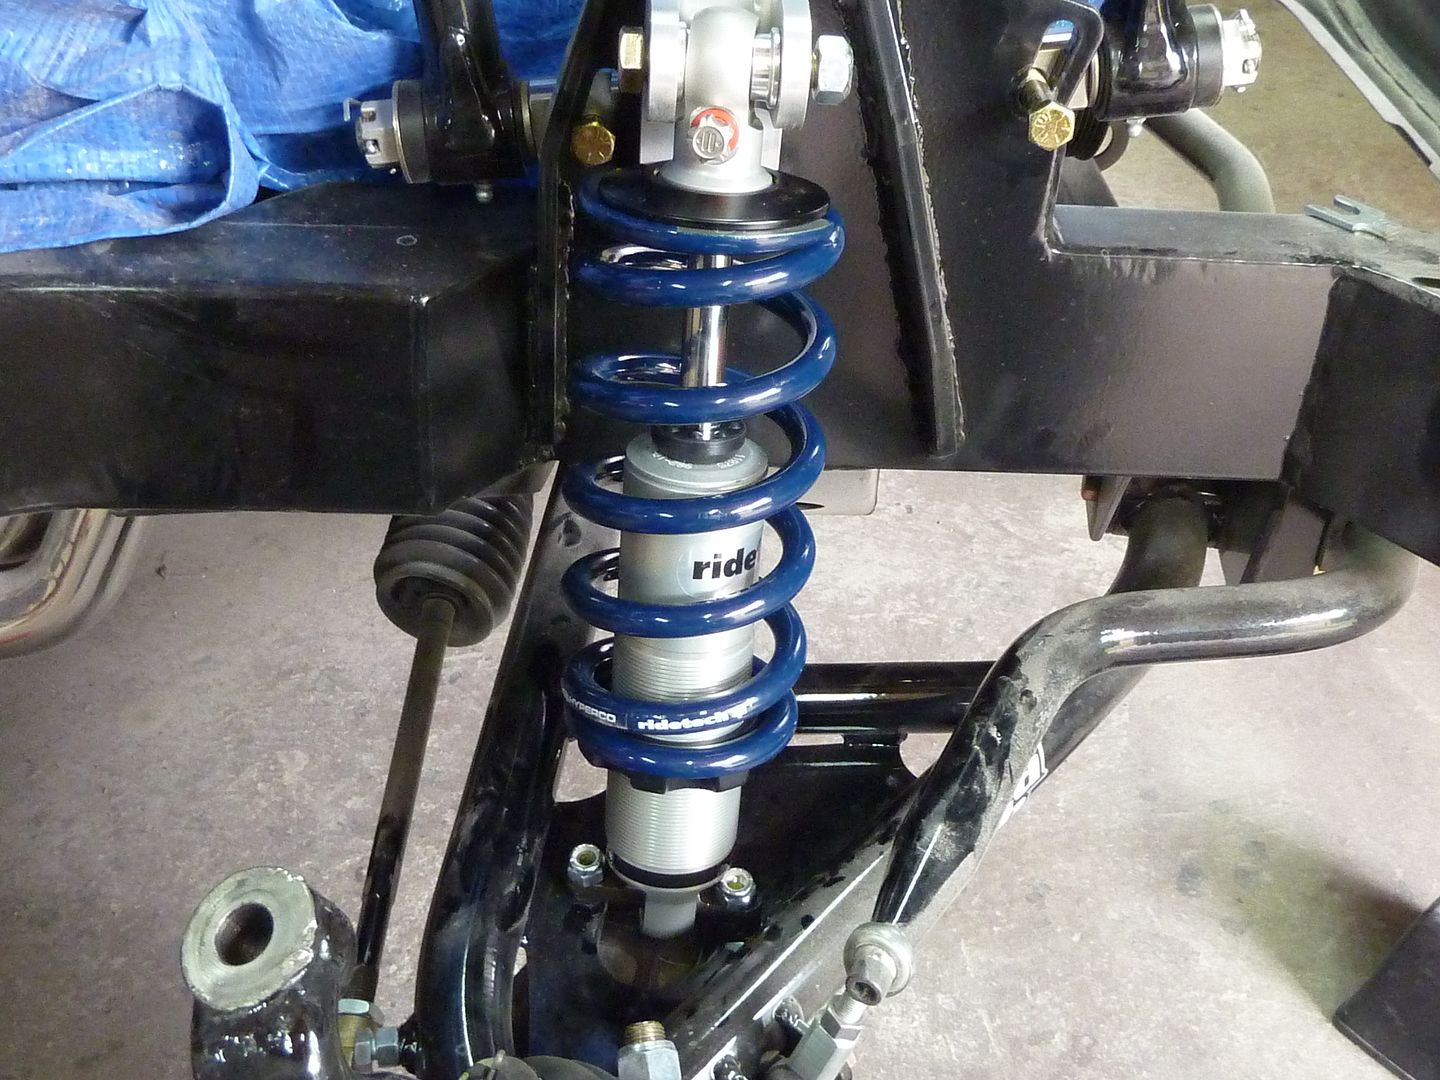
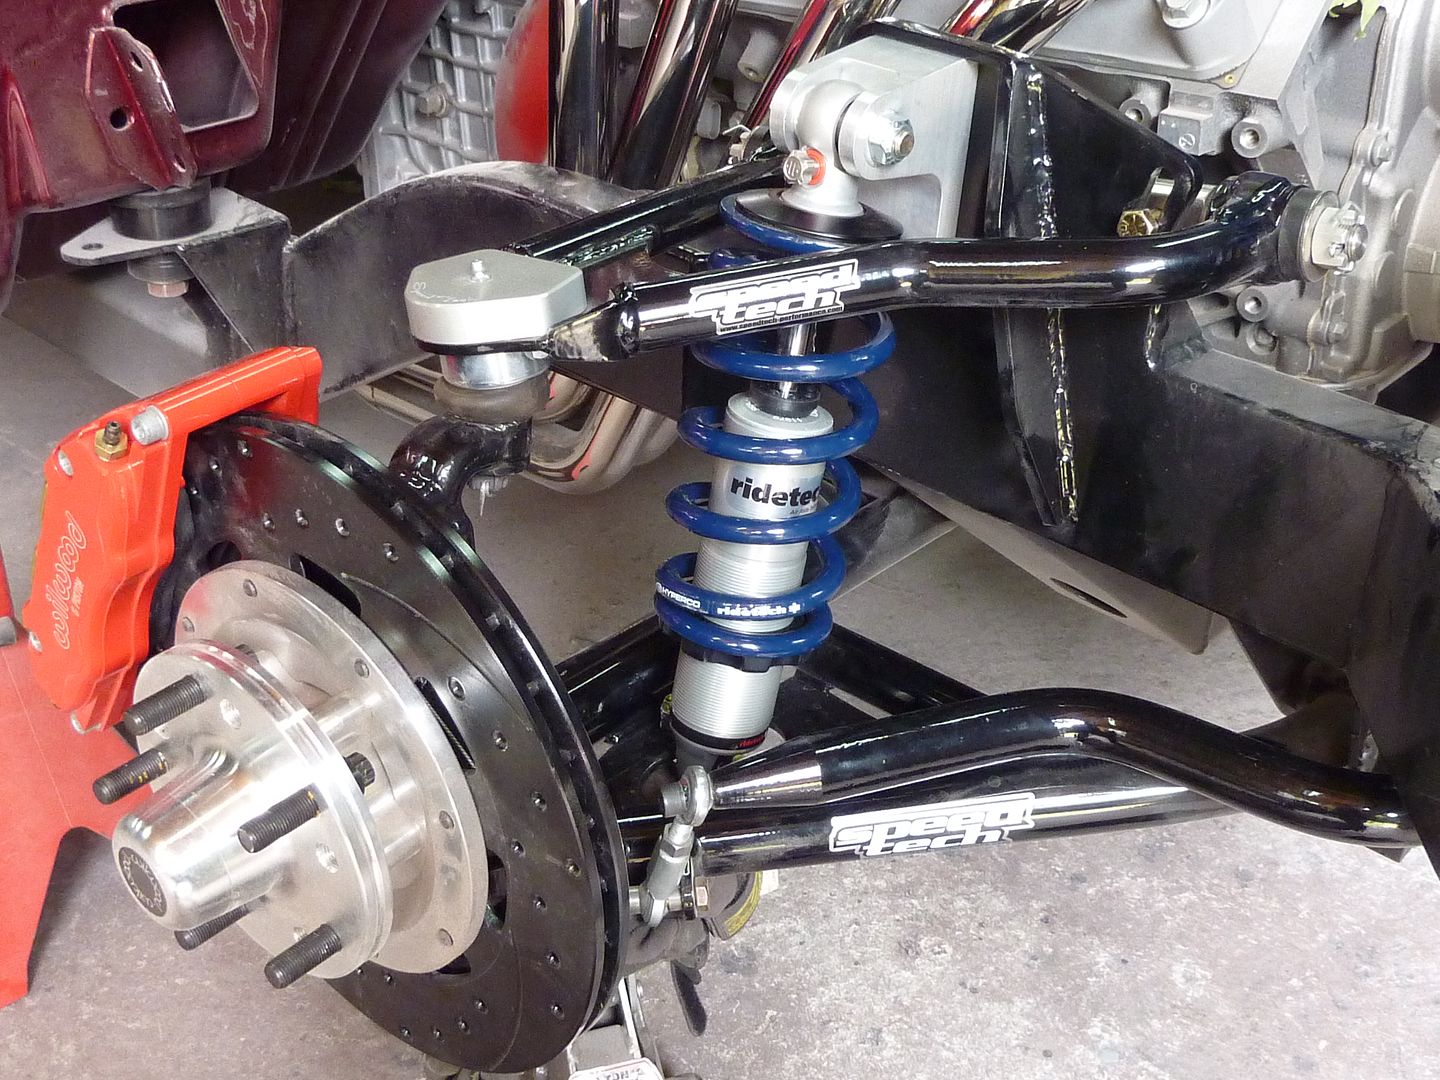
Sold the QA1 shocks and decided to get....

This things are sweet. I only have picks of the back ones, but I did get them all around. They are the single adjustable. Got them for Speed Tech.
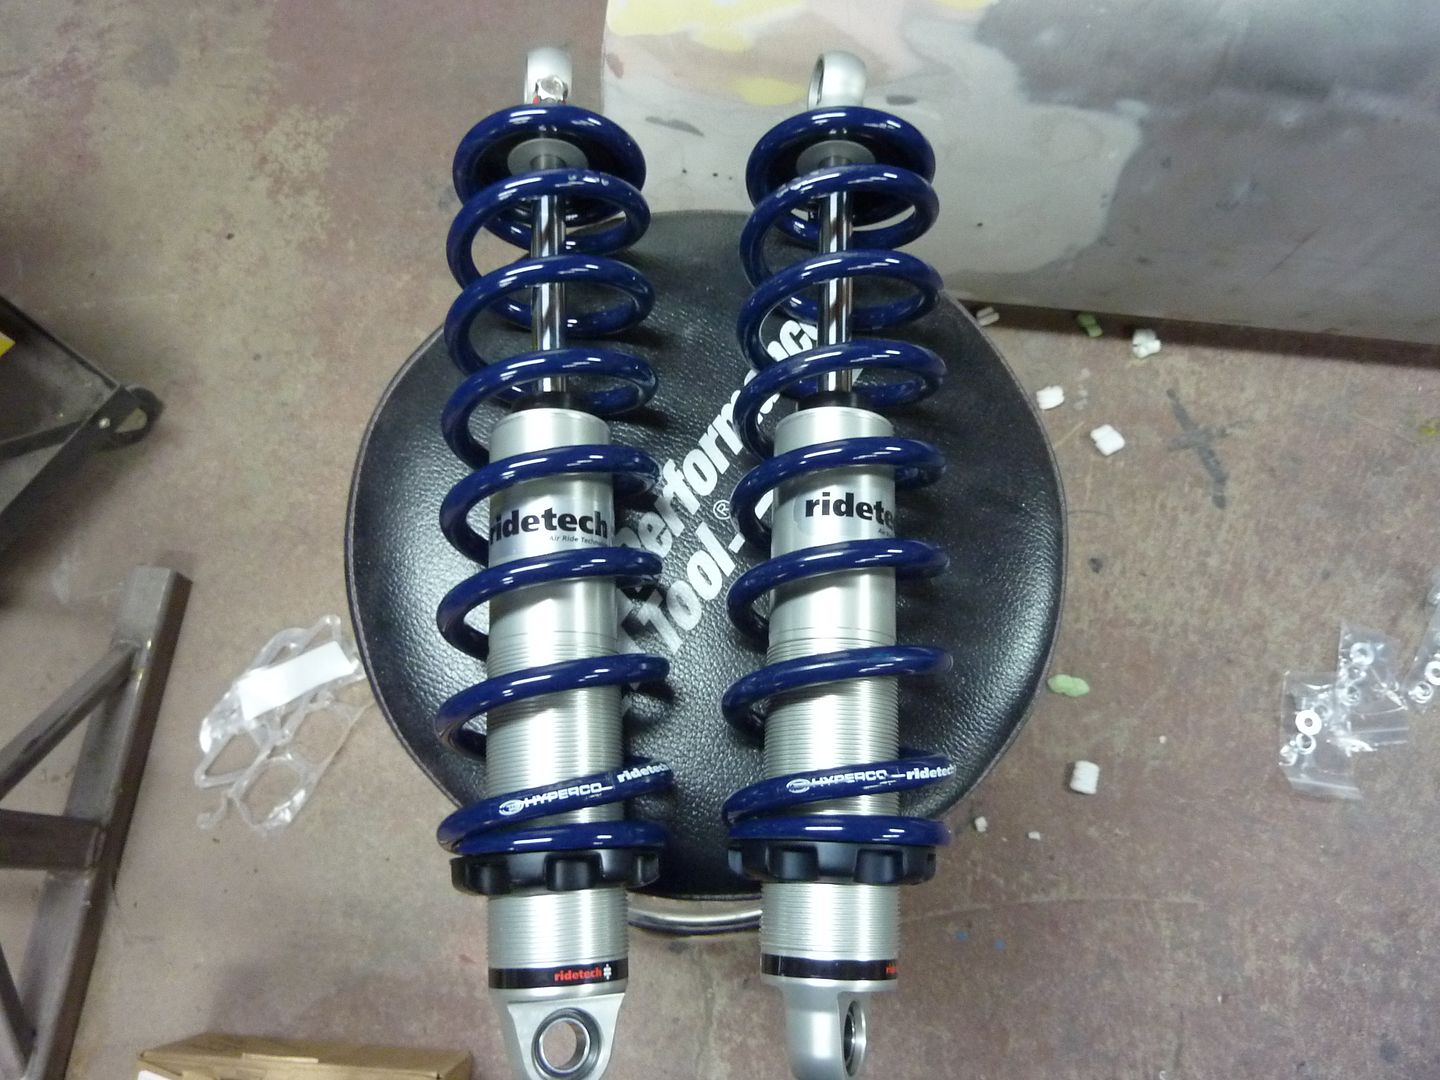
I really like how they have the bolt holes. They swivel and adjust if the bolt is on an angle at all.

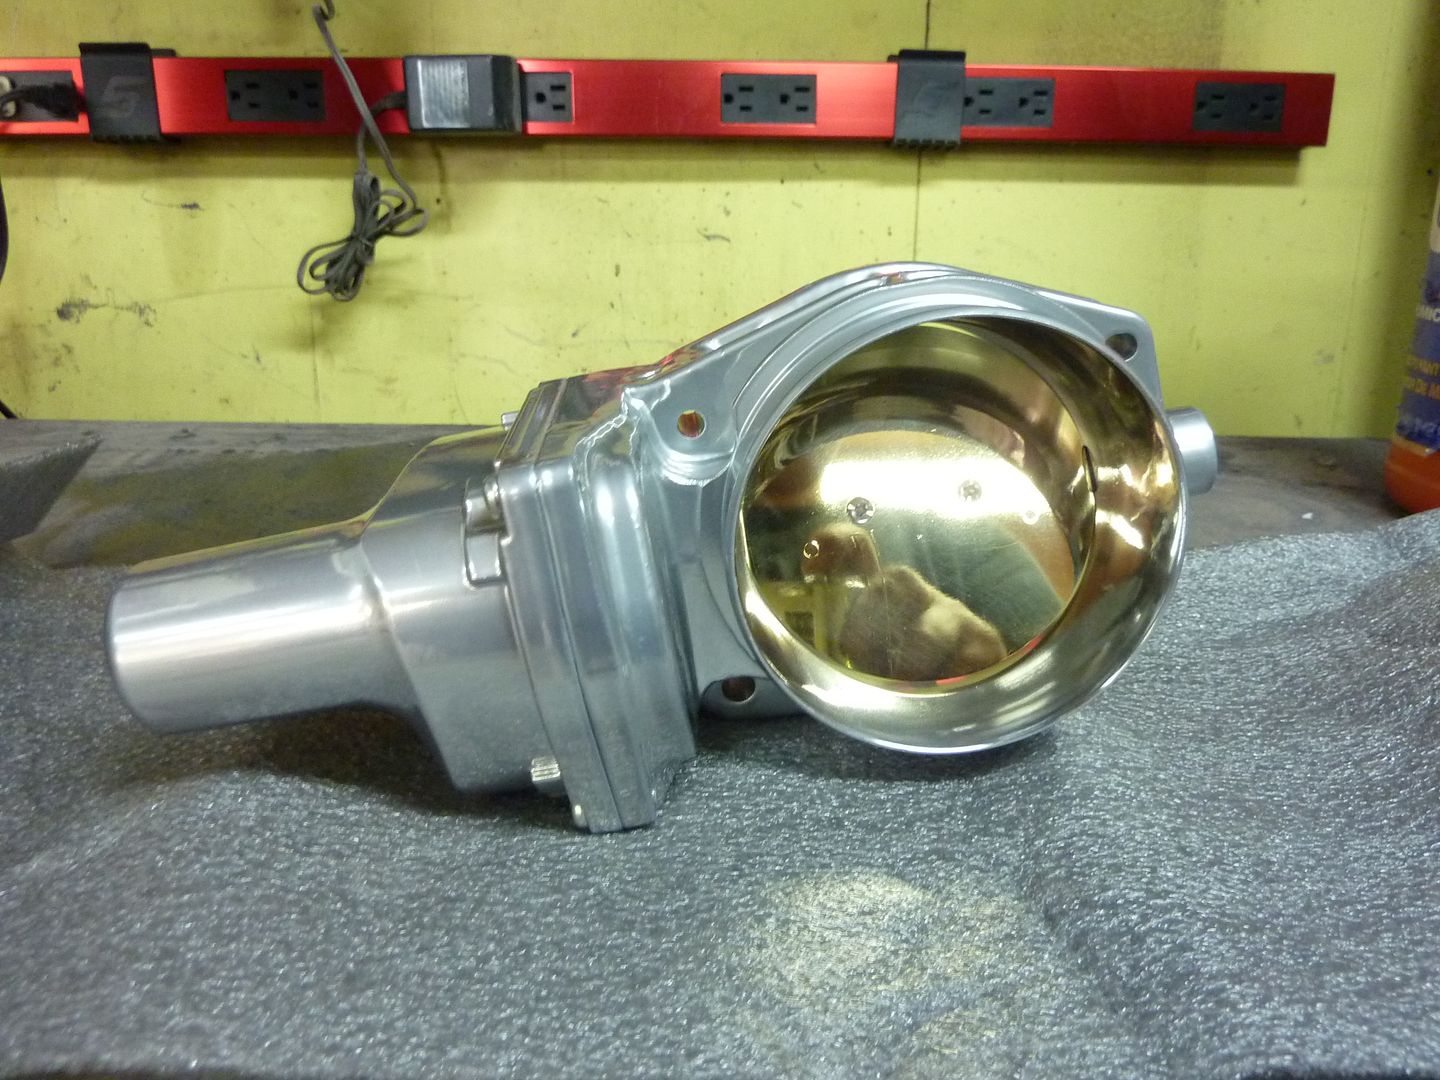
Some of you may have saw that I sold my FAST 102mm intake. After doing some more research and seeing results of how it has done, I found that it really wasn't worth the money. If I kept it, it would have cost me another $500 for the throttle body and I would still have to get injectors and fuel rails. So I sold the intake and with the money I got:
A LS3 intake taken off a 2010 Camaro. Got it from Hennessey Motor Sports for $200 on Ebay. It included the stock injectors, fuel rails, intake bolts and gaskets. Can't beat that for $200. I'm going to sand it down and paint it body color
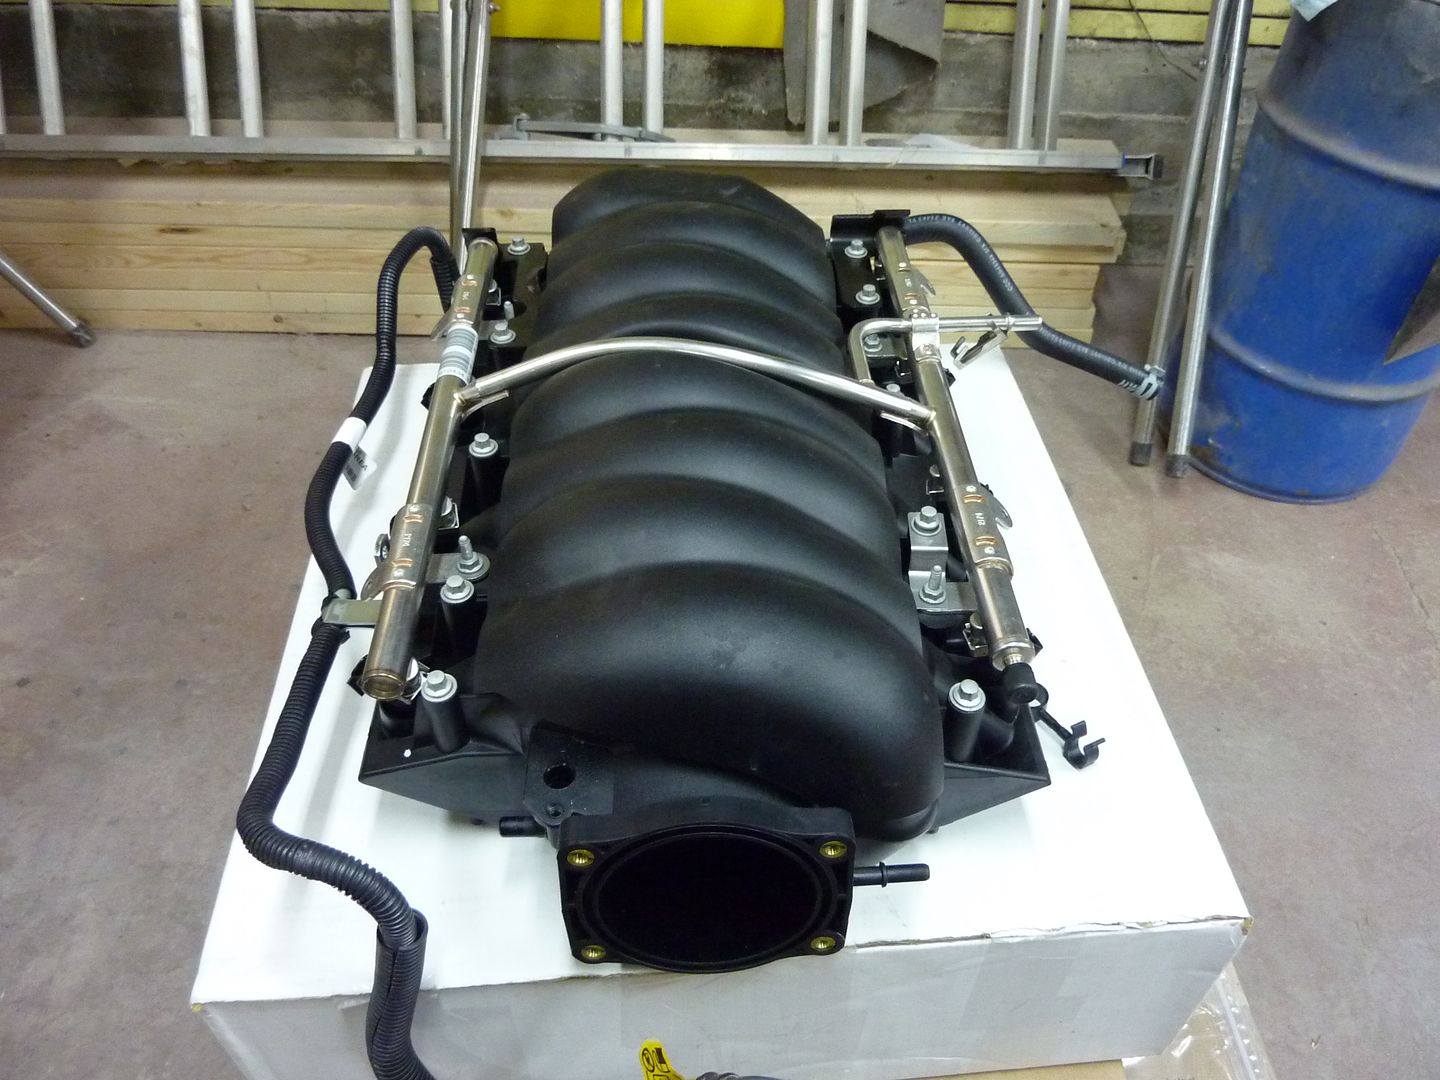
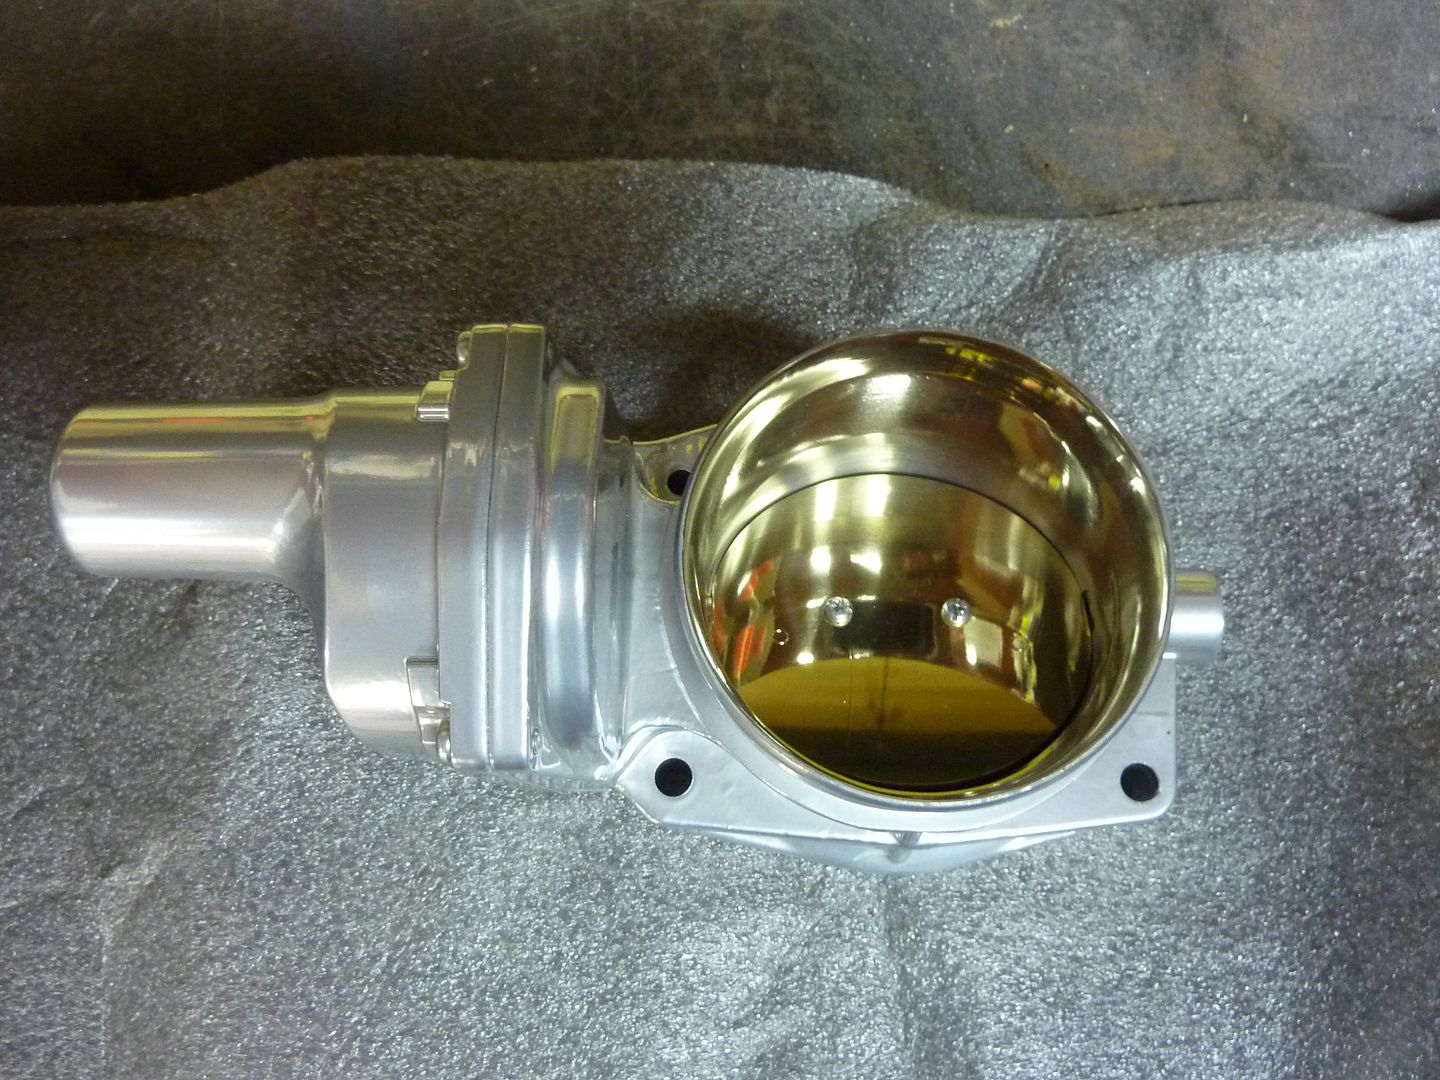
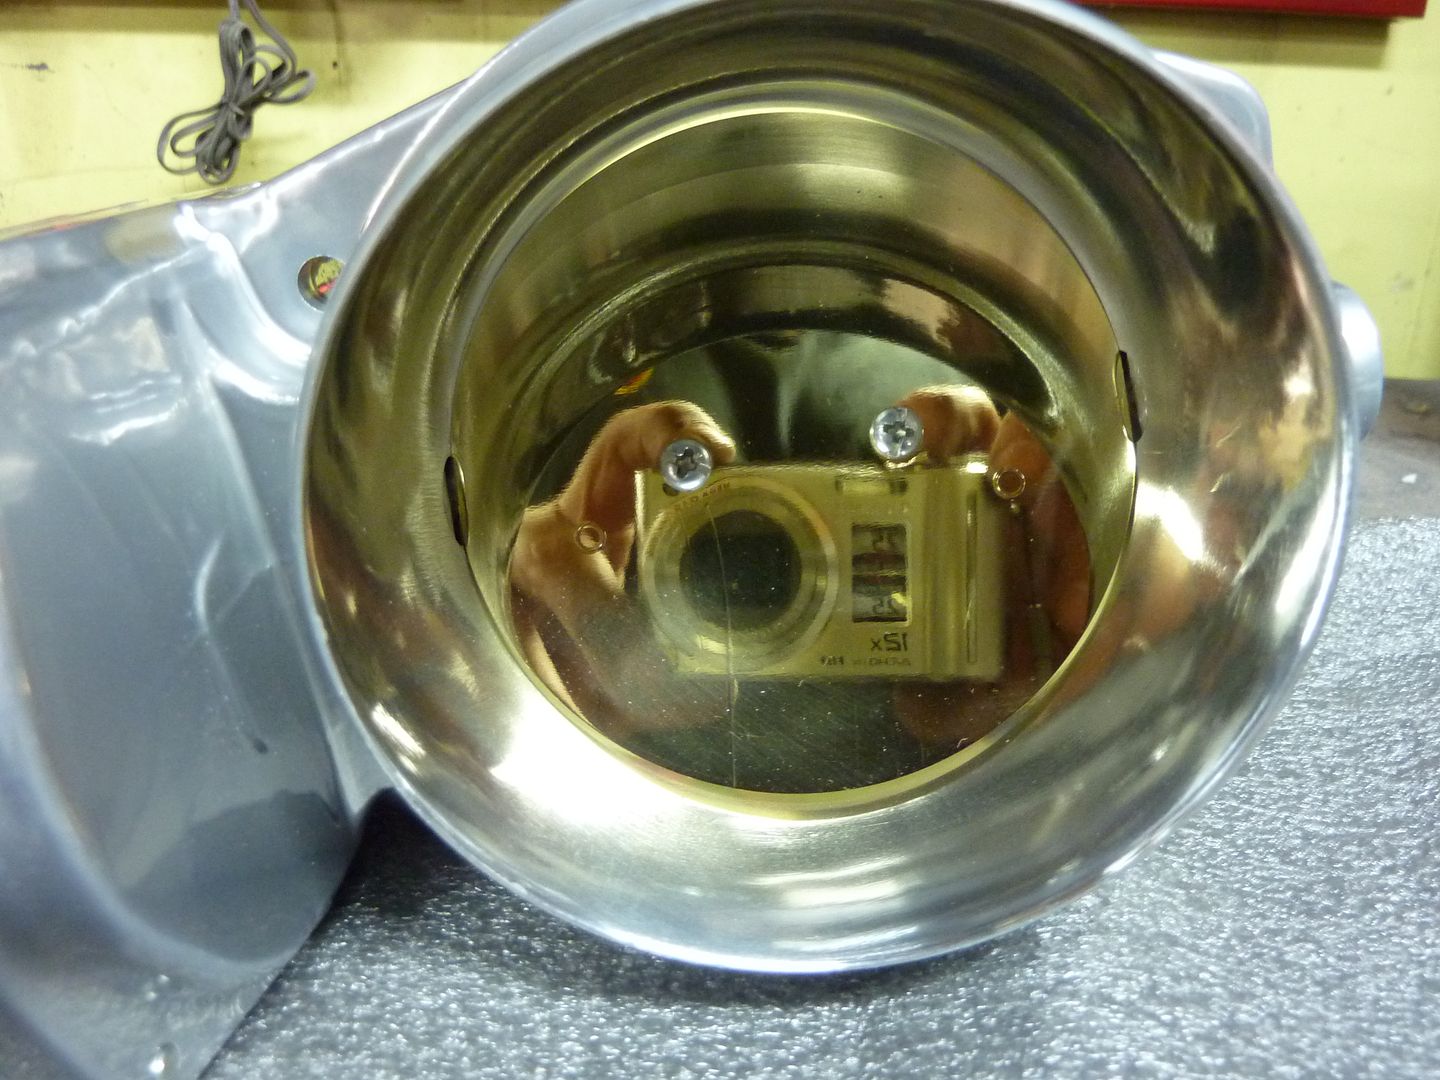
A LS3 throttle body. Was also new and taken off a crate motor. I ended up getting a really good deal on the intake as the guy I got it from bought a few of them from Ebay. He then ported and polished it and powder coated it chrome. If anyone is interested in getting one or having yours powder coated, here's a link to his thread on LS1Tech.com: https://ls1tech.com/forums/gen-5-cam...le-bodies.html Mine is the one he used in his pics on the thread. Here's some more pics of it that I took.
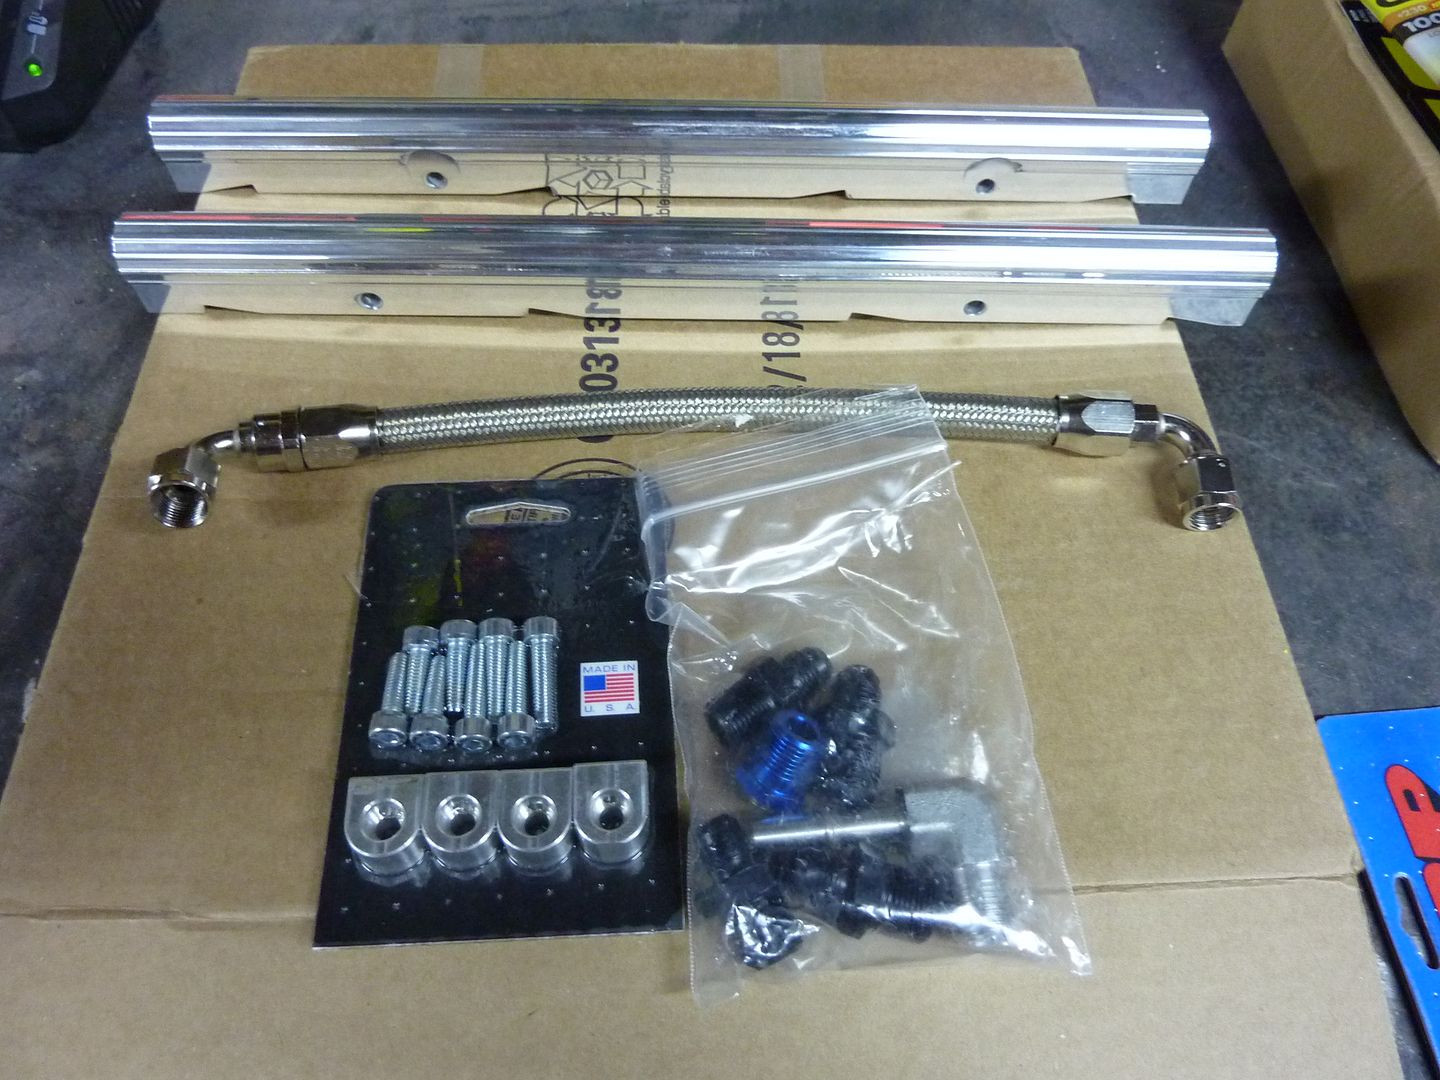
Got some polished aluminum billet rails. They will look good with the body color intake. I got these from Ebay also from a company called Custom Built Motors: http://stores.ebay.com/Custom-Built-...id=p4340.l2563 They were really good to deal with. Pretty good deal too. I think I paid $200 for everything in the pic.
Not bad...for the money I got for the 102mm intake (plus I think $50), I ended up with the intake, injectors, bolts, gaskets, throttle body and fuel rails. I'm glad I sold it.
I've also decided to get rid of the VVT on the motor. I'm still not sure if it's the right decision, but like so many people have said, it's still an unknown and one more thing to go wrong. So I got the parts I need for the delete:
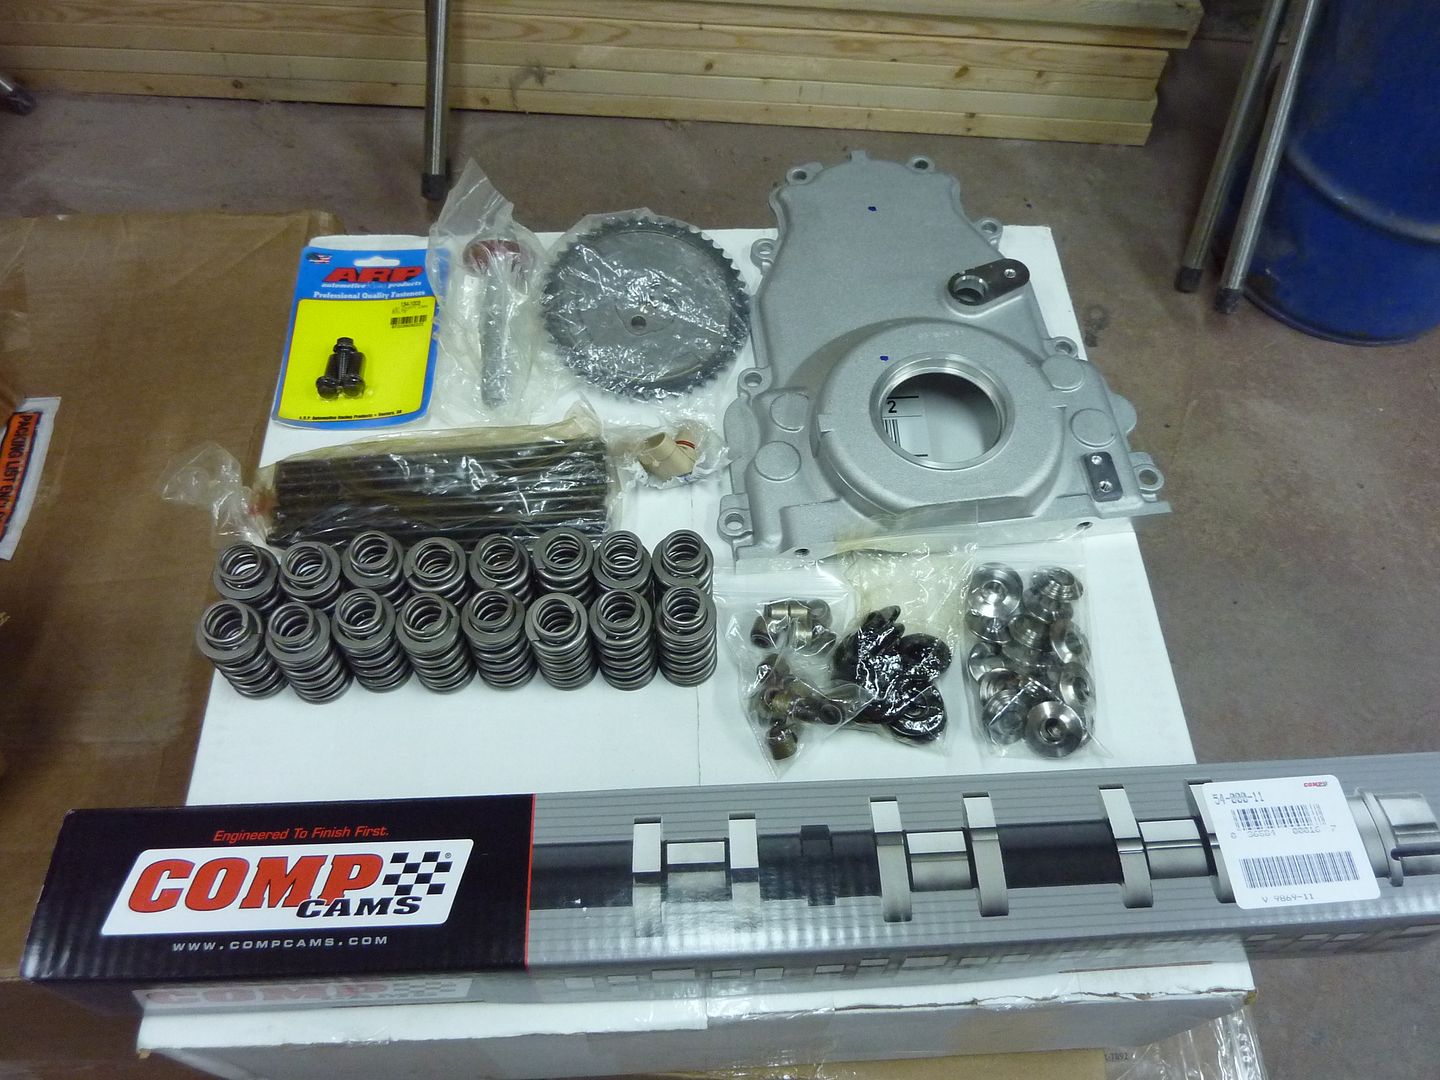
The cam is a custom grind. I ended up getting Patrick Guerra to design one for me. I had never heard of him until I started looking for cams. Very highly recommended on LS1Tech.com as well as a few on here have used him. Here's a link to his site: http://www.guerragroup.com/camshaft_help.htm
Here's the specs on the cam. Patrick said that it will be a good pro-touring cam and should have a nice wide power band. It should easily make 540-550hp at the crank.

I also got an order from Summit.
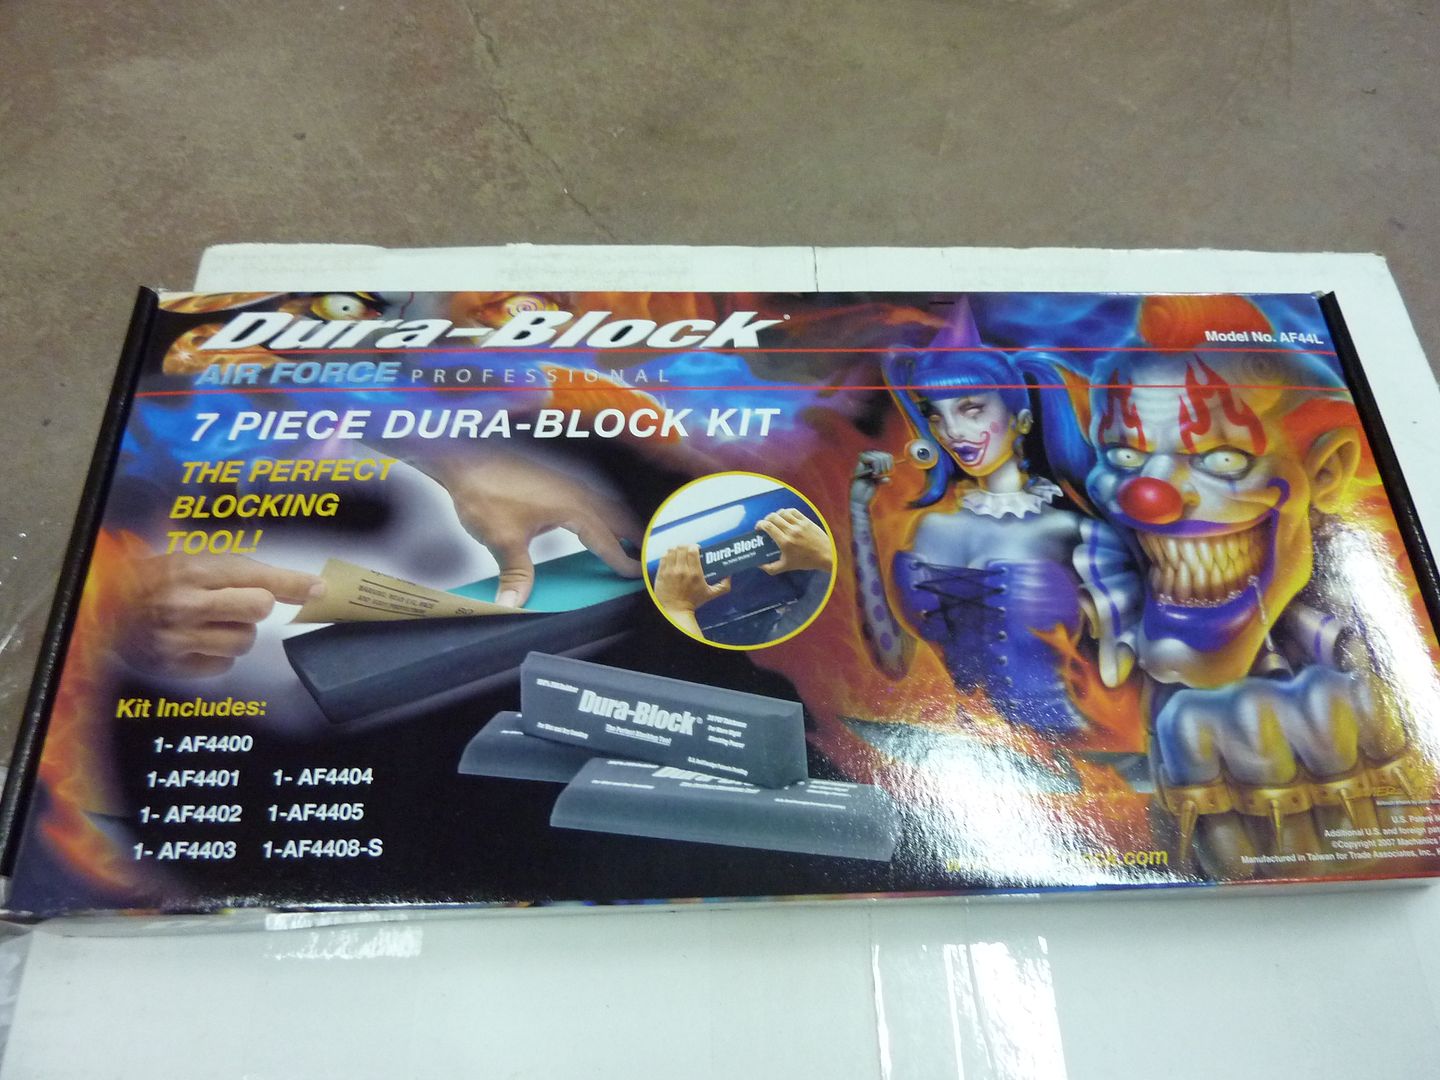
Decided to get a sanding block kit
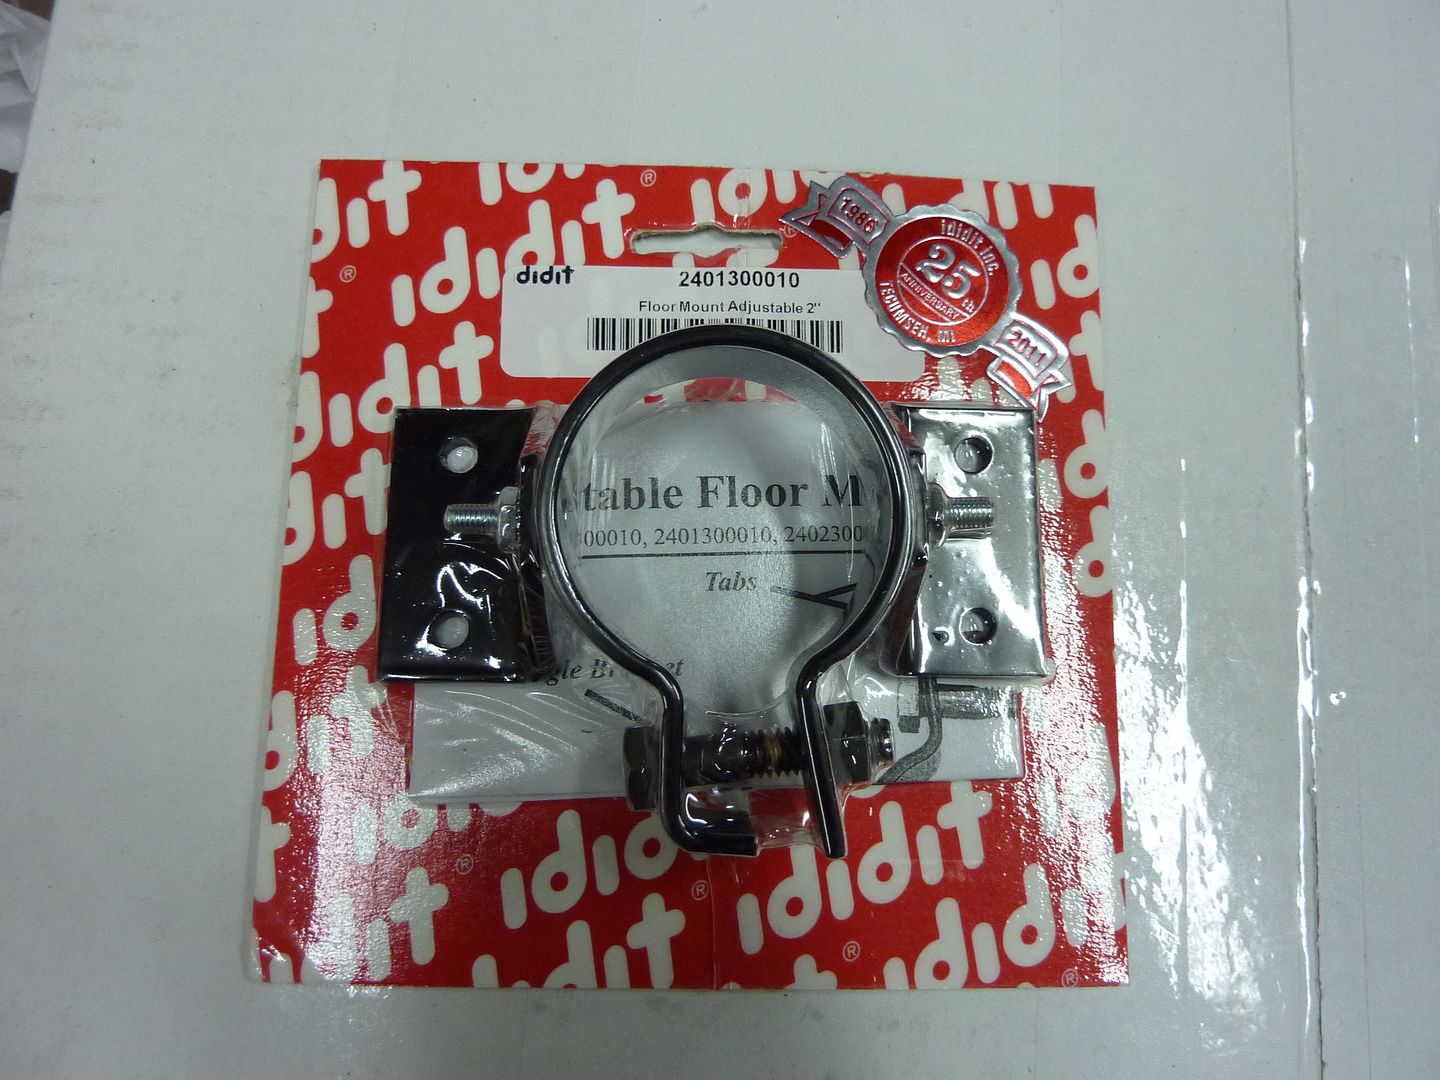
I've been trying to figure out a way to strengthen up my steering column so it feels more secure. I might end up using this to help
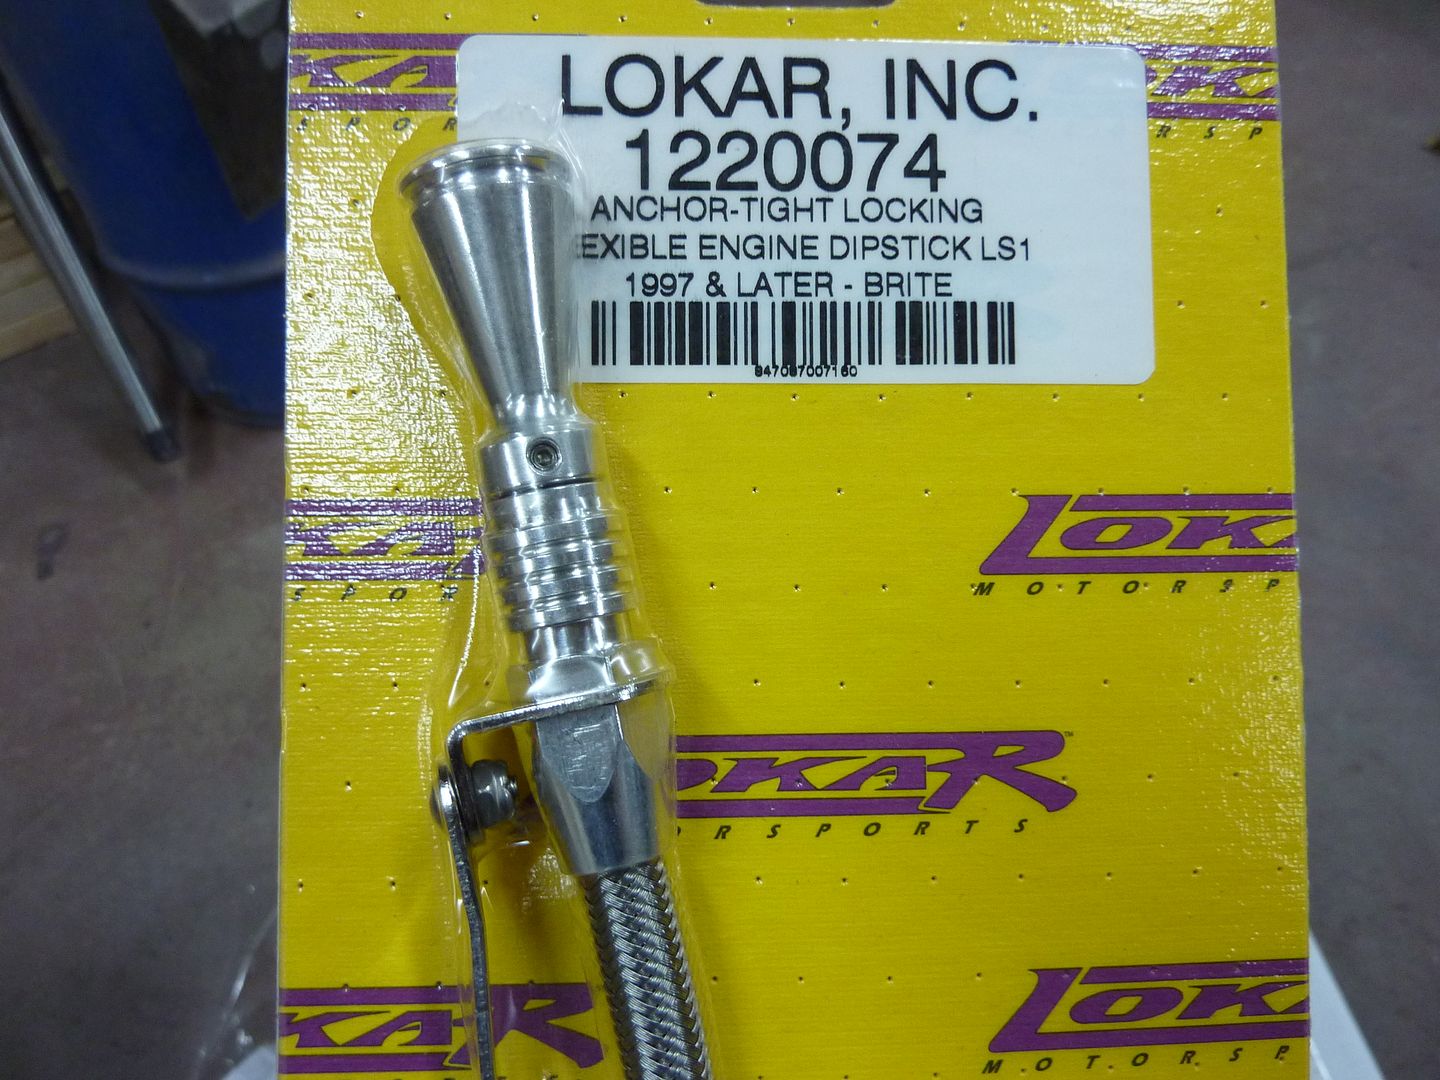
Lokar oil dipstick
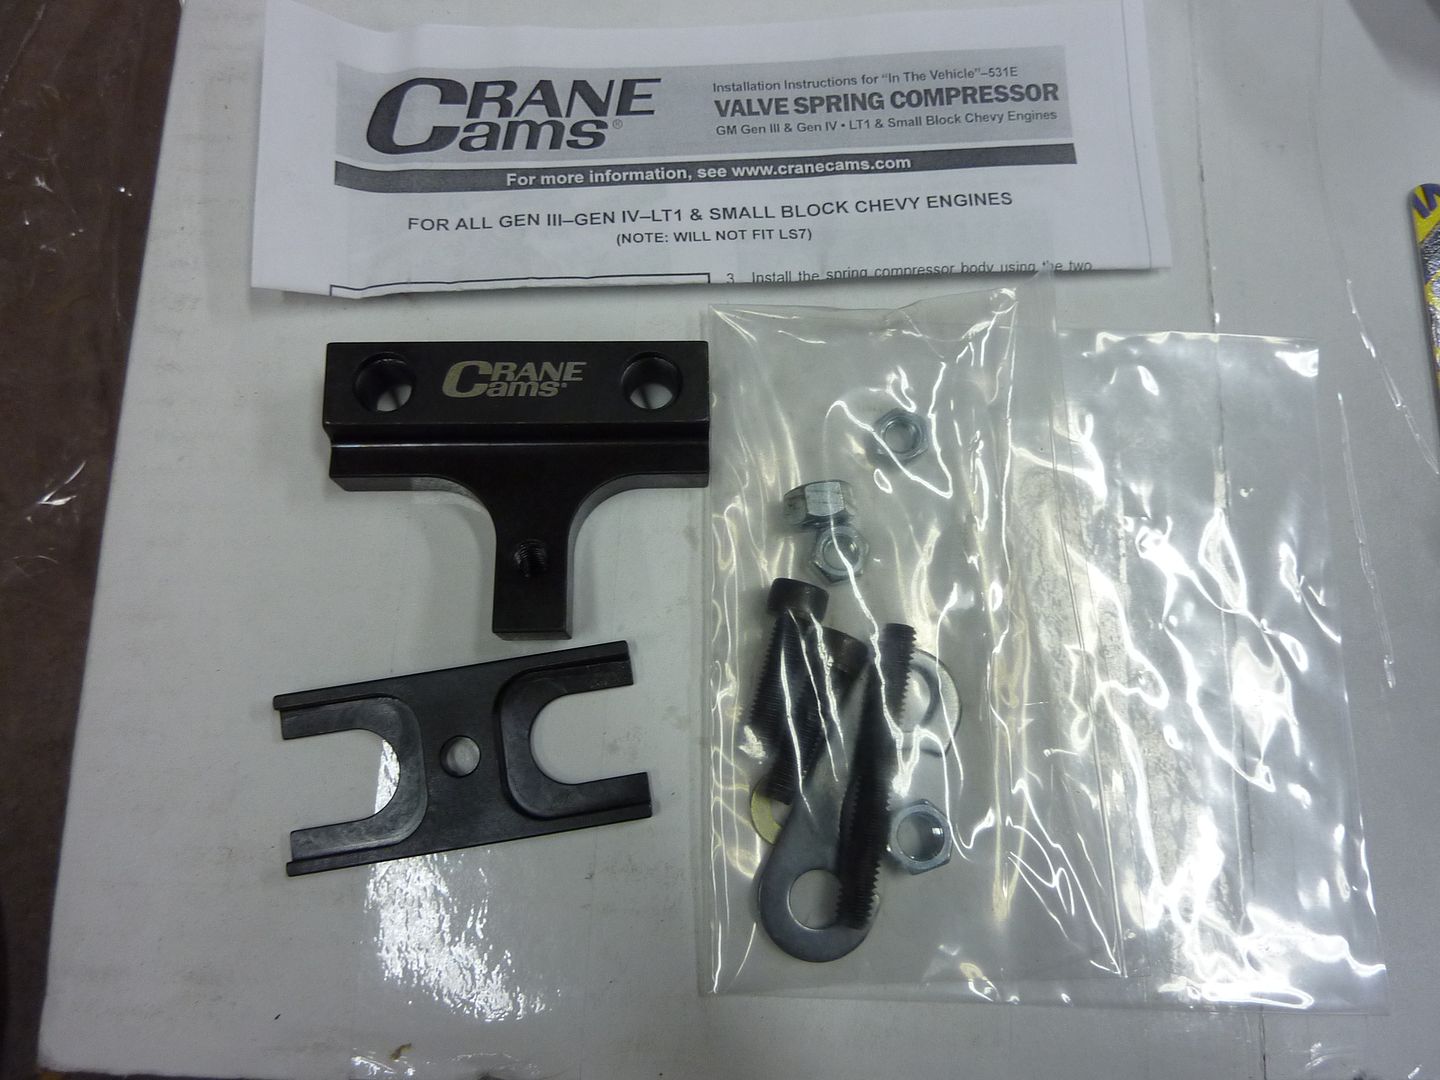
Crane LS3/L92 spring compressor
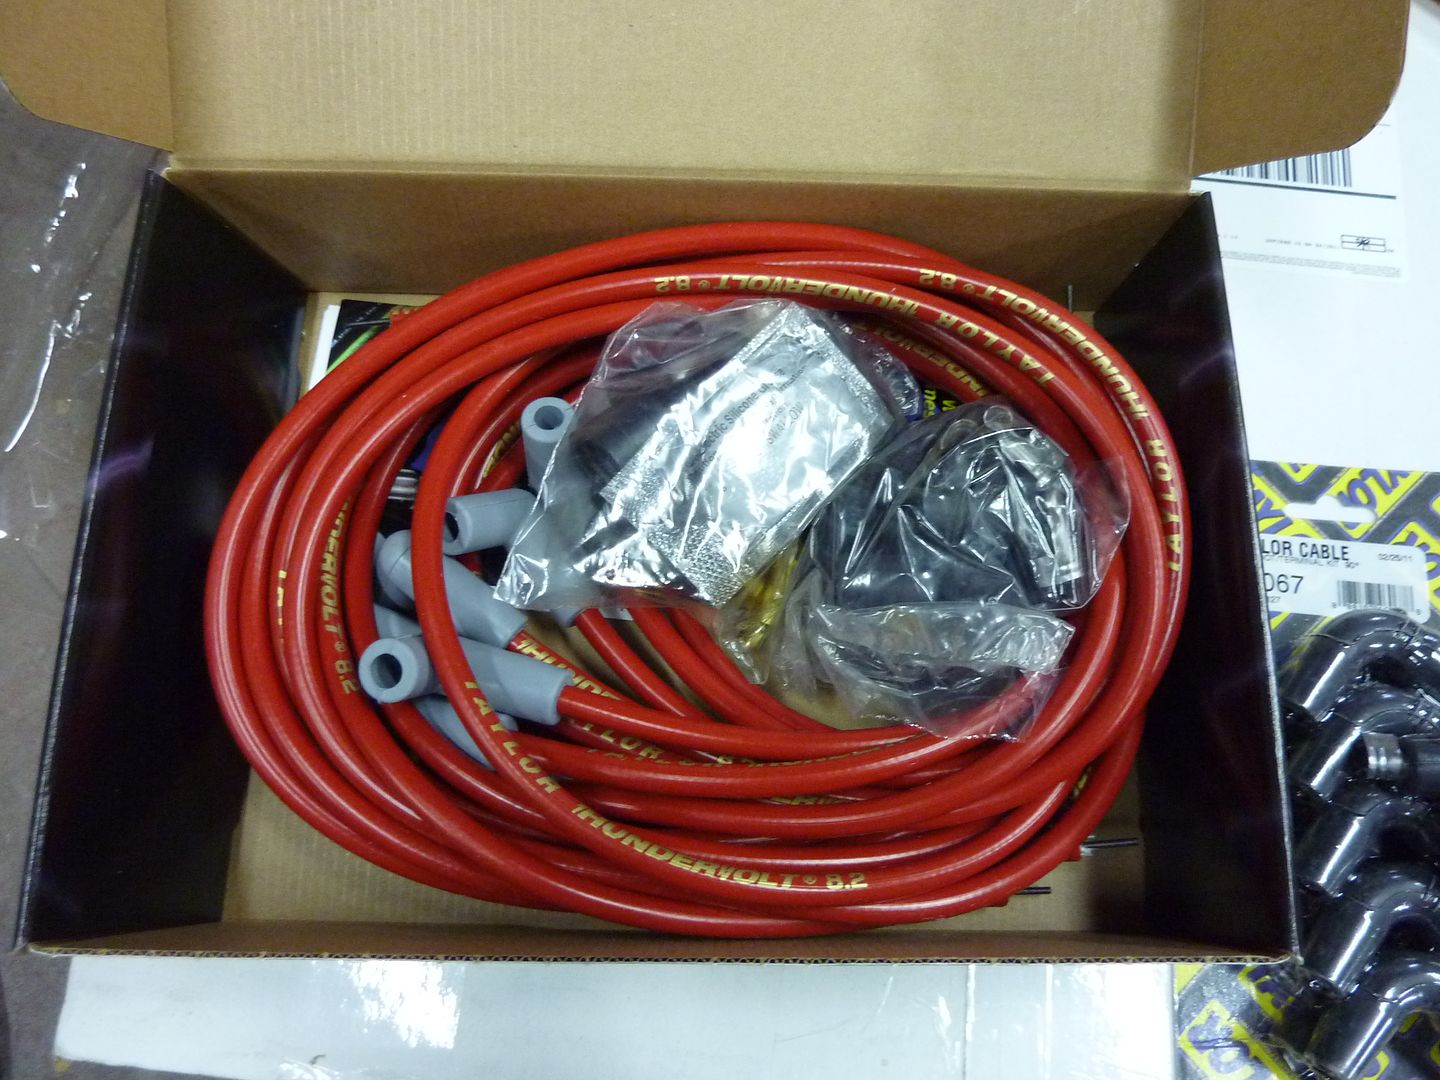
Taylor spark plug wires. Also had to get LS style boots.
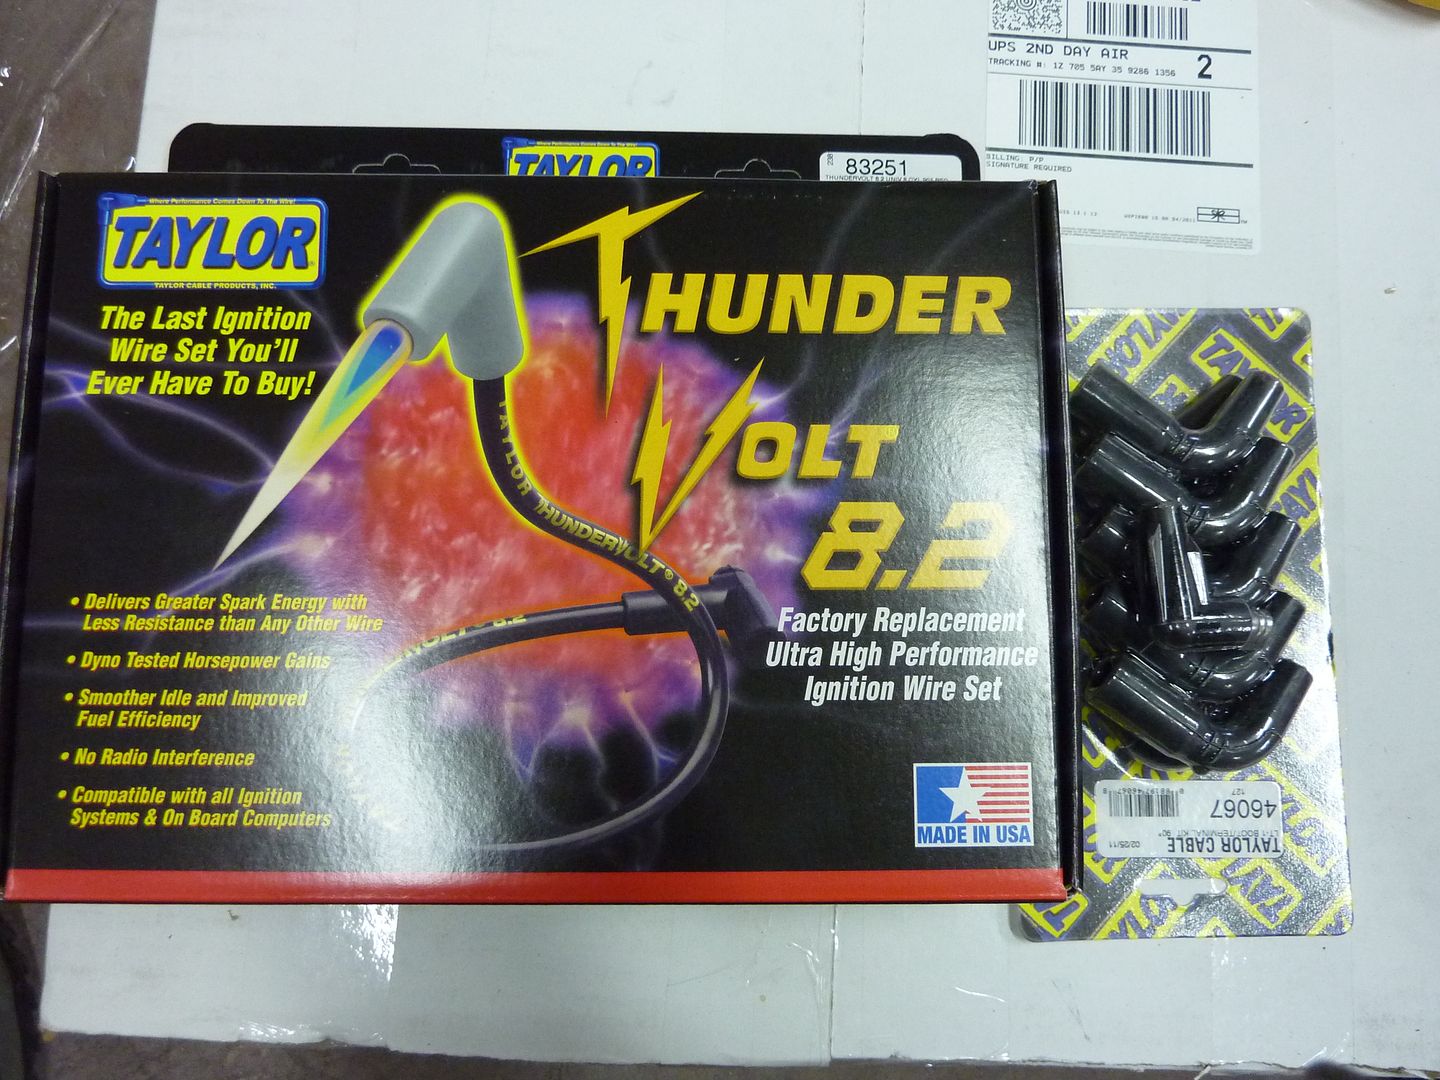
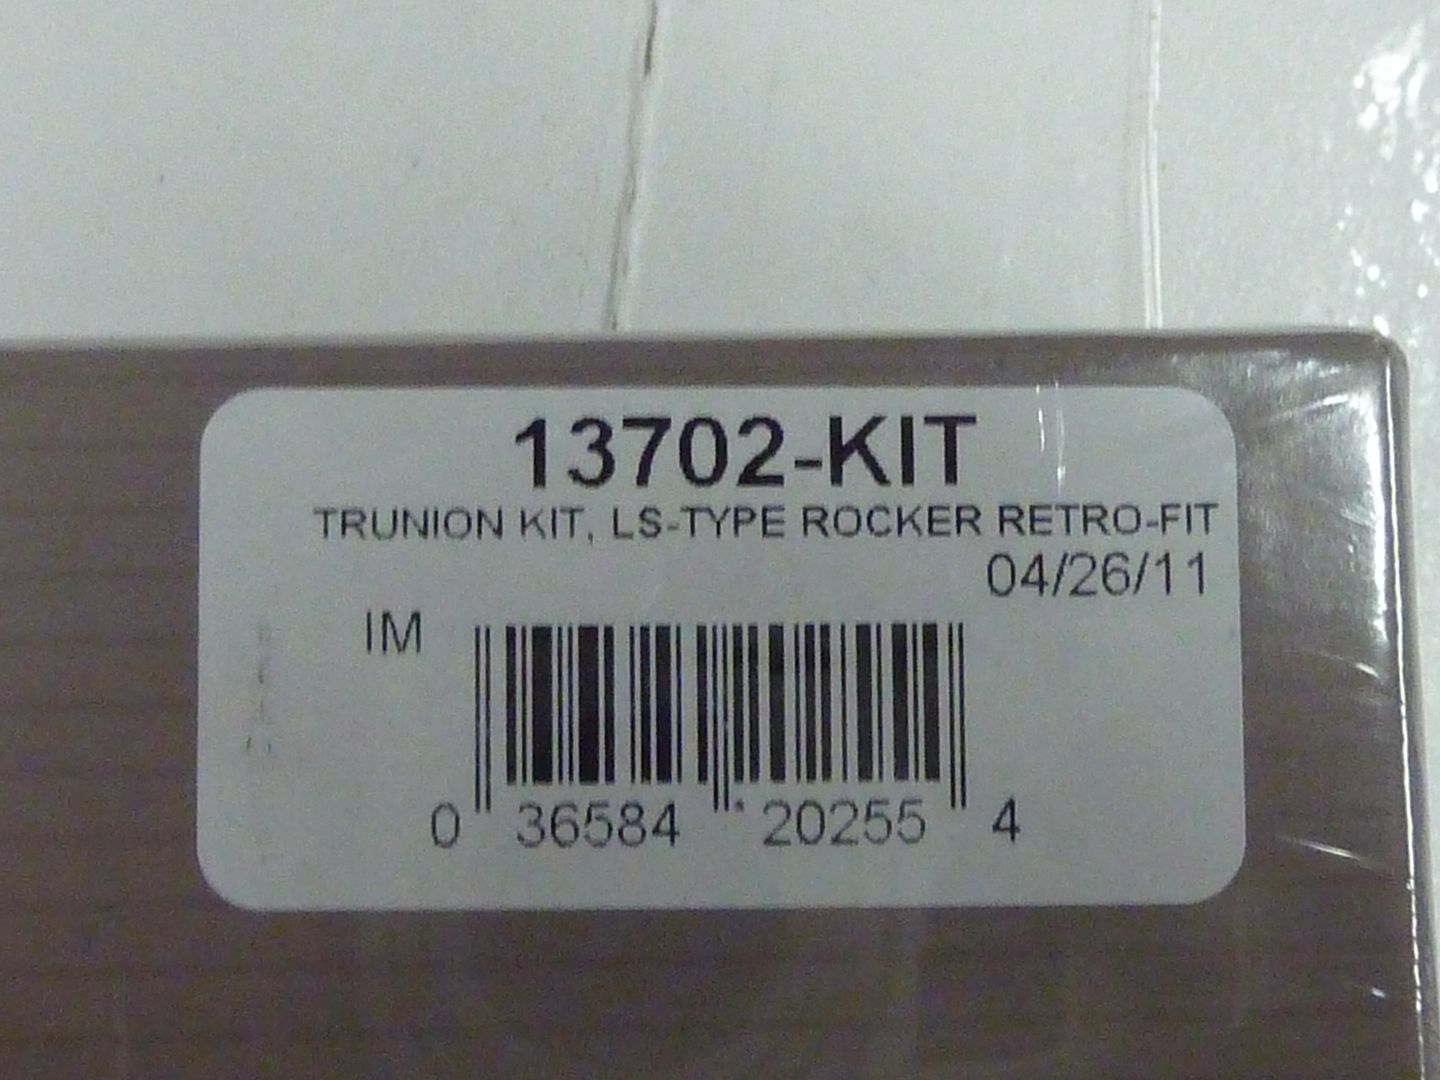
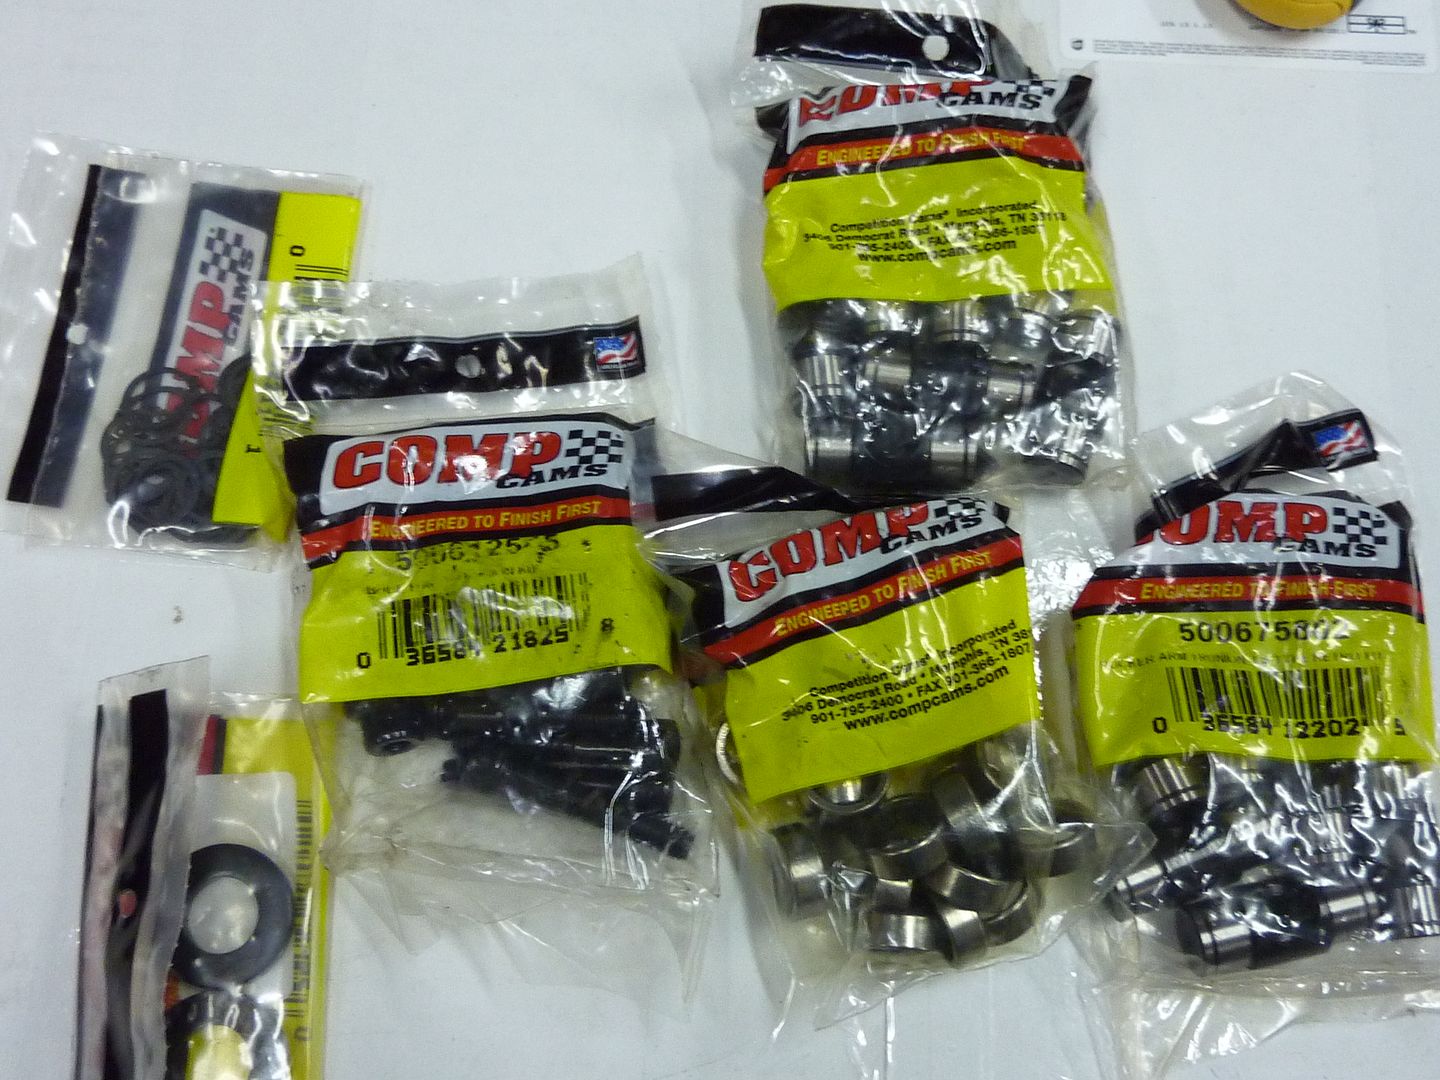
Comp Cams trunion upgrade kit
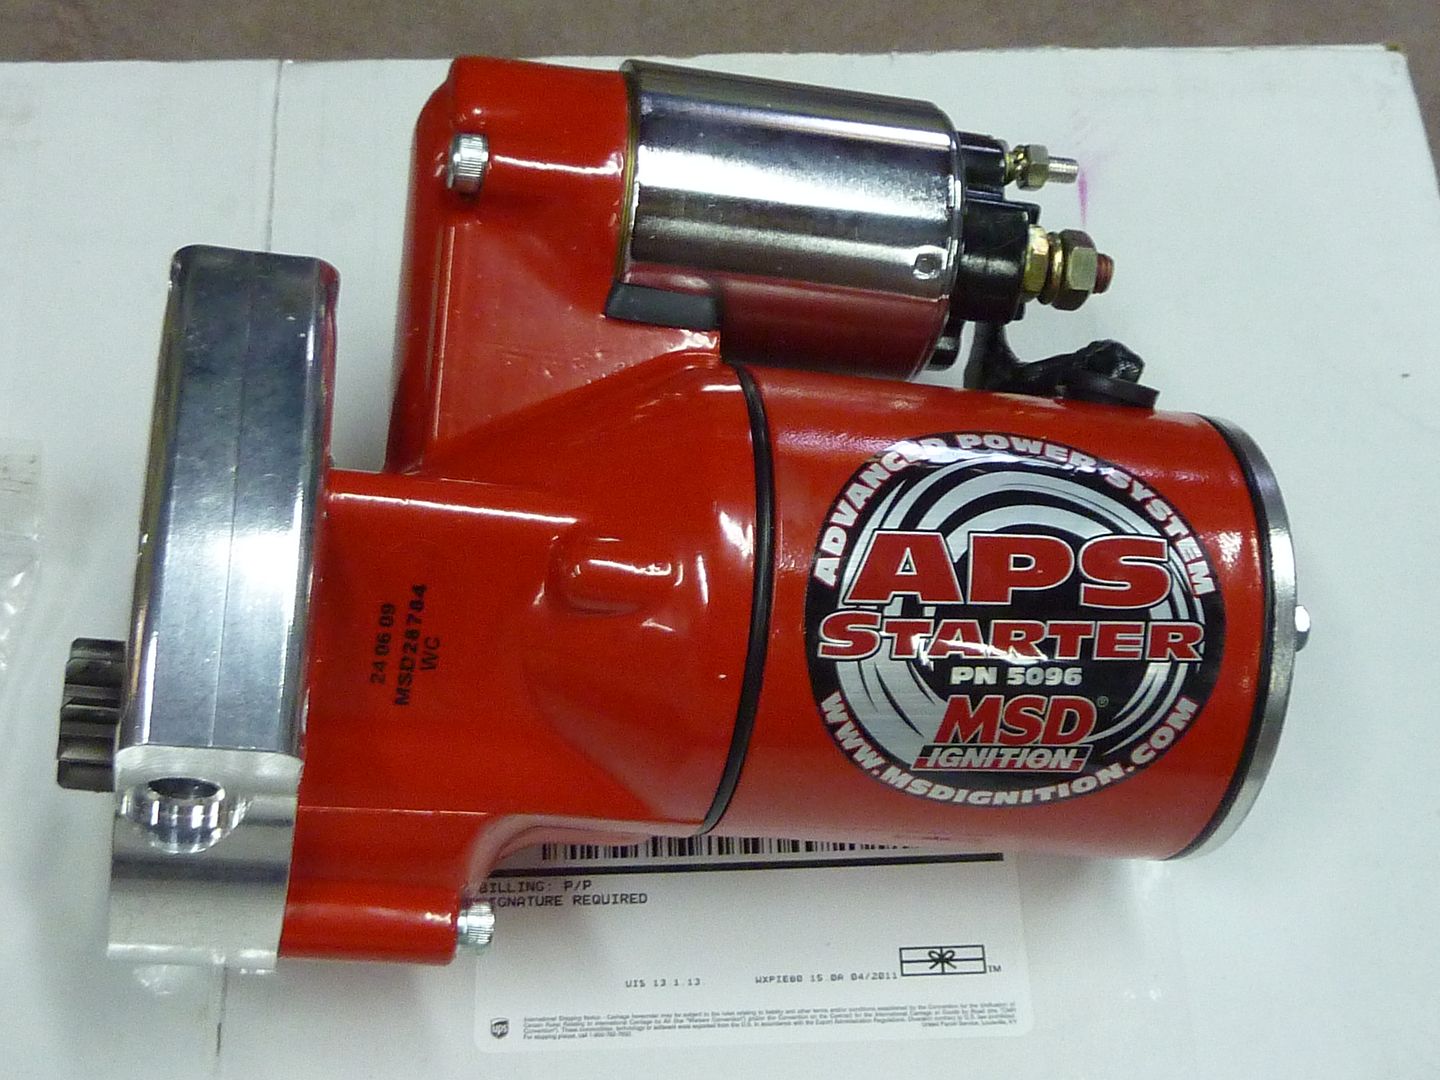
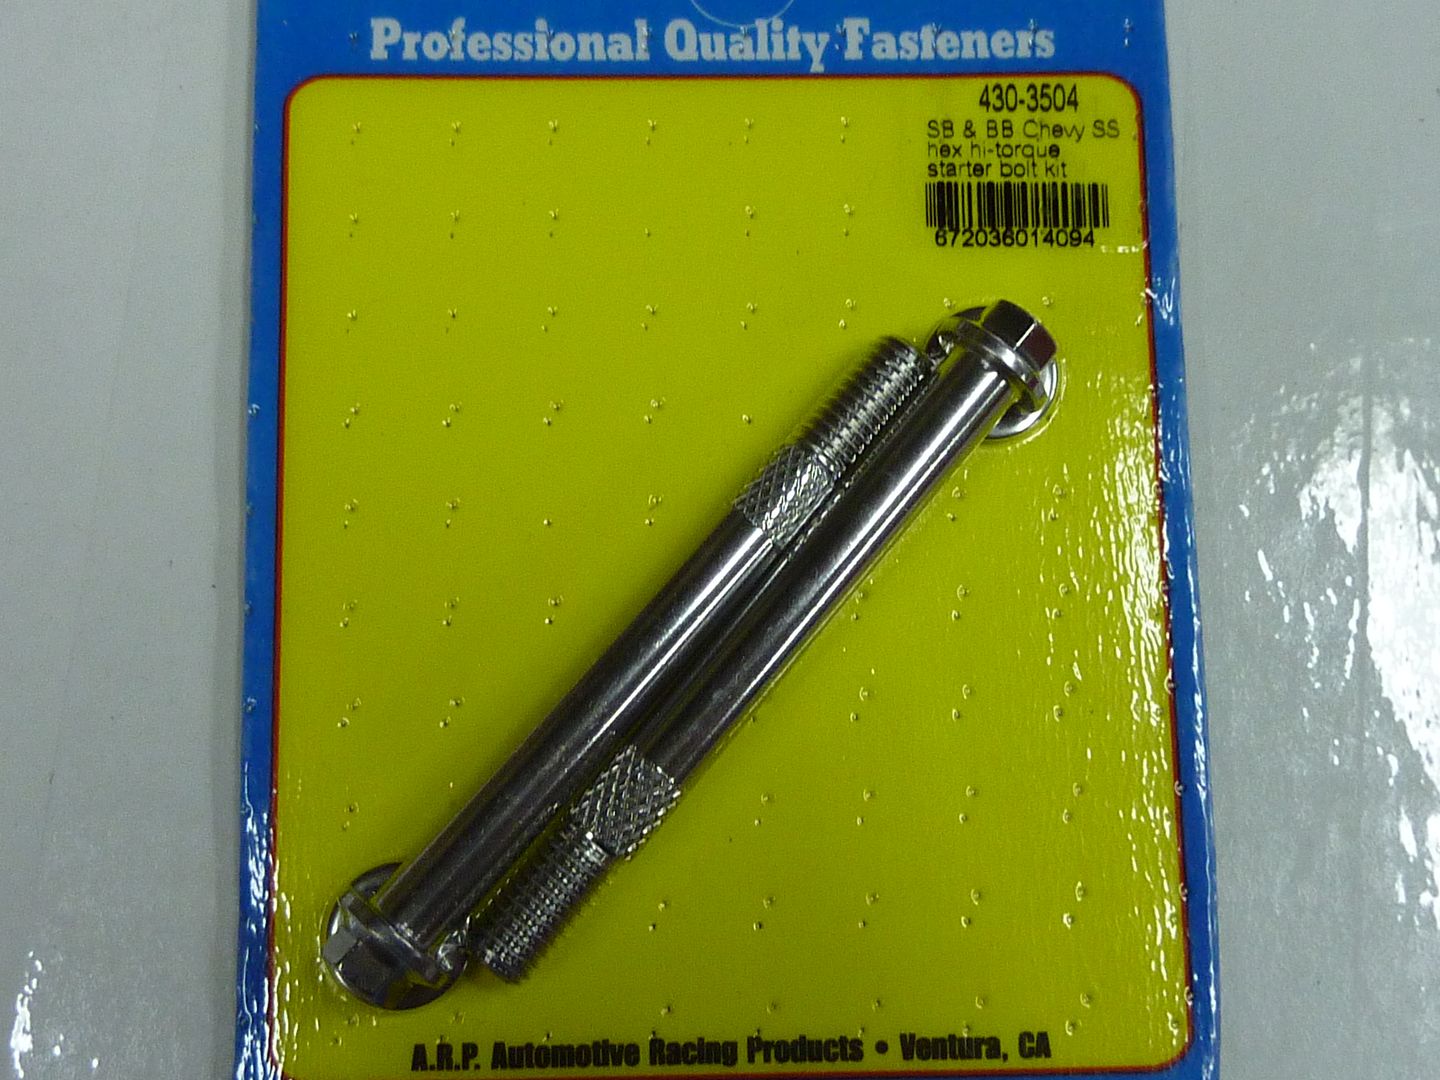
MSD starter and ARP bolts. I didn't realize that MSD includes new bolts with their starters
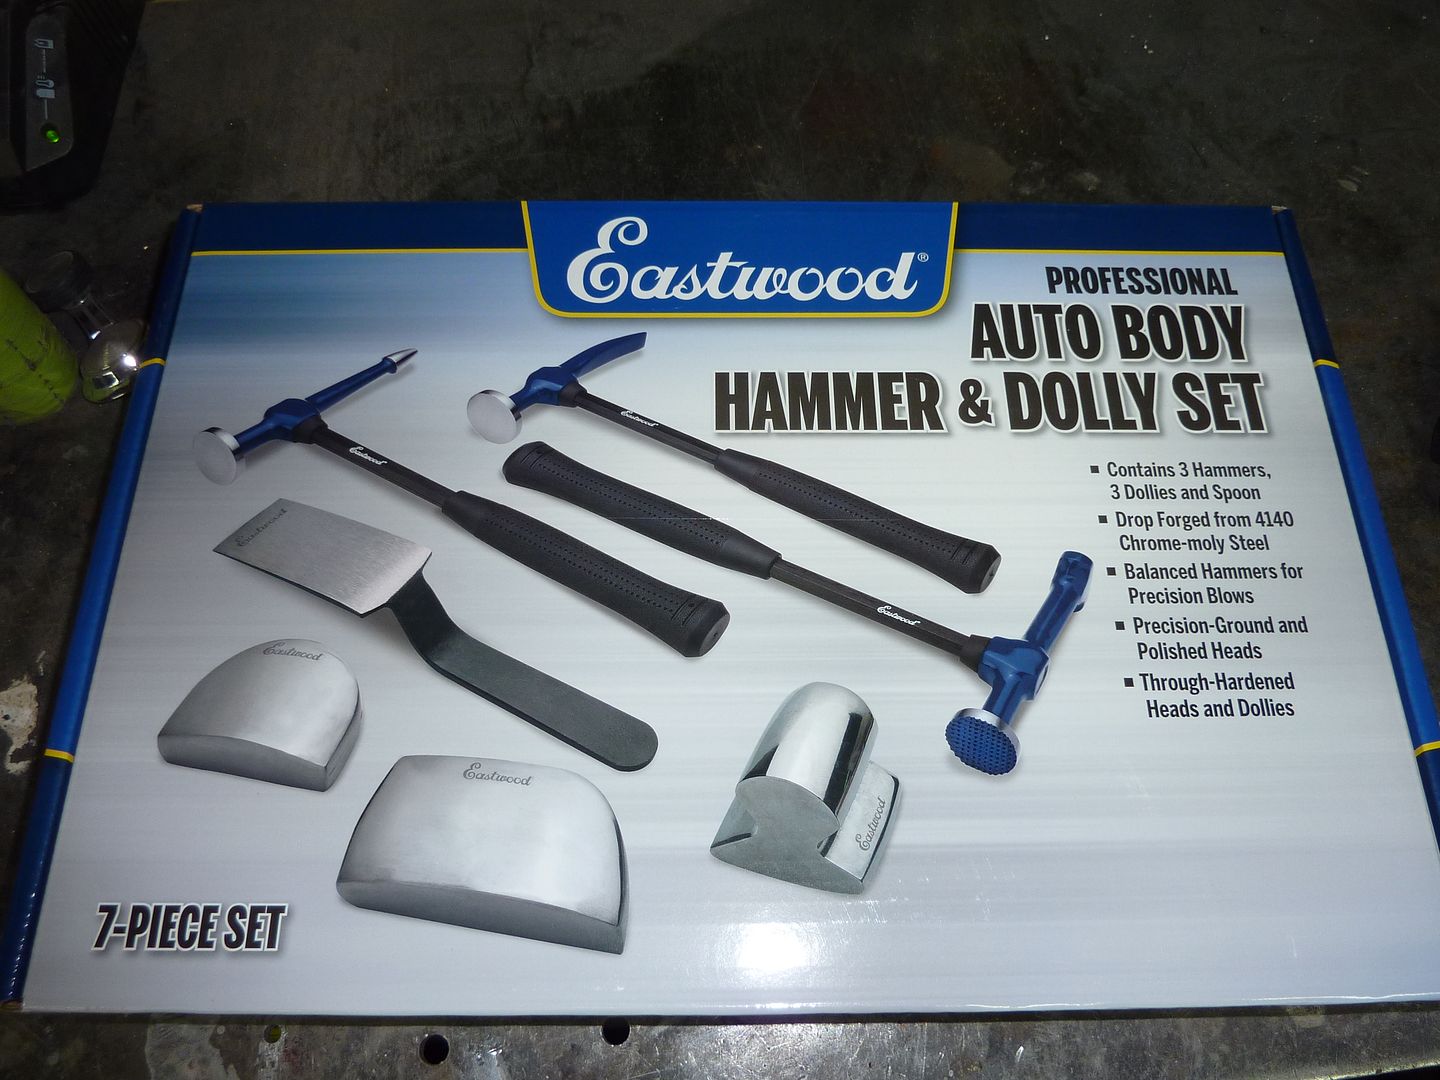
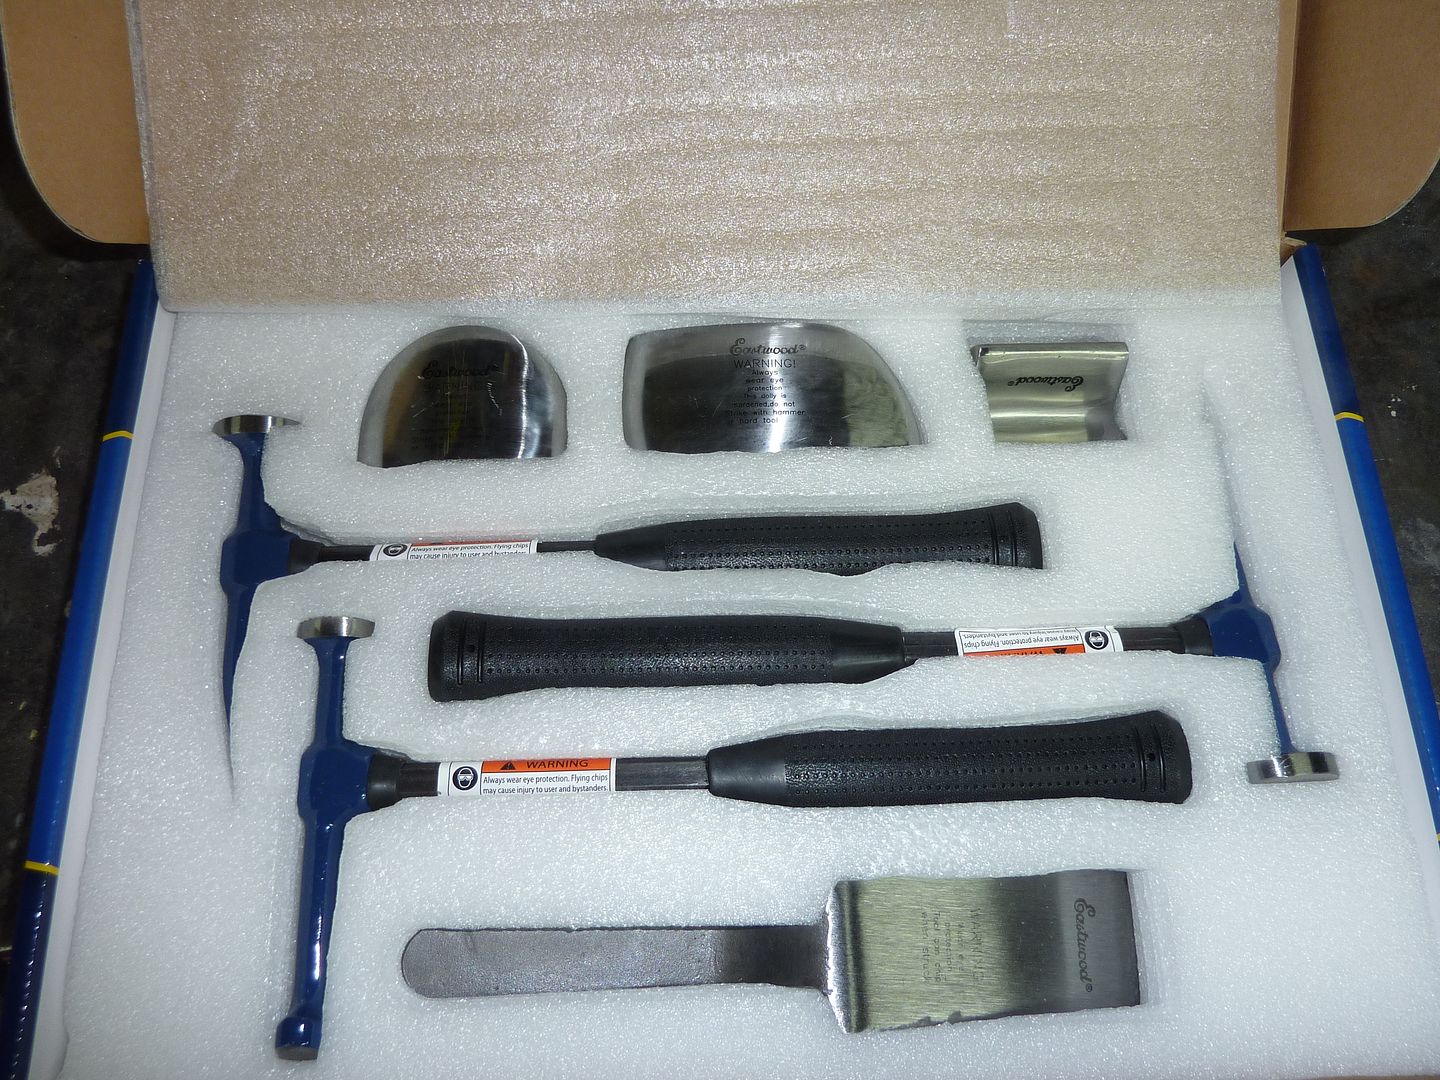
Also got a box from Jegs. It was mostly tools. I got a 68 piece screw driver set (never have enough), T style allen keys, a padded cushion for lying on the ground and I've wanted to get a new body panel hammer kit so I decided to get the Eastwood professional kit
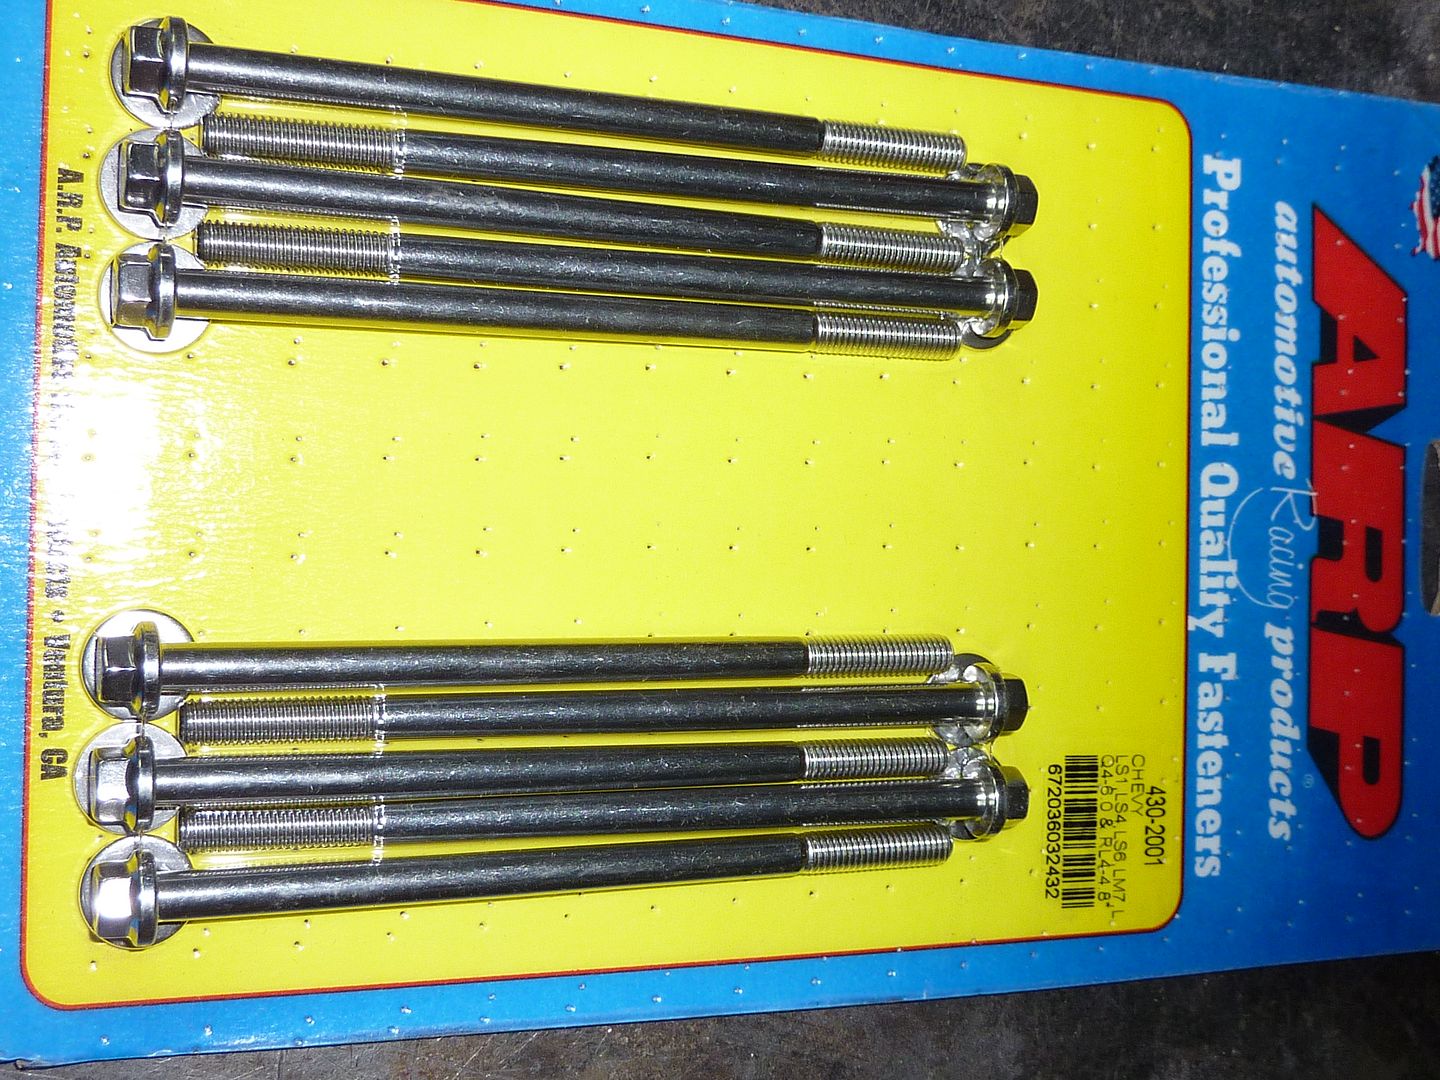
And I got some polished ARP intake bolts. I was told they weren't going to include the bolts with the intake, so now I have two sets
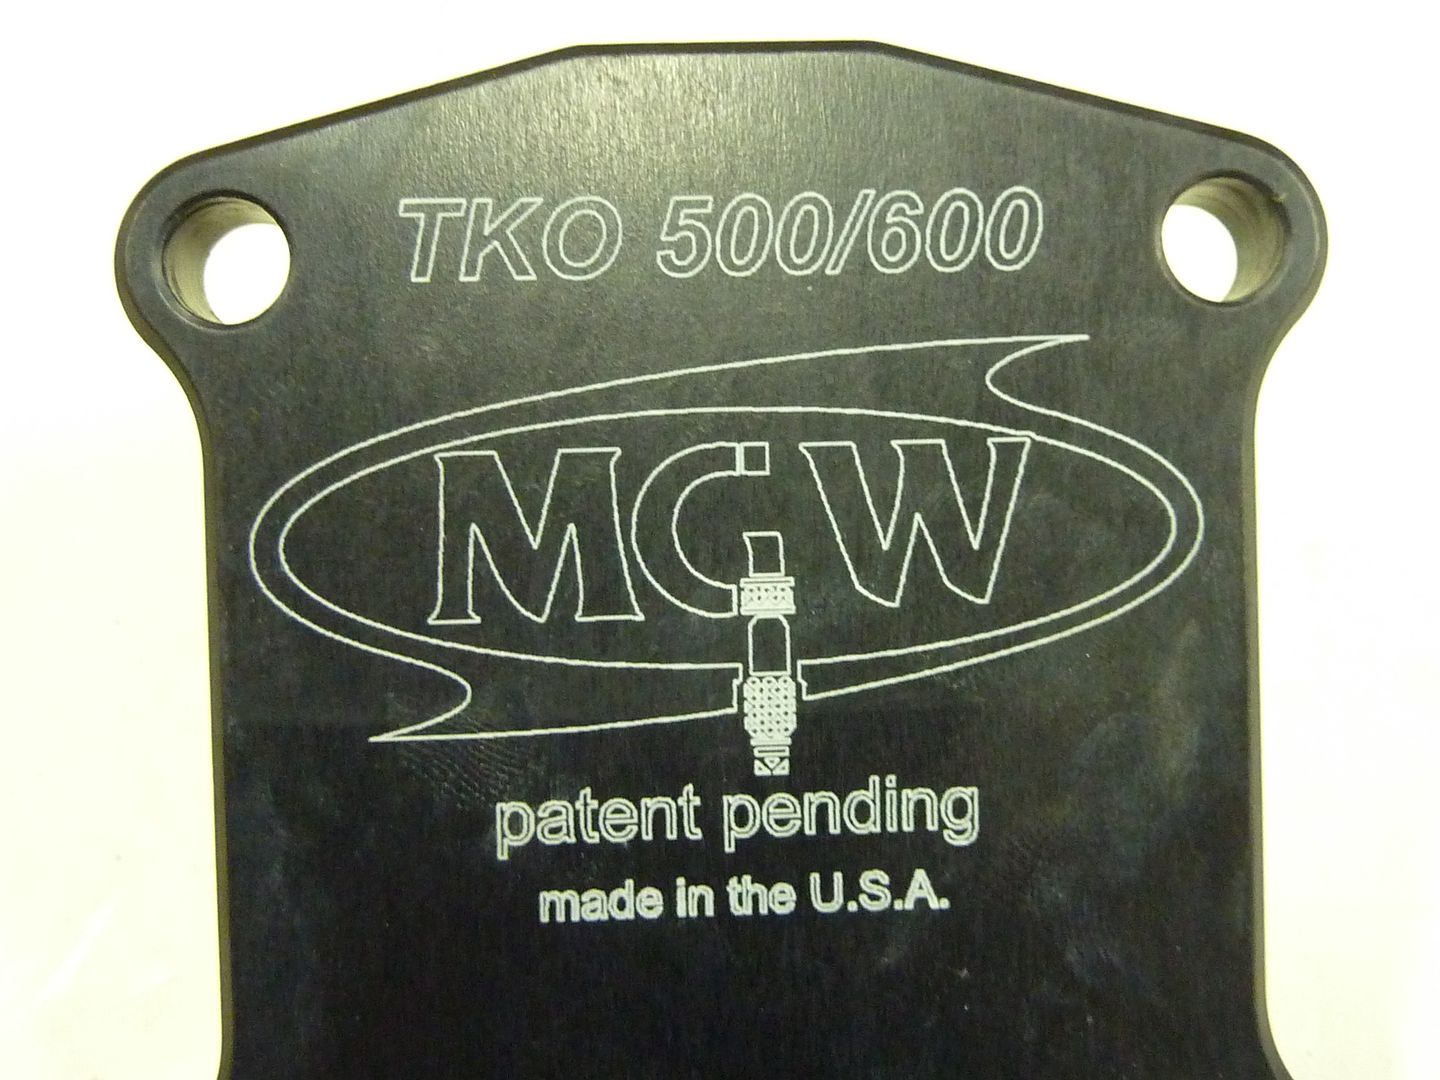
I've heard that Mustang guys with TKO's have really good luck with MGW shifters so I thought I'd give one of them a shot. It's a short throw shifter
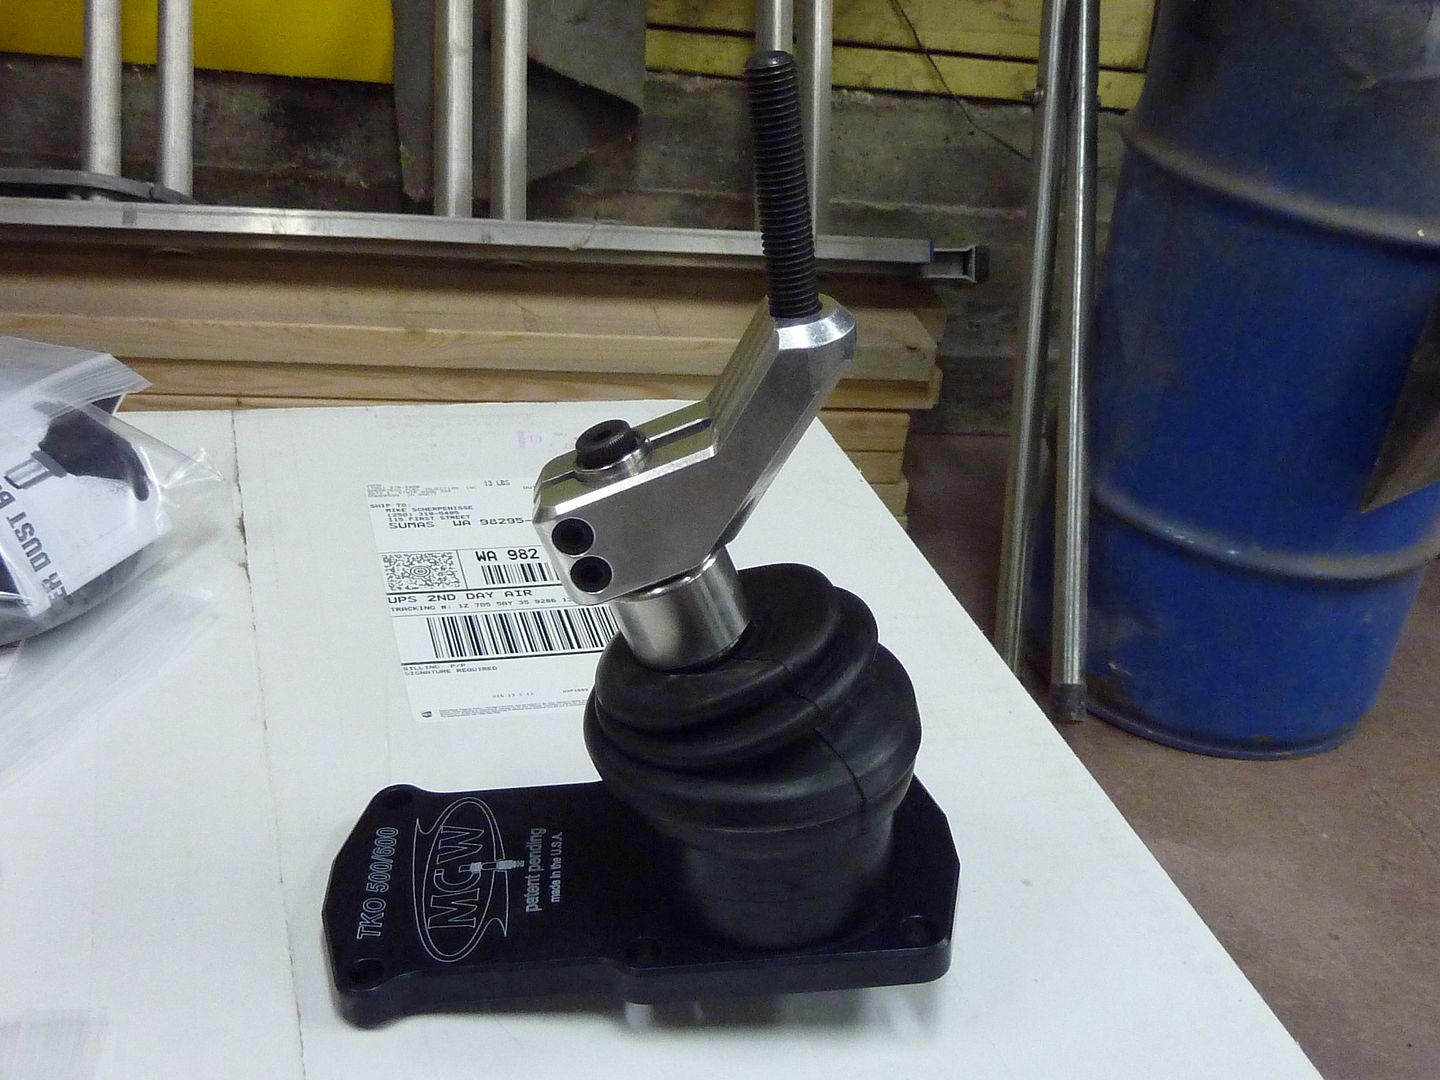
I also got the longer shift handle as I'm still working on the console and I didn't know which one I would end up using
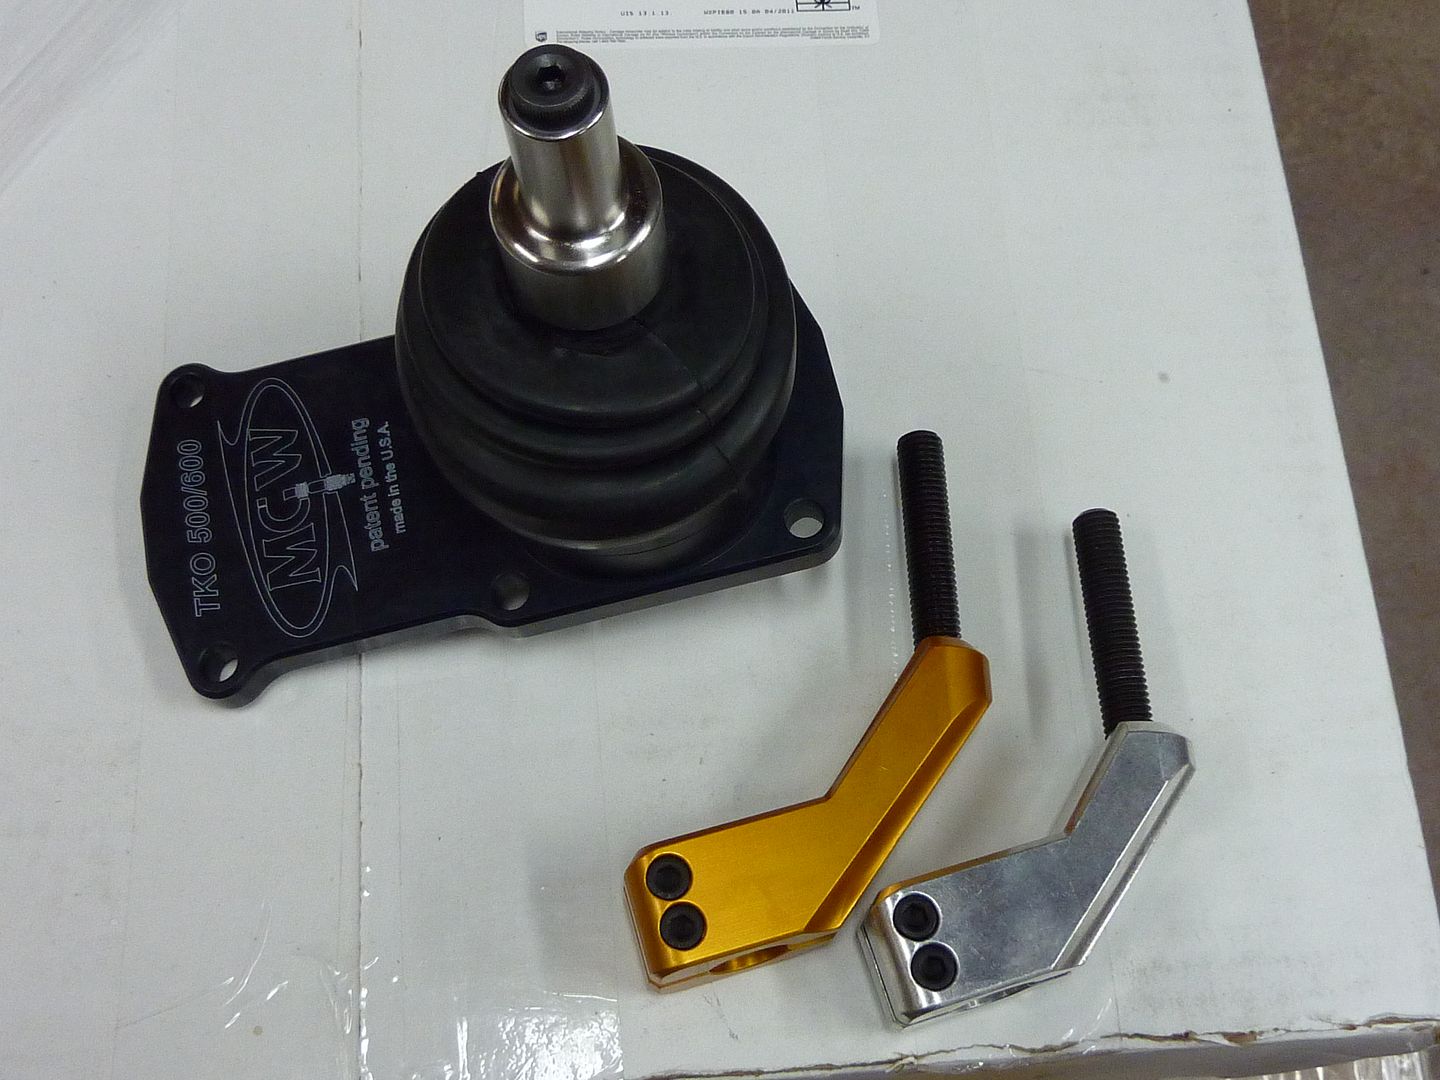
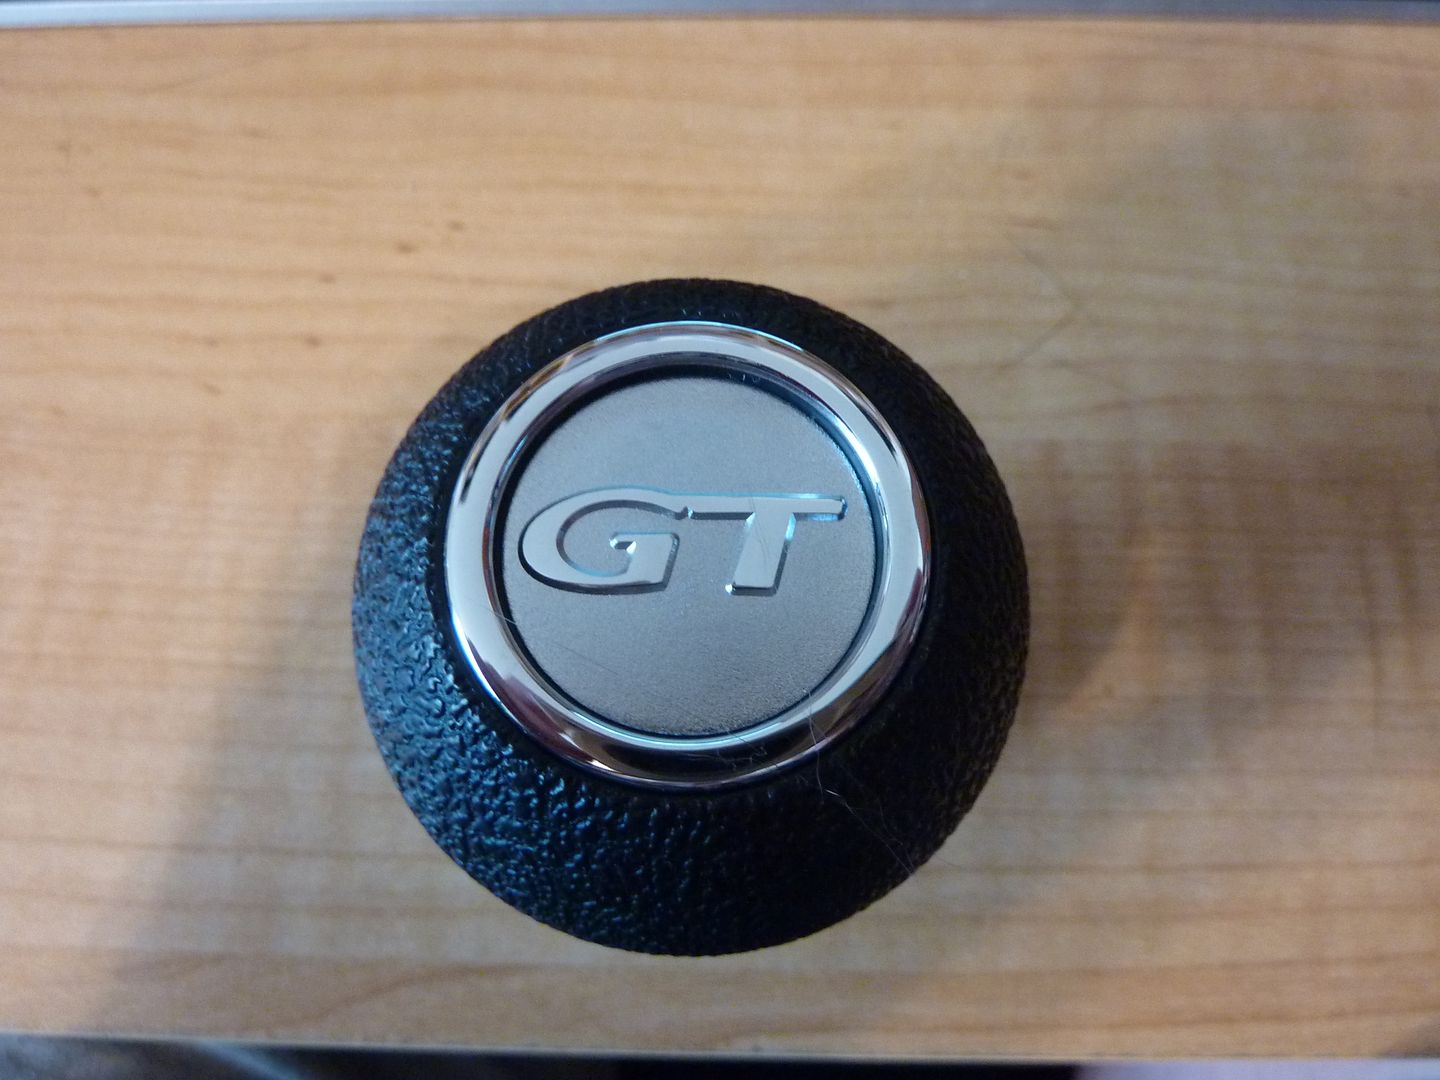
I also ordered a shift **** from them. They are really nice. I was supposed to get one that had the 5 speed layout on it, but they sent me one that says GT on it. I've emailed them and will hopefully get the 5 speed one soon. Here's what they look like
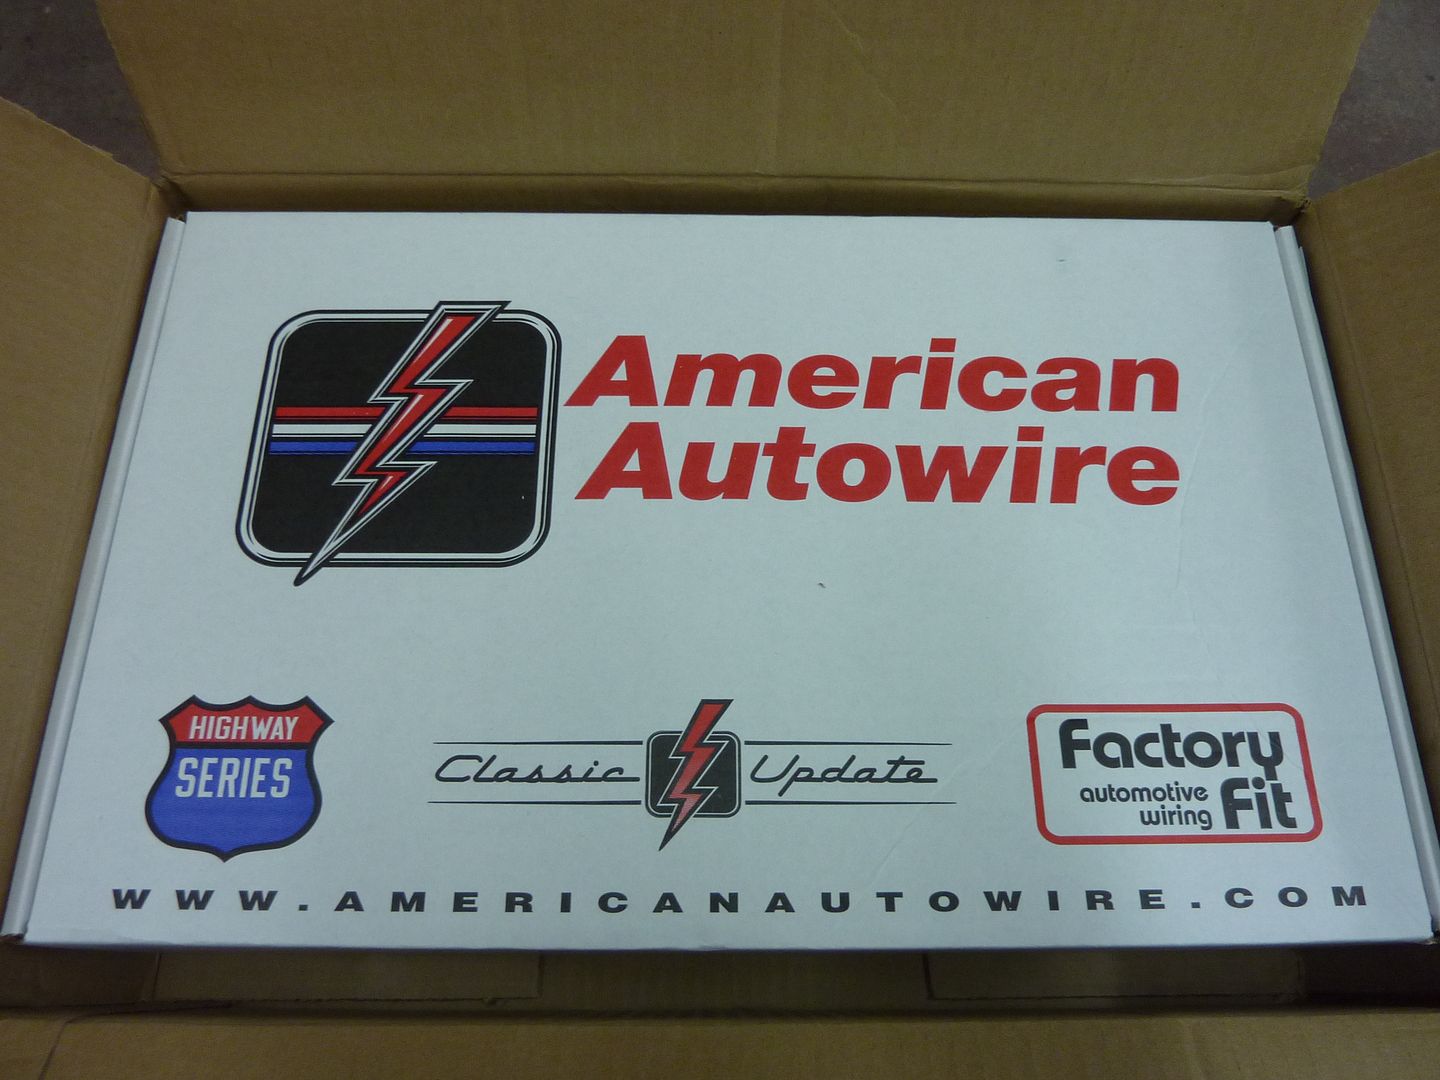
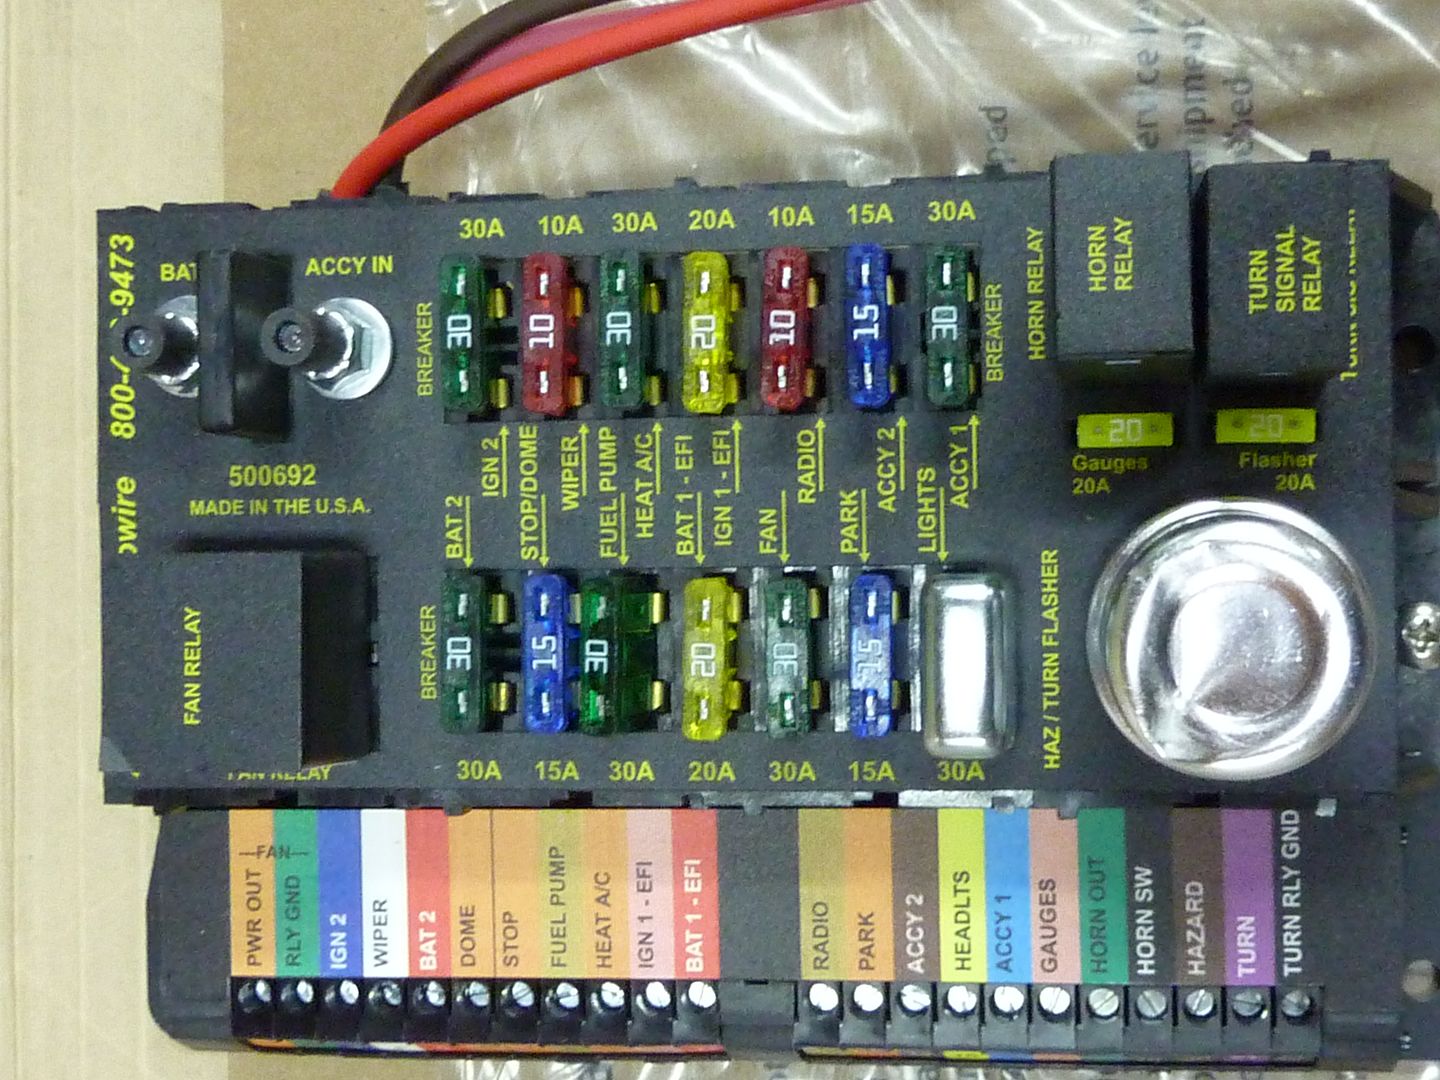
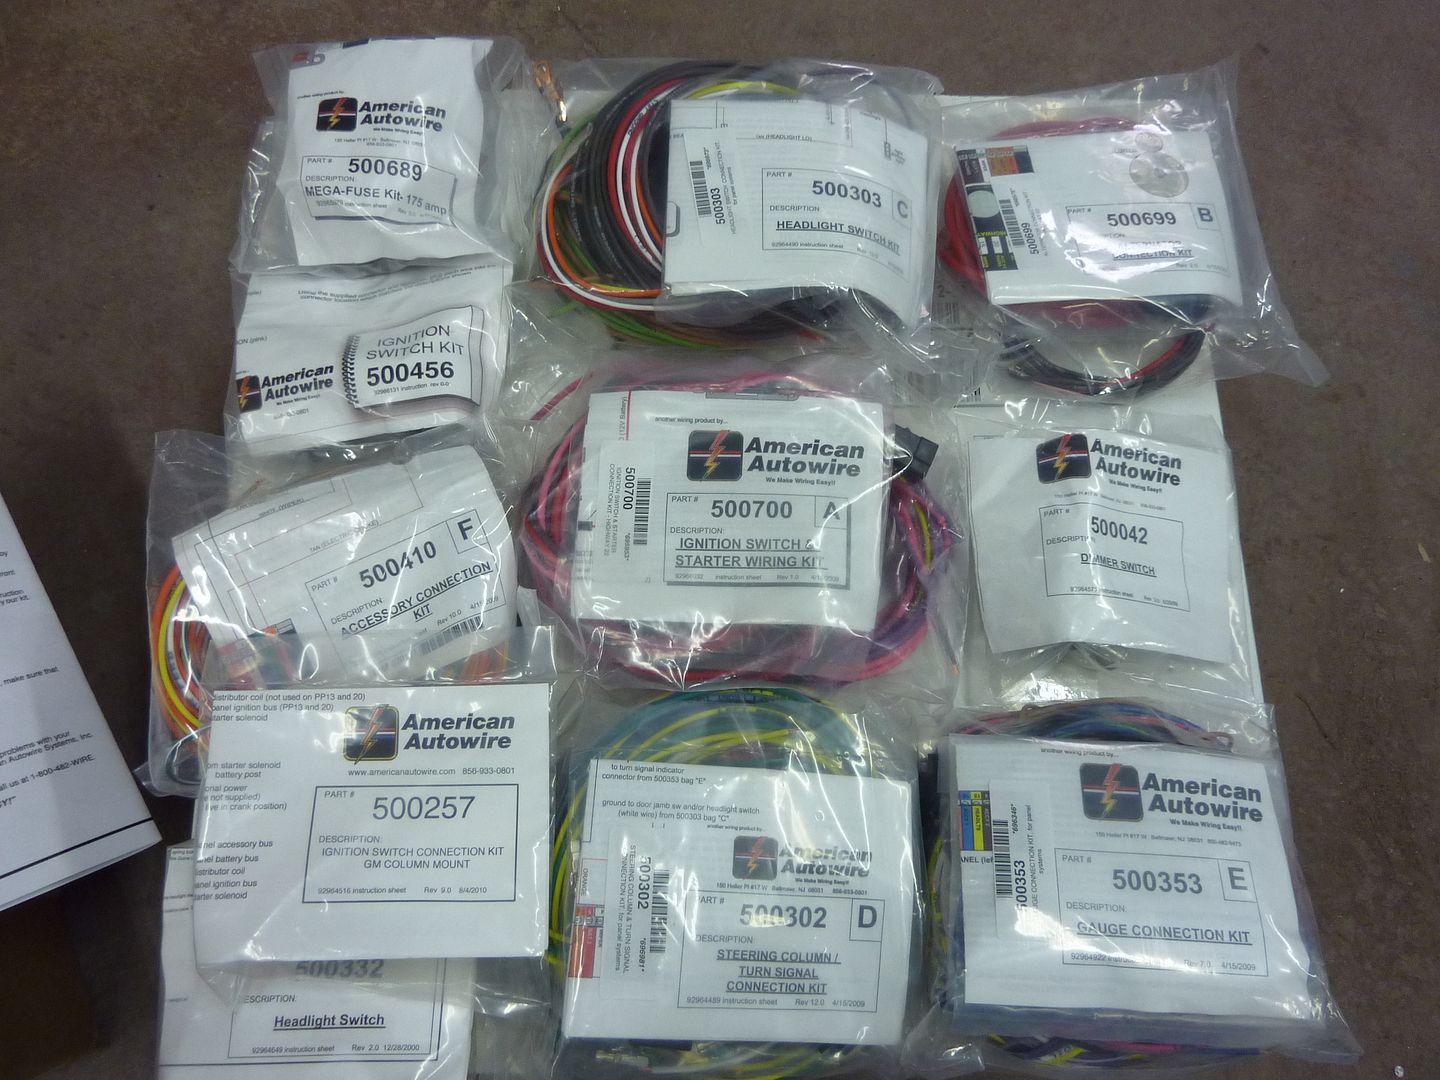
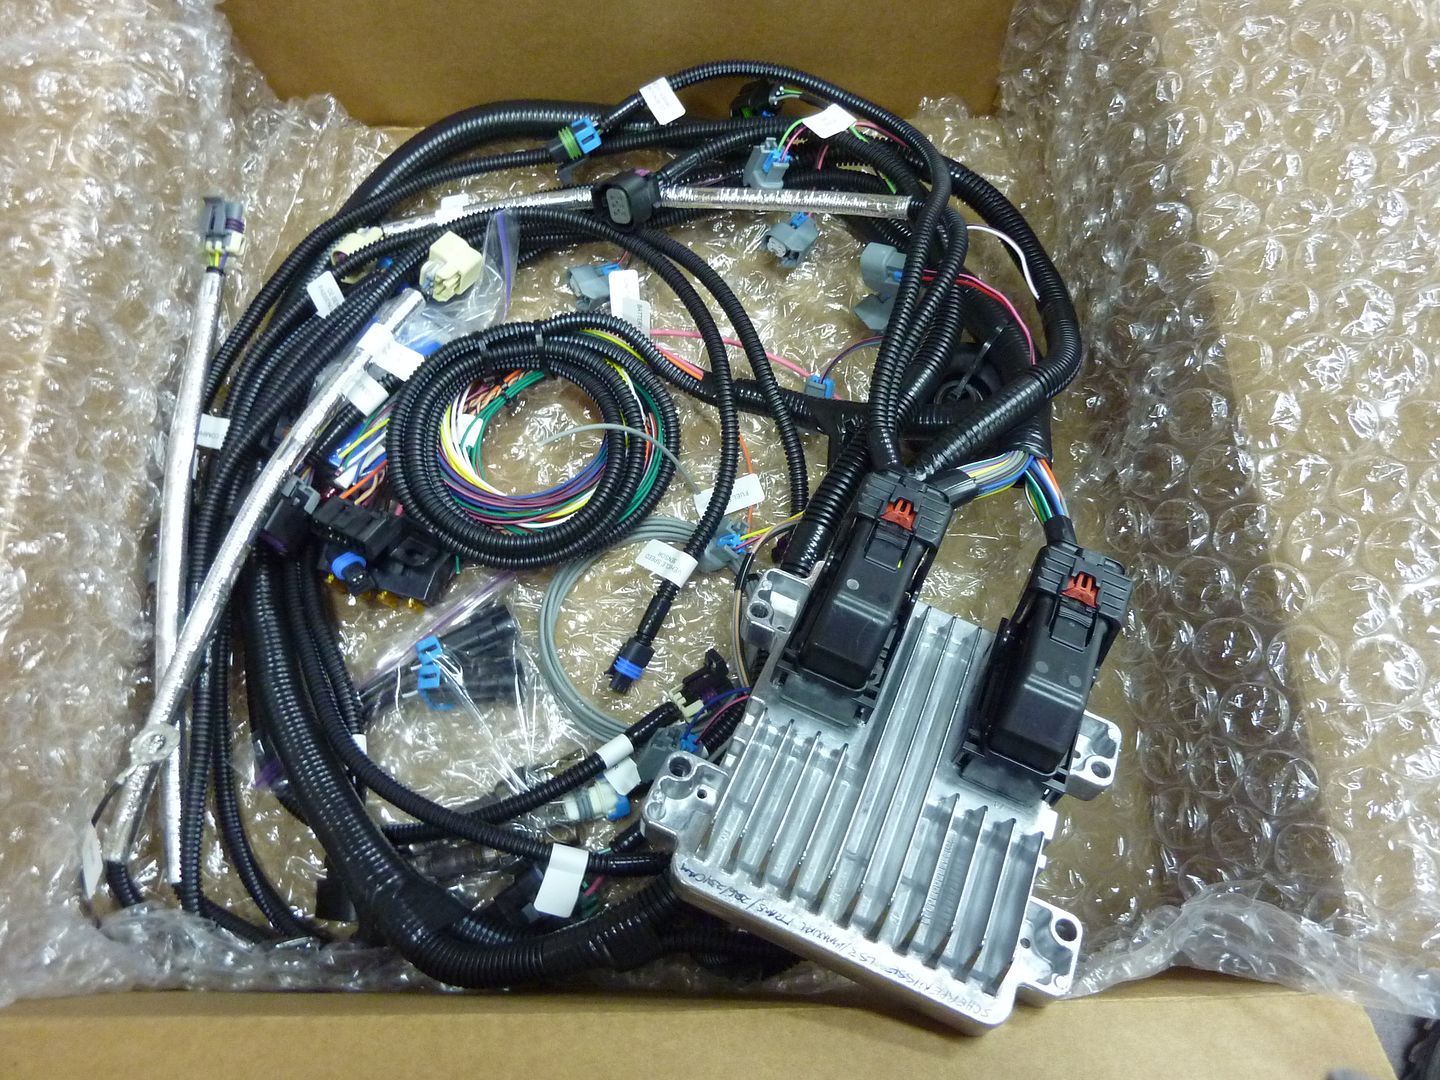
American Autowire Highway 22 kit. Got it from Mike at Musclerodz. This kit is very thorough.
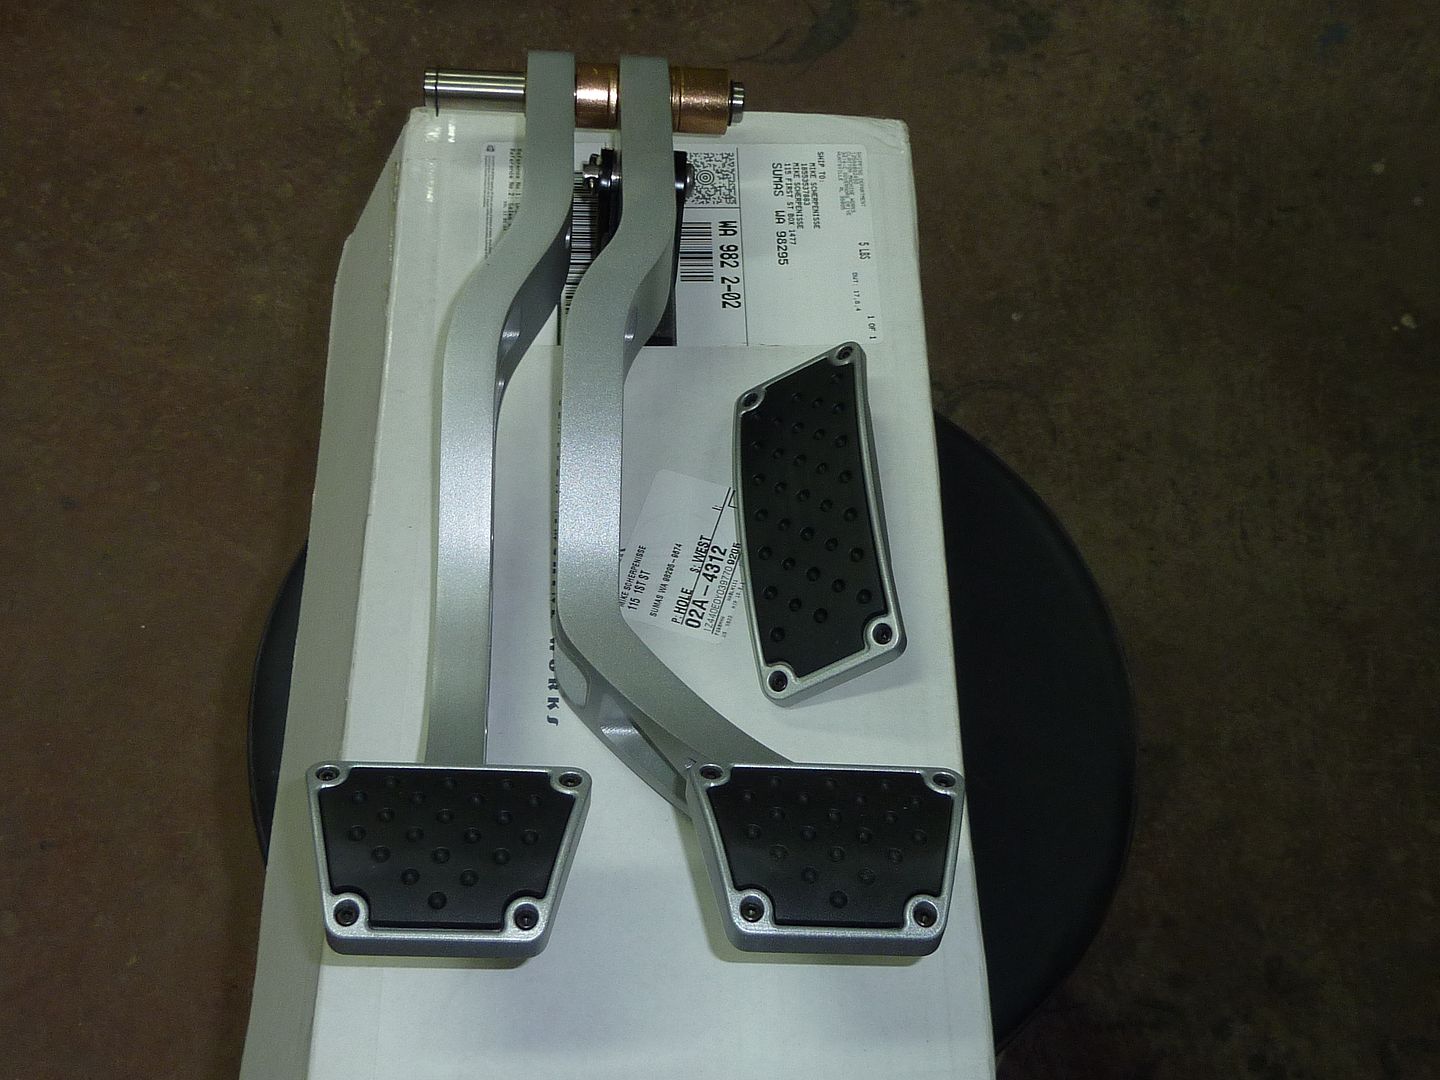
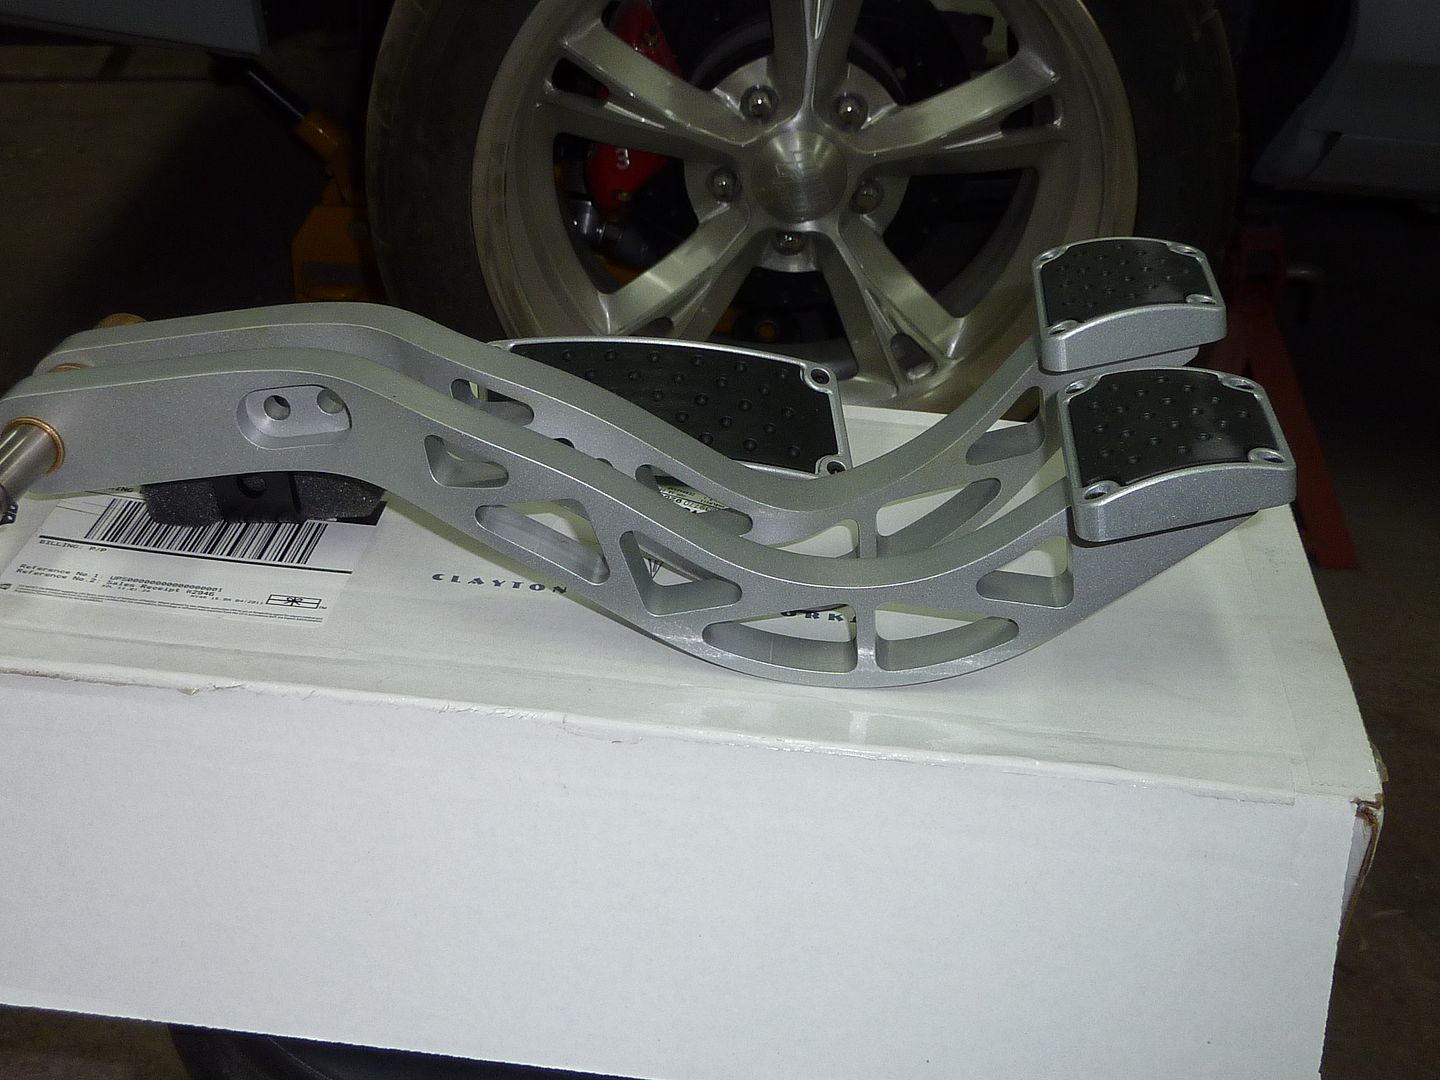
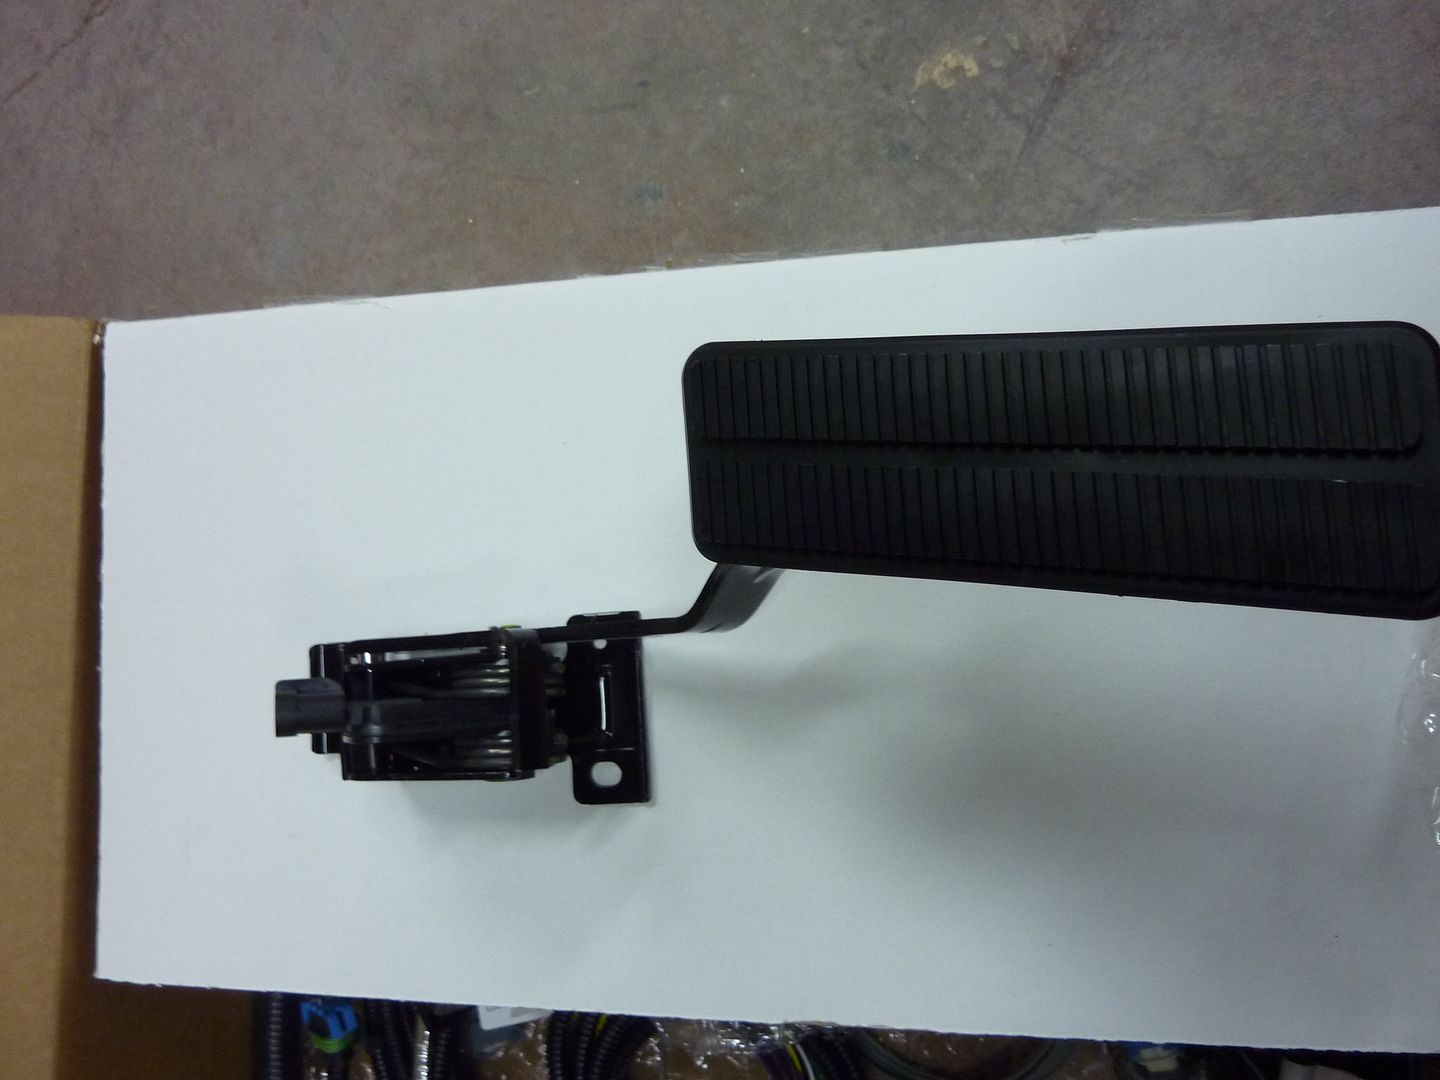
I took advantage of the sale that PTS wheels had on Clayton Machine Works pedals. I wasn't going to spend the money for these, as they are not cheap, but I could not find a stock 68 Nova clutch/brake pedal assembly anywhere. I had bought one from Classic Industries a few years ago, but sold it. They were still waiting for a new supplier to get some in. They didn't know when they would have any so I thought I'd get the nice ones. It has a matching pedal pad for the DBW pedal
Last edited by scherp69; 06-23-2011 at 09:55 PM.
06-23-2011, 09:09 PM
#103
On The Tree
Thread Starter
iTrader: (4)
Join Date: Mar 2009
Location: British Columbia, Canada
Posts: 132
Likes: 0
Received 0 Likes
on
0 Posts
And finally......

It includes a Corvette DBW pedal
I hope to actually get out to the shop tomorrow and spend a bit of time working on the car. Not sure what I'll do, but I have a lot of parts to put on :yes:
It includes a Corvette DBW pedal
I hope to actually get out to the shop tomorrow and spend a bit of time working on the car. Not sure what I'll do, but I have a lot of parts to put on :yes:
 06-24-2011, 07:50 PM
#105

I love acadians, I was almost born in an acadian sedan in Montreal. I think you made a good move selling the fast. That ls3 throttle body looks like it's from outer space. Very cool. I think Mr. G maybe a tad optimistic on his estimate, but maybe? I hope you post the dyno results, as there tends to be an LY6/L92/L99 vvt mystery.
06-24-2011, 07:59 PM
#106
On The Tree
Thread Starter
iTrader: (4)
Join Date: Mar 2009
Location: British Columbia, Canada
Posts: 132
Likes: 0
Received 0 Likes
on
0 Posts
I love acadians, I was almost born in an acadian sedan in Montreal. I think you made a good move selling the fast. That ls3 throttle body looks like it's from outer space. Very cool. I think Mr. G maybe a tad optimistic on his estimate, but maybe? I hope you post the dyno results, as there tends to be an LY6/L92/L99 vvt mystery.
I did get out to the shop for a little while today. Got the trunk bolted on and will start doing the gap work next week. I know some people have said that if the quarters were put on 100% correctly, than there should be no gapping issues. Well I guess mine weren't quite 100% correct and need a little work. Oh well, it's all a learning experience.
I put the front shocks on. I forgot to take some pics of the rears installed. I'll try to remember to next time I'm in the shop.
With all the new parts, I decided to put the new shifter on first. That way I could continue with the console.
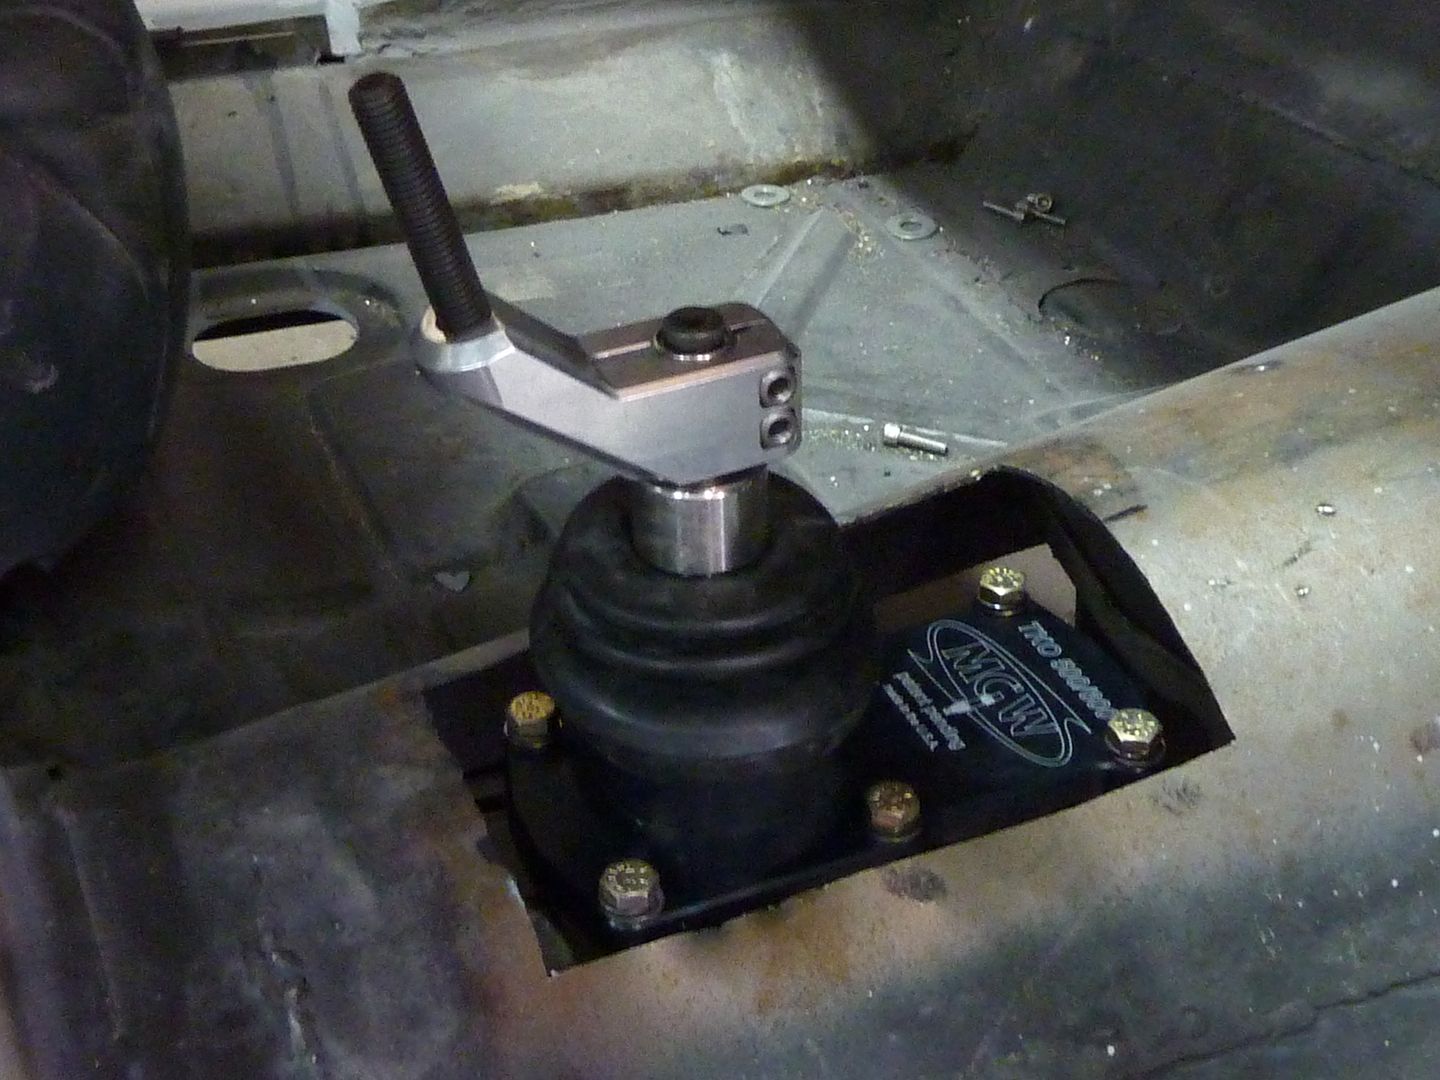
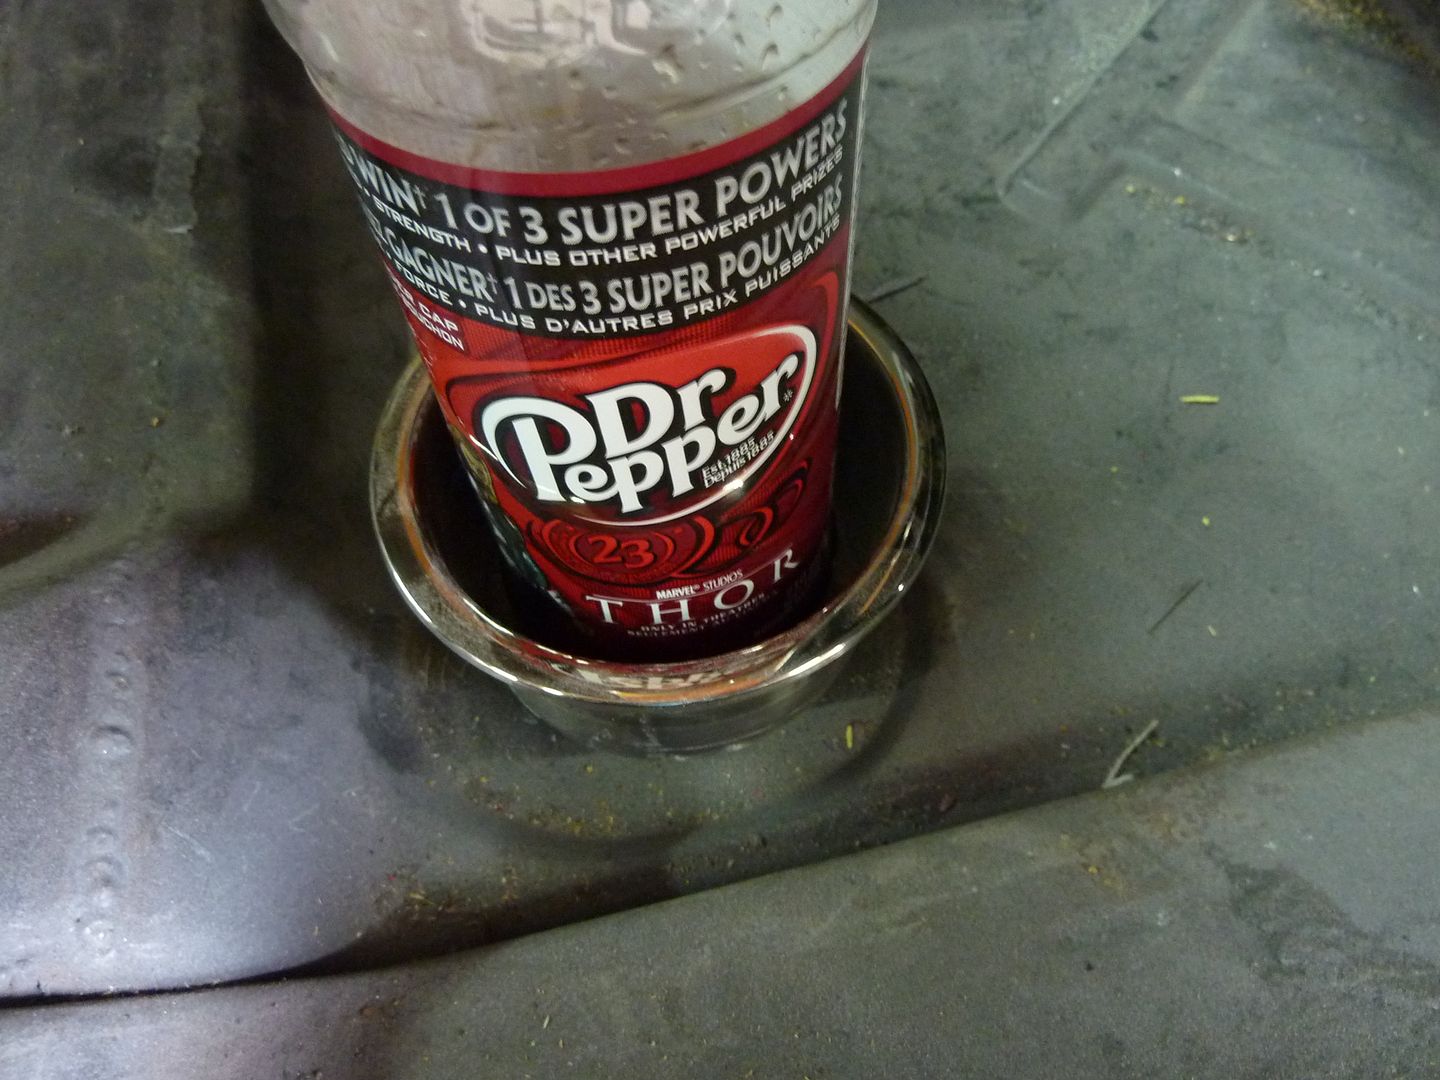
With the MGW shifter, it will definitely hit anything in the cup holders
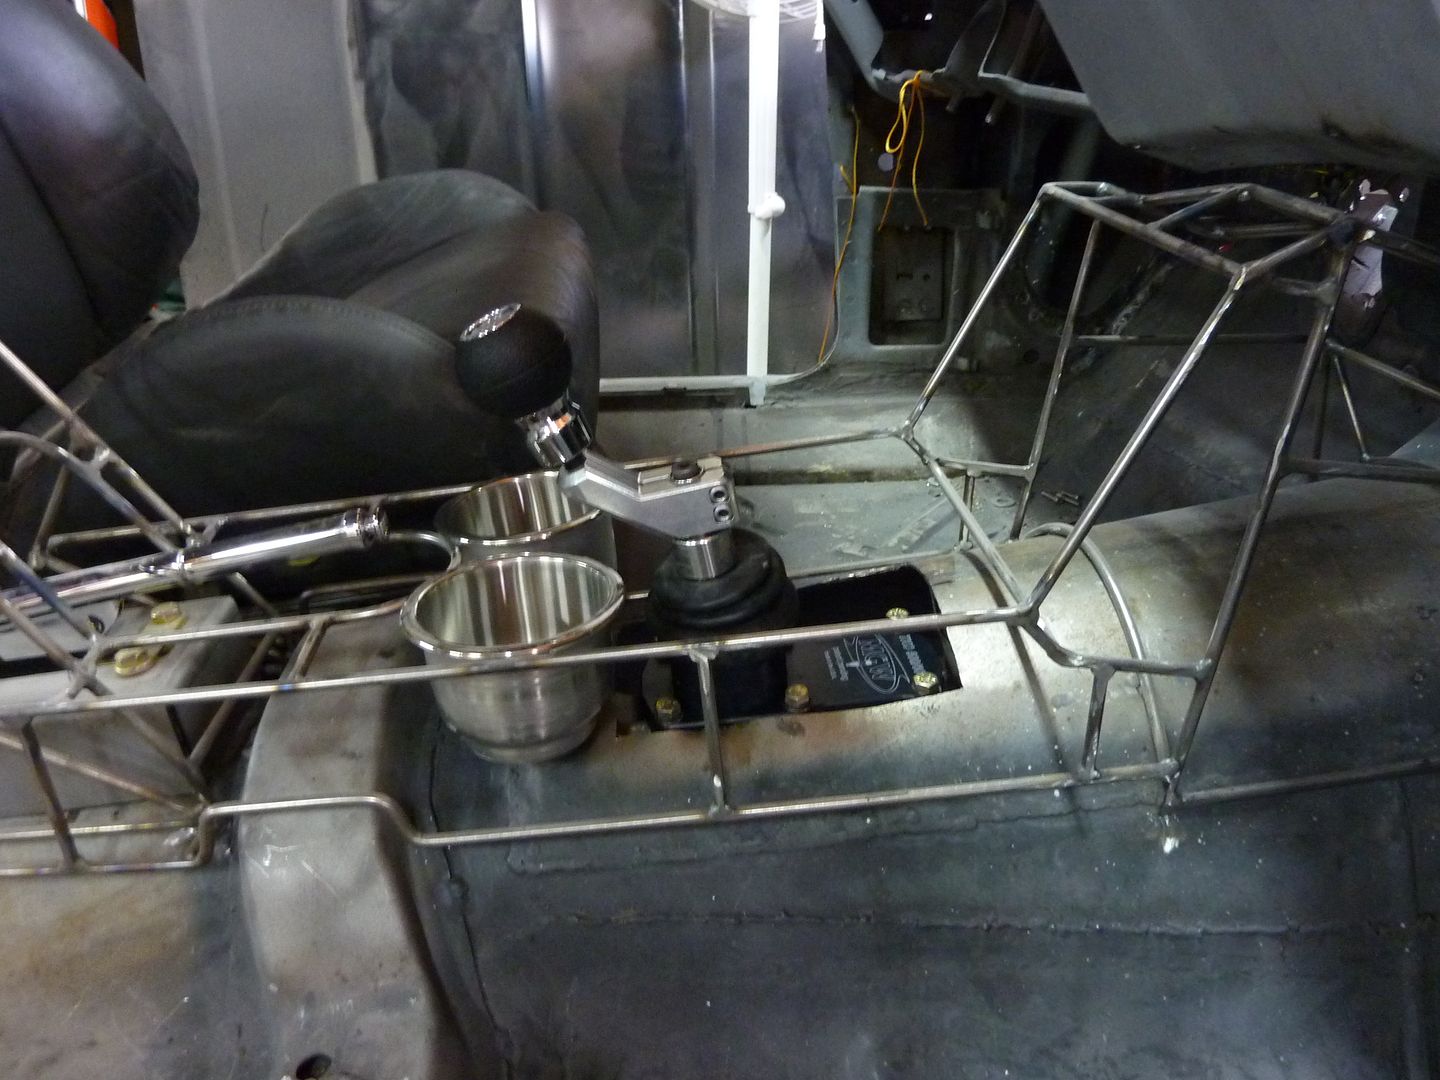
I think I'll end up putting them in front of the shifter. I'll mount the LCD a little higher up in the console and will put the Vintage Air controller under the screen
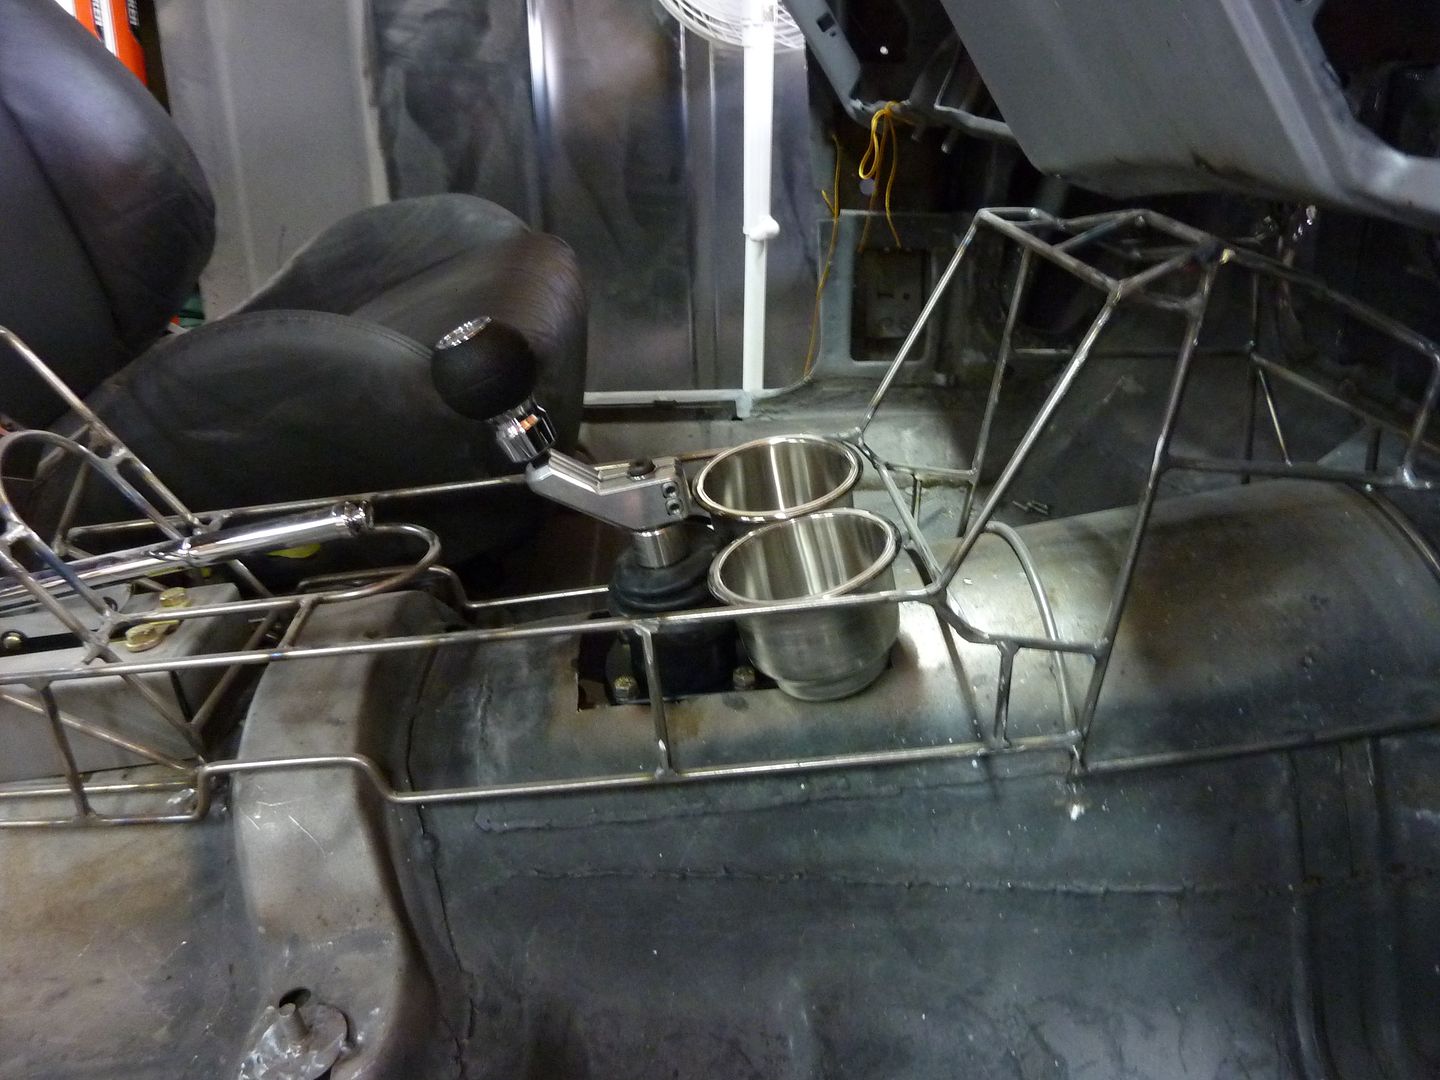
Definitely want to find some different cup holders. I would like to find some that have a hole closer to 3". The ones I have are just over 3 1/2" in diameter.
 07-12-2011, 05:29 PM
#110
On The Tree
Thread Starter
iTrader: (4)
Join Date: Mar 2009
Location: British Columbia, Canada
Posts: 132
Likes: 0
Received 0 Likes
on
0 Posts
The springs are 8" and are rated at 500 lbs.
Hopefully next week I'll get some of the new parts on.
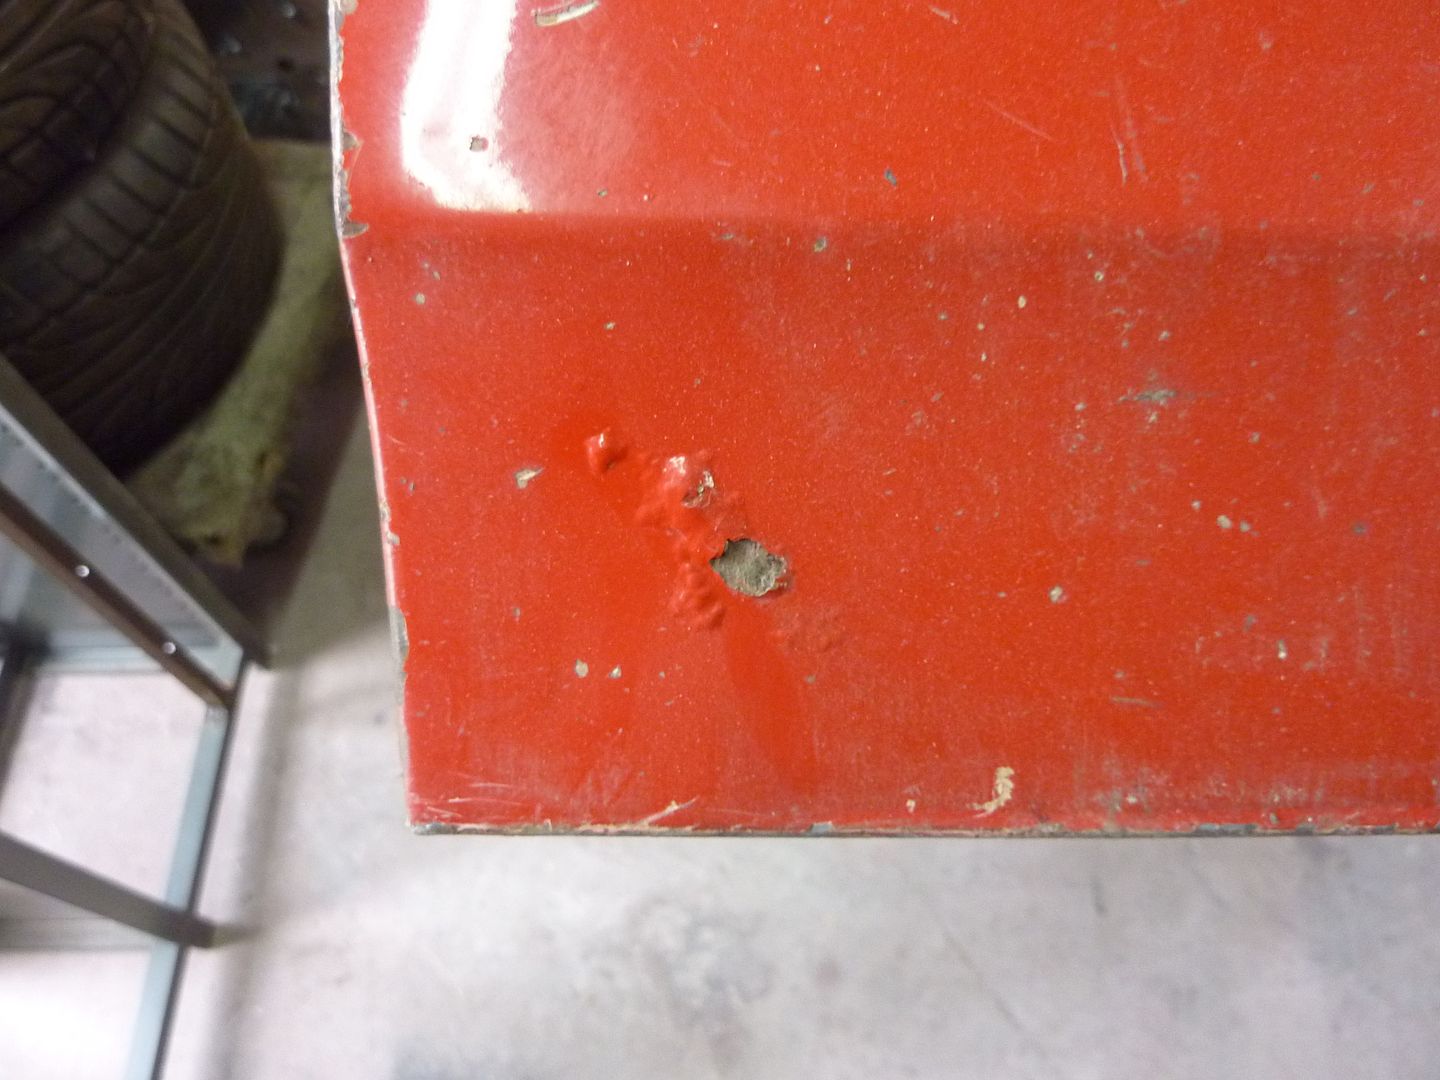
Haven't gotten anything done on the car, but still have a quick update. Last week I found a set of 73-74 doors on Craigslist. Unfortunately they were in Tacoma (south of Seattle). Talked the guy and he told me that they were in great shape. Took Friday off work and the step daughter and I hit the road. What I didn't realize was that apparently Friday is not a good day to travel as the traffic is horrible. Found that out really quick. Glad we decided to make a night of it and had already booked a room in Bellingham. Left at 9am and didn't get back to Bellingham until 7pm. Total round trip back home was 1100 kms. But he was right, the doors are in awesome shape and I traded him a couple parts and some cash. Worked out to $125 a side and they have glass and all the regulators. The ones that I had found in my province were going to cost me about a grand for just the shells. Well worth the trip.
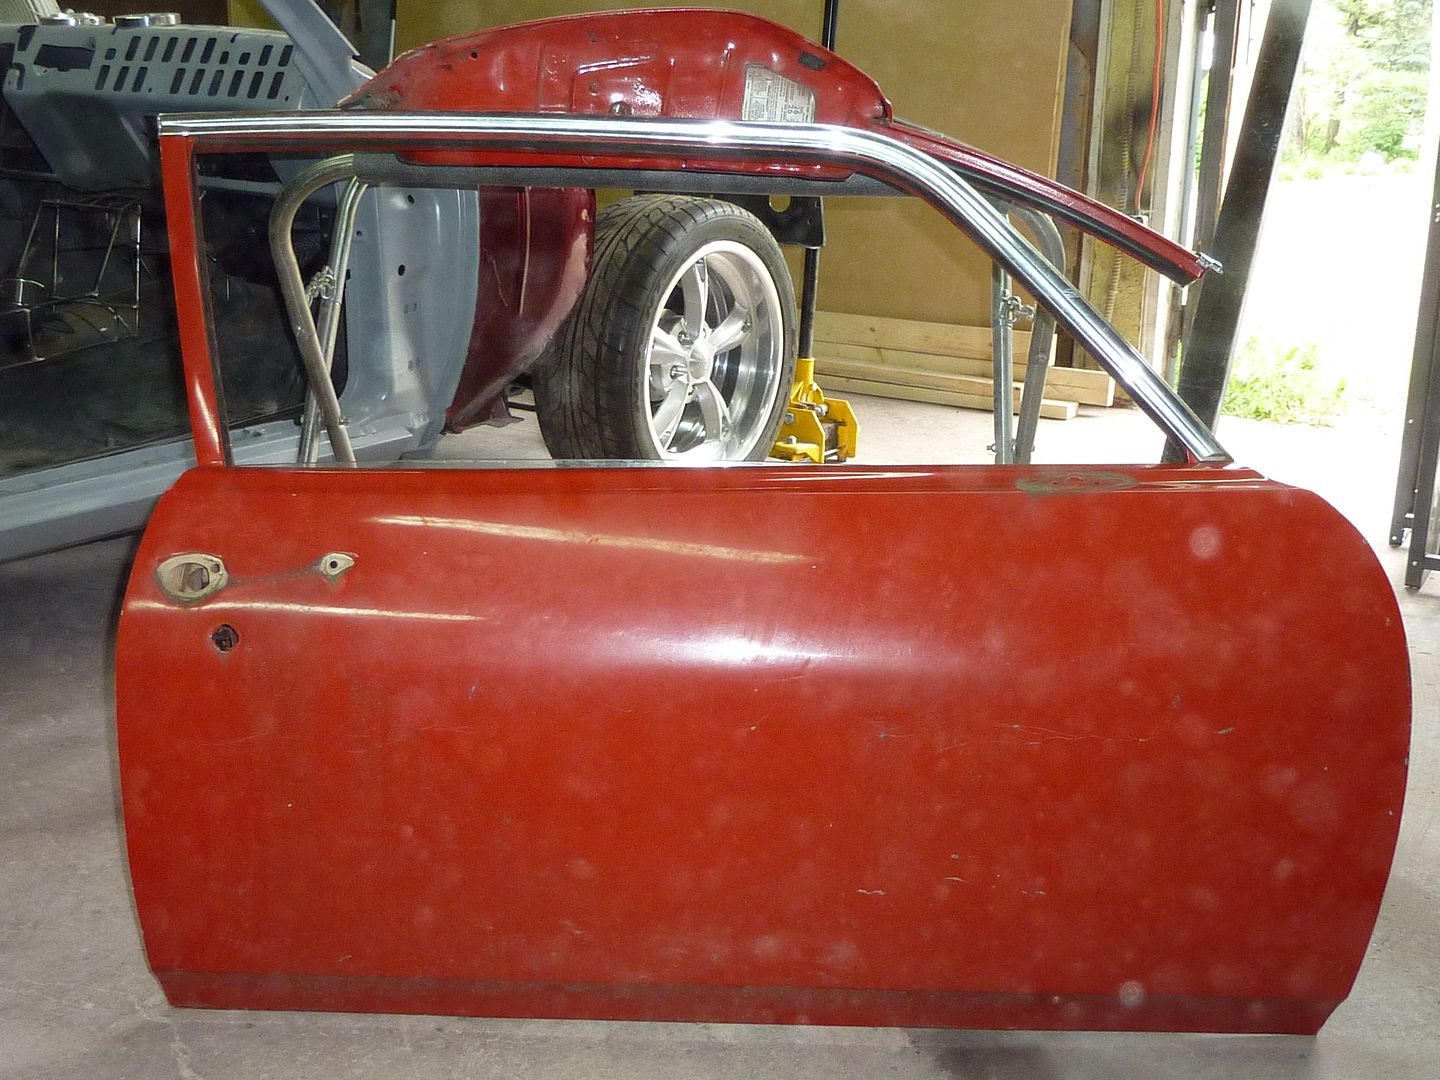
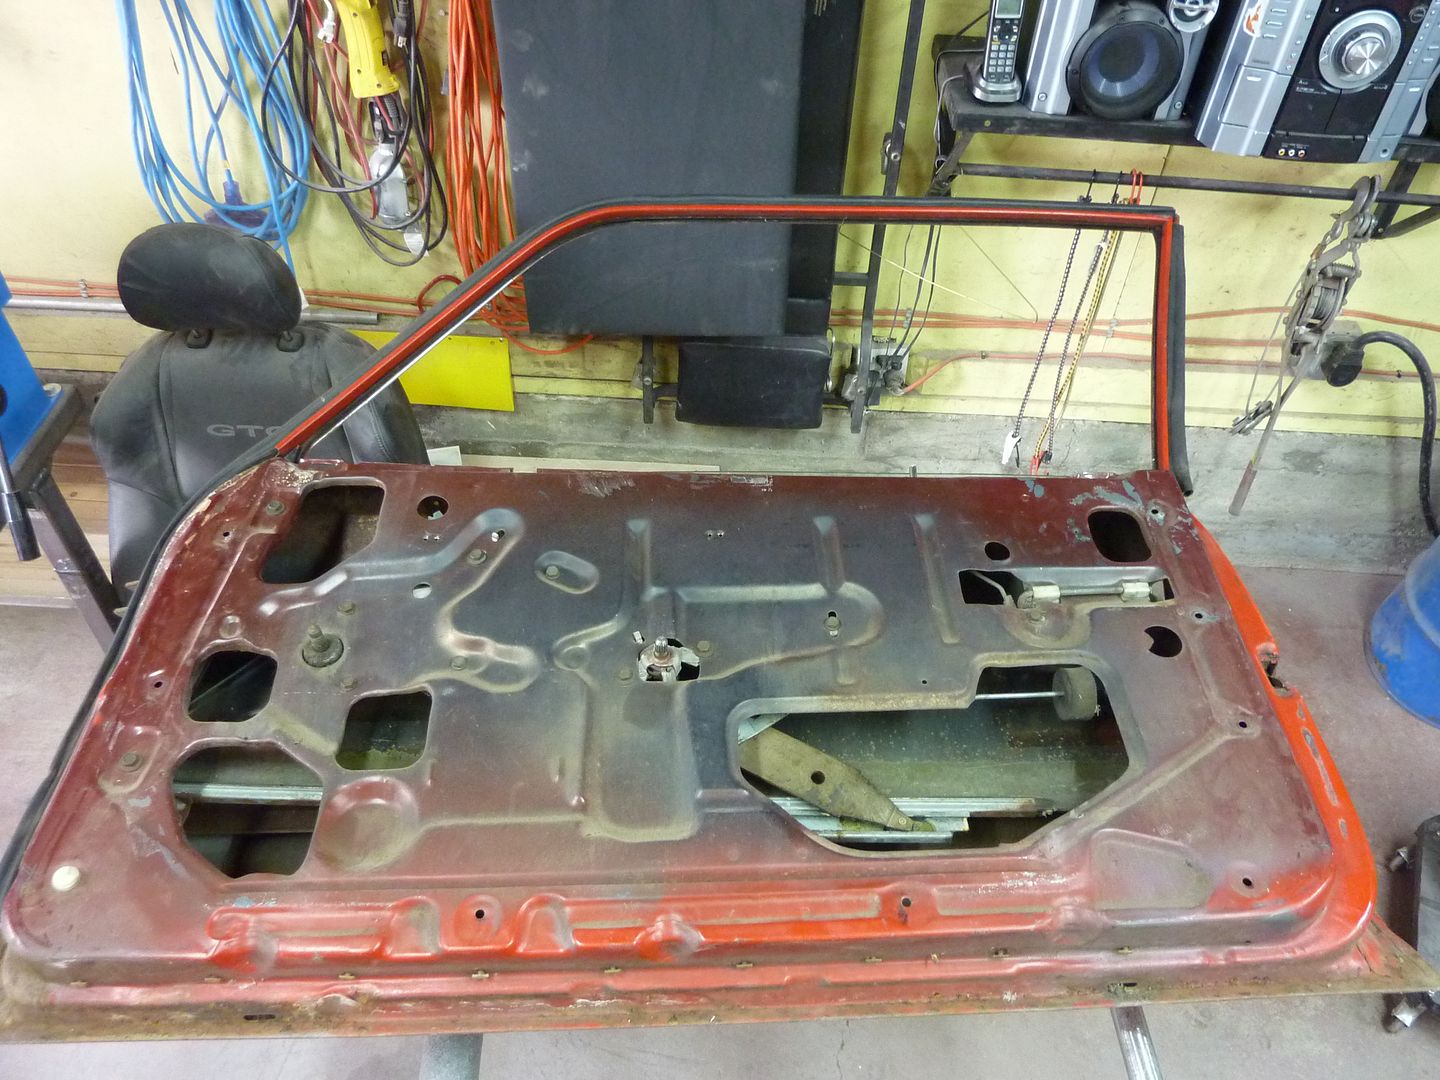
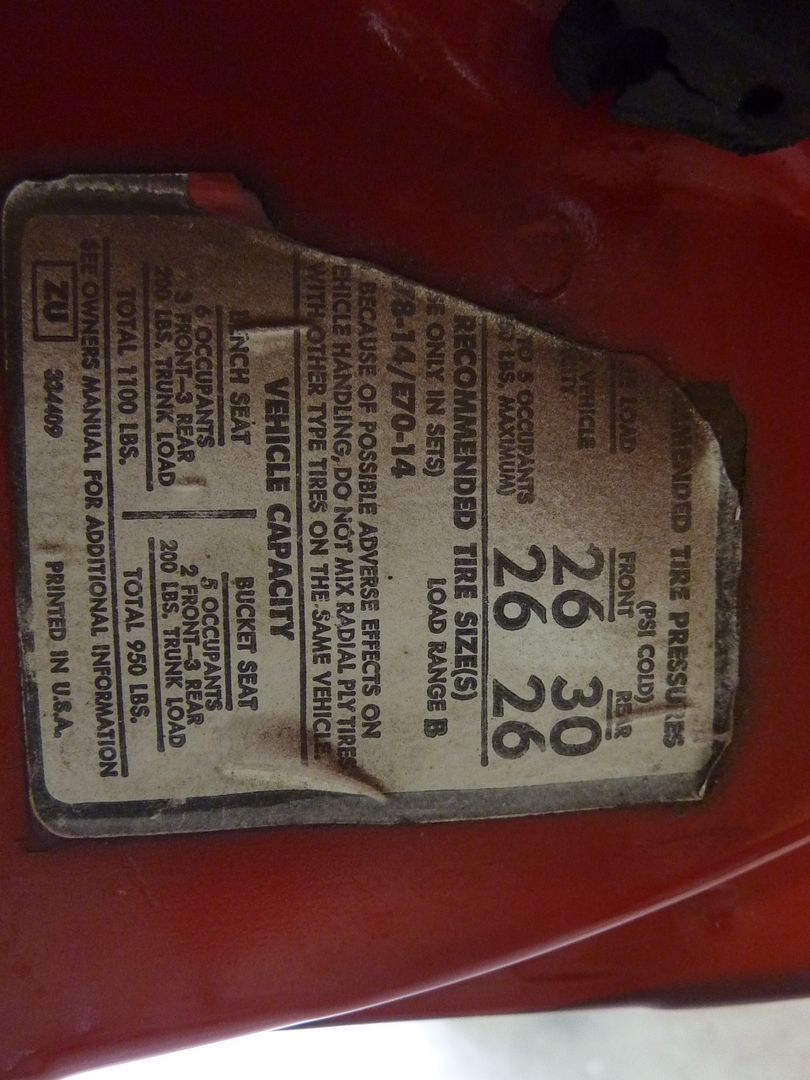
They still have the stock weather stripping on it
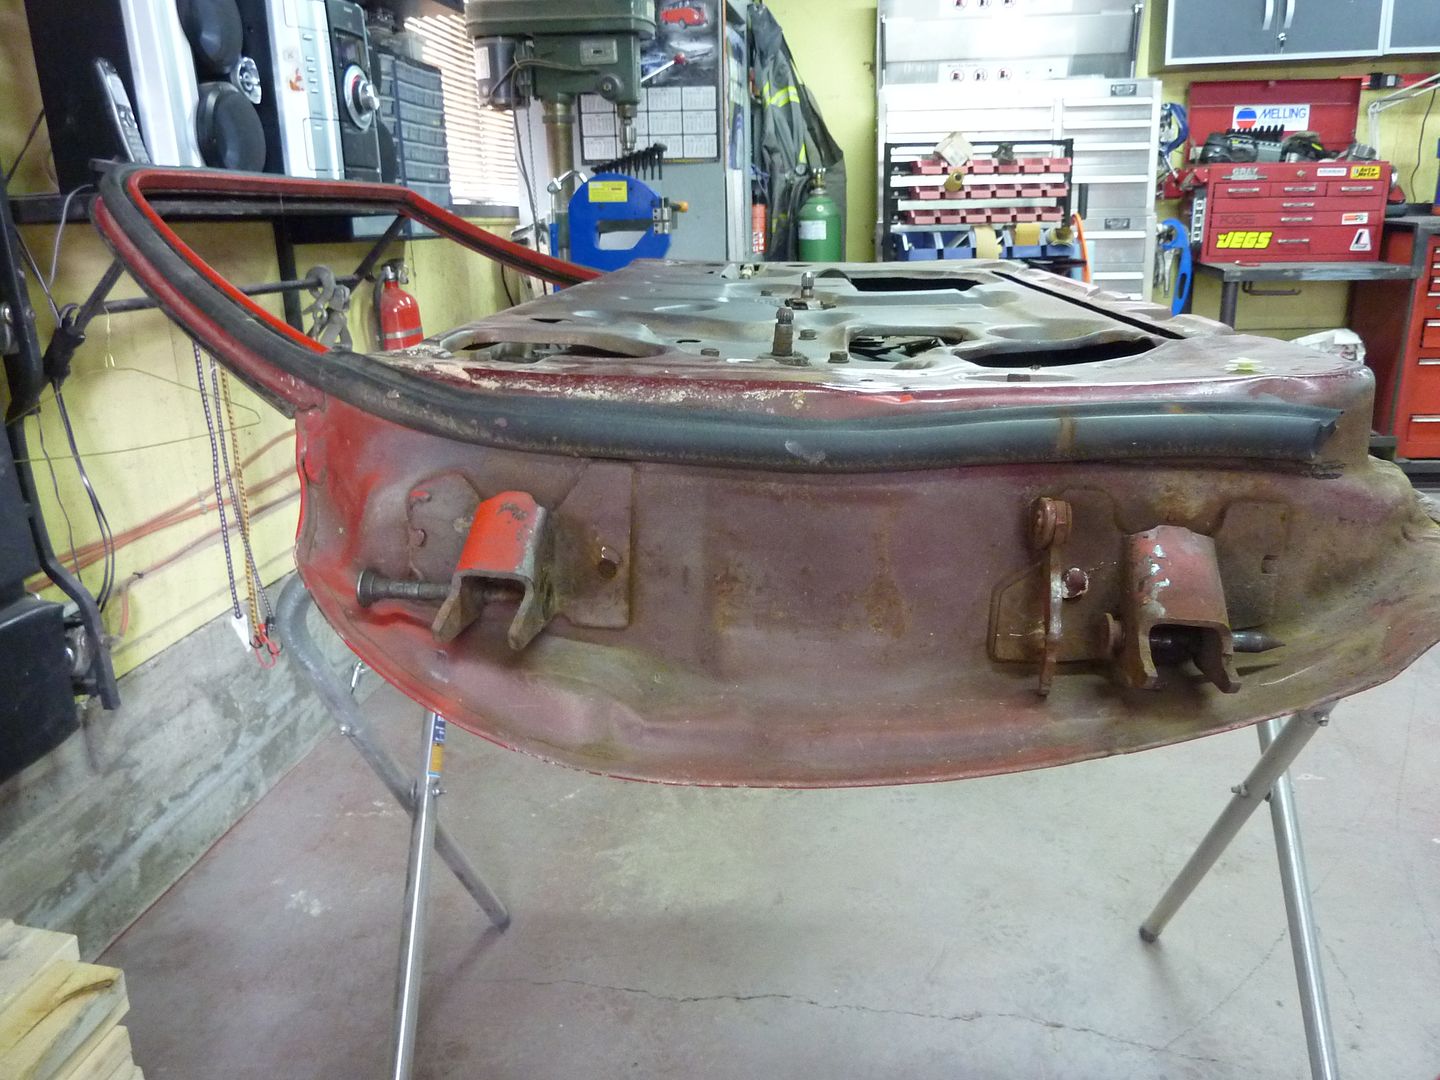
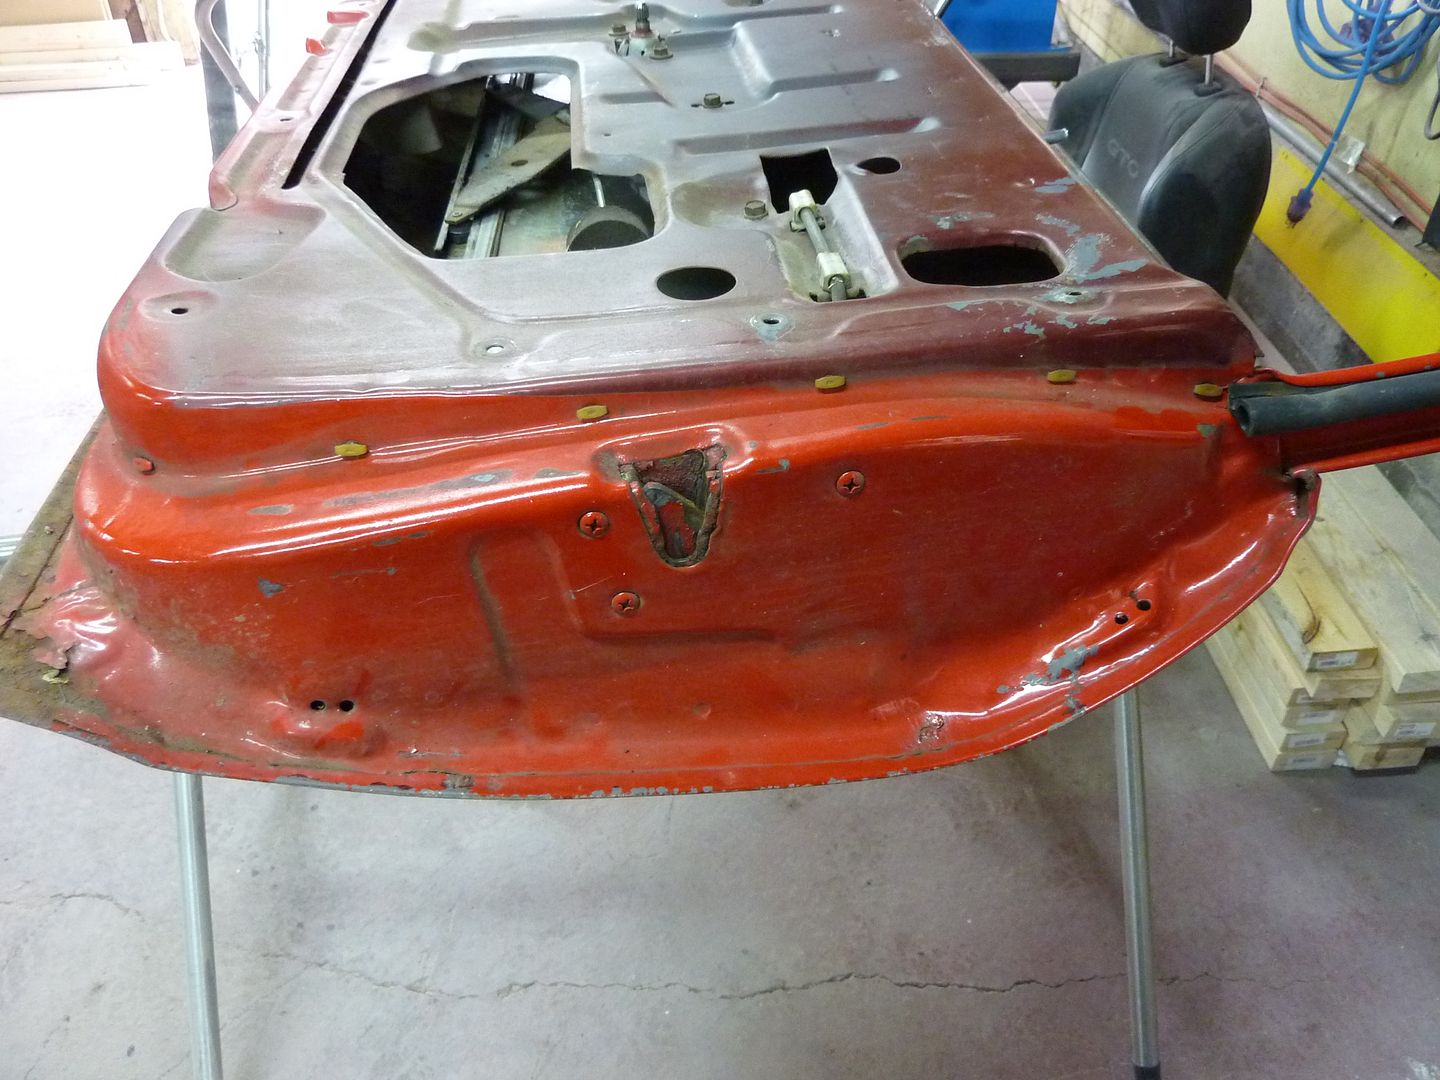
Very little rust. All surface rust

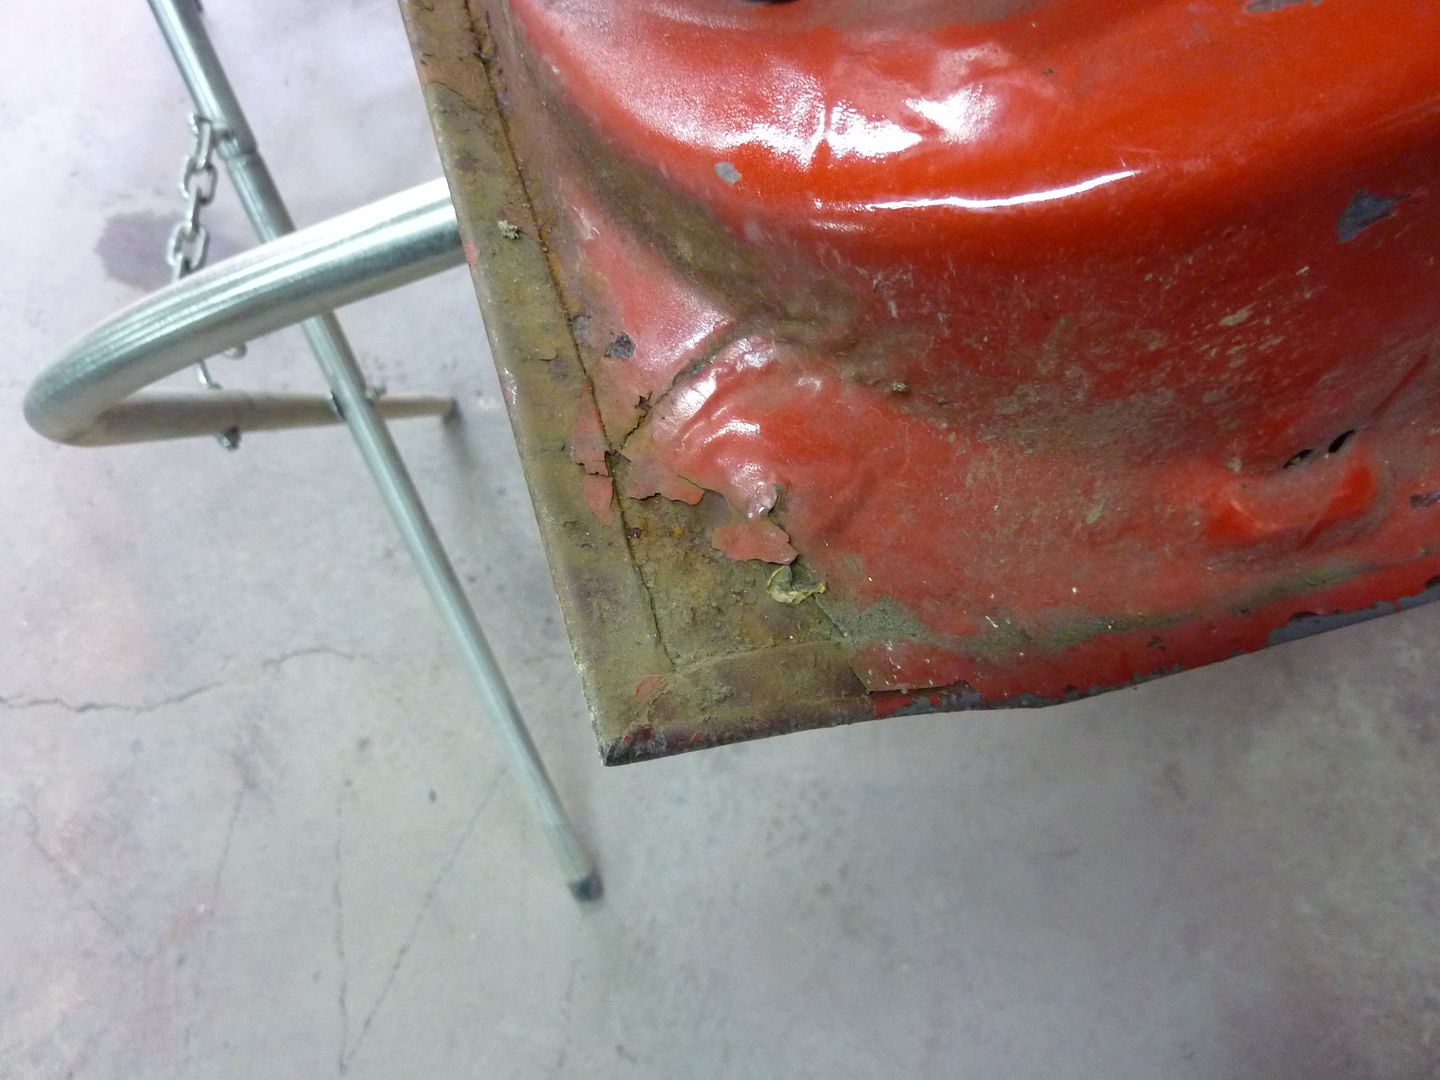
Even the stock decals on still there
That's it for updates on the car. The gentleman I bought them from has a huge 68-74 Nova parts collection and is always trading, selling and buying parts. He showed me some of his collection. He pretty much has everything you could think of. I think he said his storage shop was 20 x 40. He's also building a 68. I told him about the site, so hopefully we see him on here soon. If anyone wants his contact info, pm me. He was okay with sending guys his way.
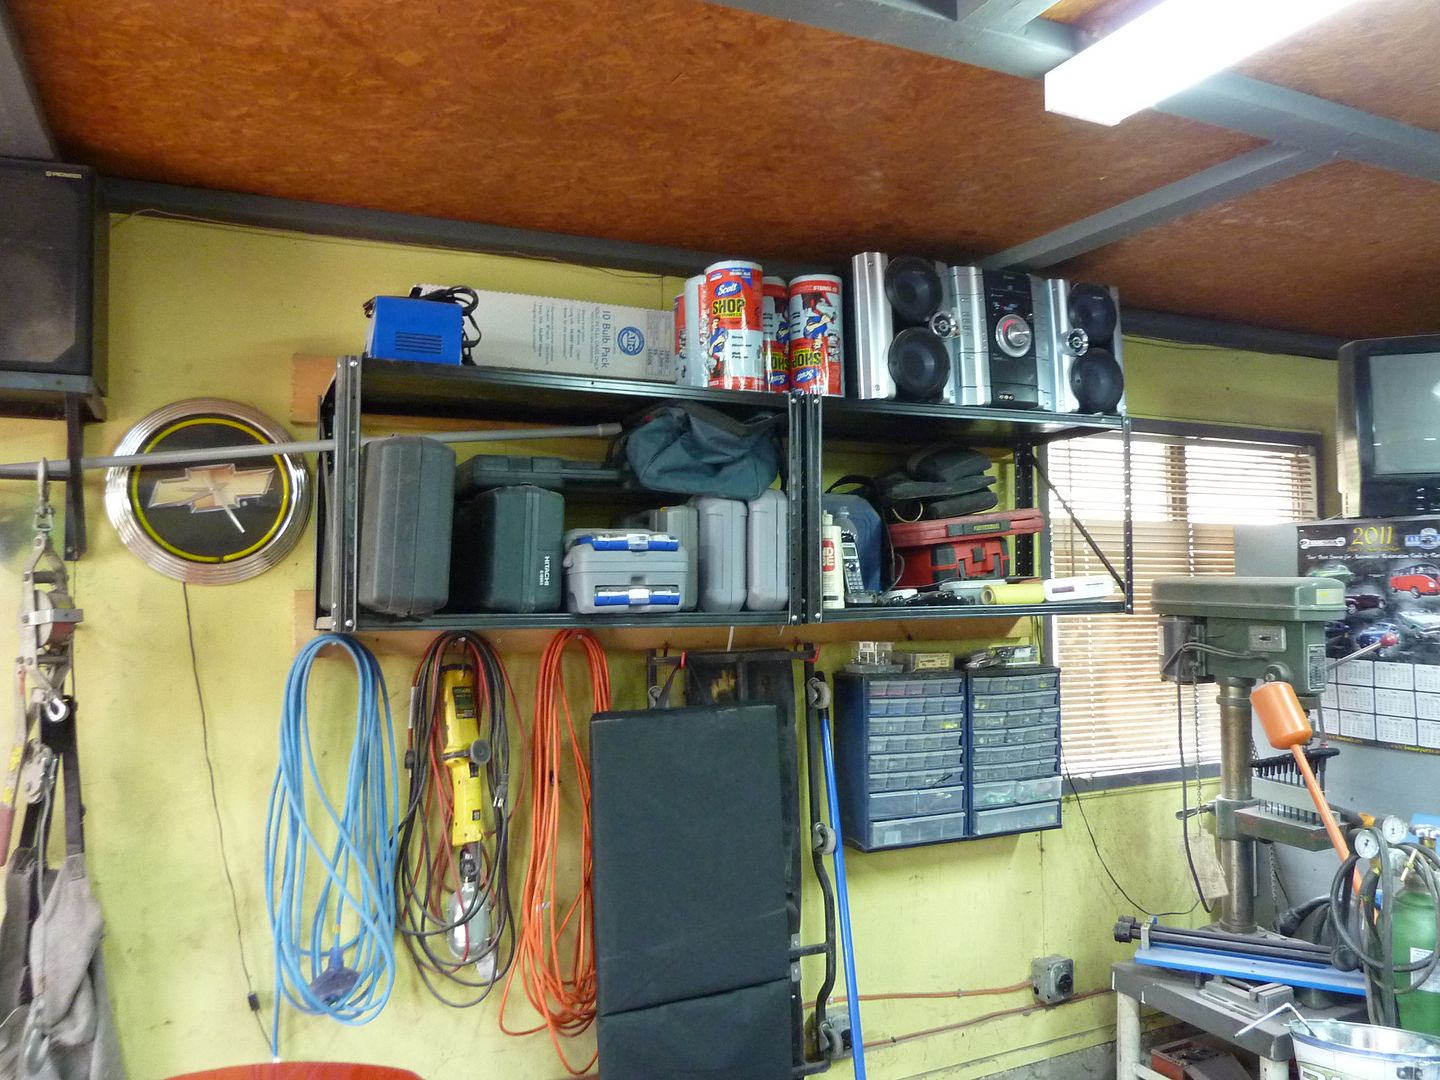
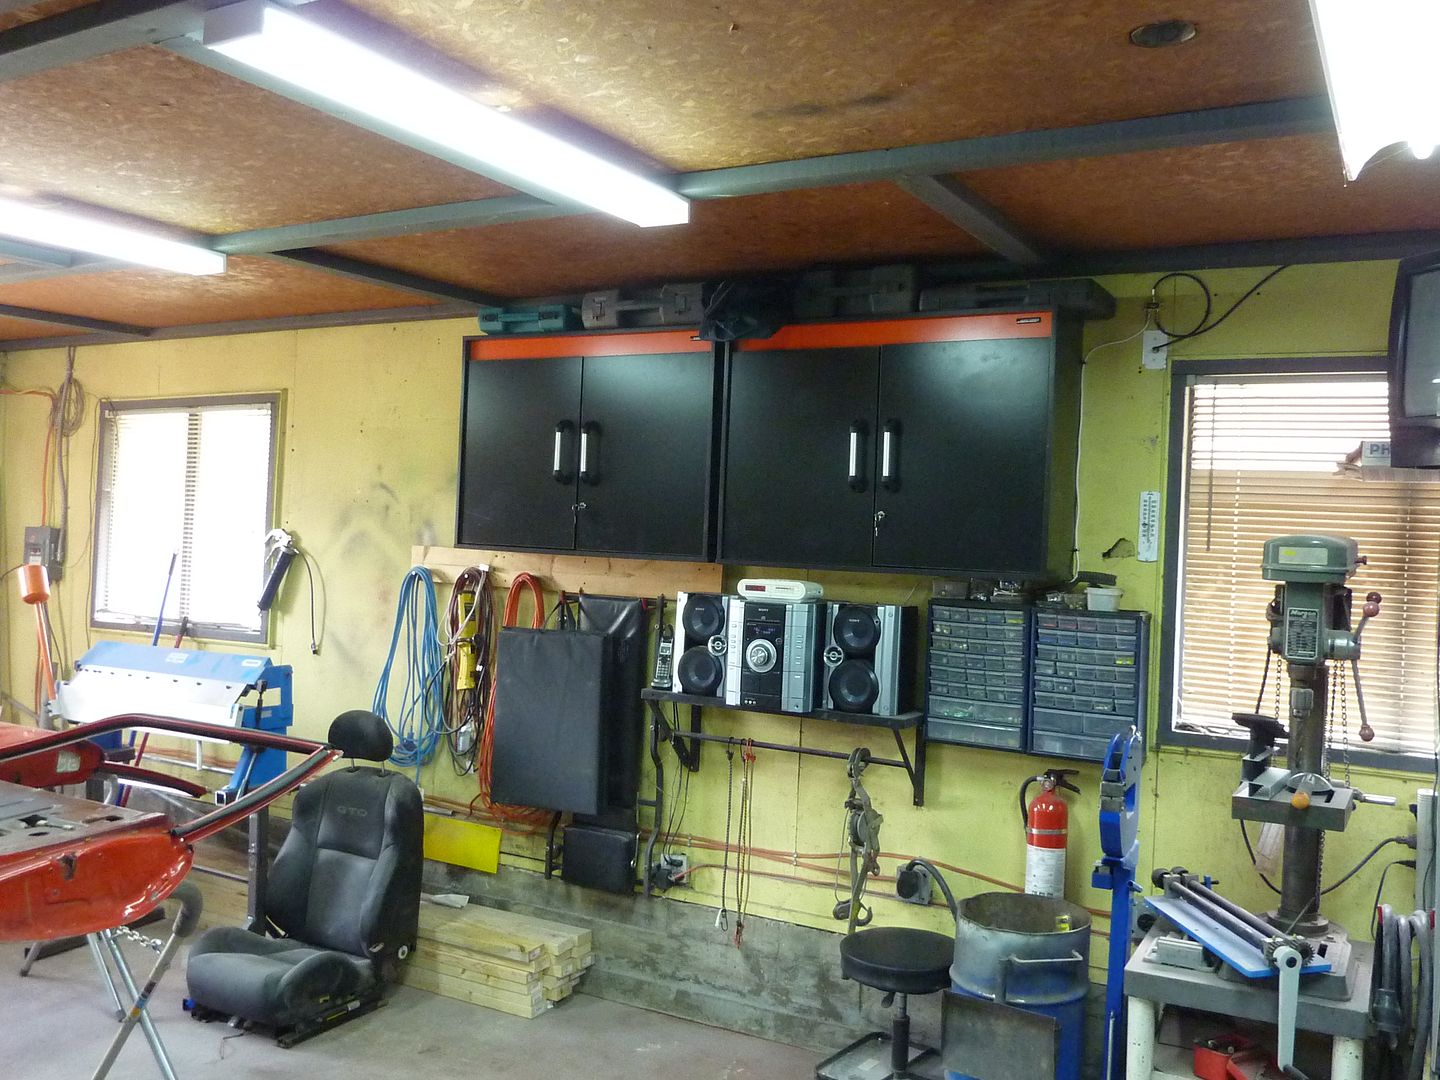
I decided to do some work on the shop. For a while now, I have wanted to add cupboards in the shop. I had storage shelves, but it still looked so cluttered and messy. I picked up two cupboards a few months ago but never got around to putting them up. Princess Auto had some other ones on sale so I picked up four more. So the past 2 days I have been reorganizing my shop. Here's some pics.
Here's two before pics
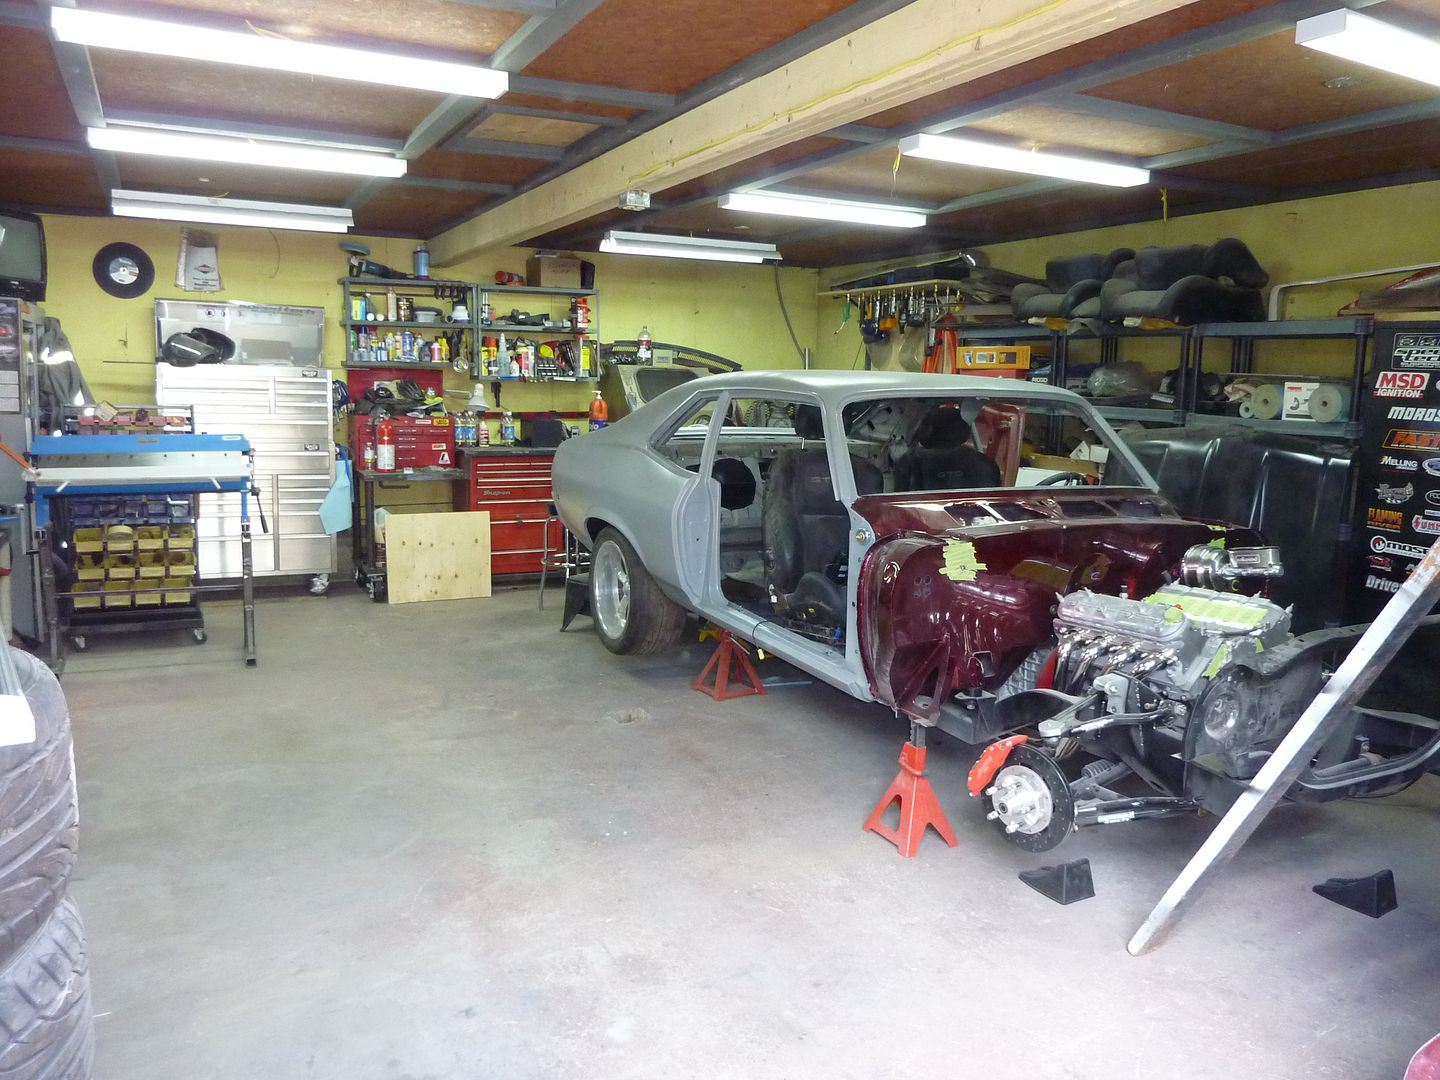
And as it looks now.
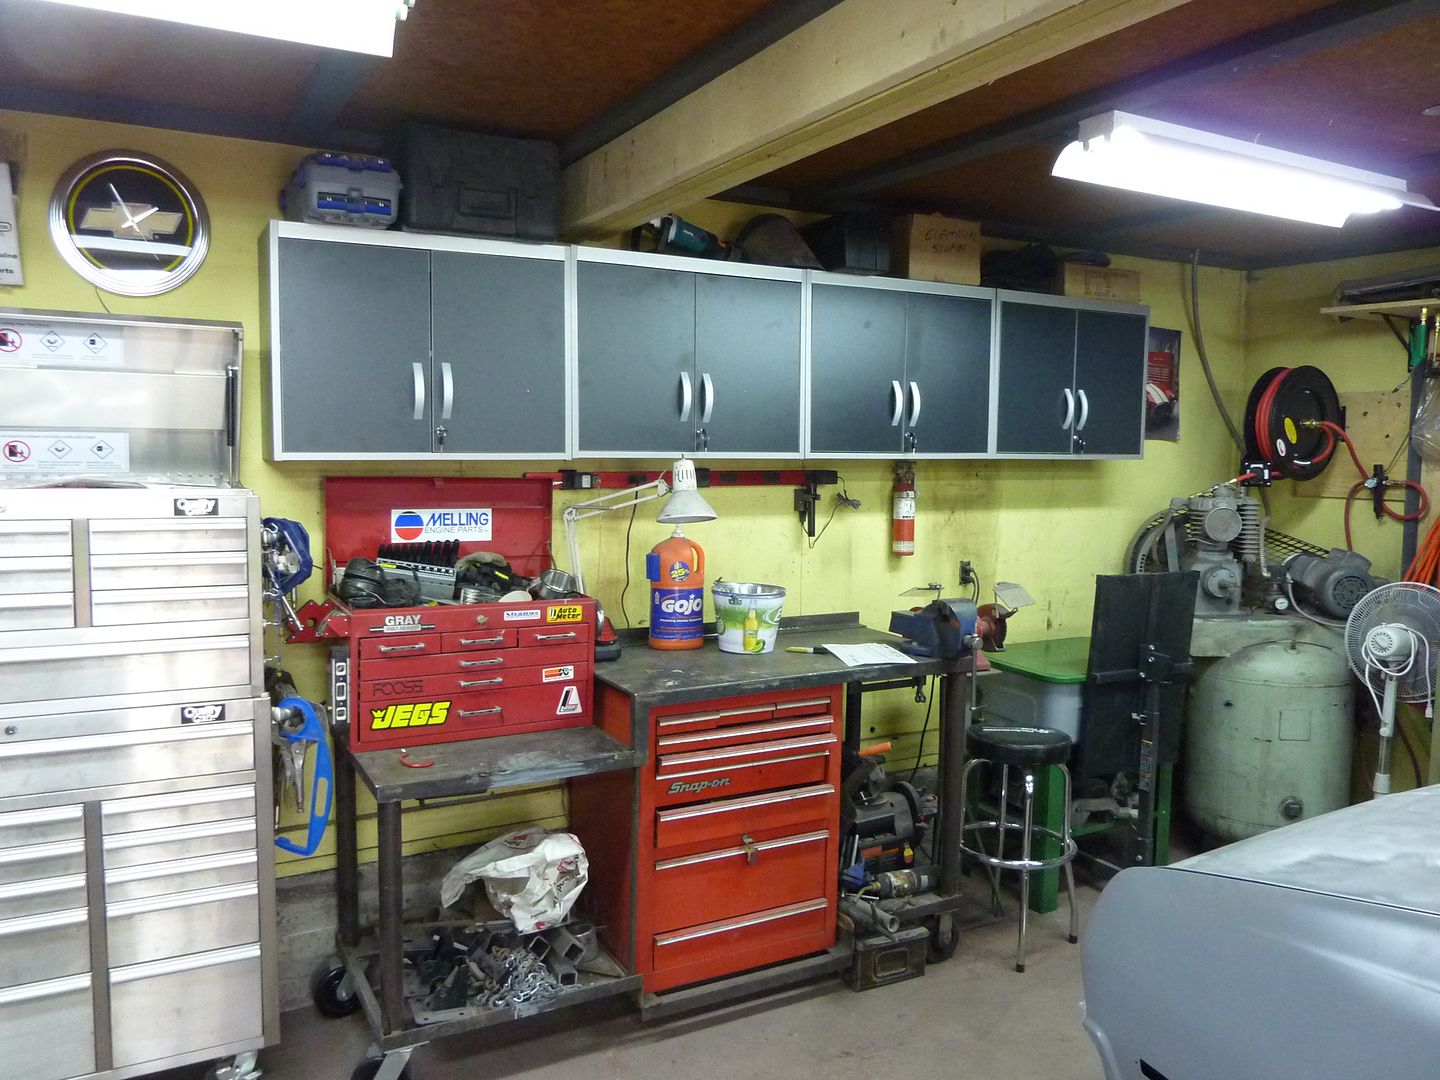
I also added a spring loaded air hose reel. I'm going to move it a little higher though. It's a little too low.
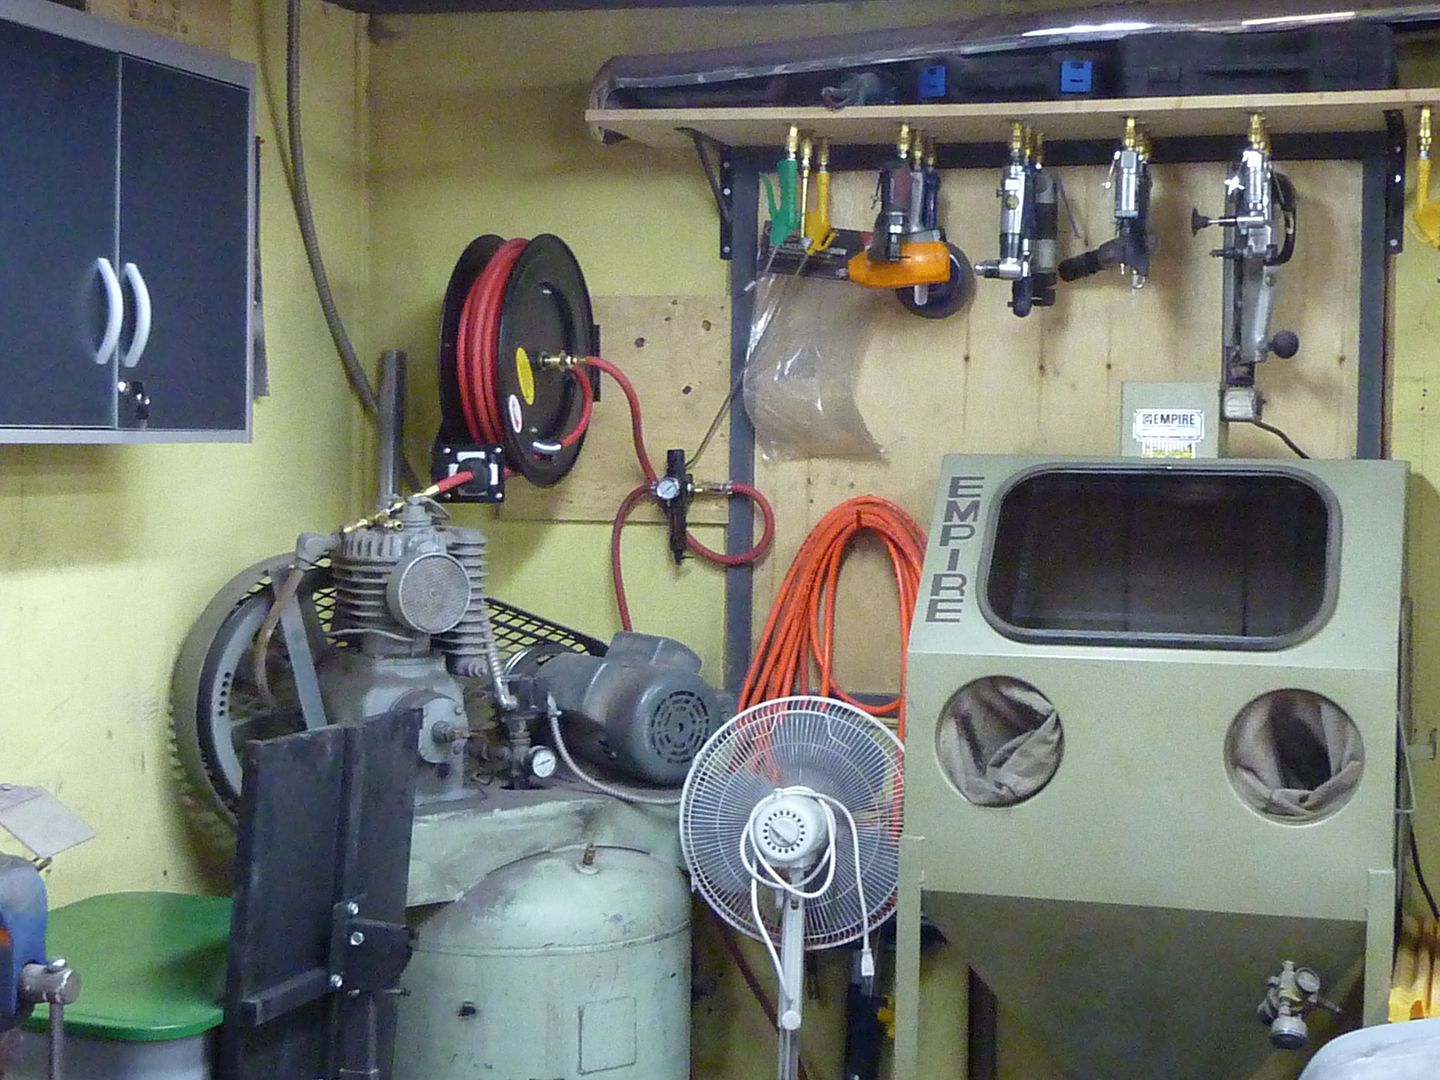
I'm still going to add one more on the left
If anyone's looking for new cupboards, the ones from Princess Auto are quite nice. And they were only $69 each. The Black and Decker ones were $99 each and they don't feel as sturdy. I added a bunch of screws to them and they feel way better.
Here's a few more shots of the shop
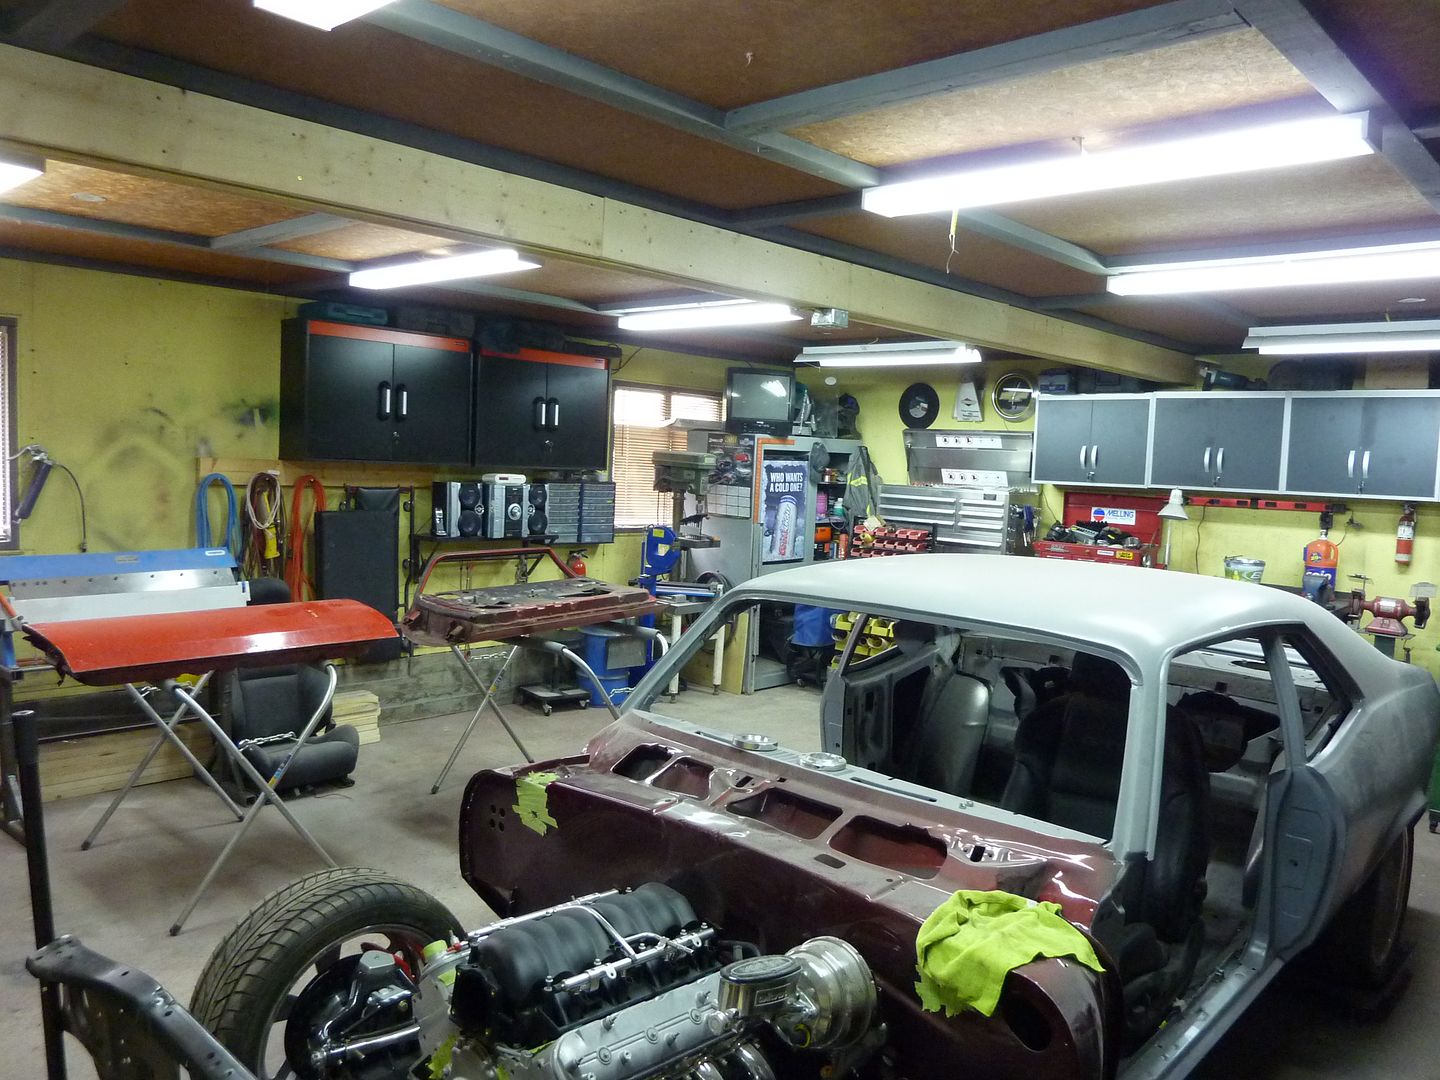
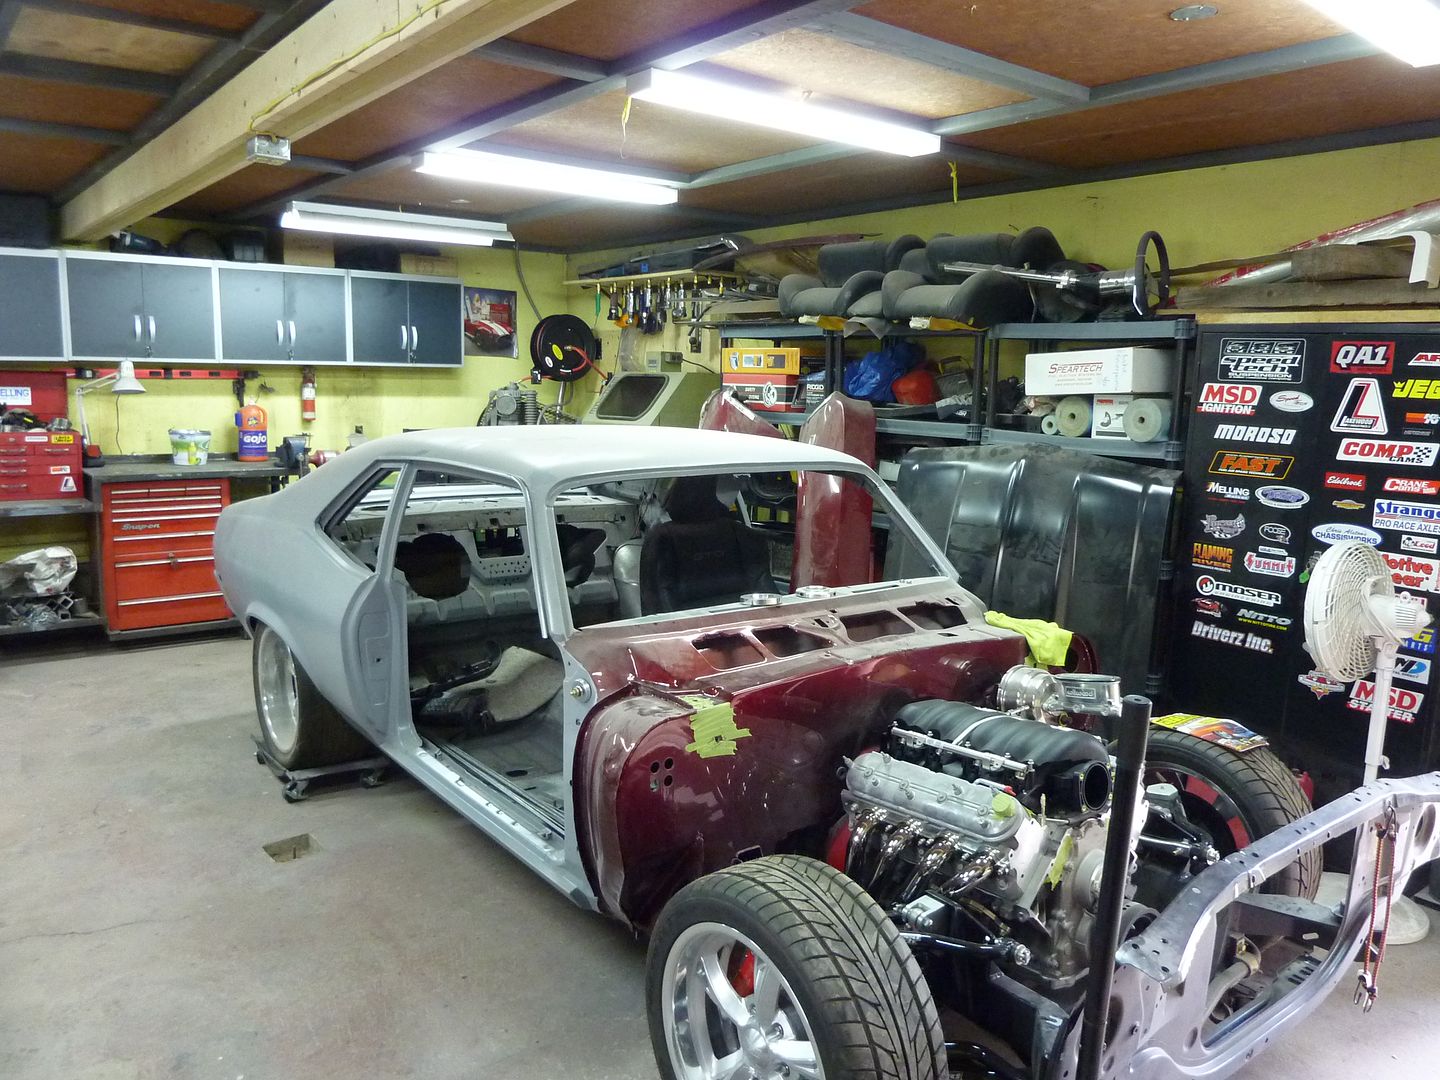
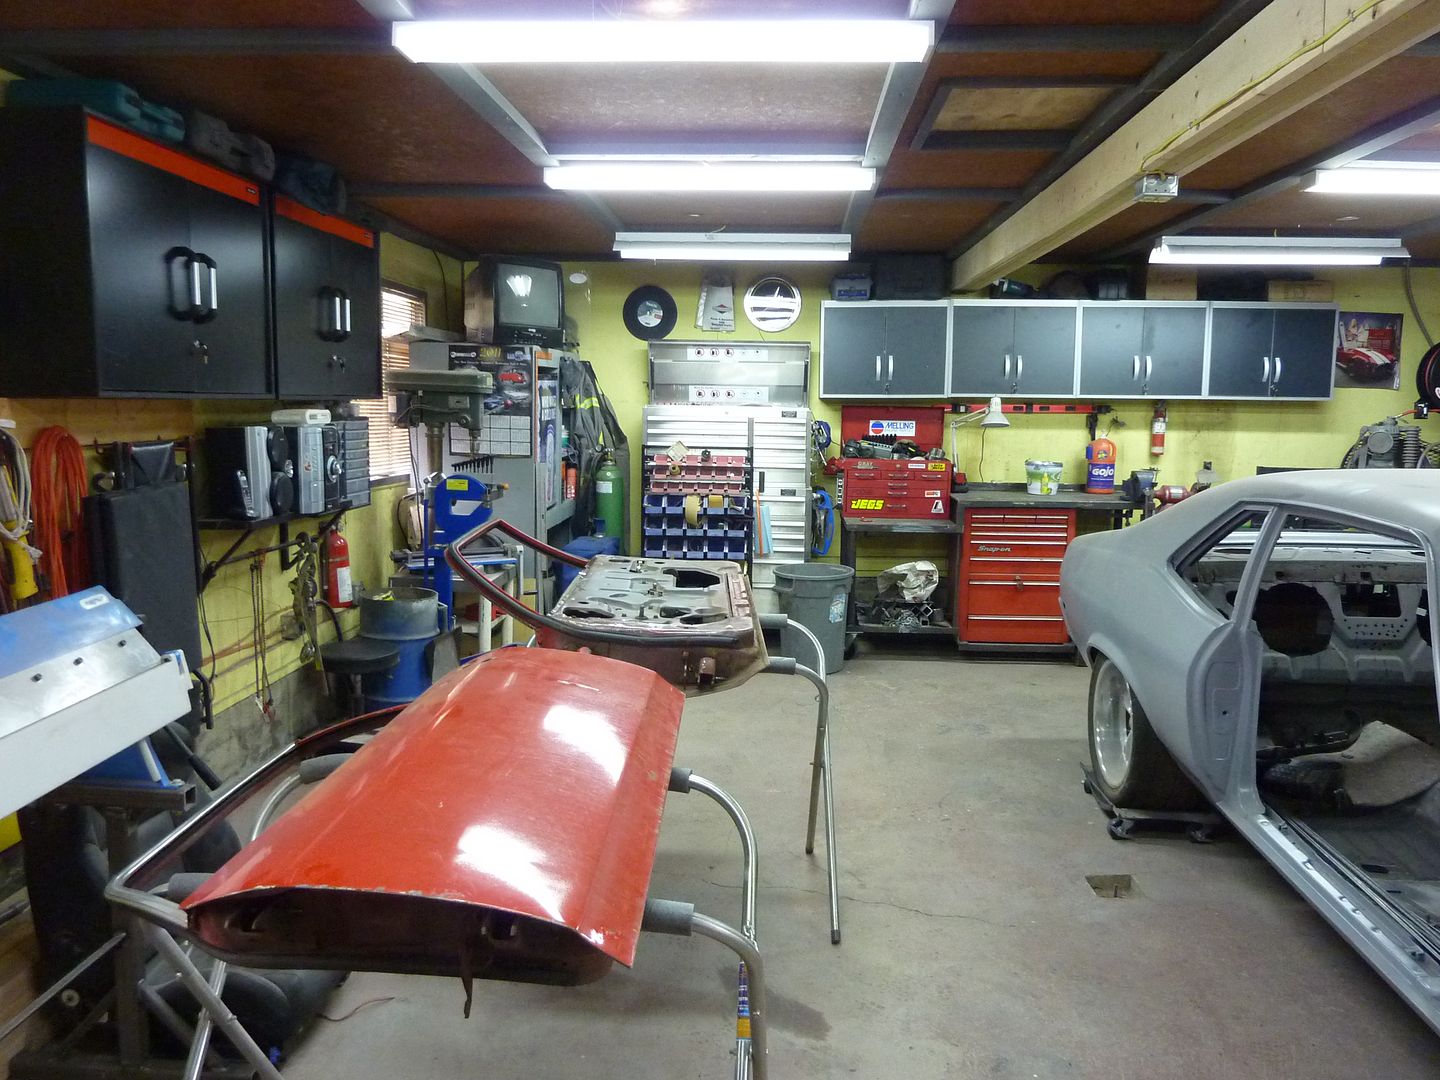
There's still a few things I want to do to the shop. Eventually I want to pull down all the interior walls. It's basically a 1/4" plywood and is cracked and has holes all over. Plus I hate the yellow. I'd like to redo all the walls with gyproc and paint it white. This summer I'm also going to get a new man door. Right now the door is an interior wood door. It's seen better days. I'm going to get a 6 panel steel door and add a dead bolt. The only problem is it's an off size (29 1/2" wide) so it will be a custom door. I would rather order the same size door cause if I went any bigger, I would have to cut the cement base to make it fit. Too much work. Hope to get some work done on the car next week as back to work tomorrow.
Last edited by scherp69; 07-12-2011 at 06:02 PM.
 07-13-2011, 01:34 AM
#112
TECH Enthusiast
iTrader: (9)
Join Date: Mar 2008
Location: IL
Posts: 698
Likes: 0
Received 0 Likes
on
0 Posts
Just a heads up, if you take the engine back out, verify your headers fit with the starter. My G-Body swap headers hit the MSD starter and I had to end up getting a rebuilt Delco from www.carahopinc.com.
Pretty badass build by the way.
Pretty badass build by the way.
07-13-2011, 09:46 AM
#113
Looking good Mike! Sometimes those little tidy-up projects around the garage pay huge dividends when you're trying to get things done out there. I think these are the first wide-angle shots I've seen of the Nova in a while... it sure looks good! All the bits & pieces you've been collecting look nice.
Are you doing a hydraulic clutch?
Are you doing a hydraulic clutch?
07-18-2011, 06:37 PM
#115
Looking back at the shop photos, if I were you I would move the air hose reel closer to center of the garage on the back wall and hang it from the ceiling. This way it is out of the way and more accesible to both sides rather than having to peel off a ton of hose to get to the other side. Just an opinion please dont be offended.
 07-18-2011, 10:49 PM
#117
On The Tree
Thread Starter
iTrader: (4)
Join Date: Mar 2009
Location: British Columbia, Canada
Posts: 132
Likes: 0
Received 0 Likes
on
0 Posts
I just hope I can get them to work. I really like them so far.
Thanks. I'll keep that in mind. I am planning on pulling the motor again. When I did some sandblasting, I missed an opening to the clutch so I'm not sure if there is any sand in there or not. I'm going to take it out and clean everything out just to make sure.
Thanks Clint. I'm pretty happy with the way the shop turned out. I was in there briefly today and it just feels so much more open. I am using a hydraulic set up. I got the hydraulic set up from Keisler.
Thanks. The rear wheels are 10" wide with 5.5" back spacing. I did have the rear narrowed a bit. I can't remember off hand what the measurement is, but I bought the wheels first and put them in place. Once I was happy with where they were sitting, I measured for the rear. Once I wear the tires out, I plan on sending the wheels out to get widened to 11". As for the air hose reel, my original plan was to mount it in the middle of the shop. I'm just waiting to get some C channel steel to add some more support to the center beam. Once that's in place, I'll look at putting it in the center as I agree, it would be much nicer having it there. And no I'm not offended at all with the comments. I appreciate suggestions, especially ones that make things easier for me 
Thanks. I'm going to cover it with sheet metal and then with leather. I thought about doing it with fiberglass, but the more I read about attaching fiberglass to metal, I decided to stick with sheet metal. Plus I bought all those sheet metals tools so I need to use them at some point. The round bar is 1/4". It's nice and light and had quite a bit of strength to it. I'm really happy with it.
Just a heads up, if you take the engine back out, verify your headers fit with the starter. My G-Body swap headers hit the MSD starter and I had to end up getting a rebuilt Delco from www.carahopinc.com.
Pretty badass build by the way.
Pretty badass build by the way.
Looking good Mike! Sometimes those little tidy-up projects around the garage pay huge dividends when you're trying to get things done out there. I think these are the first wide-angle shots I've seen of the Nova in a while... it sure looks good! All the bits & pieces you've been collecting look nice.
Are you doing a hydraulic clutch?
Are you doing a hydraulic clutch?
Looking back at the shop photos, if I were you I would move the air hose reel closer to center of the garage on the back wall and hang it from the ceiling. This way it is out of the way and more accesible to both sides rather than having to peel off a ton of hose to get to the other side. Just an opinion please dont be offended.
Thanks. I'm going to cover it with sheet metal and then with leather. I thought about doing it with fiberglass, but the more I read about attaching fiberglass to metal, I decided to stick with sheet metal. Plus I bought all those sheet metals tools so I need to use them at some point. The round bar is 1/4". It's nice and light and had quite a bit of strength to it. I'm really happy with it.
07-26-2011, 09:43 PM
#118
On The Tree
Thread Starter
iTrader: (4)
Join Date: Mar 2009
Location: British Columbia, Canada
Posts: 132
Likes: 0
Received 0 Likes
on
0 Posts
Last week I decided that I was going to put the new doors on and align the gaps. Since my car is a 68 and the doors that I have are from a 73-74, I need to take apart the 68-72 hinge and put the side that bolts to the car onto the door. The hinges on the 73-74 are welded on. I was going to use Goodmark hinges but I found out that they will not interchange with stock hinges. The pins on the Goodmark ones are smaller. So I sent Clarence (the guy in Tacoma) an email and have a stock set of hinges coming. I also now have a new set of Goodmark hinges for a 68-72 for sale. PM me if interested.
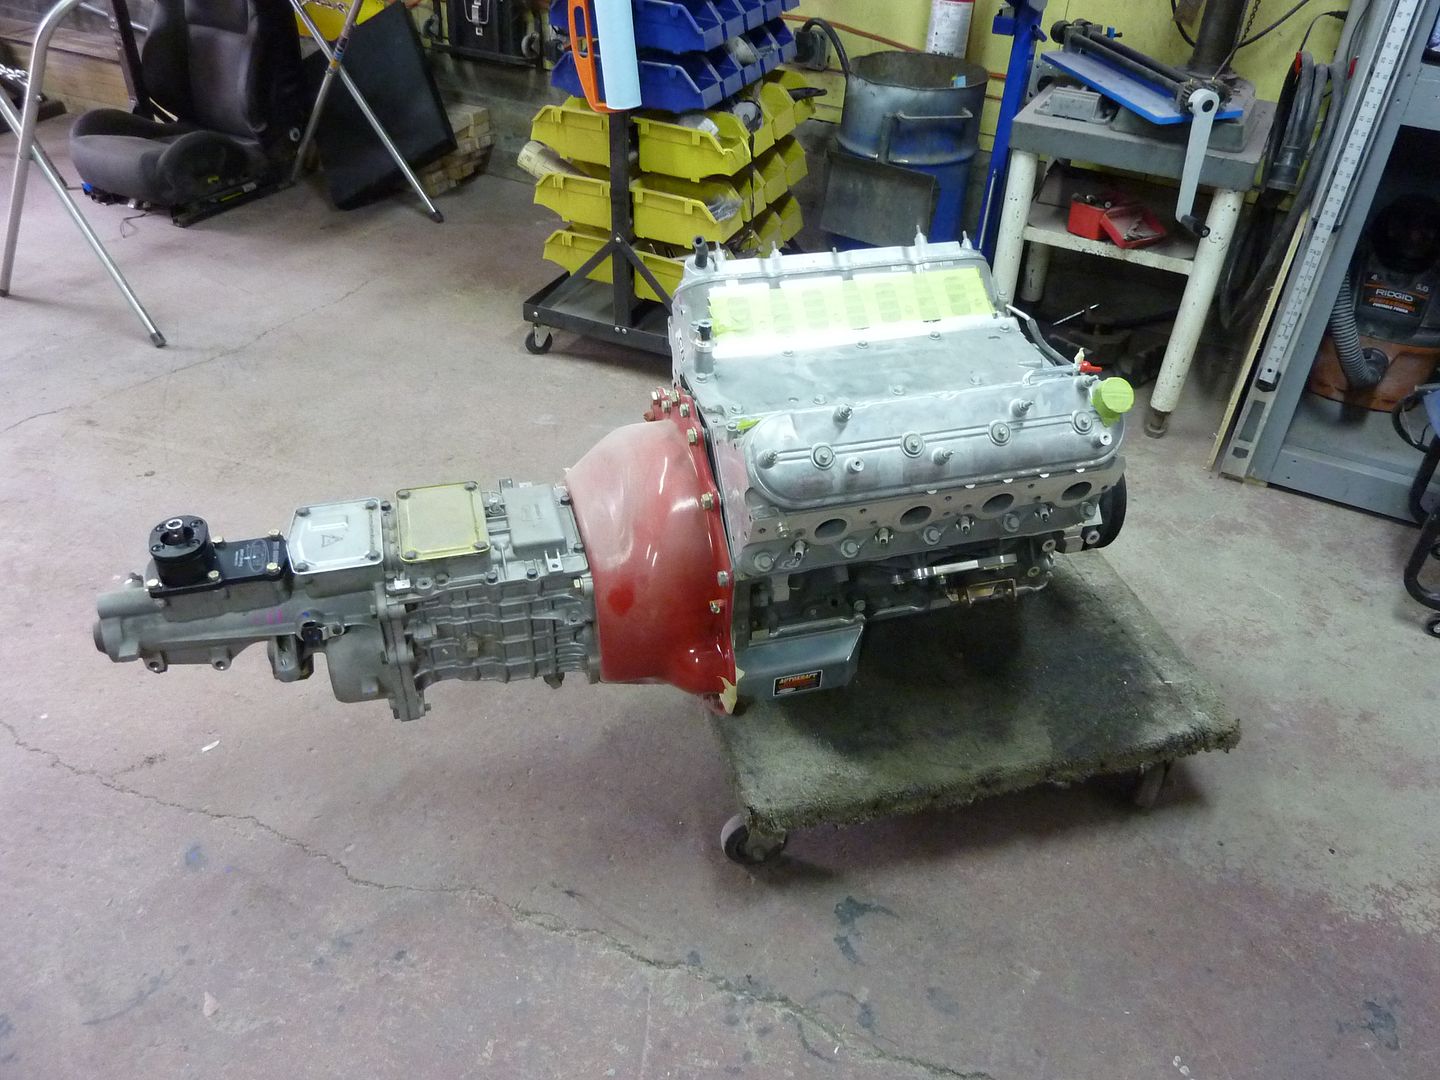
Since I could do the doors, I thought I'd start on the motor. First thing, out cam the motor and trans.
I did some sand blasting a while ago, which as you all know makes a huge mess. I noticed on the scatter shield that I missed taping off one of the holes. I decided that since it was easy to pull the motor and trans now, I would do that and make sure that no sand got into the clutch.
Sand on top of the trans
There was only a small amount of sand in the scatter shield. It may not have caused any problems, but it's the peace of mind thing knowing that it's all been cleaned out
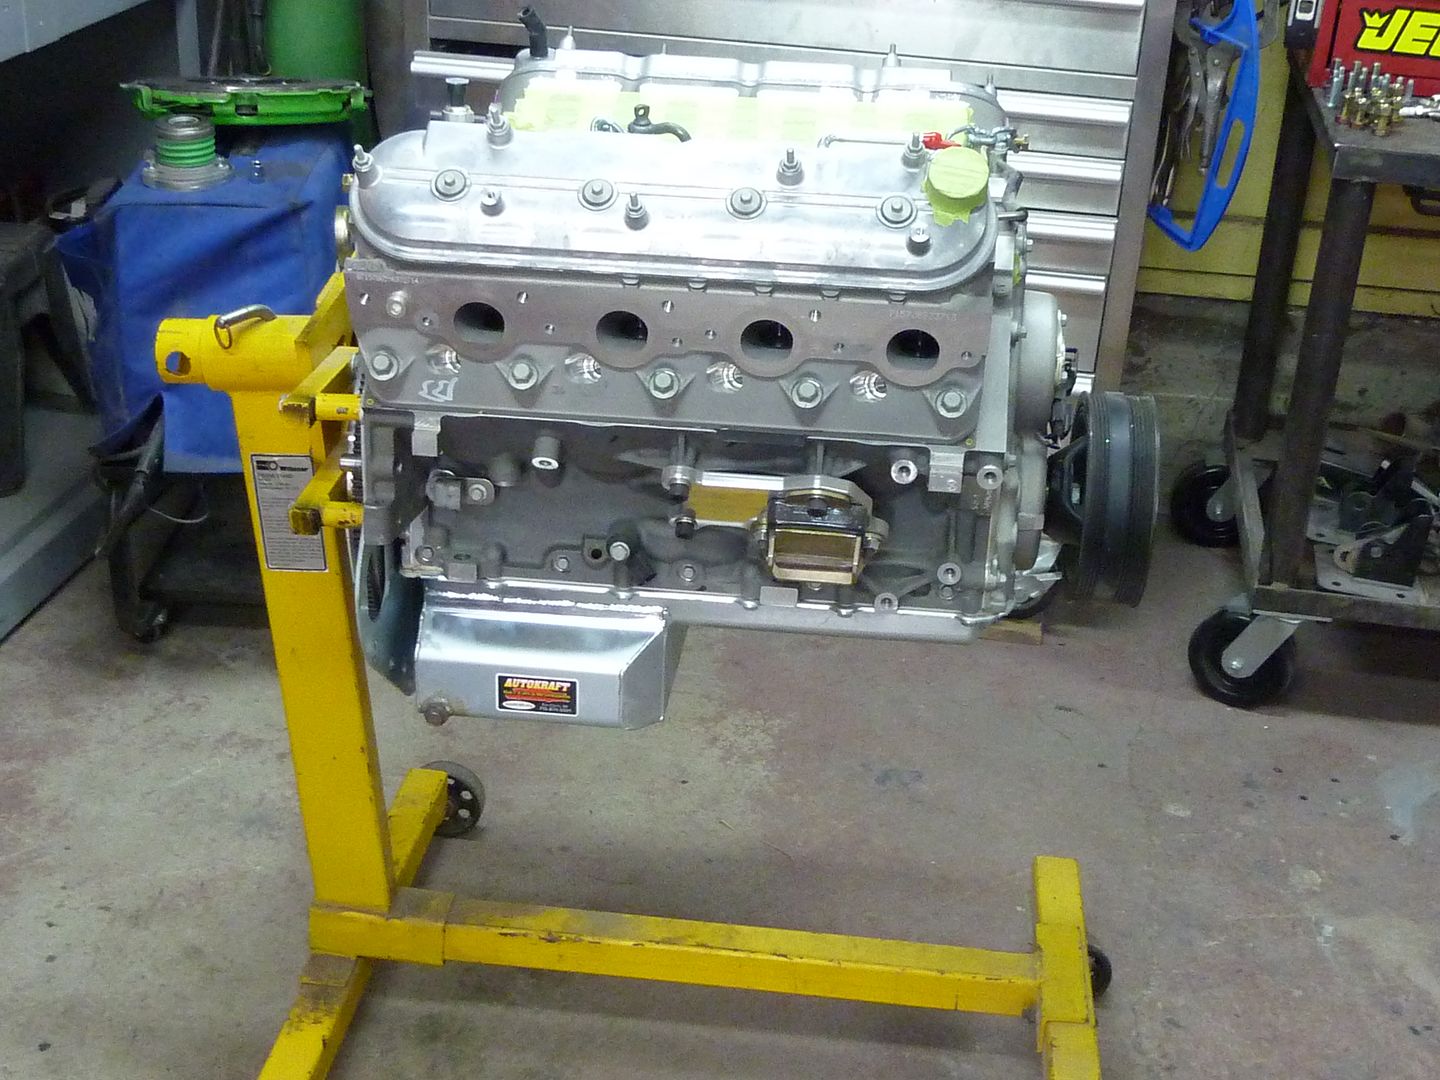
Got the motor back on the engine stand
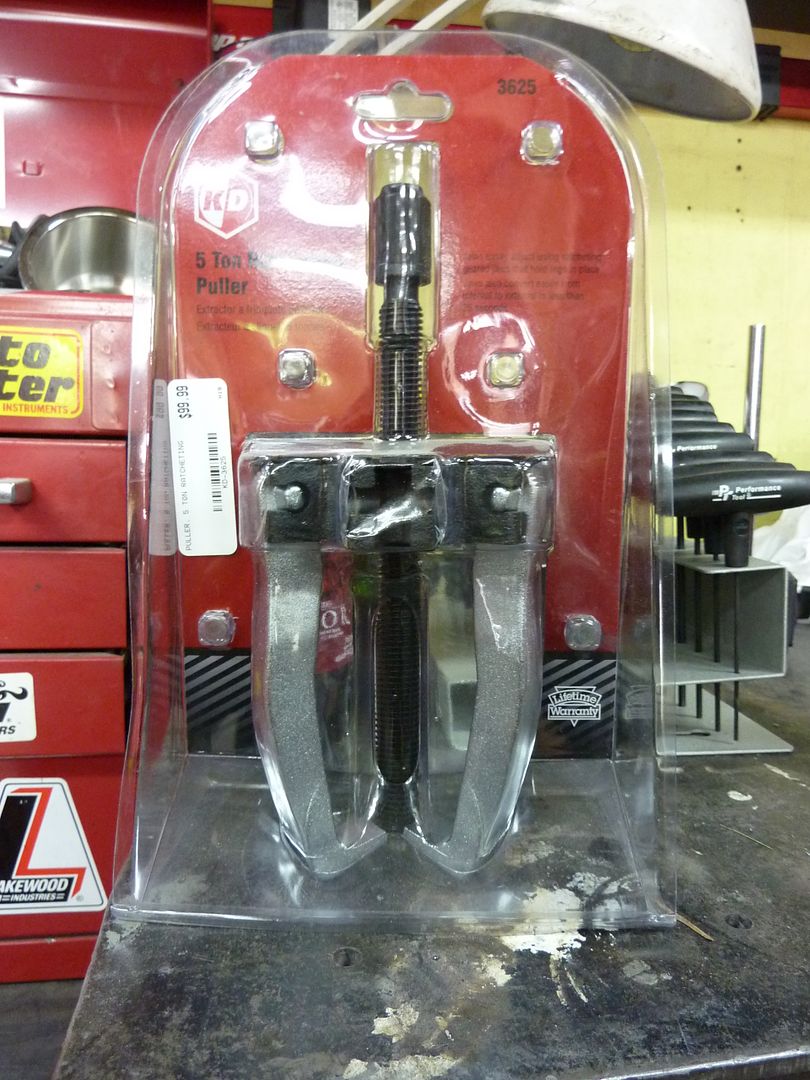
First thing was to pull the stock crank pulley. Of course my SBC harmonic balancer puller wouldn't work, so I bought 2-3 jaw puller. I'm sure it will come in handy again
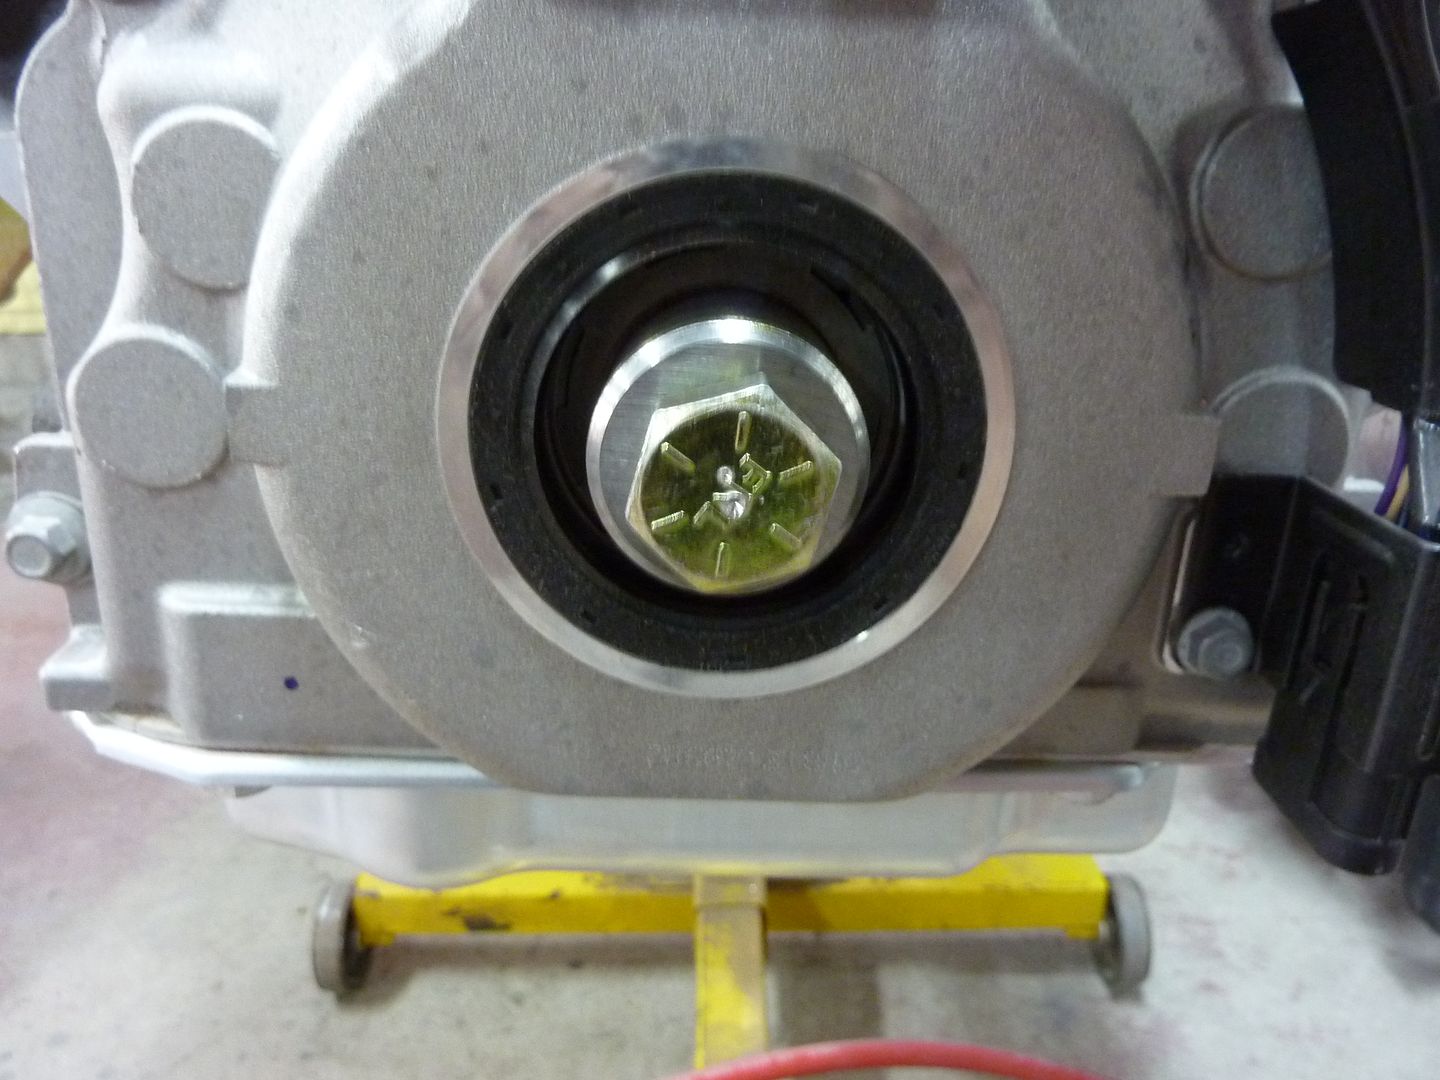
Since the threaded rod on the puller wasn't long enough, I put a bolt in the hole where the crank bolt goes and used it to set against
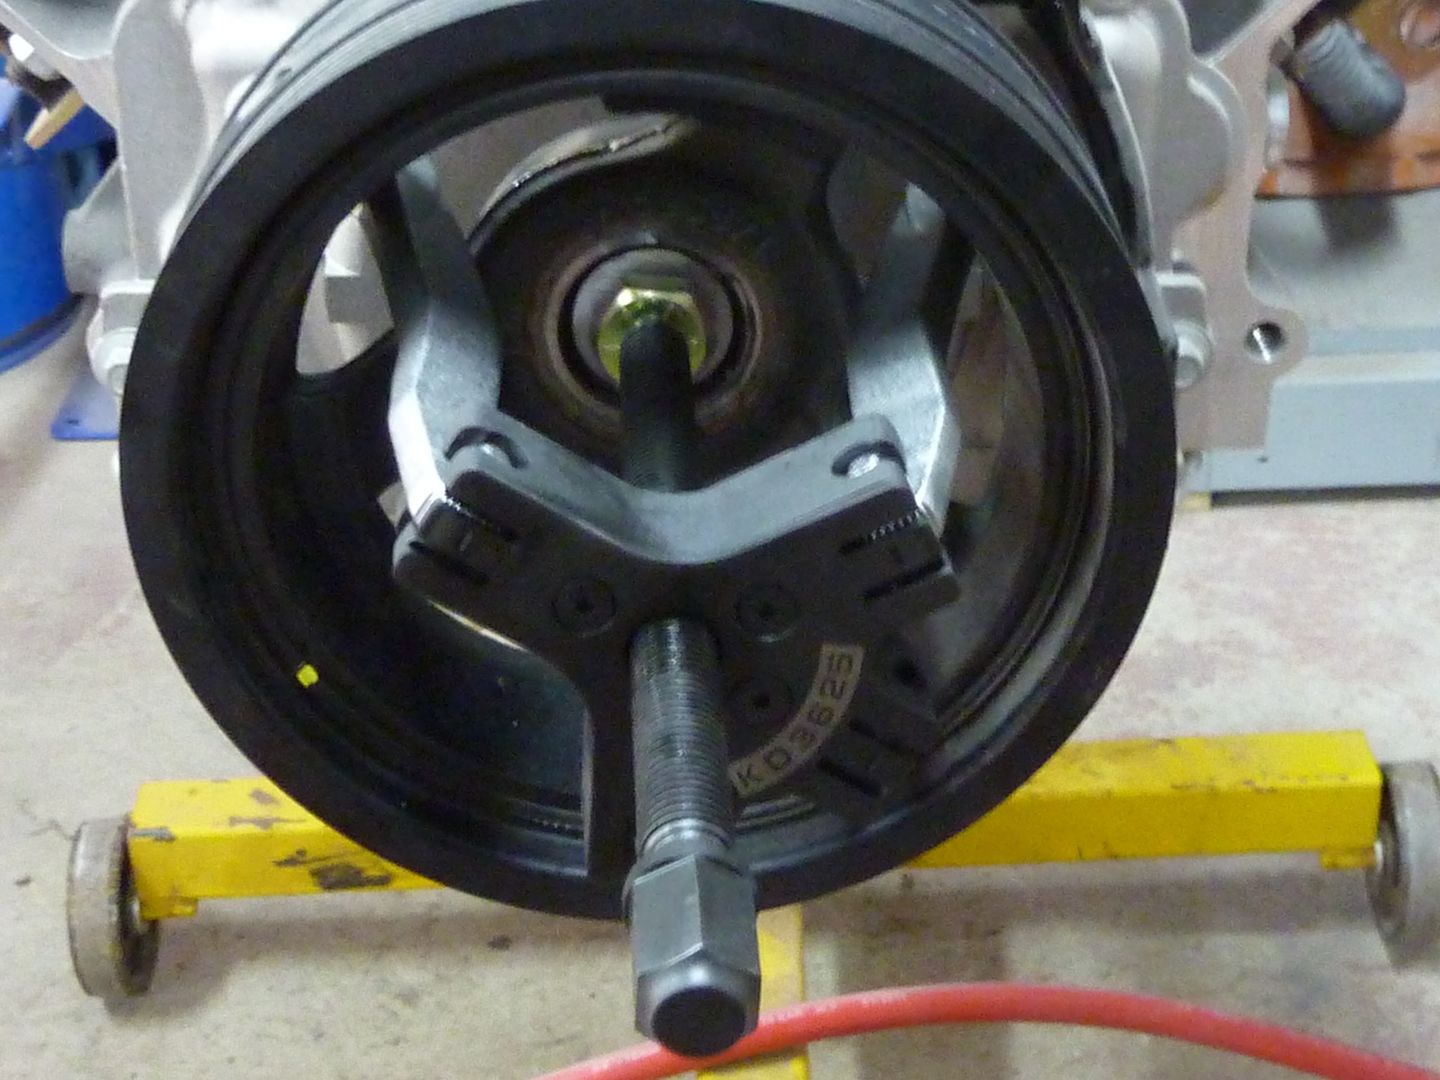
Pulley is off
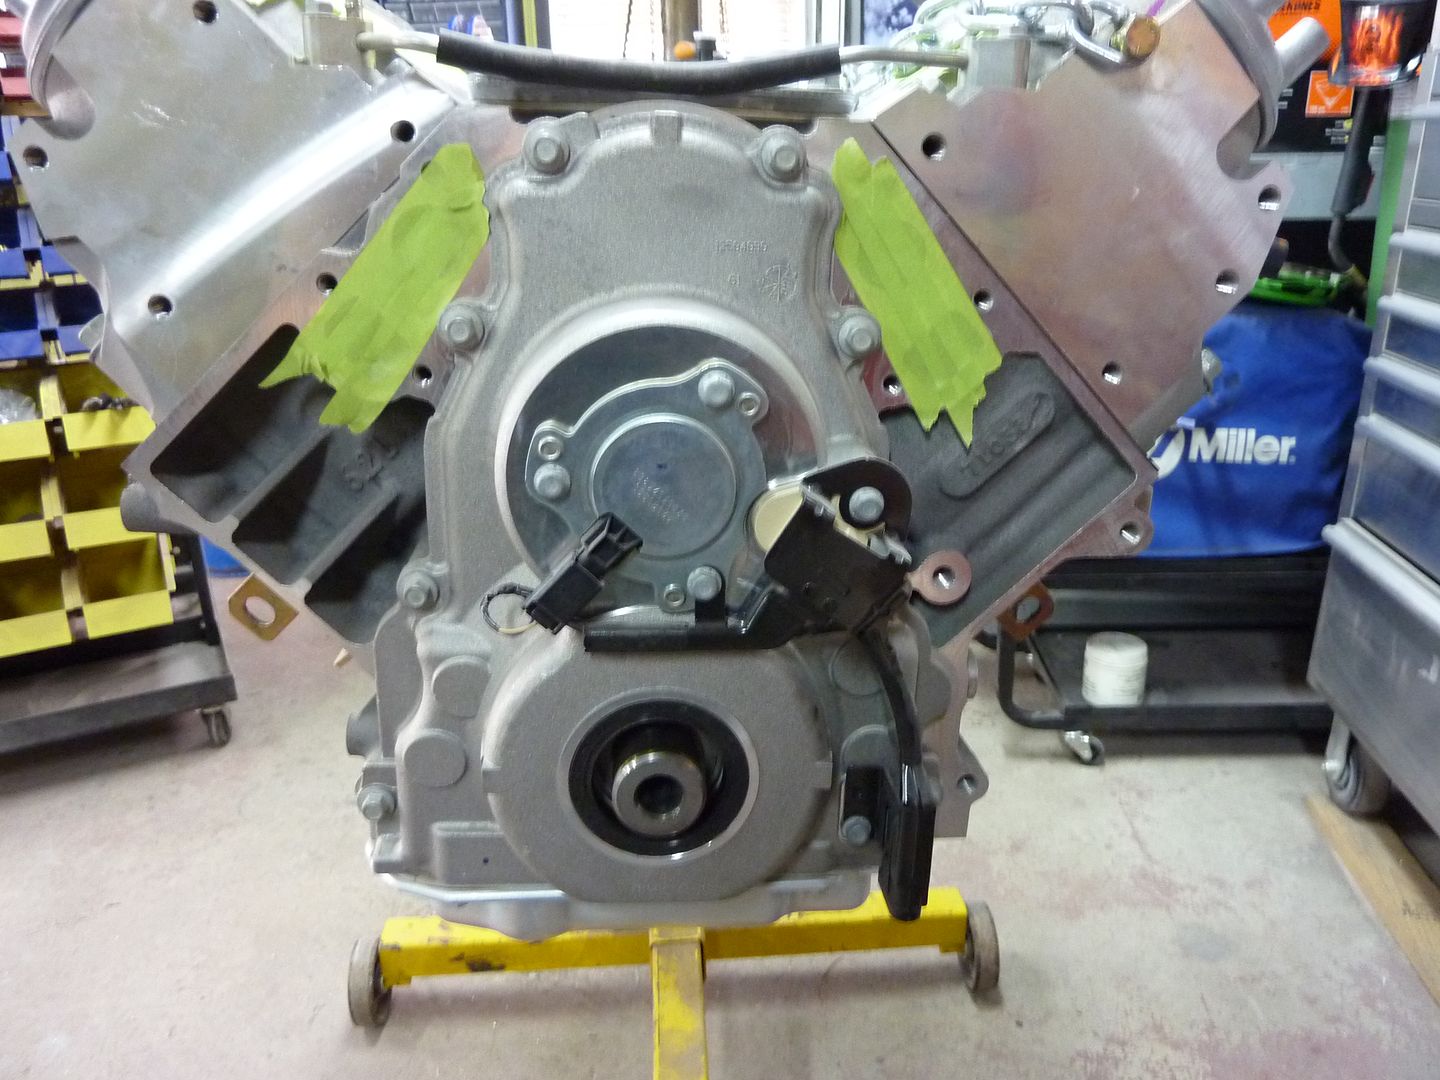
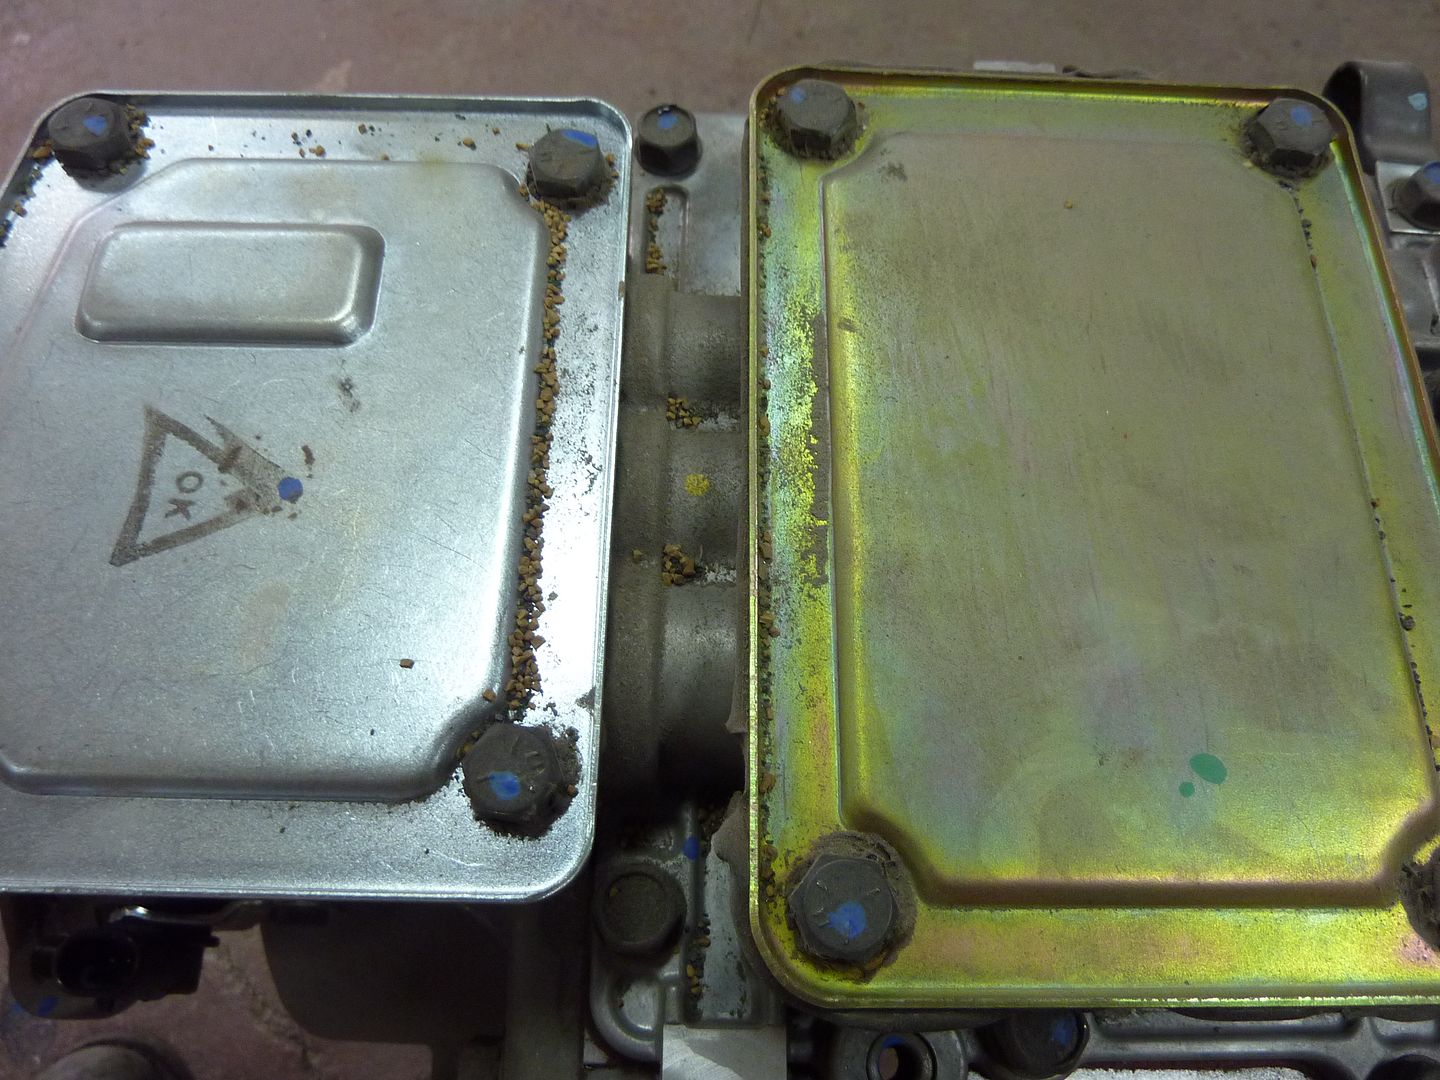
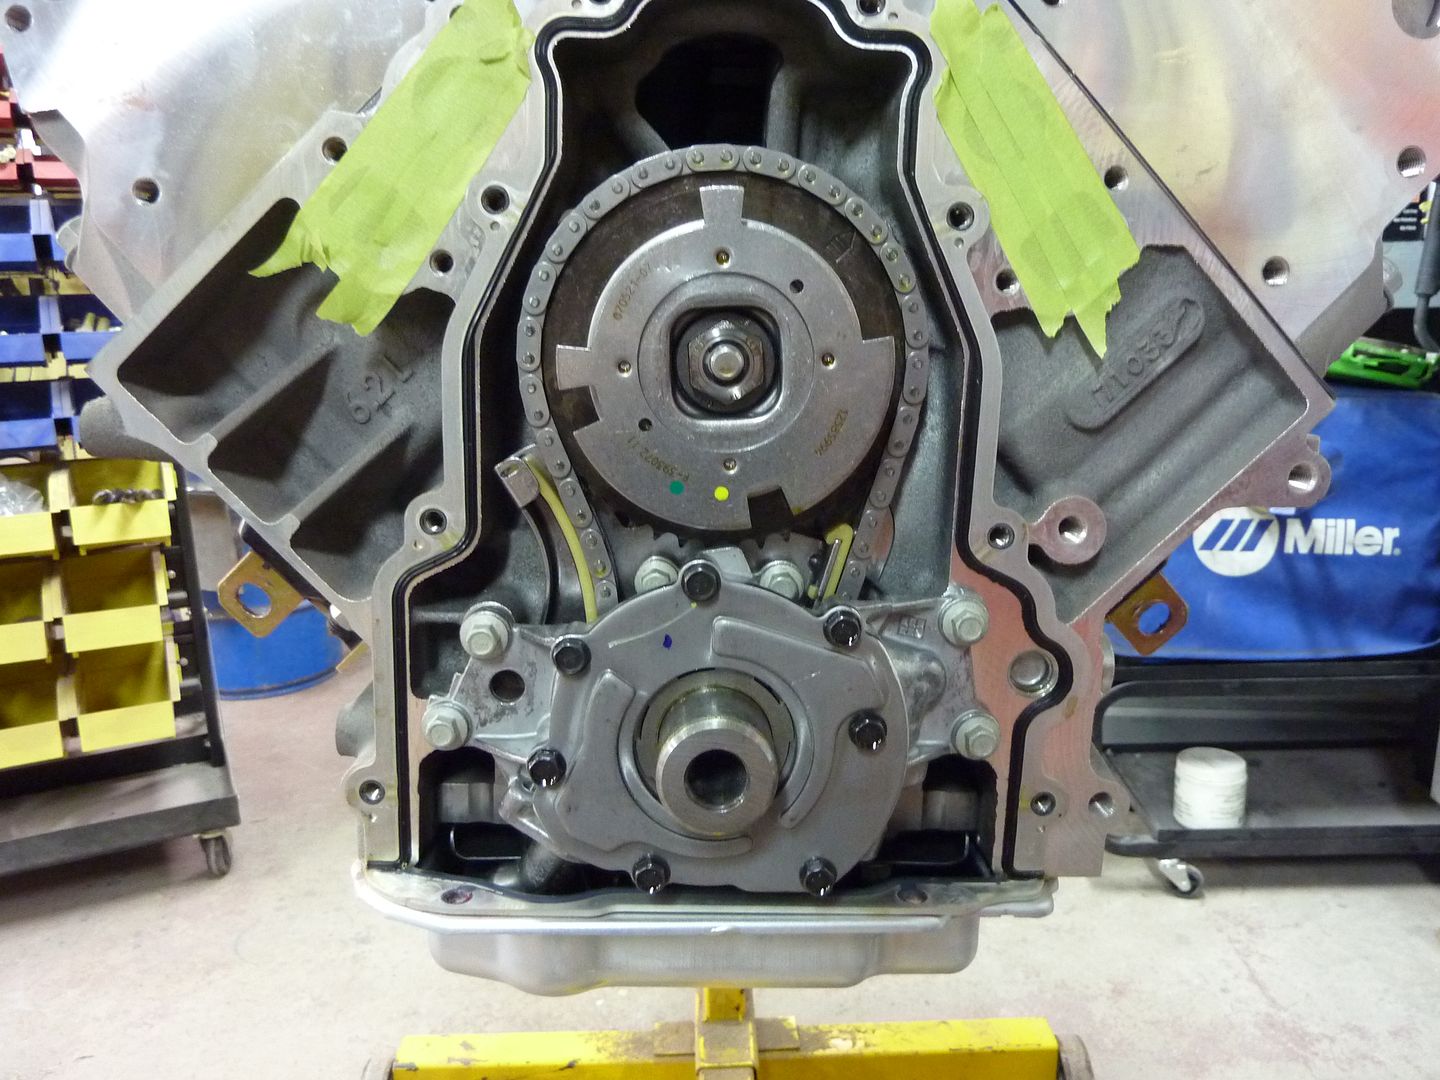
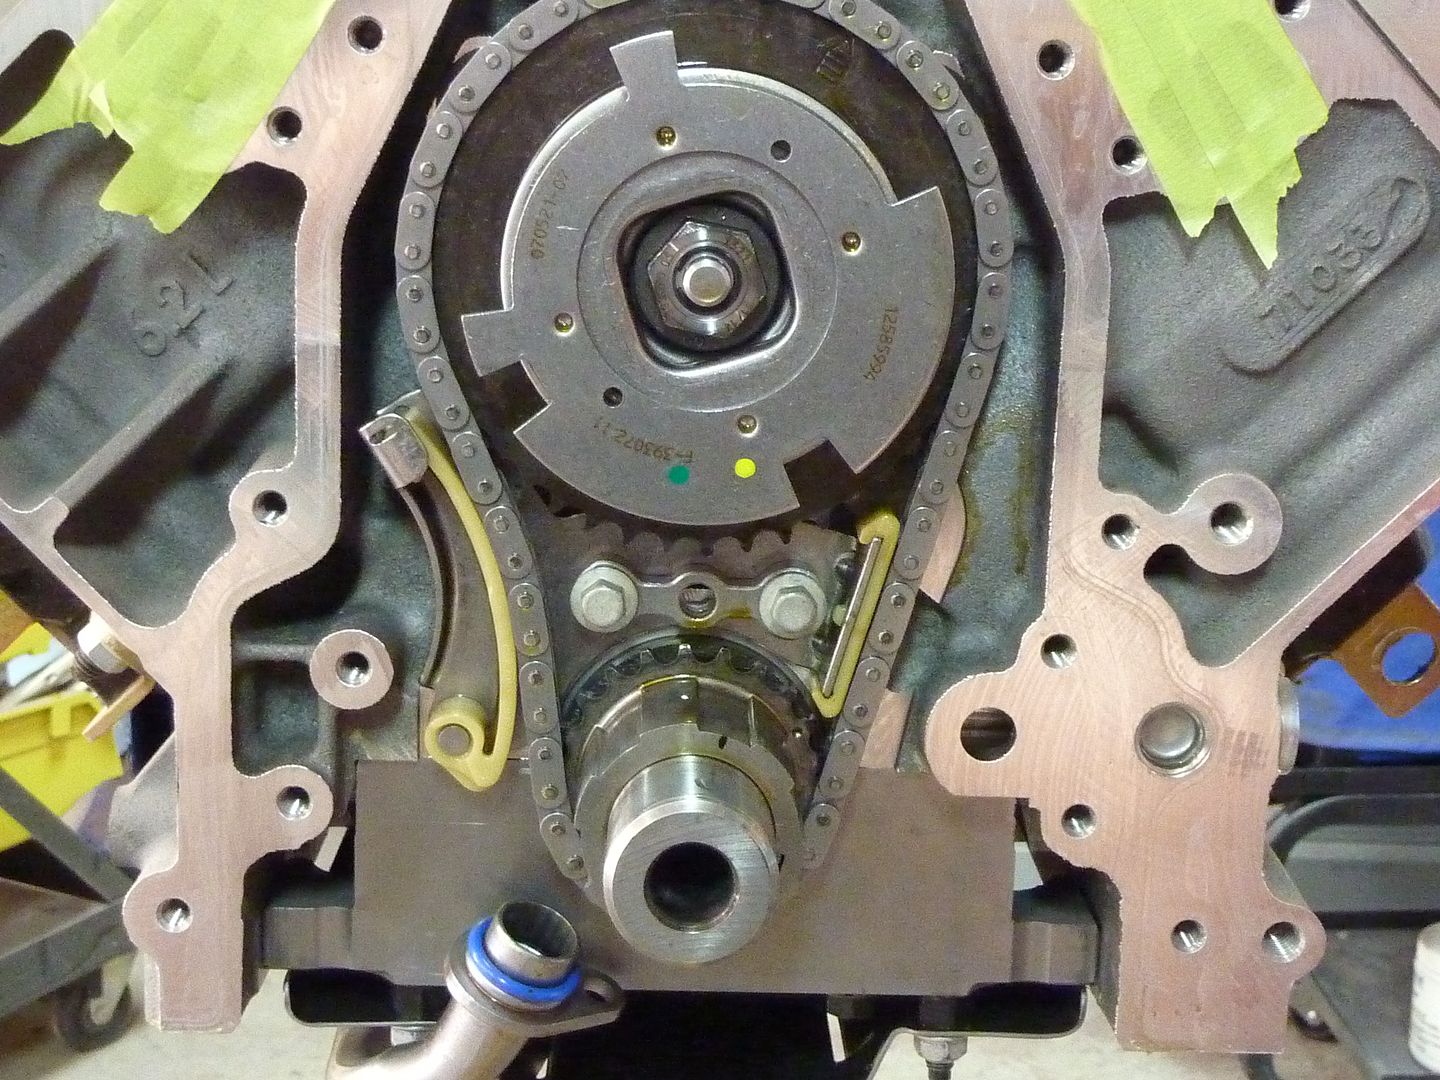
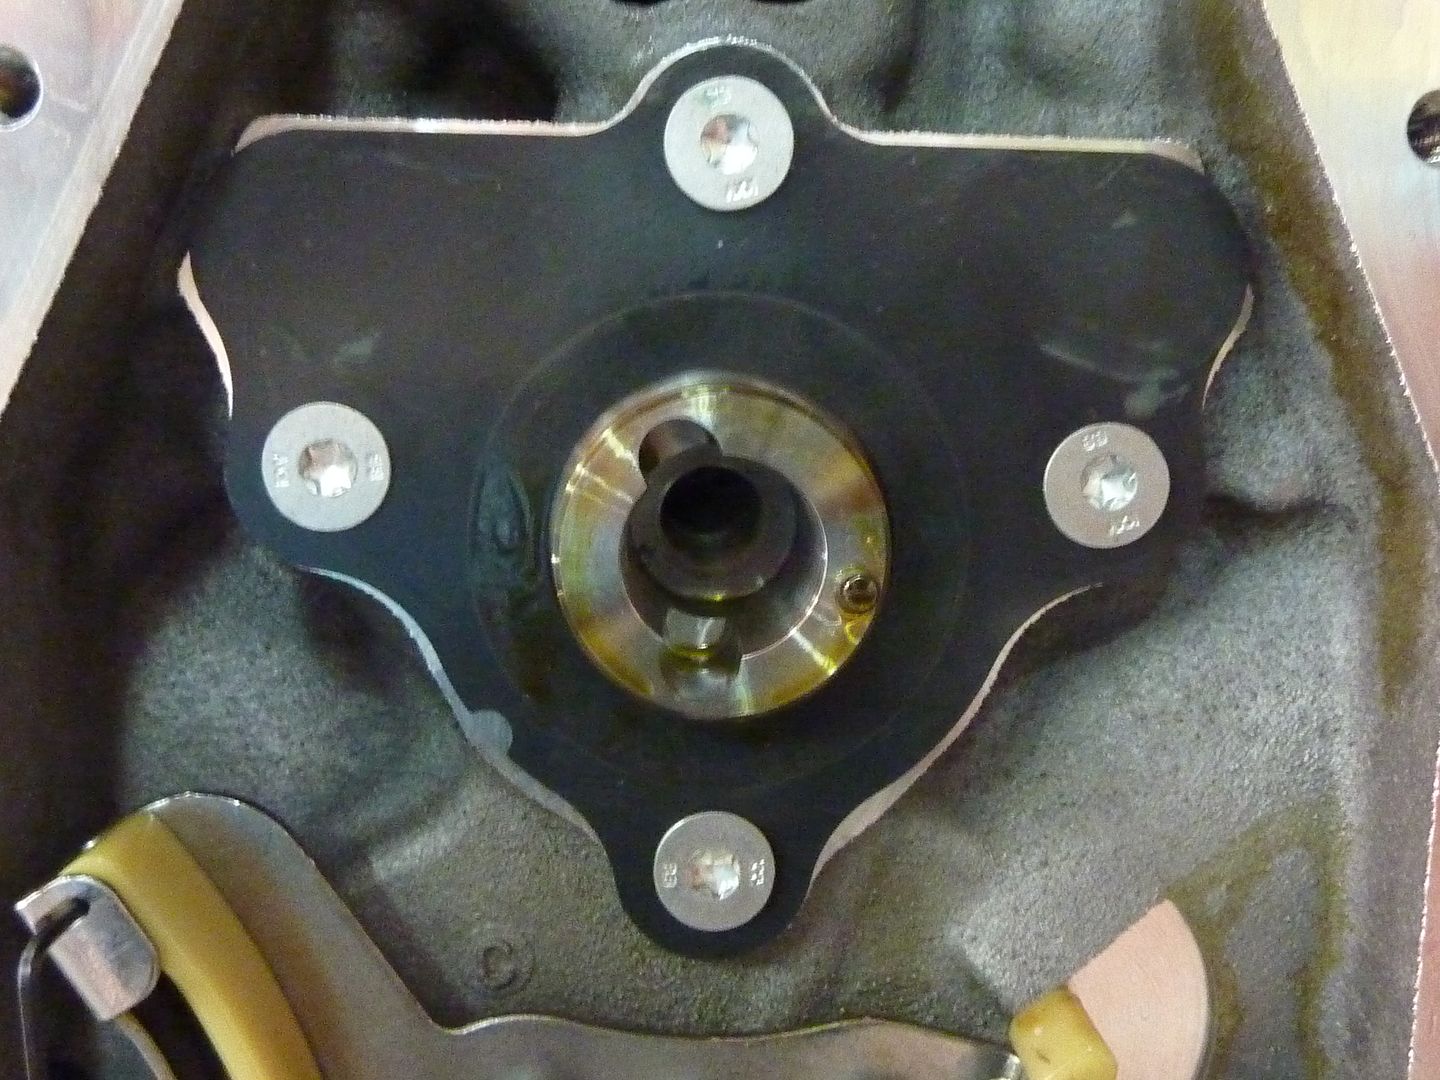
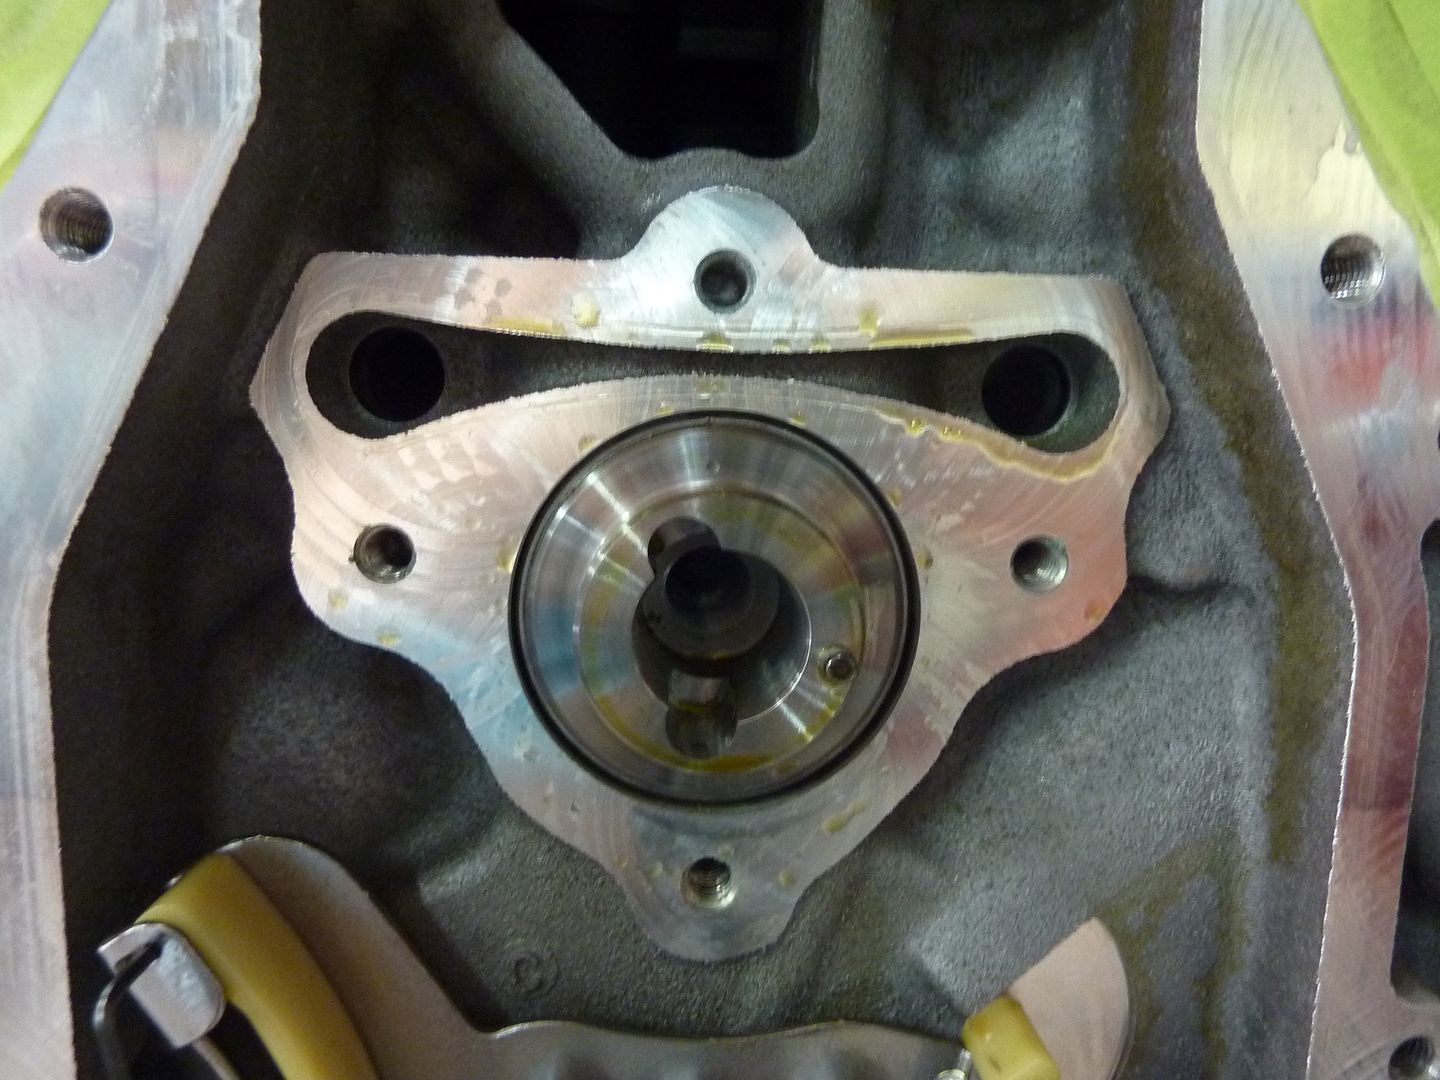
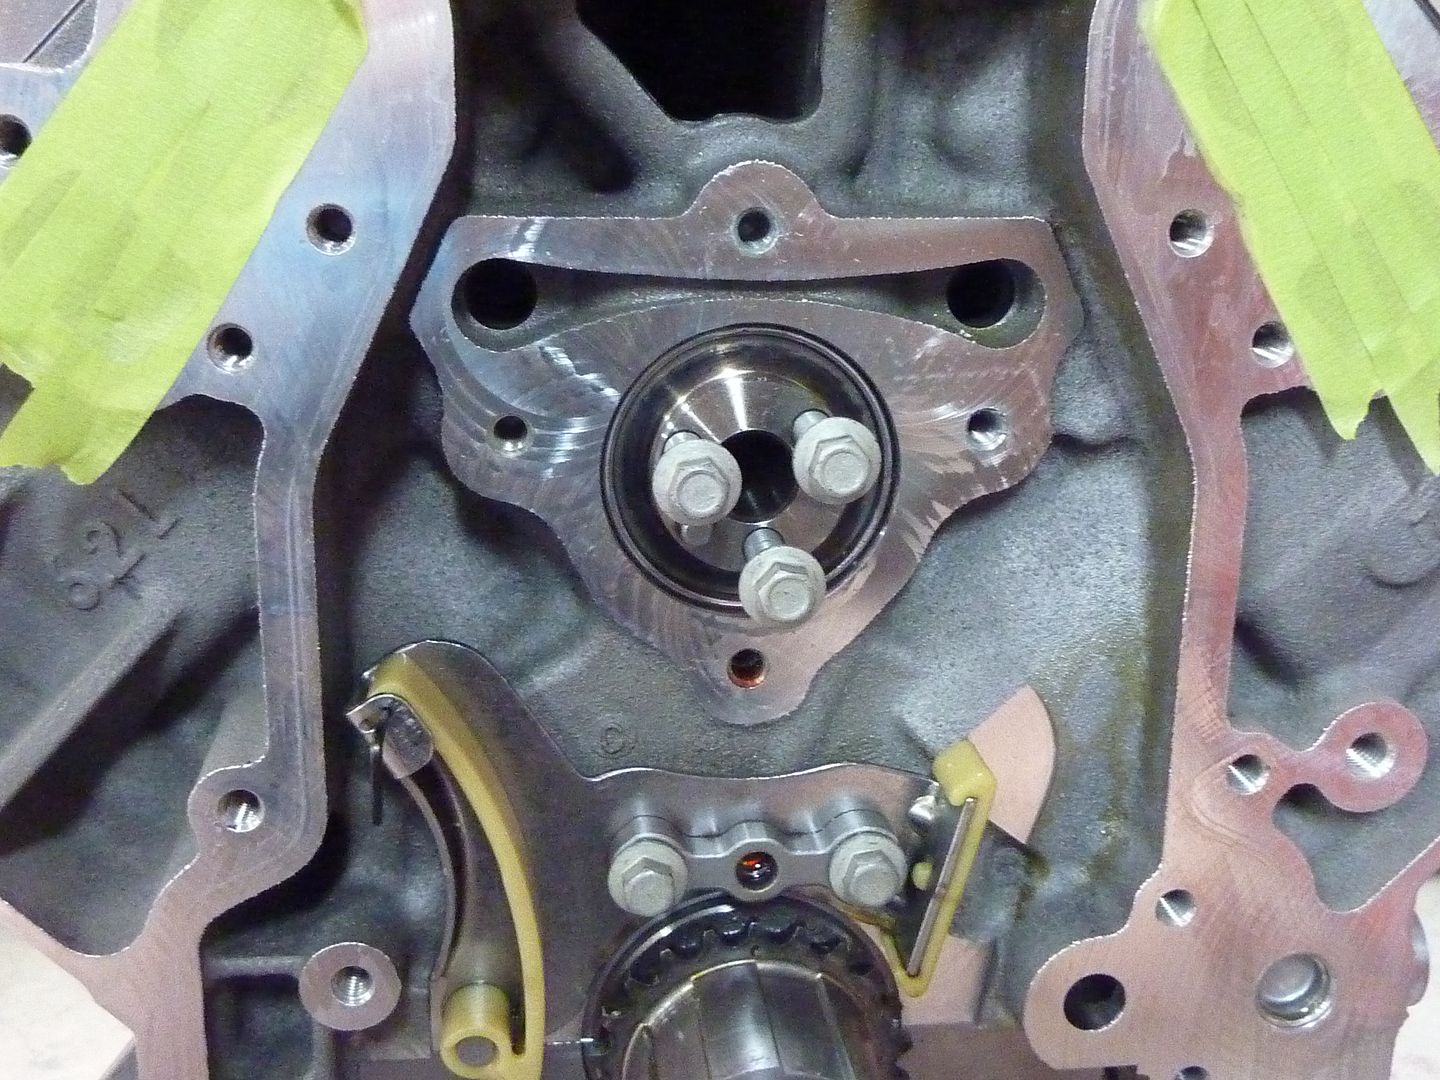
Took the stock timing cover off. This is what the VVT system looks like
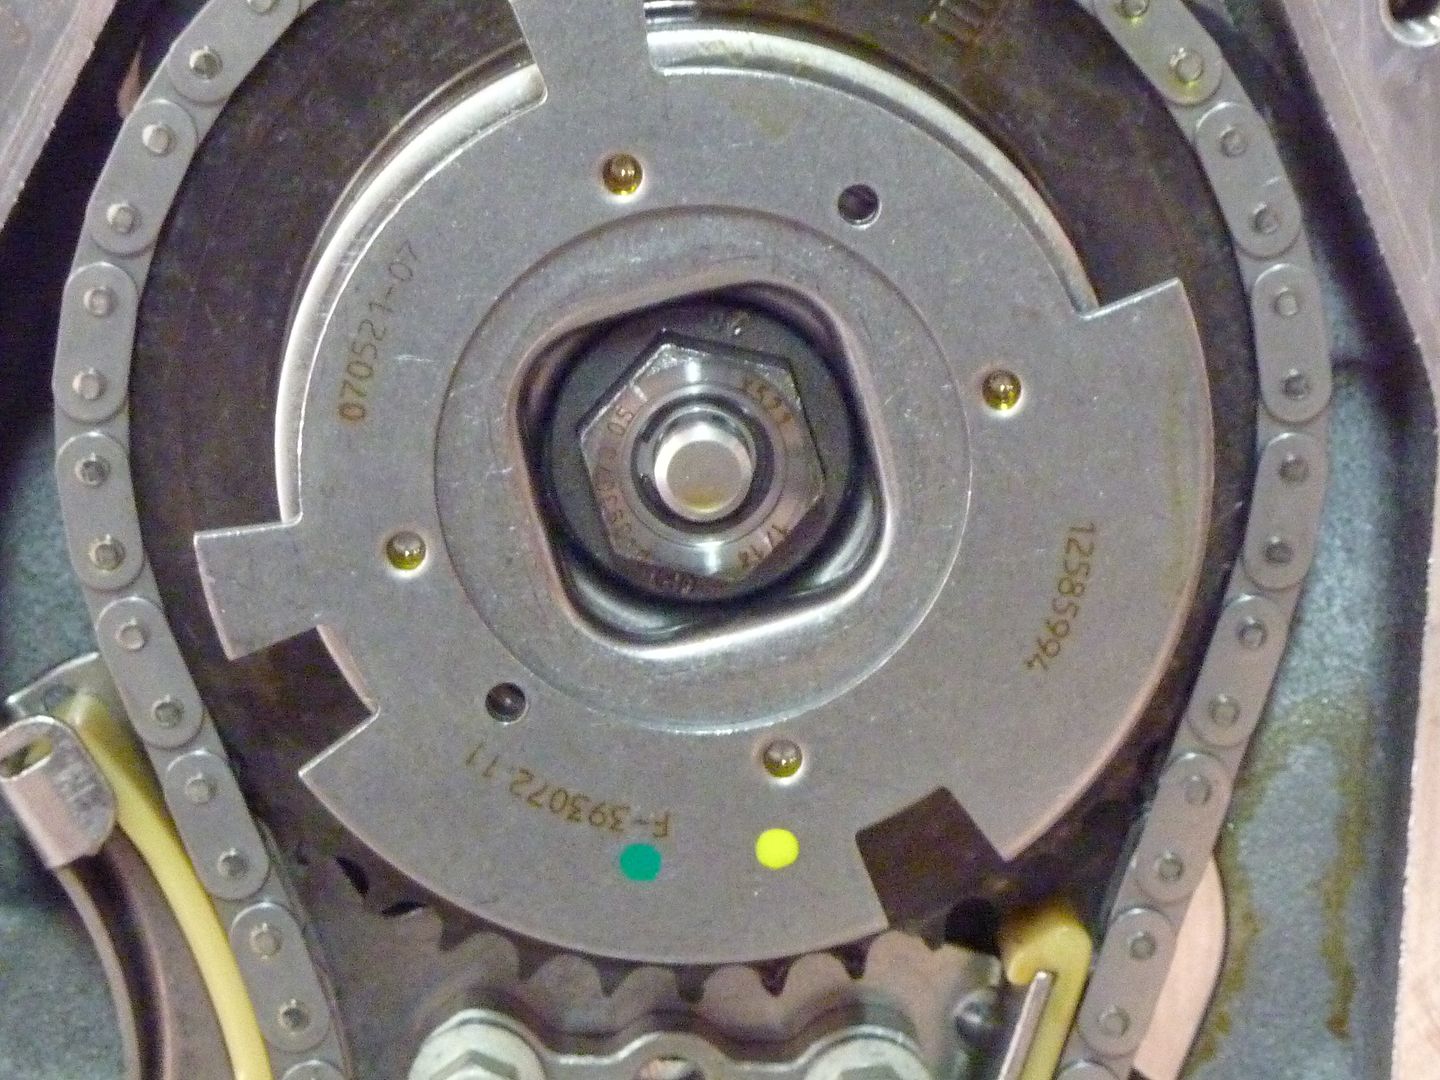
Close up of the VVT cam gear and sensor
Took off the oil pump
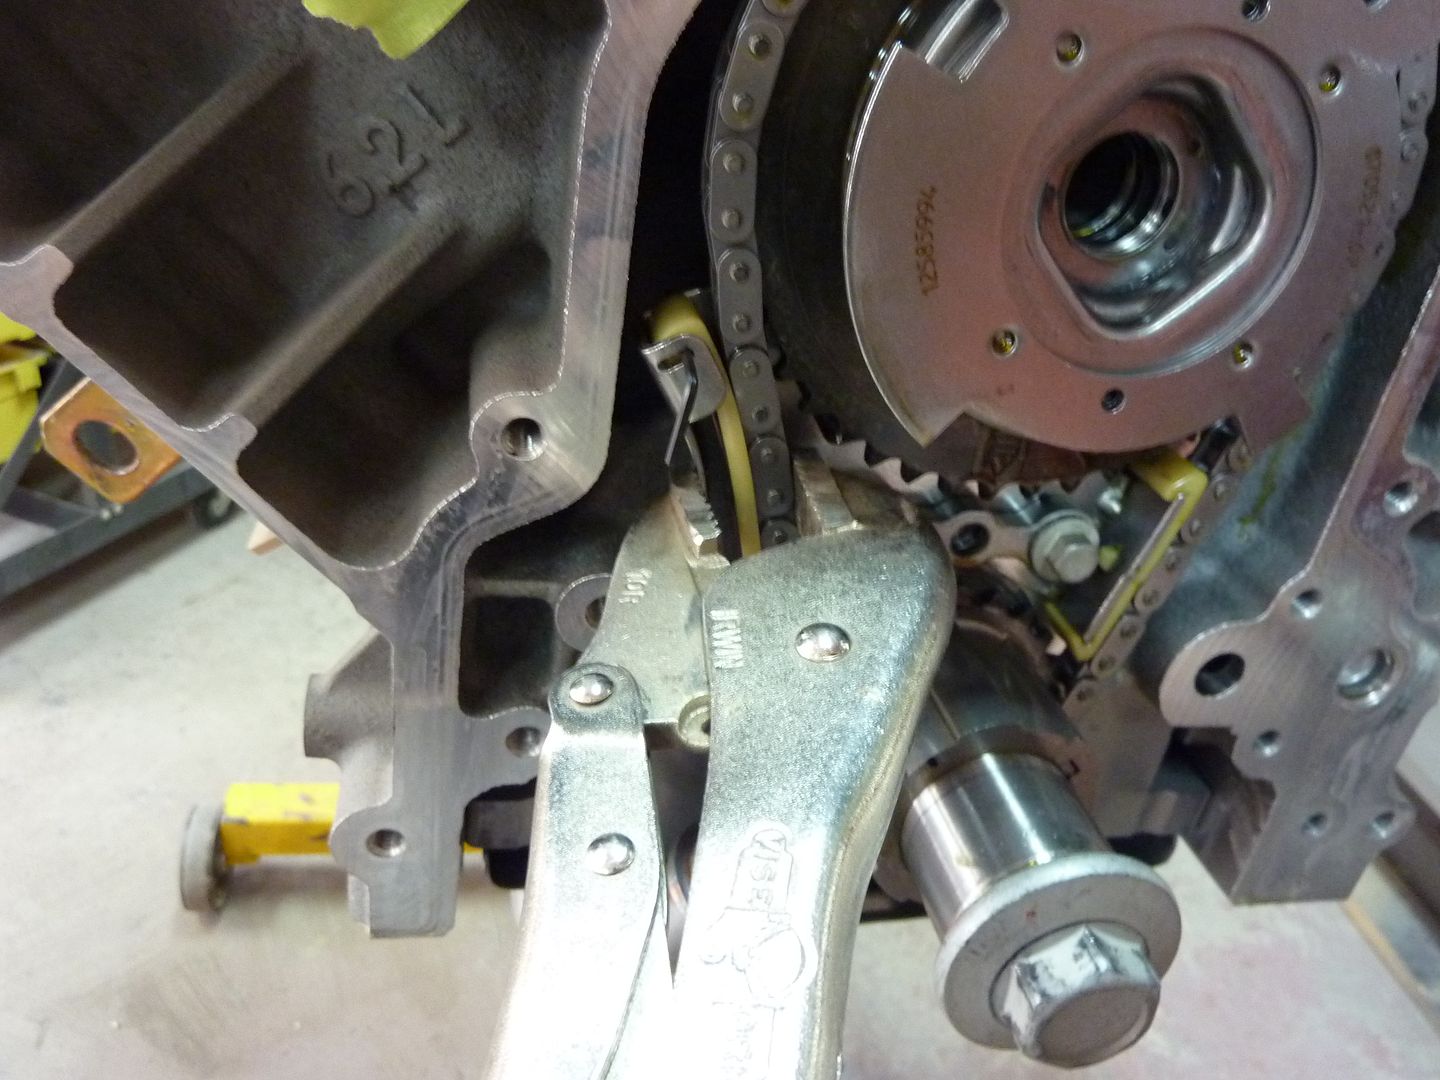
Had to take off the tension on the stock timing chain tensioner
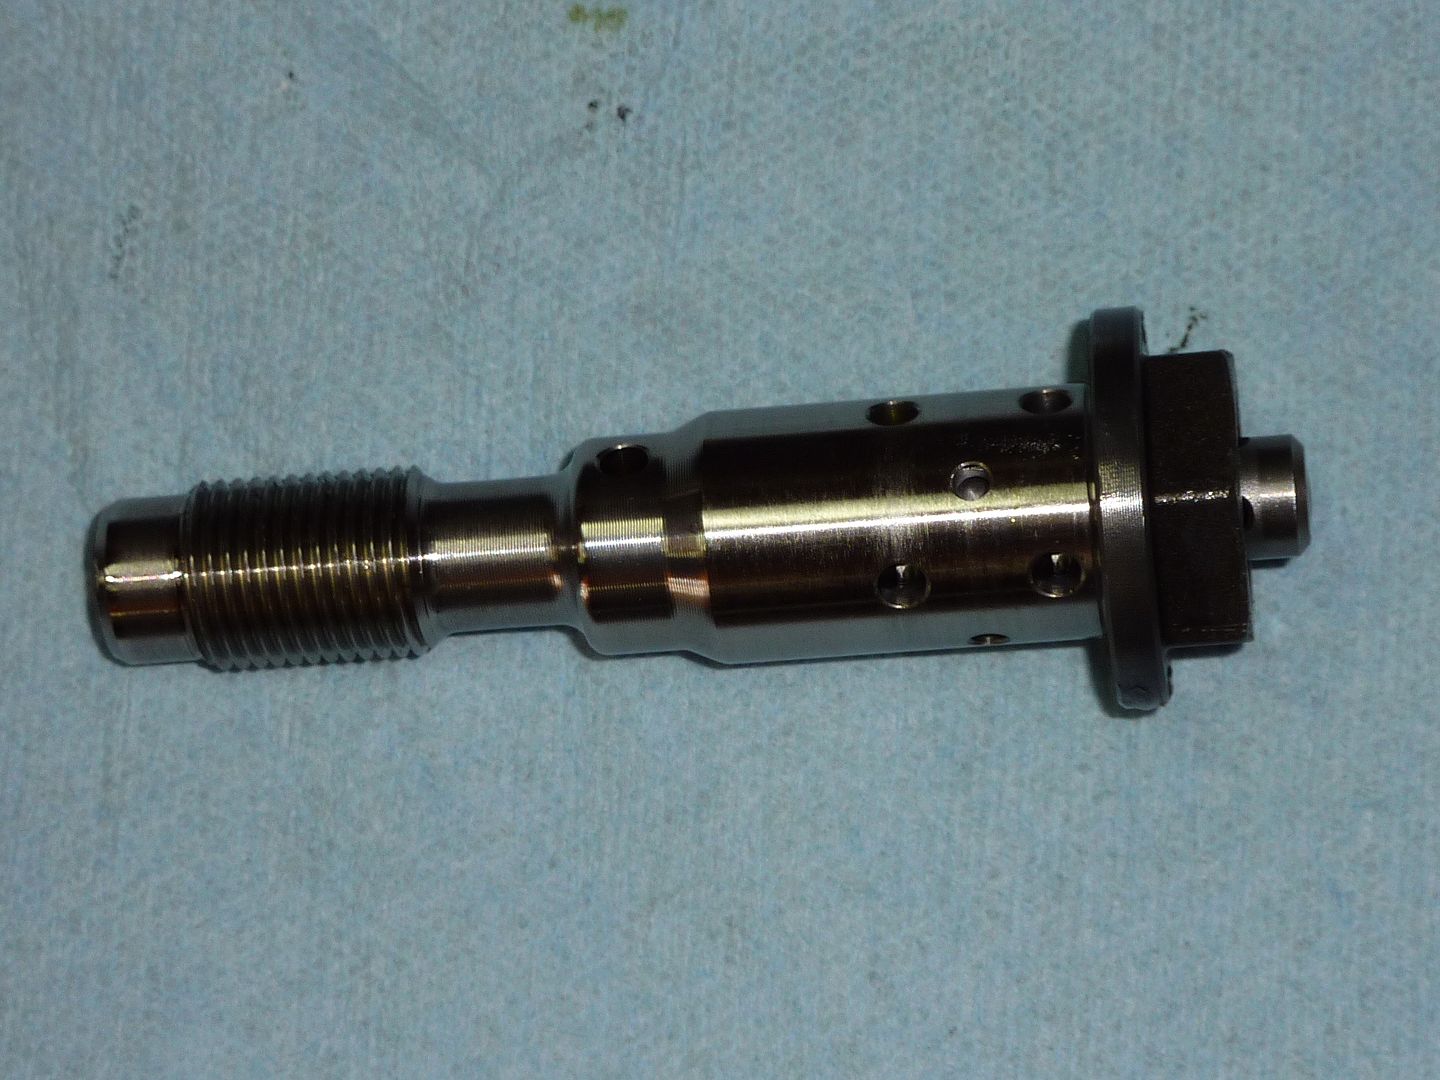
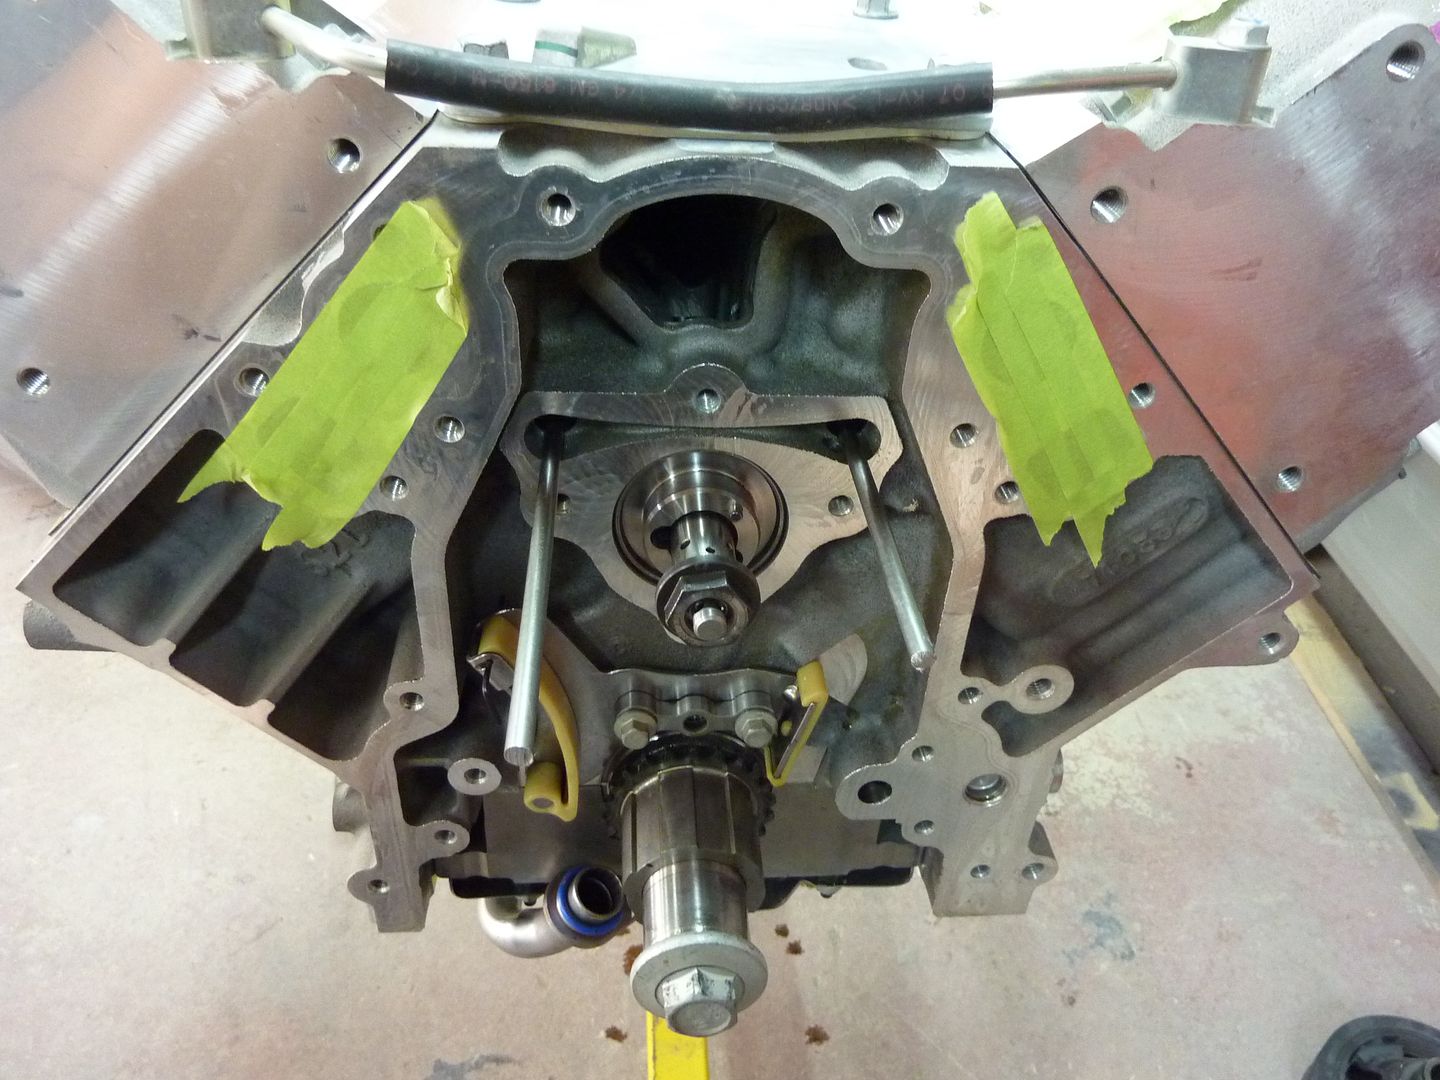
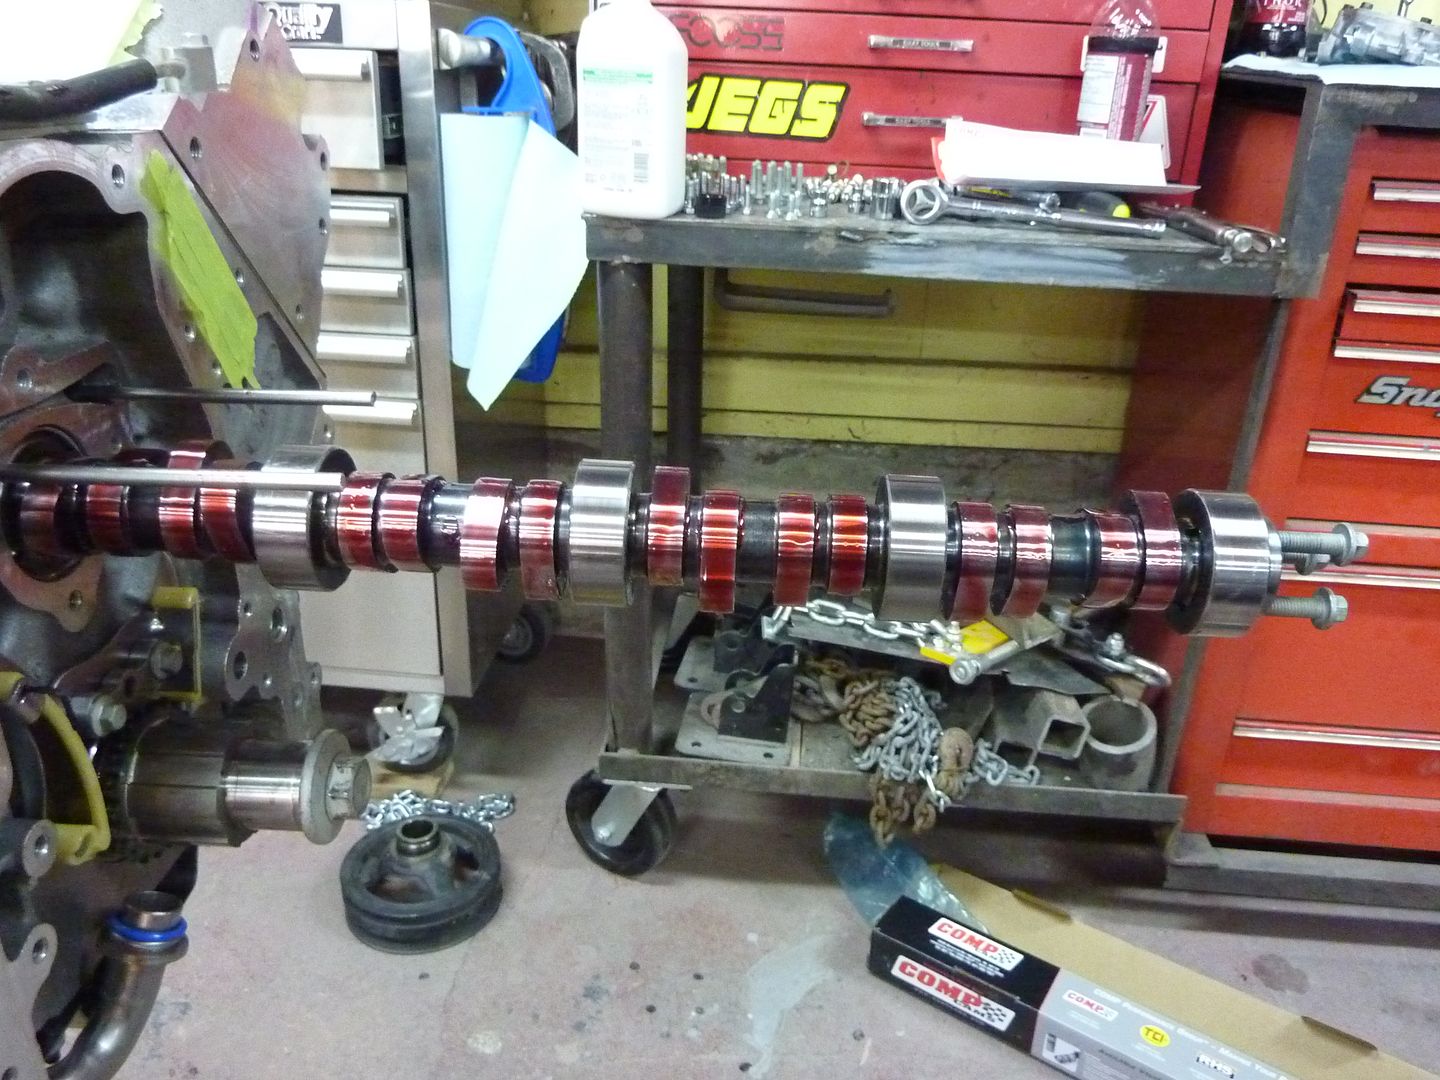
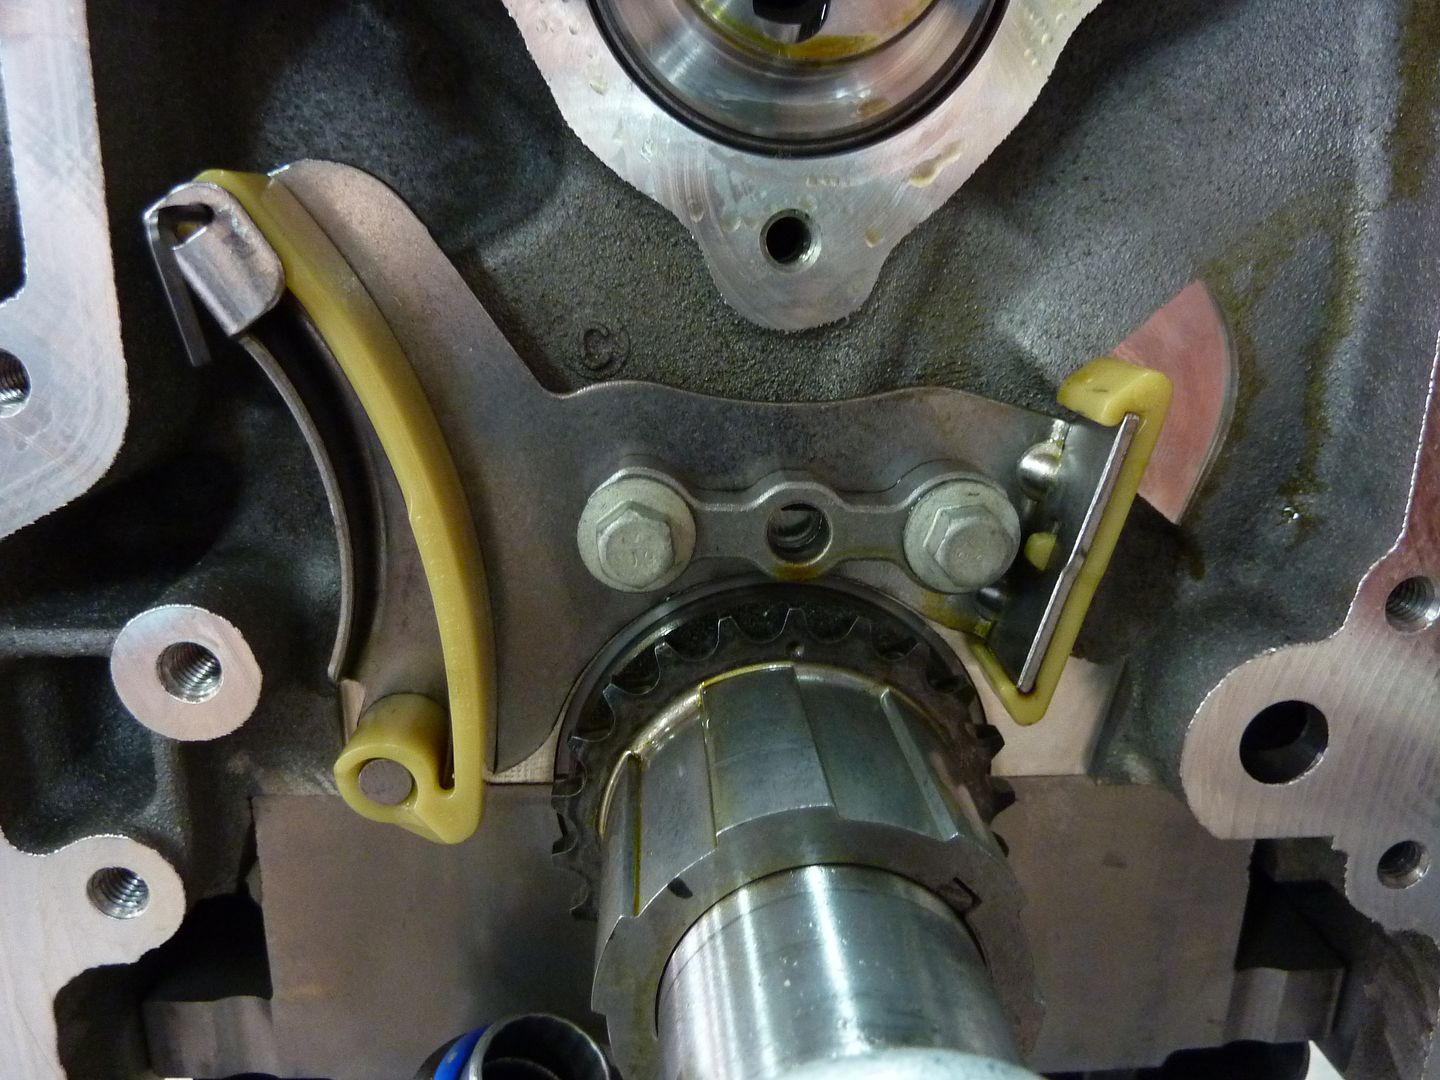
Pulled the cam bolt. Here's why they call it a one bolt cam
Took the timing gear off
Took the cam plate off
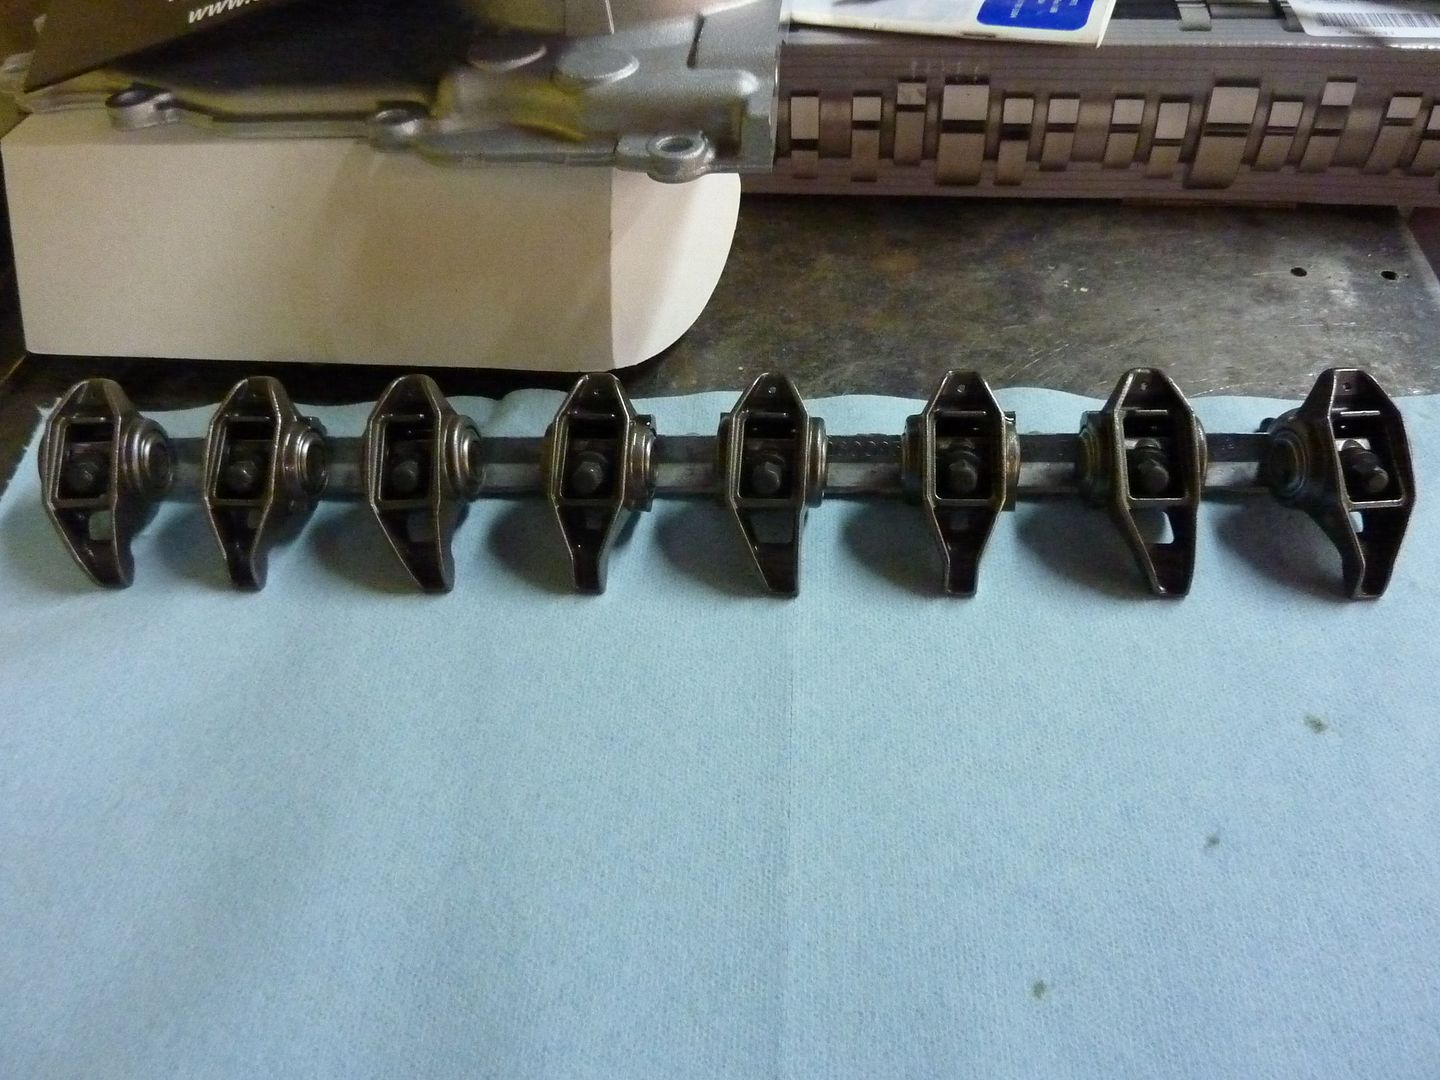
In order to get the cam out, I had to take off the rockers and remove the push rods. Nice thing with this motor, once the bolts are removed, they all come out at once


I put the cam bolt back in place to use it as a handle. I also found a neat trick online. Turn the cam over a few times by hand and it will lift all the lifters up. To keep them from coming back down when you're pulling the cam out, you can put some 1/4 dowel into the holes to keep them from falling. I didn't have a dowel so I use some 1/4" round bar.
Next thing I had a pile of parts that I had removed

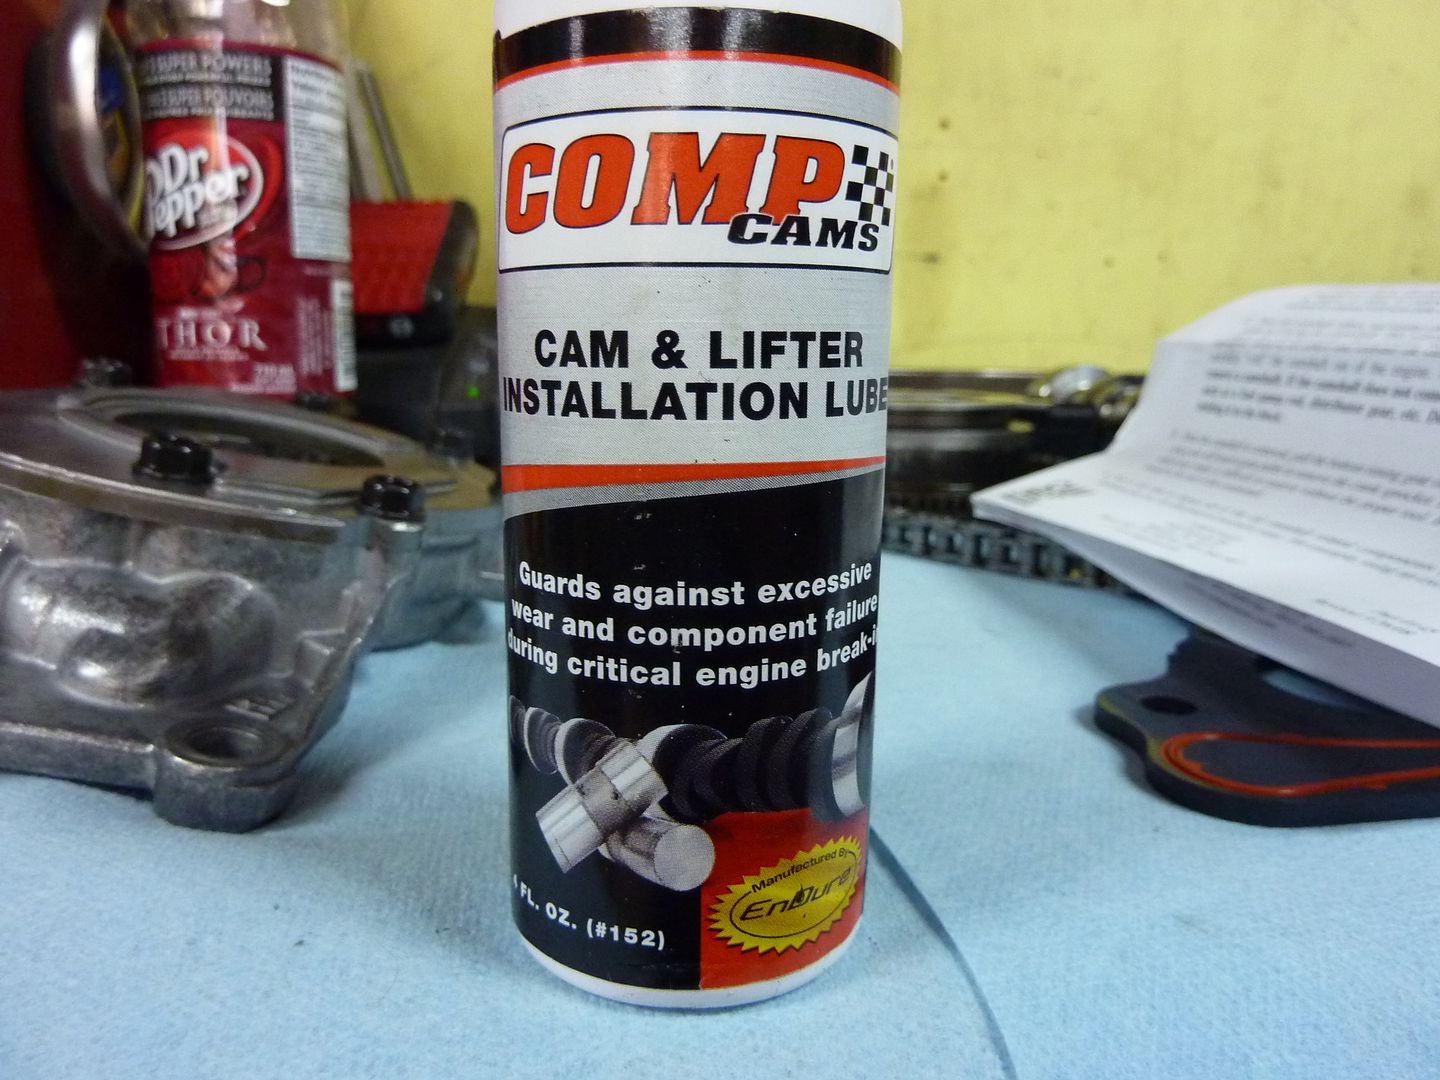
Time to put the new 3 bolt cam in. I used three of the valve cover bolts as a handle on the front of the cam. As recommended by Comp Cams, I used their install lube
And it was in
Cam cover back on
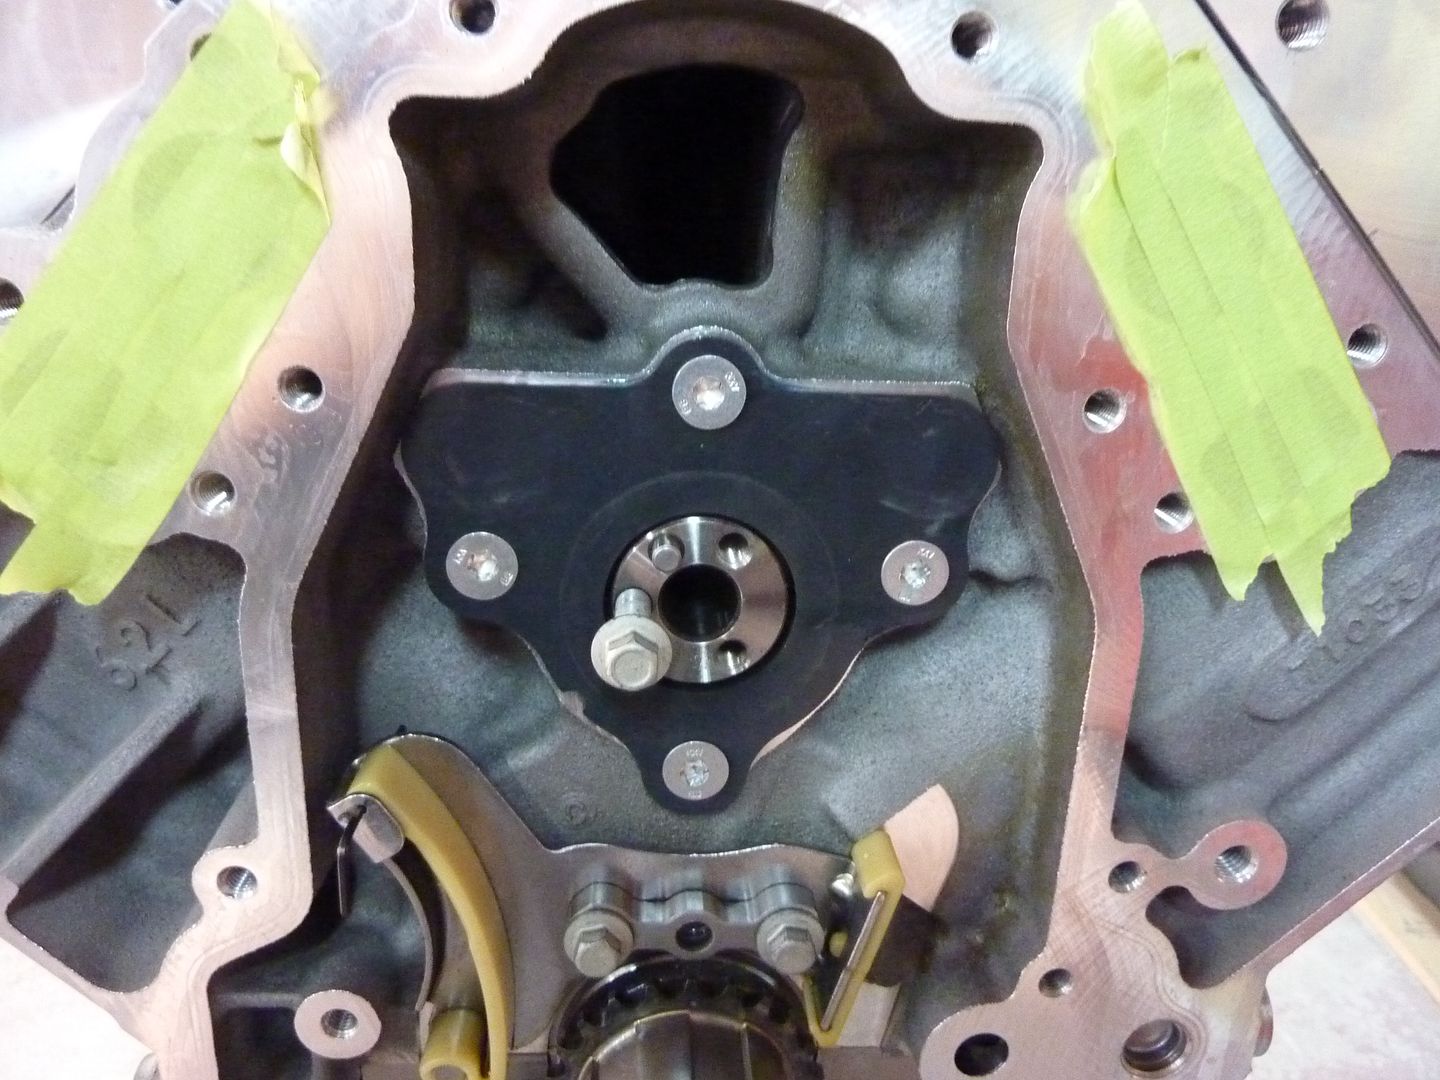
Timing chain and oil pump back on
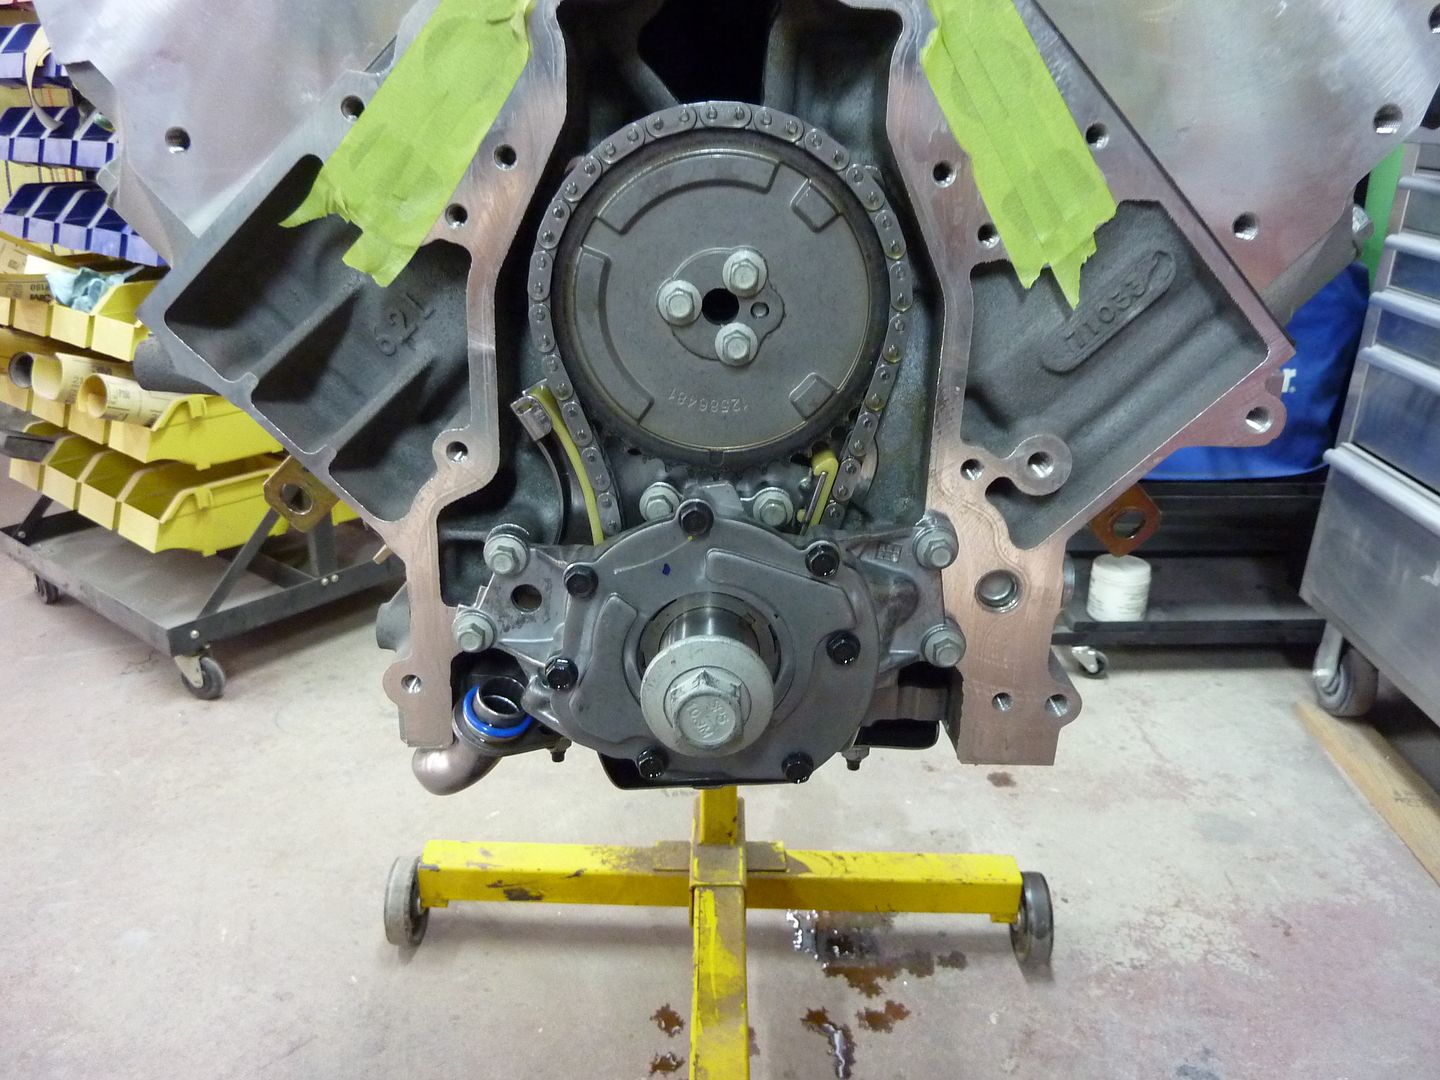
After I put it all back together, I realized that I used the wrong bolts on the cam. I have ARP bolts that I'm going to use instead of the valve cover bolts that I put in there. I've also decided that I'm going to replace the stock timing chain tensioner with a LS2 style timing chain dampner. I've read that there are pros and cons to both. I talked to some guys who leave the tensioner on and some that replace it. The reason I decided to take off the tensioner was that in some rare cases, it falls apart and some of the plastic falls into the motor. So I called GM and got them to bring a dampner in. It won't be in until later this week.
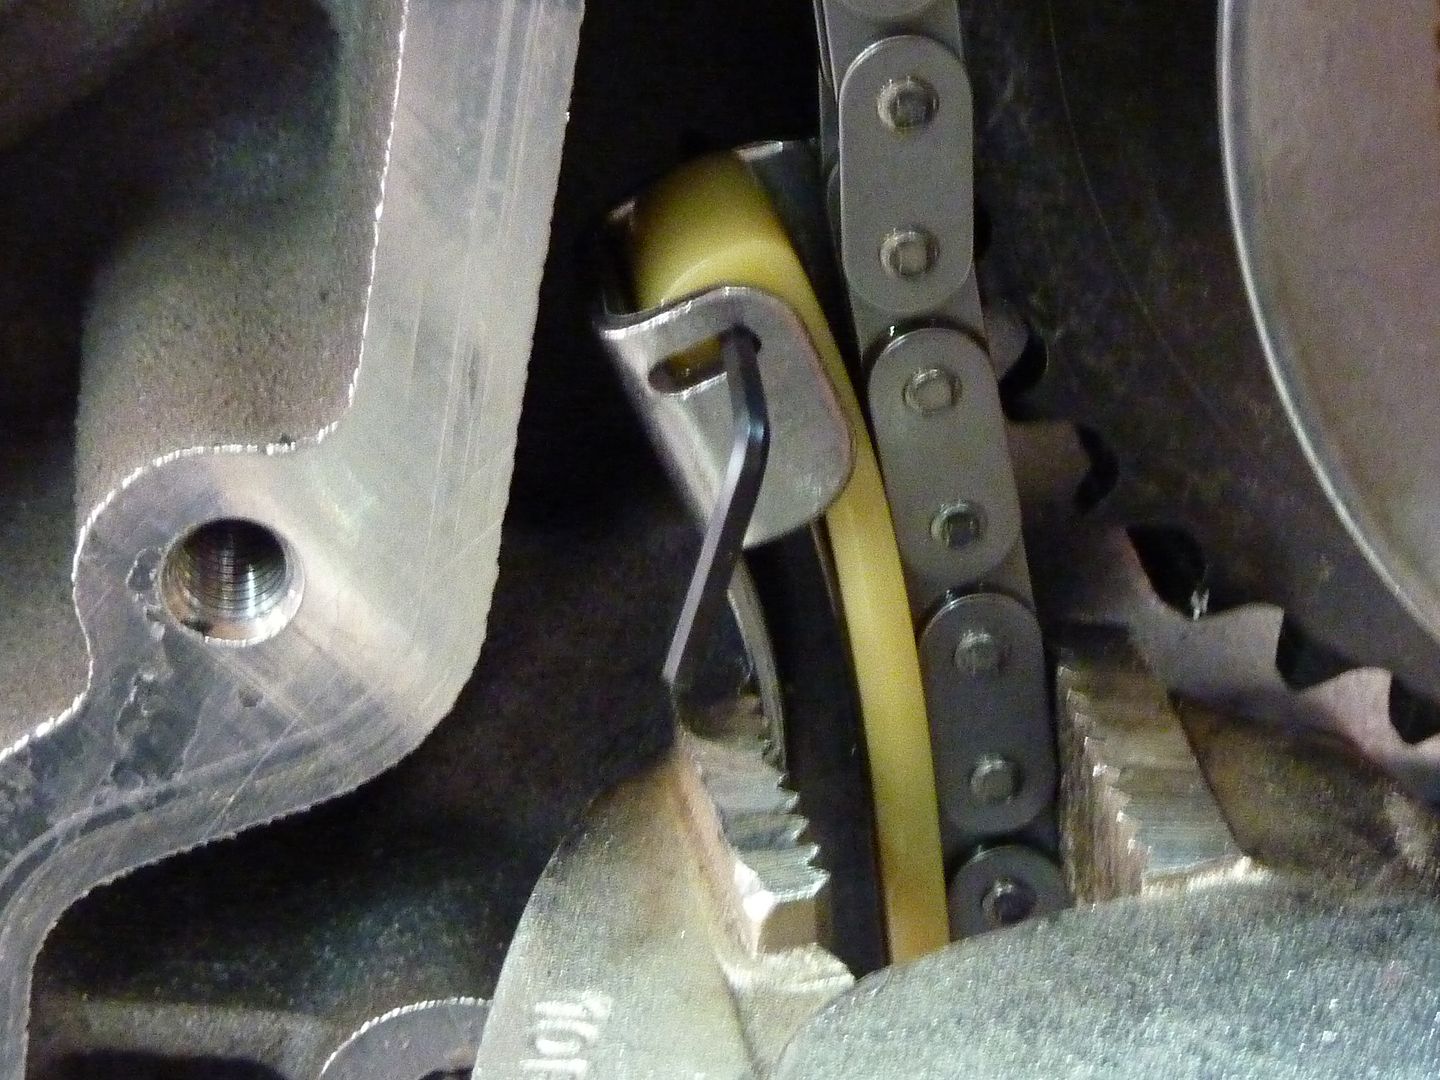
Here's a close up of the tensioner
Here's the dampner that I'll be switching it to

I also decided that I was going to take a shot at degreeing the cam. This also meant taking off the heads. I guess since everything else was off, I figured taking the heads off wouldn't be a big deal.

I bought a cheap degree wheel and mounted it to the crank. I also tried to use my dial indicator and made what I thought would work as a piston stop.
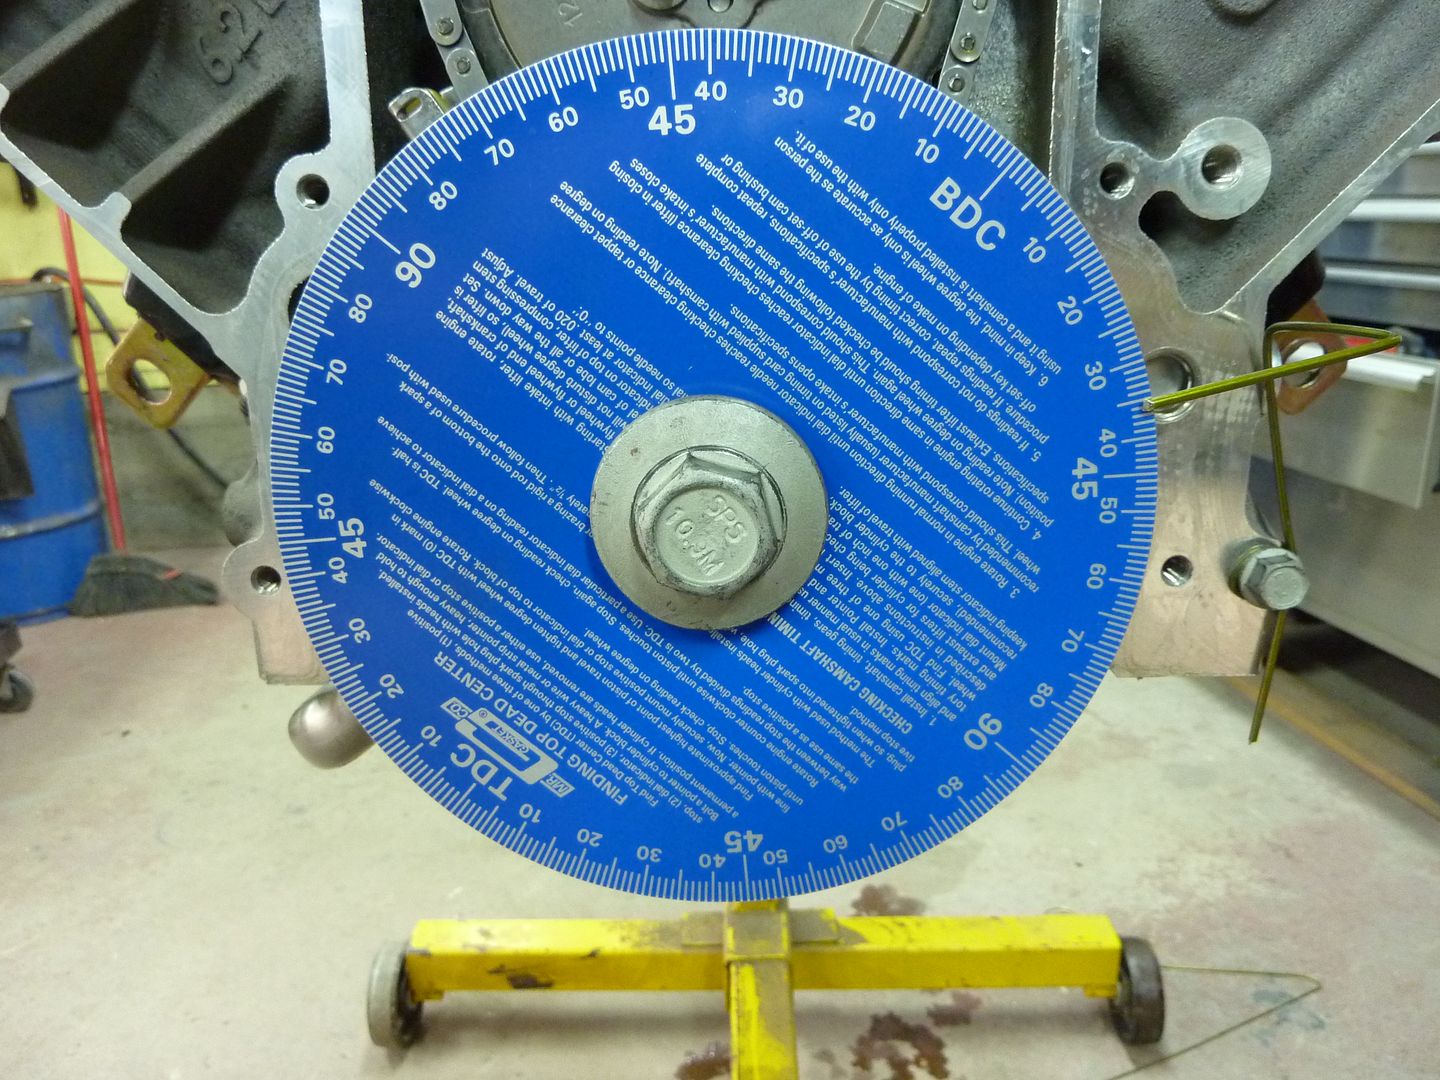
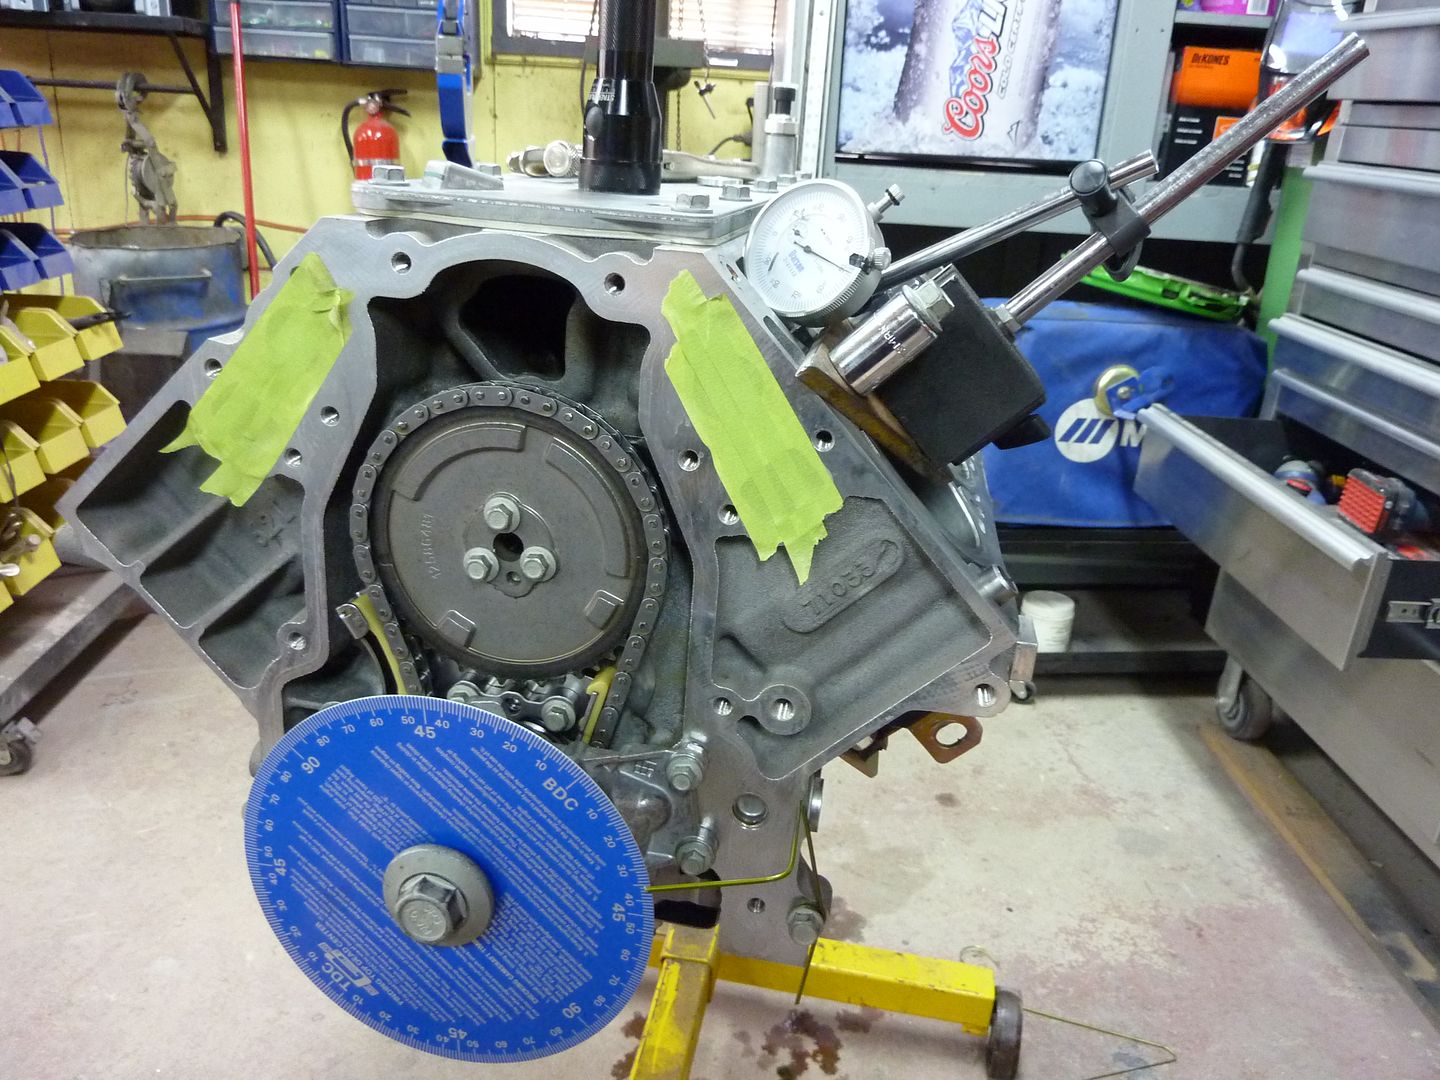
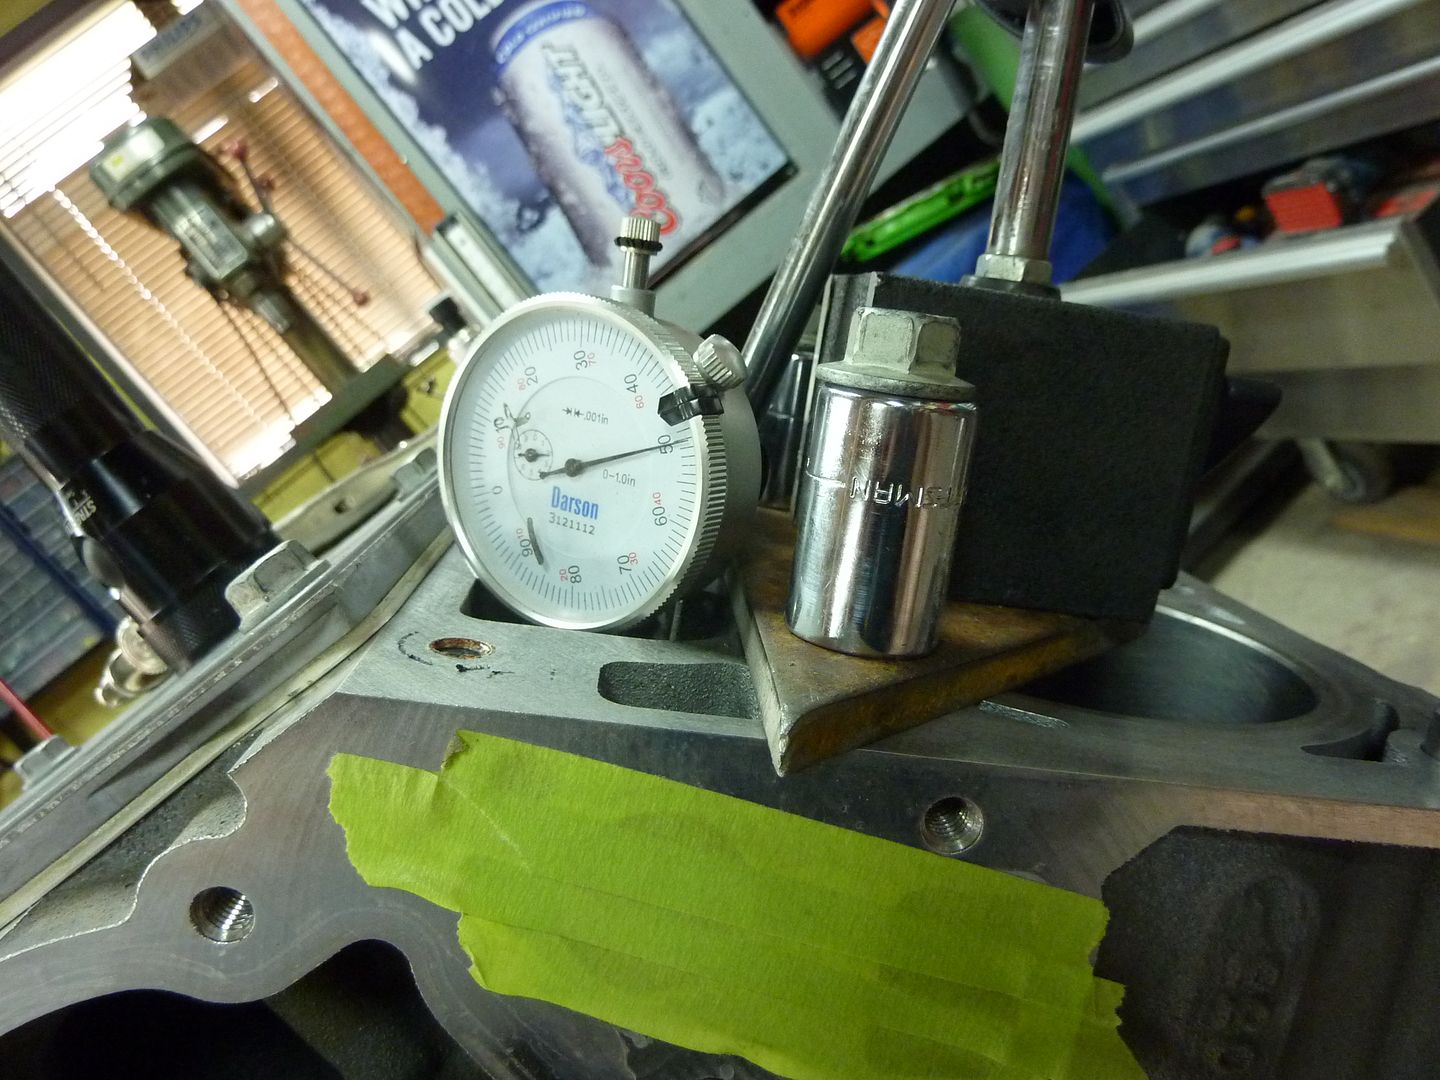
After spending a few hours trying to degree the cam with the setup I had, I realized that it would be much easier if I had a proper degree kit. So I ordered a Comp Cams LS degree kit today. Hopefully will be here next week. This is the kit I ordered: http://www.summitracing.com/parts/CCA-4942/ Not from Summit, but a local place.
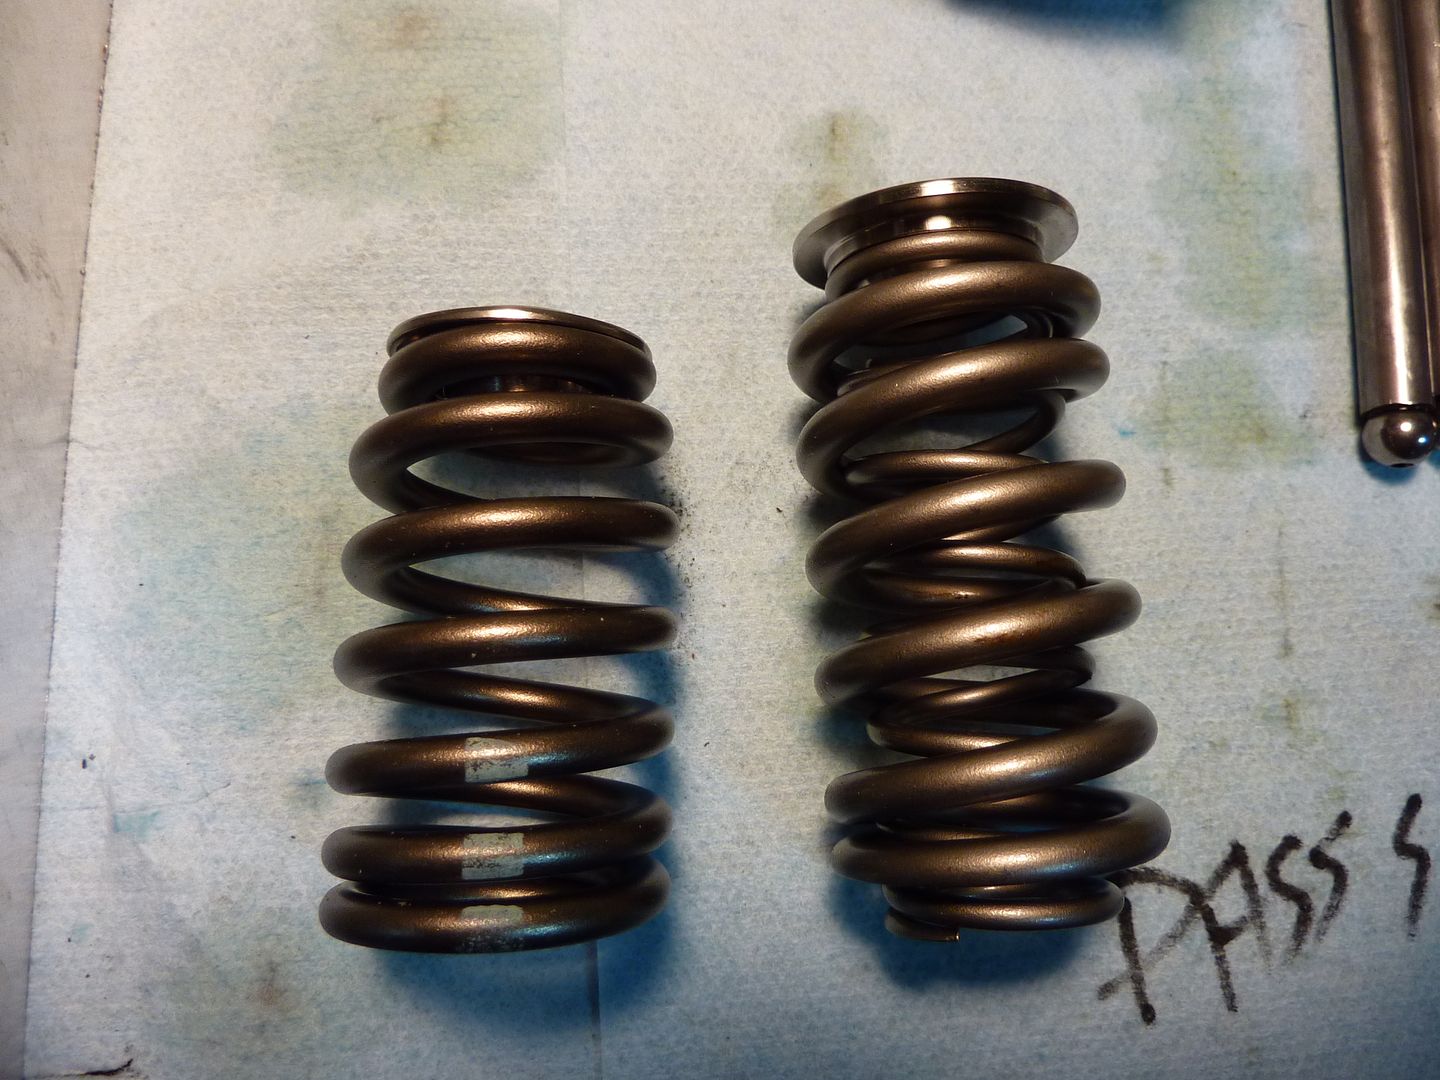
Since I have to wait for the dampner and degree kit to get here, I thought I'd swap the valve springs.
The ones on the left are the stock and the ones on the right are the new double springs that I'll be using
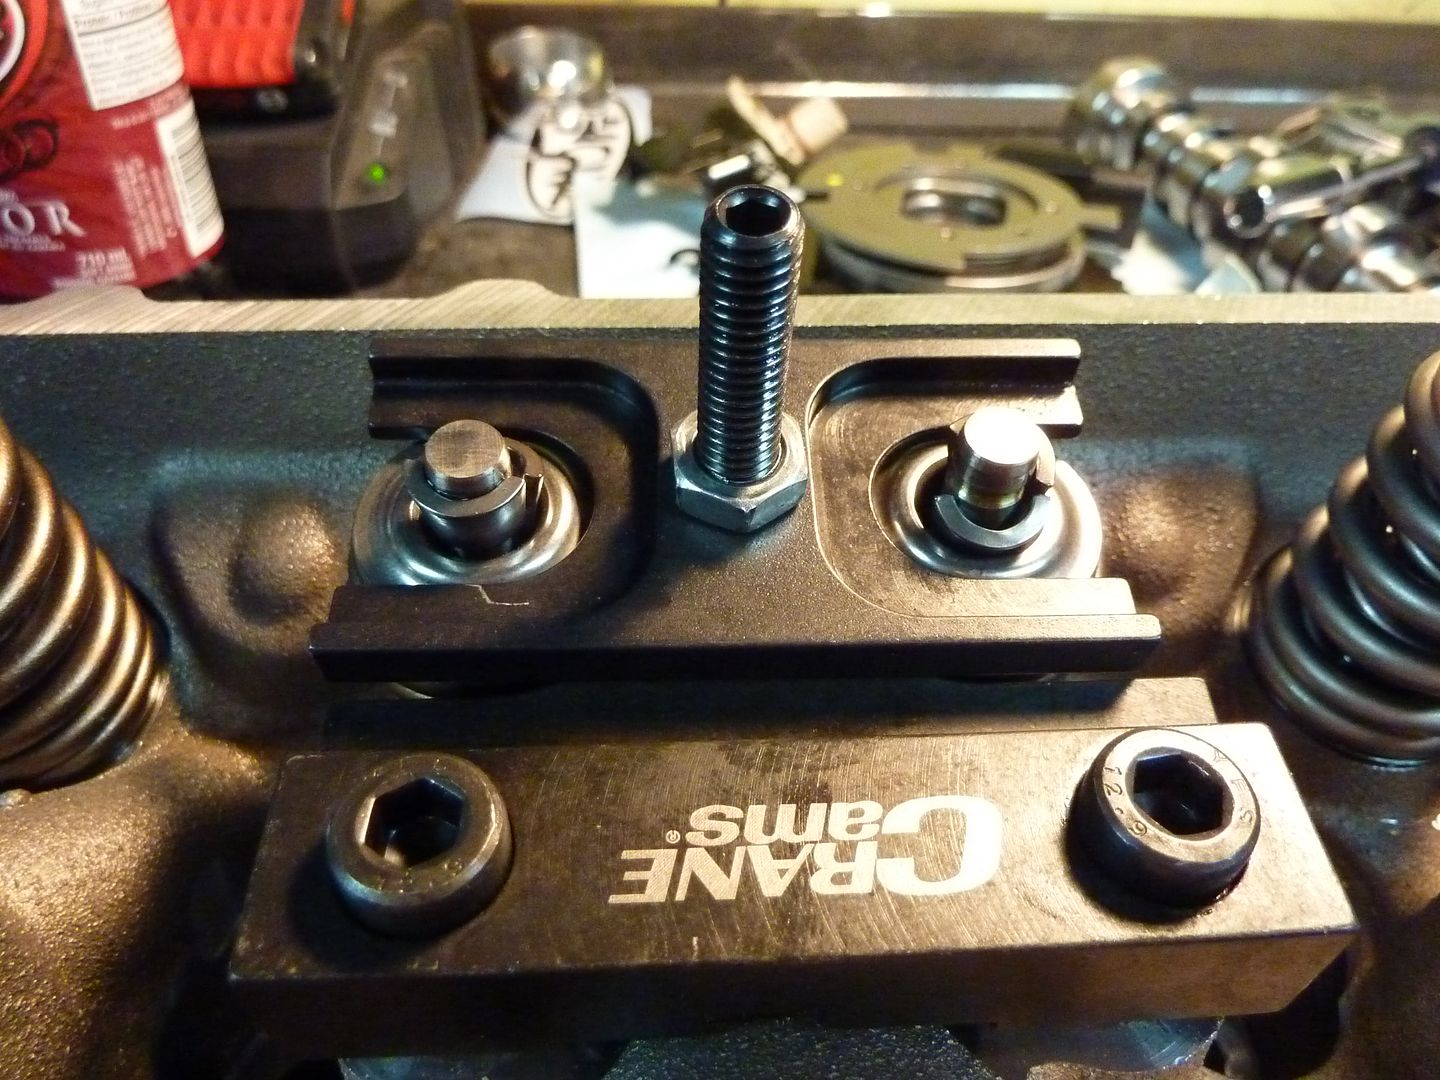
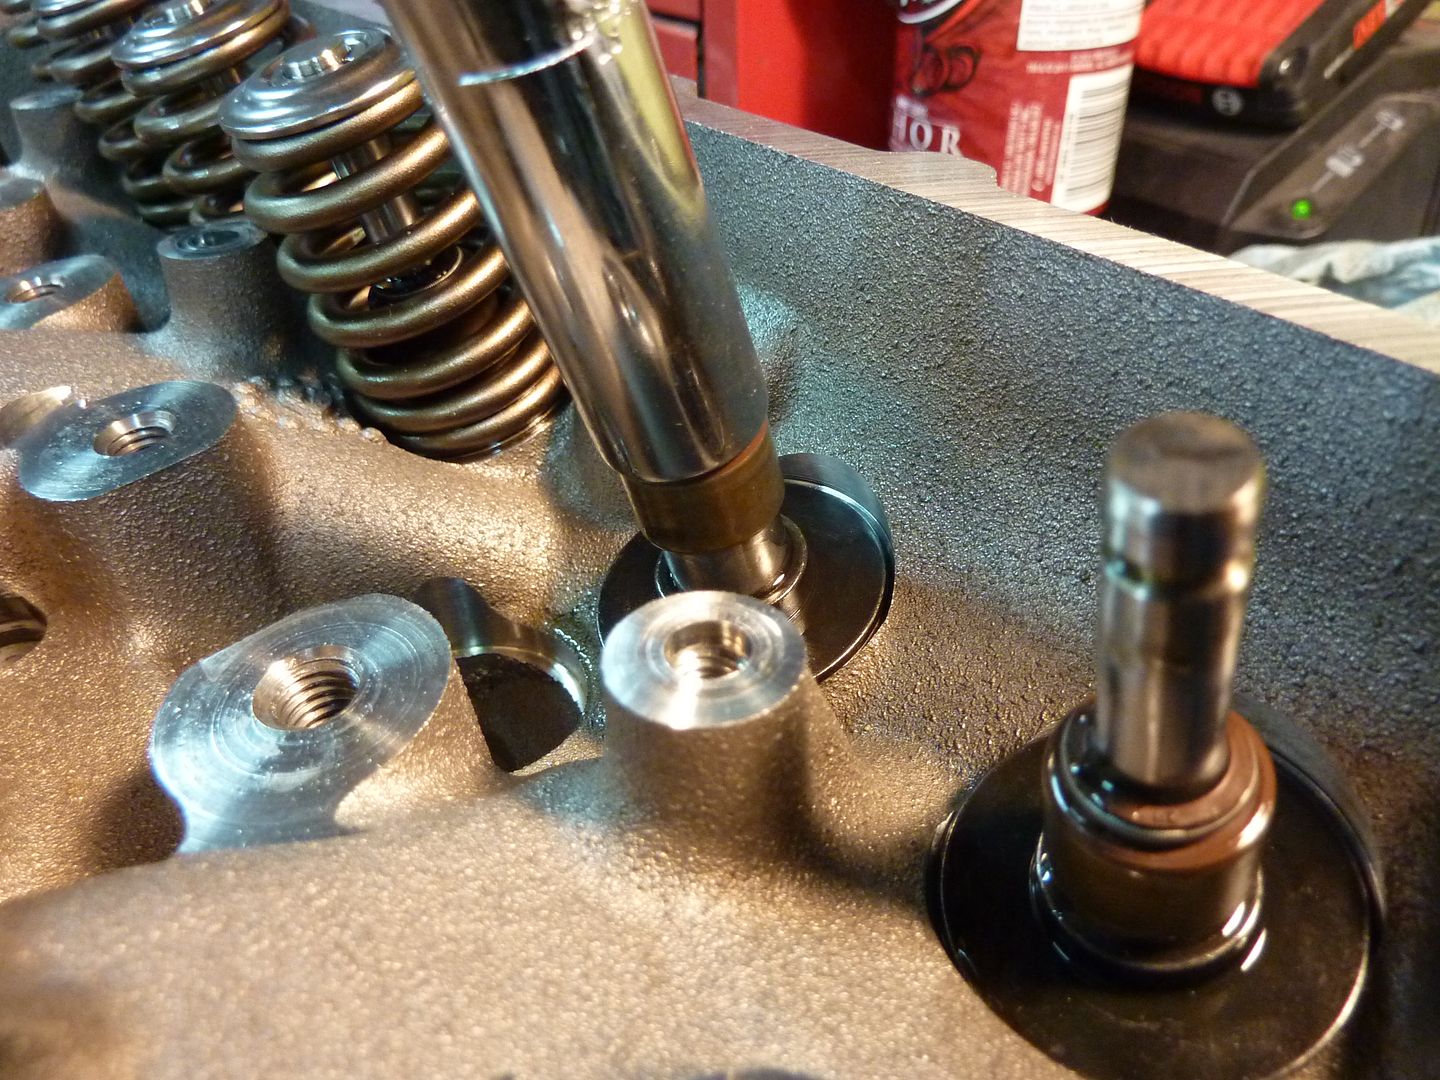
Finally got to use my new Crane valve spring compressor. It can also be used with the heads on the motor
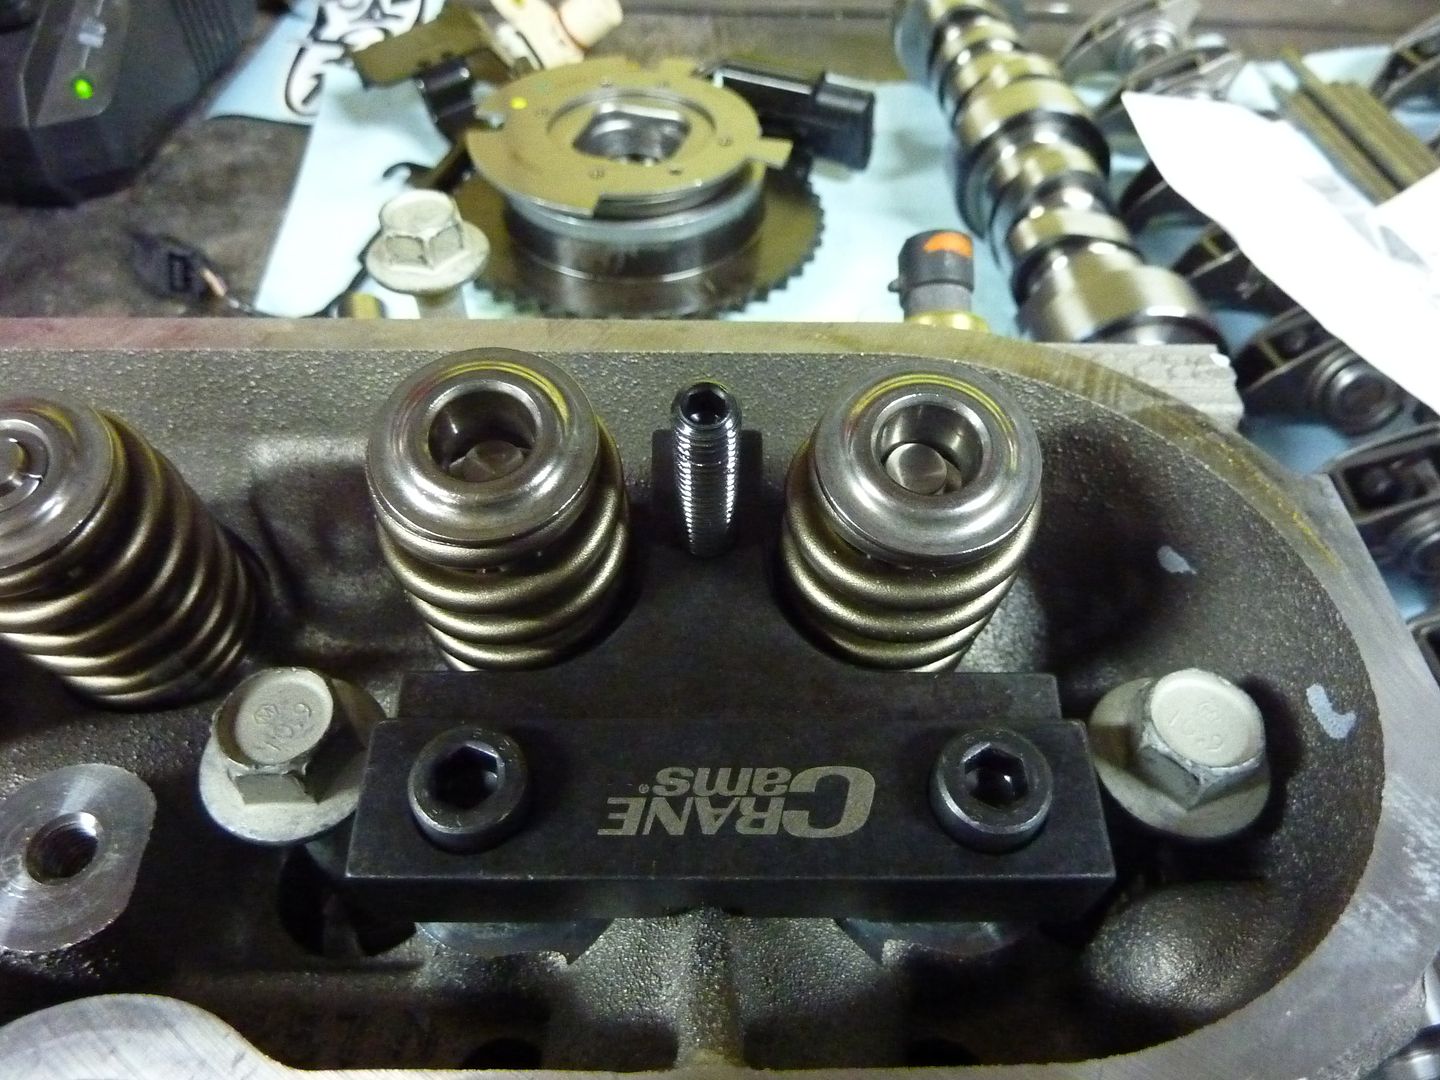
It's very easy to use, just take a ratchet and turn the nut
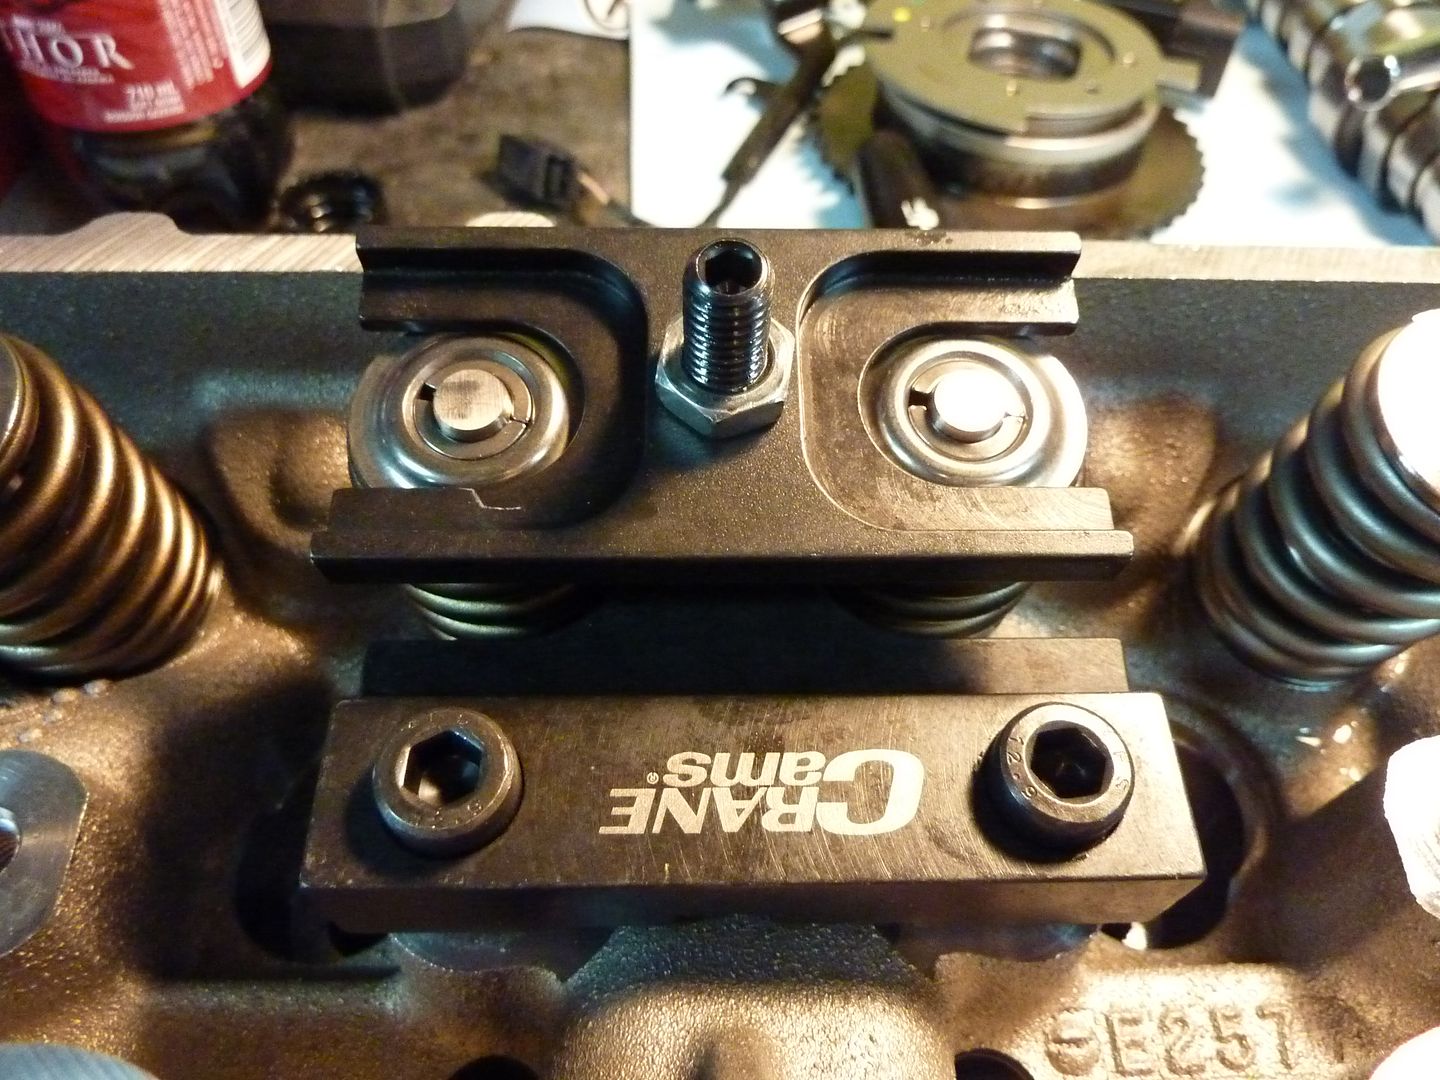
Remove the valve locks
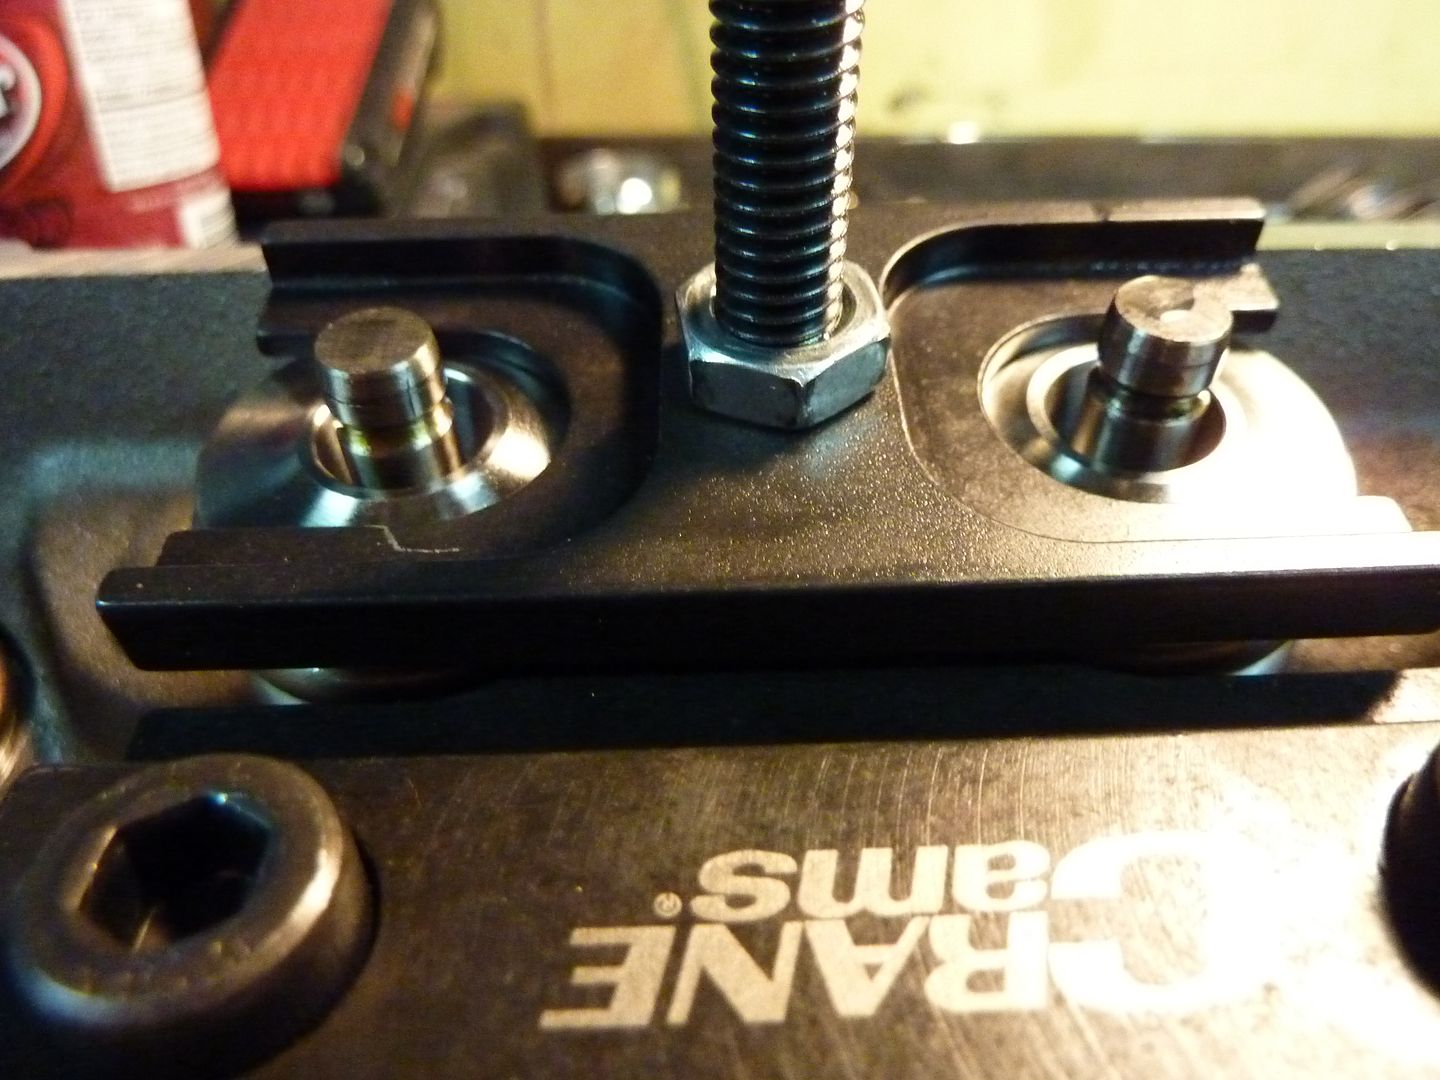
Loosen the nut and remove the tool. Then take the springs off
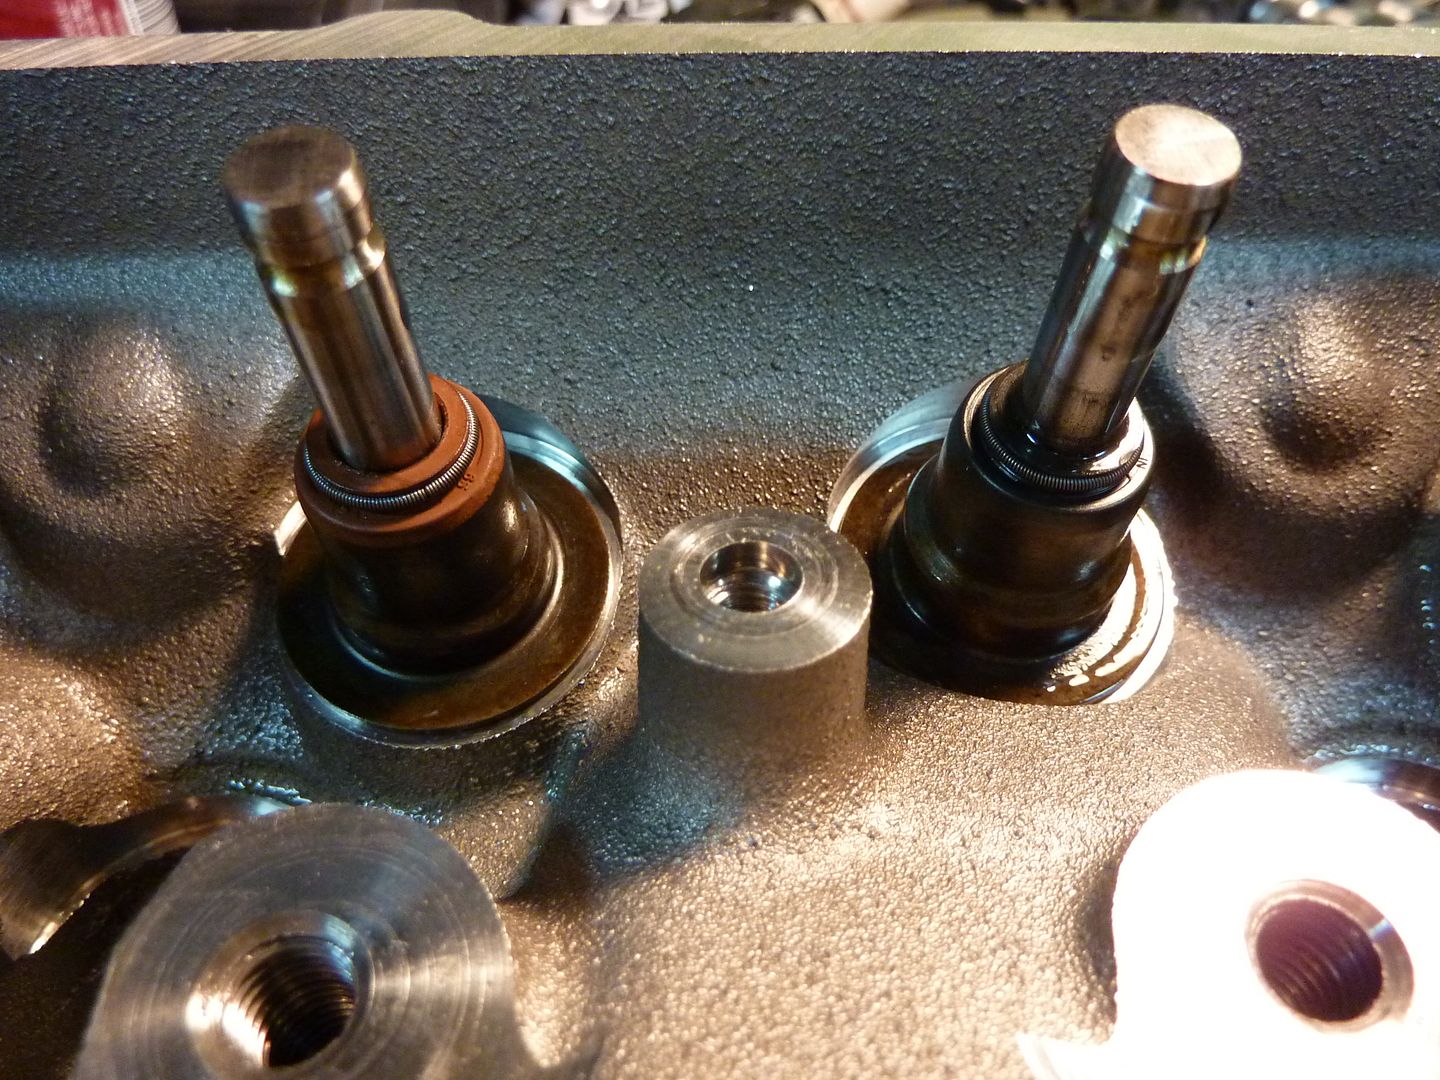
First I had to take off the stock valve seats and seals. I just used a pair of pliers and pulled the seals off. They come off quite easily. Just turn them a bit. The stock ones are one piece. The new valve seats are separate from the valve seals
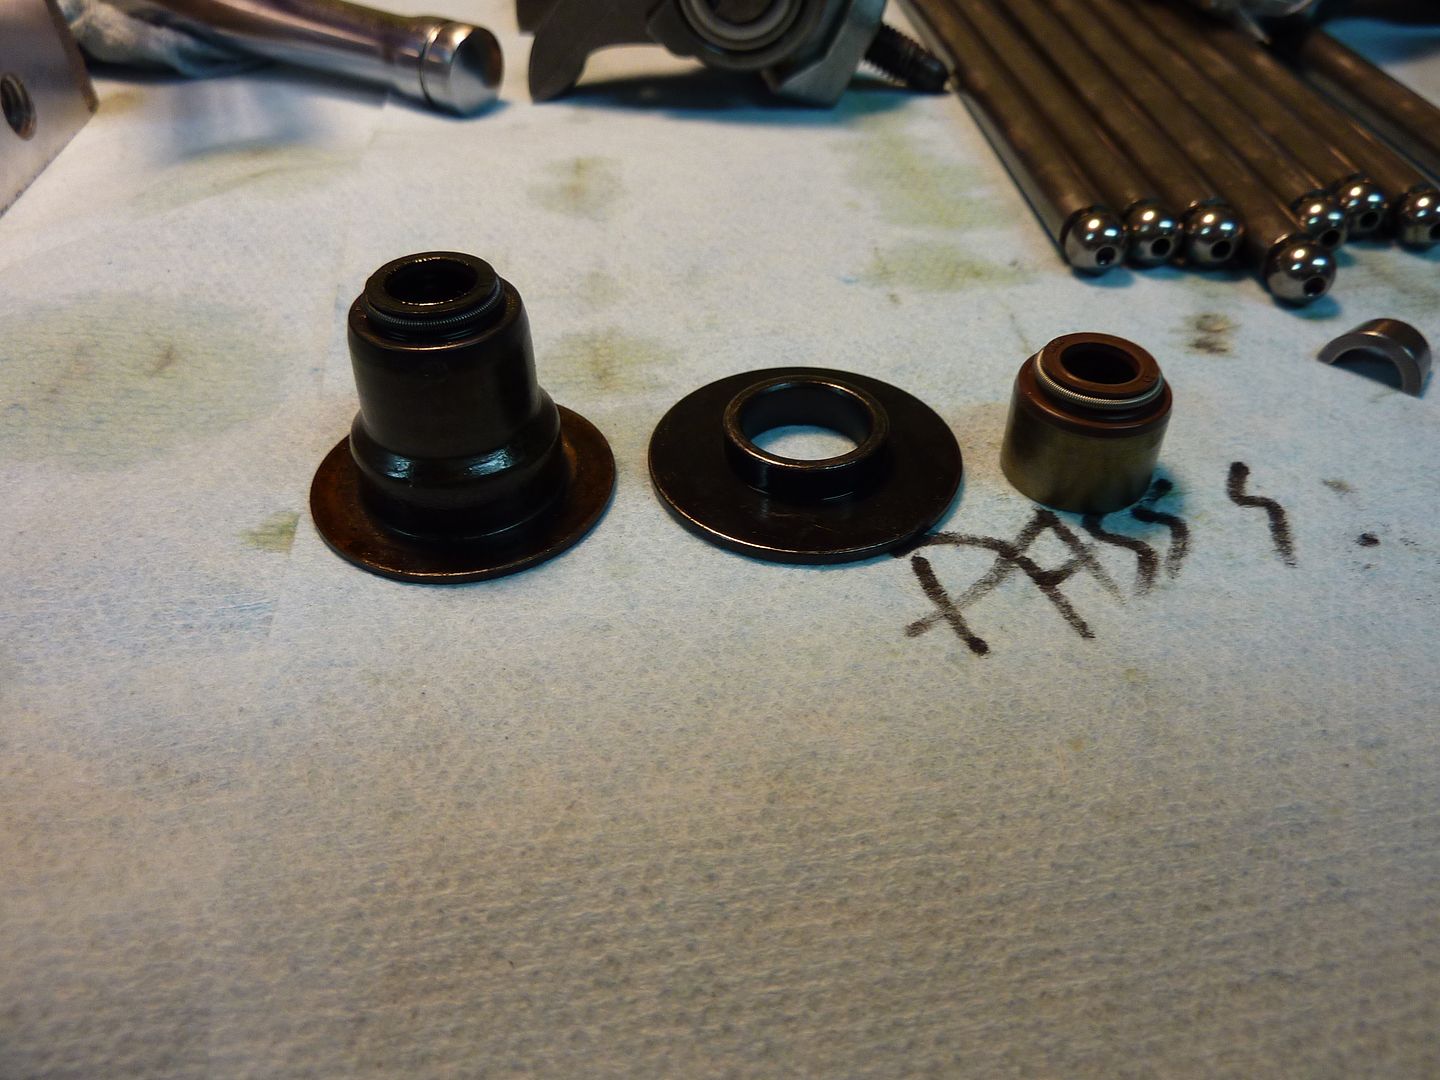
New valve seats and seals place. Installing the new seals was alot easier than I thought it was going to be. I put some oil on the inside of the seal and on the head where it sits. I then used a deep socket, I think it was a 12 mm one, that sat on the metal part of the seal. I then tapped the seals into place. Once they are in place, you'll hear a thud sound. You'll know it when you do it and they are in place.
Since I could do the doors, I thought I'd start on the motor. First thing, out cam the motor and trans.
I did some sand blasting a while ago, which as you all know makes a huge mess. I noticed on the scatter shield that I missed taping off one of the holes. I decided that since it was easy to pull the motor and trans now, I would do that and make sure that no sand got into the clutch.
Sand on top of the trans
There was only a small amount of sand in the scatter shield. It may not have caused any problems, but it's the peace of mind thing knowing that it's all been cleaned out
Got the motor back on the engine stand
First thing was to pull the stock crank pulley. Of course my SBC harmonic balancer puller wouldn't work, so I bought 2-3 jaw puller. I'm sure it will come in handy again
Since the threaded rod on the puller wasn't long enough, I put a bolt in the hole where the crank bolt goes and used it to set against
Pulley is off
Took the stock timing cover off. This is what the VVT system looks like
Close up of the VVT cam gear and sensor
Took off the oil pump
Had to take off the tension on the stock timing chain tensioner
Pulled the cam bolt. Here's why they call it a one bolt cam
Took the timing gear off
Took the cam plate off
In order to get the cam out, I had to take off the rockers and remove the push rods. Nice thing with this motor, once the bolts are removed, they all come out at once
I put the cam bolt back in place to use it as a handle. I also found a neat trick online. Turn the cam over a few times by hand and it will lift all the lifters up. To keep them from coming back down when you're pulling the cam out, you can put some 1/4 dowel into the holes to keep them from falling. I didn't have a dowel so I use some 1/4" round bar.
Next thing I had a pile of parts that I had removed
Time to put the new 3 bolt cam in. I used three of the valve cover bolts as a handle on the front of the cam. As recommended by Comp Cams, I used their install lube
And it was in
Cam cover back on
Timing chain and oil pump back on
After I put it all back together, I realized that I used the wrong bolts on the cam. I have ARP bolts that I'm going to use instead of the valve cover bolts that I put in there. I've also decided that I'm going to replace the stock timing chain tensioner with a LS2 style timing chain dampner. I've read that there are pros and cons to both. I talked to some guys who leave the tensioner on and some that replace it. The reason I decided to take off the tensioner was that in some rare cases, it falls apart and some of the plastic falls into the motor. So I called GM and got them to bring a dampner in. It won't be in until later this week.
Here's a close up of the tensioner
Here's the dampner that I'll be switching it to
I also decided that I was going to take a shot at degreeing the cam. This also meant taking off the heads. I guess since everything else was off, I figured taking the heads off wouldn't be a big deal.
I bought a cheap degree wheel and mounted it to the crank. I also tried to use my dial indicator and made what I thought would work as a piston stop.
After spending a few hours trying to degree the cam with the setup I had, I realized that it would be much easier if I had a proper degree kit. So I ordered a Comp Cams LS degree kit today. Hopefully will be here next week. This is the kit I ordered: http://www.summitracing.com/parts/CCA-4942/ Not from Summit, but a local place.
Since I have to wait for the dampner and degree kit to get here, I thought I'd swap the valve springs.
The ones on the left are the stock and the ones on the right are the new double springs that I'll be using
Finally got to use my new Crane valve spring compressor. It can also be used with the heads on the motor
It's very easy to use, just take a ratchet and turn the nut
Remove the valve locks
Loosen the nut and remove the tool. Then take the springs off
First I had to take off the stock valve seats and seals. I just used a pair of pliers and pulled the seals off. They come off quite easily. Just turn them a bit. The stock ones are one piece. The new valve seats are separate from the valve seals
New valve seats and seals place. Installing the new seals was alot easier than I thought it was going to be. I put some oil on the inside of the seal and on the head where it sits. I then used a deep socket, I think it was a 12 mm one, that sat on the metal part of the seal. I then tapped the seals into place. Once they are in place, you'll hear a thud sound. You'll know it when you do it and they are in place.
07-26-2011, 09:43 PM
#119
On The Tree
Thread Starter
iTrader: (4)
Join Date: Mar 2009
Location: British Columbia, Canada
Posts: 132
Likes: 0
Received 0 Likes
on
0 Posts
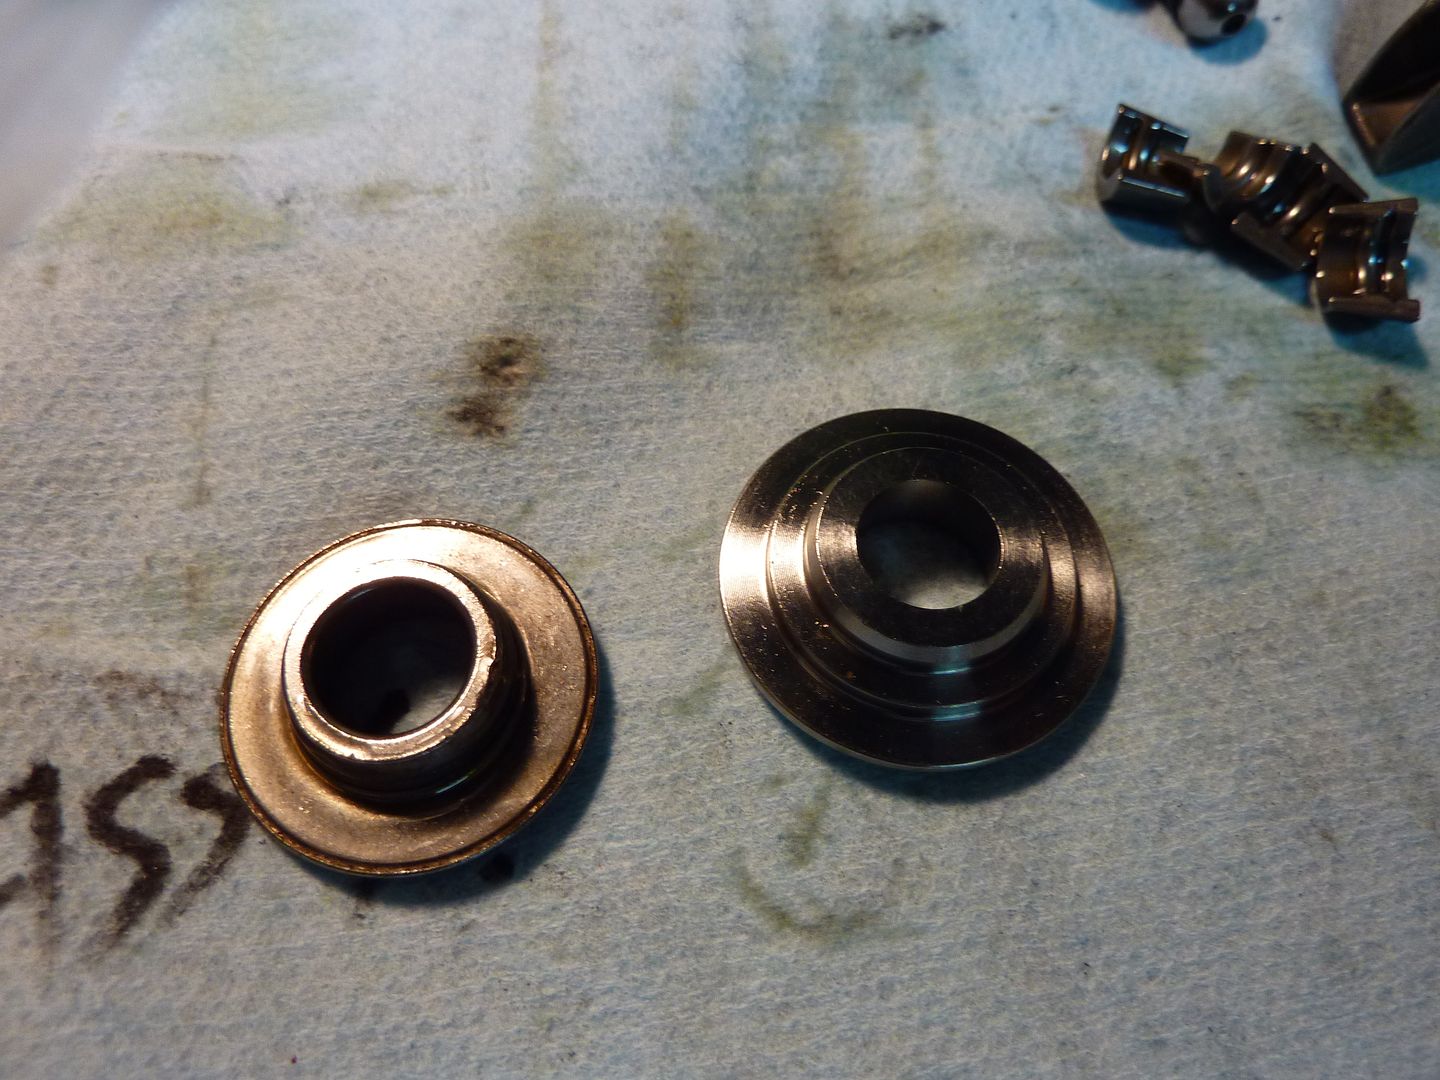
Here's the tops for the valve springs. The stock ones are on the left
And the new springs are on. To put the new springs back on, just have to do the same as taking the springs off.

After I got both heads done, I called it a day. Tomorrow I plan on installing the rocker trunion upgrade kit. I'll post pics once it's done.
And the new springs are on. To put the new springs back on, just have to do the same as taking the springs off.
After I got both heads done, I called it a day. Tomorrow I plan on installing the rocker trunion upgrade kit. I'll post pics once it's done.