
LS1 and 200-4r to L92 / T56 in 71 Chevelle convertible...now Gen V LT1 6L80e swapping
 08-15-2014, 10:41 AM
#461
Thanks, it certainly good to know that the goal is near.
As for the cause of valve problems, I don't know, I haven't really been thinking about it. This has taken so long that I've forgotten most of the process, that's why I make so many seemingly pointless updates here, it helps me keep track of things. But now that it works I'm not going to spend much time dwelling on it. There isn't much to learn here except to double check everything the first time. Maybe triple check.
The nature of my schedule makes it hard to work for more than a couple weeks a year, so that discontinuity really hurt me as well and makes it hard to pinpoint when something might have gone wrong.
Right now I'm waiting for the flatbed guy to scoop it up and take it to get finished off. At that point all I'll need to do is drop some speakers in and finish wiring up the back up cam and push start, neither of which are what I would call priority-one type things. Other than that, I think I'm going to sell this carbon hood and put the funds toward a 6 speed. Projects never seem to stop popping up.
 08-23-2014, 02:32 PM
#462
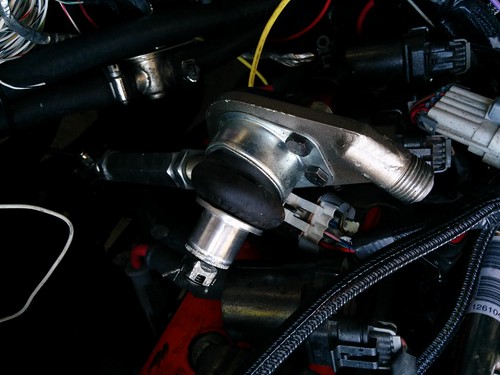
The brakes and exhaust are finished, and I was able to drive the car around the block for a day or so but now the car no longer really runs. Mostly a tuning issue at this point, I think, though there has been a really loud sucking sound coming from the air filter that I knew wasn't right. I checked for a vacuum leak then took out the IAC since it was making a clicking noise. When I did, the sound went away and the car idled better.
At this point my ignition cylinder - which had slowly been dying - decided to give out and I could no longer use it to turn the car off. I temporarily installed the push start as a workaround and when I got the car started again and went back to reinstall the IAC I found this -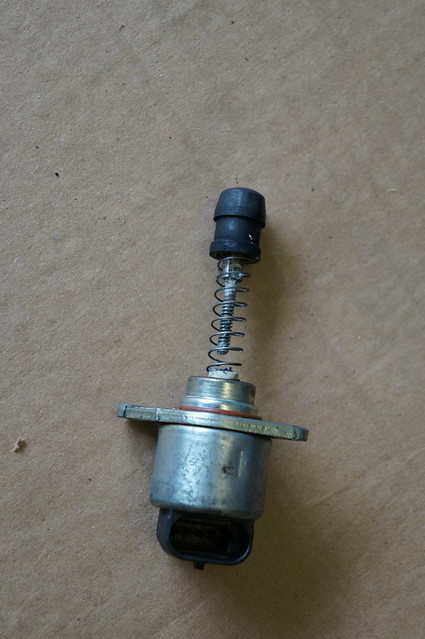 DSC03122.
I'm guessing this isn't what is supposed to happen. Edit - I've been told I can just screw it back in. Good info.
At this point my ignition cylinder - which had slowly been dying - decided to give out and I could no longer use it to turn the car off. I temporarily installed the push start as a workaround and when I got the car started again and went back to reinstall the IAC I found this -
DSC03122. I'm guessing this isn't what is supposed to happen. Edit - I've been told I can just screw it back in. Good info.
Last edited by chuckd71; 08-23-2014 at 03:09 PM.
09-22-2014, 10:01 AM
#463
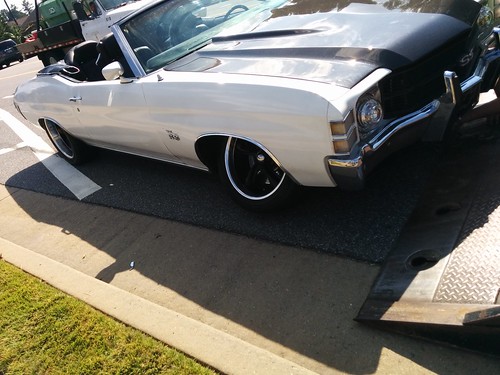
Skipped out on a couple things here in Atlanta and went to Nashville Thursday night so I could work on the car over the weekend. I got the car to a point where it was more or less drivable, but only in the sense that it sometimes starts and will generally get from point A to point B. It needed a tune by someone more experienced, so Friday afternoon I called a few places only to be told it would be a week or more. I saw Carma Performance here in Nashville on Holley's site, and the guy there said he could get me in for a tune the next morning. Saturday morning I took it in and he strapped it to their portadyno (whatever it's called) and worked on it for a couple hours.
 IMG_20140920_111829
Night and day difference in terms of how it runs; well worth the money. It only made 370 or so at the wheels, but I wasn't going for numbers and one of my brakes was dragging a bit.
I pulled the air ride off and put on some coil overs. Pretty easy process, though I'll mention a couple things about it. First is that I initially didn't get a spanner wrench with the new parts. This set me back a bit but ridetech, to their credit, did overnight me one. Everything looks solidly made and well-engineered, though I wish the rear adjustment ***** were not at the tops of the shocks. I'm not sure what others are like, but once I got it the spanner wrench was pretty neat, it goes on a ratchet so you can get several turns with each repositioning of it. Height adjustments are simple enough to make.
Some pics of the old stuff coming out and the new in. My camera battery died so only have a few.
Old stuff out.
 DSC03136
Display (for the guy who wanted to see it).
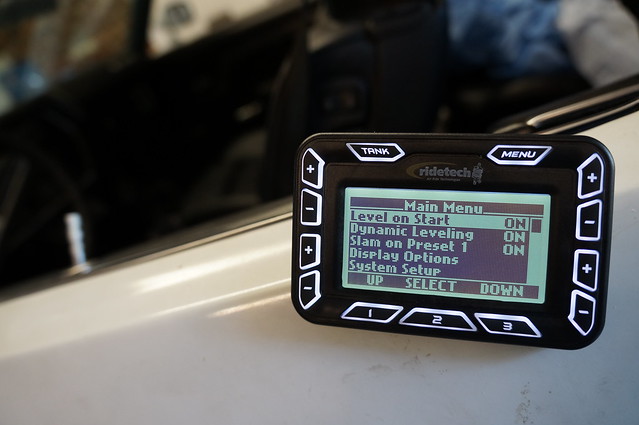 DSC03130
Rear on. Something to mention here is that no matter what I do the right side never raises and the rear has shifted about a 1/4 inch to the right. The gap on my driver's side rear tire is larger and my passenger rear tire rubs the wheel well sometimes. I know this isn't a suspension thing, just something to look into. If anyone knows why this might be feel free to comment.
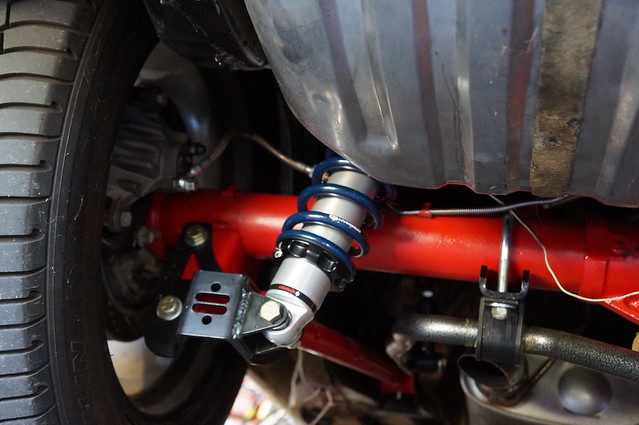 DSC03134
Assembling the front shock. The instructions say to tighten the valve all the way then slip the ring over the top. That might work for some versions, but not these. For these you need a T8 or T10 head screwdriver to take the **** off first. A small thing, but not something I was expecting based on having read the instructions online. Given my time constraints I like to buy everything I need beforehand, but in this case I had to make an extra trip to Lowe's. Not a huge deal, just a time waster.
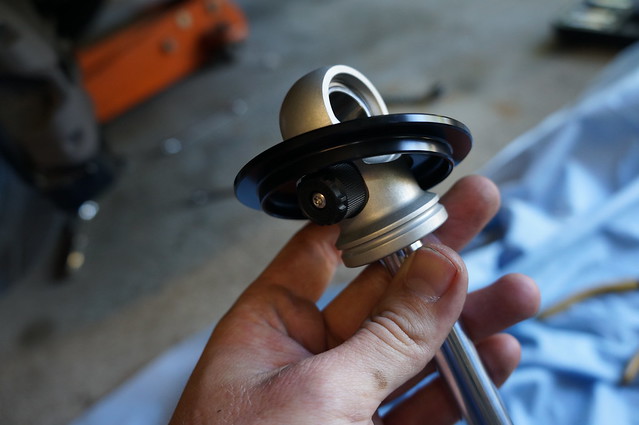 DSC03132
Once I got all that taken care of and the brakes adjusted I decided to work on the single largest problem I've had with the car: the Kwik A/C bracket. I've probably mentioned it before, but the kwik bracket is the biggest piece of **** and greatest source of strife I've come across in this build. After playing around with it for a while I got it quieted down and decided that everything was finally okay. I put maybe 70 miles on the car before it started squeaking again, so back to the garage I went. Shimmed it and it got quiet, so I started my drive back to ATL. 40 miles out and I hear the familiar sound of a belt shredding, so I pull over at a gas station. The belt is split longways down the middle, which was fortunate, because as I tried to take it off the threads in the tensioner stripped. I limped home and decided that rather than spend more money on this kwik garbage I'd buy the Holley setup. No more messing with tube spacers and shims and ****. Just FYI, advance auto sells the main brackets for $157, but they always have $50 off coupons and you can get 5.5% extra back going through ebates. Made it around $112 or so.
I also moved the battery back up front, seems to start easier this way. Still using the remote solenoid though.
So, long story short, most everything other than the odd rear end alignment appears to be great. The kwik bracket has ruined my day once again and I'm waiting for the holley stuff to get here so I can drive back to Nashville to get my car.
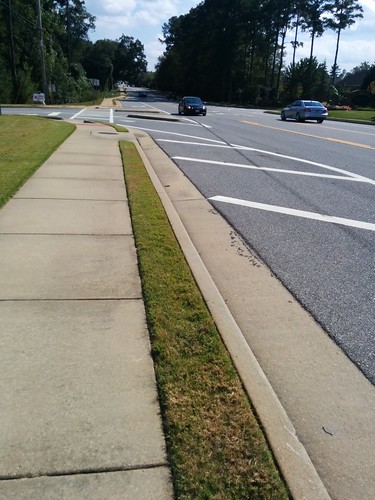
Ups and downs, but that's how it goes. This picture is just here because I like it. Helps me not think about a/c brackets.
 photo
photo
IMG_20140920_111829Night and day difference in terms of how it runs; well worth the money. It only made 370 or so at the wheels, but I wasn't going for numbers and one of my brakes was dragging a bit.
I pulled the air ride off and put on some coil overs. Pretty easy process, though I'll mention a couple things about it. First is that I initially didn't get a spanner wrench with the new parts. This set me back a bit but ridetech, to their credit, did overnight me one. Everything looks solidly made and well-engineered, though I wish the rear adjustment ***** were not at the tops of the shocks. I'm not sure what others are like, but once I got it the spanner wrench was pretty neat, it goes on a ratchet so you can get several turns with each repositioning of it. Height adjustments are simple enough to make.
Some pics of the old stuff coming out and the new in. My camera battery died so only have a few.
Old stuff out.
DSC03136Display (for the guy who wanted to see it).
DSC03130Rear on. Something to mention here is that no matter what I do the right side never raises and the rear has shifted about a 1/4 inch to the right. The gap on my driver's side rear tire is larger and my passenger rear tire rubs the wheel well sometimes. I know this isn't a suspension thing, just something to look into. If anyone knows why this might be feel free to comment.
DSC03134Assembling the front shock. The instructions say to tighten the valve all the way then slip the ring over the top. That might work for some versions, but not these. For these you need a T8 or T10 head screwdriver to take the **** off first. A small thing, but not something I was expecting based on having read the instructions online. Given my time constraints I like to buy everything I need beforehand, but in this case I had to make an extra trip to Lowe's. Not a huge deal, just a time waster.
DSC03132Once I got all that taken care of and the brakes adjusted I decided to work on the single largest problem I've had with the car: the Kwik A/C bracket. I've probably mentioned it before, but the kwik bracket is the biggest piece of **** and greatest source of strife I've come across in this build. After playing around with it for a while I got it quieted down and decided that everything was finally okay. I put maybe 70 miles on the car before it started squeaking again, so back to the garage I went. Shimmed it and it got quiet, so I started my drive back to ATL. 40 miles out and I hear the familiar sound of a belt shredding, so I pull over at a gas station. The belt is split longways down the middle, which was fortunate, because as I tried to take it off the threads in the tensioner stripped. I limped home and decided that rather than spend more money on this kwik garbage I'd buy the Holley setup. No more messing with tube spacers and shims and ****. Just FYI, advance auto sells the main brackets for $157, but they always have $50 off coupons and you can get 5.5% extra back going through ebates. Made it around $112 or so.
I also moved the battery back up front, seems to start easier this way. Still using the remote solenoid though.
So, long story short, most everything other than the odd rear end alignment appears to be great. The kwik bracket has ruined my day once again and I'm waiting for the holley stuff to get here so I can drive back to Nashville to get my car.
Ups and downs, but that's how it goes. This picture is just here because I like it. Helps me not think about a/c brackets.
photo
09-22-2014, 11:25 AM
#464
11 Second Club
iTrader: (8)
Join Date: Jan 2010
Location: Southern Idaho
Posts: 502
Likes: 0
Received 0 Likes
on
0 Posts
Chuck, car looks good sitting on the rollers! I forget what your engine combo is now but 370whp is not too shabby.
The ridetech coilovers look pretty fancy too, but what prompted the switch from the AirRide setup?
The ridetech coilovers look pretty fancy too, but what prompted the switch from the AirRide setup?
09-22-2014, 12:09 PM
#465
Between the stereo stuff, the battery and air ride my trunk was just full of air lines, wires and etc. If I had more time I could've set it up nice and neat, but I don't, so I opted to put the battery back up front (without re-running cables) and declutter everything so I could clean up the trunk and keep a spare in it. The air ride was cool, but from a practical perspective I just wanted the space back since starting next year I'm going to be moving a lot.
I went with ridetech coil overs so I could reuse the mounting brackets that I already have. Easy swap.
I went with ridetech coil overs so I could reuse the mounting brackets that I already have. Easy swap.
Last edited by chuckd71; 09-22-2014 at 06:45 PM.
09-22-2014, 04:42 PM
#467
Teching In
Join Date: May 2014
Location: Texas
Posts: 16
Likes: 0
Received 0 Likes
on
0 Posts
I'm in the parts collecting process of my build on top of sanding and painting miscellaneous odds and ends, but I got to say, I foresee my luck going somewhat just like yours! subscribed
09-22-2014, 05:29 PM
#468
Even with the coils close to the top of the adjustment area the car is pretty low. I definitely plan to swap to the new holley oil pan next time I pull the motor. I have about 1/2 inch of room left to move up, not sure what that translates to in ride height though. I have the ats spindles, might be lower than a stock one would be.
I can measure next time I'm home.
I have 700lb springs up front and 225 or so out back, dropping that a bit might not be a bad idea as it rides pretty stiff.
I can measure next time I'm home.
I have 700lb springs up front and 225 or so out back, dropping that a bit might not be a bad idea as it rides pretty stiff.
09-22-2014, 05:33 PM
#469
Teching In

Join Date: Mar 2013
Posts: 2
Likes: 0
Received 0 Likes
on
0 Posts
Ok great. Sounds like I'll be able to get her pretty low. Is that photo with the car on the dyno with the coilovers installed?
Even with the coils close to the top of the adjustment area the car is pretty low. I definitely plan to swap to the new holley oil pan next time I pull the motor. I have about 1/2 inch of room left to move up, not sure what that translates to in ride height though. I have the ats spindles, might be lower than a stock one would be.
I can measure next time I'm home.
I have 700lb springs up front and 225 or so out back, dropping that a bit might not be a bad idea as it rides pretty stiff.
I can measure next time I'm home.
I have 700lb springs up front and 225 or so out back, dropping that a bit might not be a bad idea as it rides pretty stiff.
09-22-2014, 06:52 PM
#471
Those are about the best tips I could give you. An engine swap in and of itself is pretty simple; an engine swap that turns into the mess I had is less so. If you aren't pressed for time, do things one by one then go back and integrate everything later.
 09-27-2014, 06:55 PM
#473
Thanks, it's getting there.
This morning I got up at 430 and took a bus from Atlanta to Nashville so I could work on and then hopefully return with the car.
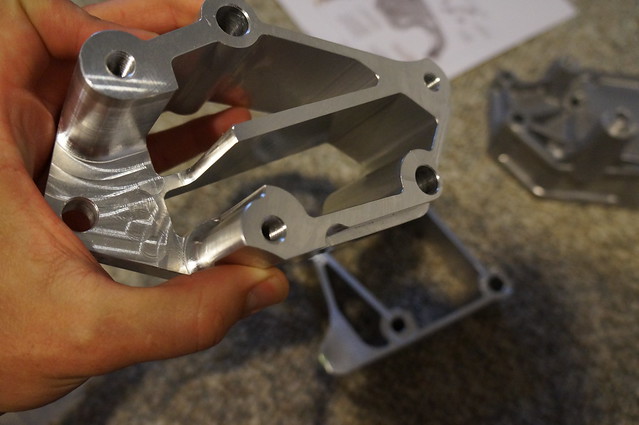
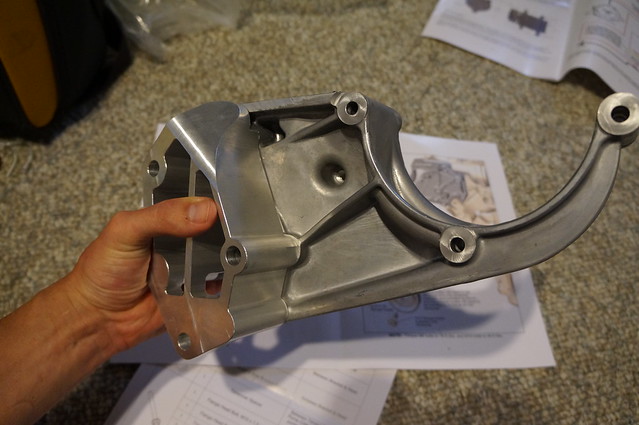
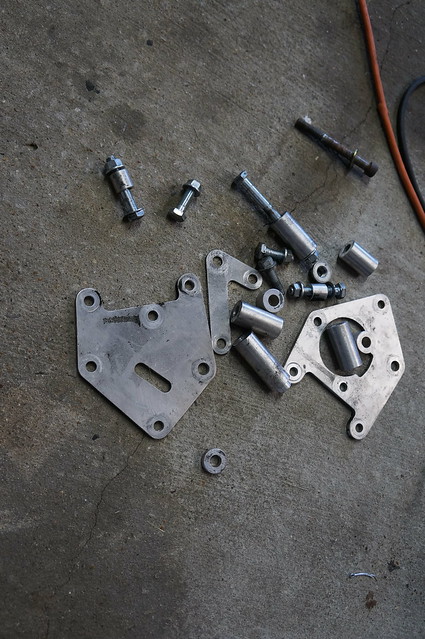
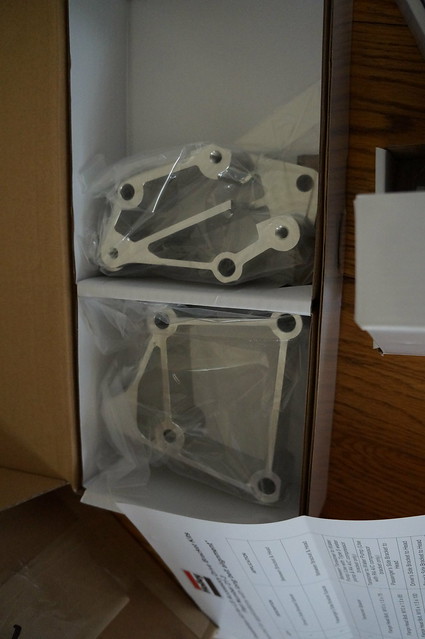
As mentioned before I ordered the Holley A/C bracket to replace the piece of **** kwik bracket, and fortunately all the parts came in on time. From the second you open the box it's clear that this bracket is orders of magnitude better than the kwik stuff. It's solid and substantial, and is basically two hefty brackets that bolt into the block. Super easy to install as you only need a 15 and I think 17mm socket and wrench. The bolt bags come labeled and with shims to make sure everything fits tight on the compressor. The kwik bracket in comparison is a bunch of spacers and bolts of various sizes that requires three hands and 6 different tools to get working.
The block to bracket spacer.
 DSC03140
The bracket that holds the compressor.
 DSC03141
Engine compartment is still a mess but looks can come later.
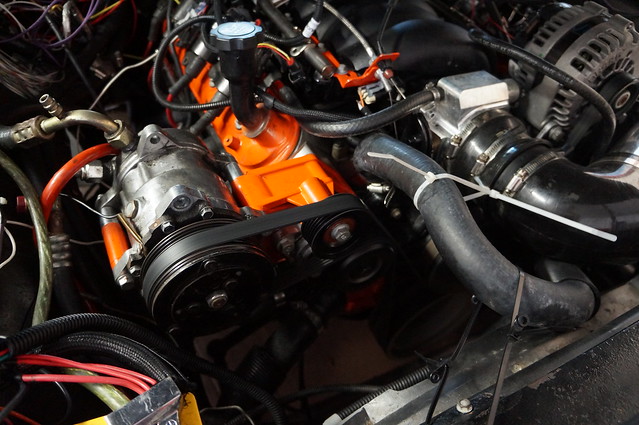 DSC03142
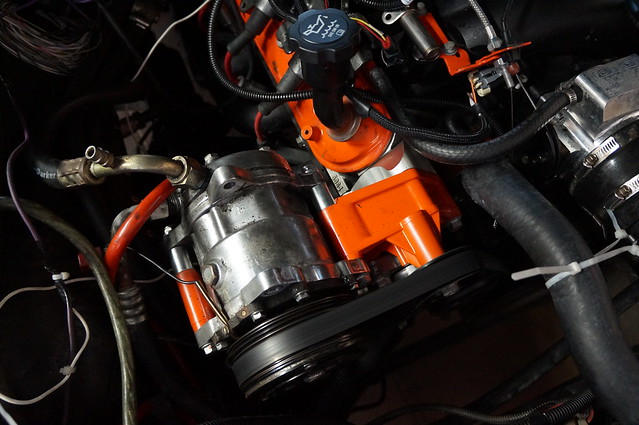 DSC03143
And for comparison the kwik bracket. I lost some of the spacers as I was removing it but this is the gist of it. If you want it let me know, $45 shipped to you. Only buy this if you hate yourself or your car.
 DSC03144
So far I don't have much time on it the new setup but (knock on wood) it appears to be the solution to the belt squeaking.
Something to note is that the spacer kit for the holley (this- ) that goes between the bracket and the block also comes with the spacer for the driver's side bracket. Not sure why, as in cases like mine it isn't needed. Similarly, if someone were just going to switch to the Holley driver's side setup they would get the a/c spacer that they don't need. Not sure why that is. If anyone needs the driver's piece let me know. It's the lowermost one in the picture, for a truck fead setup.
 DSC03138
This morning I got up at 430 and took a bus from Atlanta to Nashville so I could work on and then hopefully return with the car.
As mentioned before I ordered the Holley A/C bracket to replace the piece of **** kwik bracket, and fortunately all the parts came in on time. From the second you open the box it's clear that this bracket is orders of magnitude better than the kwik stuff. It's solid and substantial, and is basically two hefty brackets that bolt into the block. Super easy to install as you only need a 15 and I think 17mm socket and wrench. The bolt bags come labeled and with shims to make sure everything fits tight on the compressor. The kwik bracket in comparison is a bunch of spacers and bolts of various sizes that requires three hands and 6 different tools to get working.
The block to bracket spacer.
DSC03140The bracket that holds the compressor.
DSC03141 Engine compartment is still a mess but looks can come later.
DSC03142DSC03143 And for comparison the kwik bracket. I lost some of the spacers as I was removing it but this is the gist of it. If you want it let me know, $45 shipped to you. Only buy this if you hate yourself or your car.
DSC03144 So far I don't have much time on it the new setup but (knock on wood) it appears to be the solution to the belt squeaking.
Something to note is that the spacer kit for the holley (this- ) that goes between the bracket and the block also comes with the spacer for the driver's side bracket. Not sure why, as in cases like mine it isn't needed. Similarly, if someone were just going to switch to the Holley driver's side setup they would get the a/c spacer that they don't need. Not sure why that is. If anyone needs the driver's piece let me know. It's the lowermost one in the picture, for a truck fead setup.
DSC03138
09-30-2014, 05:44 PM
#474
Nothing changed on the car, but I did put about 400 miles on it and drive it from Nashville to Atlanta on Monday. To my great pleasure, upon opening the hood about 2/3 of the way along, I found absolutely zero belt dust anywhere (this is unusual for me). No squeaks, squeals or slips at all either. Good stuff.
The only issue I had on the trip was when I pulled off the interstate to get gas. As I slowed on the exit ramp I heard a loud grinding noise when I turned the wheel right; as it turns out the right tie rod had come out of the arm on spindle and was just dragging. I guess whoever looked at my brakes last didn't put the cotter pin back in. I didn't have the right stuff on me to fix it properly, so I used a washer and a thick paper clip to get it together long enough to limp to a parts house. First thing I came to was an Advance Auto, and of course they didn't have anything, but down the road I found an O'Reilly that had castle nuts and cotter pins, so I took a few minutes to fix what I can only imagine could have been a dangerous problem.
This of course ate time and set me back a bit, meaning I was now coming down 75 into Atlanta, heading toward 285E, at 430 in the afternoon. In the rain.
A miserable, miserable experience, but it was pretty much the ultimate test of every day useability. Coolant temps never went past 215 (usually 190 when cruising), oil pressure stayed good, idle was solid, trans temp got up to 180-90 but, like the coolant, dropped quickly during the rare bursts of speeds over 10 mph.
The tune needs a tiny bit of work but that will be easy to do. Mileage-wise l I got right around 21 mpg, through a trans with a torque converter that I'm not sure is locking up. Not bad, though I'm sure it would be better with cruise control.
At 70mp it's turning right at 2400 rpm give or take, which seems fine to me but I'd still like to swap in a T-56.
The plan now is to get the Holley 302-2 pan installed and vinyl wrap the car (going to try a few colors before I paint it, thinking I might start with blue). Once the new pan is in I can go about tidying up the wires.
That's about it, hopefully nothing unexpected comes up between now and then.
10-05-2014, 04:52 AM
#476
Teching In

Join Date: Aug 2010
Posts: 3
Likes: 0
Received 0 Likes
on
0 Posts

Man, I just read through this whole thread today; it's crazy what you had to go through. I love the way you write your updates, though; you're very clear and well thought-out. A lot of project threads on here seem to include large gaps between updates where a bunch of stuff is done but it never really gets shown. I'll be referring to your thread a bunch when I start on my '69.
Glad you finally got to drive it!
Where did you end up getting that L92 from? You seem pretty value-oriented and a lot of places I've found want an arm and a leg.
Glad you finally got to drive it!
Where did you end up getting that L92 from? You seem pretty value-oriented and a lot of places I've found want an arm and a leg.
10-05-2014, 11:23 AM
#477
Yeah, this bracket is what a bracket should be; too bad it wasn't available when I started this project.
For the most part I think things are worked out, or at least they were until a few days ago. There is a random ticking/ knocking noise coming from the motor. I don't have any real tools down here and I can't get under the car so it's hard to locate exactly where it is coming from though. Sounds like it's coming from the outside of the engine itself, and the noise rather sharp sounding (I'd expect it to be more dull if it were internal), but that might just be because it's aluminum and not iron. Seems to go away when I put the car in reverse, so maybe it's something in the front area of the trans? I've taken the valve covers off and everything there looks okay and I'm hoping it's not a rod bearing, but since I can't do much else to diagnose it I'm going for an oil change tomorrow and will take a look at the oil and filter for flakes. I have a video posted in another thread but I'll try to make a new one tomorrow.
I got the L92 on ebay actually. Saw it listed then just emailed the guy directly and made a deal outside of ebay. I waste a lot of money but also I try to save it where I can, and if it's easy I like to pass on how. I've saved thousands using ebates, coupons and polite emails to companies about various things.
Anyway, people often think their garbage is worth gold, just look at the LS2s or T56s listed for sale. People want $6k for a motor/ trans from a GTO when the entire car is barely worth that, same with camaros, but whatever. You just have to wait for a reasonable deal I guess. I'm looking for a T56 but I'm not going to drop $2,500 on a trans where the listing says "the guy I bought it from said he just rebuilt it with a stage 3 kit, no paperwork on it, but it feels like it shifts smooth" or some such nonsense like that.
People on performancetrucks.net seem to be a bit more reasonable with motor prices.
 10-08-2014, 03:06 PM
#479
Yeah, that was a thought as well. It was really nice out today so I decided to take it over to a transmission shop that was around 3 miles away, they said they'd throw it on a lift, we could listen and they'd check it out.
I got about 2 miles down the road and then heard a clunk, some skidding and smelled burning tires. Nice skid mark.
 IMG_20141008_144800
I had hoped that I just had a flat or something, but of course it can't be that simple.
 IMG_20141008_144547
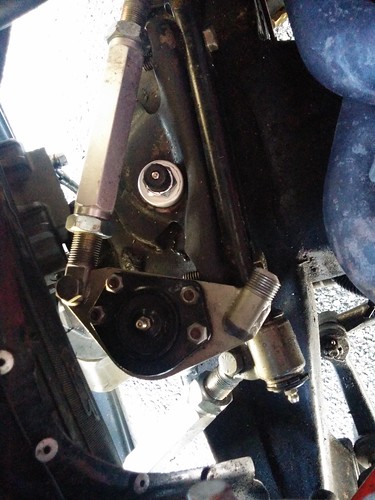
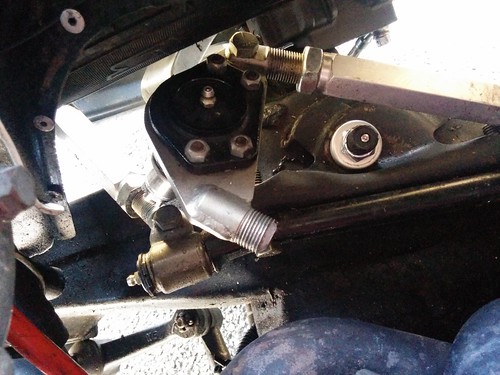
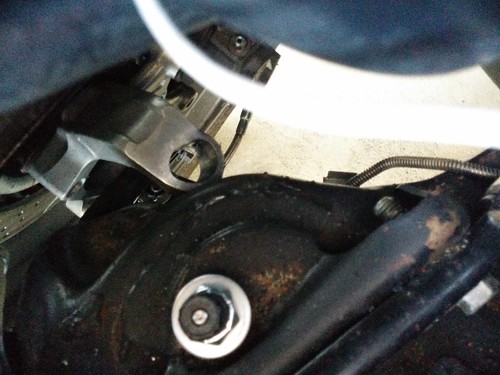
Broken control arm. How does this happen?
 IMG_20141008_143245
 IMG_20141008_143209
 IMG_20141008_143121
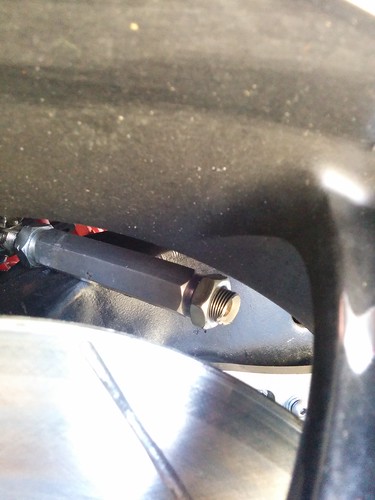
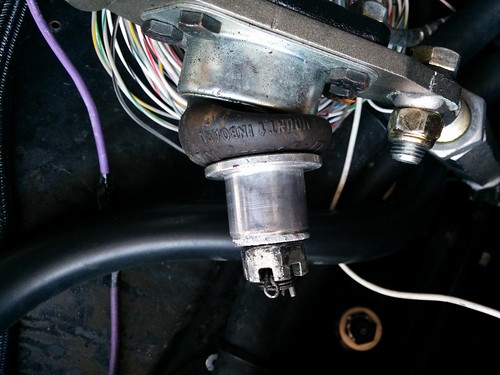
Top of the spindle pulled out.
 IMG_20141008_151911
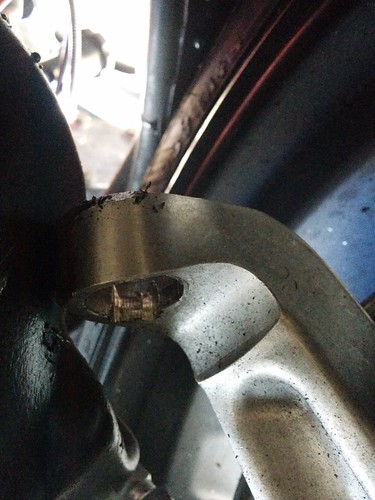 IMG_20141008_151955
 IMG_20141008_151148
 IMG_20141008_151250
And here we are again on a flatbed.
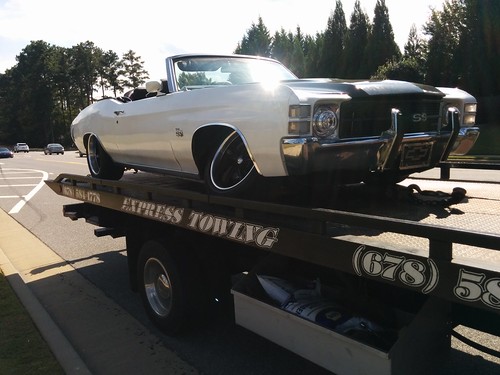 IMG_20141008_144923
I was doing 35-40 mph down a pretty straight road. I had no clue the parts that broke were even capable of breaking. It looks like either the arm broke and then pulled the ball joint out the top, or the pressed in thing on the top of the spindle came out and then the arm broke. Either way I don't get it. The tow truck driver was cool and offered to bring some tools over one day to help, but since I'm back in school I have no time and exactly zero money for parts at this point. My laptop motherboard and hard drive went out two days ago so I had to use my last fun money for that.
Not sure what to do other than let the car rot away in the garage until next summer. I don't even know what to think anymore. Even if I had money, how do I buy one control arm and one spindle? This isn't meant to be a sob story but holy **** is this frustrating.
At least it happened near home and during the day I guess.
I got about 2 miles down the road and then heard a clunk, some skidding and smelled burning tires. Nice skid mark.
IMG_20141008_144800I had hoped that I just had a flat or something, but of course it can't be that simple.
IMG_20141008_144547 Broken control arm. How does this happen?
IMG_20141008_143245IMG_20141008_143209 IMG_20141008_143121 Top of the spindle pulled out.
IMG_20141008_151911 IMG_20141008_151955 IMG_20141008_151148 IMG_20141008_151250 And here we are again on a flatbed.
IMG_20141008_144923 I was doing 35-40 mph down a pretty straight road. I had no clue the parts that broke were even capable of breaking. It looks like either the arm broke and then pulled the ball joint out the top, or the pressed in thing on the top of the spindle came out and then the arm broke. Either way I don't get it. The tow truck driver was cool and offered to bring some tools over one day to help, but since I'm back in school I have no time and exactly zero money for parts at this point. My laptop motherboard and hard drive went out two days ago so I had to use my last fun money for that.
Not sure what to do other than let the car rot away in the garage until next summer. I don't even know what to think anymore. Even if I had money, how do I buy one control arm and one spindle? This isn't meant to be a sob story but holy **** is this frustrating.
At least it happened near home and during the day I guess.
10-08-2014, 03:41 PM
#480
call the manufacturers of the parts and explain exactly what you just did and see if they'll send you replacements or at least sell you the pieces individually...ideally they'd replace them, but since this is a chicken/egg situation, the companies will likely point the finger at the other....and with any aftermarket "performance" part, stuff like this doesn't typically carry a warranty...but they might feel for you and sell you singles.