
'70 Nova LY6/TH400 6.0VVT
 07-13-2016, 11:53 AM
#1061

Joe - I agree the OEM fuse/relay centers are a great way to go because they are purpose-built to consolidate everything. The 4th gen Camaro fuse center is pretty much ready to go for this kind of thing, but you also end up having to splice just about every single wire since the terminals are not readily available (as far as I know). I am not too unhappy with what I have, but I do think it could be cleaner.
Lately I spent a fair bit of time adding wires to the ECM X1 connector - fans, data, ignition turn on signal, and B+. I wasted a lot of time digging through my old wire bin to try to find the original fan signal wires, only to eventually remember this engine had a mechanical fan and the pin locations were plugged. Fortunately I have lots of TXL wire in various colors, a handfull of Molex MX64 terminal/pins, and J-38125-641 crimpers to make my own.

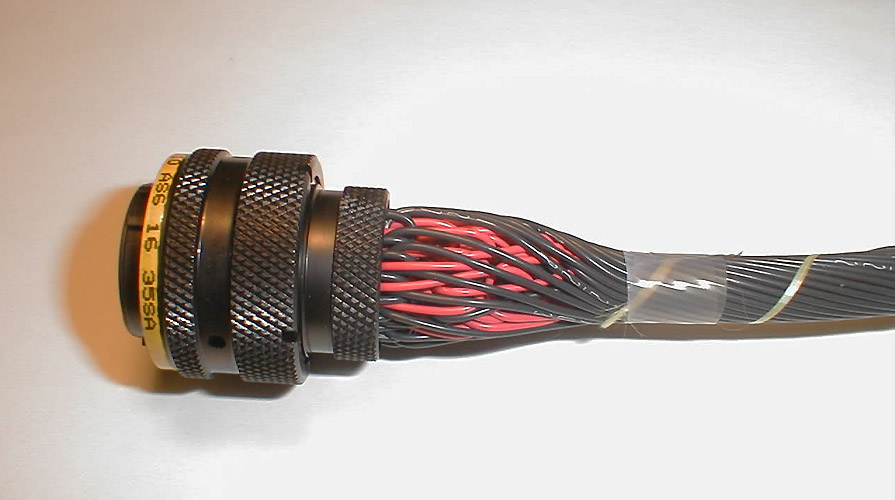
I recently learned about concentric twisting harnesses, so I attempted to do a little bit of that on the final layers of my harness. I really wish I had known about it when I started - it makes the harness very flexible and clean. You basically start with a twisted pair or two as the core and then wrap each layer in a spiral, each layer alternating direction. Here's an example of how it can look when done right:

Another idea I came across is to loop the wire at the connector to act as strain relief and provide a service length for removing the pin if need be. I am not going to do this anywhere on my harness, but it's an interesting idea.
With a little help from Mrs.TheBandit shrinking tube...

... the fuse/relay area is "finished"! I threw some scraps of loom over it for now, but I plan to wrap it a fair bit cleaner once I know everything is working.

What's not pictured there is I have finished pinning everything on the ECM and have stub wires ready to route into the cabin for the OBD port, tach, DBW pedal, fuel pump relay, etc. After finishing up the last wires to the ECM, I checked them over one-by-one on each connector and found I had one mistake where I had put a MAF signal wire one pin off in the connector body - easy enough to fix, but a good reminder to check over you wiring. I have been using this wiring diagram along with this pinout list, which are applicable to the E38 ECM I'm using. I have used factory color wiring wherever possible which makes it a lot easier to identify things.
The to-do list is getting rather short now:
- Cabin wiring (OBD port, DBW pedal, gauges)
- Fuel pump relay mount/wire in trunk
- Plug wires
- PCV plumbing
- Lengthen driveshaft
- Transmission cooling lines
- Belts, hoses, battery, fluids
- ECM programming / tuning
I talked to a local reputable tuner (Full Throttle Kustomz in Fillmore) who quoted a total of about $700 to get the ECM setup for stand alone, adjust for the various parts I've substituted, and dial everything in on the dyno and street - a fair bit more expensive than the screwdriver and distributor wrench I used to use lol. The tuner happens to live in the same city as me and offered to come to my house to get an initial tune on the car so it can start/idle and I can debug any issues before bringing it to their shop. Getting an experienced tuner on this is going to be important to make sure it idles and drives as well as it should without throwing codes or leaving me stranded, but that sure is a lot of coin. Alternatively I can buy HP Tuners with a data logger and a wideband and pull my hair out for a while figuring out what these guys do every day. I am leaning toward the former, but I do want to shop around a bit.
Lately I spent a fair bit of time adding wires to the ECM X1 connector - fans, data, ignition turn on signal, and B+. I wasted a lot of time digging through my old wire bin to try to find the original fan signal wires, only to eventually remember this engine had a mechanical fan and the pin locations were plugged. Fortunately I have lots of TXL wire in various colors, a handfull of Molex MX64 terminal/pins, and J-38125-641 crimpers to make my own.
I recently learned about concentric twisting harnesses, so I attempted to do a little bit of that on the final layers of my harness. I really wish I had known about it when I started - it makes the harness very flexible and clean. You basically start with a twisted pair or two as the core and then wrap each layer in a spiral, each layer alternating direction. Here's an example of how it can look when done right:
Another idea I came across is to loop the wire at the connector to act as strain relief and provide a service length for removing the pin if need be. I am not going to do this anywhere on my harness, but it's an interesting idea.
With a little help from Mrs.TheBandit shrinking tube...
... the fuse/relay area is "finished"! I threw some scraps of loom over it for now, but I plan to wrap it a fair bit cleaner once I know everything is working.
What's not pictured there is I have finished pinning everything on the ECM and have stub wires ready to route into the cabin for the OBD port, tach, DBW pedal, fuel pump relay, etc. After finishing up the last wires to the ECM, I checked them over one-by-one on each connector and found I had one mistake where I had put a MAF signal wire one pin off in the connector body - easy enough to fix, but a good reminder to check over you wiring. I have been using this wiring diagram along with this pinout list, which are applicable to the E38 ECM I'm using. I have used factory color wiring wherever possible which makes it a lot easier to identify things.
The to-do list is getting rather short now:
- Cabin wiring (OBD port, DBW pedal, gauges)
- Fuel pump relay mount/wire in trunk
- Plug wires
- PCV plumbing
- Lengthen driveshaft
- Transmission cooling lines
- Belts, hoses, battery, fluids
- ECM programming / tuning
I talked to a local reputable tuner (Full Throttle Kustomz in Fillmore) who quoted a total of about $700 to get the ECM setup for stand alone, adjust for the various parts I've substituted, and dial everything in on the dyno and street - a fair bit more expensive than the screwdriver and distributor wrench I used to use lol. The tuner happens to live in the same city as me and offered to come to my house to get an initial tune on the car so it can start/idle and I can debug any issues before bringing it to their shop. Getting an experienced tuner on this is going to be important to make sure it idles and drives as well as it should without throwing codes or leaving me stranded, but that sure is a lot of coin. Alternatively I can buy HP Tuners with a data logger and a wideband and pull my hair out for a while figuring out what these guys do every day. I am leaning toward the former, but I do want to shop around a bit.
 07-14-2016, 11:26 AM
#1063

From the looks of it, you're wife does good work too. , LOL
07-20-2016, 12:28 PM
#1066
Continuing to plug away at the list of things to do. Not much to look at here, but the O2 sensors are in place and wired.

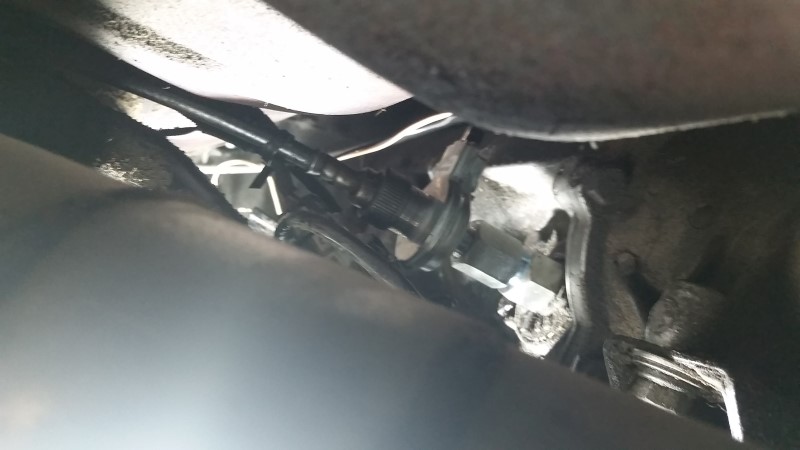
I have read conflicting information on whether or not I need a VSS (vehicle speed sensor), so I asked one of the potential tuners for their advice. I was told that it depends on the engine combination, torque converter (for auto), and the idle strategy; sometimes there are no ill effects from not having a VSS, but the ECM does like to know if the car is moving or not to help with idle transition and it can sometimes resolve problems with driveability. They recommended I use a VSS, so I installed a Dakota Digital SEN-01-4160 pass through pulse generator on my TH400. This allows use of the original mechanical speedometer and produces a pulse for the ECM.
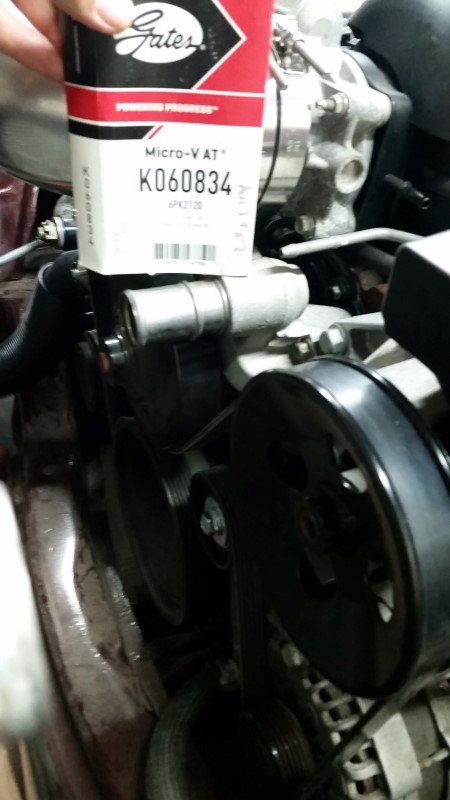
One of the other details on the laundry list was getting an accessory belt. My accessory drive is a bit of a hybrid; I am using the water pump, tensioner, and power steering pump from a 2010-2012 Camaro with a "truck" DR44 alternator mounted in a '00-'02 Camaro bracket and idler. I tried using the stock belt sizes for the '00-'02 Camaro which was way too short and the stock belt size for the 2010-2012 Camaro was too long. So I measured and bought sizes spanning either side of my measurement, ending up with a gates K060834. Decoding this, the "K06" refers to a 6 rib belt and the "834" is loosely linked to the length, which is advertised as 84" long. For what it's worth, I measured about 85" without tension on the tensioner, so if you are trying to size a belt you could probably use a 1" shorter than measured length to end up with appropriate tension.
Next, for startup I do not plan to have the HVAC assembly in place, so I needed to address the water pump outlets that normally feed the heater core. These should not be blocked because coolant needs to circulate in this area for the thermostat to operate properly. I came across a thread suggesting the use of a Dayco 87629 hose for this because it is pre-molded in a u-shape and has one end larger than the other so they fit properly on the differently-sized outlets on the water pump. All I had to do was trim one leg down by about an inch and it fits great (no kink). Obviously I still need to install hose clamps.

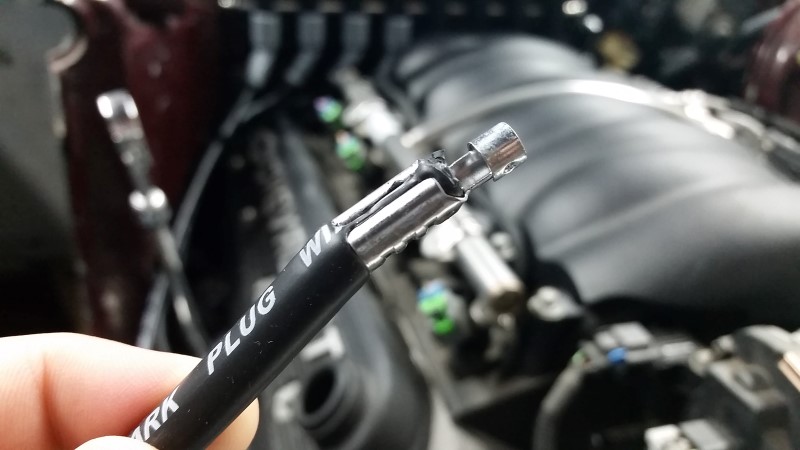
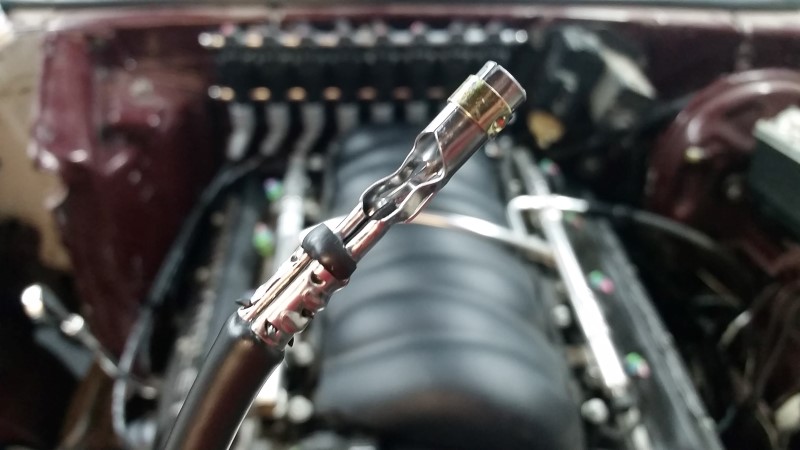
Next, I wanted to make my spark plug wires, but I had a problem with the Taylor 46069 terminals I bought for the ignition coils. The terminals are simply too small for the 8.5mm MSD wire that I want to use. In the photo below you can see the difference between the Taylor terminals on the left and properly sized spark plug terminals on the right. I attempted a crimp on the Taylor terminal and it would not hold onto the wire.

Below you can see the difference in the uncrimped terminals over the 8.5mm wire. The Taylor terminals just don't wrap around the OD far enough.

So since the Taylors 46069 terminals will not work, I have ordered MSD 3304 terminals which should fit the MSD 8.5mm wires. Hopefully those will show up soon so I can make these wires.
Last edited by -TheBandit-; 07-20-2016 at 12:36 PM.
07-20-2016, 03:28 PM
#1067
Next, for startup I do not plan to have the HVAC assembly in place, so I needed to address the water pump outlets that normally feed the heater core. These should not be blocked because coolant needs to circulate in this area for the thermostat to operate properly. I came across a thread suggesting the use of a Dayco 87629 hose for this because it is pre-molded in a u-shape and has one end larger than the other so they fit properly on the differently-sized outlets on the water pump. All I had to do was trim one leg down by about an inch and it fits great (no kink). Obviously I still need to install hose clamps.
 07-20-2016, 07:22 PM
#1068
That, or if you cannot find it and feel lazy you can always order it here (that is if you have Prime)
https://www.amazon.com/Gates-18743-H...iglink20380-20
I had it on my thread as well, https://ls1tech.com/forums/conversio...l#post18030140
https://www.amazon.com/Gates-18743-H...iglink20380-20
I had it on my thread as well, https://ls1tech.com/forums/conversio...l#post18030140
07-25-2016, 02:13 PM
#1069
I hate to tell you, but I selfishly put all these part numbers in photos and text for my own benefit. I can't tell you how many times I've gone into my own thread to figure out what the hell I was doing or what parts/tools I used along the way!
Update - driveline stuff
So I spent last night checking out the existing driveshaft to see if it needs lengthening or what since the transmission is a bit forward of where it used to be. I took measurements between the back of the transmission and the output yoke with the shaft installed at ride height, with the shaft pushed all the way into the tranmission, and with the shaft pulled out to the end of the splines. What I found was that at ride height the shaft has 1-3/8 in of travel left into the transmission and about 2" of spline engagement. When I let the suspension go to full droop (shock limited) I found the shaft actually went into the transmission about 1/8" further, increasing the spline engagement. Why I have no idea - all I can guess is the pinion must be rotating up to compensate for how far it moves down. What I gather from this is that my driveshaft does not need to be lengthened or shortened since it has more than the spline diameter of engagement and it's unlikely to move much in the range of suspension travel.
So that made me think perhaps I should measure pinion angle at ride height. Relative to the transmission, the pinion is pointed down 6.2 degrees. The drive shaft itself is 1.6 degrees relative to the transmission, giving a working angle of 1.6 degrees for the transmission u-joint and 7.8 degrees for the pinion u-joint.
I have been reading up on pinion angle and it seems there's a lot of debate on how much you should have to compensate for how much the pinion will rotate up under load. Ideally the pinion and the transmission output should be parallel when the car is under load, but leaf springs tend to wrap up a bit when torqued (see for example), so the pinion needs to be pointed down some to compensate. The problem is knowing how much - something that really can't be known without seeing what the car actually does under load. For what it's worth, I analyzed the video linked above and found the pinion rotated up about 7 degrees (image of that here)
After a lot of searching around, I'm having a hard time even finding a rule of thumb that's suitably supported. I've seen anything from 2 to 10 degrees recommend for a leaf sprung car, with values from 2-6 being more common. It does seem like, given the ranges I've seen, that the ~6 degrees I'm measuring is probably not going to blow anything up, so I suppose I will start with that and see what happens.
As an aside (my whole thread is an aside really!), I also measured the u-joints and they are 1310s. Hopefully they are up to the task.
Update - driveline stuff
So I spent last night checking out the existing driveshaft to see if it needs lengthening or what since the transmission is a bit forward of where it used to be. I took measurements between the back of the transmission and the output yoke with the shaft installed at ride height, with the shaft pushed all the way into the tranmission, and with the shaft pulled out to the end of the splines. What I found was that at ride height the shaft has 1-3/8 in of travel left into the transmission and about 2" of spline engagement. When I let the suspension go to full droop (shock limited) I found the shaft actually went into the transmission about 1/8" further, increasing the spline engagement. Why I have no idea - all I can guess is the pinion must be rotating up to compensate for how far it moves down. What I gather from this is that my driveshaft does not need to be lengthened or shortened since it has more than the spline diameter of engagement and it's unlikely to move much in the range of suspension travel.
So that made me think perhaps I should measure pinion angle at ride height. Relative to the transmission, the pinion is pointed down 6.2 degrees. The drive shaft itself is 1.6 degrees relative to the transmission, giving a working angle of 1.6 degrees for the transmission u-joint and 7.8 degrees for the pinion u-joint.
I have been reading up on pinion angle and it seems there's a lot of debate on how much you should have to compensate for how much the pinion will rotate up under load. Ideally the pinion and the transmission output should be parallel when the car is under load, but leaf springs tend to wrap up a bit when torqued (see
After a lot of searching around, I'm having a hard time even finding a rule of thumb that's suitably supported. I've seen anything from 2 to 10 degrees recommend for a leaf sprung car, with values from 2-6 being more common. It does seem like, given the ranges I've seen, that the ~6 degrees I'm measuring is probably not going to blow anything up, so I suppose I will start with that and see what happens.
As an aside (my whole thread is an aside really!), I also measured the u-joints and they are 1310s. Hopefully they are up to the task.
Last edited by -TheBandit-; 07-25-2016 at 02:51 PM.
07-28-2016, 01:21 PM
#1070
Teching In
iTrader: (1)
Join Date: Jan 2012
Location: Port Clinton, OH
Posts: 28
Likes: 0
Received 0 Likes
on
0 Posts
Hi been reading for awhile, doing good work! hopefully I can finally ad some help. We always set pinions a 7 degrees for street use, that number can vary at the track with multiple variables ( track condition, suspension wear, air temp, etc.) So 7 degrees always worked well for us. Also on the driveshaft length, rule of thumb is to push yoke in tranny till it bottoms out then pull back 1 inch, measure center to center of U-joints (at ride ht) for correct length. Hope this helps
08-16-2016, 03:24 PM
#1071
It has taken me a couple of weeks to read through your thread but has been well worth it. I have learned a few things to say the least.
As for the time line, you're doing pretty damn good. I brought my Nova home as a roller in July 1996. It saw the road for the first time (since I've had it) July '16, and it doesn't have nearly the work you have put into yours.
You know what they say about life, wife, and kids!? Well some of it is true.
Keep at it. In the grand scheme of things you'll have it on the road in no time.
Ken
08-17-2016, 10:20 AM
#1072
Scuba - Thanks for the input and tips. When you say 7 degrees, are you referring to the angle of the pinion relative to the transmission output or are you referring to pinion relative to driveshaft?
Kenova - Thanks for the kind words. I'm glad my obsessive photo taking and posting was worth a read. Congrats on getting your car back on the road after 20 years! That's awesome! I'm not sure what your referring to about life, wife, and kids?
Update
I'm happy to report the MSD 3304 terminals work on the MSD 8.5mm wiring. Here's a shot of a crimped coil terminal:
Half the plug wires are assembled and routed now.
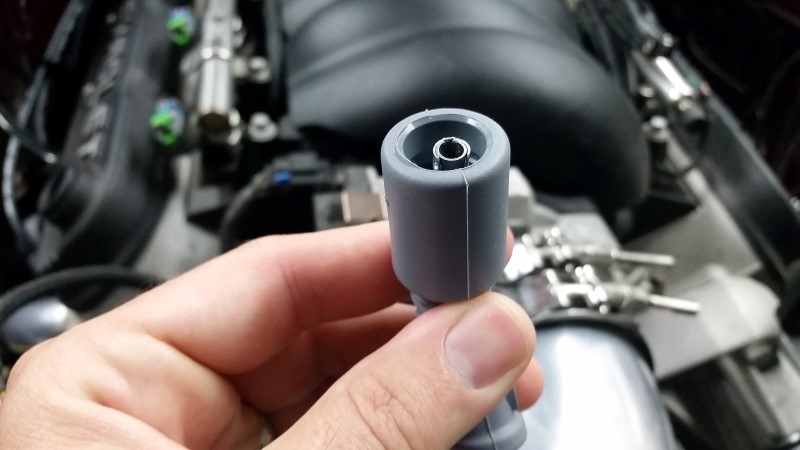
I had a really hard time getting the plug wires through the long/straight boots at the plug wire end. I tried dielectric grease, which I've used successfully in the past, and it was almost impossible to get the wires through. I discovered dish soap worked worked a lot better - light coating inside the boot and outside of the wire made it go in like butter.
There is one issue with using the soap though; the boots will slide around so easily, you can't install the wires onto the coils right away or the terminal will slip down into the boot rather than snapping into the coil. I found it was better to assemble the boots and let them sit overnight for the soap to evaporate; after that the boots become impossible to slide around. Here is the coil side terminal at the right depth in the boot - basically flush with the end.
I have a bit of a problem with insufficient clearance for installing the wires onto the coils. There's just not much space behind my intake manifold so it's hard to grip and press in the wires. I ordered a set of 45 degree plug wire pliers that I'm hoping will make things easier.
Kenova - Thanks for the kind words. I'm glad my obsessive photo taking and posting was worth a read. Congrats on getting your car back on the road after 20 years! That's awesome! I'm not sure what your referring to about life, wife, and kids?
Update
I'm happy to report the MSD 3304 terminals work on the MSD 8.5mm wiring. Here's a shot of a crimped coil terminal:
Half the plug wires are assembled and routed now.
I had a really hard time getting the plug wires through the long/straight boots at the plug wire end. I tried dielectric grease, which I've used successfully in the past, and it was almost impossible to get the wires through. I discovered dish soap worked worked a lot better - light coating inside the boot and outside of the wire made it go in like butter.
There is one issue with using the soap though; the boots will slide around so easily, you can't install the wires onto the coils right away or the terminal will slip down into the boot rather than snapping into the coil. I found it was better to assemble the boots and let them sit overnight for the soap to evaporate; after that the boots become impossible to slide around. Here is the coil side terminal at the right depth in the boot - basically flush with the end.
I have a bit of a problem with insufficient clearance for installing the wires onto the coils. There's just not much space behind my intake manifold so it's hard to grip and press in the wires. I ordered a set of 45 degree plug wire pliers that I'm hoping will make things easier.
08-17-2016, 03:19 PM
#1073
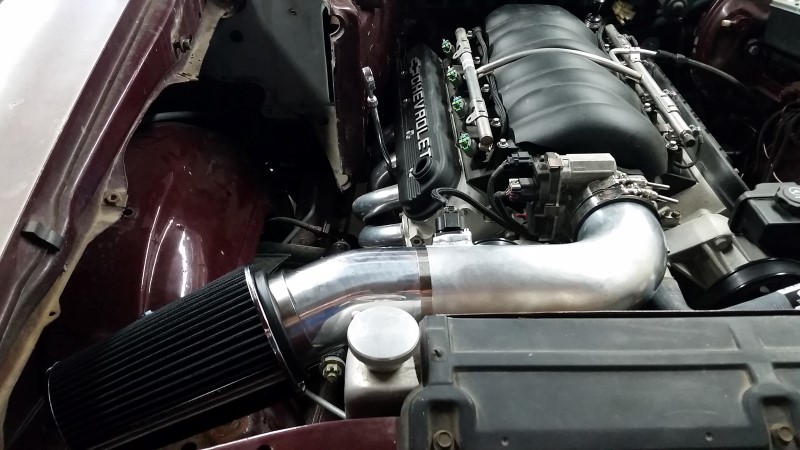
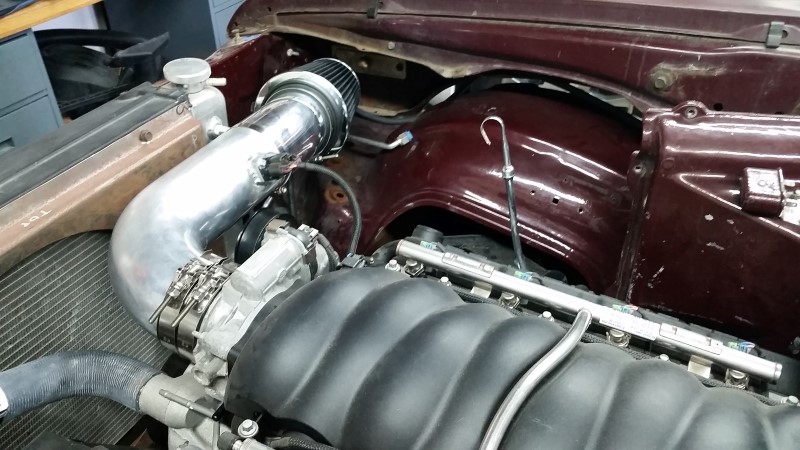
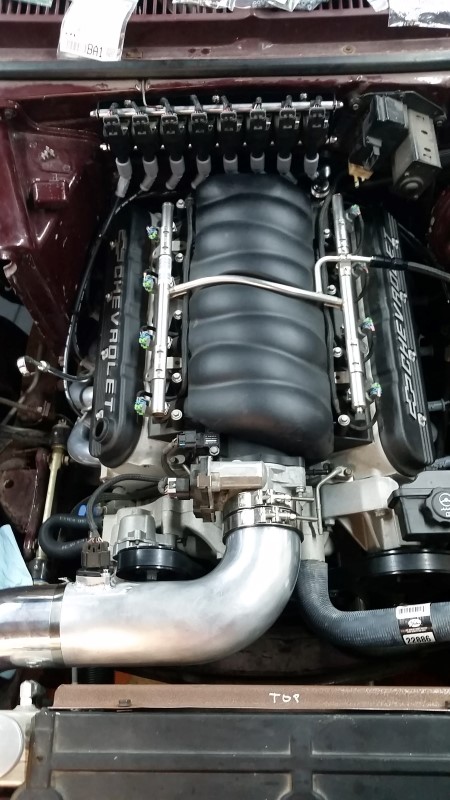
Forgot to add I also picked up a few bits for the cold air intake and mocked up where the filter will go in the area where the battery used to be.


Parts include:
Spectre 97992 90deg 4" x 7" long and 9729 22deg 4" mendrel bends
Edelbrock 43690 black conical air filter (11.5" long 7" dia x 6.5" dia)
HPS SSTC-108-116 stainless t-bolt clamps
GM MAF pad, can't recall the P/N.
I need to add a couple of couplers. I'm thinking hump connector between the straight section of tube and the 22deg elbow, then fix the elbow and filter into a box and duct to cold air from under or through the radiator support. How and when I will build said box is up in the air.
08-17-2016, 11:37 PM
#1074
I love that CAI, it's much cleaner than mine. Nice to see you're still chipping away at this thing! I just buttoned up my fuel system revamp and filled her with gas, but the temps have kept me from driving it to test the new setup.
Also, tremec has a pinion angle app that really helped me dial in my driveline angle and cut down considerably on highway vibes.
Also, tremec has a pinion angle app that really helped me dial in my driveline angle and cut down considerably on highway vibes.
08-21-2016, 09:01 AM
#1075
Teching In
iTrader: (1)
Join Date: Jan 2012
Location: Port Clinton, OH
Posts: 28
Likes: 0
Received 0 Likes
on
0 Posts
actually its a pinion "preload" per say. simply put a magnetic style angle finder on the flat face of the yoke and set it between 5 and 7 degrees (pinion point downward) "preloaded" angle, and the predetermined driveline angle of the motor and tranny (usually making the carburetor mounting surface of the intake manifold level/ zero) takes care of the rest. Again this is for general use but has always worked without fail, even have set it to this on cars as fast as 9.50 quarter mile with a 1.36 60 ft on 9" slicks w/ leaf springs and as slow as 14s.
Keep on keepin on dude you're getting there!!
Keep on keepin on dude you're getting there!!
08-25-2016, 05:06 PM
#1077
Thanks guys! Very happy to keep making progress.
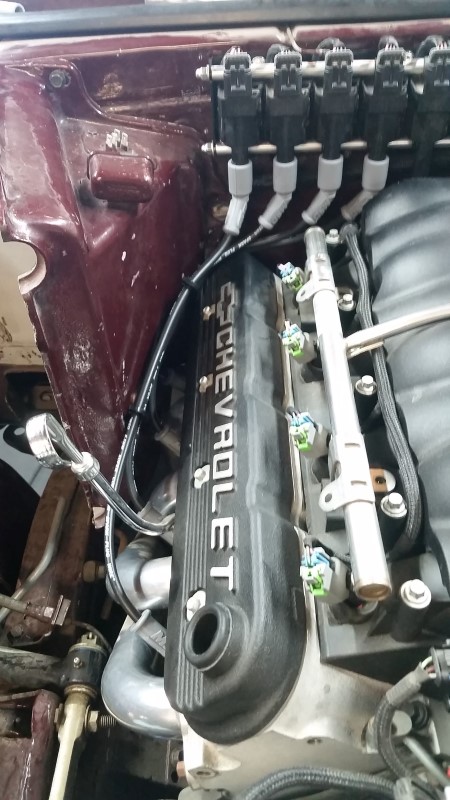
I've been traveling a lot the last few weeks, but I managed to get the remaining plug wires done.
Here's a photo of the spark plug terminal. This is a dual crimp "F" style terminal - there is a separate crimp for the conductor and the insulation. I found through trial and error that you need to do the conductor crimp first on these, then the insulation crimp, otherwise it's hard to get the conductor into place.
Finished wires on both sides. These "straight" MSD terminals are awesome because you can bend them to whatever angle best clears the headers.
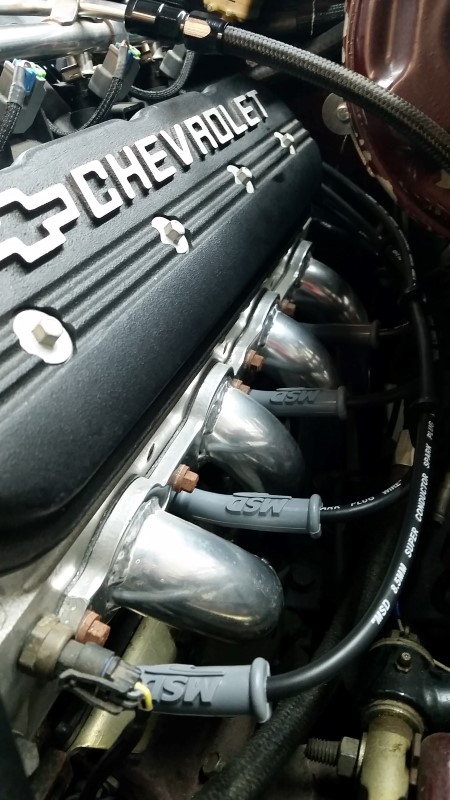
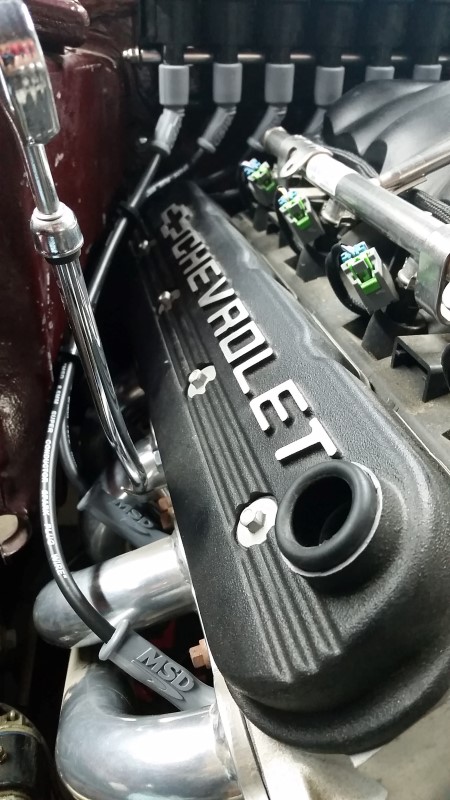
I'm very happy with how visually unobtrusive the plug wires turned out. No distraction from the valve covers.
I have the following items still to wire in/through the cabin:
- OBD2 port
- Throttle pedal
- Tach
- CAN gauges for oil pressure and water temp
- Fuel pump relay
- Key start & run
The rest of the laundry list includes:
- Transmission cooling lines
- Misc hoses and hose clamps, including steam lines, PCV, and power steering return
- Fuel, oil, transmission fluid, ps fluid
- Install a battery
- Electrical & system checks
- Line up a tuner
Getting very close! Hopefully I'll have it running before my 10th cancerversary in October.
I've been traveling a lot the last few weeks, but I managed to get the remaining plug wires done.
Here's a photo of the spark plug terminal. This is a dual crimp "F" style terminal - there is a separate crimp for the conductor and the insulation. I found through trial and error that you need to do the conductor crimp first on these, then the insulation crimp, otherwise it's hard to get the conductor into place.
Finished wires on both sides. These "straight" MSD terminals are awesome because you can bend them to whatever angle best clears the headers.
I'm very happy with how visually unobtrusive the plug wires turned out. No distraction from the valve covers.
I have the following items still to wire in/through the cabin:
- OBD2 port
- Throttle pedal
- Tach
- CAN gauges for oil pressure and water temp
- Fuel pump relay
- Key start & run
The rest of the laundry list includes:
- Transmission cooling lines
- Misc hoses and hose clamps, including steam lines, PCV, and power steering return
- Fuel, oil, transmission fluid, ps fluid
- Install a battery
- Electrical & system checks
- Line up a tuner
Getting very close! Hopefully I'll have it running before my 10th cancerversary in October.
08-25-2016, 05:31 PM
#1078
Clint, great work! I would suggest adding a 8 pin connector or what ever number of wires you have going inside from the ECM, this way if you ever need to do something just disconnect that loom and done. I regret not doing that on my wiring back then, just my 0.00001 cents.
But all in all it is coming along very nice, keep up the good work!
But all in all it is coming along very nice, keep up the good work!
08-25-2016, 05:49 PM
#1079
Thanks! I picked up a few unsealed Molex connectors that I plan to pass through the firewall with a grommet to seal. I wanted to use a bulkhead connector, but I couldn't find anything small enough, so I will have three individual connectors with enough pins to add a couple circuits in the future if needed.
08-25-2016, 06:13 PM
#1080
I have bought most of my connectors, being Weatherpack, 150 metripack etc from this guy. Really nice to work with, as well, http://stores.ebay.com/mjmnationalinc/
For some reason his store is closed today, he should open again tomorrow the 26th
For some reason his store is closed today, he should open again tomorrow the 26th