
69 Nova Build - pumpgas twin turbo 408 LS
 10-01-2010, 03:09 PM
#21

I keep coming back to this thread wanting to reply, but there's so much to reply to I don't know where to begin!
Hats off to your work so far. The engine build looks very well executed and I'm excited to see what the future has in store for your Nova. My guess is some copy-paste was used to build this thread, so spill the beans - where is the original?
I have to say, using the stock manifolds sure doesn't fit with the rest of the build. I think you are doing yourself an injustice if you don't build a set of headers to properly feed & support those twin turbos. It looks to me like you have the skill or at least the necessary tools, so please at least consider it.
Bravo on the work so far. Here is an electronic kick-in-the-butt: GET BACK TO WORK!
 10-03-2010, 01:29 PM
#22
On The Tree
Join Date: Sep 2009
Location: Mentor , Ohio
Posts: 170
Likes: 0
Received 0 Likes
on
0 Posts
That's a sweet build your doing there & keep up with the updates. I'm thinking of getting the Stainlees works Up & forward headers. I'm using the Vintage Air front runners with air. What fuel rail are you using. I'm doing the 402 LQ9 build with TT PT 62 with VTC 3 cam & have the Super Victor intake , Wilson 90 TB & 2" Wilson spacer plus Wilson elbow. I keep going back & forth to Edlebrock fuel rail for that intake or Wilson custom. The ID size are 3/8 on Edel. & Wil. is 11/16 , I'm shooting for 800whp with pump gas. I'm trying to be conservative on my spending , I always say " you get what you pay for " , but Edel. is $100.00 compared to Wil. $325.00. I know in my head bigger ID is less restrictive & better equalation in fuel flow. This set up is going in a back half 70 Nova . Thanks , your input is greatly appreciated.
Garry
Garry
10-09-2010, 01:48 PM
#24
Somehow I missed these last few posts...
Clint - it would be awesome if you would drop in from CA to AL every now and then to give me a physical kick-in-the-butt. It's not so much that I am lacking motivation, time is probably my biggest enemy. I'm thinking about taking off a Friday every now and then to focus just on the build. I agree that the stock manifolds leave a lot to be desired. But I had some encouragement from other guys that already built turbo cars to try and use cast manifolds for durability. I will probably stick with using the C6 manifolds unless it just looks terrible. The Stainless Works turbo headers are a tempting option though.
Your right, I did copy and paste from my build thread on our local car forum:
'69 Nova Build Thread
I appreciate the comments. It really helps to keep me motivated and encouraged. I'm not a highly skilled fabricator - quite the opposite actually being a Mechanical Engineer. But I know folks that are skilled welders so they can help bail me out. Sometimes I am afraid that posting pictures and build threads could come across as bragging, but I hope that isn't the case here on LS1Tech. My purpose is simply to share ideas and progress, and to pick up suggestions from other nuts who have already accomplished what I am trying to do.
Gary, your Nova build sounds like a few notches beyond mine, though we are both shooting for a similar goal of ~800 whp on pumpgas. I am using the Edlebrock fuel rails along with their Victor Jr intake and a 4150 Accufab. You will probably be able to make better use of the power since yours is backhalved. I'm going to be busy with setting up boost control trying to make it down the track on 275-60-15s.
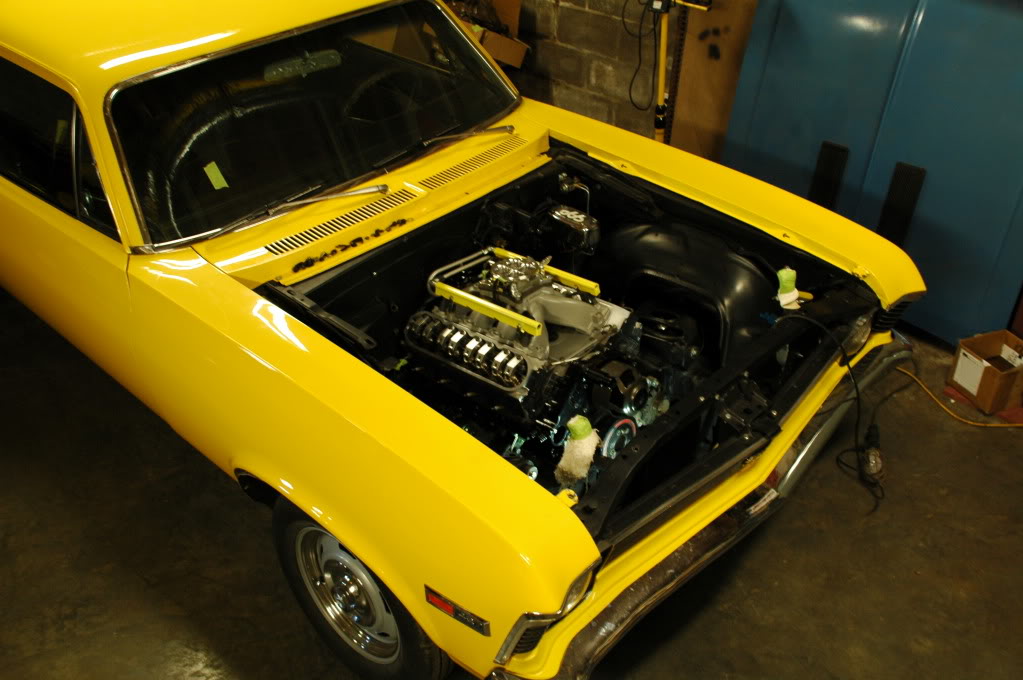
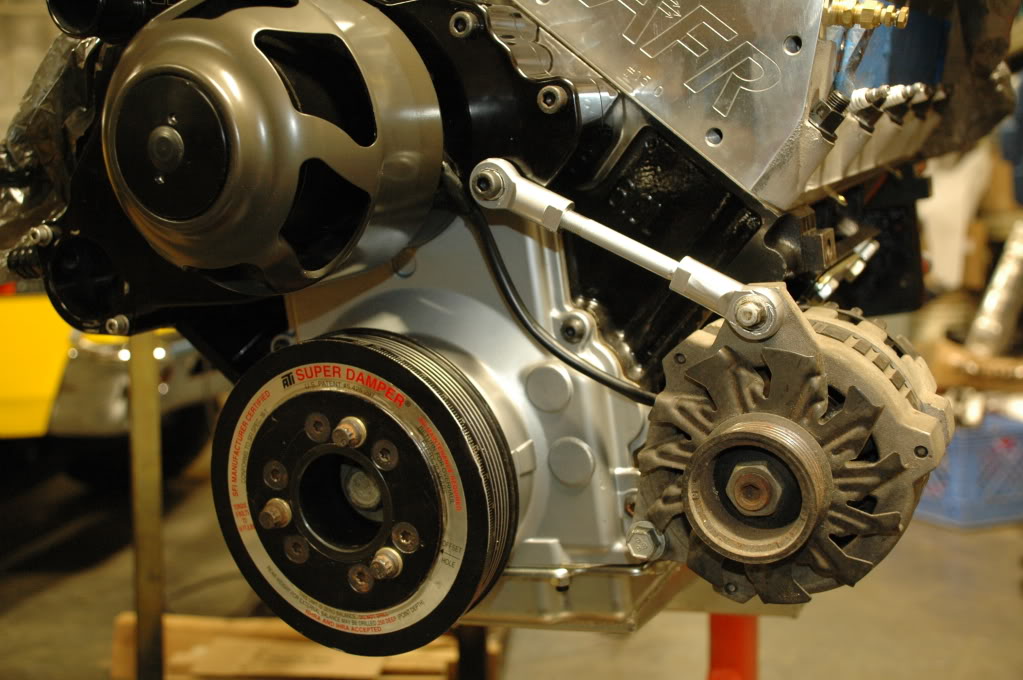
Now on to a couple new pictures. My friend got my intake, fuel rails, and C6 manifolds powder coated. He is still working on the valve covers - trying to come up with some LSX 408 lettering in powder coating. I set the engine back in the car this morning to double check my cross member notch and the alternator mount. Both are looking good.
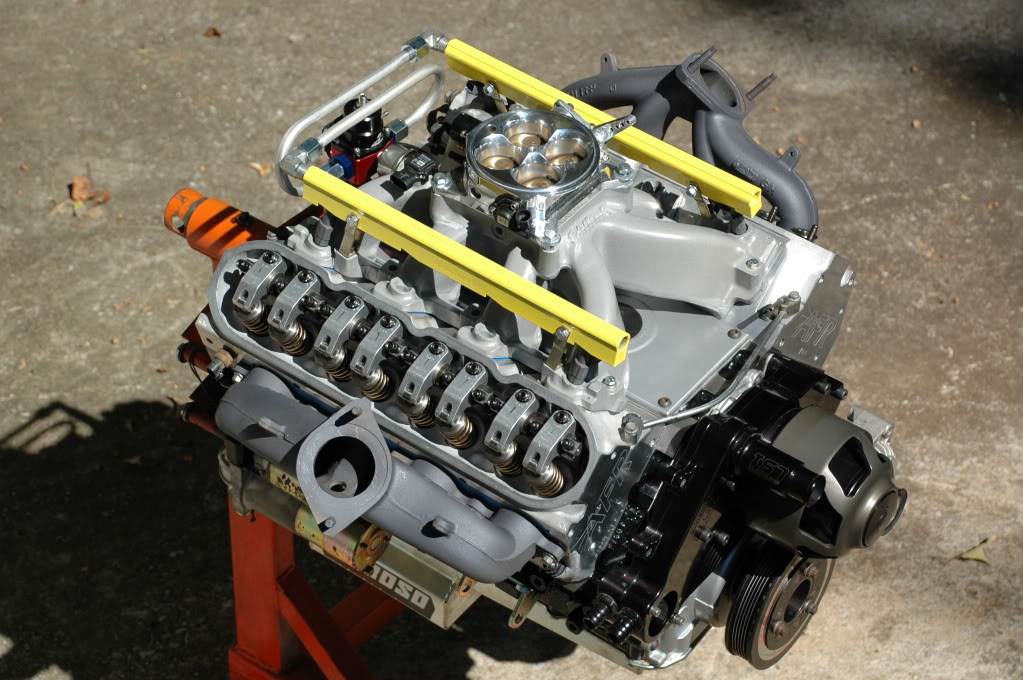
I am not totally comfortable with the yellow fuel rails. Maybe they will grow on me. Another option is to have them hydro-graphic coated in carbon fiber or some other pattern. A local guy just started up a business doing that. By the way, the fuel regulator tubing is mocked up in aluminum. I will be replacing it with stainless steel tubing after I am comfortable with the routing.
It's tough to show a black engine in a black bay. But one cool thing is that you can't see much of the wiring harness. It's routed underneath the Victor Jr. In this picture most of the sensors are connected except for the coils, which I am mounting down low.
Clint - it would be awesome if you would drop in from CA to AL every now and then to give me a physical kick-in-the-butt. It's not so much that I am lacking motivation, time is probably my biggest enemy. I'm thinking about taking off a Friday every now and then to focus just on the build. I agree that the stock manifolds leave a lot to be desired. But I had some encouragement from other guys that already built turbo cars to try and use cast manifolds for durability. I will probably stick with using the C6 manifolds unless it just looks terrible. The Stainless Works turbo headers are a tempting option though.
Your right, I did copy and paste from my build thread on our local car forum:
'69 Nova Build Thread
I appreciate the comments. It really helps to keep me motivated and encouraged. I'm not a highly skilled fabricator - quite the opposite actually being a Mechanical Engineer. But I know folks that are skilled welders so they can help bail me out. Sometimes I am afraid that posting pictures and build threads could come across as bragging, but I hope that isn't the case here on LS1Tech. My purpose is simply to share ideas and progress, and to pick up suggestions from other nuts who have already accomplished what I am trying to do.
Gary, your Nova build sounds like a few notches beyond mine, though we are both shooting for a similar goal of ~800 whp on pumpgas. I am using the Edlebrock fuel rails along with their Victor Jr intake and a 4150 Accufab. You will probably be able to make better use of the power since yours is backhalved. I'm going to be busy with setting up boost control trying to make it down the track on 275-60-15s.
Now on to a couple new pictures. My friend got my intake, fuel rails, and C6 manifolds powder coated. He is still working on the valve covers - trying to come up with some LSX 408 lettering in powder coating. I set the engine back in the car this morning to double check my cross member notch and the alternator mount. Both are looking good.
I am not totally comfortable with the yellow fuel rails. Maybe they will grow on me. Another option is to have them hydro-graphic coated in carbon fiber or some other pattern. A local guy just started up a business doing that. By the way, the fuel regulator tubing is mocked up in aluminum. I will be replacing it with stainless steel tubing after I am comfortable with the routing.
It's tough to show a black engine in a black bay. But one cool thing is that you can't see much of the wiring harness. It's routed underneath the Victor Jr. In this picture most of the sensors are connected except for the coils, which I am mounting down low.
Last edited by Chevy406; 10-09-2010 at 02:01 PM.
10-10-2010, 01:30 PM
#25
On The Tree
Join Date: Sep 2009
Location: Mentor , Ohio
Posts: 170
Likes: 0
Received 0 Likes
on
0 Posts
Thanks for letting me know about the fuel rail. I did a little research on the fuel rail & the Edelbrock has a 9/16 ID , as I was to by the Edelbrock tech line that it's a 3/8 , but yeah it uses a 3/8 fitting. Sometime you can't get a straight answer. Keep up the build & can't wait to see it run.
Thanks Garry
Thanks Garry
10-10-2010, 10:46 PM
#26
The C6 exhaust manifolds look a lot better than the truck manifolds you posted earlier!
I like the yellow. If it doesn't grow on you, it won't be hard to change down the road, so my vote is keep it for now and make progress on more important things while you make up your mind. What color(s) are you doing the valvecovers in?
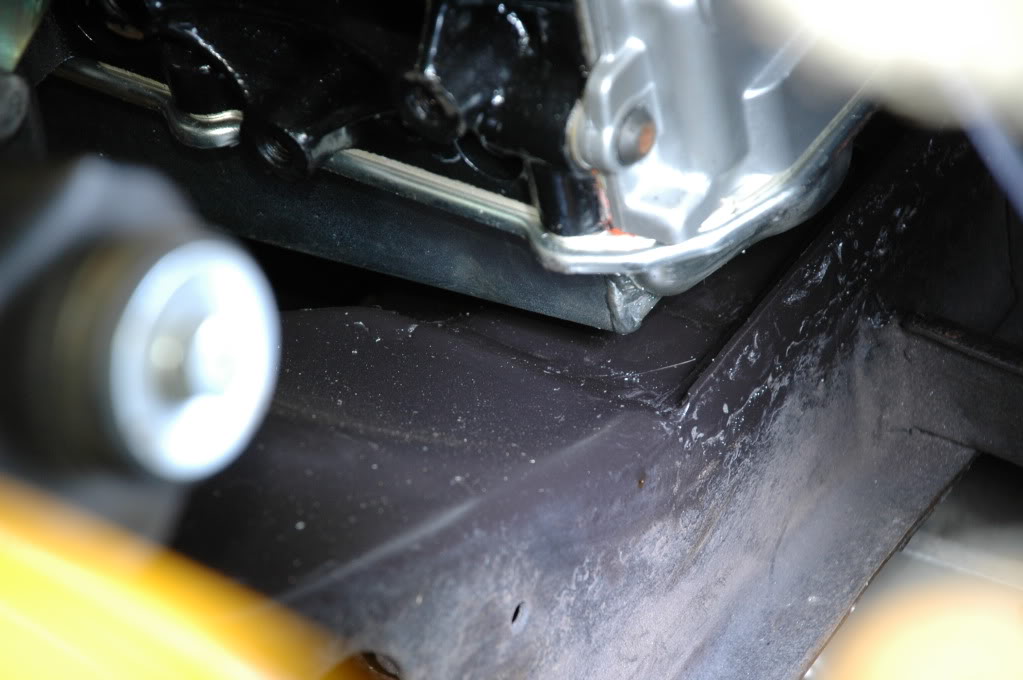
It looks like you got the engine back in. Did you have to do anything outside of notching the frame? Any pics of the completed frame notch?
I like the yellow. If it doesn't grow on you, it won't be hard to change down the road, so my vote is keep it for now and make progress on more important things while you make up your mind. What color(s) are you doing the valvecovers in?
It looks like you got the engine back in. Did you have to do anything outside of notching the frame? Any pics of the completed frame notch?
10-12-2010, 11:37 PM
#27
To be honest, in hindsight I don't believe notching the crossmember under the oil pan was necessary. It looked like my only option with the first mounts I tried, but I ended up using a 3/8" thick conversion plate off Ebay (neutral position) along with Moroso #62530 solid mounts. That combination probably would have worked with a stock cross member.
In further news - I made some progress this past weekend soldering together the fuse/circuit box to the engine harness. Just a couple more circuits left to finish that up. I'll get both the ECM and fuse box tucked under the dash. I may loose the glove box in the process, but that is a minor sacrifice for an upgrade to fuel injection.
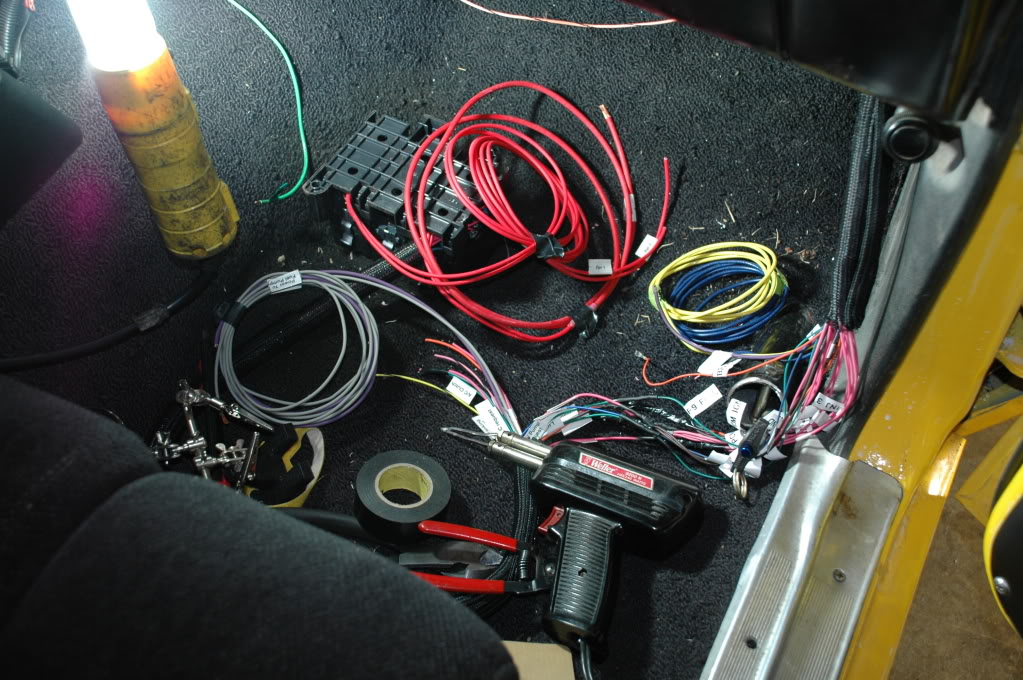
In further news - I made some progress this past weekend soldering together the fuse/circuit box to the engine harness. Just a couple more circuits left to finish that up. I'll get both the ECM and fuse box tucked under the dash. I may loose the glove box in the process, but that is a minor sacrifice for an upgrade to fuel injection.
10-13-2010, 10:59 AM
#28
I lost my glovebox when I went Vintage Air in my '66 GTO. Glove boxes are overrated. I only wish I had better soldering skills when I modified my harness - I kept it in the engine compartment so I didn't have to try to solder. It's in a small clusterf*** by the steering shaft.
10-24-2010, 10:11 AM
#29

Updates.........?
10-25-2010, 03:52 PM
#30
In the last 2 weeks I was only able to manage a few hours last Saturday working on the harness. The only wiring I have left is adding the OBDII connector. I hope to get that done tonight, but I also need to change the oil in my Corvette and help the kids with homework...
10-26-2010, 12:39 AM
#31
On The Tree
Join Date: Sep 2010
Location: San Luis Obispo CA
Posts: 155
Likes: 0
Received 0 Likes
on
0 Posts
All I can say is WOW! If I sat here typing everything I was thinking while reading your thread I'd be here for the next week! I'll keep it to a minimum, but that is an all around badass nova and a clean build. I'll be subscribing! Thanks for dropping by my newly started thread on my 63 nova. I hope you don't mind if I use your thread as a model for posting dates, pics and descriptions on my thread. I like the layout.
When you get this thing done, there's going to be nothing left of the asphalt in front of your place. Man is that going to be fun!
When you get this thing done, there's going to be nothing left of the asphalt in front of your place. Man is that going to be fun!
10-26-2010, 02:00 PM
#32
I love your enthusiasm NK. It is contagious, and I am starting to get re-envigorated with the project again. Little accomplishments like turning the ignition key and hearing the starter kick on help keep me going. Once I can spend a couple more hours on it, I'll hook up my HP Tuners and make sure the ECM is functioning. I have reworked most of the wiring under the dash, along with the new engine harness, so there is the potential for a lot of trouble shooting. But let's be optimistic for now.
10-27-2010, 07:36 AM
#33
Thanks to the prodding, I was able to spend some time last night getting the OBDII port wired into my harness, and I now have power to the ECM. It is indeed a '99 Corvette ECM so I'll get a friend to flash an F-body tune to it. My HP Tuners is already licensed to 2 other '99 C5s, so once I license the Nova's ECM it will be open to all '99 Corvettes.
I tested a few circuits last night. Fuel pump kicks on properly for 2 seconds; MAP and MAF show readings; but my electric water pump is not receiving switched power at the relay. So there is some troubleshooting to be done. I still have to wire in my tach, fuel pressure and water temperature gauges, along with an check engine light. But the forward progress lately has been fun. And no update is complete without a picture:
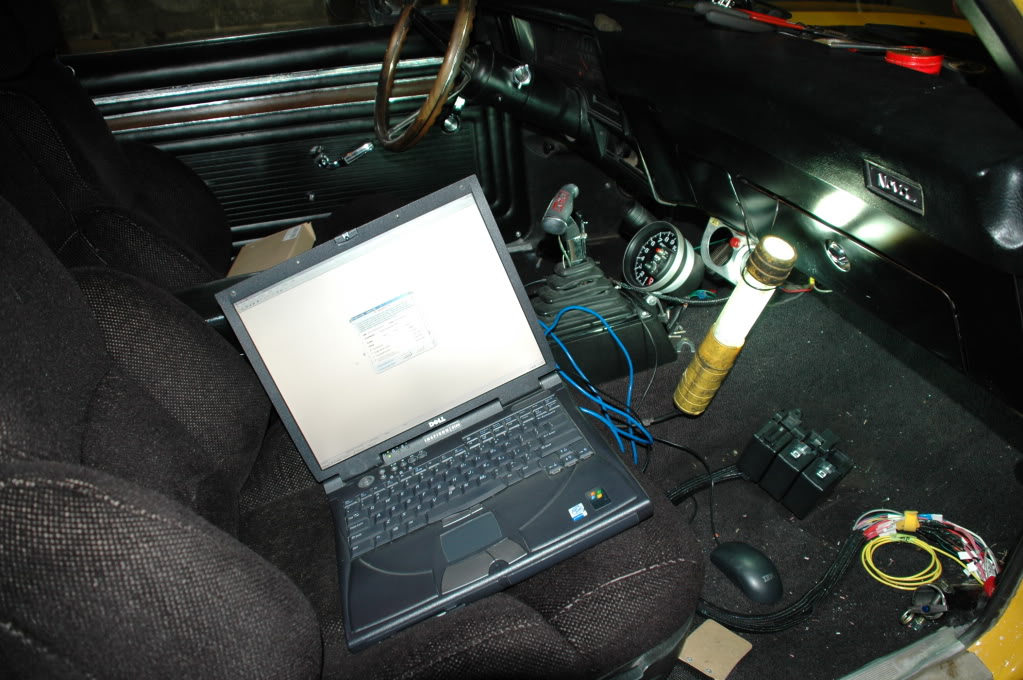
I tested a few circuits last night. Fuel pump kicks on properly for 2 seconds; MAP and MAF show readings; but my electric water pump is not receiving switched power at the relay. So there is some troubleshooting to be done. I still have to wire in my tach, fuel pressure and water temperature gauges, along with an check engine light. But the forward progress lately has been fun. And no update is complete without a picture:

 Excellent build, keep up the good work, and can't wait to see or hear the completed product!
10-29-2010, 07:43 AM
Excellent build, keep up the good work, and can't wait to see or hear the completed product!
10-29-2010, 07:43 AM
#38
 11-01-2010, 11:25 AM
#39
I realize you are doing TT but there are some better manifolds out there. http://www.ls1tech.com/forums/forced...-kit-pics.html
11-07-2010, 11:02 PM
#40
Teching In

Join Date: Oct 2010
Posts: 2
Likes: 0
Received 0 Likes
on
0 Posts
I realize you are doing TT but there are some better manifolds out there. http://www.ls1tech.com/forums/forced...-kit-pics.html