
66 GTO LY6 Swap with VVT
 07-12-2011, 09:59 PM
#1
TECH Apprentice
Thread Starter

Join Date: Jul 2011
Posts: 393
Likes: 0
Received 0 Likes
on
0 Posts
Hey everyone I'm BJ and I've been doing a lot of research on here for my LY6 swap. I have learned so much this site is and invaluable resource! I'm finally to the point where I wanted to share a little bit of my build as it goes along.
This is actually my 2nd 66 GTO that I've had and I remember being in high school when the LS1's came out and actually thinking how cool it would be to swap that motor into my GTO at the time. Well a call to the dealer kinda ruined it for me back then when they told me $6k for the engine or something So here I am now almost 15 years later and I'm finally doing it!
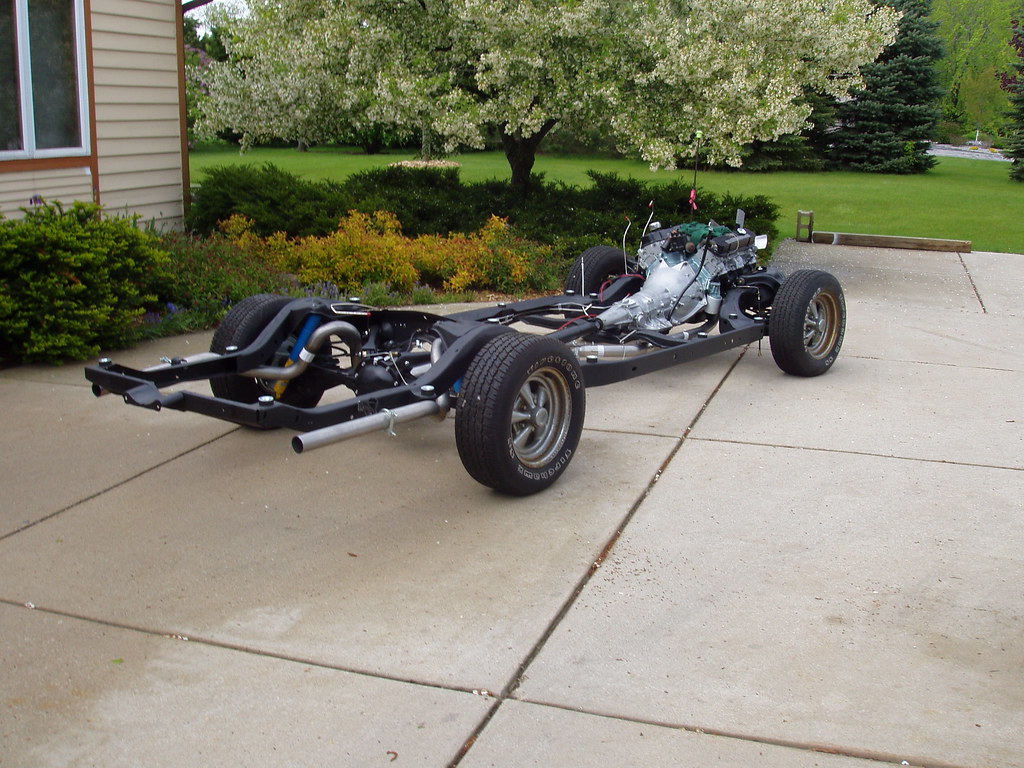
- 1966 Pontiac GTO had 400/th400 now removed, body is kinda rough in the quarters but someday that will be taken care of.
- Car is just a cruiser.
- Built the chassis last year, powdercoated the frame, hotchkis springs, bilstein shocks,ss brake and fuel lines, disc brake conversion, pypes 2.5" x pipe exhaust, 17" vintage wheel works wheels, new bushings steering components etc.
-Picked up a 2008 LY6 with out of a 2008 2500 silverado
-Keeping VVT
- No transmission yet still undecided, either going to be a 4l80e or a T56...
- Parts are slowly starting to trickle in and I have to say its harder then I thought it would be to do this, at least in the planning stages. I'm sure it will all come together pretty well.
Anyways I hope to have this done by Sept 1st we shall see... I'll just throw up a pic or 2 for tonight.
This is actually my 2nd 66 GTO that I've had and I remember being in high school when the LS1's came out and actually thinking how cool it would be to swap that motor into my GTO at the time. Well a call to the dealer kinda ruined it for me back then when they told me $6k for the engine or something
So here I am now almost 15 years later and I'm finally doing it!- 1966 Pontiac GTO had 400/th400 now removed, body is kinda rough in the quarters but someday that will be taken care of.
- Car is just a cruiser.
- Built the chassis last year, powdercoated the frame, hotchkis springs, bilstein shocks,ss brake and fuel lines, disc brake conversion, pypes 2.5" x pipe exhaust, 17" vintage wheel works wheels, new bushings steering components etc.
-Picked up a 2008 LY6 with out of a 2008 2500 silverado
-Keeping VVT
- No transmission yet still undecided, either going to be a 4l80e or a T56...
- Parts are slowly starting to trickle in and I have to say its harder then I thought it would be to do this, at least in the planning stages. I'm sure it will all come together pretty well.
Anyways I hope to have this done by Sept 1st we shall see... I'll just throw up a pic or 2 for tonight.
Last edited by FatfreeGTO; 10-23-2011 at 10:23 AM.
 07-13-2011, 03:51 PM
#7
On The Tree
Join Date: Aug 2010
Location: indiana
Posts: 129
Likes: 0
Received 0 Likes
on
0 Posts
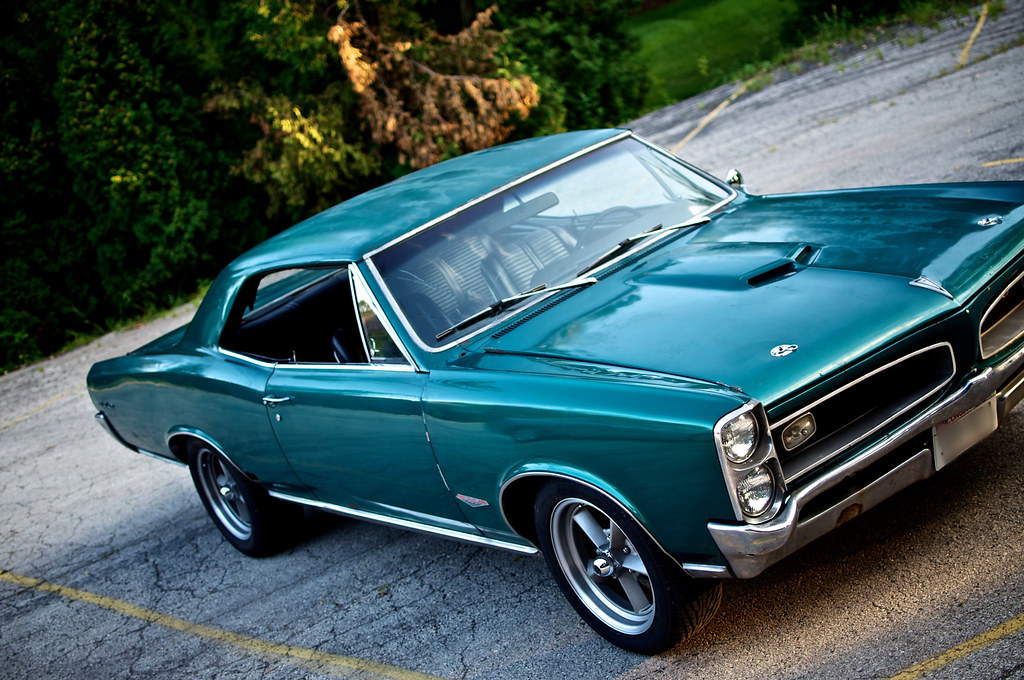
Chassis looks amazing...and i kinda like the "pitina" on the body, but i understand the want to restore a car like this....Good Work and Good Luck with the project....
Trending Topics
07-13-2011, 07:57 PM
#9
TECH Apprentice
Thread Starter
Join Date: Jul 2011
Posts: 393
Likes: 0
Received 0 Likes
on
0 Posts
Thanks everyone for the kind words!
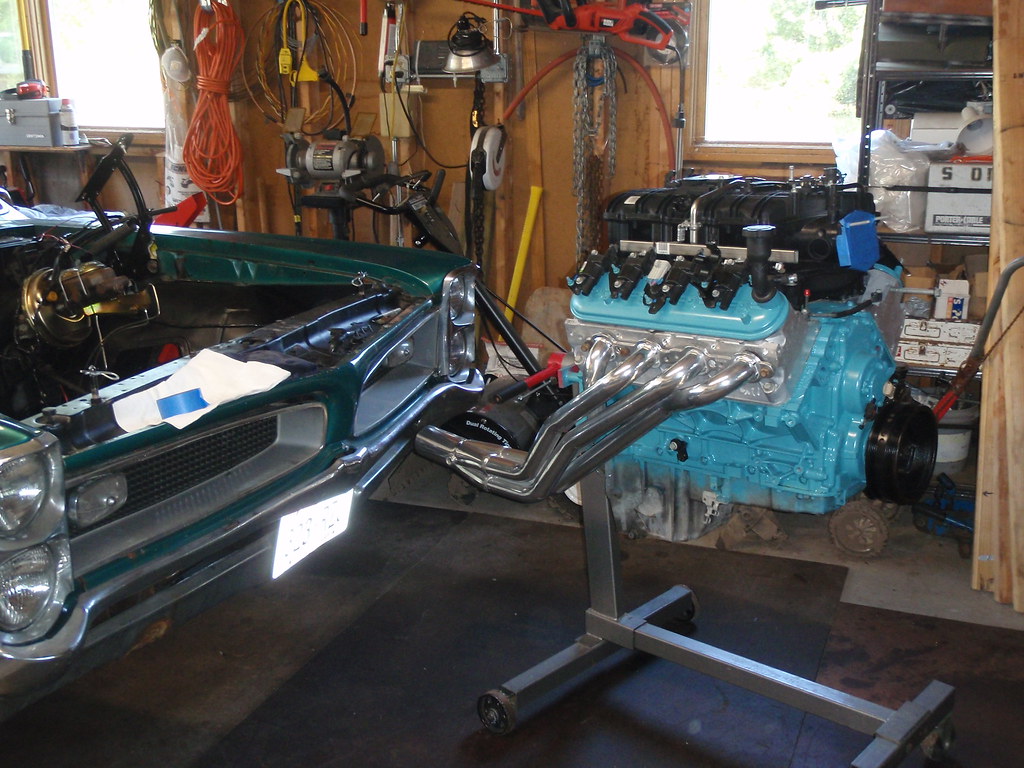
No problem. For the accessories I am going to be using the 2010 Camaro waterpump, alternator, ps pump and pulley. I'm going to try and fit the engine with the stock accessory brackets first, if they hit i'm getting the kwik alt/ps bracket. Not going to run AC. Probably going to have to order these from gmpartsdirect.com I'm waiting to hear from a dealership friend about matching the prices but since I'm still waiting I'm assuming its not good news. I just wish shipping and handling weren't so much.
For motor mounts I'm using the dougs headers/adapter plates, energy suspension mounts, with carshop BOP to SBC frame stands. Still waiting for the dougs adapters to arrive.
Oil pan is going to be Mast motorsports. Should be at my house tomorrow according to fedex! I ordered one from Mast last weekend only to find out they were backordered for at least 3 weeks. Well I got lucky searching ebay on Sun morning someone had just listed the pan up that they had but weren't going to use. Still brand new!
Thanks its funny that you say patina because that is exactly what I named the car! My dad was making fun of the condition of the paint and I just told him that's patina, seemed like a good name for it. It add character right?!?
For motor mounts I'm using the dougs headers/adapter plates, energy suspension mounts, with carshop BOP to SBC frame stands. Still waiting for the dougs adapters to arrive.
Oil pan is going to be Mast motorsports. Should be at my house tomorrow according to fedex! I ordered one from Mast last weekend only to find out they were backordered for at least 3 weeks. Well I got lucky searching ebay on Sun morning someone had just listed the pan up that they had but weren't going to use. Still brand new!
Chassis looks amazing...and i kinda like the "pitina" on the body, but i understand the want to restore a car like this....Good Work and Good Luck with the project....
07-13-2011, 08:14 PM
#10
TECH Apprentice
Thread Starter
Join Date: Jul 2011
Posts: 393
Likes: 0
Received 0 Likes
on
0 Posts
Quick ? also. I don't currently have a throttle body. I can get the truck/van TB for the same exact price as the LS3 camaro TB roughly $140 brand new. Now I was talking with John @ speartech and he had said that I can't use the LS3 camaro part that I will need a ls2 GTO TB or a 05-08 Vette. Now those are more then double the price. Does anyone know if this is correct?
07-13-2011, 09:07 PM
#11
Staging Lane
iTrader: (3)
Join Date: Jul 2009
Location: Virginia
Posts: 80
Likes: 0
Received 0 Likes
on
0 Posts

The 2010 camaro alt is going to interfere with the steering box. The old fbody accessories barely cleared. With the extra 3/4 spacing it will hit.
I used all of the truck stuff to save money and am really happy I did. It fits the engine bay a lot better then the car stuff.
I used all of the truck stuff to save money and am really happy I did. It fits the engine bay a lot better then the car stuff.
07-14-2011, 08:28 PM
#12
TECH Apprentice
Thread Starter
Join Date: Jul 2011
Posts: 393
Likes: 0
Received 0 Likes
on
0 Posts
Thanks for the info bsharpe. I have read through your build and I can't believe you got that 6spd auto in there, nice job!
Got my Mast pan today, and I located a trans. Its a 2009 4l80e with only 2000 miles on it going to pick it up tomorrow. Now to decide if I want to throw a circle D 3200 stall in it right away or wait a while...
Got my Mast pan today, and I located a trans. Its a 2009 4l80e with only 2000 miles on it going to pick it up tomorrow. Now to decide if I want to throw a circle D 3200 stall in it right away or wait a while...
07-18-2011, 09:22 PM
#13
TECH Apprentice
Thread Starter
Join Date: Jul 2011
Posts: 393
Likes: 0
Received 0 Likes
on
0 Posts
So tonight I sat down and really went through all the options for my front drive setup. I had to get this figured out because it was driving me nuts thinking about it and trying to find the best deal. I'm happy to report that I feel I got a good deal on everything. Its a hybrid kit of 2010 camaro parts and C6 vette stuff that I will build spacers for. My engine only came with the crank pulley so I had to get everything anyways.
At first I was looking at the 2010 camaro waterpump, tensioner, power steering setup, alternator etc and then putting it on the Kwik-perf brackets. This would have been a good choice at around $750 shipped total but those brackets just weren't doing it for me.
So then I started looking at the GMPP 19155167 with out AC vette setup. That was going to run about $750 shipped and then I still had to get the 2010 camaro L99 water pump which adds $180 and the belt tensioner for another $100 for a total of about $1050. This would still have required the spacers on the alt/ps bracket which is fine but I felt the price was too high.
This is what I came up with. I went here http://www.gmperformanceparts.com/_r...D_19202977.pdf for all the part numbers for the GMPP kit. I then started searching ebay and other places for the best prices. Well I ended up getting a 2009 power steering setup for a corvette off of ebay with only 3600 miles on it. This included the pump, hose, cap, reservoir, and bracket. Those parts add up fast on their own real quick. The cap and hose are $20 each from gm new for example. I can get a reman vette alternator for $150, but I haven't ordered it yet because I think I can do better from a junkyard or ebay and I don't need it for a bit. I found the camaro tensioner on ebay.
I found a great alternative to gmpartsdirect.com and their sky high shipping and handling charges. The site is gmpartscenter.net the prices are close to gmpd but their shipping charge is a flat $7.99 per order. Just comparing orders gmpartscenter.net was actually less $ by the time stuff is shipped. So I got the water pump, alt/ps bracket, belt, idler pulley, a brace thats needed all from there. Basically when it was all said and done I have a complete front drive setup for around $675 shipped from various places and this is including the water pump and the variable $150 for the alternator so it still could end up less then $600 if I get lucky and can find a good deal on that.
The cost of this swap is getting away from me fast so I'm pretty excited about finding some good deals on stuff!!
Last edited by FatfreeGTO; 07-23-2011 at 11:04 PM.
07-20-2011, 07:39 PM
#14
TECH Apprentice
Thread Starter
Join Date: Jul 2011
Posts: 393
Likes: 0
Received 0 Likes
on
0 Posts
More parts came today, got a 2007 LS7 90mm throttle body and I also received my C6 power steering pump setup. I wish my Dougs adapter plates would arrive so I can try test fitting the engine. UPS tracking shows them coming tomorrow, can't wait!
Does anyone have any opinions on the Tanks Inc. PA4 pump setup in my stock tank and corvette regulator for fuel supply? I already ran 3/8" stainless lines front to back when the chassis was done. I'm thinking this could be a better alternative then the Spectra EFI tank.
Does anyone have any opinions on the Tanks Inc. PA4 pump setup in my stock tank and corvette regulator for fuel supply? I already ran 3/8" stainless lines front to back when the chassis was done. I'm thinking this could be a better alternative then the Spectra EFI tank.
07-20-2011, 08:41 PM
#15
Teching In

Join Date: Jul 2011
Location: Orlando, FL
Posts: 21
Likes: 0
Received 0 Likes
on
0 Posts
Great looking build. I was looking at the tanks inc pumps too, would like to hear if anyone's had any success with them. In regards to you throttle body problem, if you haven't already resolved it,the truck throttle body is 88mm - not a huge difference from the 90mm LS3 tb and it will plug right in and bolt right on the LS3 intake. I've seen them on ebay new from $90-$125 shipped.
http://cgi.ebay.com/ebaymotors/L92-L...#ht_500wt_1182
http://cgi.ebay.com/ebaymotors/L92-L...#ht_500wt_1182
http://cgi.ebay.com/ebaymotors/L92-L...#ht_500wt_1182
http://cgi.ebay.com/ebaymotors/L92-L...#ht_500wt_1182
Last edited by 70Chevelle-LS; 07-20-2011 at 08:59 PM.
07-20-2011, 09:14 PM
#16
TECH Apprentice
Thread Starter
Join Date: Jul 2011
Posts: 393
Likes: 0
Received 0 Likes
on
0 Posts
Thanks 70Chevelle I got a throttle body today though. Here is an option for you with your chevelle with the gas tank. People have put in the Grand national tank since its setup for efi already and its properly baffled. Check it out here, these guys say it bolts right in and the straps even match up. http://www.chevelles.com/forums/showthread.php?t=334222
07-21-2011, 09:11 PM
#17
TECH Apprentice
Thread Starter
Join Date: Jul 2011
Posts: 393
Likes: 0
Received 0 Likes
on
0 Posts
Things are moving along spoke with PSI conversions about their harness again today and sent them the details of what I need so that will be on its way as well. I received my Dougs SK100 adapter plates for the engine today as well as a 2010 vette alternator with less then 10 miles on it that I got out of a yard for less than a 1/3 of the price of GMPD. Starter was ordered today as well. Its amazing the deals you can find searching the junk yards.
Planning on test fitting the engine this weekend I just hope it cools off a little bit. Been so hot here lately and I work outside everyday, the last thing I want to do is spend more time outside. Only things that I have left to work out before I put the whole puzzle together is my transmission crossmember and slip yoke. And the fuel system. I've read some builds where they were able to reuse the TH400 crossmember with the 4l80e by just moving it back, I'm hoping that is what will work for me. Also the slip yoke from my TH400 slipped right onto the output shaft of my 4l80e which is promising, but I've read about the amount of spline engagement as a potential issue. I pulled the tailshaft housing off and I have a fully splined output shaft (approx 5" or so) not the type that has a couple inches of splines and then an o-ring, also there is some type of pressed on shroud around the shaft that the slip yoke will go into... I'm thinking that there must be an O-Ring in that shroud to prevent leaks and since the 4l80e has a bolted on yoke I'm thinking I will have to pull that O-ring out to allow the yoke to "slip" If anyone knows anything about what I have or need please let me know, thanks!!
Hopefully I will get some more pictures this weekend I know I'm slacking in that dept right now, because that's what I look at the most is the pictures
Its amazing how time consuming this project really is, I probably have only 8-10 hours in pulling the old engine/trans out and cleaning some stuff up but I probably have roughly 50 hours spent online researching as much as I possibly can about what is needed to complete the swap. I'm still sticking to my Sept 1st deadline which I hope I can meet. 2 months start to finish would be a pretty good feat I think.
Last edited by FatfreeGTO; 07-23-2011 at 11:06 PM.
07-23-2011, 08:33 PM
#18
TECH Apprentice
Thread Starter
Join Date: Jul 2011
Posts: 393
Likes: 0
Received 0 Likes
on
0 Posts
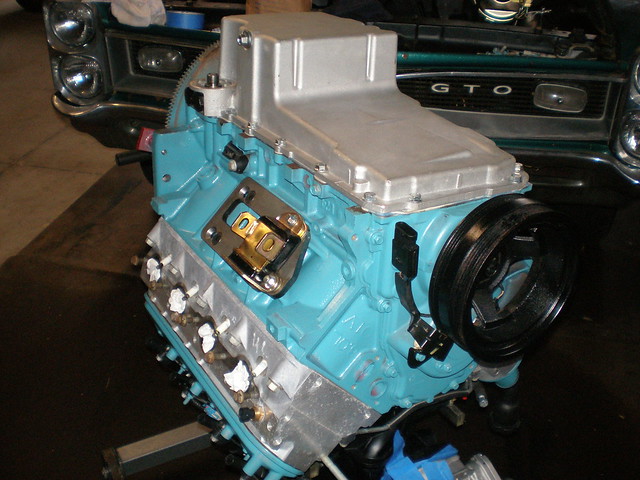
So today was eventful... I got the mast oil pan on last night, then today I put on the 6.0 flexplate so I can use my 4l80e.
I put the engine in, tie rods hit, took engine out made adjustments to dougs adapter plates.... Well did this 5 or 6 more times I have it to the point where I have a solid 1/8" of clearance on the drivers side tie rod but the passenger side still hits. My tie rods have the grease fittings on the back so thats not the issue. It starts to make contact right at the last 1/4 turn of the steering wheel. My setup is using a Buick Olds Pontiac to SBC adapter for the frame stands made by carshopinc.com http://carshop.carshopinc.com/produc...110328/CSP2380 Energy suspension short and wide mounts and the dougs adapters on the engine. I am only getting the clearance that I do have because I have the frame stands shimmed up 1/4" at this point.
I've seen alot of people that have their engine right against the firewall and mine is about 2 3/8" away lots of room, and I still have a solid 3/4" - 1" + between the oil pan sump and the crossmember. I'm thinking if I get my engine even further back that will help with tie rod clearance but I'm not sure, conversely the mast pan is actually notched in a spot where if I somehow brought the engine another 3/4" forward the tie rods would go into the notch but then the sump would be right against the crossmember.
For now I'm leaving it until I do some trial fitting on the 4l80e because I feel that the farther forward the engine is the easier it will be to get that trans in there without modifying the tunnel so much. Plus I am thinking that I need to get the trans in to see how it effects the tilt of the engine for the tie rods.
I also test fit the dougs headers, passenger side fit great no problems just kinda close to the floorpan, drivers side is touching the steering column but the header isn't all the way tight to the heads yet so that is probably why. Again the ds is pretty close to the floor pan. I am going to have to offset down from the collectors to match up to the pypes 2.5" exhaust. Then again this might all change when the trans goes in as well. That's tomorrows project.
BJ
Last edited by FatfreeGTO; 07-23-2011 at 11:12 PM.
07-23-2011, 10:05 PM
#19
TECH Apprentice
Thread Starter
Join Date: Jul 2011
Posts: 393
Likes: 0
Received 0 Likes
on
0 Posts
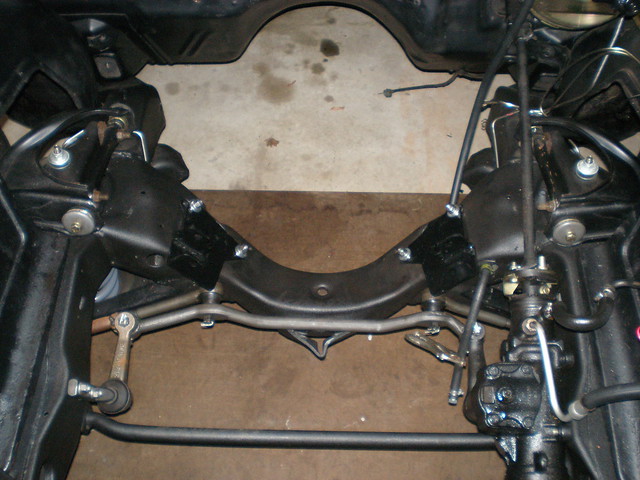
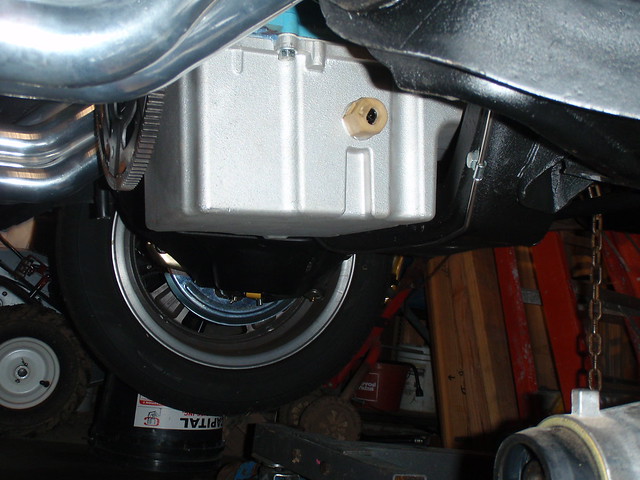
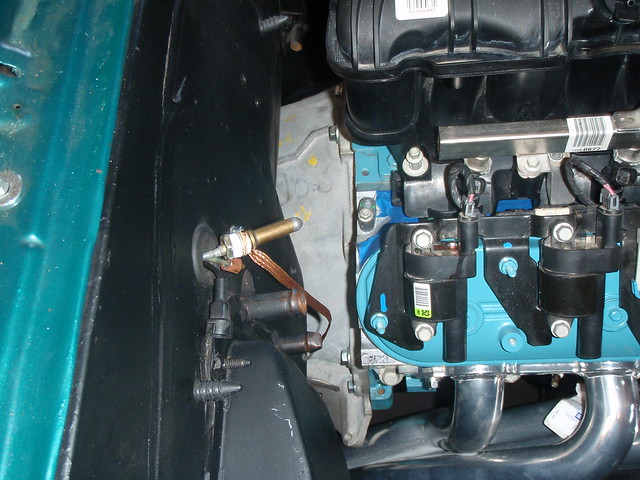
Not enough room to work

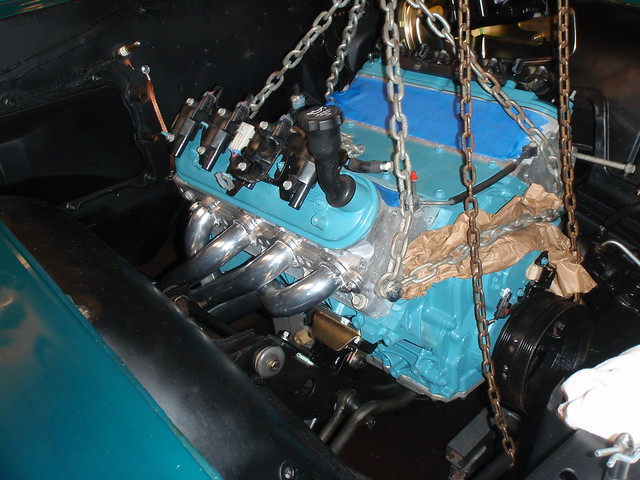
Mast Motorsports oilpan
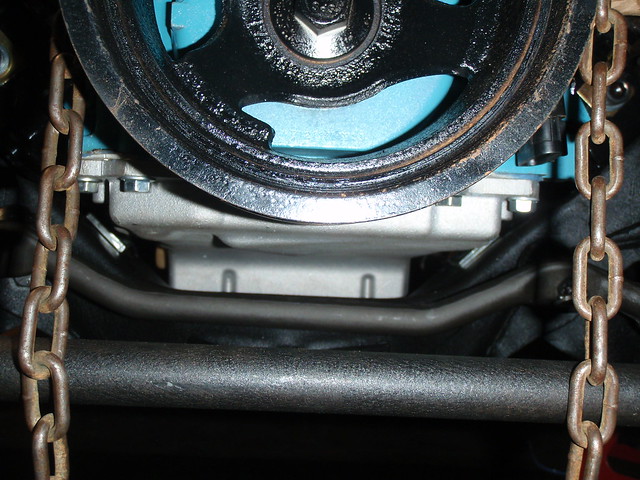
Engine in place
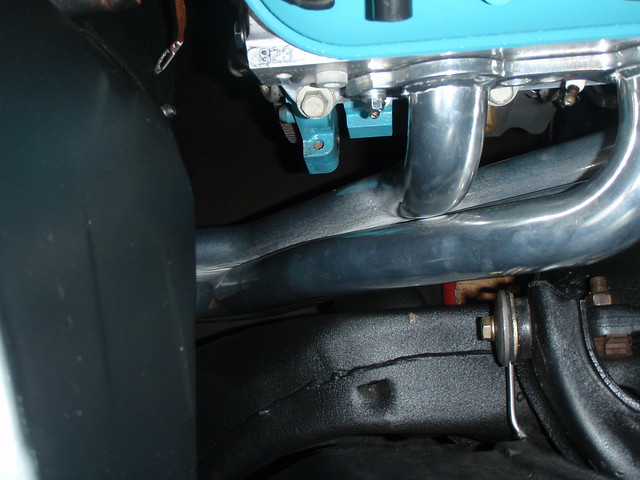
Passenger side Dougs Header clearance
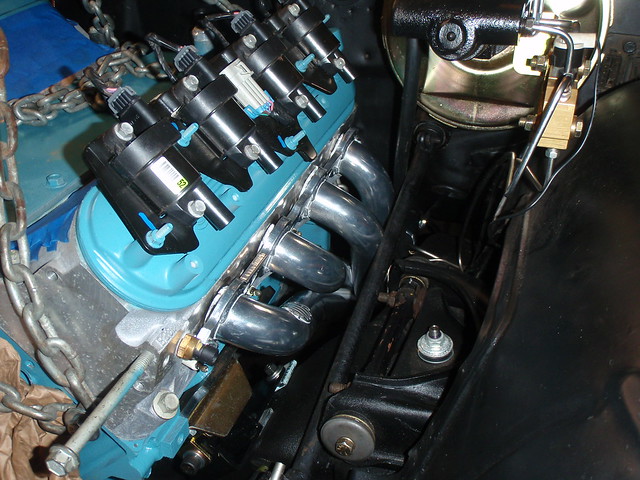
Drivers side, see the header currently touching the steering column...
Passenger side firewall clearance 2 3/8"

Mast oil pan sits above the bottom plane of the engine crossmember!
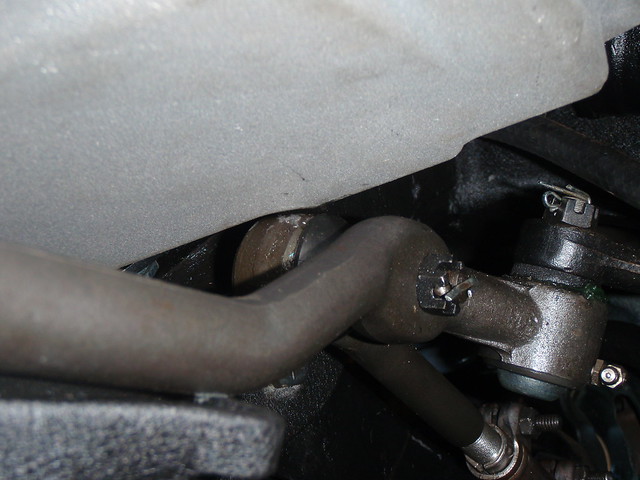
Passenger side tie rod hitting, could clear if I move the engine forward another 3/4"

1/8" clearance on drivers side tie rod at full lock.
Mast Motorsports oilpan
Engine in place
Passenger side Dougs Header clearance
Drivers side, see the header currently touching the steering column...
Passenger side firewall clearance 2 3/8"
Mast oil pan sits above the bottom plane of the engine crossmember!
Passenger side tie rod hitting, could clear if I move the engine forward another 3/4"
1/8" clearance on drivers side tie rod at full lock.
Last edited by FatfreeGTO; 07-23-2011 at 11:20 PM.
07-31-2011, 05:14 PM
#20
TECH Apprentice
Thread Starter
Join Date: Jul 2011
Posts: 393
Likes: 0
Received 0 Likes
on
0 Posts
Well the engine is set in its final place, and the 2009 4l80e is bolted up and in place as well. I didn't have to modify anything in the trans tunnel yet. The only mods I will have to make will be for clearance for the cooler lines, I am probably just going to cut out and reweld that section of the tunnel on the passenger side. I was able to reuse my th400 crossmember just had to move it back, I haven't measured the actual distance yet that it went back. I used a new replacement th400 rubber mount that I had laying around everything bolted up perfect.
When checking my driveline angle on the starter mounting surface its showing 6* I have the engine spaced up 1/4" so I'm sure that is something that is making that number a little bit high. I was hoping for 4-5* Since I have to get a new driveshaft made anyways I may just get one with a CV joint built into it like the new Camaros have. Not exactly sure what I am going to do yet. I could just get my old driveshaft shortened for now and see if I have vibrations or not.
I also have the front accessories in place now. Tomorrow at work I have to make a 1.5" spacer for the C6 alt/ps bracket, I currently have it spaced out with washers.
As for the headers the passenger side is just fine, I might not get the outermost bolt into the torque converter cover, I'm still waiting for that part from the dealership. On the drivers side the 2nd from the back tube is hitting the steering column. I am going to have to dent that in. I don't see anyway around it. Also the front brake stainless crossover line that runs along the crossmember is really close to the drivers side header so I need to adjust the bends in that to get it some clearance.
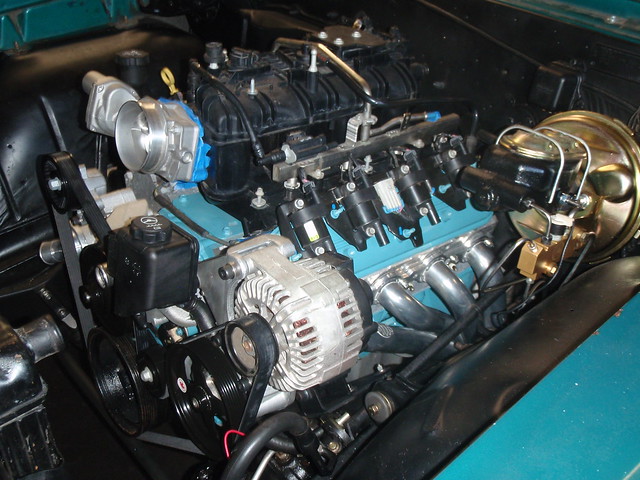
Well here are the pics!
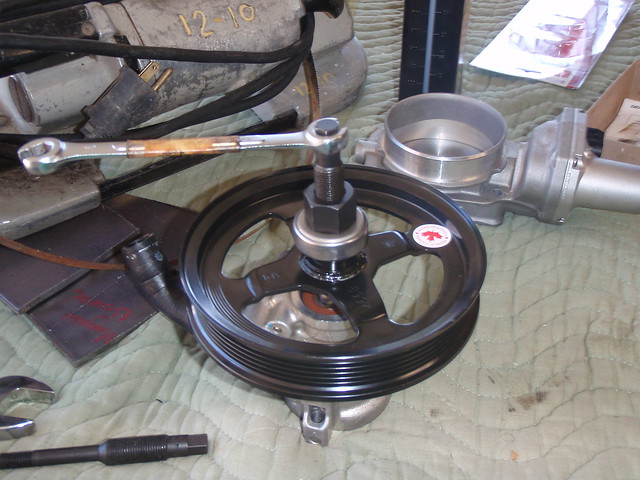
Pressing on the powersteering pulley to the C6 vette pump.
4l80e bolted to the back of the engine.
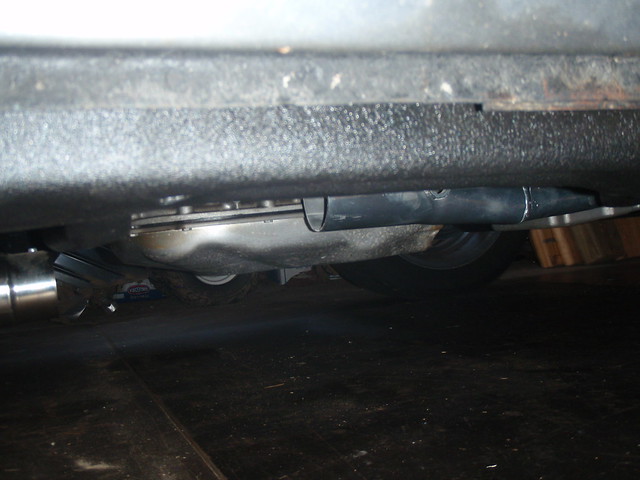
Showing ground clearance for header and trans pan, no worries there at all. I actually have to connect the header to the exhaust with a offset down.

2010 camaro waterpump and tensioner. All the rest of the FEAD is C6 vette parts.
Things that I need to figure out this week are.
- Install wire harness from PSI it was shipped on Sat.
- Order a walboro 255 external fuel pump and vette FPR. I spoke with Hector at Ricks tanks about the vaporworx tank. That ultimately is the route that I will go but I don't have it in the budget for this year to buy that tank and pump setup.
- Order the trans cooler line fittings that I need as well as the lines themselves.
- Figure out what to do about a radiator. I'm sure that one I have would work but its beat up and my th400 had started to slip so I would need to have it flushed out by a shop anyways to be safe with the 4l80e. So instead of spending that money I will just put it towards a new radiator. I've been looking at the 90-96 vette LT1 radiator, that or I might just get a new performance radiator that is meant for a 66 GTO with a built in trans cooler. Just not sure if I want to do aluminum or stick with a brass/copper unit. I've read that I should stay away from the aluminum ones....
Well comments are always welcome
When checking my driveline angle on the starter mounting surface its showing 6* I have the engine spaced up 1/4" so I'm sure that is something that is making that number a little bit high. I was hoping for 4-5* Since I have to get a new driveshaft made anyways I may just get one with a CV joint built into it like the new Camaros have. Not exactly sure what I am going to do yet. I could just get my old driveshaft shortened for now and see if I have vibrations or not.
I also have the front accessories in place now. Tomorrow at work I have to make a 1.5" spacer for the C6 alt/ps bracket, I currently have it spaced out with washers.
As for the headers the passenger side is just fine, I might not get the outermost bolt into the torque converter cover, I'm still waiting for that part from the dealership. On the drivers side the 2nd from the back tube is hitting the steering column. I am going to have to dent that in. I don't see anyway around it. Also the front brake stainless crossover line that runs along the crossmember is really close to the drivers side header so I need to adjust the bends in that to get it some clearance.
Well here are the pics!
Pressing on the powersteering pulley to the C6 vette pump.
4l80e bolted to the back of the engine.
Showing ground clearance for header and trans pan, no worries there at all. I actually have to connect the header to the exhaust with a offset down.
2010 camaro waterpump and tensioner. All the rest of the FEAD is C6 vette parts.
Things that I need to figure out this week are.
- Install wire harness from PSI it was shipped on Sat.
- Order a walboro 255 external fuel pump and vette FPR. I spoke with Hector at Ricks tanks about the vaporworx tank. That ultimately is the route that I will go but I don't have it in the budget for this year to buy that tank and pump setup.
- Order the trans cooler line fittings that I need as well as the lines themselves.
- Figure out what to do about a radiator. I'm sure that one I have would work but its beat up and my th400 had started to slip so I would need to have it flushed out by a shop anyways to be safe with the 4l80e. So instead of spending that money I will just put it towards a new radiator. I've been looking at the 90-96 vette LT1 radiator, that or I might just get a new performance radiator that is meant for a 66 GTO with a built in trans cooler. Just not sure if I want to do aluminum or stick with a brass/copper unit. I've read that I should stay away from the aluminum ones....
Well comments are always welcome
Last edited by FatfreeGTO; 09-04-2011 at 06:31 PM.

