
79 Cutlass Wagon, 5.3 G machine
 09-25-2011, 08:50 AM
#1
On The Tree
Thread Starter
Join Date: Aug 2010
Location: Eagle Mountain, Utah
Posts: 143
Likes: 0
Received 0 Likes
on
0 Posts
Hey all, I'm a newbie here and a long time supporter of the 400 small block Chevy. I've had them in pretty much every vehicle I've owned including my current ride, "Pumkinator" my Pro-Touring '79 Olds Cutlass Cruiser wagon project.
Recently I joined the ranks of the LS crowd when I purchased a 5.3 mill from a 2006 Chevy 4x4. I'm just sick of farting around with carbs and am well converted to the fact that LS motors make power way easier than a traditional small block. I'm also a college student in a Street Rod program and saw this as the perfect opportunity to become familiar with the swap.
To get everyone caught up on my build I'm copy and pasting from another forum. This isn't just an LS swap, it's a total transformation of a granny's grocery getter into a pretty sweet driver and cone killer on a really tight budget. Hope you enjoy the ride...
Last edited by SRDart; 09-25-2011 at 09:16 AM.
 09-25-2011, 08:57 AM
#2
On The Tree
Thread Starter
Join Date: Aug 2010
Location: Eagle Mountain, Utah
Posts: 143
Likes: 0
Received 0 Likes
on
0 Posts
Meet "The Pumkinator", my 1979 Olds Cutlass Cruiser that I picked up about 5 years ago. After a bit of tweaking and wrenching I've been daily driving it as my business hauler since that time, and decided recently it's time for a major overhaulin'. Hope you enjoy, as usual any comments/suggestions land on open ears...
Here's the car right after purchasing.
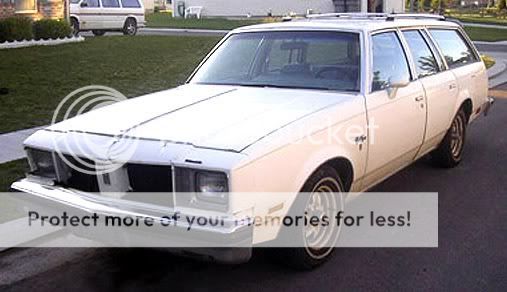
Factory Options-
140 hp 305 Chevy V8
TH250
2.41 gears in the 7.5" rear
Rally gauge pack, no tach
Olds Rally wheels
Rear air deflector
Light Blue vinyl interior
8-track AM/FM stereo (still works!)
The car ran terrible, had absolutely no power despite the 305 had been rebuilt about 36,000 miles prior. The previous owner's wife bumping a truck in the snow sealed it's fate, and for $300 I drove it home.
First order of business after getting it home was pull out the G-tech. A whopping 21.79 @ 59 mph! The 0-60 time didn't even have a chance to register! :sick:
Checked the timing and found it WAAAAAAY retarded, in every sense of the word. Bumped it up and magically I felt some ponies again. Checked the carb and saw that the factory Q-jet's choke had been paper-clip wired open. Noticed in the process of doing that they blocked the secondaries from opening! :doh: Fixed that and with no other changes, the second G-tech run yielded an 18.67 at 74 mph. This is at 4500ft altitude up here in the Rockies, so I figured this was good enough to drive for the time being.
Next on the list was new front end to pass our state's safety inspection. After a few days of searching I found a '78 Cutlass Cruiser in a farmer's field just a few miles from my place. Body was rusty, interior was hammered, but it had a transplanted Chevy 350/TH350 and a good front nose section. The guy told me they quit driving it because the trans was slipping. "How much you want for it?" I asked, "Oh... I'll take $75." Wasn't long before it was on a tow dolly on the way home. I Installed a battery and some gas in the carb and it fired right up! Ran o.k. but was clearly a high mile motor. Pulled and sold it, kept the trans as a core, and yanked the front clip and every other usable part off it before hauling it to the wrecking yard. Got a bunch of parts and made $300 cash off it, not a bad deal.
Here's the car right after purchasing.
Factory Options-
140 hp 305 Chevy V8
TH250
2.41 gears in the 7.5" rear
Rally gauge pack, no tach
Olds Rally wheels
Rear air deflector
Light Blue vinyl interior
8-track AM/FM stereo (still works!)
The car ran terrible, had absolutely no power despite the 305 had been rebuilt about 36,000 miles prior. The previous owner's wife bumping a truck in the snow sealed it's fate, and for $300 I drove it home.
First order of business after getting it home was pull out the G-tech. A whopping 21.79 @ 59 mph! The 0-60 time didn't even have a chance to register! :sick:
Checked the timing and found it WAAAAAAY retarded, in every sense of the word. Bumped it up and magically I felt some ponies again. Checked the carb and saw that the factory Q-jet's choke had been paper-clip wired open. Noticed in the process of doing that they blocked the secondaries from opening! :doh: Fixed that and with no other changes, the second G-tech run yielded an 18.67 at 74 mph. This is at 4500ft altitude up here in the Rockies, so I figured this was good enough to drive for the time being.
Next on the list was new front end to pass our state's safety inspection. After a few days of searching I found a '78 Cutlass Cruiser in a farmer's field just a few miles from my place. Body was rusty, interior was hammered, but it had a transplanted Chevy 350/TH350 and a good front nose section. The guy told me they quit driving it because the trans was slipping. "How much you want for it?" I asked, "Oh... I'll take $75." Wasn't long before it was on a tow dolly on the way home. I Installed a battery and some gas in the carb and it fired right up! Ran o.k. but was clearly a high mile motor. Pulled and sold it, kept the trans as a core, and yanked the front clip and every other usable part off it before hauling it to the wrecking yard. Got a bunch of parts and made $300 cash off it, not a bad deal.
09-25-2011, 08:58 AM
#3
On The Tree
Thread Starter
Join Date: Aug 2010
Location: Eagle Mountain, Utah
Posts: 143
Likes: 0
Received 0 Likes
on
0 Posts
After a couple months the TH250 started having issues so next in order was a new trans and some hp upgrades. I picked up a decent used TH350 from a friend and pulled a small block 406 from storage that I used to have in my Suburban. It had about 60,000 miles on the rebuild-
Stock 400 bottom end with ARP rod bolts
.030 8.7:1 eutectic pistons
Factory 400 smogger heads
Crane 266 cam, lifters, springs
Ebrock Performer and 750 Q-jet.
I swapped the cam for a Comp XE268 and the Performer for a Proform air gap dual plane intake and painted it GM corporate blue before slipping it and the TH350 with a stock converter into the engine bay.

Not a tremendous hp killer but it made decent torque and was a great daily driver motor. I installed it with Hedman shorty headers and a 3" single exhaust through a Flowmaster 40 series. On the dyno best run it made a little bit disappointing 221 hp and 282 ft lbs. The a/f ratio was pretty rich at the time and I think the altitude, low compression and junk heads were limiting it quite a bit.
Taking it to the track it ran pretty consistent 15.70's at 87mph. Consistent enough for me to win first place in points for the year in the Club Racing Series street tire class at Rocky Mountain Raceway. Overall our Utah Muscle Car Association club took 2nd place in street tire class. (Way to go boys!) My 60ft times were 2.4s, limited by the grandpa gears and stock converter. I've learned to live with it as it puts down 21 mpg highway without overdrive, but that's all changing soon.
Stock 400 bottom end with ARP rod bolts
.030 8.7:1 eutectic pistons
Factory 400 smogger heads
Crane 266 cam, lifters, springs
Ebrock Performer and 750 Q-jet.
I swapped the cam for a Comp XE268 and the Performer for a Proform air gap dual plane intake and painted it GM corporate blue before slipping it and the TH350 with a stock converter into the engine bay.
Not a tremendous hp killer but it made decent torque and was a great daily driver motor. I installed it with Hedman shorty headers and a 3" single exhaust through a Flowmaster 40 series. On the dyno best run it made a little bit disappointing 221 hp and 282 ft lbs. The a/f ratio was pretty rich at the time and I think the altitude, low compression and junk heads were limiting it quite a bit.
Taking it to the track it ran pretty consistent 15.70's at 87mph. Consistent enough for me to win first place in points for the year in the Club Racing Series street tire class at Rocky Mountain Raceway. Overall our Utah Muscle Car Association club took 2nd place in street tire class. (Way to go boys!) My 60ft times were 2.4s, limited by the grandpa gears and stock converter. I've learned to live with it as it puts down 21 mpg highway without overdrive, but that's all changing soon.
09-25-2011, 08:59 AM
#4
On The Tree
Thread Starter
Join Date: Aug 2010
Location: Eagle Mountain, Utah
Posts: 143
Likes: 0
Received 0 Likes
on
0 Posts
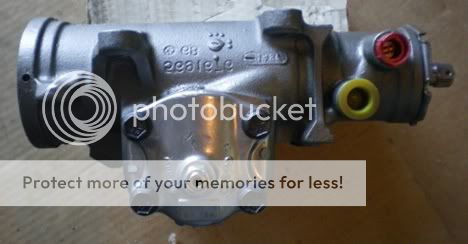
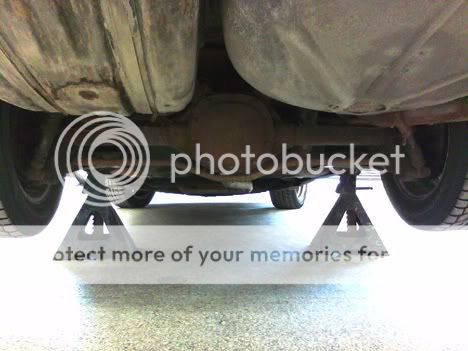
After about a year of driving it was developing a bad case of loose front suspension and it was also time for a cosmetic upgrade. I picked up new ball joints, tie rod ends and a 12:1 ratio AGR steering box.
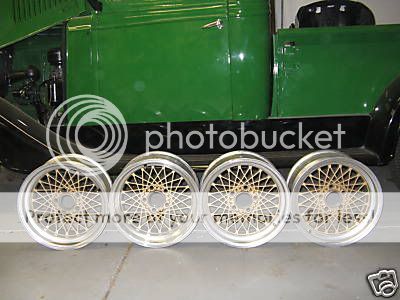
I also scored a set of Trans Am GTA wheels off ebay for a great price and after a little rattle can semi-gloss black effort threw on a set of 225-50 and 255-50-16 BFG G-Force Sport tires. Because of the funky F-body offsets, I had to put the rear wheels on the front of the car with a 3/4" spacer and extended studs and the front wheels on the back.
Photo from the ebay ad, anybody on here?
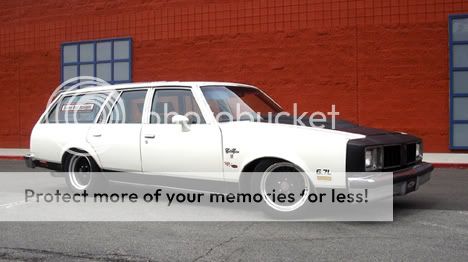
While I was in there I cut the factory springs to get a feel for the look of it lowered, and added a little more rattle can semi-gloss to hide some paint chips on the lower panels and hood. Here's the end result. It's dropped about 3" out back and almost 4" up front.
Last summer I got a taste of road course and autocross when I attended an open track "Wide Open Wednesday" at Miller Motorsports Park in Tooele, UT. I ran the autocross several times and the road course once. Unfortunately part way through the run on the road course unknown to me a valve spring cracked. Luckily the valve got stuck in the guide and it wasn't until I got in the pits at idle the valve let go and tagged a piston. Fortunately I shut it down fast enough that all it did was scuff the carbon on the piston and bent the valve slightly. No major damage to the short block. Whew! Time for a refreshing!
I also scored a set of Trans Am GTA wheels off ebay for a great price and after a little rattle can semi-gloss black effort threw on a set of 225-50 and 255-50-16 BFG G-Force Sport tires. Because of the funky F-body offsets, I had to put the rear wheels on the front of the car with a 3/4" spacer and extended studs and the front wheels on the back.
Photo from the ebay ad, anybody on here?
While I was in there I cut the factory springs to get a feel for the look of it lowered, and added a little more rattle can semi-gloss to hide some paint chips on the lower panels and hood. Here's the end result. It's dropped about 3" out back and almost 4" up front.
Last summer I got a taste of road course and autocross when I attended an open track "Wide Open Wednesday" at Miller Motorsports Park in Tooele, UT. I ran the autocross several times and the road course once. Unfortunately part way through the run on the road course unknown to me a valve spring cracked. Luckily the valve got stuck in the guide and it wasn't until I got in the pits at idle the valve let go and tagged a piston. Fortunately I shut it down fast enough that all it did was scuff the carbon on the piston and bent the valve slightly. No major damage to the short block. Whew! Time for a refreshing!
09-25-2011, 09:00 AM
#5
On The Tree
Thread Starter
Join Date: Aug 2010
Location: Eagle Mountain, Utah
Posts: 143
Likes: 0
Received 0 Likes
on
0 Posts
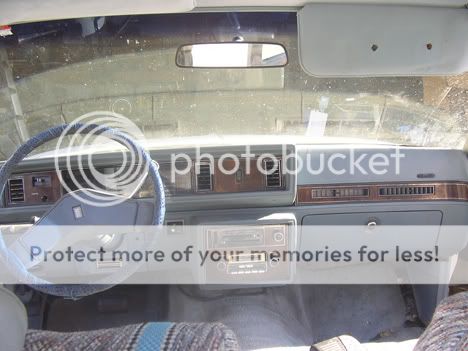
Here are some videos I got loaded up today. You can see in these how I used some vinyl dye and changed the dash to black from light blue. Also covered the fakie wood grain with brushed aluminum vinyl.
1st try at the road course. Only got to run one lap because of troubles with the car. First off I had just installed a new Hurst ratchet shifter for the TH350 earlier that day and it wasn't quite adjusted right. You can hear in the video a couple unexpected downshifts into 1st instead of 2nd at curves and a couple times it went from 1st to 3rd. Then the cracked valve spring thing happened. When I get into the pits at the end you can hear a pretty gnarly tapping of the rocker on the stuck valve. While it was idling and I was trying to figure it out the valve dropped but I was able to shut it down before any major damage to the short block. The wind was blowing on the camera so don't turn the sound too high.
http://www.youtube.com/watch?v=ZMAOQV3ZDZA
Next video was my first attempt at autocross. Kind of a wimpy course but a good way to get my feet wet. The video is my 4th or 5th run of the day. This was after pulling the 400 and putting the factory 305 back in with a Crane 266 cam and the rest of the bolt-ons from the 400. It's pretty slow off the line but gets going eventually.
http://www.youtube.com/watch?v=7TXeM3lGHek
Next is the same day from outside the car with a no sound digital camera. Woohoo! Look at the rear body roll near the end of the course. Needed a rear sway bar pretty bad at the time.
http://www.youtube.com/watch?v=3RkY8CWtYhU
09-25-2011, 09:01 AM
#6
On The Tree
Thread Starter
Join Date: Aug 2010
Location: Eagle Mountain, Utah
Posts: 143
Likes: 0
Received 0 Likes
on
0 Posts
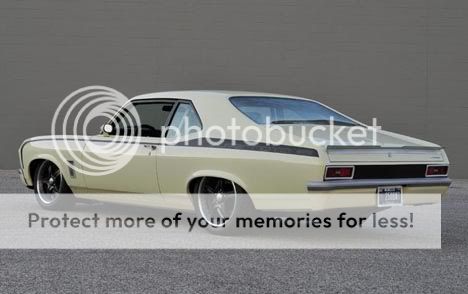
I should probably intro myself a little here. I've grown up around muscle cars and drag racing and started drawing cars after I read my first "Cartoons" mag around age 12. After some time in automotive retail I got out and put my artistic skills to work and became a graphic designer. When the economy tanked the company I was working for went into the toilet and I found myself along with about 1.7 billion other graphic designers looking for work, a real joke to even get a foot in the door for an interview. At that point I started pushing my side business, Street Rod Designs, to keep $ coming in. In the process of drawing cars of course I've drawn mine. The wagon has gone through 3 different styling changes, but I think I'm finally pretty well sold on the last.
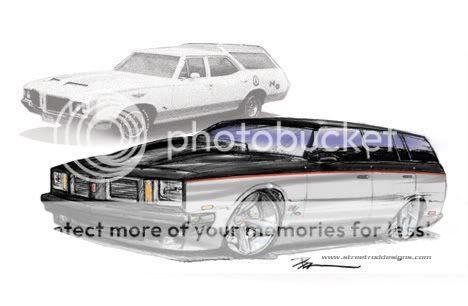
This first concept quick sketch was a pretty simple idea based on the mid 80's Hurst/Olds Cutlass. 17" Torque Thrusts and a low stance made it shout a bit.
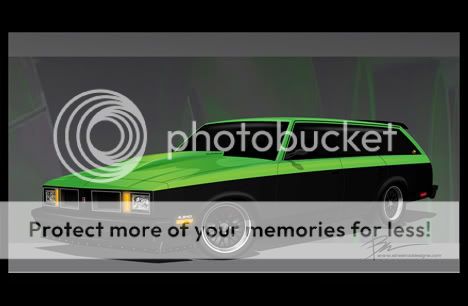
After a while of looking at it I felt the wagon needed a look that was a little less overdone and a little more aggressive. I really like this style stripe and a med-dark charcoal grey with some carbon fiber accents. I liked this theme but this stripe seemed like it had been done several times and I felt some flash was missing.
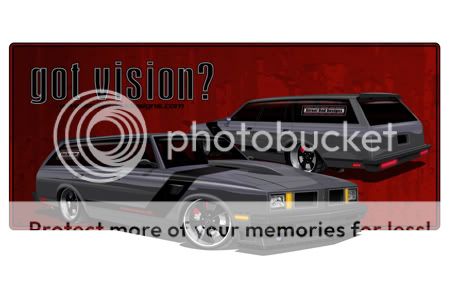
During this time of exploring ideas for the wagon I finally gave up on the graphic design gig and felt it was time to get back to my roots and passion for employment. After a lot of research in schools I decided to attend a "Collision Repair, Street Rod Emphasis" program at a Utah Valley University, only about 20 miles from where I live. Turns out the street rod instructor Cris Bogges and his program have been called by many "the best in the west". I talked with him several times before deciding to hit the books again, and had no idea about his reputation until I started asking around. A real down to earth humble guy with mad fabricating skills.
Since I needed a project to work on at school and the wagon needed a facelift things fell right into place. Ultimately I'd like to work in a shop building killer pro-touring and low-rod style machines so this car is the perfect practice project. Although the grey wagon theme was cool I figured I needed something a little more loud for two reasons- 1. to draw attention to my side business and design skills and 2. to catch the attention of shop owners/ possible employers after graduation. I've always dug the look of old school Mercs and such with a satin sheen but I don't like to see newer cars painted entirely that way. To me it looks a little too much like it isn't finished, just my opinion. Gotta have at least some shiny paint on a nice pro-touring car so I combined the two ideas. I narrowed it down to two colors, new Camaro green and Avalanche orange.
After comparing them the orange stuck and the name Pumkinator seemed a natural. In this rendering I kept details fairly simple, I just wanted to compare colors.
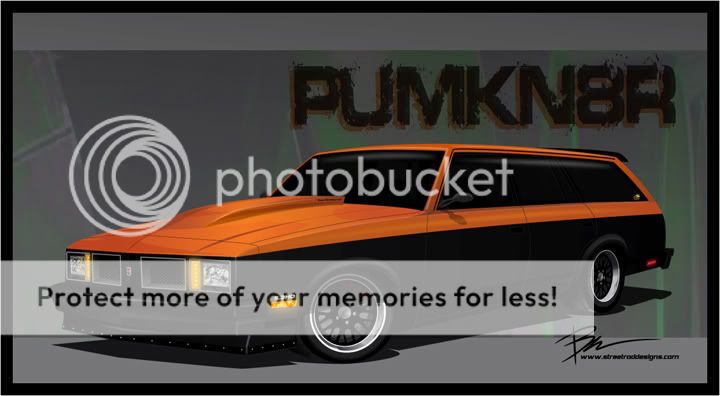
This is the base art for the car, more concept sketches coming soon...
This first concept quick sketch was a pretty simple idea based on the mid 80's Hurst/Olds Cutlass. 17" Torque Thrusts and a low stance made it shout a bit.
After a while of looking at it I felt the wagon needed a look that was a little less overdone and a little more aggressive. I really like this style stripe and a med-dark charcoal grey with some carbon fiber accents. I liked this theme but this stripe seemed like it had been done several times and I felt some flash was missing.
During this time of exploring ideas for the wagon I finally gave up on the graphic design gig and felt it was time to get back to my roots and passion for employment. After a lot of research in schools I decided to attend a "Collision Repair, Street Rod Emphasis" program at a Utah Valley University, only about 20 miles from where I live. Turns out the street rod instructor Cris Bogges and his program have been called by many "the best in the west". I talked with him several times before deciding to hit the books again, and had no idea about his reputation until I started asking around. A real down to earth humble guy with mad fabricating skills.
Since I needed a project to work on at school and the wagon needed a facelift things fell right into place. Ultimately I'd like to work in a shop building killer pro-touring and low-rod style machines so this car is the perfect practice project. Although the grey wagon theme was cool I figured I needed something a little more loud for two reasons- 1. to draw attention to my side business and design skills and 2. to catch the attention of shop owners/ possible employers after graduation. I've always dug the look of old school Mercs and such with a satin sheen but I don't like to see newer cars painted entirely that way. To me it looks a little too much like it isn't finished, just my opinion. Gotta have at least some shiny paint on a nice pro-touring car so I combined the two ideas. I narrowed it down to two colors, new Camaro green and Avalanche orange.
After comparing them the orange stuck and the name Pumkinator seemed a natural. In this rendering I kept details fairly simple, I just wanted to compare colors.
This is the base art for the car, more concept sketches coming soon...
09-25-2011, 09:02 AM
#7
On The Tree
Thread Starter
Join Date: Aug 2010
Location: Eagle Mountain, Utah
Posts: 143
Likes: 0
Received 0 Likes
on
0 Posts
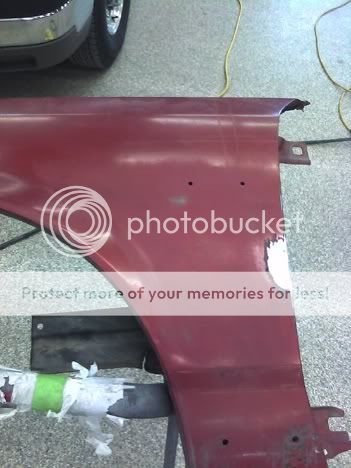
This past April I completed my first year of collision repair classes. We learned all the basics about body work and paint. During open lab time I was able to bring the wagon into the shop. Unfortunately it had gotten a cheap re-paint along the way, which included a poorly done filler hack. A lot of the areas around the rear wheels have been forming rust behind the bondo and by last year I had up to fist sized rust holes. Replacement sheet metal for wagons seems hard to come by, let alone a 79 Cutlass so I had to fab patch panels from sheet metal. Some photos...
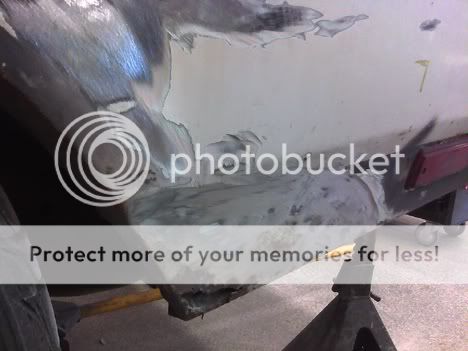
Passenger side. That's 3" pipe so you can see the size of the hole. This side was pretty much limited to this area.
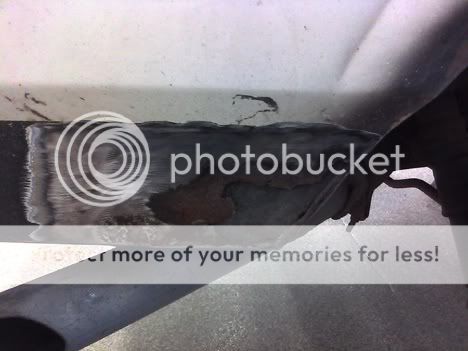
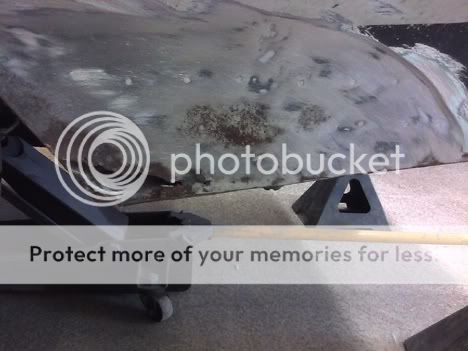
Driver's side had smaller holes but was in a lot worse shape. Rust was everywhere and you can see how thick the bondo was. Looks like they just slopped it on even in the drilled holes used to pull a dent. Not welding in these areas was just asking for rust to form.
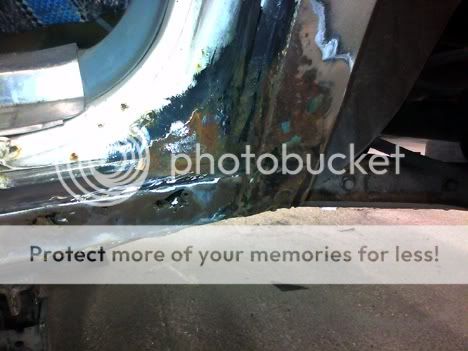
Here's the driver side after cutting out the rust and applying Por-15 to the inner panels. Also the fabricated patch panel.

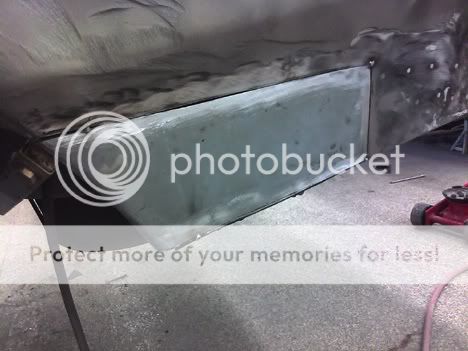
I patched all other holes in a similar manner, welding new metal in and then applying Por-15 to hold them over until I can get back to them in when school starts up again in August.
Passenger side. That's 3" pipe so you can see the size of the hole. This side was pretty much limited to this area.
Driver's side had smaller holes but was in a lot worse shape. Rust was everywhere and you can see how thick the bondo was. Looks like they just slopped it on even in the drilled holes used to pull a dent. Not welding in these areas was just asking for rust to form.
Here's the driver side after cutting out the rust and applying Por-15 to the inner panels. Also the fabricated patch panel.
I patched all other holes in a similar manner, welding new metal in and then applying Por-15 to hold them over until I can get back to them in when school starts up again in August.
Trending Topics
09-25-2011, 09:03 AM
#8
On The Tree
Thread Starter
Join Date: Aug 2010
Location: Eagle Mountain, Utah
Posts: 143
Likes: 0
Received 0 Likes
on
0 Posts
Most of the guys in the first year classes are headed towards a career as a collision repair technician and focused on fixing dings and dents on their cars during open lab times. I took a little different route and started hacking, cutting and welding instead.
When the 406 was running well I could get it up to about 127mph and then it felt like the suspension started to loosen up and the car would rock around. Not sure if it was the wind getting under the car or funky aerodynamics but it definitely wasn't a smooth ride, more like driving a boat on choppy seas.
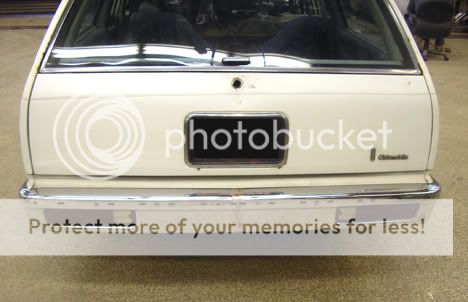
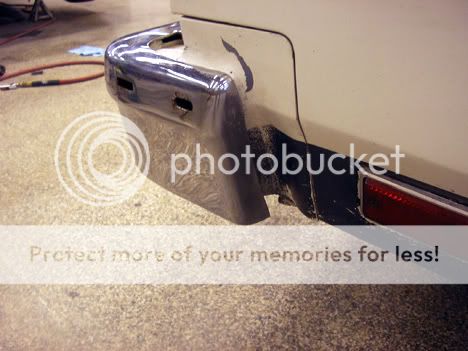
First order of business to smooth things over a bit was narrowing the bumpers. I looked on the net for ideas and saw several rear pans or narrowed bumpers that were tucked smooth with the rear 1/4. With as much real estate that a wagon has out back I didn't think it looked quite right, I think it looks better on the El Caminos I suppose. I also wanted to keep a somewhat factory look with some subtle changes so after measuring I hacked 3" out of the center with the plasma cutter.
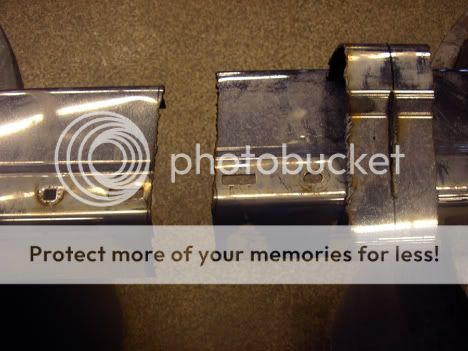
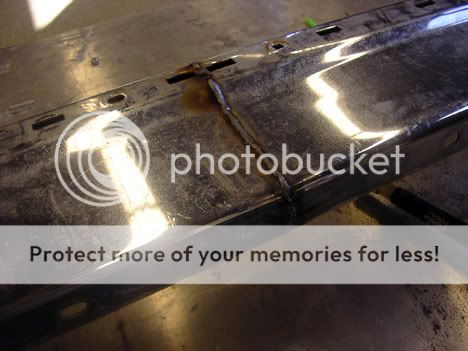
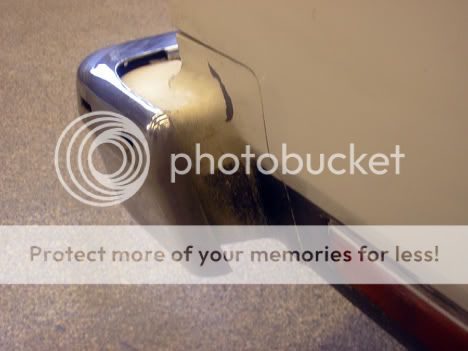
Prior to this I had been welding a lot of thin sheet metal. Probably could've stood to crank up the machine for a little deeper penetration, so to be safe I welded the back side too.
Here's some comparison shots...

When the 406 was running well I could get it up to about 127mph and then it felt like the suspension started to loosen up and the car would rock around. Not sure if it was the wind getting under the car or funky aerodynamics but it definitely wasn't a smooth ride, more like driving a boat on choppy seas.
First order of business to smooth things over a bit was narrowing the bumpers. I looked on the net for ideas and saw several rear pans or narrowed bumpers that were tucked smooth with the rear 1/4. With as much real estate that a wagon has out back I didn't think it looked quite right, I think it looks better on the El Caminos I suppose. I also wanted to keep a somewhat factory look with some subtle changes so after measuring I hacked 3" out of the center with the plasma cutter.
Prior to this I had been welding a lot of thin sheet metal. Probably could've stood to crank up the machine for a little deeper penetration, so to be safe I welded the back side too.
Here's some comparison shots...
09-25-2011, 09:04 AM
#9
On The Tree
Thread Starter
Join Date: Aug 2010
Location: Eagle Mountain, Utah
Posts: 143
Likes: 0
Received 0 Likes
on
0 Posts
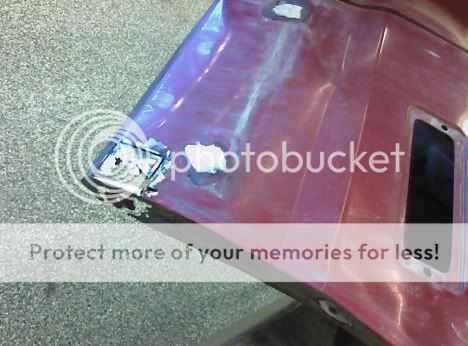
To add to the smooth look I wanted to ditch the generic boxy door handles.
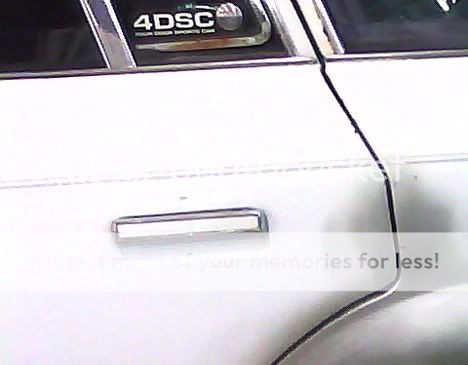
I think shaved handles are cool on the right car, but not on a daily driver. I'm also trying to do this car on a student's budget so I trudged around a local wrecking yard for ideas where I stumbled upon this 92 Geo prism. I want to keep the car all "GM" and these handles have a nice slope in them that sort of matches the hood line of my car. $10 for all 4. No key with them so I have to buy a new lock set but that's cool.
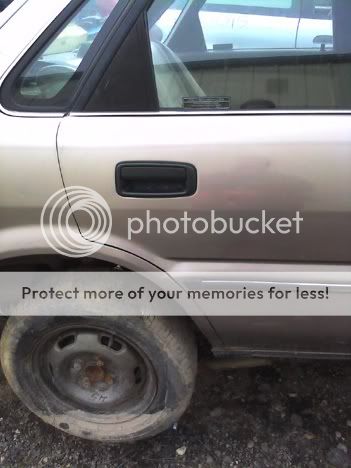
Using the door from the parts car I started hacking. I had to patch the original key lock hole and open up a hole to fit the new handle.
While at the junk yard I also spotted an 84 Regal with a factory rear sway bar. Grabbed it with the lower control arms still attached for $15. I brought them to the shop and found some scrap sheet metal that I trimmed to fit so I could box the arms. Took me two hours to knock it out, just in time to get the car back on the ground right before my professor closed the shop for the day.
Most of the welding done...
Bolted in. What a difference I felt in quick sharp autoX type cornering!
I think shaved handles are cool on the right car, but not on a daily driver. I'm also trying to do this car on a student's budget so I trudged around a local wrecking yard for ideas where I stumbled upon this 92 Geo prism. I want to keep the car all "GM" and these handles have a nice slope in them that sort of matches the hood line of my car. $10 for all 4. No key with them so I have to buy a new lock set but that's cool.
Using the door from the parts car I started hacking. I had to patch the original key lock hole and open up a hole to fit the new handle.
While at the junk yard I also spotted an 84 Regal with a factory rear sway bar. Grabbed it with the lower control arms still attached for $15. I brought them to the shop and found some scrap sheet metal that I trimmed to fit so I could box the arms. Took me two hours to knock it out, just in time to get the car back on the ground right before my professor closed the shop for the day.
Most of the welding done...
Bolted in. What a difference I felt in quick sharp autoX type cornering!
09-25-2011, 09:04 AM
#10
On The Tree
Thread Starter
Join Date: Aug 2010
Location: Eagle Mountain, Utah
Posts: 143
Likes: 0
Received 0 Likes
on
0 Posts
Another body mod I wanted to do was some fender vents. This Nova was a great motivation for the idea.
I looked and looked for a factory vent that I could stick in there like the second gen Trans Am or late model Escalade. Nothing was the right size or looked like it belonged on the car. Then I stumbled across this photo of a Mercedes AMG CLK and fell in love.
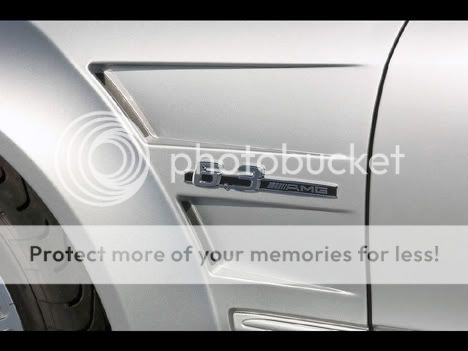
I took the spare fenders from the parts car and after welding up some trim holes I started cutting and came up with this. I basically made a 3 sided rectangular cut in the fender, bent it inward, then welded in sheet metal to fill the gaps. I got all the metal work done on both fenders and that was about the end of the semester. I'll continue with getting the fenders prepped as school rolls around again.
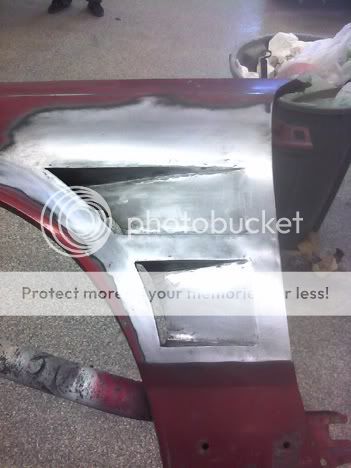
These will be fully functional to help relieve some engine compartment heat. I wanted some nice metal mesh to cover the holes but had a hard time finding what I wanted online or at the local metal suppliers. I ended up grabbing a couple old 6x9 speaker grilles and cut out the mesh from these. Perfect size holes and easily shaped!
Also had to do a little more rust patching and trim hole filling while in there...
I looked and looked for a factory vent that I could stick in there like the second gen Trans Am or late model Escalade. Nothing was the right size or looked like it belonged on the car. Then I stumbled across this photo of a Mercedes AMG CLK and fell in love.
I took the spare fenders from the parts car and after welding up some trim holes I started cutting and came up with this. I basically made a 3 sided rectangular cut in the fender, bent it inward, then welded in sheet metal to fill the gaps. I got all the metal work done on both fenders and that was about the end of the semester. I'll continue with getting the fenders prepped as school rolls around again.
These will be fully functional to help relieve some engine compartment heat. I wanted some nice metal mesh to cover the holes but had a hard time finding what I wanted online or at the local metal suppliers. I ended up grabbing a couple old 6x9 speaker grilles and cut out the mesh from these. Perfect size holes and easily shaped!
Also had to do a little more rust patching and trim hole filling while in there...
09-25-2011, 09:05 AM
#11
On The Tree
Thread Starter
Join Date: Aug 2010
Location: Eagle Mountain, Utah
Posts: 143
Likes: 0
Received 0 Likes
on
0 Posts
Some new parts came in...
When I first lowered the car I simply cut the springs. This works for a good visual reference and it helped handling because of the slightly better spring rate and lower CG, but really it's a terrible way to lower a car. After a time the springs settled and sagged and dropped almost another inch from where it started. I like a slight rake but right now it's about 1 1/2" difference front to rear and I'd rather have it closer to 1/2". As low as it is now it sits on the snubbers and it's got my suspension geometry all goofed up. Bumpsteer on hard turns like turning into a parking space is out of control.
To remedy the issue 2" drop spindles are in order. I did some research on g-body forums and found that folks had great success with both DJM and Bell Tech, and not so much with some of the cheaper off name brands. The DJMs were a better deal so keeping the budget tight I ordered them from Summit Racing. DJM doesn't list a part # for G-body cars but we share front suspension with 1st gen S-10's, part # DS2031-2, $149.95 + shipping. I'll be getting 1" lowered springs soon too, I'll post info on that when I get them. The goal is 5.5" of clearance at the frame just behind the front wheel, 6" of clearance just in front of the rear wheel. I currently have 4.5" / 6".
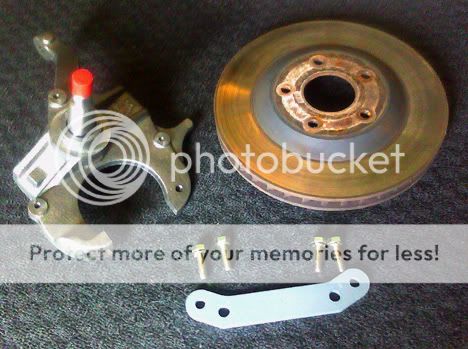
If I have my facts right our smallish 10.5" front brakes were intended to save weight. As I've researched there are many brake upgrades available out there but again keeping the cost down means being creative. I've seen a trend on g-body forums to put on either 2nd gen Camaro or 90's Caprice spindles, Problem is most folks say it creates geometry problems because of the taller spindles and tends to increase bumpsteer requiring high dollar aftermarket offset upper control arms. After doing research on S10 forums I found that a lot of those guys have come up with a better idea- keep the G-body spindles- maintaining stock geometry, have the g-body rotors milled to a hub, and with a simple bracket and some slight mods to the spindle you can mount 98+ LS1 Camaro calipers and 12" rotors. You can even re-use the factory g-body brake hoses with the F-body banjo fittings. Simple as that. There are a few different companies that make the caliper adapter brackets, but I found an engineer/machinist on one S10 forum that water jetted a bunch of sets for forum friends. Several folks said they worked great so I bought a set from him for less than half the price of buying them from these companies. I also scored a good pair of rotors free from a friend in our local muscle car club who upgraded to slotted and drilled rotors on his T/A.
When I first lowered the car I simply cut the springs. This works for a good visual reference and it helped handling because of the slightly better spring rate and lower CG, but really it's a terrible way to lower a car. After a time the springs settled and sagged and dropped almost another inch from where it started. I like a slight rake but right now it's about 1 1/2" difference front to rear and I'd rather have it closer to 1/2". As low as it is now it sits on the snubbers and it's got my suspension geometry all goofed up. Bumpsteer on hard turns like turning into a parking space is out of control.
To remedy the issue 2" drop spindles are in order. I did some research on g-body forums and found that folks had great success with both DJM and Bell Tech, and not so much with some of the cheaper off name brands. The DJMs were a better deal so keeping the budget tight I ordered them from Summit Racing. DJM doesn't list a part # for G-body cars but we share front suspension with 1st gen S-10's, part # DS2031-2, $149.95 + shipping. I'll be getting 1" lowered springs soon too, I'll post info on that when I get them. The goal is 5.5" of clearance at the frame just behind the front wheel, 6" of clearance just in front of the rear wheel. I currently have 4.5" / 6".
If I have my facts right our smallish 10.5" front brakes were intended to save weight. As I've researched there are many brake upgrades available out there but again keeping the cost down means being creative. I've seen a trend on g-body forums to put on either 2nd gen Camaro or 90's Caprice spindles, Problem is most folks say it creates geometry problems because of the taller spindles and tends to increase bumpsteer requiring high dollar aftermarket offset upper control arms. After doing research on S10 forums I found that a lot of those guys have come up with a better idea- keep the G-body spindles- maintaining stock geometry, have the g-body rotors milled to a hub, and with a simple bracket and some slight mods to the spindle you can mount 98+ LS1 Camaro calipers and 12" rotors. You can even re-use the factory g-body brake hoses with the F-body banjo fittings. Simple as that. There are a few different companies that make the caliper adapter brackets, but I found an engineer/machinist on one S10 forum that water jetted a bunch of sets for forum friends. Several folks said they worked great so I bought a set from him for less than half the price of buying them from these companies. I also scored a good pair of rotors free from a friend in our local muscle car club who upgraded to slotted and drilled rotors on his T/A.
09-25-2011, 09:08 AM
#12
On The Tree
Thread Starter
Join Date: Aug 2010
Location: Eagle Mountain, Utah
Posts: 143
Likes: 0
Received 0 Likes
on
0 Posts
More parts and art...
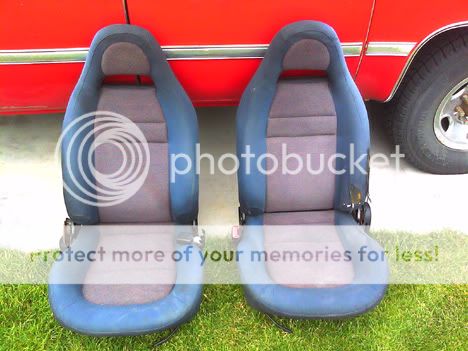
For the car's interior I definitely want to get rid of the bench seat. During hard cornering it doesn't give much support, the cover is pretty banged up, and it doesn't match the rest of the build at all. I considered getting some seats from Summit Racing, they have the Summit brand seat for $149 and the lower line Procar for $156, but I was concerned that the lower end seats may not be fantastic quality and I wanted something unique. With having worked last year as an apprentice in an upholstery shop I decided to find a used seat I like and customize the covers.
I'd love to keep my car all GM, but as I went through the local wrecking yards it's difficult to find a GM with a real performance type seat. Seems a lot of the seats are made to compensate for big Americans and my somewhat smallish 5'-10" and 160 lb size didn't fit snug in anything. Then I stumbled upon a '98 Mazda MX3 in the import section. After sitting in the seat I knew these were the ones. They fit me like a glove, have great supports to keep me planted while cornering and I like the hole under the headrest so I can run a 5-point harness through for seat belts.
The driver's side foam is beat up just a little but that's very easy to fix. Other than that they're in decent shape and a great base to start with. Not bad for $50 for the pair. The plan is I will remove the covers, take all the seams apart, using the old panels as a pattern cut out the new material and then have my old boss sew it all together. He offered to let me run the machine but I want perfect lines and curves so I'd rather the guy with 25+ years experience do the sewing. When he's done I'll assemble them back together and build custom mounts to bolt them into my floor pan. Doing a lot of the work myself I should be able to have the front and back seats done for about the same cost or less than the pair of Summit seats.
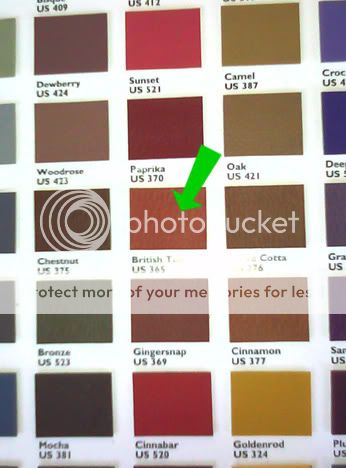
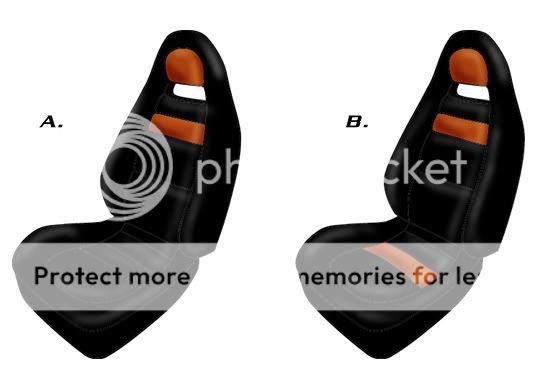
Here are the materials I'm considering. I took a paint chip book with GM 2008 Avalanche orange over to the upholstery shop and we found that his British Tan was a fairly close match. I also looked at some black vinyl with the same grain as the tan, as well as some "carbon fiber" pattern vinyl. These are all high quality products and will last for years to come.

Here are some design ideas I was toying with. So far I think I'm liking A, B, E, & F the best.
I like A & B because they're mostly black and have a bit more aggressive look. The outer perimeter will be smooth vinyl and the center black area will be carbon fiber pattern.
C & D- a couple more mostly black variations.
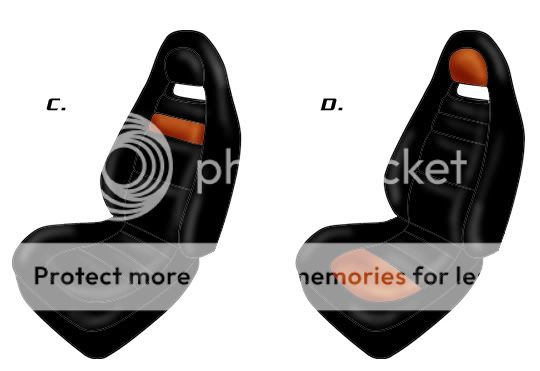
E & F I like because they would really brighten up the interior. I need to do a paint spray out card first before deciding on these, if the tan didn't actually match the orange very well it would be a big mess. If that were the case having just a small accent strip like A would be a better choice.
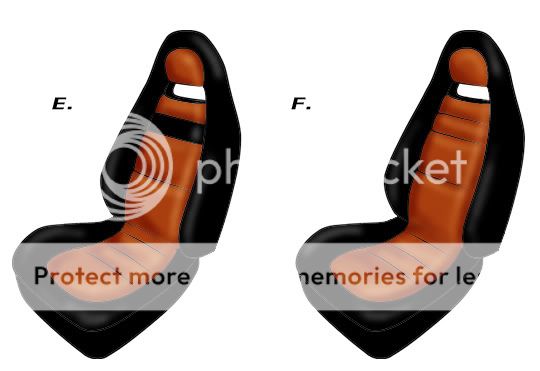
Feel free to let me know what you all think.
For the car's interior I definitely want to get rid of the bench seat. During hard cornering it doesn't give much support, the cover is pretty banged up, and it doesn't match the rest of the build at all. I considered getting some seats from Summit Racing, they have the Summit brand seat for $149 and the lower line Procar for $156, but I was concerned that the lower end seats may not be fantastic quality and I wanted something unique. With having worked last year as an apprentice in an upholstery shop I decided to find a used seat I like and customize the covers.
I'd love to keep my car all GM, but as I went through the local wrecking yards it's difficult to find a GM with a real performance type seat. Seems a lot of the seats are made to compensate for big Americans and my somewhat smallish 5'-10" and 160 lb size didn't fit snug in anything. Then I stumbled upon a '98 Mazda MX3 in the import section. After sitting in the seat I knew these were the ones. They fit me like a glove, have great supports to keep me planted while cornering and I like the hole under the headrest so I can run a 5-point harness through for seat belts.
The driver's side foam is beat up just a little but that's very easy to fix. Other than that they're in decent shape and a great base to start with. Not bad for $50 for the pair. The plan is I will remove the covers, take all the seams apart, using the old panels as a pattern cut out the new material and then have my old boss sew it all together. He offered to let me run the machine but I want perfect lines and curves so I'd rather the guy with 25+ years experience do the sewing. When he's done I'll assemble them back together and build custom mounts to bolt them into my floor pan. Doing a lot of the work myself I should be able to have the front and back seats done for about the same cost or less than the pair of Summit seats.
Here are the materials I'm considering. I took a paint chip book with GM 2008 Avalanche orange over to the upholstery shop and we found that his British Tan was a fairly close match. I also looked at some black vinyl with the same grain as the tan, as well as some "carbon fiber" pattern vinyl. These are all high quality products and will last for years to come.
Here are some design ideas I was toying with. So far I think I'm liking A, B, E, & F the best.
I like A & B because they're mostly black and have a bit more aggressive look. The outer perimeter will be smooth vinyl and the center black area will be carbon fiber pattern.
C & D- a couple more mostly black variations.
E & F I like because they would really brighten up the interior. I need to do a paint spray out card first before deciding on these, if the tan didn't actually match the orange very well it would be a big mess. If that were the case having just a small accent strip like A would be a better choice.
Feel free to let me know what you all think.
09-25-2011, 09:09 AM
#13
On The Tree
Thread Starter
Join Date: Aug 2010
Location: Eagle Mountain, Utah
Posts: 143
Likes: 0
Received 0 Likes
on
0 Posts
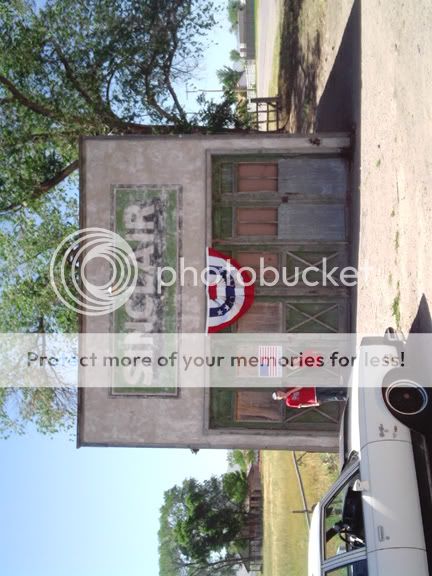
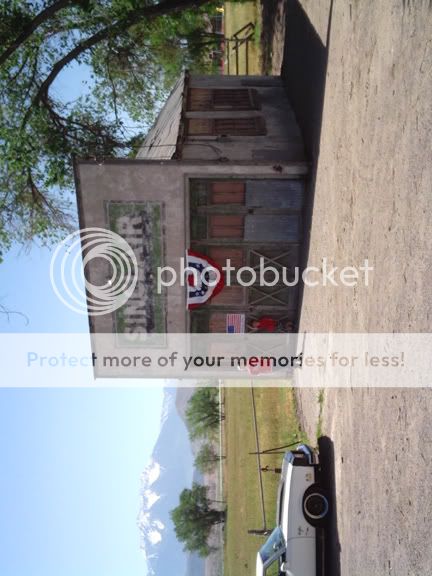
Took my 2 boys up to the mountains camping a couple weeks ago. We drove through a few small towns on the way and I came across this little gem, an old Sinclair gas station. Pretty cool find- I love old gas stations and diners, and we had a great time camping.
09-25-2011, 09:09 AM
#14
On The Tree
Thread Starter
Join Date: Aug 2010
Location: Eagle Mountain, Utah
Posts: 143
Likes: 0
Received 0 Likes
on
0 Posts
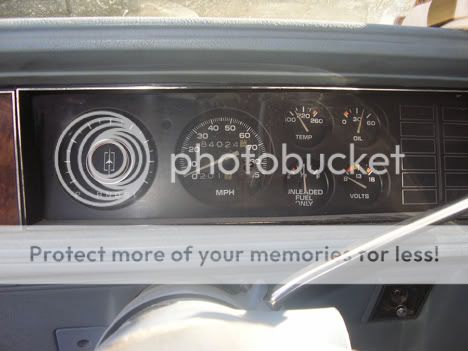
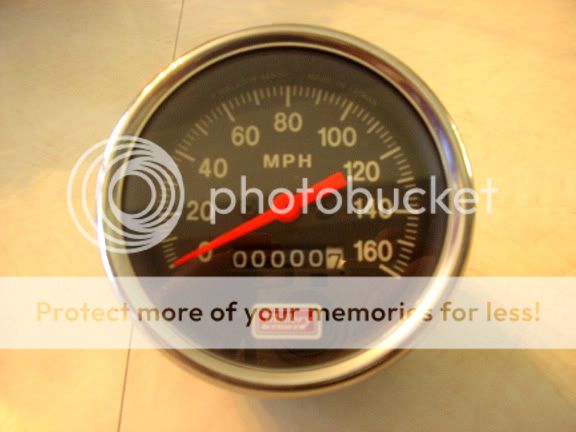
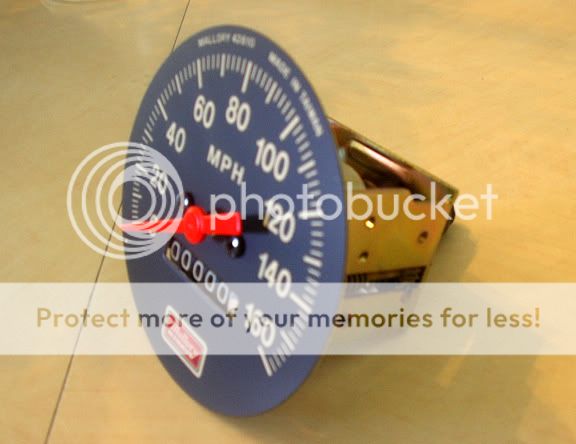
My goal is to be able to eventually get the car into the 140mph club. I've been wanting to upgrade my 85 speedo to something more accurate to the car's abilities and I recently scored this from Ebay, just under $17 dollars including shipping, new and never used! You guys remember Mallory selling gauges back in the 80s and 90s?
It's old and had a little surface rust on the back side, but it's perfect and brand new inside. I will be incorporating it into the factory gauge layout to make it look factory stock.
It's old and had a little surface rust on the back side, but it's perfect and brand new inside. I will be incorporating it into the factory gauge layout to make it look factory stock.
09-25-2011, 09:10 AM
#15
On The Tree
Thread Starter
Join Date: Aug 2010
Location: Eagle Mountain, Utah
Posts: 143
Likes: 0
Received 0 Likes
on
0 Posts
I went to the local track's open track day this past Wednesday to try out the new rear sway bar and get one last set of runs in before I tear into the suspension and change things around.
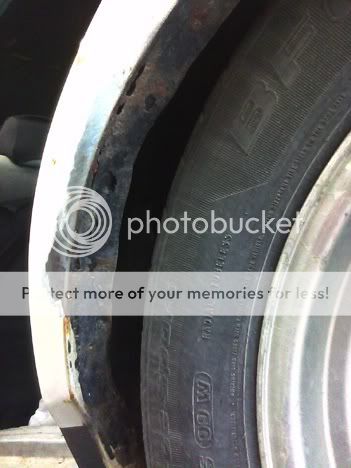
Unfortunately I had two problems with the car, the alternator quit charging on the way to the track and for some reason the right front caliper was grabbing harder than the left. You'll see in both videos how that caused the right front wheel to lock up and slide under hard braking. Got kinda scary at one point on the road course. I have a flat spot on the right front tire now, kinda sucks but at least I planned on upgrading to 17s in the near future.
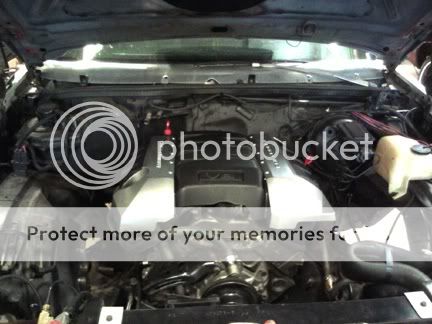
After the 406 broke a valve spring I yanked it and slipped the factory 305 back in so I could keep the car drivable while I build the 406. I put in a mild Crane 266 cam (.440 lift) and all the intake and exhaust accessories from the 406. Here's a shot of the engine as it is now.
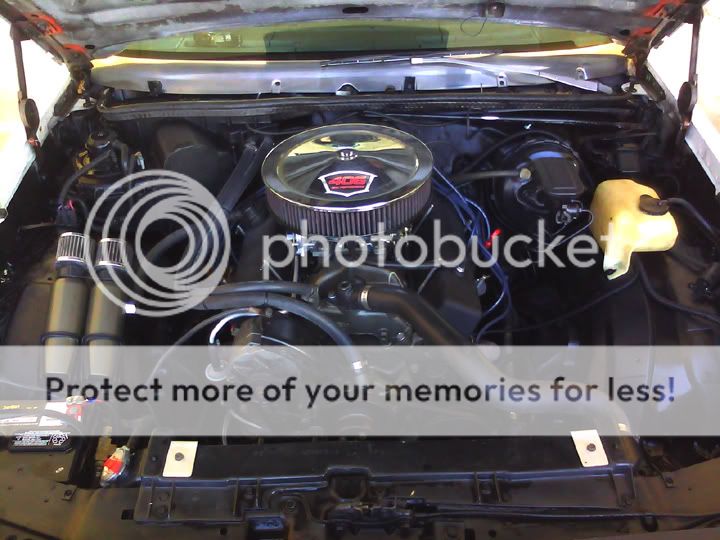
The motor runs great and lays down 21 mpg with a TH350 (no overdrive) but my guess is that the stock 140 hp is prolly only up to 170-180. Backed by factory 2.41 gears you can see it's lengthy acceleration on the track and I am so looking forward to the torquey TPI 406 I'm putting together! The cones on the course are to keep the newbies and stock handling cars from going too fast. Kinda lame but it keeps everyone safe.
Because the alternator went south I decided to head over to the autocross course where the lines are usually short rather than having to keep asking for jump starts in the road course line. I got in line and the officials decided to take about 10 minutes to discuss something while we all waited in line. I kept the motor running and the electric fan and such were running the battery down. Finally after they started racing us again and I was on deck the battery was low enough that the fan quit working and the car started to heat up. It was at 240 degrees when it was my turn so knowing this would probably be my only run I went all out. Because I wasn't familiar with the course and I was stressed about the run I saw the cones in the background of the first hard turn and got disorientated. Completely blew the run but it was fun. I spent the rest of the evening fiddling with the alternator and found a wire in the harness that came loose from the connection. Got it repaired and headed home.
Unfortunately I had two problems with the car, the alternator quit charging on the way to the track and for some reason the right front caliper was grabbing harder than the left. You'll see in both videos how that caused the right front wheel to lock up and slide under hard braking. Got kinda scary at one point on the road course. I have a flat spot on the right front tire now, kinda sucks but at least I planned on upgrading to 17s in the near future.
After the 406 broke a valve spring I yanked it and slipped the factory 305 back in so I could keep the car drivable while I build the 406. I put in a mild Crane 266 cam (.440 lift) and all the intake and exhaust accessories from the 406. Here's a shot of the engine as it is now.
The motor runs great and lays down 21 mpg with a TH350 (no overdrive) but my guess is that the stock 140 hp is prolly only up to 170-180. Backed by factory 2.41 gears you can see it's lengthy acceleration on the track and I am so looking forward to the torquey TPI 406 I'm putting together! The cones on the course are to keep the newbies and stock handling cars from going too fast. Kinda lame but it keeps everyone safe.
Because the alternator went south I decided to head over to the autocross course where the lines are usually short rather than having to keep asking for jump starts in the road course line. I got in line and the officials decided to take about 10 minutes to discuss something while we all waited in line. I kept the motor running and the electric fan and such were running the battery down. Finally after they started racing us again and I was on deck the battery was low enough that the fan quit working and the car started to heat up. It was at 240 degrees when it was my turn so knowing this would probably be my only run I went all out. Because I wasn't familiar with the course and I was stressed about the run I saw the cones in the background of the first hard turn and got disorientated. Completely blew the run but it was fun. I spent the rest of the evening fiddling with the alternator and found a wire in the harness that came loose from the connection. Got it repaired and headed home.
09-25-2011, 09:11 AM
#16
On The Tree
Thread Starter
Join Date: Aug 2010
Location: Eagle Mountain, Utah
Posts: 143
Likes: 0
Received 0 Likes
on
0 Posts
I'm back in school and I finally have some updates on the wagon project. Mostly been project planning and price shopping over the summer and just before school started I was informed I was awarded a full tuition scholarship for the 2011-2012 year. Hard work and straight A's finally pays off! That fortunately freed up a little extra $ I can slide towards the car.
Biggest project news over the summer was landing a 5.3 from a 2006 4x4 truck with just over 40,000 miles on it. A friend of a friend set the deal up and I'm getting it for $500 for the motor, accessories, computer, and wiring harness. To keep costs down I have to pull the motor out of the truck, but that's a good thing so I can see how everything hooks up and make sure I get all the parts I need. I don't have it home yet but will be posting photos when I do.
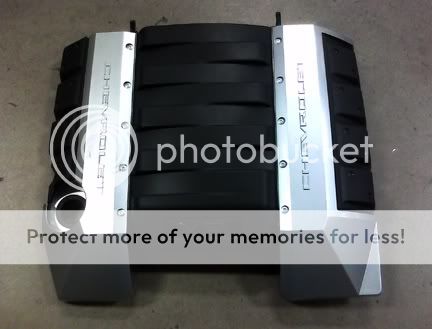
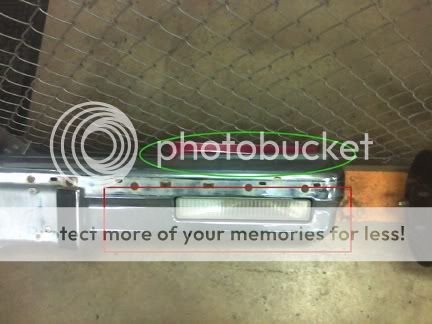
The truck intake manifolds are just plain hideous, so keeping it under a cover is critical. I'm not a big fan of the truck engine covers, they're just a bit bulky and look like they belong on a truck, so I considered making one. I got on the web to see if anyone else has done a custom cover when I ran across a photo the 2010 Camaro SS cover. It really caught my eye as it's a little different than the average LSX cover and the color scheme fit my car perfectly. I'm not a fan of the center runner bumps, but otherwise I liked it. I checked ebay and scored a nice used one with mounting bracket for only $42.00 shipped. I'm considering a custom insert for the center portion with rounded "tubes" rather than the squared off ones and will shave the Chevrolet script and add on Oldsmobile script instead.
Here's a shot of the cover and a mock up of it on my small block minus the carb to see what it will look like. Man that engine bay needs a face lift! Coming soon...
Biggest project news over the summer was landing a 5.3 from a 2006 4x4 truck with just over 40,000 miles on it. A friend of a friend set the deal up and I'm getting it for $500 for the motor, accessories, computer, and wiring harness. To keep costs down I have to pull the motor out of the truck, but that's a good thing so I can see how everything hooks up and make sure I get all the parts I need. I don't have it home yet but will be posting photos when I do.
The truck intake manifolds are just plain hideous, so keeping it under a cover is critical. I'm not a big fan of the truck engine covers, they're just a bit bulky and look like they belong on a truck, so I considered making one. I got on the web to see if anyone else has done a custom cover when I ran across a photo the 2010 Camaro SS cover. It really caught my eye as it's a little different than the average LSX cover and the color scheme fit my car perfectly. I'm not a fan of the center runner bumps, but otherwise I liked it. I checked ebay and scored a nice used one with mounting bracket for only $42.00 shipped. I'm considering a custom insert for the center portion with rounded "tubes" rather than the squared off ones and will shave the Chevrolet script and add on Oldsmobile script instead.
Here's a shot of the cover and a mock up of it on my small block minus the carb to see what it will look like. Man that engine bay needs a face lift! Coming soon...
09-25-2011, 09:11 AM
#17
On The Tree
Thread Starter
Join Date: Aug 2010
Location: Eagle Mountain, Utah
Posts: 143
Likes: 0
Received 0 Likes
on
0 Posts
Over the summer I took a couple opportunities to raid the local junkyard for a few parts. Unfortunately useable old car parts around here are rare so I have to get a little creative.
One of my favorite scores-
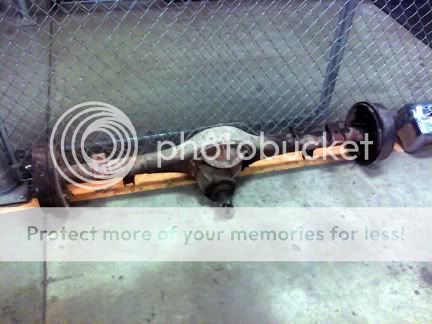
Part of next semester's chassis class is narrowing rears. The 7.5" is a weak link in the G-body cars and for a long time I had planned on a late model disc Mustang 8.8". After considering the near bullet proof 31 spline large bearing 9" and the fact that I can swap centers to change gear ratios I decided to grab one of those and use it as a narrow guinea pig. A trac loc center is a real bonus, so I checked every Ford truck rear axle tag in the yard on two different occasions. The second time I found a 78 4x4 Bronco that was missing the tag so I turned the drum on one side and with a big grin I watched the other side move in the same direction. Out of about 40-50 trucks I checked this was the only one with a track loc, so after an hour and a half of wrenching on rusted bolts I had it in the back of the wagon. Because the tag is missing and I haven't cracked it open yet I don't know what gears are in it, but I found most of the trucks had 3.50's and that'll be perfect for autocross. I also have a set of 2.75 gears I will be transplanting into another center for daily driving. I will be keeping my TH350 so the highway gears will help get the fuel mileage up there without overdrive. A third center with 4.10s would be nice for the drag strip, but that's on the back burner for now.
I suppose for a 5.3 that I will be setting up for somewhere around 400 hp at the flywheel a 9" is a bit overkill but the potential of a 5.3 with a pair of hairdryers on the exhaust is pretty intriguing. That'll have to wait until after I graduate but is on the future plans. By then I should be able to afford a larger cube motor too so hp options are wide open, no pun intended, lol!
One of my favorite scores-
Part of next semester's chassis class is narrowing rears. The 7.5" is a weak link in the G-body cars and for a long time I had planned on a late model disc Mustang 8.8". After considering the near bullet proof 31 spline large bearing 9" and the fact that I can swap centers to change gear ratios I decided to grab one of those and use it as a narrow guinea pig. A trac loc center is a real bonus, so I checked every Ford truck rear axle tag in the yard on two different occasions. The second time I found a 78 4x4 Bronco that was missing the tag so I turned the drum on one side and with a big grin I watched the other side move in the same direction. Out of about 40-50 trucks I checked this was the only one with a track loc, so after an hour and a half of wrenching on rusted bolts I had it in the back of the wagon. Because the tag is missing and I haven't cracked it open yet I don't know what gears are in it, but I found most of the trucks had 3.50's and that'll be perfect for autocross. I also have a set of 2.75 gears I will be transplanting into another center for daily driving. I will be keeping my TH350 so the highway gears will help get the fuel mileage up there without overdrive. A third center with 4.10s would be nice for the drag strip, but that's on the back burner for now.
I suppose for a 5.3 that I will be setting up for somewhere around 400 hp at the flywheel a 9" is a bit overkill but the potential of a 5.3 with a pair of hairdryers on the exhaust is pretty intriguing. That'll have to wait until after I graduate but is on the future plans. By then I should be able to afford a larger cube motor too so hp options are wide open, no pun intended, lol!
09-25-2011, 09:12 AM
#18
On The Tree
Thread Starter
Join Date: Aug 2010
Location: Eagle Mountain, Utah
Posts: 143
Likes: 0
Received 0 Likes
on
0 Posts
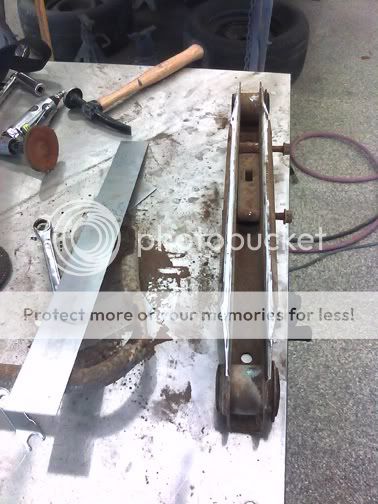
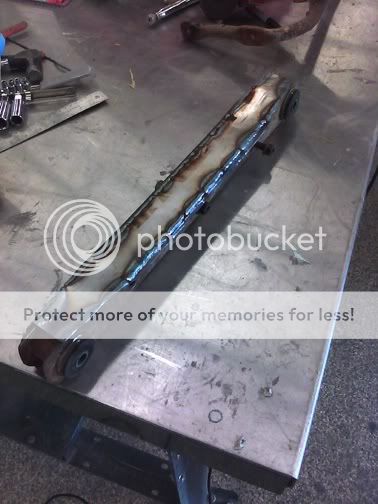
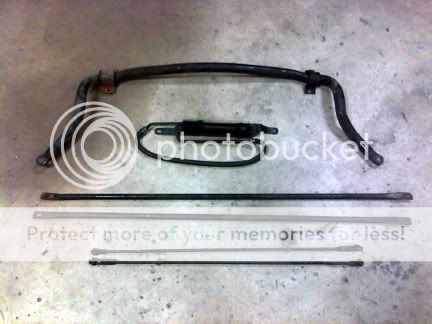
Here's another great score. Through my research I found that 82-90 something Camaros have a direct swap sway bar with G-bodys. There are currently two Camaros of that vintage in the yard so I checked both. One Camaro's bar was smaller than the wagon's stock 1" bar. The other was a '90 RS with a V8, and when I looked under it again the big grin spread wide as It had a 36mm (1 3/8") bar on it. Score for $15! I can probably order a larger aftermarket bar but I'd rather use this one for now and spend the cost savings elsewhere. I also grabbed some firewall to radiator support bars from a '75 El Camino (long ones in the photo) and from an '84 Regal I grabbed the radiator opening support bars (thin ones in the photo). I also grabbed a power steering cooler from a '96 Caddy.
09-25-2011, 09:12 AM
#19
On The Tree
Thread Starter
Join Date: Aug 2010
Location: Eagle Mountain, Utah
Posts: 143
Likes: 0
Received 0 Likes
on
0 Posts
The left corner of my front bumper is pretty rotted, a problem doubled because I plan on narrowing the bumper 3" like the I did to the rear bumper. I have yet to see a 78/9 Cutlass wagon appear in the yard, so I grabbed a donor from an '85 4 door Cutlass Supreme. When you compare the two there are some design differences, but I think I can make them work to my advantage. I don't like the top portion of the '85 bumper compared to the smooth top of mine, but I like the turn signal holes. What I will be doing is cut out the lower portions of either side of the '85 bumper and graft them into mine. I will be utilizing the turn signal holes for brake cooling ducts, so it'll have form and function. A little more than I'd hoped to have to spend but $50 scored the bumper.

09-25-2011, 09:13 AM
#20
On The Tree
Thread Starter
Join Date: Aug 2010
Location: Eagle Mountain, Utah
Posts: 143
Likes: 0
Received 0 Likes
on
0 Posts
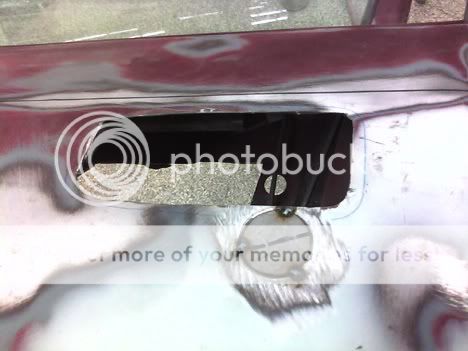
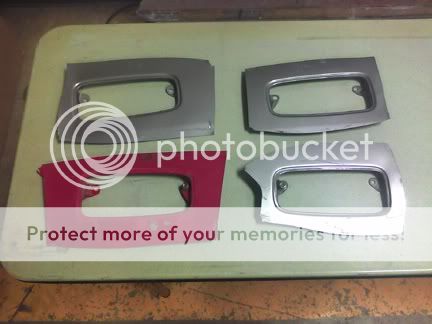
Last semester when I started getting the doors ready for the low profile Geo Prism door handles I realized that I didn't like the handles bolted right to the outer skin of the doors, but I'd rather have them sunk in like on the Geos. While at the yard to be respectful of their business rather than hack nice doors I found a couple prisms that had banged up doors and grabbed the door handle sheet metal. Now that school has started and we've been getting familiar with the shop tools I realize I could have fabricated these fairly simply with a bead roller, but I guess these save me the time in the extra step. I'll be trimming these down and welding them into my doors.
Before I bought my wagon some kids had stolen it from the previous owner one night and took it for a small joy ride. The result was a broken rear hatch handle and a very hacked up steering column. It turned the wheels but not much else worked properly. I also don't like the headlight and wiper switch styling on the 78/9 cars which looks cheap and chintzy to me, not to mention not having wiper delay drove me absolutely nuts. From the '85 Cutlass 4 door I grabbed the tilt column with the wiper switch on the column, newer design delay wiper motor, and the correct dash parts to make the changeover. Wish I could've found a column for a floor shift car but I have yet to see one show up in the wrecking yard. I'll modify this one to delete the shifter arm bump.
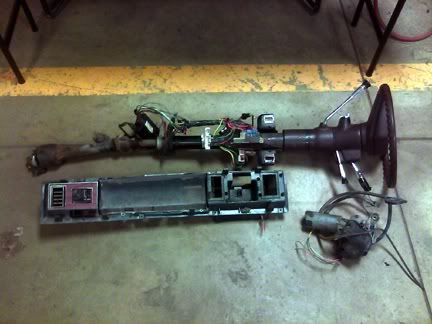
Before I bought my wagon some kids had stolen it from the previous owner one night and took it for a small joy ride. The result was a broken rear hatch handle and a very hacked up steering column. It turned the wheels but not much else worked properly. I also don't like the headlight and wiper switch styling on the 78/9 cars which looks cheap and chintzy to me, not to mention not having wiper delay drove me absolutely nuts. From the '85 Cutlass 4 door I grabbed the tilt column with the wiper switch on the column, newer design delay wiper motor, and the correct dash parts to make the changeover. Wish I could've found a column for a floor shift car but I have yet to see one show up in the wrecking yard. I'll modify this one to delete the shifter arm bump.