
1973 Nova LS BUDGET swap
 04-25-2012, 06:28 AM
#41

Bczee, I was considering using an Fbody pan or a CTS-V pan, but the sump on those pans is longer, and the front of the sump has to be modified to allow room for the steering linkage. So either way I will have to modify the pan unless I step up to a fabricated one ($$$). So I am just planning to cut the bottom 3" off the oil pan and have a 3/16" or 1/4" plate welded to the bottom.
As far as the filter goes, I think I will try to find a shorter filter for now. But eventually I would to like add a remote filter and cooler setup. Cooler oil makes for a happier engine!
On that point, what is the small port plate above the oil filter covering? It looks like a pick up and return for a cooler...I see some research in my future!
 04-26-2012, 09:13 PM
#42
OK more progress to report. Got a bunch of parts this week including fuel pump, filter, big block heater core, solid body mounts and alternator mounting. And a few more on order including all the fuel system fittings and...headers. And rest assured there will be posts to cover the installation of all of em'
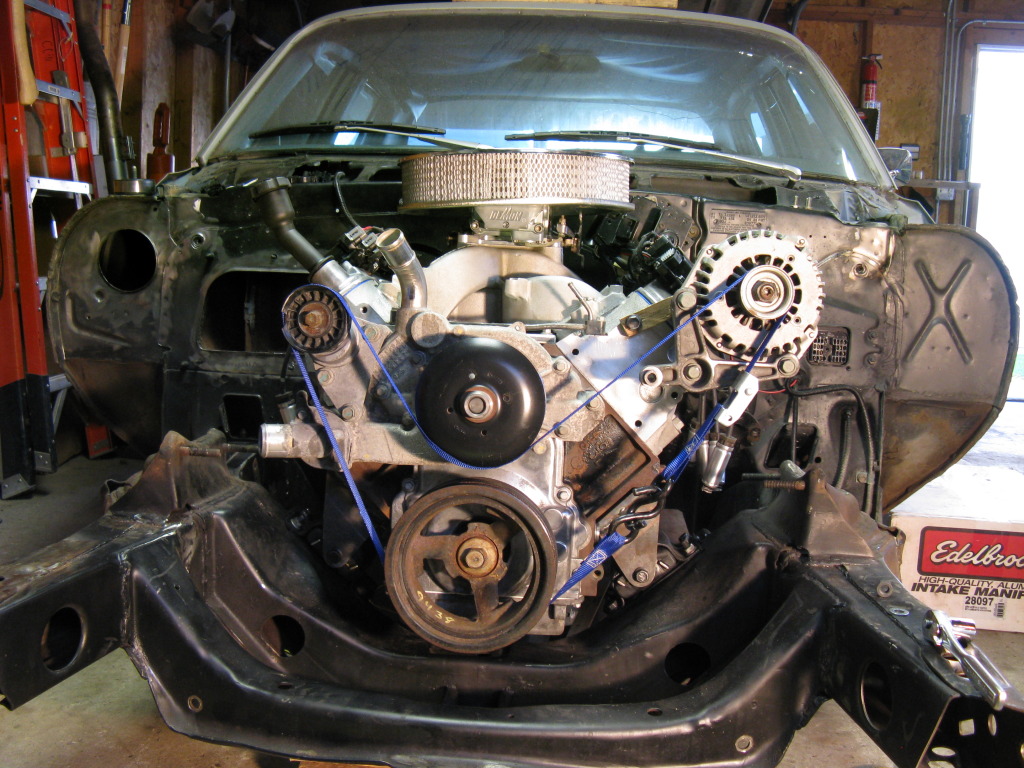
Today I started with the alt bracket and FEAD routing. Here is my initial attempt as influenced by GTC99's setup:

Then I realized...truck and Camaro belt offsets are different:
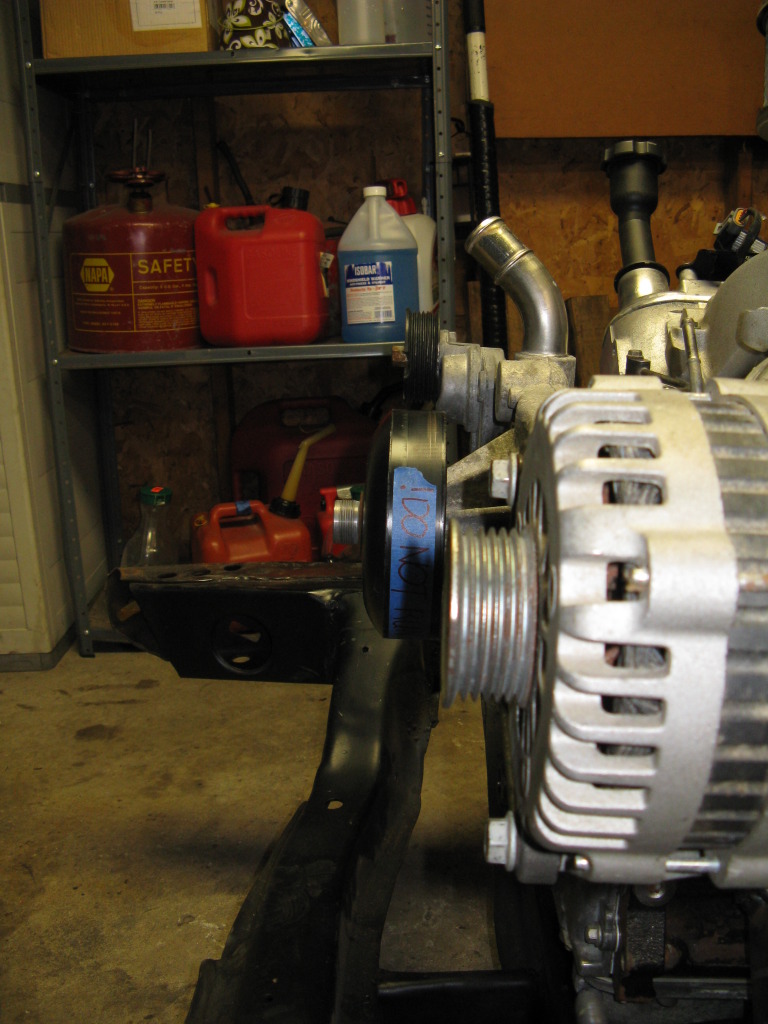
After much measuring and research I came to settle on a difference of .75".So I set off to come up with a spacer. Here is what I have right now. And NO the wood is not permenant. I just didn't have a chunk of .75" aluminum to wittle on tonight.
I like this two piece set up will enough, but after staring at it for a while I came up with a design I liked a lot better. I will be drawing up some plans to get it made at a local shop...more to come on that later.
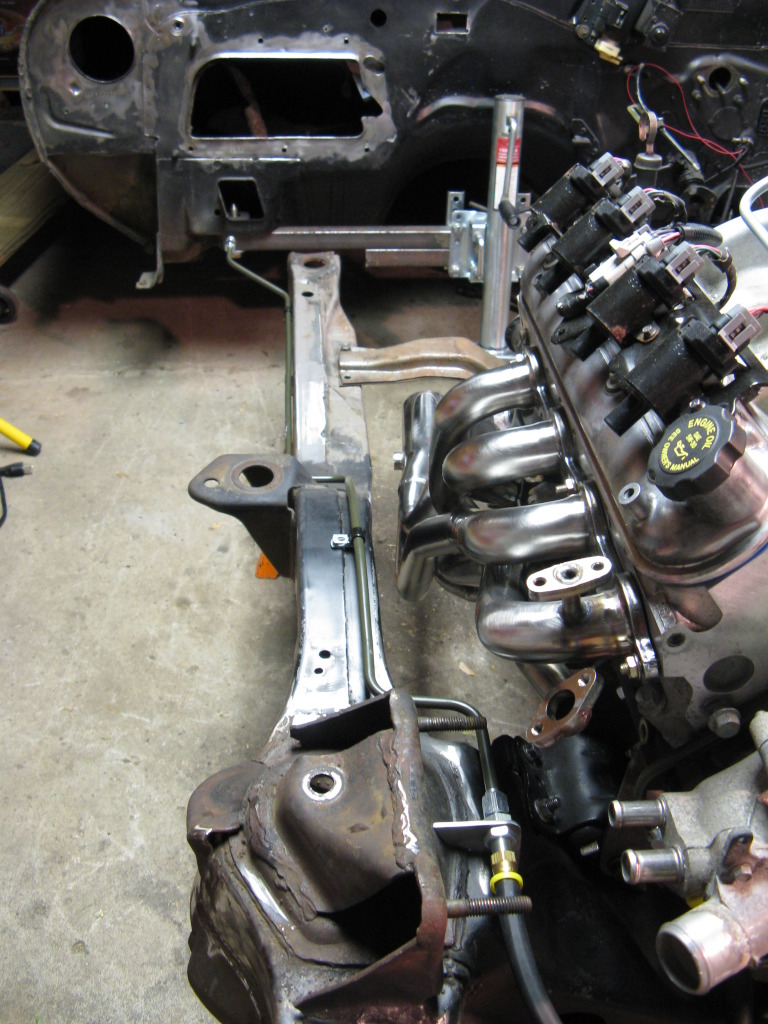
Next subject, just for Bczee, the oil pan. I used a yard stick to indicate cross member height, and traced that to the pan. You can see the 5� powerangle I designed into the system.
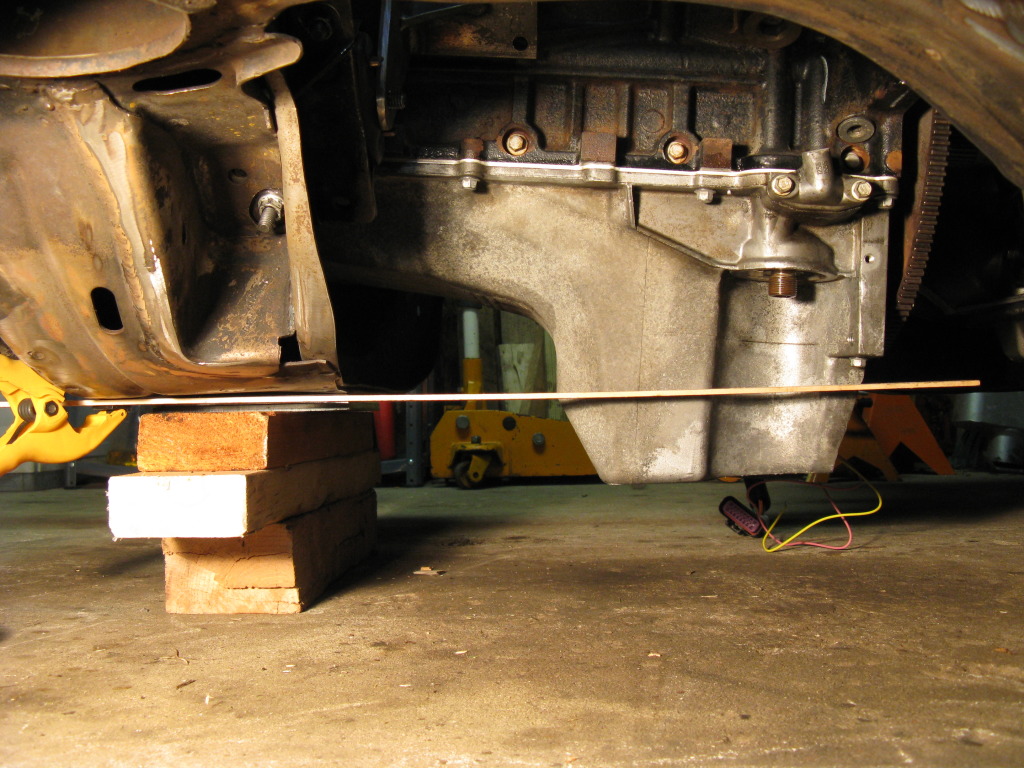
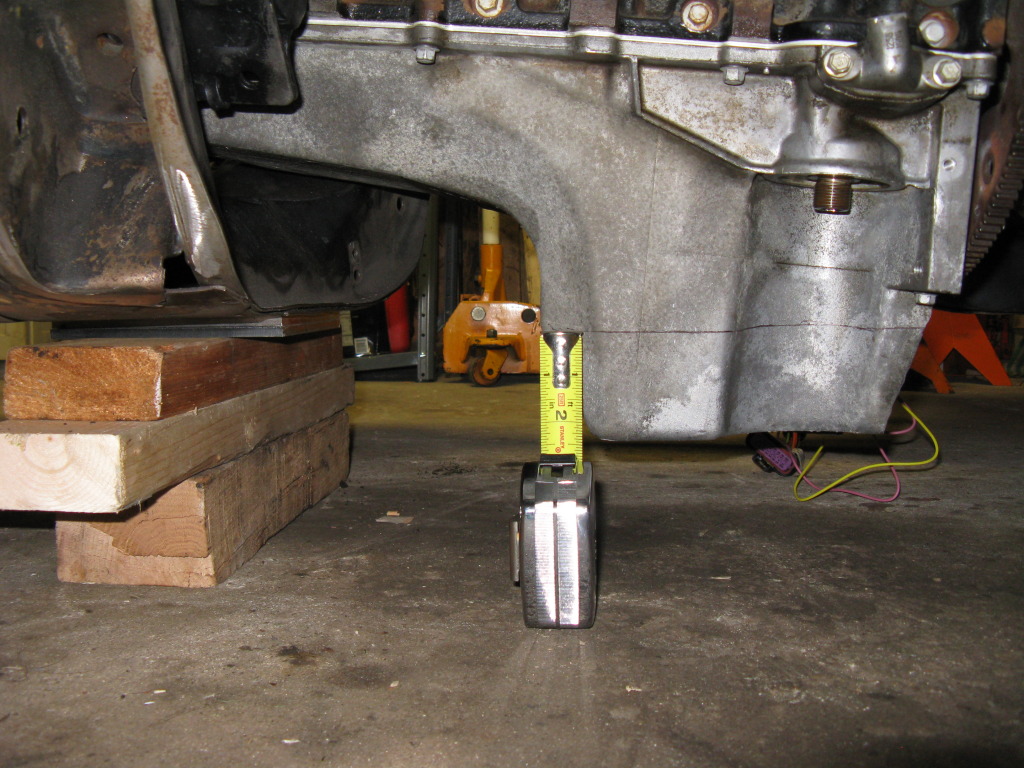
Like the tape indicates, I would have to remove 2.5" to get the pan above the crossmember, but I am not sure what kind of oil capacity that will leave me with...More research needed!
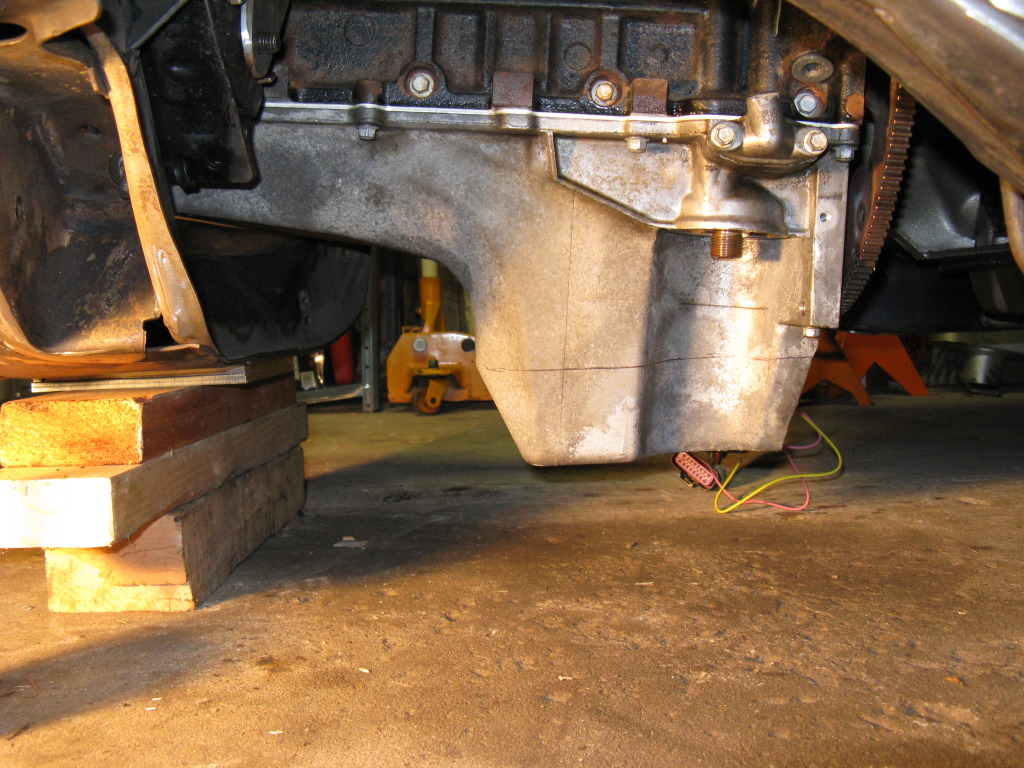
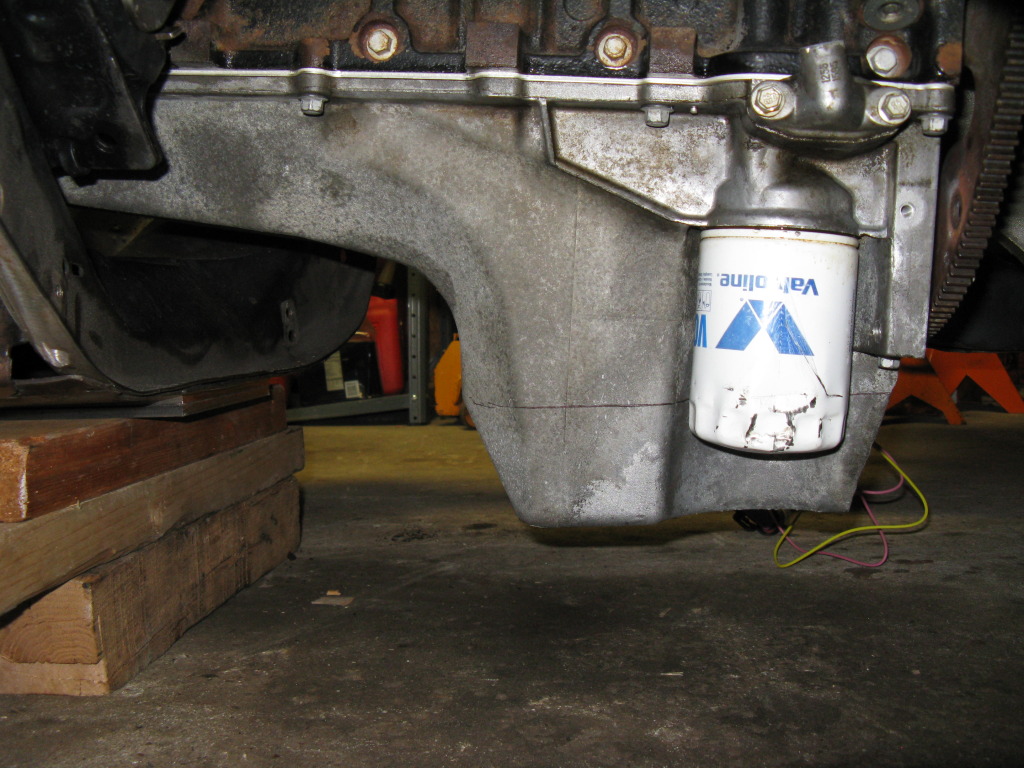
Here is a quick shot of the oil filter in reference to the crossmember height. Bczee I think I will be finding a shorter filter for now and in the future a sandwhich pickup for a remote cooler and filter setup.
Thats all for now. The project is picking up a dangerous amount of speed (unfortunately my bank account is going the other direction). More to come
Today I started with the alt bracket and FEAD routing. Here is my initial attempt as influenced by GTC99's setup:
Then I realized...truck and Camaro belt offsets are different:
After much measuring and research I came to settle on a difference of .75".So I set off to come up with a spacer. Here is what I have right now. And NO the wood is not permenant. I just didn't have a chunk of .75" aluminum to wittle on tonight.
I like this two piece set up will enough, but after staring at it for a while I came up with a design I liked a lot better. I will be drawing up some plans to get it made at a local shop...more to come on that later.
Next subject, just for Bczee, the oil pan. I used a yard stick to indicate cross member height, and traced that to the pan. You can see the 5� powerangle I designed into the system.
Like the tape indicates, I would have to remove 2.5" to get the pan above the crossmember, but I am not sure what kind of oil capacity that will leave me with...More research needed!
Here is a quick shot of the oil filter in reference to the crossmember height. Bczee I think I will be finding a shorter filter for now and in the future a sandwhich pickup for a remote cooler and filter setup.
Thats all for now. The project is picking up a dangerous amount of speed (unfortunately my bank account is going the other direction). More to come
05-18-2012, 10:49 AM
#43
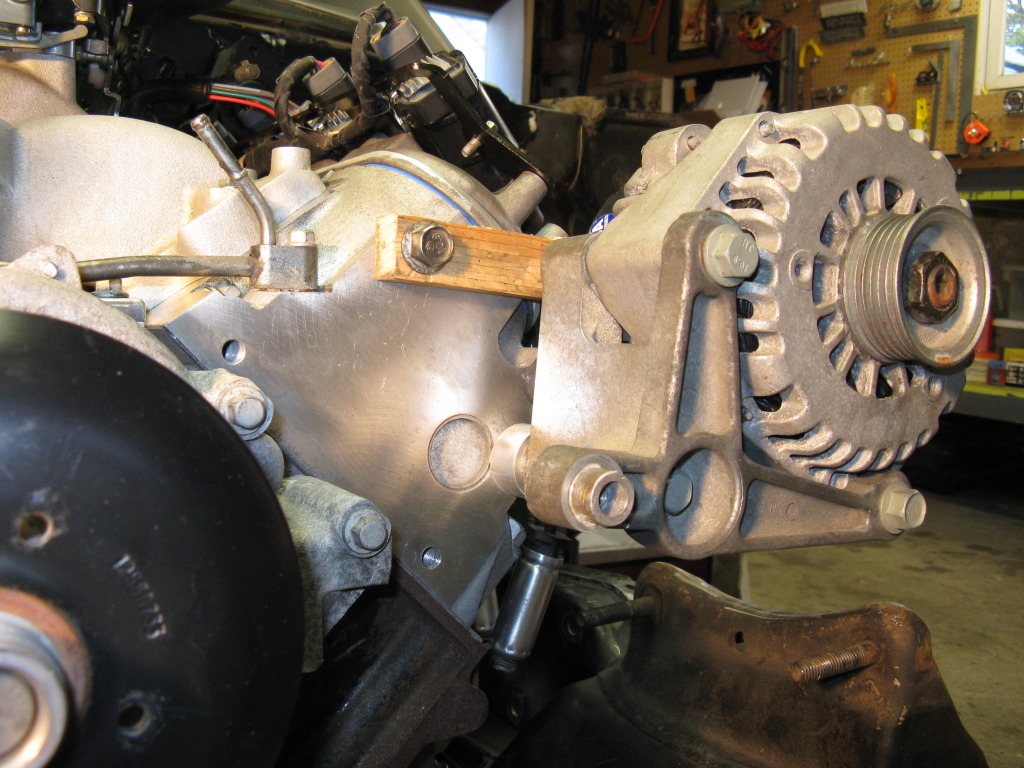
OK, like i said, the wood block alternator mounting was temporary while I had a bracket made and here it is!

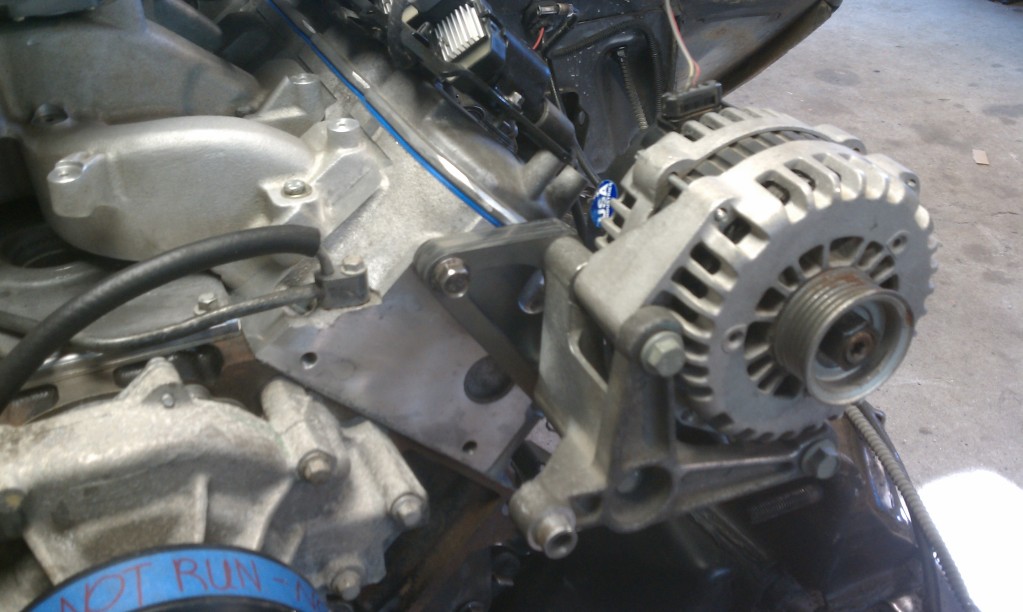
I was hoping to have the spacer laserjet from a single plate of .75" aluminum, but the local shop I was working with does 90% steel so instead of waiting until they were cutting .75" AL we decided to use 2 pieces of .375" steel. Maybe I will get it made in AL in the future.
I hope to put some good time in this weekend, so more updates to come soon. So check back in.
05-19-2012, 05:09 AM
#45
Unfortunately I did not take any pictures/measurements of the hood height or air cleaner clearance before starting on the swap so I have nothing to compare to. But just looking at the engine I am pretty sure I will need to make a few inches of clearance. I was surprised how low the Moroso air cleaner sits, definately aiding the situation.
Oh DUH! I know what I can do. I will place the cowl panel on, and use a straight edge to see where the engine is in reference to the skin of the hood! It won't be perfect but it will give us an idea at least! I will post again this weekend with progress updates and results of cowl panel testing. Thanks for the idea 88'!
Oh DUH! I know what I can do. I will place the cowl panel on, and use a straight edge to see where the engine is in reference to the skin of the hood! It won't be perfect but it will give us an idea at least! I will post again this weekend with progress updates and results of cowl panel testing. Thanks for the idea 88'!
05-19-2012, 08:53 AM
#46
On The Tree
iTrader: (5)

Join Date: Mar 2011
Location: Indiana
Posts: 126
Likes: 0
Received 0 Likes
on
0 Posts
Great! Thank you. I've been on the fence as to carb or inject. It's very close price-wise until I have to budget for a cowl hood if i do a carb. Mine will be cammed and the simplicity of tuning is definitely in favor of the carb for me.
05-21-2012, 09:09 AM
#47
I went through the same debate and came to the same conclusions. Price wise it can be done as a wash, but with the carb you can tune an tune yourself til the cows come home. Plus, I want to get the Nova up and running this summer. All the extra complication that comes with converting an EFI system to a quality level I would be happy with would take much more time.
Plus now I can take my time to build the EFI powertrain I really want while still enjoying the Nova with its Carb'd engine. And I can use it as a test bed for cam/head/tuning to see what I like and apply that to an EFI build. Sure its more time and money in the end, but I will learn much more and be much happier with the end product!
I will post a progress update tonight with pics from the weekend.
05-21-2012, 11:54 AM
#48
Good update and I like the adapter you made for the alternator. Well once you cut the bottom of the pan off, you can fill it up to see what capacity you will be loosing.. but I'd say 1 1/2" or mre from just eye balling it..
Also looks like you have enough Belt warp on the Water pulley with your setup. If anything else, add a idler between the WP Pulley and the Alternator to get a bit more, maybe extend your Alternator Adapter bracket for an Idler?
keep the posts coming !
BC
Also looks like you have enough Belt warp on the Water pulley with your setup. If anything else, add a idler between the WP Pulley and the Alternator to get a bit more, maybe extend your Alternator Adapter bracket for an Idler?
keep the posts coming !
BC
05-21-2012, 03:59 PM
#49
Bczee
Thanks! I am pretty happy with the way everything is routing, but I do have several concerns:
-Lack of wrap on the water pump
-lack of wrap on the crank
-long unsupported run of belt between pulleys
For now I am not going to change anything unless it proves to be a problem. But I may throw an idler on the alternaotr bracket idler mount between the alt and water pump.
I am also a little worried about the pan capacity, but if it is too low I will either consider an aftermarket pan OR a remote filter setup and maybe a cooler just to increase capacity. I love surprises!
05-21-2012, 04:40 PM
#50
Yeah. that is why i mentioned the Belt Wrap. Looks like the original Alternation bracket still has a boss for an Idler.. so, you might be 1/2 way there, just need to add another WP to Alt idler a bit higher that it is.
The Holley and Mast pans seem to be the good choice. I friends said he just ordered one on Amazon for something like in the lower end of the $300 range ($320 ??). Might be a good way to go instead of the Truck pan.
But let us know what you end up with !?
BC
The Holley and Mast pans seem to be the good choice. I friends said he just ordered one on Amazon for something like in the lower end of the $300 range ($320 ??). Might be a good way to go instead of the Truck pan.
But let us know what you end up with !?
BC
05-22-2012, 11:58 AM
#51
On The Tree
iTrader: (5)
Join Date: Mar 2011
Location: Indiana
Posts: 126
Likes: 0
Received 0 Likes
on
0 Posts
I went through the same debate and came to the same conclusions. Price wise it can be done as a wash, but with the carb you can tune an tune yourself til the cows come home. Plus, I want to get the Nova up and running this summer. All the extra complication that comes with converting an EFI system to a quality level I would be happy with would take much more time.
Plus now I can take my time to build the EFI powertrain I really want while still enjoying the Nova with its Carb'd engine. And I can use it as a test bed for cam/head/tuning to see what I like and apply that to an EFI build. Sure its more time and money in the end, but I will learn much more and be much happier with the end product!
I will post a progress update tonight with pics from the weekend.
Plus now I can take my time to build the EFI powertrain I really want while still enjoying the Nova with its Carb'd engine. And I can use it as a test bed for cam/head/tuning to see what I like and apply that to an EFI build. Sure its more time and money in the end, but I will learn much more and be much happier with the end product!
I will post a progress update tonight with pics from the weekend.
I do know that efi offers better driveability...but, how much better? I dont mind driving it with the carb the way it is
05-27-2012, 07:43 AM
#52
Been in the garage a lot since my last update, lots of good progress!
Here is the big block heater core installed into the HVAC box. I had to design the strap as the original small block heater core clips did not work.
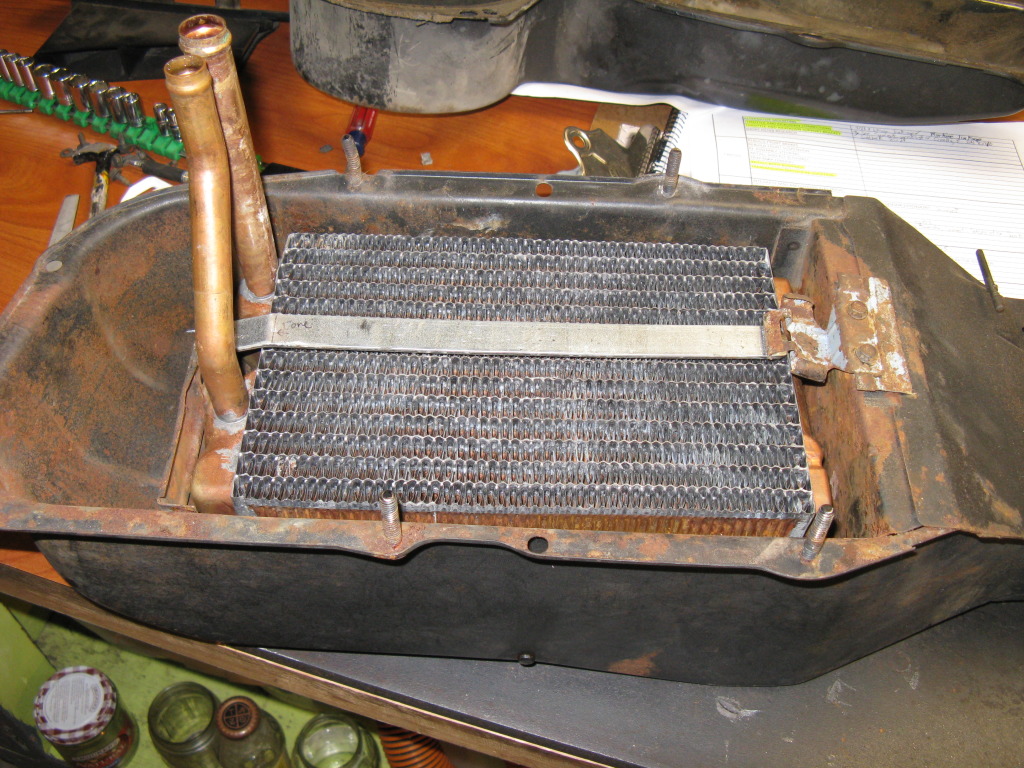
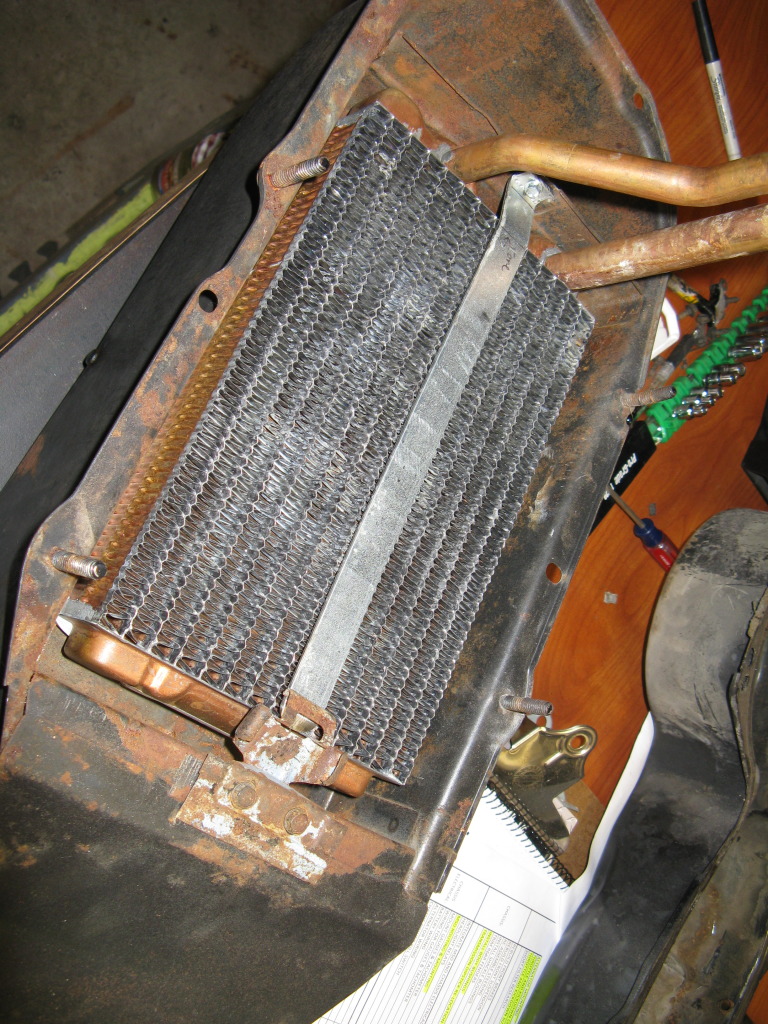
The put a small "bow" into the strap to slightly compressor the heater core. Here is the HVAC box reinstalled
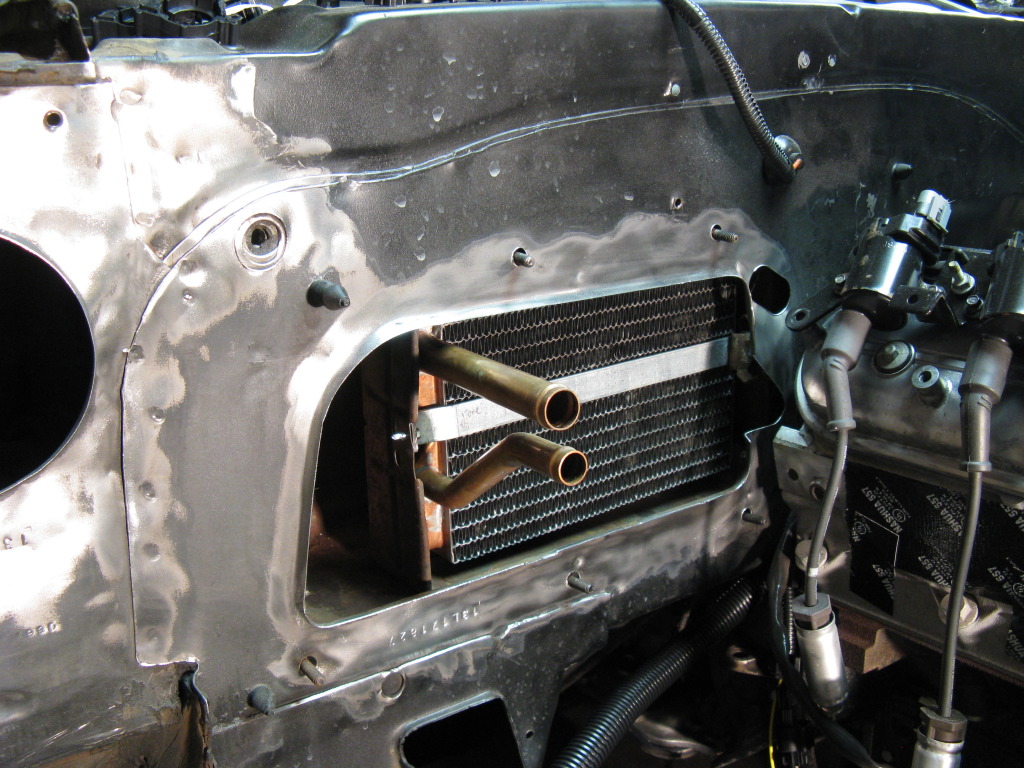
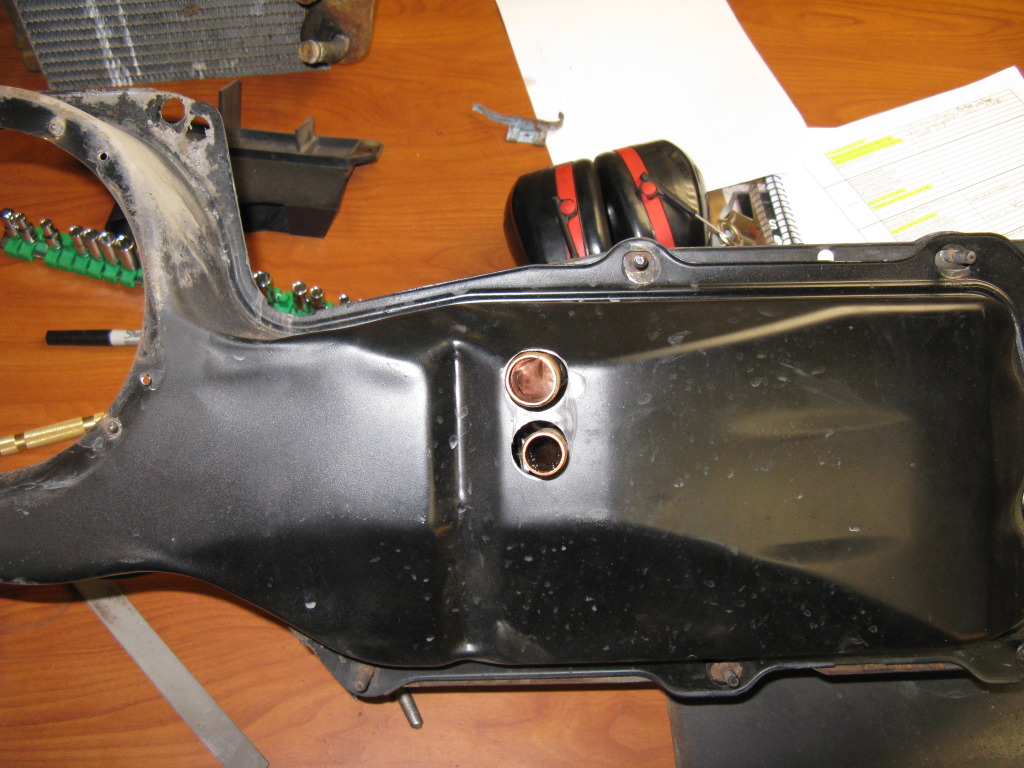
The cover had to be drilled for the new tube location. Something about cutting up original sheetmetal gives me cold sweats.
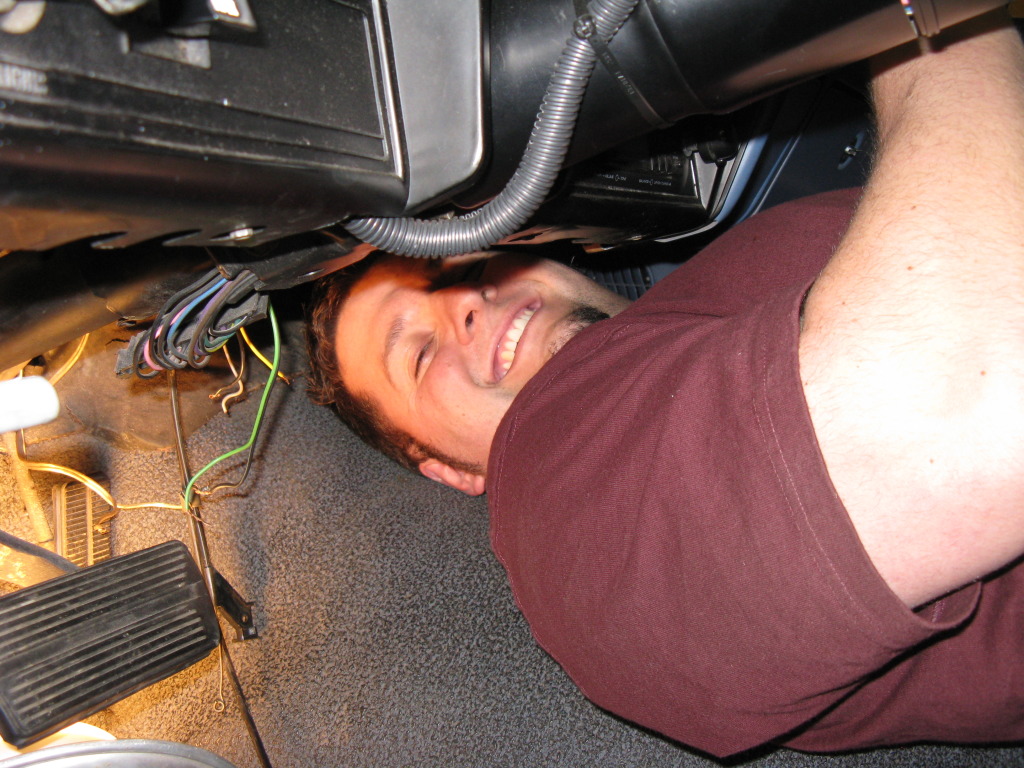
The Fiance came into the garage to find me like this. Much to ger enjoyment I was a little to stuck to argue about her taking the pictures.
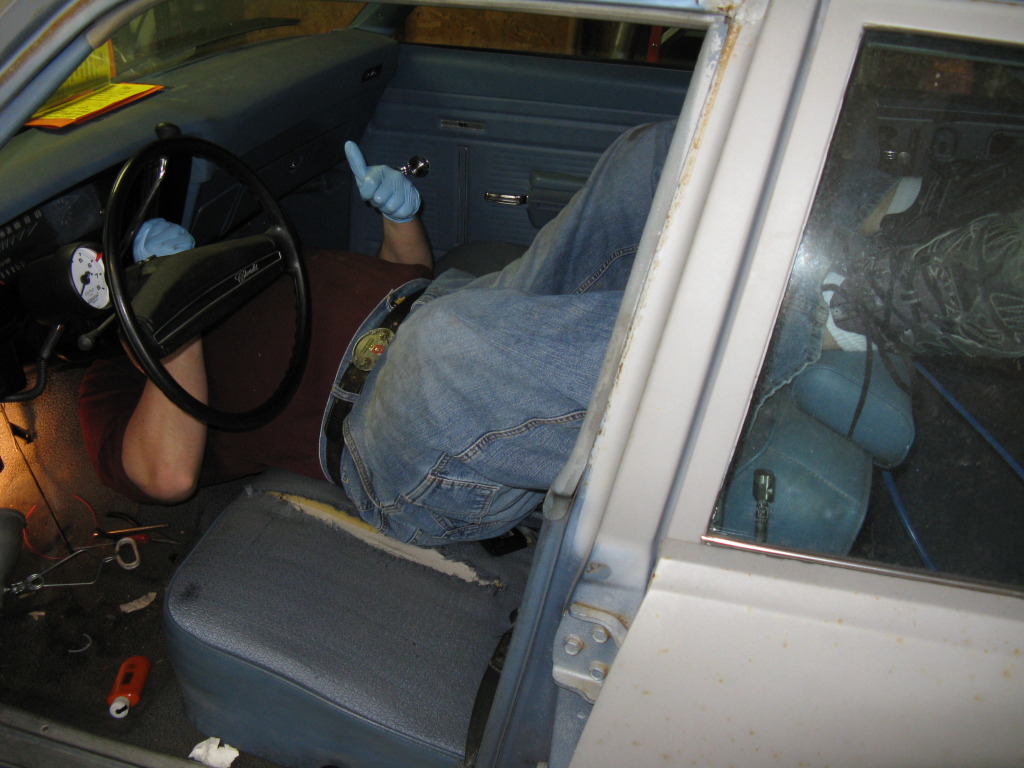
Good thing I am a small guy huh?
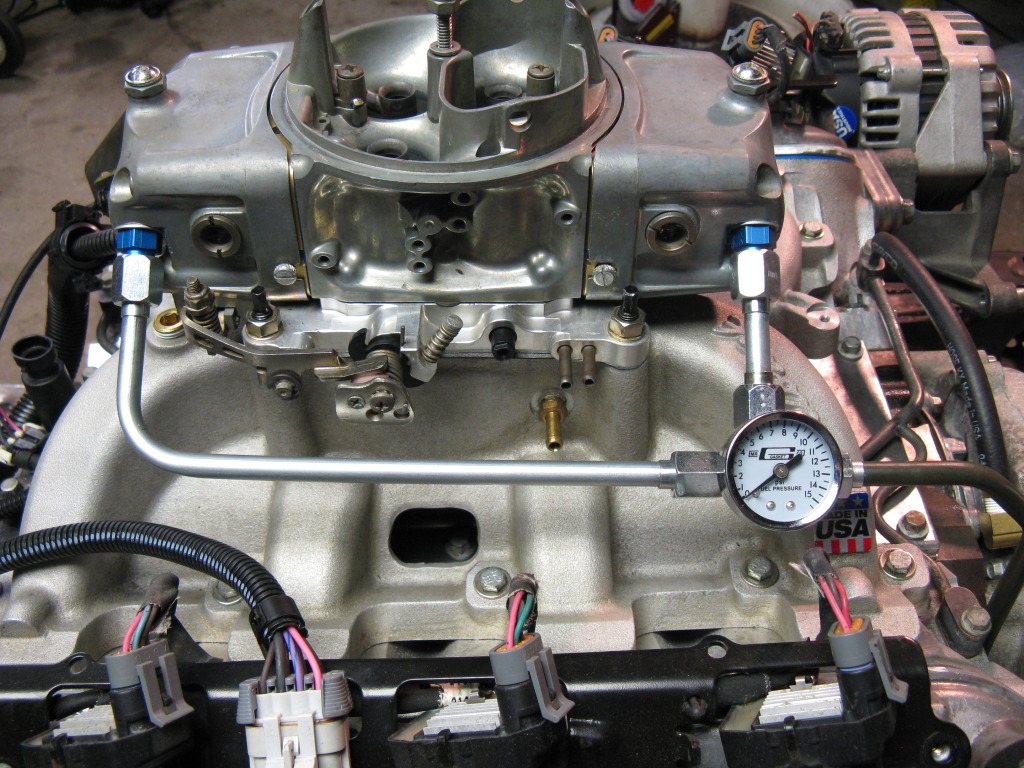
I needed a place to mount the fuel pressure gauge, SO:
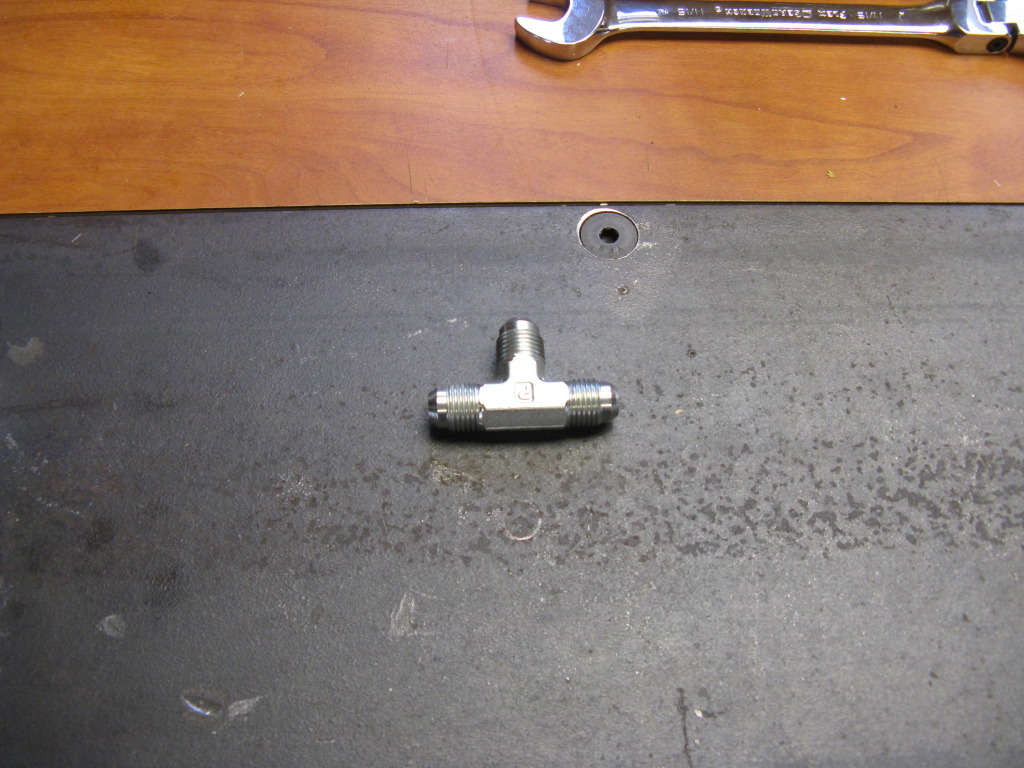
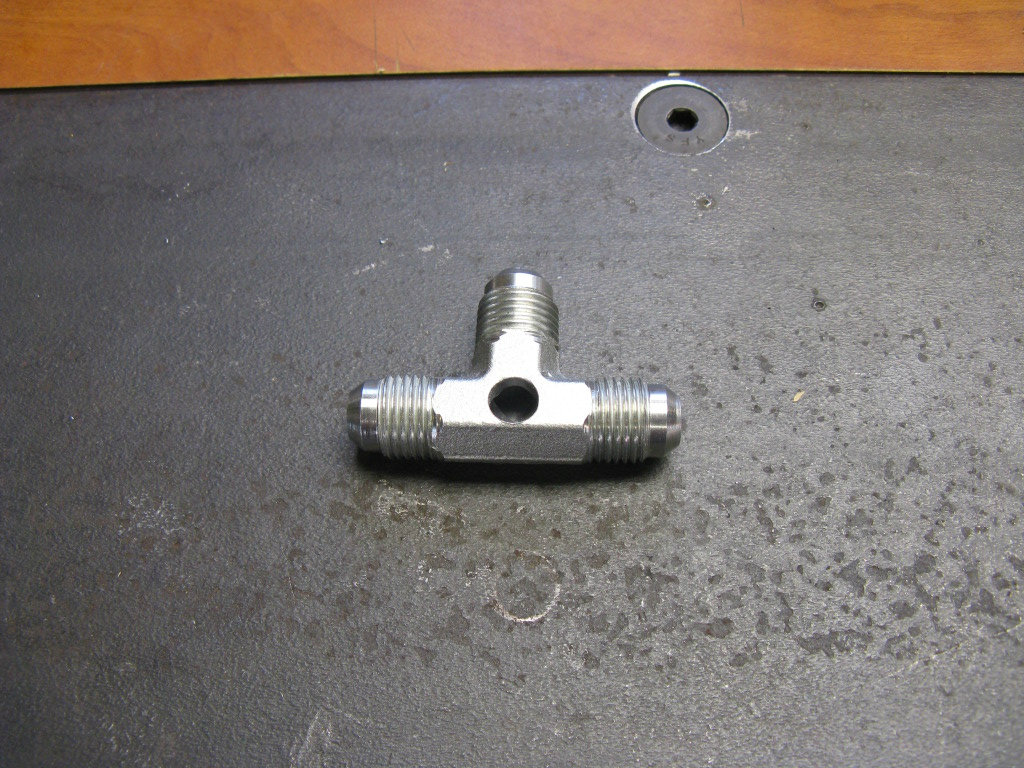
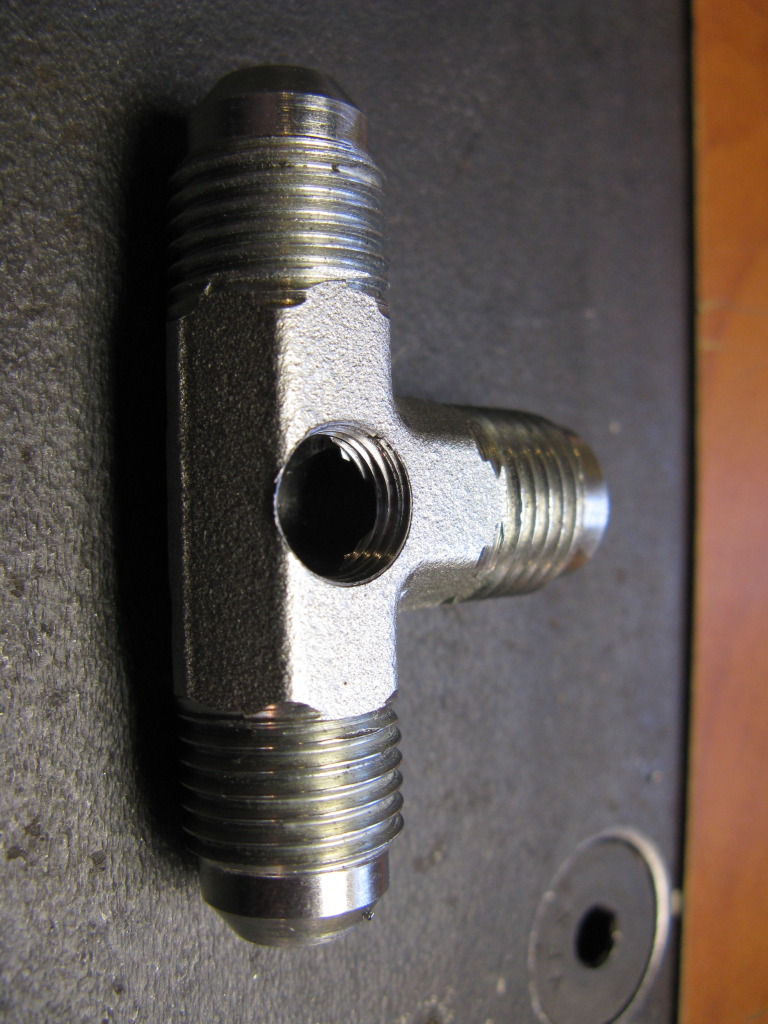
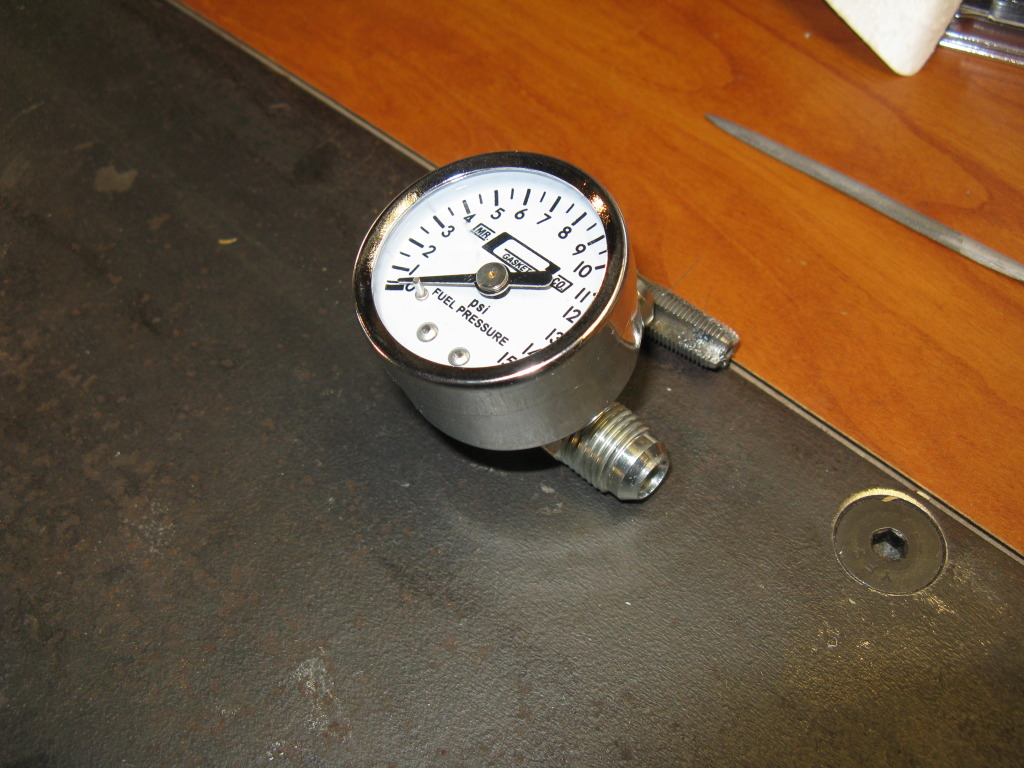
The fitting did not even intrude into the flow path.

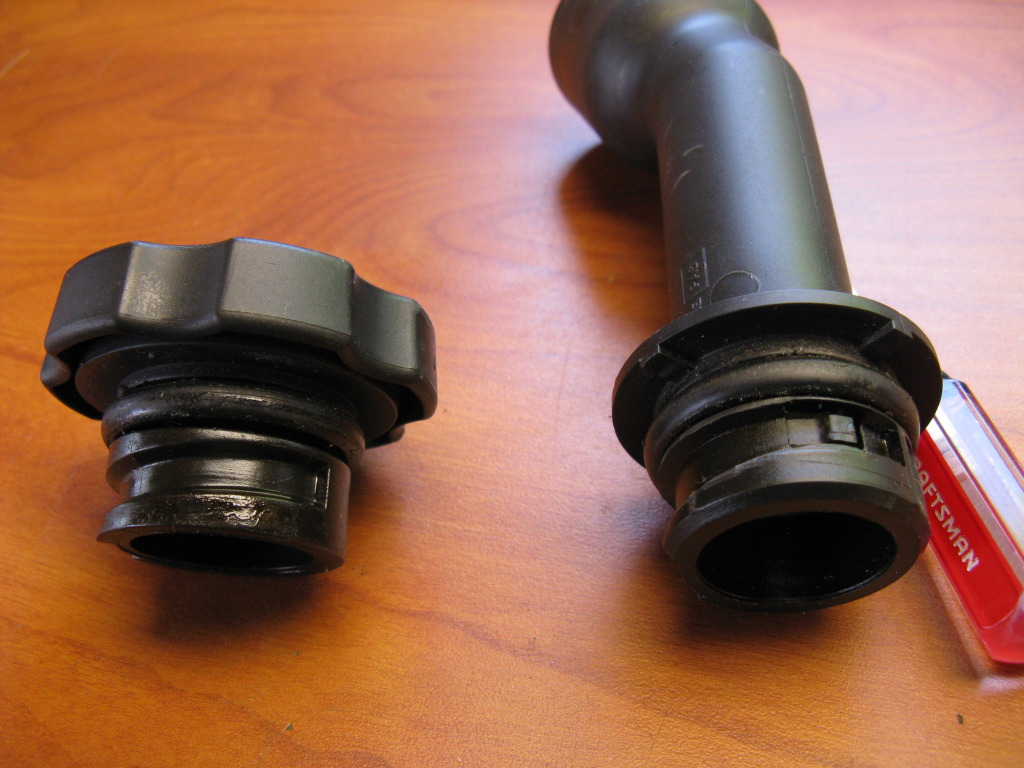
I removed the oil fill neck. You can see the locking tab on the neck as oppose to the cap. I'm going to install the cap directly into the valve cover. Maybe I'll get one of those nice ebay caps someday. For now, stock will work just fine.
Getting her out in the sun for the first time in a few months.
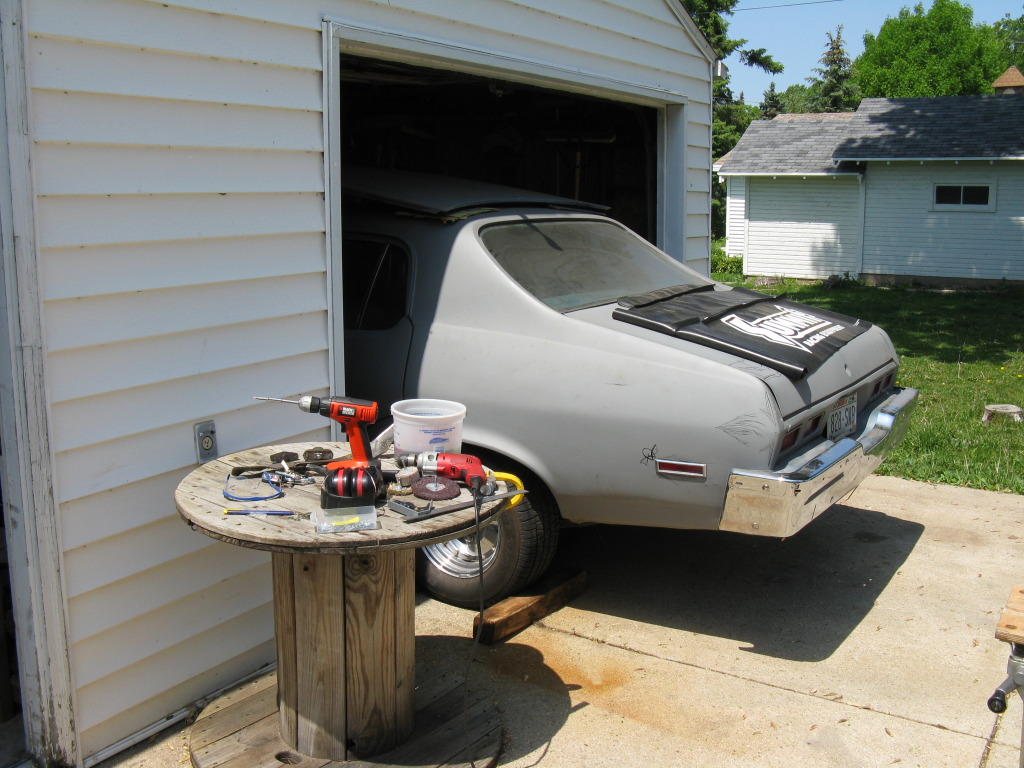
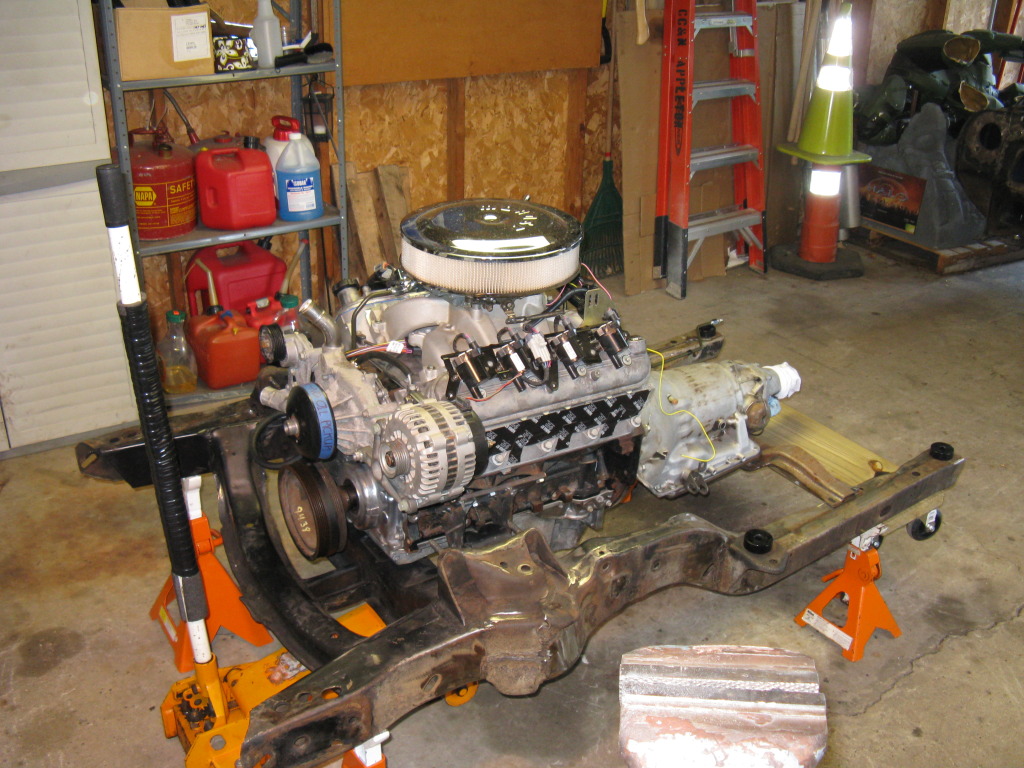
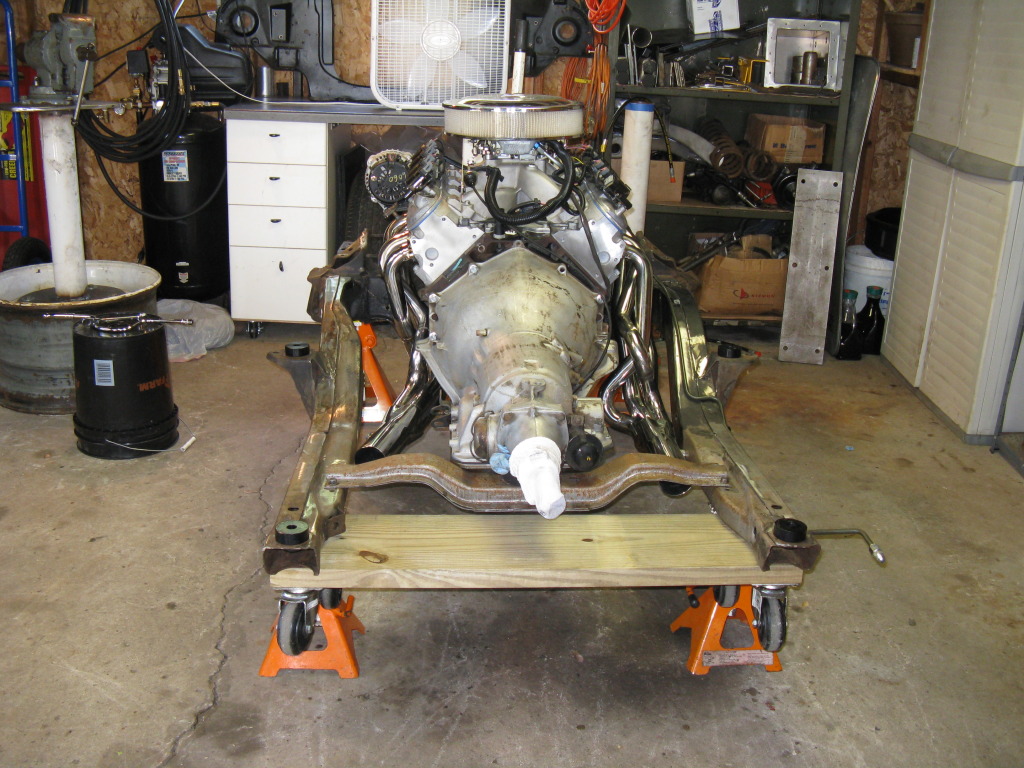
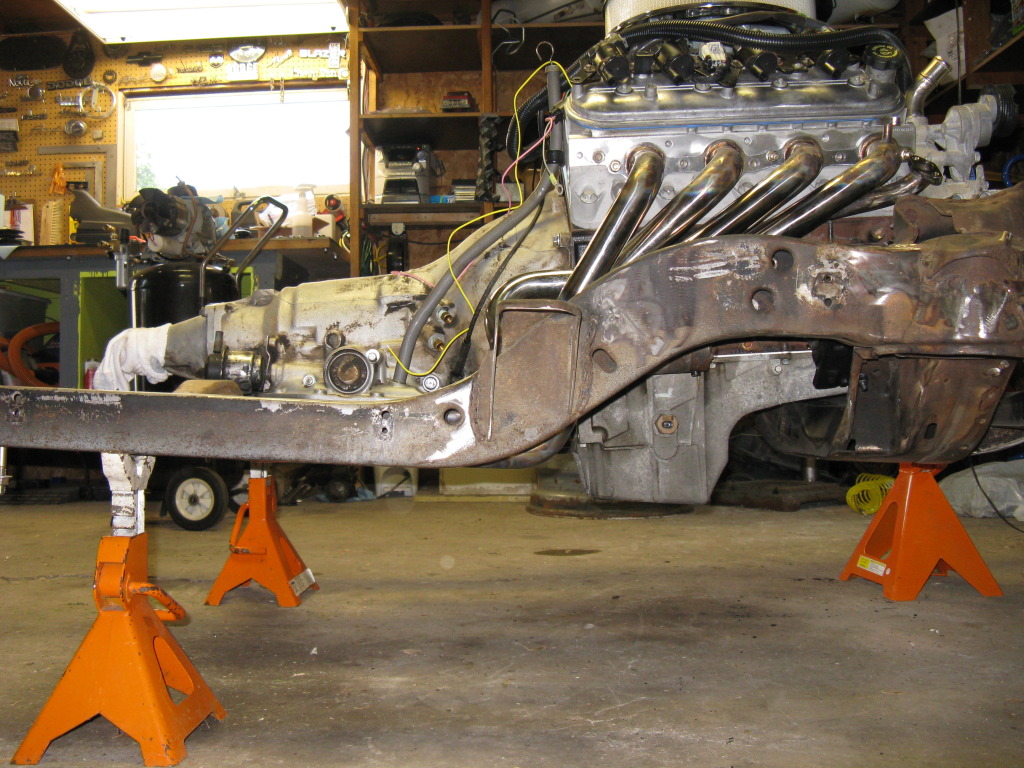
Pulled the powertrain and subframe out as 1 piece for header fittment. BTW, if you every want to try this get a 6er' and call a buddy! It is not a fun task by yourself! To ease my suffering I made a dolly for the rear of the subframe. That was a BIG help.
Here is the big block heater core installed into the HVAC box. I had to design the strap as the original small block heater core clips did not work.
The put a small "bow" into the strap to slightly compressor the heater core. Here is the HVAC box reinstalled
The cover had to be drilled for the new tube location. Something about cutting up original sheetmetal gives me cold sweats.
The Fiance came into the garage to find me like this. Much to ger enjoyment I was a little to stuck to argue about her taking the pictures.
Good thing I am a small guy huh?
I needed a place to mount the fuel pressure gauge, SO:
The fitting did not even intrude into the flow path.
I removed the oil fill neck. You can see the locking tab on the neck as oppose to the cap. I'm going to install the cap directly into the valve cover. Maybe I'll get one of those nice ebay caps someday. For now, stock will work just fine.
Getting her out in the sun for the first time in a few months.
Pulled the powertrain and subframe out as 1 piece for header fittment. BTW, if you every want to try this get a 6er' and call a buddy! It is not a fun task by yourself! To ease my suffering I made a dolly for the rear of the subframe. That was a BIG help.
Last edited by cruisin'73; 05-29-2012 at 06:18 AM.
05-27-2012, 09:58 PM
#54
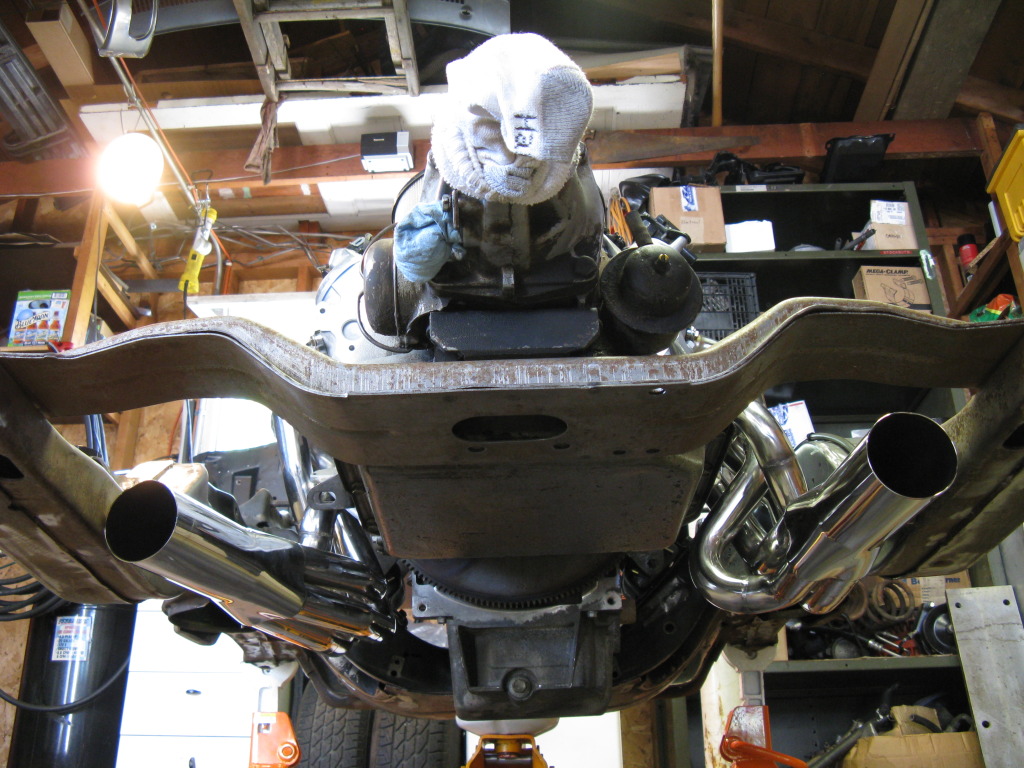
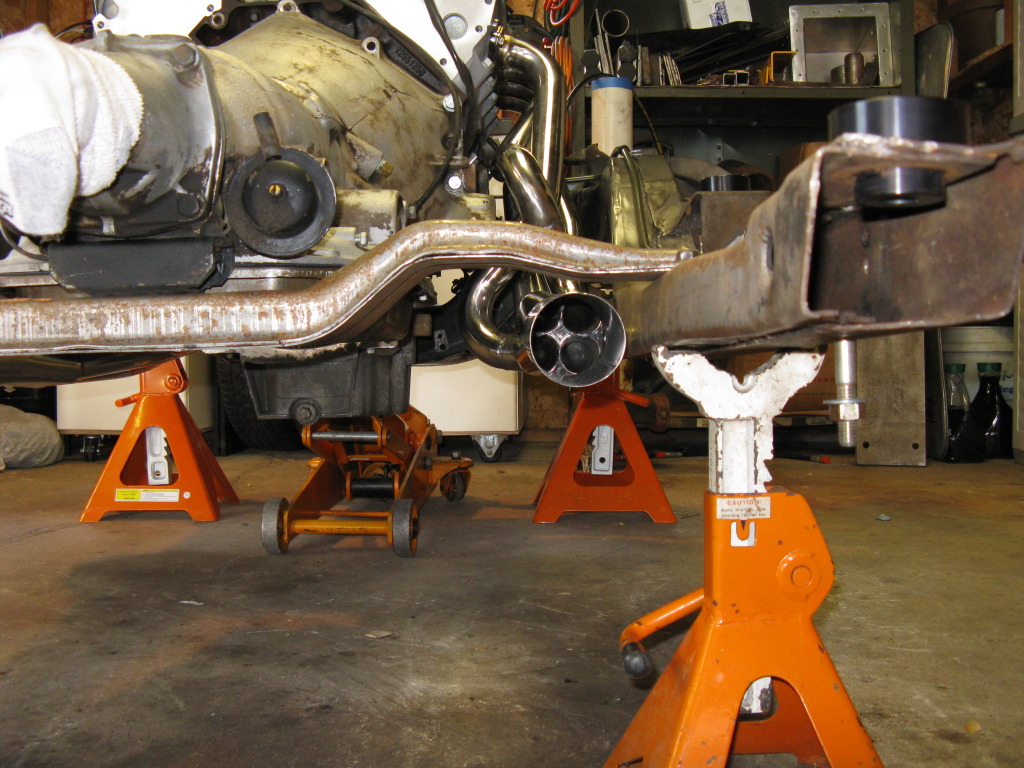
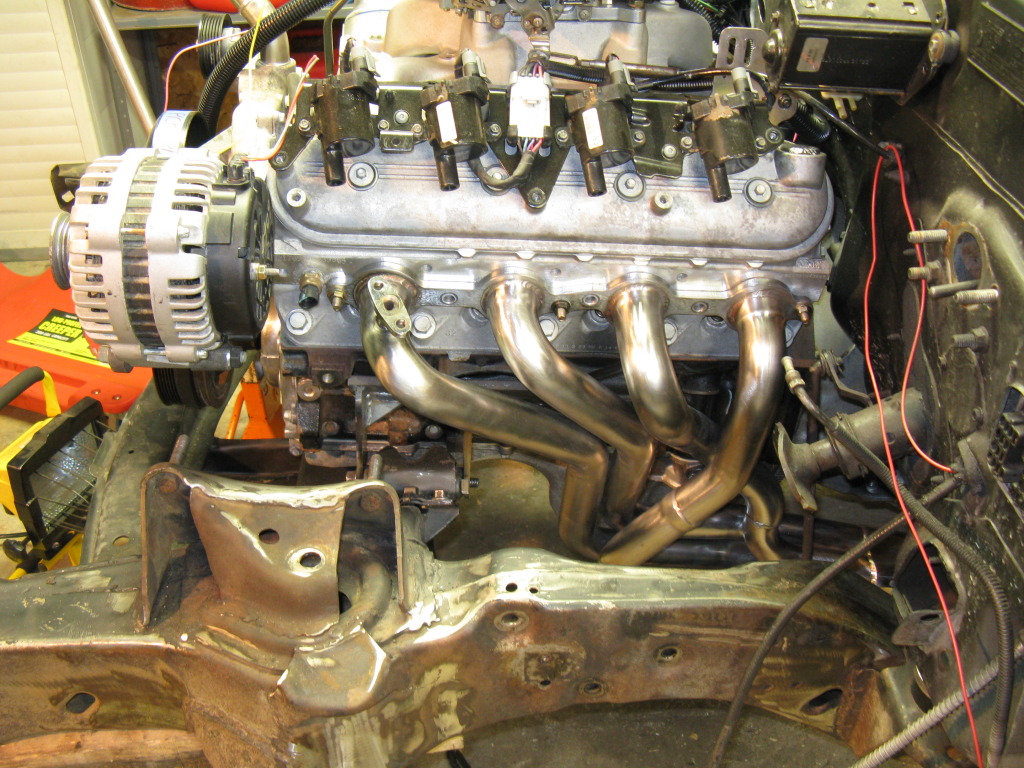
OK , I got wrapped up in house/yard projects today so here is the rest of that update. This past week my buddy and I fitted a set of the imfamous E-bay SS headers into the Nova! The verdict: THEY FIT...pretty well, and with A LOT of work.
Before:
Overhead
Under Low
RH low
RH High
RH Front
LH Low
LH High
LH Side
After:
Overhead
Overhead 2
Under
RH Front
RH Side
LH Side

You can see where we applied heat with the oxy torch. Using a long 3" pipe for leverage. There are still a few issues to work out, like what to do about the ugly burn and discoloration. So see the next post for how I solved that issue!
Before:
Overhead
Under Low
RH low
RH High
RH Front
LH Low
LH High
LH Side
After:
Overhead
Overhead 2
Under
RH Front
RH Side
LH Side
You can see where we applied heat with the oxy torch. Using a long 3" pipe for leverage. There are still a few issues to work out, like what to do about the ugly burn and discoloration. So see the next post for how I solved that issue!
 05-27-2012, 10:11 PM
#56
Fact of life, SS headers are going to discolor, and polishing them is a huge PITA for a short lived return! So I opened up my 5 gal bucket of elbow grease and went to work with a pile of scotch brite pads and wheels:
Before:
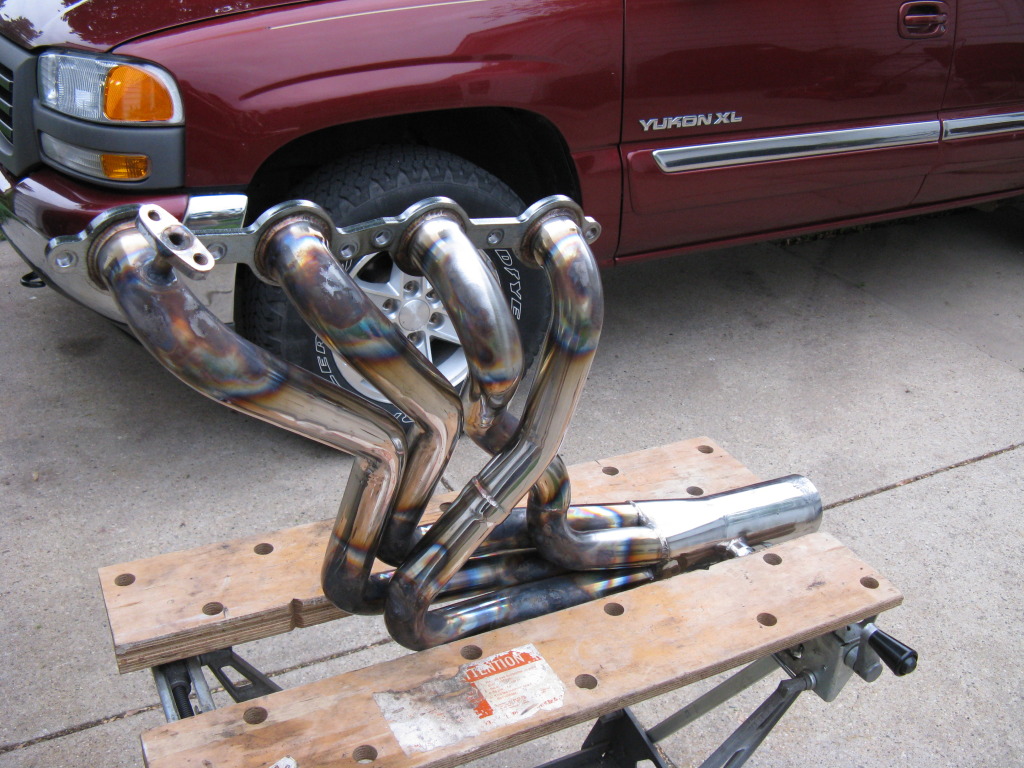
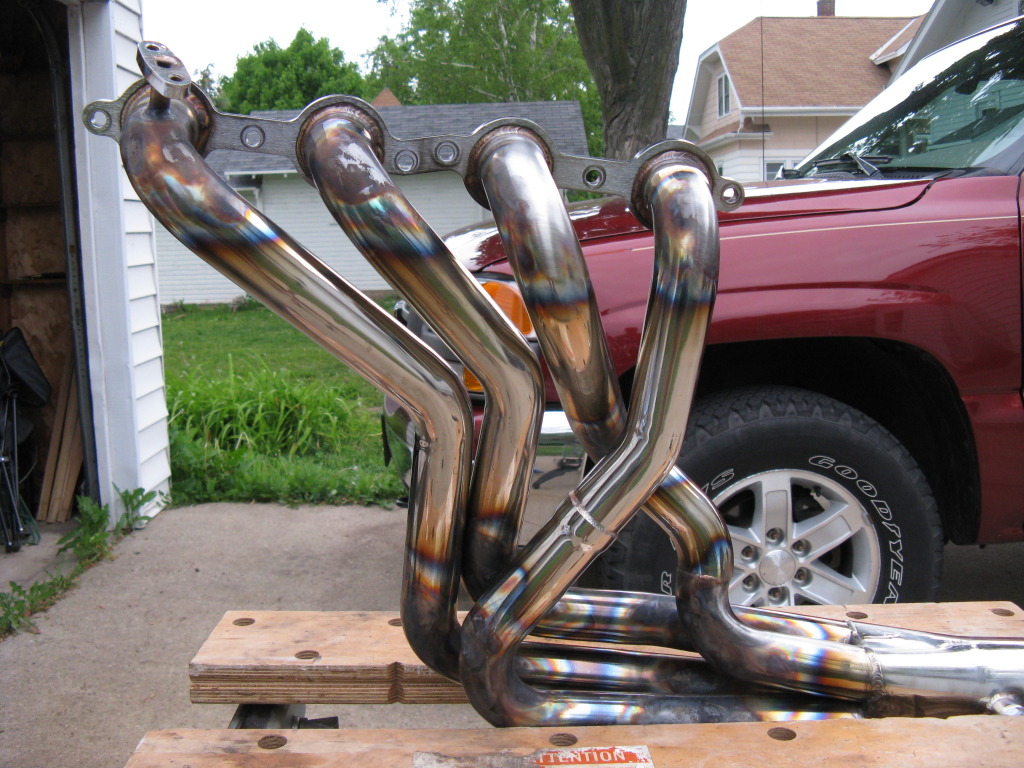
After:


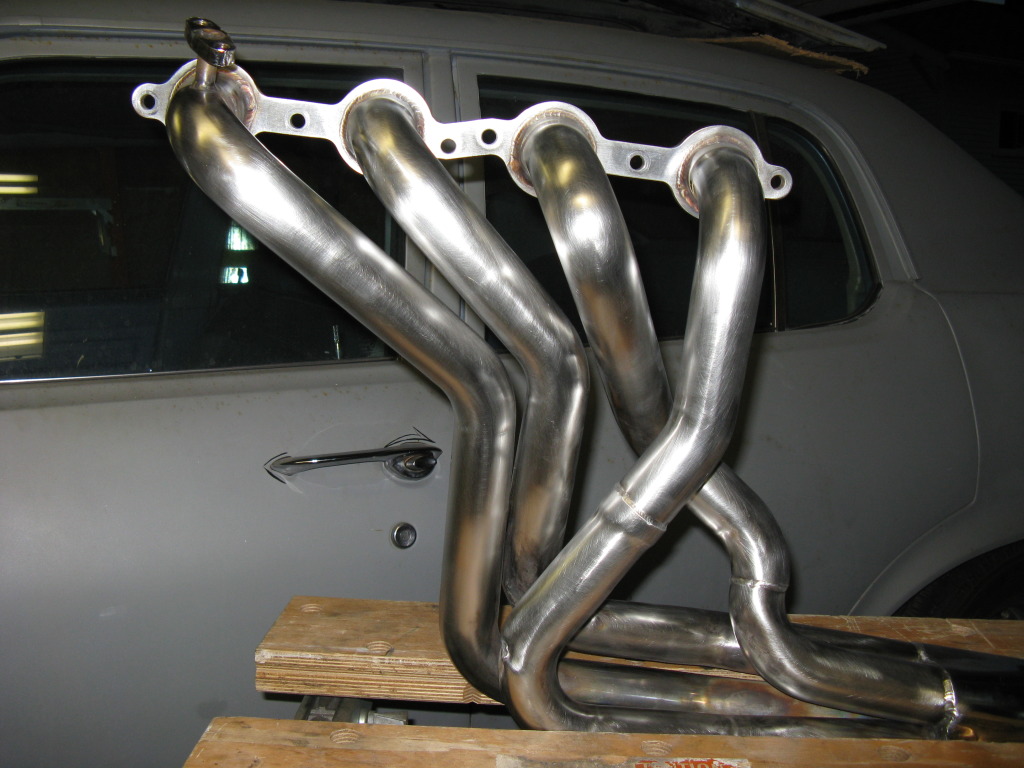
I would estimate 2hr of work per side. Note the change from sunlight to dark by the time the headers were readt for the after shots. It was a lot of work, but gave just the right look. And about $20 in scotch brite products. While I have no illusions they will stay this nice looking, I hope hitting them with a scotchbrite pad will remove discoloring and and bring back this awesome brushed luster! Time will tell.
I'll post more tomorrow, but for tonight its time to hit the sack. See ya!
Before:
After:
I would estimate 2hr of work per side. Note the change from sunlight to dark by the time the headers were readt for the after shots. It was a lot of work, but gave just the right look. And about $20 in scotch brite products. While I have no illusions they will stay this nice looking, I hope hitting them with a scotchbrite pad will remove discoloring and and bring back this awesome brushed luster! Time will tell.
I'll post more tomorrow, but for tonight its time to hit the sack. See ya!
05-27-2012, 10:58 PM
#57
Staging Lane
iTrader: (4)
Join Date: Jul 2009
Location: Killeen, Texas
Posts: 99
Likes: 0
Received 0 Likes
on
0 Posts
I was just checking out those headers and they look bent, I wouldv'e just sent them back. I think you are going to have issues with closing your hood because the truck intake sits so high. I hope you don't. Also when you made your measurements to cut the oil pan, was your tranny in? Because that 3-5* may make a difference on how the engine will sit for an accurate measurement.
05-28-2012, 07:41 AM
#58
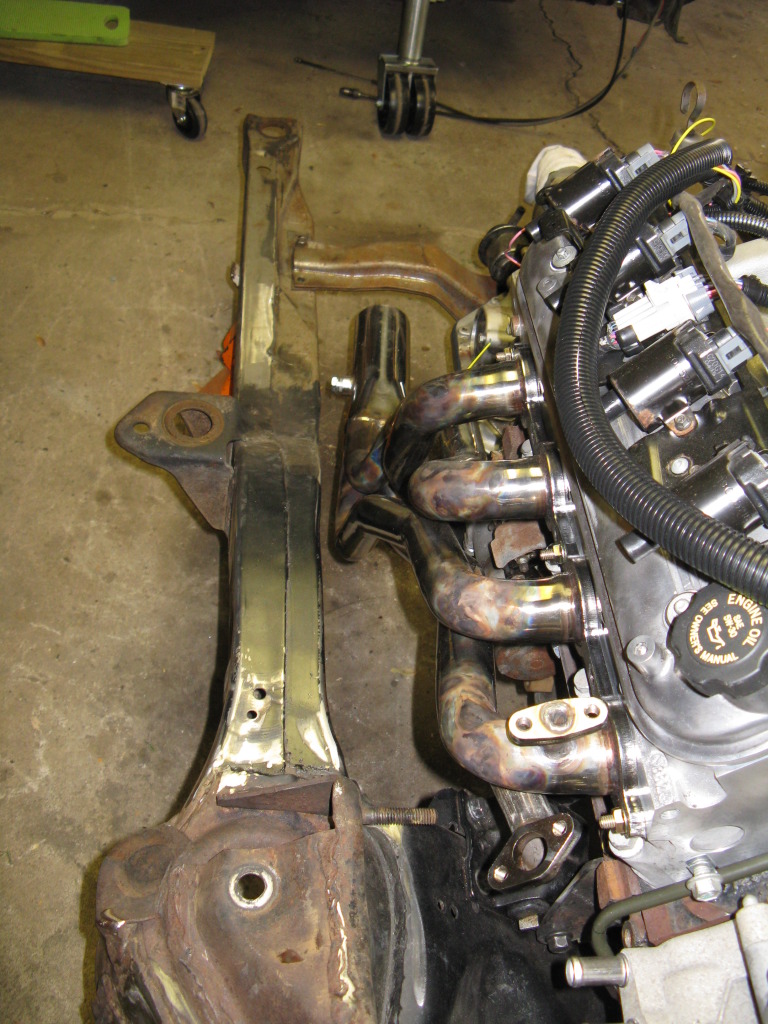
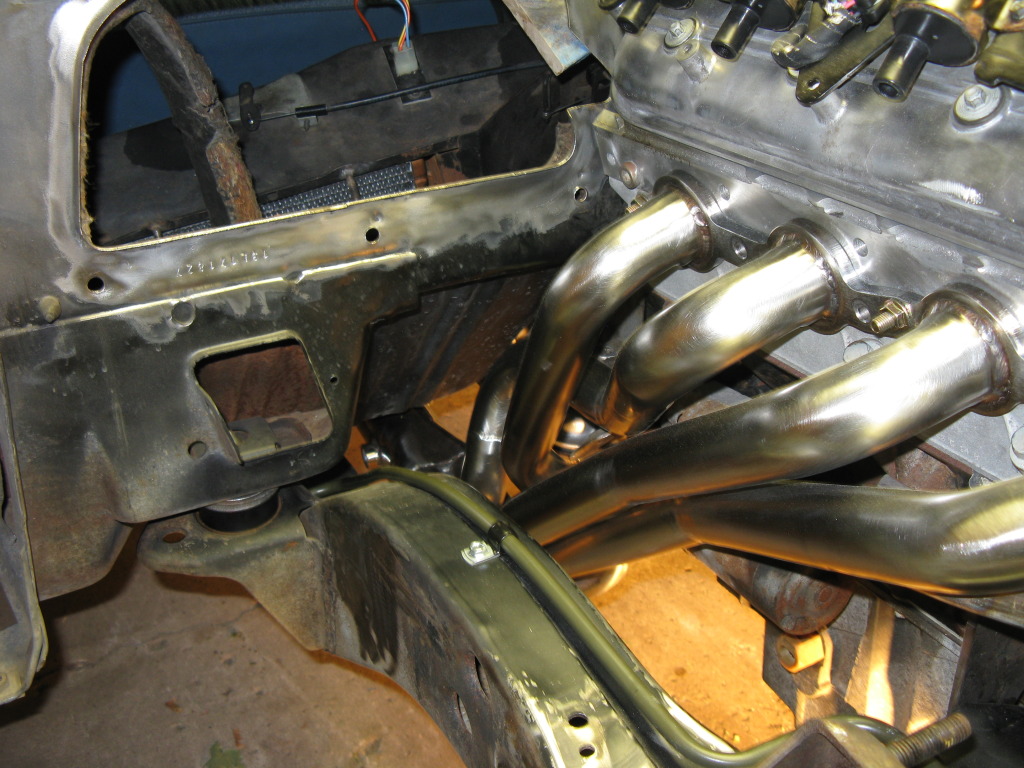
Thanks Shifter and Killer! I'm not to concerned about fitting a truck intake under the hood as I am running a carb  , but I am pretty sure I will have hood issues. I plan build a cowl induction hood to deliver fresh cool air anyway. What are you refering to being bent on the headers? In the fittment process we did end up distorting a few of the primaries, and bending the collectors out of shape a bit, but nothing I am concerned about. On that note however, There is a little more header work required. Turns out the steering box and headers are not going to get along. The #1 primary hits the steering box, and no matter how I try or which I install first they contact one another.
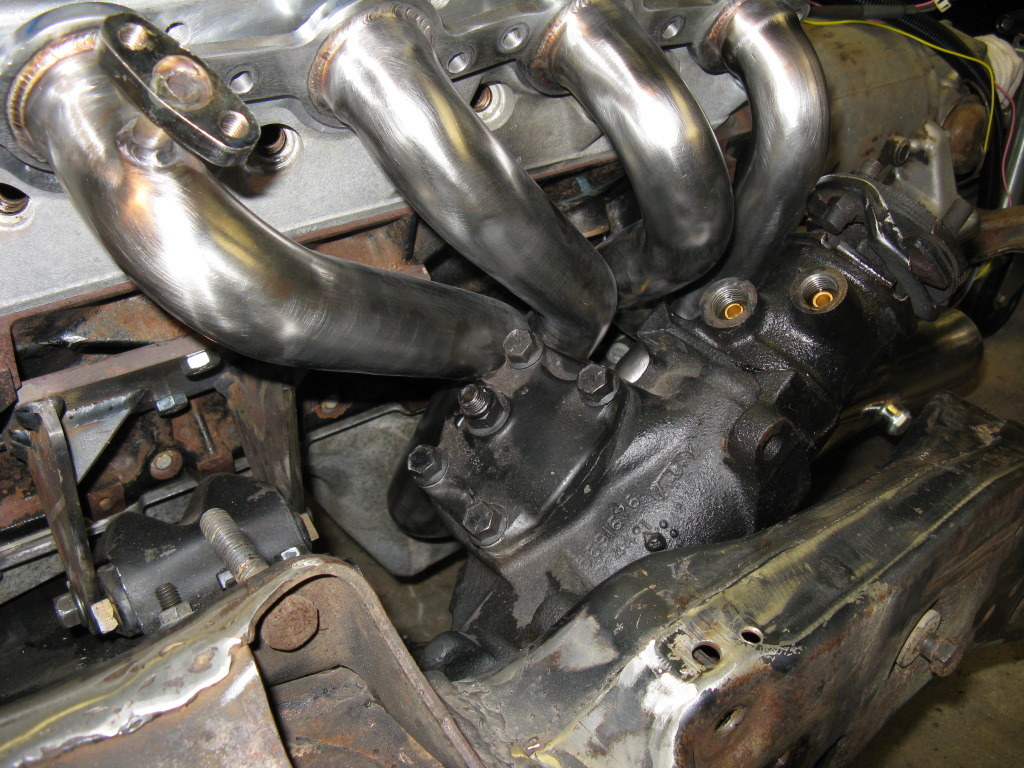
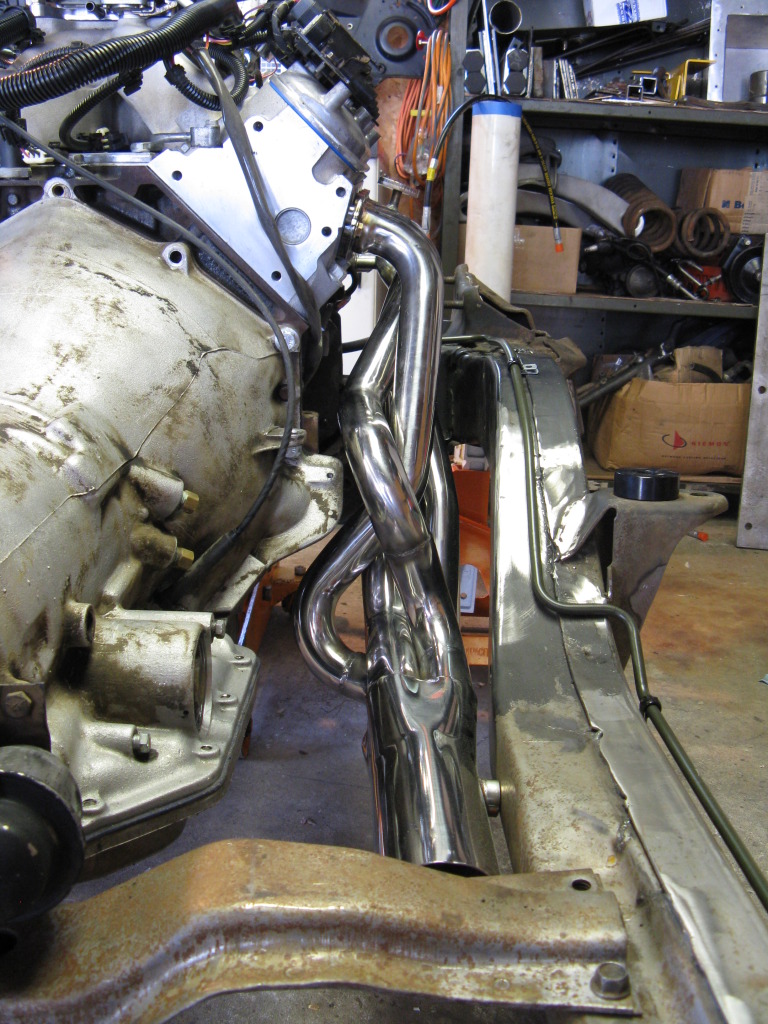
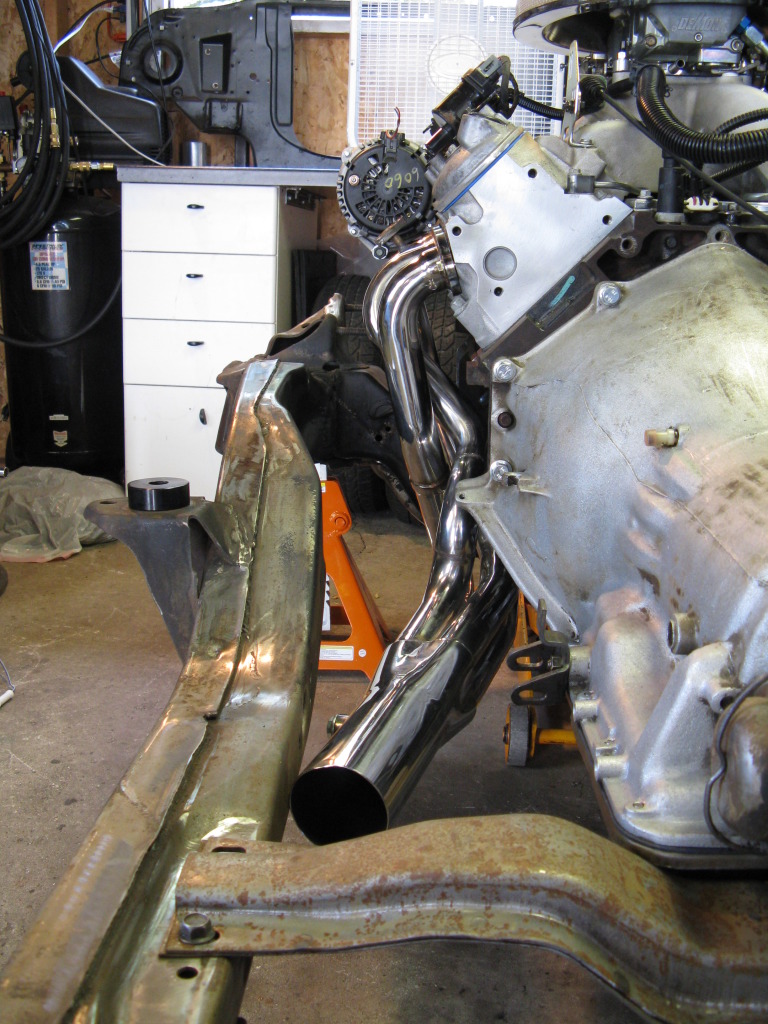
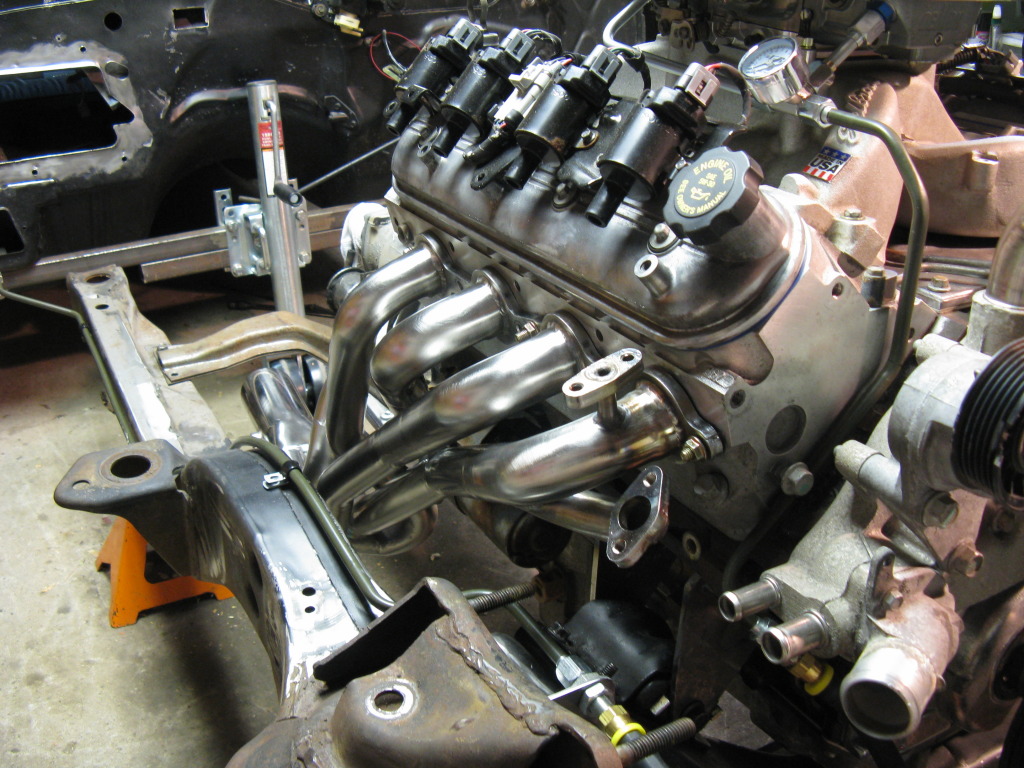
This is as low as I can get the headers

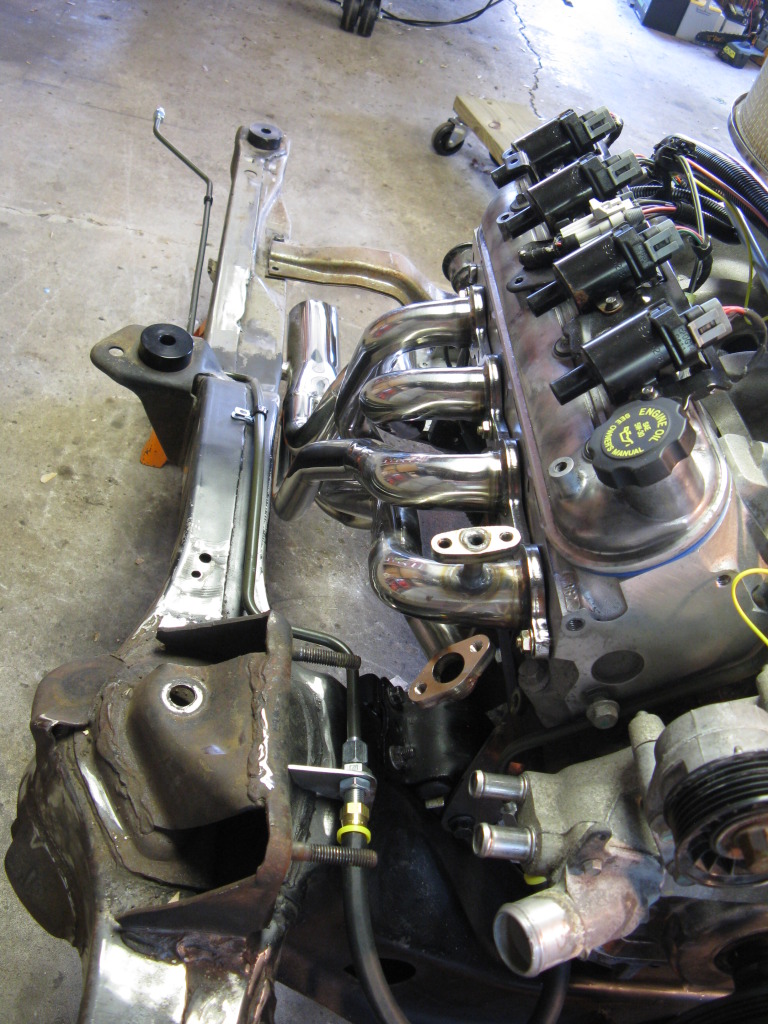
I was kind of anticipating this and found a guy on Steve's Nova Site that wants to trade his manual steering box for my power one. I like the heavy and more connected feel of the manual box. PLUS I want to try and find one of the quick ratio manual steering boxes from a mid Hi Po 80's Monte Carlo. But for now I will deal with a standard 20:1 box. Just hope it is A LOT smaller then the power gear! Without the steering gear in, here is how the brushed headers look. I like it! BTW, notice that addition of the sweet Moroso air cleaner, I have plans to get rid of that "bling" finish as well. Also the Edelbrock throttle/detent bracket. I thought about making this myself, but for $25, you can't beat it!
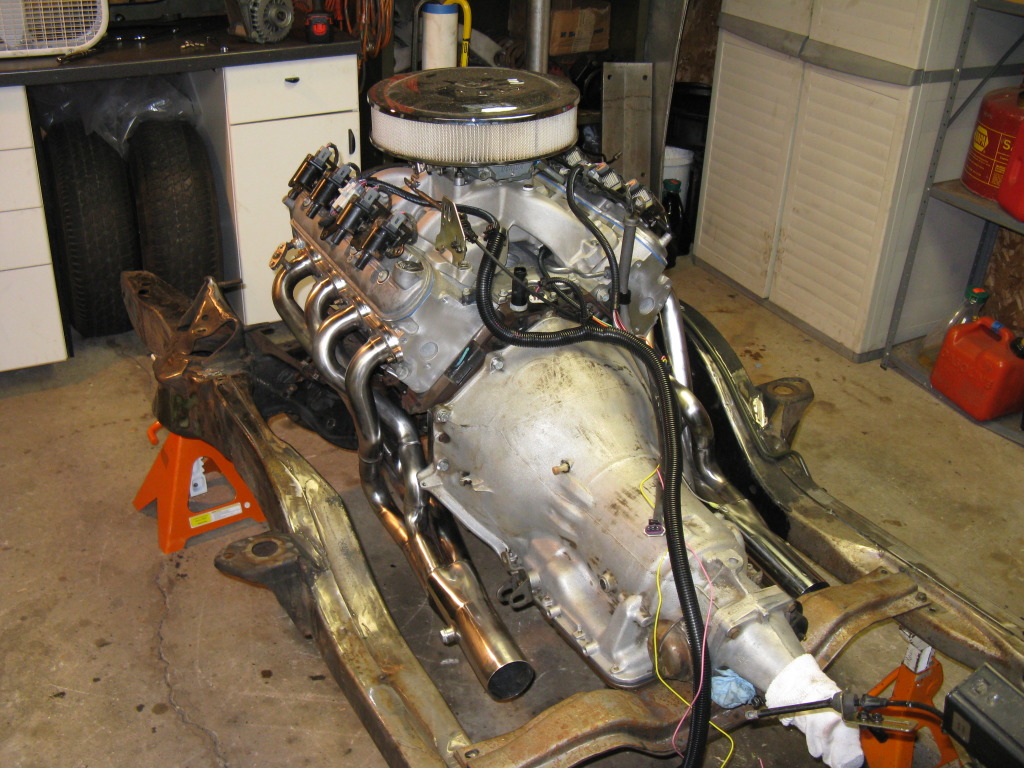
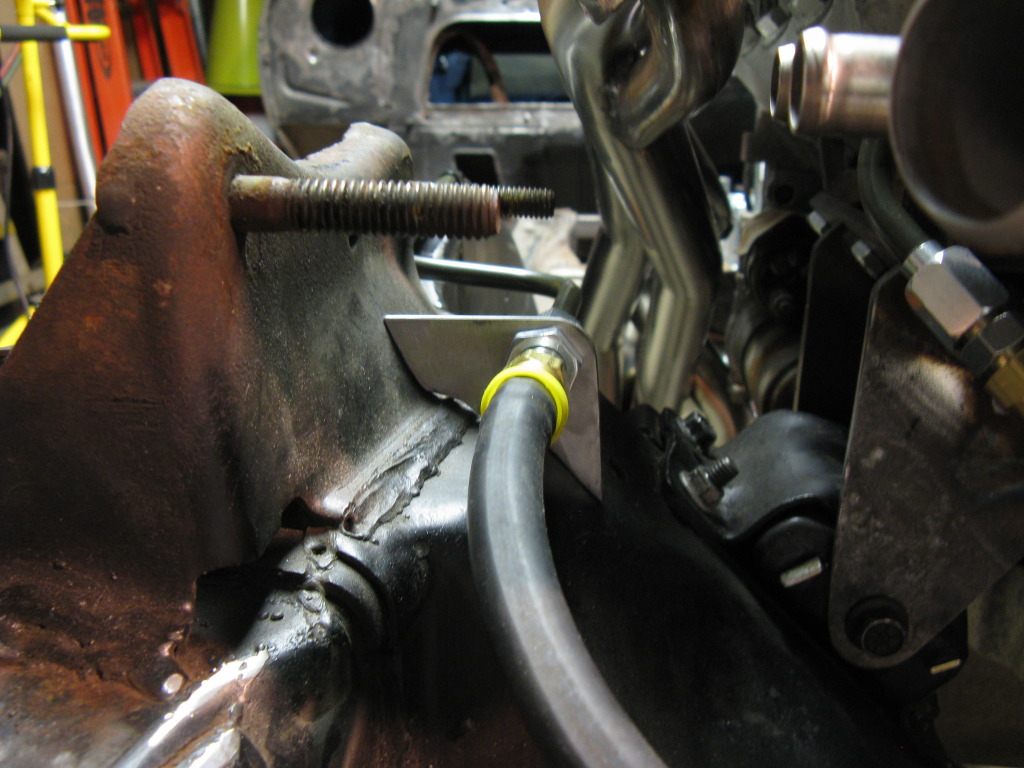
I have also been plugging away at the fuel system and just about have it finished. I'll post pics of the system from firewall back soon. For now here is what I have for the engine compartment. The carb feedline was the first hardline project I took on. It took 4 attempts to get it right. THe third was perfect but I was so excited That I flared it BEFORE I PUT ON THE LEEVE AND NUT! Man was I pissed off at myself! But the finished product came out very nice. Notice that tapped Tee found its home. I don;t think I have mentioned the carb yet. I picked up this Demon 750 in the classified section for $125, installed a $15 gasket rebuild kit and put a few hours into cleaning her up. Hope she works, (FINGERS CROSSED)
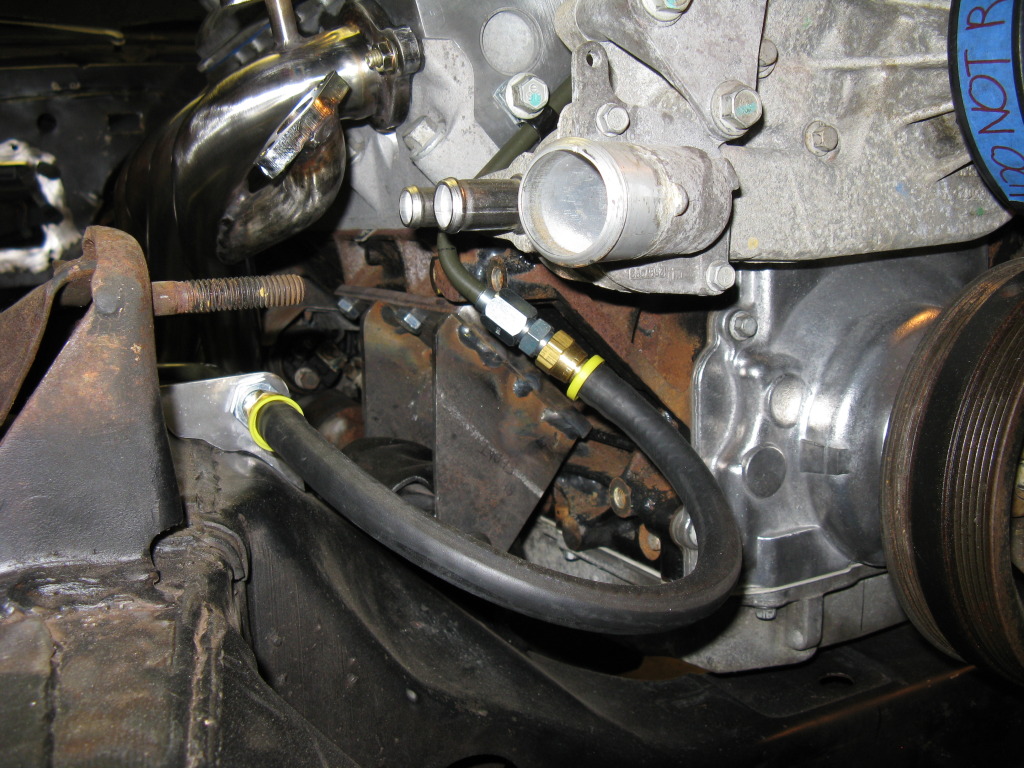
Since I hate rubber hose I bent up this stock looking hardline section. Plus this hardline section helps kkep my flex section away fro m the hot hot headers.

But a little hose is neccesary. This is standard low pressure fuel hose. But I am using push-loc hose barb. Soon I will be purchasing a small section of high pressure push-loc line for sake of mind. I tucked the hose up under the eninge, away from the headers and not to close to the FEAD.
Here is the rest of the front fuel line. This was the hardest part of the whole system as I shaped it with the body on to make sure it was clear of any body contact.
I made this small bulkhead plate for the front connection. Now if I only had a welder of my own. Everything in time.
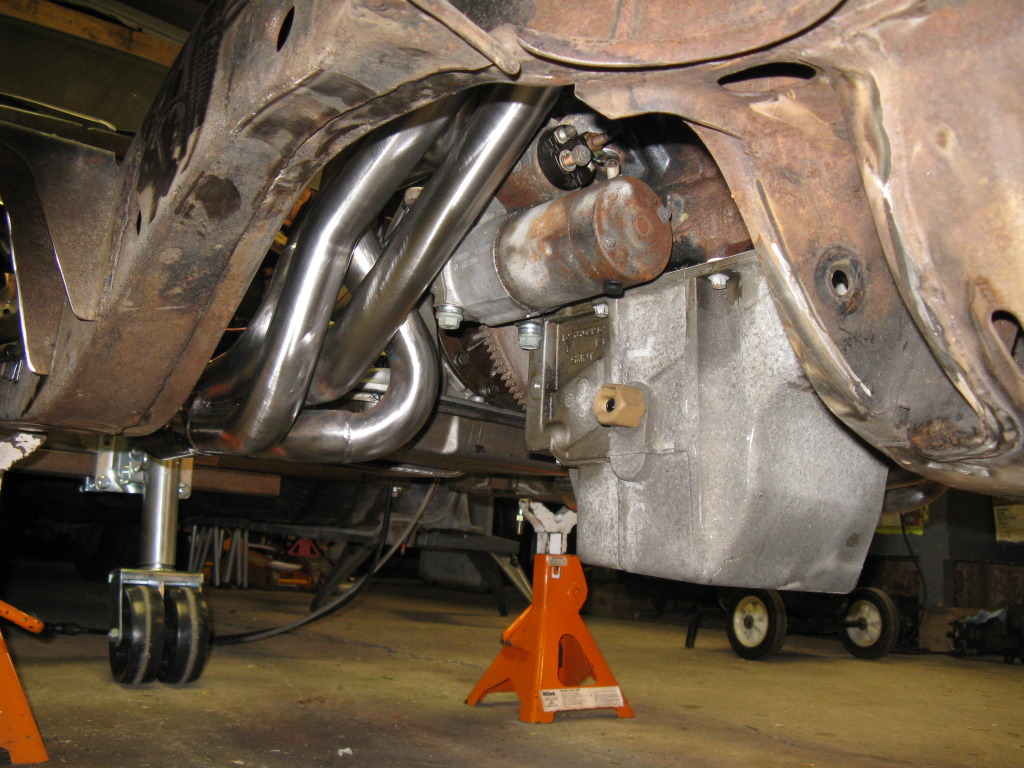
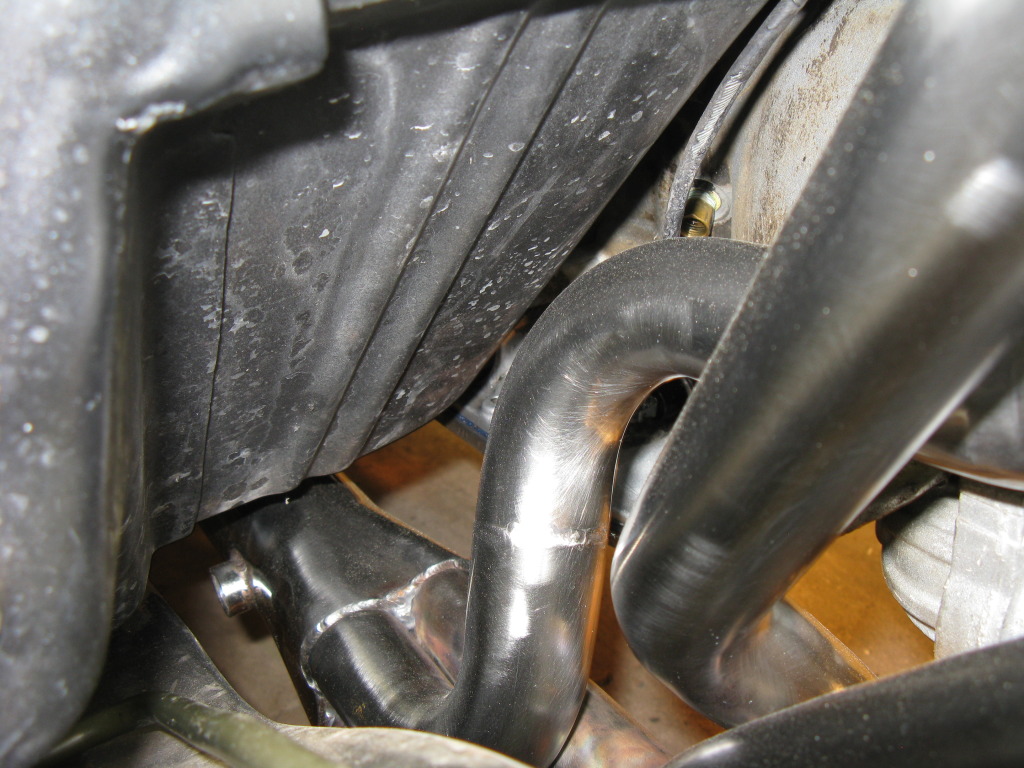
Here is a quick shot of the bottom side of the RH headers. During the fittment process we installed the starter and put a block of wood against the headers to ensure adequate room for the starter and a little breathing room. Hopefully it doesn't get cooked to much. I may make a heat shield for it anyway.
Well that just about brings us up to date. More work in the upcoming week including wiring, finishing the fuel system, exhaust system fittment and MAYBE looking into the pan alteration. Later guys...and gals.
, but I am pretty sure I will have hood issues. I plan build a cowl induction hood to deliver fresh cool air anyway. What are you refering to being bent on the headers? In the fittment process we did end up distorting a few of the primaries, and bending the collectors out of shape a bit, but nothing I am concerned about. On that note however, There is a little more header work required. Turns out the steering box and headers are not going to get along. The #1 primary hits the steering box, and no matter how I try or which I install first they contact one another.This is as low as I can get the headers
I was kind of anticipating this and found a guy on Steve's Nova Site that wants to trade his manual steering box for my power one. I like the heavy and more connected feel of the manual box. PLUS I want to try and find one of the quick ratio manual steering boxes from a mid Hi Po 80's Monte Carlo. But for now I will deal with a standard 20:1 box. Just hope it is A LOT smaller then the power gear! Without the steering gear in, here is how the brushed headers look. I like it! BTW, notice that addition of the sweet Moroso air cleaner, I have plans to get rid of that "bling" finish as well. Also the Edelbrock throttle/detent bracket. I thought about making this myself, but for $25, you can't beat it!
I have also been plugging away at the fuel system and just about have it finished. I'll post pics of the system from firewall back soon. For now here is what I have for the engine compartment. The carb feedline was the first hardline project I took on. It took 4 attempts to get it right. THe third was perfect but I was so excited That I flared it BEFORE I PUT ON THE LEEVE AND NUT! Man was I pissed off at myself!
But the finished product came out very nice. Notice that tapped Tee found its home. I don;t think I have mentioned the carb yet. I picked up this Demon 750 in the classified section for $125, installed a $15 gasket rebuild kit and put a few hours into cleaning her up. Hope she works, (FINGERS CROSSED)Since I hate rubber hose I bent up this stock looking hardline section. Plus this hardline section helps kkep my flex section away fro m the hot hot headers.
But a little hose is neccesary. This is standard low pressure fuel hose. But I am using push-loc hose barb. Soon I will be purchasing a small section of high pressure push-loc line for sake of mind. I tucked the hose up under the eninge, away from the headers and not to close to the FEAD.
Here is the rest of the front fuel line. This was the hardest part of the whole system as I shaped it with the body on to make sure it was clear of any body contact.
I made this small bulkhead plate for the front connection. Now if I only had a welder of my own. Everything in time.
Here is a quick shot of the bottom side of the RH headers. During the fittment process we installed the starter and put a block of wood against the headers to ensure adequate room for the starter and a little breathing room. Hopefully it doesn't get cooked to much. I may make a heat shield for it anyway.
Well that just about brings us up to date. More work in the upcoming week including wiring, finishing the fuel system, exhaust system fittment and MAYBE looking into the pan alteration. Later guys...and gals.
Last edited by cruisin'73; 05-28-2012 at 07:50 AM.
06-05-2012, 08:24 AM
#59
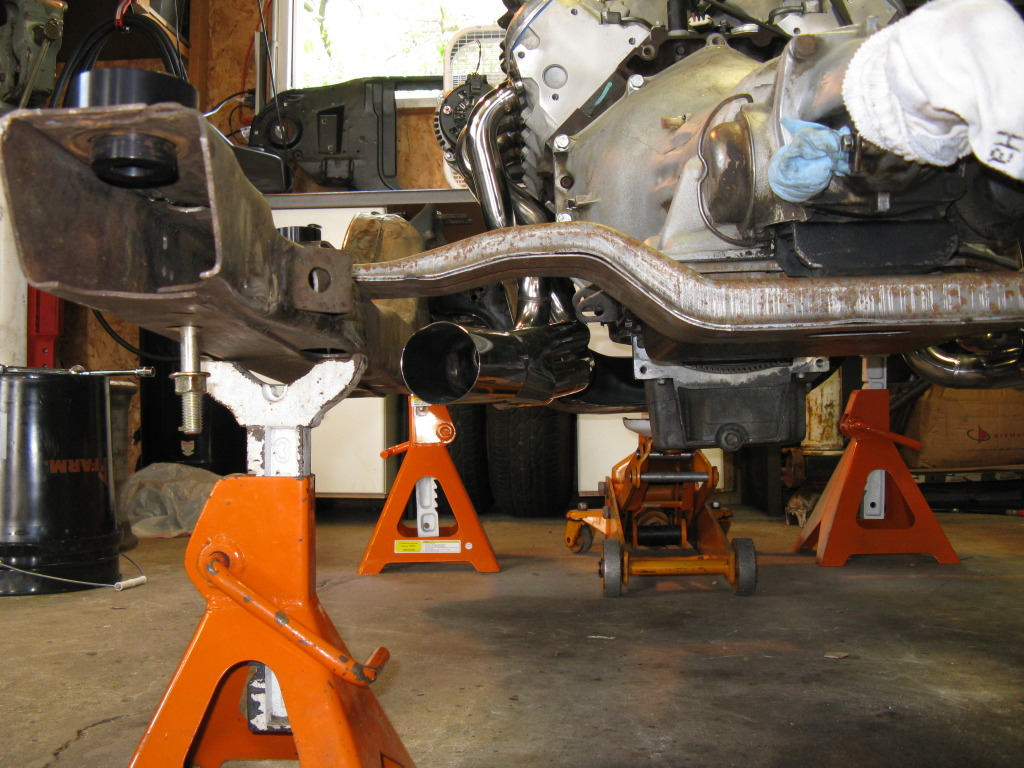
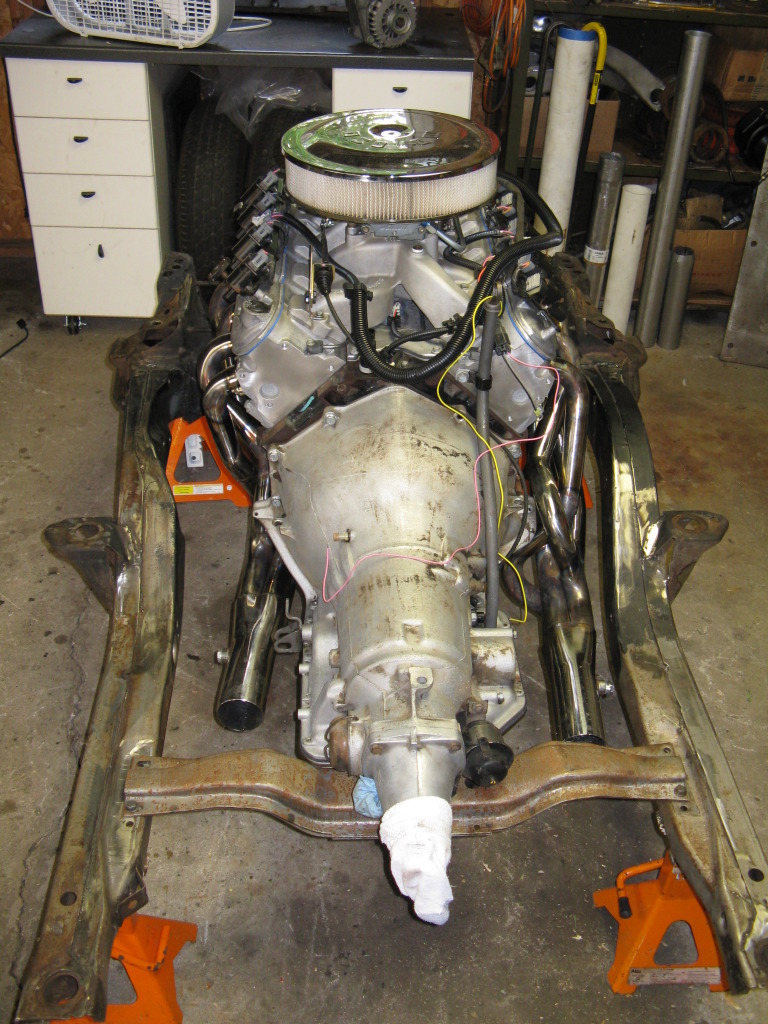
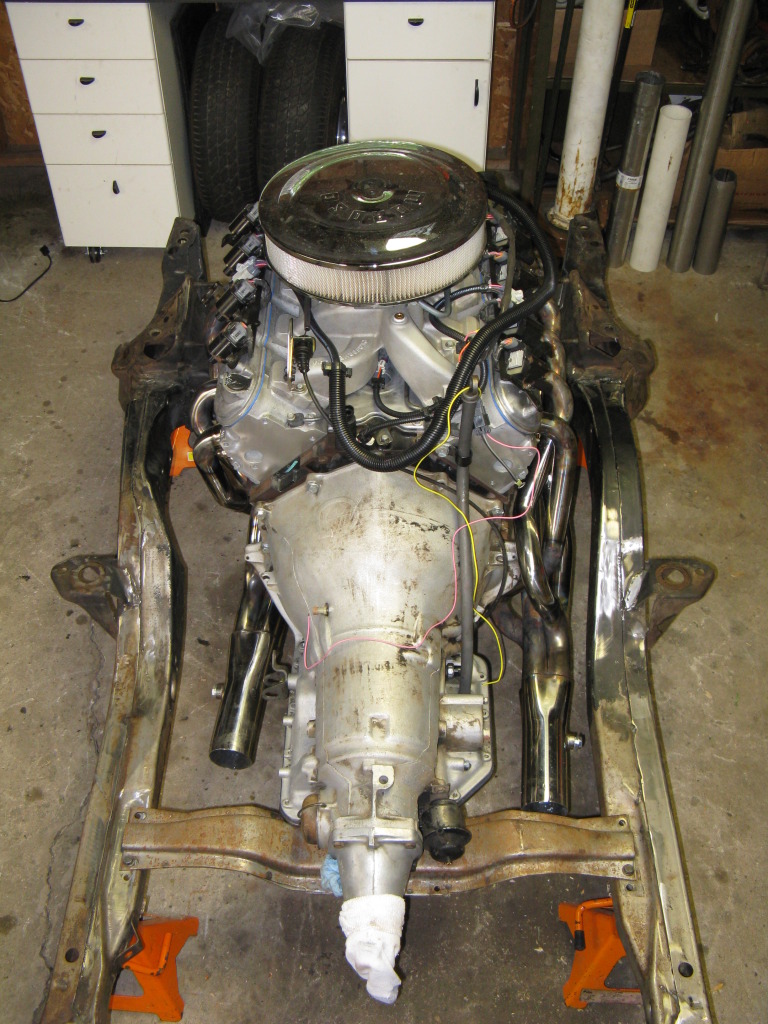
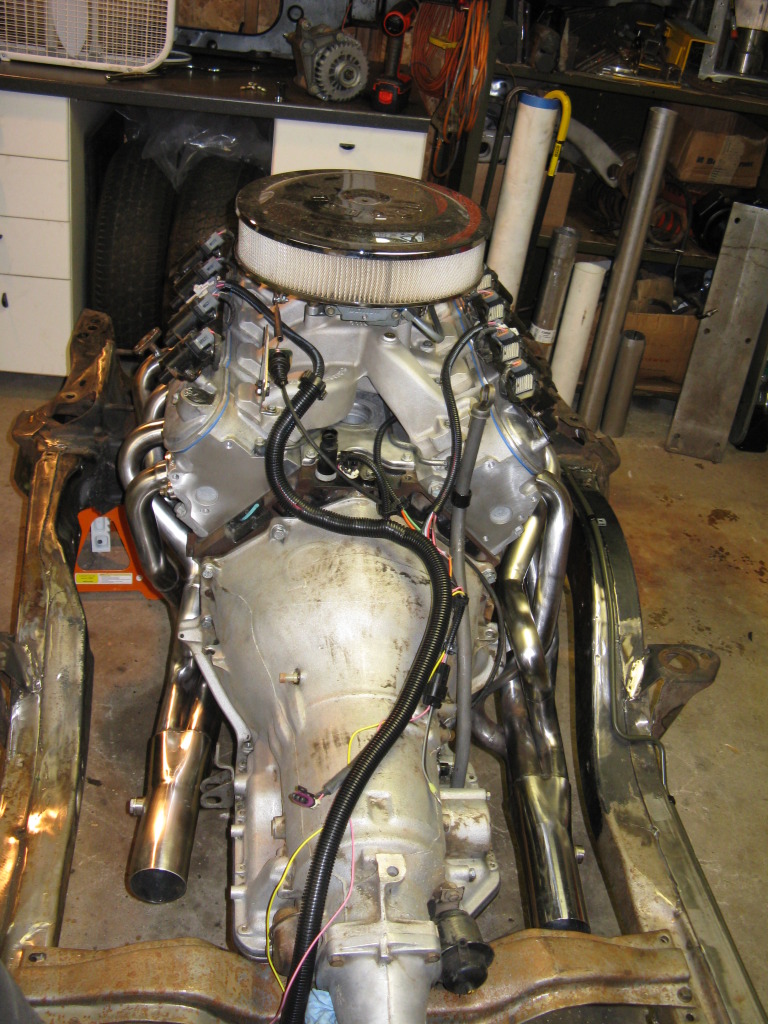
OK more progress. I mounted the powertrain and subframe back onto the chassis to address exhaust fittment, fuel system, maybe some wiring, transmission linkage design as well as a few other issues.
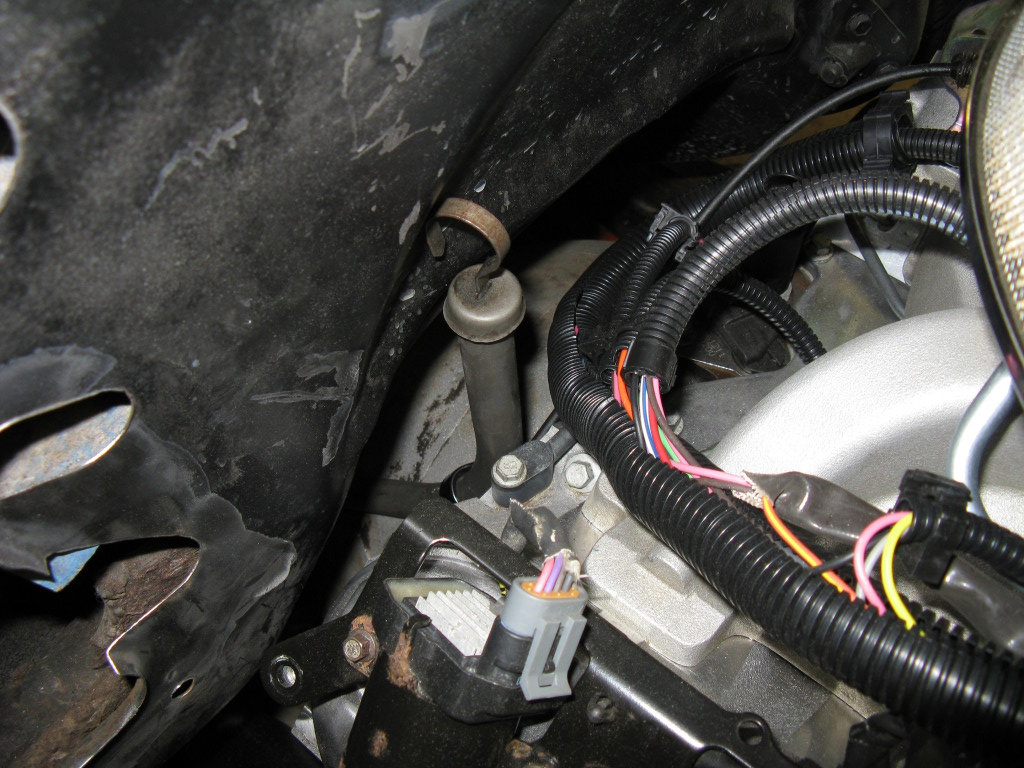
Tranny dipstick hits the firewall. I'm going to put a bend in the tube to see if I can make it work otherwords it will be replaced with a flexible unit.
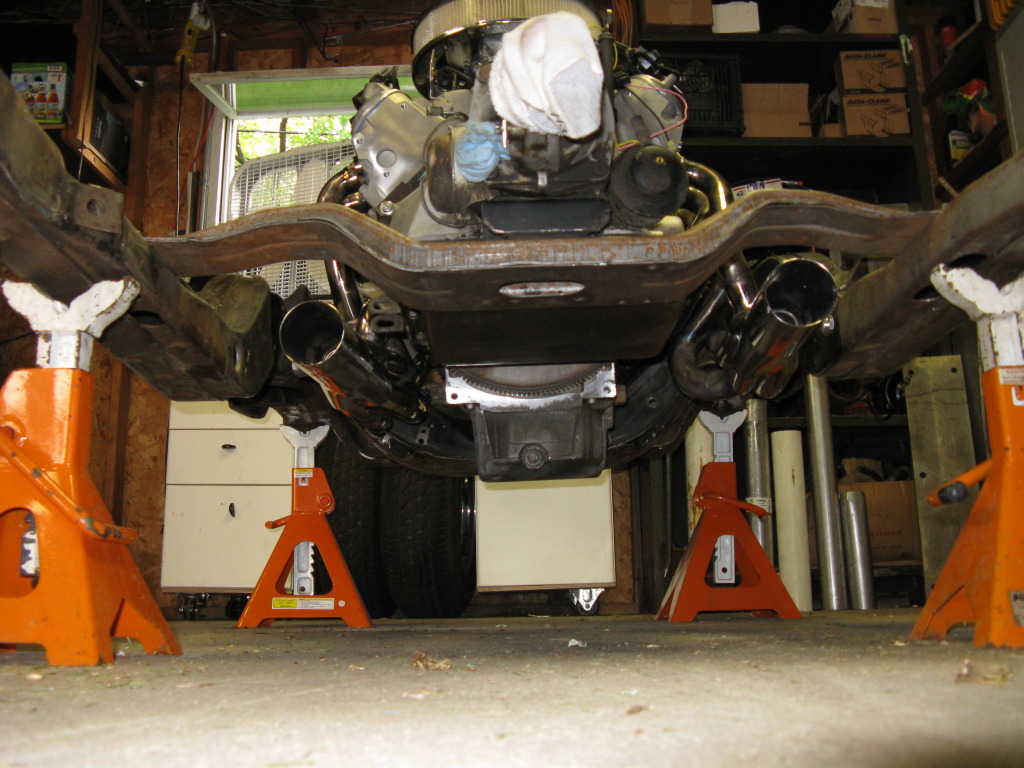
Here is the exhaust system I put together for the small block 307 I had in the Nova. dual 3" mandrel with Thrust welded mufflers dumping before the axle. This system is way overkill for anything I would ever put in the car, but the sound was great even with the 307. Hoping the LS will sound even better!

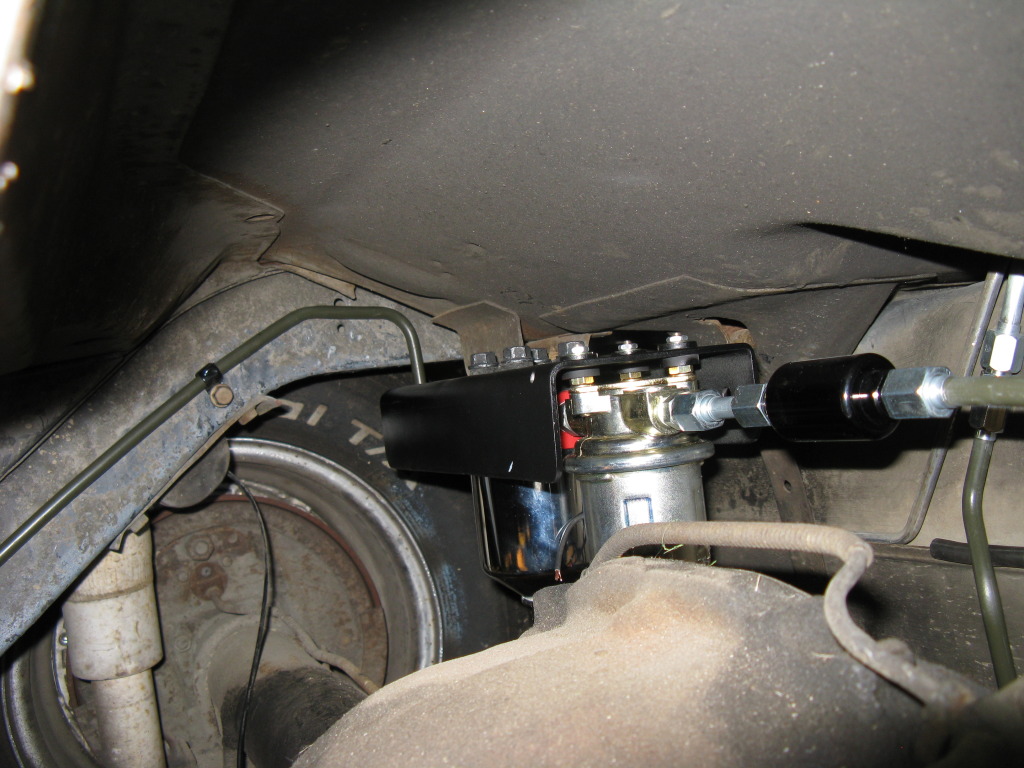
OK onto the fuel system. Here are the Carter pump and 10 micron Fram HP filter connected with an NPT union. I made this bracket to mount them together. both filter and pump have rubber isolators to limit vibration and noise.
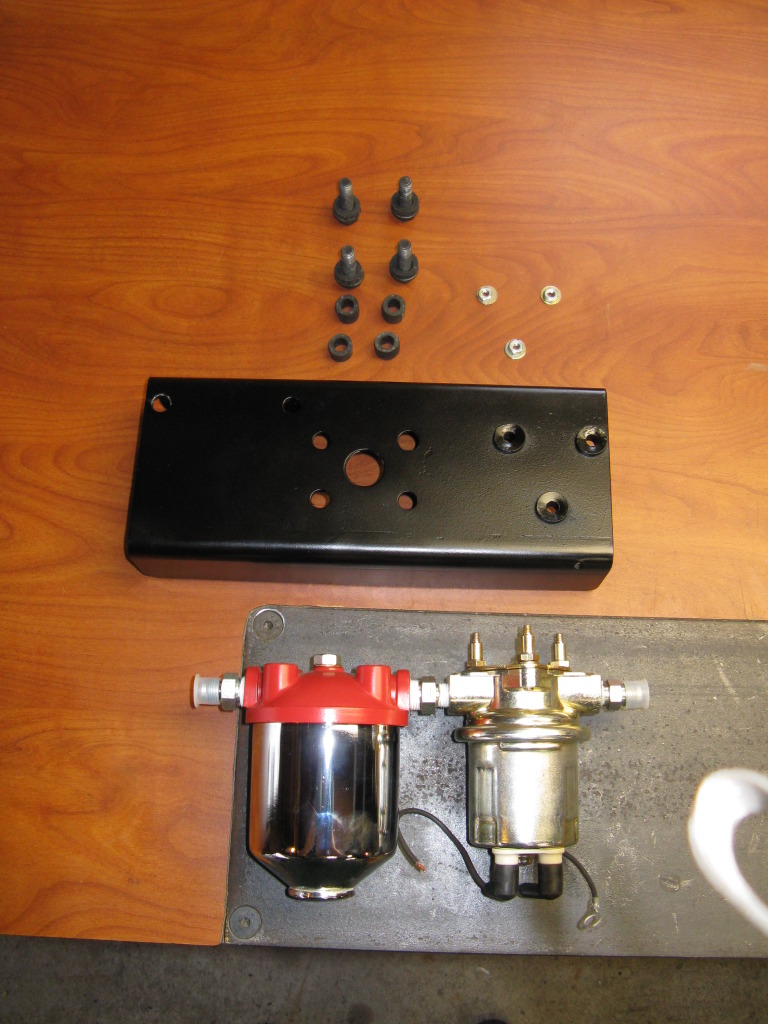
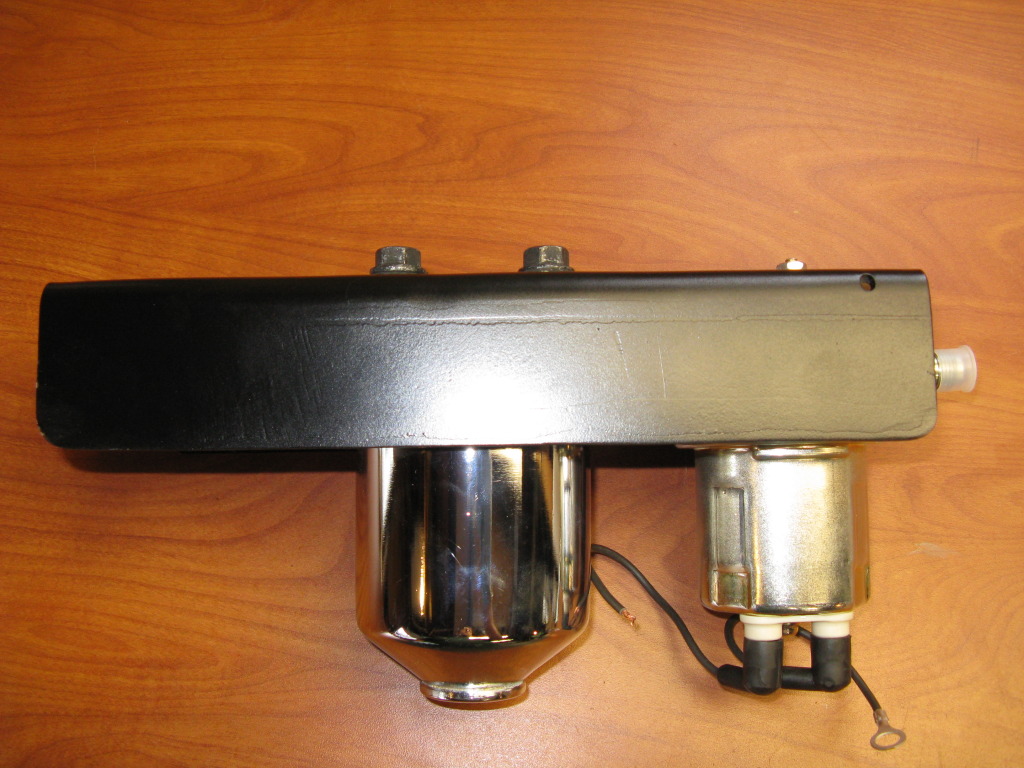
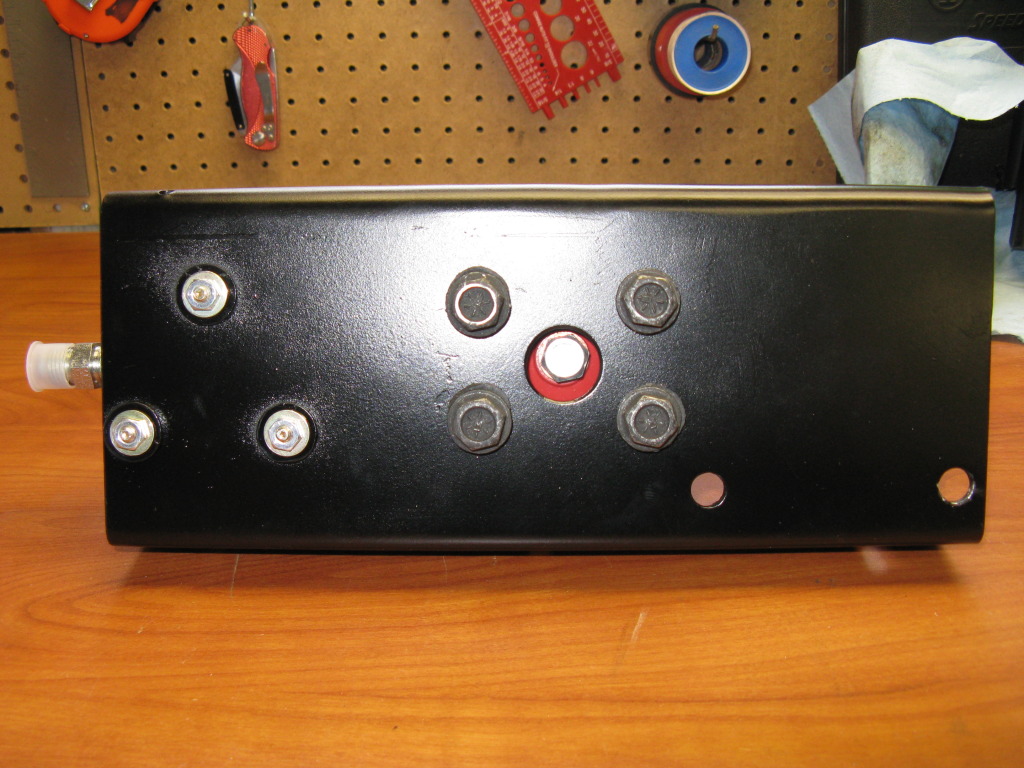
From the top you can see the isolators and the hole for access to the filter retaining bolt. This will allow me to change the filter without removing the housing.
I used short sections of rubber hose to isolate te filter and align the pump and filter ports. Cheap problem solving!

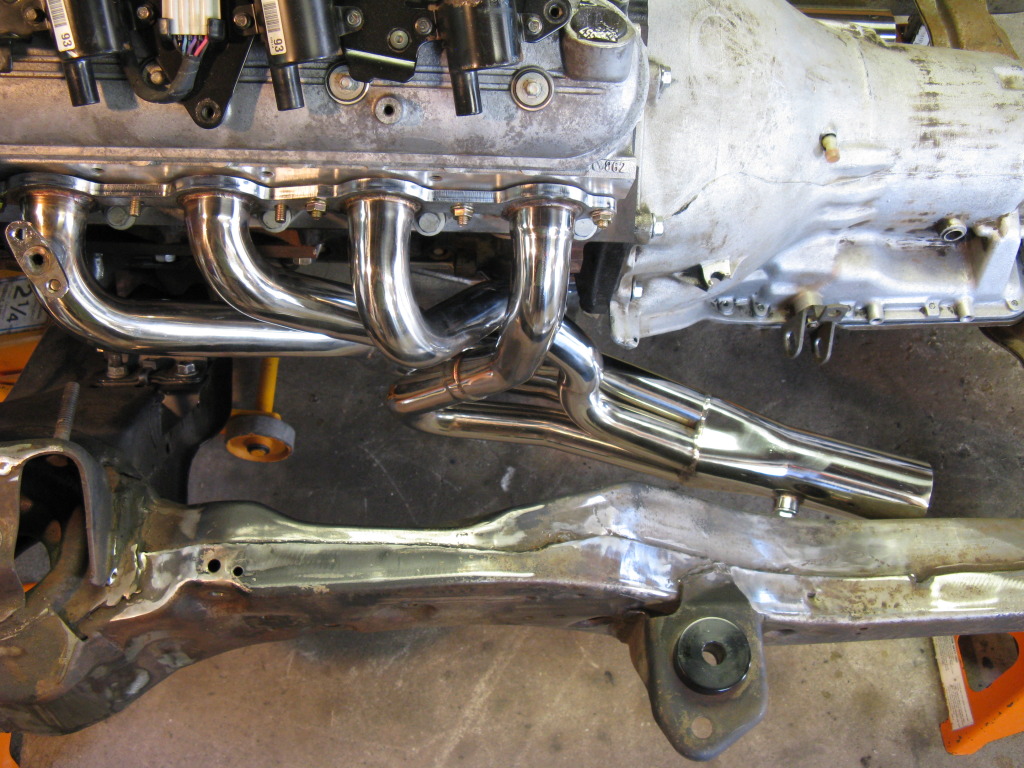
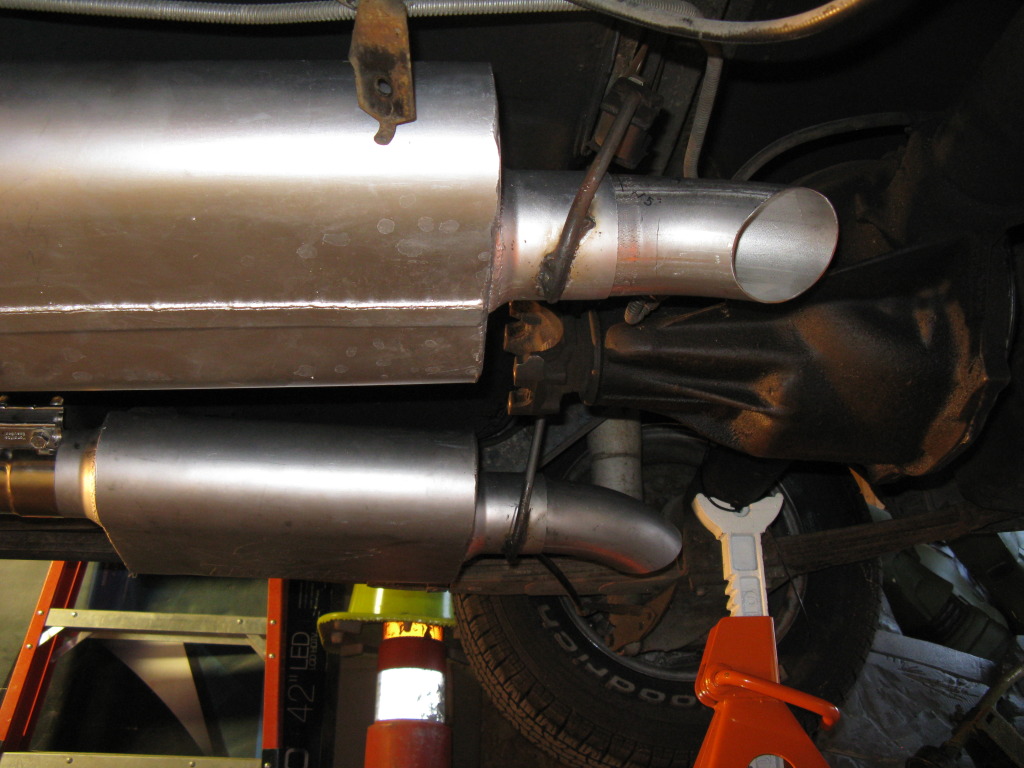
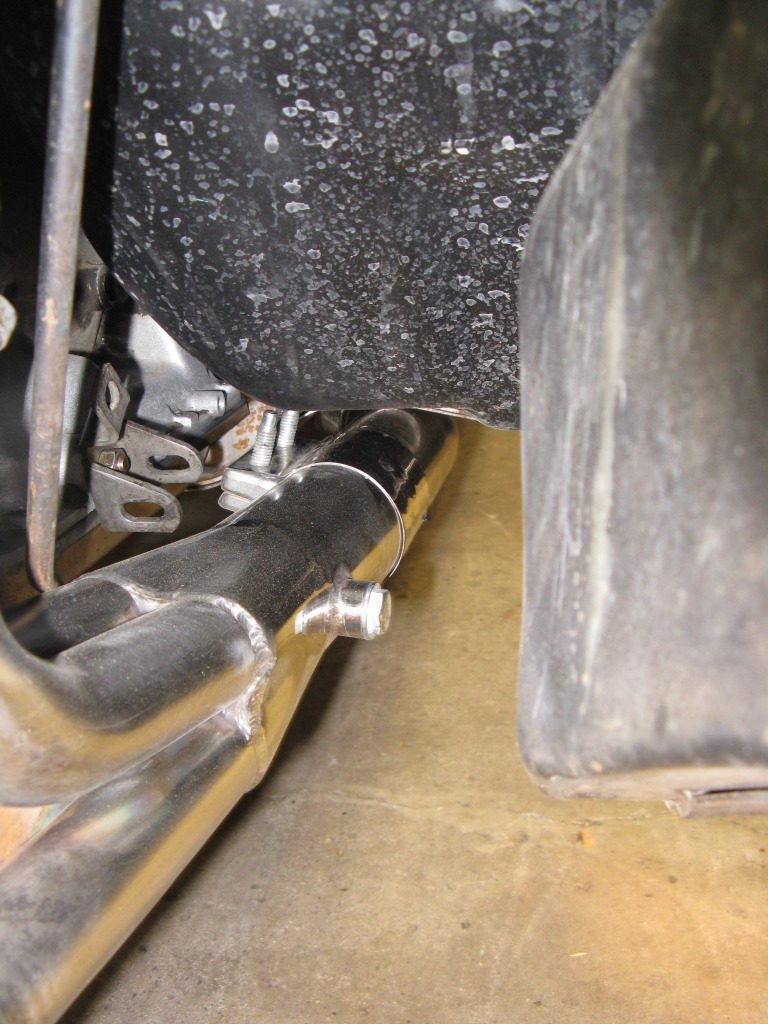
Here is the headers connected to the exhaust they line up surprisingly well. The connections are mitered a little, but barely noticable. These SS band clamps are the way to go! So much cleaner looking, longer lasting and able to soak up a little misalignment.
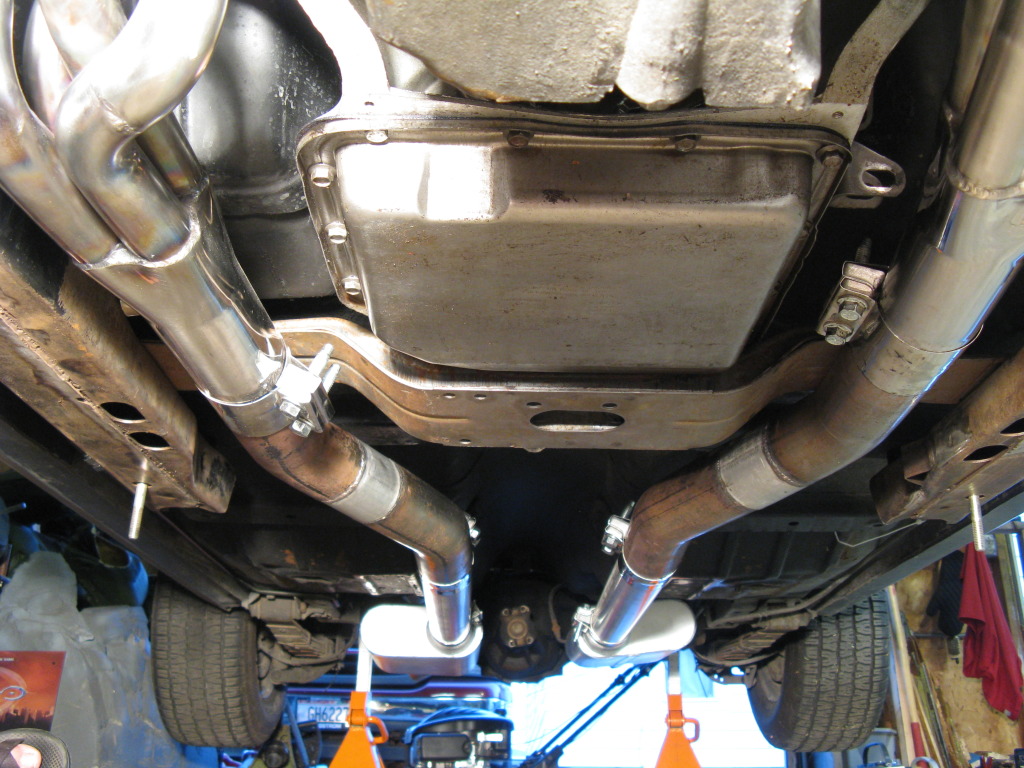
I added the angled end pieces to hopefully keep the exhaust from turning the passenger compartment into a bass box!! I will be angling them 45� to the ground and out. Hoping it will help
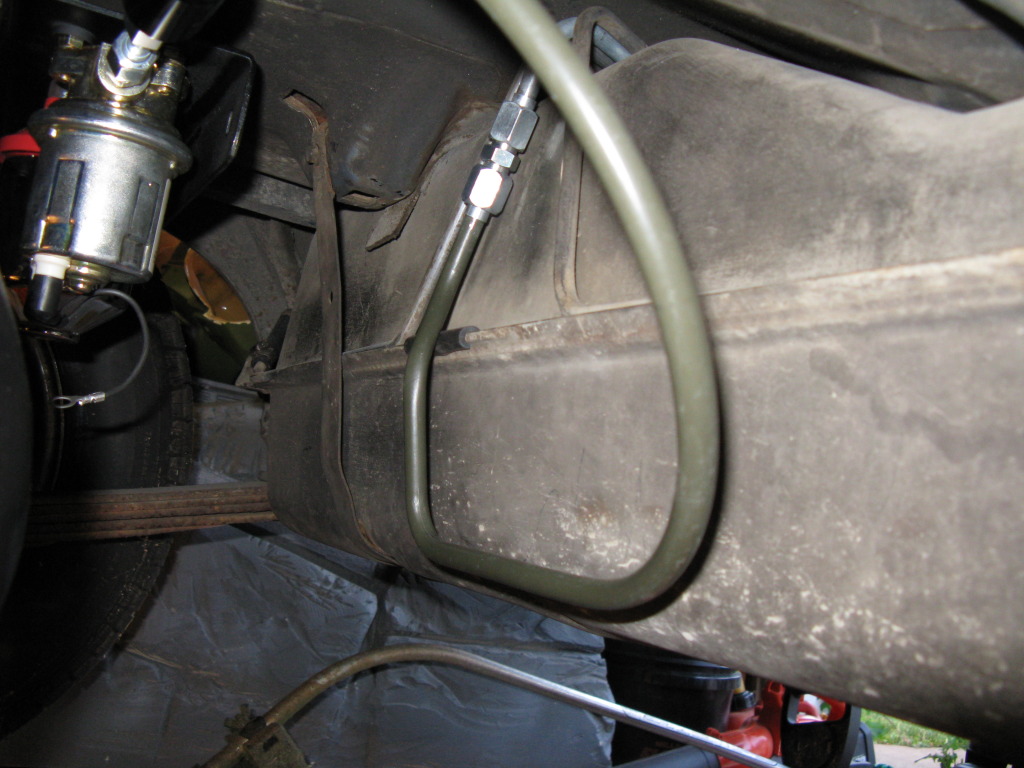
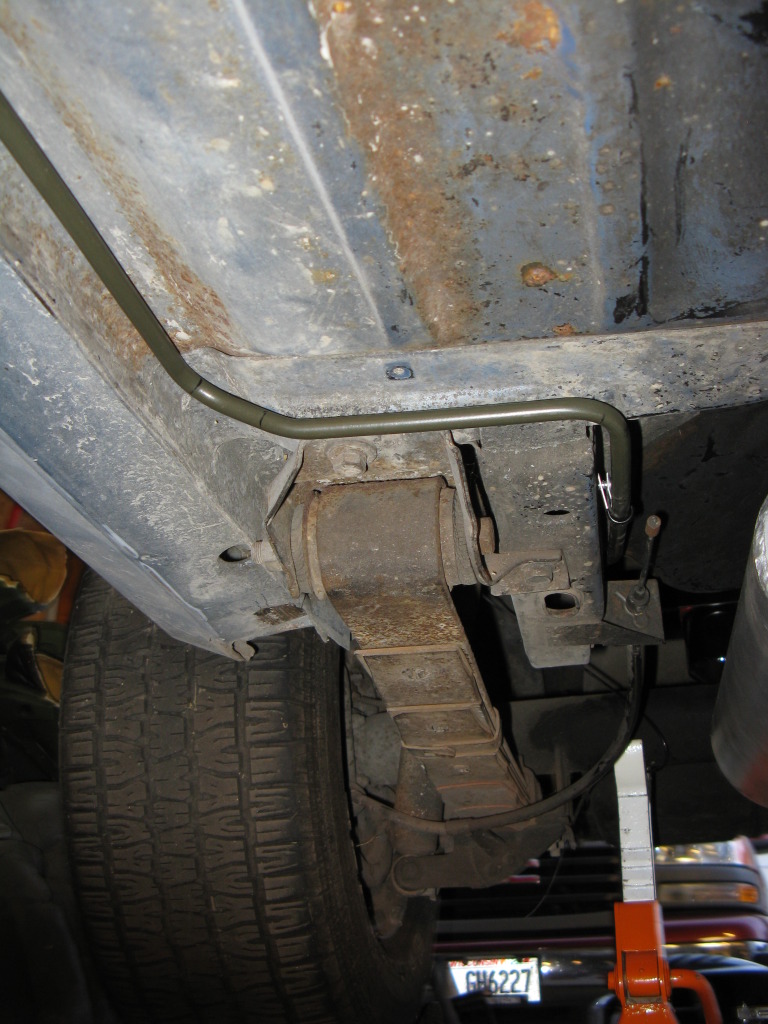
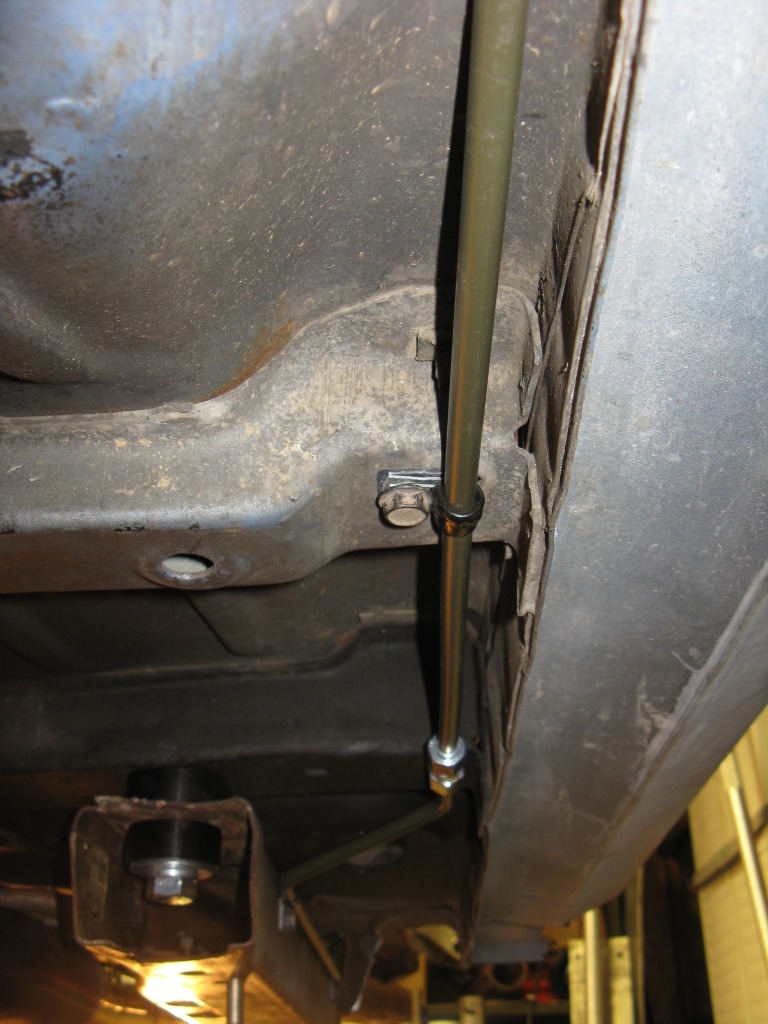
Fuel system is finally finished!! This was my first time working with hardline and it is a learning experience. I went through 2 25' rolls of tube to complete the car and I have a pile of scrap. But I think it came out pretty good! Though I have not pressure tested the system yet.

I put this large loop in to act like a P-trap on a toilet. This should ensure gas in the line in front of the pump and avoid dry starts which will KILL a pump.
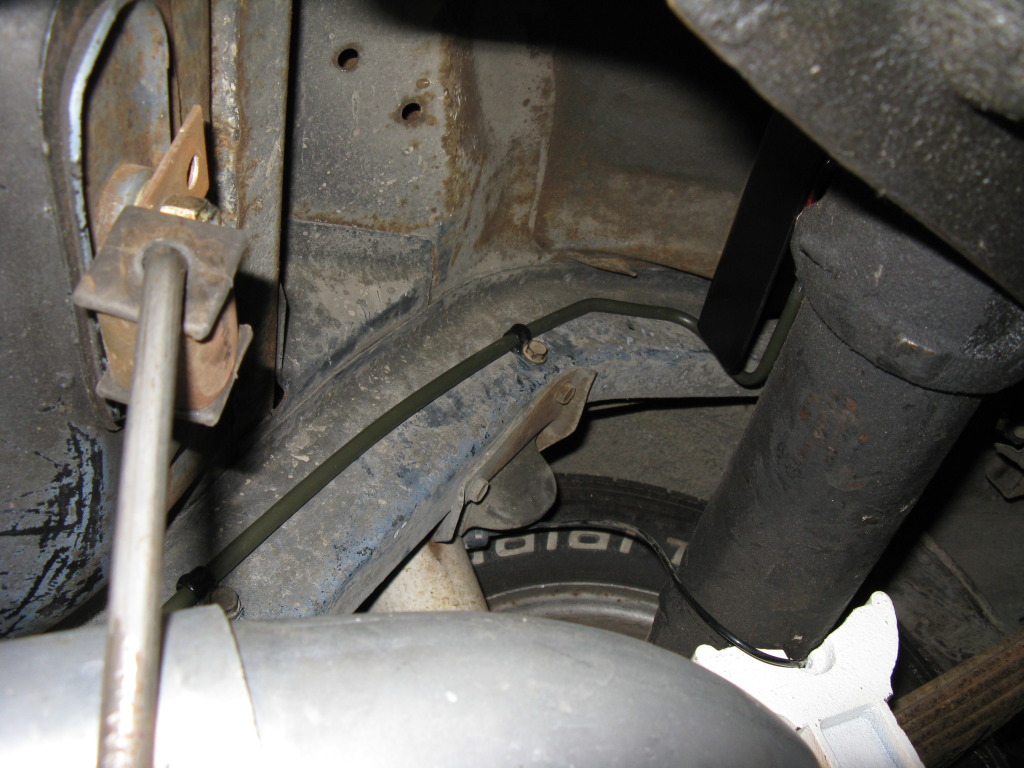
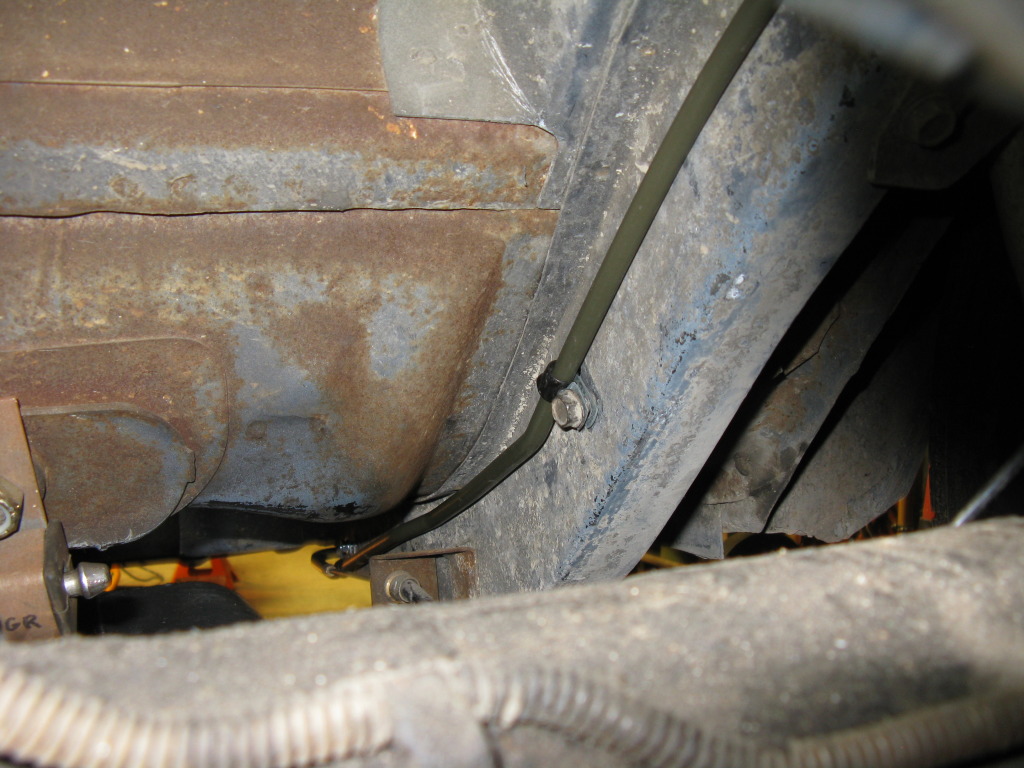
I was able to use almost all the original fuel line mounting hardware, plus a few extras.
I might make some sort of a heat shield between the muffler and fuel line to prevent heat soaking the fuel.
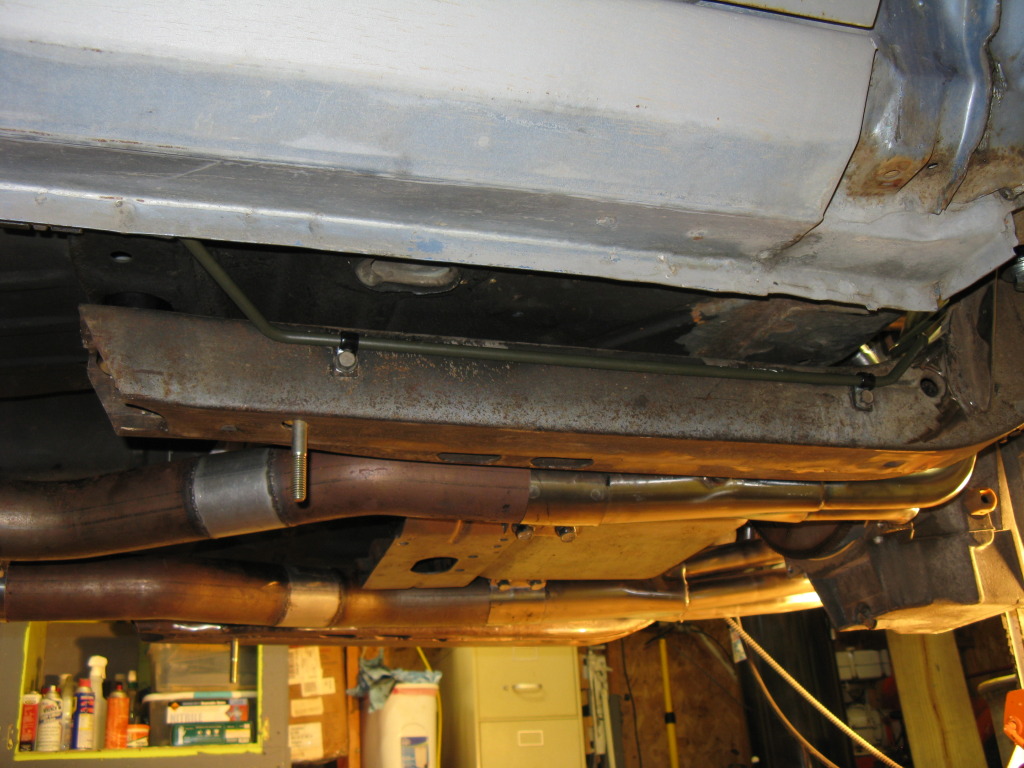
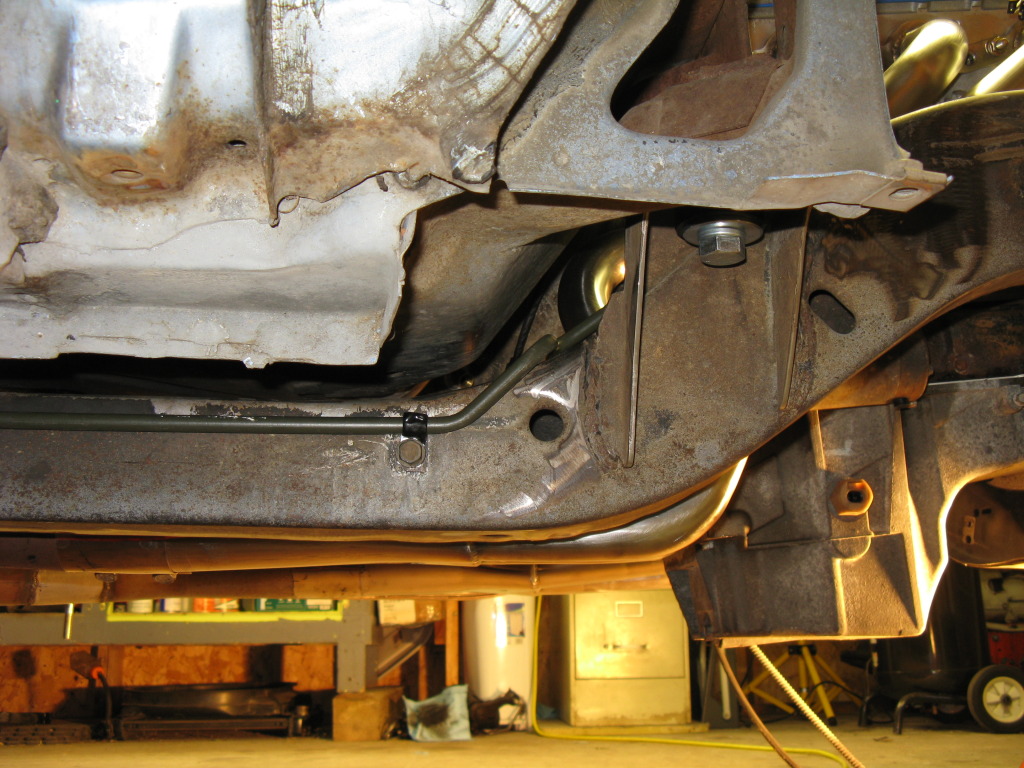
Here are a few of the header clearances.
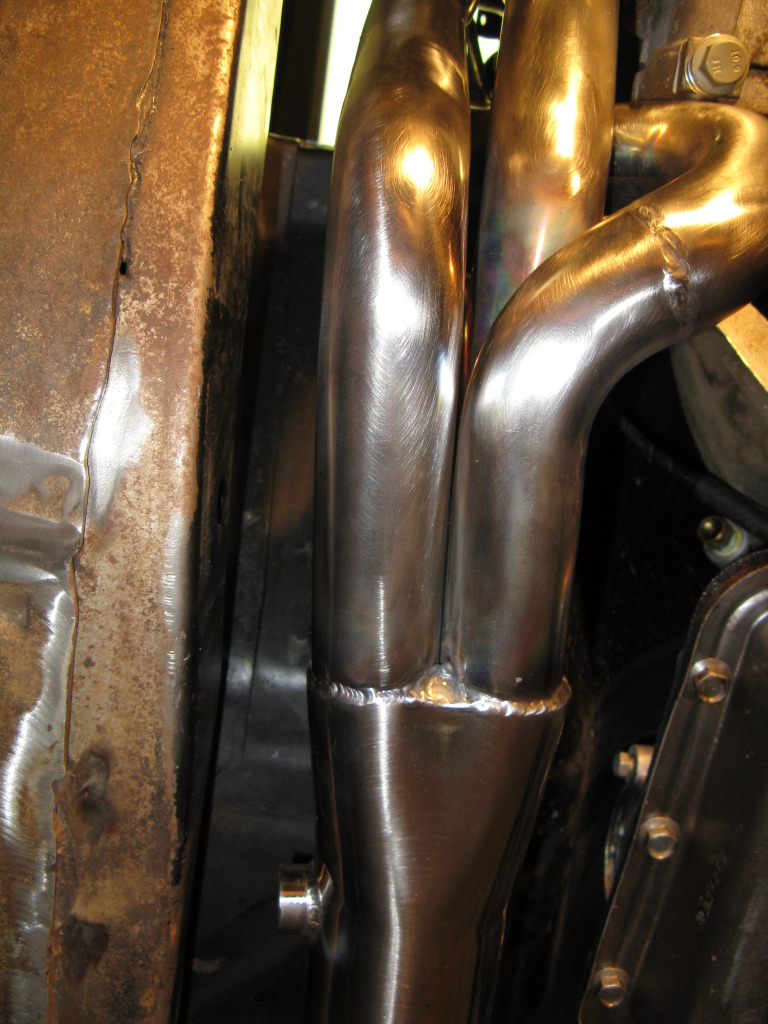
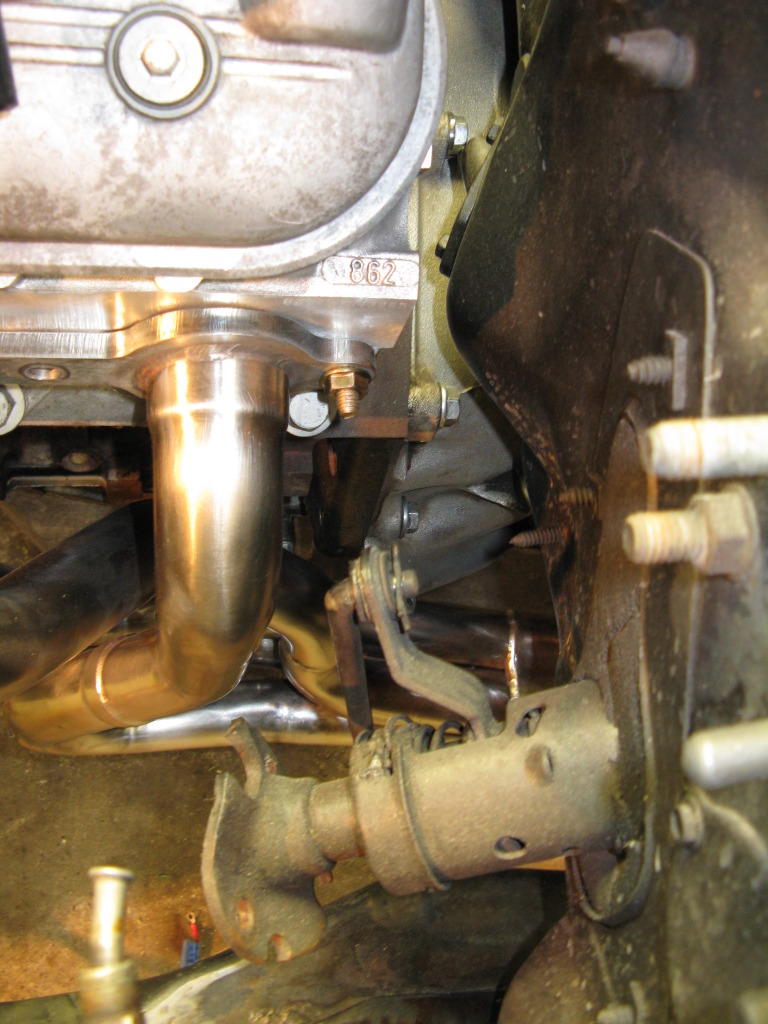
I will for sure have to come up with a solution for the tranny shift linkage as the heades runs right through where the frame to tranny linkage should be. Bczee and I are in the same boat on this issue and will be trying a few option out in the near future.
More updates to come so keep checking back
Tranny dipstick hits the firewall. I'm going to put a bend in the tube to see if I can make it work otherwords it will be replaced with a flexible unit.
Here is the exhaust system I put together for the small block 307 I had in the Nova. dual 3" mandrel with Thrust welded mufflers dumping before the axle. This system is way overkill for anything I would ever put in the car, but the sound was great even with the 307. Hoping the LS will sound even better!
OK onto the fuel system. Here are the Carter pump and 10 micron Fram HP filter connected with an NPT union. I made this bracket to mount them together. both filter and pump have rubber isolators to limit vibration and noise.
From the top you can see the isolators and the hole for access to the filter retaining bolt. This will allow me to change the filter without removing the housing.
I used short sections of rubber hose to isolate te filter and align the pump and filter ports. Cheap problem solving!
Here is the headers connected to the exhaust they line up surprisingly well. The connections are mitered a little, but barely noticable. These SS band clamps are the way to go! So much cleaner looking, longer lasting and able to soak up a little misalignment.
I added the angled end pieces to hopefully keep the exhaust from turning the passenger compartment into a bass box!! I will be angling them 45� to the ground and out. Hoping it will help
Fuel system is finally finished!! This was my first time working with hardline and it is a learning experience. I went through 2 25' rolls of tube to complete the car and I have a pile of scrap. But I think it came out pretty good! Though I have not pressure tested the system yet.
I put this large loop in to act like a P-trap on a toilet. This should ensure gas in the line in front of the pump and avoid dry starts which will KILL a pump.
I was able to use almost all the original fuel line mounting hardware, plus a few extras.
I might make some sort of a heat shield between the muffler and fuel line to prevent heat soaking the fuel.
Here are a few of the header clearances.
I will for sure have to come up with a solution for the tranny shift linkage as the heades runs right through where the frame to tranny linkage should be. Bczee and I are in the same boat on this issue and will be trying a few option out in the near future.
More updates to come so keep checking back
Last edited by cruisin'73; 06-05-2012 at 08:31 AM.


