
5.3 + t56 in a 1981 volvo 240
 03-29-2012, 03:45 PM
#1
Launching!
Thread Starter

Join Date: Mar 2012
Posts: 214
Likes: 0
Received 0 Likes
on
0 Posts
Been on here gathering information and ideas for my swap for about a year now. I figured i should give some info back and post up my build thread here.
I had a pretty fun little volvo 242 that I was using for my daily driver but I really wanted to paint it....and paint it proper. It was a great car. Suspension was dialed in and it had a bondo header and a 16g. Pulled really good, but I had something else in mind and this was not the car to do it to.
So, Pat and I went to look at a car for his cousin a month or so ago and it was really, really clean. All stock, the exterior was in reasonable shape but the interior was in really sad shape.
A carpet cleaning new seats and a dash swap and the interior was in much better shape. Good enough to drive to work and back at least.
b21f kjet na was an absolute joke. Not to mention it did not run very well it wsa so slow that my wife would not even drive it.
My plan was not to keep the little 4 banger in this car but i had not planned on yarding it out this quick. but this had to go....
So last weekend I decided that this ill running little motor needed to go.
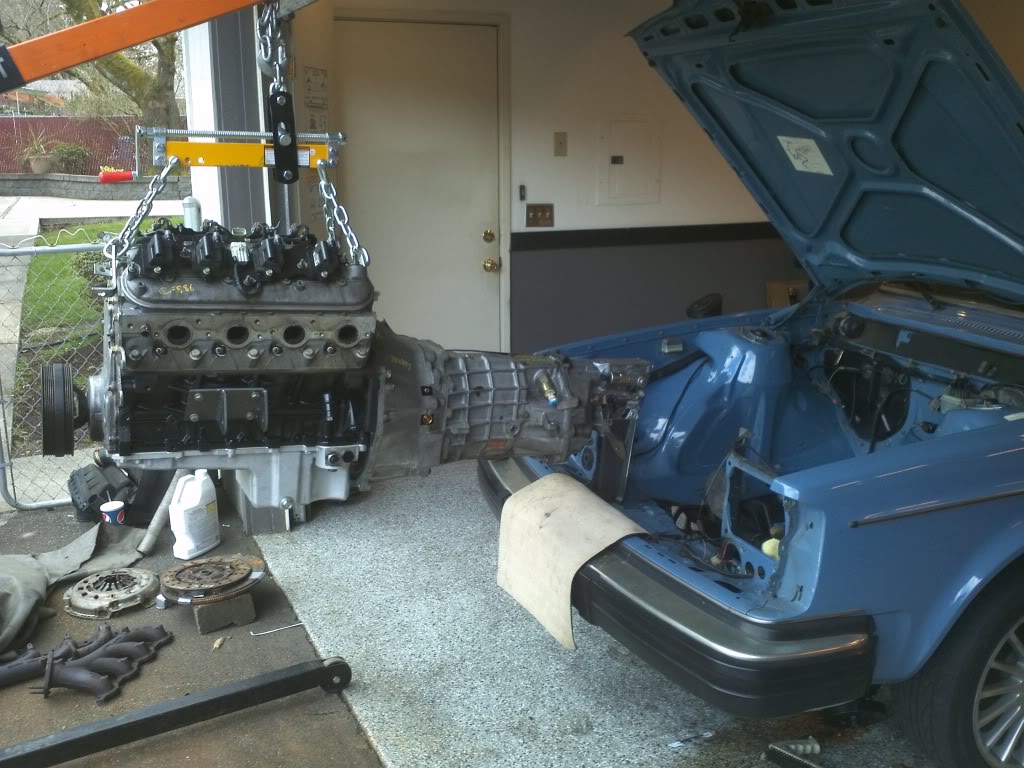
Had this out by lunch last saturday.
Spent the week rounding up some parts but mostly cleaning up the 30 some years of crap in the engine compartment. Pressure washed, cleaned and took out some more parts and pieces for refinishing. Also buffed and waxed the entire engine bay so that I had something descent to work with.
Forgot to snap a pic of the cleaned up bay though....sorry.
Well here is where it got a bit fun. A few weeks earlier the parts started coming together.
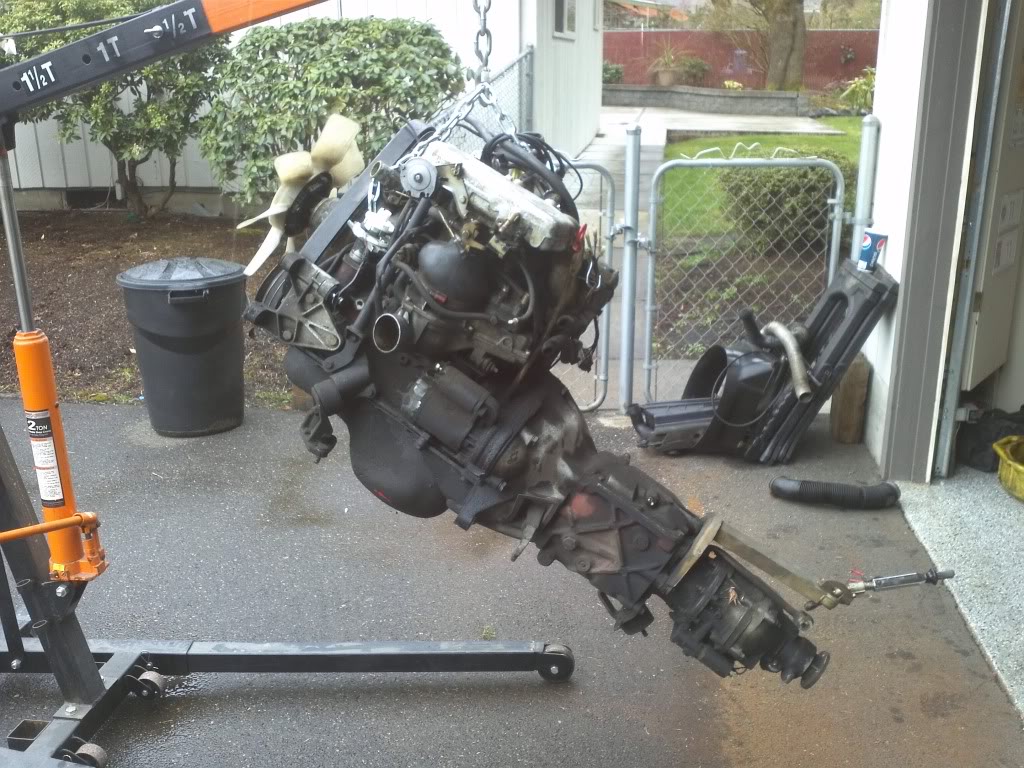
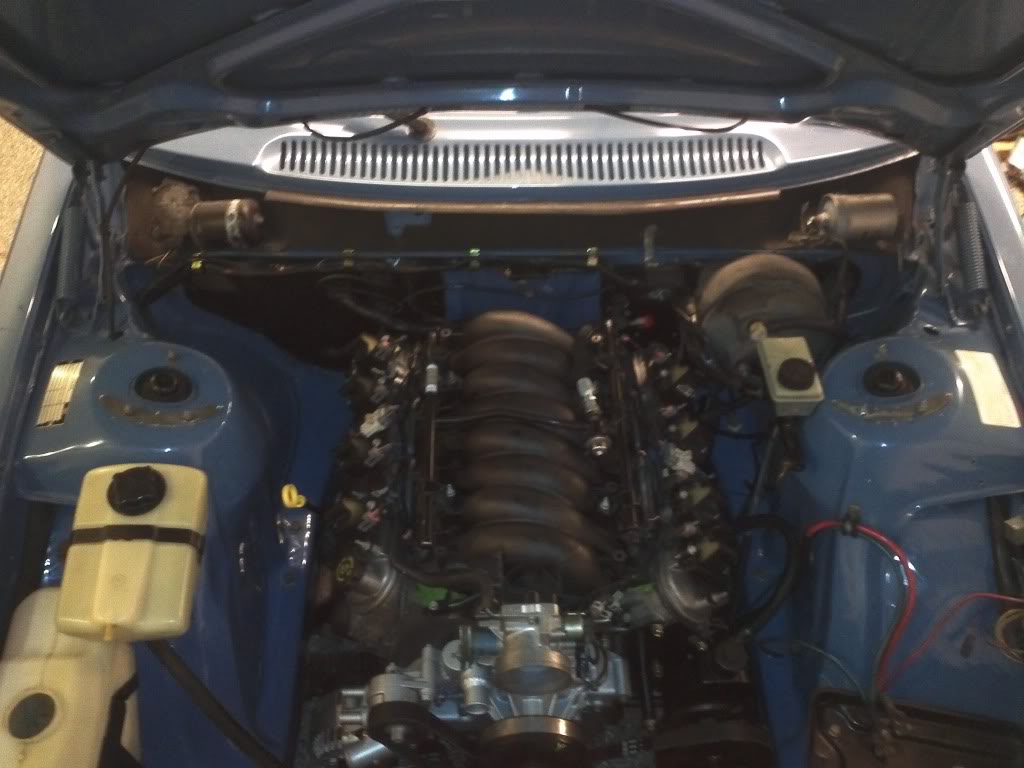
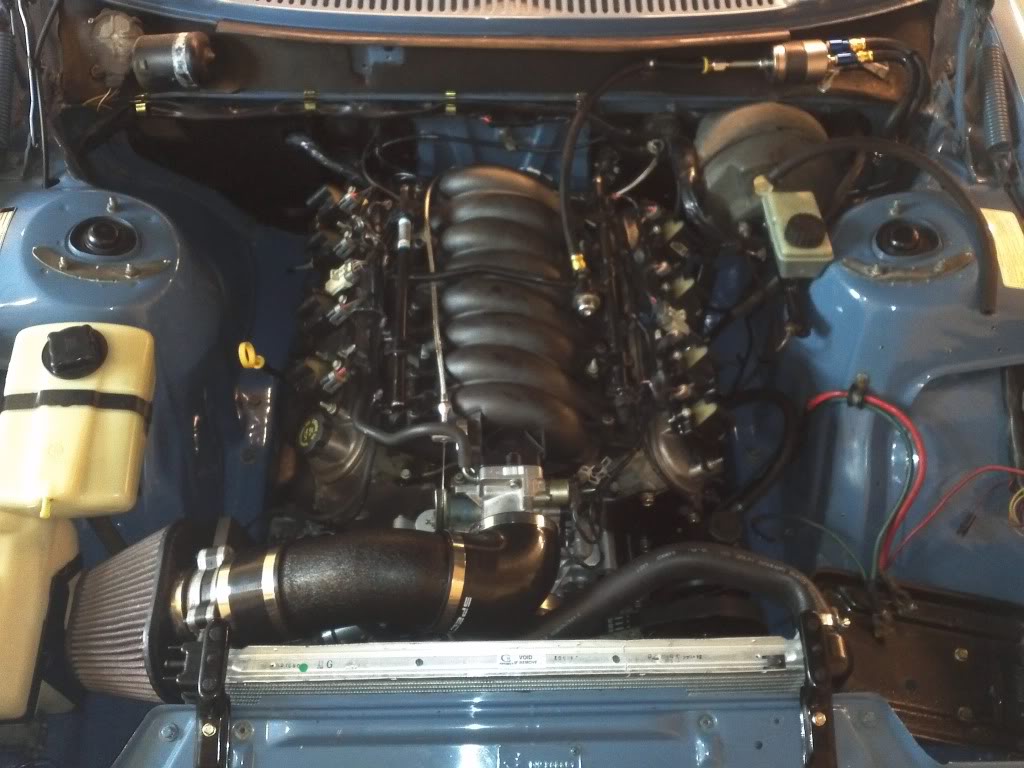
2001 5.3 LQ4 motor drive by cable throttle body.
2002 t56 from a camaro.....still waiting on the flywheel from the yard
ls6 intake manifold with ls1 steam ports bottom of intake clearanced to clear the steam lines
Mast Motorsports oil pan (should arrive on Monday)
Hooker Cast exhaust manifolds (ordered yesterday)

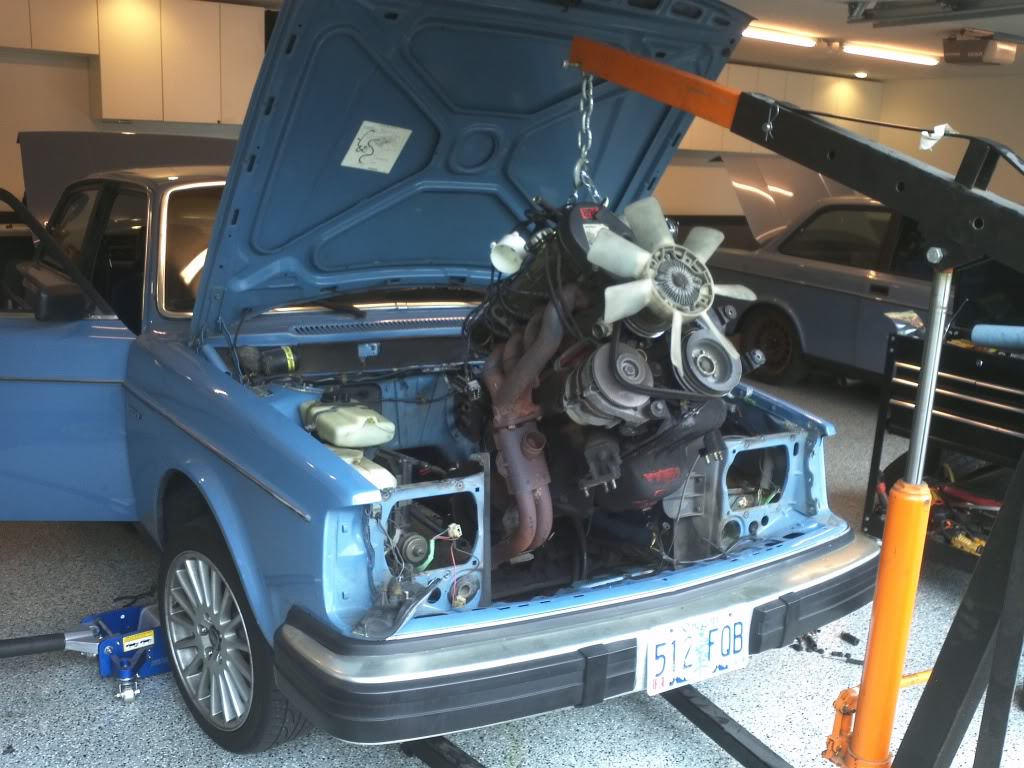
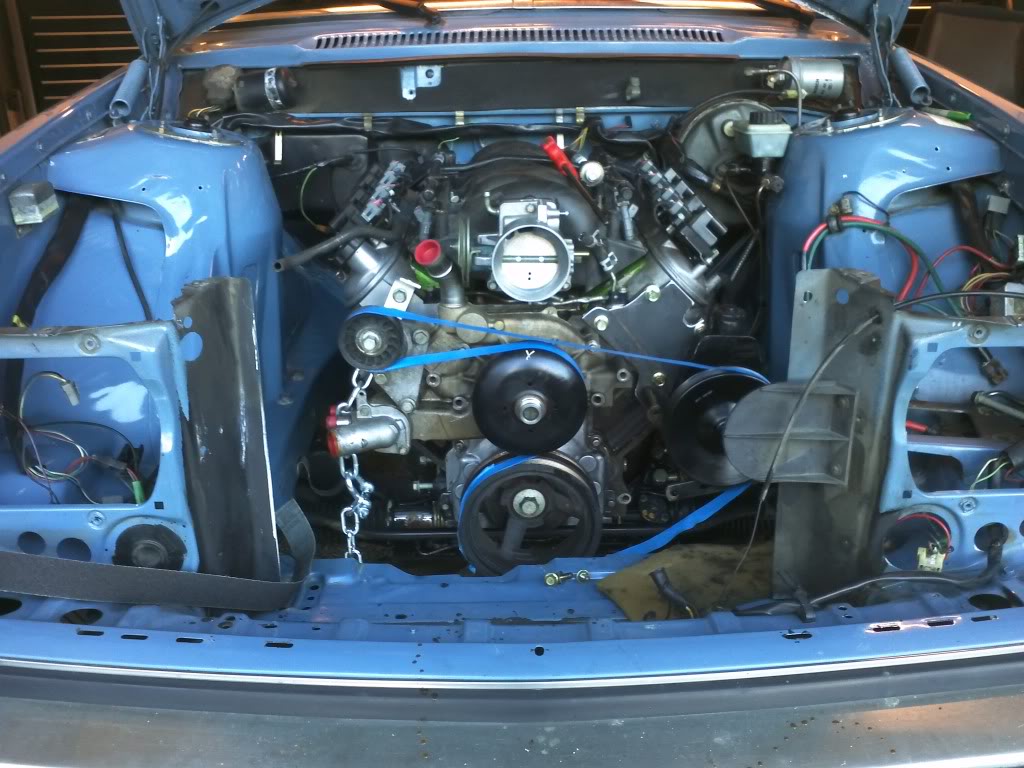
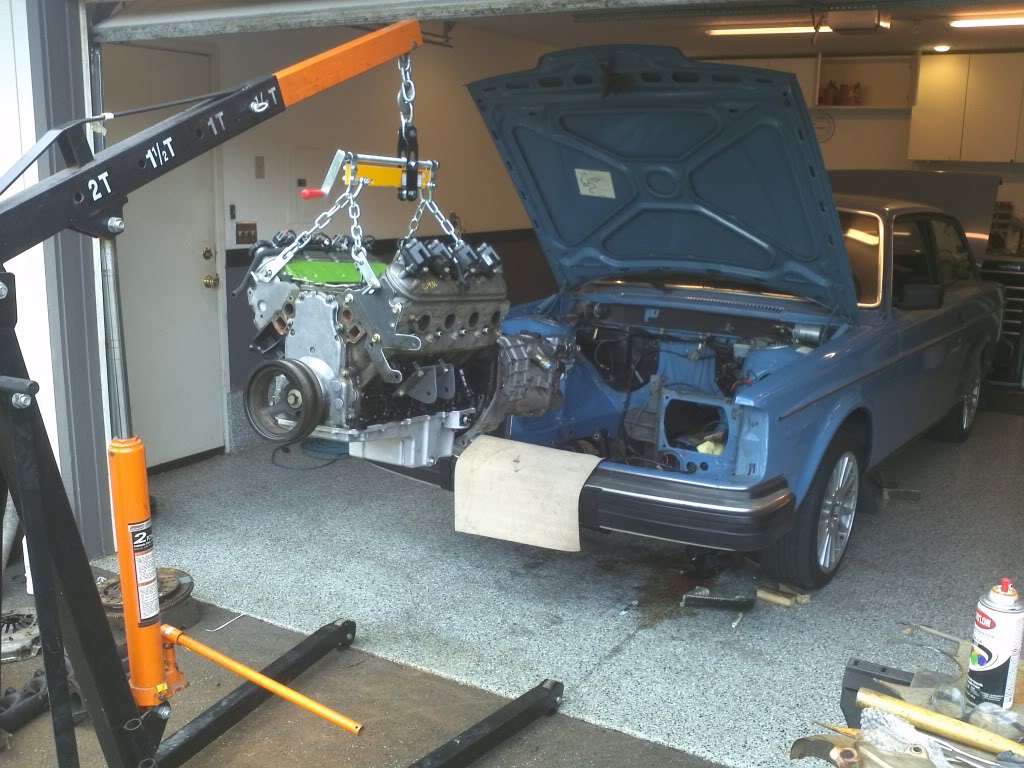
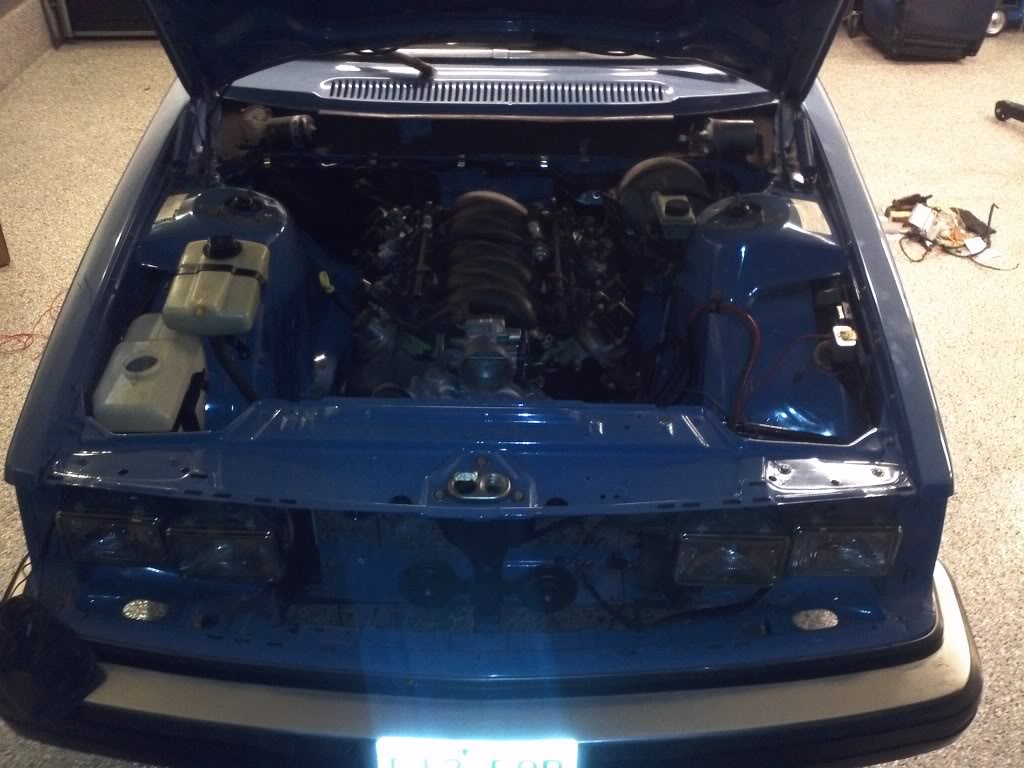
So this weekend I thought the oil pan was going to show up yesterday but no go.....I got the cut sheet from Mast and got to work. I pulled the oil pan and pickup toob this morning and swung this big old setup into place.
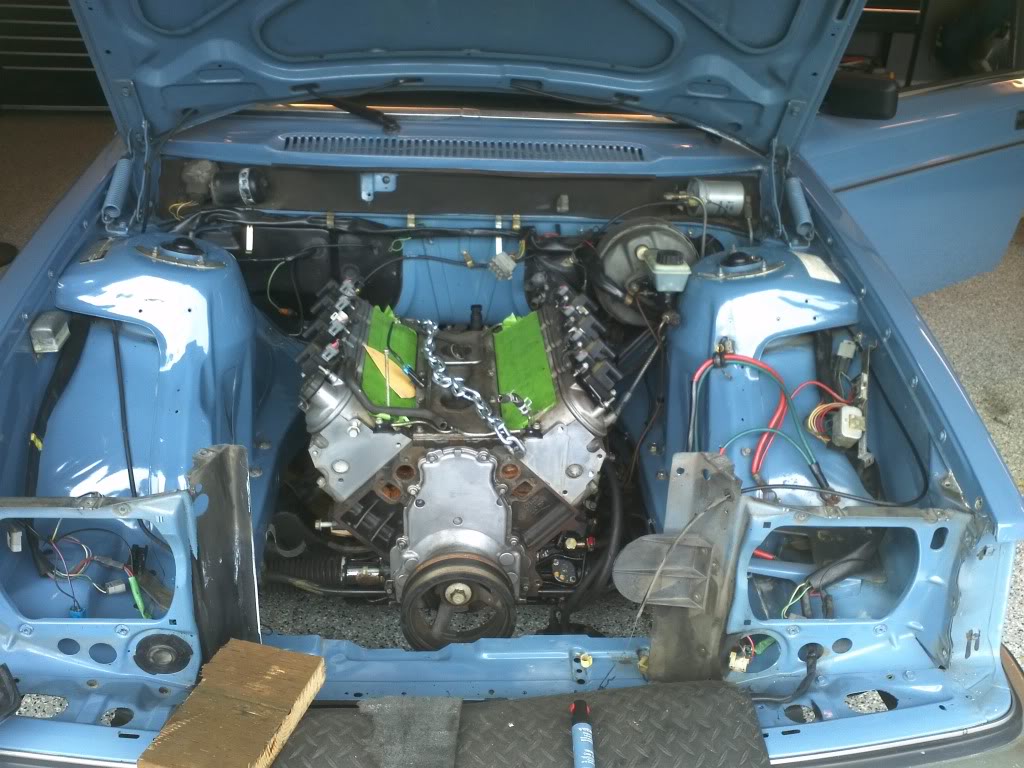
Its quite a long unit for the 240 chassis but I was pretty suprised just how well it fit in there.
It went in three or four times just today. I had a hand from a buddy while trimming the tranny tunnel for the reverse lockout solenoid to clear. I had to take a bit of sheetmetal out of the side of the tunnel, but it will be patched up and easily fit under the stock carpet.
At this point it is just setting in there on blocks at the right height....it came out lots more after this pic was taken but I just had to see what it was going to look like.
So we got it to sit where I wanted it to after some trimming Very little trimming though as I am trying to keep this as stock and uncut as I can.
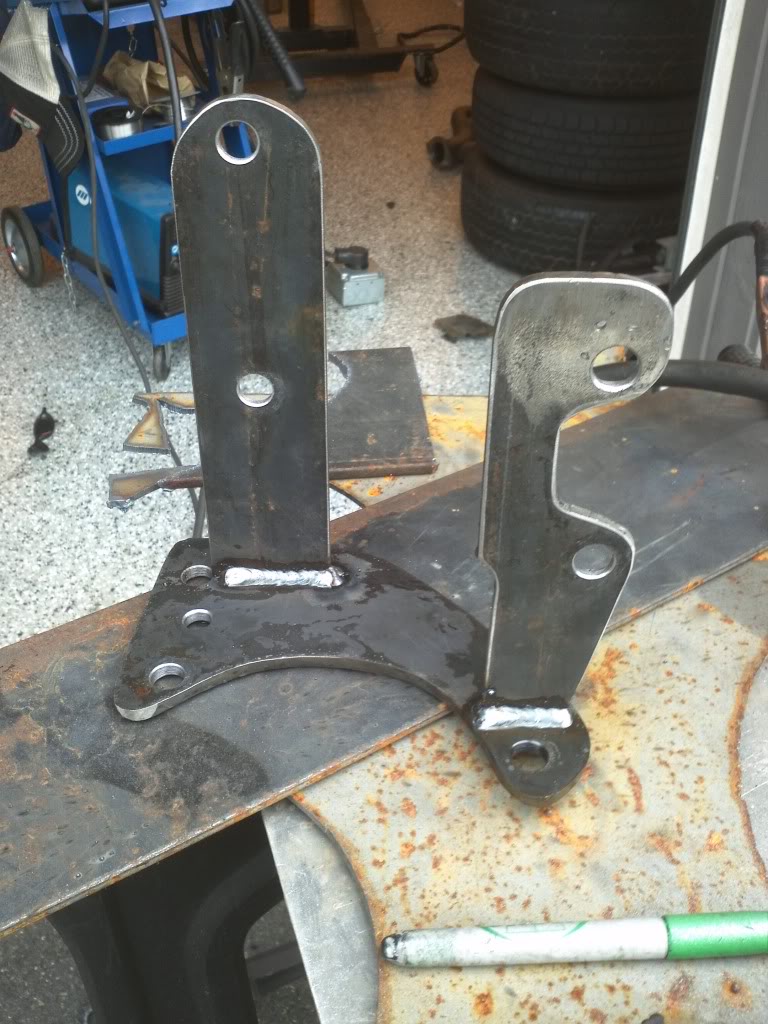
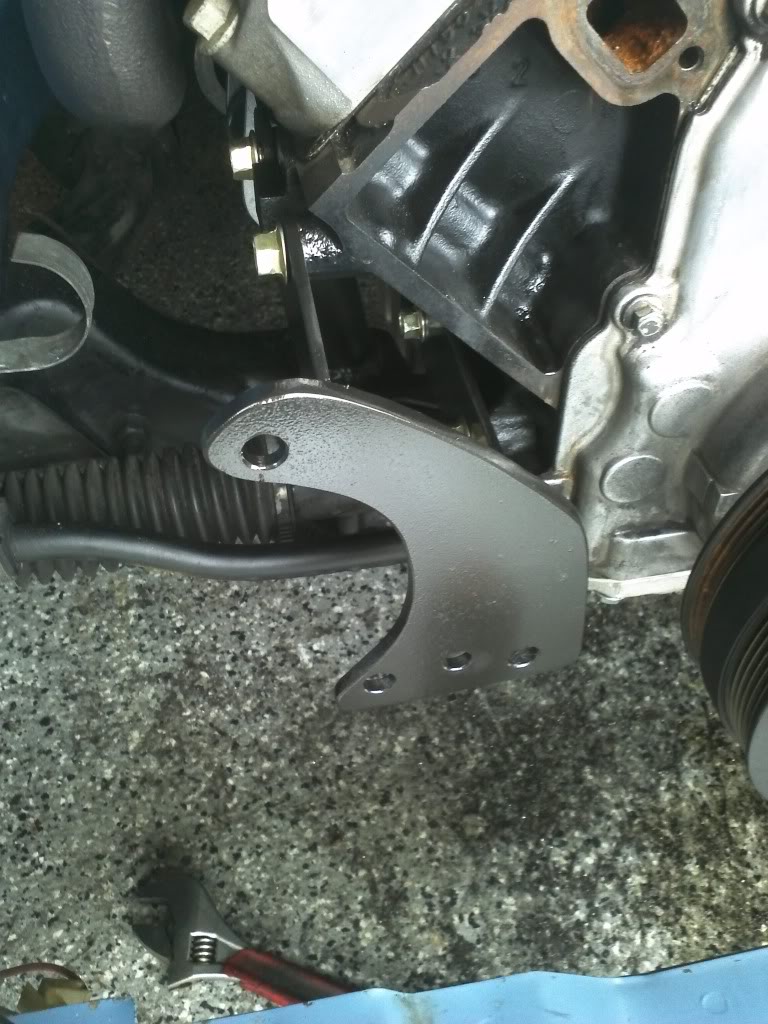
WIth things sitting well I moved onto the motor mounts. Started with some plate and toob and built these.
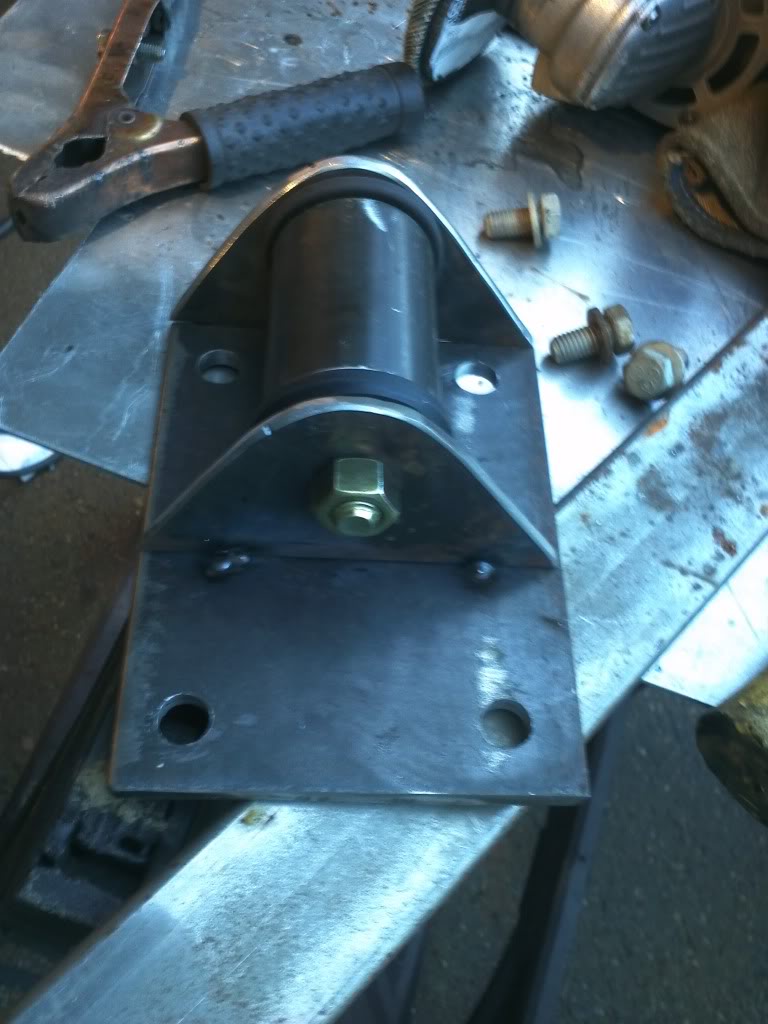
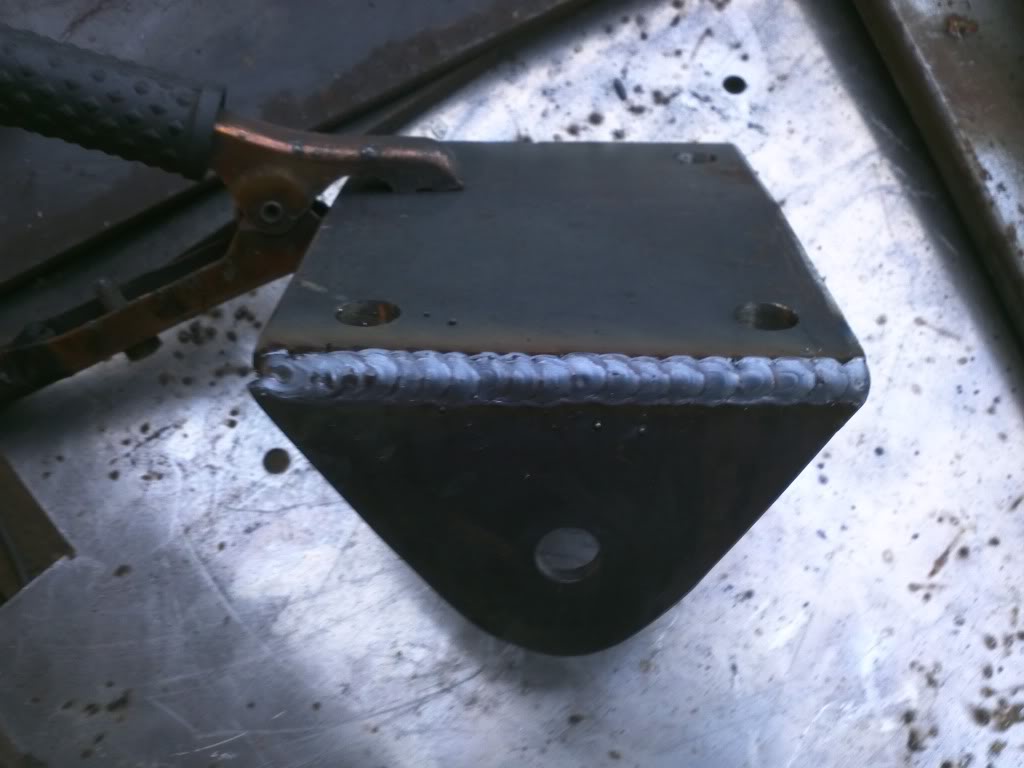
Bolted them onto the motor and started to make some uprights. These are 1 3/4" .120 wall toobing as well as the mounts with the poly bushings. This is a common method of mounting stuff in my normal world of offroading. It is clean easy and cheap
I had a pretty fun little volvo 242 that I was using for my daily driver but I really wanted to paint it....and paint it proper. It was a great car. Suspension was dialed in and it had a bondo header and a 16g. Pulled really good, but I had something else in mind and this was not the car to do it to.
So, Pat and I went to look at a car for his cousin a month or so ago and it was really, really clean. All stock, the exterior was in reasonable shape but the interior was in really sad shape.
A carpet cleaning new seats and a dash swap and the interior was in much better shape. Good enough to drive to work and back at least.
b21f kjet na was an absolute joke. Not to mention it did not run very well it wsa so slow that my wife would not even drive it.
My plan was not to keep the little 4 banger in this car but i had not planned on yarding it out this quick. but this had to go....
So last weekend I decided that this ill running little motor needed to go.
Had this out by lunch last saturday.
Spent the week rounding up some parts but mostly cleaning up the 30 some years of crap in the engine compartment. Pressure washed, cleaned and took out some more parts and pieces for refinishing. Also buffed and waxed the entire engine bay so that I had something descent to work with.
Forgot to snap a pic of the cleaned up bay though....sorry.
Well here is where it got a bit fun. A few weeks earlier the parts started coming together.
2001 5.3 LQ4 motor drive by cable throttle body.
2002 t56 from a camaro.....still waiting on the flywheel from the yard
ls6 intake manifold with ls1 steam ports bottom of intake clearanced to clear the steam lines
Mast Motorsports oil pan (should arrive on Monday)
Hooker Cast exhaust manifolds (ordered yesterday)
So this weekend I thought the oil pan was going to show up yesterday but no go.....I got the cut sheet from Mast and got to work. I pulled the oil pan and pickup toob this morning and swung this big old setup into place.
Its quite a long unit for the 240 chassis but I was pretty suprised just how well it fit in there.
It went in three or four times just today. I had a hand from a buddy while trimming the tranny tunnel for the reverse lockout solenoid to clear. I had to take a bit of sheetmetal out of the side of the tunnel, but it will be patched up and easily fit under the stock carpet.
At this point it is just setting in there on blocks at the right height....it came out lots more after this pic was taken but I just had to see what it was going to look like.
So we got it to sit where I wanted it to after some trimming Very little trimming though as I am trying to keep this as stock and uncut as I can.
WIth things sitting well I moved onto the motor mounts. Started with some plate and toob and built these.
Bolted them onto the motor and started to make some uprights. These are 1 3/4" .120 wall toobing as well as the mounts with the poly bushings. This is a common method of mounting stuff in my normal world of offroading. It is clean easy and cheap
 03-29-2012, 03:46 PM
#2
Launching!
Thread Starter
Join Date: Mar 2012
Posts: 214
Likes: 0
Received 0 Likes
on
0 Posts

I am trying to keep the mounts tucked in as sometime down the road this may get a little bit of boost. Not right away, but maybe next winter.
Computer was unhappy so I posted that up to not loose the whole post.
So hopefully tomorrow can be as productive as today. Patch up the hole in the floor, build the tranny crossmember and start getting the hydraulic clutch setup.
Fuel management will be all GM. Harness is in capable hands getting dwindled down to the bare necessities and should be ready to go in on monday or tuesday.
Sean
03-29-2012, 03:57 PM
#3
Launching!
Thread Starter
Join Date: Mar 2012
Posts: 214
Likes: 0
Received 0 Likes
on
0 Posts
Back out in the garage early this morning to start on it again. I have realized that I am not the best at taking photos of every step of the process.
I started off with mounting the transmission and adapting the t56 tranny to mount up on the stock volvo crossmember. This proved to be pretty easy to be honest. I mounted the x member in the rearmost holes and made a plate to bolt the stock volvo mount up to the t56. I forgot to snap a photo of it though:oops:
Ill get some this week when I pull the motor out.
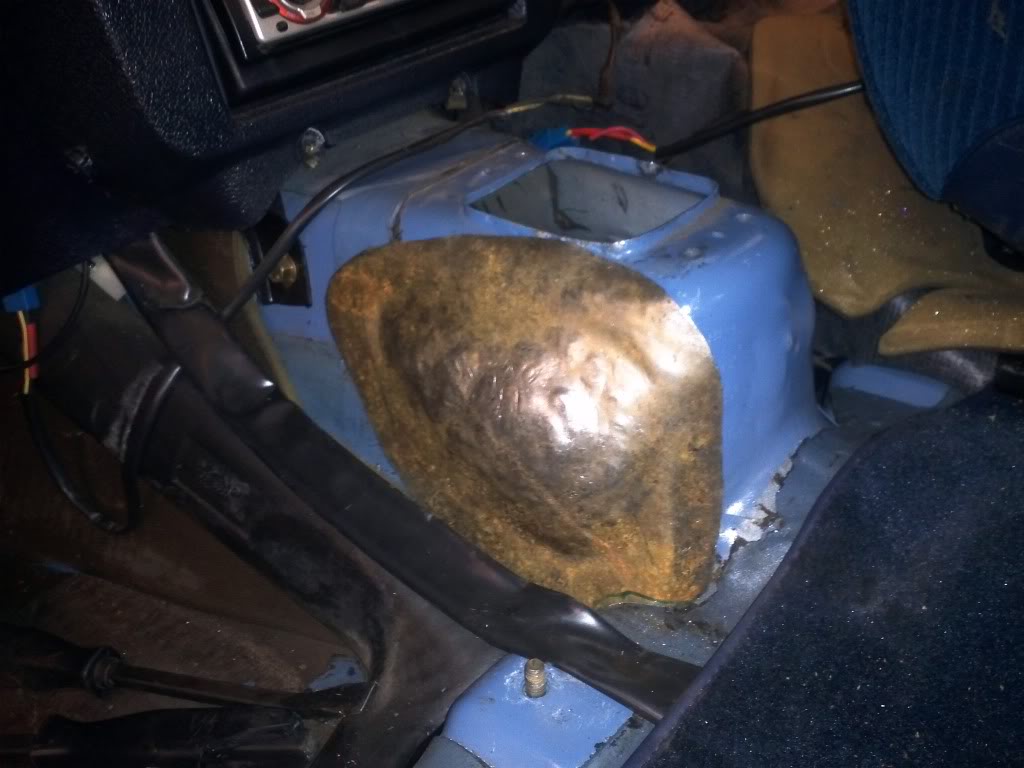
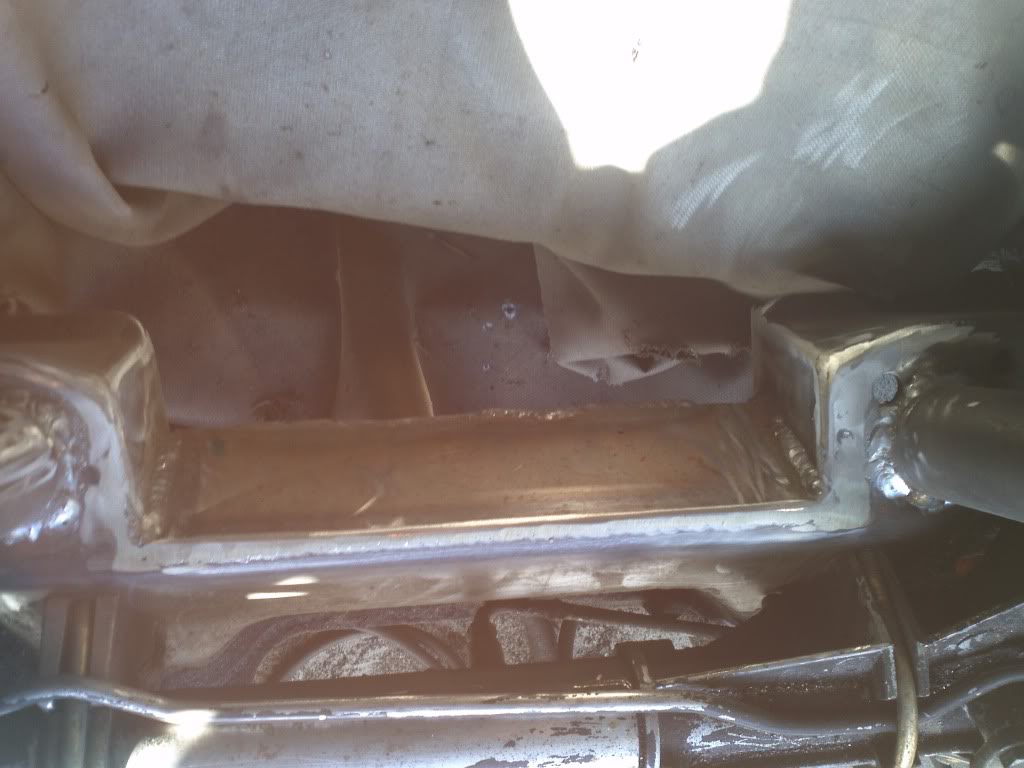
That finished up I decided to move onto something that I was dreading....building a cover fot the reverse lockout solenoid in the passenger compartment.
I absolutly am not a sheetmetal guy. I know just enough about shaping sheetmetal to get in trouble. This is the result of not having real tools.
Did this with a ball peen hammer and my home made anvil. My buddy does a lot more sheetmetal work and he is going to come over and polish this turd a little for me before we burn it in.
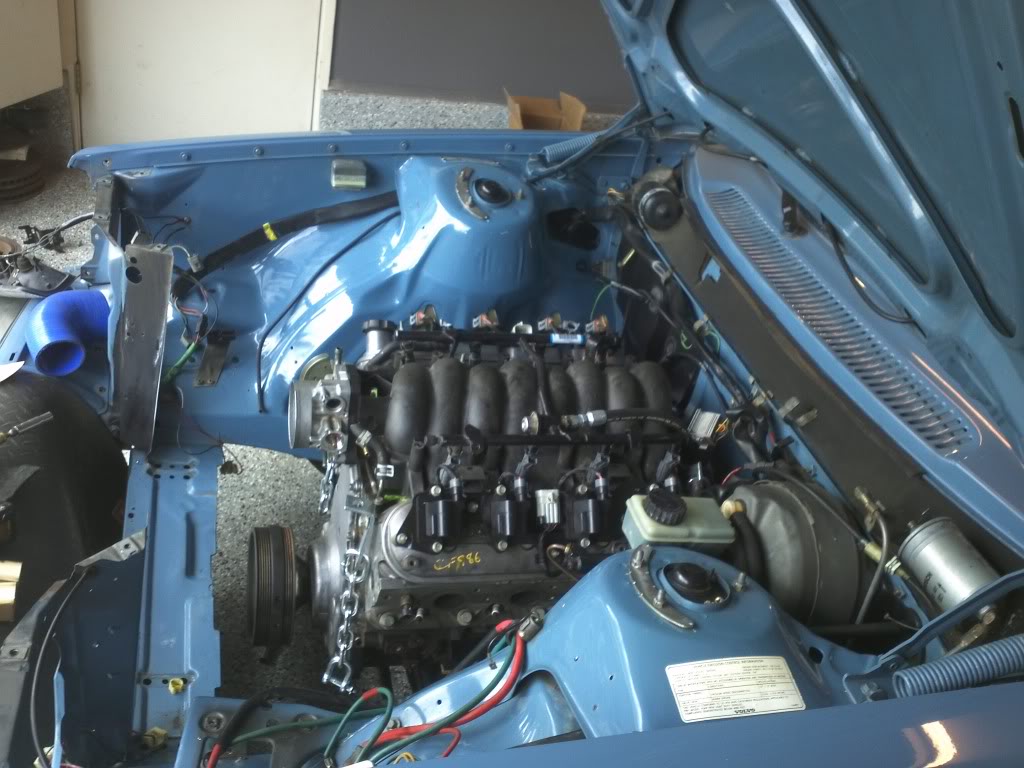
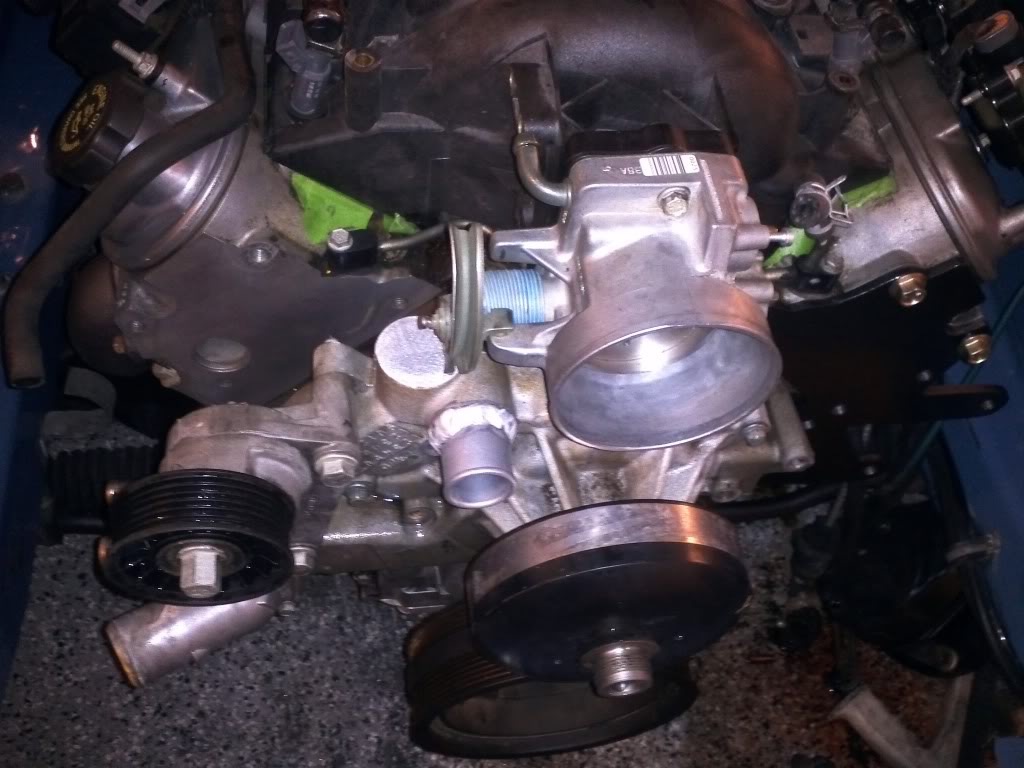
I moved onto trying to get a handle on the power steering setup. I realy wanted to keep the volvo pump as it would be one less thing fr me to buy. I pulled off the stock volvo pulley and then removed the hub. I took all my crap down to car quest and amazingly we found a new pulley for that pump that was a serpentine setup, 6 rib and GM to boot. Came home and Ill be damned.....it fit. Pressed it on and it is nice and straight, a tiny bt larger than the stock one but only by 1/4".
I knew it needed to go in this general location...
So like normal I built a paper template and got to work with some 1/4" plate and the plasma cutter, drill press and grinder.
Here is the result.
The pump actually worked out really well and sits nice and low, out of harms way and keeps the upper end of the engine bay clean and uncluttered.
I am a little curious if the belt will smack together near the water pump but as the tensioner comes in it raises up and ends up with about another 3/8". Its a tight fit but the belt needs to clear the water pump and the throttle body as well as the higher the pump sits, the farter out from the engine it needs to be mounted.
Pan should be here tomorrow so its about time to yard it all out again and see if my measuring is close to what the actual pan dimensions are.
I started off with mounting the transmission and adapting the t56 tranny to mount up on the stock volvo crossmember. This proved to be pretty easy to be honest. I mounted the x member in the rearmost holes and made a plate to bolt the stock volvo mount up to the t56. I forgot to snap a photo of it though:oops:
Ill get some this week when I pull the motor out.
That finished up I decided to move onto something that I was dreading....building a cover fot the reverse lockout solenoid in the passenger compartment.
I absolutly am not a sheetmetal guy. I know just enough about shaping sheetmetal to get in trouble. This is the result of not having real tools.
Did this with a ball peen hammer and my home made anvil. My buddy does a lot more sheetmetal work and he is going to come over and polish this turd a little for me before we burn it in.
I moved onto trying to get a handle on the power steering setup. I realy wanted to keep the volvo pump as it would be one less thing fr me to buy. I pulled off the stock volvo pulley and then removed the hub. I took all my crap down to car quest and amazingly we found a new pulley for that pump that was a serpentine setup, 6 rib and GM to boot. Came home and Ill be damned.....it fit. Pressed it on and it is nice and straight, a tiny bt larger than the stock one but only by 1/4".
I knew it needed to go in this general location...
So like normal I built a paper template and got to work with some 1/4" plate and the plasma cutter, drill press and grinder.
Here is the result.
The pump actually worked out really well and sits nice and low, out of harms way and keeps the upper end of the engine bay clean and uncluttered.
I am a little curious if the belt will smack together near the water pump but as the tensioner comes in it raises up and ends up with about another 3/8". Its a tight fit but the belt needs to clear the water pump and the throttle body as well as the higher the pump sits, the farter out from the engine it needs to be mounted.
Pan should be here tomorrow so its about time to yard it all out again and see if my measuring is close to what the actual pan dimensions are.
03-29-2012, 03:57 PM
#4
Launching!
Thread Starter
Join Date: Mar 2012
Posts: 214
Likes: 0
Received 0 Likes
on
0 Posts
I was a little more than excited when the fed ex guy delivered this box to my desk at work today.....it was from Mast Motorsports.

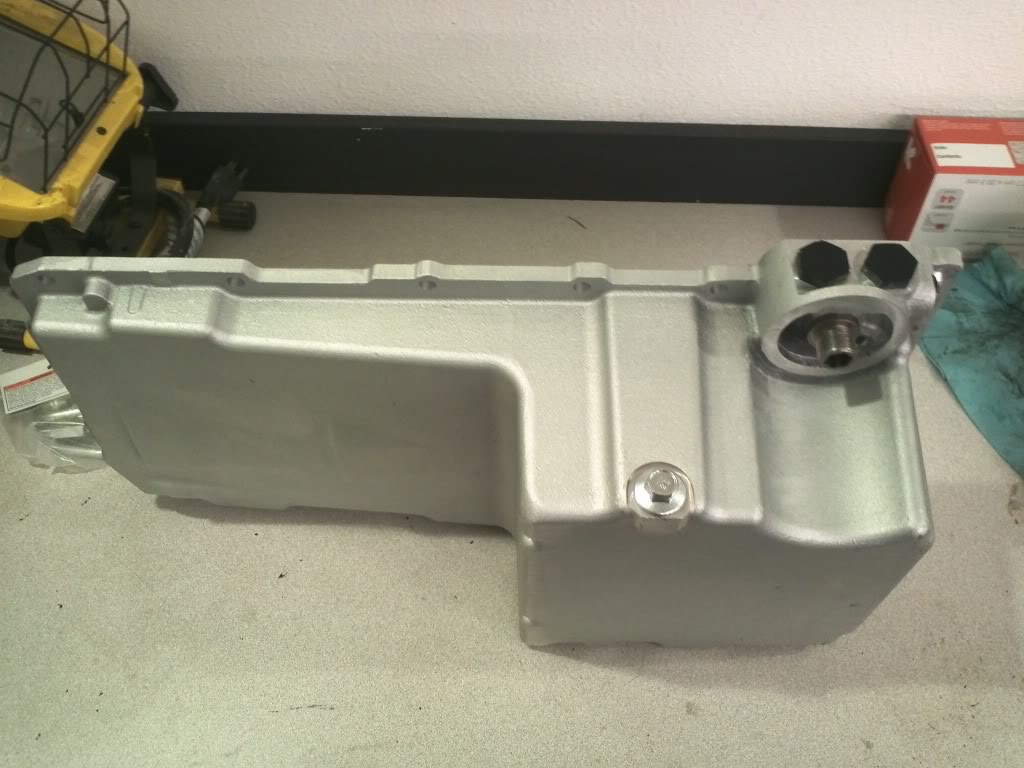
Although it added to the overall cost of the project by a few hundred dollars the quality fit and finish are awesome. I cannot believe how tight to the motor the front sump is.
I took a handful of measurements when I got home and I need to trim a fair bit off the back of the crossmember but the oil pan will clear the height of the crossmember as well as the power steering rack so it looks like all of my measuring paid off and the motor mounts worked out well.
So I yarded the motor back out again and set to measuring out the cut lines on the crossmember. Tomorrow night should be some fun with the sawzall and plasma
Anyone out there ever run a na 940 radiator with a v8? I am wondering how well they cool the v8's.
Gotta figure out hydraulic clutch setup too.
Sean
03-29-2012, 03:59 PM
#5
Launching!
Thread Starter
Join Date: Mar 2012
Posts: 214
Likes: 0
Received 0 Likes
on
0 Posts
Well not a ton of progress on the car this last week.....
I did however do a pretty good job on the parts collecting.
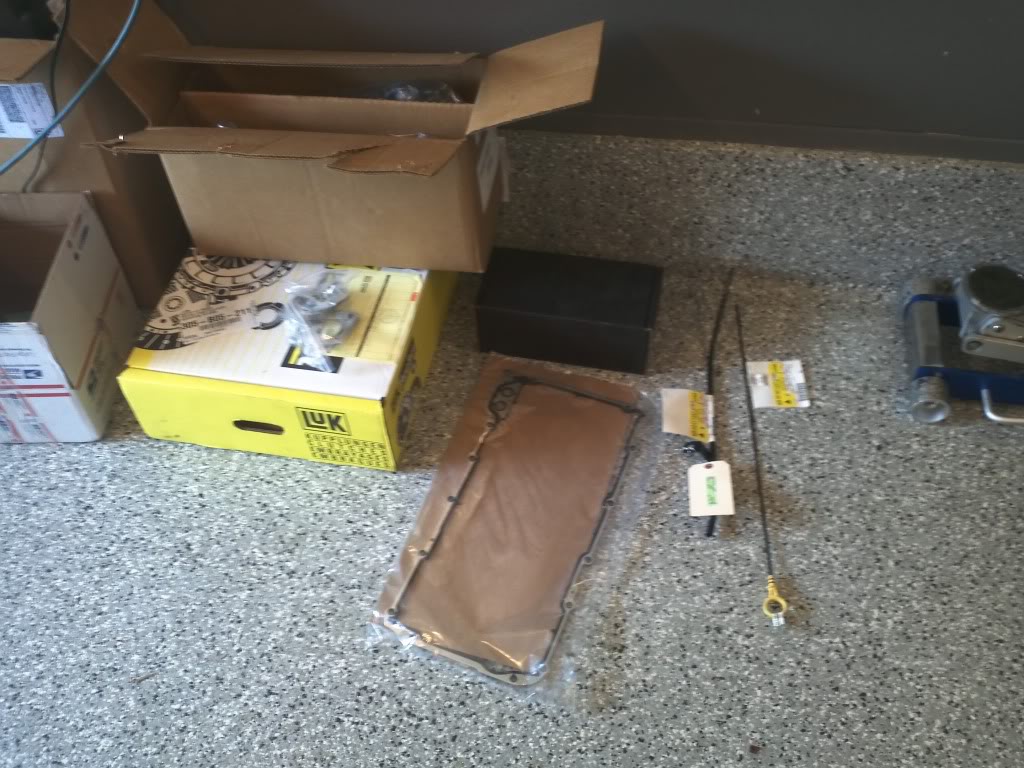
Oil Pan from Mast Motorsports.
Hooker's new block hugger cast manifolds.
Luk clutch, pressure plate, flywheel, pilot bearing
New Hydraulic slave cylinder.
New GM oil pan gasket.
GM oil dipstick tube and new dipstick.
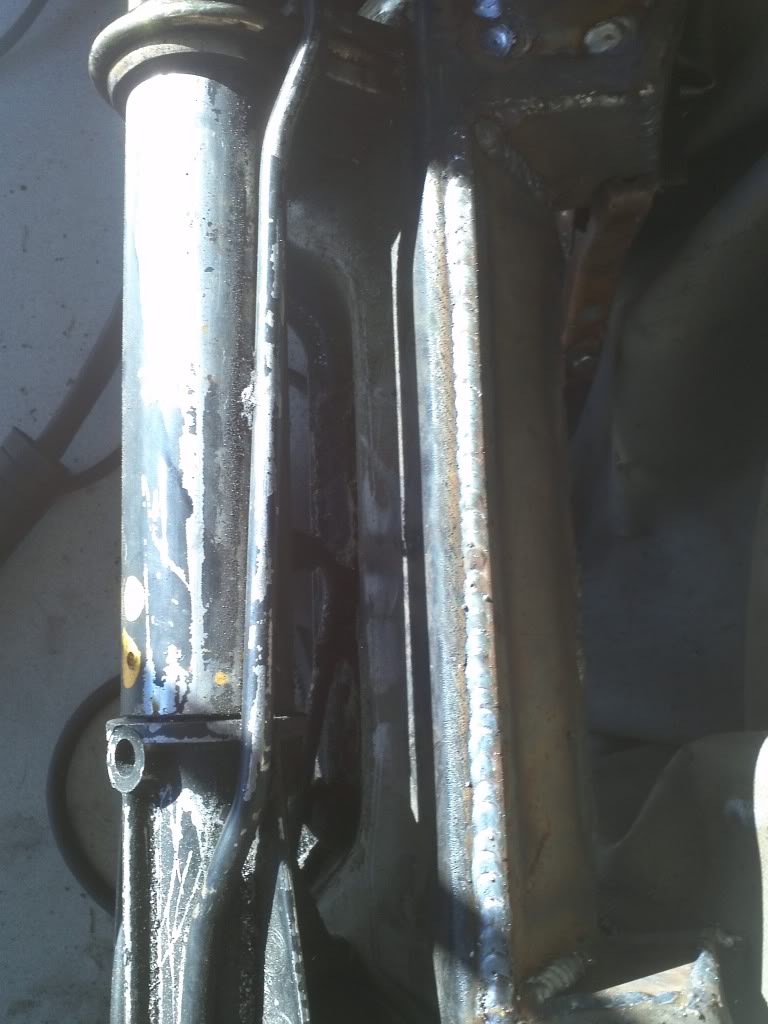
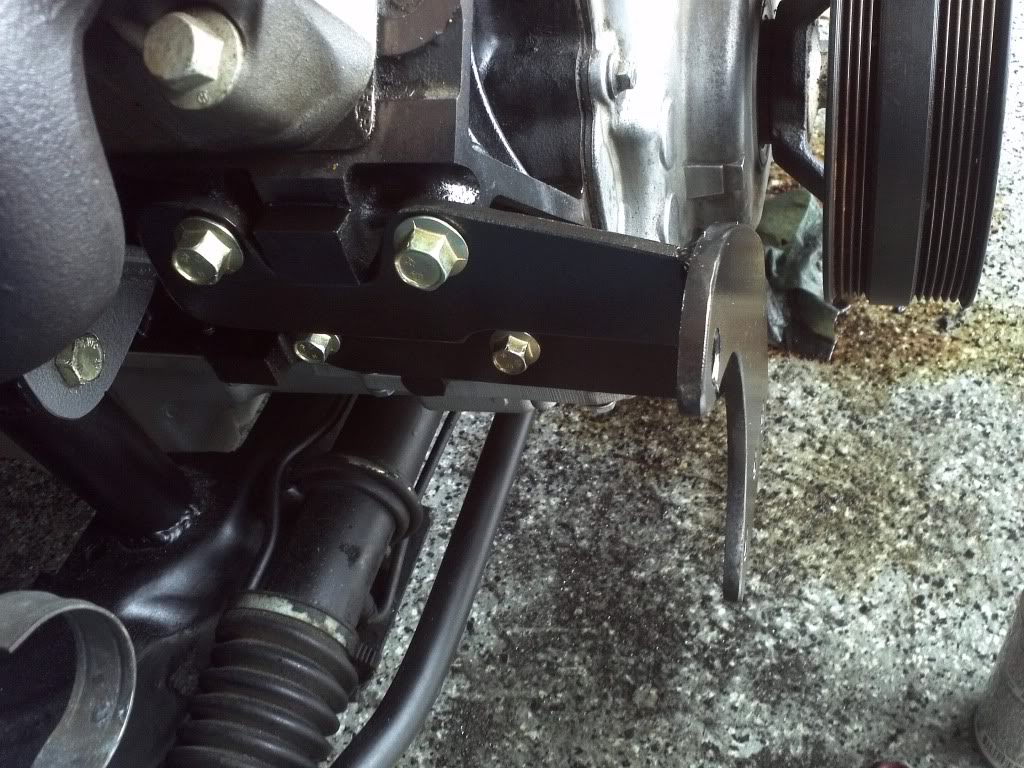
As of Today I have had the motor/tranny combo in and out 15 times. The tranny tunnel has been quite a pain in the butt to get the tranny to fit up there where it needs to go. Each time you make a change, the unit needs to come out work on the tunnel and crossmember and back in again.
Pat stoped by to lend a much appreciated hand yesterday afternoon and he was shocked to see how much work has gone into the tunnel to make the t56 fit nicely.
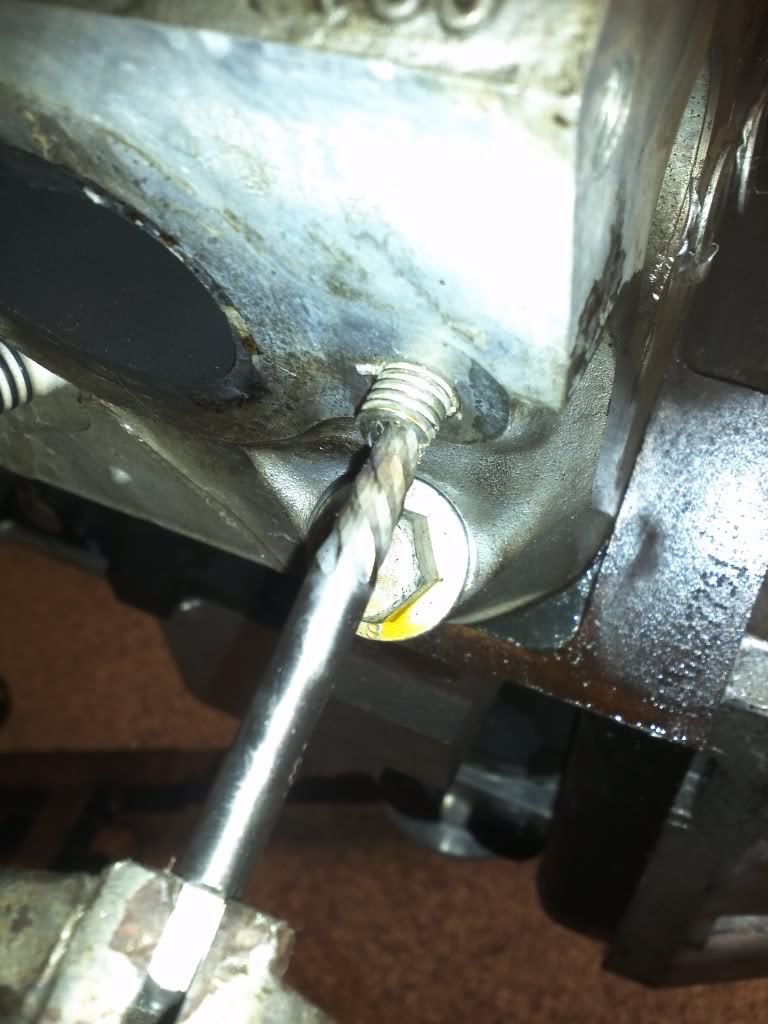
Got it all final fitted last night and had eerything ready to weld out this morning. I got up early and decided to tackle this broken exhaust manifold bolt while the neighbors slept in. Removing this was a major pain and burned up at least an houe of my morning.
With that out of the way, it was late enough then to open up the garage and fire up the welder.
Final welded all of the crossmember and motor mounts.
So with that all buttoned I moved on to getting the tranny pulled off the motor and ready to go in its new home for good.
New flywheel torqued to 74 ft lbs.
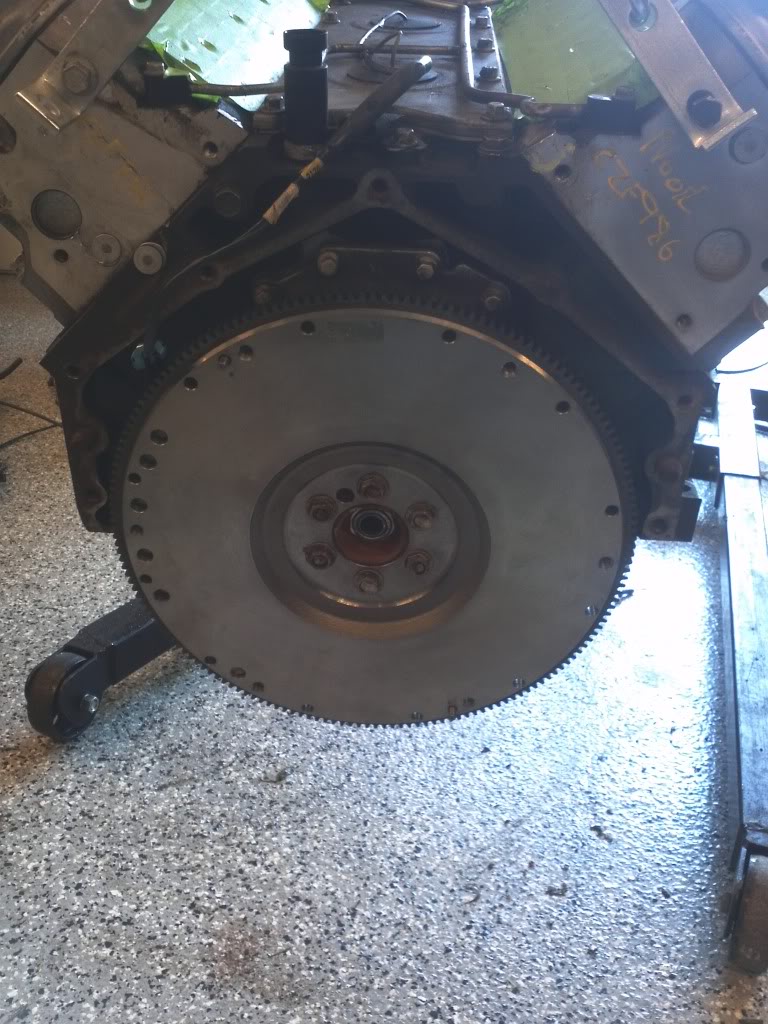
Pilot bearing installed, clutch aligned and pressure plate installed and torqued to 30 ft lbs. This clutch and pp assembly is huge compared to the little guy that came out of this car.
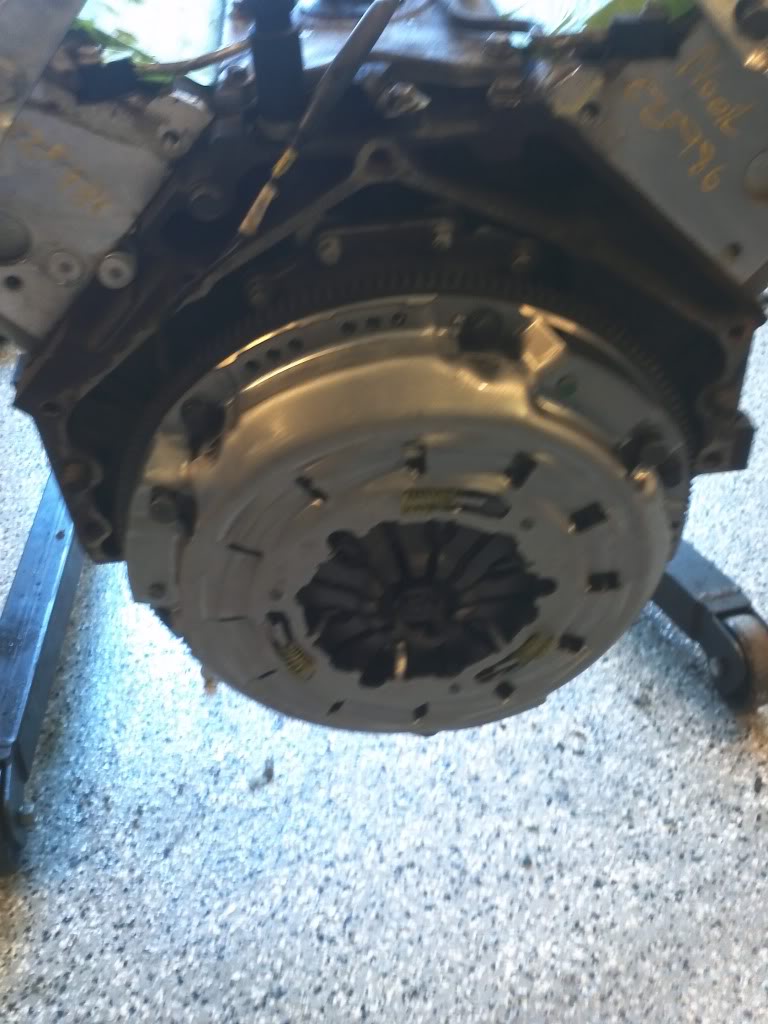
Had Geno come over to help me get this assembly onto the motor as it had gained some heft and extra resistance with the throwout bearing and clutch disc.
Went together without much issue once we had two guys on the job.
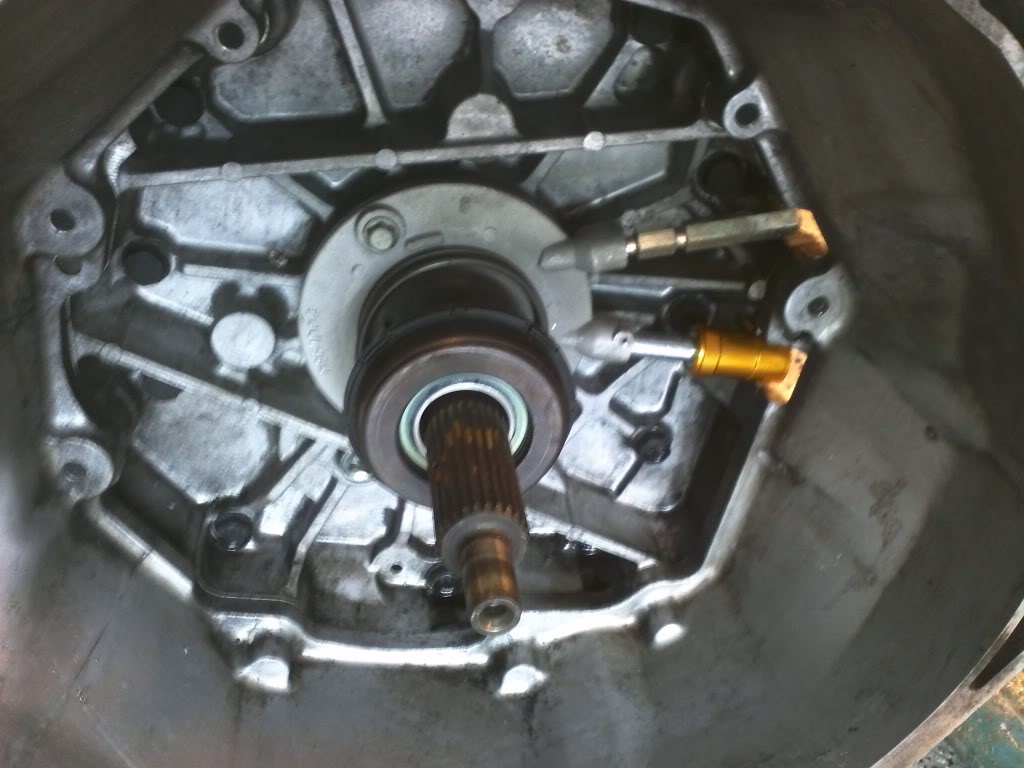
New hydraulic slave and throwout bearing too.
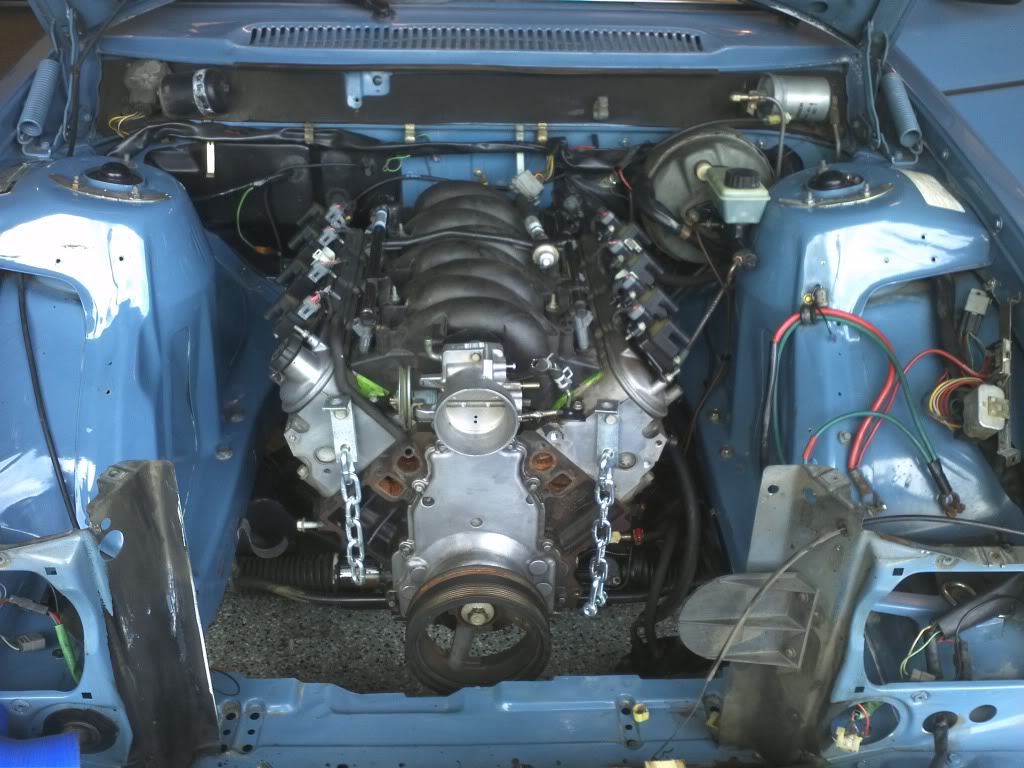
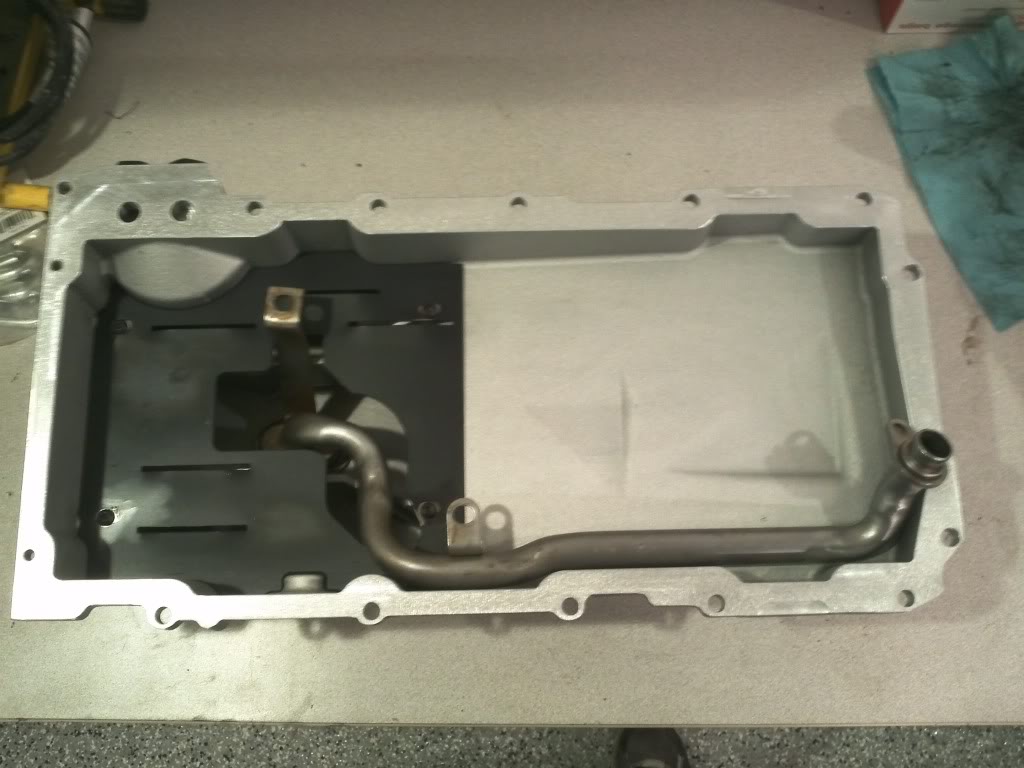
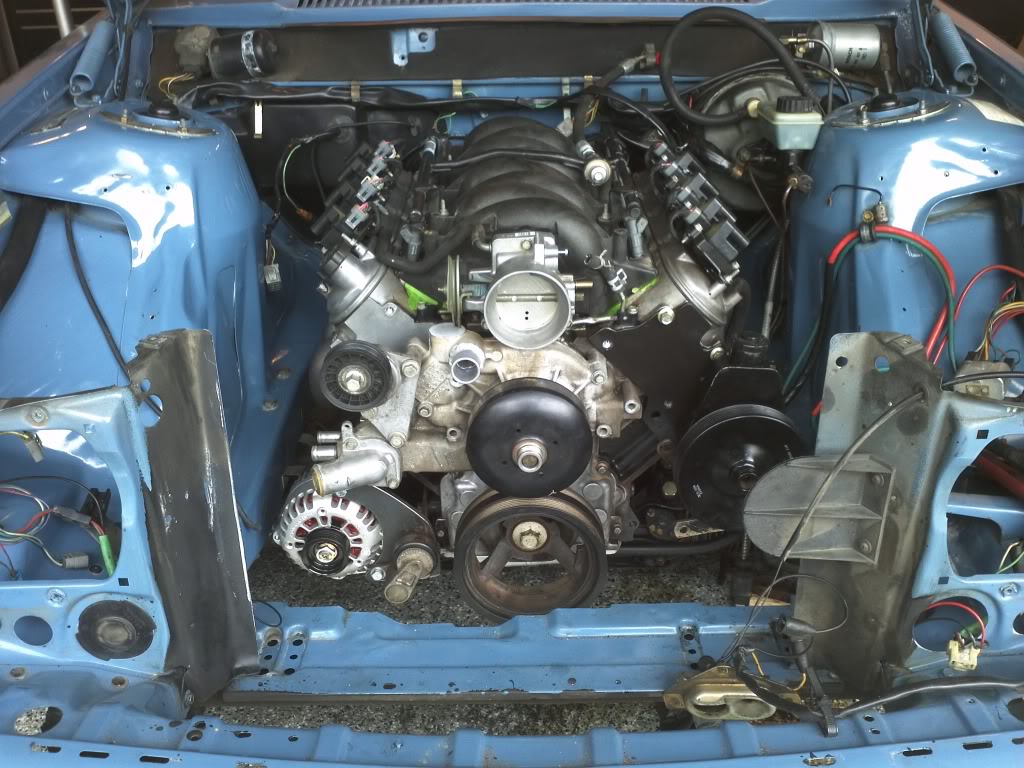
That was buttoned up so I put the new pump pickup on the engine. It is really tight to the bottom of the engine/ windage tray.
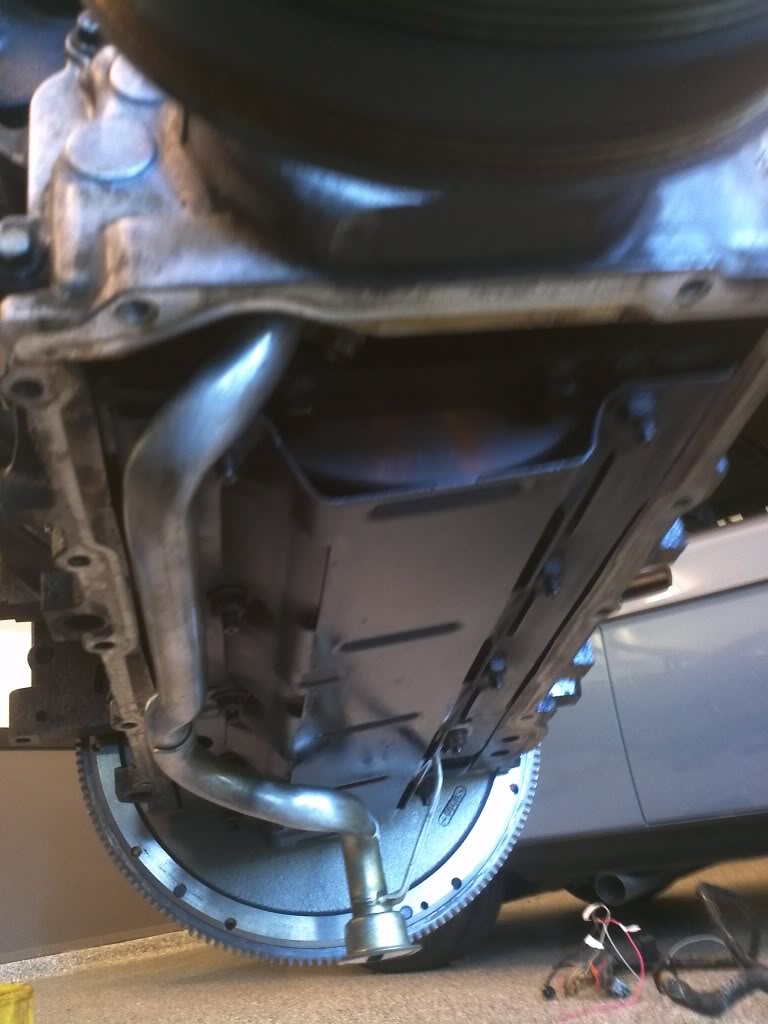
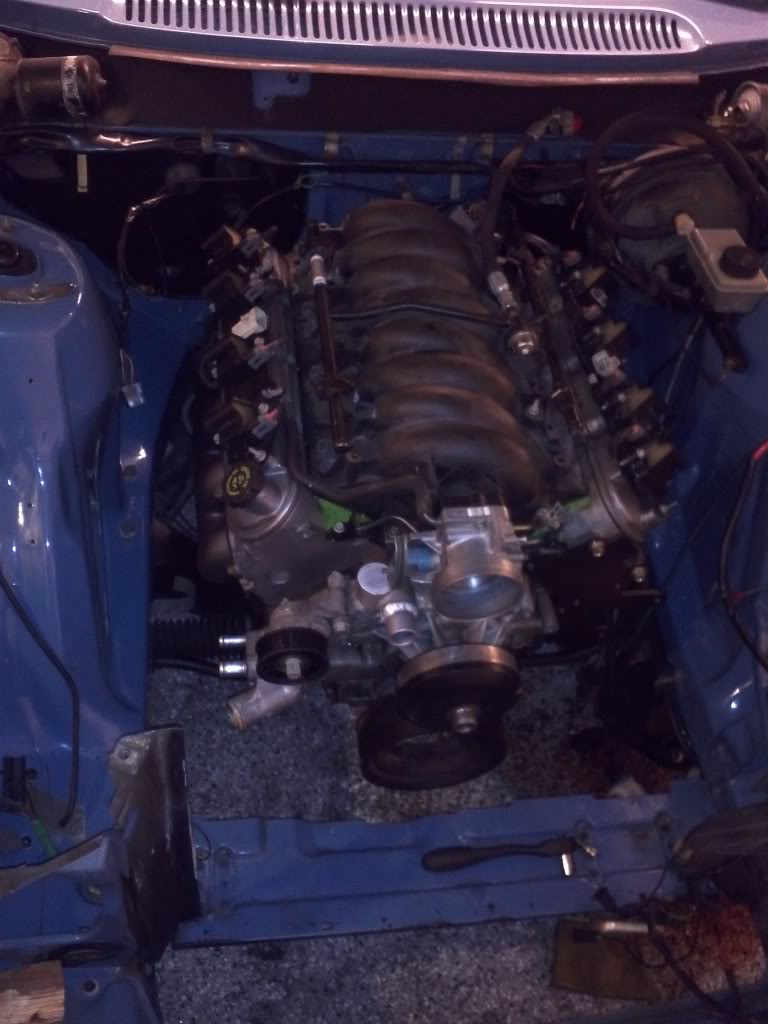
I also shot the motor with some high temp black paint, cleaned and installed the pan. I painted the motor mounts as well and got them bolted on for the final install.
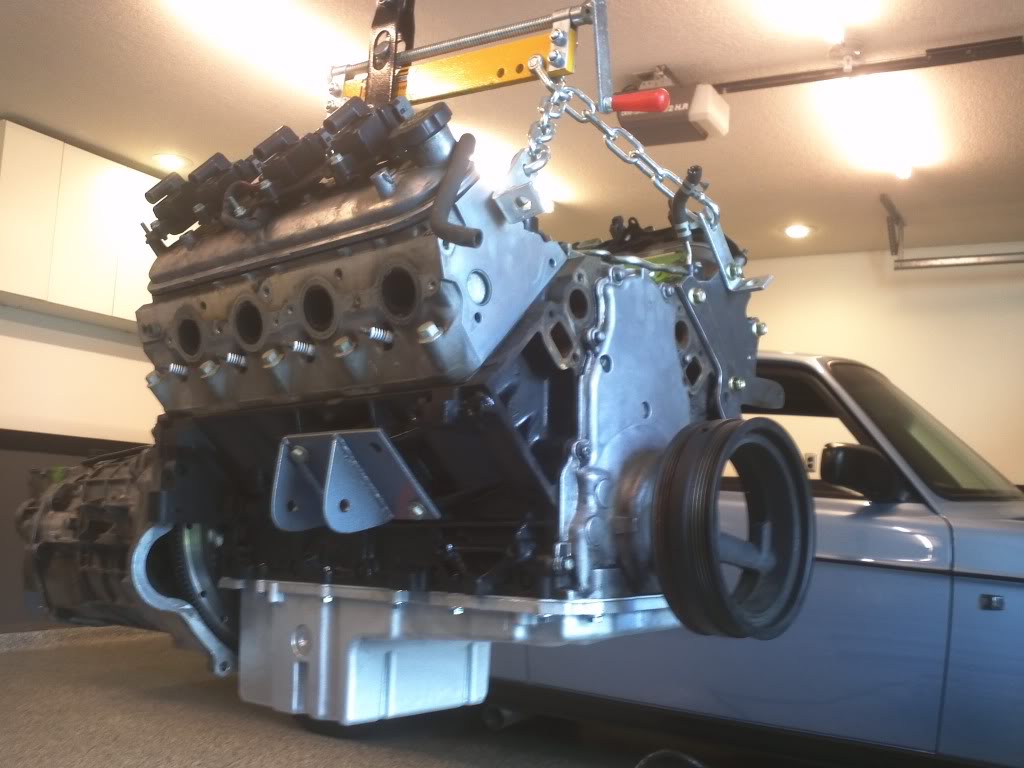
TIme to marry the two of these girls together with nuts and bolts.
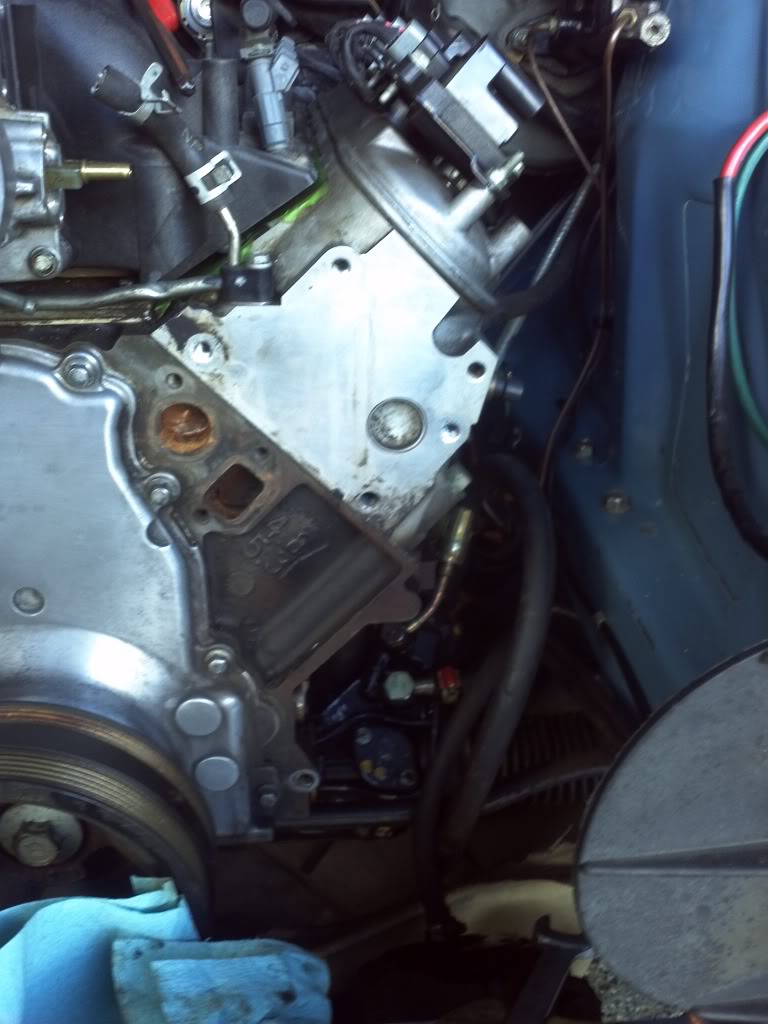
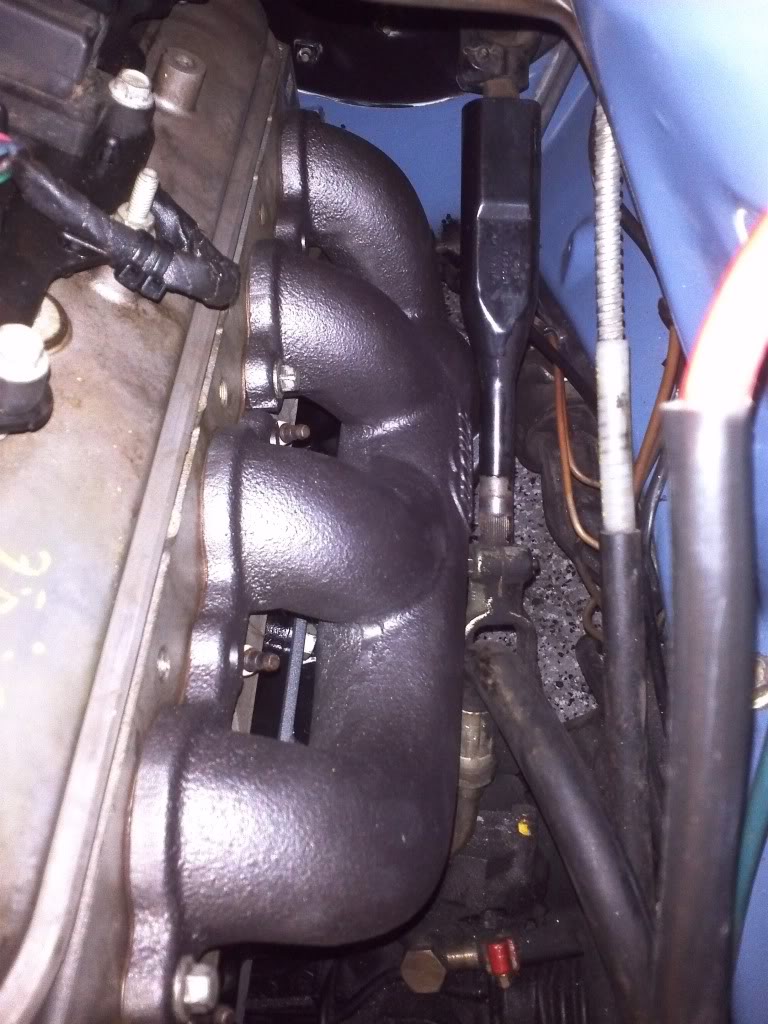
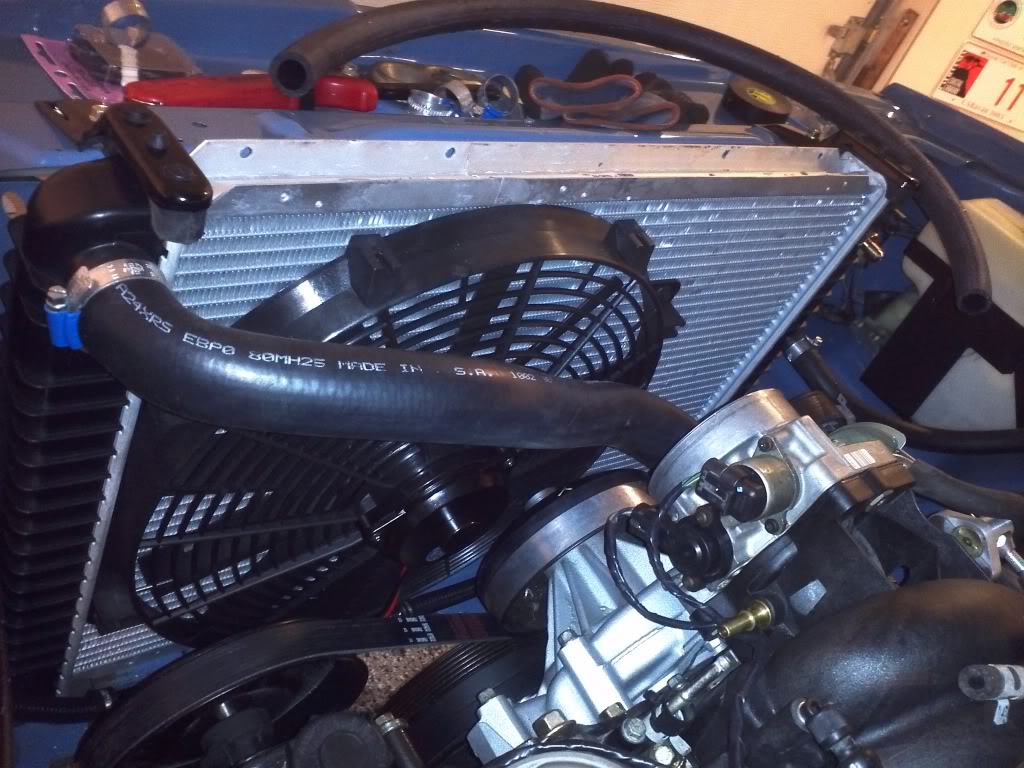
Once I got it set it was time to deal with the water pump to throttle body clearance issue from the truck water pump to the ls6 intake. Luckily Geno is an ace when it comes to aluminum....
We drilled this new passage in the front of the pump and hacked up a thermostat housing to make the stub out.
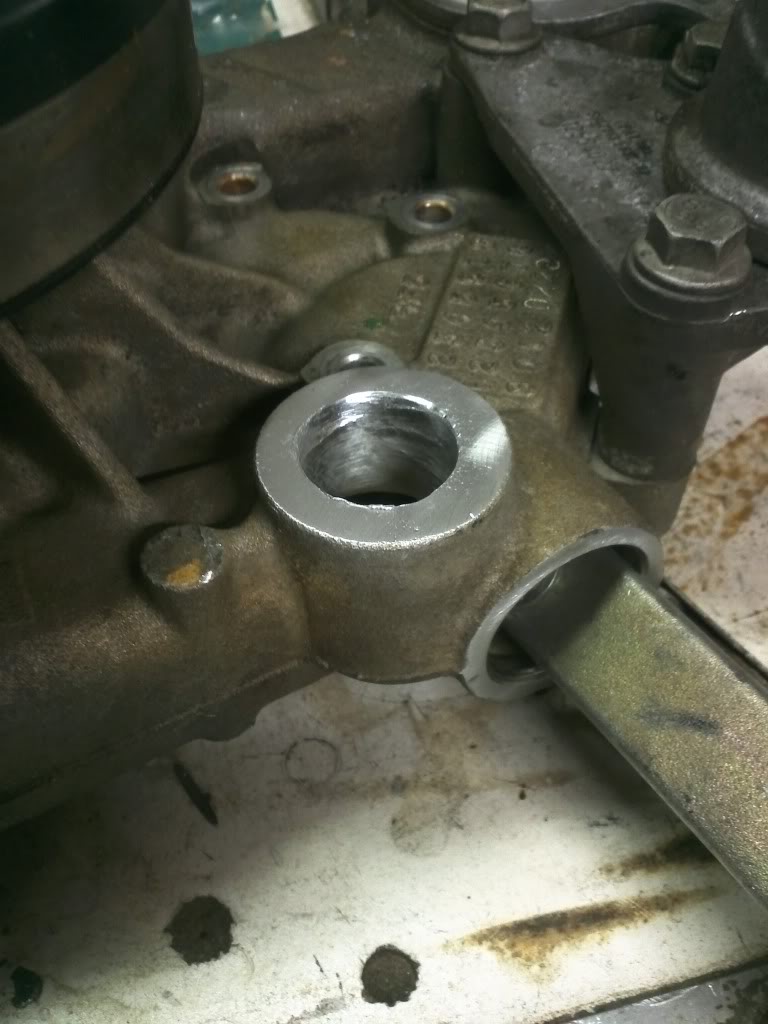
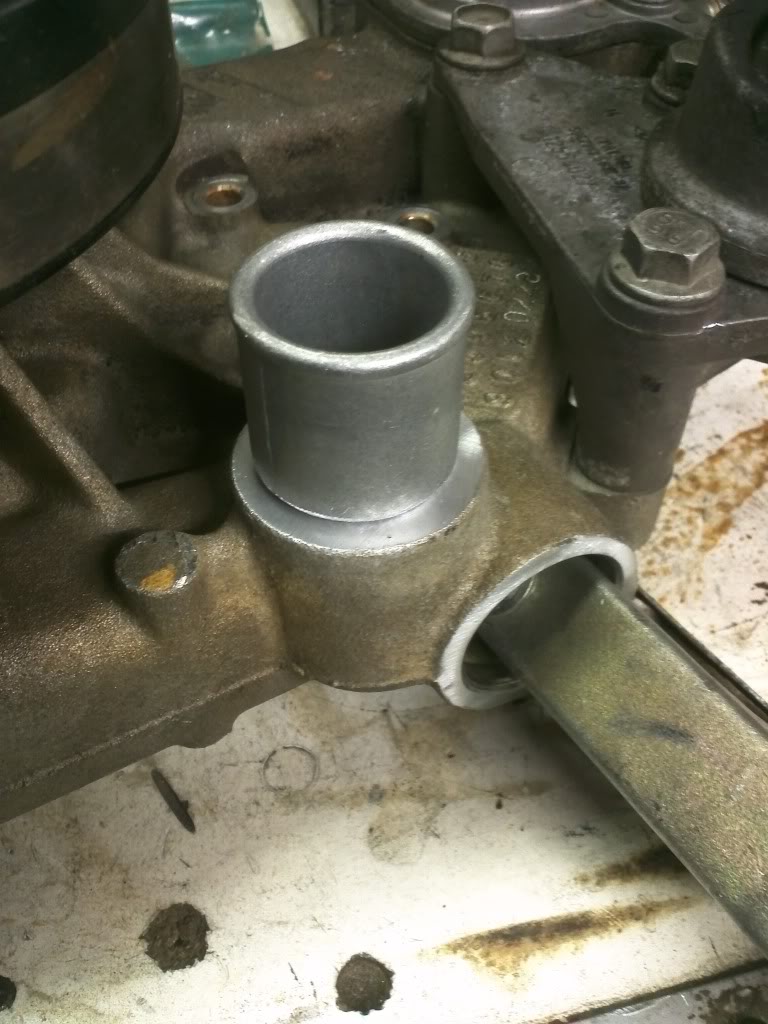
It fit perfect and was a less expensive alternative to buying a new pump. This idea is not mine though. I stole it from a couple other builds and saw how nicely it worked for them and used it on this one.
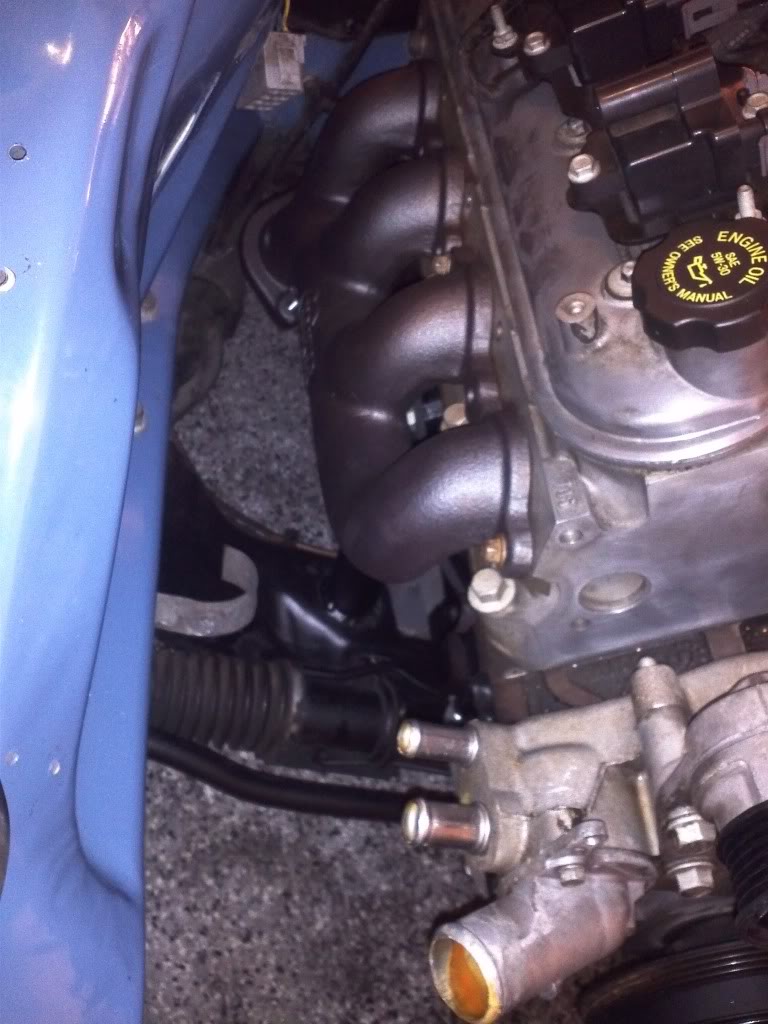
Manifolds are coated with Stove Bright and they fit like a glove on the car. I had to move the steering column over a little bit but the fit is great!!!
Here is how she sits as of tonight. Awesome day for me and I cannot thank Pat and Geno enough for their help on this the last couple of days.
Tomorrow looks like it will be alternator, starter, wiring, fuel system and cooling.
Hope to have it done in time to drive to the portland swap meet on april 13th.
Sean
I did however do a pretty good job on the parts collecting.
Oil Pan from Mast Motorsports.
Hooker's new block hugger cast manifolds.
Luk clutch, pressure plate, flywheel, pilot bearing
New Hydraulic slave cylinder.
New GM oil pan gasket.
GM oil dipstick tube and new dipstick.
As of Today I have had the motor/tranny combo in and out 15 times. The tranny tunnel has been quite a pain in the butt to get the tranny to fit up there where it needs to go. Each time you make a change, the unit needs to come out work on the tunnel and crossmember and back in again.
Pat stoped by to lend a much appreciated hand yesterday afternoon and he was shocked to see how much work has gone into the tunnel to make the t56 fit nicely.
Got it all final fitted last night and had eerything ready to weld out this morning. I got up early and decided to tackle this broken exhaust manifold bolt while the neighbors slept in. Removing this was a major pain and burned up at least an houe of my morning.
With that out of the way, it was late enough then to open up the garage and fire up the welder.
Final welded all of the crossmember and motor mounts.
So with that all buttoned I moved on to getting the tranny pulled off the motor and ready to go in its new home for good.
New flywheel torqued to 74 ft lbs.
Pilot bearing installed, clutch aligned and pressure plate installed and torqued to 30 ft lbs. This clutch and pp assembly is huge compared to the little guy that came out of this car.
Had Geno come over to help me get this assembly onto the motor as it had gained some heft and extra resistance with the throwout bearing and clutch disc.
Went together without much issue once we had two guys on the job.
New hydraulic slave and throwout bearing too.
That was buttoned up so I put the new pump pickup on the engine. It is really tight to the bottom of the engine/ windage tray.
I also shot the motor with some high temp black paint, cleaned and installed the pan. I painted the motor mounts as well and got them bolted on for the final install.
TIme to marry the two of these girls together with nuts and bolts.
Once I got it set it was time to deal with the water pump to throttle body clearance issue from the truck water pump to the ls6 intake. Luckily Geno is an ace when it comes to aluminum....
We drilled this new passage in the front of the pump and hacked up a thermostat housing to make the stub out.
It fit perfect and was a less expensive alternative to buying a new pump. This idea is not mine though. I stole it from a couple other builds and saw how nicely it worked for them and used it on this one.
Manifolds are coated with Stove Bright and they fit like a glove on the car. I had to move the steering column over a little bit but the fit is great!!!
Here is how she sits as of tonight. Awesome day for me and I cannot thank Pat and Geno enough for their help on this the last couple of days.
Tomorrow looks like it will be alternator, starter, wiring, fuel system and cooling.
Hope to have it done in time to drive to the portland swap meet on april 13th.
Sean
03-29-2012, 04:00 PM
#6
Launching!
Thread Starter
Join Date: Mar 2012
Posts: 214
Likes: 0
Received 0 Likes
on
0 Posts
Today was not hugely successful like yesterday but I did manage to get a few things crossed off the list.
First up was to clean up the craphole of a garage that we created in our tornado like work pattern the last two days.
Then I headed out to round up some parts.
New alternator, corvette filter and some misc stuff.
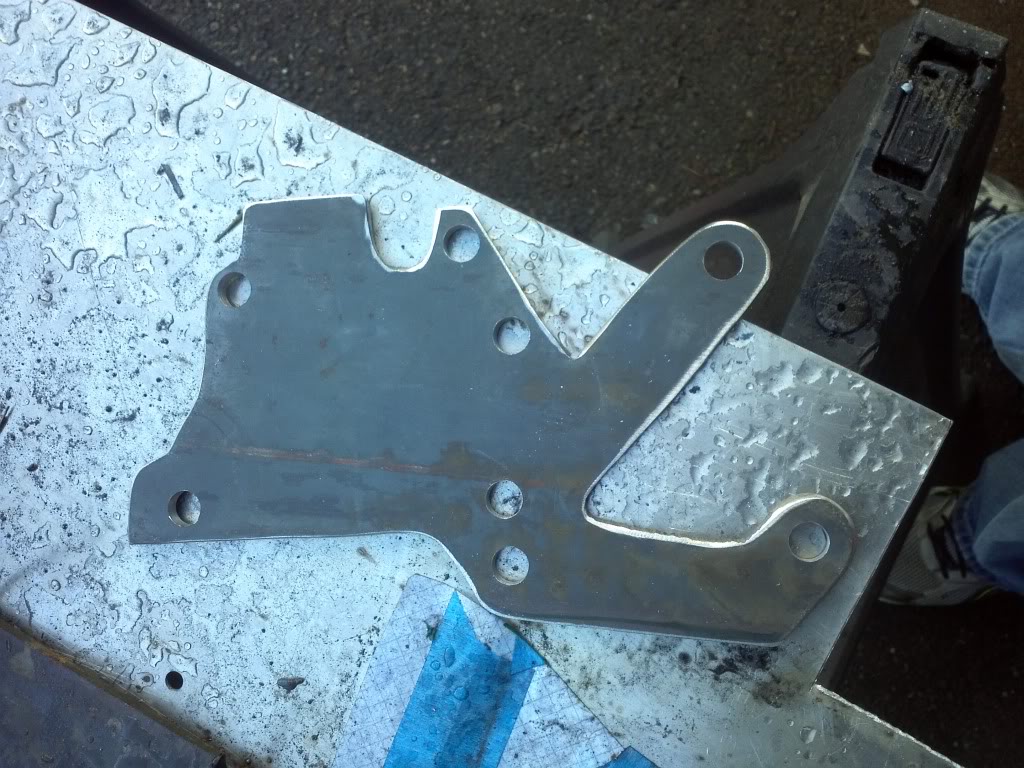
Started by locating the alternator about where it needed to go and came up with a game plan. I wanted to use the ac location for the alternator and really wanted to use a tensioner for future service.
Built a template out of paper and got to work on the plasma and drill press.
Here is the mockup
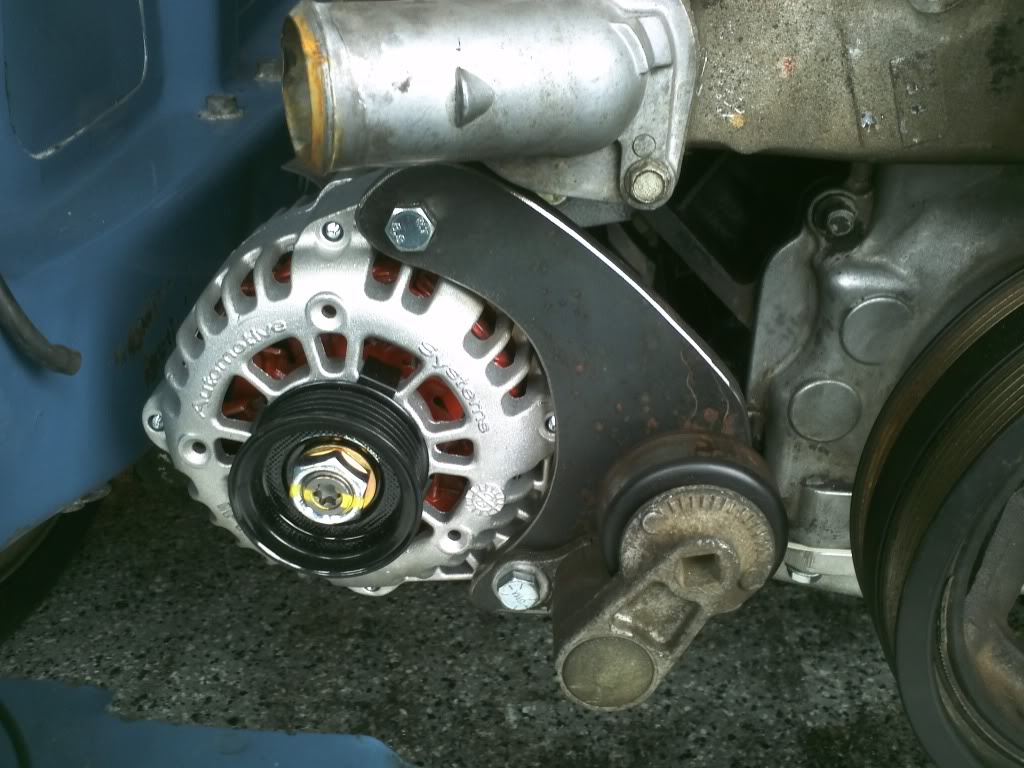
Mockup looked good so I had the boss come out and hold the alternator so I could tack it in place. (She just loves it when I drag her out and dress her up in safety glasses and gloves....)
We tacked it in place, checked the alignment and I finished welding it out.

Its pretty beefy at 1/4" plate but I just did not want to have belt issues down the road.
I also had to get water pump gaskets and make two trips to get the belts. I had no luck of getting the water pump like new clean so it got a little coat of aluminum paint to get it back to descent looking as well as got bolted on the motor for the last time. Exhaust manifold gaskets are in and the manifolds on there for good.
Apparently I forgot to snap any photos after this but I did get both belts finally and got them installed. Everything lined up nicely and both tensioners work well.
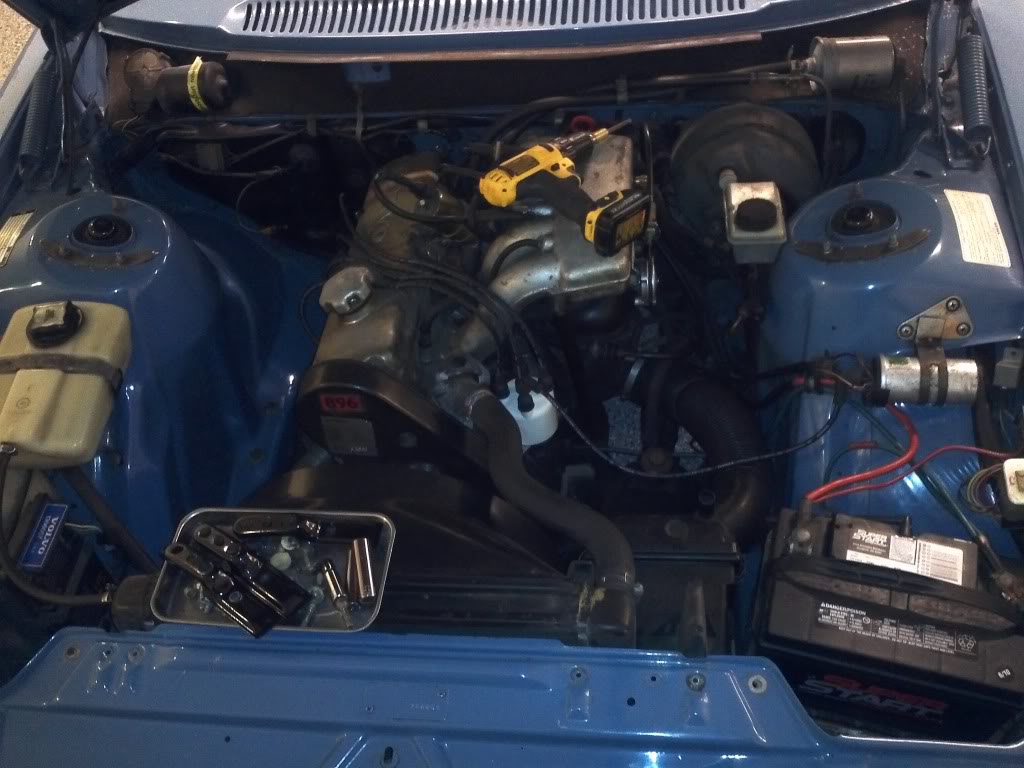
I swapped out the parts on the throttle body and got it on there. Then started to look at the wiring to see what kind of fun I am in for there. I am very clear on the chevy side, just not too clear on the volvo side....does however look like the dash will be coming out again.
Oh and MH....you will not regret it. Coming from a mustang guy, these motors are simply amazing. If you have any questions, just ask.
Need to order a few parts so I can make a good run at it this coming week and weekend. If I were to play my cards right I would think this thing might be ready to try and start in the next week and a half or so.
Sean
First up was to clean up the craphole of a garage that we created in our tornado like work pattern the last two days.
Then I headed out to round up some parts.
New alternator, corvette filter and some misc stuff.
Started by locating the alternator about where it needed to go and came up with a game plan. I wanted to use the ac location for the alternator and really wanted to use a tensioner for future service.
Built a template out of paper and got to work on the plasma and drill press.
Here is the mockup
Mockup looked good so I had the boss come out and hold the alternator so I could tack it in place. (She just loves it when I drag her out and dress her up in safety glasses and gloves....)
We tacked it in place, checked the alignment and I finished welding it out.
Its pretty beefy at 1/4" plate but I just did not want to have belt issues down the road.
I also had to get water pump gaskets and make two trips to get the belts. I had no luck of getting the water pump like new clean so it got a little coat of aluminum paint to get it back to descent looking as well as got bolted on the motor for the last time. Exhaust manifold gaskets are in and the manifolds on there for good.
Apparently I forgot to snap any photos after this but I did get both belts finally and got them installed. Everything lined up nicely and both tensioners work well.
I swapped out the parts on the throttle body and got it on there. Then started to look at the wiring to see what kind of fun I am in for there. I am very clear on the chevy side, just not too clear on the volvo side....does however look like the dash will be coming out again.
Oh and MH....you will not regret it. Coming from a mustang guy, these motors are simply amazing. If you have any questions, just ask.
Need to order a few parts so I can make a good run at it this coming week and weekend. If I were to play my cards right I would think this thing might be ready to try and start in the next week and a half or so.
Sean
03-29-2012, 04:01 PM
#7
Launching!
Thread Starter
Join Date: Mar 2012
Posts: 214
Likes: 0
Received 0 Likes
on
0 Posts
The car was in really really good shape for an 81 242. The paint and bodywork to me was the selling point of the car.
I know that the b21f is a stout little motor....naturally aspirated k jet is a train wreck if you ask me.
Now that I have the car this torn apart, I know that I made the right decision. The wiring on the motor was really really bad, to the point that it could have easlily been a disaster.
Speaking of wiring.... The past two days have been spent pouring over wiring diagrams, haynes manuals and green books.
I was finally able to make heads and tail out of what was in the car so I went to town gutting what I did not need and building the harness for the car side of things.
I also found that the wiring to the fuel pump relay was toast, so much that the connectors had melted :omg:
This was just not going to cut it for me so I yarded a bunch of stuff out and built my own fuel delivery wiring with one relay dedicated for each pump, this will give me the ability to seriously upgrade the pumps if I need to down the road.
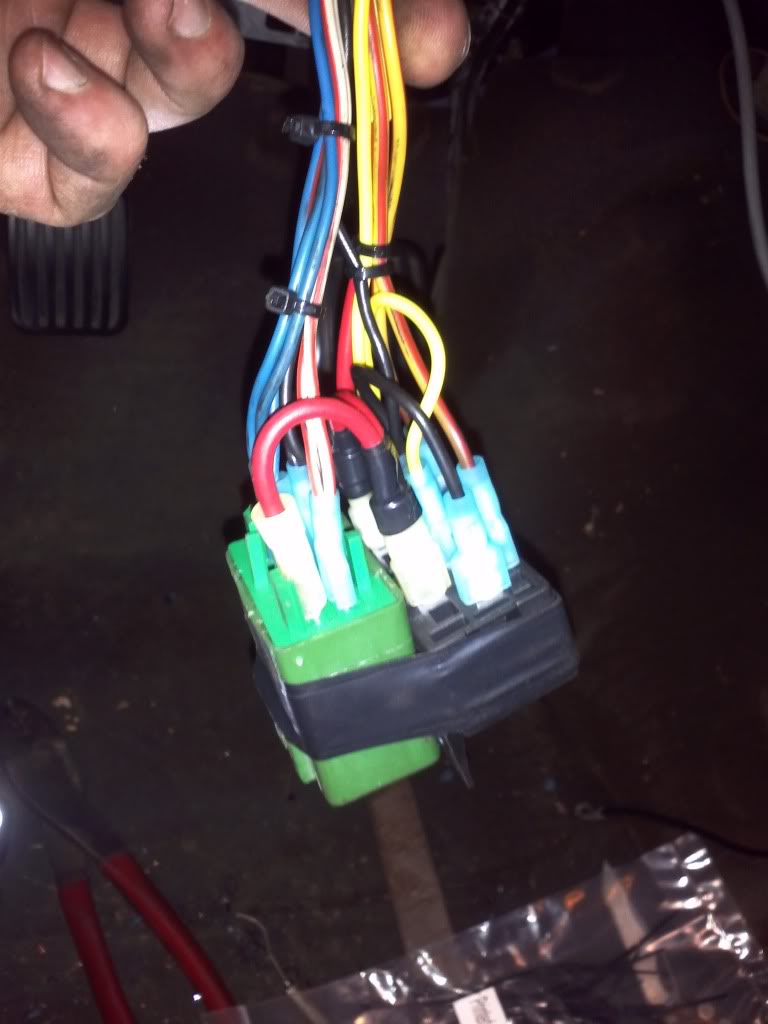
Once that was all buttoned up I made my way to the engine compartment and eliminated all the excess wiring in the engine bay and installed a 4 pin weatherpack connector. This harness runs the starter, alternator excite wire oil pressure and temperature sending units. Basically all that the car will need to see to keep all of the guages operating and happy.
I was also able to get the entire engine harness through the tiny hole in the fire wall and get it laid out on the motor and where it needed to be. I have all of the plugs landed except for the O2 and a couple others.
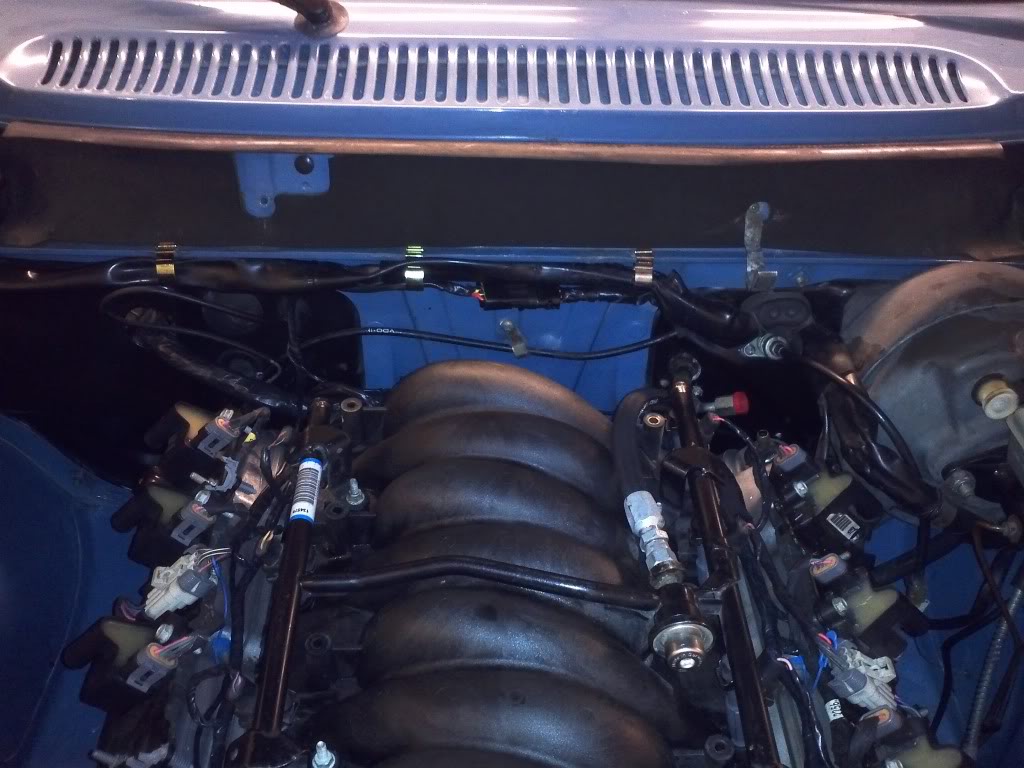
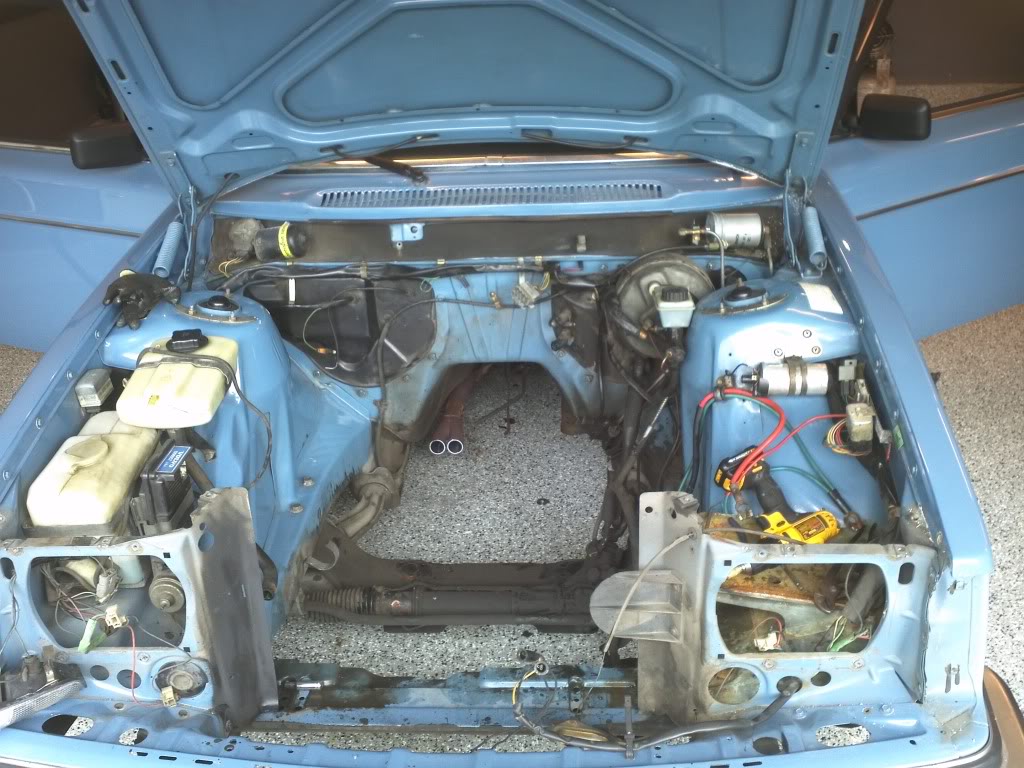
Got tired of wiring so I decided to do some cleaning and reassembly. Put the core support, headlights hood latch coolant tank and windshield washer assy back in after a thorough clean up and a quick sandblast and respray. Got the Battery tray back in as well.
I think these give an idea of the look I am going for now as stock as possible but with an ls motor.
Bunch of parts should arrive tomorrow and friday....maybe enough stuff that I can turn the old girl over this weekend.
Sean
I know that the b21f is a stout little motor....naturally aspirated k jet is a train wreck if you ask me.
Now that I have the car this torn apart, I know that I made the right decision. The wiring on the motor was really really bad, to the point that it could have easlily been a disaster.
Speaking of wiring.... The past two days have been spent pouring over wiring diagrams, haynes manuals and green books.
I was finally able to make heads and tail out of what was in the car so I went to town gutting what I did not need and building the harness for the car side of things.
I also found that the wiring to the fuel pump relay was toast, so much that the connectors had melted :omg:
This was just not going to cut it for me so I yarded a bunch of stuff out and built my own fuel delivery wiring with one relay dedicated for each pump, this will give me the ability to seriously upgrade the pumps if I need to down the road.
Once that was all buttoned up I made my way to the engine compartment and eliminated all the excess wiring in the engine bay and installed a 4 pin weatherpack connector. This harness runs the starter, alternator excite wire oil pressure and temperature sending units. Basically all that the car will need to see to keep all of the guages operating and happy.
I was also able to get the entire engine harness through the tiny hole in the fire wall and get it laid out on the motor and where it needed to be. I have all of the plugs landed except for the O2 and a couple others.
Got tired of wiring so I decided to do some cleaning and reassembly. Put the core support, headlights hood latch coolant tank and windshield washer assy back in after a thorough clean up and a quick sandblast and respray. Got the Battery tray back in as well.
I think these give an idea of the look I am going for now as stock as possible but with an ls motor.
Bunch of parts should arrive tomorrow and friday....maybe enough stuff that I can turn the old girl over this weekend.
Sean
Trending Topics
03-29-2012, 05:24 PM
#8
Teching In

Join Date: Nov 2005
Location: Atlanta, GA
Posts: 11
Likes: 0
Received 0 Likes
on
0 Posts
Nice work and what a different platform! I really like the job you did with the accessory brackets. Really anxious to see the front dress with both belts at full tension.
What Miller equipment are you using there on the cart? Looks like you have a compact Plasma with the Mig above it?
What Miller equipment are you using there on the cart? Looks like you have a compact Plasma with the Mig above it?
03-29-2012, 05:51 PM
#9
Launching!
Thread Starter
Join Date: Mar 2012
Posts: 214
Likes: 0
Received 0 Likes
on
0 Posts
Thanks, it is definately not your average ls1 swap. Goal was to be a bit of a sleeper.
The last few pics have both belts on the, the belt routing turned out great. Ill try and snap a few photos of it from straight on so you can see the routing if the rain ever stops here....
Miller 375 extreme on the plasma and an old *** miller 175 mig machine on the top. I have built a ton of cars with these two little machines though. the welder is a bit quirky but never lets me down. I do a lot of fab work on off road rigs and a fair bit on hot rods lately.
I couldnt survive without my welder, plasma and 4" dewalt grinder.
Sean
03-31-2012, 11:08 PM
#10
Launching!
Thread Starter
Join Date: Mar 2012
Posts: 214
Likes: 0
Received 0 Likes
on
0 Posts
So.......I had a good day of picking up stuff yesterday and getting boxes in from the Fed Ex guy.
Also got a sweet radiator (Thanks Cameron) and all of what I thought I needed for the fuel system.
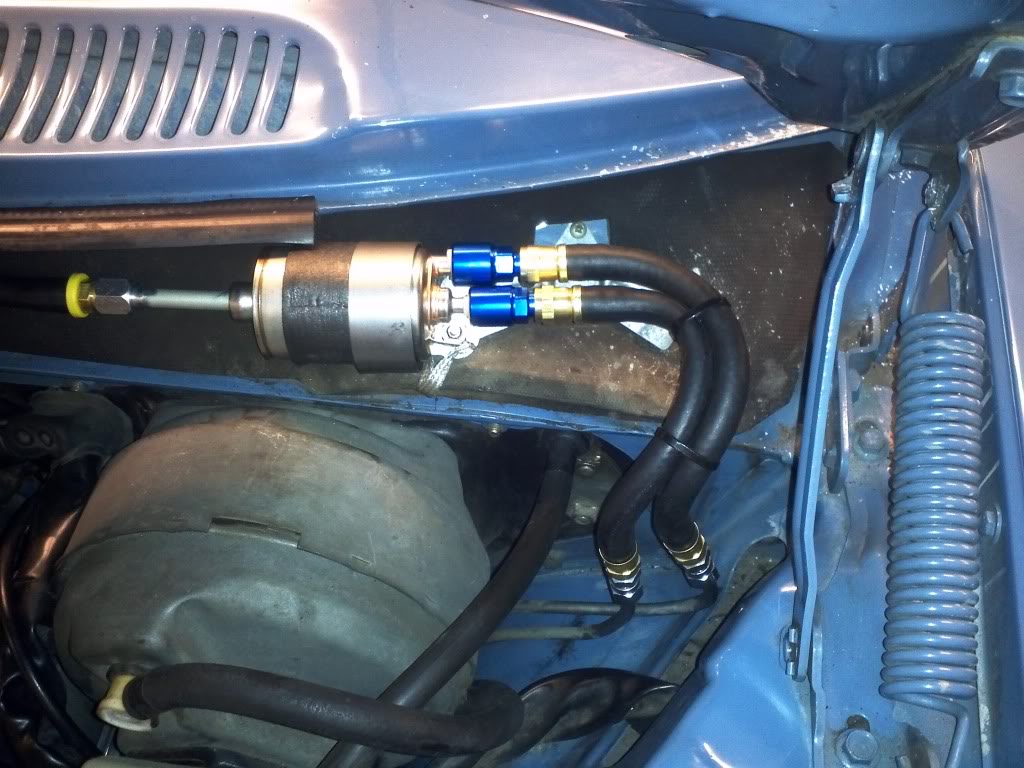
So last night I dug into the fuel system and after at least an hour of debating on what to do, I ended up putting the corvette fuel pressure regualtor in place of the stock volvo fuel filter. I liked the idea more than the actual execution. I need to get some 90 degree fittings to make it look proper in my opinion, but this is going to have to do for now.
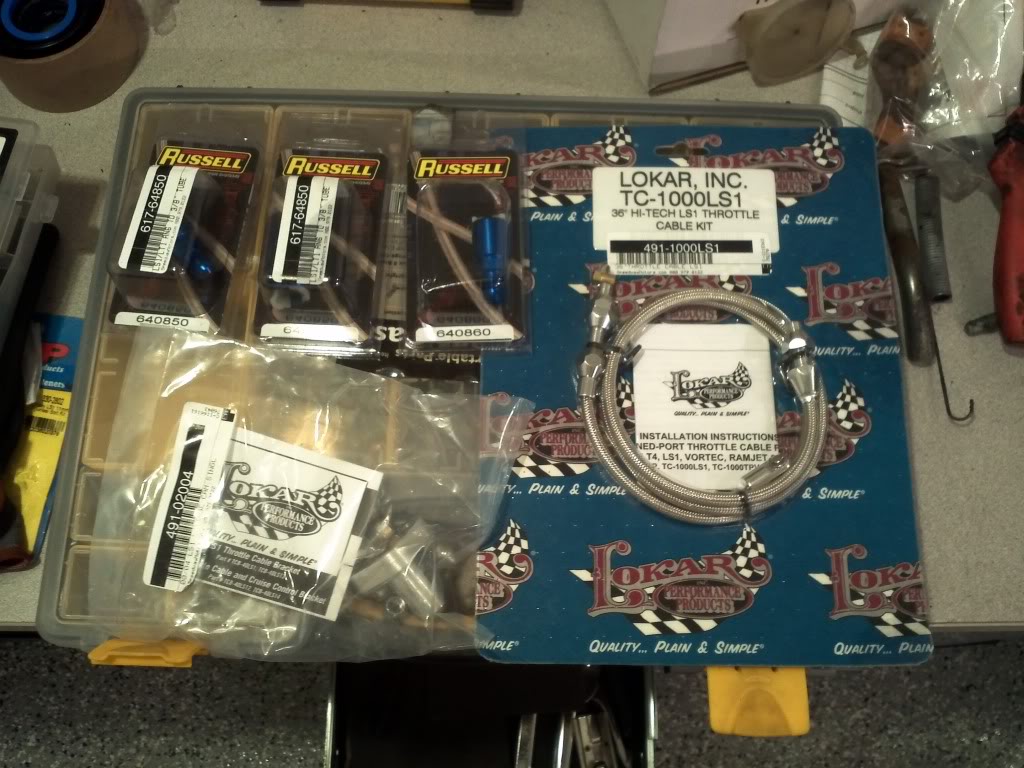
So with that done, I got to work on trying to finishing up some loose ends. Installed the Lokar throttle cable for the LS. Very nice piece by the way.
Pulled the tape off the heads and finally got the bolts in on the intake manifold.
I trimmed the stock mounts off the radiator with a hacksaw drilled one hole in the lower core support for the drain valve and mounted the radiator.

That was about where I stopped last night.
This morning I went out and made a shopping list, bent up some coat hangers and headed out to my local Baxters and dug through all of their radiator hoses......ended up finding a couple that will work.
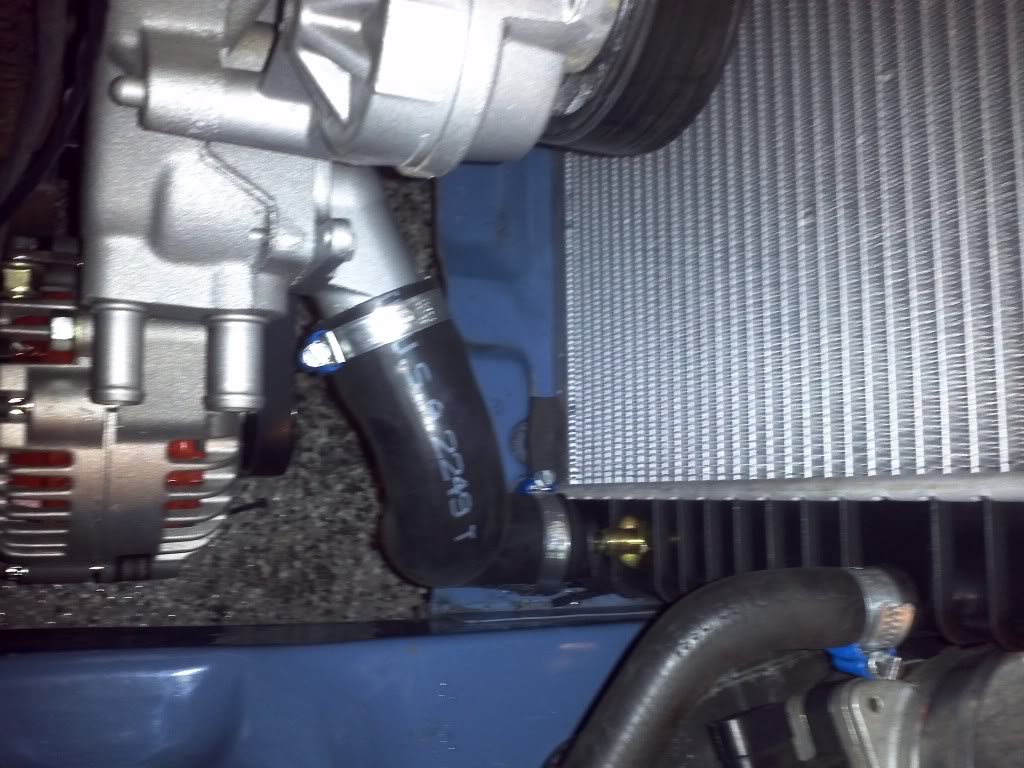
This lower one was a bit tricky, but turned out to be the easy one to do. The upper one was really long and took some trimming but turned out close. Might keep an eye out for something that will have a little more bend at the top.
I picked up a cold air kit on the cheep got it home and promplty cut it up into pieces to fit my needs. I did a bit of research on this one to make sure it would work and it turned out to fit well.
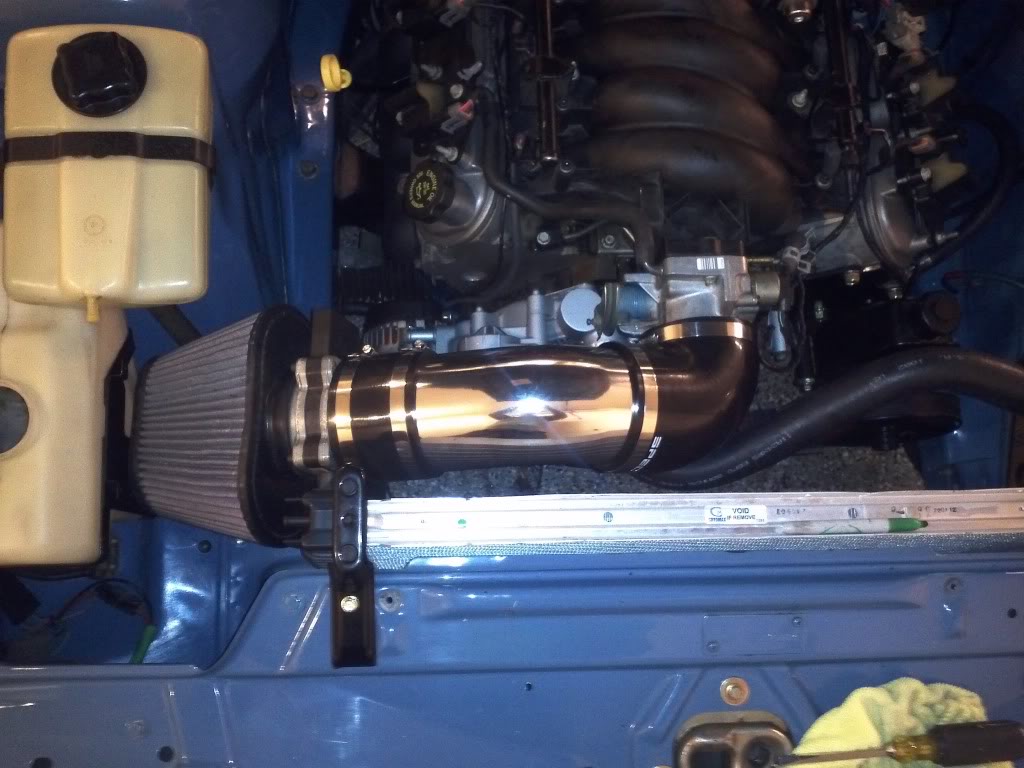
There is a little rise in it to clear the tensioner and everything clears nicely now.
There is no way I could live with the nasty polished toob so I hit it with some 220 and some wrinkle black to try and keep the oem look going.
As far as pics thats all.
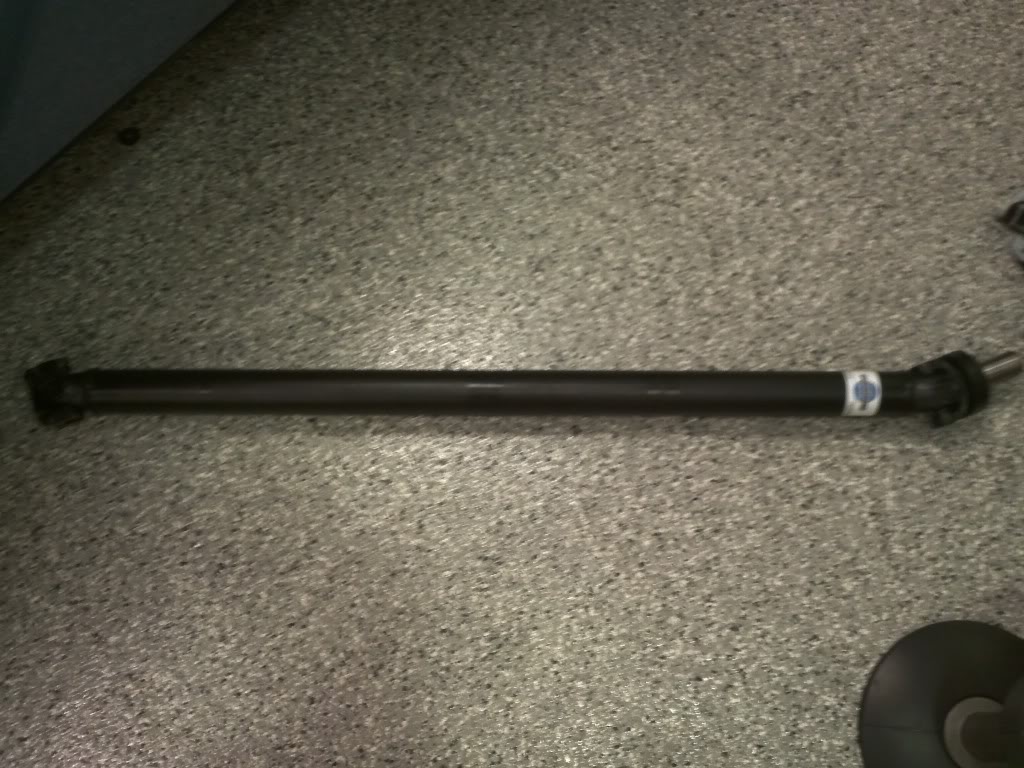
I also got a ton of loose ends tied up that I did not take photos of. Got the starter installed. Installed the driveline (also realized that the tranny was mounted way to high in the tunnel)
Finalized all the connections on the engine, built an adapter for the volvo sending unit to mount into the ls head. It isnt too pretty but it is functional.
Ran the 0 guage wire from the battery over to the starter and ran an 8 guage wire from the alternator to the starter from there.
I am so close.... Need a plug for the alternator to hook up the excite wire. Need to hook up a few mist hoses and vacuum lines and then I can hook up power and see what happens.
Also picked up an electric pusher fan. since there is no way a fan is fitting in there.
Tomorrow should be descent if I can find the plug I need.
Sean
Also got a sweet radiator (Thanks Cameron) and all of what I thought I needed for the fuel system.
So last night I dug into the fuel system and after at least an hour of debating on what to do, I ended up putting the corvette fuel pressure regualtor in place of the stock volvo fuel filter. I liked the idea more than the actual execution. I need to get some 90 degree fittings to make it look proper in my opinion, but this is going to have to do for now.
So with that done, I got to work on trying to finishing up some loose ends. Installed the Lokar throttle cable for the LS. Very nice piece by the way.
Pulled the tape off the heads and finally got the bolts in on the intake manifold.
I trimmed the stock mounts off the radiator with a hacksaw drilled one hole in the lower core support for the drain valve and mounted the radiator.
That was about where I stopped last night.
This morning I went out and made a shopping list, bent up some coat hangers and headed out to my local Baxters and dug through all of their radiator hoses......ended up finding a couple that will work.
This lower one was a bit tricky, but turned out to be the easy one to do. The upper one was really long and took some trimming but turned out close. Might keep an eye out for something that will have a little more bend at the top.
I picked up a cold air kit on the cheep got it home and promplty cut it up into pieces to fit my needs. I did a bit of research on this one to make sure it would work and it turned out to fit well.
There is a little rise in it to clear the tensioner and everything clears nicely now.
There is no way I could live with the nasty polished toob so I hit it with some 220 and some wrinkle black to try and keep the oem look going.
As far as pics thats all.
I also got a ton of loose ends tied up that I did not take photos of. Got the starter installed. Installed the driveline (also realized that the tranny was mounted way to high in the tunnel)
Finalized all the connections on the engine, built an adapter for the volvo sending unit to mount into the ls head. It isnt too pretty but it is functional.
Ran the 0 guage wire from the battery over to the starter and ran an 8 guage wire from the alternator to the starter from there.
I am so close.... Need a plug for the alternator to hook up the excite wire. Need to hook up a few mist hoses and vacuum lines and then I can hook up power and see what happens.
Also picked up an electric pusher fan. since there is no way a fan is fitting in there.
Tomorrow should be descent if I can find the plug I need.
Sean
04-01-2012, 01:06 PM
#11

Careful with that Spectre Elbow on the TB, I have one and I can see it suction closed under WOT...and yes my air filter is clean, lol..
I am going to use an aluminum elbow with just some straight couplers using some better brand of Silicone, not the cheap, very thin Spectre stuff, but it worked to get the truck running though..
Just saying since you may have issues and not know whats happening when your trying to make some power and you have a major restriction causing the issue and not know why.
Nice build, lookin good.

 04-01-2012, 11:08 PM
#14
Launching!
Thread Starter
Join Date: Mar 2012
Posts: 214
Likes: 0
Received 0 Likes
on
0 Posts
I am running the volvo rear for now but I am going to put an explorer rear in it eventually. They are a good fit, easy to work with and plenty strong enough for the future power levels of this thing.
I decided to start easy this am.....got the fan out of the box and started to see where I could fit it. Turns out that it did end up fitting on the backside of the radiator just by a gnats *** though. Has about a half inch of clearance everywhere so it should be good.
Its a 16" fan and should be enough to cool this little guy.
I also installed a fan switch directly into the radiator.....remember the volvo thing? Yeah, pretty sweet. So I used that and ran over to a relay tucked in right next to the battery and hid all the wires away so nobody can ever see them. No manual switch for now, I will see how it works and then change it if I need to.
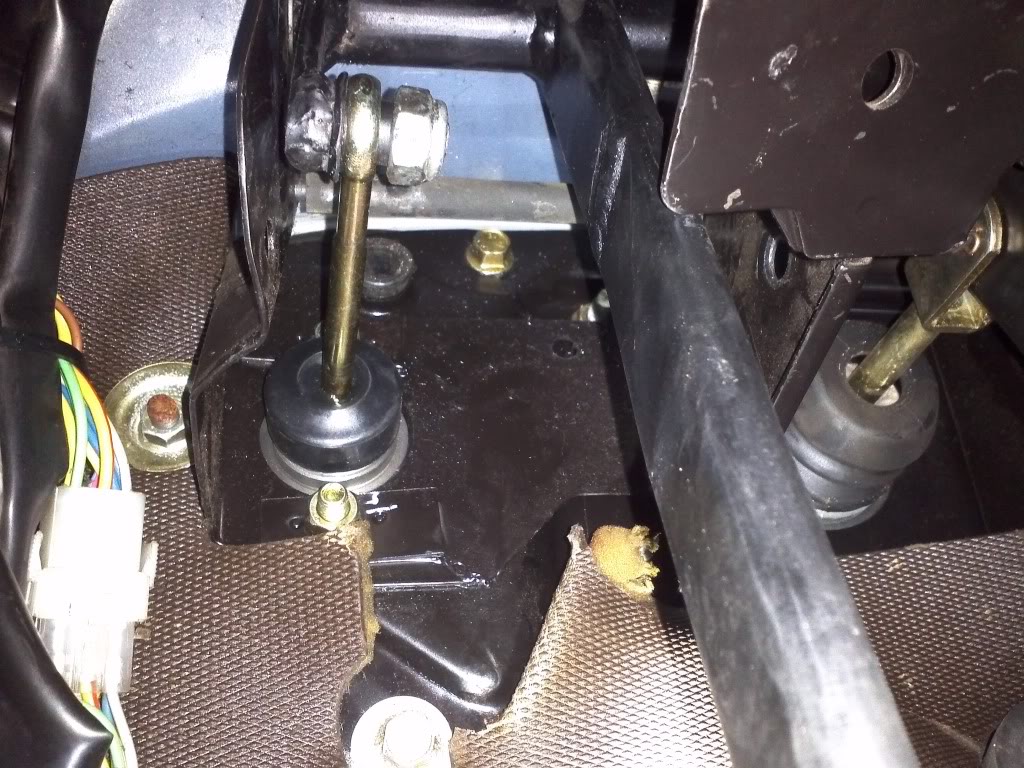
So then, I moved onto a task that I have been dreading. Converting from a pull style cable setup clutch pedal to a push style hydraulic pedal.
This was a couple of hours under the dash and cussing. I used a generic GM master cylinder for the clutch. It was about 1/16th of an inch off from the mounting holes, so I hit it a little with the die grinder and bolted it in. Then I removed the pedal to convert it. The cutting fitting and welding were easy. The tough part was getting it in and out of the damn pedal box.
The stock one has a really long bolt that goes all the way through the top of the pedal for the pivot. Made it a real pain in the butt to get in and out so I revised their design. Tapped out the ends of the pivot tube to accept some bolts, then I put a set screw into the tube to pinch the pivot so you could tighten and LOOSEN both bolts and remove the pedal assembly. This made it much easier to get in and out. Good chage for those of you looking to do the hydro setup on your 240.
Also extended the pedal 2 3/4".
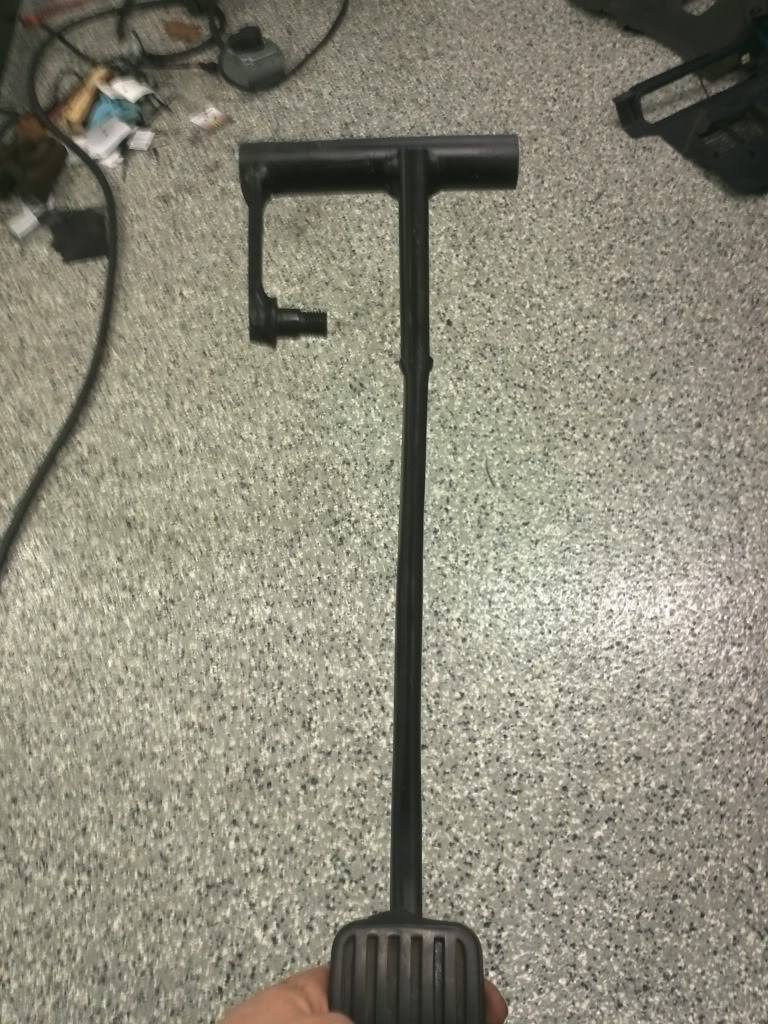
Ran a hard like from this down to an adapter and then to the stock t56 clutch line. Still need to bleed it but thats it.

Unfortunately for all your web followers, this is where I stopped taking photos.
I ran the heater hoses and buttoned up all the hose clamps down. Installed new plug wires from coils to plugs. Installed new plugs in all eight holes filled up the tranny with fluid finished wiring up the ecu and buttoned up any other loose ends.
Installed oil filter filled with oil and hooked the battery up for the first time. Turned on the key and Ill be damned the fuel pumps both fired right up. Took one key cycle to find a leak in the fuel lines. Disconnect battery chase down fuel leak and recheck.
No more leaks, oil pressure light goes out when cranking......so lets see what she does.
No start... gave it a couple tries and sounds good but no start. Check a few things and then I see the ECU plug and realize that i did not plug the ecu in all the way, just kinda set the plugs in there and ran the 8mm down a couple threads.
Turned the key over and holy crap....she lit right off!! Kinda suprised me to be honest.
<iframe width="560" height="315" src="http://www.youtube.com/embed/BYD_4RI350A" frameborder="0" allowfullscreen></iframe>
So, i have a few loose ends to button up still. Pick up some fittings so I can button up the vacuum line situation, figure out a shifter, run some exhaust and button up the interior.
Should be on the road this week if all goes well.
Sean
I decided to start easy this am.....got the fan out of the box and started to see where I could fit it. Turns out that it did end up fitting on the backside of the radiator just by a gnats *** though. Has about a half inch of clearance everywhere so it should be good.
Its a 16" fan and should be enough to cool this little guy.
I also installed a fan switch directly into the radiator.....remember the volvo thing? Yeah, pretty sweet. So I used that and ran over to a relay tucked in right next to the battery and hid all the wires away so nobody can ever see them. No manual switch for now, I will see how it works and then change it if I need to.
So then, I moved onto a task that I have been dreading. Converting from a pull style cable setup clutch pedal to a push style hydraulic pedal.
This was a couple of hours under the dash and cussing. I used a generic GM master cylinder for the clutch. It was about 1/16th of an inch off from the mounting holes, so I hit it a little with the die grinder and bolted it in. Then I removed the pedal to convert it. The cutting fitting and welding were easy. The tough part was getting it in and out of the damn pedal box.
The stock one has a really long bolt that goes all the way through the top of the pedal for the pivot. Made it a real pain in the butt to get in and out so I revised their design. Tapped out the ends of the pivot tube to accept some bolts, then I put a set screw into the tube to pinch the pivot so you could tighten and LOOSEN both bolts and remove the pedal assembly. This made it much easier to get in and out. Good chage for those of you looking to do the hydro setup on your 240.
Also extended the pedal 2 3/4".
Ran a hard like from this down to an adapter and then to the stock t56 clutch line. Still need to bleed it but thats it.
Unfortunately for all your web followers, this is where I stopped taking photos.
I ran the heater hoses and buttoned up all the hose clamps down. Installed new plug wires from coils to plugs. Installed new plugs in all eight holes
filled up the tranny with fluid finished wiring up the ecu and buttoned up any other loose ends.Installed oil filter filled with oil and hooked the battery up for the first time. Turned on the key and Ill be damned the fuel pumps both fired right up. Took one key cycle to find a leak in the fuel lines. Disconnect battery chase down fuel leak and recheck.
No more leaks, oil pressure light goes out when cranking......so lets see what she does.
No start... gave it a couple tries and sounds good but no start. Check a few things and then I see the ECU plug and realize that i did not plug the ecu in all the way, just kinda set the plugs in there and ran the 8mm down a couple threads.
Turned the key over and holy crap....she lit right off!! Kinda suprised me to be honest.
<iframe width="560" height="315" src="http://www.youtube.com/embed/BYD_4RI350A" frameborder="0" allowfullscreen></iframe>
So, i have a few loose ends to button up still. Pick up some fittings so I can button up the vacuum line situation, figure out a shifter, run some exhaust and button up the interior.
Should be on the road this week if all goes well.
Sean
04-02-2012, 03:00 AM
#15
TECH Fanatic
iTrader: (5)
Real nice project. Real original, can't say I'd ever saw a Volvo sporting an LS motor. BTW, if it doesn't cool or stay cool enough with that fan only pulling air from it's 16" area a mid `90's Taurus/Sable 3.0 fan with it's shroud will do the job. Seen them used on all kinds of drag cars with big blocks, early 5.0 mustangs etc. and you can get em a pick n pull really cheap. Good luck with your car.
04-09-2012, 05:38 AM
#16

What's your exhaust plan? Any cats?


