
86 Monte SS. 5.3, Single turbo, Megasquirt II. Lots of pics
 10-02-2013, 07:57 PM
#121

Use the explorer rear, cut 2 inches off the drivers side, use a passenger axle in the newly shortened drivers tube. The rear is now the same length as a stock 7.5 and the pinion is now centered. Use a truss from a 4x4 shop. Blue torch fab has a nice 8.8 truss. this will raise the mounting points up and give you a usable instant center.

 10-04-2013, 04:17 PM
#123
On The Tree
Thread Starter

Join Date: Nov 2012
Posts: 101
Likes: 0
Received 0 Likes
on
0 Posts
Napa Part # 25-060739
It actually worked very well but the squeak was kind of annoying.
PayPal me $5.80 for a USPS flat rate box and PM me your address and I will send it to you. It's a 30 dollar belt that I will never use again so it's yours if you want it!
It actually worked very well but the squeak was kind of annoying.
PayPal me $5.80 for a USPS flat rate box and PM me your address and I will send it to you. It's a 30 dollar belt that I will never use again so it's yours if you want it!
01-11-2014, 03:43 PM
#124
Okay a little bit to report. I am progressing but it is taking some time.
I took the manifolds back off because I thought they needed to be cleaned up and it would make my life easier with some of the turbo work.
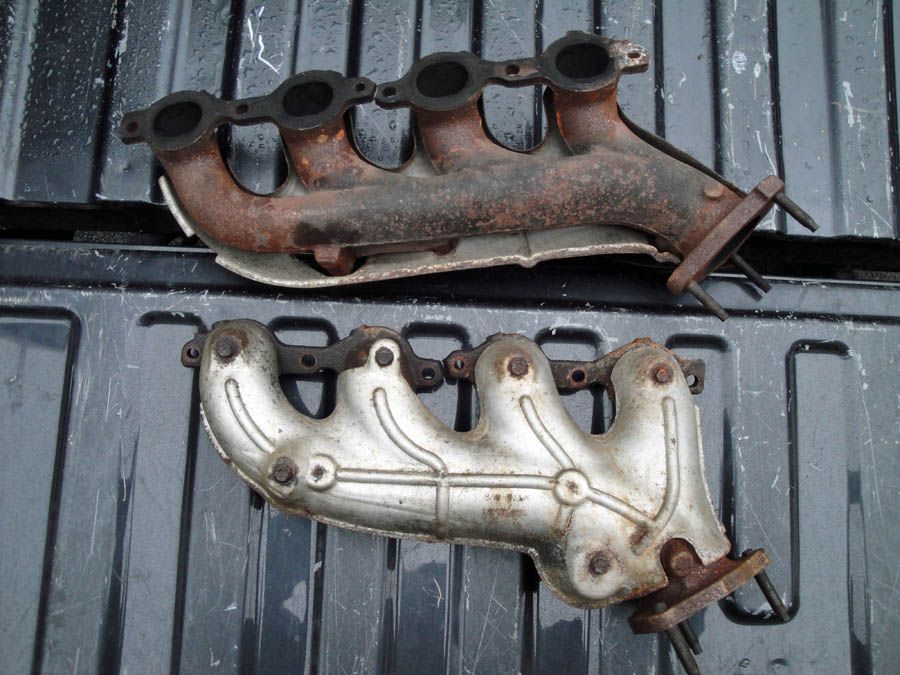
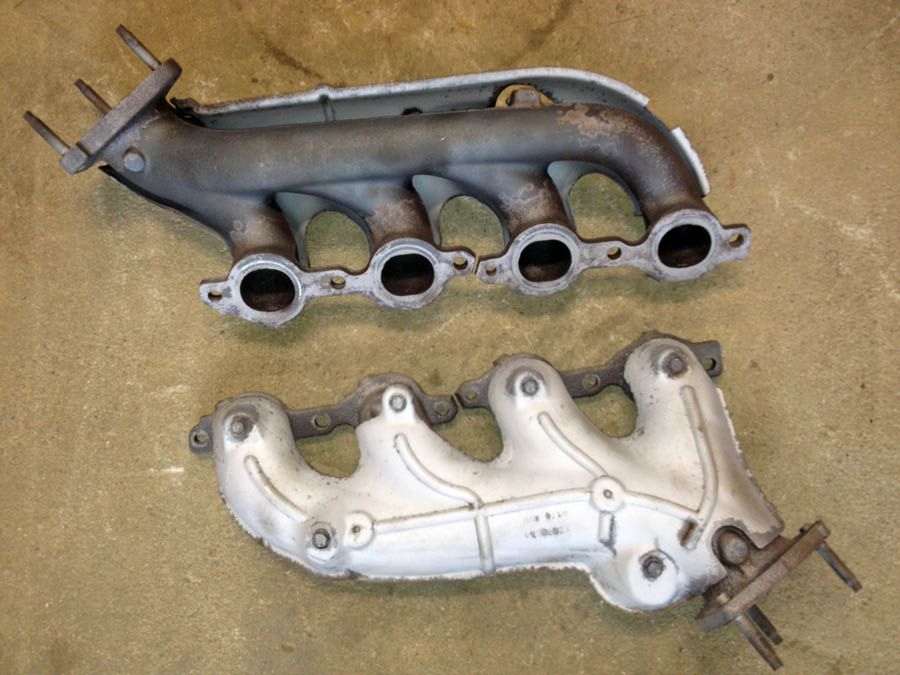
I took them to work and put them in the sandblasting cabinet and they sure cleaned up nice.
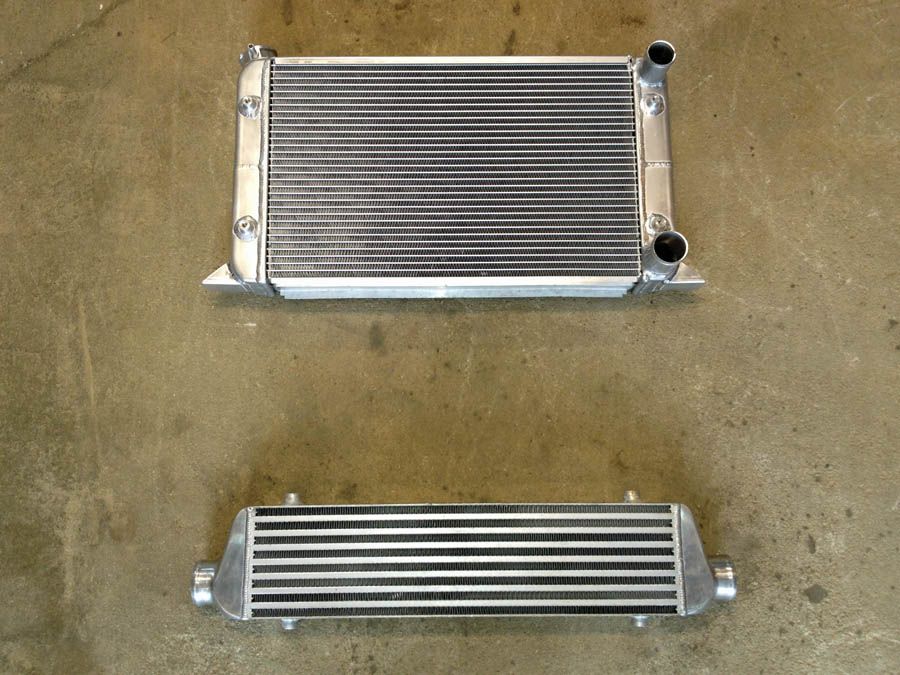
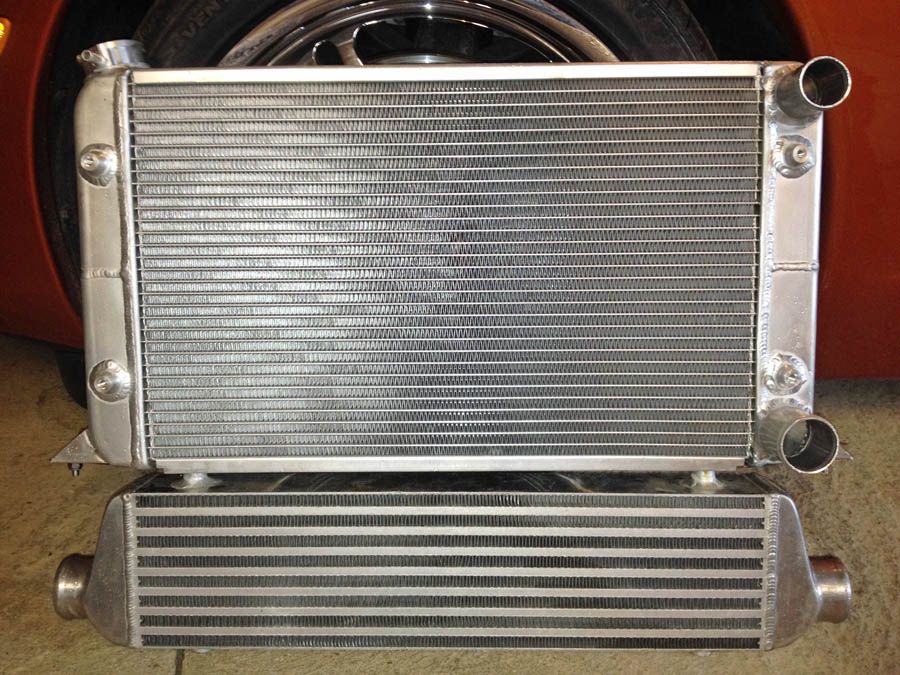
Nice big Griffin aluminum radiator and a little intercooler. For the boost I am planning on running this intercooler should be more than adequate.
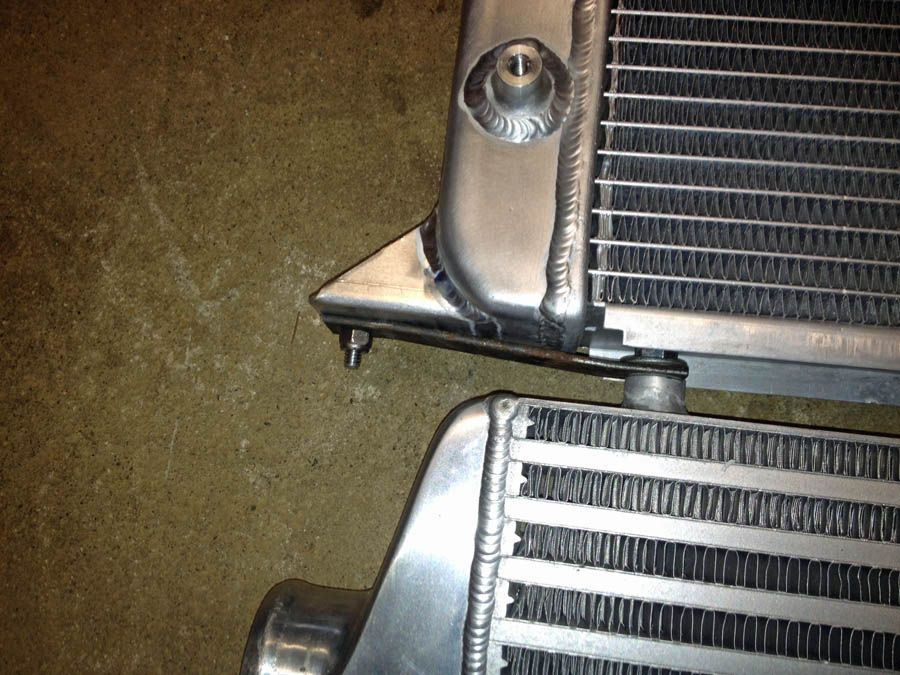
I decided to mate the radiator and intercool together and install them as a unit in place of the factory radiator. So with some strap iron I attached them.

The whole thing bolted together, I think it looks awesome.
Trial fit to the car. Obviously too tall! I'm gonna have to notch the lower radiator support to get it in place.
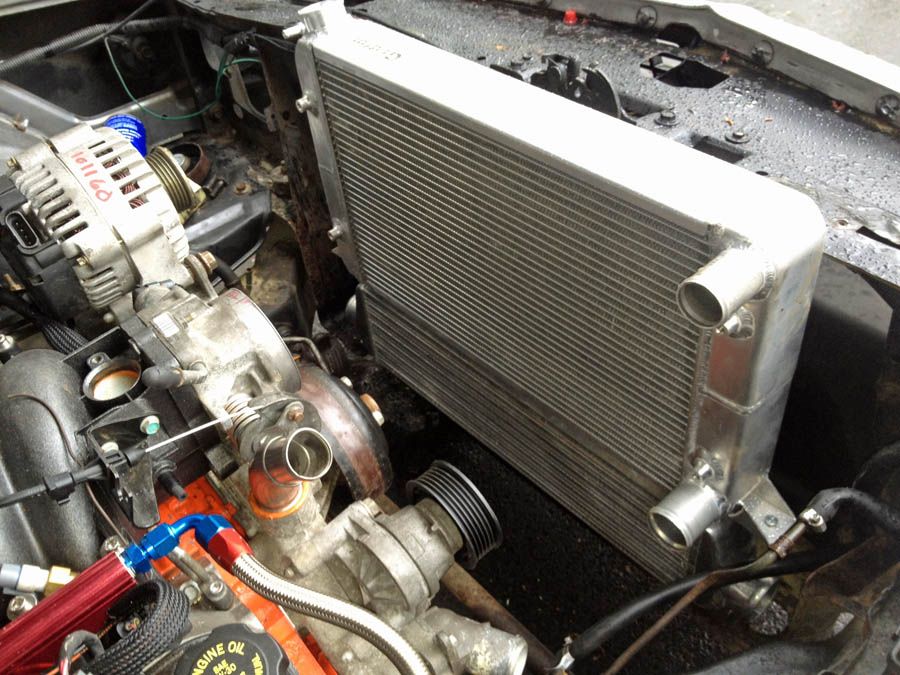
Everything fits pretty as a picture now! Some hoses from NAPA have connected everything up nice and neat, and the heater hoses are connected as well now too. Flat bar was formed for the lower mounts as well as the struts up at the top.

From the drivers side, I think it looks great personally.
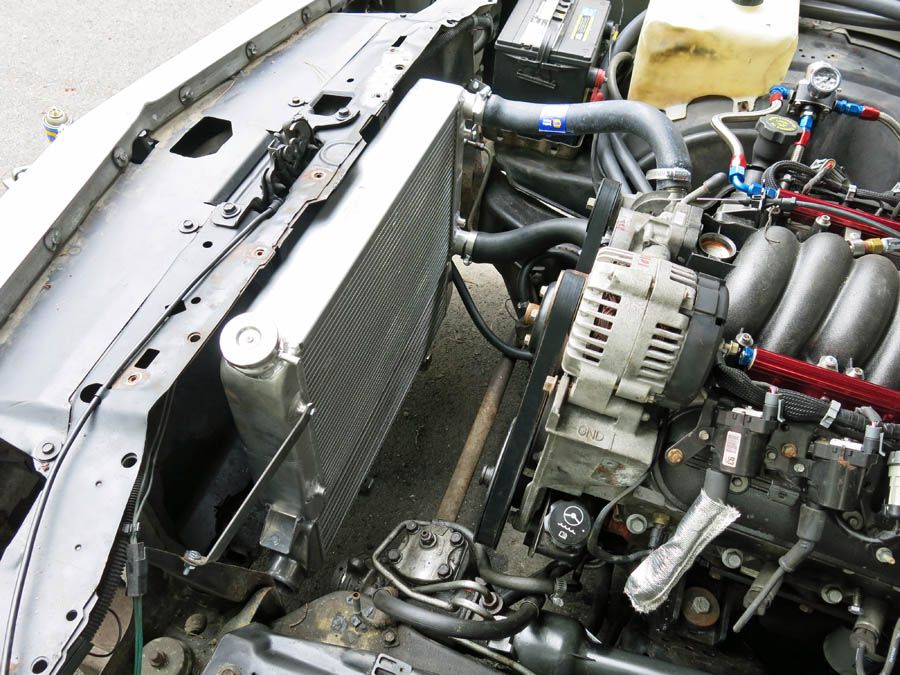
After two trips to NAPA I had the right length serpentine belt. I think this is going to work to be honest. But only time will tell.
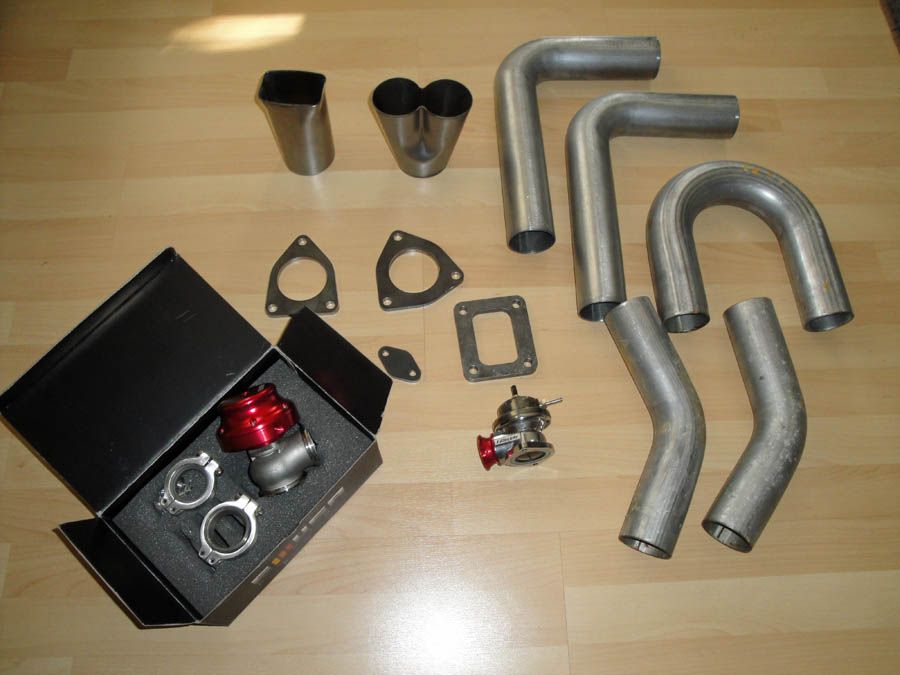
More parts have shown up, wastegate, blow off valve, and a whole bunch of exhaust parts including bends as well as really nice water cut flanges. I have been dying to get started on this part of the project and it is finally time! More to come soon.
I took the manifolds back off because I thought they needed to be cleaned up and it would make my life easier with some of the turbo work.
I took them to work and put them in the sandblasting cabinet and they sure cleaned up nice.
Nice big Griffin aluminum radiator and a little intercooler. For the boost I am planning on running this intercooler should be more than adequate.
I decided to mate the radiator and intercool together and install them as a unit in place of the factory radiator. So with some strap iron I attached them.
The whole thing bolted together, I think it looks awesome.
Trial fit to the car. Obviously too tall! I'm gonna have to notch the lower radiator support to get it in place.
Everything fits pretty as a picture now! Some hoses from NAPA have connected everything up nice and neat, and the heater hoses are connected as well now too. Flat bar was formed for the lower mounts as well as the struts up at the top.
From the drivers side, I think it looks great personally.
After two trips to NAPA I had the right length serpentine belt. I think this is going to work to be honest. But only time will tell.
More parts have shown up, wastegate, blow off valve, and a whole bunch of exhaust parts including bends as well as really nice water cut flanges. I have been dying to get started on this part of the project and it is finally time! More to come soon.
 02-03-2014, 06:52 PM
#125
On The Tree
Thread Starter
Join Date: Nov 2012
Posts: 101
Likes: 0
Received 0 Likes
on
0 Posts
Sorry I missed your question from almost a month ago. I guess I need to check this thread more often!
The flanges and tubing all came from Columbia River Mandrel Bending. They can be found here: http://www.mandrel-bends.com/catalog/
They have a truly amazing variety of exhaust parts there!
Thank you for the compliment.
More updates to this project coming. I have a new rear end as well as injectors now, just gotta sort the trans and driveshaft! This Spring is going to be a lot of fun.
08-26-2014, 08:53 PM
#127
On The Tree
Thread Starter
Join Date: Nov 2012
Posts: 101
Likes: 0
Received 0 Likes
on
0 Posts
Okay this is a mega post! There is about 7 months worth of work here in this update so I hope you all like it!
I have really let this thread languish, this should bring folks up to speed.
Since February I have done quite a bit.
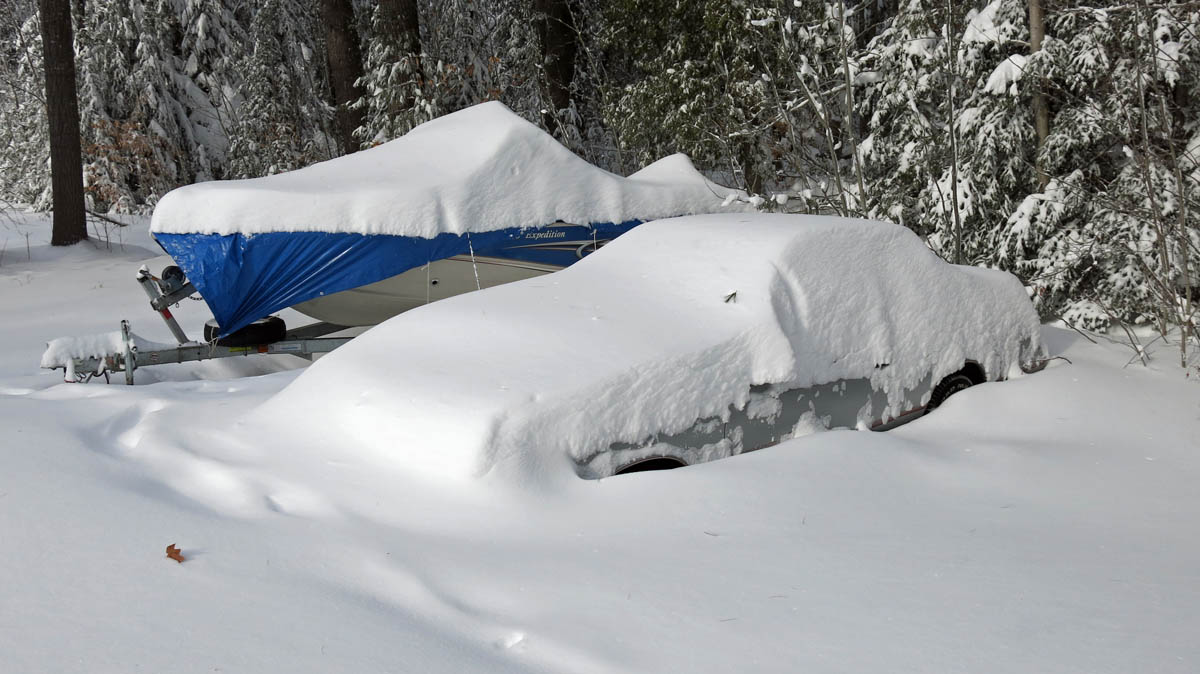
This is how the car looked just before things thawed out and I was able to bring it out to be worked on again.
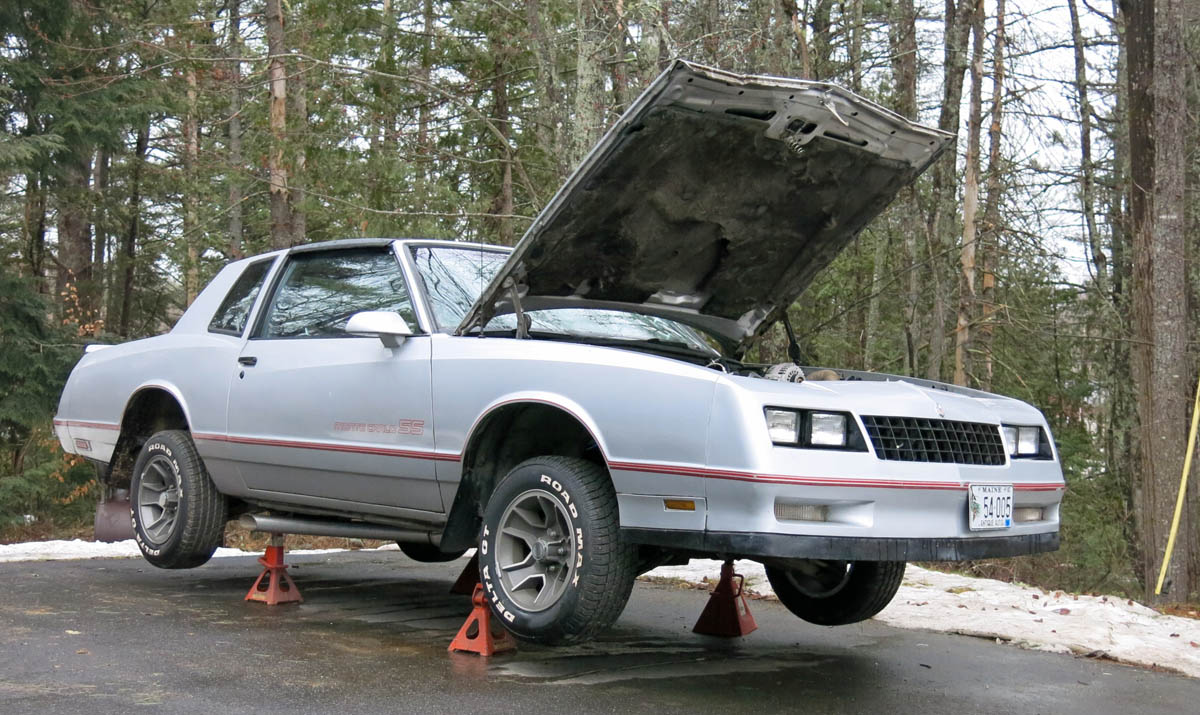
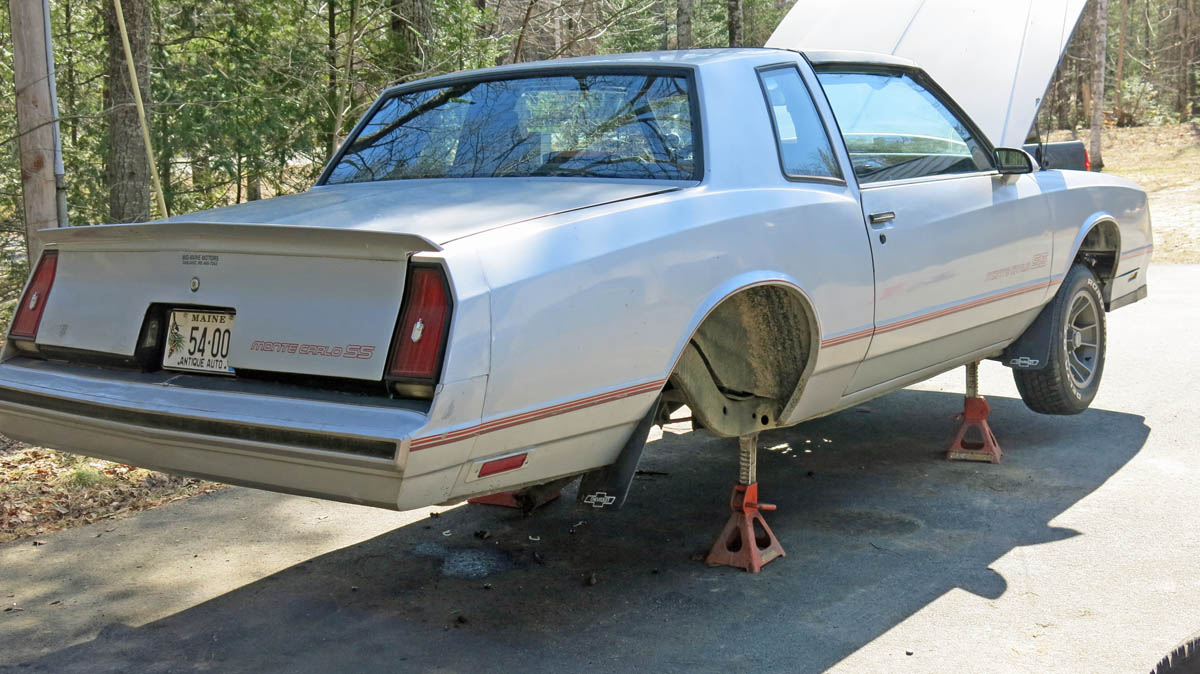
Then it made this unfortunate transition to jackstands. The curse of projects cars the world over!
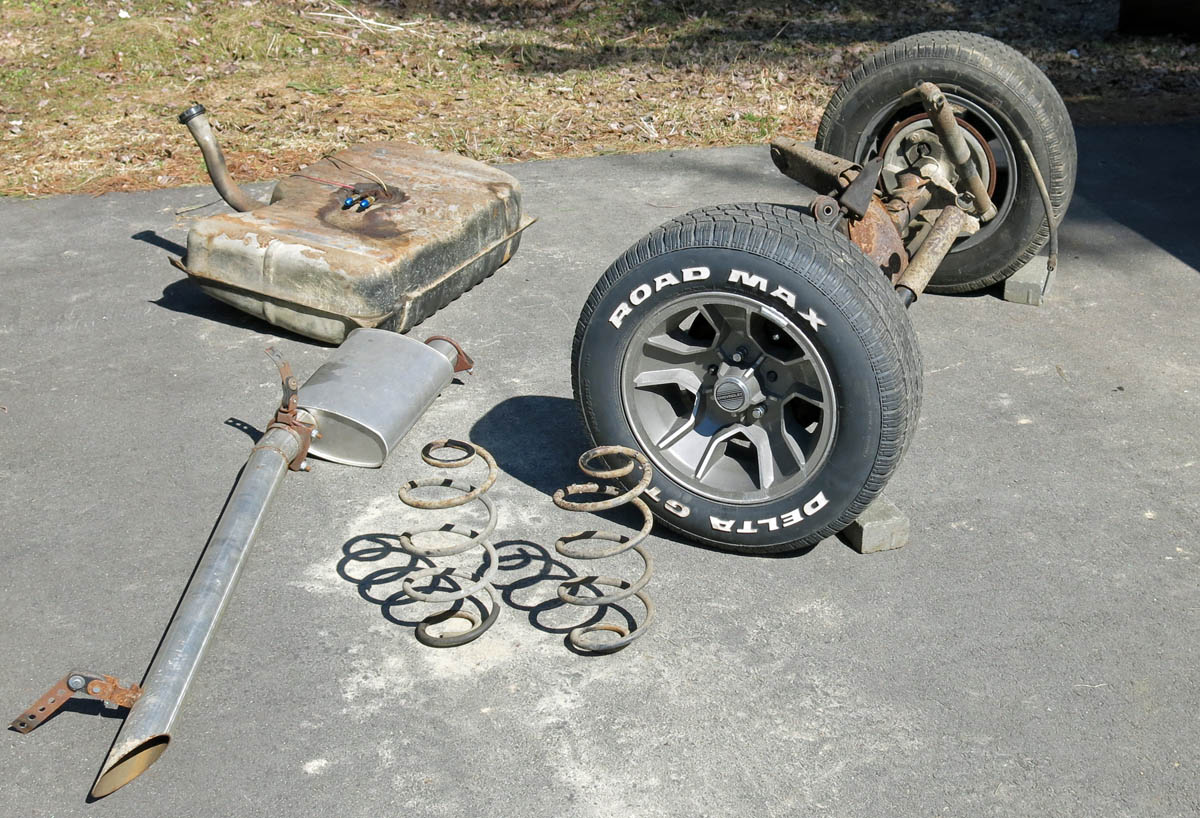
After that I stripped out all of this old crap to make way for new stuff!
The car then looked like this for ages. Notice the lines of rubber built up in the wheel well.
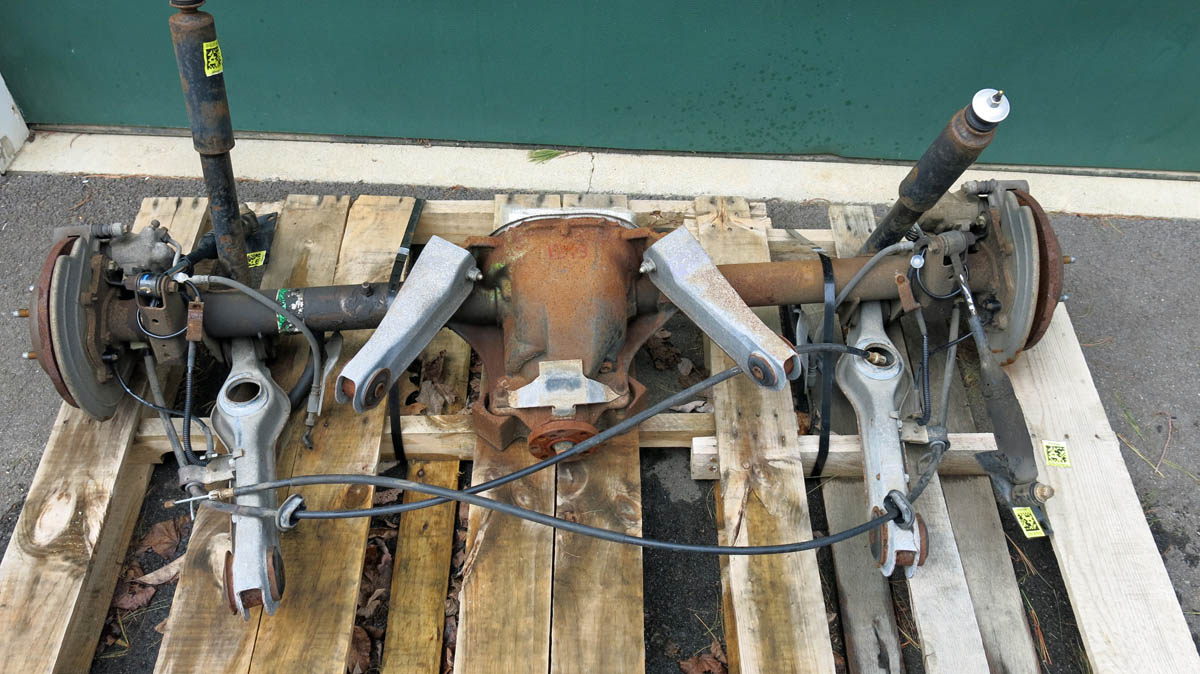
I got this Ford 8.8" rear end from an 02 Mustang for a song.
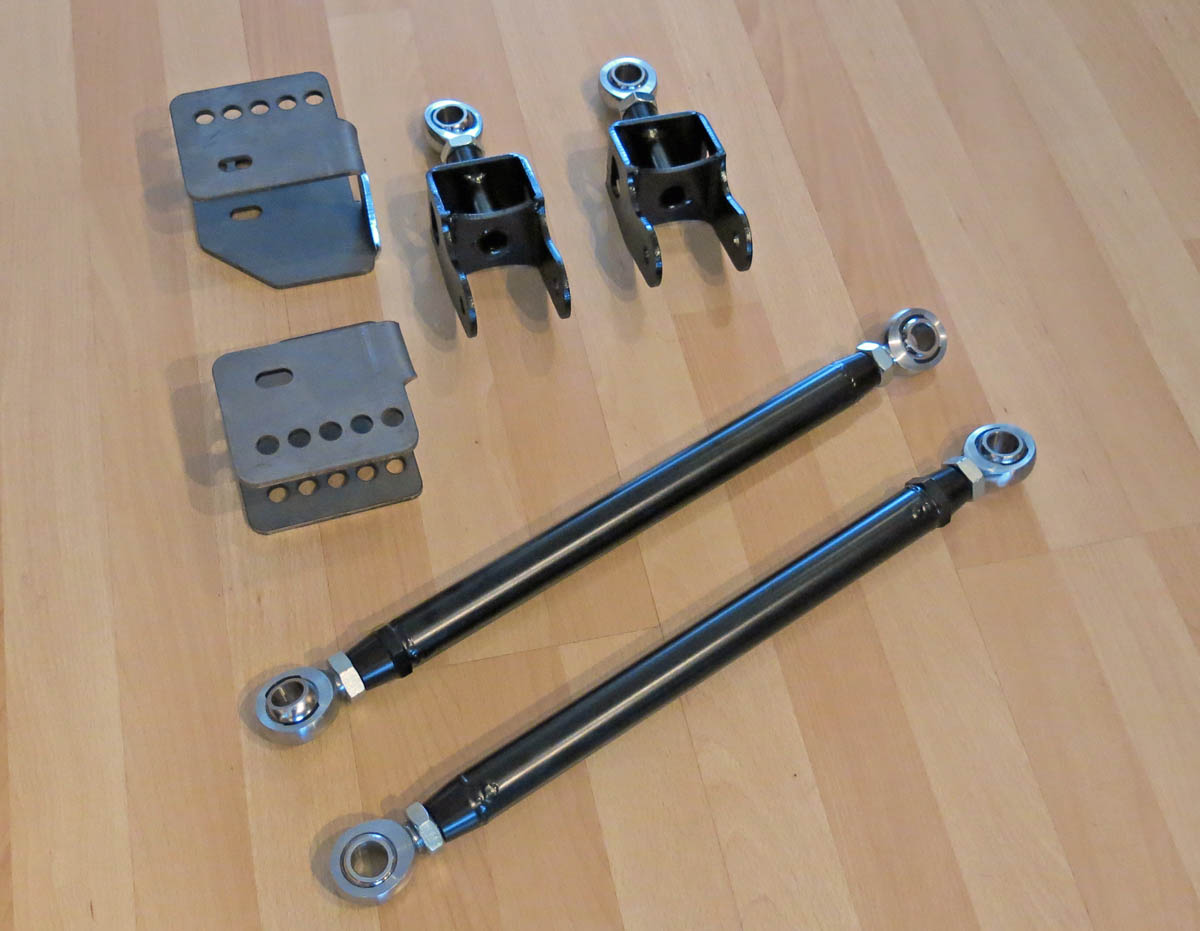
Then I got this kick butt Trick Chassis swap kit to bolt it in.
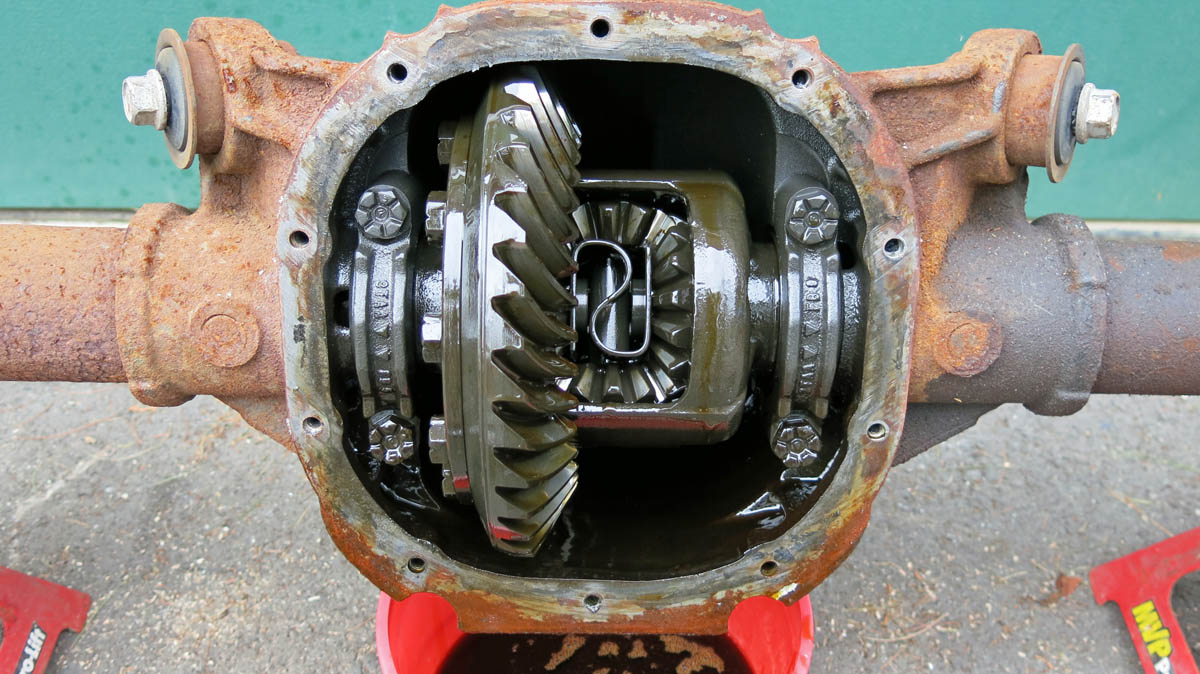
I stripped all the stuff off of the rear end that wasn't needed and then opened it up to see how things looked inside. It was clean and low mile, just like the ad said!
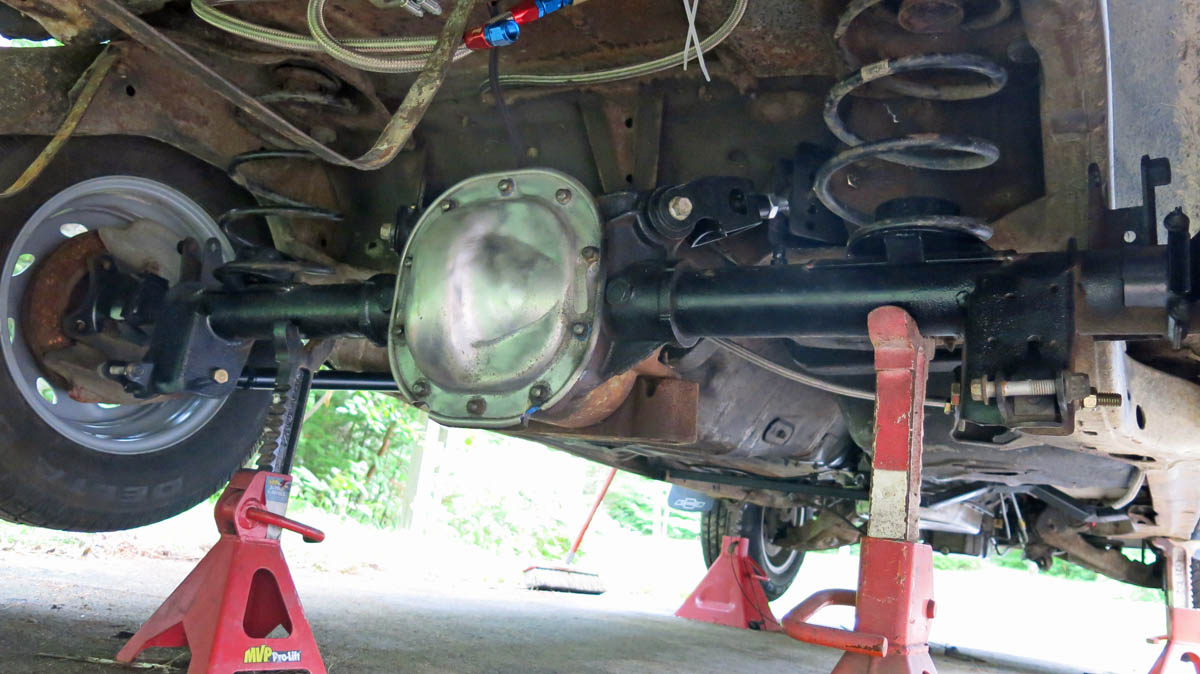
Put it back together, got it cleaned up, added some spring perches and bolted on the swap kit. Looking sharp, to me anyway.
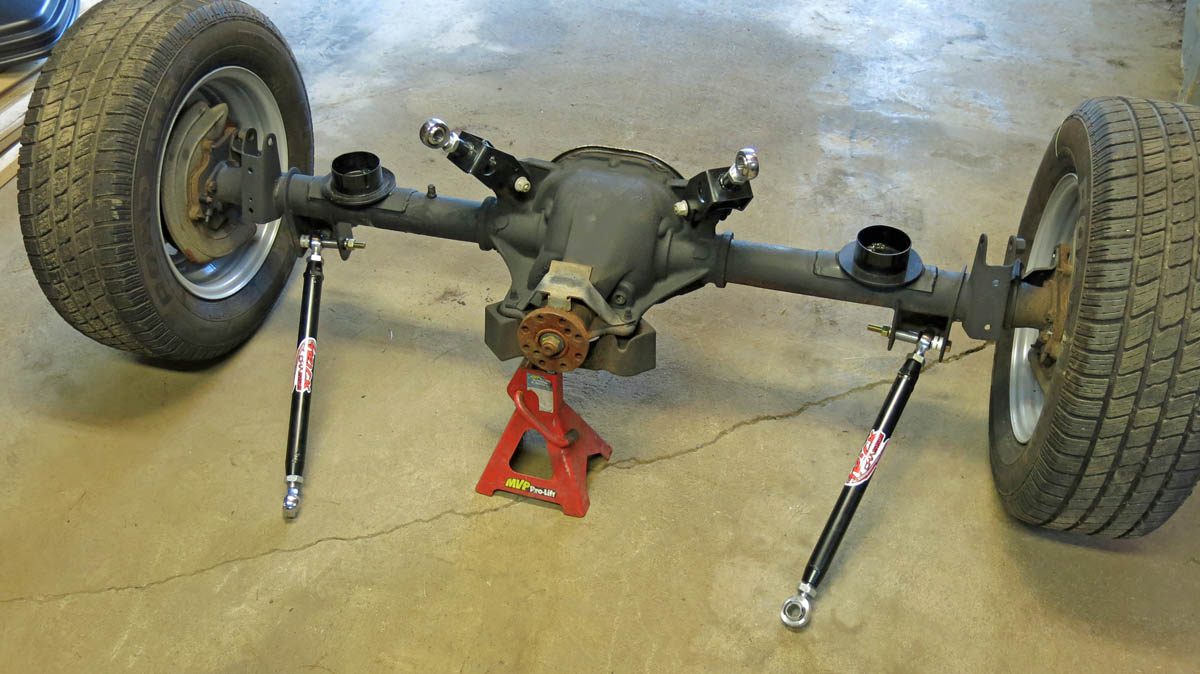
All bolted in the car. The angle finder says my geometry is right. I hope so!
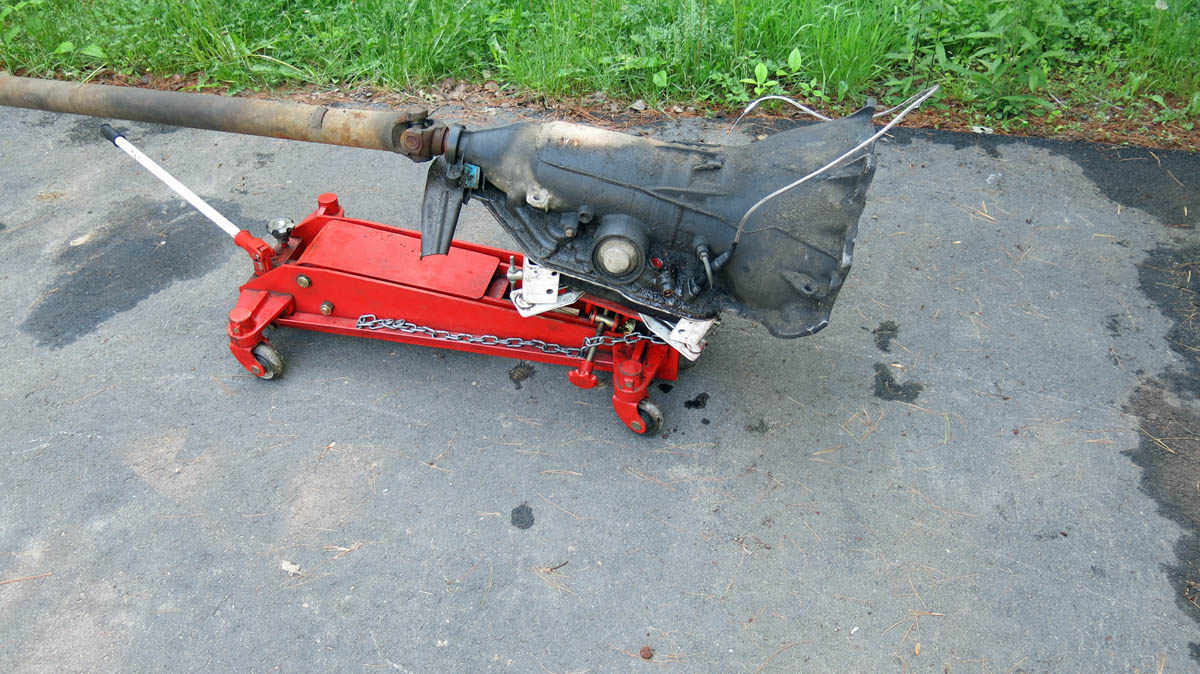
Tired and beat 200-4R is pulled out.
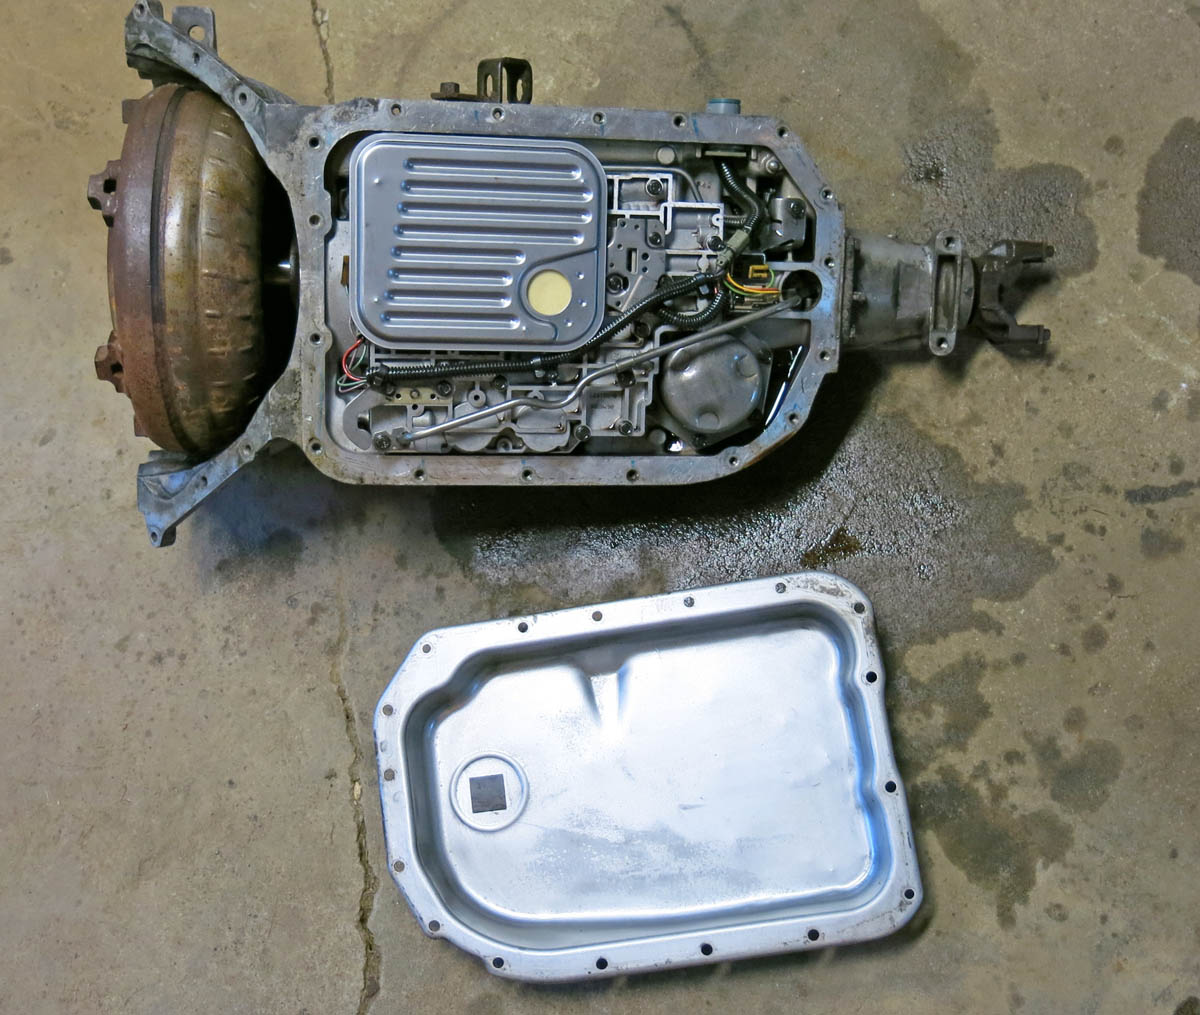
Ripped my donor 4L80E apart so I could put the TransGo shift kit in.

After almost a full day of screwing with it the trans was back together and ready to go in.
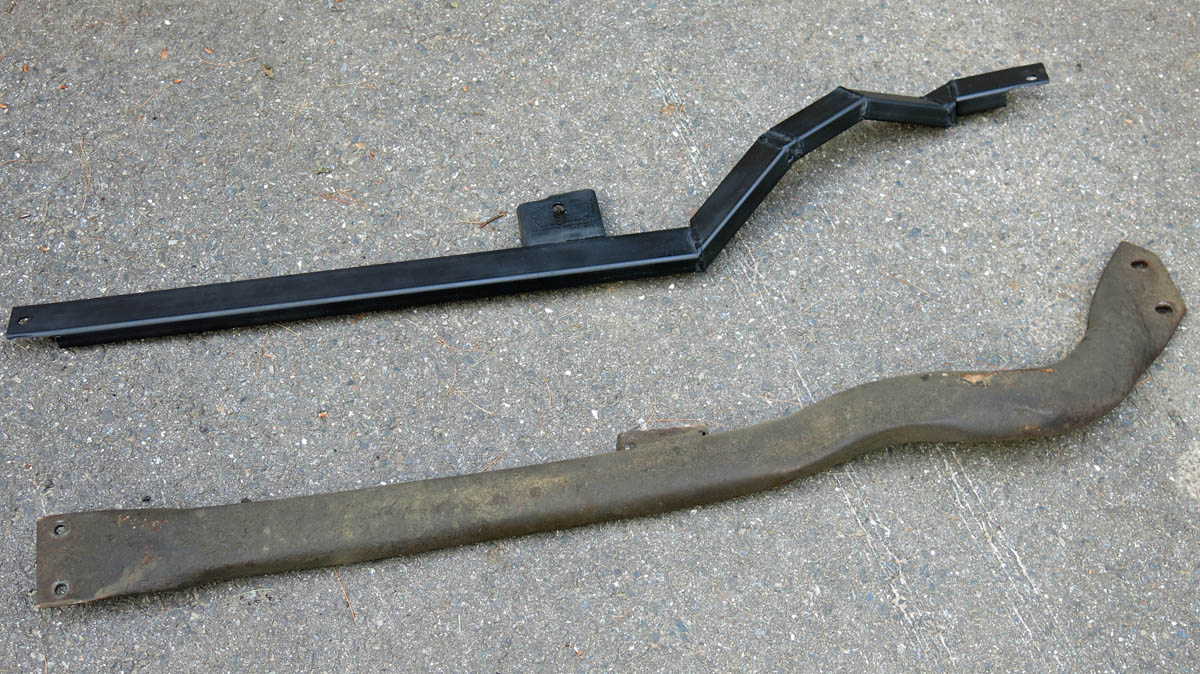
There was no way the factory crossmember was going to work with the 4L80E so I made a new one. The old one is on bottom and the new one on top. I hacked the mount off the factory one and welded it onto my homebuilt one. I guess it is crude, but we will see how it holds up.
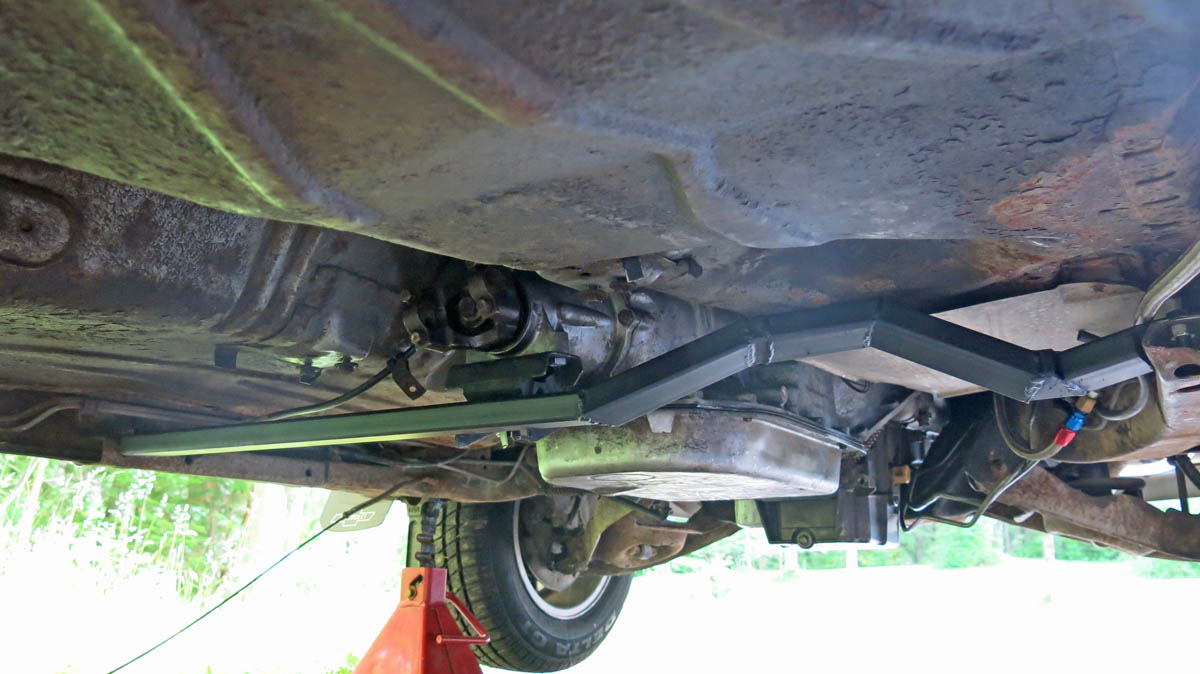
Transmission bolted in and sitting on the new crossmember. The kick up is for the exhaust in case anyone is wondering.
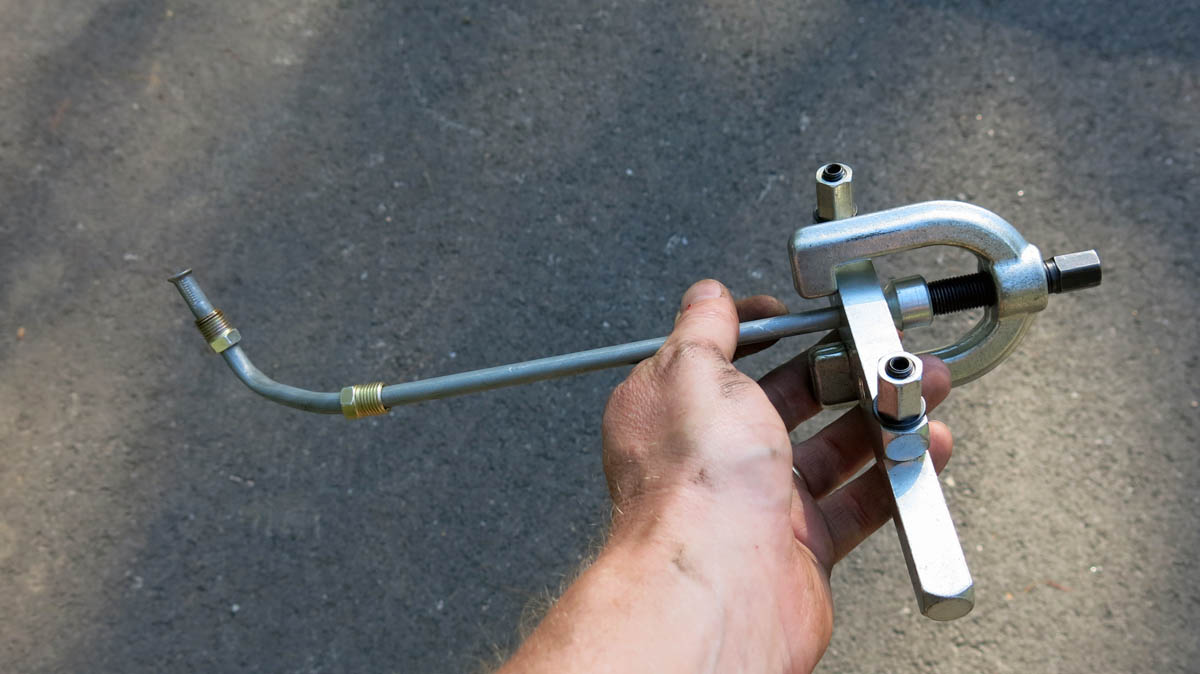
Trans cooler lines were close but not close enough. I had to make a short section to mate up to the factory lines, although one of the original 1986 lines bolted right up.
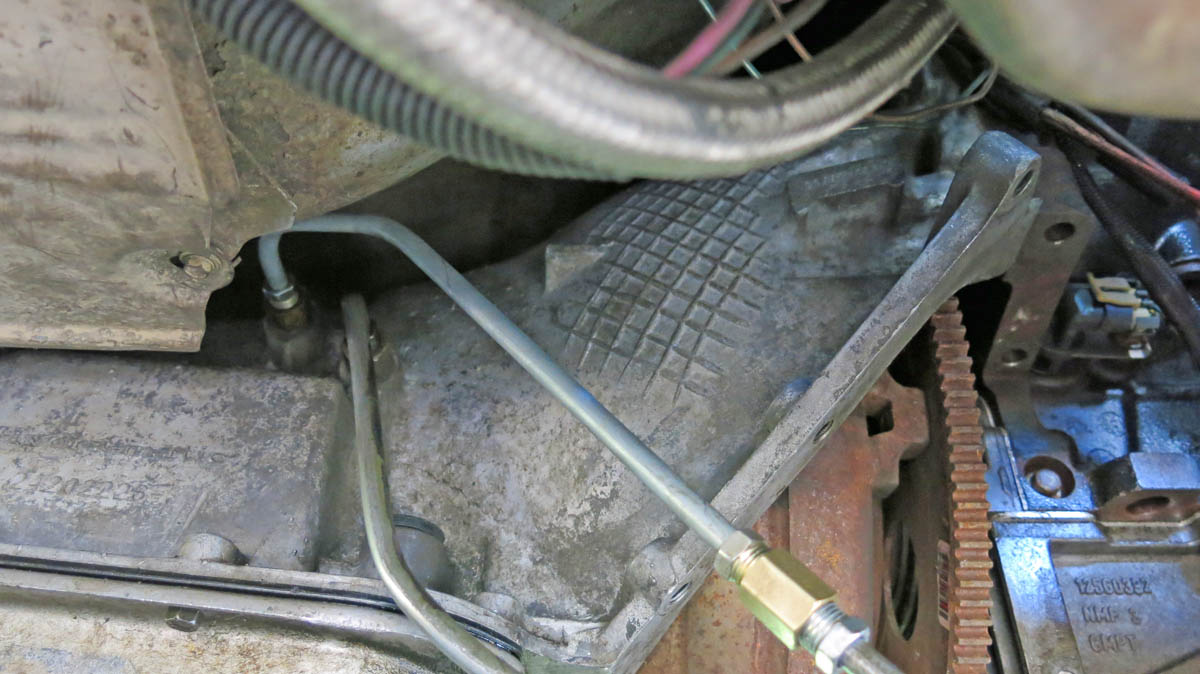
Bolted in and looking okay I think.
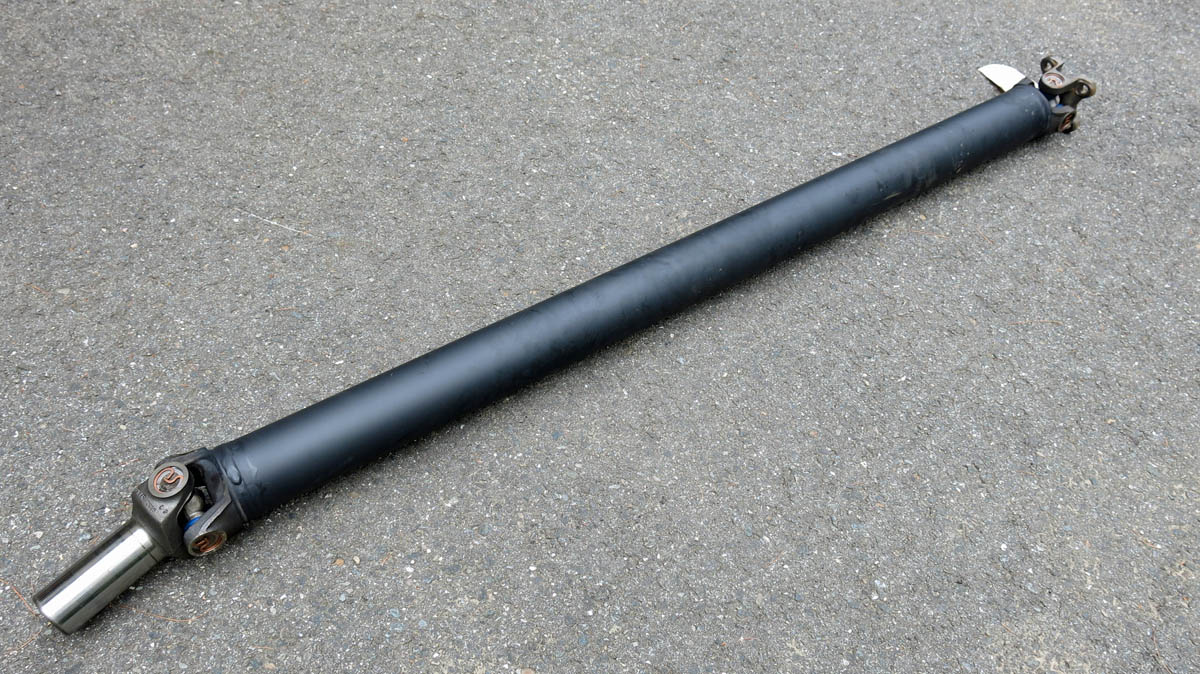
Bought a 4L80E slip joint yoke and a Ford 8.8" bolt on yoke. Then I took them to the driveshaft shop.

A few days later they called me and said my new driveshaft was ready. I went and picked up this beauty. It is a work of art! It fits like a glove which means I measured right the first time, go me!
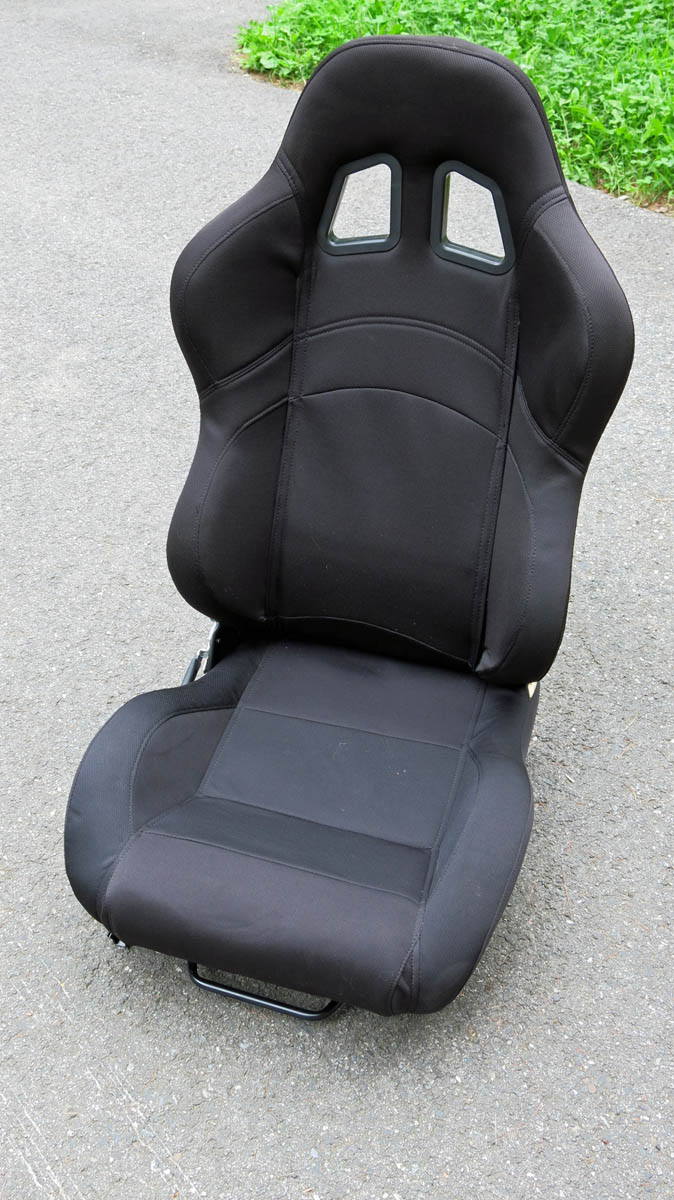
Summit had a great deal going on some cool bucket seats as well as mounting brackets so I ordered a set.
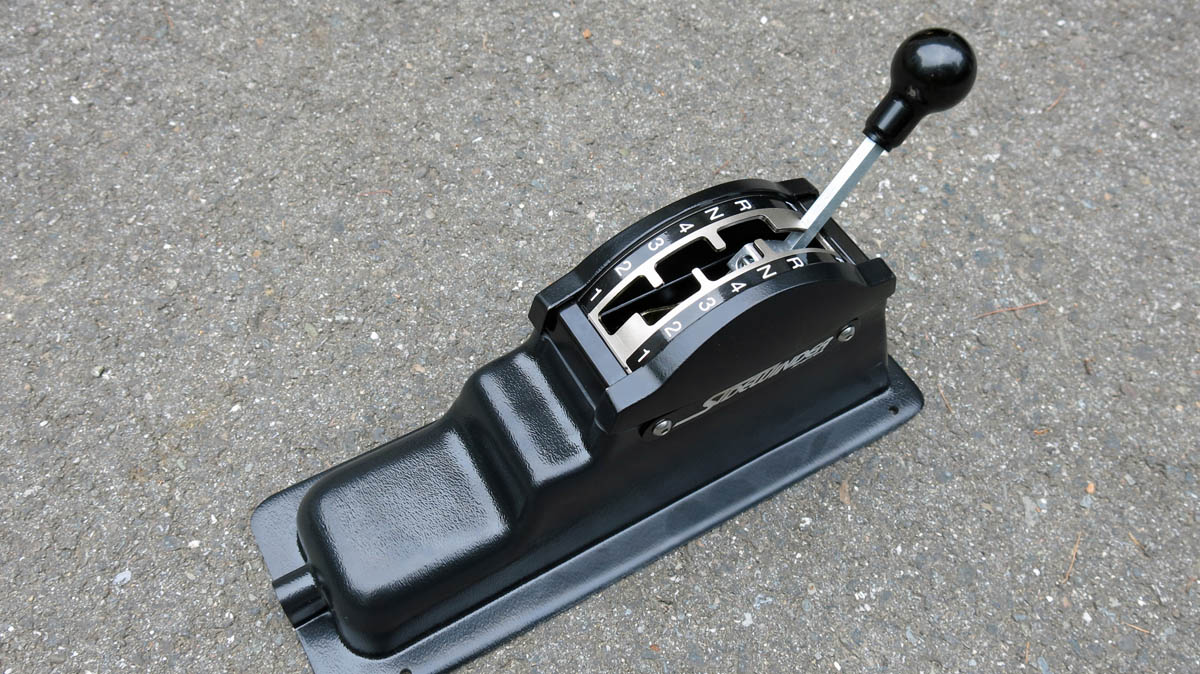
In addition I bought this AWESOME Winters shifter for the 4L80E.
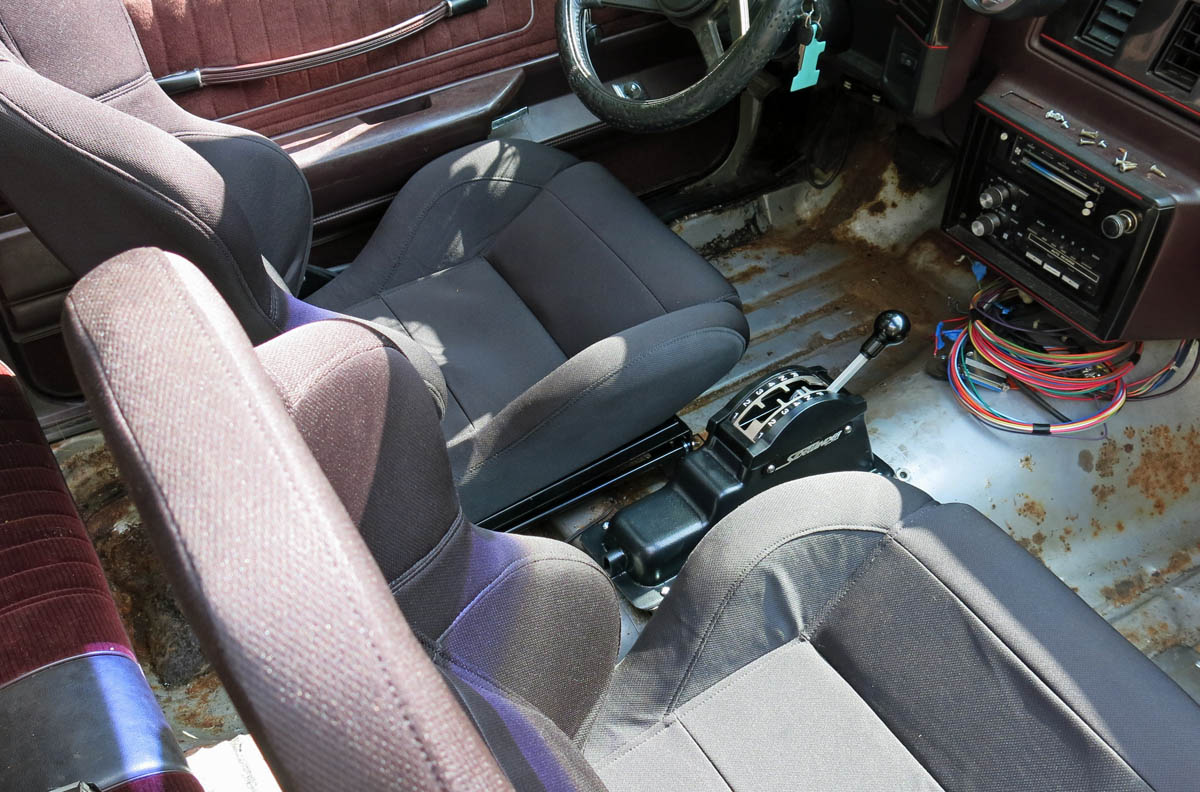
The dry fitting of the seats and shifter. I had to build a mount to sit the shifter on. I also have a new carpet to go in the car as well. Everything pictured here is back out now. My T-Roofs still leak and i don't want everything getting wet. Gotta seal this pig up!
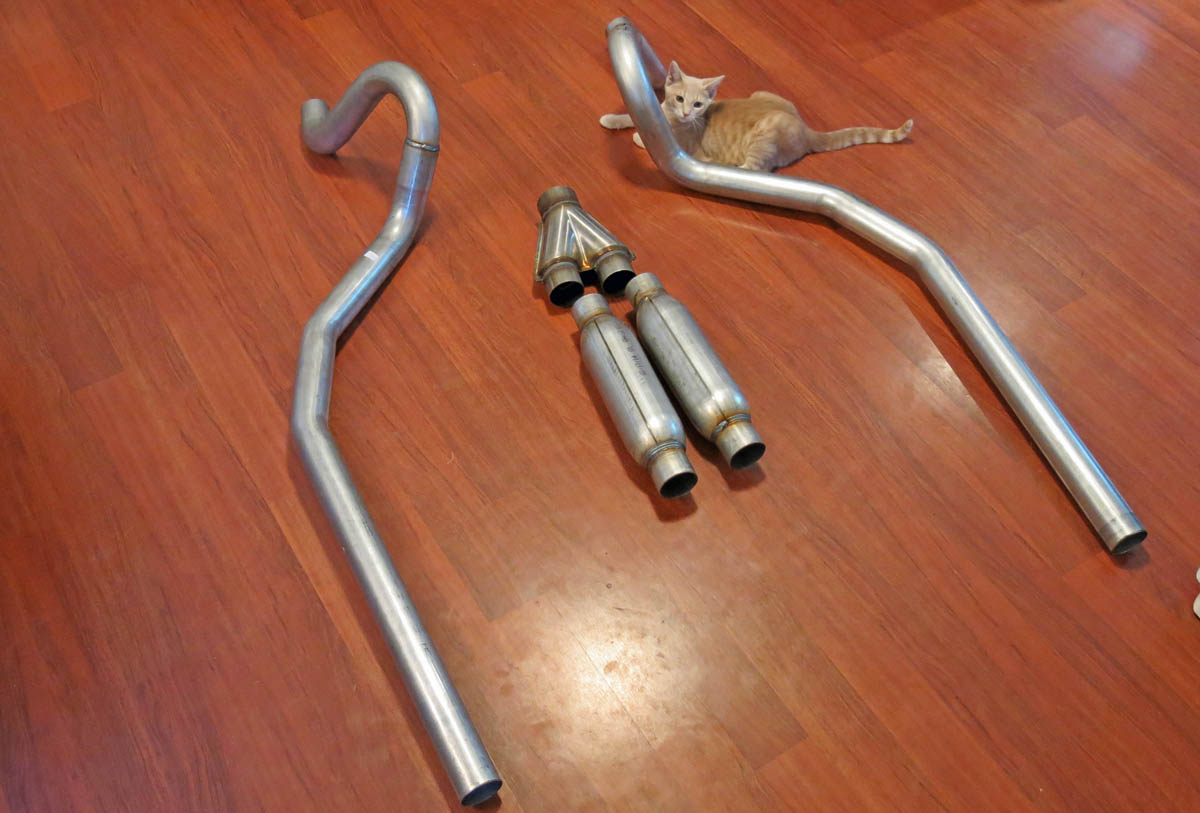
Since I am ditching the ghetto exhaust I had to replace it with something a lot better. Flowmaster 2.5" tailpipes, 2.5" Dynomax race bullets, and a 3" to dual 2.5" Y pipe. Should sound awesome!
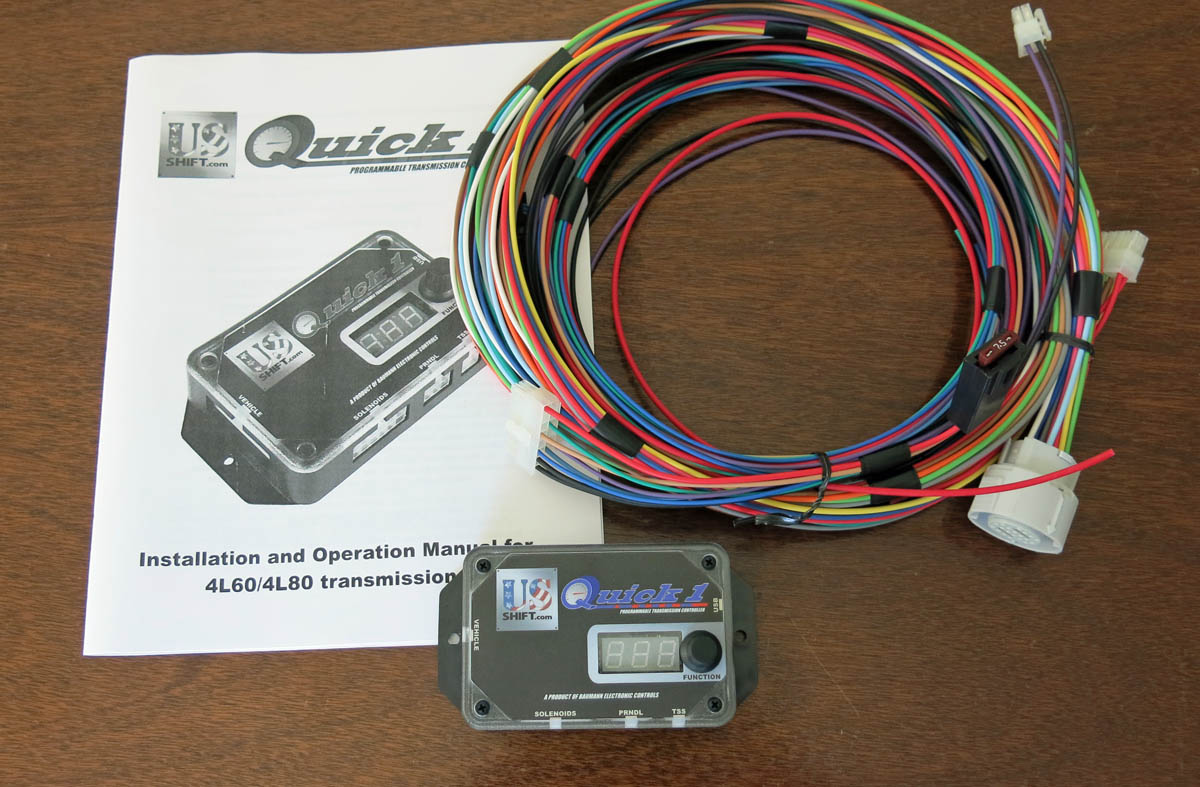
The US Shift Quick 1 transmission controller for the 4L80E. It sure wasn't cheap. I hope this thing works as well as advertised!
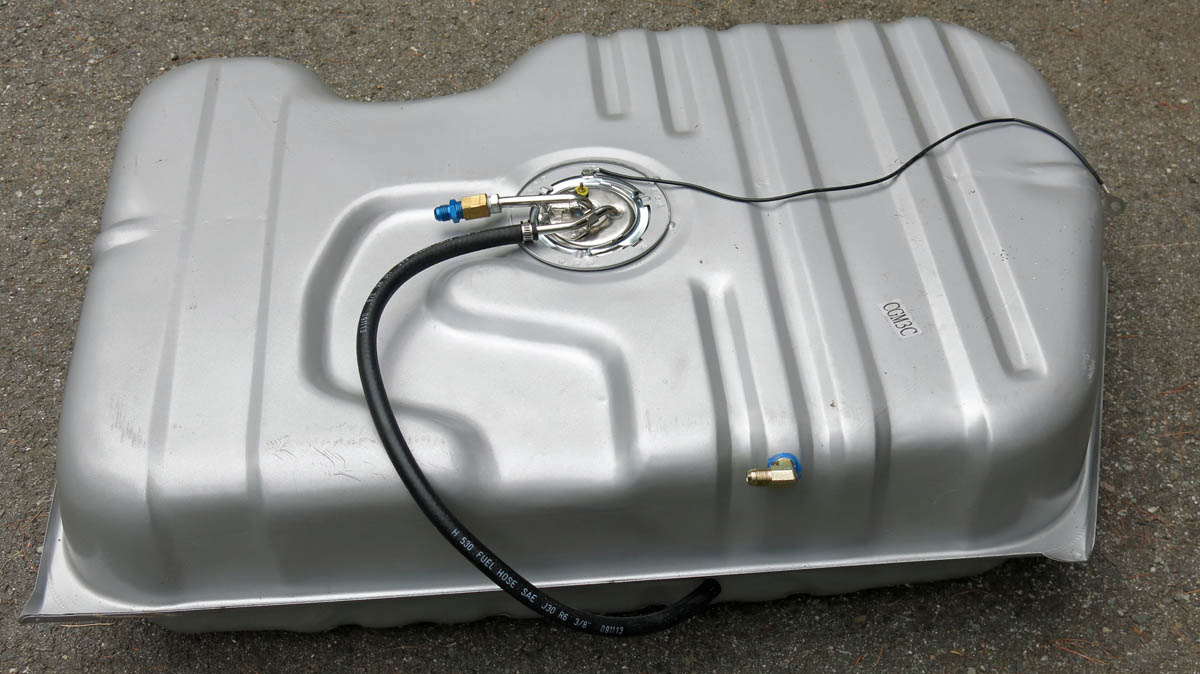
A new gas tank and sending unit. The fuel return now goes into the forward side of the tank and the fittings on the sender are pickup and vent.
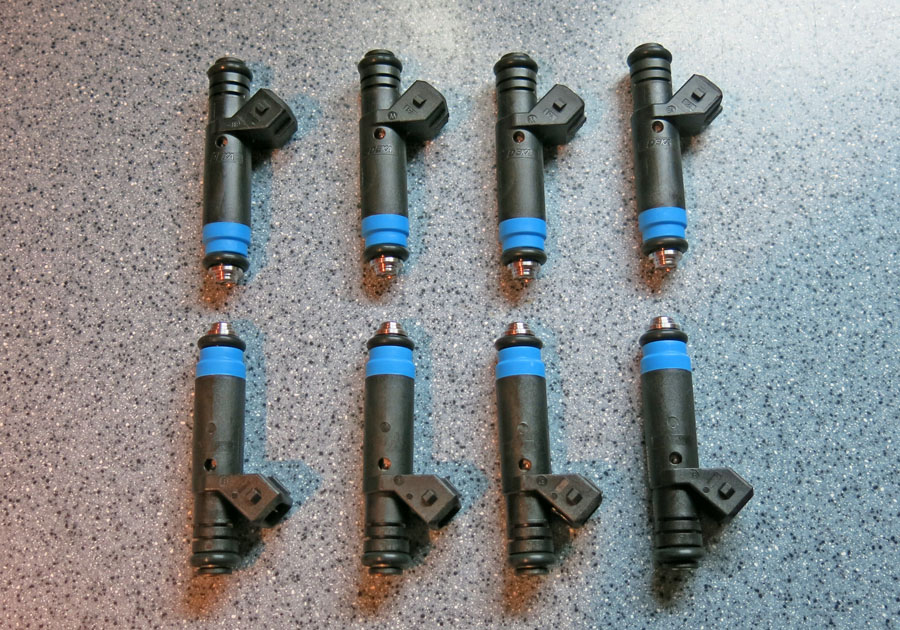
And finally some 80 lb Siemens Deka injectors, I have the new connectors for them as well. I'll have to cut into my beautiful harness to make these work, oh well! But that will allow me to turn up the boost when it finally hits the road again!!!!
Stay tuned, more coming soon.
I have really let this thread languish, this should bring folks up to speed.
Since February I have done quite a bit.
This is how the car looked just before things thawed out and I was able to bring it out to be worked on again.
Then it made this unfortunate transition to jackstands. The curse of projects cars the world over!
After that I stripped out all of this old crap to make way for new stuff!
The car then looked like this for ages. Notice the lines of rubber built up in the wheel well.
I got this Ford 8.8" rear end from an 02 Mustang for a song.
Then I got this kick butt Trick Chassis swap kit to bolt it in.
I stripped all the stuff off of the rear end that wasn't needed and then opened it up to see how things looked inside. It was clean and low mile, just like the ad said!
Put it back together, got it cleaned up, added some spring perches and bolted on the swap kit. Looking sharp, to me anyway.
All bolted in the car. The angle finder says my geometry is right. I hope so!
Tired and beat 200-4R is pulled out.
Ripped my donor 4L80E apart so I could put the TransGo shift kit in.
After almost a full day of screwing with it the trans was back together and ready to go in.
There was no way the factory crossmember was going to work with the 4L80E so I made a new one. The old one is on bottom and the new one on top. I hacked the mount off the factory one and welded it onto my homebuilt one. I guess it is crude, but we will see how it holds up.
Transmission bolted in and sitting on the new crossmember. The kick up is for the exhaust in case anyone is wondering.
Trans cooler lines were close but not close enough. I had to make a short section to mate up to the factory lines, although one of the original 1986 lines bolted right up.
Bolted in and looking okay I think.
Bought a 4L80E slip joint yoke and a Ford 8.8" bolt on yoke. Then I took them to the driveshaft shop.
A few days later they called me and said my new driveshaft was ready. I went and picked up this beauty. It is a work of art! It fits like a glove which means I measured right the first time, go me!
Summit had a great deal going on some cool bucket seats as well as mounting brackets so I ordered a set.
In addition I bought this AWESOME Winters shifter for the 4L80E.
The dry fitting of the seats and shifter. I had to build a mount to sit the shifter on. I also have a new carpet to go in the car as well. Everything pictured here is back out now. My T-Roofs still leak and i don't want everything getting wet. Gotta seal this pig up!
Since I am ditching the ghetto exhaust I had to replace it with something a lot better. Flowmaster 2.5" tailpipes, 2.5" Dynomax race bullets, and a 3" to dual 2.5" Y pipe. Should sound awesome!
The US Shift Quick 1 transmission controller for the 4L80E. It sure wasn't cheap. I hope this thing works as well as advertised!
A new gas tank and sending unit. The fuel return now goes into the forward side of the tank and the fittings on the sender are pickup and vent.
And finally some 80 lb Siemens Deka injectors, I have the new connectors for them as well. I'll have to cut into my beautiful harness to make these work, oh well! But that will allow me to turn up the boost when it finally hits the road again!!!!
Stay tuned, more coming soon.
08-27-2014, 01:39 AM
#128
On The Tree
iTrader: (1)

Join Date: Oct 2008
Location: NE PA
Posts: 181
Likes: 0
Received 0 Likes
on
0 Posts

Very nice build. That is going to kick some butt. I read the whole thread and couldn't find the # of the NAPA lower hose. Could you please post it? Also what did you have to do to modify the radiator shroud to lower the radiator and intercooler combo? If you took some pics it would be surely appreciated. Any drag strips in your part of Maine? Good luck with your build. Also a BIG THANK YOU for serving in the military to keep our butts safe. Rich


 09-02-2014, 06:29 PM
#136
On The Tree
Thread Starter
Join Date: Nov 2012
Posts: 101
Likes: 0
Received 0 Likes
on
0 Posts
Very nice build. That is going to kick some butt. I read the whole thread and couldn't find the # of the NAPA lower hose. Could you please post it? Also what did you have to do to modify the radiator shroud to lower the radiator and intercooler combo? If you took some pics it would be surely appreciated. Any drag strips in your part of Maine? Good luck with your build. Also a BIG THANK YOU for serving in the military to keep our butts safe. Rich
No part number for the lower hose, sorry. I bent a piece of coat hanger into the rough shape I needed and then wandered through the hose racks at NAPA until I found one that was close. It took a little trimming to fit it but not overly difficult. For the rad/intercooler I had to notch out a section of the lower radiator support to allow the whole unit to sit lower, I hated to cut on the car but you gotta do what you gotta do! There is a dragstrip only 15 minutes from my house, it is only an 1/8th mile but what the heck. I can't wait to go run it! And thanks about the .mil service. I love my job!!

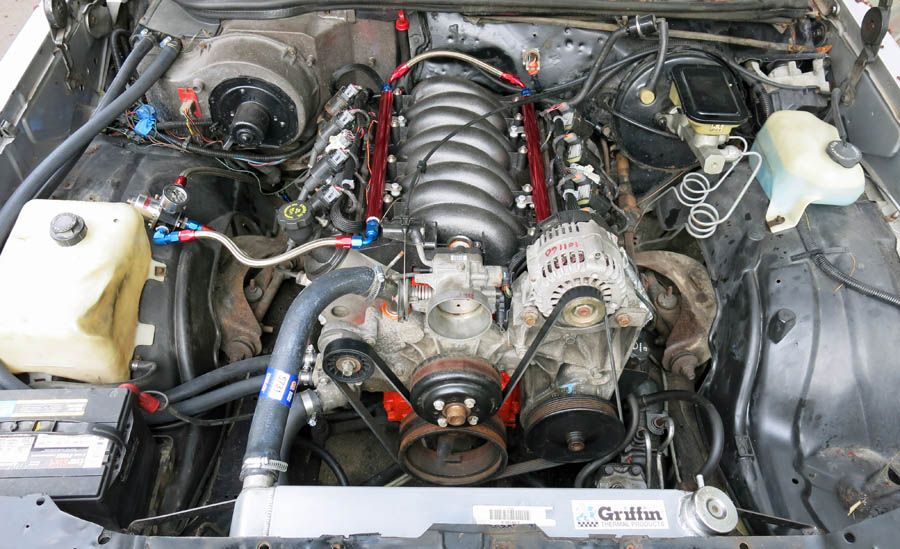
Thanks man! No need for extra drivers on the MS2. I am running four of the six usable spark outputs on the MS2 and have them set up in wasted spark mode. While this rules out individual coil control it didn't bother at all last year. The car hauls *** and runs awesome!
http://www.summitracing.com/parts/sum-csum4031
For the money this was a pretty hard to beat combo. Everything you need to bolt the seats right in. They seem pretty nice so far. Time will tell though.
I wish I could help but I'm all the way in Maine!
09-03-2014, 11:08 AM
#137
Isn't the mustang bolt pattern different what wheels are you going to run? Also is the 8.8 rear wider than a 7.5 rear? Also why no rear sway bar?
Last edited by Number1; 09-03-2014 at 08:37 PM.
09-06-2014, 08:25 PM
#140
On The Tree
Thread Starter
Join Date: Nov 2012
Posts: 101
Likes: 0
Received 0 Likes
on
0 Posts
The 8.8 is only slightly wider than the 7.5. Wheel backspacing will easily correct it.
No rear sway bar because there is no easy way to make it work. When it gets right down to it I wan't this car to go fast in a straight line. I'm not overly worried about making it corner just yet.