
Rotating the intake on an LS1
 05-13-2013, 06:58 PM
#1
Registered User
Thread Starter

Join Date: Feb 2013
Location: Northern California
Posts: 20
Likes: 0
Received 0 Likes
on
0 Posts
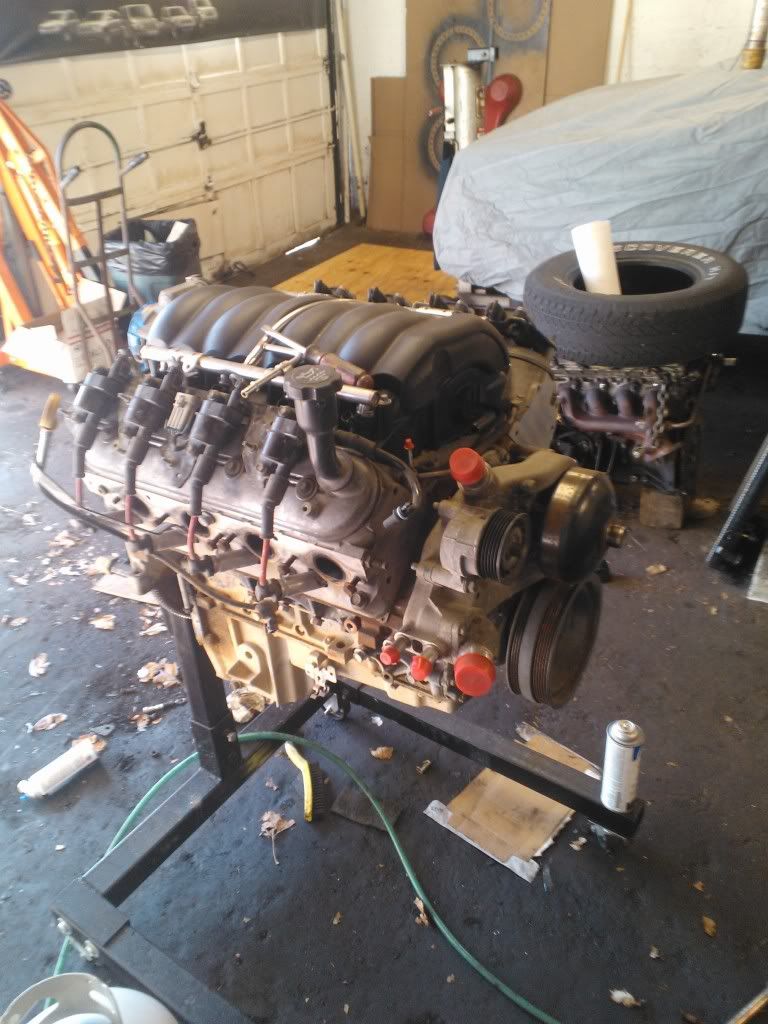
I have never seen a complete write up on the LS1 intake rotation, so having just completed mine I will do so here.
I have an IFG Roadster with a NAERC chassis. The throttle body was 3 ˝” from the firewall. No room even for a tight turn. Further, I have read such a tight turn was a 20 RWHP loss! It would also give many problems with water lines and future repairs.
I started the best way with LOTS of reading and research, then acquiring parts before ever turning a wrench.
Next step was to take lots of pictures before doing anything. These did prove to be helpful later on.
I had read about the oil in the intake problem with LS1’s due to their PCV system pulling from the valve covers. I decided to do the LS6 valley cover swap at the same time. I am very glad I did as it was very easy and some of the PCV oil issues should be gone. Besides, it really cleaned up the top of the engine, no more pipes. I could write a lot on this swap but it is done better than I could on LS1HOWTO.COM Go there! I got my LS6 valley cover off EBay for around $80, which included new bolts and gasket. I have seen many other prices and this seemed very reasonable.
SO… time to start.
 05-13-2013, 06:58 PM
#2
Registered User
Thread Starter
Join Date: Feb 2013
Location: Northern California
Posts: 20
Likes: 0
Received 0 Likes
on
0 Posts
First step for me was to tag and remove all the wiring. Note the small rectangular gaskets/seals on the injectors. Don’t lose these.
Then the same with some of the hoses. One of the advantages for me, was the fact the canister and fuel intake lines would be flipping to the other side, where my gas tank and fuel filters/pumps are.
With these out of the way, take out the 10 intake manifold bolts. This takes an 8mm socket. They are not too tight. Note this as when reinstalling them it is just INCH pounds for the install. Note the small bracket at the #3 and #5 cylinder bolts. This will be flipped with the swap. All the PCV piping should be off so just carefully pry up on the intake and lift it off. BUT !!! before this, realize you will be exposing the ports to the valves. MAKE SURE there are no small parts or tools to fall into them during this process. Have some shop rags (8) ready to stuff into them right away. So off it comes. There was a LOT of dirt and such that had built up around the intake. I vacuumed all this off and used acetone to clean off the heads. I then taped off the ports.
Next was to remove the knock sensors and valley cover. Again, go to LS1HOWTO.Com for all this.
As an aside: I REALLY wanted to flip the breather pipe on the valley cover so it came out by the throttle body. I pulled off the plastic oil separator on the bottom of the valley cover. I was noting how I could cut the long arm of it where it swedged down, so the small area would slip into the larger width, then thinking silicone or JB. It seemed easy enough to shorten the arm. Drilling and taping new holes a bit more difficult. I looked carefully at the plastic intake and found there was are area that could be cut out where the pipe wanted to be, but even cutting this out did not get me back far enough to get a brass fitting into the valley cover. I believe moving the pipe to the front, perhaps an aluminum pipe tig welded in at an angle or such is possible. I did not feel up to all this so frankly gave up and left it all alone. BUT, again, with a little perseverance I see it quite possible. Let me know when you get it done, and how you did it!
05-13-2013, 06:59 PM
#3
Registered User
Thread Starter
Join Date: Feb 2013
Location: Northern California
Posts: 20
Likes: 0
Received 0 Likes
on
0 Posts
I then took out the oil pressure sending unit. Biggest single problem with this project was finding the adapters to get out of the 16Mx1.5 and get some way to relocate the sending unit. I finally found the parts at Summit. I got a 90 degree 16M1.5 to -6AN, then a -6 plug to use temporarily, and a -6 to 16Mx1.5 adapter. It is my intent to run an AN braided cable and remotely mount the sending unit.
I have read others have found a brass fitting/90, but I could not. I have read about removing the part that is bolted right by the oil filter and drilling and tapping a hole here for the sending unit. Pick your poison.
There is no problem with the cam position sensor, just leave it alone.
While you have the intake off, time to do the cooling water bypass project. Back to LS1HOWTO.com for this. Really simple as you have to mess with these lines anyway due to the rotation so just eliminate them. Surly you will not be driving your car after leaving it in freezing conditions, needing for the throttle body to be warmed up by the radiator water! I also cut these metal pipes off and put small plastic caps on the lines.
I have read many times how it was very possible to run a truck type steam pipes setup under the intake if you grind the fins off the bottom. I have read as many stating you can’t. In my case I am going to run a set of lines like on the “front”, on the back. They fit exactly the same way. There will be so many radiator lines running around I am sure I will find a place to tie in. I have heard some just leave the rear plugs alone as this is the way the factory sent it out, yet the LS1 is known for bad #7 (and #8 at times) cylinders, purportedly related to this steam in the heads without coolant lines. I have also seen some pretty cool (EXPENSIVE) braided lines connecting the 4 ports over the top of a FAST intake. Poison choosing time again. :-0
05-13-2013, 06:59 PM
#4
Registered User
Thread Starter
Join Date: Feb 2013
Location: Northern California
Posts: 20
Likes: 0
Received 0 Likes
on
0 Posts
Regardless of your choice, you need to remove the bolt/stud holding the front steam tubes on, that the PCV was grounded to, when you removed the intake, and switch it to the opposite end/side for reconnecting the ground. I just unscrewed them and switched. I believe I did not break the seal doing so and do not expect leaks.
So I now have:
The valley cover changed out
The oil sending unit adapter installed
The larger PCV hole in the valley cover plugged (lots of ways to do this).
The bolt/stud for the PCV ground switched
Another aside:
I have read others have taken their intakes and cleaned the inside out due to the large oil buildups they have. Mine did have some.
I have seen performance tips about how to grind the throttle stop so the butterfly opens a full 90 degrees.
I have read about custom ported throttle bodies but how you can get 90% of the effect by just doing it yourself. (Fine sandpaper and time)
I have read about ported intakes, but these usually state this is RWHP effective only if you are making many other internal changes.(I did not want to remove the heads so I did not gasket match the cathedral ports to the intake.)
05-13-2013, 07:00 PM
#5
Registered User
Thread Starter
Join Date: Feb 2013
Location: Northern California
Posts: 20
Likes: 0
Received 0 Likes
on
0 Posts
Time to reinstall the intake:
Replaced the gaskets (around $35) and it dropped right on. Don’t forget the small bracket which will now be on the #6 and #8 bolts. Torque for these is INCH pounds. Really small.
I wanted to have the install as clean as possible, so I removed the PCV from the throttle body and bent some 3/8 steel gas line in a tight loop. With this, I am able to put the PCV pretty much under the throttle body and pretty hidden. Very simple for a cleaner look.
QUESTION: I reinstalled the rubber line for the valve cover intake air line to the back valve cover connector (although I did hold it with pliers and flip it to point the other way). I capped the other port. It would be cleaner if I could tie to the port closest to the throttle body but I do not know what the underside of the valve covers look like. Do you see any problem doing this switch?
You can now sell your old PCV piping on Ebay, apparently for $50, as well as your LS1 valley cover ($30) and pay for the LS6 valley cover.
Having never worked on an LS1 I was very nervous about doing the swap and rotate, and not having any clear complete set of instructions for it, but I say DO IT!! It really is quite easy and no special skills/knowledge or tools are required. The PCV is cleaned up, the fuel lines are on the opposite (passenger) side now, lots of space now for MAFs and air cleaners, and lots more room up front for belts and radiator hoses.
Feel free to PM me with any questions you may have.


Trending Topics
05-13-2013, 09:37 PM
#8
On The Tree
iTrader: (1)

Join Date: Apr 2009
Location: 201 NJ
Posts: 153
Likes: 0
Received 0 Likes
on
0 Posts

The fuel rails are symmetrical too, so if you want your fuel lines on the same side after the flip, just pull the rail off the intake and rotate it back around.
On the truck motors, the oil pressure sender on the back of the valley cover will probably interfere with cable throttle, and if you run a car intake it has to be cut off and plugged. At least mine did (LS3 intake on a LY6).
On the truck motors, the oil pressure sender on the back of the valley cover will probably interfere with cable throttle, and if you run a car intake it has to be cut off and plugged. At least mine did (LS3 intake on a LY6).