
Holley LS oil pan hitting frame - Help
 09-15-2013, 07:12 PM
#1
Teching In
Thread Starter

Hello everyone, this is my first post so please be easy on me.
I am installing a 6.0L vortec with a 7000r4 in my 69 camaro. I tried to place the engine in the car yesterday but the Holley LS oil pan hit the frame before I could get the bolts through both the mounts. If one bolt was installed, the other would be about 1/2 inch too high.
I am using the Holley LS adapter plates, stock location, with the "short and wide" Energy Suspension mounts. I am wondering if the "tall and narrow" mounts will work with the "short and wide" frame brackets. I measured the frame bracket and it did measure 2 3/8 wide.
Once I am done with this project, I will list all the pieces I had to buy to get it to work.
Thanks for the help.


 09-15-2013, 09:35 PM
#4
The mix and match will add some height, just about 7/16".. as that is what on my .chevelle. You well have to narrow the short and wide frame stand, I narrowed them 3/4" and use spacer to make up the difference... but I am now able to jack the engine back/forward a bit to get the engine centered where I wanted or needed it.
BC
BC
09-15-2013, 11:52 PM
#5
TECH Resident
I extended the frameside mounts by putting the engine in place where I wanted, and then raising it on the cherrypicker to the height I wanted. Then I let the mounts flop down on the upper side, tacked them in place, and then removed the engine. Then I boxed in the bottom of the mount to mount it solidly to the frame
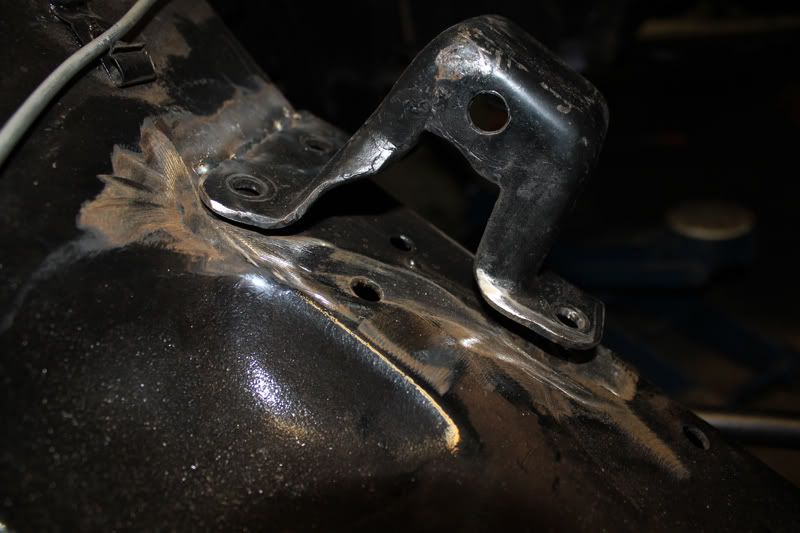
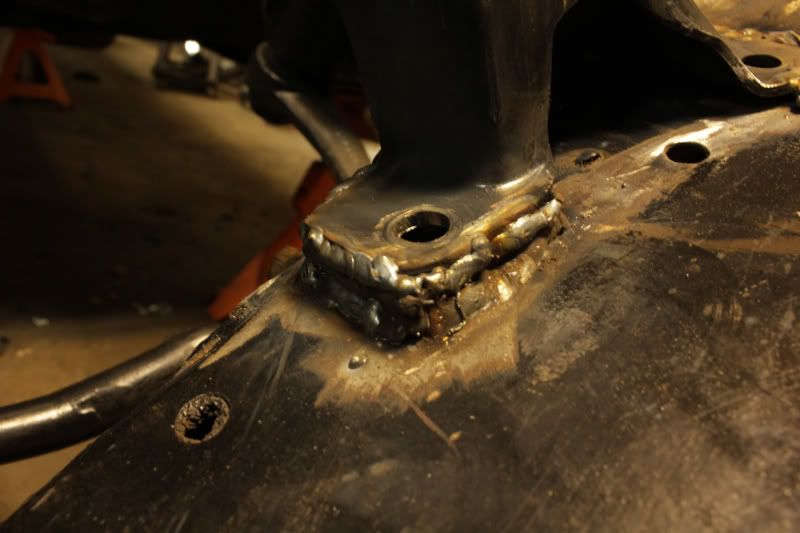
Unfortunately, even though I was super super super careful in my measuring, my engine was still too low. I ended up cutting up a pair of solid motor mounts (engineside) and extended them about an inch. An inch is longer than most people need to clear but my exhaust and oil pan were hanging too low for my liking. I also ended up raising the transmission some by using large bolts (1/2" thick) as spacers between the trans crossmember and the shelf where it bolts to the frame.
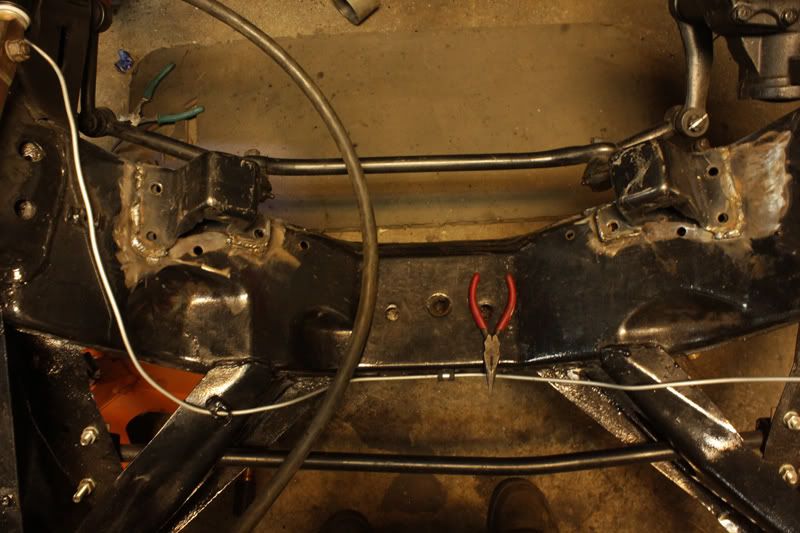
I did all this when I had the 5.3 in the car, and I sure am glad I did. The LS2 I just bought has a low mounted alternator and if I didn't raise the engine to the height I did, it would have touched and jammed me all up. There's about 1/4" clearance between the alternator and my frame.
Unfortunately, even though I was super super super careful in my measuring, my engine was still too low. I ended up cutting up a pair of solid motor mounts (engineside) and extended them about an inch. An inch is longer than most people need to clear but my exhaust and oil pan were hanging too low for my liking. I also ended up raising the transmission some by using large bolts (1/2" thick) as spacers between the trans crossmember and the shelf where it bolts to the frame.
I did all this when I had the 5.3 in the car, and I sure am glad I did. The LS2 I just bought has a low mounted alternator and if I didn't raise the engine to the height I did, it would have touched and jammed me all up. There's about 1/4" clearance between the alternator and my frame.
09-16-2013, 07:05 AM
#6

Hello everyone, this is my first post so please be easy on me.
I am installing a 6.0L vortec with a 7000r4 in my 69 camaro. I tried to place the engine in the car yesterday but the Holley LS oil pan hit the frame before I could get the bolts through both the mounts. If one bolt was installed, the other would be about 1/2 inch too high.
I am using the Holley LS adapter plates, stock location, with the "short and wide" Energy Suspension mounts. I am wondering if the "tall and narrow" mounts will work with the "short and wide" frame brackets. I measured the frame bracket and it did measure 2 3/8 wide.
Once I am done with this project, I will list all the pieces I had to buy to get it to work.
Thanks for the help.
I am installing a 6.0L vortec with a 7000r4 in my 69 camaro. I tried to place the engine in the car yesterday but the Holley LS oil pan hit the frame before I could get the bolts through both the mounts. If one bolt was installed, the other would be about 1/2 inch too high.
I am using the Holley LS adapter plates, stock location, with the "short and wide" Energy Suspension mounts. I am wondering if the "tall and narrow" mounts will work with the "short and wide" frame brackets. I measured the frame bracket and it did measure 2 3/8 wide.
Once I am done with this project, I will list all the pieces I had to buy to get it to work.
Thanks for the help.
In an effort to provide expanded LS swap oil pan options, Holley has developed a brand new oil pan that has a minimal height front edge (same as a 4th-gen F-body pan) to allow desirable engine inclination angles to be achieved in a bolt-on manner.
In fact, the design of this new pan was carried out in conjunction with the development of the new Hooker engine mounts, transmission crossmembers, headers and exhaust systems soon to be released for 1st-gen F-body LS swaps.
The pan geometry provides the same inner tie rod oil pan clearance as a notched 4th-gen F-body pan without giving up the oil capacity that happens as part of that common modification.
This new pan and the mentioned Hooker components are due to be released at the SEMA show.
09-16-2013, 08:21 AM
#7
Teching In
Thread Starter
Thanks everyone for the suggestions.
I think I will try the plate/spacer between the mounts and the adapter, and/or using the "tall and narrow" mounts with the "short and wide" frame stands. I think that combination will work without too much effort because the frame stands measured 2 3/8 wide, the same as the opening in the "tall and narrow" mounts.
Toddoky, you said, "The front end geometry of the current Holley pan is too tall to package well into a 1st-gen F-body swap and obtain good engine inclination/ U-joint working angles without notching the engine crossmember." I wish Holley would have mentioned this, I am now stuck with a $340 pan. Holleys website states: �Provides maximum clearance to chassis and �Fits GM rear wheel drive applications that were originally equipped with a Small Block or Big Block Chevy engine and traditional rear sump oil pan*, the * is a disclaimer saying the engine may need to be raised but I do not remember seeing that when I was researching pans.
Trending Topics
09-16-2013, 10:44 AM
#8
Thanks everyone for the suggestions.
I think I will try the plate/spacer between the mounts and the adapter, and/or using the "tall and narrow" mounts with the "short and wide" frame stands. I think that combination will work without too much effort because the frame stands measured 2 3/8 wide, the same as the opening in the "tall and narrow" mounts.
Toddoky, you said, "The front end geometry of the current Holley pan is too tall to package well into a 1st-gen F-body swap and obtain good engine inclination/ U-joint working angles without notching the engine crossmember." I wish Holley would have mentioned this, I am now stuck with a $340 pan. Holleys website states: �Provides maximum clearance to chassis and �Fits GM rear wheel drive applications that were originally equipped with a Small Block or Big Block Chevy engine and traditional rear sump oil pan*, the * is a disclaimer saying the engine may need to be raised but I do not remember seeing that when I was researching pans.
I think I will try the plate/spacer between the mounts and the adapter, and/or using the "tall and narrow" mounts with the "short and wide" frame stands. I think that combination will work without too much effort because the frame stands measured 2 3/8 wide, the same as the opening in the "tall and narrow" mounts.
Toddoky, you said, "The front end geometry of the current Holley pan is too tall to package well into a 1st-gen F-body swap and obtain good engine inclination/ U-joint working angles without notching the engine crossmember." I wish Holley would have mentioned this, I am now stuck with a $340 pan. Holleys website states: �Provides maximum clearance to chassis and �Fits GM rear wheel drive applications that were originally equipped with a Small Block or Big Block Chevy engine and traditional rear sump oil pan*, the * is a disclaimer saying the engine may need to be raised but I do not remember seeing that when I was researching pans.
1st-gen F-body. There are a multitude of oils pans currently used in LS swaps for 1st-gen F-bodies, including the Holley pan. None of them provided the fitment we were looking when tested for use in the development of the upcoming Hooker swap system components; each fell short in their dimensions somewhere to provide the combined component clearances and engine inclination angles we were after in a bolt-on scenario. All existing pans either hang too low on the sump end (GM muscle car pan), have too long of a sump that interferes with the inner tie rod ends during full steer (current Holley pan without positioning the engine very close to the firewall, or the 4th-gen F-body pan without notching), or are taller than they need to be on the front end to provide a detailed level of fitment that would be considered vehicle specific for these cars (every pan except a 4th-gen F-body pan, which has the lowest front profile of any LS pan in existence). With all this said, it doesn't mean that you cannot use the existing Holley pan in the manner in which you are trying to, which is by raising the engine, or notching the crossmember. All LS components (OE or aftermarket) possess design traits that are more suitable for some applications than others and this new pan broadens the current selection on the market to give you the user more choices. The front end of the new design pan requires the use of the same 3/4 length windage tray that the 4th-gen F-body pan does as the internal dimensions of both pans do not have enough room to run a full-length tray. You may decide that you prefer the full-length windage tray capability of the existing pan in your possession and be willing to go through extra steps/annoyances to use it as others have and you are in the middle of doing, or you may decide that you would prefer to go with a newer approach that removes some of the steps/annoyances that you are going to discover and go with the new type instead. The choice is up to you as only you know what your end swap goals are.
Something else to note here is that in order to acheive the engine inclination angle we were going for that takes full advantage of the new pan demensions, we had to re-think the method of engine mounting used as well, as no current "swap plates" and frame stand combination would provide it. We are working to develop more efficient ways of performing this swap and others similar to it that go beyond what may be currently available in the market.
09-16-2013, 11:16 AM
#9
Teching In
Thread Starter
Thanks for the input Toddoky, I was just a little fustrated this morning. I, like everyone who performs this task, did a lot of research and thought that I had read of all the problems that arise and had them figured out.
09-16-2013, 11:43 AM
#10
TECH Enthusiast

I picked up a BRP kit when they first came out and there was not a lot of info on them including how low the pan sat. The Holley pan didn't even exist as the Retro LSX pan either. I selected the kit due to it supposedly being a complete kit along with the ability to use the compressor in the stock location with a notched frame. In the last few weeks I pulled the motor and replaced the LH3 pan with a Holley pan. The BRP kit places the motor high and they said they had the proper engine angles. What I found was that the motor was angled at about 6 degrees and that was with a turbo 400 mount pushed up as far as I could go before it started interfering with my sway bar in front. My TBSS headers and TBSS tranny pan also hung too low. I raised the rear mount about 1-1.5 inches from stock to get the motor angle down to about 3.5 degrees. This was after cutting and flipping the BRP mounting legs because it looks like I could get another 1/4-1/2 inch height in front. I don't think the rear can be raised much more and the front can't be lowered more that about 1/4- 1/2 inch but it does fit and it tucks the headers and pans real nicely. Note this is for an auto trans. I believe BRP made the kit so you could tuck a manual tranny in as well as a truck manifold but it definitely was not where it should have been for an auto tranny. Lesson learned is that you will probably have to modify something and I believe that most people are afraid to move the motor higher to get it right but it may solve a number of problems like mine did.
09-16-2013, 12:47 PM
#11
The BRP kit was designed to use either the CTS-V or LH8 (Hummer) pan. I had sold Phil the CTS-V pan he used to mock up and design the kit with and later used the LH8 pan and they did mount the engine higher to avoid many of the issue we are all finding with the front part of the pan.
I also got one of the 1st Retro LSx pan from Shawn when he as marketing it. I was supprised that the front part of the pan was not more shallower like a F-Body pan. I am using it in my Nova and was able to get the engine to sit without the pan hitting the crossmember and without using spacer to raise the engine.
I did use 1" setback Plates (used Edelbrock as a template) but found that the trans was being pushed back into the tunnel a bit to much and made contact with the turnnel. I moved the Frame stands 1/2" mounting location 1/2 fordward and all seem to fit well at that point. .... so 1/2" setback seem to work well for my setup.
09-16-2013, 01:09 PM
#12
Teching In
Thread Starter
I am using the Holley swap plates with the stock location. I found that the passenger head is hitting the heater hoses where they enter the firewall and the transmission fill tube is being crushed (slightly). I just ordered both the 1/2and 1.25 inch forward mounting plates to see which works best while not having interference between oil pan and the steering center link.
09-16-2013, 01:36 PM
#13
I am using the Holley swap plates with the stock location. I found that the passenger head is hitting the heater hoses where they enter the firewall and the transmission fill tube is being crushed (slightly). I just ordered both the 1/2and 1.25 inch forward mounting plates to see which works best while not having interference between oil pan and the steering center link.
09-16-2013, 03:31 PM
#15
TECH Enthusiast
I did use 1" setback Plates (used Edelbrock as a template) but found that the trans was being pushed back into the tunnel a bit to much and made contact with the turnnel. I moved the Frame stands 1/2" mounting location 1/2 fordward and all seem to fit well at that point. .... so 1/2" setback seem to work well for my setup.
09-16-2013, 03:44 PM
#16
The new Hooker engine and transmission mounting and exhaust components resolve that common issue as well. You can use the standard small block heater core with no problems as well as the stock A/C suitcase if you wish. This image shows the passenger side mid-length header (long tube header has same clearances) installed using our new mounts. Look closely and you will notice something unique about the engine mount. It's a 72'-up clamshell mount retrofit into a 1st-gen F-body/3rd gen Nova...goodbye frame stand compatibility/installation headaches.
09-16-2013, 07:58 PM
#17

Superdave84 was your ls swap into a first Gen camaro? I am doing an ls swap into a 68 camaro and trying to use factory low mount alternator will I have clearances issues? If anybody else may know id appreciate the input
09-16-2013, 08:17 PM
#18
The answer depends on how far forward and how low your mounts of choice place your engine. Some swap plates and mounting kits position the engine in an extreme forward position so as to allow use of the low-mount F-body alternator and A/C compressor. You have to keep in mind that many of these components were designed at a time when not many choices existed in regards to relocation components that allowed you to position the engine where it makes the most sense from a performance standpoint and not where is has to go in order to use a specific component.
09-16-2013, 09:12 PM
#19
TECH Resident
09-17-2013, 03:14 PM
#20
On The Tree
iTrader: (3)

Join Date: Aug 2011
Location: WA
Posts: 125
Likes: 0
Received 0 Likes
on
0 Posts
I am starting to think Toddoky is pretty well versed on the 67-69 camaro/ 68-74 Nova chassis, haha.
I have the holley swap pan in a 70' nova and the pan was pbarely touching the crossmember, you could actually get the bolts in but I did not like the idea of the pan contacting the subframe as the engine moved around, so I notched the subframe approximately 1/2", which was more than enough. Considered washers, spacers, ect but I was happy with the engine position otherwise and I did not have any other clearance problems. It is very hard to notice the notch with the motor installed in my opinion.
It sounds like holley will have a nice matched package for this chassis before too long, but I got started a long time ago. Another option is the Mast pan, the dimensions are available to see if that would solve your issue.

