
65 Impala SS L92/4L80E Conversion...Update...It Runs!
 12-09-2013, 09:30 PM
#1
Launching!
Thread Starter

Hey folks..
Wanted to start a thread on here so I could quit bugging the selected few with questions, and document my progress. (Disclaimer, don't expect a build quality like that of kwizz, and I have about 1/4 the creativity of superdave84, so check out their threads for some real inspiration )
)
Updated: Dyno Run and Results
I will be dropping an L92 from a 2007 Denali into my 65 impala SS. I also picked up a 4L80E that was recently rebuilt from a buddy, and I will be putting that in as well.
A little background on the car: I bought it when I was 16, and have slowly built it along the way. Most recently, I put air ride on it (I'm currently finishing the front right now) as well as finishing the final stages of a quarter panel replacement. Now, my plans for the engine/trans:
2007 L92- Keeping it stock, and even hoping to use the ugly truck intake
Truck Accessories
95 4L80E- Recently rebuilt
Stand alone wiring harness from PCI (Thanks Jon!)
Keeping DBW and stock TB
Engine mount adapter plates, same as kwizz, literally.
E38 ECM and T42 TCM
Holley oil Pan
69 Camaro LS swap headers
EFI Fuel Tank, Corvette regulator
I have done quite a bit of research, but I'll have a ton more questions as we go along. A few other things about the car to get you up to speed: This is a driver and not a show car, so go easy on me here.
-Air Ride
-Disc brakes 13" rotors and dropped spindles
-Addco 1 1/4 Front sway bar and rear 1" sway bar
-Camaro 12.7-1 quick ratio steering gearbox
18" front and 20" rear wheels
All stock interior
Enjoy the ride!

Stock Interior

Just pulled the L92, ready for a good cleaning!

Got it torn apart and cleaned up, and threw a coat of paint on the valve covers, and accessories.


Wiring harness showed up, as well as my new gas tank.


I am going to try to use as many of the stock gauges as I can, but still haven't decided completely what I am going to do yet. Also waiting on the Holley pan to show up so I can put it back together.
Wanted to start a thread on here so I could quit bugging the selected few with questions, and document my progress. (Disclaimer, don't expect a build quality like that of kwizz, and I have about 1/4 the creativity of superdave84, so check out their threads for some real inspiration
) Updated: Dyno Run and Results
I will be dropping an L92 from a 2007 Denali into my 65 impala SS. I also picked up a 4L80E that was recently rebuilt from a buddy, and I will be putting that in as well.
A little background on the car: I bought it when I was 16, and have slowly built it along the way. Most recently, I put air ride on it (I'm currently finishing the front right now) as well as finishing the final stages of a quarter panel replacement. Now, my plans for the engine/trans:
2007 L92- Keeping it stock, and even hoping to use the ugly truck intake
Truck Accessories
95 4L80E- Recently rebuilt
Stand alone wiring harness from PCI (Thanks Jon!)
Keeping DBW and stock TB
Engine mount adapter plates, same as kwizz, literally.
E38 ECM and T42 TCM
Holley oil Pan
69 Camaro LS swap headers
EFI Fuel Tank, Corvette regulator
I have done quite a bit of research, but I'll have a ton more questions as we go along. A few other things about the car to get you up to speed: This is a driver and not a show car, so go easy on me here.
-Air Ride
-Disc brakes 13" rotors and dropped spindles
-Addco 1 1/4 Front sway bar and rear 1" sway bar
-Camaro 12.7-1 quick ratio steering gearbox
18" front and 20" rear wheels
All stock interior
Enjoy the ride!
Stock Interior
Just pulled the L92, ready for a good cleaning!
Got it torn apart and cleaned up, and threw a coat of paint on the valve covers, and accessories.
Wiring harness showed up, as well as my new gas tank.
I am going to try to use as many of the stock gauges as I can, but still haven't decided completely what I am going to do yet. Also waiting on the Holley pan to show up so I can put it back together.
Last edited by nicke; 06-21-2016 at 10:18 PM.
 12-10-2013, 12:35 AM
#3
TECH Resident
Oh my God....I just put 2 and 2 together......this car is the same as the one on this forum: http://67-72chevytrucks.com/vboard/s...d.php?t=360612
Your car, sir, is one of the reasons I decided to buy my '65 Impala! What an absolutely stunning car. I am so glad you are joining the LS club along with the rest of us, and I am happy to offer all the help I can with your build...so please don't be shy about asking!
Your car, sir, is one of the reasons I decided to buy my '65 Impala! What an absolutely stunning car. I am so glad you are joining the LS club along with the rest of us, and I am happy to offer all the help I can with your build...so please don't be shy about asking!
12-10-2013, 07:29 AM
#4


Nicke...........This site is where I got "Educated" as far as LS stuff .............These guy's here are the "Best".............Enjoy the ride!!
12-10-2013, 11:02 AM
#5
Launching!
Thread Starter
Oh my God....I just put 2 and 2 together......this car is the same as the one on this forum: http://67-72chevytrucks.com/vboard/s...d.php?t=360612
Your car, sir, is one of the reasons I decided to buy my '65 Impala! What an absolutely stunning car. I am so glad you are joining the LS club along with the rest of us, and I am happy to offer all the help I can with your build...so please don't be shy about asking!
Your car, sir, is one of the reasons I decided to buy my '65 Impala! What an absolutely stunning car. I am so glad you are joining the LS club along with the rest of us, and I am happy to offer all the help I can with your build...so please don't be shy about asking!
-Nick
12-11-2013, 12:34 PM
#6
Launching!
Thread Starter
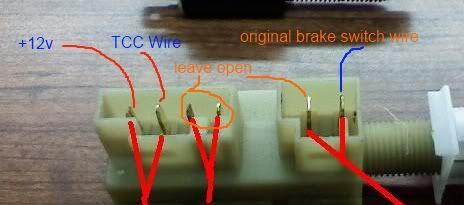
For you guys who have done this swap on our older cars and are using an auto trans, what are you doing for a TCC brake switch? Replacing the old single wire brake switch and going with something like this?
Thanks
Thanks
12-11-2013, 06:20 PM
#7

That is what I did with mine. However with my 6L80 on the part you left open I put a 1K resistor to ground. Also ran the TCC to both inside posts if that makes since. Not sure if you need to do that. So either the TCC wire either has 12v or goes to ground through a 1K resistor.
Trending Topics
12-11-2013, 10:26 PM
#8
Launching!
Thread Starter
That is what I did with mine. However with my 6L80 on the part you left open I put a 1K resistor to ground. Also ran the TCC to both inside posts if that makes since. Not sure if you need to do that. So either the TCC wire either has 12v or goes to ground through a 1K resistor.
On another note, one step closer.

-Nick

 12-12-2013, 09:44 AM
#10
Staging Lane
iTrader: (4)

Join Date: Oct 2010
Location: Spokane Wa.
Posts: 76
Likes: 0
Received 0 Likes
on
0 Posts
Looking good Nick.
I have all the front suspension removed from my 62 right now getting ready to put the tubular upper/lower control arms & power disc swap on her.
Hit me up when you have a chance.
I have all the front suspension removed from my 62 right now getting ready to put the tubular upper/lower control arms & power disc swap on her.
Hit me up when you have a chance.
01-03-2014, 02:01 PM
#11
Launching!
Thread Starter
Got a bit more done. I got a set of the cheap ebay ls headers for a 69 camaro that I will use to test fit, and beat up, and eventually use as a template for custom headers down the road (if needed). These headers fit nice and tight, and not low at all. The only tight spaces seems like it could be the steering box. I'll know shortly.


The other thing I was working on was what I wanted to do for gauges. I wanted to keep the stock look, and I don't like the idea of having a completely custom dash for gauges, nor do I like the look of the Dakota gauges (I do like VHX but they dont have them for 65 yet). So, what I decided to do was purchase a gauge housing from another 65 SS, so that I can take the speedometer housing out of it, to modify for some inconspicuous digital gauges.

I want to keep the stock manifold vacuum gauge on the right, as well as the stock gauge set on the left (has fuel, amp, oil press, water temp), but I will put 4 52mm digital gauges in the speedo housing, where the speedometer is. (I'm not a fan of this style speedo, and didn't want to get it converted for the electronic signal. I will then cut a piece of 1/4" tinted plexi to cover the gauges so that when the car is off, they can't be seen, which will lend to a somewhat stock appearance. The four gauges I will be using in this space will be speedo, tach, oil pressure, and water temp. I'll also add small LED's near the top for turn signals, bright light indicator, and check engine, which will all be invisible with the car off.


I'll use the speedometer outline as a template to cut the plexi to size.

Best of all, I'll have my original stuff if I ever want to go back to stock.
The other thing I was working on was what I wanted to do for gauges. I wanted to keep the stock look, and I don't like the idea of having a completely custom dash for gauges, nor do I like the look of the Dakota gauges (I do like VHX but they dont have them for 65 yet). So, what I decided to do was purchase a gauge housing from another 65 SS, so that I can take the speedometer housing out of it, to modify for some inconspicuous digital gauges.
I want to keep the stock manifold vacuum gauge on the right, as well as the stock gauge set on the left (has fuel, amp, oil press, water temp), but I will put 4 52mm digital gauges in the speedo housing, where the speedometer is. (I'm not a fan of this style speedo, and didn't want to get it converted for the electronic signal. I will then cut a piece of 1/4" tinted plexi to cover the gauges so that when the car is off, they can't be seen, which will lend to a somewhat stock appearance. The four gauges I will be using in this space will be speedo, tach, oil pressure, and water temp. I'll also add small LED's near the top for turn signals, bright light indicator, and check engine, which will all be invisible with the car off.
I'll use the speedometer outline as a template to cut the plexi to size.
Best of all, I'll have my original stuff if I ever want to go back to stock.
Last edited by nicke; 01-03-2014 at 02:09 PM.
01-24-2014, 01:08 PM
#12
Launching!
Thread Starter
As I am getting closer to dropping this in, I started to think about my exhaust.
Currently, I have 2 1/2 duals back to turbo mufflers, that then reduces to 2 1/4 out the muffler and going out the back.
This was the stock setup for original 396/425HP version of this car for 65'.
Will this setup negatively affect my LS performance? I know that 2 1/2 all the way would be more ideal, but for stock power on this L92 with headers, is this necessary?
Thoughts?
01-24-2014, 08:08 PM
#13

As I am getting closer to dropping this in, I started to think about my exhaust.
Currently, I have 2 1/2 duals back to turbo mufflers, that then reduces to 2 1/4 out the muffler and going out the back.
This was the stock setup for original 396/425HP version of this car for 65'.
Will this setup negatively affect my LS performance? I know that 2 1/2 all the way would be more ideal, but for stock power on this L92 with headers, is this necessary?
Thoughts?
Currently, I have 2 1/2 duals back to turbo mufflers, that then reduces to 2 1/4 out the muffler and going out the back.
This was the stock setup for original 396/425HP version of this car for 65'.
Will this setup negatively affect my LS performance? I know that 2 1/2 all the way would be more ideal, but for stock power on this L92 with headers, is this necessary?
Thoughts?
Sorry I don't have any insight on this but I am super curious to hear an educated answer since I will be facing the same question in the near future.
Nice Ride btw!
01-24-2014, 08:28 PM
#14
nicke - where did you order the new gas tank pictured above? I'm considering this one, seems to be what I need for a 5.3 swap...
http://www.tanksinc.com/index.cfm/pa...rod/prd415.htm
http://www.tanksinc.com/index.cfm/pa...rod/prd415.htm
01-24-2014, 08:33 PM
#15
Launching!
Thread Starter
nicke - where did you order the new gas tank pictured above? I'm considering this one, seems to be what I need for a 5.3 swap...
http://www.tanksinc.com/index.cfm/pa...rod/prd415.htm
http://www.tanksinc.com/index.cfm/pa...rod/prd415.htm
http://www.rockauto.com/catalog/moreinfo.php?pk=1216832&cc=1434988
-Nick
01-24-2014, 09:15 PM
#17
Teching In

Join Date: Nov 2013
Posts: 23
Likes: 0
Received 0 Likes
on
0 Posts
That is what I did with mine. However with my 6L80 on the part you left open I put a 1K resistor to ground. Also ran the TCC to both inside posts if that makes since. Not sure if you need to do that. So either the TCC wire either has 12v or goes to ground through a 1K resistor.
01-24-2014, 11:40 PM
#18
"Doesn't the tcu just need to see +12vdc when the brake is applied?"
Possibly. However this circuit simulates a real light bulb. One could try it with just the +12vdc and see what happens.
Possibly. However this circuit simulates a real light bulb. One could try it with just the +12vdc and see what happens.
01-25-2014, 12:01 AM
#19
Launching!
Thread Starter
Sorry guys, I think you have it backwards. The switch I showed is what is needed to control brake lights correctly, as well as the TCC function for the TCM.
The brake light would obviously be 12v when brakes are depressed, 0v with foot off the brake.
The other set is the opposite. It should be 12v without the brakes pressed, and it will go to 0v when the brakes are applied. This is the needed input to correctly function the TCC.
That's how I am going to wire it anyway. Someone please correct me if I'm wrong here.
-Nick
01-25-2014, 06:28 AM
#20

Sorry guys, I think you have it backwards. The switch I showed is what is needed to control brake lights correctly, as well as the TCC function for the TCM.
The brake light would obviously be 12v when brakes are depressed, 0v with foot off the brake.
The other set is the opposite. It should be 12v without the brakes pressed, and it will go to 0v when the brakes are applied. This is the needed input to correctly function the TCC.
That's how I am going to wire it anyway. Someone please correct me if I'm wrong here.
-Nick
The brake light would obviously be 12v when brakes are depressed, 0v with foot off the brake.
The other set is the opposite. It should be 12v without the brakes pressed, and it will go to 0v when the brakes are applied. This is the needed input to correctly function the TCC.
That's how I am going to wire it anyway. Someone please correct me if I'm wrong here.
-Nick
Are your 2 1/4 pipes mandrel bent? If not, upgrade the tailpipes. I believe they will be a restriction. I just took off some 2 1/4 tails on my 68 Impala and they are severely restricted in the bends by the over the axle portion.