
Old School LSx 1967 Camaro
 12-13-2013, 11:25 AM
#41

Well, I might have hit a small bump in the road here...
I have a -4an line coming off my master cylinder and need to find an adapter to the GTO slave cylinder. I found one from Russel but can't tell if it attaches directly to the slave (inside the bellhousing) or to the quick disconnect fitting (outside the bellhousing). I don't want to install the engine/tranny today and find out there is no fitting to connect outside the bellhousing.
I have PM'd Tick Performance, posted here in the Emergecy Room and on LS1tech to see if I can get a quick answer to see if I can move forward. But I'm posting here as well just in case someone may know the answer.
Copy and pasted from LS1tech.com:
HELP!
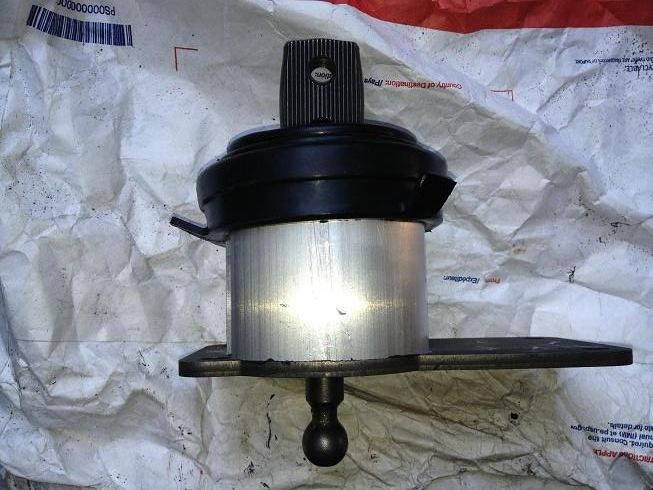
I just installed a new GM GTO slave cylinder along with a Monster Level 2 clutch. LQ9 engine and GTO T56 are still out of the car, this is a new build. I want to mate the two and drop them in tomorrow, but just realized that the line going from my McLeod adjustable MC is a -4AN line, and it looks like the slave cylinder is a quick disconnect fitting?
Here's a pic of my slave:
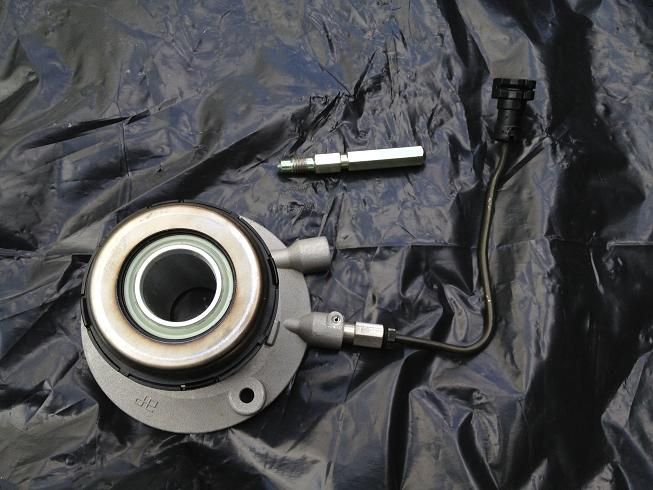
Do you think this fitting would work? Russell clutch adapter fitting 641001(http://www.summitracing.com/parts/RUS-641001/):
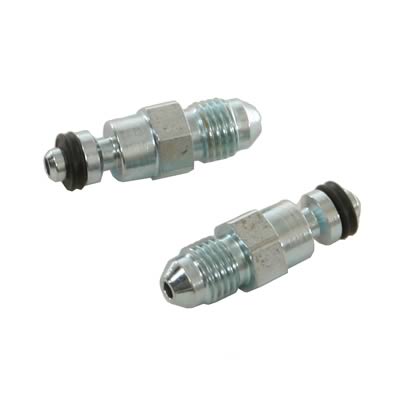
If so, I can pick up the fitting next week and all is good. If not, I'm worried that I'll need an adapter that connects directly to to the slave and I'd have to drop the tranny to access it. ANY HELP IS APPRECIATED!!!!
I just installed a new GM GTO slave cylinder along with a Monster Level 2 clutch. LQ9 engine and GTO T56 are still out of the car, this is a new build. I want to mate the two and drop them in tomorrow, but just realized that the line going from my McLeod adjustable MC is a -4AN line, and it looks like the slave cylinder is a quick disconnect fitting?
Here's a pic of my slave:

Do you think this fitting would work? Russell clutch adapter fitting 641001(http://www.summitracing.com/parts/RUS-641001/):
If so, I can pick up the fitting next week and all is good. If not, I'm worried that I'll need an adapter that connects directly to to the slave and I'd have to drop the tranny to access it. ANY HELP IS APPRECIATED!!!!
 12-13-2013, 11:26 AM
#42
Plugging along...
Well, couldn't really find an answer to my question, so I didn't install the engine/tranny today. I ordered the above part and when it arrives, I'll see what my options are.
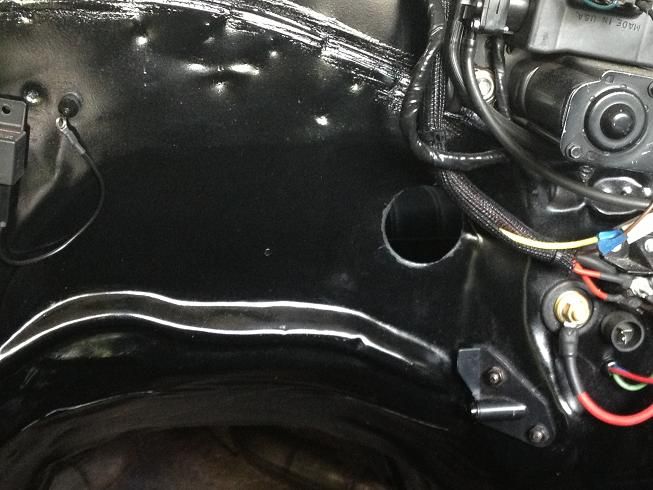
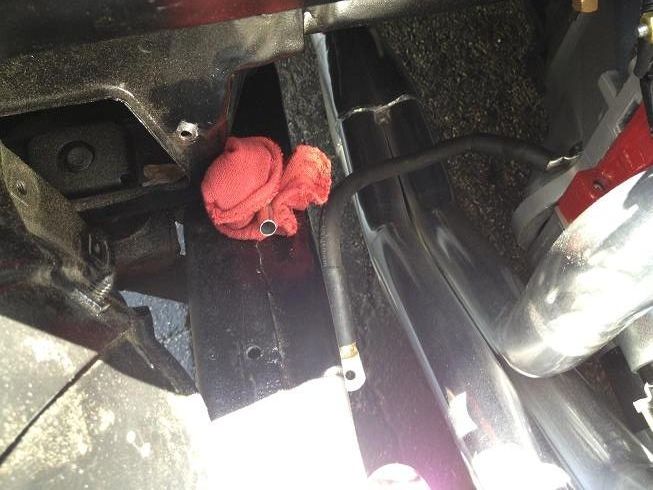
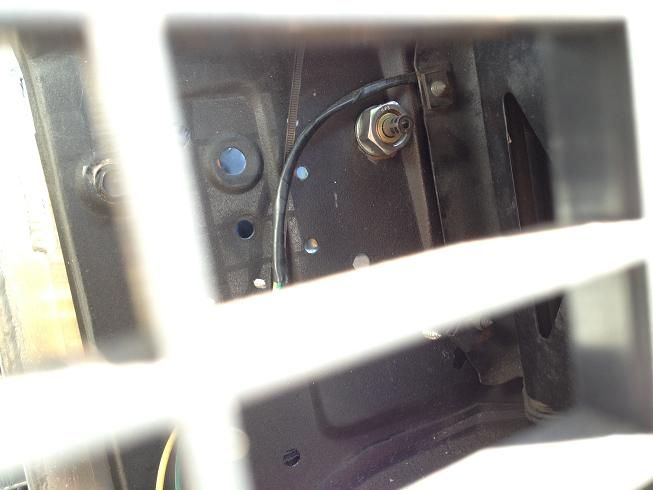
I did a bunch of small stuff, and took a pic of the hole for the PSI harness to pass through. This is why you don't paint in the dark. I must have grabbed a can of flat or satin black by accident instead of the gloss. Luckily it will be covered by the grommet, but I may still go back and paint it gloss if I have a can of it lying around.
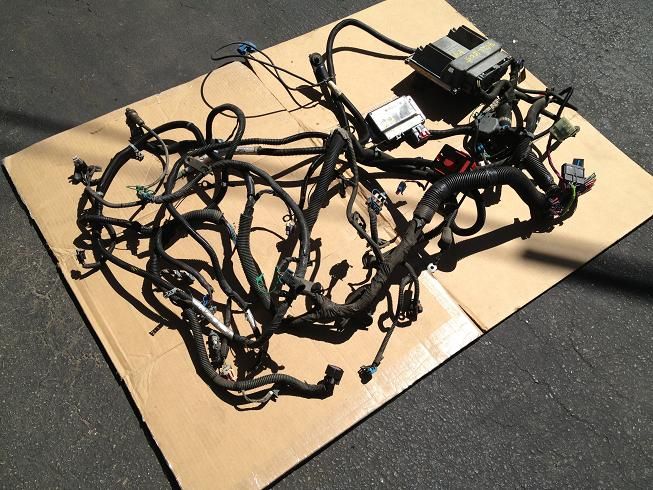
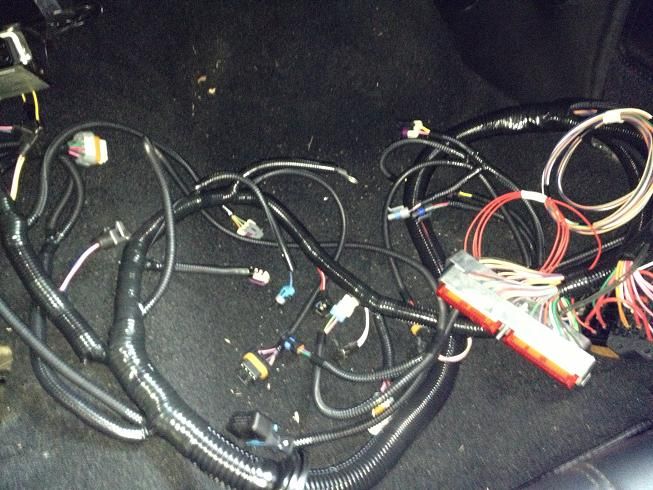
Here's the old LQ9 harness, I sold it on eBay:
Here's the PSI conversion harness, this is for Drive By Cable:

I also mounted up the Dirty Dingo Sliders and the Energy Suspension poly motor mounts. Energy Suspension says you must use the preload plate on the left of the photo, Dirty Dingo says you don't. After much research and debate I went without it, as the Dingo sliders act as the preload plate:
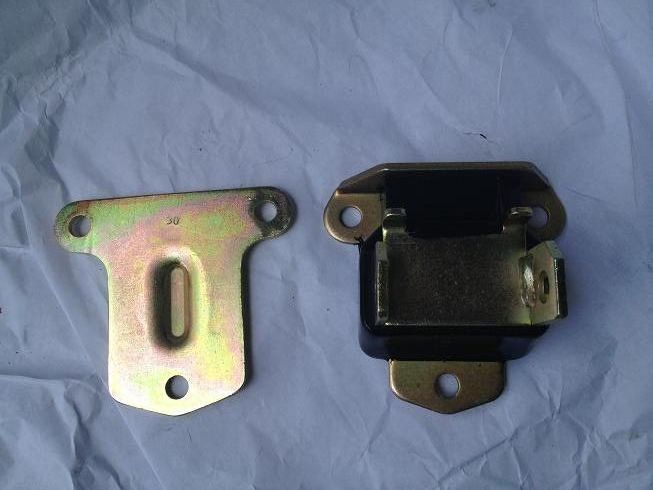
The slider on the left doesn't have the preload plate, the one on the right does:
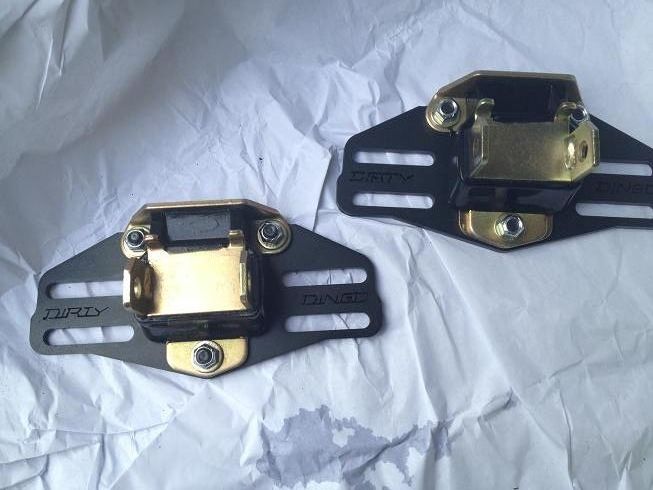
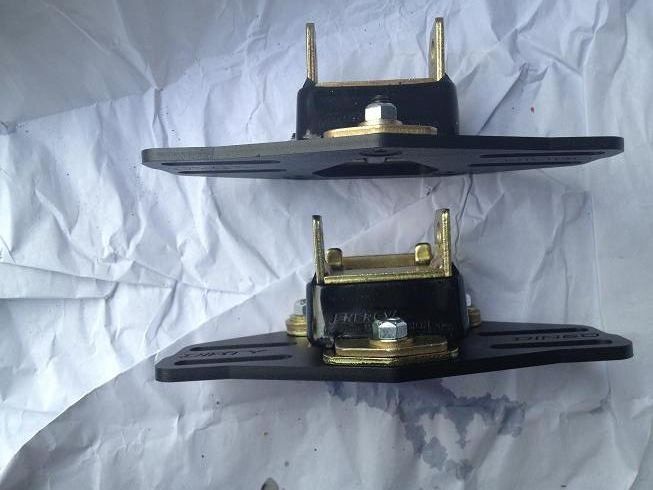
Here's a shot from above, the one on the top doesn't have the plate, the one on the bottom does:
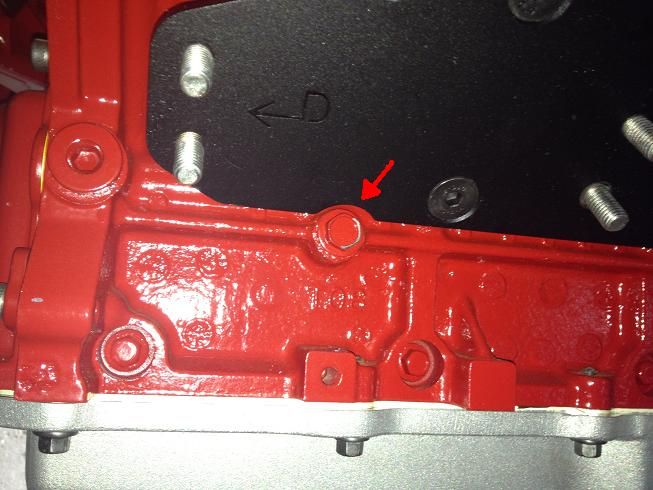
I mounted up the driver's side and only had about 1/2" of adjustability before it locked. It turned out the slider was hitting this bolt. Luckily I had taken a million photos and was able to go back and see what the bolt was used for, and it's just for a ground strap. I was worried it might be a PS bracket or something necessary. I just removed the bolt and touched it up with some engine enamel:
Sorry about the blurry photo, I think that's my finger in the top left, but the next two photos show the passenger side mount and how much adjustability these mounts from Dirty Dingo give you:
Engine all the way forward:
All the way back:
I did a bunch of small stuff, and took a pic of the hole for the PSI harness to pass through. This is why you don't paint in the dark. I must have grabbed a can of flat or satin black by accident instead of the gloss. Luckily it will be covered by the grommet, but I may still go back and paint it gloss if I have a can of it lying around.

Here's the old LQ9 harness, I sold it on eBay:

Here's the PSI conversion harness, this is for Drive By Cable:

I also mounted up the Dirty Dingo Sliders and the Energy Suspension poly motor mounts. Energy Suspension says you must use the preload plate on the left of the photo, Dirty Dingo says you don't. After much research and debate I went without it, as the Dingo sliders act as the preload plate:

The slider on the left doesn't have the preload plate, the one on the right does:

Here's a shot from above, the one on the top doesn't have the plate, the one on the bottom does:

I mounted up the driver's side and only had about 1/2" of adjustability before it locked. It turned out the slider was hitting this bolt. Luckily I had taken a million photos and was able to go back and see what the bolt was used for, and it's just for a ground strap. I was worried it might be a PS bracket or something necessary. I just removed the bolt and touched it up with some engine enamel:

Sorry about the blurry photo, I think that's my finger in the top left, but the next two photos show the passenger side mount and how much adjustability these mounts from Dirty Dingo give you:
Engine all the way forward:

All the way back:

Last edited by 67rally; 01-02-2014 at 05:53 PM.
12-13-2013, 11:27 AM
#43
.....
I think I have found a solution to the GTO slave cylinder/-4AN hose issue. Actually 2 solutions, so one has to work (finger crossed), so I can install the engine and tranny this weekend.
I ordered a Russell clutch adapter fitting #641001, which I believe attaches directly to the slave cylinder and has a -4AN male end to it. I also purchased a 6" -4AN hose and a -4AN to -4AN union, so I could make the connection outside the bellhousing.
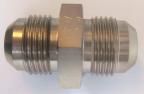
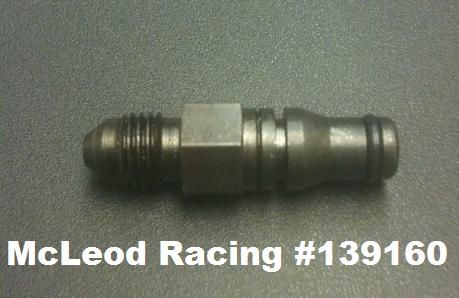
And I called McLeod Racing and they said their part # 139160 wire clip fitting to AN-4 male should connect directly to the quick disconnect fitting outside the bellhousing on the end of the GTO slave elbow. So I ordered that as well.


 12-13-2013, 11:30 AM
#45
Progress!


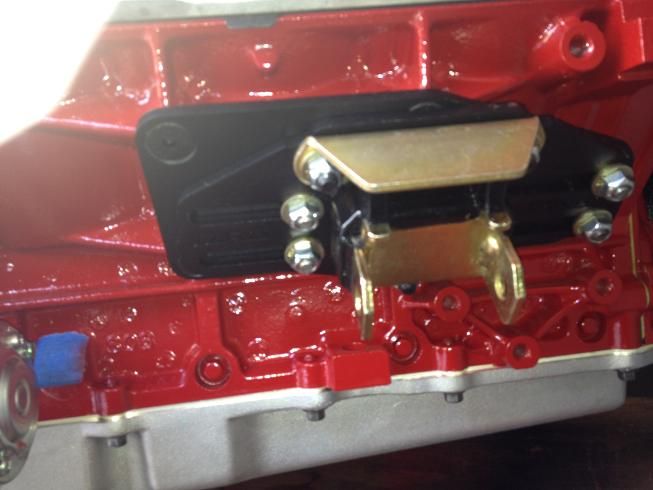
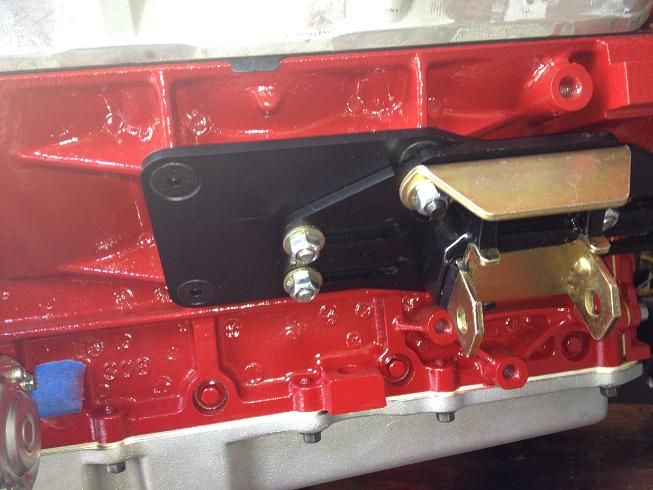
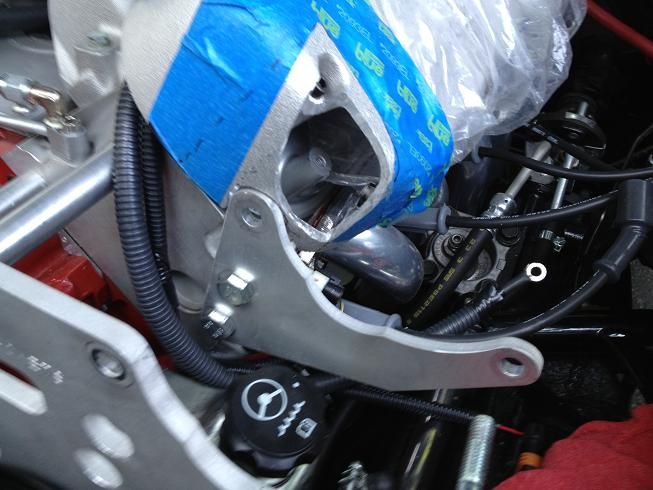
I forgot to mention two things. First is that I had the driver's side motor mount upside down, as you can see in the pics where the engine is still on the hoist. And second is that I ended up using the pre-load plate that Energy Suspension provides. My oil pan was either touching the front subframe crossmember or it was less than a paper width from it, so I used the pre-load plates as a 1/4" spacer. They also bought me some room for the headers (that still needed clearancing).
Here's a pic of the #7 tube in relation to the Pitman arm. As you can see, if I slide the motor forward at all it will hit:
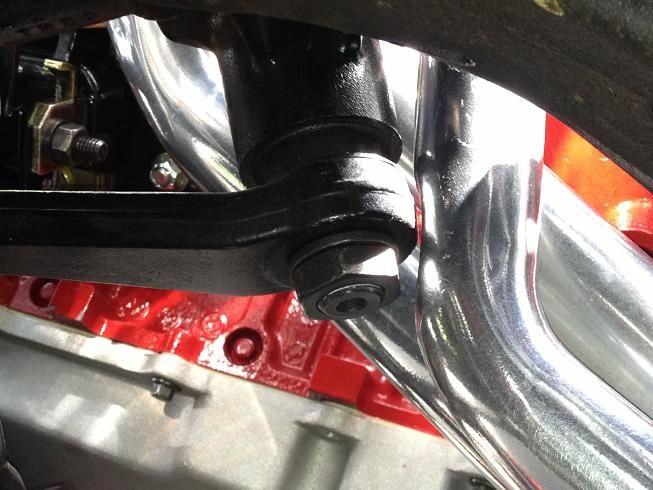
Here's a pic of the #7 tube in relation to the Pitman arm. As you can see, if I slide the motor forward at all it will hit:
 12-13-2013, 11:32 AM
#46
Coil packs...
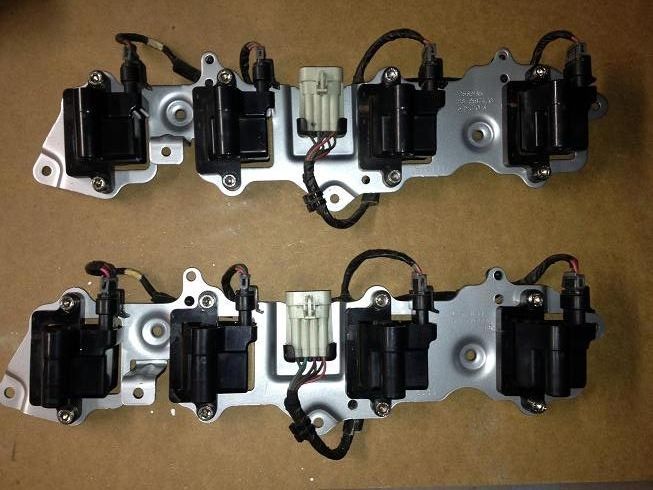
I think I mentioned that I was cleaning up my coil packs and re-painting the bracket a while back, so here are some pics. I cleaned the coils with a dry nylon brush, then went back with a damp towel, and a final cleaning with a cloth with brake cleaner on it. Then I cleaned up the brackets, cleaned them with brake cleaner and then prep spray and hit them with a coat of primer and a couple coats of aluminum colored paint to match the valve covers. I added some new hex head bolts (I'm using them in several locations on the engine), and reassembled them. Eventually I'll hide the coils, but this will do for now.
Before:
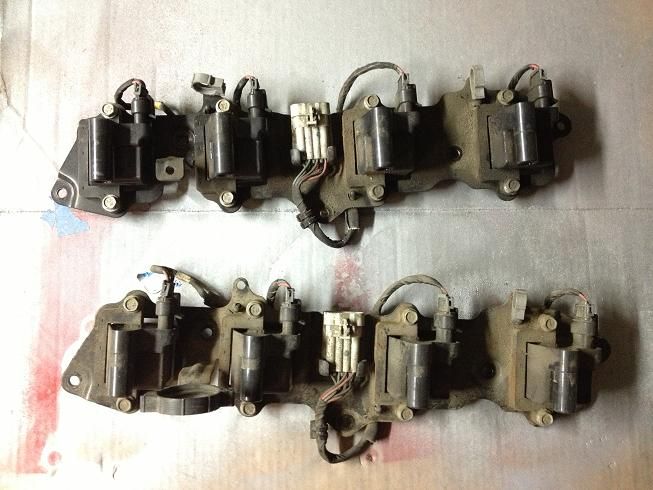
Cleaned and Painted:
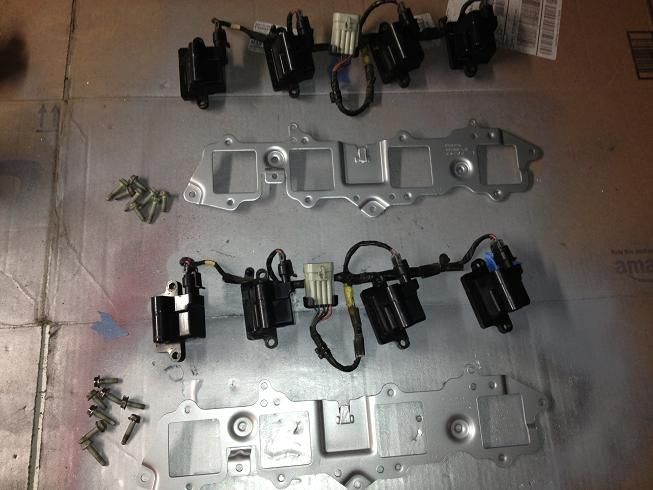
Re-assembled:
Before:

Cleaned and Painted:

Re-assembled:
 12-13-2013, 11:33 AM
#47
Accessories...
I got some more work done last night. I worked on the accessories. I couldn't stand the stock LQ9 power steering/alt bracket. It stuck the alternator way too high, so I'm using a bracket from LSBrackets.com. This retains the stock PS pump location but moves the alternator to the Corvette location. It comes with all the aluminum brackets, spacers, idler pulley bolts, and fit perfectly.
LQ9 bracket on left vs LSBrackets on right:
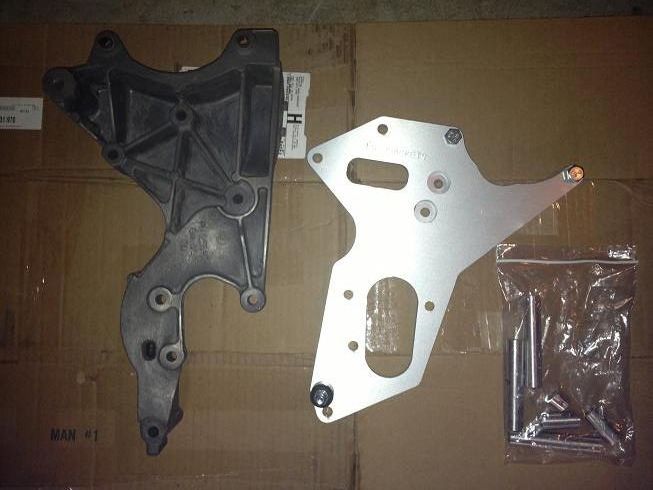
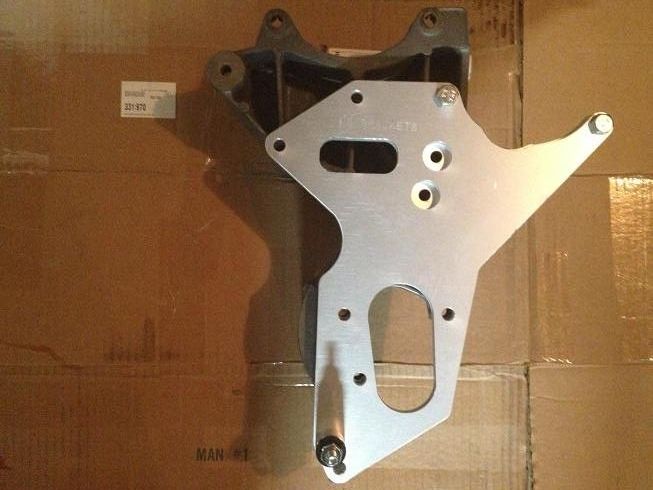
And here's the new bracket on top of the old one for comparison:
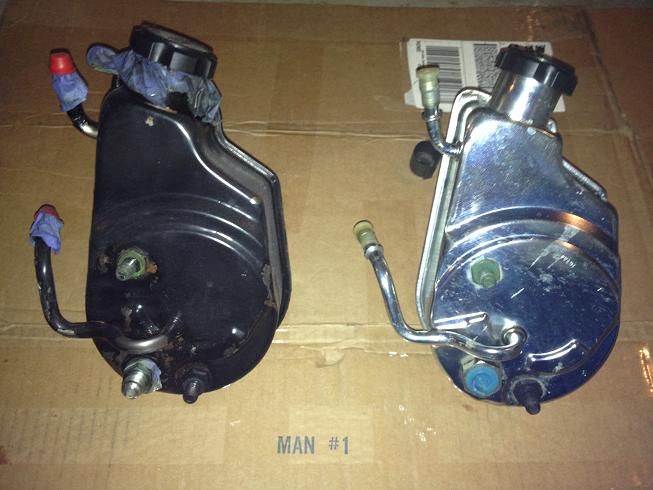
I also picked up a new PS pump from a 6.0 Silverado since it was shiny (LQ9 on left, Silverado on Right):
LQ9 bracket on left vs LSBrackets on right:

And here's the new bracket on top of the old one for comparison:

I also picked up a new PS pump from a 6.0 Silverado since it was shiny (LQ9 on left, Silverado on Right):


 12-13-2013, 11:36 AM
#48
Wiring. I got my harness from Jon at PSI Conversions. I highly recommend these guys...
And here's what I started on my lunch hour(s) today:
This would have gone quicker with someone pulling the wires from the engine bay side, while I fed them through the firewall. Instead I went back and forth a dozen times to get to this point (I also mounted the coils and coil brackets):
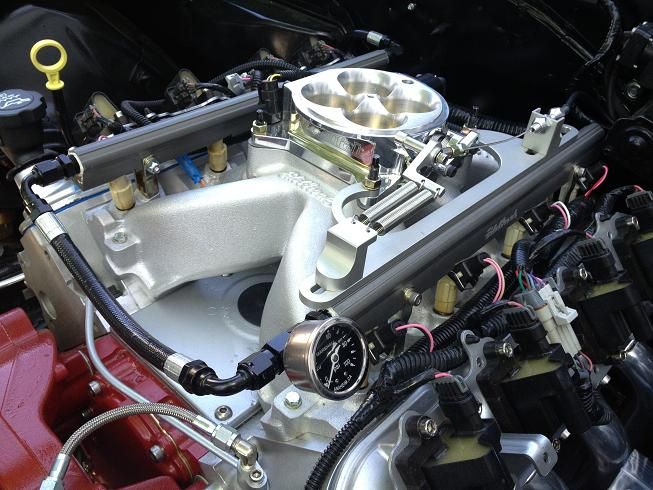
At this point I have about half of the wires hooked up in the engine bay. I will probably have to cut the harness open to re-route some of the sensor wires that go to the throttle body. Those are the wires up front with blue tape on them. Normally the TB would be located directly above the water pump, but because I'm using a 4 barrel TB mounted on top of the Vic Jr., the wires may not reach, and even if they do, they will not look very clean. I just need to remove the electrical tape on the loom, and pull a few of the wires back so they pop out closer to the firewall, then re-tape the loom.

I've been plugging away (pun intended) at the wiring this week, but haven't had much time. I did have to cut the harness open to move the IAT, IAC, MAP and TPS sensors to the rear/passenger side of the engine, and deleted my MAF sensor altogether since I won't be running it with the Vic Jr.
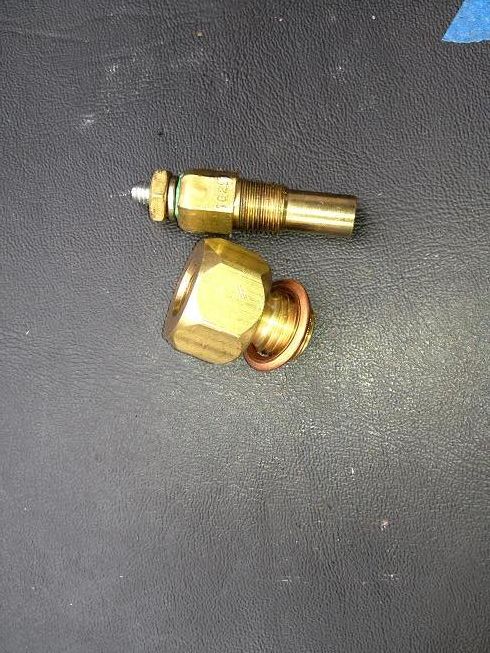
I also need to use my old oil pressure and coolant temp sensor for the gauges. The new coolant sensor in the front of the driver's side head that plugs into the harness will just send info to the PCM (ECU), so I'm actually running two coolant sensors. The coolant sensor for the gauges is in the rear of the passenger side head. Anyways, I ordered some adapters from NVU to go from 1/8"NPT to M12 (coolant) and M16 (oil pressure), since I'm running their gauges.
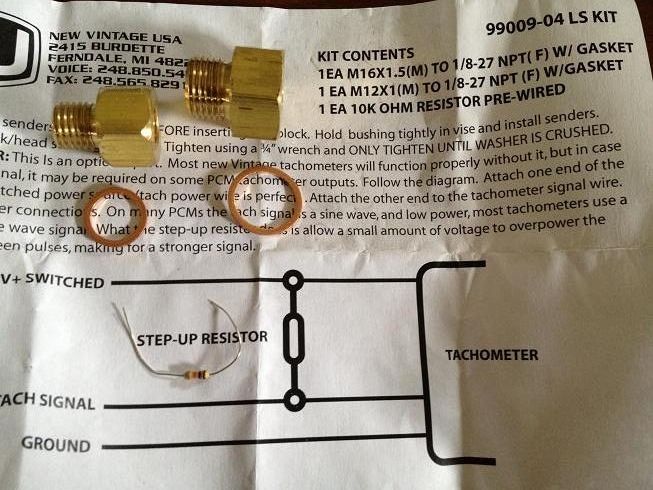
Coolant temp sensor for gauges with M12 adapter:
Installed:
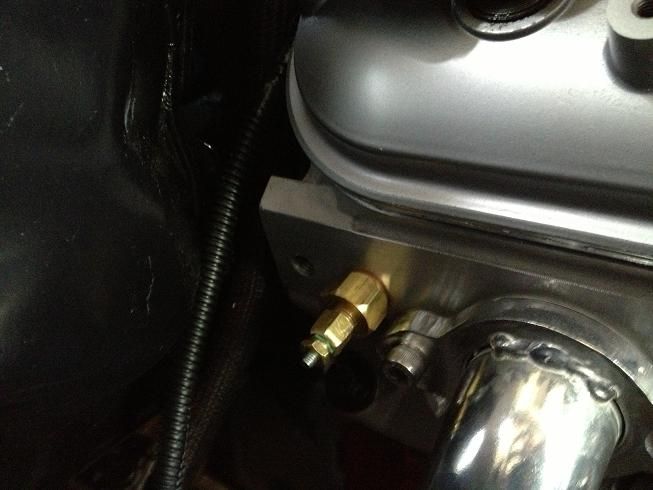
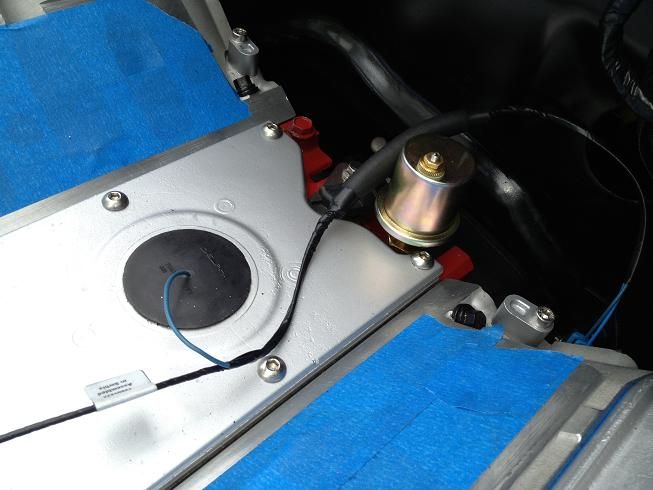
Oil pressure sensor installed:
I also found out I can't re-use my LQ9 Oxygen (O2) sensors that screw into the headers. The harness is set up for a 4 wire flat connector and the LQ9 has a 3 wire triangular connector. No big deal, except new sensors are $60 each. I also need to pick up a couple of O2 sensor harness extenders since the sensors are about 8" too far away. Another $20 each. Luckily I know someone who might have a spare set of the right O2 sensors I can pick up for half price.
LQ9 O2 sensor and plug:
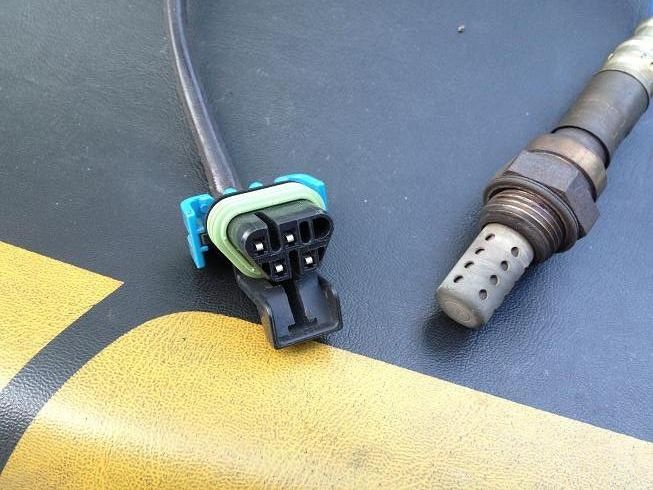
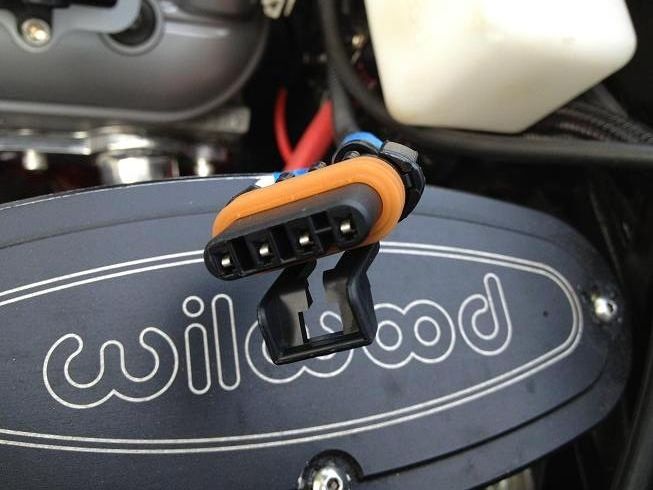
Here's the plug on the PSI harness (uses GM# 25312184 / Delco# AFS75):
That's it for a few days. I'm putting down the wrenches and heading North for a long weekend.:beers:
I also need to use my old oil pressure and coolant temp sensor for the gauges. The new coolant sensor in the front of the driver's side head that plugs into the harness will just send info to the PCM (ECU), so I'm actually running two coolant sensors. The coolant sensor for the gauges is in the rear of the passenger side head. Anyways, I ordered some adapters from NVU to go from 1/8"NPT to M12 (coolant) and M16 (oil pressure), since I'm running their gauges.

Coolant temp sensor for gauges with M12 adapter:

Installed:

Oil pressure sensor installed:

I also found out I can't re-use my LQ9 Oxygen (O2) sensors that screw into the headers. The harness is set up for a 4 wire flat connector and the LQ9 has a 3 wire triangular connector. No big deal, except new sensors are $60 each. I also need to pick up a couple of O2 sensor harness extenders since the sensors are about 8" too far away. Another $20 each. Luckily I know someone who might have a spare set of the right O2 sensors I can pick up for half price.
LQ9 O2 sensor and plug:

Here's the plug on the PSI harness (uses GM# 25312184 / Delco# AFS75):

That's it for a few days. I'm putting down the wrenches and heading North for a long weekend.:beers:
12-13-2013, 11:41 AM
#49
I hit a roadblock in the build today. I spent two hours under the car trying to install my old drive shaft so I could measure to have it shortened. This driveshaft has less than 1000 miles and no real abuse on it. It was mated to a Saginaw tranny which is a 27 spline output shaft. The T56 came out of a running/driving GTO and also has a 27 spline output shaft. From everything I read the two use the same slip yoke.
I couldn't even get the driveshaft to start sliding in. I had cleaned both parts thoroughly with brake cleaner and then lubed them up and got nowhere. I took pics of the output shaft and of the slip yoke and they both look clean. No obvious dings or twisted splines. I ran out of time today, so I'll get back under there tomorrow and see if the tail shaft bushing is a different size in the T56 vs the outer diameter of the yoke. I'm open to any words of wisdom here, apart from "did you try it when it was out of the car?" The answer to that is a resounding no.:sad:
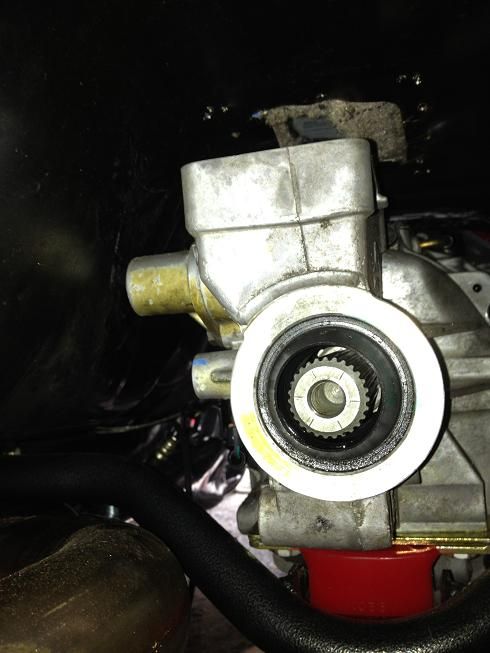
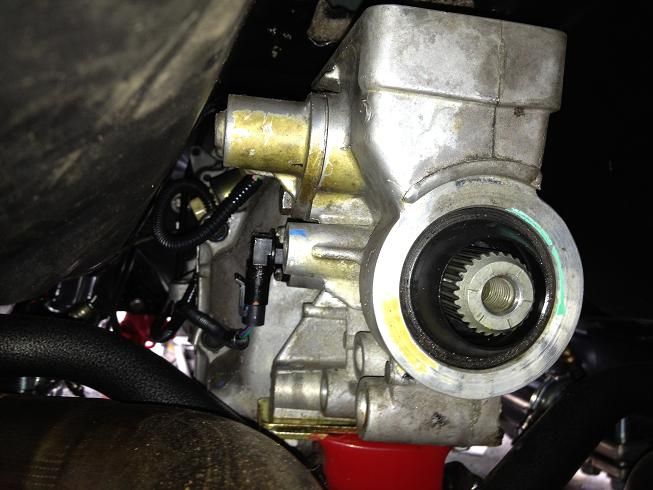
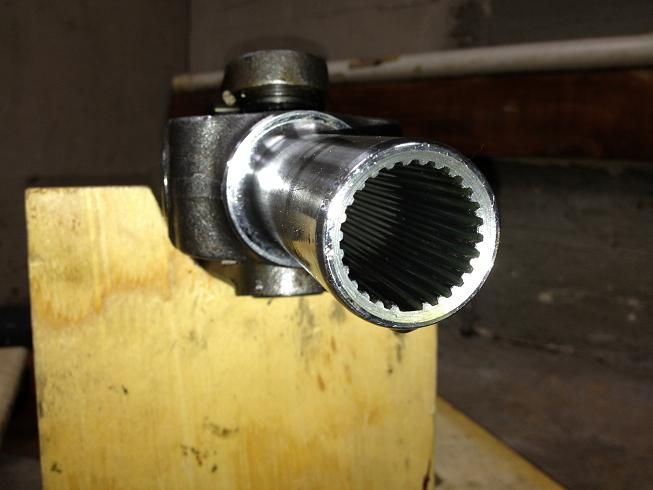
I couldn't even get the driveshaft to start sliding in. I had cleaned both parts thoroughly with brake cleaner and then lubed them up and got nowhere. I took pics of the output shaft and of the slip yoke and they both look clean. No obvious dings or twisted splines. I ran out of time today, so I'll get back under there tomorrow and see if the tail shaft bushing is a different size in the T56 vs the outer diameter of the yoke. I'm open to any words of wisdom here, apart from "did you try it when it was out of the car?" The answer to that is a resounding no.:sad:


It turned out that the U-joint was bumping against a weld booger on top of the exhaust H-Pipe. It had nothing to do with the output shaft of the trans or the slip yoke. I accidently pulled down on the exhaust when I was trying to reposition myself and the slip yoke slid into place. Big relief.
12-13-2013, 11:42 AM
#50
More progress...
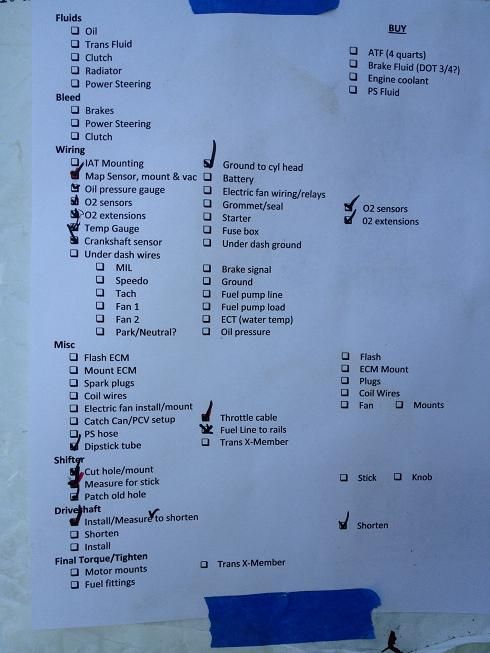
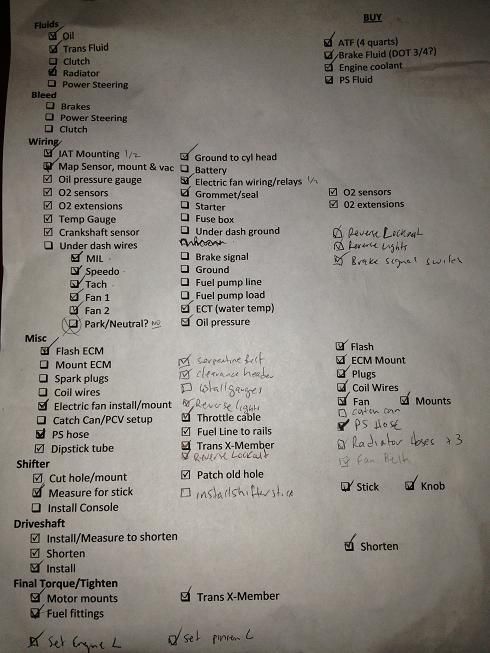
Only a few pics, but I got a lot of stuff done, including wiring and sensors. I created a punch list on Friday and am checking them off as I go. Motivation to get it done. The left and center colums are the to do list. The right column is stuff I still need to buy.
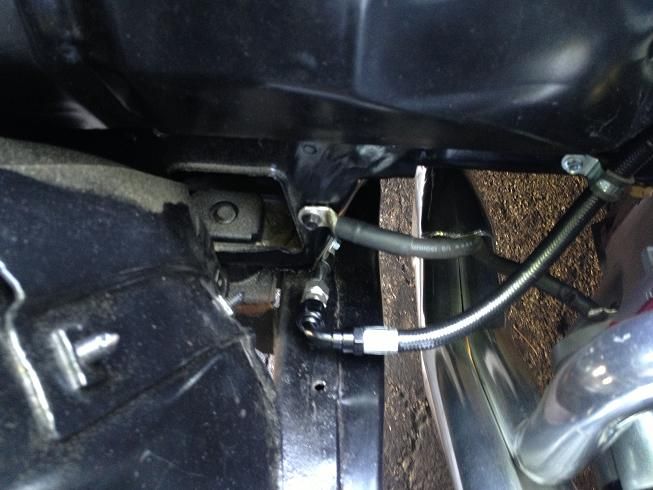
Here's where I cut the 3/8" hard fuel lines and transitioned to -6an lines. The fuel hose looks a lot closer to the headers than they really are, there's 3-4" of space, just a wierd angle:
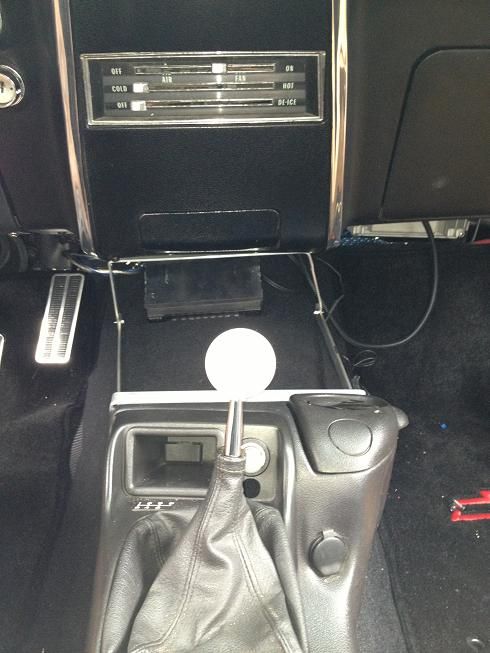
Here's the new shifter from Core-Shifters. This one is setup for a GTO shifter cup which is different than the F-bodies.
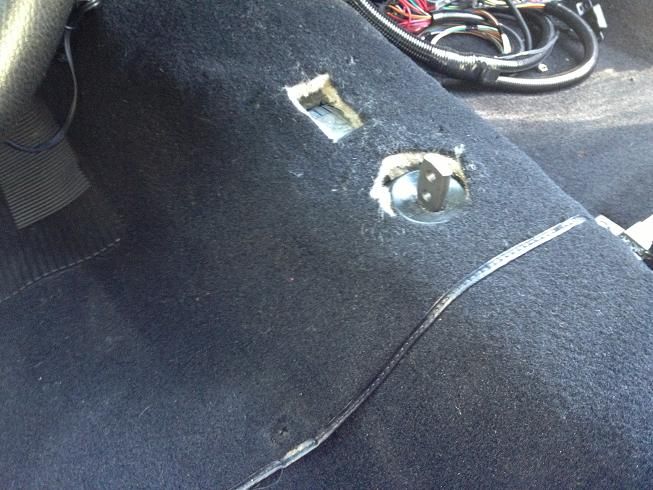
I cut a new hole for the shifter and used the scrap of floor to patch the old hole. The new shifter sits 4-5" further back than the Saginaw did:
Here's where I mounted my MAP sensor (the black sensor with a vacuum hose attached to the top of it), and it connects to the vacuum port on the throttle body.

This is where I left off. All the fuel lines are done. I installed a fuel pressure gauge on the end of the fuel rail. The Lokar throttle cable is installed and tightened down. The new oil dipstick tube is installed.

Here's where I cut the 3/8" hard fuel lines and transitioned to -6an lines. The fuel hose looks a lot closer to the headers than they really are, there's 3-4" of space, just a wierd angle:


Here's the new shifter from Core-Shifters. This one is setup for a GTO shifter cup which is different than the F-bodies.

I cut a new hole for the shifter and used the scrap of floor to patch the old hole. The new shifter sits 4-5" further back than the Saginaw did:

Here's where I mounted my MAP sensor (the black sensor with a vacuum hose attached to the top of it), and it connects to the vacuum port on the throttle body.

This is where I left off. All the fuel lines are done. I installed a fuel pressure gauge on the end of the fuel rail. The Lokar throttle cable is installed and tightened down. The new oil dipstick tube is installed.

I'm happy with my progress over the past few days, and I'm crossing things off the punch list although I've added a few things as well.
-I got my gauges (MIL, Speedo, Tach) wired up.
-I got my driveshaft back from the shop and installed. I realized the tranny wasn't perfectly centered, so I re-centered it, and set the engine and pinion angles.
-I got my ECU programmed with a base tune. I went down to Slowhawk Performance and met with Don, and he took good care of me. He's got a rep of being one of the best tuners in the country, and luckily only about 30 minutes from me. My tune will be complicated, since I'm not using a Mass Airflow Sensor (MAF), it will have to be a Speed Density Tune. Too complicated to explain here.
-I replaced my reverse lockout solenoid after finding out the plastic end of it wasn't a good place to wedge a 2x4 against while trying to center the tranny. :p Another sensor, another $75.
-I mocked up a few different shifter sticks I made out of plywood and found the perfect height, but the offset was wrong, so I ended up taking apart my brand new shifter from Core-Shifters and flipping the shifter handle base around so I could mount the shifter on the opposite side (pics later will make sense)
-I filled the transmission through the shifter hole, while the shifter was out.
-I ordered a new fan belt, since the one that was supposed to fit with the LS Brackets setup was a couple inches short.
-I also ordered my new dual Electric Fans, fan mounting brackets, coil wires, spark plugs, upper and lower radiator hoses, and a block off hose since I still don't have a heater box yet.
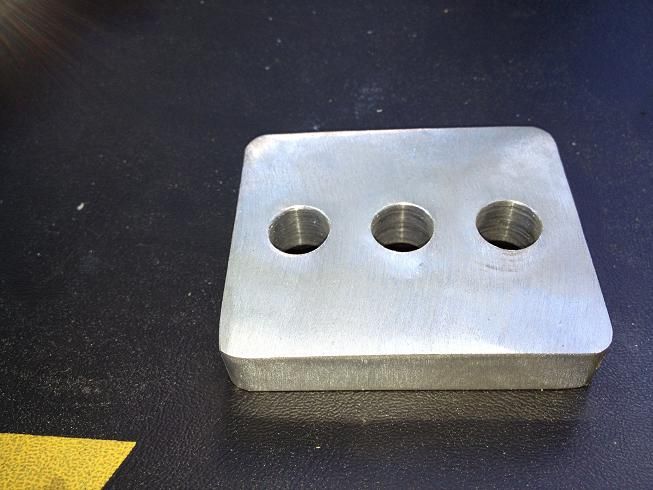
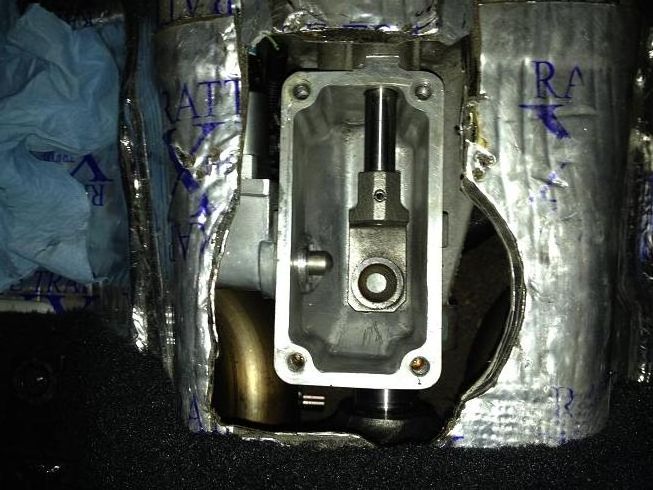
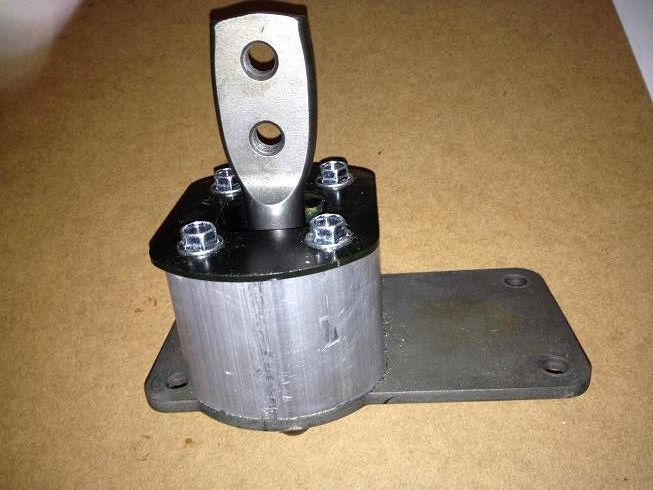
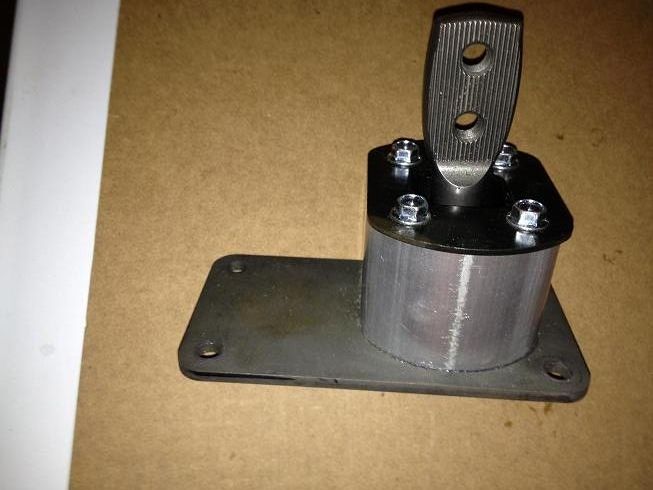
Here's a shot of the billet transmission mount that I modified. This was supposed to be for use with the auto tranny. I had too much downward angle of my engine and transmission, compared to my pinion angle, and my pinion angle was exactly where I wanted it to be. This mount was originally .750" thick. I drew a line around it with a sharpie (wish I had taken pics), placed it in a vice and sliced a 1/3 of it off. I wasn't sure how it would come out. I was looking for around 1/2" thick rather than using a stack of washers. I measure it on all 4 sides with a micrometer and came out with .481", .481", .479" and .491". Pretty darned close for eyeballing it, so I took my grinder with a sanding wheel and knocked .010" off the tall side. I came out with exactly 2* rearward engine angle, which is exactly where I wanted to be.
Here's a closeup of the cutout for the shifter hole. I've seen guys just cut a circle, but if you ever need to change out the shifter assembly, you have to drop the tranny. This way I can lift it straight up. I did have to widen the hole after I realized I had to shift the tranny 3/8" towards the passenger side.
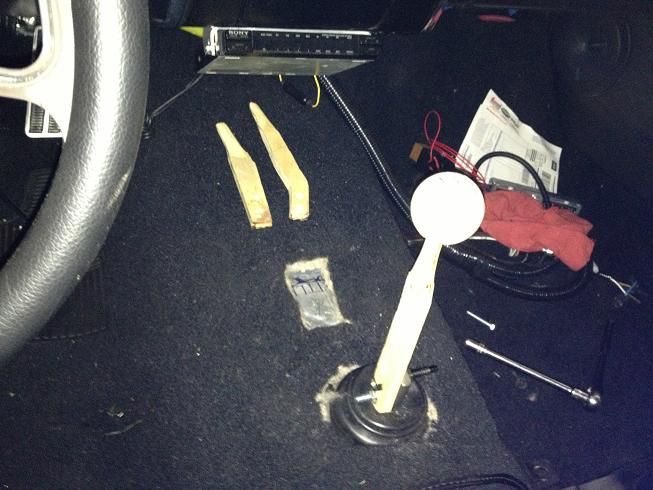
Not a great pic, but here's a shot of the shifter stick mockups. I had planned on going with a curved handle, but it put the shifter way to far back. The three Hurst shifter sticks I was looking at were 538-0015 (8" tall angled back 3"), 538-7238 (7.5" tall straight), and 538-7201 (6.38" tall with a 10* rear angle). I ordered from core-shifters.com, since I ordered my shifter there as well. They are super responsive to e-mails, I have contacted them a half dozen times and never waited more than 2 hours for a response. Here's a link to pics of all of their Hurst sticks: http://www.core-shifters.com/hurst2004sticks.pdf
538-7238 mocked up (you can see the other two wooden sticks lying on the trans tunnel). This is designed to be mounted on the passenger side of the shifter. There are ridges on one side of the shifter base and one side of the stick that need to line up, so they in effect lock together. The height was perfect, but it was about an inch too far to the passenger side (sounds fussy, but it was important with my console. More on that later.....)
-I got my gauges (MIL, Speedo, Tach) wired up.
-I got my driveshaft back from the shop and installed. I realized the tranny wasn't perfectly centered, so I re-centered it, and set the engine and pinion angles.
-I got my ECU programmed with a base tune. I went down to Slowhawk Performance and met with Don, and he took good care of me. He's got a rep of being one of the best tuners in the country, and luckily only about 30 minutes from me. My tune will be complicated, since I'm not using a Mass Airflow Sensor (MAF), it will have to be a Speed Density Tune. Too complicated to explain here.
-I replaced my reverse lockout solenoid after finding out the plastic end of it wasn't a good place to wedge a 2x4 against while trying to center the tranny. :p Another sensor, another $75.
-I mocked up a few different shifter sticks I made out of plywood and found the perfect height, but the offset was wrong, so I ended up taking apart my brand new shifter from Core-Shifters and flipping the shifter handle base around so I could mount the shifter on the opposite side (pics later will make sense)
-I filled the transmission through the shifter hole, while the shifter was out.
-I ordered a new fan belt, since the one that was supposed to fit with the LS Brackets setup was a couple inches short.
-I also ordered my new dual Electric Fans, fan mounting brackets, coil wires, spark plugs, upper and lower radiator hoses, and a block off hose since I still don't have a heater box yet.
Here's a shot of the billet transmission mount that I modified. This was supposed to be for use with the auto tranny. I had too much downward angle of my engine and transmission, compared to my pinion angle, and my pinion angle was exactly where I wanted it to be. This mount was originally .750" thick. I drew a line around it with a sharpie (wish I had taken pics), placed it in a vice and sliced a 1/3 of it off. I wasn't sure how it would come out. I was looking for around 1/2" thick rather than using a stack of washers. I measure it on all 4 sides with a micrometer and came out with .481", .481", .479" and .491". Pretty darned close for eyeballing it, so I took my grinder with a sanding wheel and knocked .010" off the tall side. I came out with exactly 2* rearward engine angle, which is exactly where I wanted to be.

Here's a closeup of the cutout for the shifter hole. I've seen guys just cut a circle, but if you ever need to change out the shifter assembly, you have to drop the tranny. This way I can lift it straight up. I did have to widen the hole after I realized I had to shift the tranny 3/8" towards the passenger side.

Not a great pic, but here's a shot of the shifter stick mockups. I had planned on going with a curved handle, but it put the shifter way to far back. The three Hurst shifter sticks I was looking at were 538-0015 (8" tall angled back 3"), 538-7238 (7.5" tall straight), and 538-7201 (6.38" tall with a 10* rear angle). I ordered from core-shifters.com, since I ordered my shifter there as well. They are super responsive to e-mails, I have contacted them a half dozen times and never waited more than 2 hours for a response. Here's a link to pics of all of their Hurst sticks: http://www.core-shifters.com/hurst2004sticks.pdf
538-7238 mocked up (you can see the other two wooden sticks lying on the trans tunnel). This is designed to be mounted on the passenger side of the shifter. There are ridges on one side of the shifter base and one side of the stick that need to line up, so they in effect lock together. The height was perfect, but it was about an inch too far to the passenger side (sounds fussy, but it was important with my console. More on that later.....)

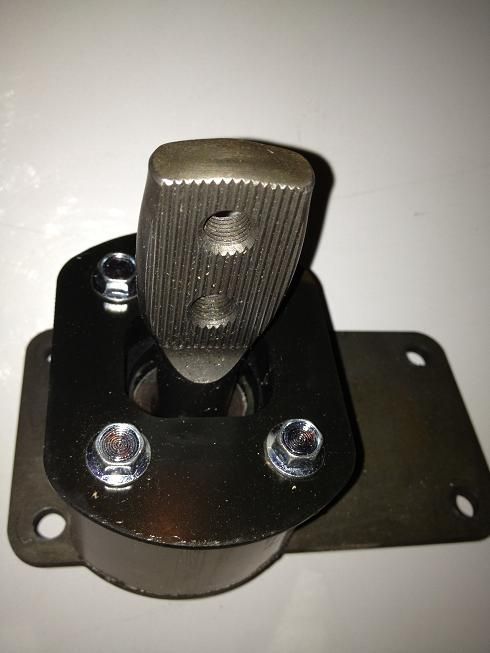
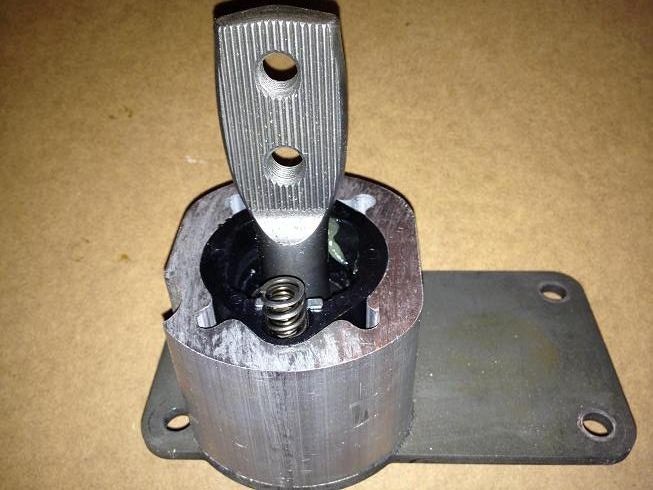
Just documenting this for the sake of documenting it. This may never help anyone other than myself. This is the shifter base from core-shifters.com. As you can see in the pics, one side of the handle base is grooved and one side is smooth. I wanted to mount my shifter handle on the drivers side, but that was the smooth side. I decided to pull the shifter base apart to see if I could flip the handle around.
Here's the shifter in stock form. The left side is the rear, the right side is the front (as if looking at from the passenger seat)
I unbolted the top 4 bolts:
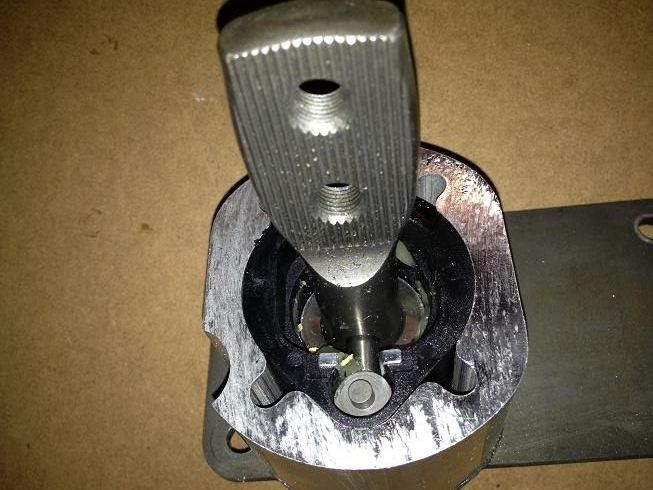
Removed the top plate and found 2 springs, one each side, that are for centering the shifter:
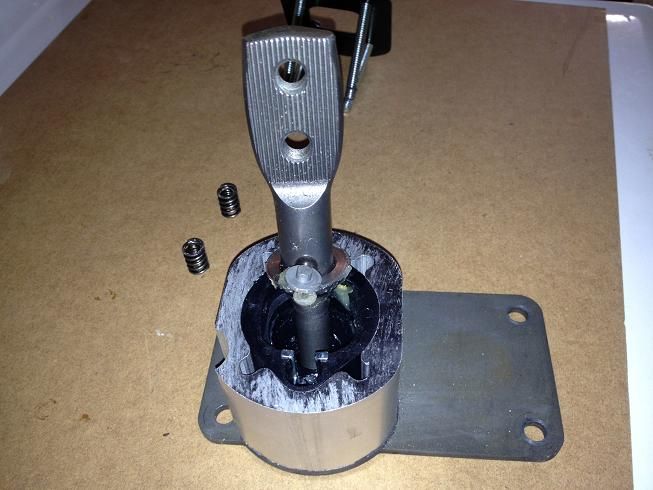
Remove the springs and this is what you see:
Lift the shifter handle straight up:
Rotate it 180*:
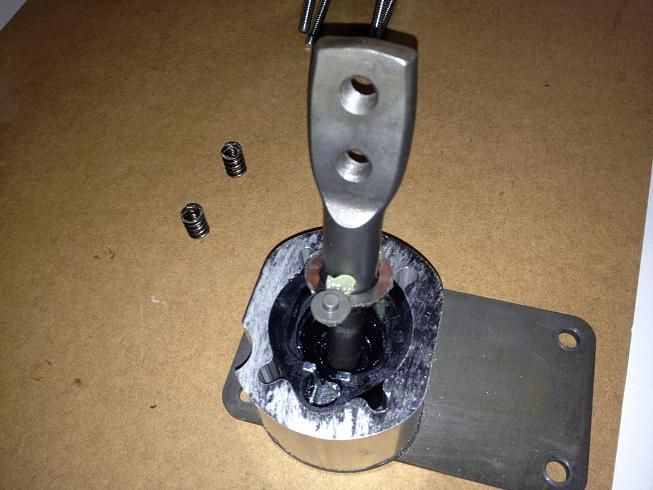
And reverse the process:
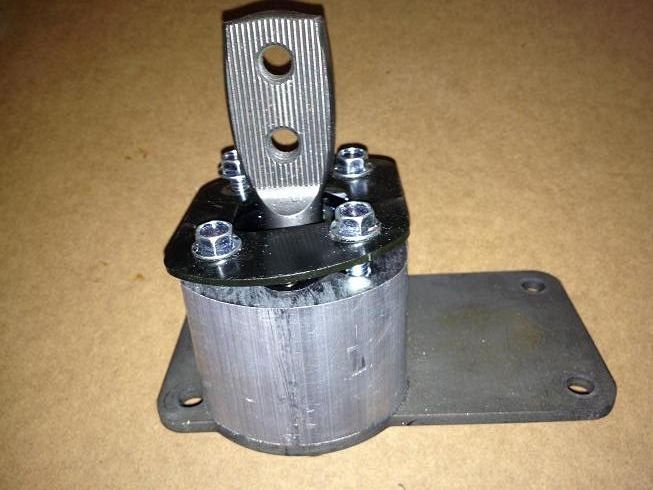
Now here it is looking from the drivers side:
This literally took less than 10 minutes, including taking the pics. The only thing I didn't show was I used a little RTV black on the tip of the 4 bolts, since that's what was on there when I took them out.
This will allow you to mount any of the dozens of shifters that Hurst sells in the opposite direction they intended. Perfect for customizing your setup.
Here's the shifter in stock form. The left side is the rear, the right side is the front (as if looking at from the passenger seat)

I unbolted the top 4 bolts:

Removed the top plate and found 2 springs, one each side, that are for centering the shifter:

Remove the springs and this is what you see:

Lift the shifter handle straight up:

Rotate it 180*:

And reverse the process:

Now here it is looking from the drivers side:

This literally took less than 10 minutes, including taking the pics. The only thing I didn't show was I used a little RTV black on the tip of the 4 bolts, since that's what was on there when I took them out.
This will allow you to mount any of the dozens of shifters that Hurst sells in the opposite direction they intended. Perfect for customizing your setup.
12-13-2013, 11:45 AM
#51
Finally an update...
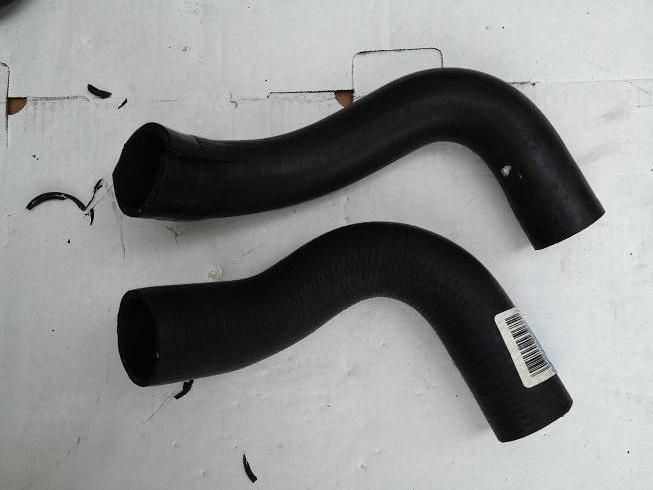
I tried using the lower radiator hose from an 04-06 GTO, but my lower radiator outlet is 1 3/4" and the GTO hose was 1 1/2". I managed to force it on, but it looked distorted, and I figured it would be a stress point.
I bent up some heavy gauge non-stranded wire to the shape of the GTO hose, took it down to Pep Boys and went through their rack of hoses and found one for an 85-95 GMC/Chevy 1500/2500, etc. It had the perfect bend, with a 1 3/4" opening on one end, and 1 1/2" on the other. I cut the hose down to the right length and it worked perfectly.
GTO hose on top, 85-95 GM truck hose on bottom (after cutting down):
Here's the part number:
And the fitment:
Here's the upper hose I used. I didn't have to do any trimming. The part number is in an earlier post:
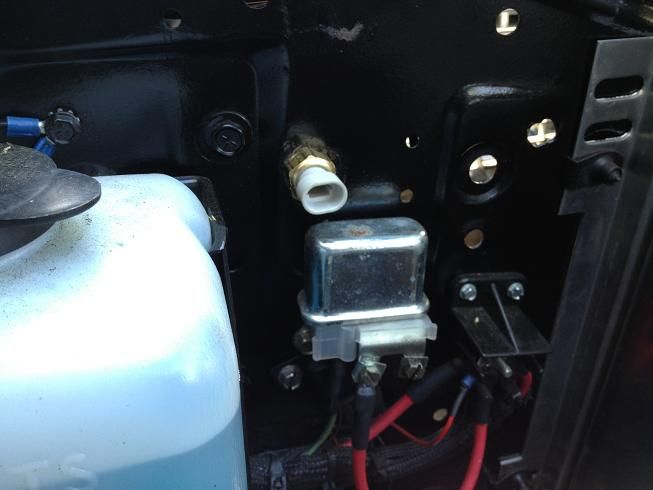
I thought I was going to get clever and mount my IAT (intake air temp) sensor in the base of my air cleaner, but my tuner said it would give me a false high reading. He suggested mounting it near the grille and tuning off ambient temps. I had already bought this sensor with a threaded base (AC Delco 213190) and I also thought it would thread into this fitting I found at the hardware store, but the thread sizes were not a match:

I drilled a larger hole through the radiator support and ended up mounting it here:
And used a bolt I had lying around (I think from my old LQ9 alternator) to thread it on. Here's a view looking through the grille:
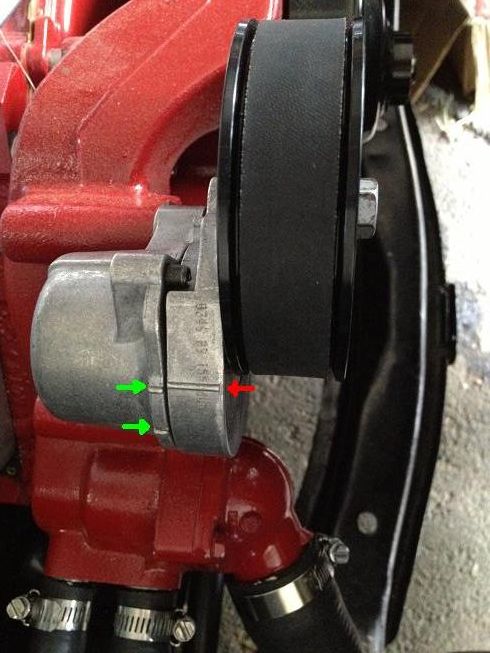
The first serpentine belt I bought was 73.5" long and it was far too short. It was supposed to work with my alt/ps bracket, but not even close. I wrapped a long piece of string around all the brackets and then measured the string and came up with 75.5", so I bought that one and it was closer, but still didn't fit, so I returned it. I special ordered one at 76.5" and it fit great, but then I realized it's still 1/2" short. The single line on the tensioner is supposed to line up between the double lines. So I ordered my 4th belt at 77.0". It should be here tomorrow. Part number is Gates 5060770. Belts are identified by the last 3 digits. The 73.5" one was 5060735. The 6 in the middle of the sequence is the number of ribs. I'm keeping the 76.5" one as a spare, just in case I break a belt and need to limp home:
I tried using the lower radiator hose from an 04-06 GTO, but my lower radiator outlet is 1 3/4" and the GTO hose was 1 1/2". I managed to force it on, but it looked distorted, and I figured it would be a stress point.

I bent up some heavy gauge non-stranded wire to the shape of the GTO hose, took it down to Pep Boys and went through their rack of hoses and found one for an 85-95 GMC/Chevy 1500/2500, etc. It had the perfect bend, with a 1 3/4" opening on one end, and 1 1/2" on the other. I cut the hose down to the right length and it worked perfectly.
GTO hose on top, 85-95 GM truck hose on bottom (after cutting down):

Here's the part number:

And the fitment:

Here's the upper hose I used. I didn't have to do any trimming. The part number is in an earlier post:

I thought I was going to get clever and mount my IAT (intake air temp) sensor in the base of my air cleaner, but my tuner said it would give me a false high reading. He suggested mounting it near the grille and tuning off ambient temps. I had already bought this sensor with a threaded base (AC Delco 213190) and I also thought it would thread into this fitting I found at the hardware store, but the thread sizes were not a match:

I drilled a larger hole through the radiator support and ended up mounting it here:

And used a bolt I had lying around (I think from my old LQ9 alternator) to thread it on. Here's a view looking through the grille:

The first serpentine belt I bought was 73.5" long and it was far too short. It was supposed to work with my alt/ps bracket, but not even close. I wrapped a long piece of string around all the brackets and then measured the string and came up with 75.5", so I bought that one and it was closer, but still didn't fit, so I returned it. I special ordered one at 76.5" and it fit great, but then I realized it's still 1/2" short. The single line on the tensioner is supposed to line up between the double lines. So I ordered my 4th belt at 77.0". It should be here tomorrow. Part number is Gates 5060770. Belts are identified by the last 3 digits. The 73.5" one was 5060735. The 6 in the middle of the sequence is the number of ribs. I'm keeping the 76.5" one as a spare, just in case I break a belt and need to limp home:

The reason the serpentine belts didn't fit was because I switched the water pump to the L99 (2010+ Camaro) and the tensioner pulley has a larger diameter than the ones for the LQ4/9 and older Camaro setups. If you use the original LQ water pump, the 73.5" belt should fit fine.
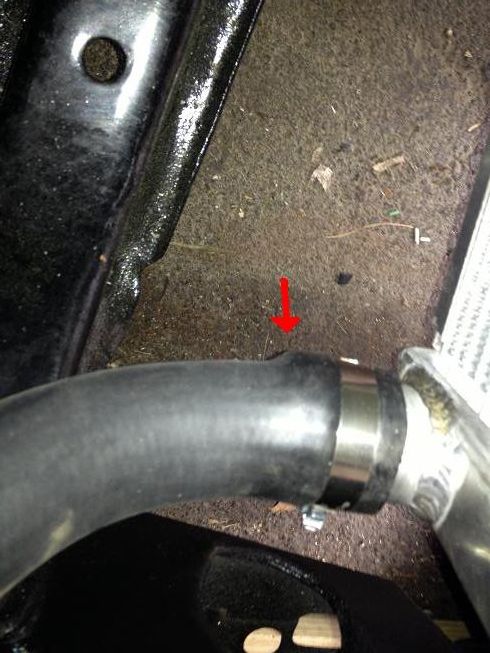
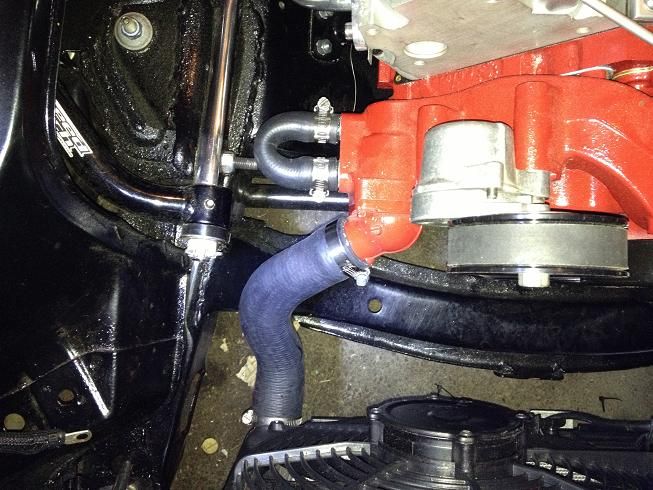
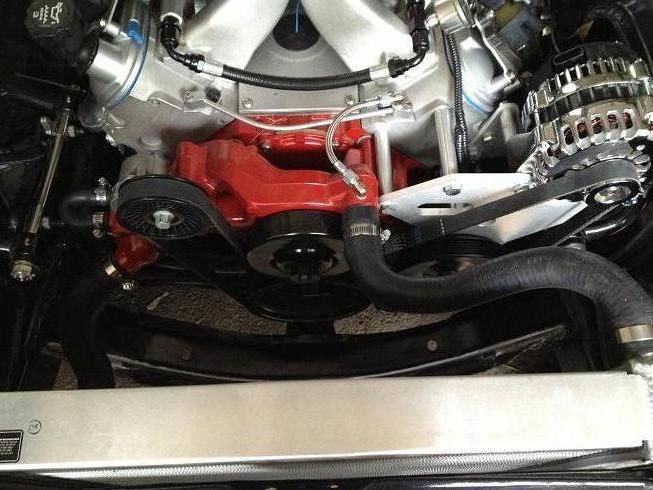
Here are the radiator hoses I used that worked with the BeCool radiator and LQ9 engine with an L99 water pump:
Upper: Gates 22373 (this is a lower hose for something like a Buick LaCrosse, but it's a great fit)
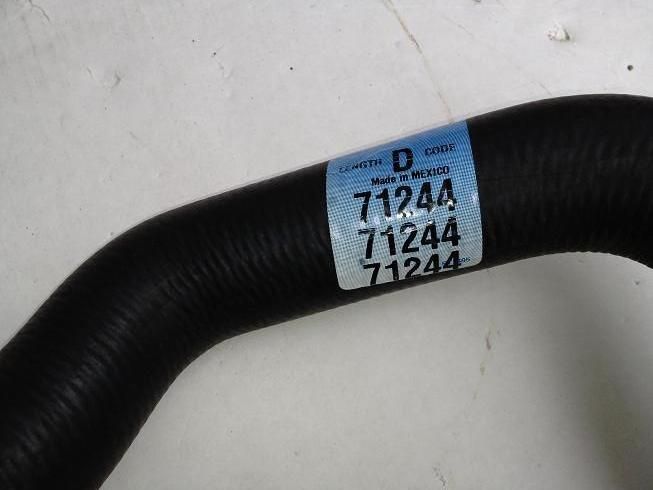
Lower: Dayco 71244 (this a lower hose for some kind of 85-95 Chevy/GMC truck)
U-Shaped return for heater delete: Gates 18743 (this has a 5/8" end and a 3/4" end, it just needs to be cut to length)
Last edited by 67rally; 01-04-2014 at 08:54 AM.
12-13-2013, 11:46 AM
#52
Getting very close...
I did a bunch of wiring, filling fluids, power steering hoses, etc.
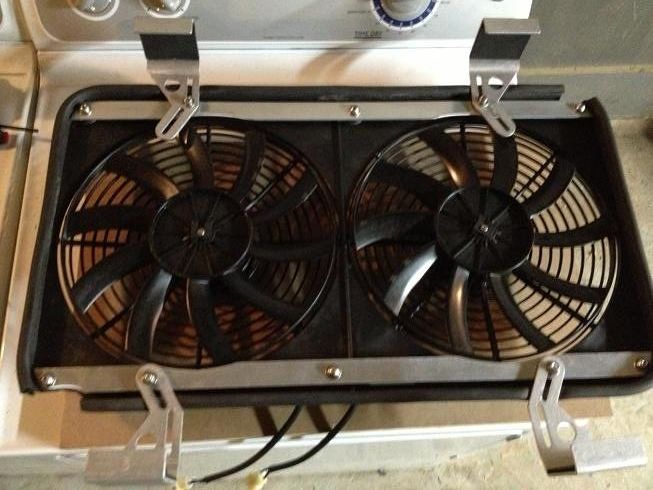
Then it was on to the electric fans. I'm using a dual fan setup from Summit Racing.
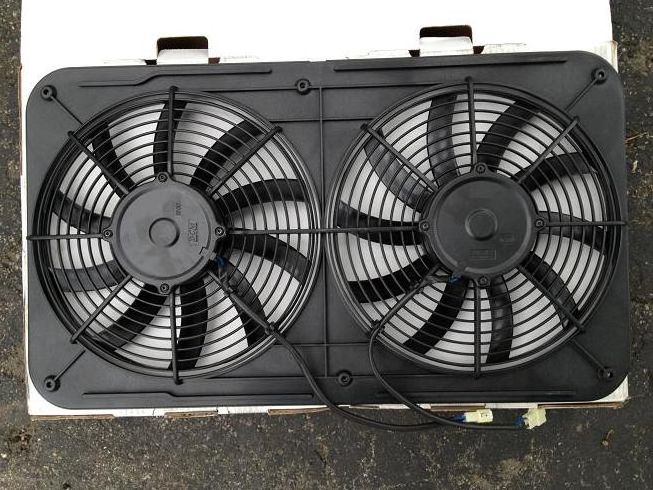
They did not fit. They were too wide, and hit the upper and lower radiator hose. If I wasn't on a time crunch I would have returned them and just bought the right ones to go with my BeCool radiator. Instead I modified them to fit by cutting out a section out of each corner. And fabricated some horizontal brackets out of aluminum.

I ran new wire between the passenger wheel well/fender area to a couple of relays. I also picked up some brackets from eBay to mount to the brackets I fabricated:
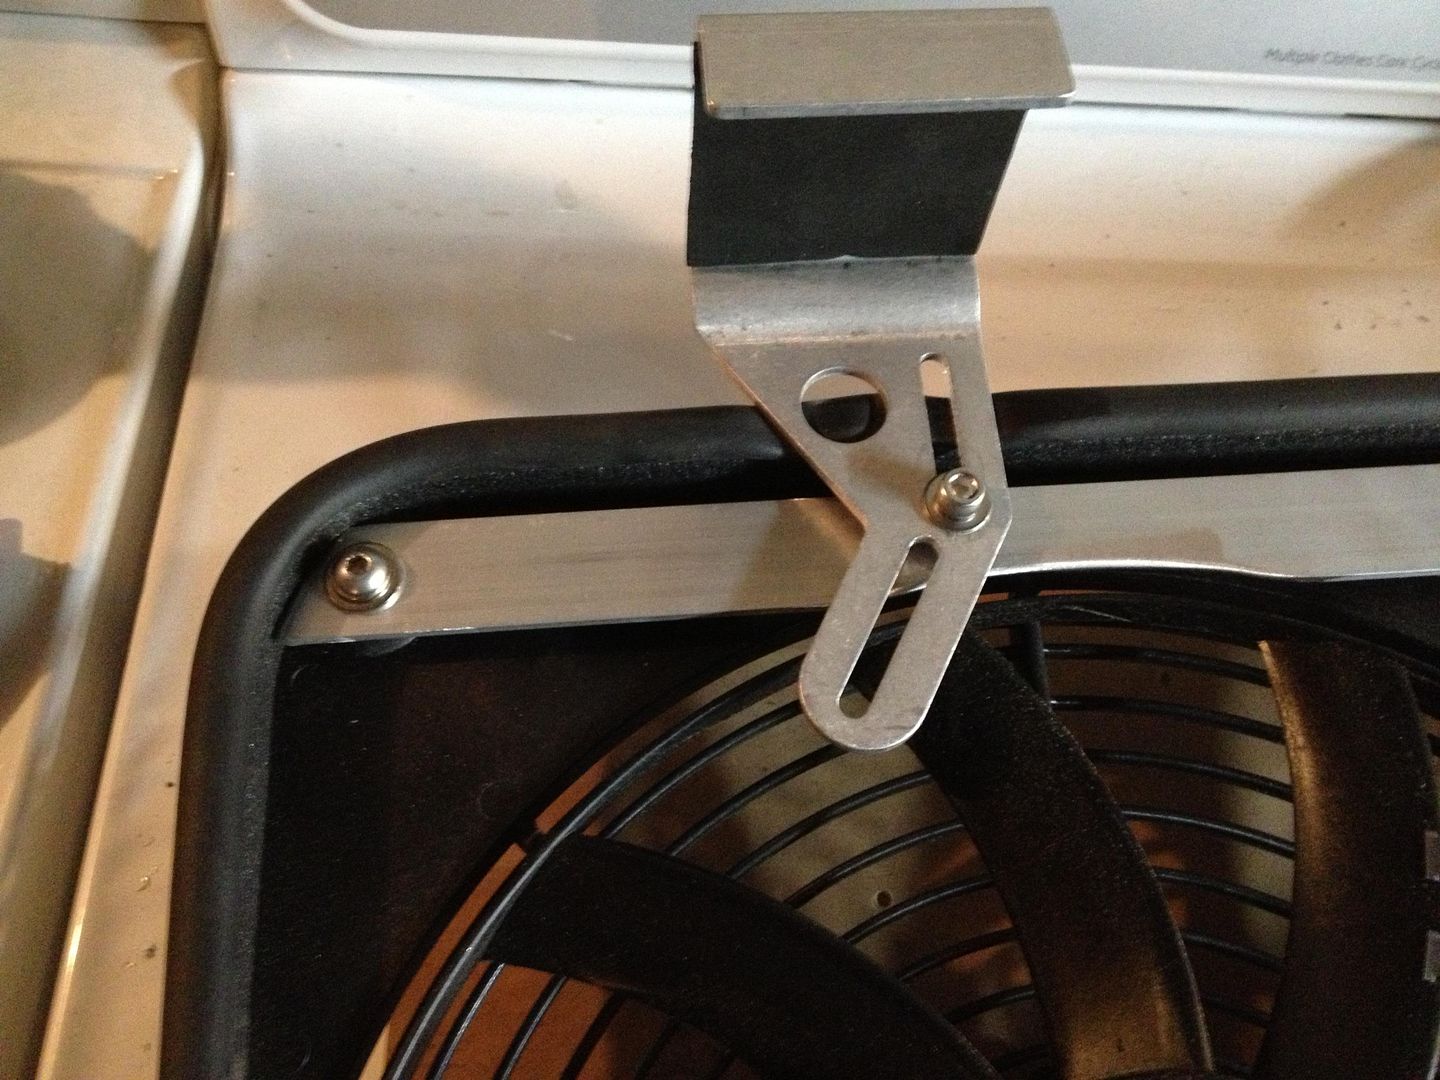
Here they are mounted and wired up:
This shows how much clearance I have, tons of space:
And this is what's left on my punch list:
Actually, the starter is wired and the shifter stick is mounted as well, I just forget to check them off. I'm going to try to finish up by Saturday or Sunday at the latest. Then turn the key and see what happens.
Then it was on to the electric fans. I'm using a dual fan setup from Summit Racing.

They did not fit. They were too wide, and hit the upper and lower radiator hose. If I wasn't on a time crunch I would have returned them and just bought the right ones to go with my BeCool radiator. Instead I modified them to fit by cutting out a section out of each corner. And fabricated some horizontal brackets out of aluminum.

I ran new wire between the passenger wheel well/fender area to a couple of relays. I also picked up some brackets from eBay to mount to the brackets I fabricated:


Here they are mounted and wired up:

This shows how much clearance I have, tons of space:

And this is what's left on my punch list:

Actually, the starter is wired and the shifter stick is mounted as well, I just forget to check them off. I'm going to try to finish up by Saturday or Sunday at the latest. Then turn the key and see what happens.
12-13-2013, 11:48 AM
#53
She's alive!
Quick exhaust clip:
*
A long weekend of trying to finish up the car resulted in a no start on Saturday evening. I spent all day Sunday troubleshooting. First no fuel pressure to the rails (fuel pump wasn't working due to my wiring mistake), and then no spark.
In the end, it turned out I had a wire going to the ECU that needed to be HOT with ignition on and while cranking, and it was only hot with ignition on. It had no power while cranking. I slept on it last night, and spent a few hours going through all the grounds, and connections, trying to rule everything out before calling PSI Conversions, or Slowhawk (my tuner). After straightening out he wiring, she fired right up. I let it run for about 2 minutes, but had to get back to work.
I still need to finish a few things up and then try to get it down to my tuner. Hopefully I can take it out of the garage under it's own power tomorrow.
In the end, it turned out I had a wire going to the ECU that needed to be HOT with ignition on and while cranking, and it was only hot with ignition on. It had no power while cranking. I slept on it last night, and spent a few hours going through all the grounds, and connections, trying to rule everything out before calling PSI Conversions, or Slowhawk (my tuner). After straightening out he wiring, she fired right up. I let it run for about 2 minutes, but had to get back to work.
A long weekend of trying to finish up the car resulted in a no start on Saturday evening. I spent all day Sunday troubleshooting. First no fuel pressure to the rails (fuel pump wasn't working due to my wiring mistake), and then no spark.
In the end, it turned out I had a wire going to the ECU that needed to be HOT with ignition on and while cranking, and it was only hot with ignition on. It had no power while cranking. I slept on it last night, and spent a few hours going through all the grounds, and connections, trying to rule everything out before calling PSI Conversions, or Slowhawk (my tuner). After straightening out he wiring, she fired right up. I let it run for about 2 minutes, but had to get back to work.
I still need to finish a few things up and then try to get it down to my tuner. Hopefully I can take it out of the garage under it's own power tomorrow.
Big relief getting it started.
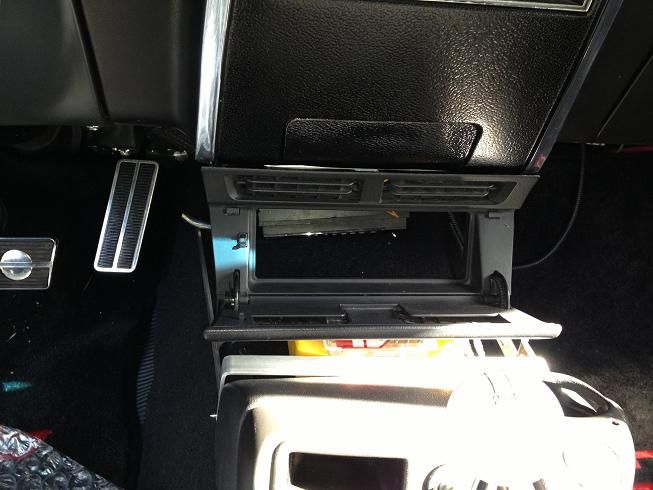
I got some of the finishing stuff buttoned up, but not everything. I mounted the ECU and fusebox where the old heater box used to be. It will get moved again next year when I do Vintage Air, but gotta stop spending money for a little while.
I cleaned up some wiring looms, then started the engine back up. I let it get up to temp today and one of the fans kicked on which is a good sign. The other one is set to come on 5 degrees higher, but never needed to. Oil pressure looked good, temp was good.
I have a Power Steering hose leak (dribble), that I found yesterday, new hose should be here tomorrow. I bent the hardline trying to get it off the old pump and it doesn't want to make a good seal any more, no biggie.
I was going to bleed the brakes, and had it up on jack stands ready to remove the wheels and the sky turned black. I decided to re-install my hood instead, and just after I got it close enough the skies started to open up. Pushed it back into the garage and called it a day. I'm going to see if I can get it finished up and down to my tuner by Friday.
*
Just need to bleed the brakes, swap out the PS hose and bleed that, mount and plumb a catch can and fix my horn, add an air cleaner then get an inspection sticker and hit the road.
Oh, and vacuum up the 2000 little pieces of wire clippings from all the wiring I've done lately.
Almost there...
Oh, and vacuum up the 2000 little pieces of wire clippings from all the wiring I've done lately.
Almost there...
Oops, looks like I forgot to update here. I got the new PS hose on and took care of the leak, I bled the brakes, got everything buttoned up and started to drive down to see Don at Slowhawk Performance for the final tune. I had a bad knocking on the passenger side of the engine, so aborted the mission. It turned out to be a rocker arm bolt that I must not have torqued down to spec. I retorqued everything and all was well. I brought it down the following morning to leave in his capable hands.
Well, I got my Camaro back from Slowhawk today. They did a great job on the tune, and reworked the exhaust temporarily. It's a freaking rocket ship!!!
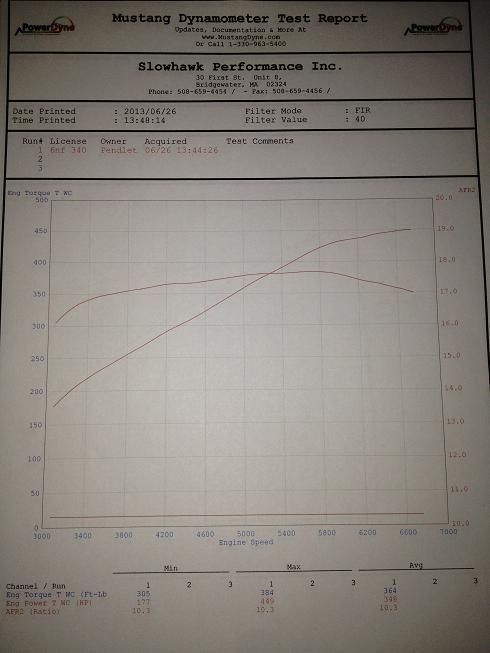
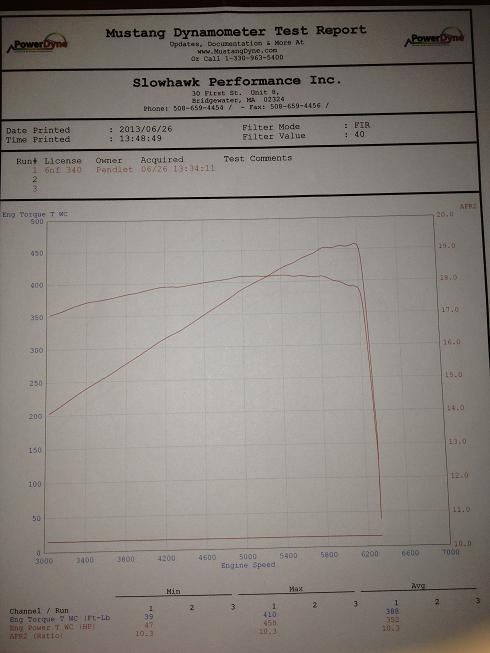
As always, there's good news and bad news. The bad news is that I must not have hit my pinion angle right, so I'll have to adjust that. Don had to shut down the dyno test in 4th gear at 6200rpm when it started to vibrate pretty bad. You can see where the line vibrates just before shutdown. So he did a final pull in 3rd gear. He said it wanted to pull to the moon, and set the redline in the ECU to 7k rpm.
Once I get the driveline angle perfect, I may jump back on the dyno, but it would just be for a final number, the tune is great the way it is. Maybe I'll wait for a Dyno Day.
3rd Gear Pull:
449 rwhp
384 ft-lb
4th Gear Pull, shut down at 6200rpm:
458 rwhp
410 ft-lbtq
Well, I got my Camaro back from Slowhawk today. They did a great job on the tune, and reworked the exhaust temporarily. It's a freaking rocket ship!!!
As always, there's good news and bad news. The bad news is that I must not have hit my pinion angle right, so I'll have to adjust that. Don had to shut down the dyno test in 4th gear at 6200rpm when it started to vibrate pretty bad. You can see where the line vibrates just before shutdown. So he did a final pull in 3rd gear. He said it wanted to pull to the moon, and set the redline in the ECU to 7k rpm.
Once I get the driveline angle perfect, I may jump back on the dyno, but it would just be for a final number, the tune is great the way it is. Maybe I'll wait for a Dyno Day.
3rd Gear Pull:
449 rwhp
384 ft-lb

4th Gear Pull, shut down at 6200rpm:
458 rwhp
410 ft-lbtq

Last edited by 67rally; 01-02-2014 at 06:01 PM.
12-13-2013, 12:11 PM
#54
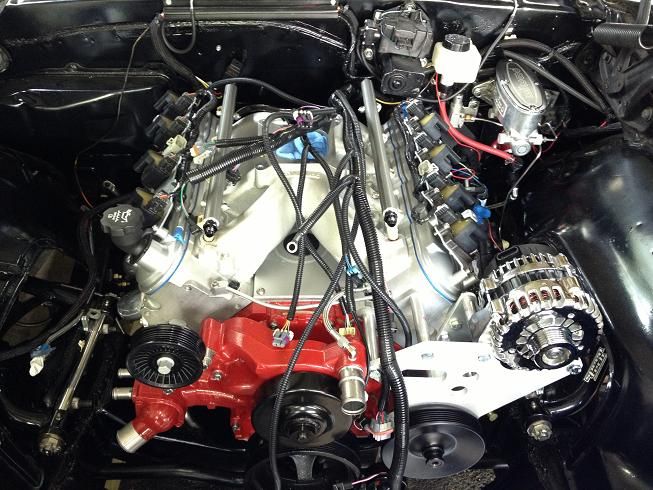
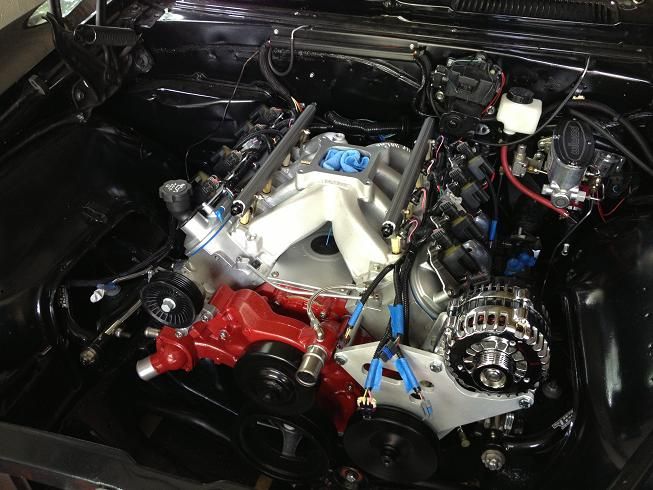
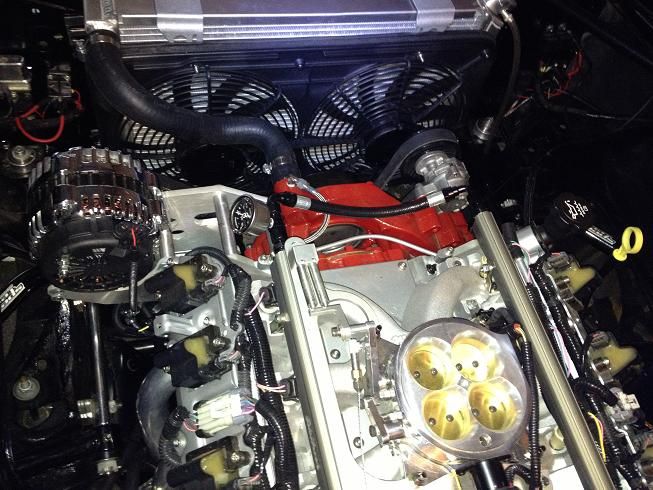
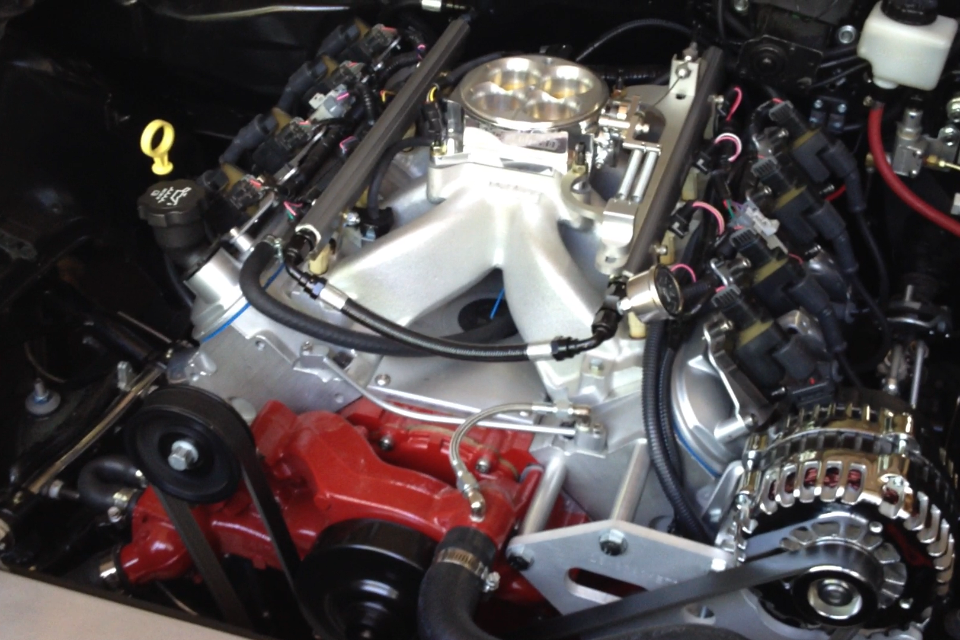
A better shot of the engine...
*
After a bunch of trouble shooting, it turned out the clutch was fine. The ringing went away when I pressed in on the clutch, but what was really happening is that the rpm's were dropping. It turned out I had a loose power steering pump bracket that only vibrated at low rpm's under load. Press in on the clutch, no load, no ringing. Easy (free) fix.
*

I got about 250-300 miles on the new engine setup and started to hear a ringing sound coming from the clutch. It's only there at low rpm's under load.
I started to trouble shoot today and found a some fluid at the bottom edge of the bellhousing on the passenger side. First thoughts are leaking slave cylinder? Rear main seal?
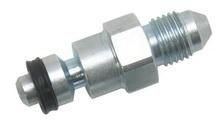
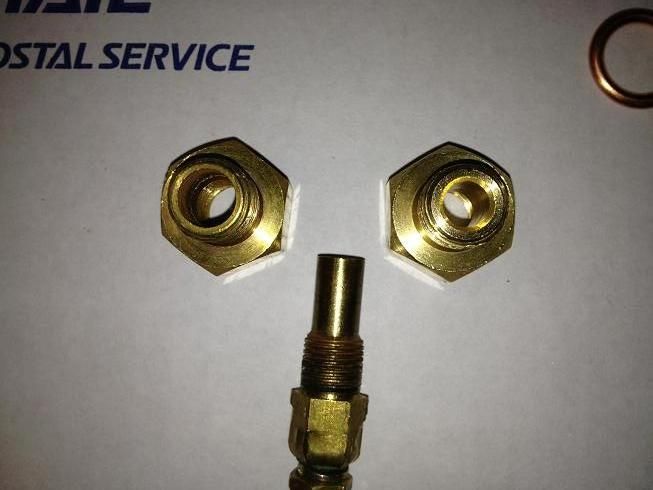
But I traced the fluid up to the engine block, then I thought blown head gasket? Just a leak from the valve covers? No oil around the valve covers, but I found a little coolant around the temp sensor on the rear part of the passenger side head. The first adapter I used cracked when I threaded it in, so I bought another. I decided to remove the adapter to make sure it wasn't cracked. I literally touched it with a 3/4" socket and it fell out. Or so I thought. It actually broke in half, leaving half in my head and half out.
Luckily I was able to back it out with a screw extractor, and just ordered a new one. Here's the adapter coming out, and then the broken unit:

I started to trouble shoot today and found a some fluid at the bottom edge of the bellhousing on the passenger side. First thoughts are leaking slave cylinder? Rear main seal?
But I traced the fluid up to the engine block, then I thought blown head gasket? Just a leak from the valve covers? No oil around the valve covers, but I found a little coolant around the temp sensor on the rear part of the passenger side head. The first adapter I used cracked when I threaded it in, so I bought another. I decided to remove the adapter to make sure it wasn't cracked. I literally touched it with a 3/4" socket and it fell out. Or so I thought. It actually broke in half, leaving half in my head and half out.
Luckily I was able to back it out with a screw extractor, and just ordered a new one. Here's the adapter coming out, and then the broken unit:


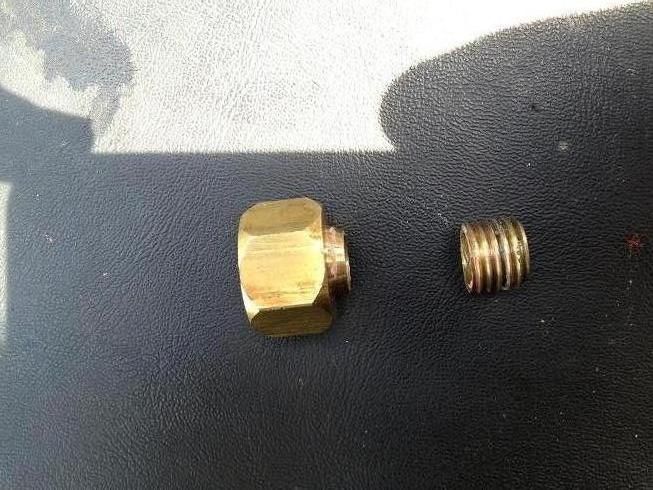
The new temp sensor adapter arrived. The thread pitch was right, but the opening for the sensor was too small. I knew this in advance, and just drilled the opening with a 5/16" bit. The opening was .250" and needed to be .3125. I managed to do it without cracking the adapter, and even installed it into the head without breaking it!
Here's the old adapter on the left and the new one (before I drilled it out on the right):
Here's the old adapter on the left and the new one (before I drilled it out on the right):

Last edited by 67rally; 01-02-2014 at 06:08 PM.
12-13-2013, 12:14 PM
#55
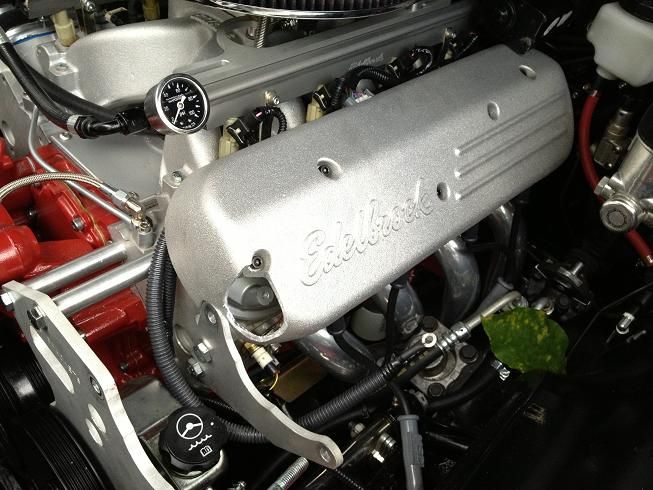
Details...
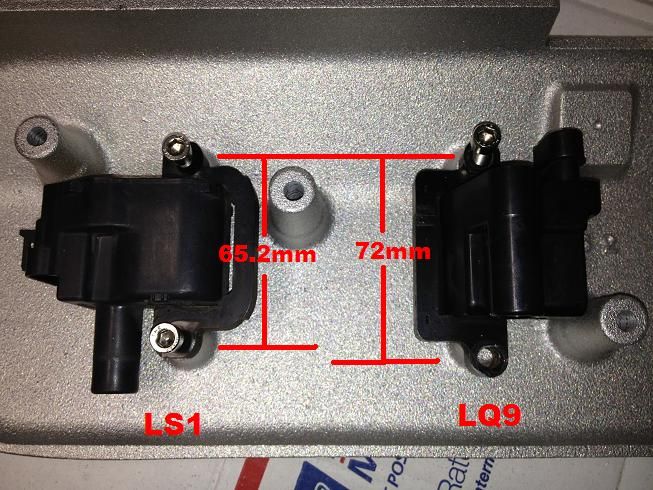
I got my Edelbrock Coil Covers in while I was away. I had to switch to an LS1 coil pack because the LQ9 is too big, and the mounting holes on the LQ9 coils are too far apart. Of course nothing ever fits right. The coil cover was hitting the PS/Alt bracket as well as the alternator itself. I contacted the guy who makes the LS brackets and he said he could do a one off set for me with the right height and spacing, but I couldn't swallow the cost, so I did a litte modification to the coil covers. I'm happy with the finished product, but always a little nervous to hack into a brand new anything.
Blurry photo, but it shows the height difference of the LS1 vs LQ9 coil packs:

And here you can see the hole spacing between the two:
Here's the coil cover and where I had interference:
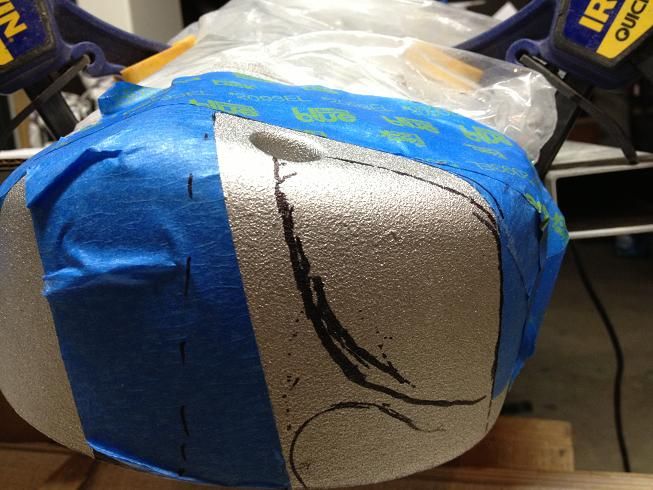
A little Dremel and cutoff wheel work:

Mocked up:
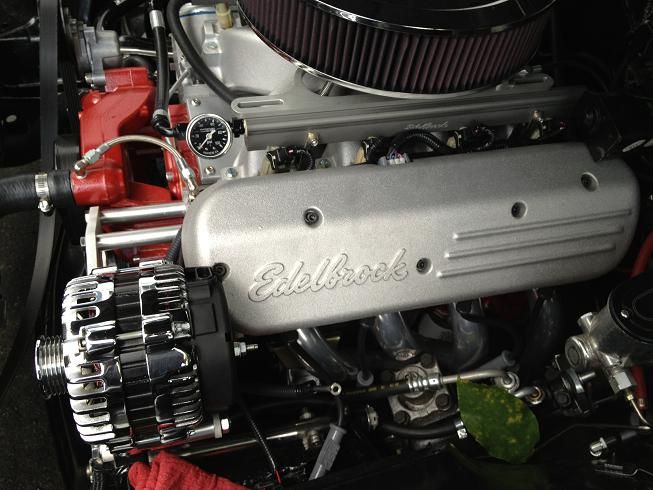
Mounted:
And with the alternator in place:
Blurry photo, but it shows the height difference of the LS1 vs LQ9 coil packs:

And here you can see the hole spacing between the two:

Here's the coil cover and where I had interference:

A little Dremel and cutoff wheel work:

Mocked up:

Mounted:

And with the alternator in place:

I also entered my car into the American Car & Truck Day at Larz Anderson Auto Museum. I didn't expect to win any awards, and I didn't. But I had a ton of positive comments. A lot of people had to do a double take and then ask what it was, how I did it, etc.
The highlight of the day was this old timer (85+) and his two "kids" (both in their 60's)...The old timer was pointing everything out and oohing and ahhing, and then he sees the emblem on the fender, then the emblem on the top of the air cleaner and says "Wait. That ain't the original motor, this car get's no votes from us." And the two kids bow their heads and all three just move on to the next car. I had to chuckle.
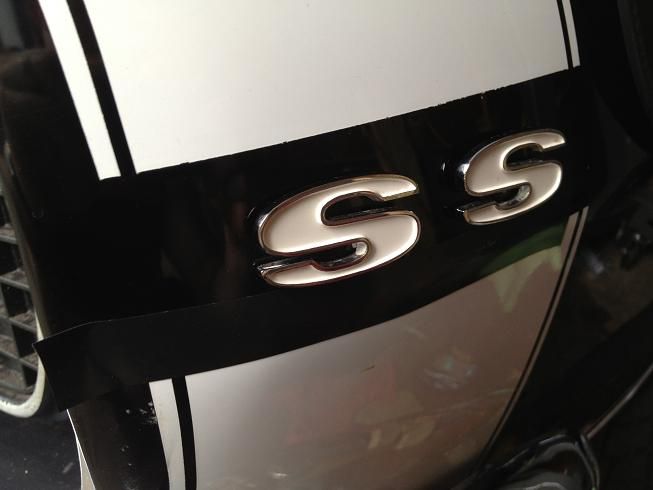
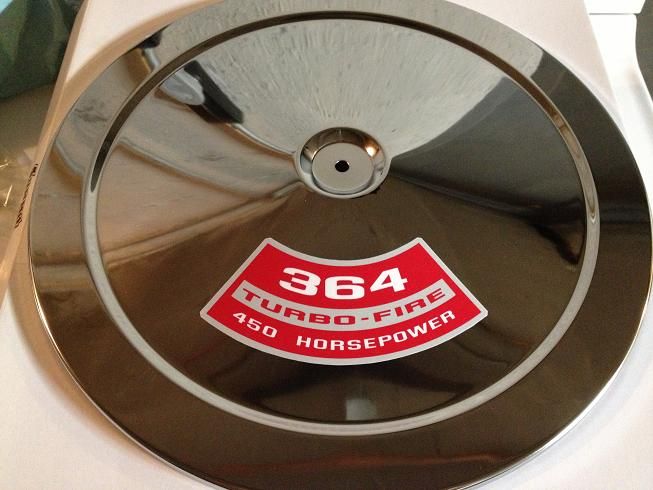
I finished debadging the SS emblems. It wasn't a real SS and I wasn't trying to fool anyone. But in keeping with the theme of the car, I replaced them with "364" emblems, and had a custom air cleaner decal made to replace the old 350/300hp decal.
Say goodbye to the SS emblems:
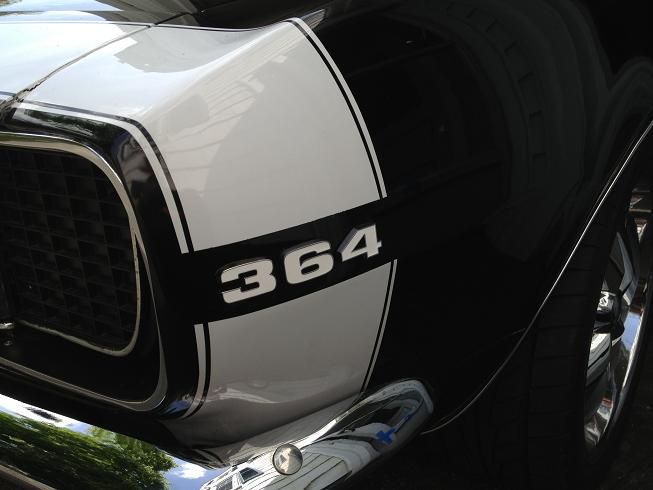
And hello to the 364:
And here's the new air cleaner decal:
Here are a few photos from the show:


The highlight of the day was this old timer (85+) and his two "kids" (both in their 60's)...The old timer was pointing everything out and oohing and ahhing, and then he sees the emblem on the fender, then the emblem on the top of the air cleaner and says "Wait. That ain't the original motor, this car get's no votes from us." And the two kids bow their heads and all three just move on to the next car. I had to chuckle.
I finished debadging the SS emblems. It wasn't a real SS and I wasn't trying to fool anyone. But in keeping with the theme of the car, I replaced them with "364" emblems, and had a custom air cleaner decal made to replace the old 350/300hp decal.
Say goodbye to the SS emblems:

And hello to the 364:

And here's the new air cleaner decal:

Here are a few photos from the show:


 12-13-2013, 12:17 PM
#56
Problems...
Well, that didn't go so well. I was supposed to cruise up to Maine today with a bunch of guys from Team Camaro. I put 100 trouble free miles on yesterday, topped off the fluids and was ready to go.
I got up long before sunrise this morning, hit the road at 5am and within 10 minutes I had a mechanical issue. It felt like it wasn't getting spark or fuel, so I pulled off the parkway into a sketchy section of town and into a gas station. It felt like it was dropping cylinders, but occasionally they would all come back and run smooth for 10-15 seconds. The driver's side headers didn't feel as hot as they should have.
I couldn't get to my coil packs because of the coil covers I installed, so I couldn't do much trouble shooting. Once it started running ok, I turned around and headed home. It ran good for a couple minutes, then the problems returned. I limped home, pulled off the coil covers to start trouble shooting, and this was what I found under my driver's side cover:
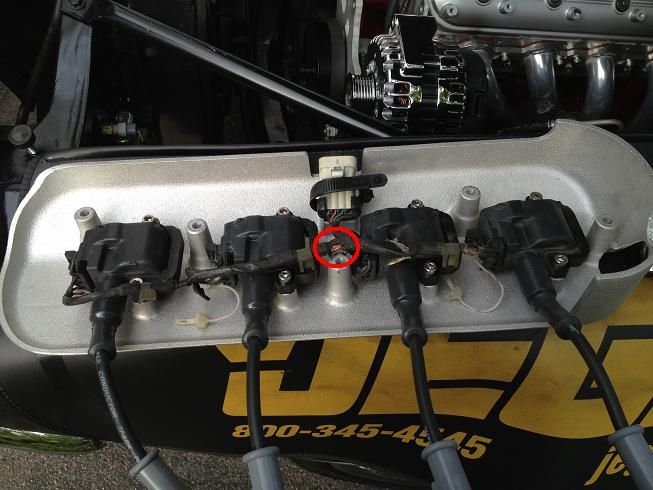
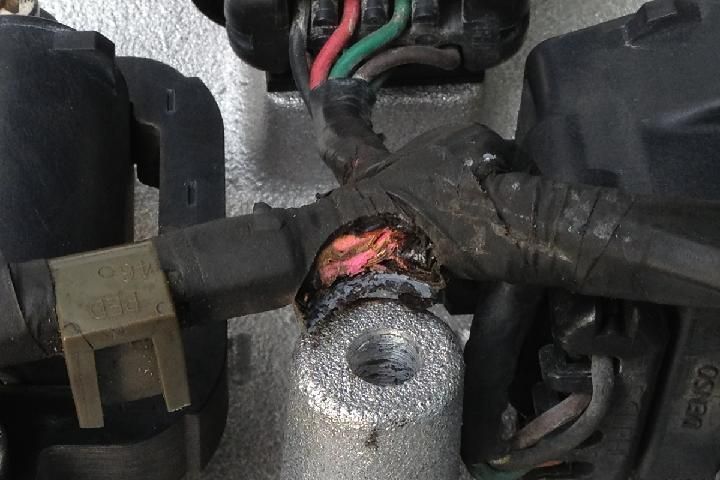
The wiring harness was rubbing on the cover and ate through the wires. If this had happened yesterday, I could have fixed it by this a.m. Anyways, I removed the covers and LS1 coils, bolted my old LQ9 coils to the valve covers, put the old wiring harness back on, cleaned the plugs, and she fired right up. Cheap fix, but I'm pretty bummed I missed out on the cruise.
12-13-2013, 12:19 PM
#57
Console...
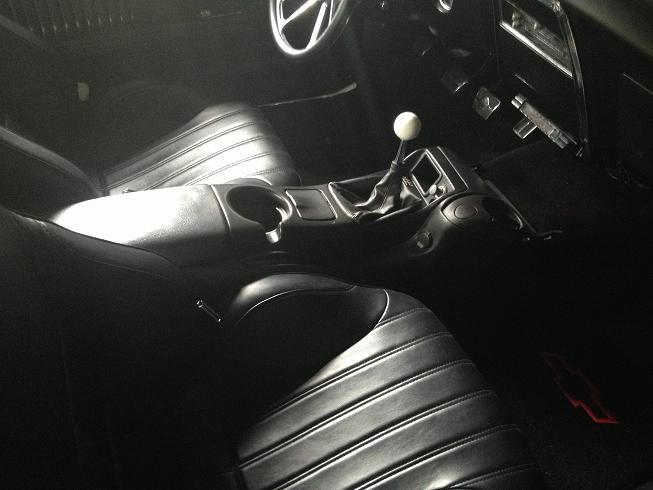
I'm using a 2002 Camaro console from a 6 speed car. The console fits the tunnel pretty well. It wants to lean towards the passenger seat a bit, but I haven't screwed it down yet either. The console is too short for a first gen, but I'm going to fabricate a filler piece out of mdf or aluminum, then staple felt over that, fiberglass it, sand it smooth, and cover with vinyl. Once everything is together, I'll spray the vinyl and plastic parts with the appropriate black SEM paint so it matches the interior. It looked black when I bought it, but compared to the rest of the interior it has too much of a gray tone for me (tough to see in the pics).
Here it is loosely installed:
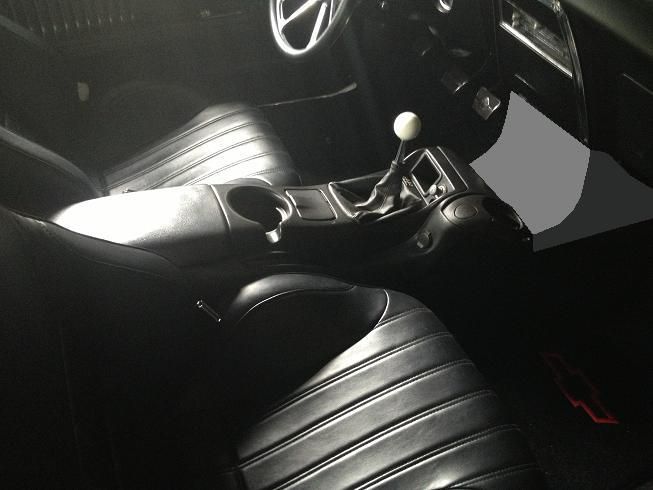
And here's a very sophisticated Microsoft Paint job to show where the closeout panel will run:
I have a plan, but I'll post photos along the way, because that plan may change as I go.
Here it is loosely installed:

And here's a very sophisticated Microsoft Paint job to show where the closeout panel will run:

I have a plan, but I'll post photos along the way, because that plan may change as I go.
12-13-2013, 12:21 PM
#58
More console fab...
I have been working on a closeout panel for my console over the past couple weeks. I'm using the console out of a 2002 Camaro. It fit's the tunnel great, has an armrest, cup holders, etc. but doesn't meet up with the dash.
***THIS IS NOT A HOW TO***, it is a "how I did it". I have no experience working with fiberglass. I just saw it done on some TV show, probably West Coast Customs, or OverHaulin'.
Skip to the end for finished results...
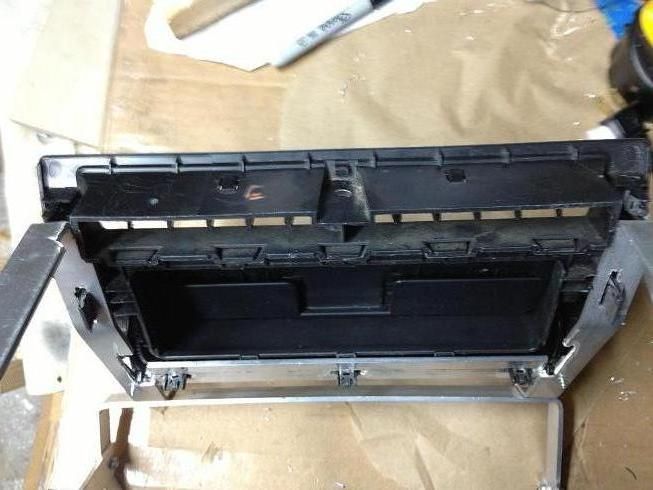
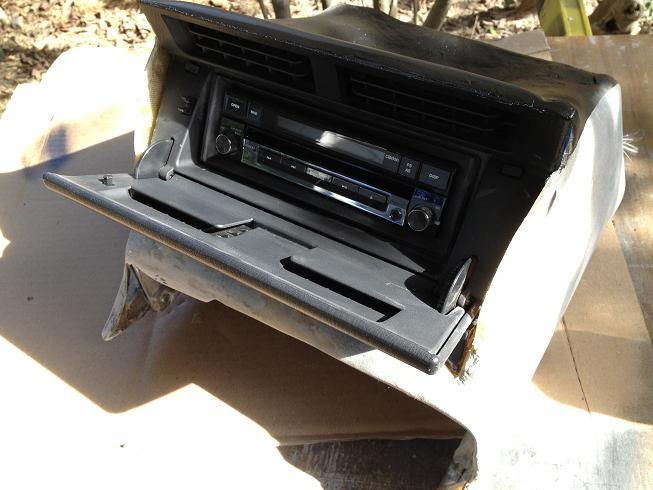
I found this radio bezel for a 2001 Honda S2000 on eBay and it looked to be about the right size:
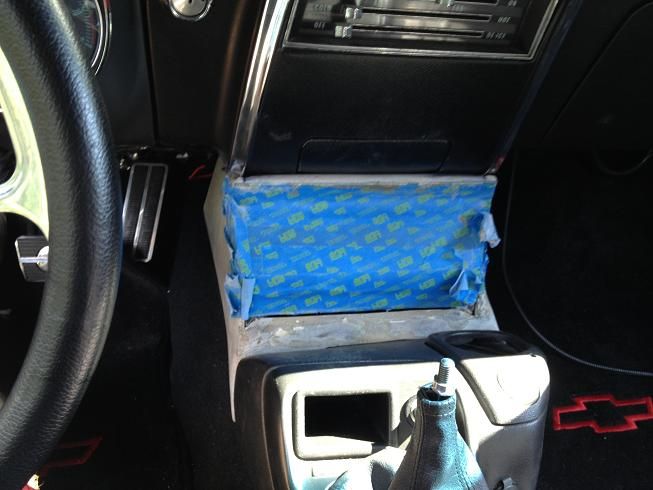
I started with some aluminum stock (light weight, easy to bend and I had some lying around). The console sits a little towards the passenger side, so the aluminum looks and is crooked. No worries, since I was going to be covering it in fiberglass. I just wanted it to mold to the tunnel:
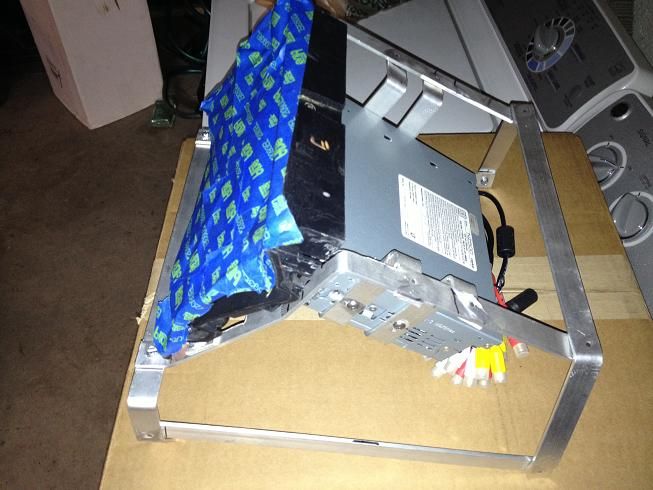
I added two more pieces that I had shaped to the radio bezel:
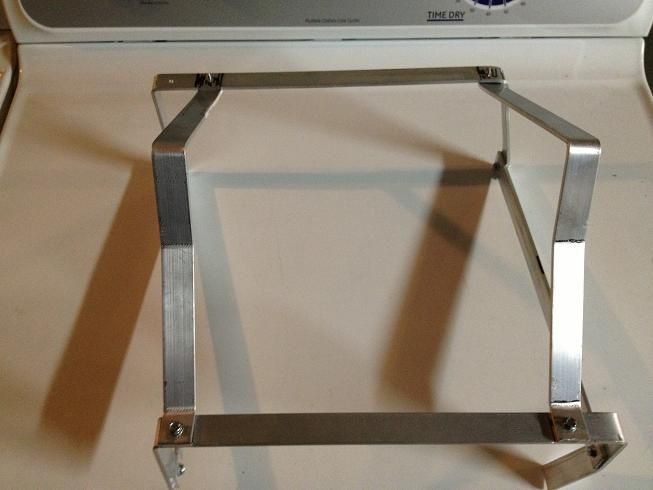
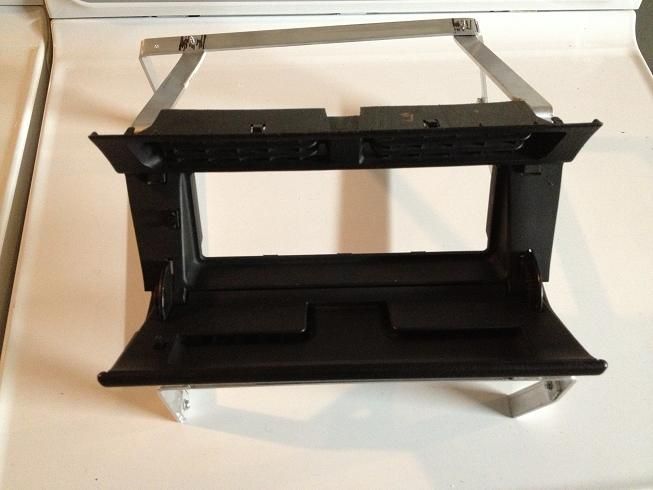
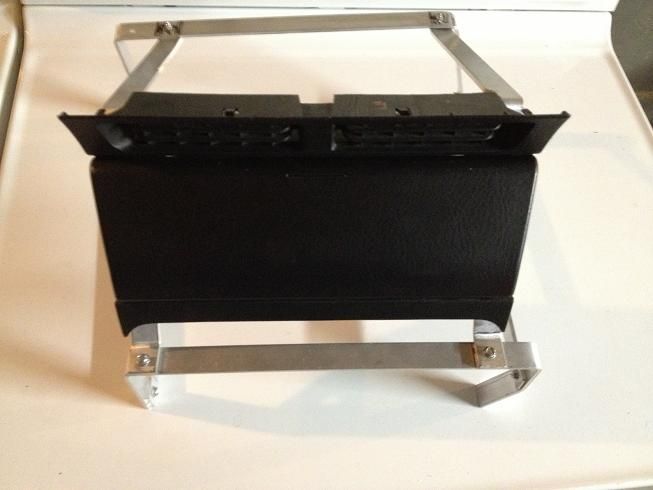
Cut out some openings for the clips on the back of the bezel to fit through:
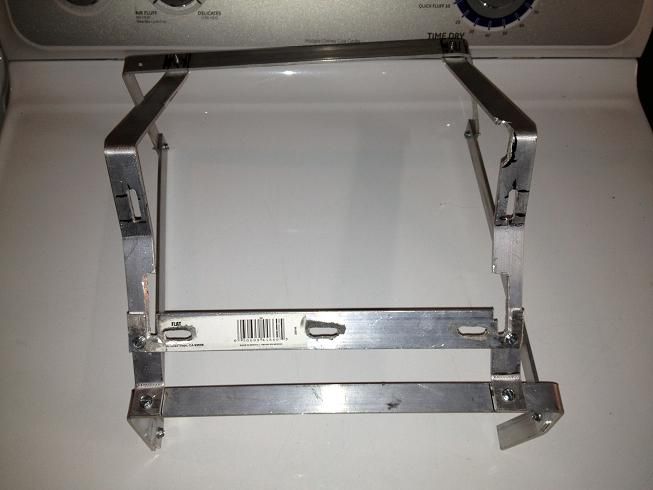
And mounted it up:
***THIS IS NOT A HOW TO***, it is a "how I did it". I have no experience working with fiberglass. I just saw it done on some TV show, probably West Coast Customs, or OverHaulin'.
Skip to the end for finished results...
I found this radio bezel for a 2001 Honda S2000 on eBay and it looked to be about the right size:

I started with some aluminum stock (light weight, easy to bend and I had some lying around). The console sits a little towards the passenger side, so the aluminum looks and is crooked. No worries, since I was going to be covering it in fiberglass. I just wanted it to mold to the tunnel:

I added two more pieces that I had shaped to the radio bezel:

Cut out some openings for the clips on the back of the bezel to fit through:

And mounted it up:


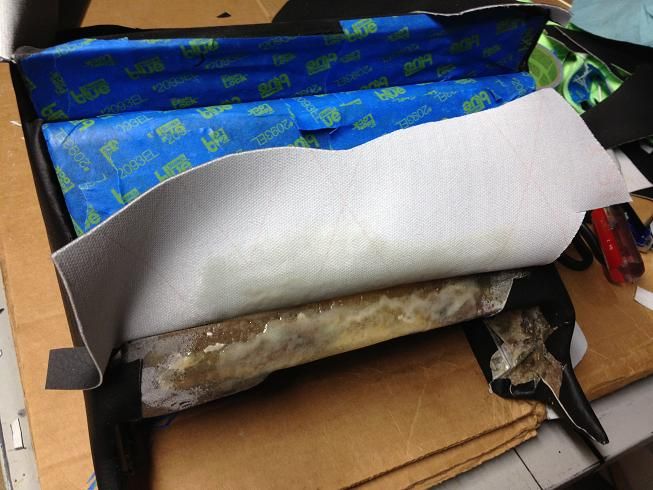
I taped off the front in preparation for the fiberglass.
I started with some fiberglass cloth, resin and hardener.
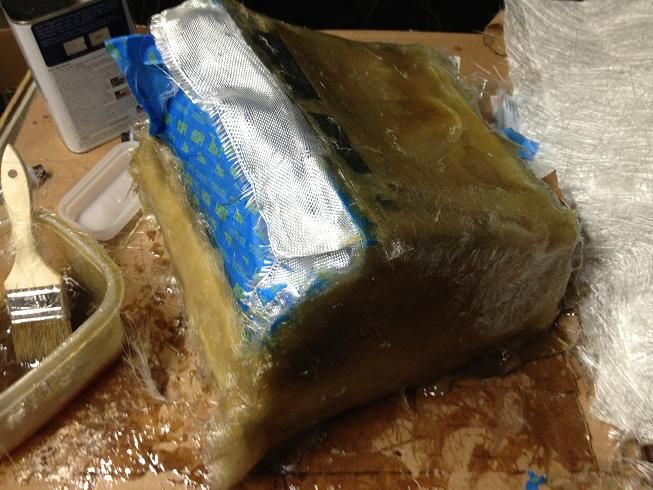
Sanded it, added fiberglass mat to the areas I needed to build, sanded it:
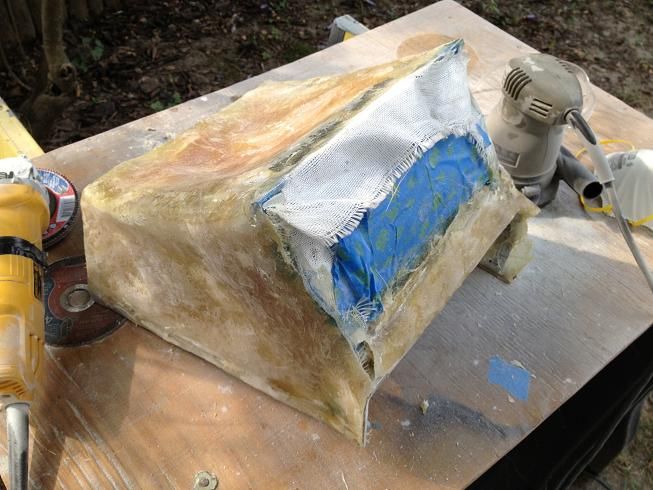
Then started my layers of Bondo Glass:
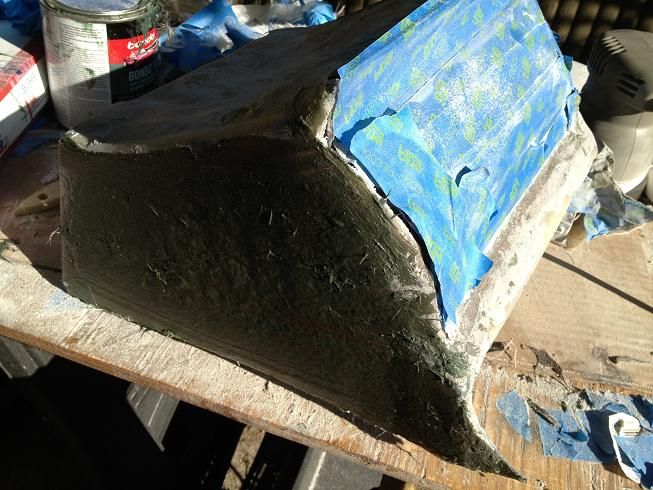
I didn't finish the top, since it will not be seen, and I didn't want to build it up due to clearance issues. Since I was going to cover it in vinyl, it just needed to be smooth, but not perfect. If I was going to paint it, I would have moved on to some Bondo body filler for a glass like finish.
Test Fitting:
I sprayed the top lip with black plastidip to give it a rubberized finish:
Started covering it in black vinyl, using 3M 80 Rubber & Vinyl Adhesive:
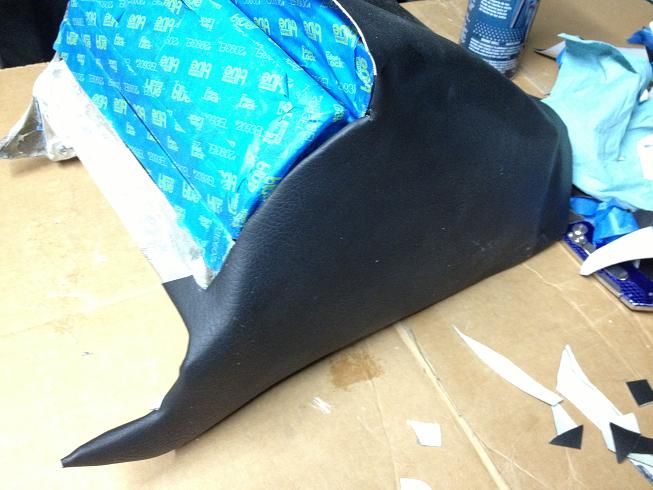
I knew I was going to have to have some seams because the angles on the front were pretty complex for someone of, uh, my skill level. I decided to seam it in line with the where the door opens. I probably should have made some grooves with a dremel and flushed it in, but it'll do.
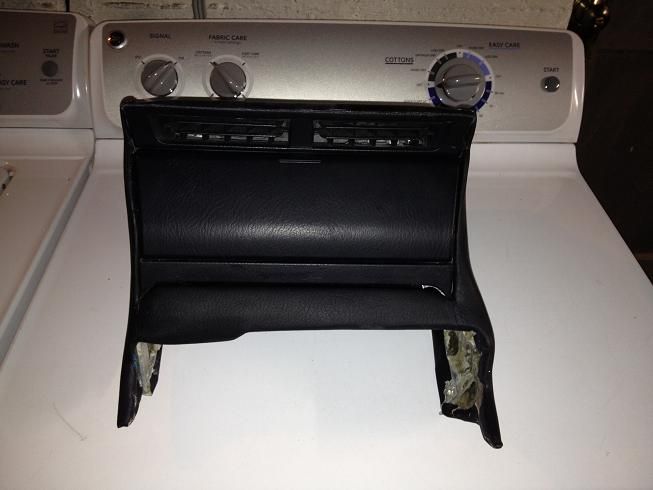
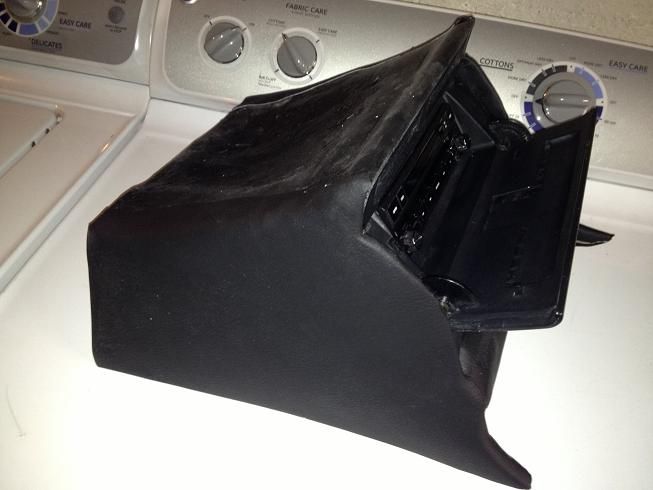
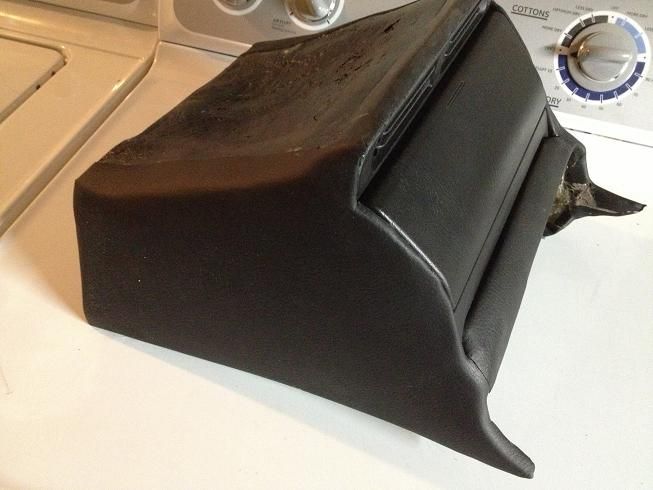
Test fit:
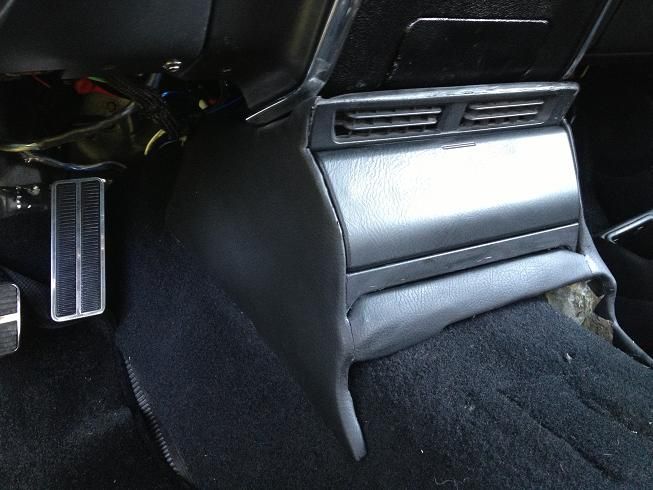
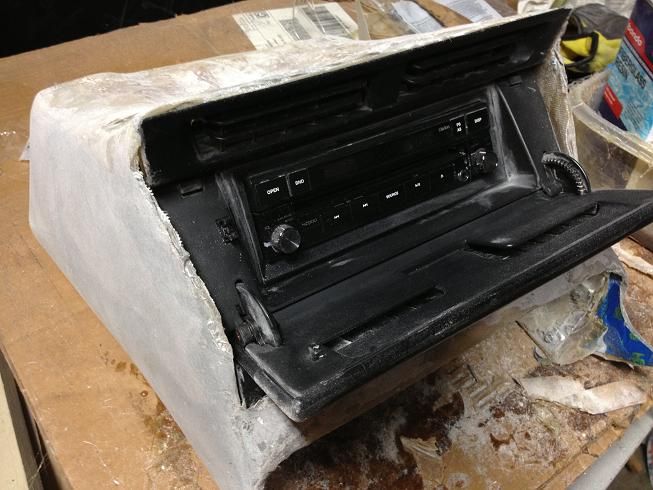
Here it is installed:
Radio is in and working:
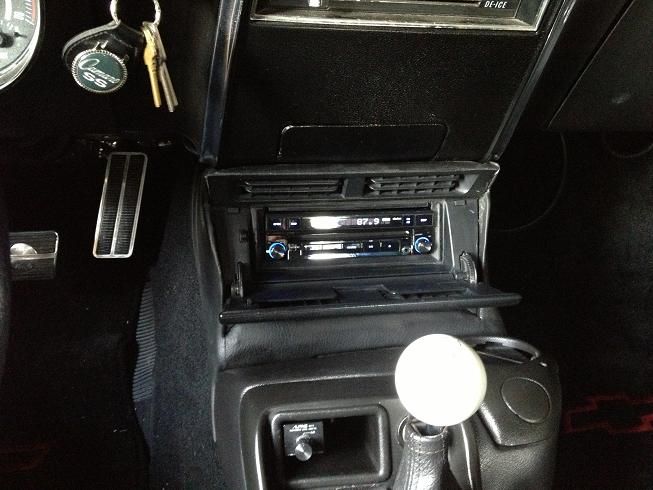
This is a Clarion NZ500 I picked up off eBay. It's a couple model years old, but I actually preferred it because the new models don't have ***** to adjust the volume, just buttons. Touch screen, iPod controls, Nav, backup camera (if I want it):
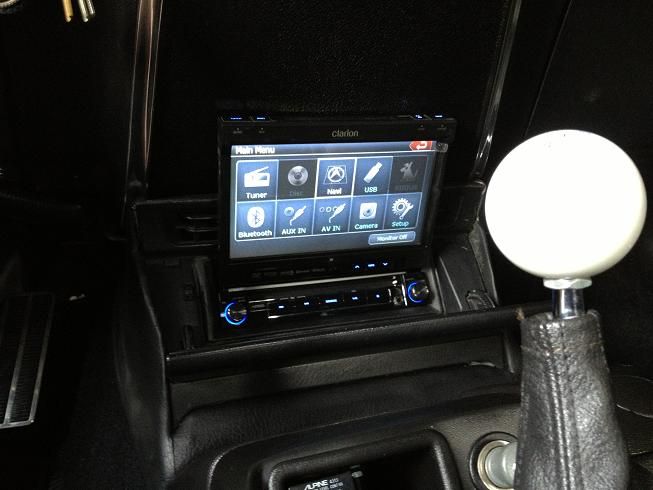
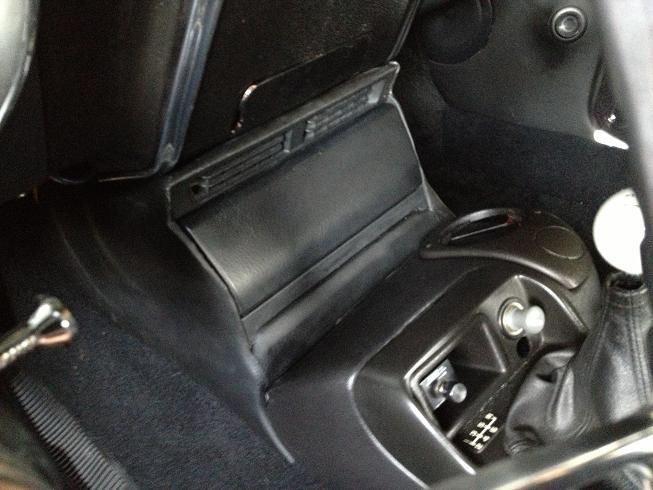
A couple more shots of the finished install:

I started with some fiberglass cloth, resin and hardener.

Sanded it, added fiberglass mat to the areas I needed to build, sanded it:

Then started my layers of Bondo Glass:

I didn't finish the top, since it will not be seen, and I didn't want to build it up due to clearance issues. Since I was going to cover it in vinyl, it just needed to be smooth, but not perfect. If I was going to paint it, I would have moved on to some Bondo body filler for a glass like finish.

Test Fitting:

I sprayed the top lip with black plastidip to give it a rubberized finish:

Started covering it in black vinyl, using 3M 80 Rubber & Vinyl Adhesive:

I knew I was going to have to have some seams because the angles on the front were pretty complex for someone of, uh, my skill level. I decided to seam it in line with the where the door opens. I probably should have made some grooves with a dremel and flushed it in, but it'll do.


Test fit:

Here it is installed:

Radio is in and working:

This is a Clarion NZ500 I picked up off eBay. It's a couple model years old, but I actually preferred it because the new models don't have ***** to adjust the volume, just buttons. Touch screen, iPod controls, Nav, backup camera (if I want it):

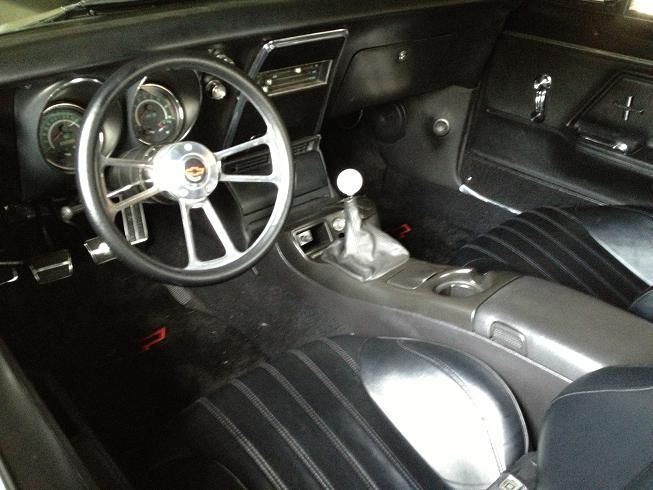
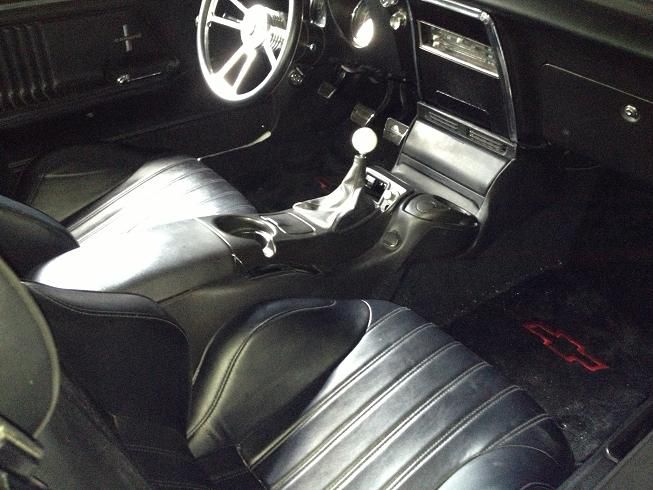
A couple more shots of the finished install:

 12-13-2013, 02:38 PM
#59
I like that console. If I go that route, I will put my gauges where you made the filler panel. I should probably buy a console and start messing with it. What sucks is that I had one for the 99 Firebird I parted out and sold it.

