
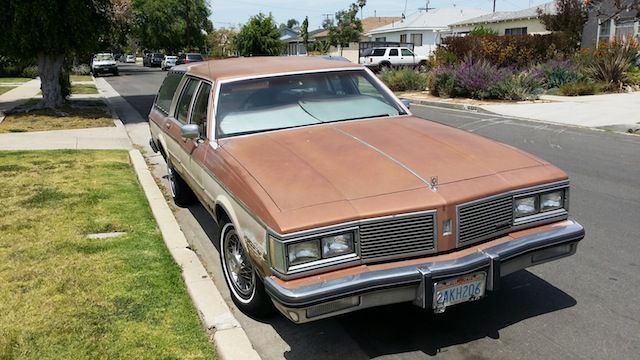
82 Olds Custom Cruiser wagon LQ4
 05-04-2014, 12:33 AM
#1
On The Tree
Thread Starter

Join Date: Aug 2013
Posts: 188
Likes: 0
Received 0 Likes
on
0 Posts
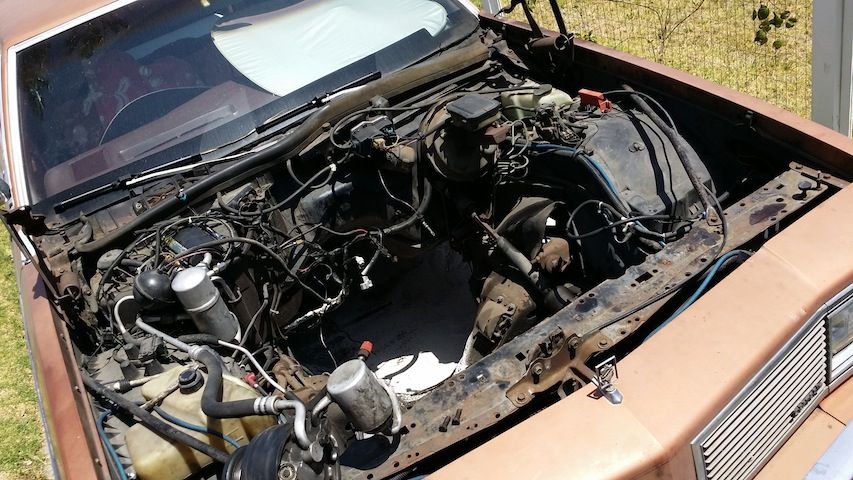
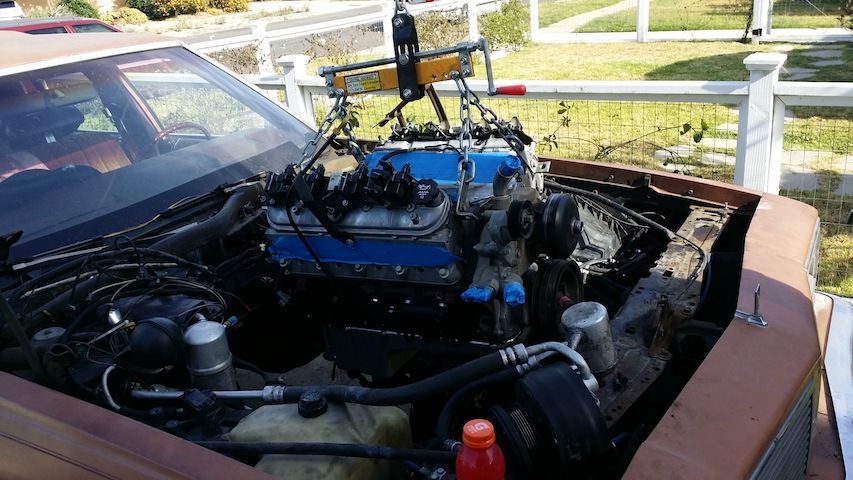
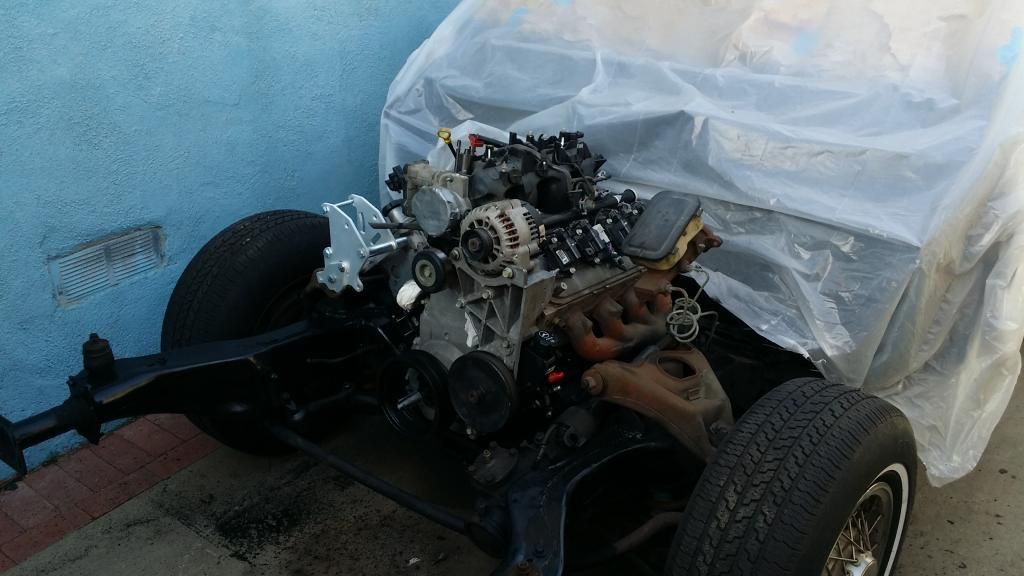
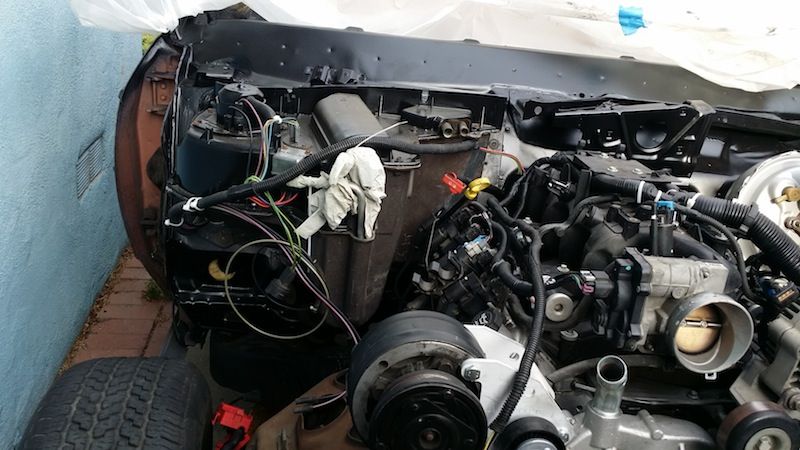
Finally! Here we go, dads car, bought brand new by his dad in 1982, an Olds Custom Cruiser, complete with the 3rd seat, faux wood grain paneling and the roof rack. Plan is to do the LS swap then it gets its paint and body work done. Stock looking wagon with a kick, should run better than it did with the anemic 307, and even better than the 350 TBI I put in. Ive never been happy with the power from the TBI, mainly cause I think the exhaust put on it by the exhaust shop I used was too small, and its got a slippy slidey worn out 200r4. You can see in the Ypipe where it joins how discolored the pipe is. But anyway...
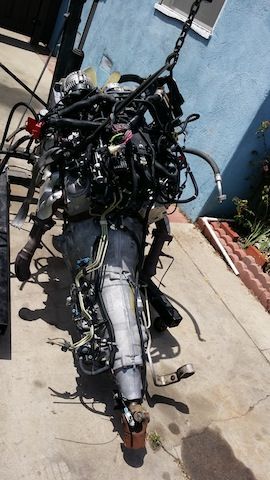
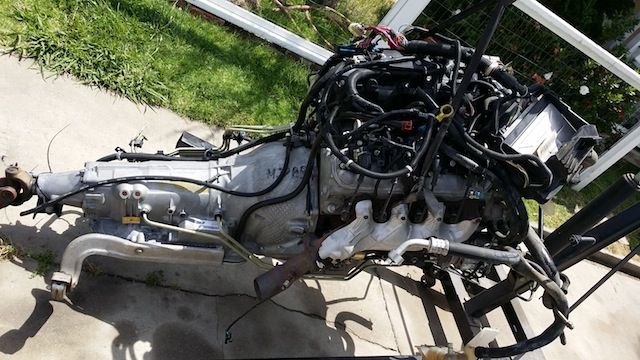
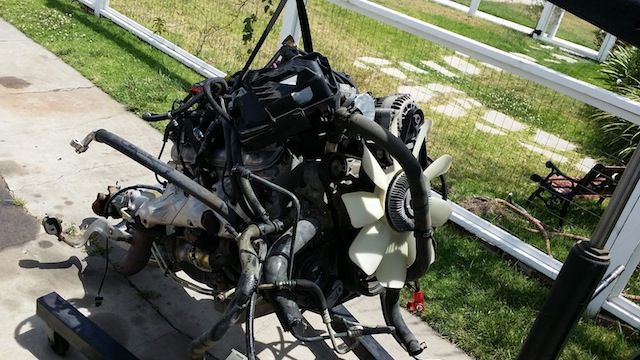
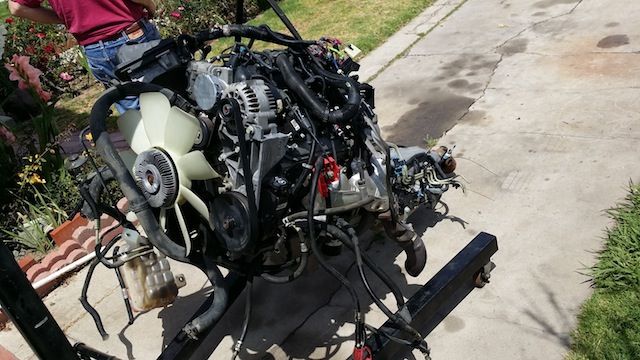
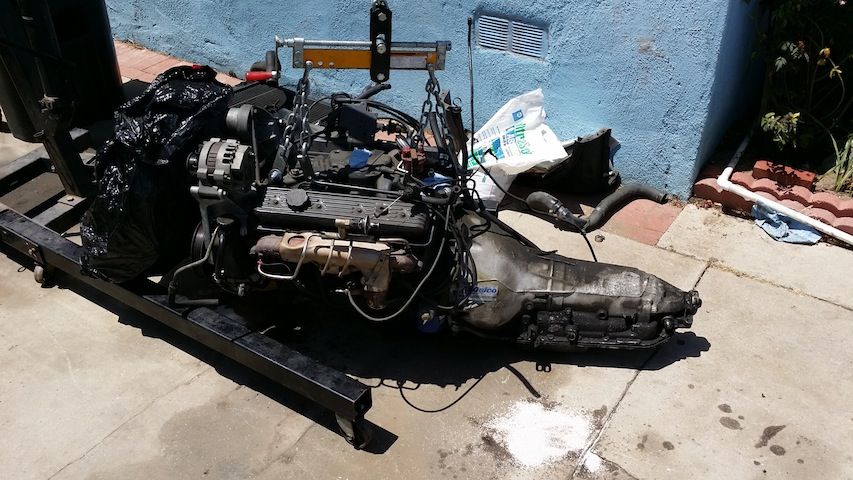
Motor is an LQ4/4L80e form an 03 silverado, so far as I know anyway. 63k miles I was told, pulled outa of a wrecked truck that the junk yard just got in yesterday. Fuel tank from a late LT1 jelly bean wagon will be put in, that and the pedal/TAC module the salvage yard forgot to send me ill have next week. Going to use some basic mount plates, keep the motor in the same spot. A/C relocation/adapter bracket for the R-4 compressor. Probably going to pick up a Holly LSx conversion oil pan too, I dont feel like hacking up the stock one, nor do I want to cut the K member or frame and i want a bolt in motor with no oil pan clearance issues. F-body exhaust manifolds, with the air injection/EGR welded closed as I dont need em on this motor. 2 cats, 4 o2 sensors etc etc. This will be a smog legal referee certified car in California, so EVAP system will also be made to be functional.
I need to get the ECU flashed to remove VATS and set the A/C to a request signal as opposed to the serial data so I can run compressor control through the ECU, and ill retain the original cycling switch. Not gonna do any tuning as of yet, I want to see how it runs bone stock first. Also need to pick up fuel rail fittings, this one is the last of the return fuel systems. Also need to get a fuse relay box, comb out the harness and prep that, figure out what im gonna do for the mech speedo. changing the tailshaft housing is way too pricey, so ill prolly end up with an electric box to drive the speedo. Unsure if ill go electric fans or if the stock fan clutch will work...if it doesnt then it will get a set of electrics, or a single electric from a taurus or lincon Mark8. A new aluminum radiator is on the list though. Should be straight forward, im lookin forward to getting started.
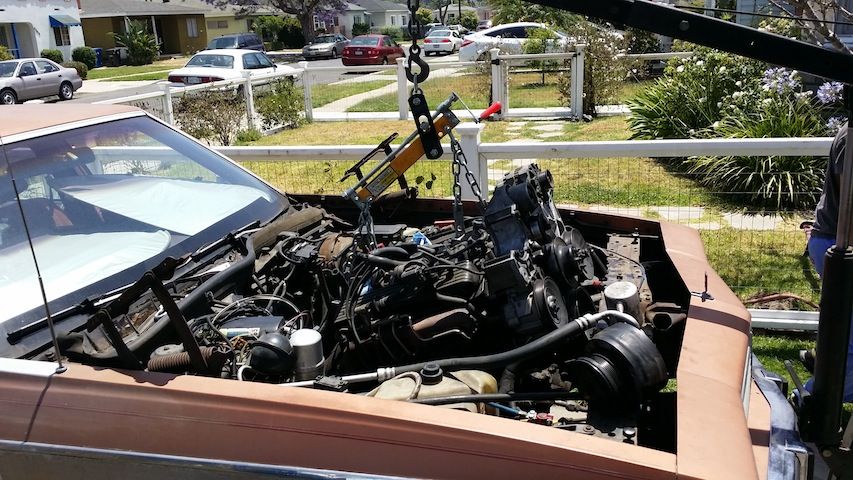
A few pics of the motor and the motor prepped and the car. More to come prolly next week when i yank the 350.
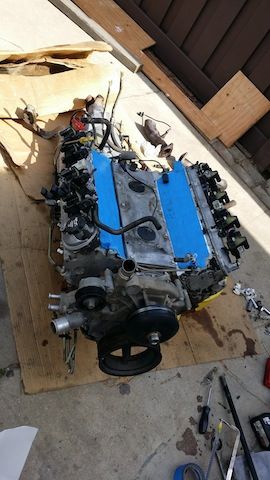

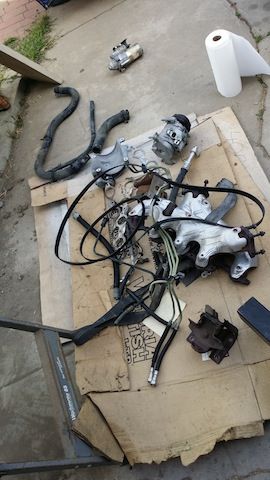
Motor is an LQ4/4L80e form an 03 silverado, so far as I know anyway. 63k miles I was told, pulled outa of a wrecked truck that the junk yard just got in yesterday. Fuel tank from a late LT1 jelly bean wagon will be put in, that and the pedal/TAC module the salvage yard forgot to send me ill have next week. Going to use some basic mount plates, keep the motor in the same spot. A/C relocation/adapter bracket for the R-4 compressor. Probably going to pick up a Holly LSx conversion oil pan too, I dont feel like hacking up the stock one, nor do I want to cut the K member or frame and i want a bolt in motor with no oil pan clearance issues. F-body exhaust manifolds, with the air injection/EGR welded closed as I dont need em on this motor. 2 cats, 4 o2 sensors etc etc. This will be a smog legal referee certified car in California, so EVAP system will also be made to be functional.
I need to get the ECU flashed to remove VATS and set the A/C to a request signal as opposed to the serial data so I can run compressor control through the ECU, and ill retain the original cycling switch. Not gonna do any tuning as of yet, I want to see how it runs bone stock first. Also need to pick up fuel rail fittings, this one is the last of the return fuel systems. Also need to get a fuse relay box, comb out the harness and prep that, figure out what im gonna do for the mech speedo. changing the tailshaft housing is way too pricey, so ill prolly end up with an electric box to drive the speedo. Unsure if ill go electric fans or if the stock fan clutch will work...if it doesnt then it will get a set of electrics, or a single electric from a taurus or lincon Mark8. A new aluminum radiator is on the list though. Should be straight forward, im lookin forward to getting started.
A few pics of the motor and the motor prepped and the car. More to come prolly next week when i yank the 350.


 05-04-2014, 12:58 AM
#2
On The Tree
Thread Starter
Join Date: Aug 2013
Posts: 188
Likes: 0
Received 0 Likes
on
0 Posts
I am curious though...For the heater i will get a bypassing valve, but for filling the system, am i gonna have issues filling it though the radiator as i would normally? I know its a reverse flow system and my fill is on the lower hose side...so id be filling against a closed thermostat. The truck had an expansion tank that filled through the heater hose return...thoughts? And whats the best places to adapt the stock senders for the oil and temp gauges?
 05-17-2014, 11:20 PM
#5
On The Tree
Thread Starter
Join Date: Aug 2013
Posts: 188
Likes: 0
Received 0 Likes
on
0 Posts
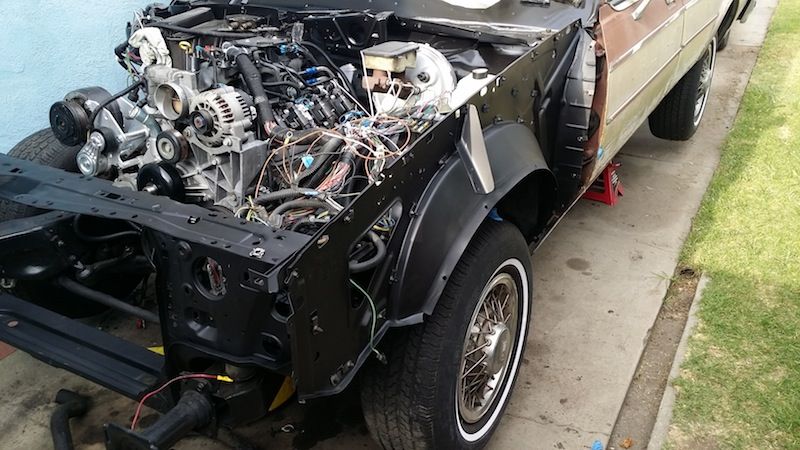
So finally got started. Pulled the 350tbi and 200R4, bolted on the new pan, the setback plates and the 350's mount brackets and dropped it in. Well that didnt go so well...Lined up one side and the other side was over an inch off. So i picked up new mounts cause the old ones were toast and that didn't help. I had to move each mount up 1/2 inch to bolt the motor down. The adaptor plates are 1" setback, and the mount brackets are off the 350, but who knows what they were off of. They had a bump on the back of em so I had to use 2 washers to space it away from the plated, but that wasnt enough to move anything. I dont have the trans in it yet, gonna do that tomorrow, but the front of the pan is pretty much hitting the draglink for the steering right now, im hoping with the trans in and bolted down it tilts back a little and clears.
Are there more than one version of the clamshell brackets for the small block? The plates were off ebay, they are well made, 3/8" steel, from someone that does LS brackets. The mounts are 87 caprice (this car originally had an olds 307 those mounts were totally different) The 350 sat right on them with no issues, I think its weird they were so far off, but ive never dropped an LS in a car like this before. I shouldn't have had to move them at all from the stock place. And the oil pan is a holly retrofit 302-1. You can see in the pics when it didnt fit, and the holes i drilled bout 1/2 inch higher in each side
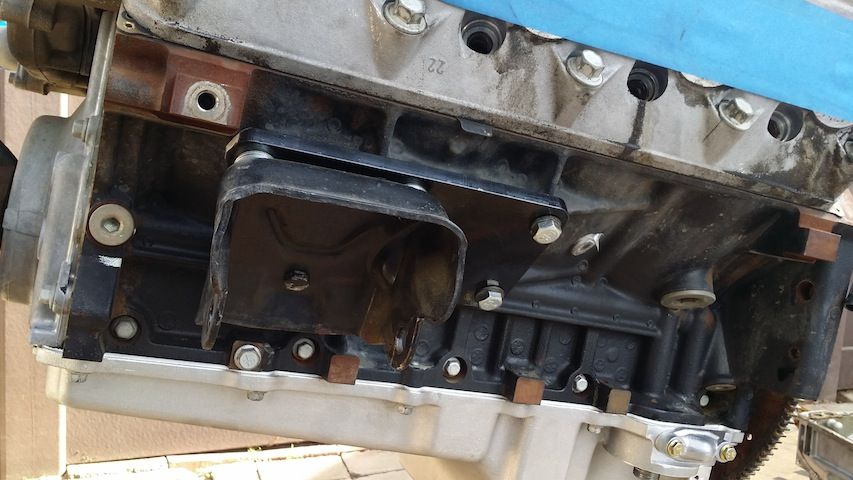
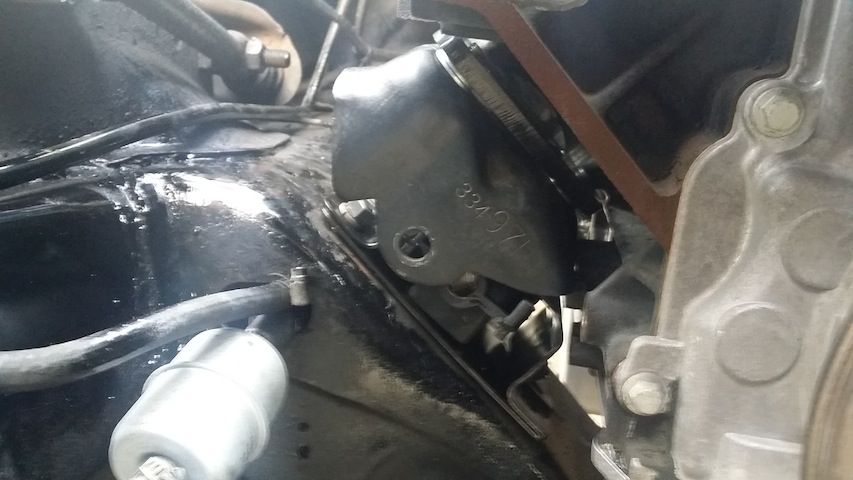
Are there more than one version of the clamshell brackets for the small block? The plates were off ebay, they are well made, 3/8" steel, from someone that does LS brackets. The mounts are 87 caprice (this car originally had an olds 307 those mounts were totally different) The 350 sat right on them with no issues, I think its weird they were so far off, but ive never dropped an LS in a car like this before. I shouldn't have had to move them at all from the stock place. And the oil pan is a holly retrofit 302-1. You can see in the pics when it didnt fit, and the holes i drilled bout 1/2 inch higher in each side


 05-26-2014, 11:12 PM
#7
On The Tree
Thread Starter
Join Date: Aug 2013
Posts: 188
Likes: 0
Received 0 Likes
on
0 Posts
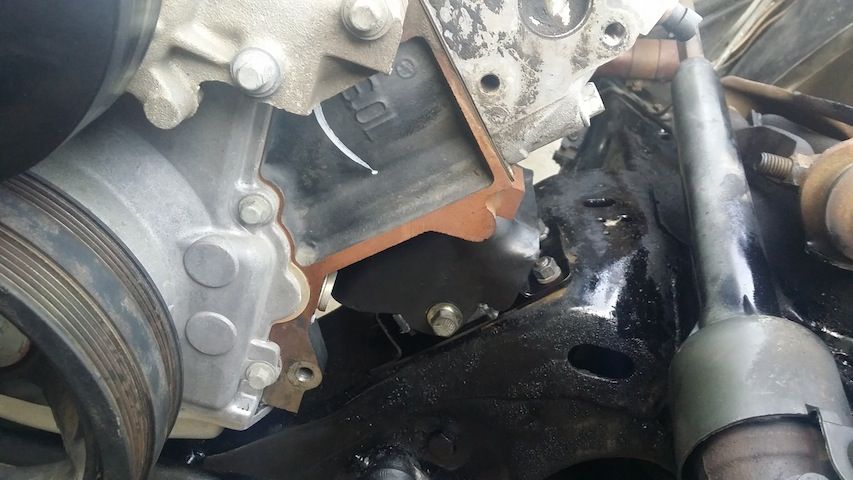
Those new holes I drilled sat the motor in just fine, bolted the trans in, plenty of clearance. The stock colums shifter even works, Its a little far foarward, the linkage is pulled forward an inch, which is odd. I used set back plates, and everywhere I read those were supposed to put it in the stock location. I dunno if i really want the motor back any farther anyway. But i can get it through all the gears ok, the detent and indicator are dead on.
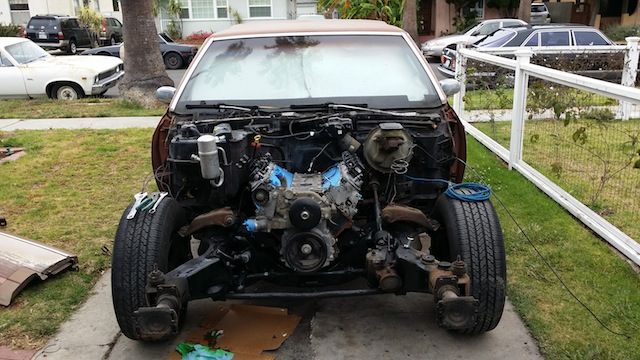
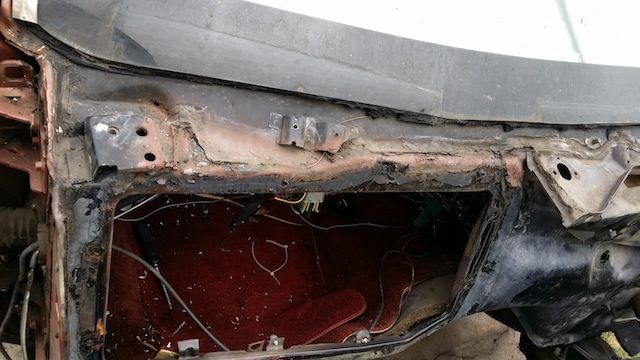
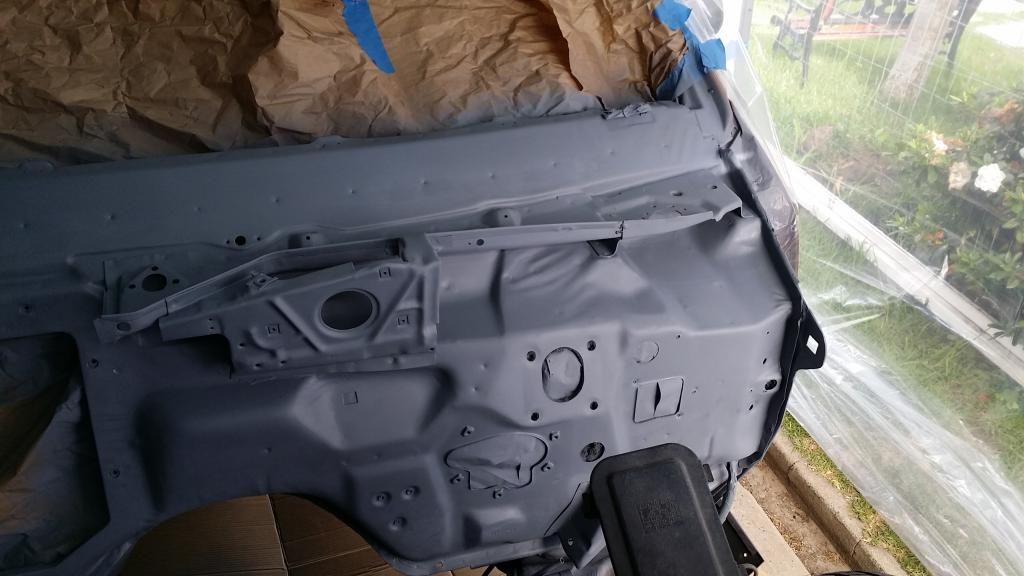
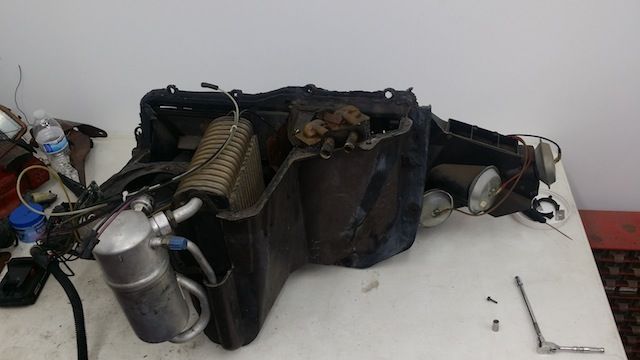
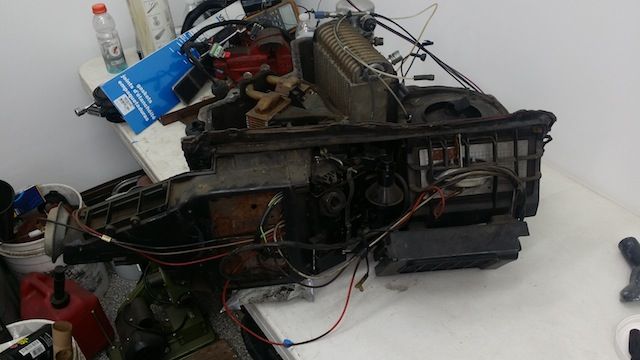
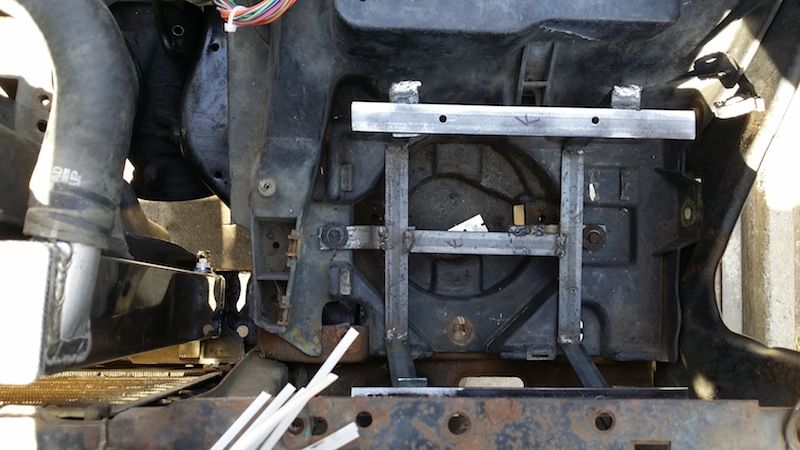
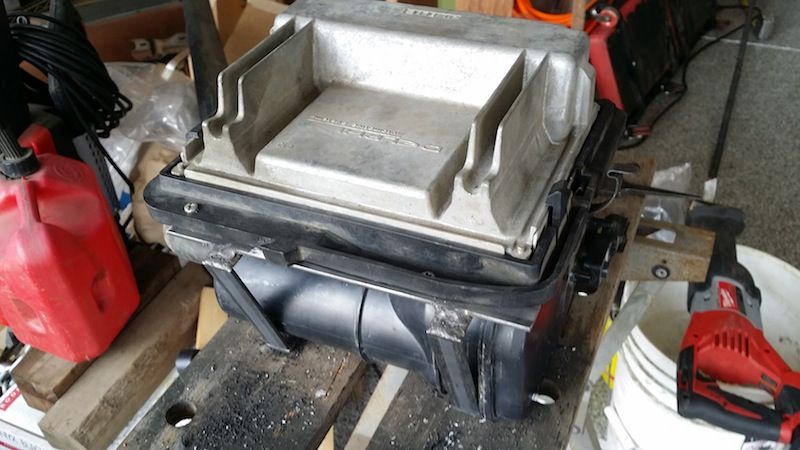
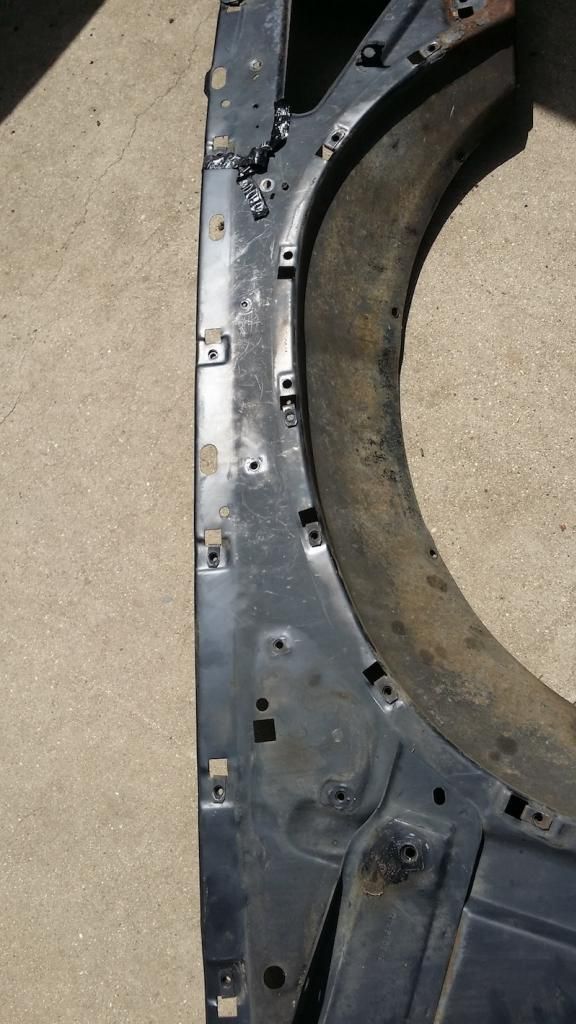
Then I hit the mushroom effect. The car is gonna get painted, and and all spifified. Looking at the rust on the core support that looked ugly and the firewall with its faded paint i knew i wouldnt be happy. Also the HVAC box thats never been off the firewall, i was worries about that seal being bad and leaking water inside. I want to be sure that the engine compartment was totally rust free, around that box, under the windshield etc etc. And to replace the stupid power antenna which has ben broken for 15 years i need to pull the fender off anyway.
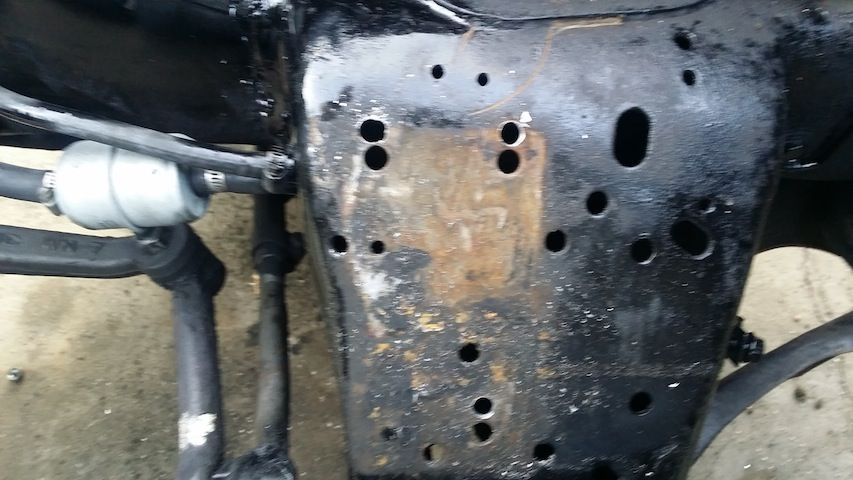
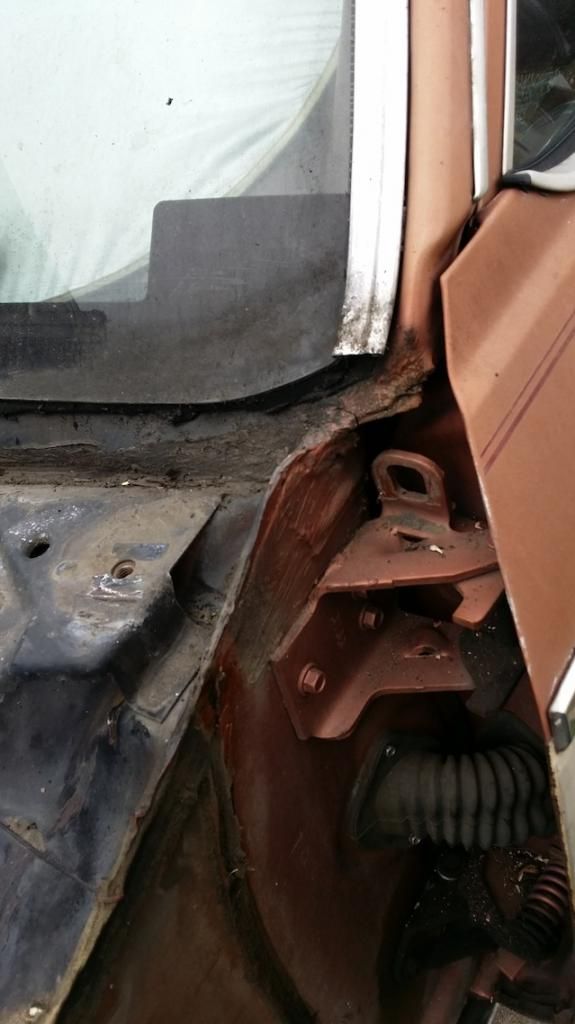
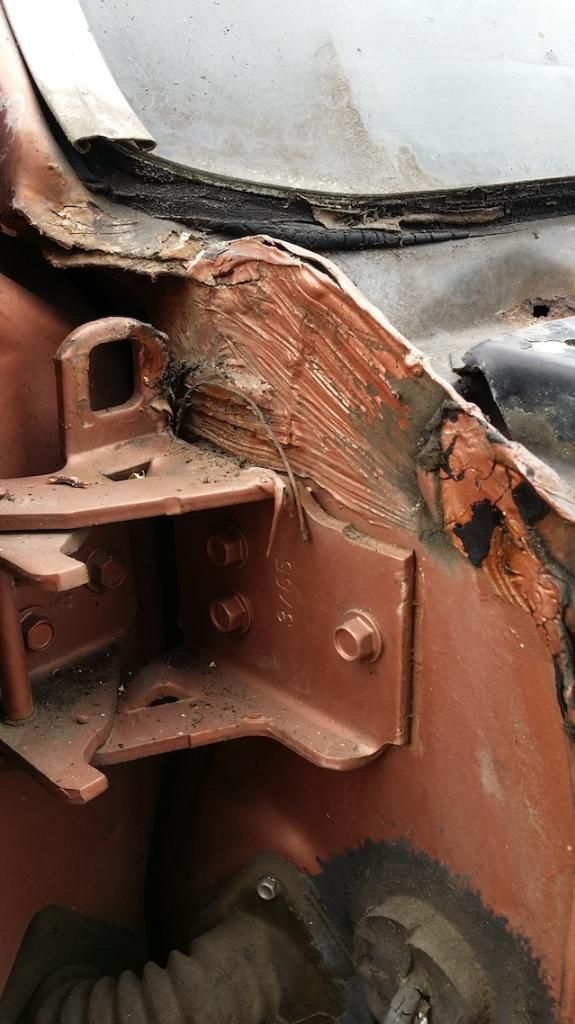
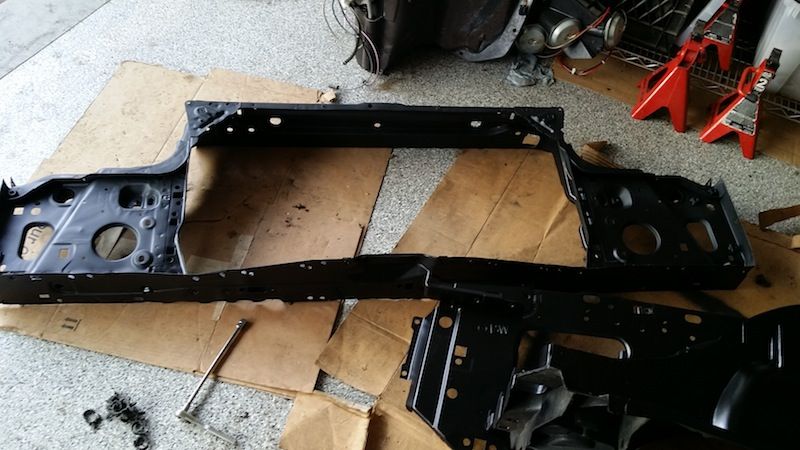
So I pulled the nose, bumper, fenders, the whole front clip really, and the HVAC box. Found one small hole under the windshield, pul the trim off and found more surface starting at the top of the windshield. A little at the a-pillars at the bottom thats just starting. No real damage, but i need to take care of it now before it gets bad. Gonna get my heat gun and get off all the seam sealer thats sprayed everywhere, make it all presentable. Ive got my metal body guy coming this week I think to look at the little 1/4" hole and the bottoms under the A-pillars to see what should be done to help prevent any further issues. I need to order a set of body bushings and get to work sanding the core support. Also need to hit the bone yard for a new top to the HVAC box (I broke that) and a new pass front door, and a tailgate (rusted out in the inside bottom corner, and bad cracks and structural issues with the old tailgate, but i may end up fixing the old tailgate)
Ive never pulled the front clip off one of these, Ive worked on cars for years though. Little overwhelming seeing it sit there with no front, Ive been around this car long as I can remember haha. no turning back now though. Get the windshield out, take care of the rust issues, rattle can the firewall and frame, toss in new body bushings and bolt the fenders back on. Then back to the motor swap haha.
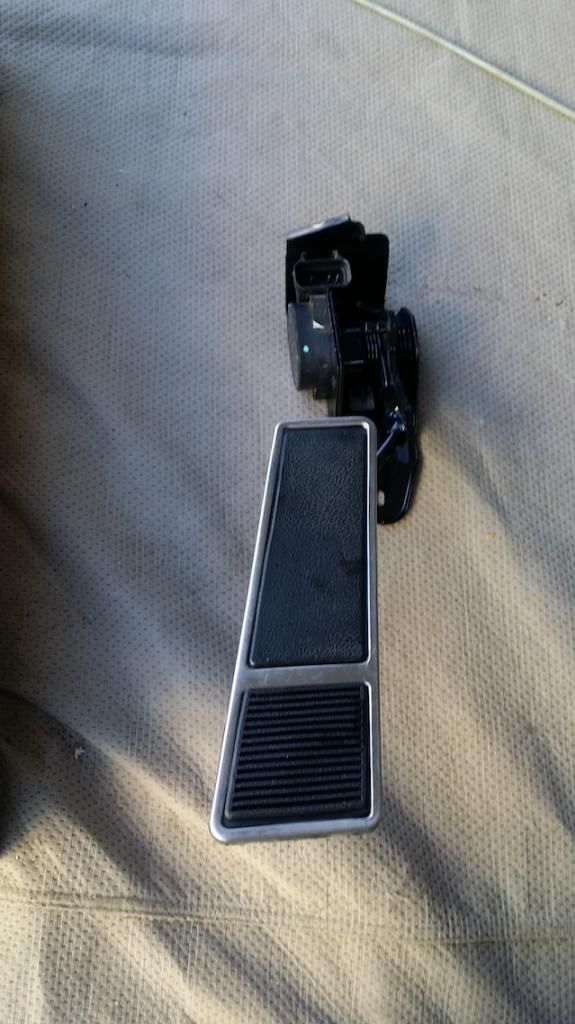
I did end up with a factory aluminum hood by luck on my last trip to the bone yard, because race car! But didnt even think bout grabbing the lighter springs, so ill have to order a set. Haha, and I need to fab up a bracket to use the stock accel pedal. I will probably cut the stock pedal off and weld the rod to the DBW pedal so the pivot is in the same place, then I know if i put the DBW pedal close to where the original holes are approx, the pedal will be in exactly the same spot


Then I hit the mushroom effect. The car is gonna get painted, and and all spifified. Looking at the rust on the core support that looked ugly and the firewall with its faded paint i knew i wouldnt be happy. Also the HVAC box thats never been off the firewall, i was worries about that seal being bad and leaking water inside. I want to be sure that the engine compartment was totally rust free, around that box, under the windshield etc etc. And to replace the stupid power antenna which has ben broken for 15 years i need to pull the fender off anyway.
So I pulled the nose, bumper, fenders, the whole front clip really, and the HVAC box. Found one small hole under the windshield, pul the trim off and found more surface starting at the top of the windshield. A little at the a-pillars at the bottom thats just starting. No real damage, but i need to take care of it now before it gets bad. Gonna get my heat gun and get off all the seam sealer thats sprayed everywhere, make it all presentable. Ive got my metal body guy coming this week I think to look at the little 1/4" hole and the bottoms under the A-pillars to see what should be done to help prevent any further issues. I need to order a set of body bushings and get to work sanding the core support. Also need to hit the bone yard for a new top to the HVAC box (I broke that) and a new pass front door, and a tailgate (rusted out in the inside bottom corner, and bad cracks and structural issues with the old tailgate, but i may end up fixing the old tailgate)
Ive never pulled the front clip off one of these, Ive worked on cars for years though. Little overwhelming seeing it sit there with no front, Ive been around this car long as I can remember haha. no turning back now though. Get the windshield out, take care of the rust issues, rattle can the firewall and frame, toss in new body bushings and bolt the fenders back on. Then back to the motor swap haha.
I did end up with a factory aluminum hood by luck on my last trip to the bone yard, because race car! But didnt even think bout grabbing the lighter springs, so ill have to order a set. Haha, and I need to fab up a bracket to use the stock accel pedal. I will probably cut the stock pedal off and weld the rod to the DBW pedal so the pivot is in the same place, then I know if i put the DBW pedal close to where the original holes are approx, the pedal will be in exactly the same spot


Trending Topics
07-07-2014, 03:14 PM
#8
On The Tree
Thread Starter
Join Date: Aug 2013
Posts: 188
Likes: 0
Received 0 Likes
on
0 Posts
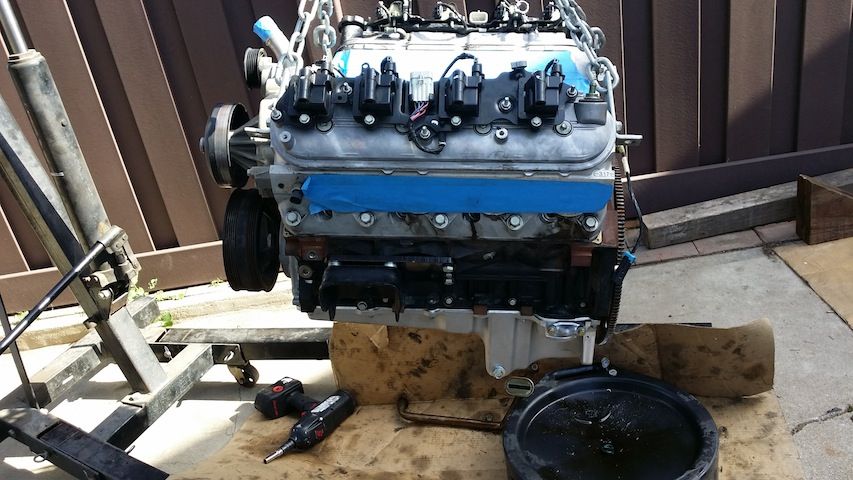
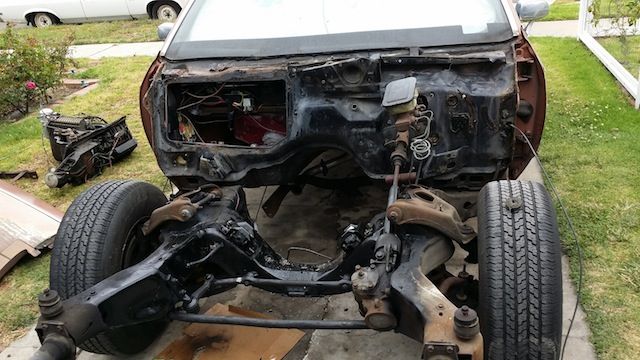
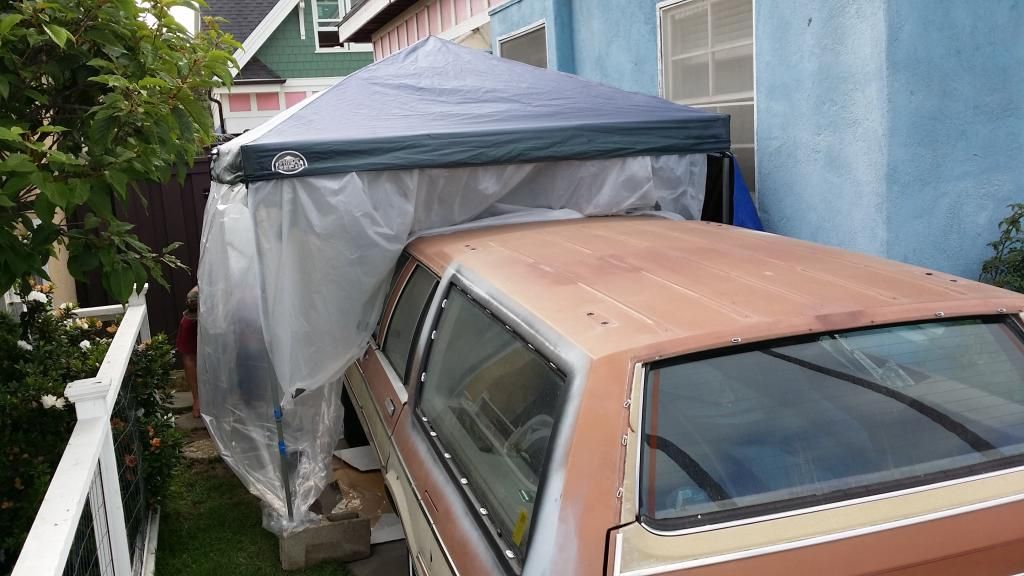
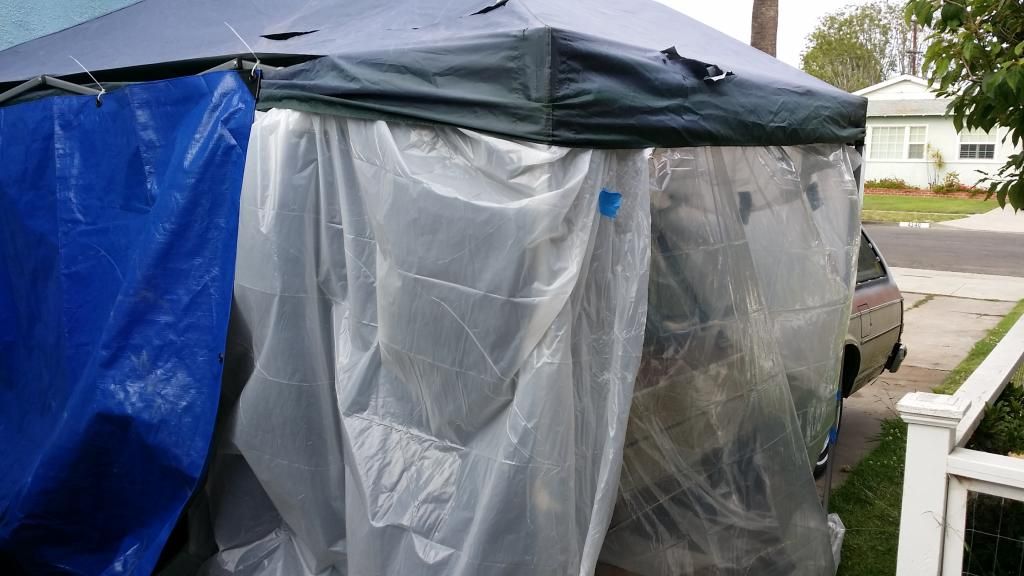
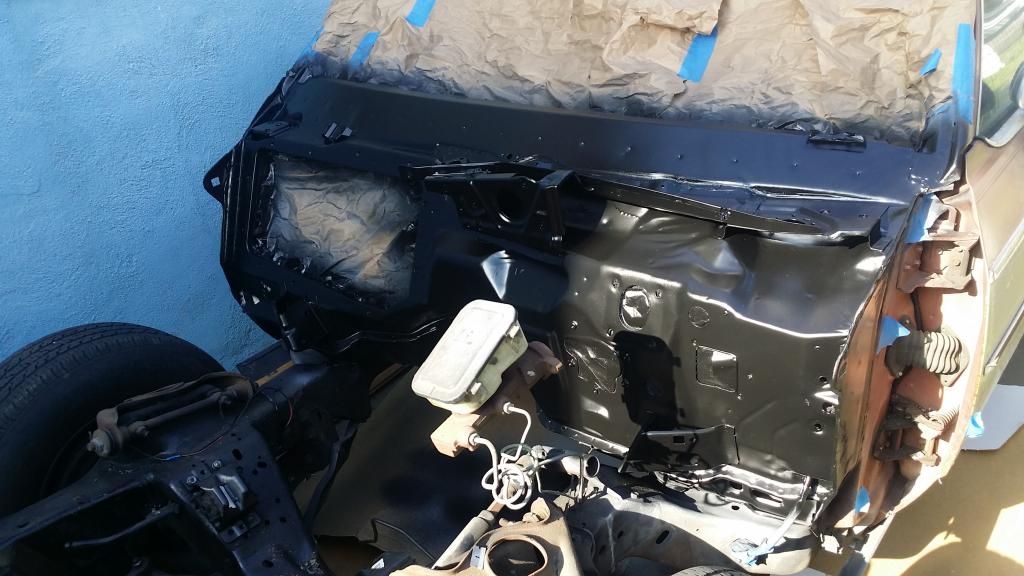
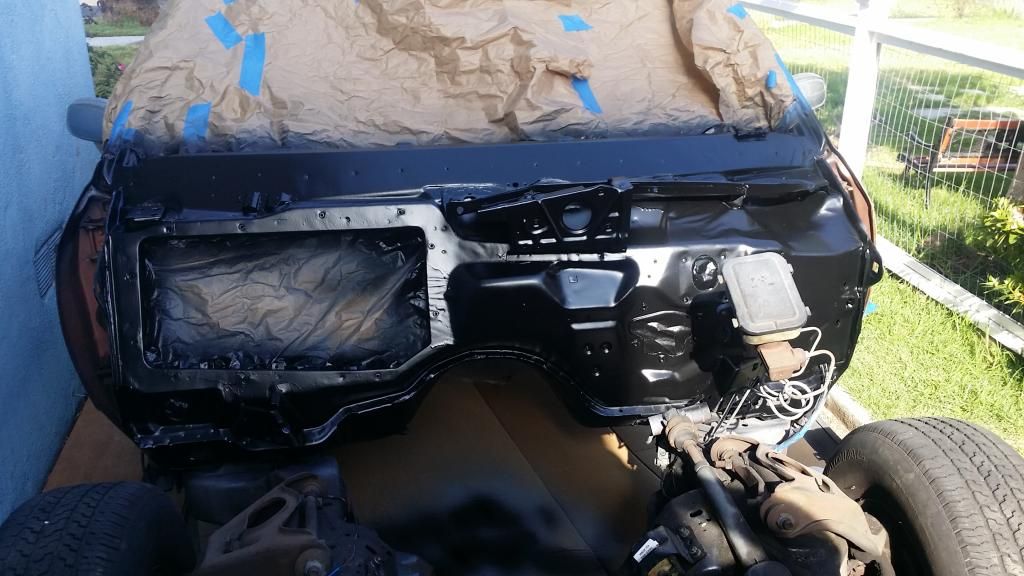
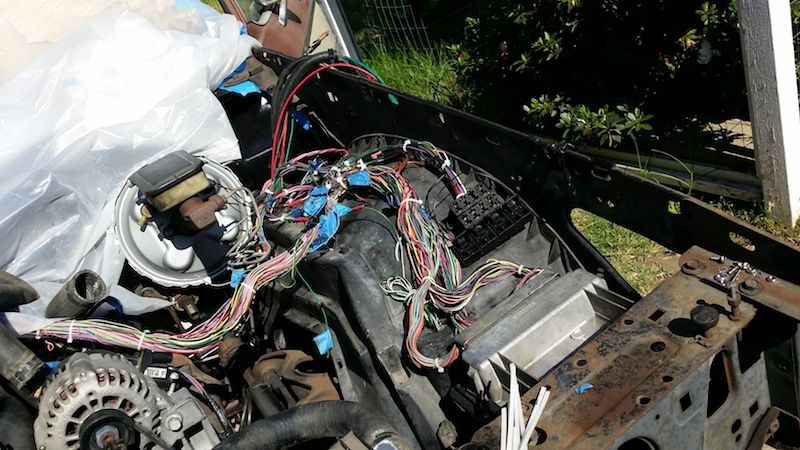
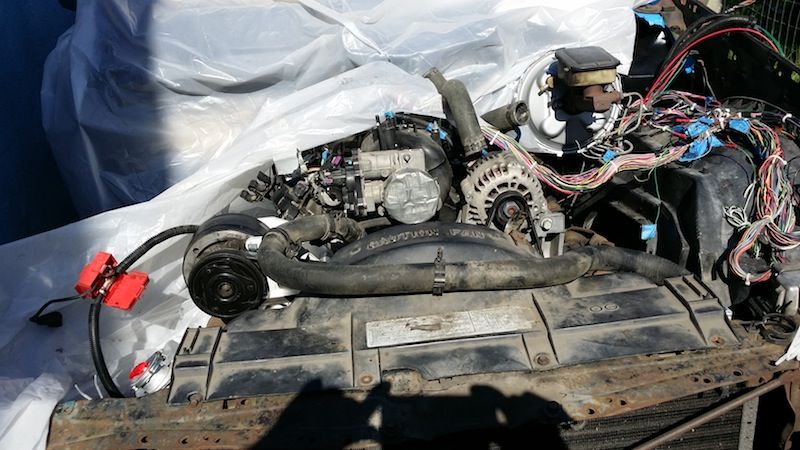
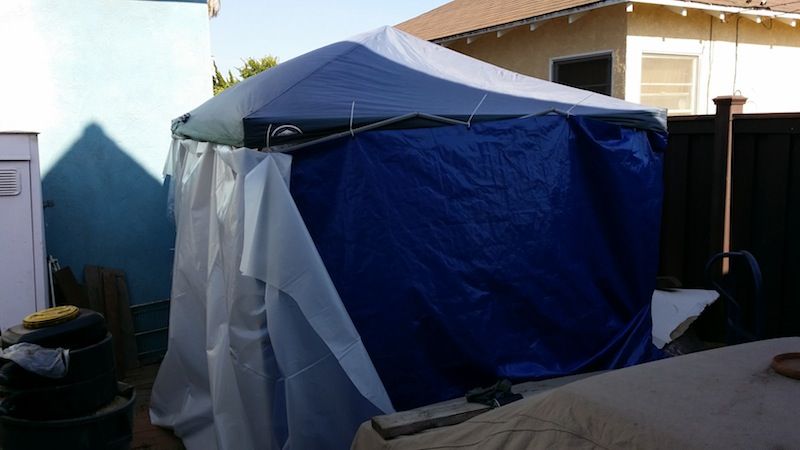
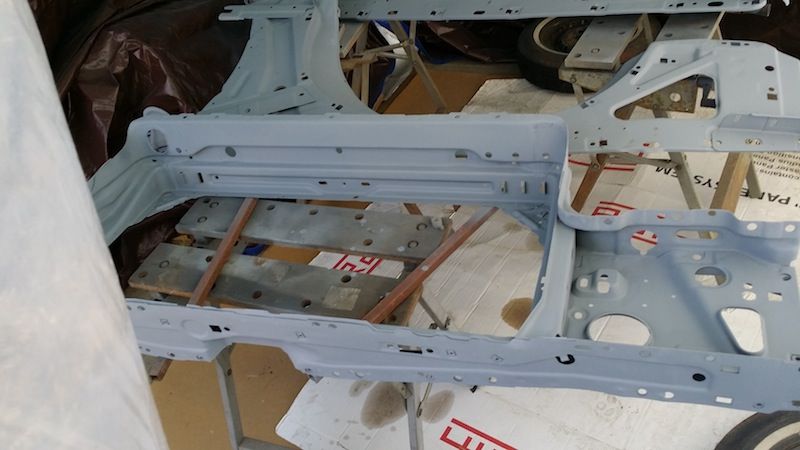
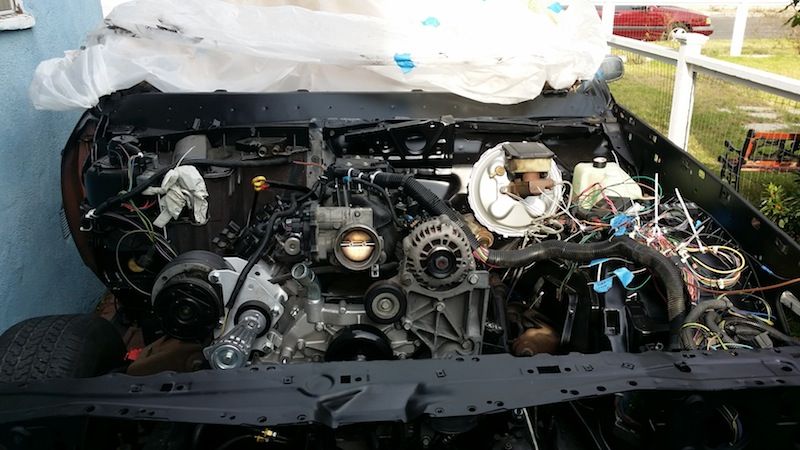
Finally made some progress. I wasnt gonna be happy if I didnt do this right and detail it out better, paint the fire wall, make sure there was no rust behind the HVAC box, etc etc. So I stripped the firewall, pulled the windshield, welded up the 3 small rust holes I found, made a makeshift paint booth, primed, painted and went back to it. Came out pretty good, for my first time with a gun. Im good with rattle cans, and after getting the hang of the gun and its adjustments and quirks its not too bad. Put a coat of black on the block too and restabbed it. Got the trans cross member cut and modded to fit. Motor is finally bolted down. Started on the exhaust, realized i was a few pipes short, so got that ordered, along with temp gauge sender and body bushings.
The exhaust manifolds are truck manifolds. I know the Fbody manifolds were a bolt on for this chassis, but with the need to make it smog legal I was worried bout using F body manifolds and having to weld closed or cap off the AIR and EGR ports, and the truck 6.0 doesn't have em. Just a hassle I didn't need. And the more I read the more I saw people welding the manifolds with a MIG welder. So either they have a high steel/nickel content, or they are cast steel, I dunno. But cranked up the MIG and they welded with no problem. Cut the flanges off the manifolds and re aimed em where I wanted em.
Waiting for exhaust parts i need to lay the fenders on and make up some kinda ECU bracket and run the wiring, weld up the pedal bracket, install the fuel tank and new lines, etc etc. The humidity got worse as the weekend went on so I just called it. The P/S, ALT bracket is on there temp for PS hose fitting and belt fitting, its ugly and needs some help
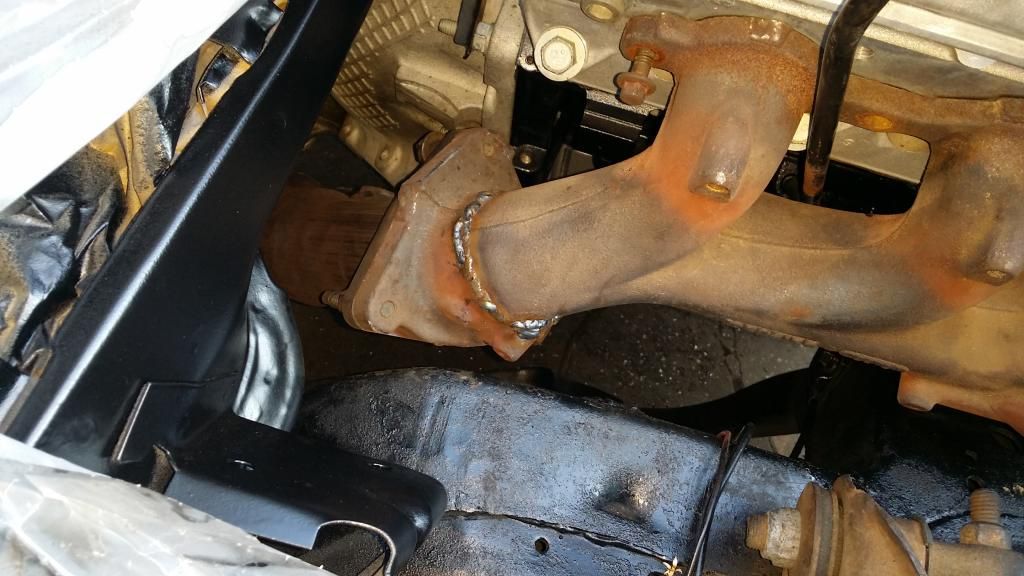


 07-13-2014, 12:30 AM
#9
On The Tree
Thread Starter
Join Date: Aug 2013
Posts: 188
Likes: 0
Received 0 Likes
on
0 Posts
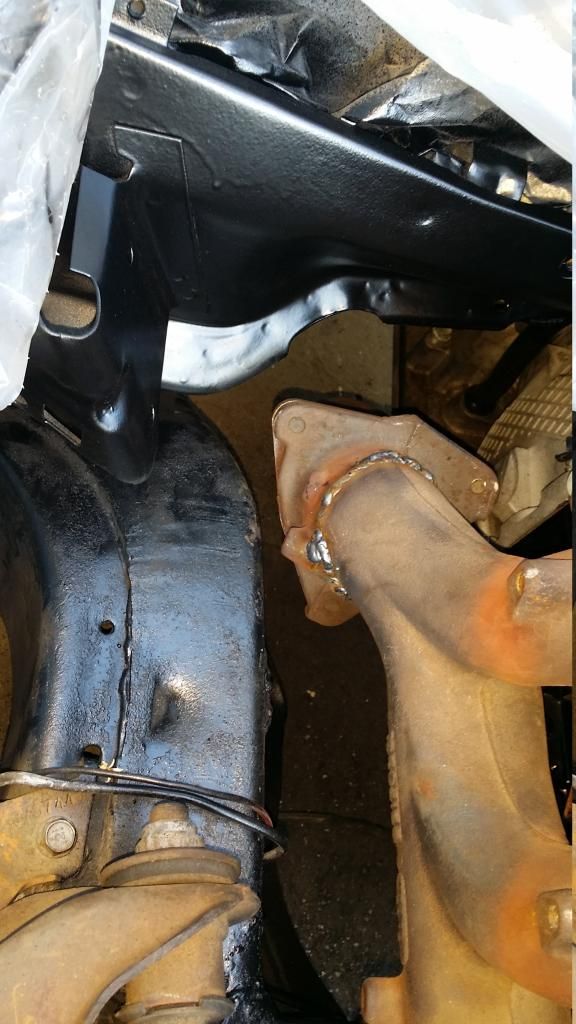
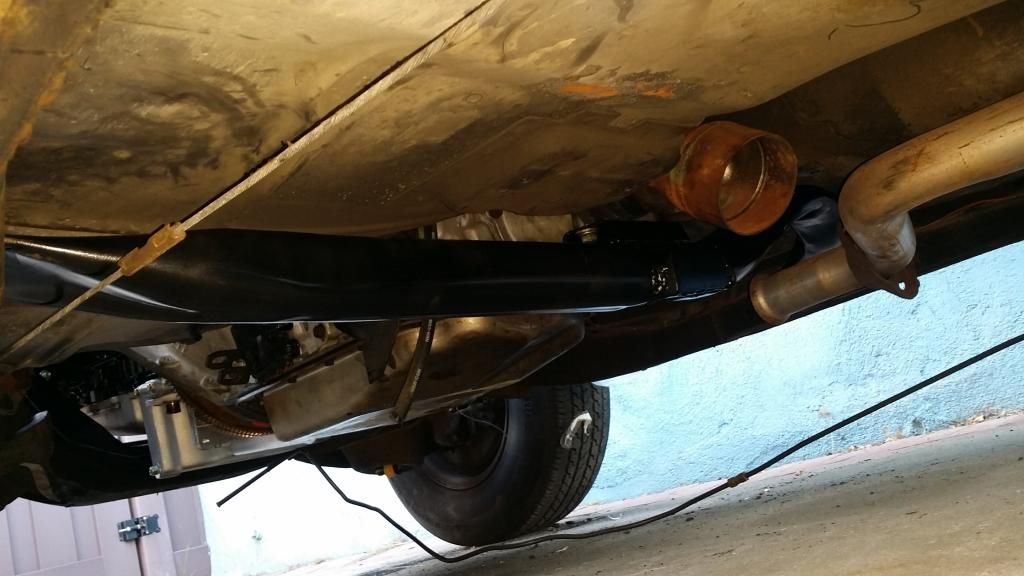
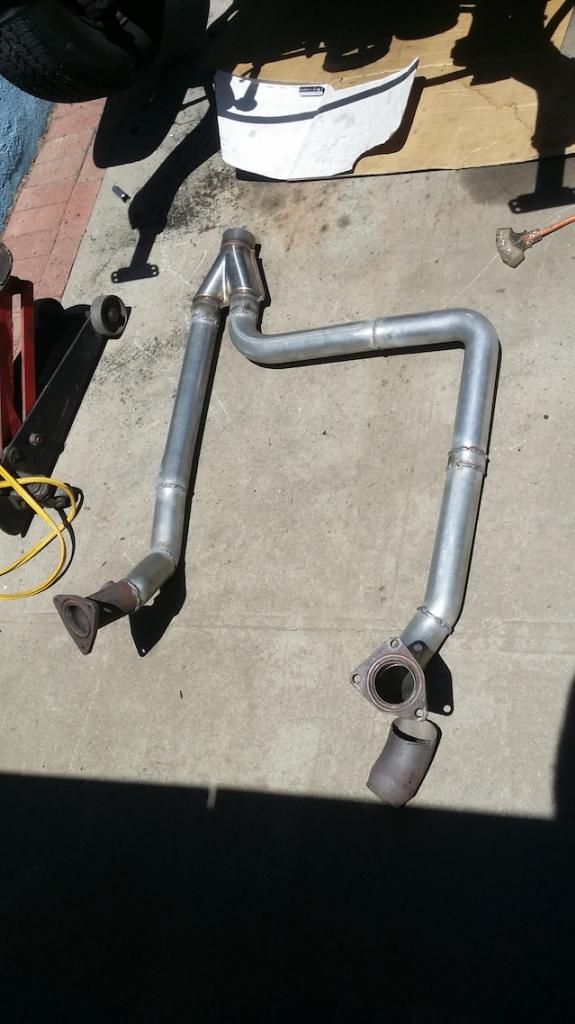
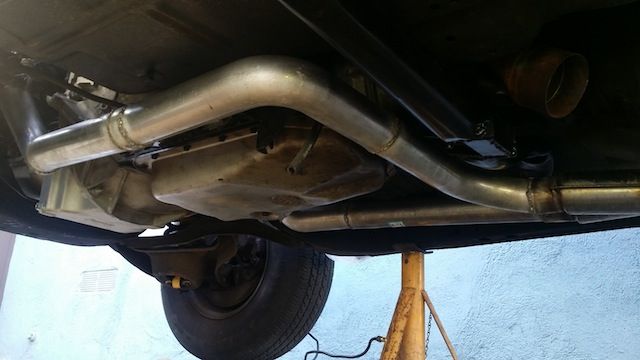
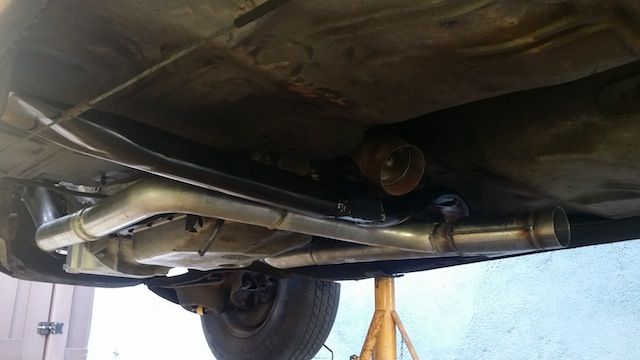
More progress...U-pipe made 2.5" into 3" single to go out the back. Left some space so cats can be put in later, and ill make some aluminum heat shields to pop rivit to the floor. And ill either make a heat shield around the tail shaft or wrap the pipe under the trans. It will prolly cook the mount and back of the gasket if I don't.
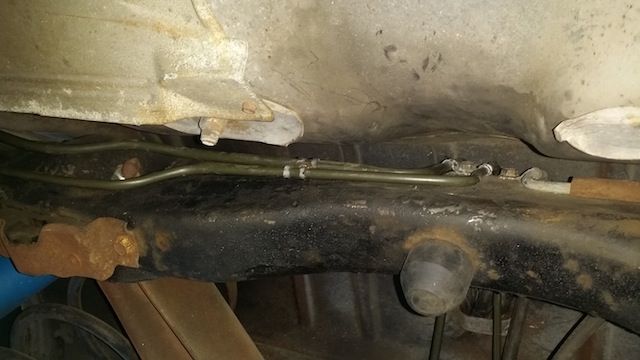
Jellybean wagon tank installed, literally bolt in. Tore out all the old fuel lines to run new ones. They are defiantly put on the frame before the body is put on, what a pain. Got them run in the rear to the fuel filter for the most part, need to order a 37deg flare tool. And Im not sure how im going to run them in the front. Once I get to the front if I attach em to the body to run up the middle of the firewall I need to put a flex part between the body and frame, thats 2 more flex lines I have to make that didnt account for. I could run them along the crossmember and pop em up under the booster, but it gets crowded over there with the shifter linkage, brake lines, the wiper motor and what have you.
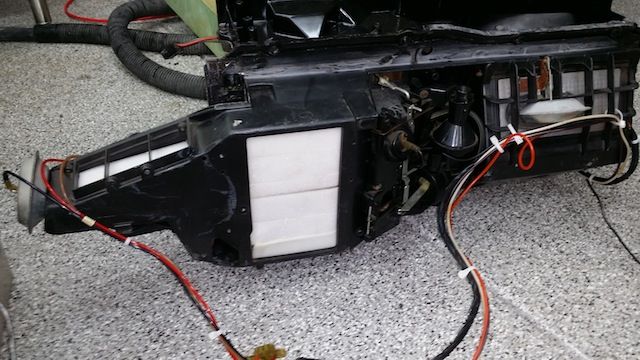
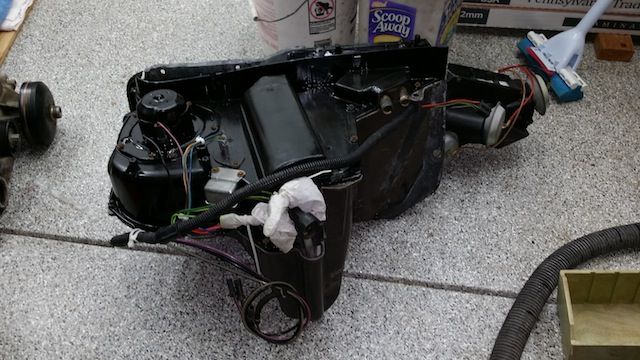
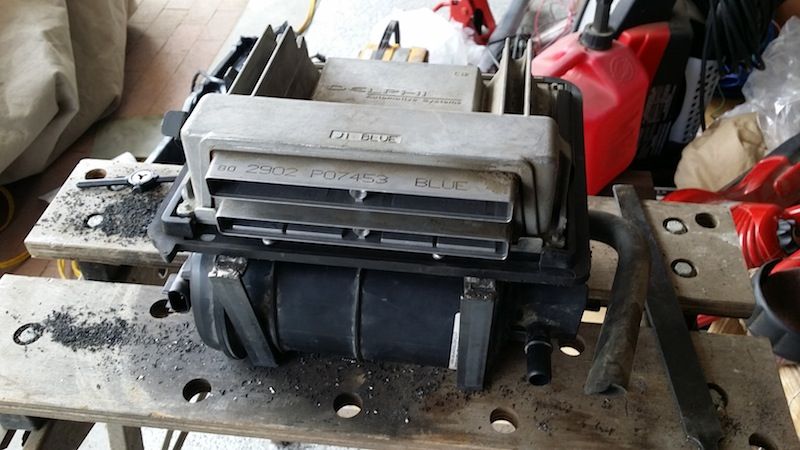
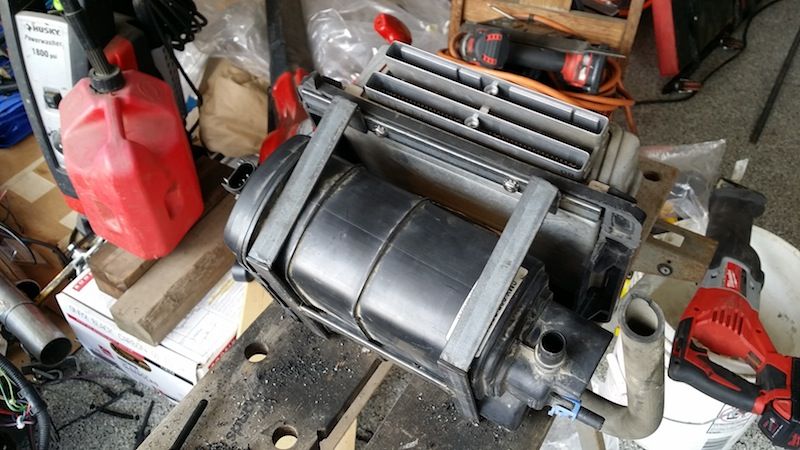
And got the HVAC box cleaned up, refoamed etc etc. And the stock pedal fabbed up to the throttle sensor and bracket
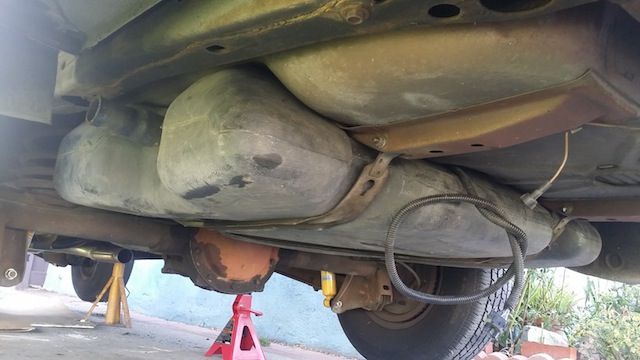
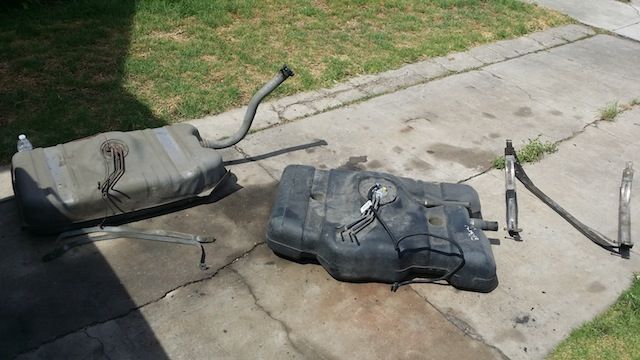
Jellybean wagon tank installed, literally bolt in. Tore out all the old fuel lines to run new ones. They are defiantly put on the frame before the body is put on, what a pain. Got them run in the rear to the fuel filter for the most part, need to order a 37deg flare tool. And Im not sure how im going to run them in the front. Once I get to the front if I attach em to the body to run up the middle of the firewall I need to put a flex part between the body and frame, thats 2 more flex lines I have to make that didnt account for. I could run them along the crossmember and pop em up under the booster, but it gets crowded over there with the shifter linkage, brake lines, the wiper motor and what have you.
And got the HVAC box cleaned up, refoamed etc etc. And the stock pedal fabbed up to the throttle sensor and bracket


 07-13-2014, 03:01 AM
#10

Great progress. Making it smog legal definitely makes it a challenge. Is the gas tank going to be a problem since it's not from the donor truck you got the engine from? The shop that finished my car had issues with an E-Rod swap on a Trans AM. They put in a Ricks Tank on it and had to have Ricks Tank state on the invoice that it's a direct replacement for that 80 Trans Am they put it in. Save your old tank in case you have to fab it to accommodate an in tank pump, or you might have to go with an external pump.
What are your plans for the Interior? Are you going with buckets and floor console? Or keep it stock? If you are going for a floor shift with buckets, like the Holiday 88, use a G-Body console and buckets. The Holiday 88's used the same console, shifter, and seats from the cutlass. Im using buckets from a buick regal, a repro console and floor shifter from a Monte Carlo. I want my interior to look like it came like that from the factory since the Chevy B-Bodys didn't have buckets, console and floor shift as an option like the Olds, Buicks,and Pontiac B's. The BOPs borrowed parts from their G-body cousins.
What are your plans for the Interior? Are you going with buckets and floor console? Or keep it stock? If you are going for a floor shift with buckets, like the Holiday 88, use a G-Body console and buckets. The Holiday 88's used the same console, shifter, and seats from the cutlass. Im using buckets from a buick regal, a repro console and floor shifter from a Monte Carlo. I want my interior to look like it came like that from the factory since the Chevy B-Bodys didn't have buckets, console and floor shift as an option like the Olds, Buicks,and Pontiac B's. The BOPs borrowed parts from their G-body cousins.
07-13-2014, 12:03 PM
#11
On The Tree
Thread Starter
Join Date: Aug 2013
Posts: 188
Likes: 0
Received 0 Likes
on
0 Posts
I had a 350 TBI in there that replaced the stock 307carb, and I had that referee'd. Im a cali smog tech so I kinda knew what they would look for. Tank doesn't matter long as it does what its supposed to. Only thing thats gonna matter is the EVAP system needs to work, but I dont think thats gonna be an issue. Only thing that may be problematic with that is the fuel level signal. Stock is 0-90 and the truck ecu expects to see 40-220 I think is it. So ill deal with that later. the 04 motor has no EGR no air pump so dont have to worry bout that. Truck also had 2 cats in pretty much the same place Im gonna put em, so that should be all good.
Interior is staying stock. Im pretty sure I can still get the same material so the drivers seat will be redone, every other seat is in good shape. This one is a 60/40 split power bench on front, the pass side is manual. Rear seat and 3rd seat are perfect, door panels are in good shape. Headliner ill handle myself. New carpet, and im gonna have to figure out how to spruce up the sun baked rear panels. This car came with gauges not just too late lights which is nice, so I have my volt/oil/temp. Dad wants it stock so it needs to stay stock. I had to get creative when I put the stereo in it. I got a later ETR headunit which fits the dash perfectly and was an option on later ones. Speaker to line level convertor to an EQ which gives me a controllable sub out (and an AUX in), ran that to 2 amps in the storage compartment in the rear. Kept the 4x10 and 3.5's (worst speaker sizes ever) and put 2 8" subs under the floor where the 3rd seat is, easily removable. All you see is the EQ under the ash trey. Im gonna see if I can convince him to let me cut the door panels for components cause the 3.5 sound like they are in a plastic box, just inherent in the design of the dash. Or i need to see If i can put a kick panel speaker in, I dunno. There isnt much room between the kick panel and the parking brake. I dont want that to interfere
Either way ya, all stock, down to the wire wheel hubcaps and balloon tires it rides on. Got new rockets for the header panel and tailgate, and a new hood ornament to top it off after paint. And the stock column shifter works fine. Motor is inch back so the linkage is a little twisted, but it does go in every gear right where it should, all the way down to 1st. If it becomes an issue there are kits to make the column shifter a cable shift instead of a rod, so thats an option. Roof rack wont go back on, just more spots for rust to start again. And Ill prolly add keyless entry, cause damn its so nice.
07-13-2014, 01:57 PM
#12
Do you need to have the fuel level signal to the ECU? Can't you just connect the fuel level gauge to the sender in the tank?
As far as that sun baked rear panels, just repaint them with car interior paint.
As far as that sun baked rear panels, just repaint them with car interior paint.
I had a 350 TBI in there that replaced the stock 307carb, and I had that referee'd. Im a cali smog tech so I kinda knew what they would look for. Tank doesn't matter long as it does what its supposed to. Only thing thats gonna matter is the EVAP system needs to work, but I dont think thats gonna be an issue. Only thing that may be problematic with that is the fuel level signal. Stock is 0-90 and the truck ecu expects to see 40-220 I think is it. So ill deal with that later. the 04 motor has no EGR no air pump so dont have to worry bout that. Truck also had 2 cats in pretty much the same place Im gonna put em, so that should be all good.
Interior is staying stock. Im pretty sure I can still get the same material so the drivers seat will be redone, every other seat is in good shape. This one is a 60/40 split power bench on front, the pass side is manual. Rear seat and 3rd seat are perfect, door panels are in good shape. Headliner ill handle myself. New carpet, and im gonna have to figure out how to spruce up the sun baked rear panels. This car came with gauges not just too late lights which is nice, so I have my volt/oil/temp. Dad wants it stock so it needs to stay stock. I had to get creative when I put the stereo in it. I got a later ETR headunit which fits the dash perfectly and was an option on later ones. Speaker to line level convertor to an EQ which gives me a controllable sub out (and an AUX in), ran that to 2 amps in the storage compartment in the rear. Kept the 4x10 and 3.5's (worst speaker sizes ever) and put 2 8" subs under the floor where the 3rd seat is, easily removable. All you see is the EQ under the ash trey. Im gonna see if I can convince him to let me cut the door panels for components cause the 3.5 sound like they are in a plastic box, just inherent in the design of the dash. Or i need to see If i can put a kick panel speaker in, I dunno. There isnt much room between the kick panel and the parking brake. I dont want that to interfere
Either way ya, all stock, down to the wire wheel hubcaps and balloon tires it rides on. Got new rockets for the header panel and tailgate, and a new hood ornament to top it off after paint. And the stock column shifter works fine. Motor is inch back so the linkage is a little twisted, but it does go in every gear right where it should, all the way down to 1st. If it becomes an issue there are kits to make the column shifter a cable shift instead of a rod, so thats an option. Roof rack wont go back on, just more spots for rust to start again. And Ill prolly add keyless entry, cause damn its so nice.
Interior is staying stock. Im pretty sure I can still get the same material so the drivers seat will be redone, every other seat is in good shape. This one is a 60/40 split power bench on front, the pass side is manual. Rear seat and 3rd seat are perfect, door panels are in good shape. Headliner ill handle myself. New carpet, and im gonna have to figure out how to spruce up the sun baked rear panels. This car came with gauges not just too late lights which is nice, so I have my volt/oil/temp. Dad wants it stock so it needs to stay stock. I had to get creative when I put the stereo in it. I got a later ETR headunit which fits the dash perfectly and was an option on later ones. Speaker to line level convertor to an EQ which gives me a controllable sub out (and an AUX in), ran that to 2 amps in the storage compartment in the rear. Kept the 4x10 and 3.5's (worst speaker sizes ever) and put 2 8" subs under the floor where the 3rd seat is, easily removable. All you see is the EQ under the ash trey. Im gonna see if I can convince him to let me cut the door panels for components cause the 3.5 sound like they are in a plastic box, just inherent in the design of the dash. Or i need to see If i can put a kick panel speaker in, I dunno. There isnt much room between the kick panel and the parking brake. I dont want that to interfere
Either way ya, all stock, down to the wire wheel hubcaps and balloon tires it rides on. Got new rockets for the header panel and tailgate, and a new hood ornament to top it off after paint. And the stock column shifter works fine. Motor is inch back so the linkage is a little twisted, but it does go in every gear right where it should, all the way down to 1st. If it becomes an issue there are kits to make the column shifter a cable shift instead of a rod, so thats an option. Roof rack wont go back on, just more spots for rust to start again. And Ill prolly add keyless entry, cause damn its so nice.
07-14-2014, 10:18 AM
#13
On The Tree
Thread Starter
Join Date: Aug 2013
Posts: 188
Likes: 0
Received 0 Likes
on
0 Posts
The EVAP system wont run its monitor unless the tank is 1/4-3/4 SO the ECU needs to know how much fuel is in the tank. I could just fool it with a resistor to say its always got 1/2 tank, but I dont know if this ECU has programming in it to say hey now, there has been 1/2 tank for 500 miles, thats not right. Some ECU's have that programming in it. So ya, the fuel sender will run the gauge, but the signal isnt gonna work so well to feed the ECU. Either I make a box to convert the signal, or change the sender part on the fuel module so it reads right for the ECU and have the gauge recalibrated
07-20-2014, 08:29 PM
#14
On The Tree
Thread Starter
Join Date: Aug 2013
Posts: 188
Likes: 0
Received 0 Likes
on
0 Posts
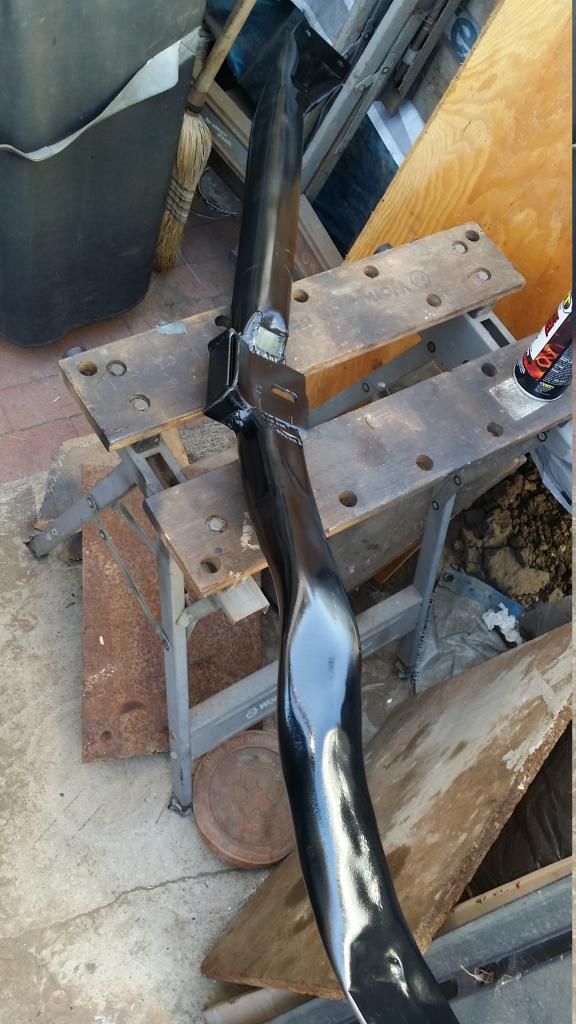
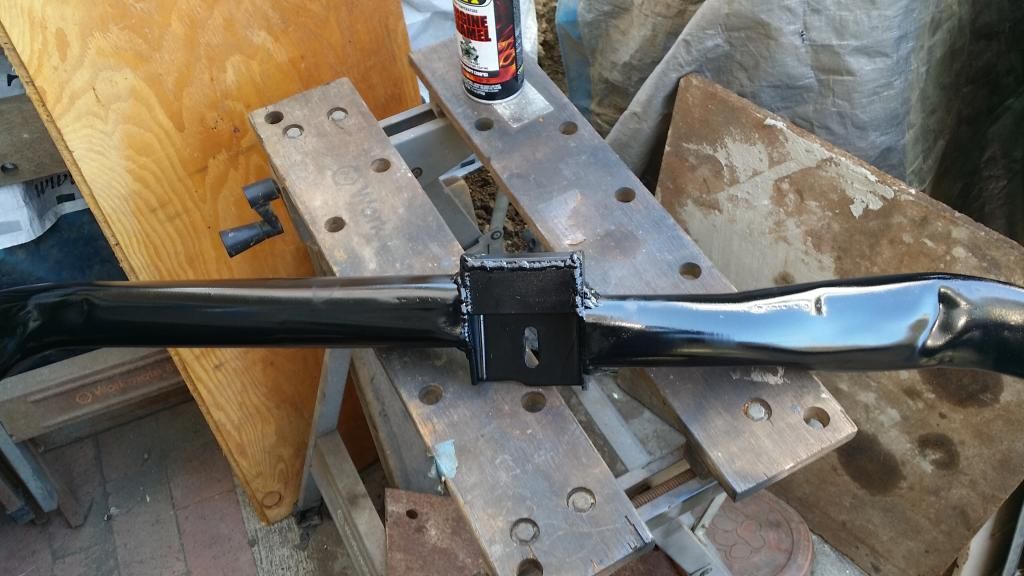
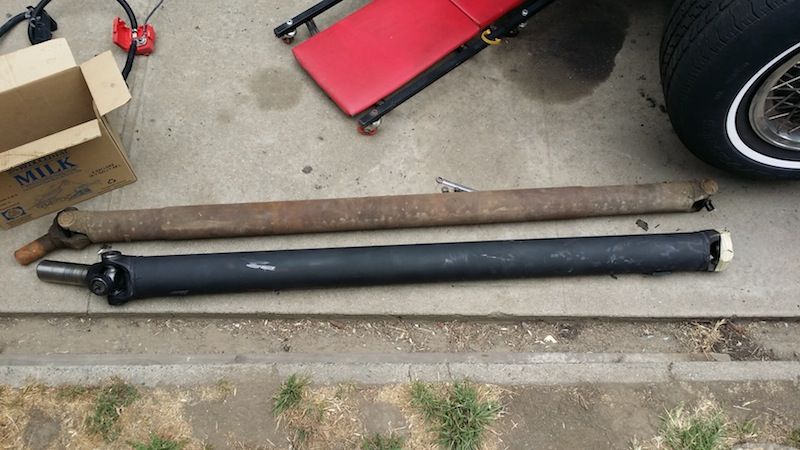
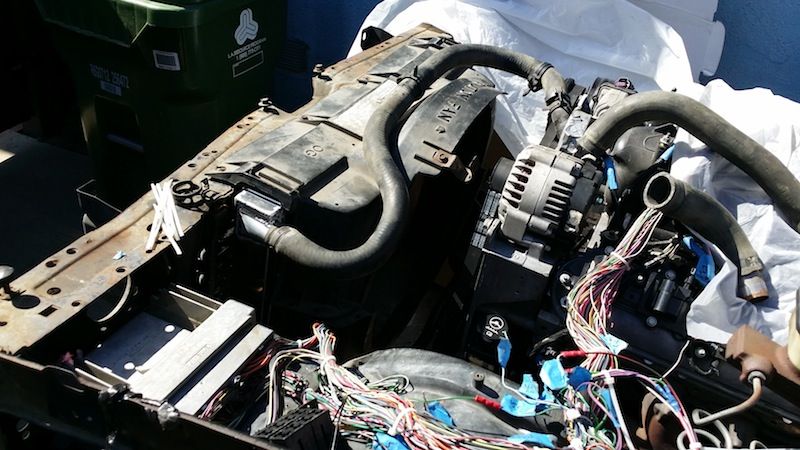
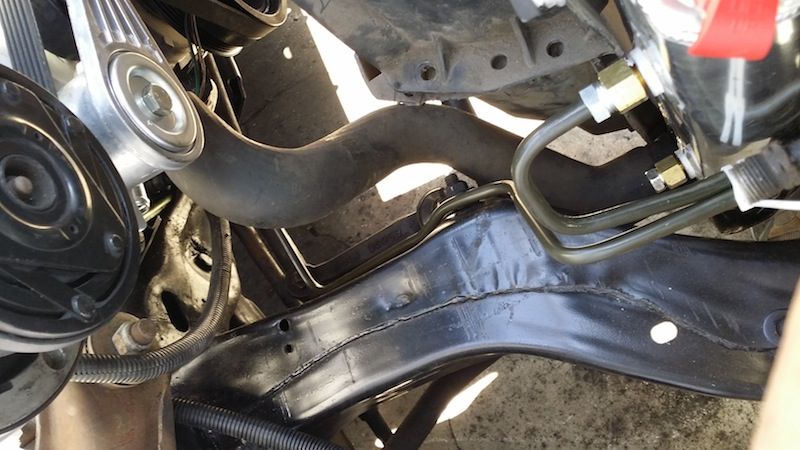
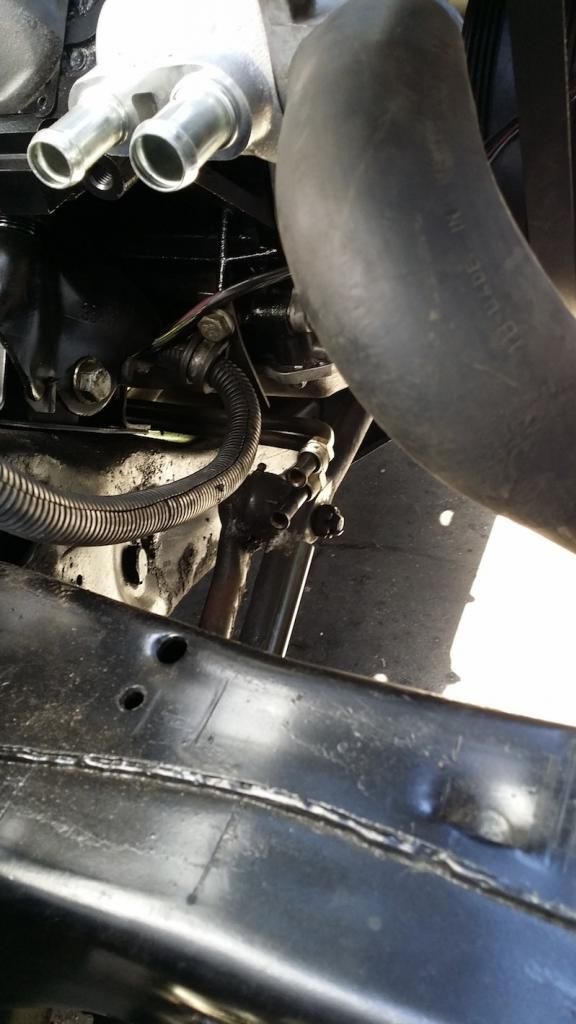
Well makin progress but holy hell it feels slow goin. Due to 'weather issues' I didn't get 2 fuel rail fittings, so that keeps me from pressurizing the fuel system this weekend. I did get the trans lines run along the motor, and got em pretty much laid out for the trans cooler. Need to order some barb fittings to connect up the rubber hoses, Don't wanna do AN stuff, its gonna be too much $$. GOt the core support sitting there to set up the cooler, and check the hose fittament. I don't remember the clearance from the shroud and the hood but if there is room i can use the stock 04 truck upper hose. The stock olds hose will just about work. Driveshaft is in, shortened maybe 3 inches and 3.5" tube instead of the 2.75" tube which expands to 3" in the middle, don't know why they did that, but anyway...
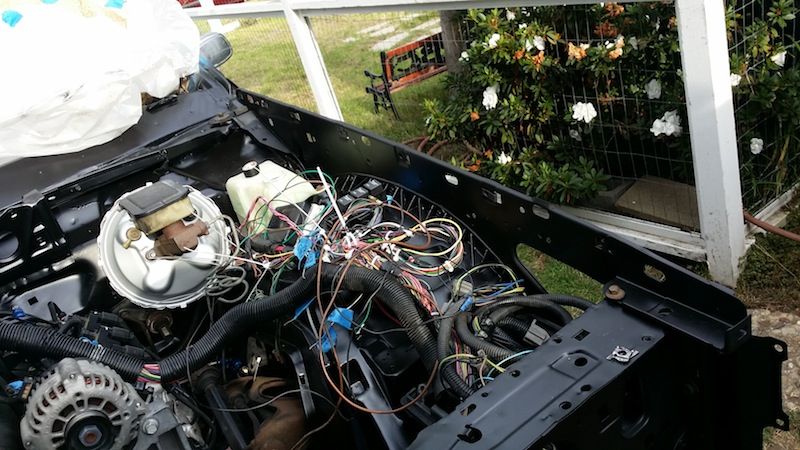
Made a bracket for the canister/ECU, fits perfect. Wiring is mostly done, ill have to pull the engine harness again to re-loom later, wanna hear it run first. Pedal mounted up, feels good, looks stock. And fortunately there was a hole in the firewall with a huge grommet and 1 wire for the low coolant sensor, lol...I ran the wire from the TAC module to the pedal and the other few wires through that hole with the factory truck grommet. A/C compressor relocated belt on, accessories tightened down
So need to finish up the fuel line, trans lines, figure out where im gonna get oil pressure from, put the exhaust manifold gaskets on and an O2 bung in the U pipe I made. Once its a runner I gotta paint the core support, inner fenders and the wheel wells, bolt the HVAC box back in, make a few brackets for lines, and tie up the fuel lines. Gotta order a cable-X too. Get the hood on so I can drive it, get the exhaust finished up, then its off to paint and body.
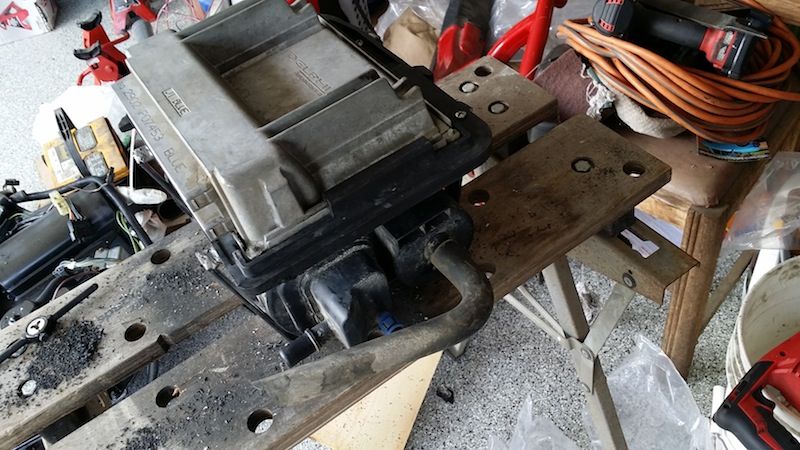
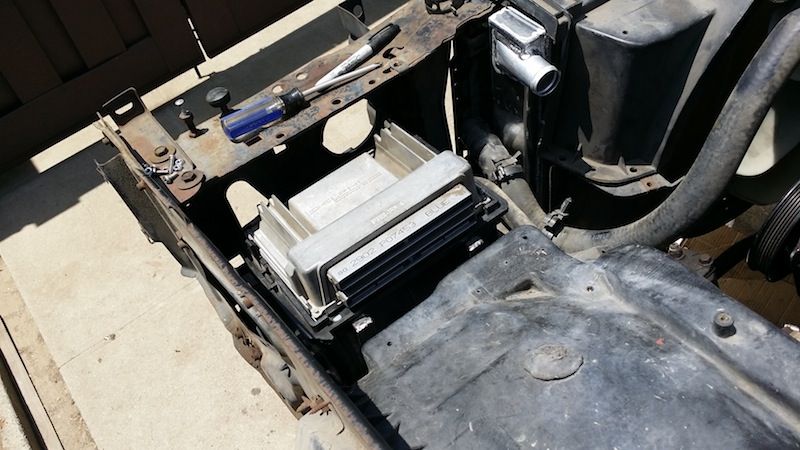
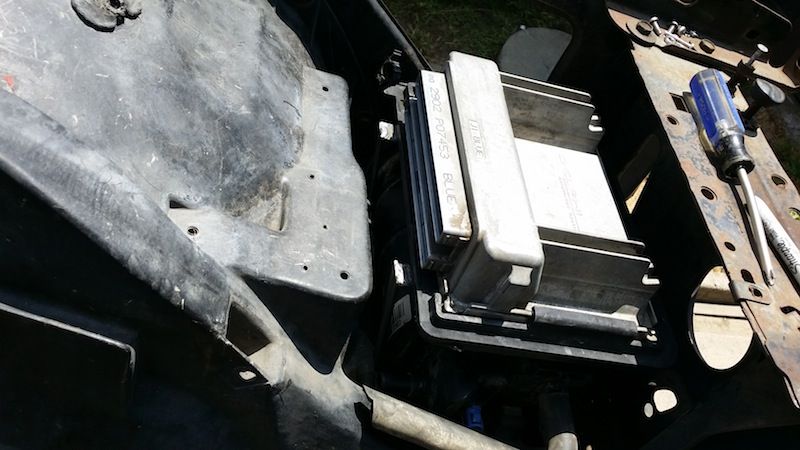
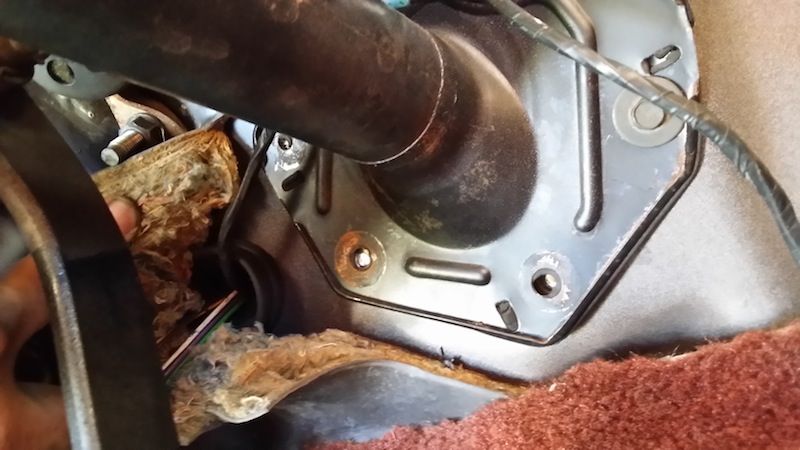
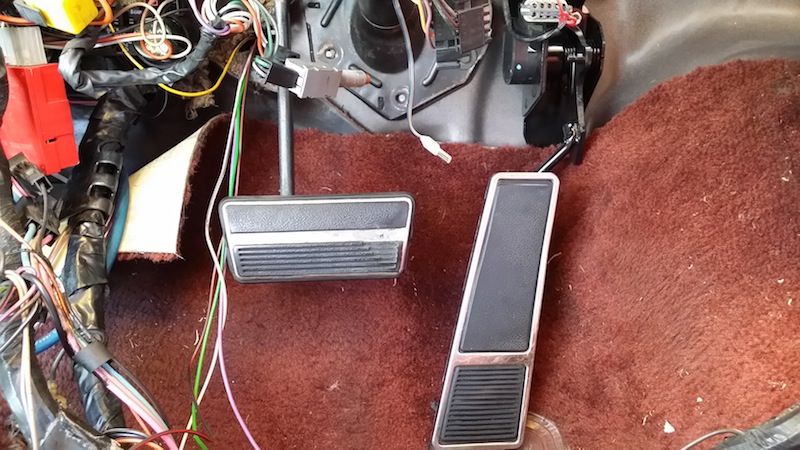


 07-23-2014, 10:45 AM
#15
On The Tree
Thread Starter
Join Date: Aug 2013
Posts: 188
Likes: 0
Received 0 Likes
on
0 Posts
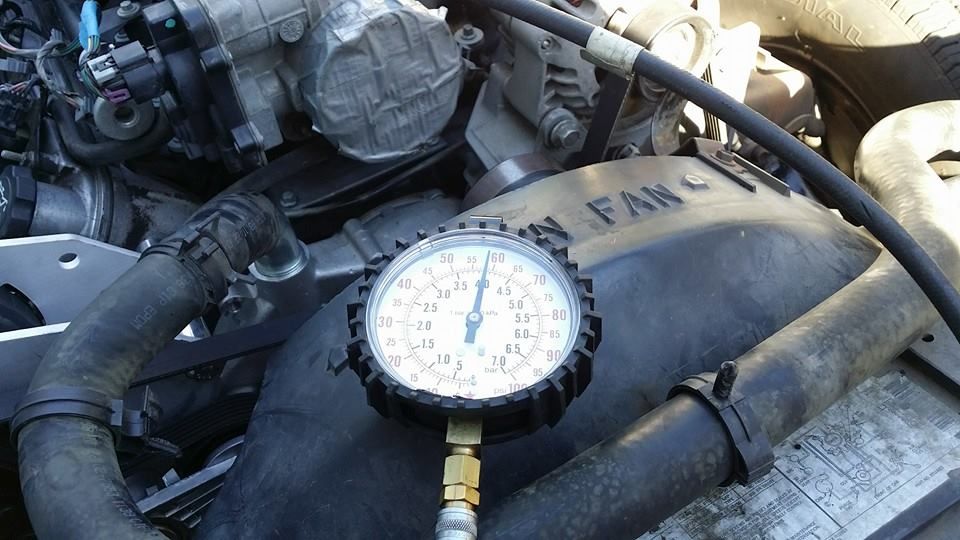
58 PSI and aside from snugging a few fittings, and re-seating an o-ring on the fuel filter, no fuel leaks! Gonna get the ECU flashed today and I should have it running by the weekend. Unfortunately the line clamps, trans cooler fittings and exhaust manifold bolts wont be here till next week...but im happy so far.
 08-03-2014, 09:45 PM
#18
On The Tree
Thread Starter
Join Date: Aug 2013
Posts: 188
Likes: 0
Received 0 Likes
on
0 Posts
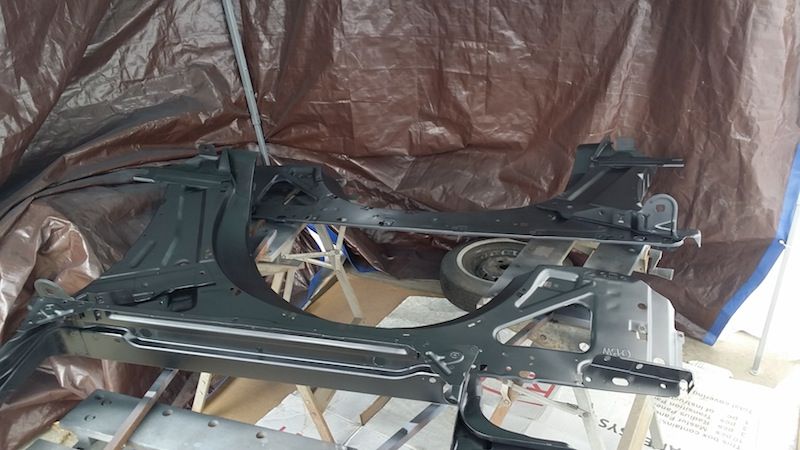
Well made a little more progress. The weather in LA has been pretty crappy. Humid and just icky. Last night it was hot moist and raining. Working one full day in the humidity really takes it outa ya. But...got the inner fenders and wheel wells prepped and painted (yay homemade paint shack, and I loves me that PCL epoxy primer and 'flat' black) a few fuel and tranny line brackets made. Drivers inner fender and wheel well on so I could mount the ECU bracket and the fuse block, feed few more wires through the firewall, lay out where things will go.
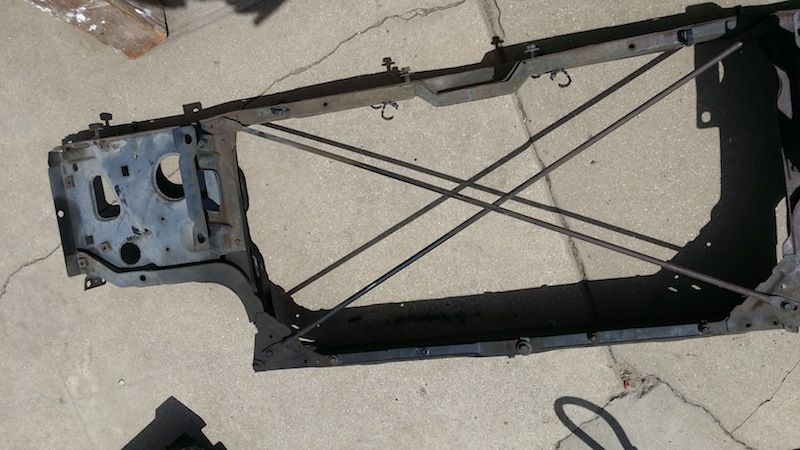
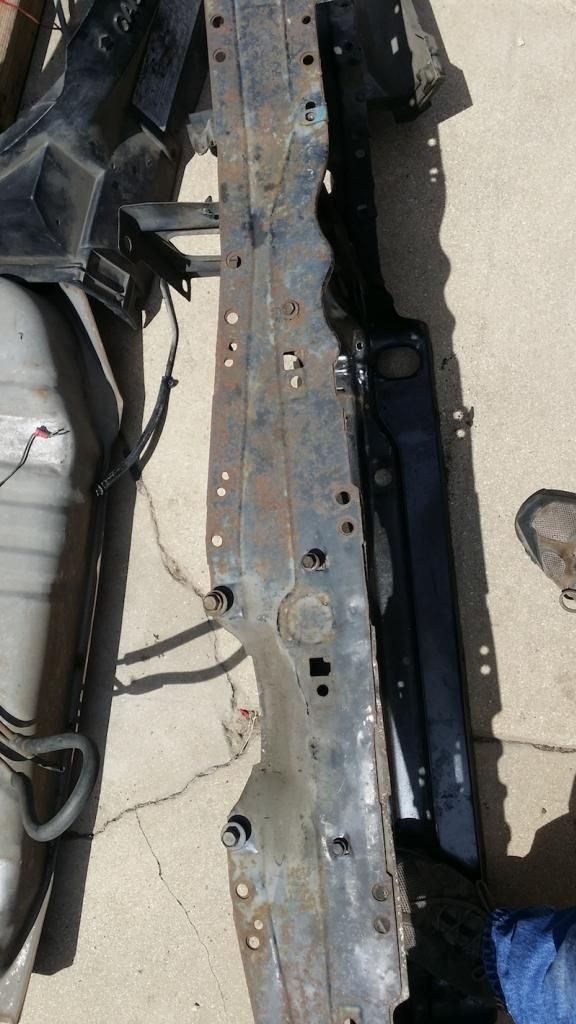
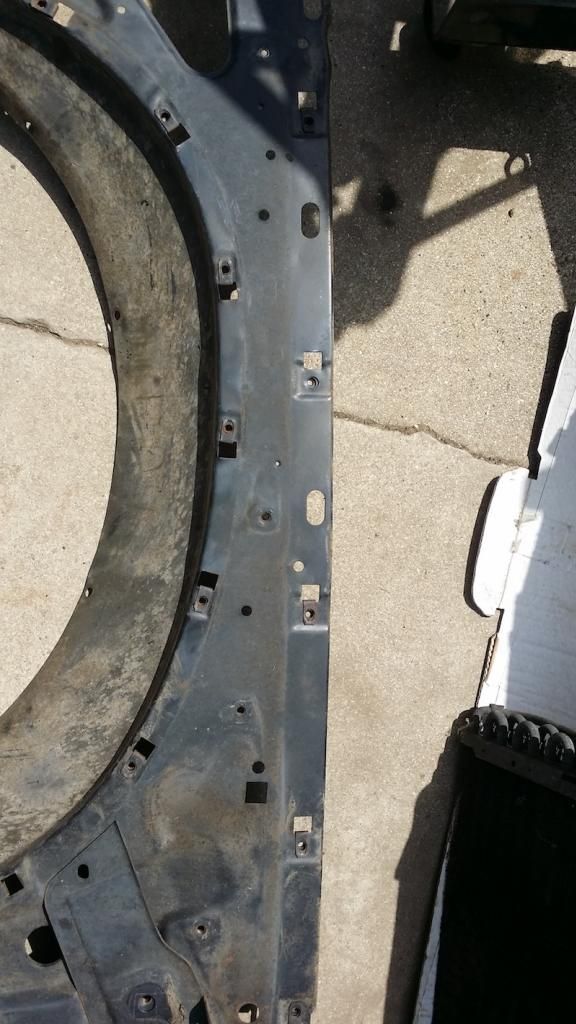
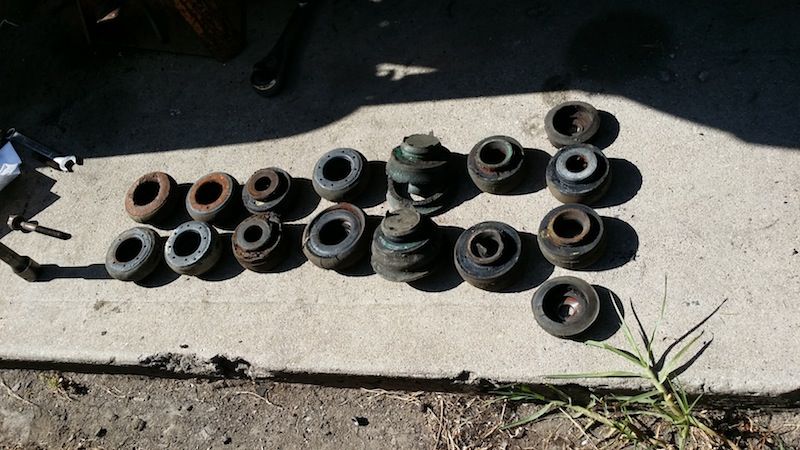
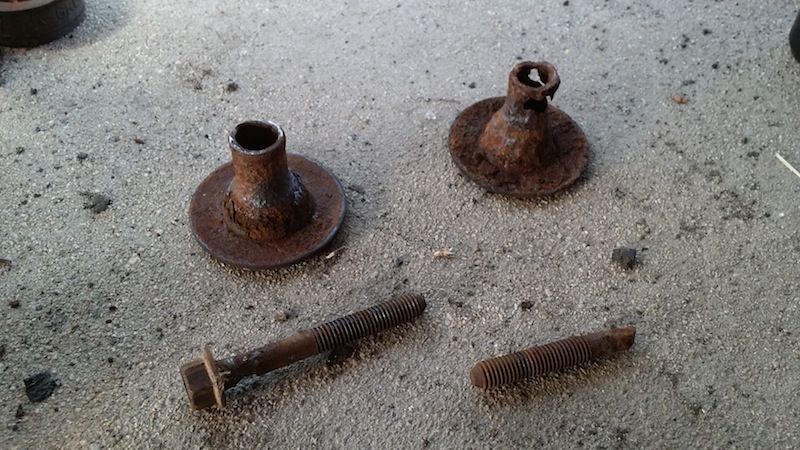
Button up the engine harness (put the split loom back on) plug everything into the trans, motor etc etc. Got the HVAC box back in, body mounts done. I need to pick up a few body mount bolts and find some conical washers. Only 2 were really bad, under the HVAC box where the A/C drains. However they all came out real easy, and that bolt missing the head didnt break, it was flat out missing. The ES kit I got was for a later jelly bean car (the frames for B-bodies didn't really change from 77-96) so most of the mounts were ok, but didnt have some of the lower halves for the front body mounts, so I need to figure out how to order individual ES part numbers. And the stupid core support mounts didnt fit over the original conical washers. I might just make up a new one (tube and washer welded together) so I can really button stuff up. I was hoping to be farther along this weekend but i made a good dent, and im seeing the end finally.
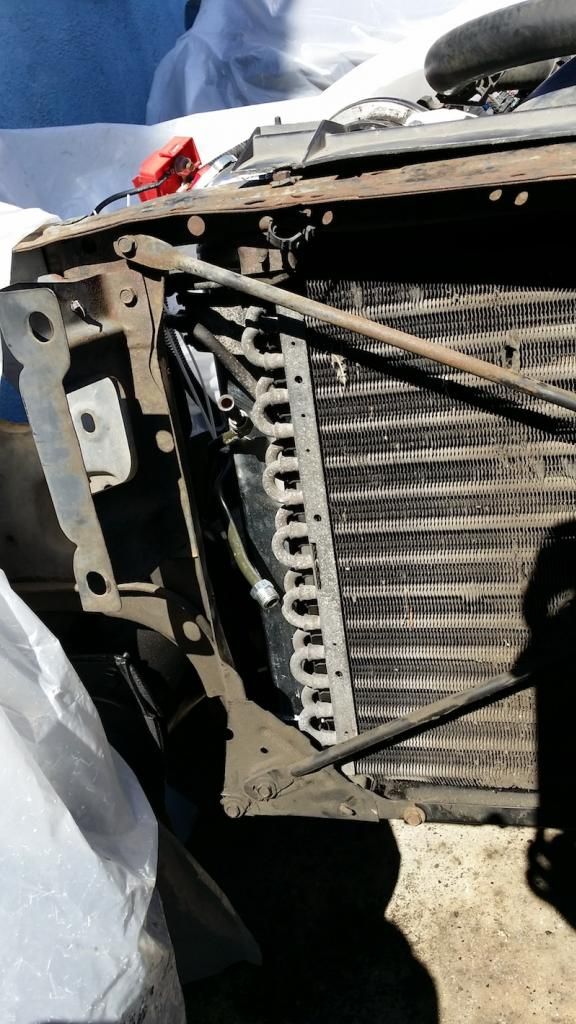
Oh and found out the aluminum radiator replacement I got had a nipple in it for heater hose return, as some of these cars returned into the tank directly, but this one is threaded and its at the top of the tank, so I can run the stem vent right into it with a 1/4" fitting. Thats super convenient!


Button up the engine harness (put the split loom back on) plug everything into the trans, motor etc etc. Got the HVAC box back in, body mounts done. I need to pick up a few body mount bolts and find some conical washers. Only 2 were really bad, under the HVAC box where the A/C drains. However they all came out real easy, and that bolt missing the head didnt break, it was flat out missing. The ES kit I got was for a later jelly bean car (the frames for B-bodies didn't really change from 77-96) so most of the mounts were ok, but didnt have some of the lower halves for the front body mounts, so I need to figure out how to order individual ES part numbers. And the stupid core support mounts didnt fit over the original conical washers. I might just make up a new one (tube and washer welded together) so I can really button stuff up. I was hoping to be farther along this weekend but i made a good dent, and im seeing the end finally.
Oh and found out the aluminum radiator replacement I got had a nipple in it for heater hose return, as some of these cars returned into the tank directly, but this one is threaded and its at the top of the tank, so I can run the stem vent right into it with a 1/4" fitting. Thats super convenient!


 08-05-2014, 11:02 PM
#19
Great progress. I managed to score an 85 Delta 88 Royale Brougham Coupe roller. I've decided to put my Lq9/4l80 in this car instead of the 78 Impala coupe. The Impala is going to get the LSA E-Rod as originally planned. Let us know how it goes with the referee.
08-06-2014, 02:56 AM
#20

Great work. Keep it up. Thanks for sharing!