
1967 Cougar build (over 500 pictures and videos)
 07-31-2015, 09:32 PM
#601


That's more like it !!!!!!

 08-05-2015, 03:59 PM
#603
TECH Senior Member
Thread Starter
iTrader: (7)
Well...I broke down and ordered the Baer SS+4 kit. I did this for a few reasons. The first one being that despite all of my fiddling around with the caliper brackets and different rotors, I still need to run a tiny spacer in order for the wheels to clear the calipers. The second reason is that the Mustang calipers and and rotor are pretty heavy. Lastly, the Baer calipers have bigger pistons which will improve braking performance, although that is not really an issue with what I have now. The Baer kit should shed a few pounds of unsprung weight per side, which is always a good thing. The weight savings will be due to the lighter calipers, aluminum hubs, aluminum caliper brackets, and a rotors with aluminum hats.
I used the Baer template and the brakes will clear my wheels by a good margin.


I am also waiting on a set of 1/2" lowering blocks and some 4 degree wedges from Calvert racing. I figure that with the blocks and wedges it will bring the rear down almost to where it was before.
Stay tuned for a detailed brake installation write-up as well as the lowering blocks and wedge install.
Andrew
I used the Baer template and the brakes will clear my wheels by a good margin.
I am also waiting on a set of 1/2" lowering blocks and some 4 degree wedges from Calvert racing. I figure that with the blocks and wedges it will bring the rear down almost to where it was before.
Stay tuned for a detailed brake installation write-up as well as the lowering blocks and wedge install.
Andrew
08-05-2015, 04:17 PM
#604
08-05-2015, 10:58 PM
#606
 08-11-2015, 10:52 PM
#612
TECH Senior Member
Thread Starter
iTrader: (7)
Today I got my Baer brakes and I had a chance to install them, but first a little story.
Back around 2000, when I was still in the process of building my GTO, I ordered Baer brakes for it. It was nothing fancy, just one of the Track kits that consisted of 13" rotors, PBR calipers, some billet hubs, etc...The kit was fairly complete and included a master cylinder. The MC that came with the kit was a 15/16" bore, it had a plastic reservoir on it, which I liked, but it was angled, as if it was made for a power set-up. My set-up was to be manual, so I called Baer and told them my issue with the MC. They indicated that I had no other options and that this was the only MC that was available, and they were not interested in exchanging it. As I recall, they were quite snooty about the whole thing, so much so, that I got really mad. I sold the kit, had a custom Wilwood set-up made, and swore that I would never buy anything from Baer again, ever. In the fall of 2003 my GTO got photographed for Popular Hotrodding magazine, made it on the cover, and the Wilwood brakes were shown prominently through the wheels.
It took me 15 years to get over it, and do business with Baer again, but today they redeemed themselves.
The kit arrived in two boxes, and everything was packed beautifully. All the hardware was included, was packaged in individual bags, and everything was labeled. When I say everything was included, I mean everything: the hoses, the right banjo bolts, greased hubs, cotter pins, all the shims (each size labeled), bolts, and AN to hardline adapters (they actually included both 3/8" and 7/16" adapters just in case), calipers, pads, brackets, assembled rotors....everything! The ARP studs are an option.

The calipers came in their own box, fully padded, and individually packaged in bubble bags.

They arrived undamaged and the powder coating is flawless. All of the aluminum brackets are machined beautifully and are anodized.

The rotors were are 11", drilled, slotted, and zinc coated, with an anodized hat, and are fully assembled. They are even tagged so there is no confusion which one goes on which side.

The aluminum hubs and main caliper brackets were in another box, fully padded. The hubs are fully assembled with greased bearings, and seals.

At this point, I was already impressed with the attention to detail, but the installation was still to come.
To be continued...
Back around 2000, when I was still in the process of building my GTO, I ordered Baer brakes for it. It was nothing fancy, just one of the Track kits that consisted of 13" rotors, PBR calipers, some billet hubs, etc...The kit was fairly complete and included a master cylinder. The MC that came with the kit was a 15/16" bore, it had a plastic reservoir on it, which I liked, but it was angled, as if it was made for a power set-up. My set-up was to be manual, so I called Baer and told them my issue with the MC. They indicated that I had no other options and that this was the only MC that was available, and they were not interested in exchanging it. As I recall, they were quite snooty about the whole thing, so much so, that I got really mad. I sold the kit, had a custom Wilwood set-up made, and swore that I would never buy anything from Baer again, ever. In the fall of 2003 my GTO got photographed for Popular Hotrodding magazine, made it on the cover, and the Wilwood brakes were shown prominently through the wheels.
It took me 15 years to get over it, and do business with Baer again, but today they redeemed themselves.
The kit arrived in two boxes, and everything was packed beautifully. All the hardware was included, was packaged in individual bags, and everything was labeled. When I say everything was included, I mean everything: the hoses, the right banjo bolts, greased hubs, cotter pins, all the shims (each size labeled), bolts, and AN to hardline adapters (they actually included both 3/8" and 7/16" adapters just in case), calipers, pads, brackets, assembled rotors....everything! The ARP studs are an option.
The calipers came in their own box, fully padded, and individually packaged in bubble bags.
They arrived undamaged and the powder coating is flawless. All of the aluminum brackets are machined beautifully and are anodized.
The rotors were are 11", drilled, slotted, and zinc coated, with an anodized hat, and are fully assembled. They are even tagged so there is no confusion which one goes on which side.
The aluminum hubs and main caliper brackets were in another box, fully padded. The hubs are fully assembled with greased bearings, and seals.
At this point, I was already impressed with the attention to detail, but the installation was still to come.
To be continued...
08-11-2015, 11:33 PM
#613
TECH Senior Member
Thread Starter
iTrader: (7)
The brakes bled easily and quickly. The last thing I did was swap the hoses, so all I had to do was purge the air out of the new hoses and calipers.
The pedal feel is a little softer now than it was before. I suspect it is because the Baer calipers have bigger pistons than the S197 calipers that I was using before. I didn't do any spirited stops because Baer recommends normal driving for a few days to wear the zinc coating off where the pads ride. But first impressions are excellent. As I said the pedal feel is a little softer, which is a good thing with manual brakes, but the felt effectiveness is much better than the old calipers. The bigger pistons make a difference, since this puts more torque to the rotor, and I think the HP pads are also more aggressive than the Raybestos pads that I was using before. No doubt the Baer calipers are also stiffer than the other calipers. All these things combined makes for brakes that feel solid!
The other bonus is that without any spacers (I was still using a very thin spacer even with the Ranger rotors) my steering is much improved. The steering feels lighter now and the jitteriness that I had before is almost all gone.
Thank you Baer for a great kit. You have earned me as a customer once again.
Andrew
08-12-2015, 12:51 PM
#614
TECH Resident

Sometimes the rubber dust seals, when new, have a tendency to pull the pistons back into the calipers a bit more than when they get worn in. This can cause a longer dead zone; maybe being perceived as softer, too.
Looks like a nice and well-engineered kit. Congrats.
Doug
Looks like a nice and well-engineered kit. Congrats.
Doug
08-12-2015, 04:36 PM
#615
TECH Senior Member
Thread Starter
iTrader: (7)
That can very well be what I am feeling, although the brakes feel great. They seem to have more bite than my previous setup. My guess is that the bigger caliper pistons and Hawk pads are the reason.
I am very happy I did this swap. Should have just done it from the beginning.
Andrew
08-13-2015, 10:16 AM
#617
TECH Senior Member
Thread Starter
iTrader: (7)
I also just realized that I forgot to post pictures of the installation.
Here is the naked spindle after I removed the previous set-up.

This is the main caliper bracket and it gets mounted to the 4 holes on the spindle, much like the previous set-up. The big difference is that these brackets are aluminum vs. steel and are thus much lighter.

I like the use of the countersunk flat head screws because they do a good job of accurately positioning the bracket on the spindle. The hardware gets torqued to 45 lb/ft/

The secondary caliper bracket attaches to the first. This is done temporarily at first, because the shims ultimately go between the main and secondary brackets.

I ordered the optional screw in ARP studs and installed them from the back with some anti-seize. Then the hub was ready to be mounted to the spindle. The grease cap is sealed with an o-ring and gets tapped in-place. Baer thoughtfully machined the edge of the hub so that when the cap is installed there is a small groove between the cap and the hub. This will make taking the cap off much easier should the hub need to be serviced. I would prefer that the cap be anodized as well, but that's just my taste.

Next, the rotor is installed and held in place temporarily. I did check run-out and it was only a couple of thousands. The caliper is also installed temporarily and measurements are taken for the shims. The driver's side needed .065" and the passenger side took .070". The shims are used so that the caliper is perfectly centered over the rotor.
The calipers are gorgeous and the pistons have dust seals, which is a great touch for a street car. They are also much...much lighter than the S197 calipers that I was using before. The pads that are included with the kit are Hawk HP.

Once the caliper shims are installed, the secondary bracket gets torqued to 85 lb/ft and the calipers are torqued to 75 lb/ft. Once the calipers were mounted, I installed the hose on the caliper, and torqued the banjo bolt to 15 lb/ft. I already had braided lines installed with the previous kit, so the hoses just screwed on to the AN3 to hardline adapters that were already there. But as I mentioned, Baer includes the adapters with the kit.
As shown in a previous photo where I checked for clearance using the template, the wheels fit over the brakes without any issues.

Andrew
 08-17-2015, 05:44 PM
#619
TECH Senior Member
Thread Starter
iTrader: (7)
I am still waiting for the trans, but in the meantime a did a couple of little projects.
I am planning on attending the Holley LS Fest in early September and with a long road trip I need some tunes. Around town I am perfectly content listening to a FM radio station, but out on the road, the last thing I want to be doing is trying to tune in a radio station with the old school dial tune. I thought about doing some clever things to add more modern functionality to the head unit, but ultimately I decided that it was not worth it.
Instead, I started doing some research on portable Bluetooth speakers. After reading a bunch of reviews, I decided to stop by the local Best Buy and have a listen. Here is what I ended up with:
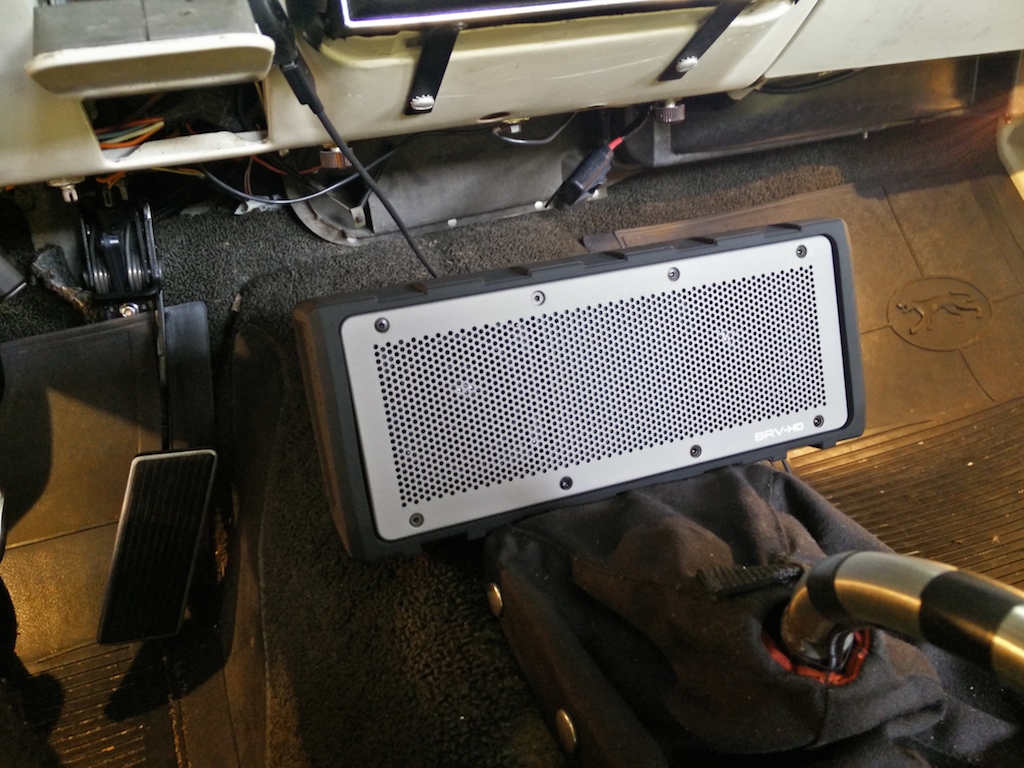
It is a Braven HD. It has a super touch, rubberized case, it's relatively heavy, and has a nice flat bottom. It fits perfectly on the flat section of the transmission tunnel, and it sounds great. It has a 28 hour battery life, which is more than adequate for any single day of driving, and it plays loud enough that I can hear it over the engine. On the back it has a couple of passive radiators and when it is positioned as shown in the picture, the bass is quite respectable. Certainly not like a sub-woofer, but good enough for a road trip. I can now stream Pandora from my phone, or listen to my selection of MP3s...
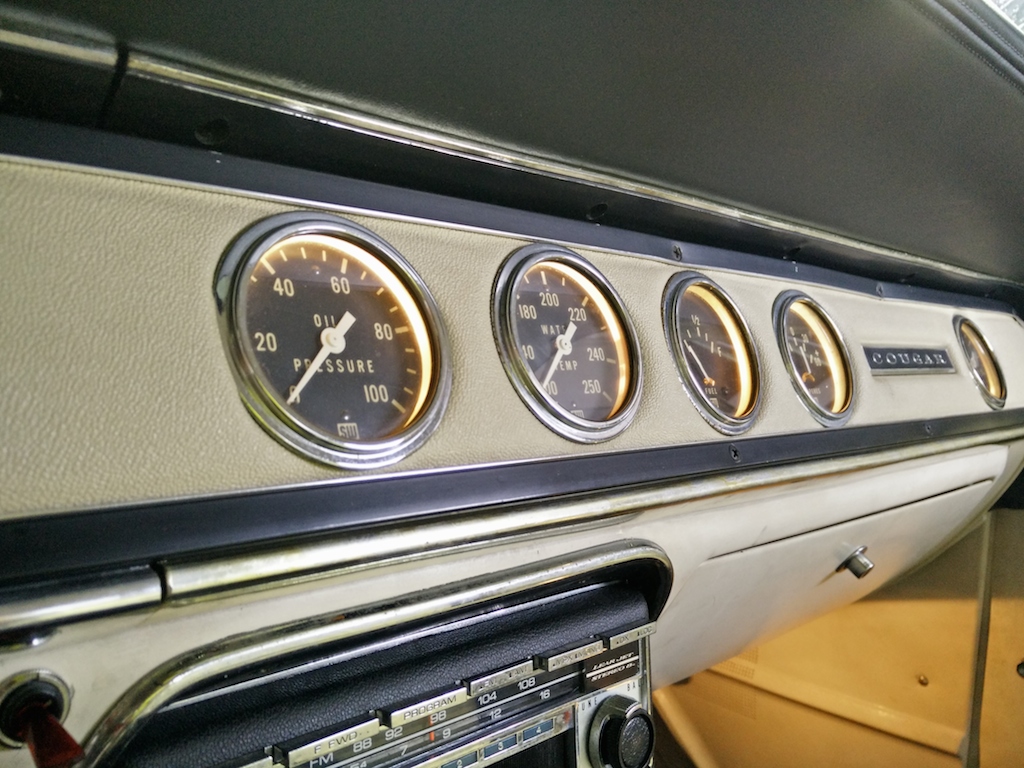
Since my only "gauge" is the Holley digital dash, the inside of the car is pretty dark at night. I wanted to add just a little bit of lighting for a little more comfort. For some reason none of the Stewart Warner gauges were lighting up. The wiring to the back of the speedo and tach is almost impossible to get to and it was just way too much work to trouble shoot.
So instead, I figured out that the dash is powered by the blue/red wire off the headlight switch. I didn't want to just cut that wire and splice into it, so instead, I took it out of the headlight connector.
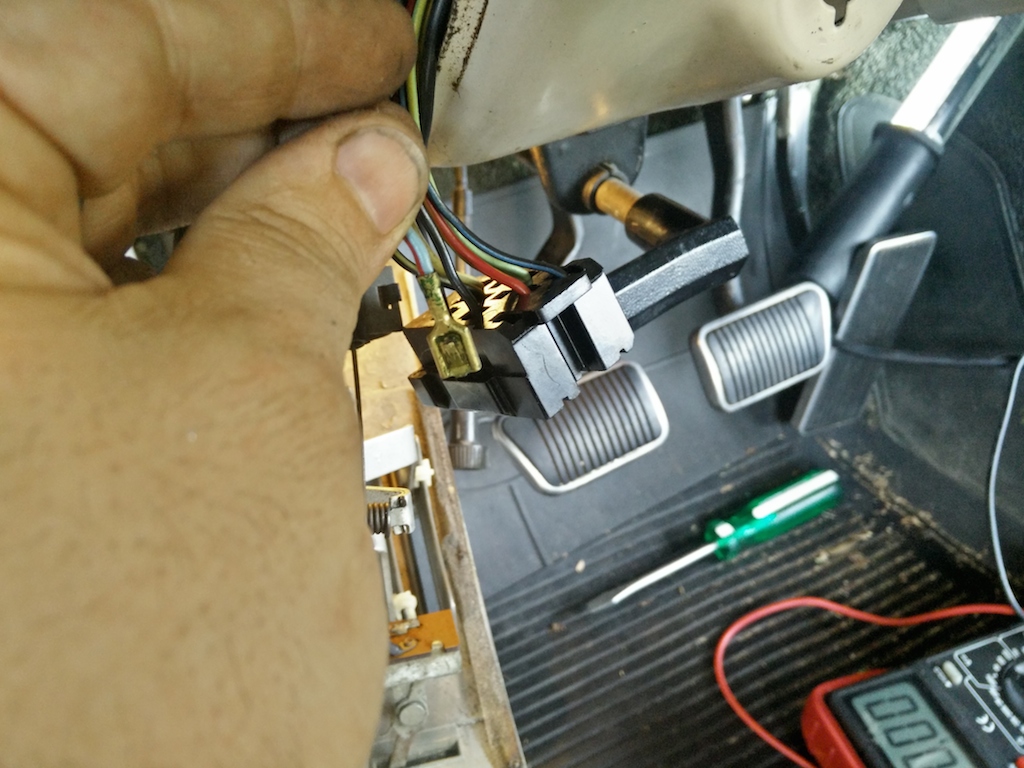
I then used a basic spade terminal connector and ran a separate wire to the 5 little SW gauges that are in the dash. So now I have some lights when driving at night, and as a bonus I can read the fuel level gauge, which actually works.
Andrew
I am planning on attending the Holley LS Fest in early September and with a long road trip I need some tunes. Around town I am perfectly content listening to a FM radio station, but out on the road, the last thing I want to be doing is trying to tune in a radio station with the old school dial tune. I thought about doing some clever things to add more modern functionality to the head unit, but ultimately I decided that it was not worth it.
Instead, I started doing some research on portable Bluetooth speakers. After reading a bunch of reviews, I decided to stop by the local Best Buy and have a listen. Here is what I ended up with:
It is a Braven HD. It has a super touch, rubberized case, it's relatively heavy, and has a nice flat bottom. It fits perfectly on the flat section of the transmission tunnel, and it sounds great. It has a 28 hour battery life, which is more than adequate for any single day of driving, and it plays loud enough that I can hear it over the engine. On the back it has a couple of passive radiators and when it is positioned as shown in the picture, the bass is quite respectable. Certainly not like a sub-woofer, but good enough for a road trip. I can now stream Pandora from my phone, or listen to my selection of MP3s...
Since my only "gauge" is the Holley digital dash, the inside of the car is pretty dark at night. I wanted to add just a little bit of lighting for a little more comfort. For some reason none of the Stewart Warner gauges were lighting up. The wiring to the back of the speedo and tach is almost impossible to get to and it was just way too much work to trouble shoot.
So instead, I figured out that the dash is powered by the blue/red wire off the headlight switch. I didn't want to just cut that wire and splice into it, so instead, I took it out of the headlight connector.
I then used a basic spade terminal connector and ran a separate wire to the 5 little SW gauges that are in the dash. So now I have some lights when driving at night, and as a bonus I can read the fuel level gauge, which actually works.
Andrew
08-18-2015, 10:59 AM
#620
See you in Bowling Green.............
Ken
Ken