
1968 Impala Turbo LY6/4L80e Swap - 798 RWHP @ 17 PSI
 01-15-2015, 08:30 PM
#21

Thanks for the pics. It's good to see how far back you can set the motor since the stock location leaves a ton of room at the firewall. I will need some room in between the radiator and pulleys and this shows how much real estate there can be. I'll be honest though, I'm know for sure I wont be going with your brothers motor mount design. Are those things really holding up to daily driving duty?
 01-16-2015, 11:31 AM
#22
On The Tree
Join Date: Apr 2010
Location: LI, New York
Posts: 156
Likes: 0
Received 0 Likes
on
0 Posts

Thanks for the pics. It's good to see how far back you can set the motor since the stock location leaves a ton of room at the firewall. I will need some room in between the radiator and pulleys and this shows how much real estate there can be. I'll be honest though, I'm know for sure I wont be going with your brothers motor mount design. Are those things really holding up to daily driving duty?
01-19-2015, 06:19 PM
#23
My Jake's Stage 3 kit came today so I tore into the trans to find a pristine core that probably did not need to be torn down. I have not ripped all the clutch packs apart but the bands, 4th pack, and intermediate pack look literally unused. It's getting all new frictions, billet input, billet/rollerized front hub, and re-calibration.
I also treated myself to another head light. My kids dropped my last one in the toiled so I splurged on a 300 lumen Li-Ion rechargeable. If you are still stuck on drop lights I suggest trying one of these out. It's one of the most used tools I own.


I also treated myself to another head light. My kids dropped my last one in the toiled so I splurged on a 300 lumen Li-Ion rechargeable. If you are still stuck on drop lights I suggest trying one of these out. It's one of the most used tools I own.
Last edited by alocker; 11-08-2015 at 06:23 AM.
02-05-2015, 08:04 PM
#24
Teching In

Join Date: Oct 2011
Posts: 37
Likes: 0
Received 0 Likes
on
0 Posts
Yeah there's plenty of room between the engine and radiator for a turbo crossover, and we may have been able to put it back a little further. I seriously dont blame you about the engine mounts LOL... Those were version 1.0. the passenger side one was a little uglier and it broke, so we added some bracing on both sides and they hold up fine now. Did it for the hell of it to see if it could work. Its no show car haha...
Last edited by ferrets bueller; 02-05-2015 at 09:57 PM. Reason: additional question
02-06-2015, 05:19 AM
#25
The goal with the pedal is to use the factory floor pivoted unit and grind down a DBW pedal to a nub that will work. This plan may change when I actually have the car and start fitting it but that is usually one of the last tasks for the swap. It will be awhile before I share the results of that one.
02-08-2015, 01:48 PM
#26
On The Tree
Join Date: Apr 2010
Location: LI, New York
Posts: 156
Likes: 0
Received 0 Likes
on
0 Posts
For a gas pedal, we ended up removing the factory setup and took a trip to a local junk yard for a new pedal. My brother ended up finding one on the ground (lol) that looked like it would work. It ended up working great now after some tweaks, but i have no idea what kind of car it originally came out of sorry. Your best bet is to hit the yard and ask to walk around and grab one out of something with a factory cable driven throttle. Costed around 10 bucks
03-17-2015, 05:55 AM
#27
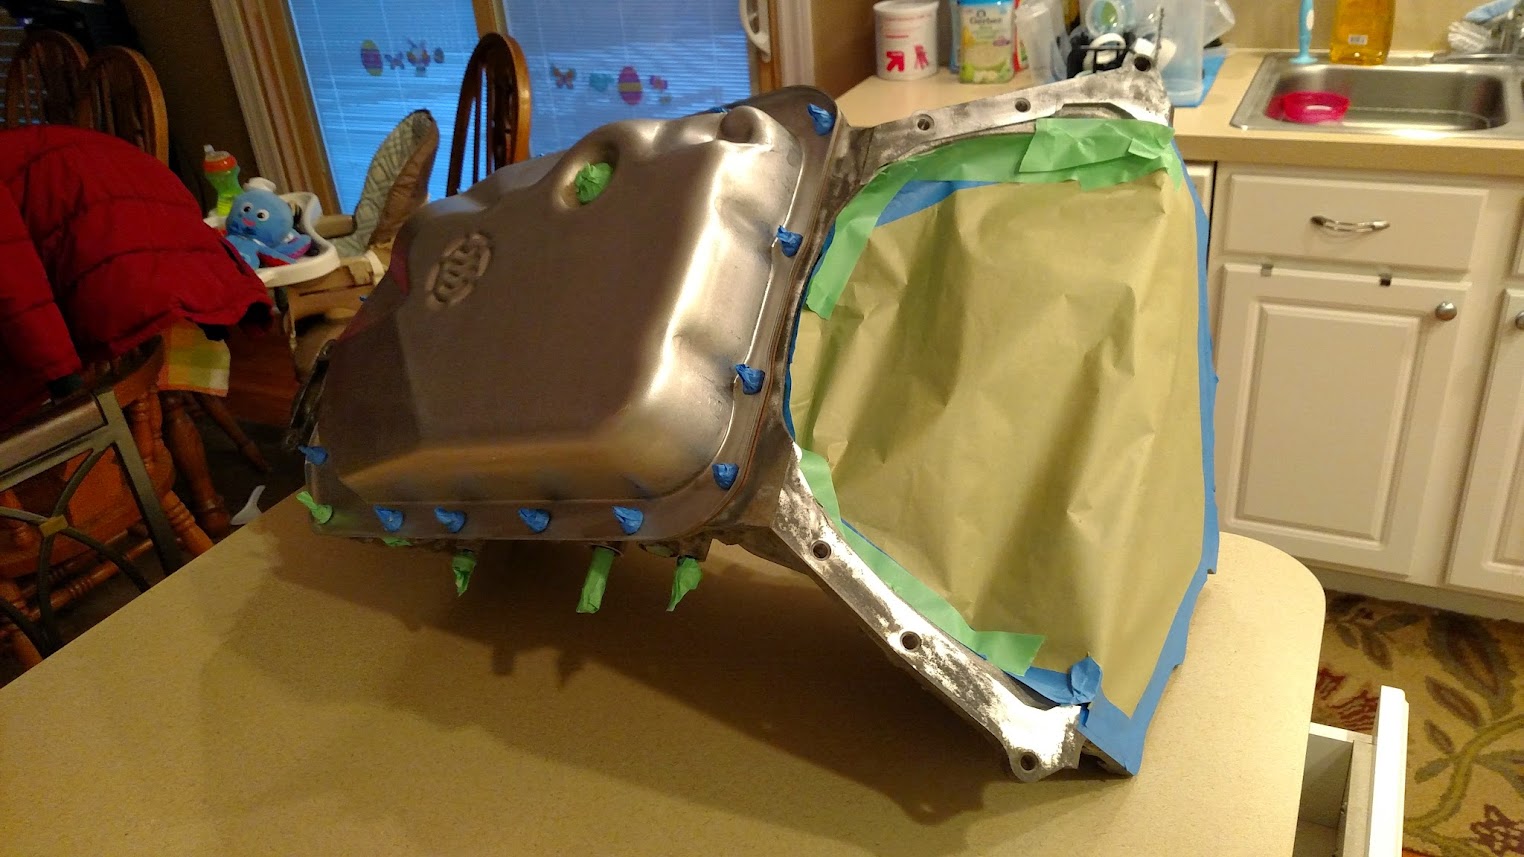
Things stalled a bit due to the cold weather here. I rebuilt all the trans sub assemblies and had to wait to paint the trans case. I used SPI Epoxy primer and it really needs to be 60 degrees or warmer to work well. A break in the weather allowed me to shoot it and it came out very nice. This stuff is extremely durable. It does not even scuff when moving the loaded trans around.
Here are a few pics of what a Jakes's stage 3 consists of. The 300m billet input and rollerized billet front hub. Overall the 4L80e build was interesting. The rear went together nicely but I had a problem with the front end. It was a real bitch getting everything seating to set up the front end clearance. I initially thought the billet forward hub was machined wrong because I would install the stock hub and it would all fall into place. After tearing it down 10 times I finally got it seated and everything is nice and tight. Fingers crossed this thing works.
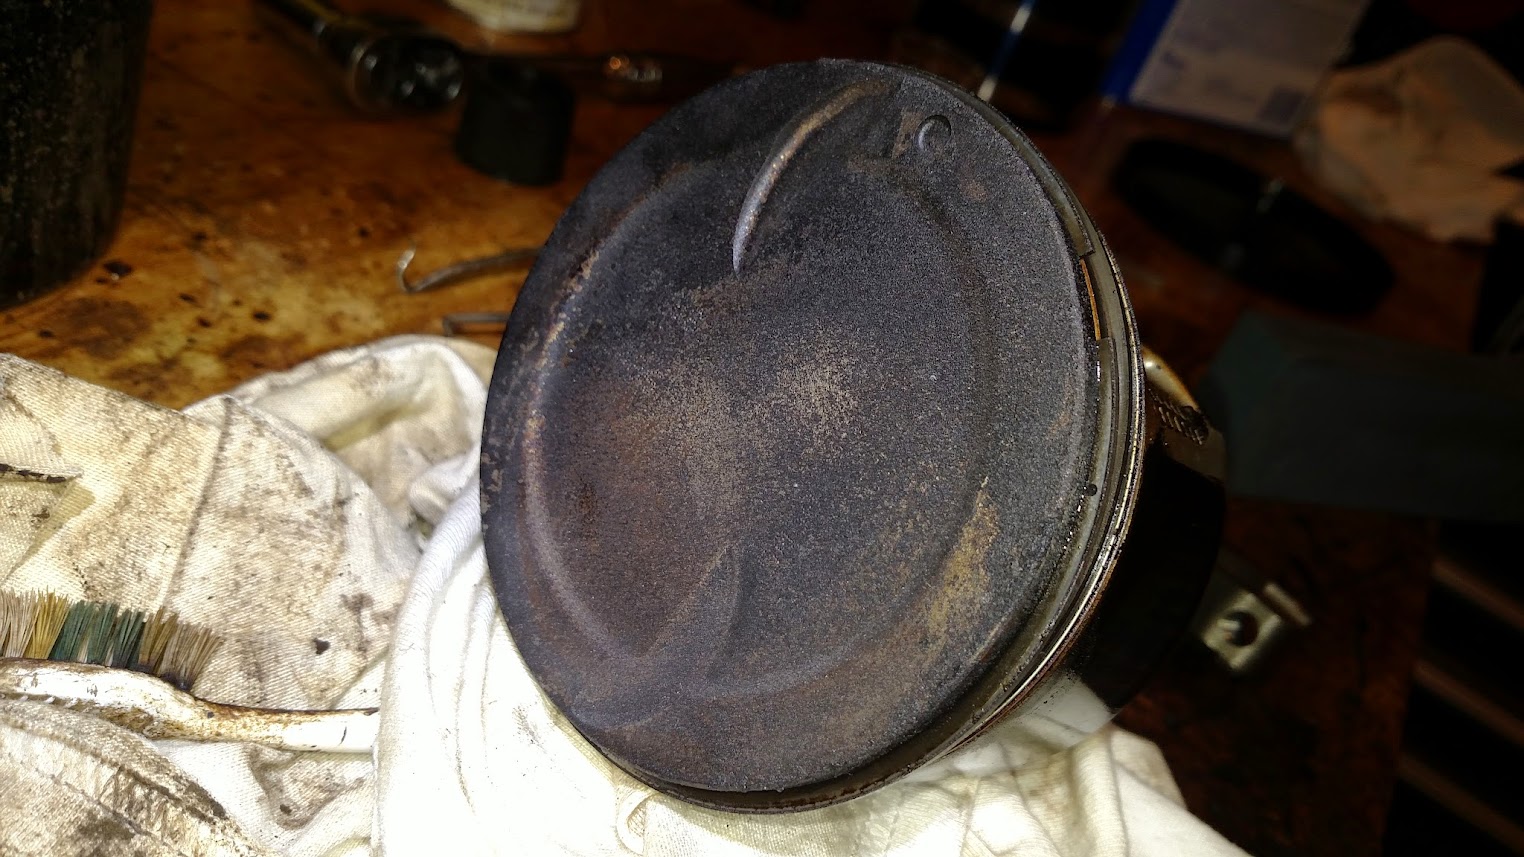
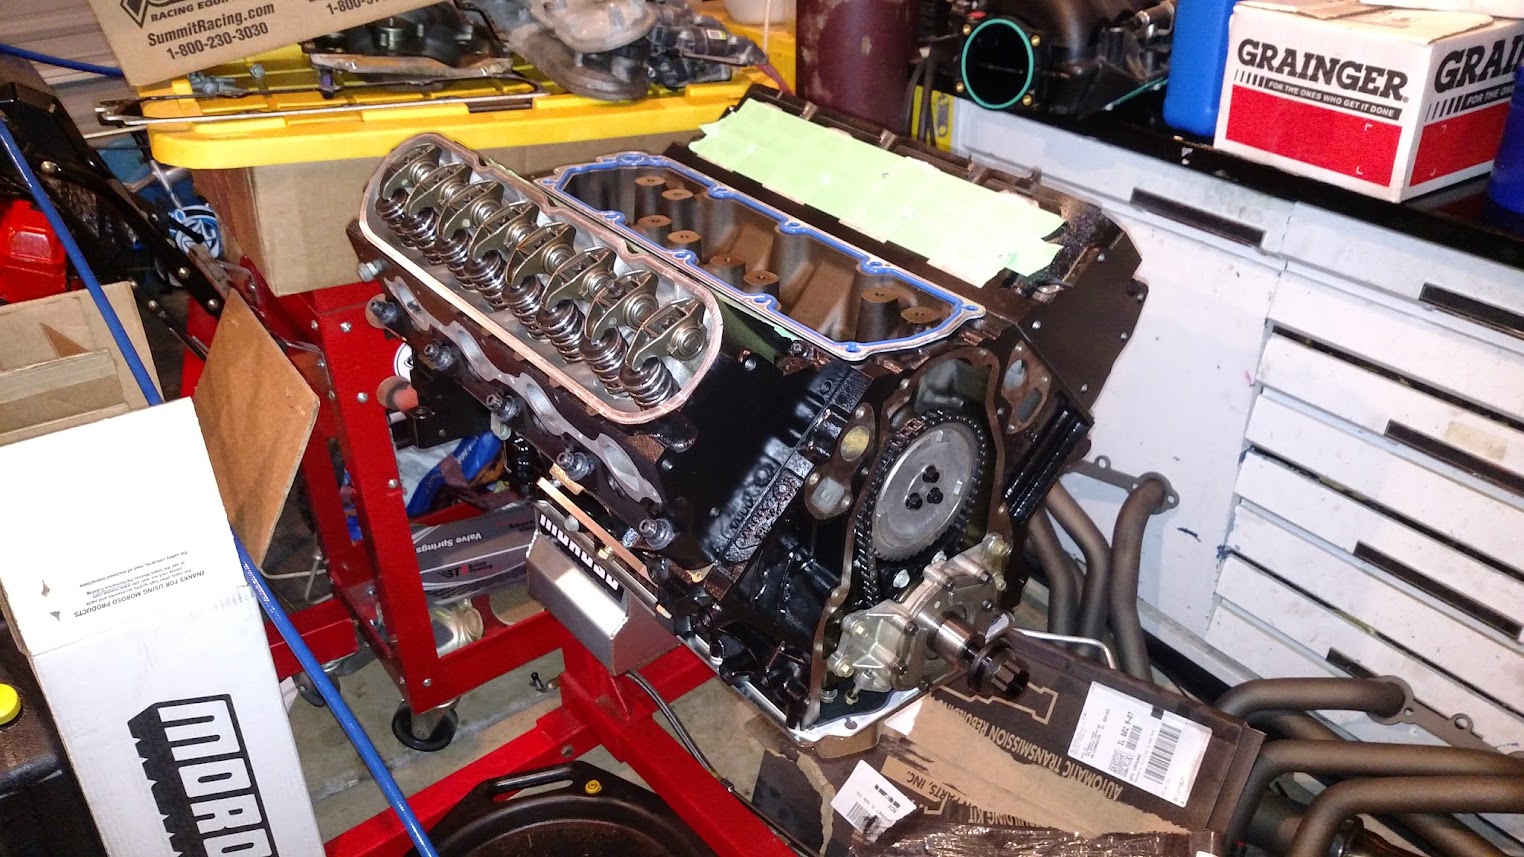
I tore into the motor more to inspect and prepare the short block. Everything looks great inside, just a little carbon buildup. I will inspect the lifters, gap the rings, and install the cam before it gets LS9 head gaskets and ARP studs. I am still on the fence about surfacing the heads just to make sure they flat.


Here are a few pics of what a Jakes's stage 3 consists of. The 300m billet input and rollerized billet front hub. Overall the 4L80e build was interesting. The rear went together nicely but I had a problem with the front end. It was a real bitch getting everything seating to set up the front end clearance. I initially thought the billet forward hub was machined wrong because I would install the stock hub and it would all fall into place. After tearing it down 10 times I finally got it seated and everything is nice and tight. Fingers crossed this thing works.
I tore into the motor more to inspect and prepare the short block. Everything looks great inside, just a little carbon buildup. I will inspect the lifters, gap the rings, and install the cam before it gets LS9 head gaskets and ARP studs. I am still on the fence about surfacing the heads just to make sure they flat.
Last edited by alocker; 03-26-2015 at 03:00 PM.
03-26-2015, 03:35 PM
#28
The heads are off at Legend Racing Enterprises in Schaumburg IL to get the Brian Tooley valvesprings installed and to get checked for straightness.
In the mean time I started prepping the shortblock. I pulled each piston one at a time to clean them and gap the rings. They have decent carbon buildup in the ringlands and I am glad I took the time to get the crud out. What I did not realize is how time consuming this process is. I figure about an hour to clean, gap, and install each piston. The good thing is the rings looked great and all came in at .014 on the top and .018 for the second ring. I opened them up to .022 on top and .025 for the 2nd.
The heads should be back this weekend. Everything will get paint so I can re-install the heads and degree the cam.
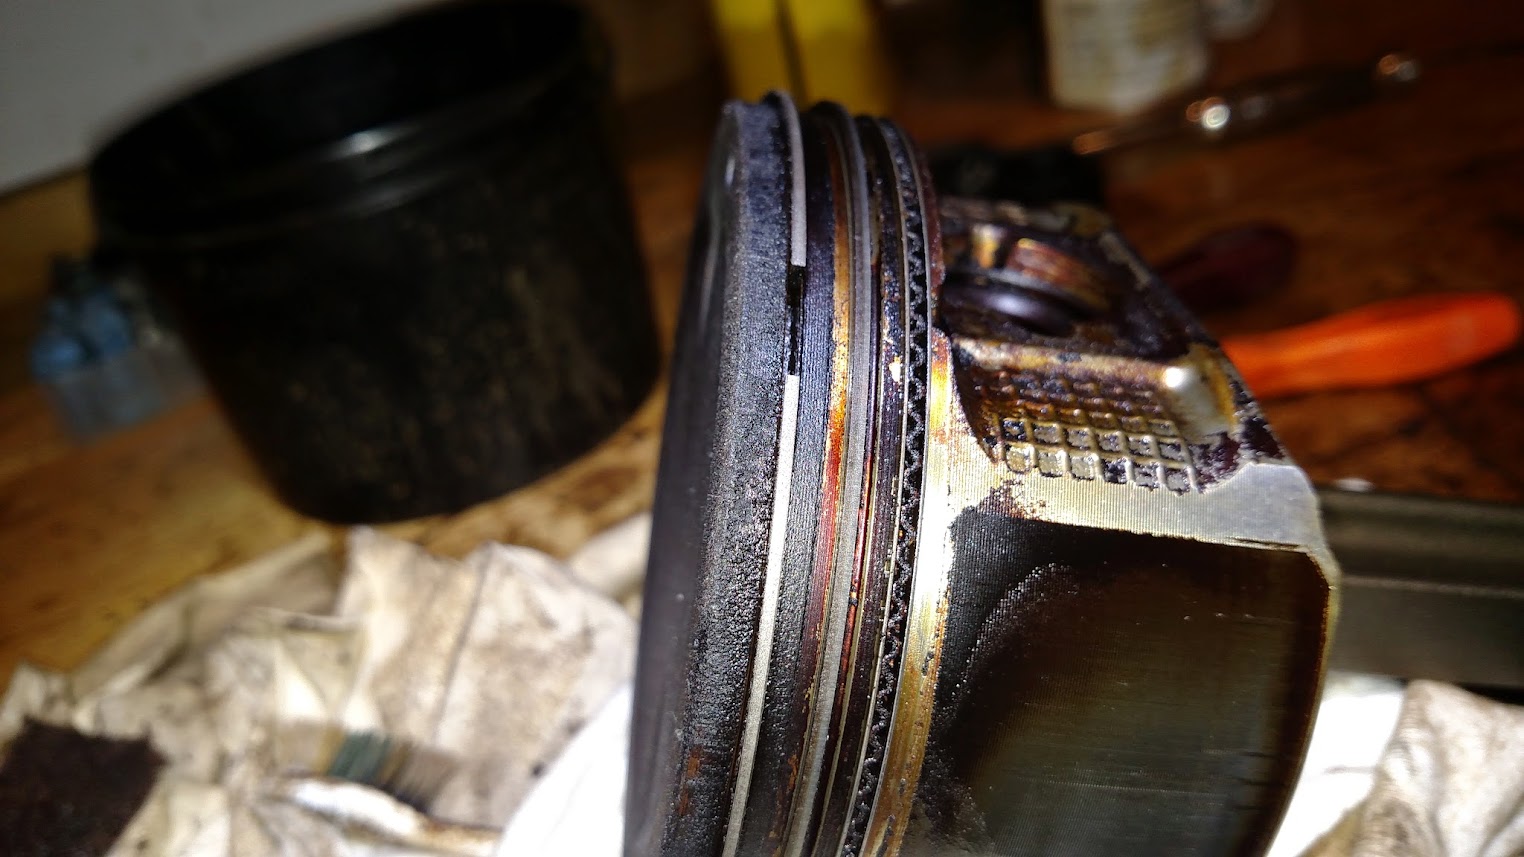
03-31-2015, 07:29 PM
#29

what's your thoughts on staying with the stock pistons/rings? just asking because I'm rebuilding one myself and am on the fence as to whether to reuse the pistons vs new stock replacement vs forged on a mild 5.3l build
great build so far, the trans on the kitchen island is priceless
great build so far, the trans on the kitchen island is priceless
03-31-2015, 07:43 PM
#30
what's your thoughts on staying with the stock pistons/rings? just asking because I'm rebuilding one myself and am on the fence as to whether to reuse the pistons vs new stock replacement vs forged on a mild 5.3l build
great build so far, the trans on the kitchen island is priceless
great build so far, the trans on the kitchen island is priceless
The kitchen shot was just from warming it up to get the epoxy since the garage is too cold.
 03-31-2015, 08:20 PM
#32
Thanks man. The only thing I love more than cars is racing bikes. When the kids are grown maybe I will get back into them. I love being able to enjoy the car with the family though. The kids know it's different and will be a great memory for them.
04-04-2015, 09:05 AM
#33
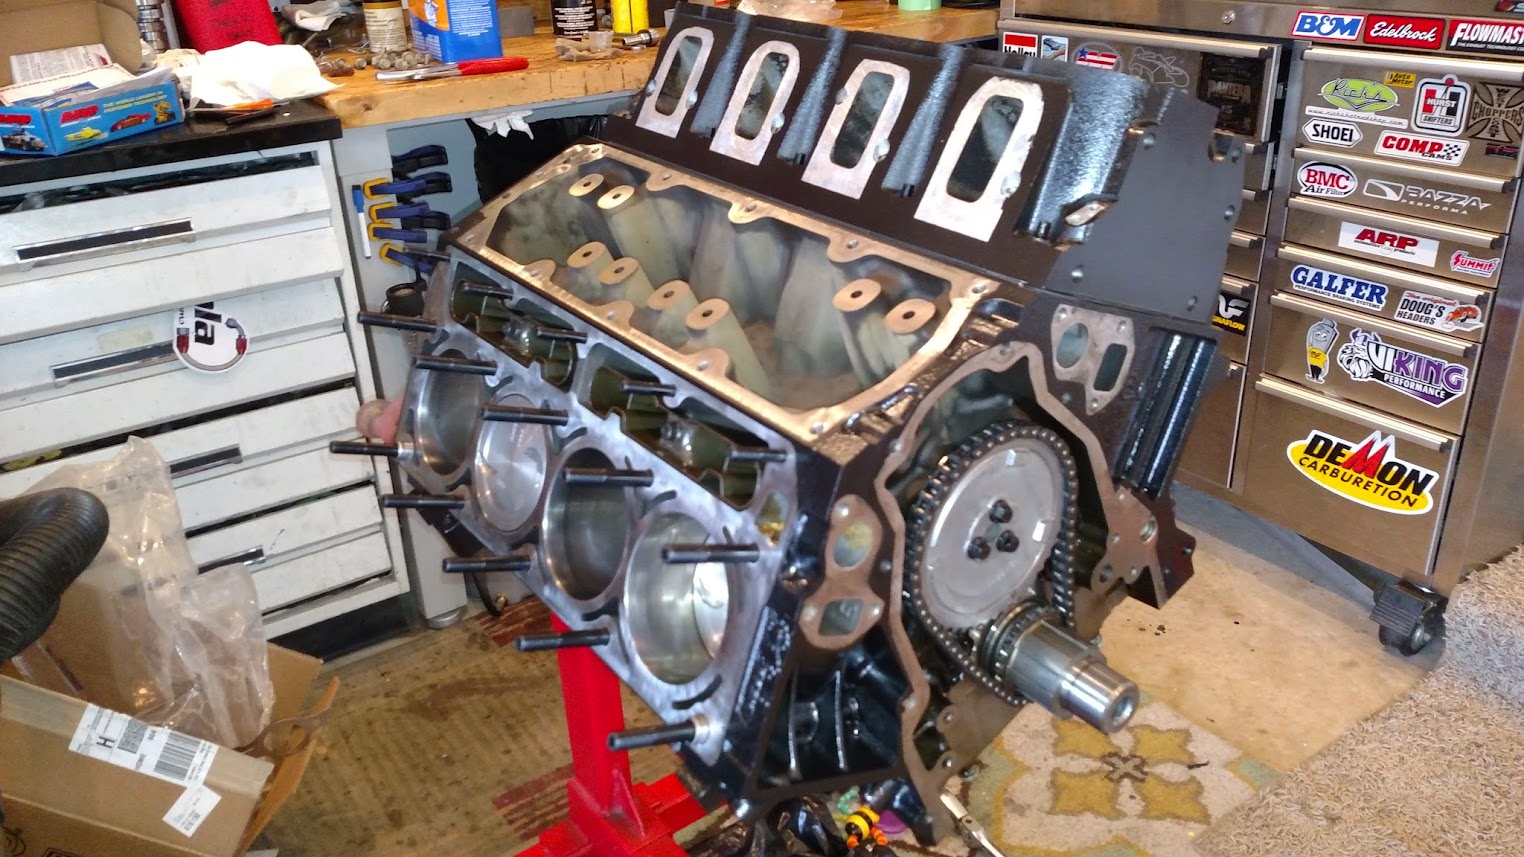
Another break in the weather allowed my to get the heads and block epoxied. The block came out with more gloss than I wanted but I'll take it for a bulletproof finish.
I also installed the Isky JFR grind cam. I wanted to stay conservative for good street manners and to make sure this boat can get out of the hole. He has a turbo 6.0 Silverado that runs 9's at 4800 lbs so I trust it will work well. I also degreed the cam which was my first time doing so. Everything was in the ballpark by about a degree which shows the stock timing set will work fine.
Doug and Legend Racing Enterprises turned the heads around quick. Turns out they needed the seats and valves ground but the decks were flat. He also installed the BTR spring kit.
The existing motor and trans if up for sale. I have some interest in it but I have time. So far we are on schedule.
04-07-2015, 12:19 PM
#34
Staging Lane
Join Date: Jun 2012
Location: Nor Cal
Posts: 64
Likes: 0
Received 0 Likes
on
0 Posts
VERY nice car. Have you figured out what you are going to do for an intake and intercooler setup? I have an ls3 in my nova but my plan is eventually to go TTs and I saw this intake from lingenfelter http://www.lingenfelter.com/mm5/merc...5#.VSQQv_nF-_Q Havent really seen anyone run it but it might help simplify the coldside setup. Also do you know if you have to cut the floor to fit the 4l80e?
04-07-2015, 12:51 PM
#35
VERY nice car. Have you figured out what you are going to do for an intake and intercooler setup? I have an ls3 in my nova but my plan is eventually to go TTs and I saw this intake from lingenfelter http://www.lingenfelter.com/mm5/merc...5#.VSQQv_nF-_Q Havent really seen anyone run it but it might help simplify the coldside setup. Also do you know if you have to cut the floor to fit the 4l80e?
As for the floor I am hoping it will fit. I plan to mount it as low as humanly possible to make room for the turbo. I wont know until I test fit in about a month.
04-09-2015, 07:44 PM
#36
I received a deposit for the old motor and trans so I pulled the car out of storage. It's a shame to pull such a good running setup. It started up quick after sitting for 5 months and ran great. The wife was not too happy when I dropped the fact that there will be no spring or early summer cruising. Then I bent the truth a bit and said the money from the old motor/trans was all I need to finish the project.
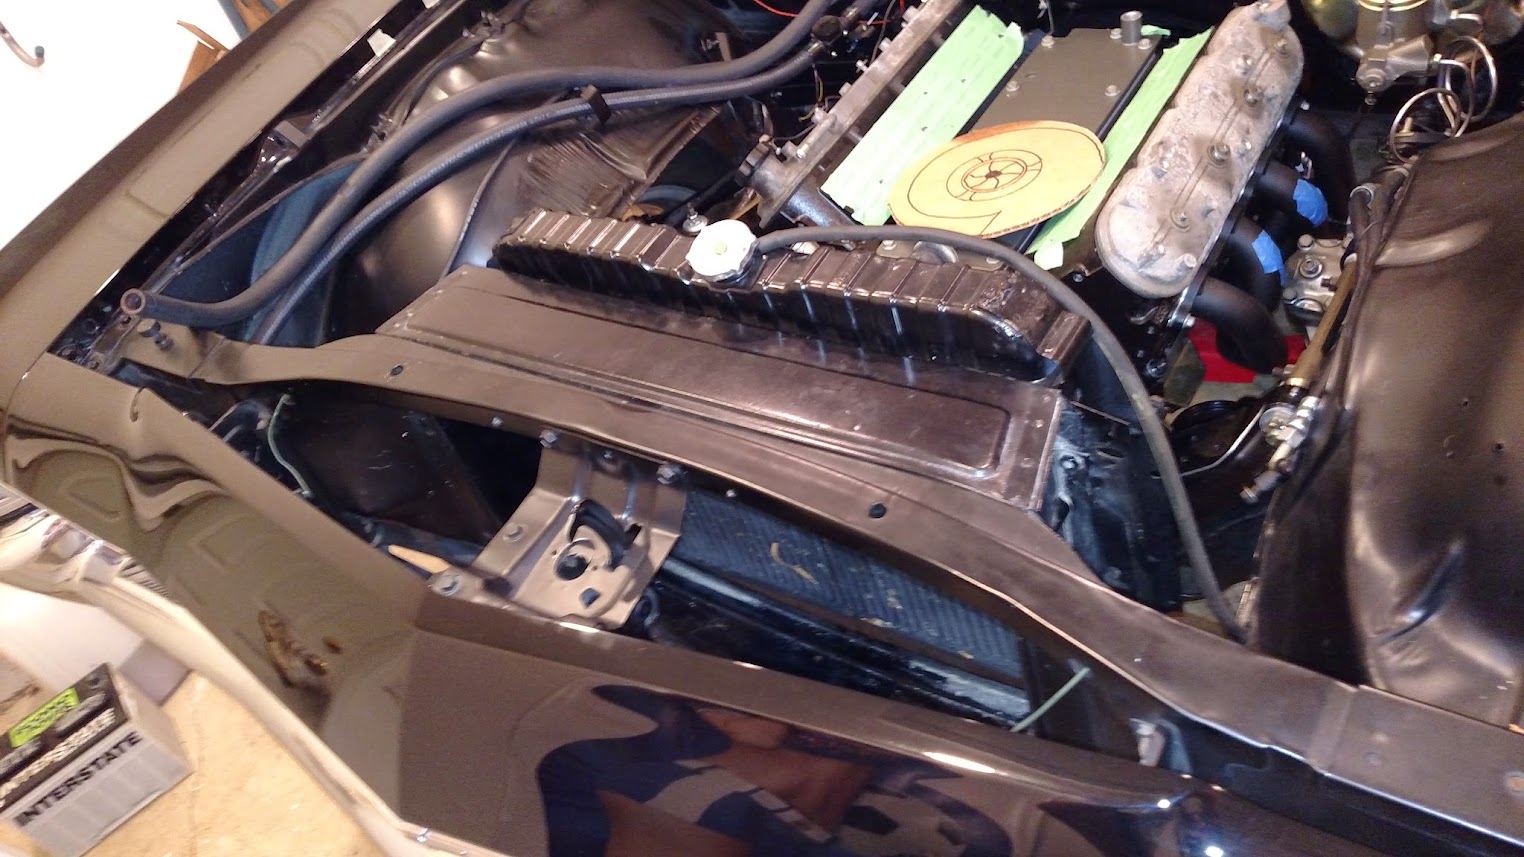
I installed the ARP head studs and test fit the LS9 Gaskets and heads. All went smoothly. I also got the Moroso 20142 oil pan in today. It's a nice piece. Build quality is on par with the Champ/Autocraft pan but has more of a fabricated look. I also like the single fitting on the oil filter housing versus a stock style cover that the Champ pan needs. For whatever reason this pan seems to get overlooked vs the Holley pans. It comes with a nice oil control setup and a 7 qt capacity.


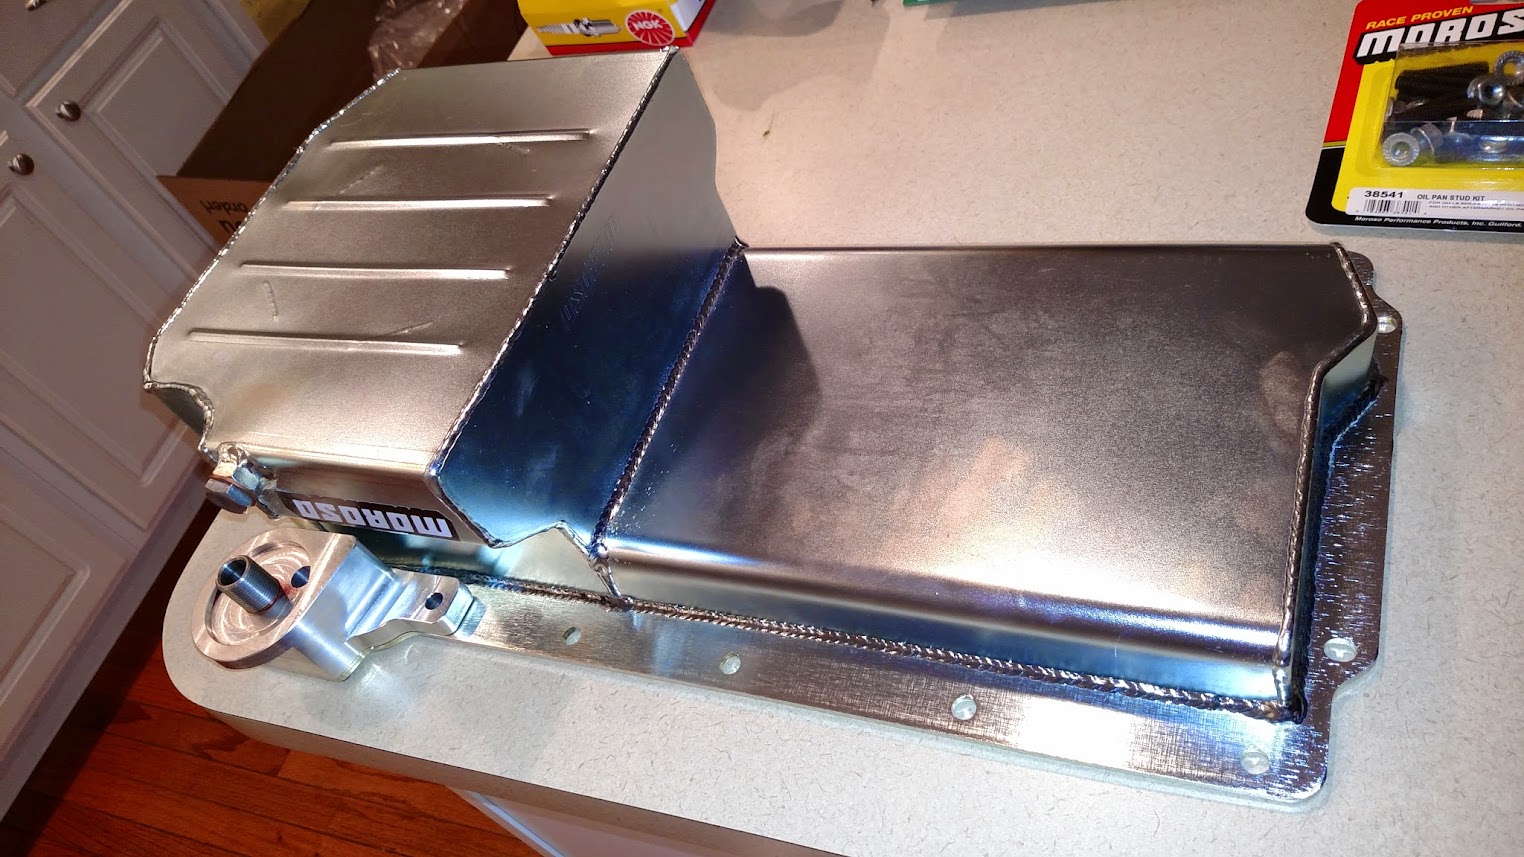

I installed the ARP head studs and test fit the LS9 Gaskets and heads. All went smoothly. I also got the Moroso 20142 oil pan in today. It's a nice piece. Build quality is on par with the Champ/Autocraft pan but has more of a fabricated look. I also like the single fitting on the oil filter housing versus a stock style cover that the Champ pan needs. For whatever reason this pan seems to get overlooked vs the Holley pans. It comes with a nice oil control setup and a 7 qt capacity.
04-15-2015, 04:40 PM
#37
The old motor is out. The art of not making a mess is really a skill that needs to be practiced. I swear I made a puddle of every fluid even though I tried not to. I am trying to use that as a reason to convince the wife that I need a lift. Either way this thing has been motorless for 3 consecutive years now. I hope this will be the last time for awhile.

The heads are installed and torqued. I was a bit worried because of all the broke head stud stories floating around. No issues there.
I found these motor mount plates on Ebay from LSXinnovations and pulled the trigger on them. I was pleasantly surprised by how nice they are. They are truly CNC'd billet steel and the finish was nice enough that I decided satin clear was the way to go. They fit perfect, hardware is nice, and the bolt threads have a very nice fit. No sloppy burrs or loose threads.


I broke out the 1/8 pipe tap to get the factory oil pressure gauge a spot to read from. Went smoothly and was much easier than drilling out the sensor like the last build. Plus I can keep the oil pressure gauge hooked up to the ECM.


The heads are installed and torqued. I was a bit worried because of all the broke head stud stories floating around. No issues there.
I found these motor mount plates on Ebay from LSXinnovations and pulled the trigger on them. I was pleasantly surprised by how nice they are. They are truly CNC'd billet steel and the finish was nice enough that I decided satin clear was the way to go. They fit perfect, hardware is nice, and the bolt threads have a very nice fit. No sloppy burrs or loose threads.
I broke out the 1/8 pipe tap to get the factory oil pressure gauge a spot to read from. Went smoothly and was much easier than drilling out the sensor like the last build. Plus I can keep the oil pressure gauge hooked up to the ECM.
Last edited by alocker; 04-15-2015 at 04:50 PM.
04-18-2015, 09:05 PM
#38
Phase 1 is complete. That included selling the old motor and prepping the long black and trans for mock up.
Well, today the old drivetrain is gone and the first stab is complete. The motor needs to be low and back to make room for the turbo stuff. I already see issues with the valve cover to brake booster and driver side exhaust manifold clearance. The truck one will not work and I don't think a Camaro one will either. I might have to go with a Hooker manifold on the that one side which will hurt the wallet since I only need one. Anyways, it feels good to see some real progress.
A decent amount of room around the trans. The floor may need a little ding for the rear speed sensor. I will say the 4L80e is a beast. Iv'e been able to muscle around TH350's and the 2004R, but not this thing.
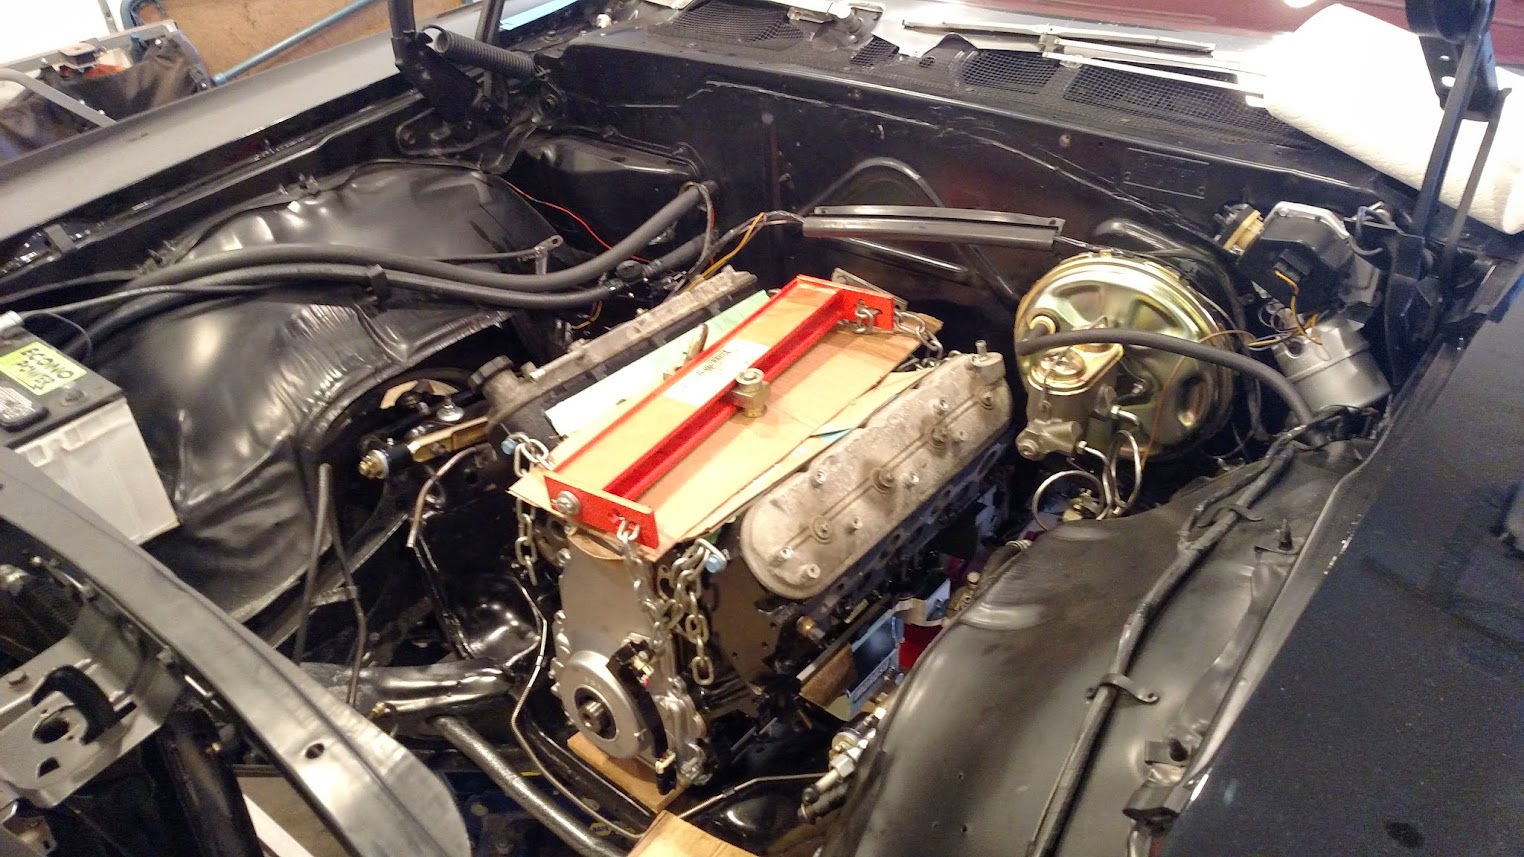
05-17-2015, 10:53 AM
#40
It's been a bit since I last post for several reasons. First, went to Playa Del Carmen for vacation with the wifey. First no kid vacation in 6 years and was much needed.
Second, my initial ideas for the hotside did not pan out. Starting with the driver side, no manifolds fit because I have the motor so low. The stock truck manifold was not even close. Next I tried the Hooker manifolds. No dice either. They both hit the steering box and were really not in the ballpark. I took a gamble and ordered a set of black painted Hooker swap headers part 2473HKR mid length 1.75" primary for first gen F-body LS swaps. It plopped right in. I actually have about and inch and a half of space to move the final motor position in all directions. If anyone needs just a passenger side I will make you a killer deal. The headers themselves are really nice. Thick flange and good looking welds. The Trick T6 manifold did not fit either. The width and wastegate flange placement just will not work. I am having a T4 log fabricated that should drop right in.
I also found a nice 67-68 Chevy full size radiator spacer. These came on low performance no ac small blocks. It spaces the radiator rearward by 4.5 inches creating a perfect box to mount the intercooler. I am going this route for 2 reasons. One, this part is made for this car and looks good. Two, I wont have to cut any hard to replace metal in the core support. I thought about going under the core supports but the bumper does not come low enough to conceal it. I will be able to perfectly fit a 12x24x4" Garrett intercooler core. Chevy made over a million full size cars in 1968 and it's amazing how few of them survived. For that reason I have chose to not cut the car up. I have all the original drivetrain parts that will allow me to return in to stock by turning bolts only.
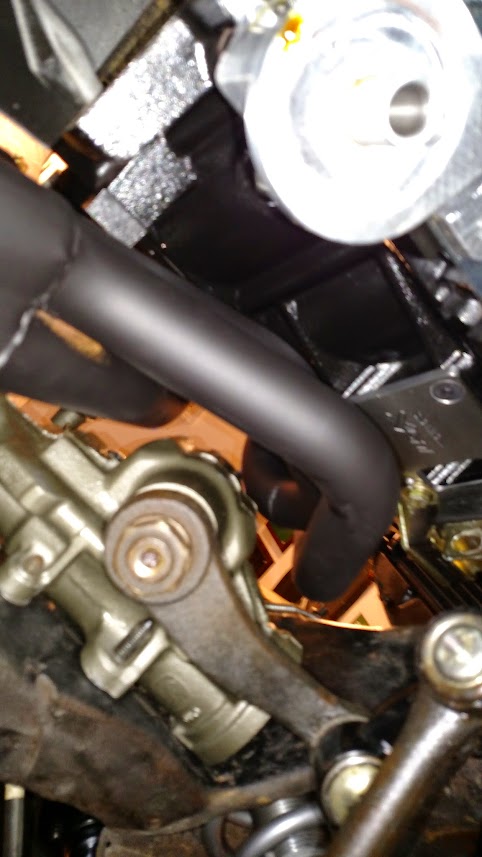