
240sx LS>VQ build thread.
 01-25-2015, 07:23 PM
#1

Hey all. This is going to be my build thread. My s14 used to be dylan crumleys car with vq35de swap. After wanting more power and also considering reliability, I decided to go with LS1 swap. My goal for this thread is to give people information as well as resources . I found out that most people who did ls swap are not really helpful and has that douchebgary attitude as far as answering questions ect ect. We all have to start somewhere and my goal is to have this thread as a starting point for your swap. So fire your questions away ,and I will try to help . Note: I'm not a mechanic nor have any ase certification .what I did here is from my own experience and mistakes. If you don't feel comfortable doing it, take it to the pros.
Joe.
Goal
reliability with good amount of power and reasonable MPG = Daily drive and <450 rwhp
First Before starting a project, research and planning need to be done.
Everything you need to know about LS Engine
http://en.wikipedia.org/wiki/GM_small-block_engine
Everything you need to know about swapping ls into S14 chasis
http://www.silviav8forums.com/forum/viewtopic.php?t=723
In article form
http://my.prostreetonline.com/2013/0...-into-a-240sx/
If you decided to rebuild the block or at least open it up to see the condition of it, I suggest getting
E- kindle version of Rebuilding Ls 1 performance engine.
View youtube video
Rebuilding Ls engine by carburetorsuck.com
Jegs.com
WHERE to buy
1. www.ls1tech.com (a lot of used parts)
2. Silviav8forum (got a good deal on header and oil pan)
3. Craiglist ( you can see the parts and inspect it)
4. Jegs.com (brand new parts + free shipping)!
5. tick performance
6.texasspeed.com
$$ this is how much I paid total currently. Ignore the total. I have to update it.
Project LS Swap Price and items
Engine
1.Ls 1 Long block ARP rod bolts, Clevite HP Bearings, Piston rings, Metal HG, Katech timing chain, Brian tooley lifters, PAC valve springs and LOC, LS6 oil pump, 243 head. = $1800 (2k miles after rebuild)
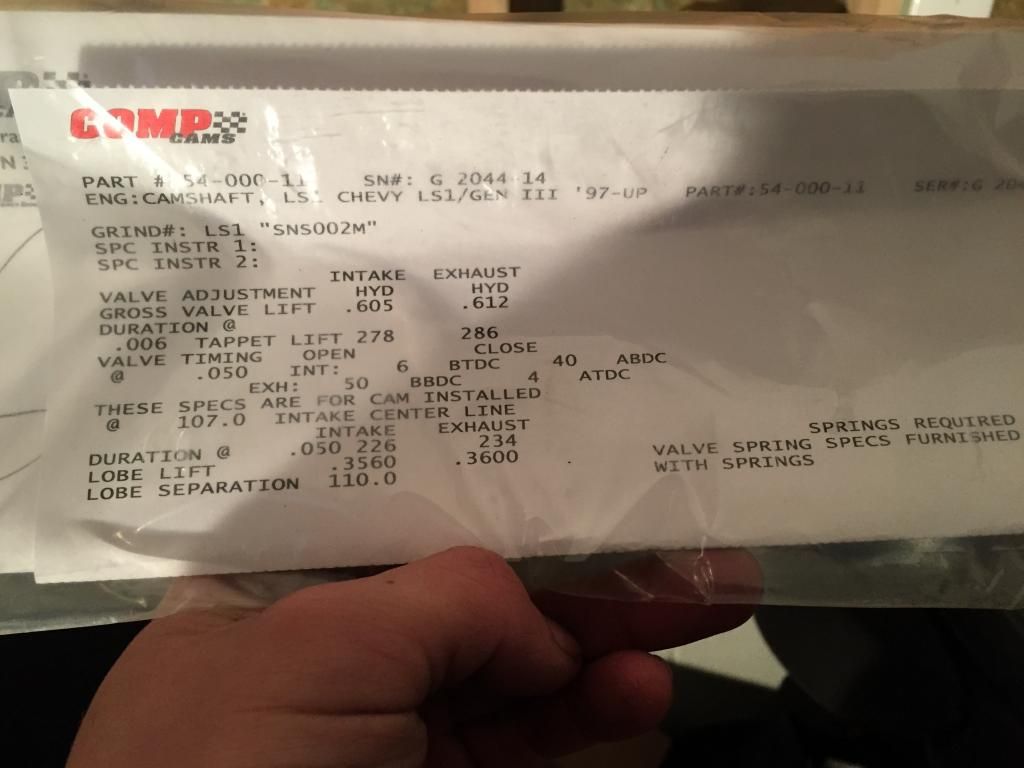
2. SNS stage 2 cam mild tick performance $389
3. ARP balancer bolt $ $33.06
4. Used ASP 25 % UD pulley $150 (used)
5. ARP Cam bolts $ 6
6. Canton oil pan kit by fueled $ 675 (like new)
7. Oil pan gasket $35
8. FAST Intake Manifold/NW TB port and polised $1132 (used)
9. Lifter tray $0
10. Fuel rail + Stock injectors = $130 (used)
11. Coil Packs and harness = $60 (used)
12. Coil pack Bracket= $41 (used)
13. Taylor thunder volt 82 mm Ignition wire $49
14. Ignition wire volcano sleeve Hinson $17.99
15. Hooker Header 7/8 primaries $550 (Like New)
16. Fueled performance mount kit $695
17. Lokar TB cable 36� $54.99
18. Front and rear main seal $59
19. ARP cam bolts retainer $18
20. Headgaskets $47.99
21. LS6 Valley cover $70
22. Brian tooley Head bolts $20.60
23. Coil bracket bolts $14.99
24. Fueled performance flywheel cover plate $35 shipped.
Total = $
Drive accessories
1. Ac line kit from fueled performance $385
2. Fbody Ac components $46.50 (used)
3. Tensioner pulley $30 (Used)
4. Alternator bracket F body $47.38 (used)
5. Power steering pump Bracket $59.99
6. Power steering pump W reservoir cardone $88.23
7. Water pump $35 (used)
8. Water pump gasket
9. Thermostat $35 Advanced auto
Power steering pump pulley $44.60
10.Alternator $67
11. Starter $58.98
12. Idler pulley $20.20
13. Ac compressor bolts $28
14. Starter Bolts ARP $13.38
15. Water pump Bolts $10.95
16. Upper belts tensioner Bolts $9.99
17. Alternator Bolts $28
18. Water pump gaskets $5.99
19. Power steering bolts 40
20. AC bracket $30
21.Ac Bracket and bolts $20
22. Jegs power steering pulley $34.60 refunded
Total =
Drivetrain
1.T56 driveshaft 80K miles rebuilt Fbody $1500 (used)
3. LS3 Flex plate $50
4. Spec stage3+ clutch $265
5. Slave cylinder $76.19 Phoenix friction product.
6. Pilot bearing $16.99 Parts geek
7. Wilwood Slave MC $50 (used)
8. Speed bleeder t56 release bearing kit $29.99
9. Fueled performance driveshaft steel with abs $300
10. J30 Diff shimmed $130 (used)
11. steering rack bushing energy suspension $5
12. subframe bushing Energy suspension $35
13. Arp Flywheel bolts $33
14. 36� braided ss brake line $12.99
15. Release bearing fitting $21.43
16. Aeoroequip banjo bolt $14.40
17. ARP Pressure plate bolts $19
18. ARP Bellhousing bolts $26.47
19. Hurst shifter used $55
20. Q45 Differential $131
Total =
Plumbing
1. Fuel Plumbing $123.60
2. Car ID Fuel line flex 10� $43.80 refunded
3. Fuel Clamp $8.99
4. Fuel Pressure Gauge and fitting JEGS $23
Total = $
Cooling
1. Radiator Hose Gates upper flex $11.42
2. Heat sleeve 19.90
3. steam line vent fitting $33
4. Heat sleeve fuel line $7.90
5. Upper radiator hose Part # C71765
6. Mishimoto radiator $225
7. Lower Rad Hose #C70705
8. Ebay fan shroud $79
Total=
Sensors needed
1. Coolant temp sensor NA
2. O2 sensors downstream $55
3. O2 sensors upstream $ 53.87
4. Oil pressure sensor NA
5. Coolant + oil pressure sensors adapter $20
6. Map sensor $18
Total =
Misc
1. Sound deadening $40
2. Sonic motor race seat $500
3. Autometer cobalt digital speedometer/tach $289.95
4. Evo Oil pressure gauge $ 36.99
5. EvoWater temp gauge $30.79
6. Intellitronix Fuel pressure Gauge $60
7. Autometer fuel meter gauge $79
8. PCM $95
9. Tuning $125
10. Dyno $400
11. Bolts for Fuel rail to IM, Oil pick Up, Lifter tray $52
12. Assembly lube $8
13. Spray paints $40
14. Spark Plug wire boot heat protector $28
15. Vent tube bracket $30
16. Drag Dr 33 Wheels 15� Front and 17� rear +2 tires rear $653
17. Dash gauge holder $47.98
18. Broken driver side door handle $28
19. DEI Heat sleeves 1.5� $15
20. Battery cable and ground $30
21. New Battery $101
22. Passenger side racing seat $ traded
23. Passenger side seat bracket $
24. Hurst shifter **** $25
25. New key made $95
Mistakes
1. Broken bolts on ls cam $25
2. Broken Balancer pulley $178
3. Return shipping JEGS $11.89
4. Multiple order bolts $19.99
5. Multiple order pulley $201.50
6. Ls1 flywheel JEGS $99
7. Wrong idler pulley $33
8. Assistant labor $220
9. Assorted bolts and tools from ace hardware $49
10. Broken power steering fitting $18
11. Lokar tb cable ls1 Model # TC 1000ls148 $64.99
12. Broken PS line fitting High pressure $18.98
13. DEI heat shield 2� $15.99
14. Wrong MAF sensor $50
15. Radiator hoses $92
16. Malfunction Map sensor $63 Autozone
17. GM Coolant temp sensor $20
18.
Total =
Grand total $
Vq 35 sold $1800
Suspension sold $50
Sold multiple order pulley for $142.50
Sold broken balancer pulley $35
Stock injectors sold $55
What would I have done different.
1. Buy a complete block with drive accesories ect ect or a crate engine. Shop wisely if you wanna get a crate engine.
2. If you think buying a truck block and get it rebuild s cheaper, think again. After the cost of rebuild and finding all the parts including every nuts and bolts $$ can add up. Just to reconsider. A new drive accesories kit from Holley is arnd 800 bucks.
Joe.
Goal
reliability with good amount of power and reasonable MPG = Daily drive and <450 rwhp
First Before starting a project, research and planning need to be done.
Everything you need to know about LS Engine
http://en.wikipedia.org/wiki/GM_small-block_engine
Everything you need to know about swapping ls into S14 chasis
http://www.silviav8forums.com/forum/viewtopic.php?t=723
In article form
http://my.prostreetonline.com/2013/0...-into-a-240sx/
If you decided to rebuild the block or at least open it up to see the condition of it, I suggest getting
E- kindle version of Rebuilding Ls 1 performance engine.
View youtube video
Rebuilding Ls engine by carburetorsuck.com
Jegs.com
WHERE to buy
1. www.ls1tech.com (a lot of used parts)
2. Silviav8forum (got a good deal on header and oil pan)
3. Craiglist ( you can see the parts and inspect it)
4. Jegs.com (brand new parts + free shipping)!
5. tick performance
6.texasspeed.com
$$ this is how much I paid total currently. Ignore the total. I have to update it.
Project LS Swap Price and items
Engine
1.Ls 1 Long block ARP rod bolts, Clevite HP Bearings, Piston rings, Metal HG, Katech timing chain, Brian tooley lifters, PAC valve springs and LOC, LS6 oil pump, 243 head. = $1800 (2k miles after rebuild)
2. SNS stage 2 cam mild tick performance $389
3. ARP balancer bolt $ $33.06
4. Used ASP 25 % UD pulley $150 (used)
5. ARP Cam bolts $ 6
6. Canton oil pan kit by fueled $ 675 (like new)
7. Oil pan gasket $35
8. FAST Intake Manifold/NW TB port and polised $1132 (used)
9. Lifter tray $0
10. Fuel rail + Stock injectors = $130 (used)
11. Coil Packs and harness = $60 (used)
12. Coil pack Bracket= $41 (used)
13. Taylor thunder volt 82 mm Ignition wire $49
14. Ignition wire volcano sleeve Hinson $17.99
15. Hooker Header 7/8 primaries $550 (Like New)
16. Fueled performance mount kit $695
17. Lokar TB cable 36� $54.99
18. Front and rear main seal $59
19. ARP cam bolts retainer $18
20. Headgaskets $47.99
21. LS6 Valley cover $70
22. Brian tooley Head bolts $20.60
23. Coil bracket bolts $14.99
24. Fueled performance flywheel cover plate $35 shipped.
Total = $
Drive accessories
1. Ac line kit from fueled performance $385
2. Fbody Ac components $46.50 (used)
3. Tensioner pulley $30 (Used)
4. Alternator bracket F body $47.38 (used)
5. Power steering pump Bracket $59.99
6. Power steering pump W reservoir cardone $88.23
7. Water pump $35 (used)
8. Water pump gasket
9. Thermostat $35 Advanced auto
Power steering pump pulley $44.60
10.Alternator $67
11. Starter $58.98
12. Idler pulley $20.20
13. Ac compressor bolts $28
14. Starter Bolts ARP $13.38
15. Water pump Bolts $10.95
16. Upper belts tensioner Bolts $9.99
17. Alternator Bolts $28
18. Water pump gaskets $5.99
19. Power steering bolts 40
20. AC bracket $30
21.Ac Bracket and bolts $20
22. Jegs power steering pulley $34.60 refunded
Total =
Drivetrain
1.T56 driveshaft 80K miles rebuilt Fbody $1500 (used)
3. LS3 Flex plate $50
4. Spec stage3+ clutch $265
5. Slave cylinder $76.19 Phoenix friction product.
6. Pilot bearing $16.99 Parts geek
7. Wilwood Slave MC $50 (used)
8. Speed bleeder t56 release bearing kit $29.99
9. Fueled performance driveshaft steel with abs $300
10. J30 Diff shimmed $130 (used)
11. steering rack bushing energy suspension $5
12. subframe bushing Energy suspension $35
13. Arp Flywheel bolts $33
14. 36� braided ss brake line $12.99
15. Release bearing fitting $21.43
16. Aeoroequip banjo bolt $14.40
17. ARP Pressure plate bolts $19
18. ARP Bellhousing bolts $26.47
19. Hurst shifter used $55
20. Q45 Differential $131
Total =
Plumbing
1. Fuel Plumbing $123.60
2. Car ID Fuel line flex 10� $43.80 refunded
3. Fuel Clamp $8.99
4. Fuel Pressure Gauge and fitting JEGS $23
Total = $
Cooling
1. Radiator Hose Gates upper flex $11.42
2. Heat sleeve 19.90
3. steam line vent fitting $33
4. Heat sleeve fuel line $7.90
5. Upper radiator hose Part # C71765
6. Mishimoto radiator $225
7. Lower Rad Hose #C70705
8. Ebay fan shroud $79
Total=
Sensors needed
1. Coolant temp sensor NA
2. O2 sensors downstream $55
3. O2 sensors upstream $ 53.87
4. Oil pressure sensor NA
5. Coolant + oil pressure sensors adapter $20
6. Map sensor $18
Total =
Misc
1. Sound deadening $40
2. Sonic motor race seat $500
3. Autometer cobalt digital speedometer/tach $289.95
4. Evo Oil pressure gauge $ 36.99
5. EvoWater temp gauge $30.79
6. Intellitronix Fuel pressure Gauge $60
7. Autometer fuel meter gauge $79
8. PCM $95
9. Tuning $125
10. Dyno $400
11. Bolts for Fuel rail to IM, Oil pick Up, Lifter tray $52
12. Assembly lube $8
13. Spray paints $40
14. Spark Plug wire boot heat protector $28
15. Vent tube bracket $30
16. Drag Dr 33 Wheels 15� Front and 17� rear +2 tires rear $653
17. Dash gauge holder $47.98
18. Broken driver side door handle $28
19. DEI Heat sleeves 1.5� $15
20. Battery cable and ground $30
21. New Battery $101
22. Passenger side racing seat $ traded
23. Passenger side seat bracket $
24. Hurst shifter **** $25
25. New key made $95
Mistakes
1. Broken bolts on ls cam $25
2. Broken Balancer pulley $178
3. Return shipping JEGS $11.89
4. Multiple order bolts $19.99
5. Multiple order pulley $201.50
6. Ls1 flywheel JEGS $99
7. Wrong idler pulley $33
8. Assistant labor $220
9. Assorted bolts and tools from ace hardware $49
10. Broken power steering fitting $18
11. Lokar tb cable ls1 Model # TC 1000ls148 $64.99
12. Broken PS line fitting High pressure $18.98
13. DEI heat shield 2� $15.99
14. Wrong MAF sensor $50
15. Radiator hoses $92
16. Malfunction Map sensor $63 Autozone
17. GM Coolant temp sensor $20
18.
Total =
Grand total $
Vq 35 sold $1800
Suspension sold $50
Sold multiple order pulley for $142.50
Sold broken balancer pulley $35
Stock injectors sold $55
What would I have done different.
1. Buy a complete block with drive accesories ect ect or a crate engine. Shop wisely if you wanna get a crate engine.
2. If you think buying a truck block and get it rebuild s cheaper, think again. After the cost of rebuild and finding all the parts including every nuts and bolts $$ can add up. Just to reconsider. A new drive accesories kit from Holley is arnd 800 bucks.
 01-25-2015, 07:33 PM
#2
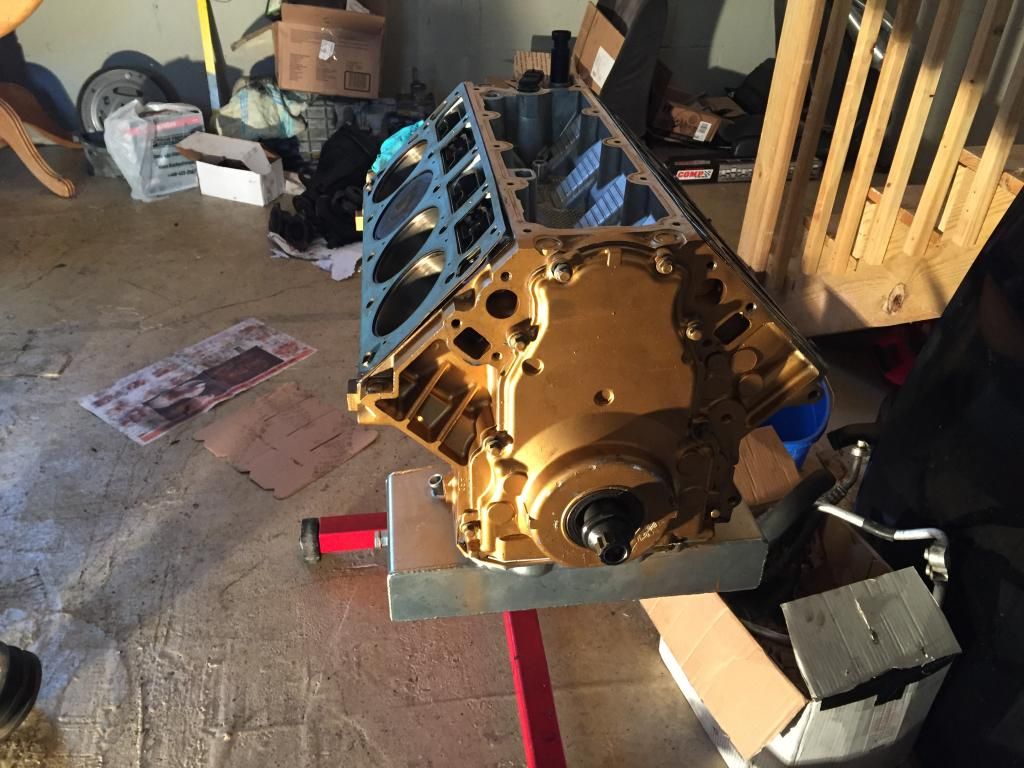
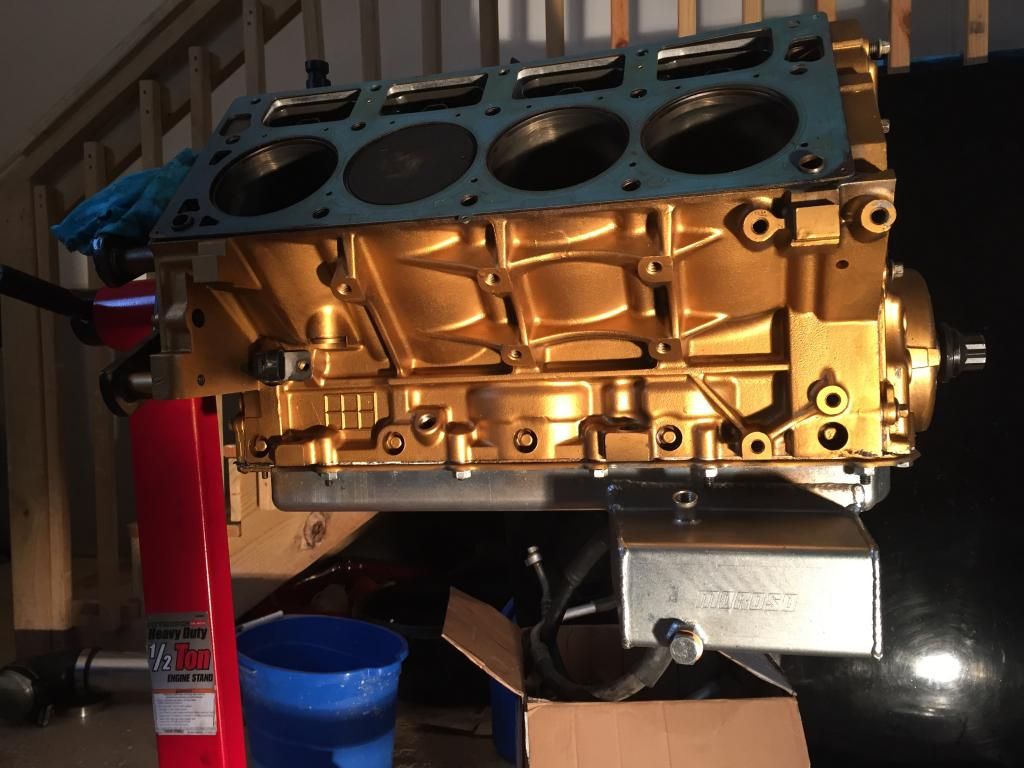
Stage 1 Engine Prep
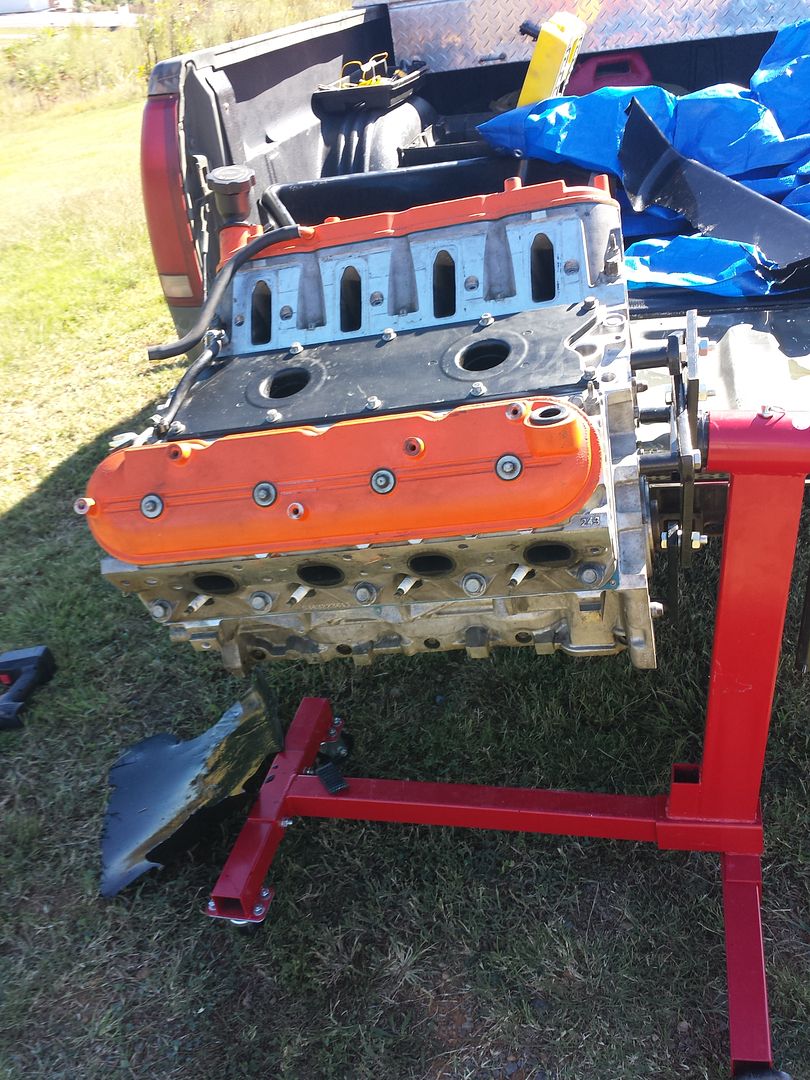
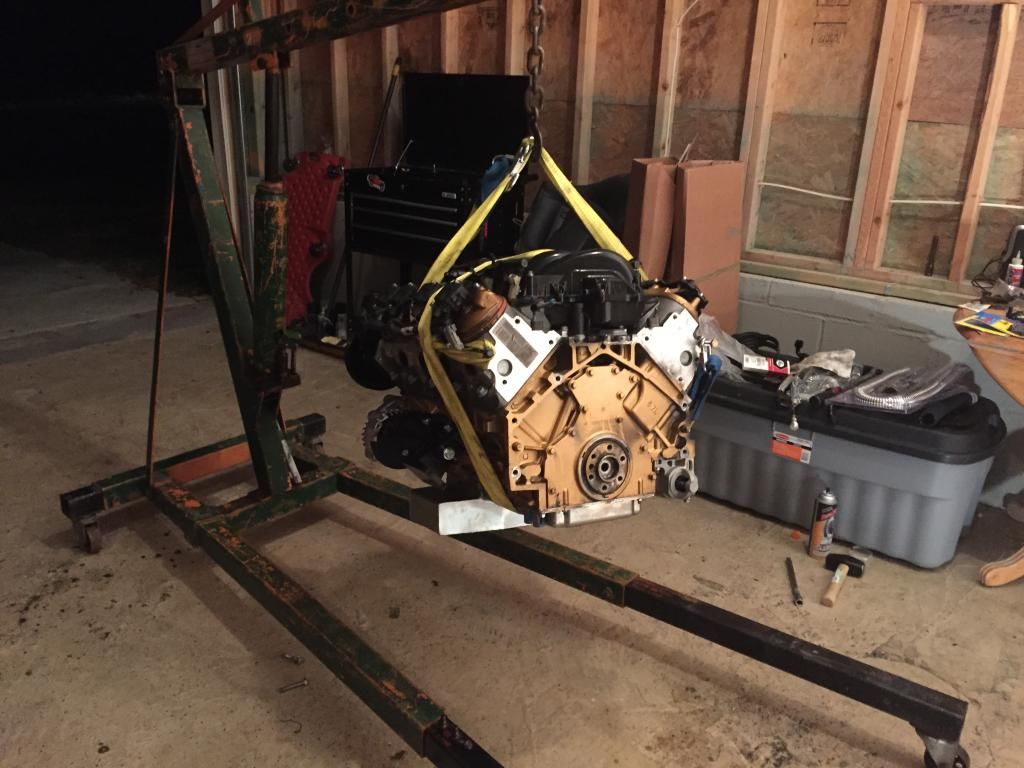
Unloading it from my truck. Bought it all the way from NC.
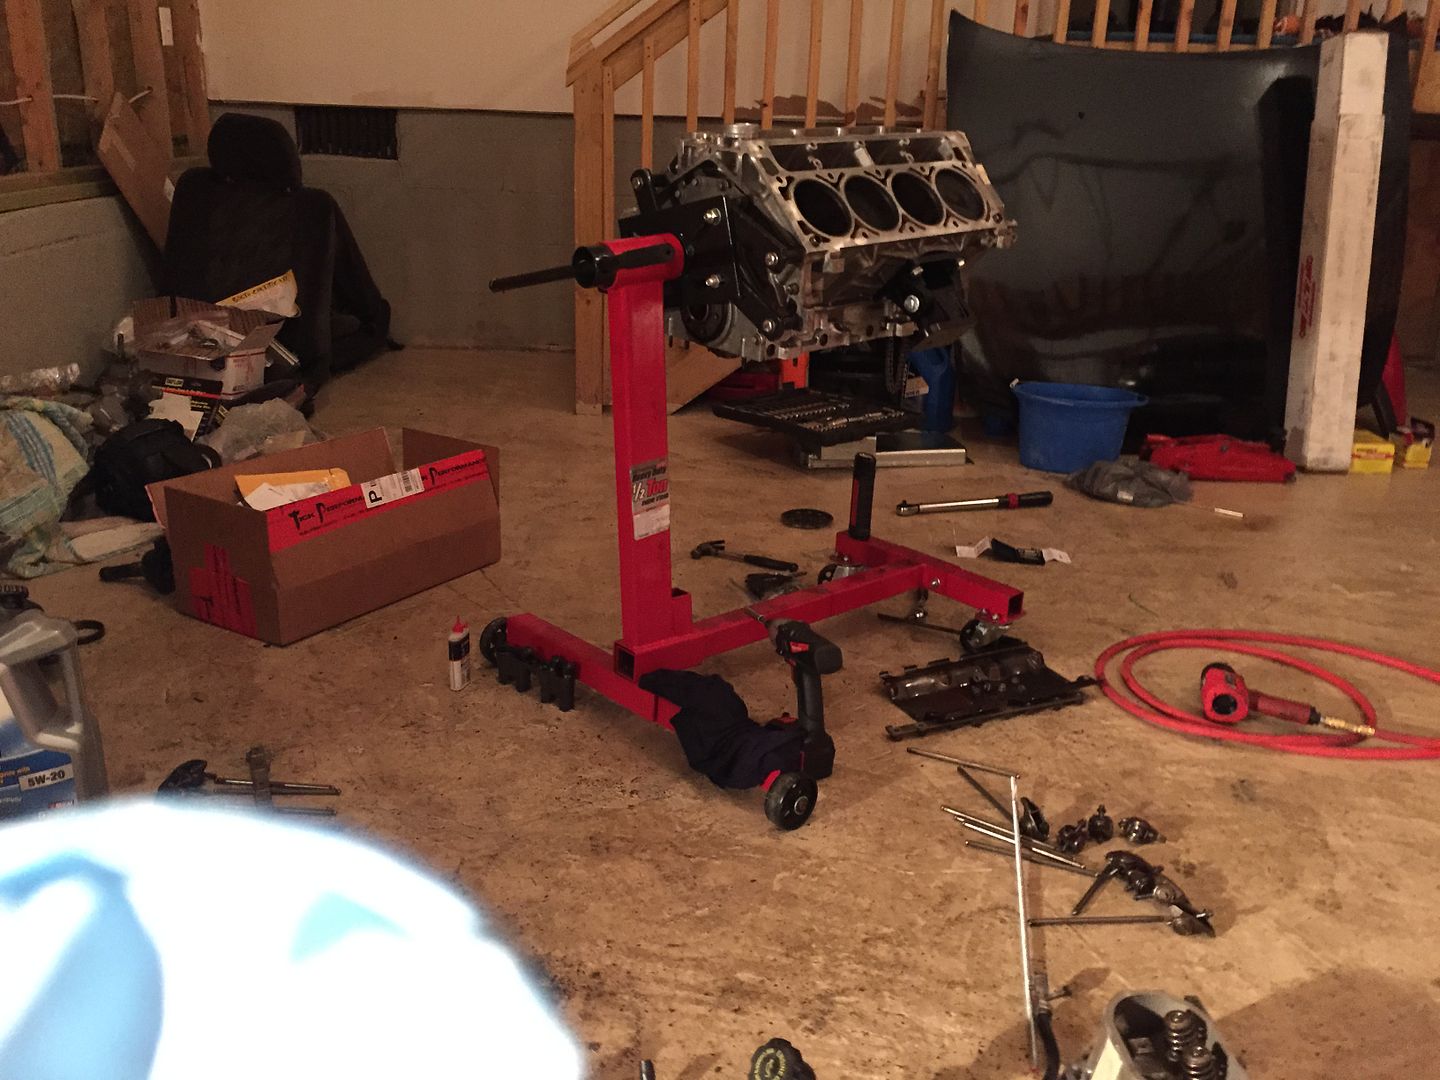
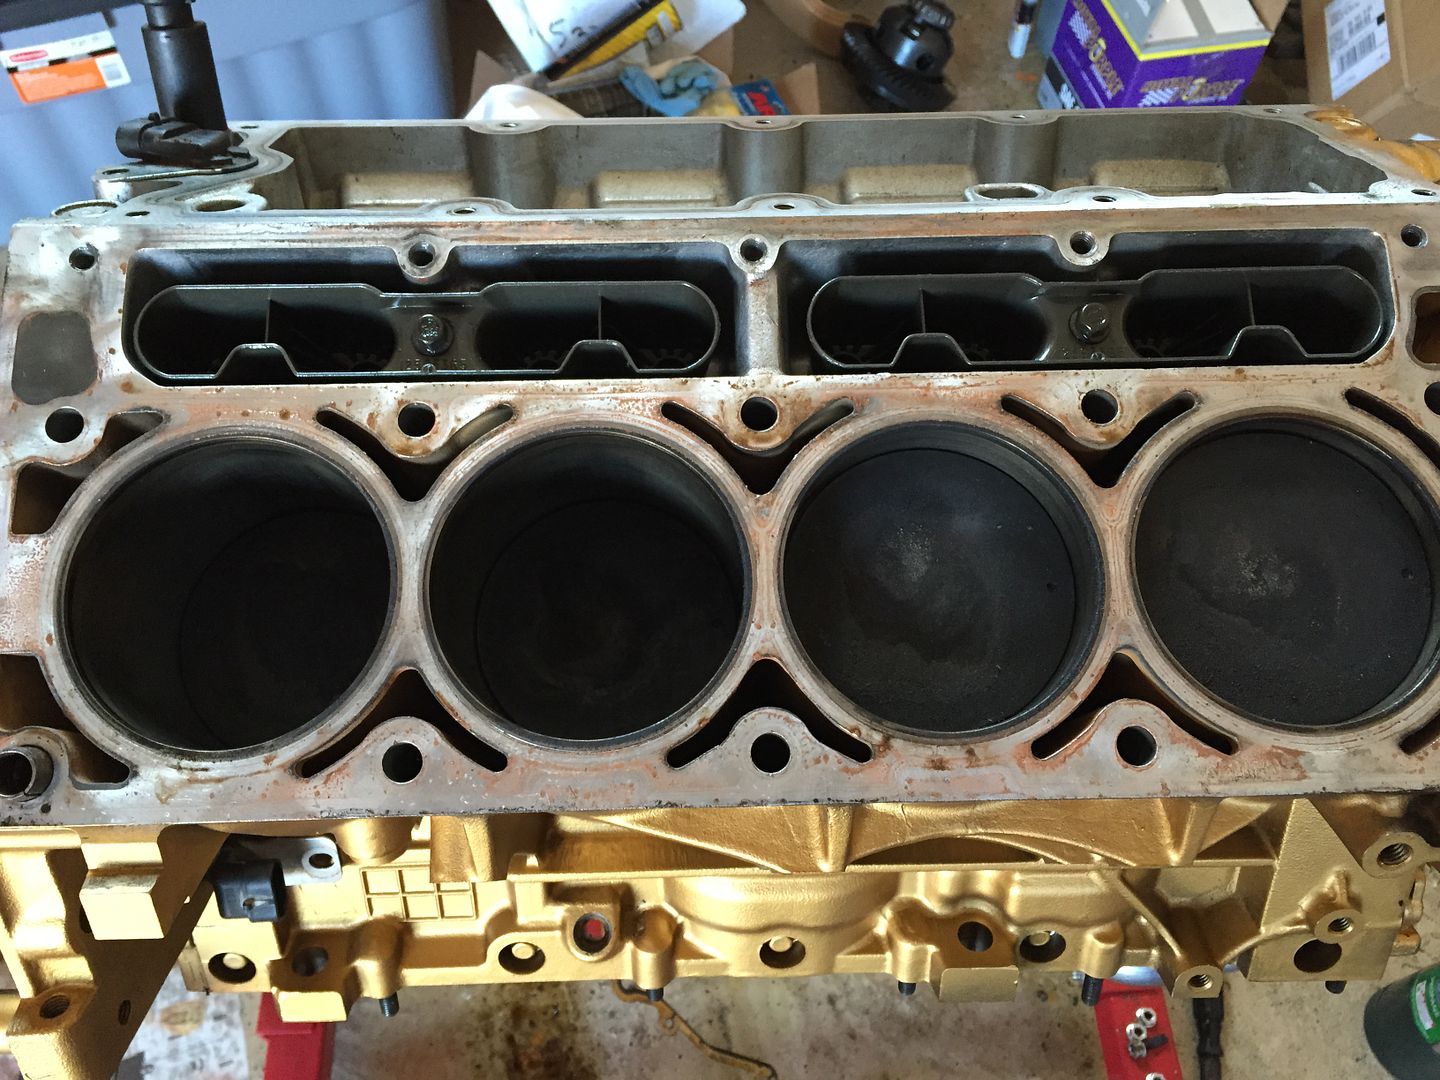
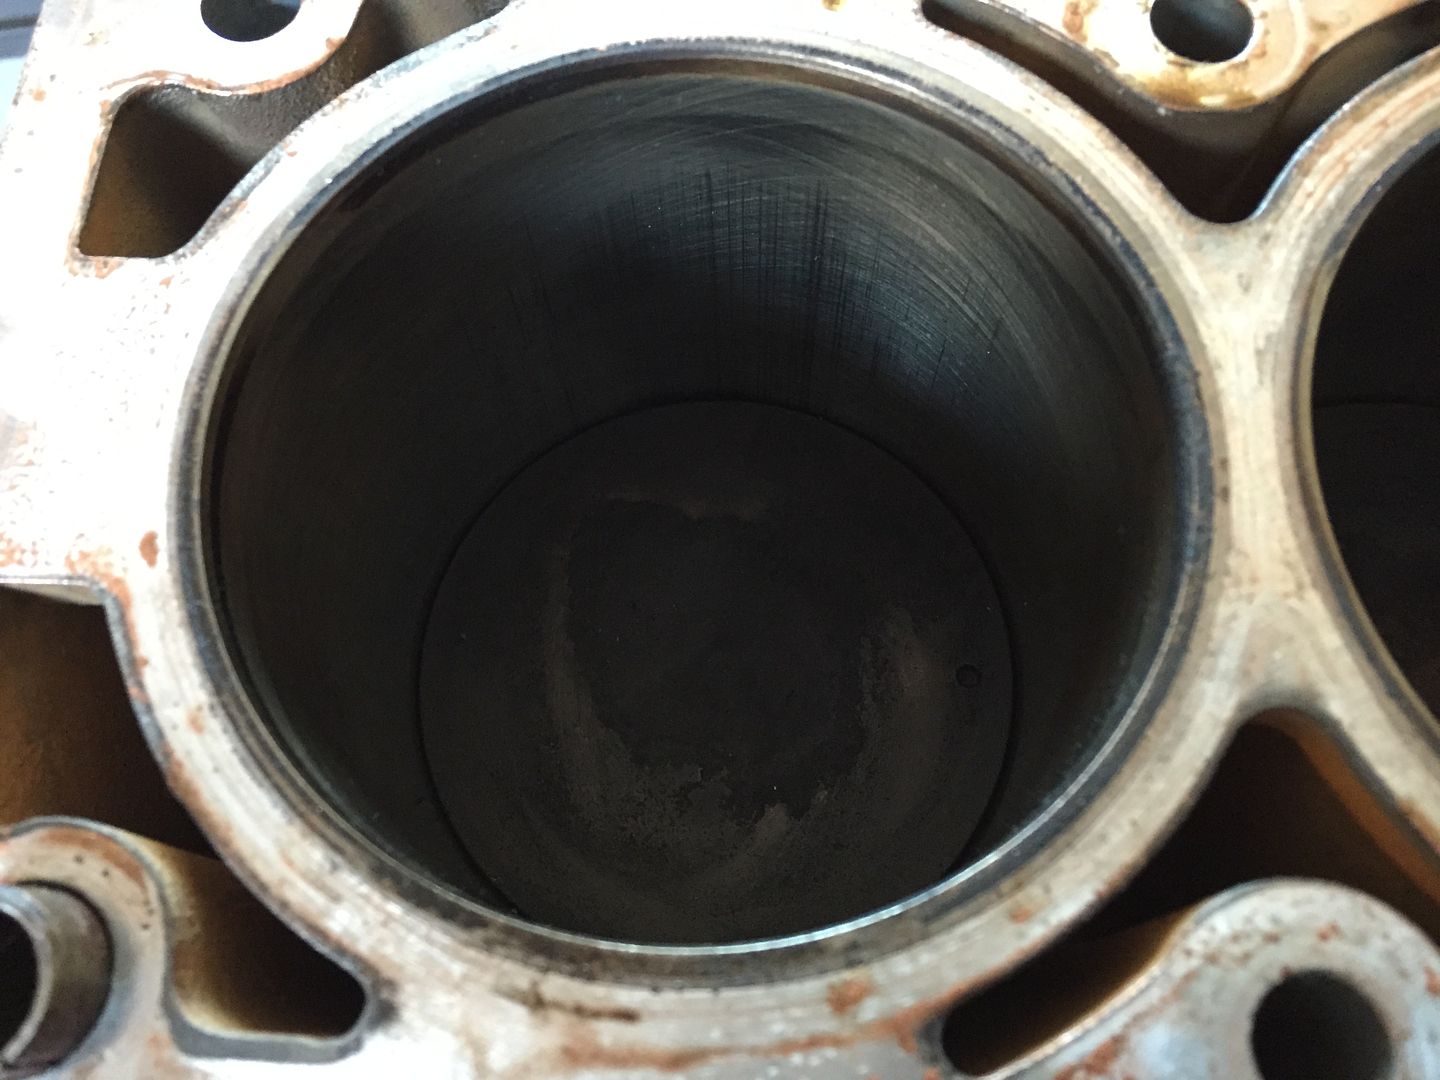
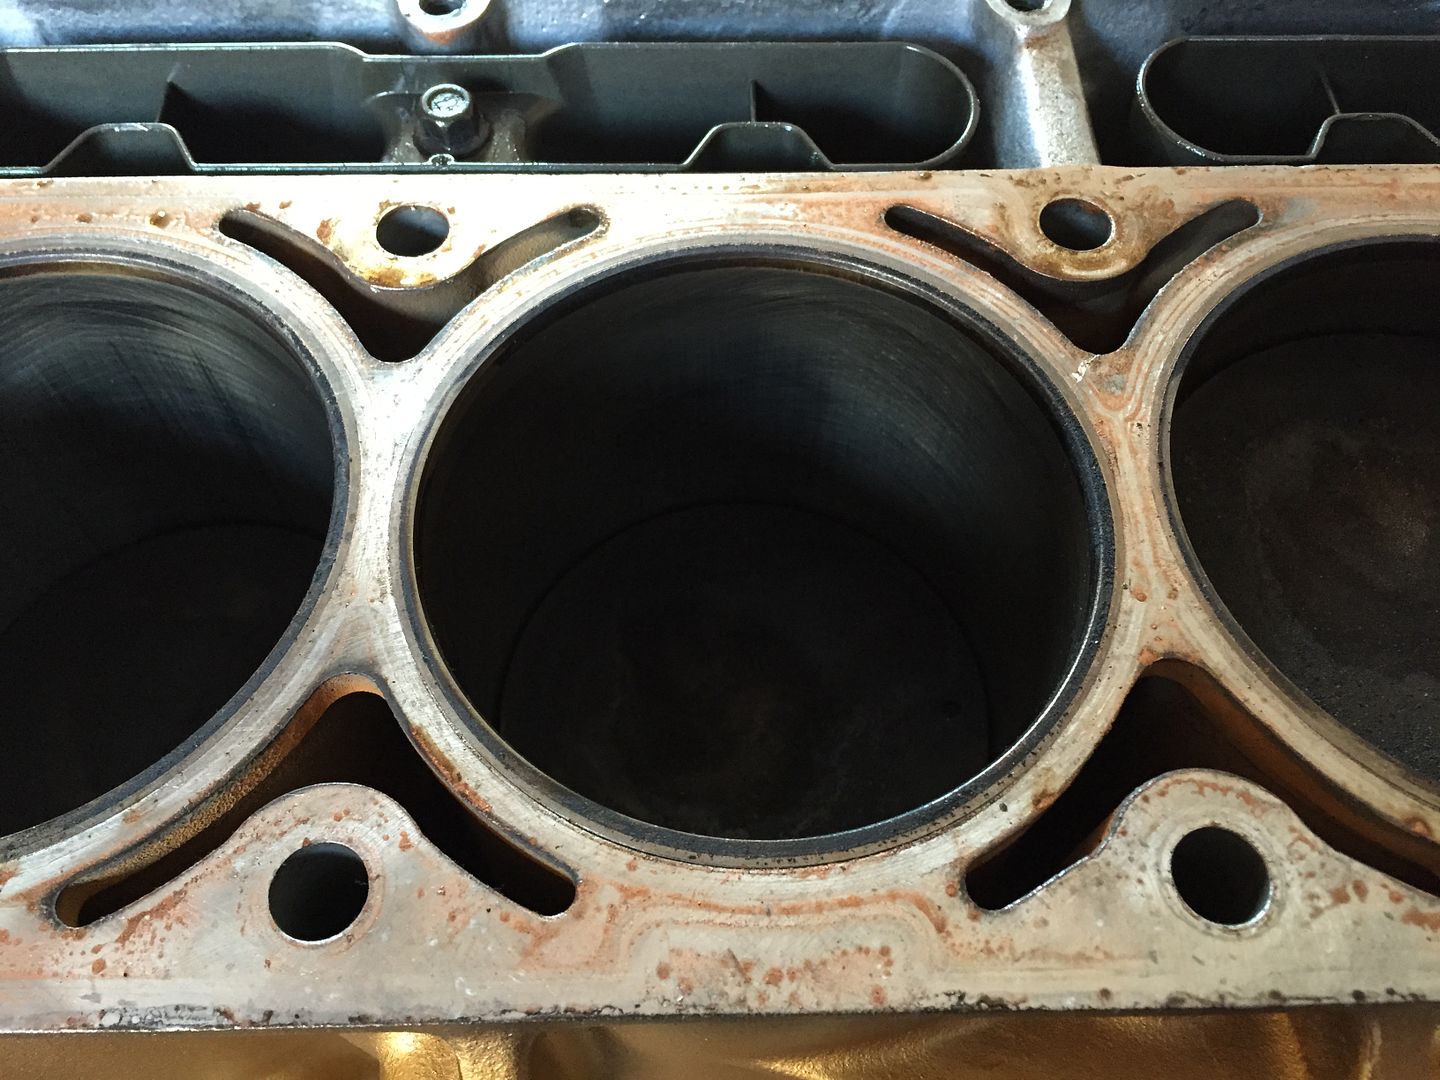
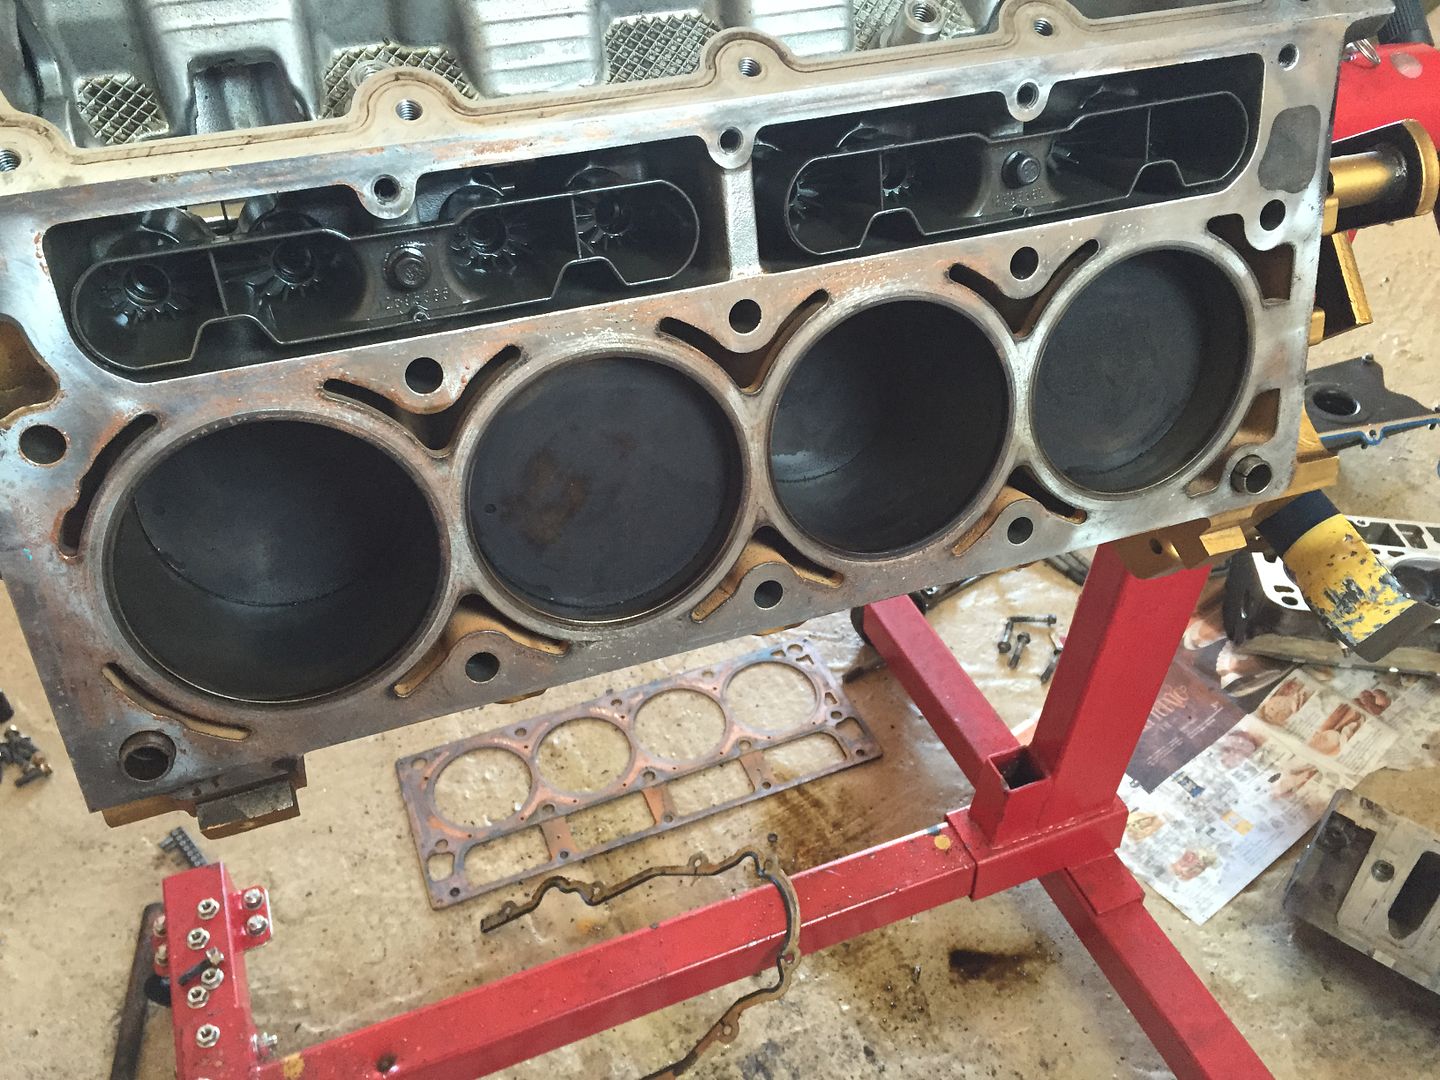
Put the engine on the stand and started my inspections to check everything is code 4.
http://s1121.photobucket.com/user/sm...2A579.jpg.html
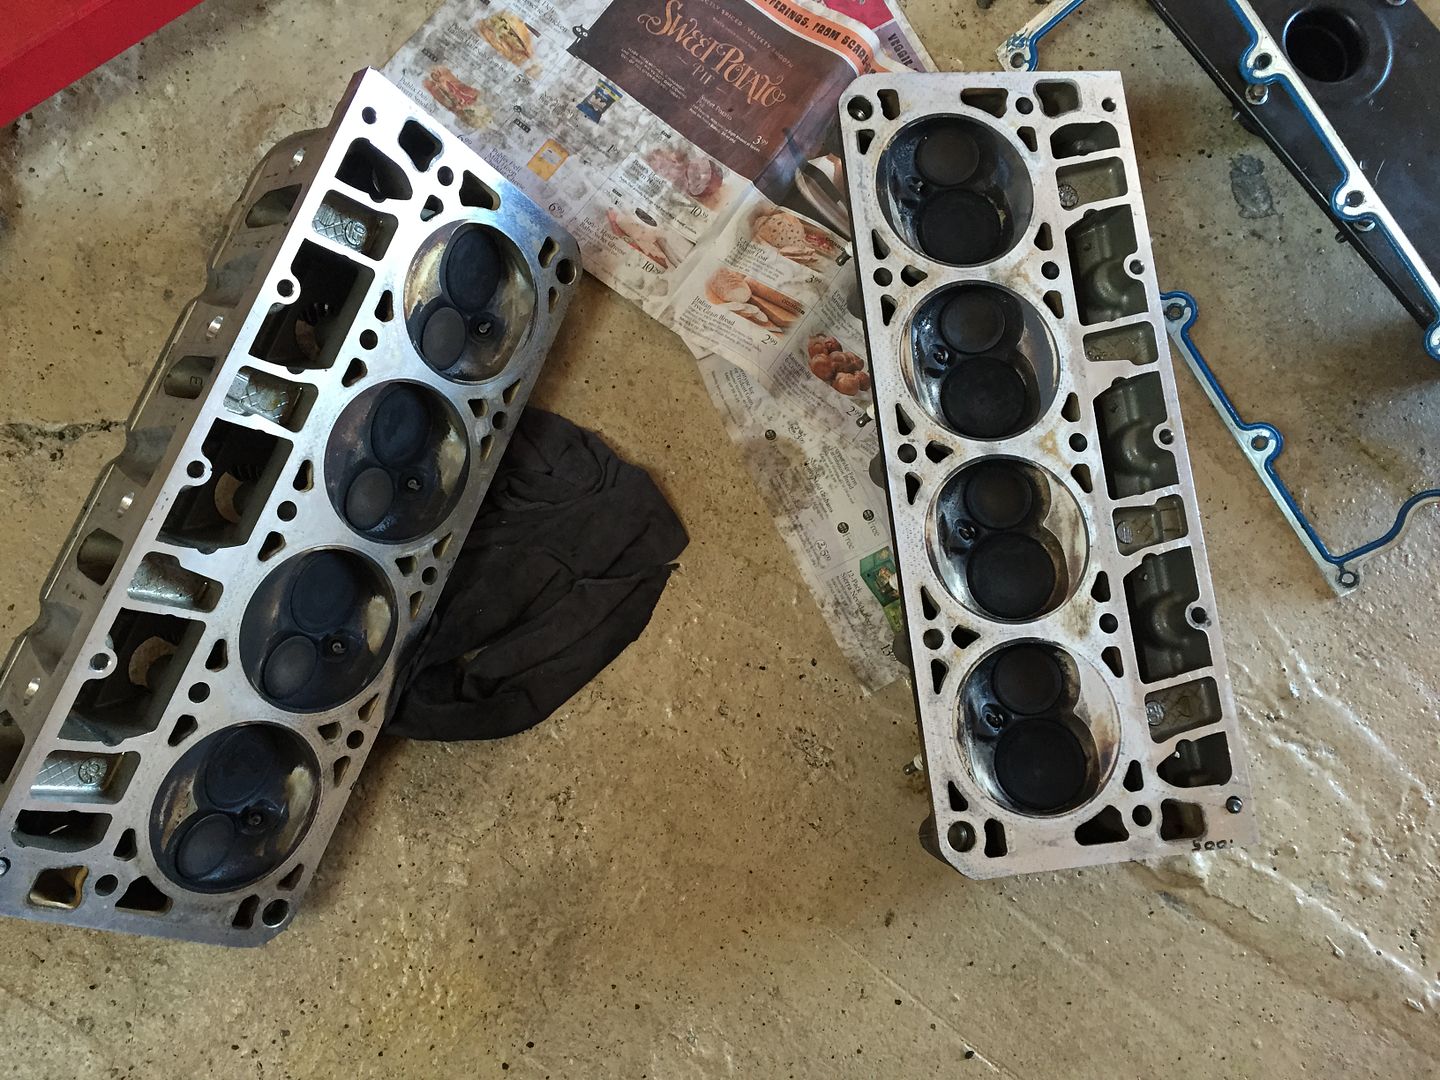
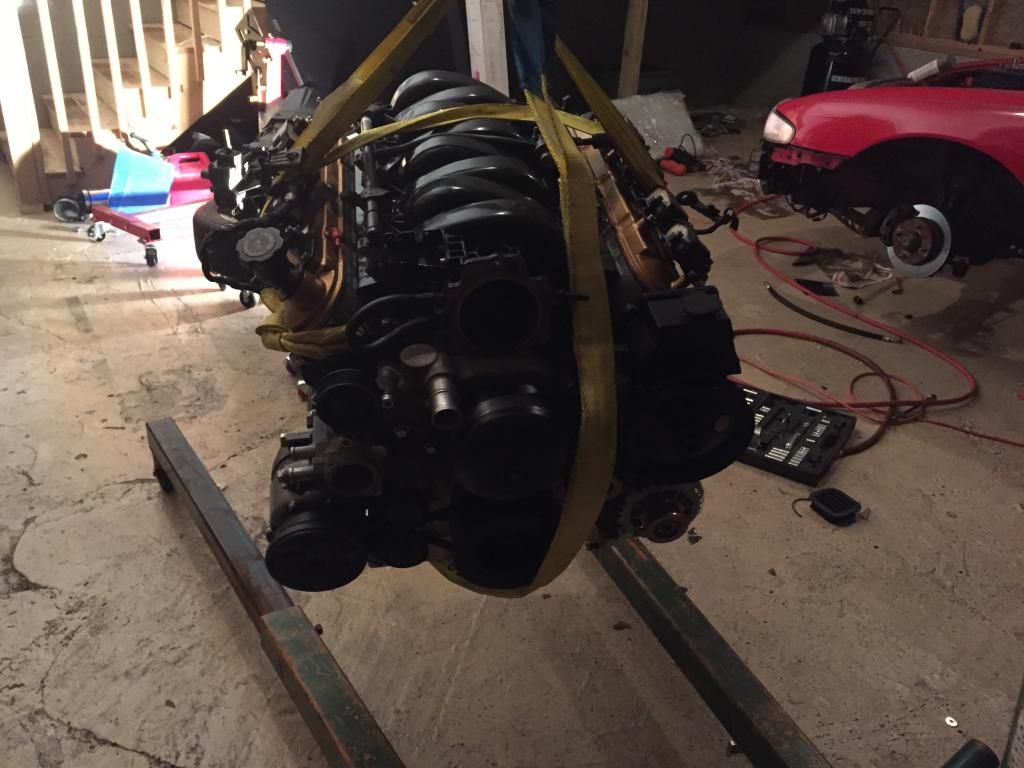
More pics of the block.
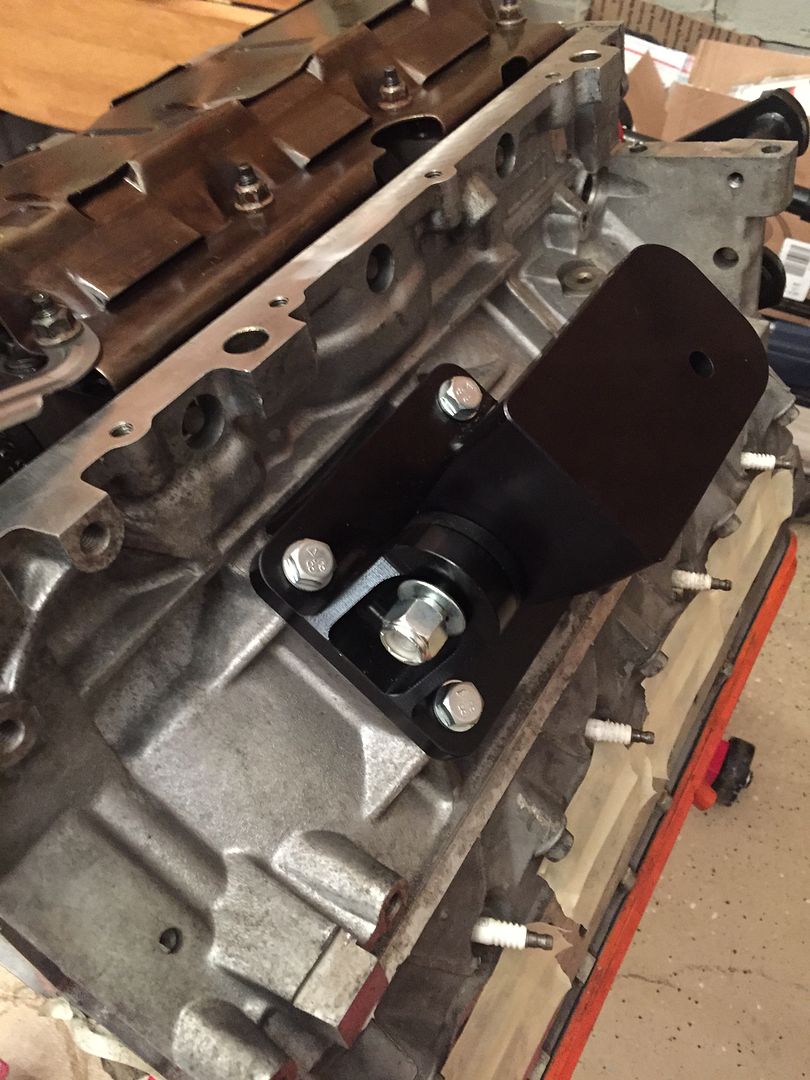
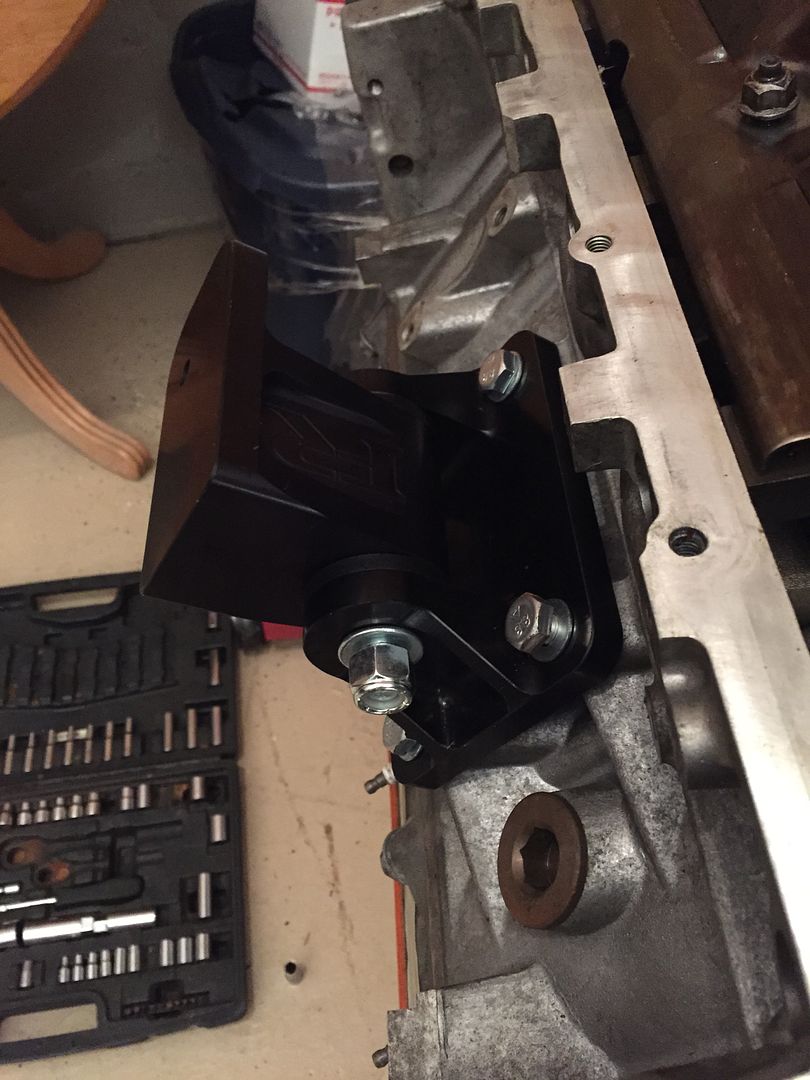
There are so many options as far as mount kit goes. I've decided to go with fueled performance.
1. All their materials are made in usa
2. It fits like a glove . No tunnel bashing. Only requires trimming in the t56 .
Pricewise is identical to sikky but you get what you pay for.
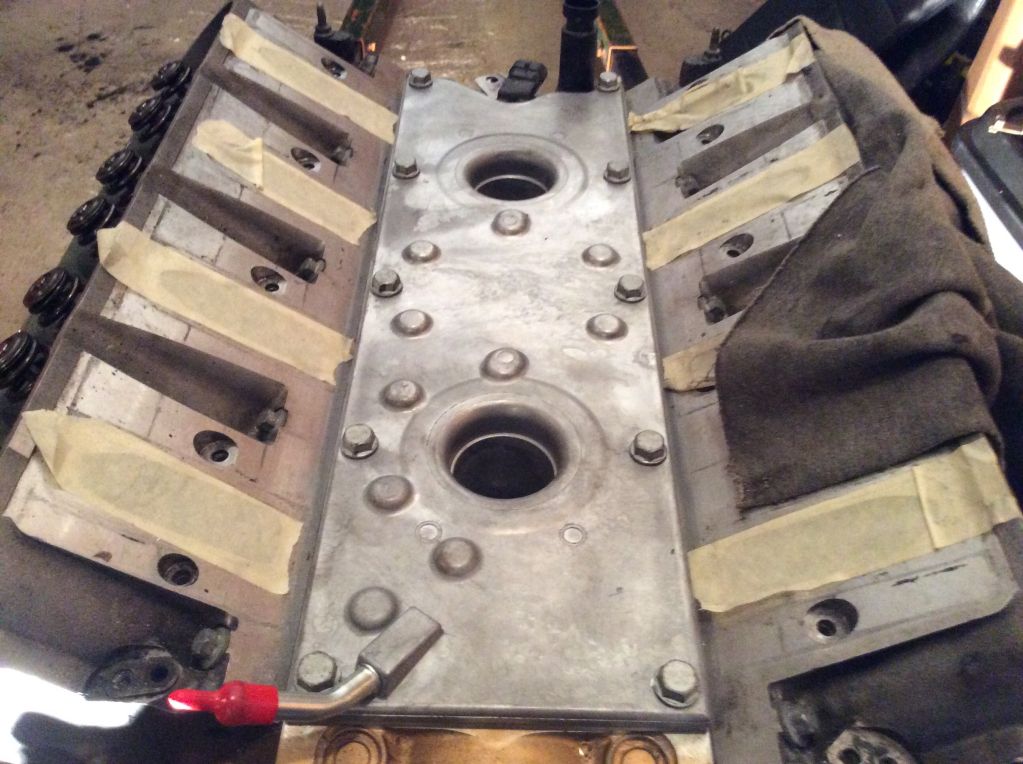
Oil Pick up by moroso
Installing aftermarket cam by tick.
Paint the block
If you plan to go with upgraded aftermarket cam, read this thread. It's informative and I strongly advised reading it.
https://ls1tech.com/forums/generatio...comp-cams.html
Sources:
How to paint your engine block
How to install cam
Write up
http://www.ls1howto.com/index.php?article=23
Make sure the 2 dots align unless you plan on degreeing the cam and Ill strongly advise to check PTV clearance if you have upgraded head.
Make sure you check the torque specs on the flex plate bolts. I overtorqued it and have to take to the machine shop to get the bolt out. waste of 55 bucks
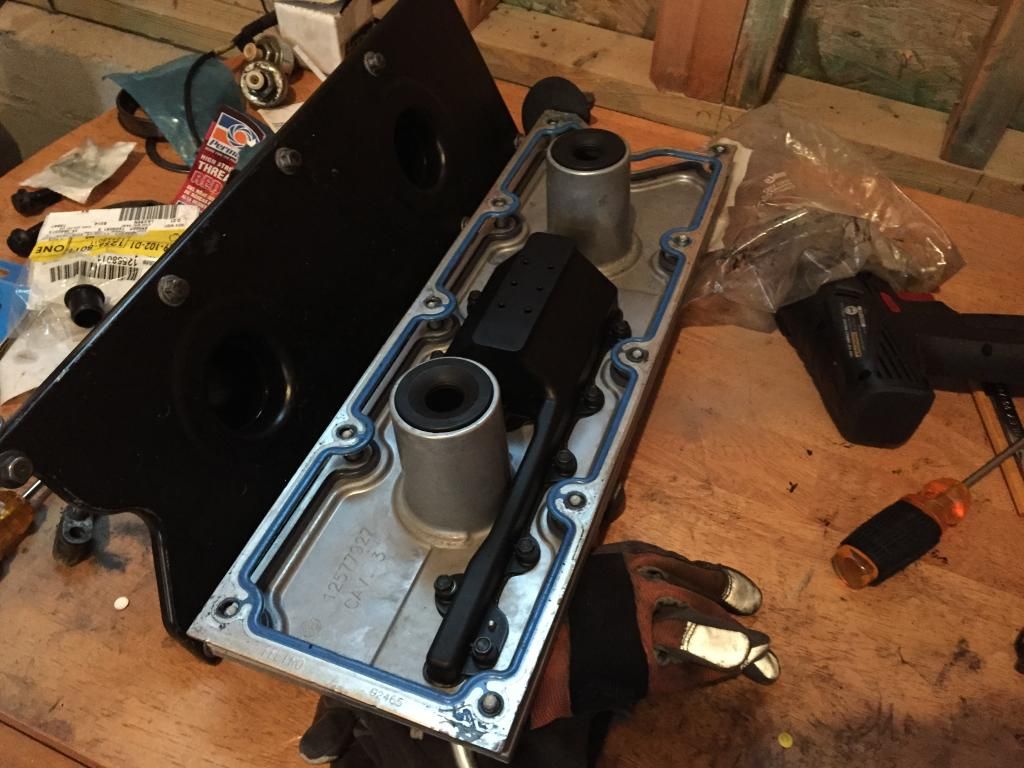
Doing the ls6 valley cover swap to fix he oil consumption issues.
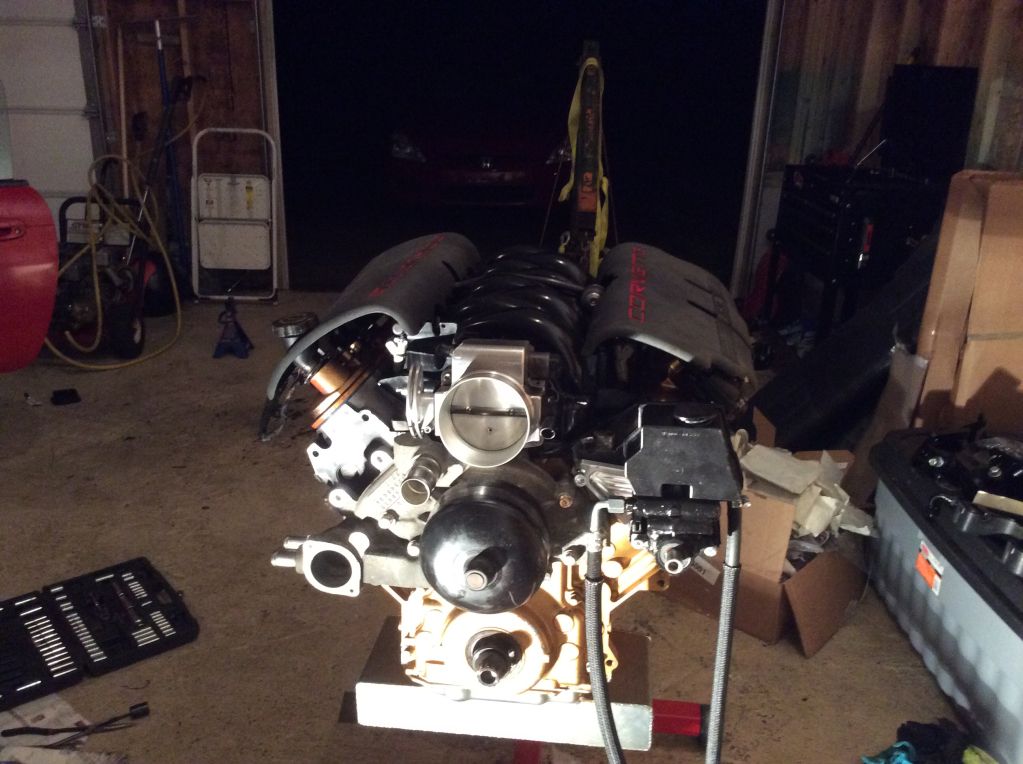
Engine assembly is almost complete. Just waiting on sensors.
http://s1121.photobucket.com/user/sm...1c6c0.jpg.html

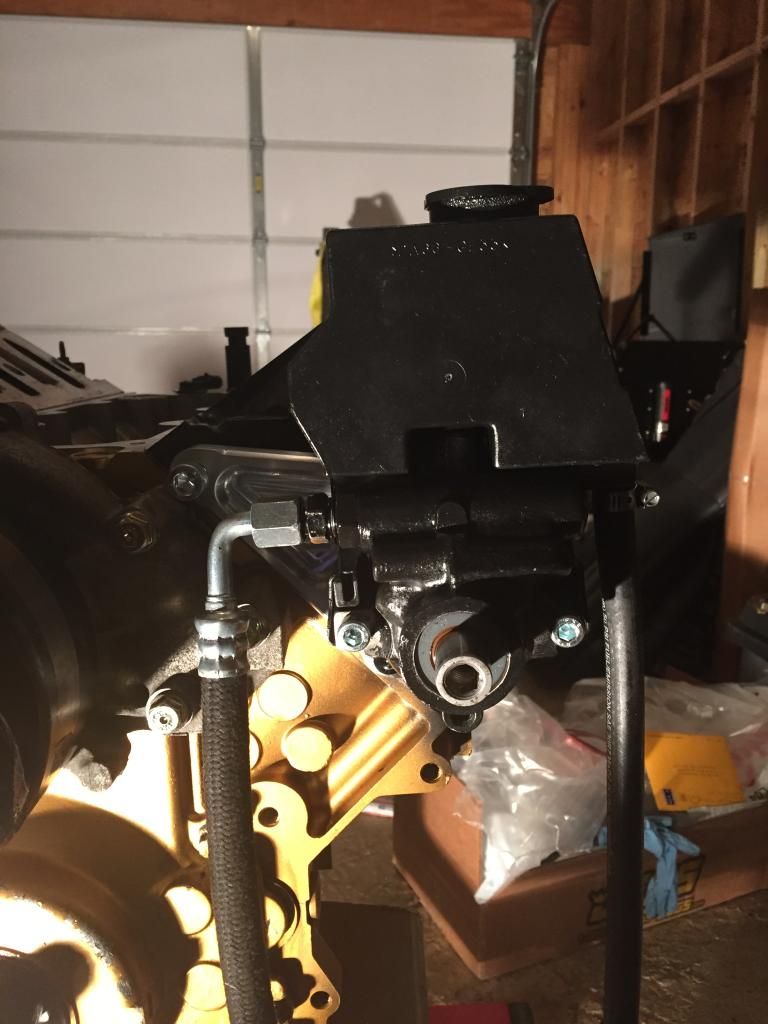
Engine assembly is complete with PS mounted.
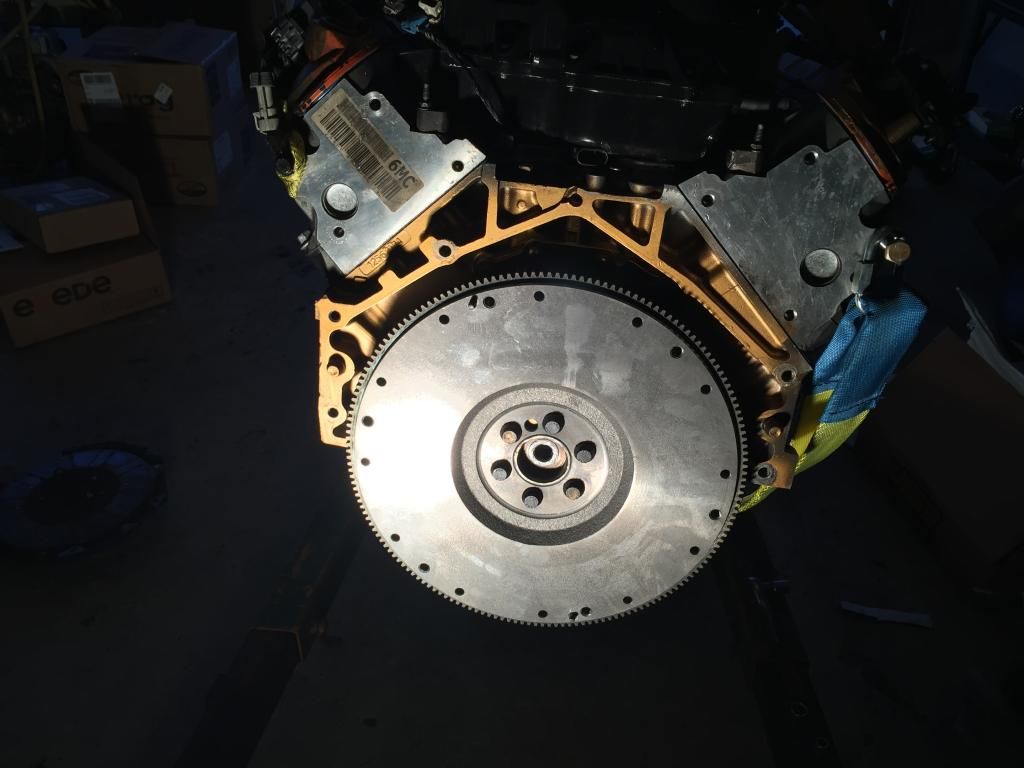
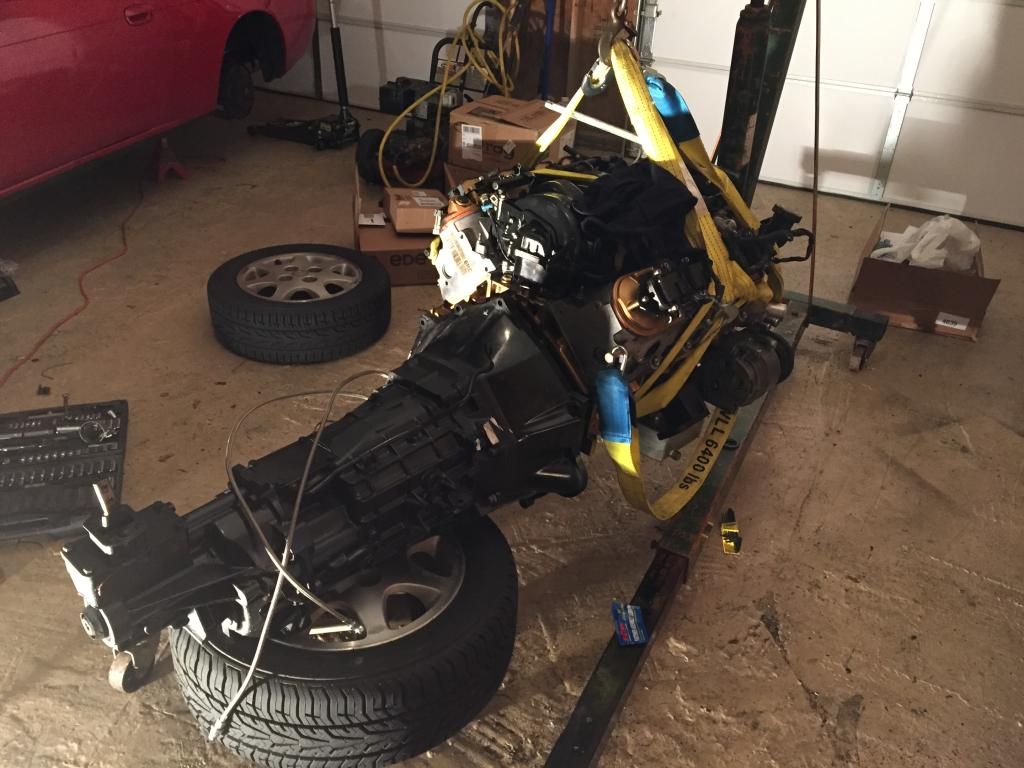
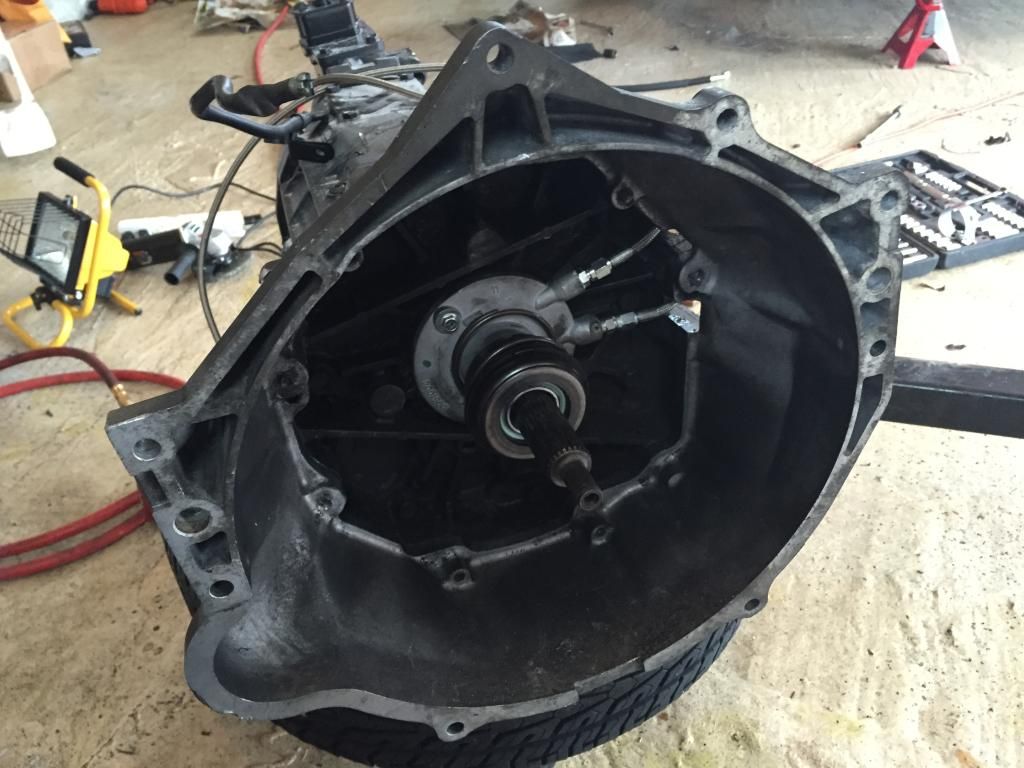
Mock mounting my transmission to the engine. Flywheel need to be torqued correctly. Bought the wrong size bolt and not sure why ARP has to use star bolt!

Unloading it from my truck. Bought it all the way from NC.

Put the engine on the stand and started my inspections to check everything is code 4.
http://s1121.photobucket.com/user/sm...2A579.jpg.html
More pics of the block.


There are so many options as far as mount kit goes. I've decided to go with fueled performance.
1. All their materials are made in usa
2. It fits like a glove . No tunnel bashing. Only requires trimming in the t56 .
Pricewise is identical to sikky but you get what you pay for.


Oil Pick up by moroso


Installing aftermarket cam by tick.

Paint the block


If you plan to go with upgraded aftermarket cam, read this thread. It's informative and I strongly advised reading it.
https://ls1tech.com/forums/generatio...comp-cams.html
Sources:
How to paint your engine block
How to install cam
http://www.ls1howto.com/index.php?article=23
Make sure the 2 dots align unless you plan on degreeing the cam and Ill strongly advise to check PTV clearance if you have upgraded head.
Make sure you check the torque specs on the flex plate bolts. I overtorqued it and have to take to the machine shop to get the bolt out. waste of 55 bucks
Doing the ls6 valley cover swap to fix he oil consumption issues.


Engine assembly is almost complete. Just waiting on sensors.
http://s1121.photobucket.com/user/sm...1c6c0.jpg.html

Engine assembly is complete with PS mounted.


Mock mounting my transmission to the engine. Flywheel need to be torqued correctly. Bought the wrong size bolt and not sure why ARP has to use star bolt!

Last edited by laurentj23; 01-25-2015 at 07:49 PM.
01-25-2015, 08:27 PM
#3
Stage 2 Chasis Prep/engine install
First you need to remove your old engine. There many ways to do this. But if youre unsure, refer to the video here
Tools needed:
Wrench and sockets with breaker bar
Cherry picker. Rent if you dont do this very often. Its huge and it takes up space
Crate or engine stand
A couple of buddies
Degreaser
Since i have a vq, the engine removal is a little different but the concept is the same. The buyer of my engine came with his buddies from florida and did the removal in under <2 hrs.
After the removal, i decided to wash the whole chasis especially the engine bay with power washer@3000 psi.
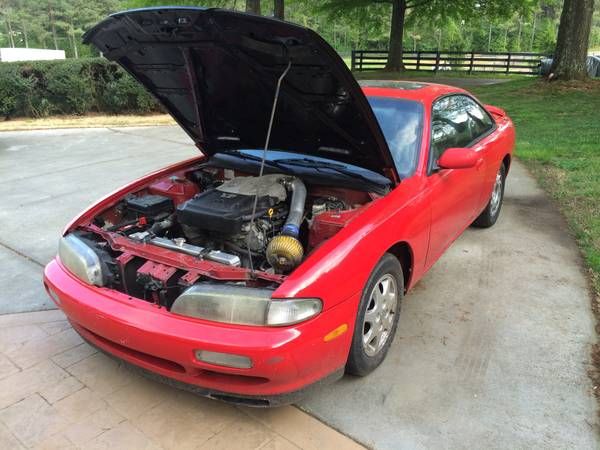
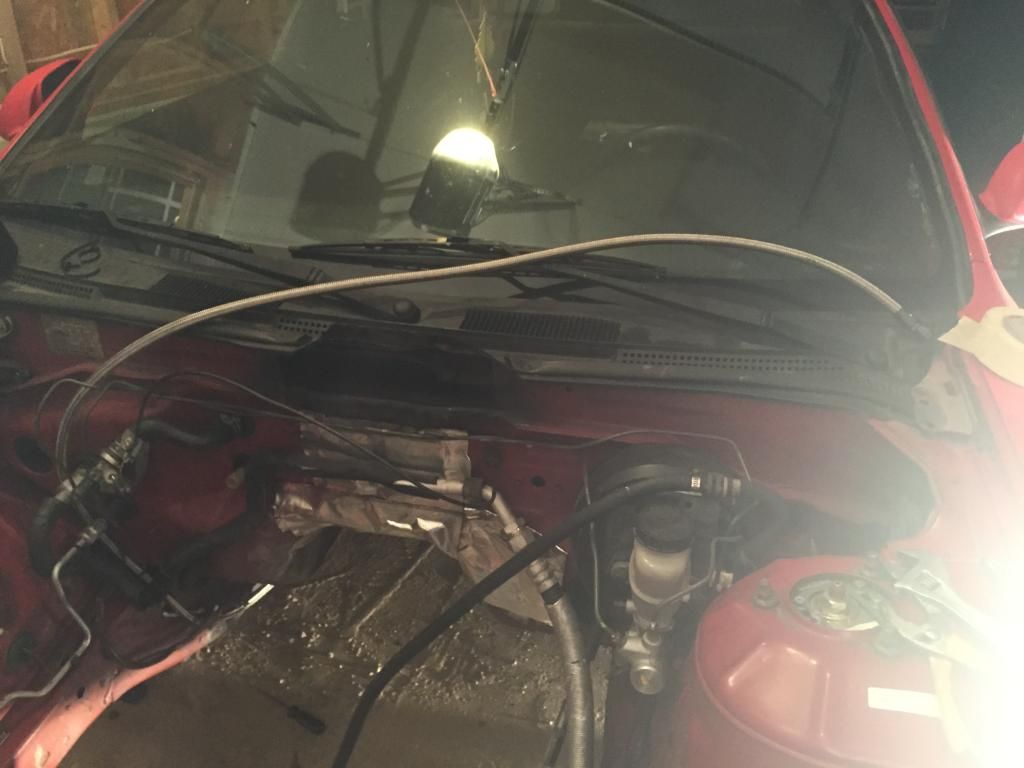
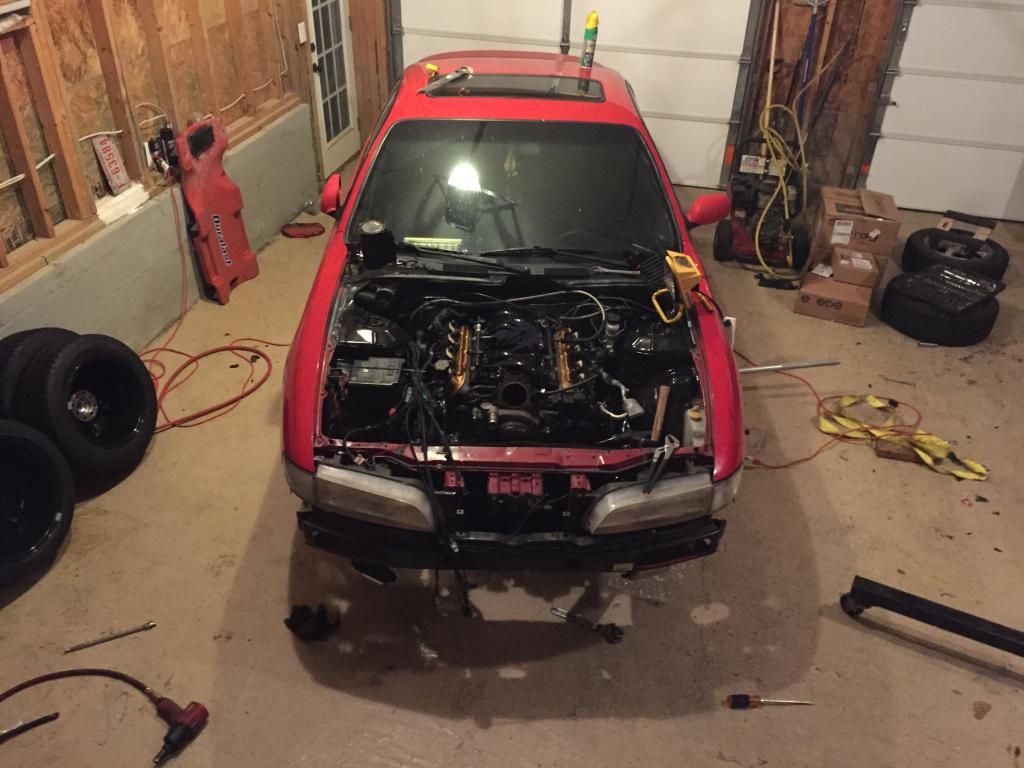
This is how the car looks like before swap
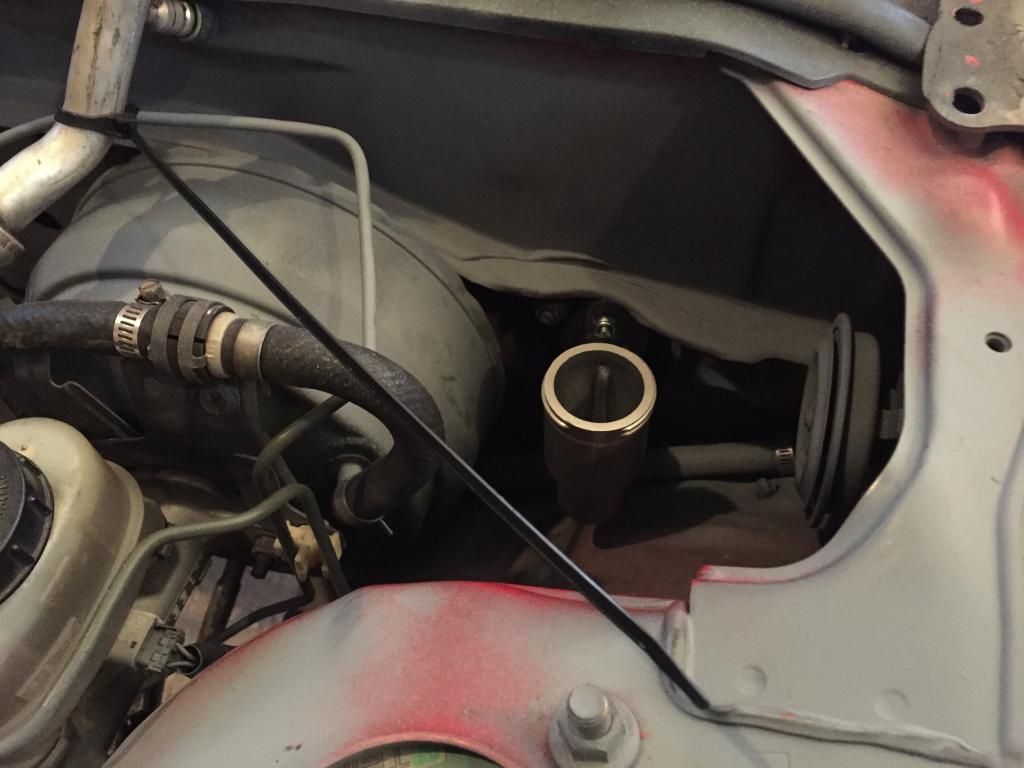
Removed the engine and Pressure wash the bay. Than I proceed to prime and paint it with rattle can.
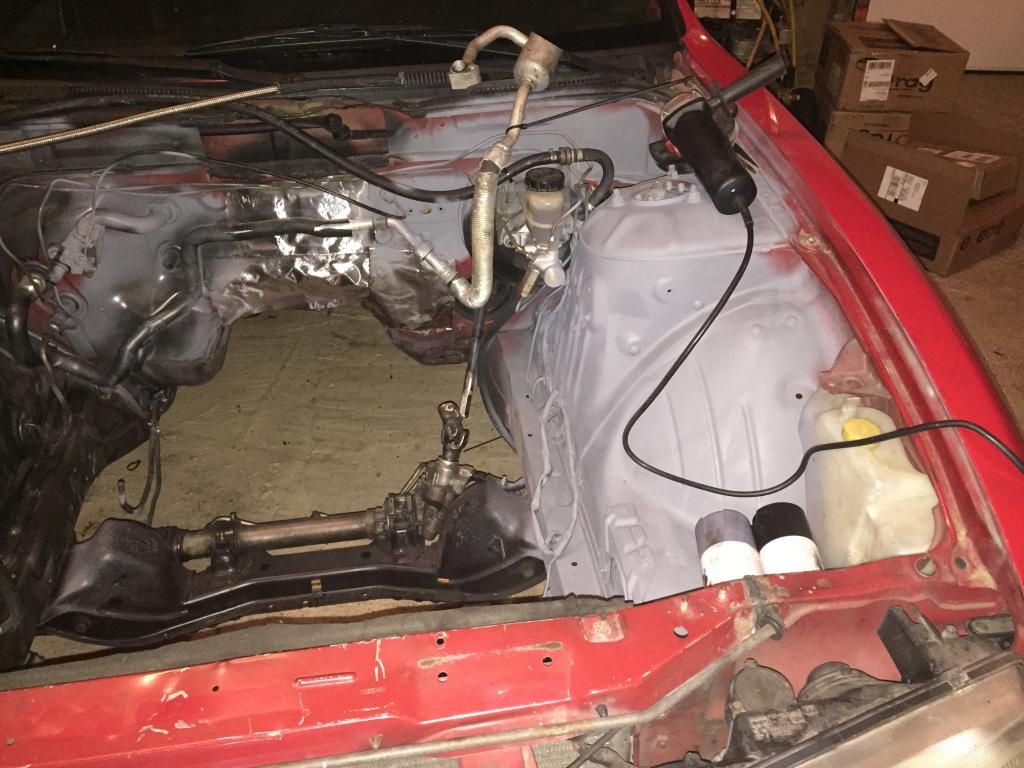
Installed my fuel plumbing.
Mount the wilwood MC
I removed the carpet and install sound deadening materials.

While at work, i replaced the pushrod and placed it on the wilwood master cylinder. Its ready to be mounted in the car when i get home. Chasis prep is almost done.
Refer here for instructions
http://tech.240sxone.com/186/lsx-clutch-hydraulics/
Painted my T56 Trans
Friend came by and dropped the engine in. We also installed the clutch and mated the t56 to the engine.
Instead of using fueled header, I choose the Hooker header 1/78 and it fits.

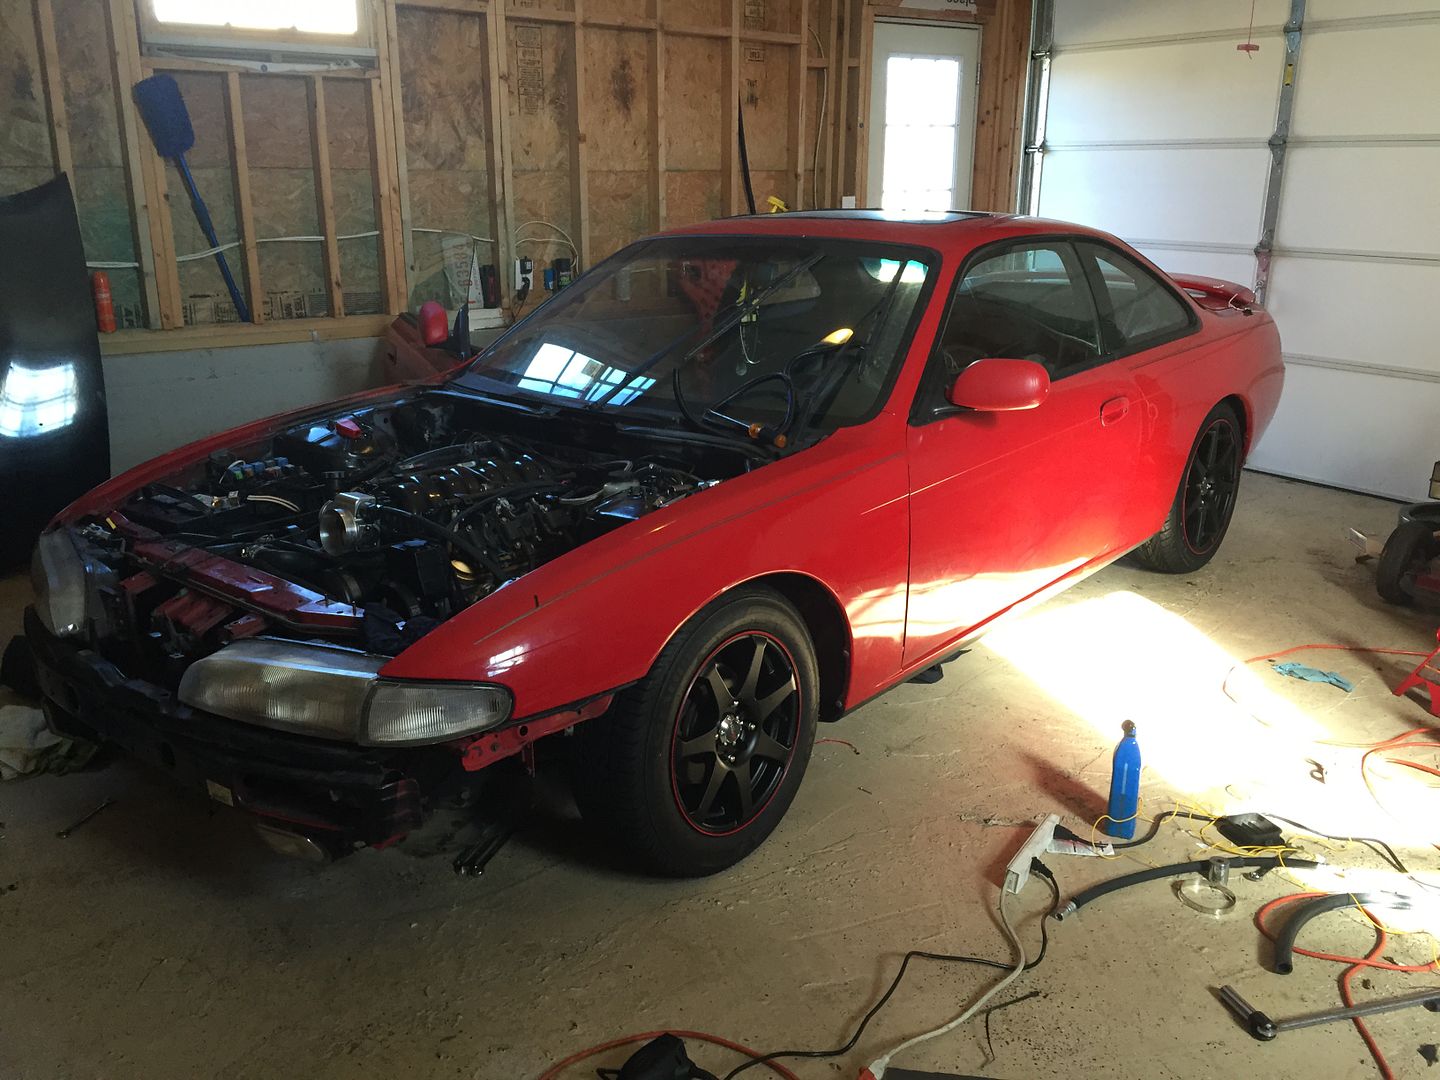
Engine finally mounted
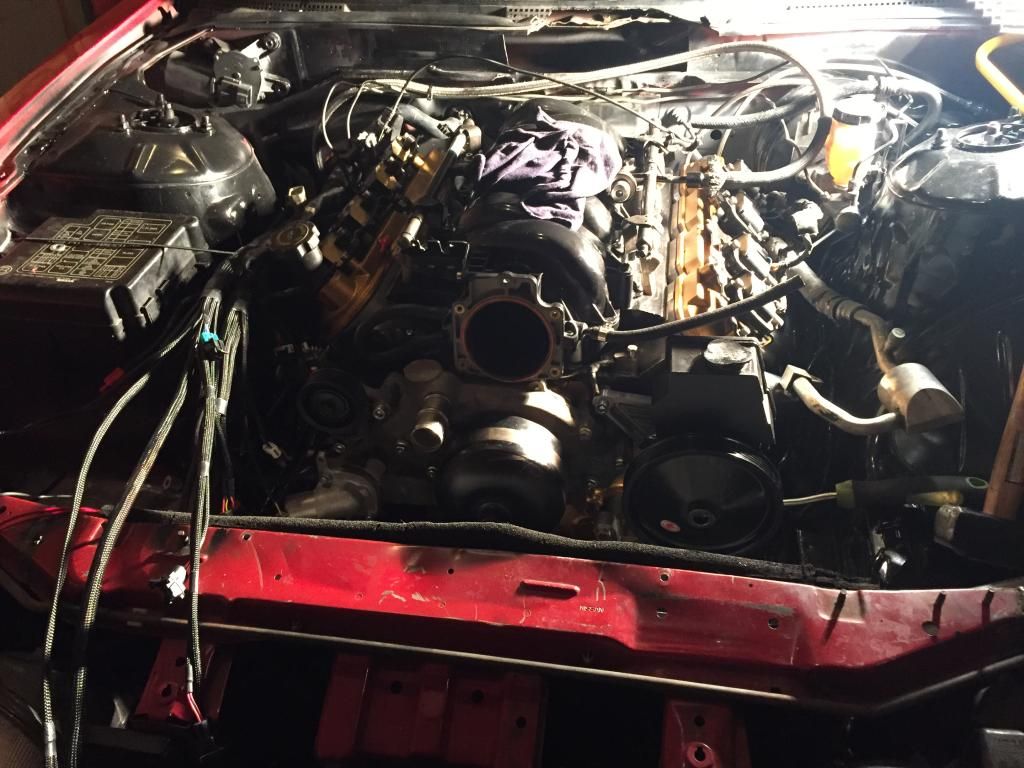
I wished it comes this way from the factory
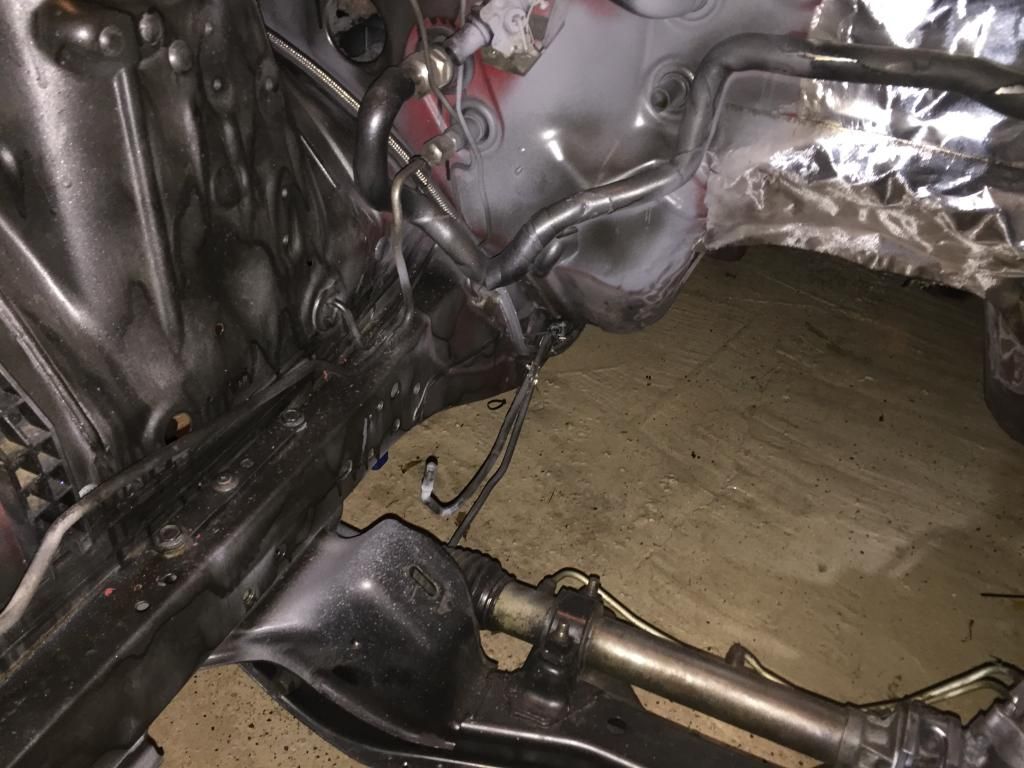
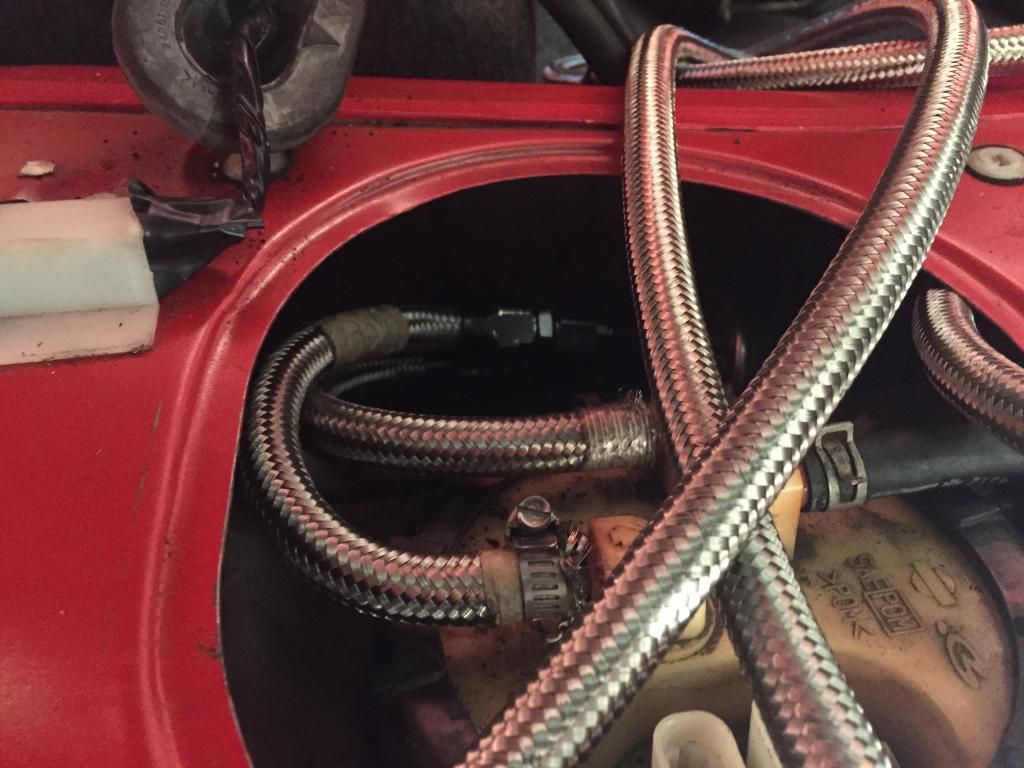
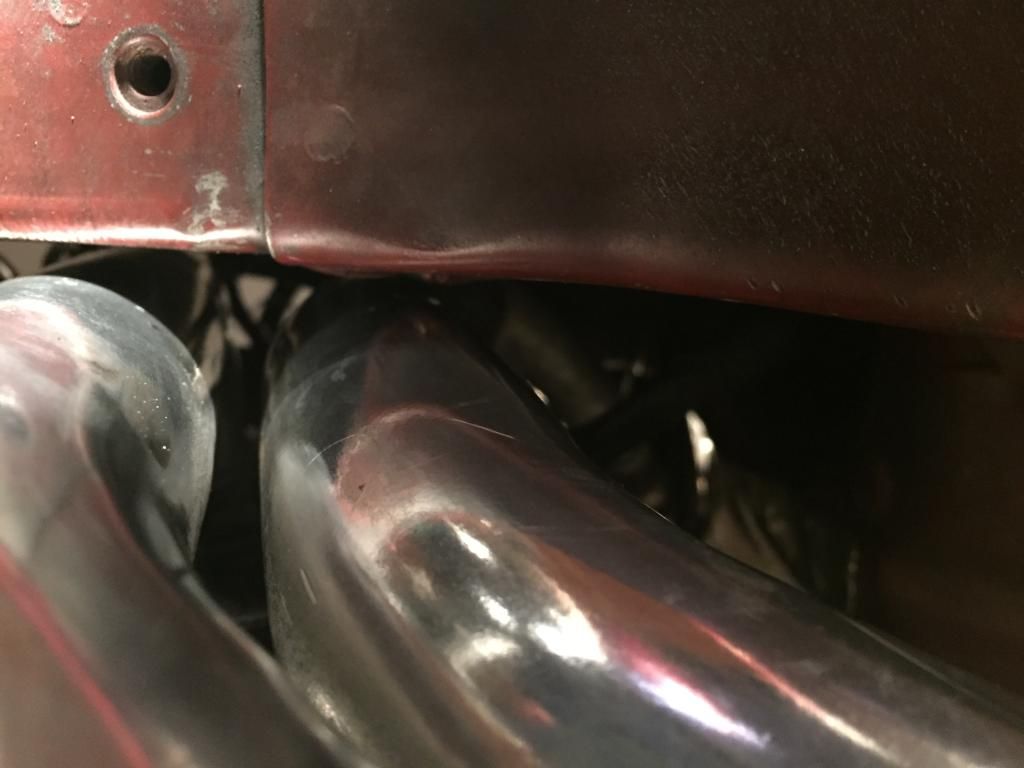
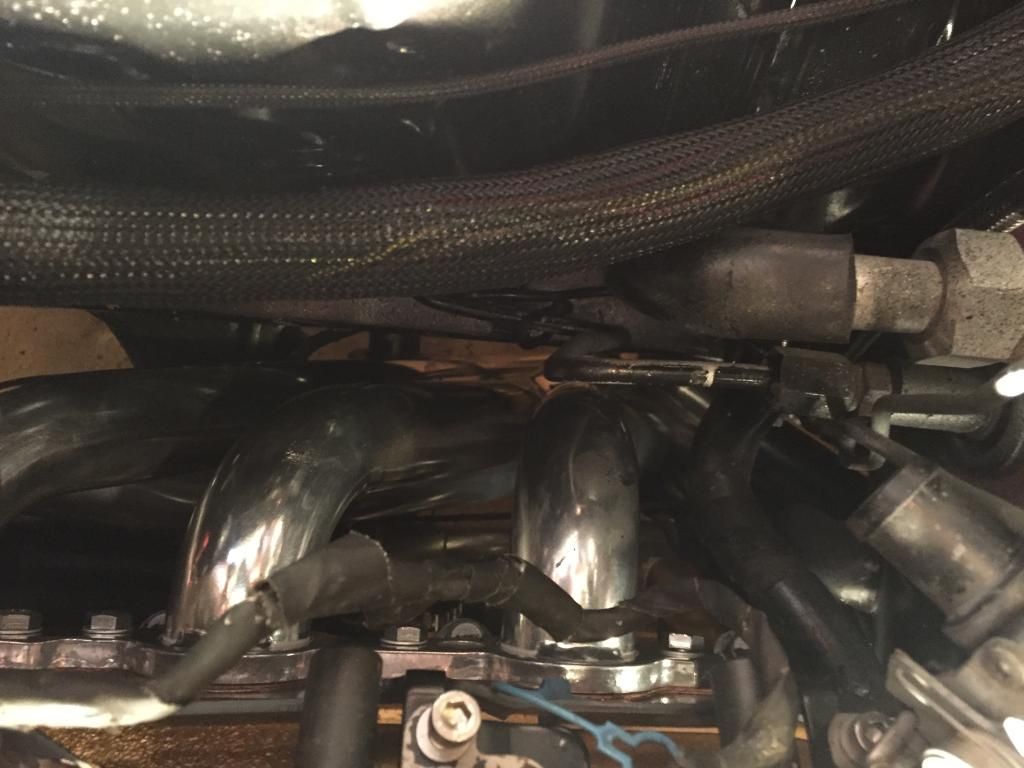
Route the oil relocations lines
Sleeve it with 1.5" since it touches the header.

Sleeve the heater hoses

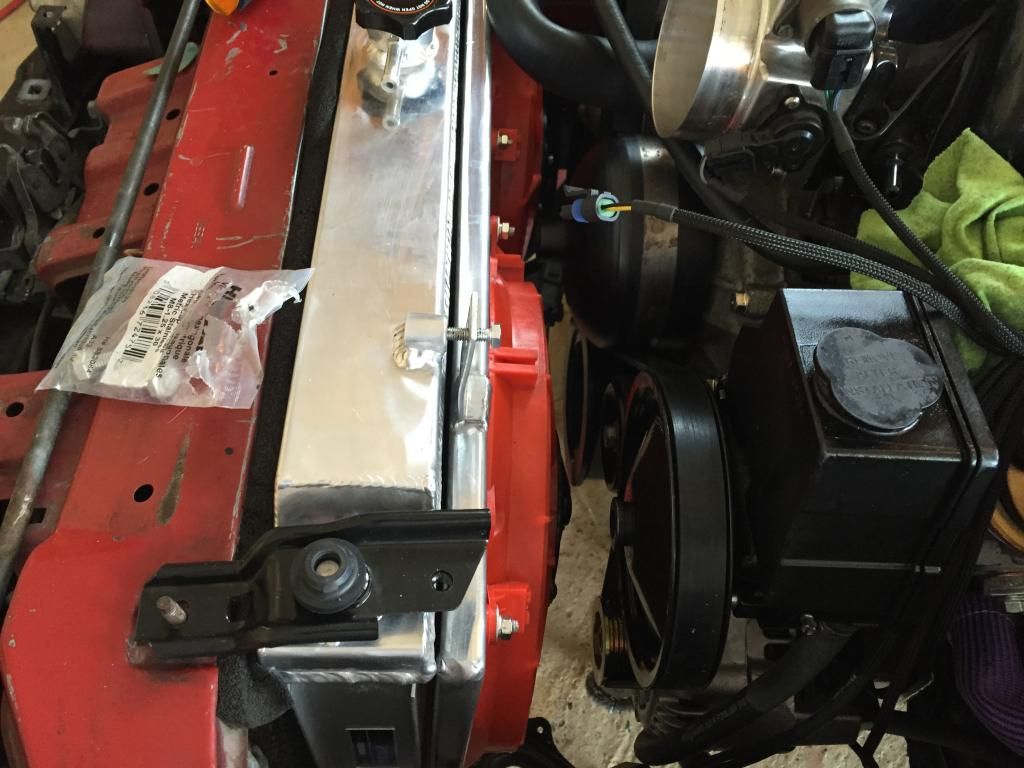
Radiator and fan shroud installed
First you need to remove your old engine. There many ways to do this. But if youre unsure, refer to the video here
Tools needed:
Wrench and sockets with breaker bar
Cherry picker. Rent if you dont do this very often. Its huge and it takes up space
Crate or engine stand
A couple of buddies
Degreaser
Since i have a vq, the engine removal is a little different but the concept is the same. The buyer of my engine came with his buddies from florida and did the removal in under <2 hrs.
After the removal, i decided to wash the whole chasis especially the engine bay with power washer@3000 psi.
This is how the car looks like before swap

Removed the engine and Pressure wash the bay. Than I proceed to prime and paint it with rattle can.


Installed my fuel plumbing.


Mount the wilwood MC

I removed the carpet and install sound deadening materials.

While at work, i replaced the pushrod and placed it on the wilwood master cylinder. Its ready to be mounted in the car when i get home. Chasis prep is almost done.


Refer here for instructions
http://tech.240sxone.com/186/lsx-clutch-hydraulics/
Painted my T56 Trans

Friend came by and dropped the engine in. We also installed the clutch and mated the t56 to the engine.
Instead of using fueled header, I choose the Hooker header 1/78 and it fits.


Engine finally mounted

I wished it comes this way from the factory

Route the oil relocations lines

Sleeve it with 1.5" since it touches the header.

Sleeve the heater hoses

Radiator and fan shroud installed
 01-25-2015, 08:41 PM
#4
LS swap wiring
http://site.wiringspecialties.com/In...ialtiesLS1.pdf
I decided to get my harness done by wiring specialities. Theyre the only legit company with good customer service and quick turnaround time. I heard a lot of bad reviews from chasebays taking to long, jordan innov ect ect. Yuri and chris are willing to answer any questions i have regarding wiring issues and did a follow up.
1. Read the instructuons on the ws homepage. Be familiar with it and have the fsm handy. Disconnect the battery. You need to remove the heater blower to insert the cable to the interior side. Be advised that is pain in the ***!
2.When you bought their harness it comes with a few options. Gto or fbody. Abs or non, 5spd or auto, ac or without. I choose ac and abs option for 800 shipped. If you choose the ls1 5 pin maf, make sure you get one from 2001 corvette or newer. Which is technically ls6. All other mafs wont fit the connector.
3. Lay out the wiring harness and divide between driver and passanger side . Make sure you lay it out right if not there will be issues reaching the sensor on the trans and o2.
4. Plugged all in. There is one connector that plug inside the car which power the dash ect ect. The only things that need to be inside are ecu connectors, obd2 plug,sgi wires if you choose that option, dash interface,relays for fan,fuel pump ect ect. Everything else is exterior.
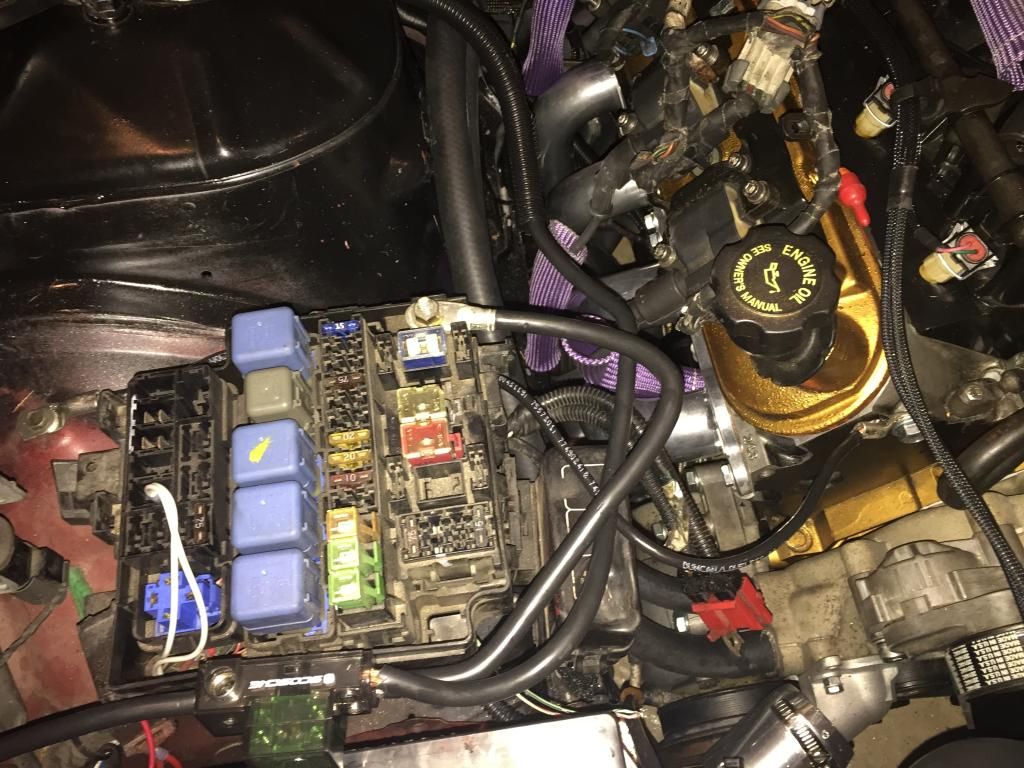
5. You need some kind of distributor block for power. They way the power goes is positive cable/distributor block with 2 outlets to the positive side of battery. One wire goes to the starter and one goes to the fusebox.
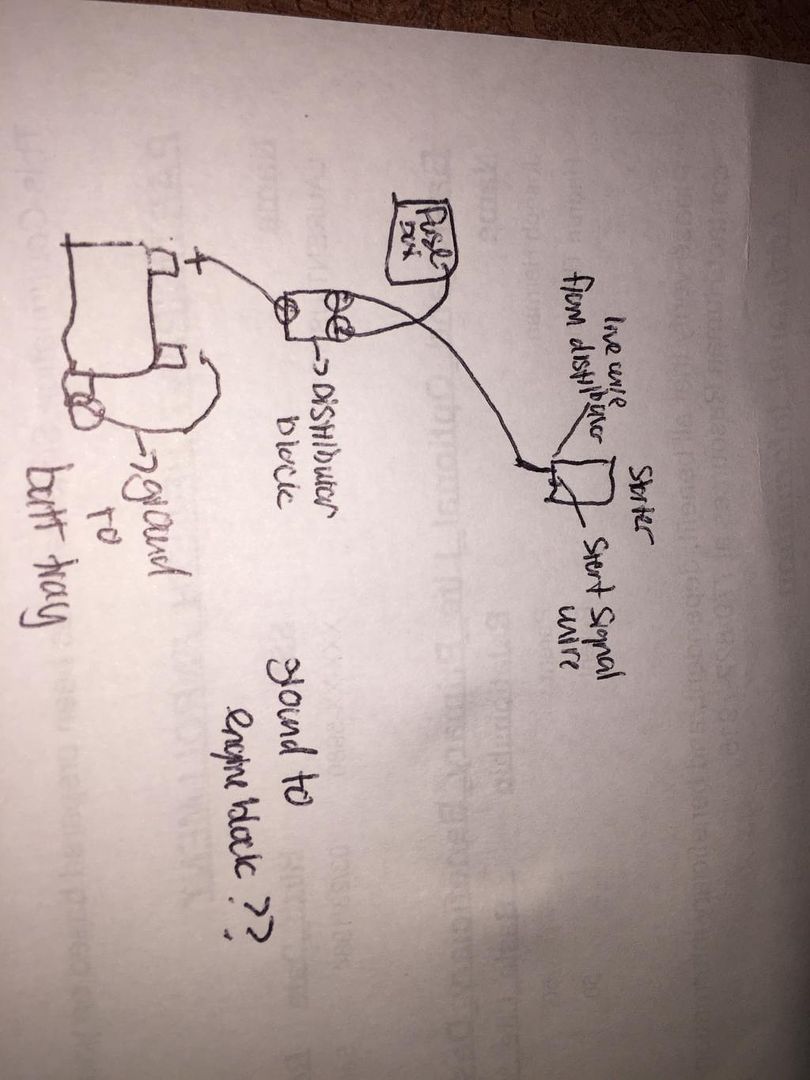
6. Once you get everything plugged in, ground the engine to the chasis. Starter wont turn if you dont or fuse might blow. I ground mine with passenger side head front to ground and drivers side head to chasis. I also ground my negative cable to the engine block.
Drivers side ground
Passenger side ground
7. Before you turn it on, make sure battery is at 12.6 volts. Fuel should prime when key is 'on' or at 'acc' . Some company, you need to wire the fuel pump relay to work. It is located on the drivers side kick panel. Ws takes care of that issue by providing their own relay. Make sure the cluster is connected. The cluster provides charger to thestarter according to chris. So if you want to have aftermarket gauges ect ect , take it to the shop and get the wiring modified.
Sources:
http://silviav8forums.com/forum/viewtopic.php?t=2834
8. If things dont crank. Triple quadriple check your fuses! . Make sure all sensors connected and of course your pcm should have been reflashed.if youre local, i would go to vengeance racing in cumming and look for mike carnahan. He did a lot of ls things its like second nature.$125. If youre running all stock, ill contact poconoejoe and he will flash it for 40 plus shipping.
9. Wire up the fan with plug ins that they gave you.
Additional info:
If youre utilizing stock cluster dont waster money and get the ls sensor for oil pressure and coolant temp. You need to get an adapter and use the nissan sensors.
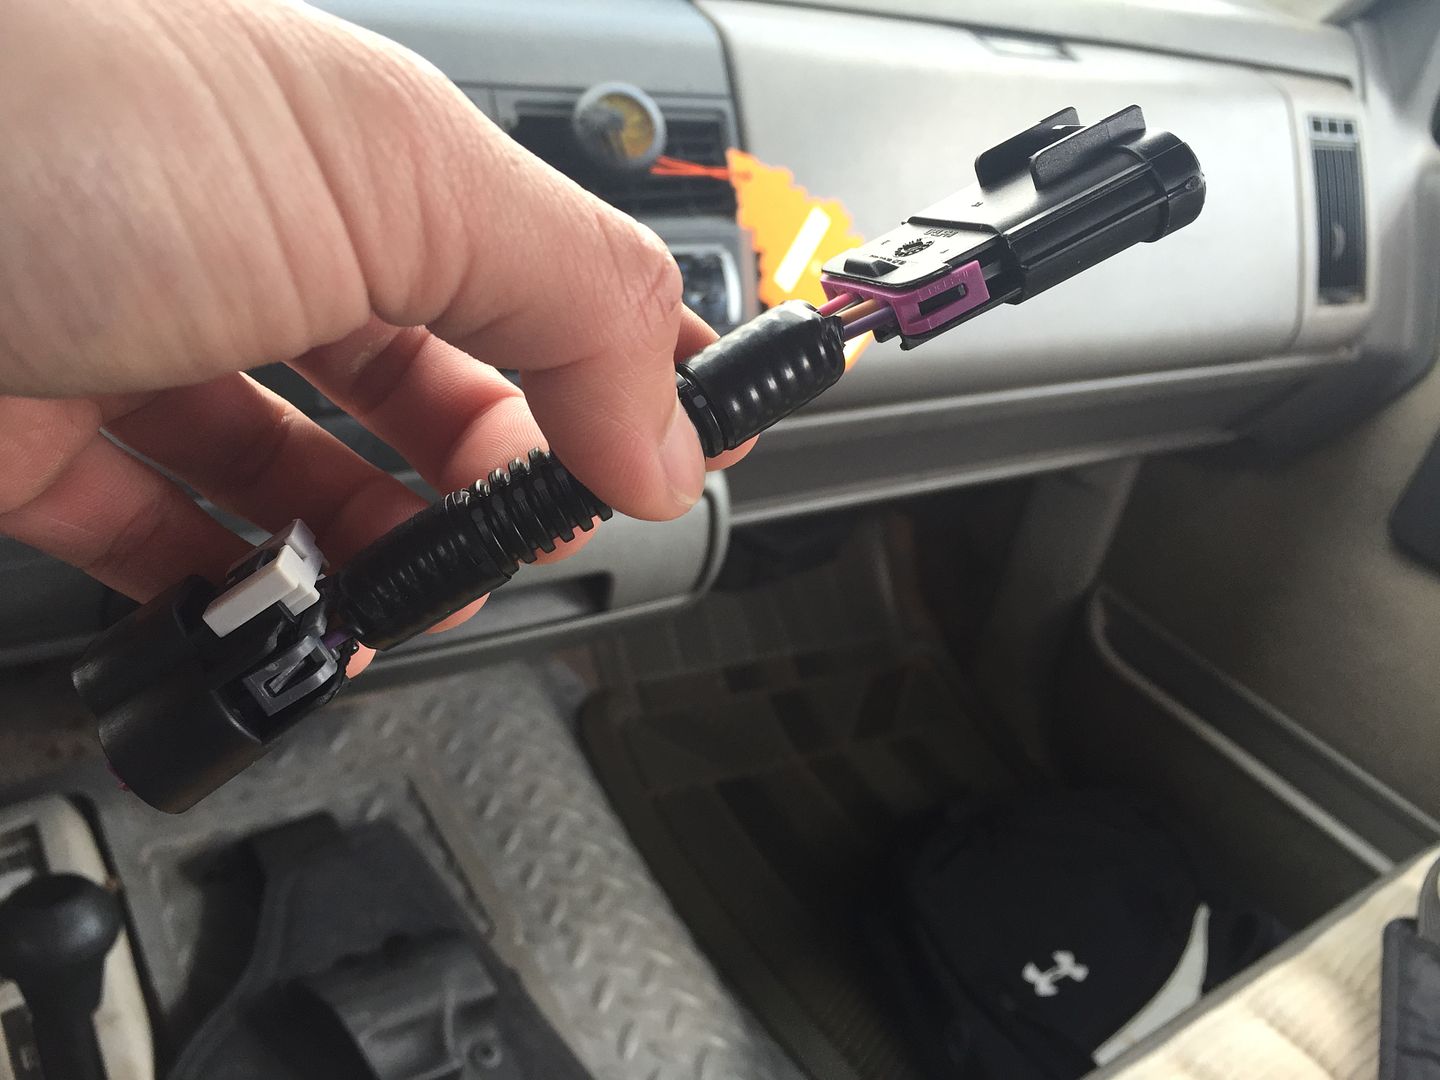
For those of you who are planning to go with wiring specialities please be advised of this issue.
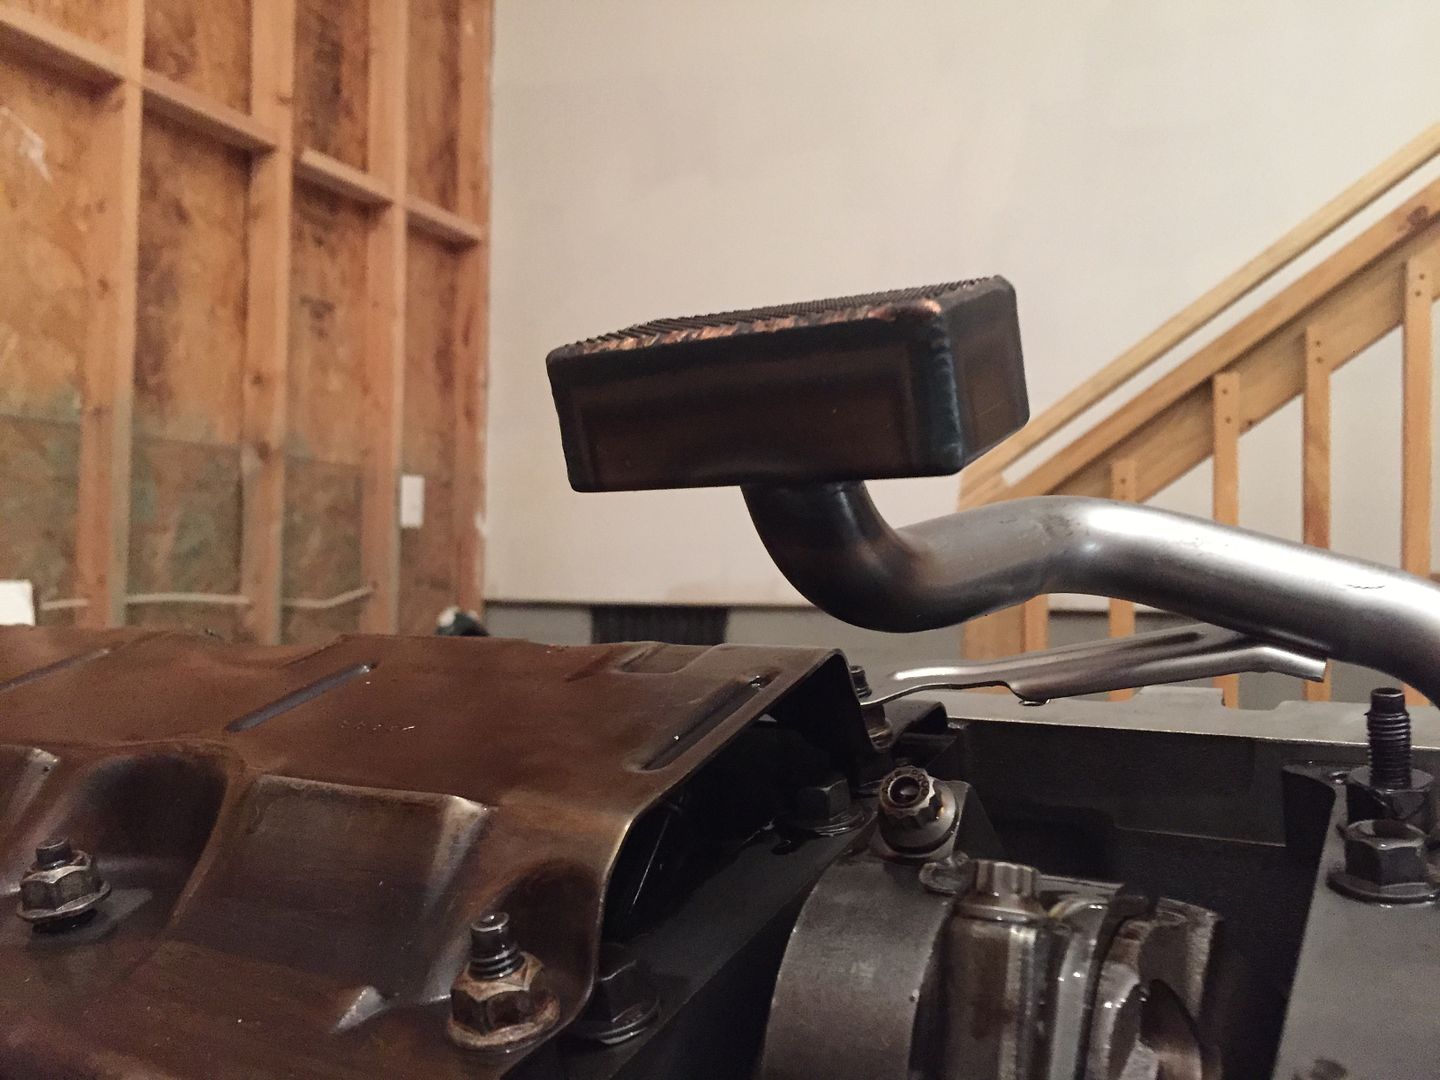
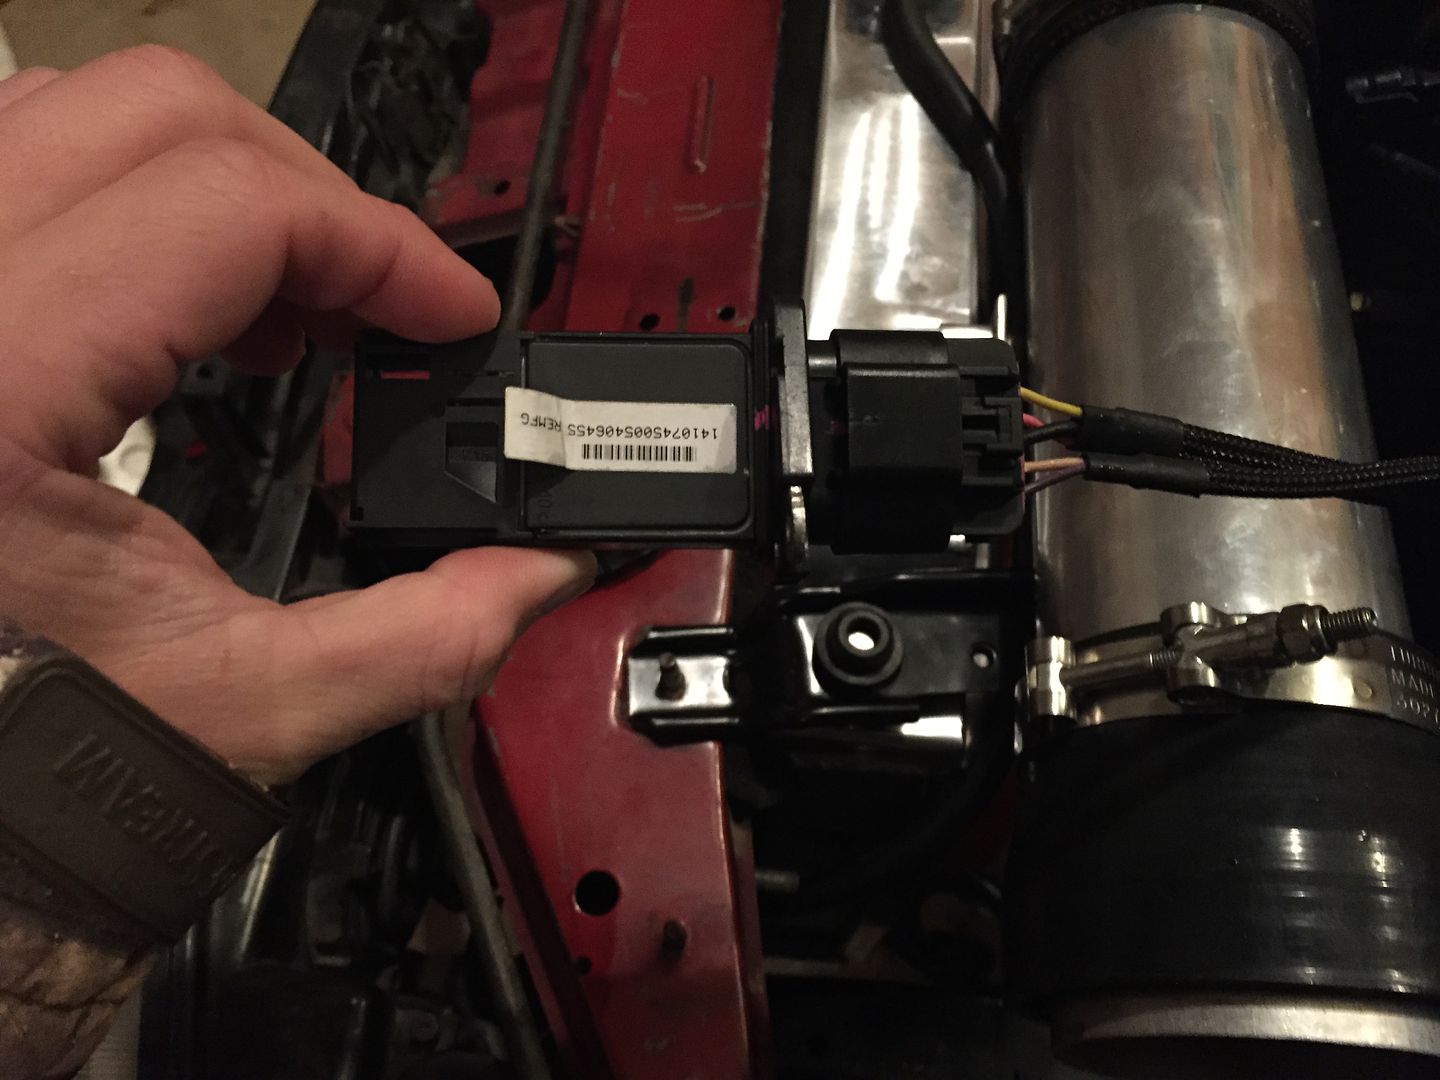
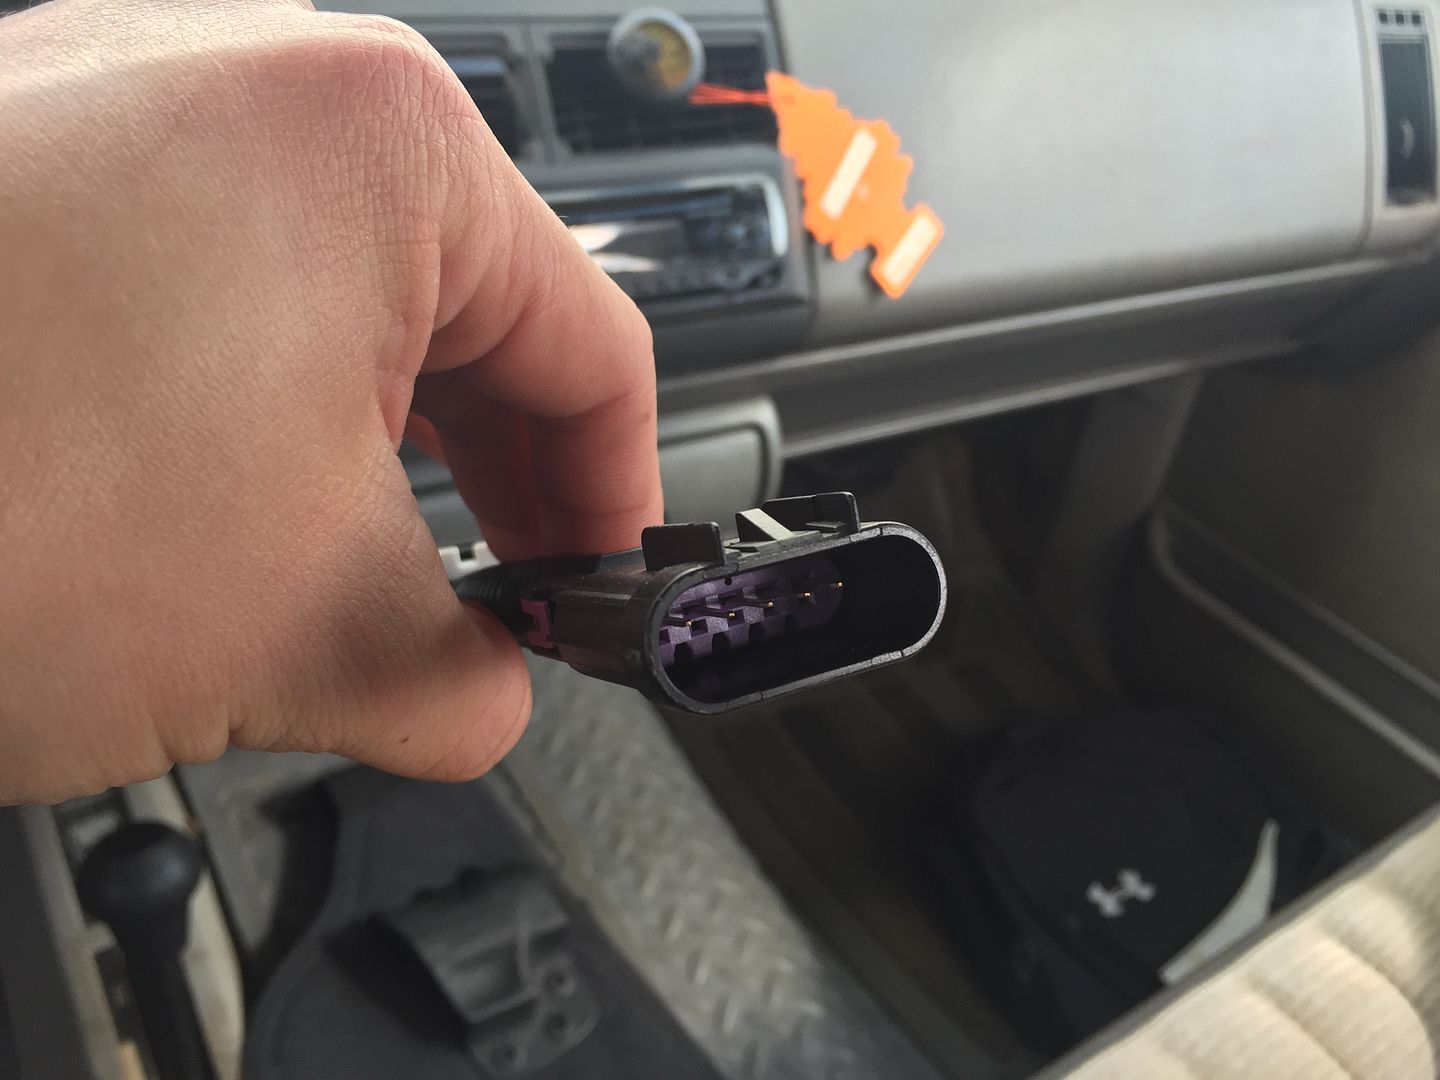
If you choose the ls1 5 pin maf option when you order, the connector/pigtail that they supply doesnt fit the ls 5 pin maf. I learnt this the hard way and ended up buying a total of 4 mafs.
Heres the picture as a proof.
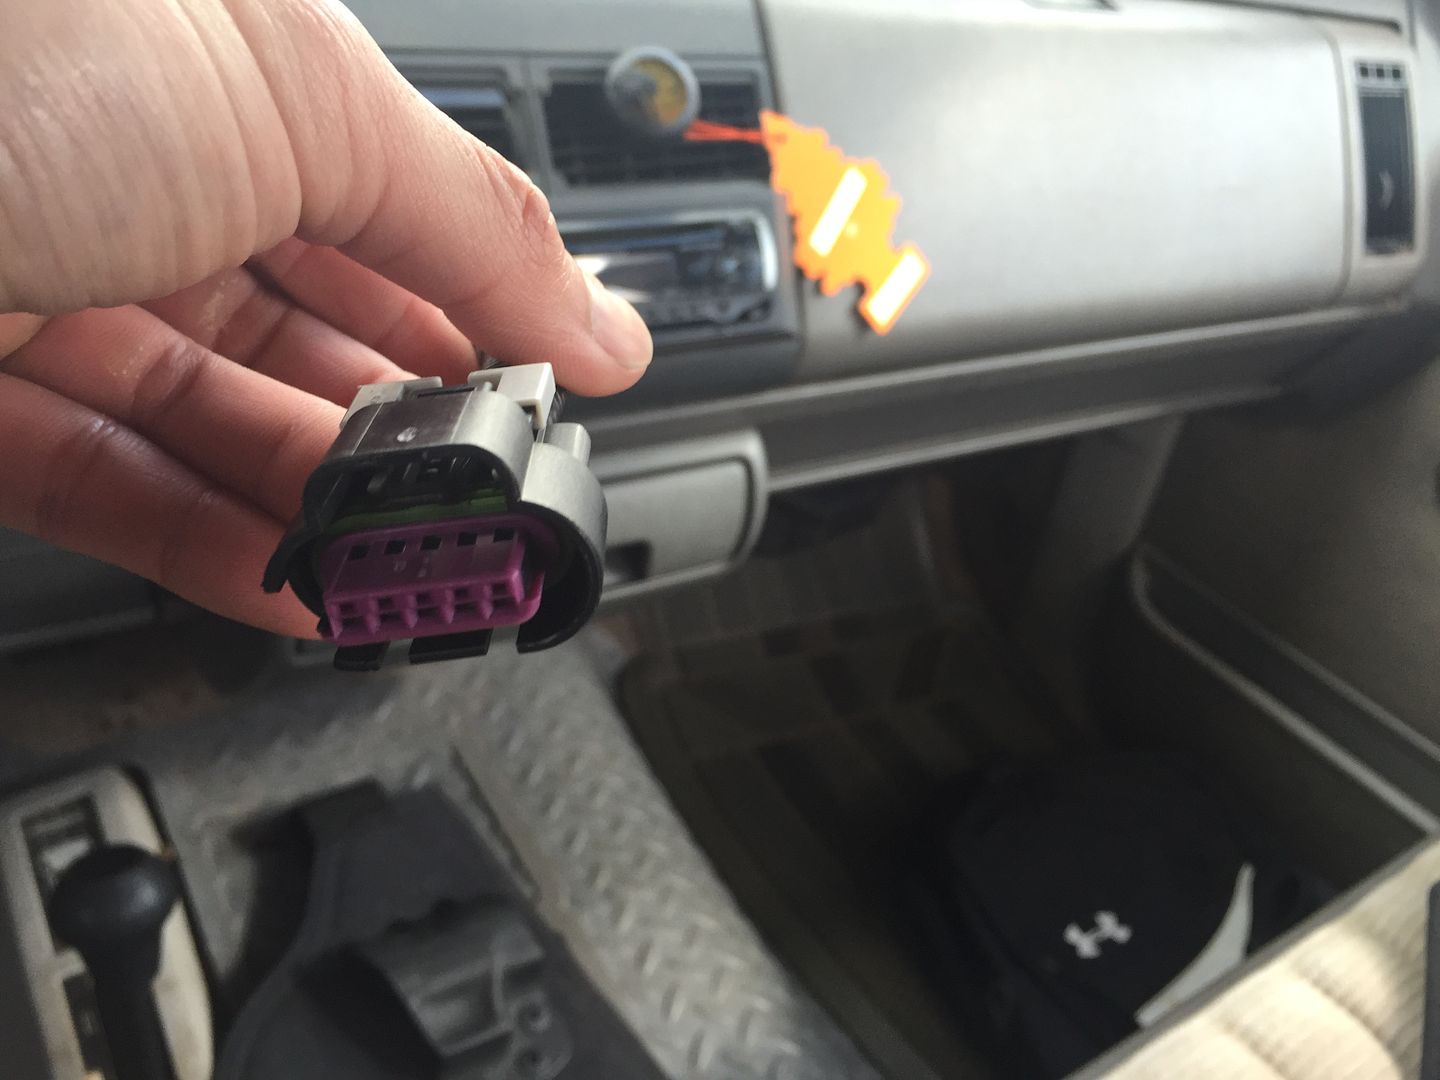
The connector that is supplied
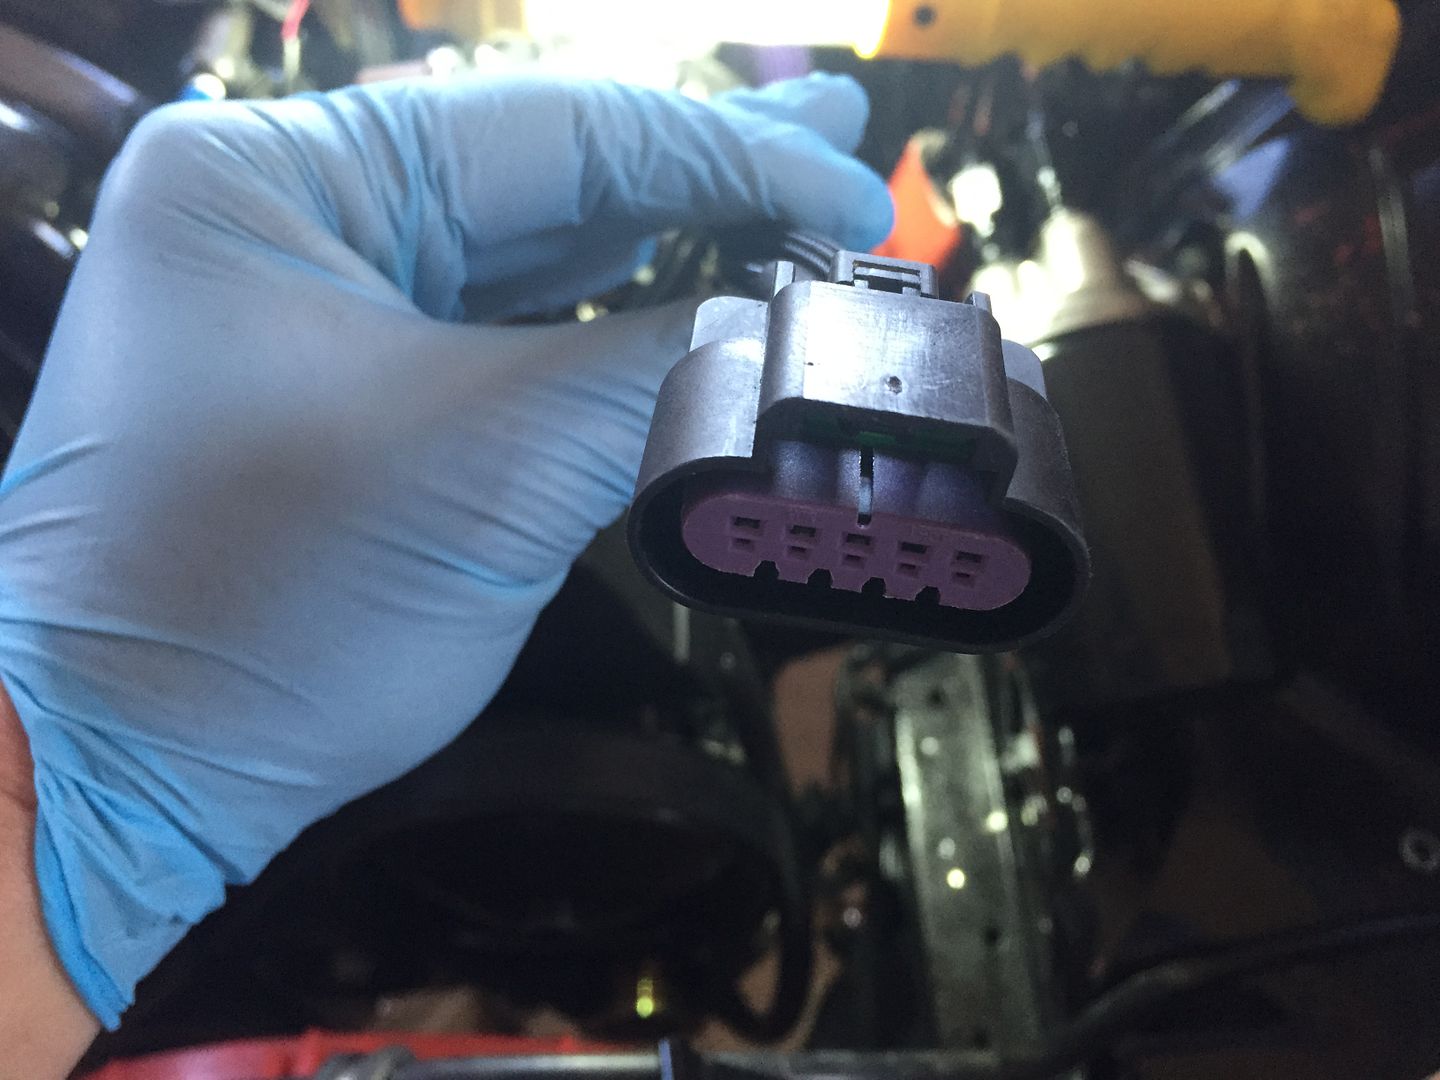
I asked yuri the owner which year maf do i need to get since i aready bought 2. One for ls2 and one from truck maf. Yuri referred me to chris (tech support) and he said to order one for 2001 corvette maf sensor. And so i did. And its still didnt fit.
I called chris and he asked me to sent the pictures and i did per instruction. Chris insisted that i got the truck maf and refused to answer my calls after i sent him the pictures . And i did leave a msg. At this point im pissed off . He decided to email me back and still insist that the only solution is to:
Get the correct maf which i did
Or
Get the vortec 5 pin pigtail = more money.
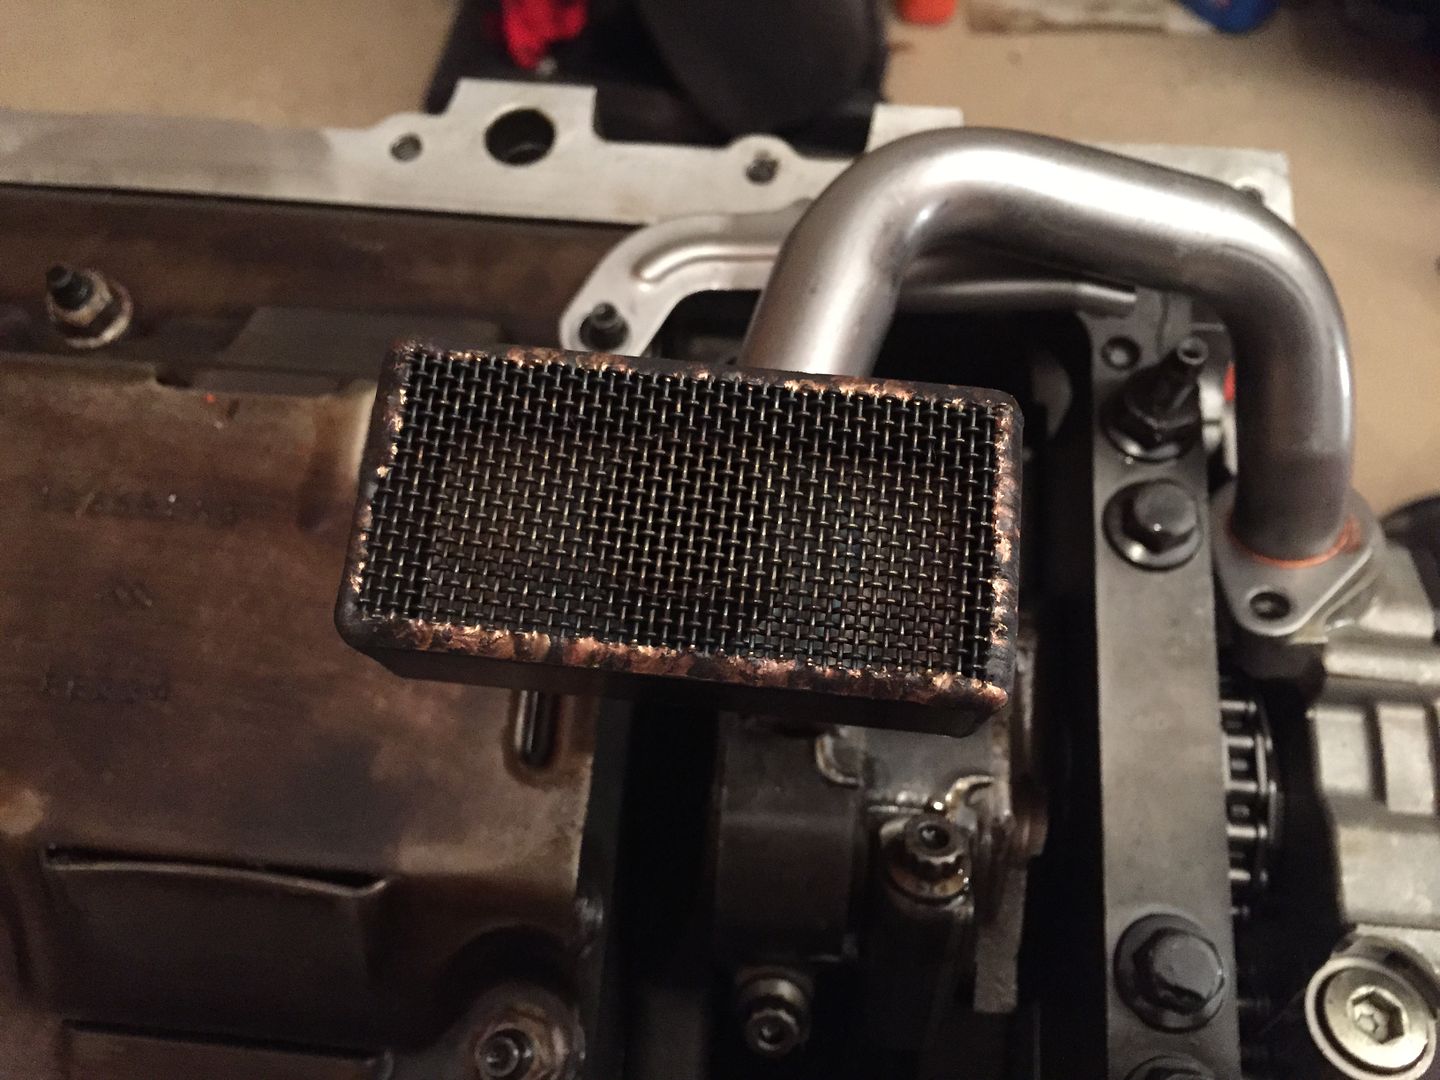
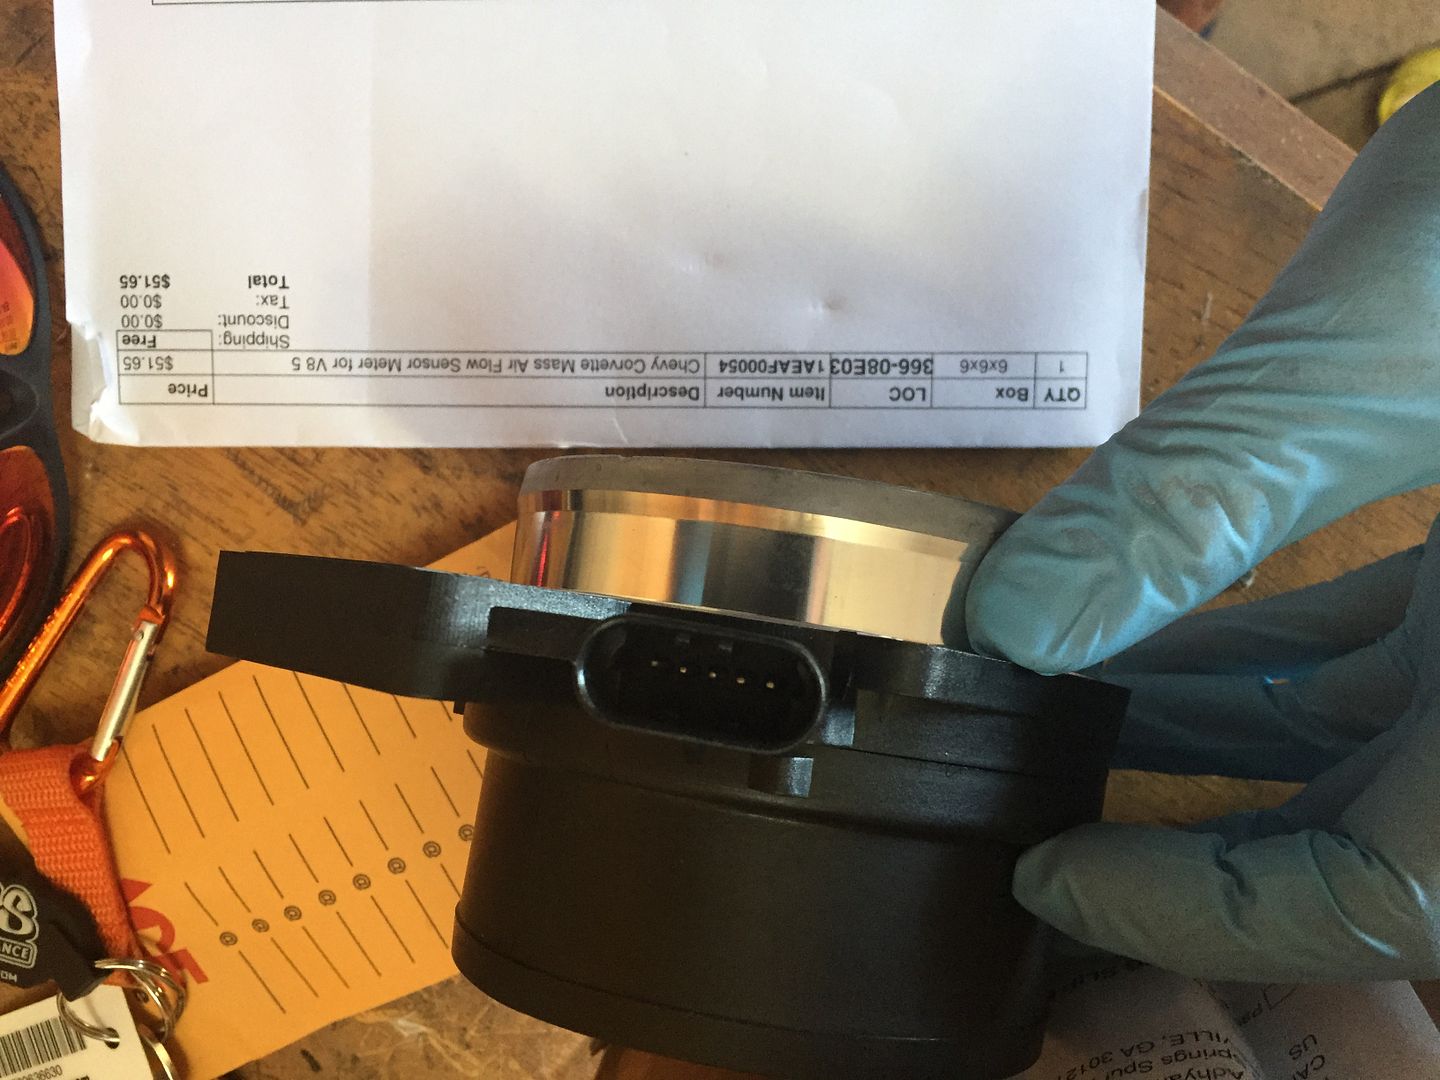
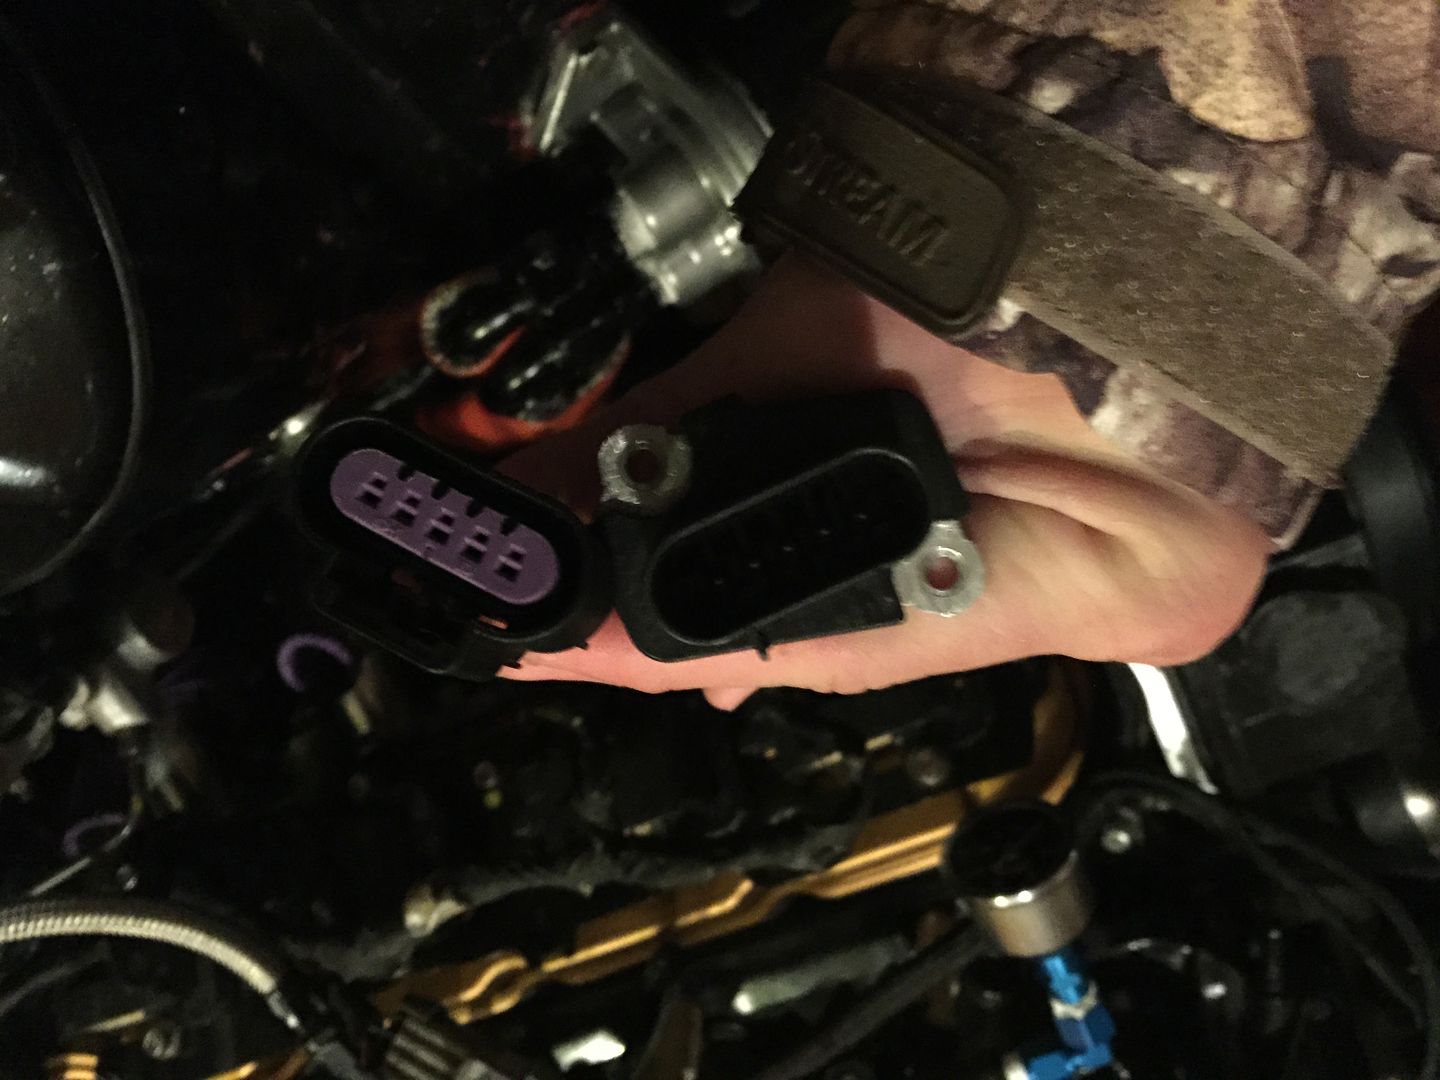
So i wanna make sure the company that i ordered from sent me the right maf. I went to autozone and ask to look at their 2001 corvetter maf and it is identical. The guy happens to know about ls motor and i showed him the picture of the connector in my harness. He said that the connector is for ls3 6.2 l maf and the maf sensor its totally different. Heres another pictures.
Ls3 6.2l maf
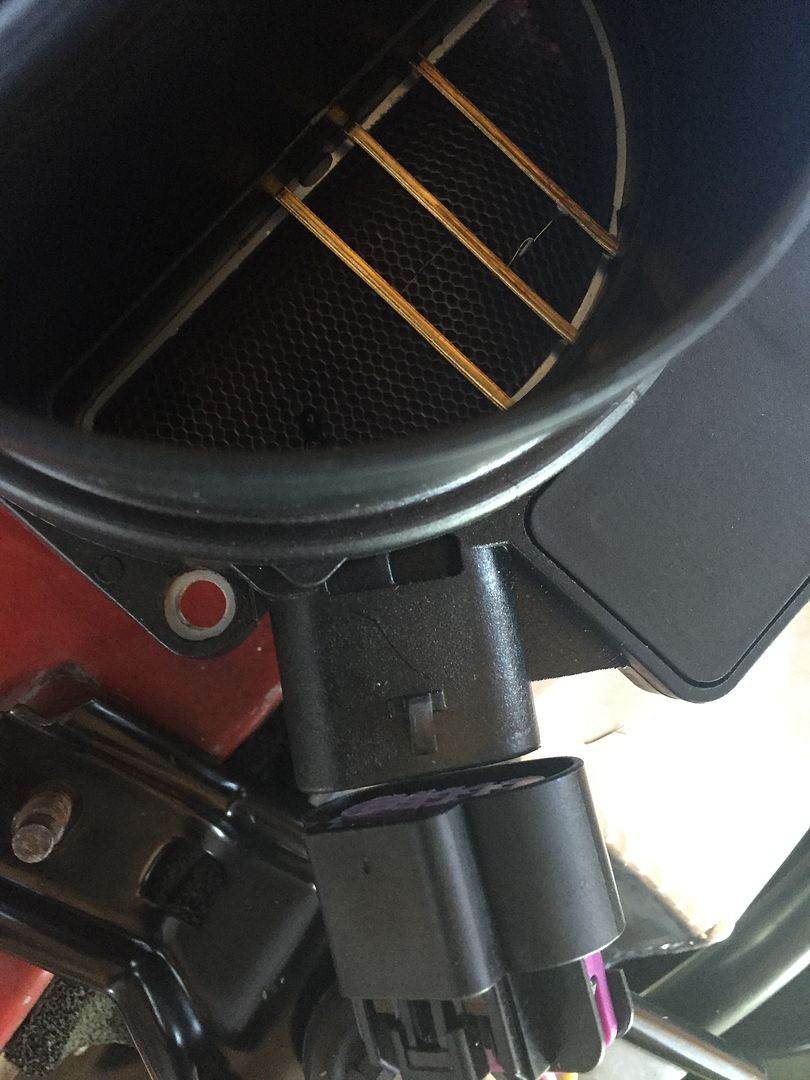
Ls3 and the connector matched.
So i ended up losing 30 bucks for first maf, 50 bucks for 2nd maf , 50 bucks for the corvette maf and 120 bucks for the ls3 maf.
So the cheapest solution is i called tsc performance and they will make and adapter to fit that connector to the ls1 5 pin maf.
All in all, yuri the owner has been great and provides good service especially trying to figure out why my car wont start. As far as his tech chris goes..not so much. Slow to reply email and no follow up. Refused to answer my phone calls back.
Wiring can be intimidating know someone thatcan help you!
Company that deal with harness
1. Wiring specialities 8 weeks if they wont have it in stock.
2. Jerry yang he is in jonesboro
3. Sergio but he lives in fl
4. Chasebays gonna take forever
5. Jordan innov. Need the stock chasis
6. Daft . Need stock chasis and takes forever
Some pictures are taken from ws website.
http://site.wiringspecialties.com/In...ialtiesLS1.pdf
I decided to get my harness done by wiring specialities. Theyre the only legit company with good customer service and quick turnaround time. I heard a lot of bad reviews from chasebays taking to long, jordan innov ect ect. Yuri and chris are willing to answer any questions i have regarding wiring issues and did a follow up.
1. Read the instructuons on the ws homepage. Be familiar with it and have the fsm handy. Disconnect the battery. You need to remove the heater blower to insert the cable to the interior side. Be advised that is pain in the ***!
2.When you bought their harness it comes with a few options. Gto or fbody. Abs or non, 5spd or auto, ac or without. I choose ac and abs option for 800 shipped. If you choose the ls1 5 pin maf, make sure you get one from 2001 corvette or newer. Which is technically ls6. All other mafs wont fit the connector.
3. Lay out the wiring harness and divide between driver and passanger side . Make sure you lay it out right if not there will be issues reaching the sensor on the trans and o2.
4. Plugged all in. There is one connector that plug inside the car which power the dash ect ect. The only things that need to be inside are ecu connectors, obd2 plug,sgi wires if you choose that option, dash interface,relays for fan,fuel pump ect ect. Everything else is exterior.
5. You need some kind of distributor block for power. They way the power goes is positive cable/distributor block with 2 outlets to the positive side of battery. One wire goes to the starter and one goes to the fusebox.

6. Once you get everything plugged in, ground the engine to the chasis. Starter wont turn if you dont or fuse might blow. I ground mine with passenger side head front to ground and drivers side head to chasis. I also ground my negative cable to the engine block.
Drivers side ground

Passenger side ground

7. Before you turn it on, make sure battery is at 12.6 volts. Fuel should prime when key is 'on' or at 'acc' . Some company, you need to wire the fuel pump relay to work. It is located on the drivers side kick panel. Ws takes care of that issue by providing their own relay. Make sure the cluster is connected. The cluster provides charger to thestarter according to chris. So if you want to have aftermarket gauges ect ect , take it to the shop and get the wiring modified.
Sources:
http://silviav8forums.com/forum/viewtopic.php?t=2834
8. If things dont crank. Triple quadriple check your fuses! . Make sure all sensors connected and of course your pcm should have been reflashed.if youre local, i would go to vengeance racing in cumming and look for mike carnahan. He did a lot of ls things its like second nature.$125. If youre running all stock, ill contact poconoejoe and he will flash it for 40 plus shipping.
9. Wire up the fan with plug ins that they gave you.
Additional info:
If youre utilizing stock cluster dont waster money and get the ls sensor for oil pressure and coolant temp. You need to get an adapter and use the nissan sensors.
For those of you who are planning to go with wiring specialities please be advised of this issue.
If you choose the ls1 5 pin maf option when you order, the connector/pigtail that they supply doesnt fit the ls 5 pin maf. I learnt this the hard way and ended up buying a total of 4 mafs.
Heres the picture as a proof.
The connector that is supplied

I asked yuri the owner which year maf do i need to get since i aready bought 2. One for ls2 and one from truck maf. Yuri referred me to chris (tech support) and he said to order one for 2001 corvette maf sensor. And so i did. And its still didnt fit.

I called chris and he asked me to sent the pictures and i did per instruction. Chris insisted that i got the truck maf and refused to answer my calls after i sent him the pictures . And i did leave a msg. At this point im pissed off . He decided to email me back and still insist that the only solution is to:
Get the correct maf which i did
Or
Get the vortec 5 pin pigtail = more money.
So i wanna make sure the company that i ordered from sent me the right maf. I went to autozone and ask to look at their 2001 corvetter maf and it is identical. The guy happens to know about ls motor and i showed him the picture of the connector in my harness. He said that the connector is for ls3 6.2 l maf and the maf sensor its totally different. Heres another pictures.
Ls3 6.2l maf

Ls3 and the connector matched.


So i ended up losing 30 bucks for first maf, 50 bucks for 2nd maf , 50 bucks for the corvette maf and 120 bucks for the ls3 maf.
So the cheapest solution is i called tsc performance and they will make and adapter to fit that connector to the ls1 5 pin maf.


All in all, yuri the owner has been great and provides good service especially trying to figure out why my car wont start. As far as his tech chris goes..not so much. Slow to reply email and no follow up. Refused to answer my phone calls back.
Wiring can be intimidating know someone thatcan help you!
Company that deal with harness
1. Wiring specialities 8 weeks if they wont have it in stock.
2. Jerry yang he is in jonesboro
3. Sergio but he lives in fl
4. Chasebays gonna take forever
5. Jordan innov. Need the stock chasis
6. Daft . Need stock chasis and takes forever
Some pictures are taken from ws website.
Last edited by laurentj23; 01-27-2015 at 02:08 PM.
01-25-2015, 08:46 PM
#5
Final Touches and issues I am having.
Installed all my interior and my new racing seat.
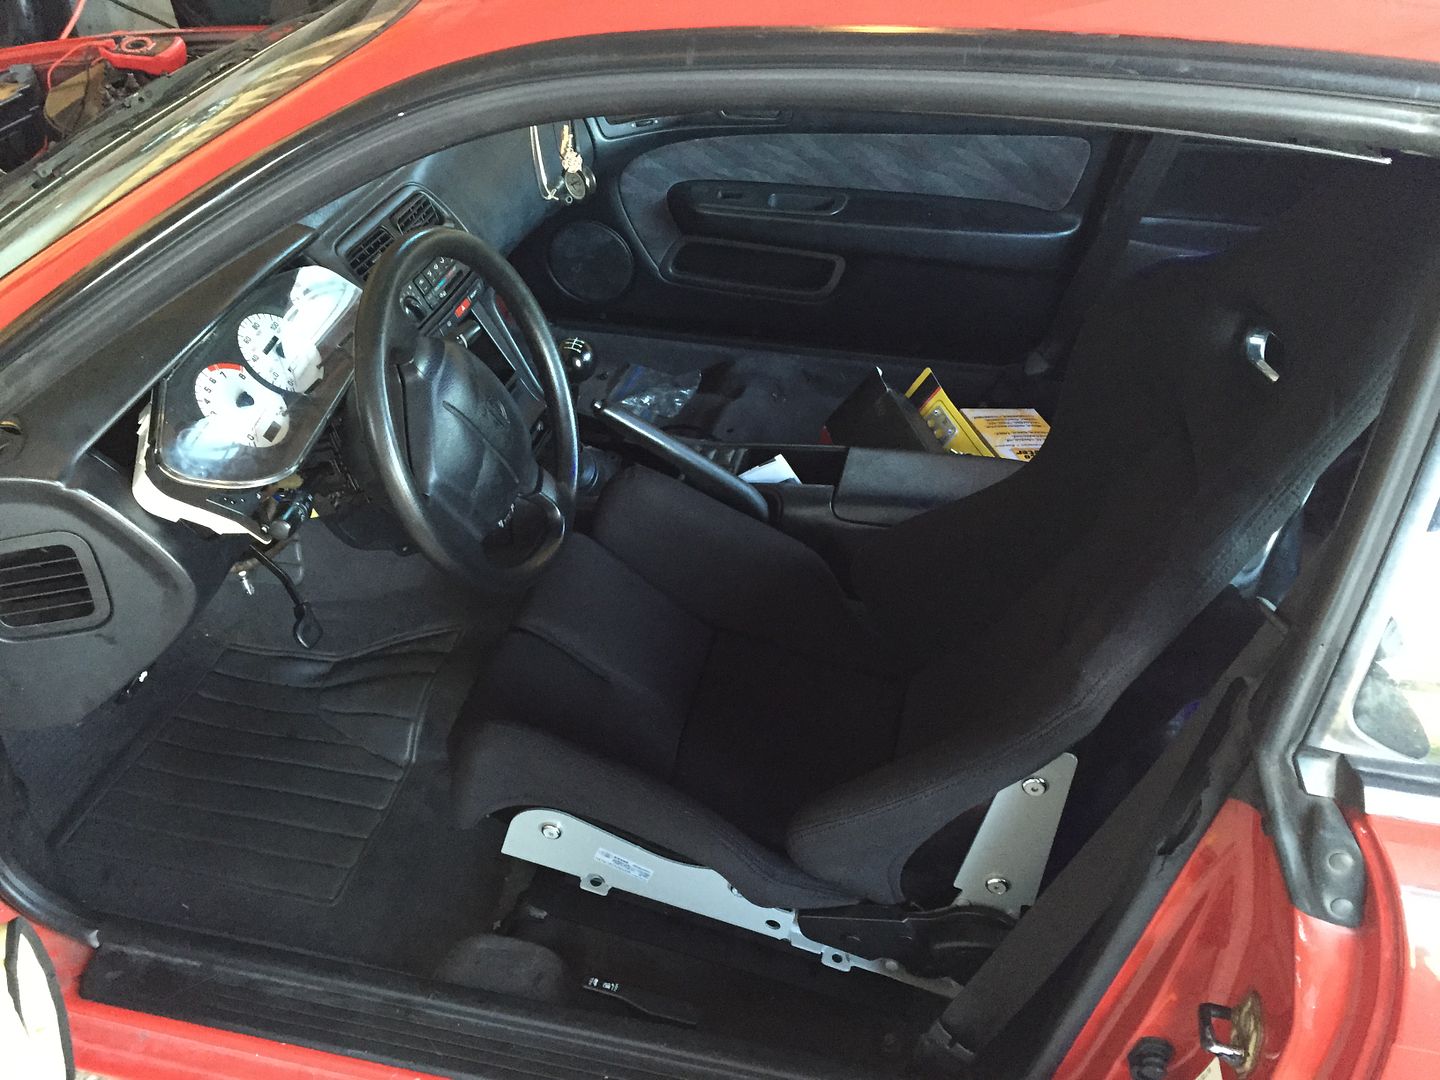
Wheels are mounted. Im gonna have to raise the suspension up.
Videos of the issues Im having
DTC Codes showed as Map sensor/Coolant temp sensor. I replaced the Map sensor and the issue is still there. No start.
Fuel Psi at 60
Sparks present
Plugs are wet.
Installed all my interior and my new racing seat.

Wheels are mounted. Im gonna have to raise the suspension up.

Videos of the issues Im having
DTC Codes showed as Map sensor/Coolant temp sensor. I replaced the Map sensor and the issue is still there. No start.
Fuel Psi at 60
Sparks present
Plugs are wet.
 01-26-2015, 05:28 PM
#7


Looks good, sounds like it is flooded, pull the plug let it sit for a little bit, burn the plugs with a lighter. If it don't crank after that pull the plug and poor about a lid full of engine oil in each cylinder to bump the compressin up and make sure they not washed
Last edited by ls13ater; 01-26-2015 at 07:17 PM.
Trending Topics
01-26-2015, 07:16 PM
#8
Teching In

Join Date: Jan 2015
Posts: 29
Likes: 0
Received 0 Likes
on
0 Posts
Nice swap you have there. I am also doing an ls1 swap into an s14 and have a few questions for you.
1st one - I am also using the fueled racing mounts and you mentoined you had to cut the t56 to get it to fit. Do you have any pictures of what you had to cut?
2nd - I have a wiring harness from wiring specilties and am using the pcm with a stock engine/trans would I still need to get it flashed?
1st one - I am also using the fueled racing mounts and you mentoined you had to cut the t56 to get it to fit. Do you have any pictures of what you had to cut?
2nd - I have a wiring harness from wiring specilties and am using the pcm with a stock engine/trans would I still need to get it flashed?
01-26-2015, 08:55 PM
#9
Yes you will have to get the Ecu flashed, to remove the vats
Nice swap you have there. I am also doing an ls1 swap into an s14 and have a few questions for you.
1st one - I am also using the fueled racing mounts and you mentoined you had to cut the t56 to get it to fit. Do you have any pictures of what you had to cut?
2nd - I have a wiring harness from wiring specilties and am using the pcm with a stock engine/trans would I still need to get it flashed?
1st one - I am also using the fueled racing mounts and you mentoined you had to cut the t56 to get it to fit. Do you have any pictures of what you had to cut?
2nd - I have a wiring harness from wiring specilties and am using the pcm with a stock engine/trans would I still need to get it flashed?
01-27-2015, 12:11 AM
#10
This the tuning specs:
This is the tuning specs.
Engine and Chassis info:
-----------------------
Engine: LS1 5.7L V8 from a 1999 trans am with 243 heads
Transmission: t56 from 2000 camaro 6 speed
Rear End Ratio: 3.96
Tire Height: not sure but the size for the rear is 215 45 17
Modifications:
-------------
Headers: 1 3/8 primary long tube header
Exhaust: dual 3" with x pipe cat delete to 3.5 inches muffle
Intake: Open air 3.5" with K&N Cone Filter.
Fast 92 mm Intake with nw 92 tb
Stock fuel rails with 72 lbs injectors
Aftermarket cam 226/234 .605/.612 LsA110
Feature Changes:
---------------
-Disable VATS
-Disable CAGS/Skip Shift
-Disable EVAP
-Disable Rear O2 Sensors
-Disable Speed Limiter
-Disable Oil Level Sensor
-Disable Fuel level Sensors
-Disable Fuel Tank Pressure Sensor
-PCM should never turn off car
-Manual A/C Type (only needed for certain cars)
Last edited by laurentj23; 01-27-2015 at 07:24 AM.
01-27-2015, 12:15 AM
#11
Nice swap you have there. I am also doing an ls1 swap into an s14 and have a few questions for you.
1st one - I am also using the fueled racing mounts and you mentoined you had to cut the t56 to get it to fit. Do you have any pictures of what you had to cut?
2nd - I have a wiring harness from wiring specilties and am using the pcm with a stock engine/trans would I still need to get it flashed?
1st one - I am also using the fueled racing mounts and you mentoined you had to cut the t56 to get it to fit. Do you have any pictures of what you had to cut?
2nd - I have a wiring harness from wiring specilties and am using the pcm with a stock engine/trans would I still need to get it flashed?
Like ls1later said, it needs to be flashed. Ill take mine to mike at vengeance racing since he's local and he charged 125 bucks. If you're not running any aftermarket cams, ext ext , ill go to poconoe joe. He charged around 40 bucks plus shipping.
 01-27-2015, 08:29 AM
#13
FUELED RACING LSSX MOUNT KIT INSTRUCTIONS
All hardware is shipped loose and must be tightened during the installation process.
Clutch Master Cylinder Kit: (optional part)
(transmission must be removed from engine)
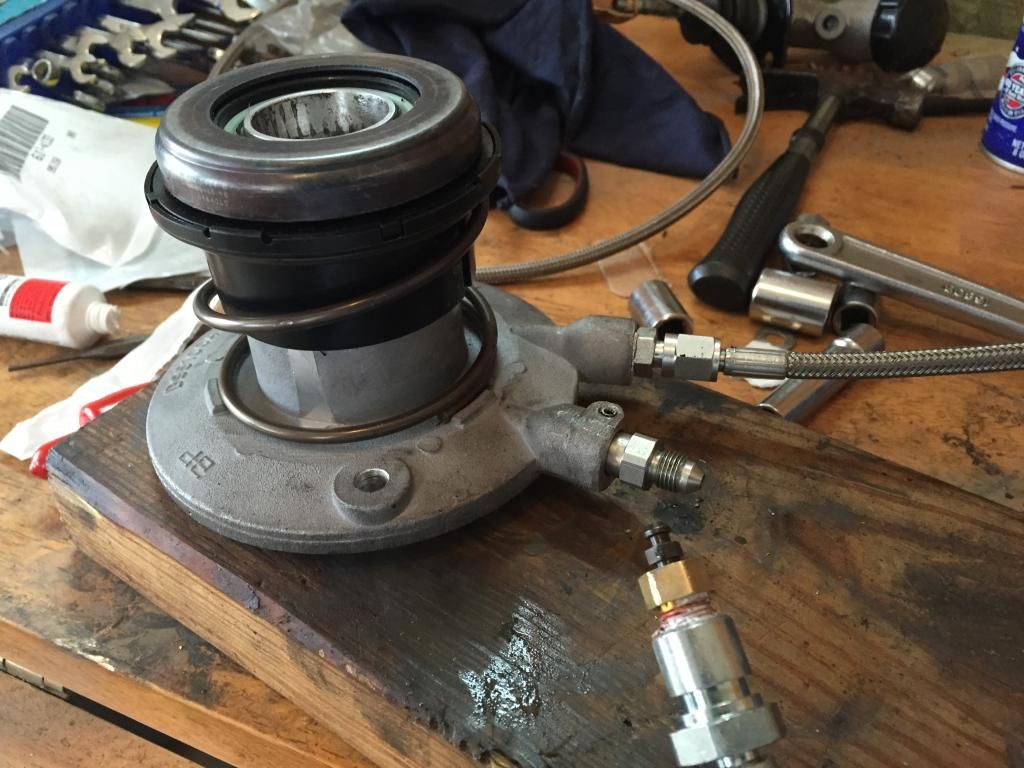
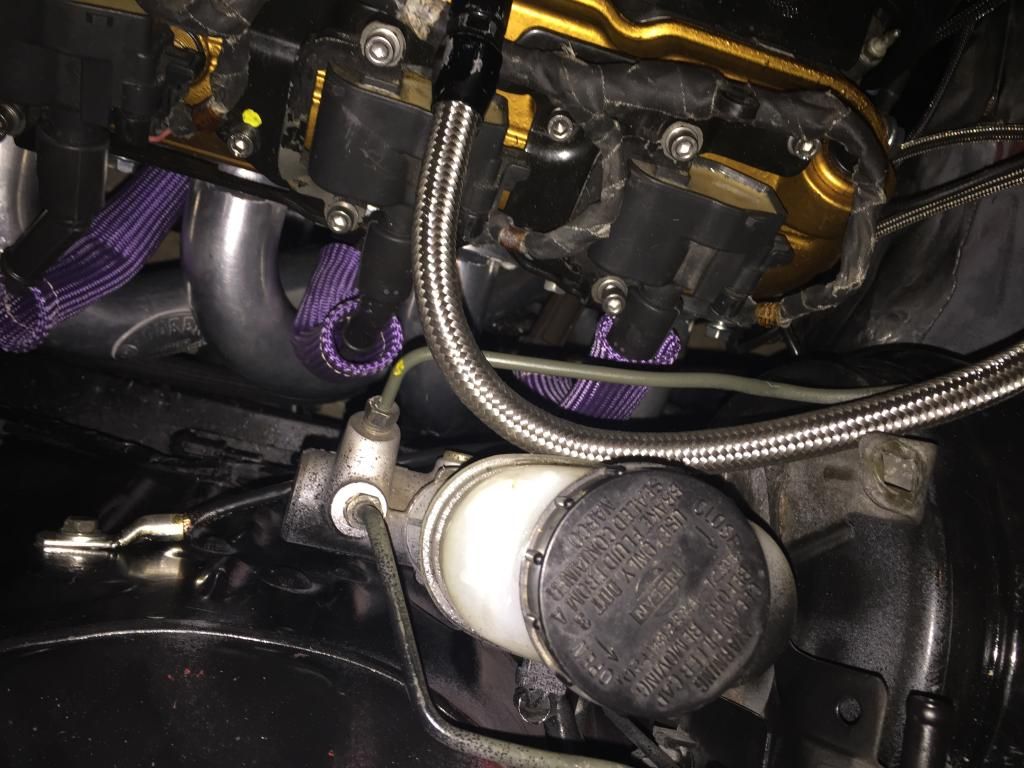
Start by removing the factory clutch slave cylinder pressure fitting from the slave cylinder by removing the small roll pin with a drift or punch of slightly smaller diameter. Install the pressure line fitting in its place and reinstall roll pin with small hammer until flush. Next remove the factory clutch bleeder fitting from the slave cylinder and replace with the remote bleeder supplied in the clutch kit using the aluminum crush washer. Route the bleeder line through the bleeder hole and route the clutch pressure line out the pressure line hole. Both lines should be routed away from the left header. We recommend that the line be ran directly up to the back of the intake manifold and then across to the clutch master cylinder. Install the clutch master cylinder using the supplied bracket being sure to tighten all hardware. Please note the bleeder fitting has a coat of thread sealant and it must be fully seated to seal so removal of some of the thread sealer may be necessary. I find it easiest to just remove the bleeder and bleeder adaptor from the bleeder line and place the adaptor in a vice to seat the bleeder fully.
Oil Pan:
The moroso oil pan is installed using the supplied Moroso stud kit, oil pan gasket and oil pick up tube (see instructions from Moroso website if needed). Always use a new gasket if oil pan is removed for any reason. (reusing the old gasket may result in poor sealing and engine failure). The oil pickup tube should be installed using thread locker and torqued to factory specification for you particular engine. (A common problem with LS engine failure relates to improper installation of the oil pickup tube). Be sure the oil pickup tube is seated flat with oil pump before tightening.
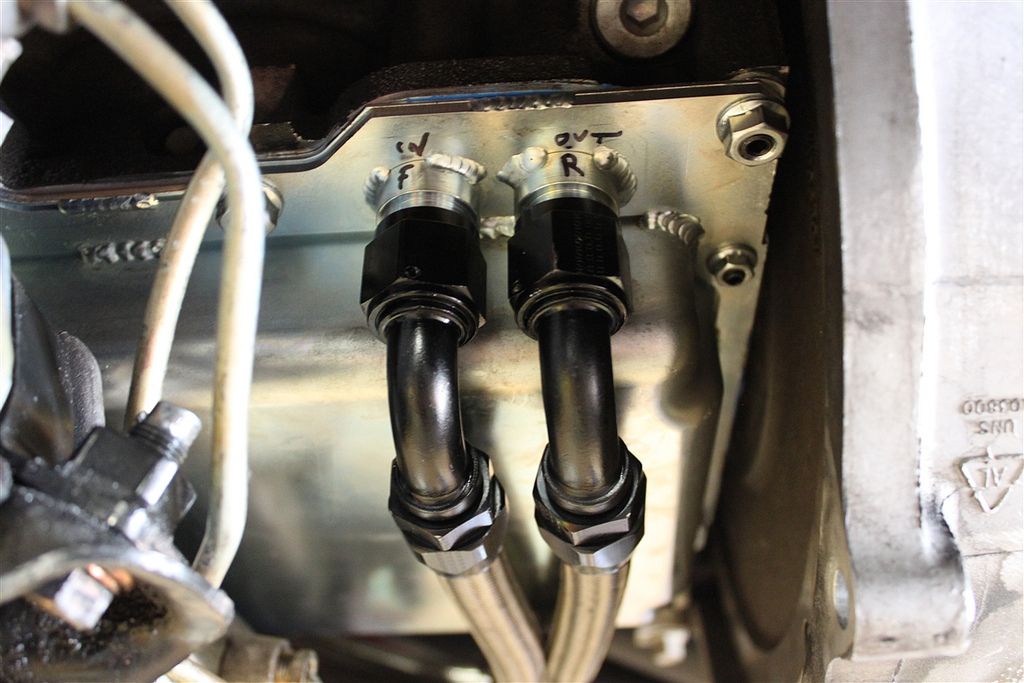
The oil pan has two -10 fittings for the oil feed and return. The front fitting is the feed line to the oil filter and should be run to the IN port of the oil filter housing. The rear fitting on the oil pan is the return and should be run to the out port on the oil filter housing. Please verify that your plumbing is correct before starting the engine as severe damage may result. (It is your responsibility to make sure the direction of flow is correct on your particular application). Remember to flush all lines before installation.
The oil filter relocation uses a Mobil One M301 or similar oil filter and should be mounted to the right side frame rail positioning the filter so that it just clears the sway bar mounts and crossmember. The exact positioning is not critical but should position the filter to be near the drain plug for ease of oil drainage during oil change. Use the included three self tapping screws to mount the oil filter relocation housing to the side of the frame rail. Thread sealer or Teflon tape should only be used on the 1/2 npt fittings where they thread into the oil filter housing. No thread sealer or Teflon tape should ever be used on 37 degree AN fittings. Please remember to never over torque AN fittings as they will crack and leak.
To set the proper dip stick level fill the oil pan while vehicle is on a level surface until the oil level is just to the top of the sump while level. (As seen through dip stick bung). Once the oil level reaches the top of the sump or bottom of bung threads (not the top of bung threads) install dip stick outer tube (the steel braided portion) using thread sealer. Now install the dip stick and measure the distance from the full level mark to the actual oil level. This is the amount you will need to trim off of the handle side of the dip stick. The dip stick is held to the handle with one allen set screw. Simply loosen the set screw allowing the billet handle to slide off of the dip stick and cut off the amount measured. Reinstall the handle and tighten the set screw. Double check that the dip stick now reads properly.
Please remember if you are using an engine that had the dipstick in the block and not in the oil pan you will need to plug the old dip stick hole with GM part number 12557520 or similar plug.
Use thread sealer on all unused ports on the oil pan as well as on any fittings or sensors installed on the oil pan.
Note: The engine mounts have been designed using a brand new OEM Nissan crossmember. If your crossmember is dented or damaged be sure to check that there is a minimum clearance between the oil pan and steering rack of .195 inches. Once engine is installed, be sure the engine is sitting level in car and oil pan is parallel with the crossmember (failure to do so will cause the headers to come to close to P.S. lines and frame rail). The left headers should be quite close to frame rail and have minimum of 3/16 clearance to P.S. return line.
Engine and Transmission Mounts:
The engine mounts come marked with a L for left and a R for right. There are arrows pointing to F meaning front of engine or car and T meaning top of engine or car. The mounts should be installed with supplied bolts and torqued to factory specification ( 37 LB FT )using blue threadlocker.
The transmission mount is installed using factory Nissan transmission crossmember bolts for the crossmember and factory GM transmission mount bolts for the transmission mount. (Use factory torque specs for your application)
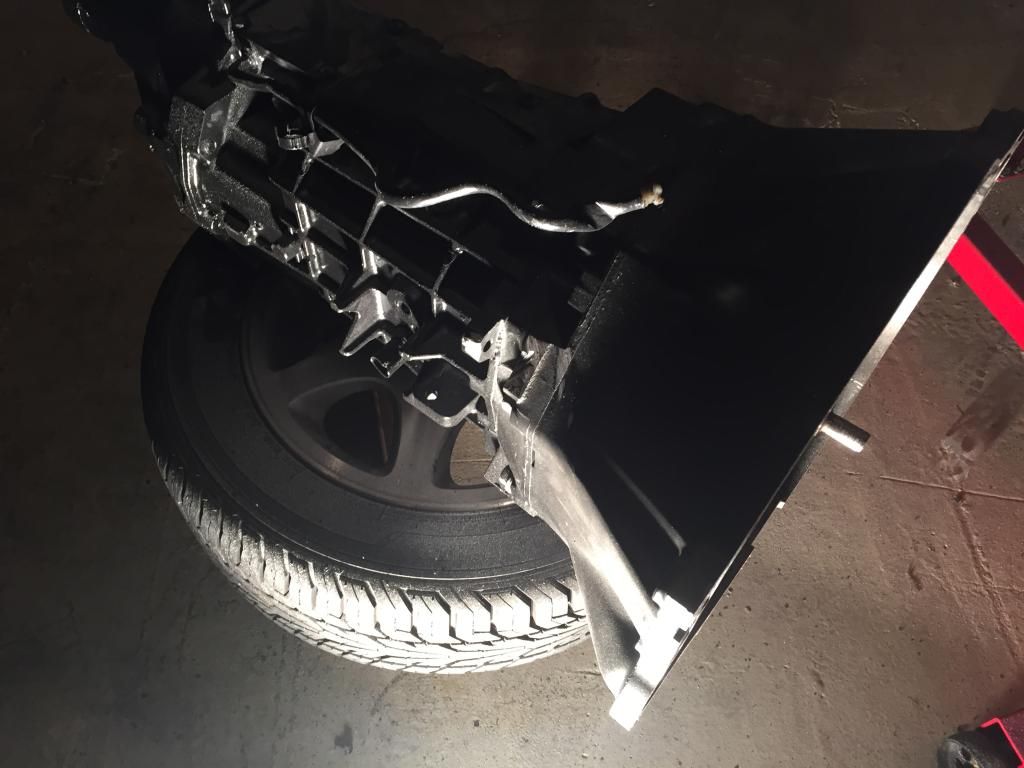
If using a T56 it is recommended that you trim the ears off of the top of the transmission to increase clearance between transmission and transmission tunnel.
Headers:
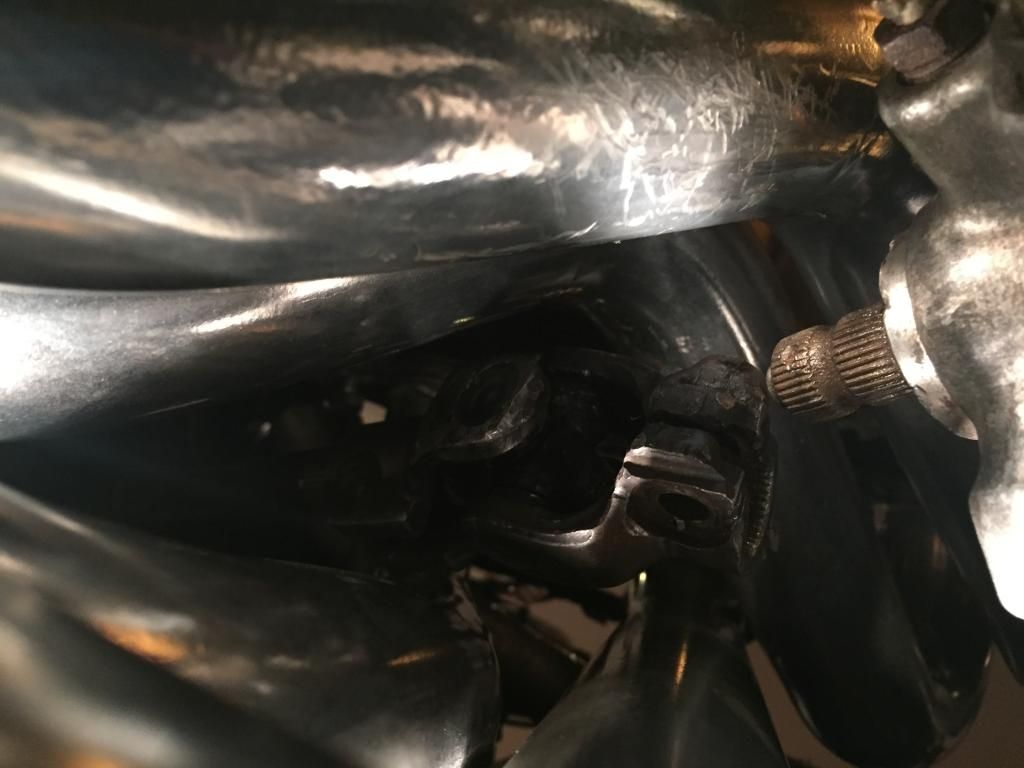
Installation of headers is easiest from above. The right header is very easy to install, just simply feed the collector past the starter and angle back up to level. The left header should be installed before the power steering fittings are installed into the steering rack allowing the Vband flange more room. Removing the left bank coil packs will also allow more room for header installation. The left header can be installed without removal of the steering shaft by feeding the header collector at a near 90 degree angle between the frame rail and steering shaft. Then rotate the header into position. Torque headers to factory specification for your particular application. Please note that the header collector can be positioned slightly higher or lower if needed by just slightly loosening the header bolts and then positioning the collector in desired location before being re-torqued.
Power Steering:
The two machined power steering fittings should be installed into the steering rack (the fittings are machined so that the O-ring seats in the rack). The power steering fitting that has not been machined should be installed into the power steering pump. The pressure line should be installed with the 90 degree fitting at the pump and the straight fitting at the lower fitting on the rack (pressure fitting). The return fitting on the rack should have the barbed fitting installed on it and the 3/8 hose on that barb fitting run to the reservoir. There are two 1600 degree heat sleeves included in the kit use one for the pressure line and one for the return line. Most people find it easier to install the pressure line to the steering rack first and then route the pressure line to the pump. This makes threading the pressure line on to the pressure fitting much easier. Simply route both lines between the frame rail and crossmember in factory location.
Fueledracing.com
For more pics on the instructions, look here. Different company, same concept.
http://www.sikky.com/images/pdf/1303...structions.pdf
All hardware is shipped loose and must be tightened during the installation process.
Clutch Master Cylinder Kit: (optional part)
(transmission must be removed from engine)
Start by removing the factory clutch slave cylinder pressure fitting from the slave cylinder by removing the small roll pin with a drift or punch of slightly smaller diameter. Install the pressure line fitting in its place and reinstall roll pin with small hammer until flush. Next remove the factory clutch bleeder fitting from the slave cylinder and replace with the remote bleeder supplied in the clutch kit using the aluminum crush washer. Route the bleeder line through the bleeder hole and route the clutch pressure line out the pressure line hole. Both lines should be routed away from the left header. We recommend that the line be ran directly up to the back of the intake manifold and then across to the clutch master cylinder. Install the clutch master cylinder using the supplied bracket being sure to tighten all hardware. Please note the bleeder fitting has a coat of thread sealant and it must be fully seated to seal so removal of some of the thread sealer may be necessary. I find it easiest to just remove the bleeder and bleeder adaptor from the bleeder line and place the adaptor in a vice to seat the bleeder fully.
Oil Pan:
The moroso oil pan is installed using the supplied Moroso stud kit, oil pan gasket and oil pick up tube (see instructions from Moroso website if needed). Always use a new gasket if oil pan is removed for any reason. (reusing the old gasket may result in poor sealing and engine failure). The oil pickup tube should be installed using thread locker and torqued to factory specification for you particular engine. (A common problem with LS engine failure relates to improper installation of the oil pickup tube). Be sure the oil pickup tube is seated flat with oil pump before tightening.
The oil pan has two -10 fittings for the oil feed and return. The front fitting is the feed line to the oil filter and should be run to the IN port of the oil filter housing. The rear fitting on the oil pan is the return and should be run to the out port on the oil filter housing. Please verify that your plumbing is correct before starting the engine as severe damage may result. (It is your responsibility to make sure the direction of flow is correct on your particular application). Remember to flush all lines before installation.
The oil filter relocation uses a Mobil One M301 or similar oil filter and should be mounted to the right side frame rail positioning the filter so that it just clears the sway bar mounts and crossmember. The exact positioning is not critical but should position the filter to be near the drain plug for ease of oil drainage during oil change. Use the included three self tapping screws to mount the oil filter relocation housing to the side of the frame rail. Thread sealer or Teflon tape should only be used on the 1/2 npt fittings where they thread into the oil filter housing. No thread sealer or Teflon tape should ever be used on 37 degree AN fittings. Please remember to never over torque AN fittings as they will crack and leak.
To set the proper dip stick level fill the oil pan while vehicle is on a level surface until the oil level is just to the top of the sump while level. (As seen through dip stick bung). Once the oil level reaches the top of the sump or bottom of bung threads (not the top of bung threads) install dip stick outer tube (the steel braided portion) using thread sealer. Now install the dip stick and measure the distance from the full level mark to the actual oil level. This is the amount you will need to trim off of the handle side of the dip stick. The dip stick is held to the handle with one allen set screw. Simply loosen the set screw allowing the billet handle to slide off of the dip stick and cut off the amount measured. Reinstall the handle and tighten the set screw. Double check that the dip stick now reads properly.
Please remember if you are using an engine that had the dipstick in the block and not in the oil pan you will need to plug the old dip stick hole with GM part number 12557520 or similar plug.
Use thread sealer on all unused ports on the oil pan as well as on any fittings or sensors installed on the oil pan.
Note: The engine mounts have been designed using a brand new OEM Nissan crossmember. If your crossmember is dented or damaged be sure to check that there is a minimum clearance between the oil pan and steering rack of .195 inches. Once engine is installed, be sure the engine is sitting level in car and oil pan is parallel with the crossmember (failure to do so will cause the headers to come to close to P.S. lines and frame rail). The left headers should be quite close to frame rail and have minimum of 3/16 clearance to P.S. return line.
Engine and Transmission Mounts:
The engine mounts come marked with a L for left and a R for right. There are arrows pointing to F meaning front of engine or car and T meaning top of engine or car. The mounts should be installed with supplied bolts and torqued to factory specification ( 37 LB FT )using blue threadlocker.
The transmission mount is installed using factory Nissan transmission crossmember bolts for the crossmember and factory GM transmission mount bolts for the transmission mount. (Use factory torque specs for your application)
If using a T56 it is recommended that you trim the ears off of the top of the transmission to increase clearance between transmission and transmission tunnel.
Headers:
Installation of headers is easiest from above. The right header is very easy to install, just simply feed the collector past the starter and angle back up to level. The left header should be installed before the power steering fittings are installed into the steering rack allowing the Vband flange more room. Removing the left bank coil packs will also allow more room for header installation. The left header can be installed without removal of the steering shaft by feeding the header collector at a near 90 degree angle between the frame rail and steering shaft. Then rotate the header into position. Torque headers to factory specification for your particular application. Please note that the header collector can be positioned slightly higher or lower if needed by just slightly loosening the header bolts and then positioning the collector in desired location before being re-torqued.
Power Steering:
The two machined power steering fittings should be installed into the steering rack (the fittings are machined so that the O-ring seats in the rack). The power steering fitting that has not been machined should be installed into the power steering pump. The pressure line should be installed with the 90 degree fitting at the pump and the straight fitting at the lower fitting on the rack (pressure fitting). The return fitting on the rack should have the barbed fitting installed on it and the 3/8 hose on that barb fitting run to the reservoir. There are two 1600 degree heat sleeves included in the kit use one for the pressure line and one for the return line. Most people find it easier to install the pressure line to the steering rack first and then route the pressure line to the pump. This makes threading the pressure line on to the pressure fitting much easier. Simply route both lines between the frame rail and crossmember in factory location.
Fueledracing.com
For more pics on the instructions, look here. Different company, same concept.
http://www.sikky.com/images/pdf/1303...structions.pdf
01-31-2015, 01:42 PM
#18
Not yet bud. The car is at the shop to get gauges install with custom panel.i also asked him to figure out the issues but from what ive read is probably due to the maf sensor and gm ect sensor not connected.
Why cant your shop be in ga!!?? Lol. I would have taken it to you.
Why cant your shop be in ga!!?? Lol. I would have taken it to you.
02-01-2015, 10:57 AM
#19
Differential swap and final gear ratio
The stock 1995 nissan 240sx comes with 4.08 final gear ratio. This can be a good thing for people who plan to build it as race car or drifting, but for DD, this can cause your cost of living to go up. I used the 4.08 final gear with the vq, and it literally took a lot of gas.
Since my build is for DD, I opted to change the final drive ratio. There are many options. here is the list from the easiest to hardest.
1. Use j30 differential from later production 94-96. It's basically plug and play for s14. For s13, you have to change the differential cover. Make sure you opted to choose the driveshaft with ABS. If you choose non abs, it's not gonna fit. GEAR RATIO: 3.96
2. Use q45 97-01 differential. which is the route I opted. You have to use 93 or early production model 94 j30 axles. Some people said the 97-01 axles will work but I didn't get any confirmation yet. Be advised that the axles are really hard to get and local auto parts don't make them anymore. You also have to drill a hole in the pinion flange . Final GEAR RATIO 3.69
3.93-94 J30 differential which requires the axles from 93 to early 94 j30 production year. Same gear ratio at 3.96
4.Use early model Q45 diff. 97 and below. This requires driver's side axle from z32 tt, passenger side axle from q45. Hubs from q45 which means you have to get a 5 lugs wheels and drilling the hole in the pinion. The only advantage to this is you will get a bigger beefier axle. GEAR RATIO 3.54
5. Put the J30/Q45 R/P to the stock differential. I don't advised this unless you are familiar with differential install ext ext
Sources
http://www.240sxforums.com/forums/re...-subframe.html
http://www.ka24development.com/vlsd.html
http://www.ls240sx.com/site.aspx?pag...20RP%20Install
http://silviav8forums.com/forum/view...&highlight=q45
02-04-2015, 02:23 PM
#20
You need to move to nc I would have done had it running
Not yet bud. The car is at the shop to get gauges install with custom panel.i also asked him to figure out the issues but from what ive read is probably due to the maf sensor and gm ect sensor not connected.
Why cant your shop be in ga!!?? Lol. I would have taken it to you.
Why cant your shop be in ga!!?? Lol. I would have taken it to you.