
1937 Ford Sedan
 03-22-2015, 09:32 PM
#81


 03-23-2015, 11:31 AM
#82
TECH Resident

Can't you flip the shackle in some way?
OR
You are only $1k away and some hours away from a triangulated 4 link and double adjustable coil-overs (viking)
Real easy to get exactly the ride height with fewer compromises (eliminate axle wrap, adjust height and pinion angle more easily, improved suspension articulation and ride quality.
Just a thought. Clearly you've done this all before.
Doug
03-23-2015, 04:24 PM
#84
TECH Apprentice
kharp is killing this one. His knowledge is extensive in all types of suspensions and shocks. We all know that the coil overs (and airbags) are the easiest to set up as far as ride height is concerned. I think that the leafs are a very good way to go for this car and the end result he is looking for.
As far as flipping the shackle, the spring is directly under the frame rail, can't flip it. kharp is not far enough along for paint yet...lol
Kwhizz posted the pic of the complete/painted frame from the 37 he built. That car was real nice and judging by some of his other builds, he does top notch work too.
Keith - your work is looking good! I know you will have this ride height issue resolved without much more work or expense!
03-23-2015, 04:45 PM
#85
TECH Resident
I hope I didn't insult Keith in any way. Absolutely not my intention! It is obvious he's doing a great job! Lots of ways to do things.
I farted around for a while with trying to get rid of axle wrap on hard acceleration, good ride height and ride quality out of leaf springs on my truck project. In retrospect, I would have invested that time and money straight in to coil-overs.
it looked to me like the rear shackles are out board of the springs. The latest picture looks like it is 1/2 outboard of the frame rail as if the frame curves inward in the rear.
Doug
03-23-2015, 06:05 PM
#86
TECH Senior Member
iTrader: (7)

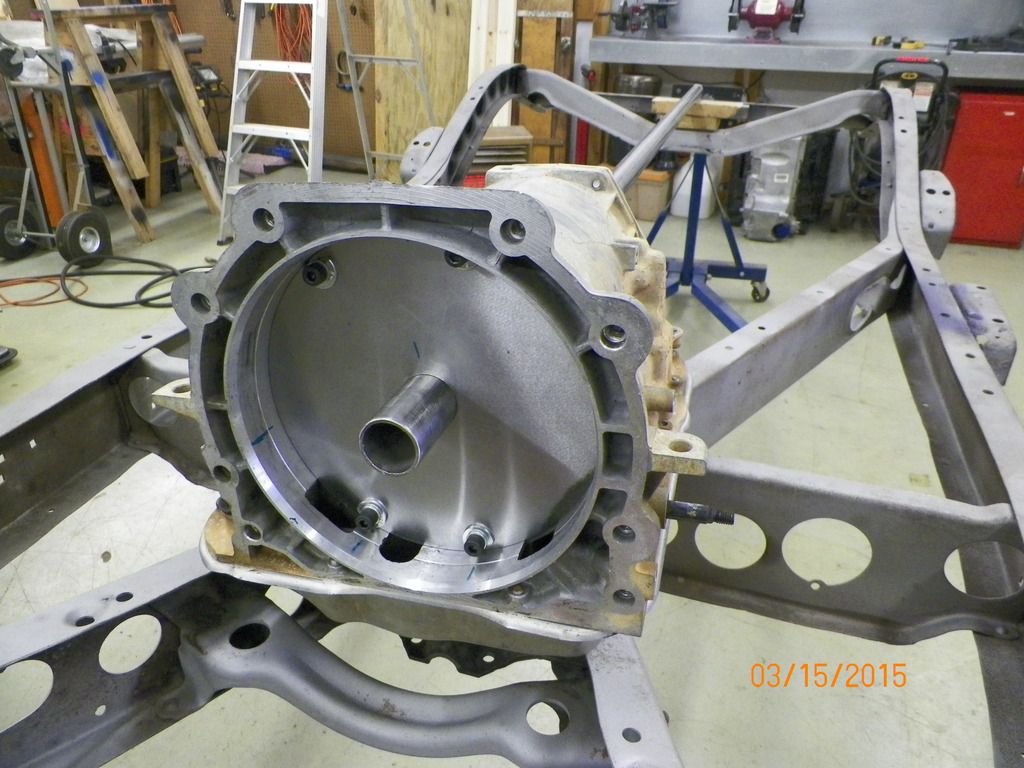
Starting to gather some items for mocking up the drivetrain. The 4L60E case is empty, and I had a plate made that bolts in the front pump location. It serves as a guide for a full length mandrel (1.5" OD steel pipe) that will extend to the rear pinion for measuring and setup purposes.
Andrew
03-23-2015, 06:53 PM
#87

I have leaf springs on my '39 Chevy and to get the rear down Had to use lots of blocks, then the plates end up close to the ground. Right now the ride is good but loaded for a trip and maybe a passenger in the back seat could cause problems. Had coil overs on the ****** but did not like the rear hanging by one bolt on each side. To solve my problem I'm building a complete new frame for the '39. Rear suspension will be triangle 4 bars and air bags. Don't mean to steal your thread, just alternate ideas for us masses.

 03-24-2015, 12:25 PM
#89
TECH Regular
Thread Starter

Very cleaver idea!!! Last thing you need are extreme u-joint operating angles.
Andrew
__________________
Popular Hotrodding feature
GM High-Tech Performance feature
1970 GTO v2.0 build thread
1967 Cougar build thread
Andrew I can't take credit for the pipe idea since I've seen many race cars built that way. Normally it is not used on street cars due to floor board interference and not being as critical, but I figured it would still help in my initial setup. Raising the tunnel a little bit at this point is not out of the question if that what it takes to make it ride smooth. Stay tuned on this....
You have quite a build going with your Cougar thanks for documenting and sharing! I have thoroughly enjoyed reading through your posts. The neat part to me about watching these builds is all the back stories, problems faced and solutions, and details you might not notice by casually looking at the cars. Keep up the good work - Keith
 03-26-2015, 07:14 AM
#91
TECH Regular
Thread Starter
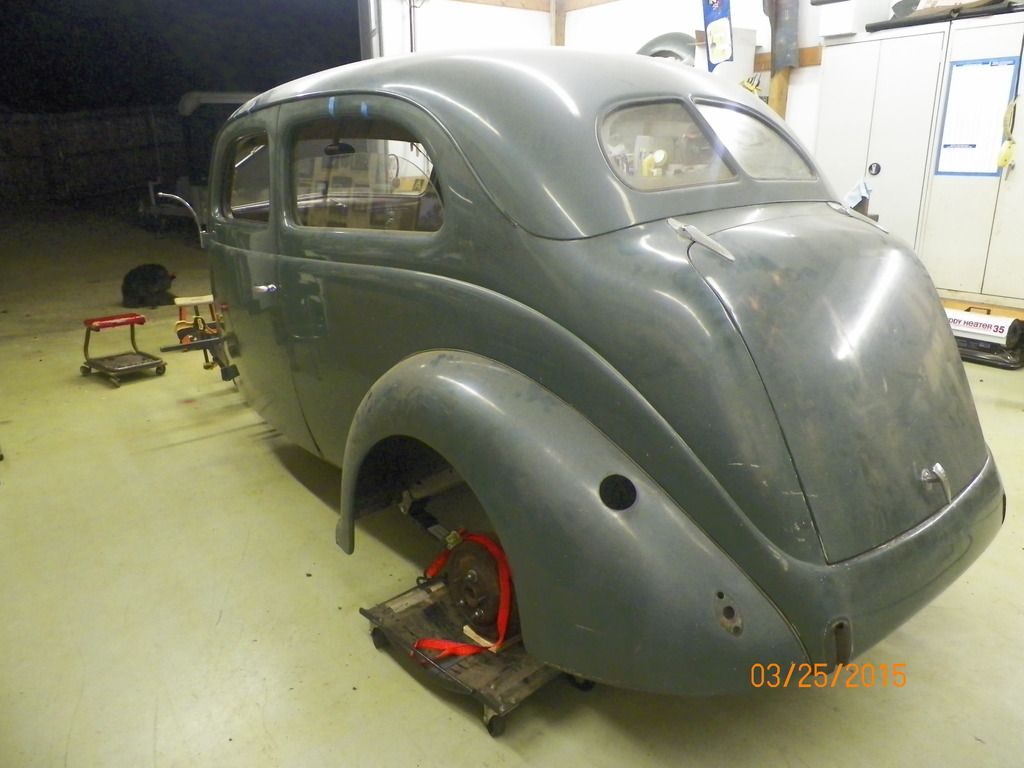
Mounted the body with a kit from Bob Drake, which by the way had an error on the pad location directions. Also had to run down some fasteners that I'm happy with. Installed a rear fender, did some measuring and serious calculating, and now have the car sitting at ride height based on 28" tall rear tire and 25" front - thanks Ken for the tire sizes!

Last edited by Kharp; 03-26-2015 at 07:27 AM.
03-26-2015, 07:17 AM
#92
TECH Regular
Thread Starter
And the front IFS begins. Still needs another night of tweaking, but not too far from tack welds.


Last edited by Kharp; 03-26-2015 at 08:03 AM.
03-26-2015, 07:28 AM
#93
Make sure your front springs have no more than a 300# spring rate and check all the welds where the Calipers bolt on.......Heidt's has a tendency for the welds to overlap with the mounting surface and the Calipers mount on a angle......so ....check that and grind them so the interference go's away and they mount like they should....(You would think they would have that figured out by now)........If Gary still owned the Company that would never be an issue............Just Say'in......
03-26-2015, 08:34 AM
#94
TECH Senior Member
iTrader: (7)
.....
Andrew I can't take credit for the pipe idea since I've seen many race cars built that way. Normally it is not used on street cars due to floor board interference and not being as critical, but I figured it would still help in my initial setup. Raising the tunnel a little bit at this point is not out of the question if that what it takes to make it ride smooth. Stay tuned on this....
You have quite a build going with your Cougar thanks for documenting and sharing! I have thoroughly enjoyed reading through your posts. The neat part to me about watching these builds is all the back stories, problems faced and solutions, and details you might not notice by casually looking at the cars. Keep up the good work - Keith
Thanks for the kind words. I look forward to further progress on your 37...
Andrew
03-26-2015, 04:18 PM
#95
TECH Regular
Thread Starter
I have leaf springs on my '39 Chevy and to get the rear down Had to use lots of blocks, then the plates end up close to the ground. Right now the ride is good but loaded for a trip and maybe a passenger in the back seat could cause problems. Had coil overs on the ****** but did not like the rear hanging by one bolt on each side. To solve my problem I'm building a complete new frame for the '39. Rear suspension will be triangle 4 bars and air bags. Don't mean to steal your thread, just alternate ideas for us masses.
03-28-2015, 09:49 PM
#96
TECH Regular
Thread Starter
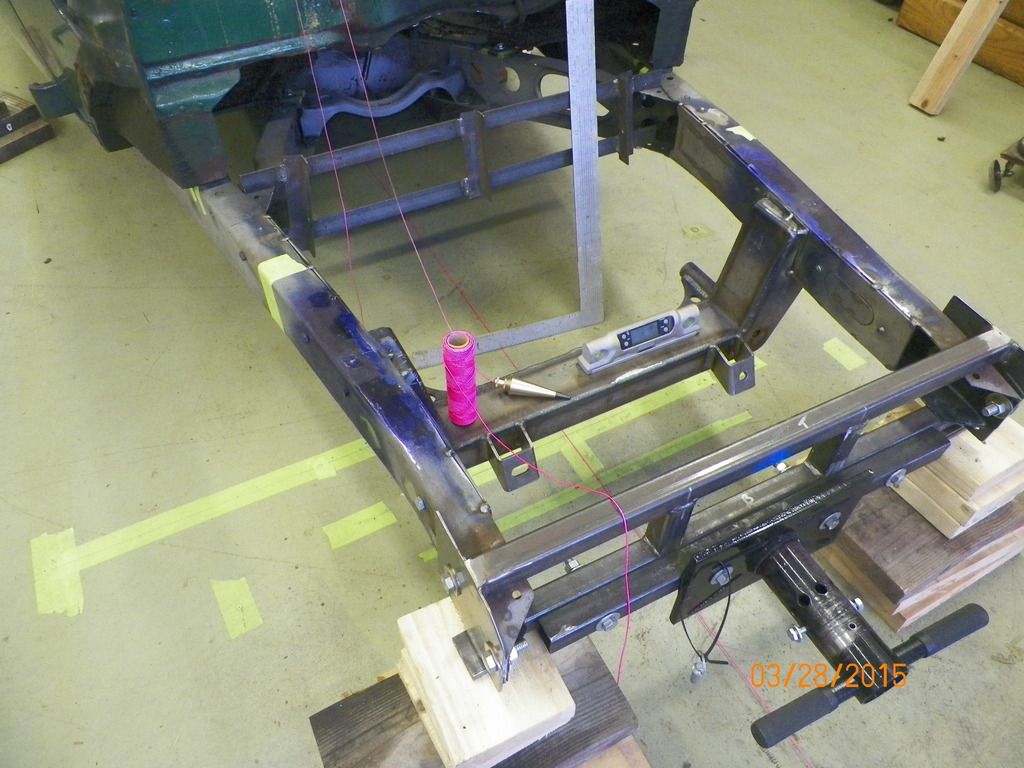
My previous post said "One more night of tweaking on the cross member before it is tack welded in". Well, it took ALL day, but it's in. 
Thanks for the help Glen!
Thanks for the help Glen!
 03-29-2015, 12:21 PM
#97
HarpMan,
I approve, I see the proper number of tools including the critical string line. Tape on floor, plumb bob, several squares, lot's of ciphering, all necessary for a good outcome.
You are on a good path.
WoodenMan
I approve, I see the proper number of tools including the critical string line. Tape on floor, plumb bob, several squares, lot's of ciphering, all necessary for a good outcome.
You are on a good path.
WoodenMan
The following users liked this post:
IMPALAMAN1 (03-21-2023)
03-29-2015, 01:26 PM
#98
03-29-2015, 07:56 PM
#99
TECH Regular
Thread Starter
It took all day because the strings just wouldn't lie to us when we kept trying to get a different answer ! After we got a good frame centerline the cross member was nice and square to the frame, but just not centered in the car. We checked it off the machined surface for the lower control arms, we checked it off the center of the ball joints, etc, and kept getting the same answer. Didn't really make much sense because I barely took off any material (less than 1/16") to make it fit at the axle centerline. Eventually we moved the cross member over 1/8" and voila'.....dead centered, and every single new line we had marked on the tape on the floor was covered up by the string because all the marks lined up! Ended up being flat in all directions with about 2 degrees rake for the frame. If we can get the back of the car down to what we set for ride height it should work well. For every inch the car moves up or down in the rear, it only changes the cross member angle 1/2 degree for 112" wheelbase so we have a little wiggle room at the end.
Ken thanks for the info the other day. I did look and my springs are 300 pound (with a green dot), and I will remember to check the calipers when I bolt it together soon. My spindle, rotor, and caliper came assembled from TCI so I when bolt it up I'll pull off a caliper and see if the mount surface is flat. Thanks!
! After we got a good frame centerline the cross member was nice and square to the frame, but just not centered in the car. We checked it off the machined surface for the lower control arms, we checked it off the center of the ball joints, etc, and kept getting the same answer. Didn't really make much sense because I barely took off any material (less than 1/16") to make it fit at the axle centerline. Eventually we moved the cross member over 1/8" and voila'.....dead centered, and every single new line we had marked on the tape on the floor was covered up by the string because all the marks lined up! Ended up being flat in all directions with about 2 degrees rake for the frame. If we can get the back of the car down to what we set for ride height it should work well. For every inch the car moves up or down in the rear, it only changes the cross member angle 1/2 degree for 112" wheelbase so we have a little wiggle room at the end. Ken thanks for the info the other day. I did look and my springs are 300 pound (with a green dot), and I will remember to check the calipers when I bolt it together soon. My spindle, rotor, and caliper came assembled from TCI so I when bolt it up I'll pull off a caliper and see if the mount surface is flat. Thanks!
Last edited by Kharp; 03-30-2015 at 08:50 AM.
04-05-2015, 09:17 PM
#100
TECH Regular
Thread Starter
Got a little bit done this weekend, but ran into a small issue with the lower control arms. The lower shock bolts were already installed when I received the parts, and when I took the shock bolt out it was severely bent on both control arms. I had to order more bolts (8" long) and cut them to the proper length. I also had to ream the sleeve quite a bit to get a straight shot at the threaded hole. The picture below shows the new straight bolt that is still not centered.
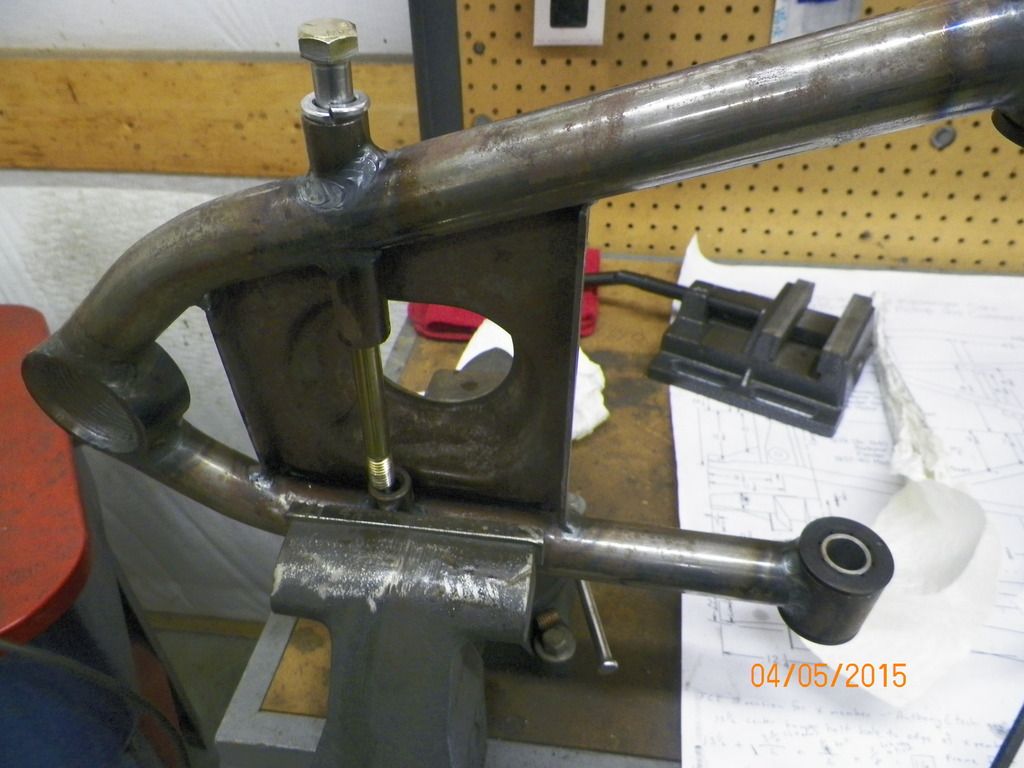
The picture below is after the sleeve was drilled at an angle and this corrected the issue. I'm guessing it was taken out of the fixture while it was still hot, or maybe wrong weld sequence, or ??? For whatever reason it sure didn't line up. I'm going to let TCI know about it so they can address it and maybe no one else will run into this same issue.
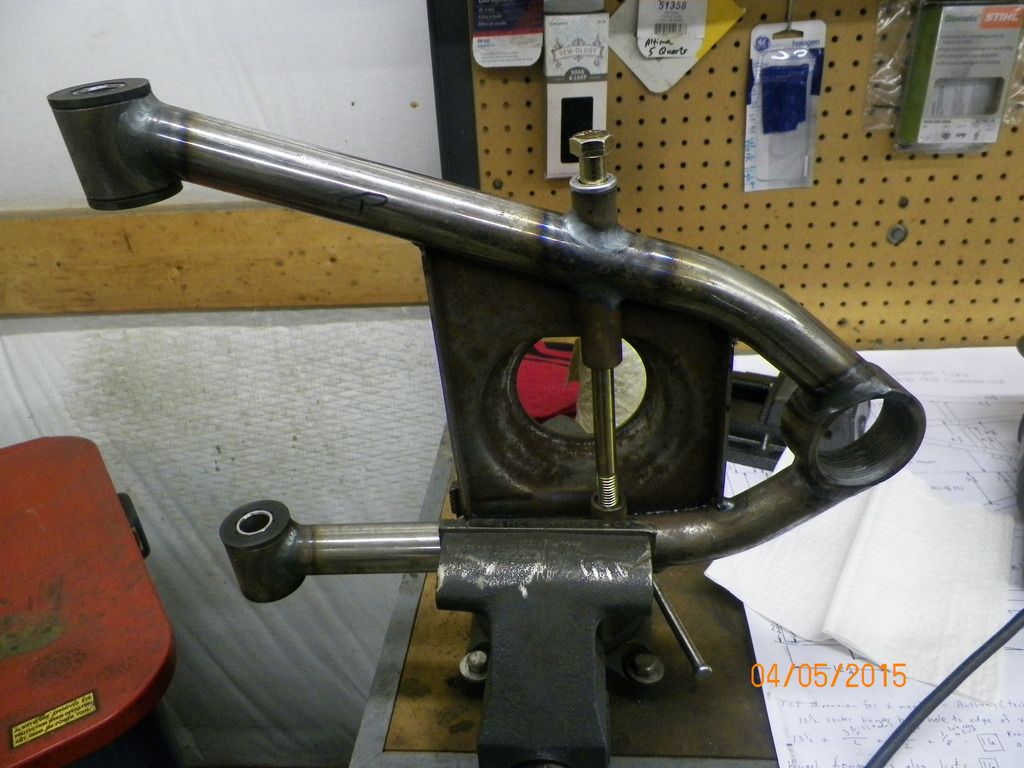
Note: Talked to Anthony at TCI yesterday to let him know of the issue. He said there were no other reports of this issue at this time, and his opinion was that the control arms were taken out of the fixture too soon after welding.
Last edited by Kharp; 04-09-2015 at 07:58 PM.

