
1989 Silverado "Ugly Bruce" Build Thread (RCSB OBS)
 07-04-2015, 01:27 AM
#1
Teching In
Thread Starter

Join Date: Jul 2015
Location: SoCal
Posts: 8
Likes: 0
Received 0 Likes
on
0 Posts
Preface: This build won't be fast, but it will be good.......
This is the story of my 1989 Silverado “Ugly Bruce”
I acquired Ugly Bruce from Patrick, previously an editor of Truckin Magazine. A ton of work was already completed (documented below), but he was unable to finish the truck. Let's take a look at the work Patrick had already done before I made the purchase. (FYI: his photos and captions will be better than mine. lol)
You can read the Truckin story here..... http://www.trucktrend.com/how-to/cha...#ixzz3euNa01nL
Follow me @lees_garage on Instagram for sneak peak updates
The following work was done by Truckin Magazine before I purchased the truck.
note: I will be using their photos and captions for this part of the post.
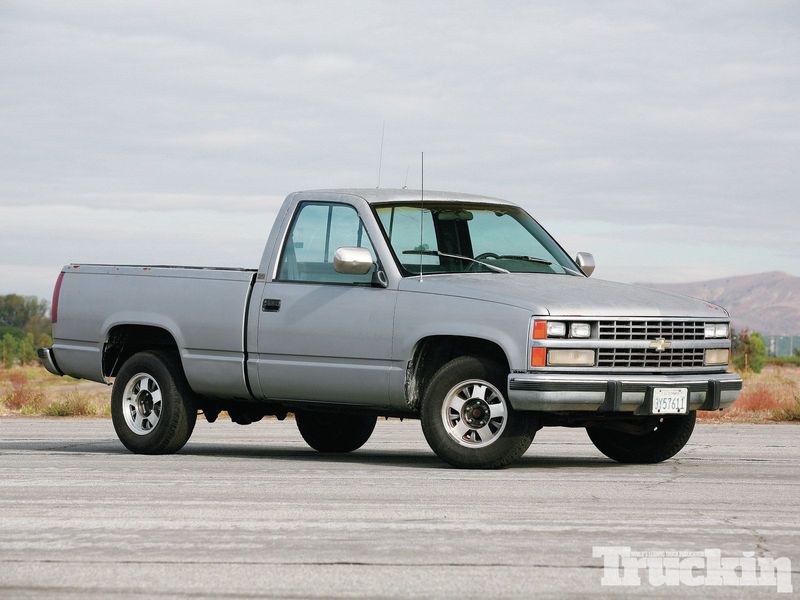
This '89 Silverado has definitely seen better days, so it will be a long journey to reach the finish line, but we will persevere. This truck has spent its life wallowing around muddy farmland on the Central California coast for roughly 300,000 miles, so it's rusty and needs just about everything replaced.
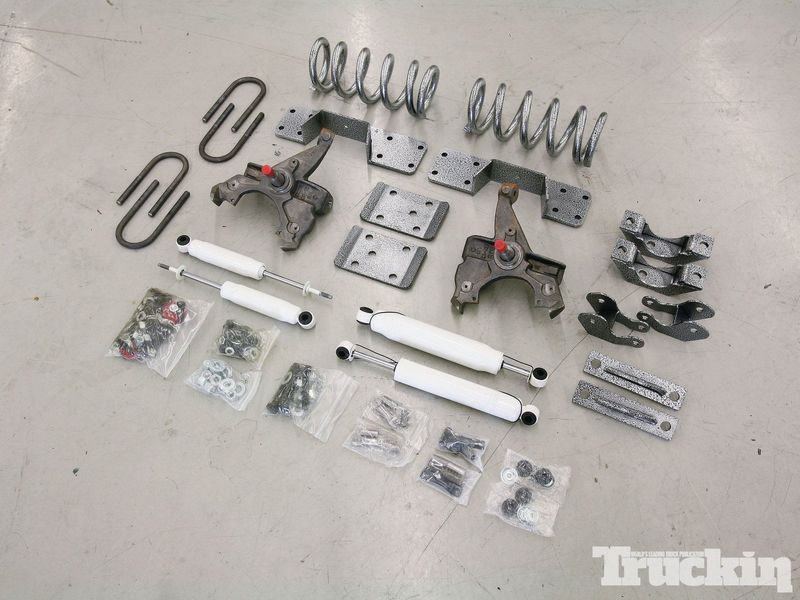
DJM 4/6 drop
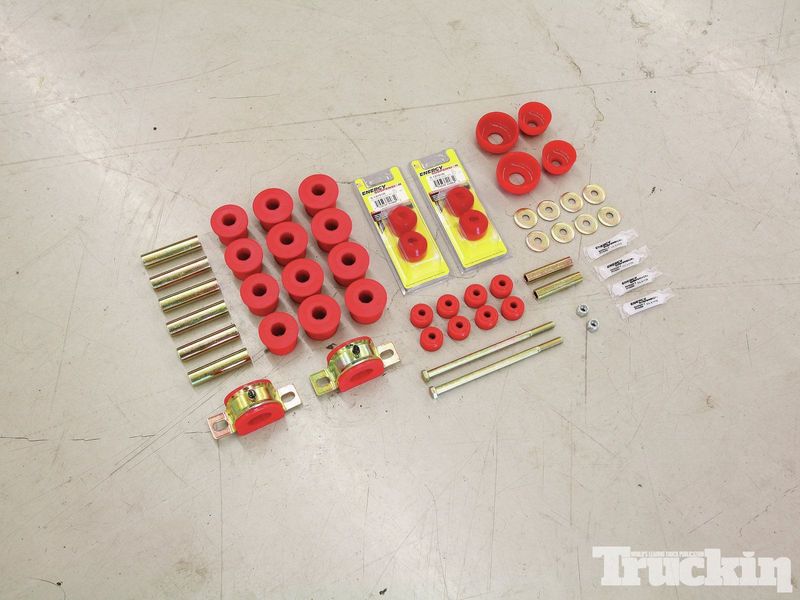
Energy Suspension bushing master kit.

Most every nut and bolt was frozen to some extent, thanks to the extensive coating of rust from the coastal salt air.

We began by tearing down the front suspension. The brakes were tossed aside so the ball joints could be busted loose, and the stock spindles and coil springs were added to the scrap pile.
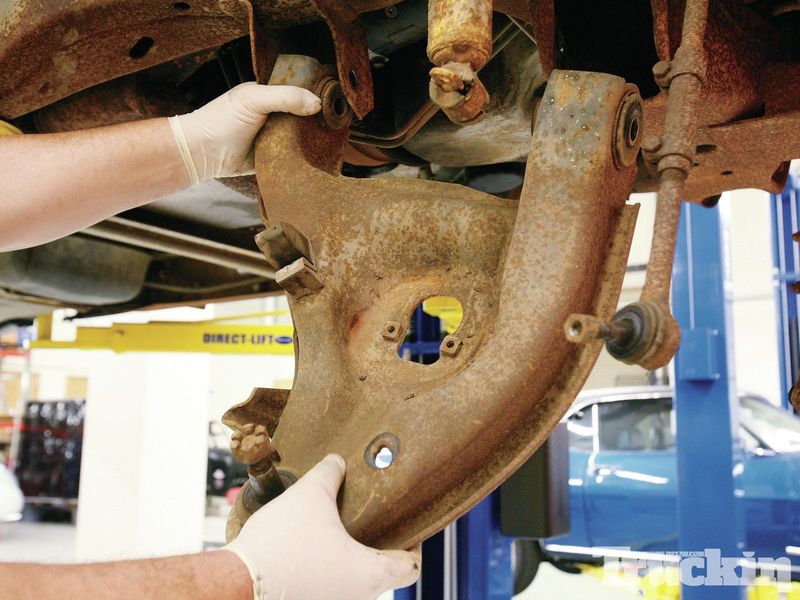
Since we chose to replace every wear item, both upper and lower control arms were removed for better access.
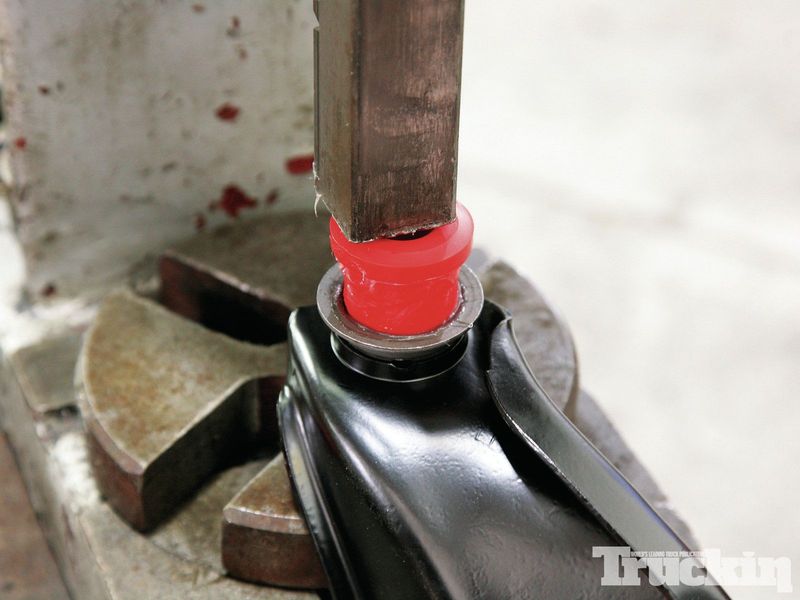
Rusty metal wasn’t going back on this truck, so we stripped many of the front parts and had them powdercoated before installing the replacement Energy Suspension bushings.
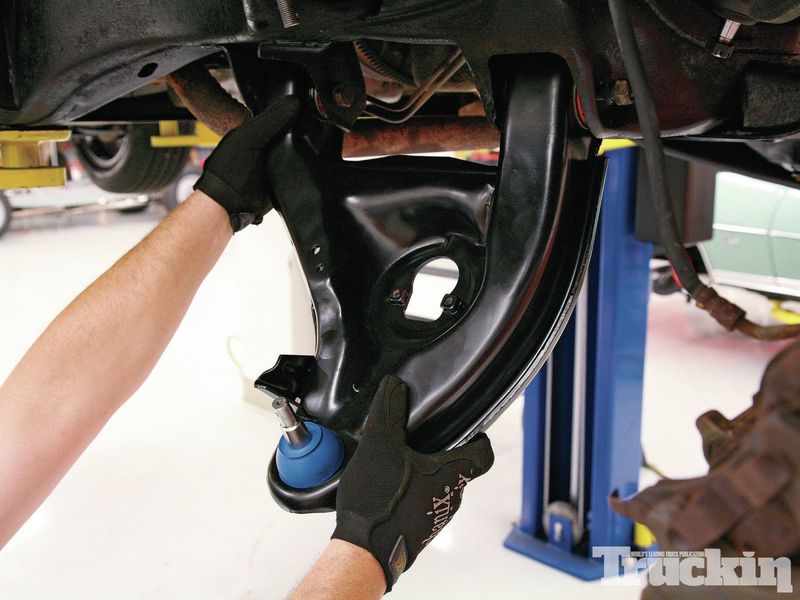
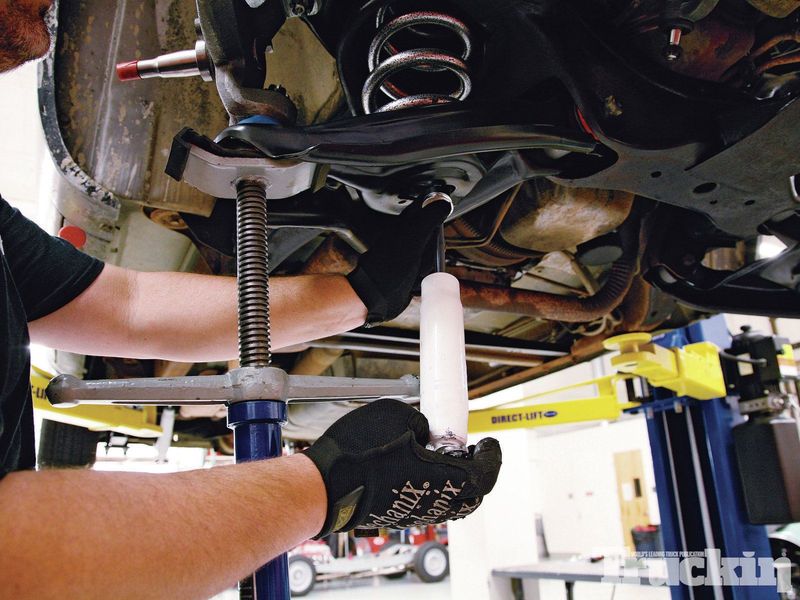
Along with the urethane bushings, new ball joints were pressed into the control arms, and the arms reinstalled onto the Silverado.
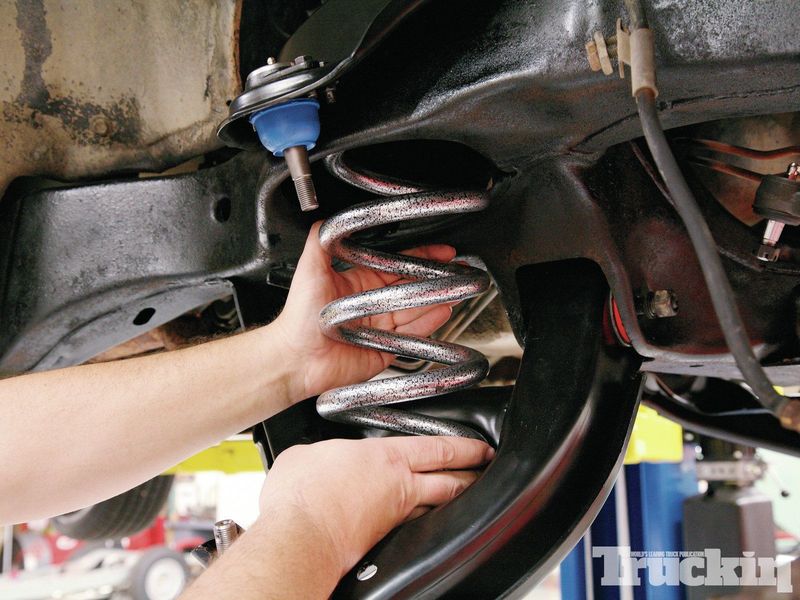
Then, the DJM 2-inch lowering springs were situated between the control arms
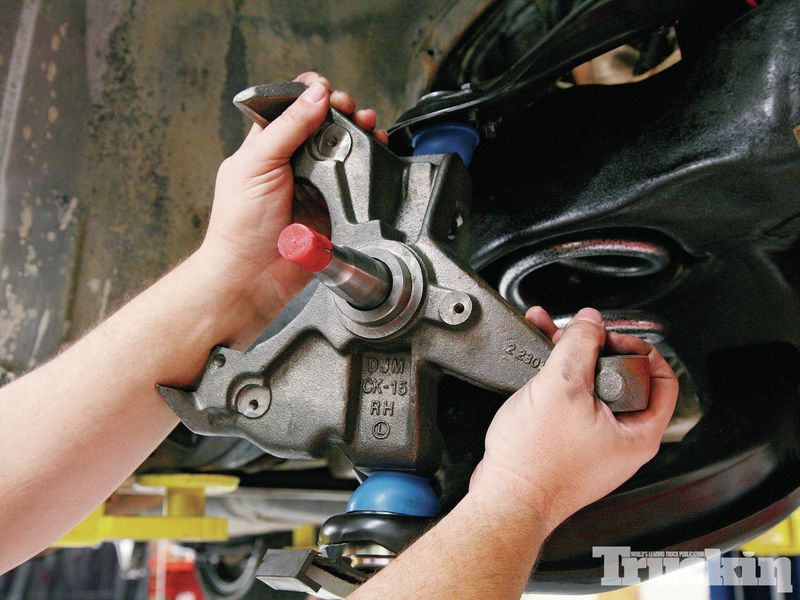
Next, DJM’s 2-inch drop spindles were bolted onto the fresh ball joints.
The last DJM components to go on the front were a pair of gas-charged Calmax shocks developed specifically for lowered applications.

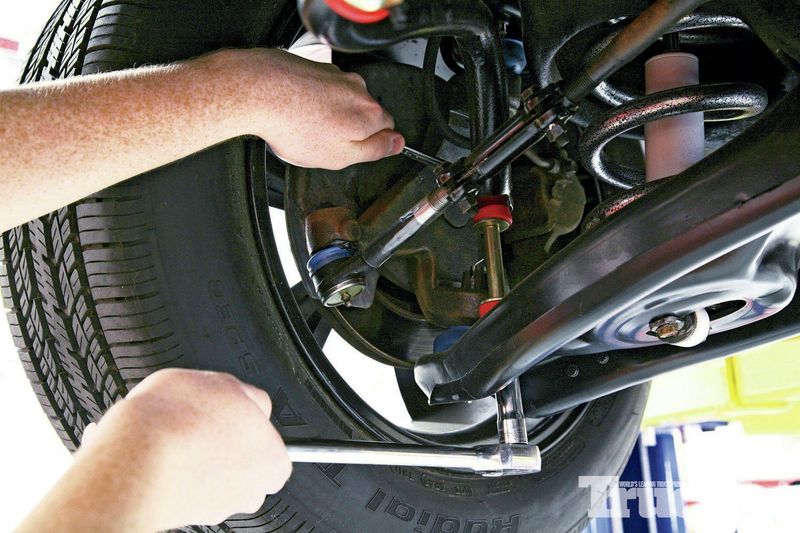
As part of their Master Set bushing kit, Energy included grease boots for the replacement tie rods. The tie rods were mounted to the original centerlink after it was powdercoated
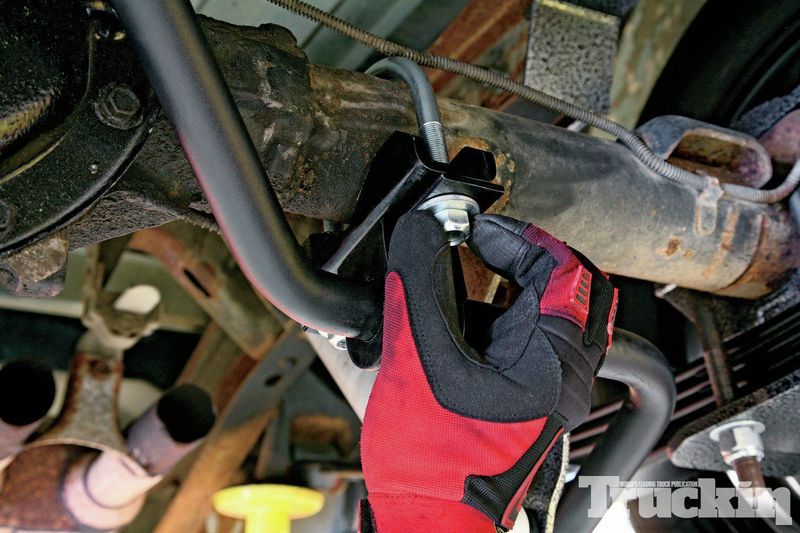
Our newly powdercoated stock sway bar was mounted using new Energy bushings and brackets.

Energy’s kit also supplied us with entirely new sway bar endlinks and hardware to make the most out of our factory bar.
This is the story of my 1989 Silverado “Ugly Bruce”
I acquired Ugly Bruce from Patrick, previously an editor of Truckin Magazine. A ton of work was already completed (documented below), but he was unable to finish the truck. Let's take a look at the work Patrick had already done before I made the purchase. (FYI: his photos and captions will be better than mine. lol)
You can read the Truckin story here..... http://www.trucktrend.com/how-to/cha...#ixzz3euNa01nL
Follow me @lees_garage on Instagram for sneak peak updates
The following work was done by Truckin Magazine before I purchased the truck.
note: I will be using their photos and captions for this part of the post.

This '89 Silverado has definitely seen better days, so it will be a long journey to reach the finish line, but we will persevere. This truck has spent its life wallowing around muddy farmland on the Central California coast for roughly 300,000 miles, so it's rusty and needs just about everything replaced.

DJM 4/6 drop

Energy Suspension bushing master kit.

Most every nut and bolt was frozen to some extent, thanks to the extensive coating of rust from the coastal salt air.

We began by tearing down the front suspension. The brakes were tossed aside so the ball joints could be busted loose, and the stock spindles and coil springs were added to the scrap pile.

Since we chose to replace every wear item, both upper and lower control arms were removed for better access.

Rusty metal wasn’t going back on this truck, so we stripped many of the front parts and had them powdercoated before installing the replacement Energy Suspension bushings.

Along with the urethane bushings, new ball joints were pressed into the control arms, and the arms reinstalled onto the Silverado.

Then, the DJM 2-inch lowering springs were situated between the control arms

Next, DJM’s 2-inch drop spindles were bolted onto the fresh ball joints.

The last DJM components to go on the front were a pair of gas-charged Calmax shocks developed specifically for lowered applications.

As part of their Master Set bushing kit, Energy included grease boots for the replacement tie rods. The tie rods were mounted to the original centerlink after it was powdercoated

Our newly powdercoated stock sway bar was mounted using new Energy bushings and brackets.

Energy’s kit also supplied us with entirely new sway bar endlinks and hardware to make the most out of our factory bar.
Last edited by Lees_Garage; 07-04-2015 at 03:28 AM.
 07-04-2015, 01:42 AM
#2
Teching In
Thread Starter
Join Date: Jul 2015
Location: SoCal
Posts: 8
Likes: 0
Received 0 Likes
on
0 Posts

Out back, the rear suspension parts were equally ugly and rust-coated, and even with a liberal dose of penetrating fluid, we fought to pull the stock U-bolts off.

We then worked to get the leaf-spring pivot bolts freed so the springs could be removed from the topside of the axle.

It was certainly nice to blast the rust off of everything, coat it with paint, add new bushings, and then compare it to what we began with. We want this truck to ride flawlessly for its next 300,000 miles.

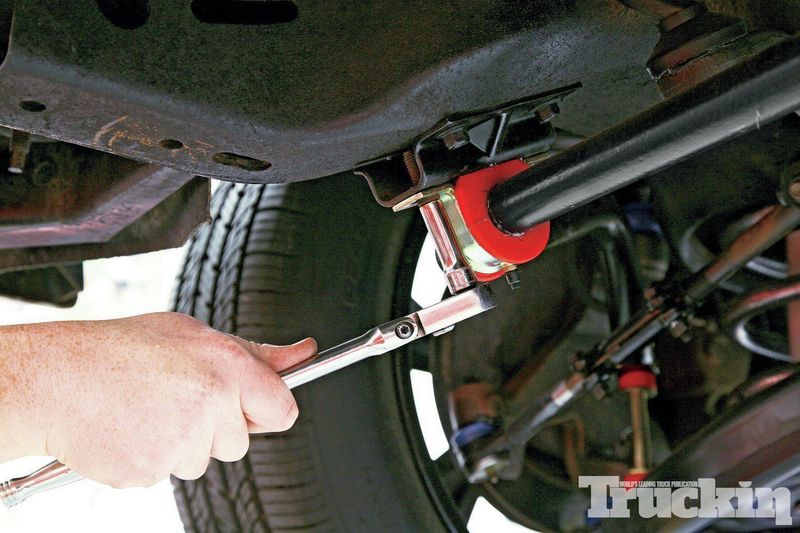
After grinding the rust off the leaf packs and adding a few coats of black paint, we mated the DJM drop shackles with Energy Suspension bushings.

Our Chevy’s 6-inch rear drop was accomplished by remounting the leaf springs under the axle with a flip kit.

To facilitate the new mounting location, DJM created these axle cradles with adjustment allowance to set the correct pinion angle.

New U-bolts and spring plates completed the rear drop.

Shock extenders were part of the DJM kit, and they allow the rear shocks to be angled appropriately for proper function with the 6-inch drop.

Cutting the C-notch in the frame to allow axle clearance was made easier with a plasma cutter, but we have done plenty of these in the past with a cut-off wheel or Sawzall.

A number of 1/2-inch holes had to be drilled through the frame for the C-notch hardware. We recommend you do one at a time to ensure they line up perfectly.

The included bumpstops simply bolted in place, preventing metal-to-metal contact between the frame and axle.

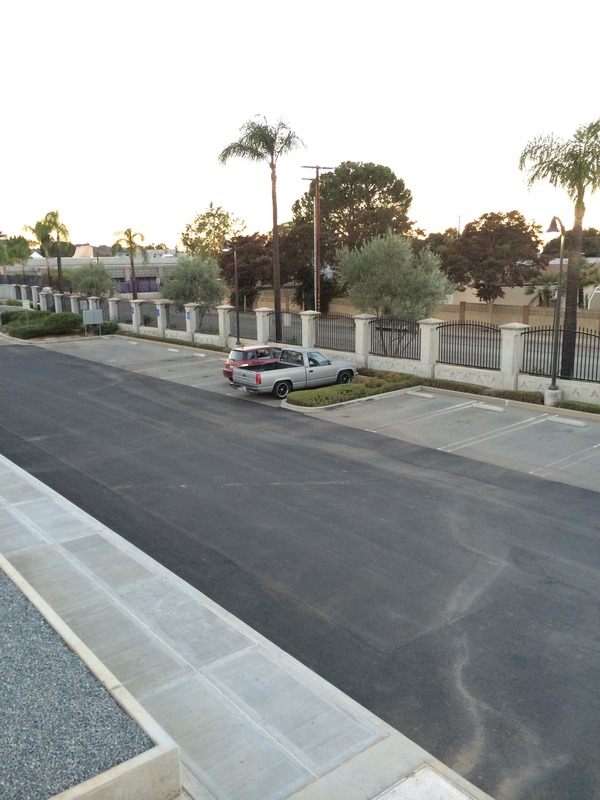
After: Now sporting a new stance and safer, more precise handling, Ugly Bruce was topped off with a set of black 18-inch Streeter wheels from Showwheels, shod in updated BFGoodrich Radial T/A
07-04-2015, 02:09 AM
#3
Teching In
Thread Starter
Join Date: Jul 2015
Location: SoCal
Posts: 8
Likes: 0
Received 0 Likes
on
0 Posts
Now for some body roll control. Read the whole story here http://www.trucktrend.com/how-to/cha...#ixzz3eu5kq7Io.
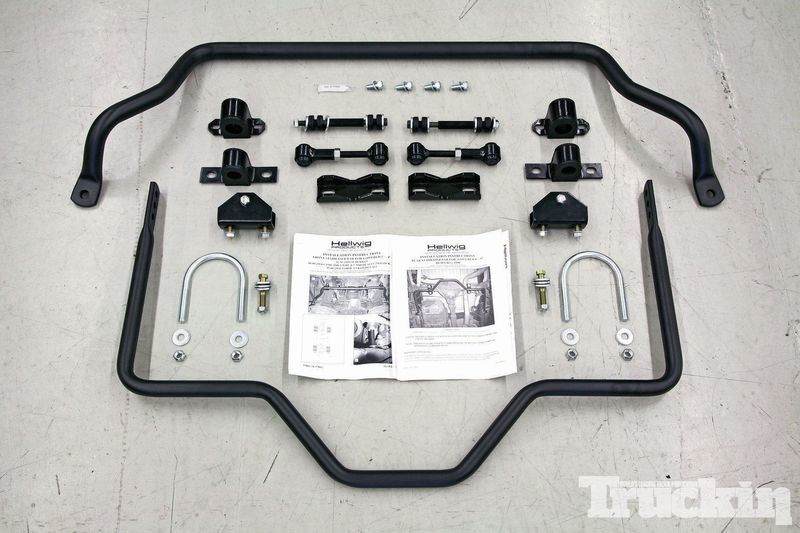
Since we previously lowered our truck with a 4/6-inch DJM Suspension kit, Hellwig provided us with bars tailored to this lowered application. The 15⁄16-inch front bar (PN: 7801) and 1-inch adjustable rear bar (PN: 7802) included endlinks, bushings, hardware, and step-by-step instructions.
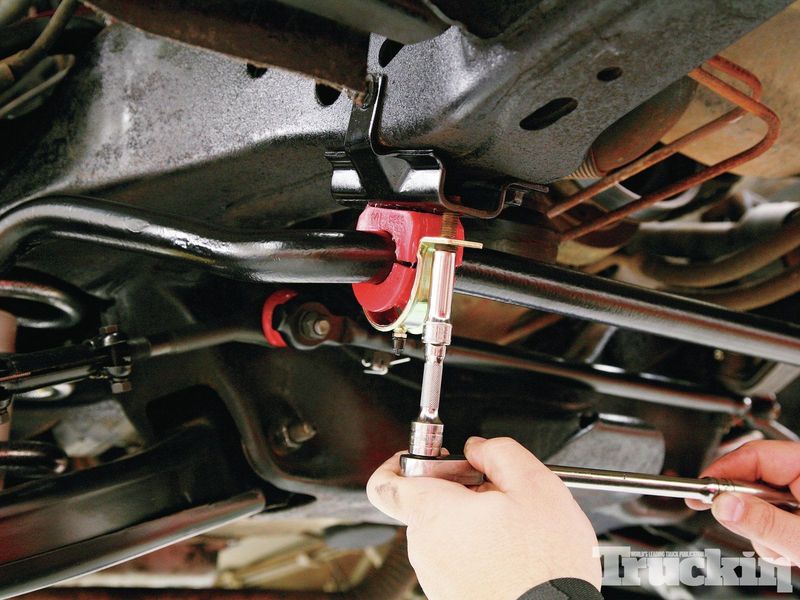
During the install of our DJM lowering kit, we had our factory front sway bar powdercoated black, and upgraded to Energy Suspension poly bushings and endlinks. However, the stock bar wasn�t stiff enough for our high-performance needs, so it had to go.
First, the endlinks were unbolted and removed. The Hellwig kit will replace them with heavy-duty units to support the stiffer bar.
Next, the two sway bar bushing brackets were loosened, and the factory bar was freed from the truck.
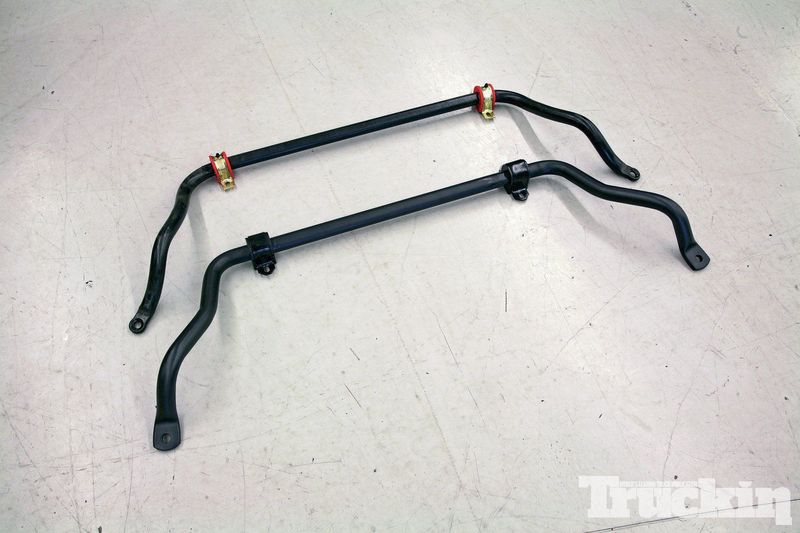
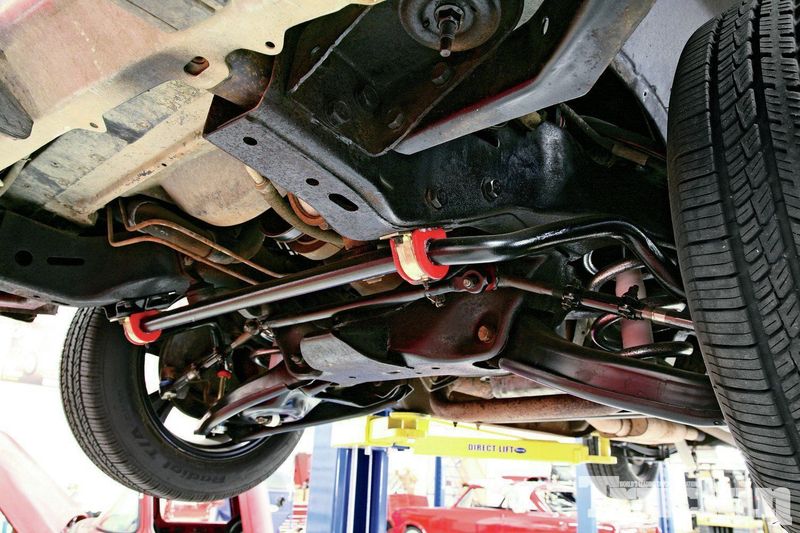
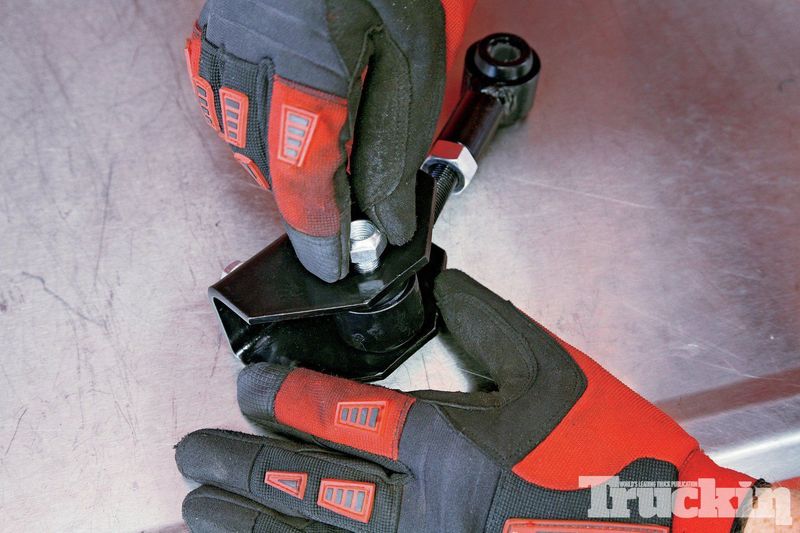
Placing the factory front bar next to the new Hellwig model reveals that the Hellwig bar is thicker, has tougher endlink mounts, and features oversized polyurethane bushings and brackets

Once the new bushings and brackets were thoroughly greased and slipped onto the bar, it was positioned in place under the truck.
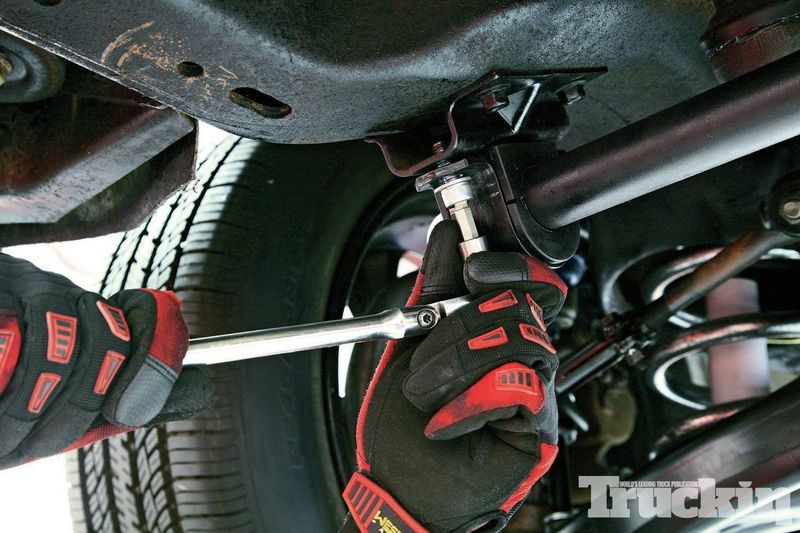
Hellwig�s new endlinks were assembled and installed on the control arms, then the new bushings were secured to the truck�s frame using the included hardware. Once everything was torqued down, we moved on to the rear.
The rear bar�s bushings were greased and installed on the bar, then the new bushing brackets were fit onto the U-bolts and finger-tightened, holding the bar in place.
Next, the rear endlinks were adjusted to equal lengths, and attached to these frame mount brackets per Hellwig�s instructions.
Since the C1500 didn�t originally come with a rear sway bar, we had to drill out two holes on each framerail to provide mounting points for the endlinks.
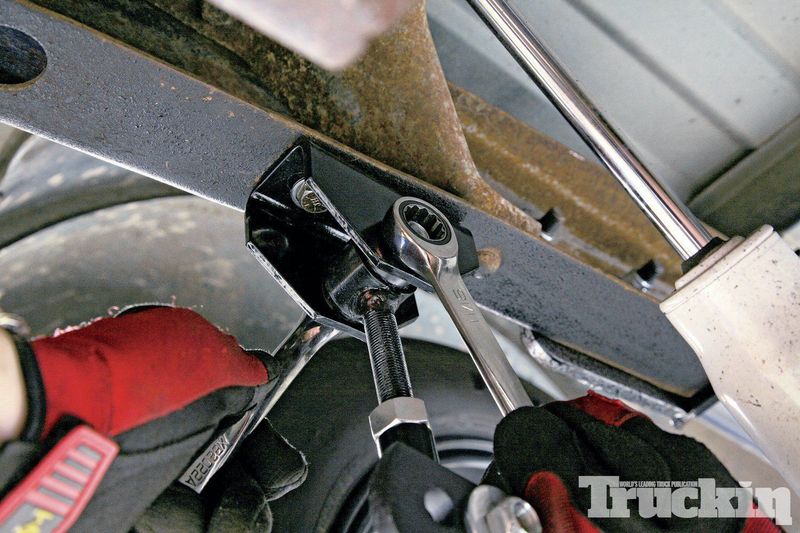
After bolting the endlink brackets securely to the frame, the endlinks were attached and torqued down. Adjusting the bar�s stiffness in the future is as simple as unbolting each endlink and repositioning it in one of three holes on the bar.
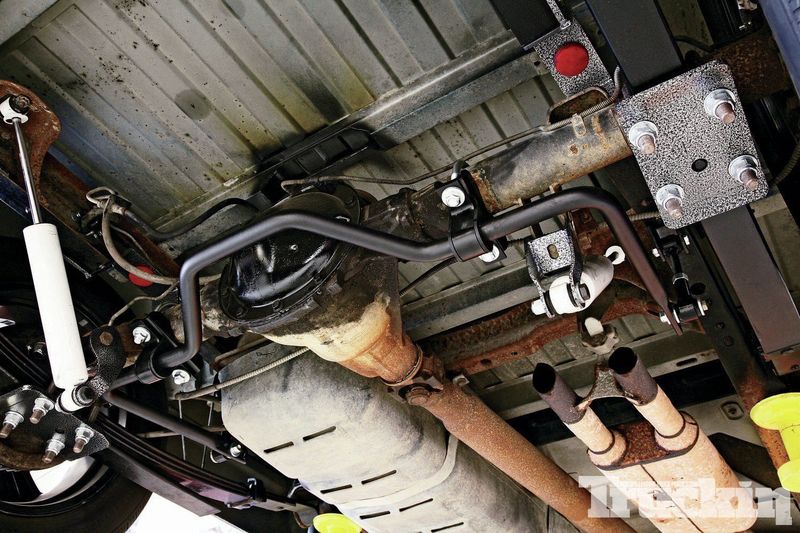
Once the bushing brackets were torqued down, the install was complete. We promptly took the truck on a test drive, and immediately noticed that it felt more stable in the corners, more precise on turn-in, and understeered less overall -- not bad for an afternoon�s work.

And a token slalom photo after swaybar install.

Since we previously lowered our truck with a 4/6-inch DJM Suspension kit, Hellwig provided us with bars tailored to this lowered application. The 15⁄16-inch front bar (PN: 7801) and 1-inch adjustable rear bar (PN: 7802) included endlinks, bushings, hardware, and step-by-step instructions.

During the install of our DJM lowering kit, we had our factory front sway bar powdercoated black, and upgraded to Energy Suspension poly bushings and endlinks. However, the stock bar wasn�t stiff enough for our high-performance needs, so it had to go.

First, the endlinks were unbolted and removed. The Hellwig kit will replace them with heavy-duty units to support the stiffer bar.

Next, the two sway bar bushing brackets were loosened, and the factory bar was freed from the truck.

Placing the factory front bar next to the new Hellwig model reveals that the Hellwig bar is thicker, has tougher endlink mounts, and features oversized polyurethane bushings and brackets

Once the new bushings and brackets were thoroughly greased and slipped onto the bar, it was positioned in place under the truck.

Hellwig�s new endlinks were assembled and installed on the control arms, then the new bushings were secured to the truck�s frame using the included hardware. Once everything was torqued down, we moved on to the rear.

The rear bar�s bushings were greased and installed on the bar, then the new bushing brackets were fit onto the U-bolts and finger-tightened, holding the bar in place.

Next, the rear endlinks were adjusted to equal lengths, and attached to these frame mount brackets per Hellwig�s instructions.

Since the C1500 didn�t originally come with a rear sway bar, we had to drill out two holes on each framerail to provide mounting points for the endlinks.

After bolting the endlink brackets securely to the frame, the endlinks were attached and torqued down. Adjusting the bar�s stiffness in the future is as simple as unbolting each endlink and repositioning it in one of three holes on the bar.

Once the bushing brackets were torqued down, the install was complete. We promptly took the truck on a test drive, and immediately noticed that it felt more stable in the corners, more precise on turn-in, and understeered less overall -- not bad for an afternoon�s work.

And a token slalom photo after swaybar install.
07-04-2015, 03:23 AM
#4
Teching In
Thread Starter
Join Date: Jul 2015
Location: SoCal
Posts: 8
Likes: 0
Received 0 Likes
on
0 Posts
Here is where I come into the picture.....
I had been looking for an 88-98 reg cab, short bed Silverado off and on for a while, and one night while surfing Craigslist, I stumbled on a truck I recognized from reading a Truckin Magazine build, Project Rehab.
I made a phone call, and was scheduled to look at the truck that weekend.
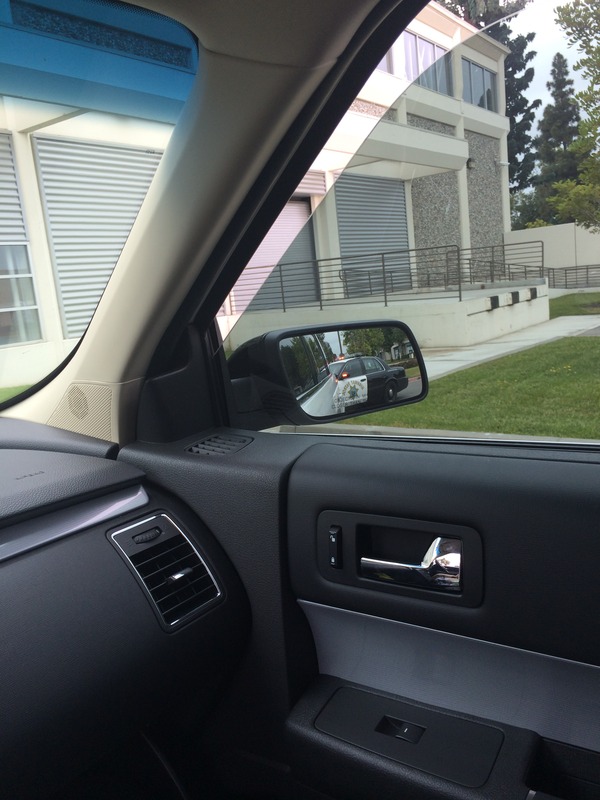
On the way to Patrick's house I had a little encounter with the CA HWY Patrol, and was let go when I definitely deserved the ticket. I took this as an omen that this purchase was meant to be.
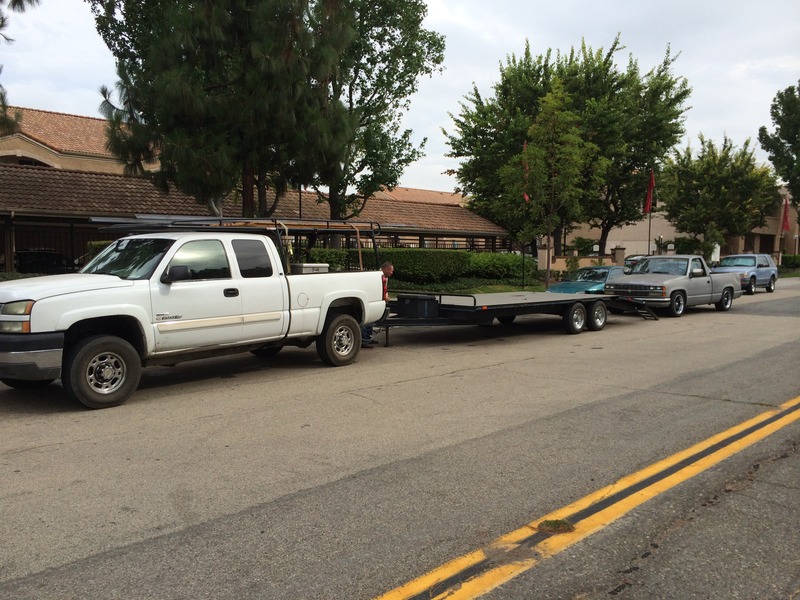
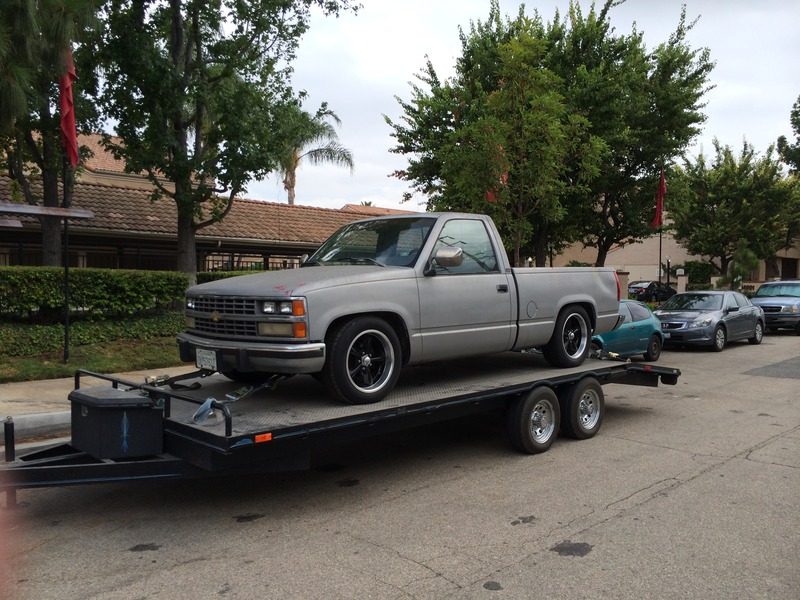
I fell in love with Bruce, left a deposit, and came back the next weekend and picked him up.
I daily'd Bruce for a while, but.....
...... the SBC was tired, and decided it didn't like its head gasket..... let the fun begin.
I had been looking for an 88-98 reg cab, short bed Silverado off and on for a while, and one night while surfing Craigslist, I stumbled on a truck I recognized from reading a Truckin Magazine build, Project Rehab.
I made a phone call, and was scheduled to look at the truck that weekend.

On the way to Patrick's house I had a little encounter with the CA HWY Patrol, and was let go when I definitely deserved the ticket. I took this as an omen that this purchase was meant to be.


I fell in love with Bruce, left a deposit, and came back the next weekend and picked him up.

I daily'd Bruce for a while, but.....

...... the SBC was tired, and decided it didn't like its head gasket..... let the fun begin.
Last edited by Lees_Garage; 07-04-2015 at 03:30 AM.

 07-04-2015, 11:16 AM
#6
TECH Apprentice
Cool truck! I like the stance and wheels. I always like the 88-89 quad headlight look.
Trending Topics
07-04-2015, 04:26 PM
#8
Teching In
Thread Starter
Join Date: Jul 2015
Location: SoCal
Posts: 8
Likes: 0
Received 0 Likes
on
0 Posts
The truck will be getting an iron block LS, frame restored, a new c-notch, and a paint job.
 04-09-2017, 12:58 PM
#11
Registered User

Join Date: Apr 2017
Location: Rockwall, Tx
Posts: 2
Likes: 0
Received 0 Likes
on
0 Posts
What ever happened to Bruce? I searched everywhere to find the follow up to the Truckin magazine article on this truck to find it is now named Bruce. Then, it dead ends here. Is this really it?
04-09-2017, 04:41 PM
#12
Teching In
Thread Starter
Join Date: Jul 2015
Location: SoCal
Posts: 8
Likes: 0
Received 0 Likes
on
0 Posts
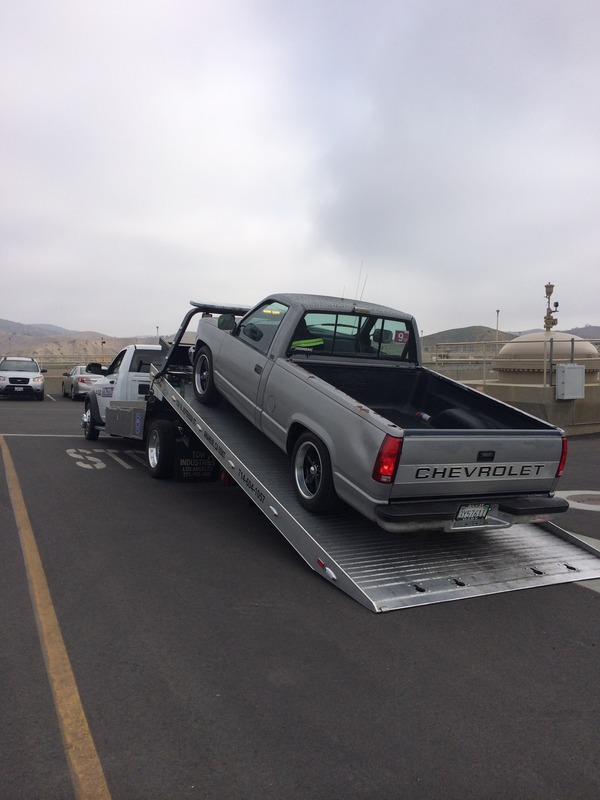
I put him back together with the TBI motor about a year ago, and sold him. New owner currently drives the truck often, and has a 5.3 going in, but I don't believe he's created a thread on here.
04-09-2017, 09:49 PM
#13
Registered User
Join Date: Apr 2017
Location: Rockwall, Tx
Posts: 2
Likes: 0
Received 0 Likes
on
0 Posts
Thanks. From your experience with the truck, how did the truck drive with the mods the magazine performed? Anything you would have done differently? Do you know the specs on the wheels and tire sizes?
It's tough to find budget GMT400 truck builds. I have a '95 and was looking to copy "Bruce".
It's tough to find budget GMT400 truck builds. I have a '95 and was looking to copy "Bruce".
04-09-2017, 10:12 PM
#14
Teching In
Thread Starter
Join Date: Jul 2015
Location: SoCal
Posts: 8
Likes: 0
Received 0 Likes
on
0 Posts
Thanks. From your experience with the truck, how did the truck drive with the mods the magazine performed? Anything you would have done differently? Do you know the specs on the wheels and tire sizes?
It's tough to find budget GMT400 truck builds. I have a '95 and was looking to copy "Bruce".
It's tough to find budget GMT400 truck builds. I have a '95 and was looking to copy "Bruce".
For a daily, the truck was about perfect. The suspension was smooth, but still handled decently (no canyon carver, but definitely better than stock. If I remember correctly it was on 18x7/18x8 with (I believe) 245/55R18 front and rear.
As far as doing anything different, I would have purchased a newer, vortech truck, to start with. I would've ran a square wheel setup, and airshocks in the rear in case I wanted to haul/tow.