
Jaguar S Type Turbo LS Swap
 06-23-2016, 12:32 PM
#1
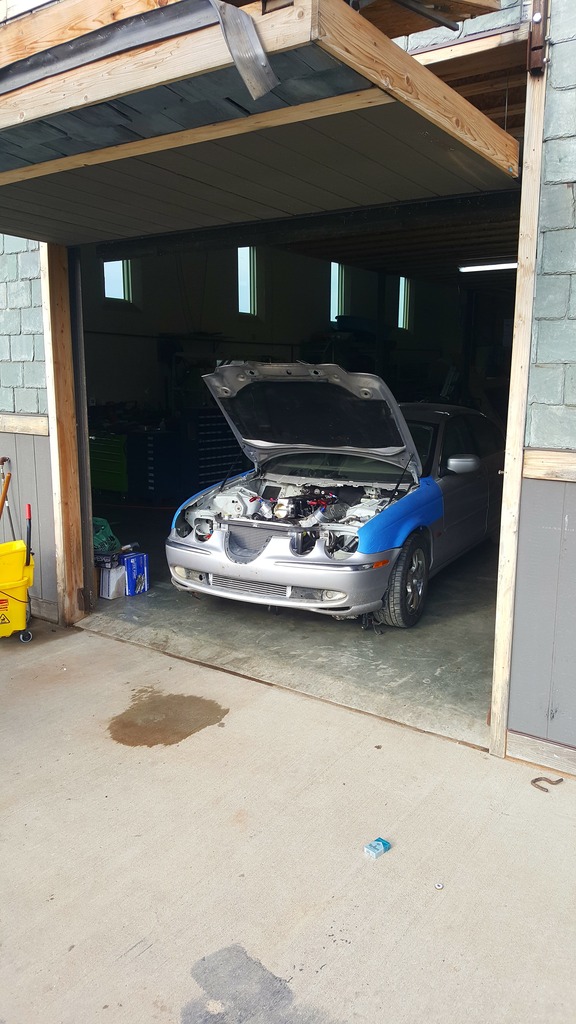
I thought I would finally start to throw together a build thread for this thing. So here she goes.
After picking this car up for what i thought was going to be a quick and easy flip, i started to play around with the idea of swapping this car. After a little research, i quickly found that no one makes any kits to do it, and I could only find one person that has actually started to tackle an actual S Type. I did however run across a Lincoln LS that looked to be done correctly and turned out pretty nice. Everyone else said this was impossible and that it would take sooo much to make everything work. I don't care. I like a challenge I guess.
So, I fully developed the plan, pulled a motor I had sitting in another car, started buying some parts, and ripped into the old Jaguar.
The plan:
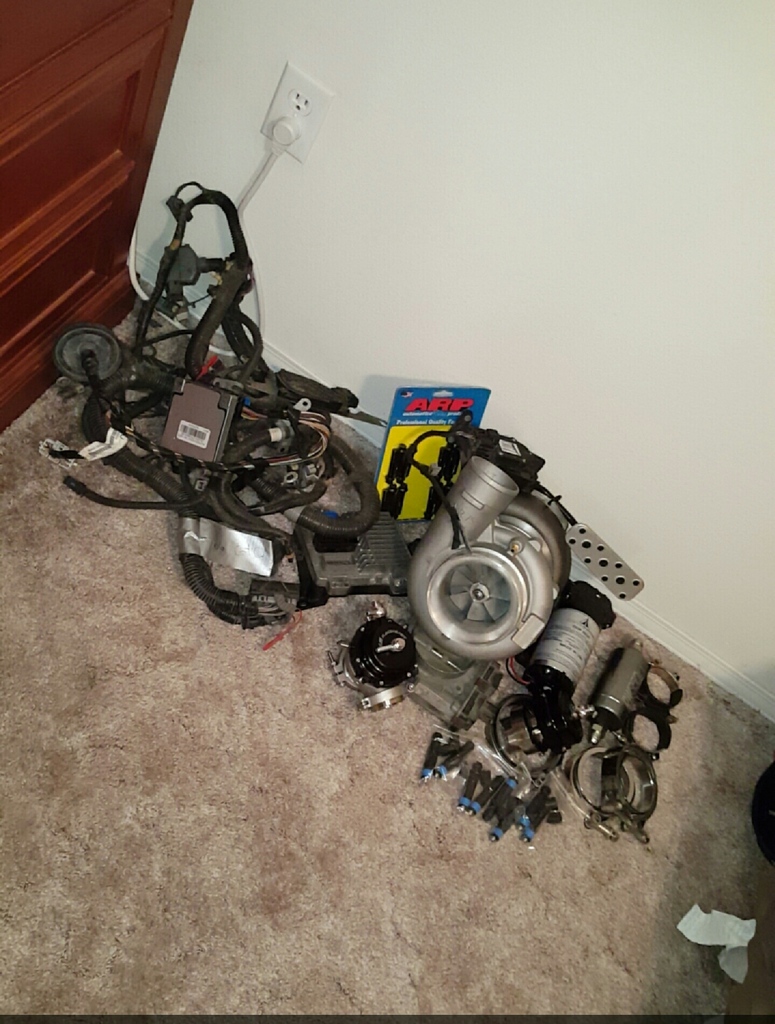
5.3 w/ right around 100k on it
Early model 4L80E with the harness upgrade of course.
Engine & trans controlled by two Microsquirt units
VS Racing 88/83 turbo
VS Racing WG and BOV
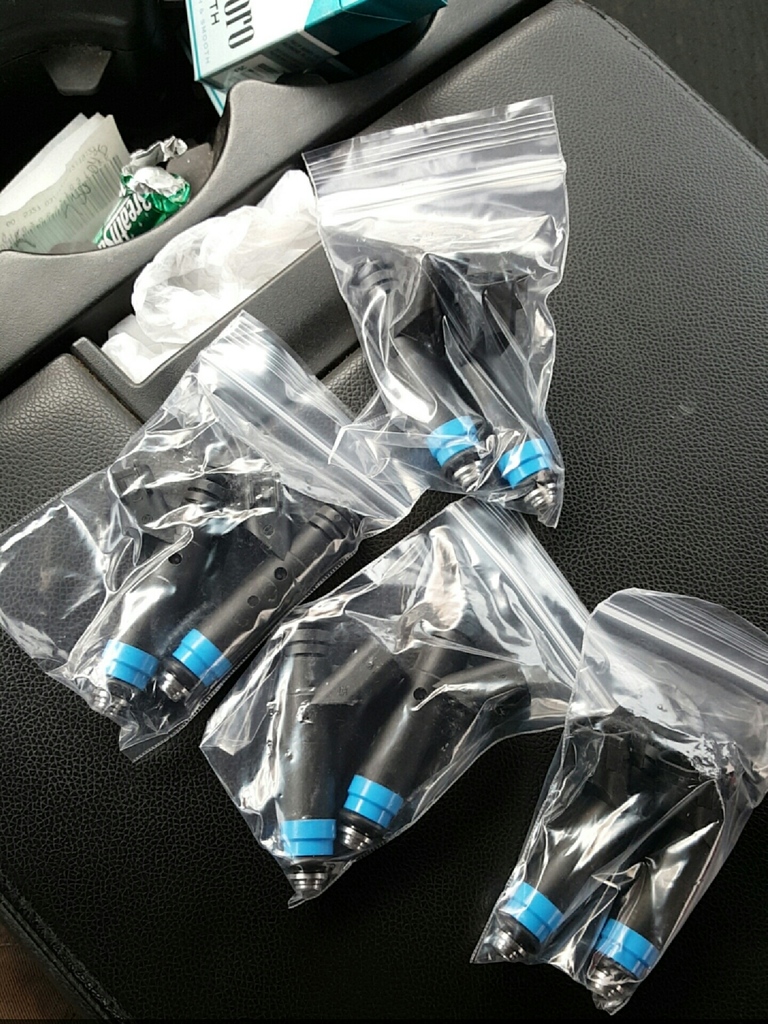
Siemens Deka 80 lb/hr injectors from VSR
Twin Walbro 450 E85 fuel pumps
A2W intercooler with heat exchanger for daily street driving and ice box for the track and Mexico of course.
Factory IRS will be retained but the 8" open rear diff will be swapped to an 8.8" LSD. If the 28 spline axles or 8" ring gear give up after being tortured, a custom rear suspension will be in line along with a 31+ spline solid 8.8".
Reworked hubs all around with 5x4.5" bolt pattern incorporated in lieu of the funky 5x108mm pattern to widen the spectrum of wheel options.
Plus bunches of other jazz I can't remember...
I am trying to retain as many of the interior functions as possible to keep this car comfortable since I want it to be capable of daily driver duty. This will include AC, power steering, power seats and steering wheel with memory, factory stereo and navigation, etc.. However, I am not even going to attempt communicating with the Jag's indecipherable CANbus systems, so it will be lacking functional ABS and traction control.. big deal. I hate that shitt anyways lol.
Anyways... on to the pictures and whatnot!

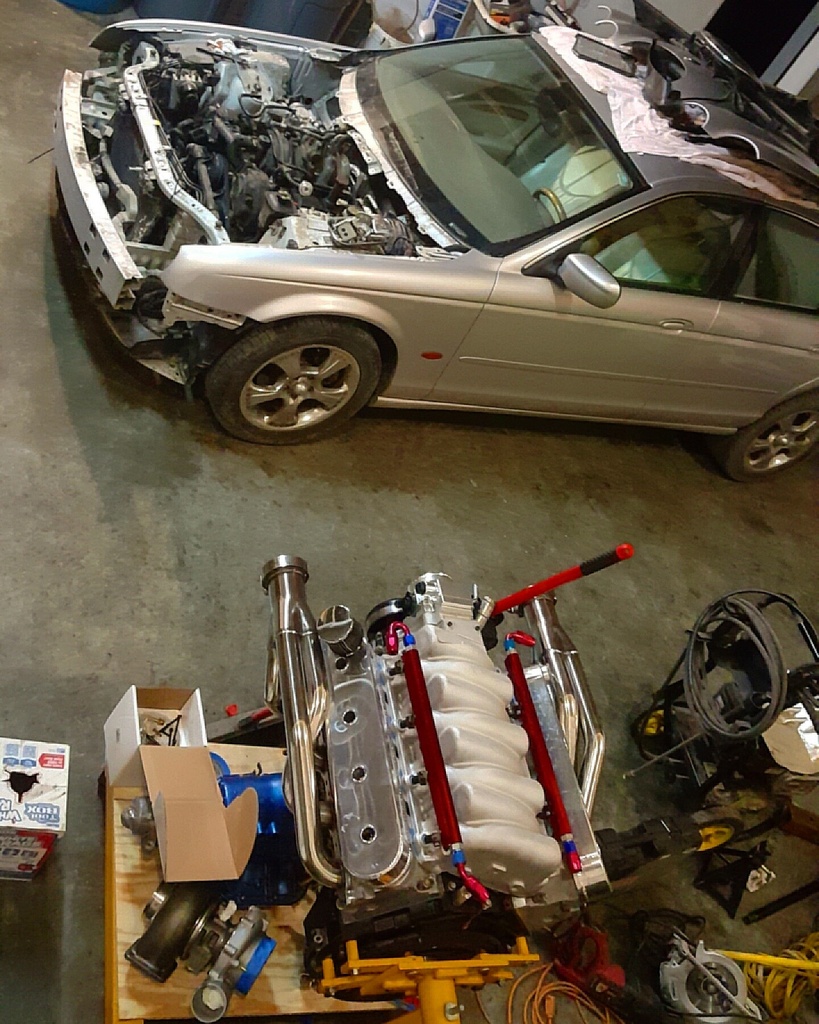
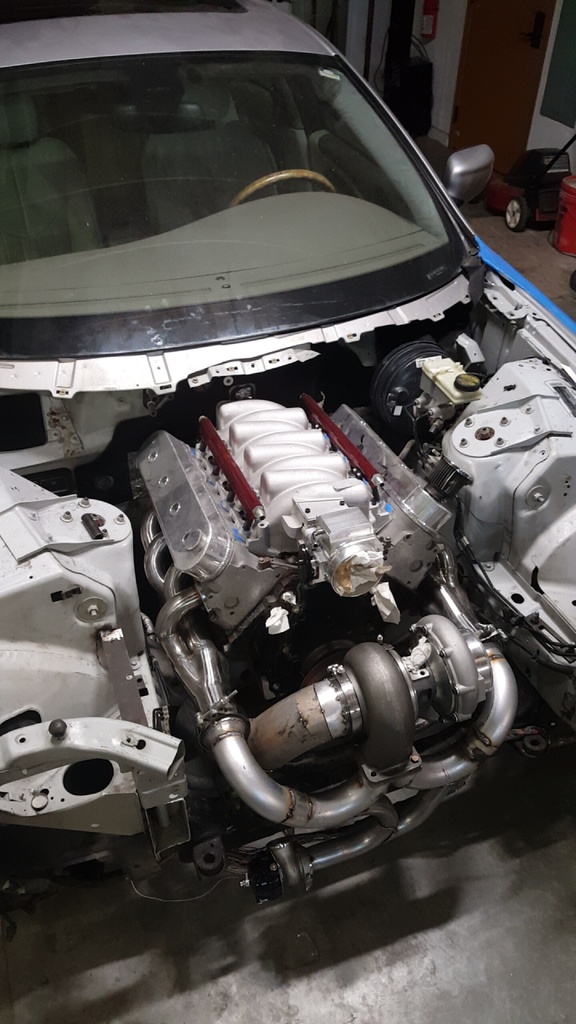
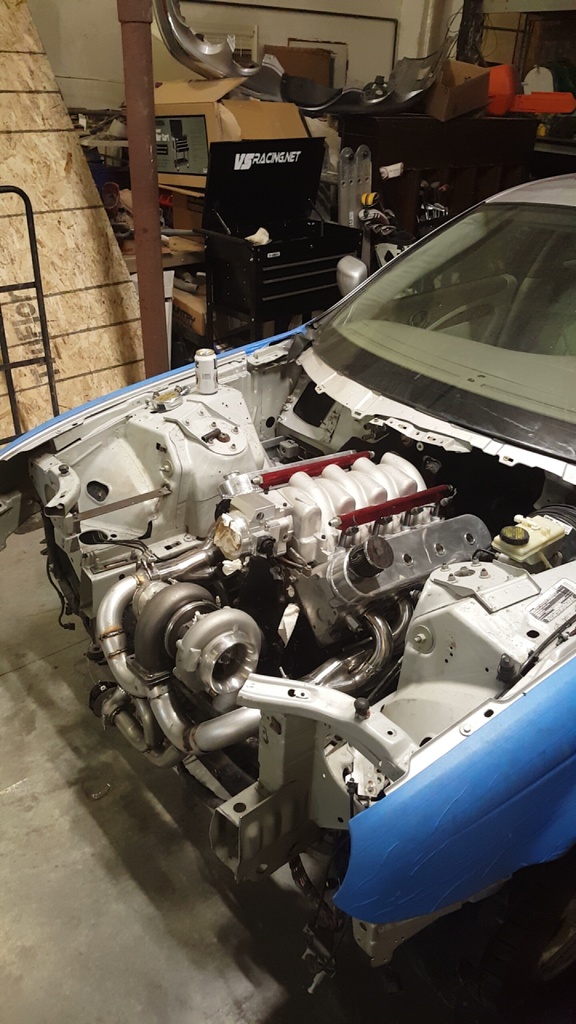
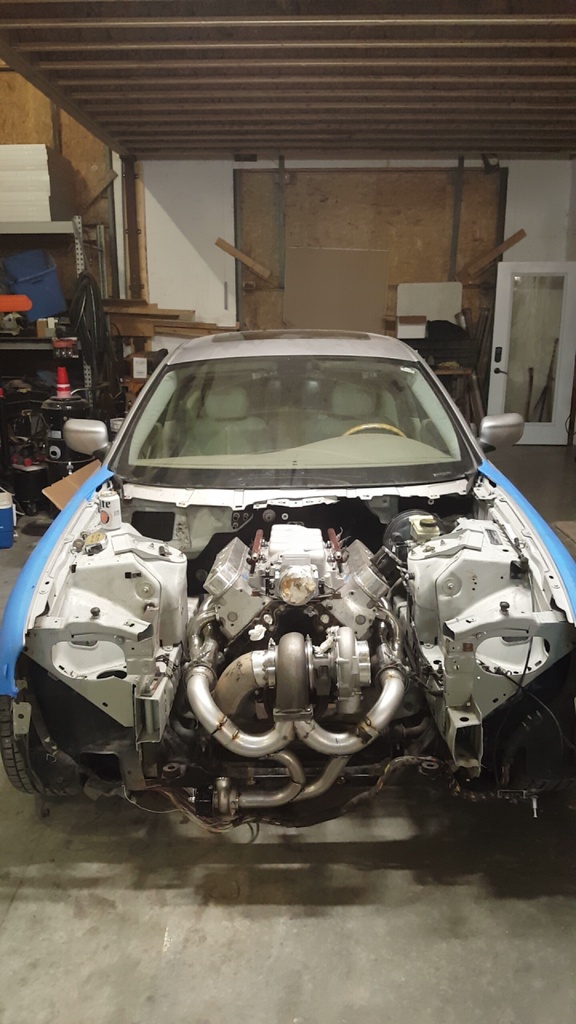
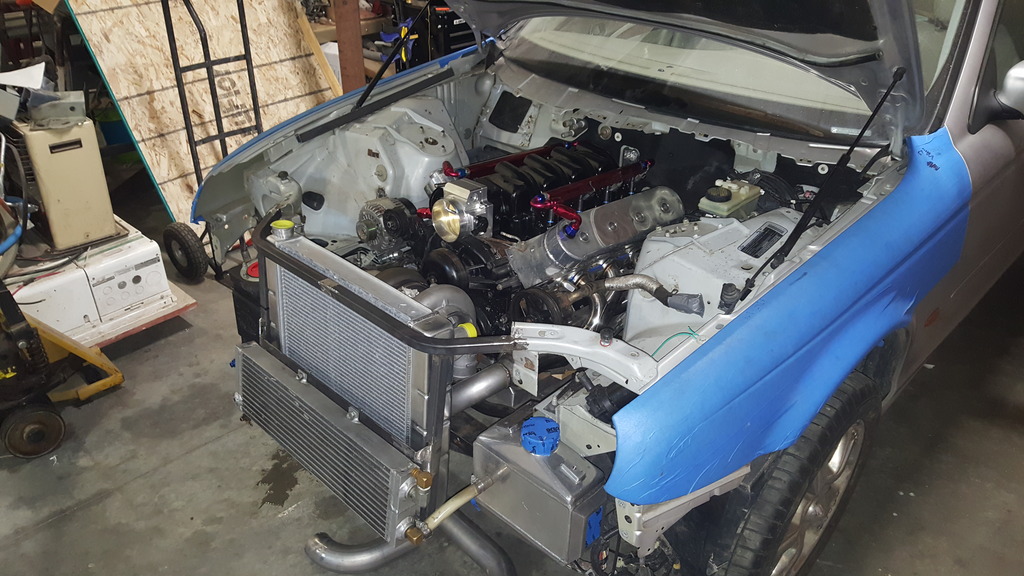
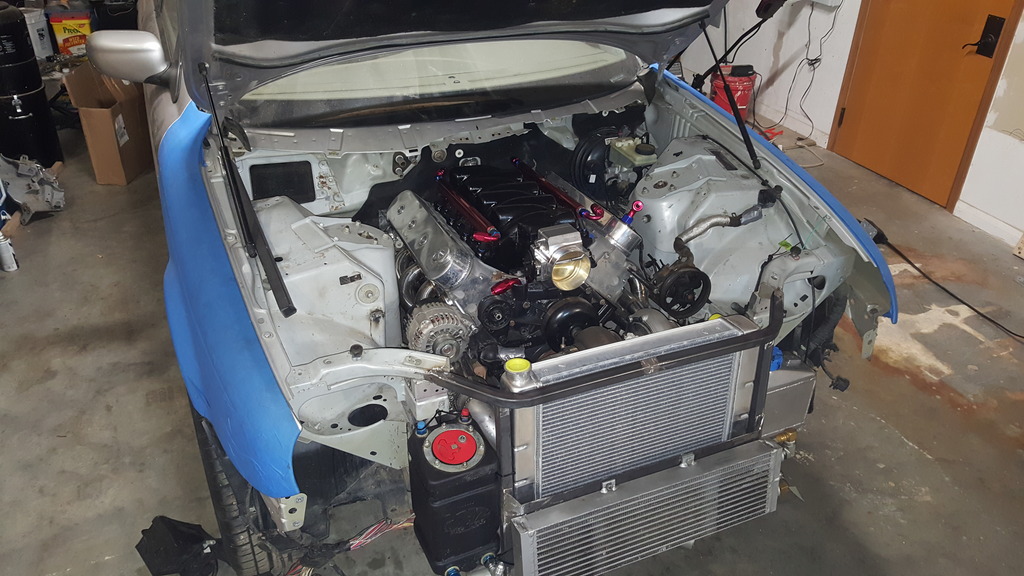
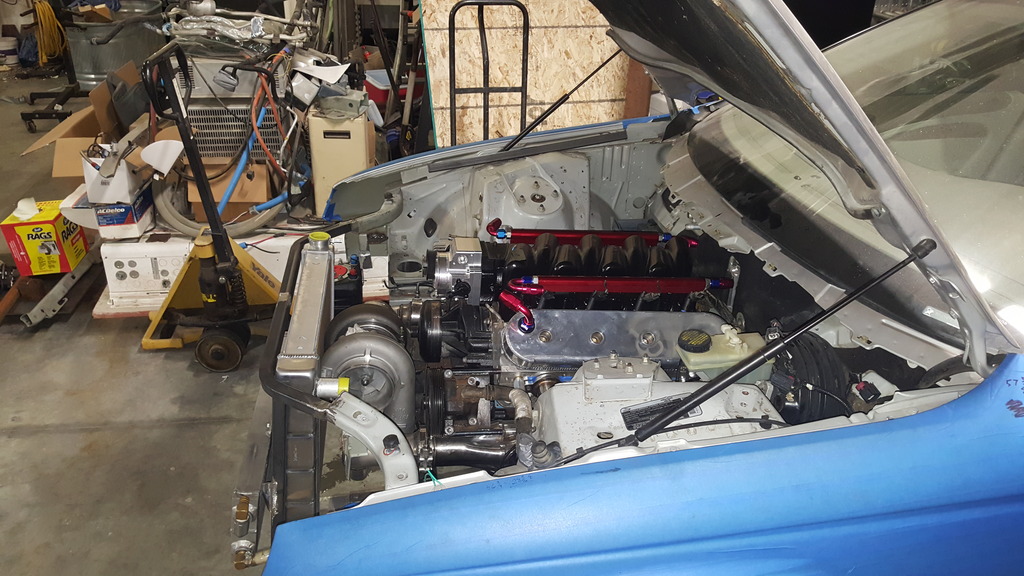
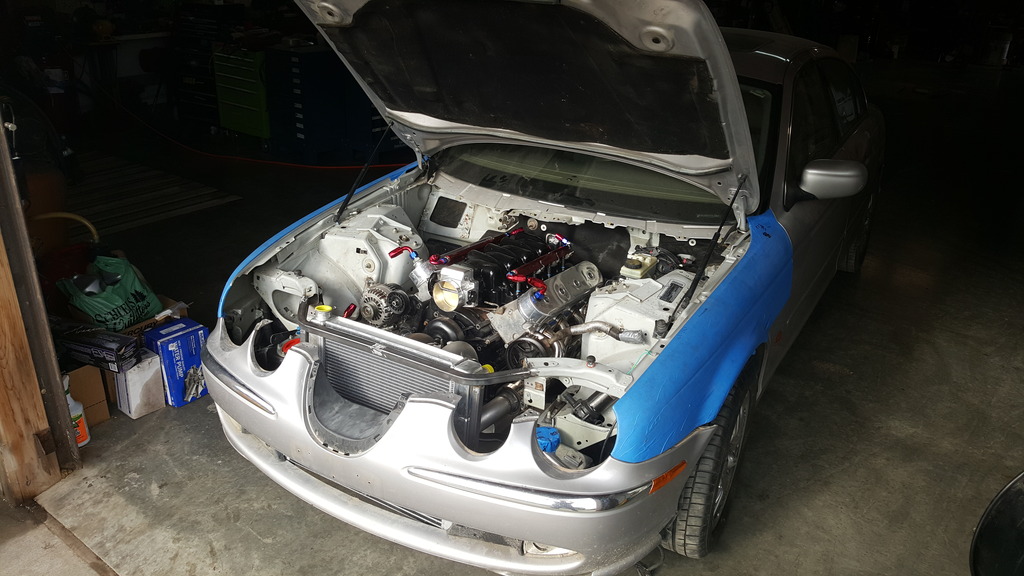
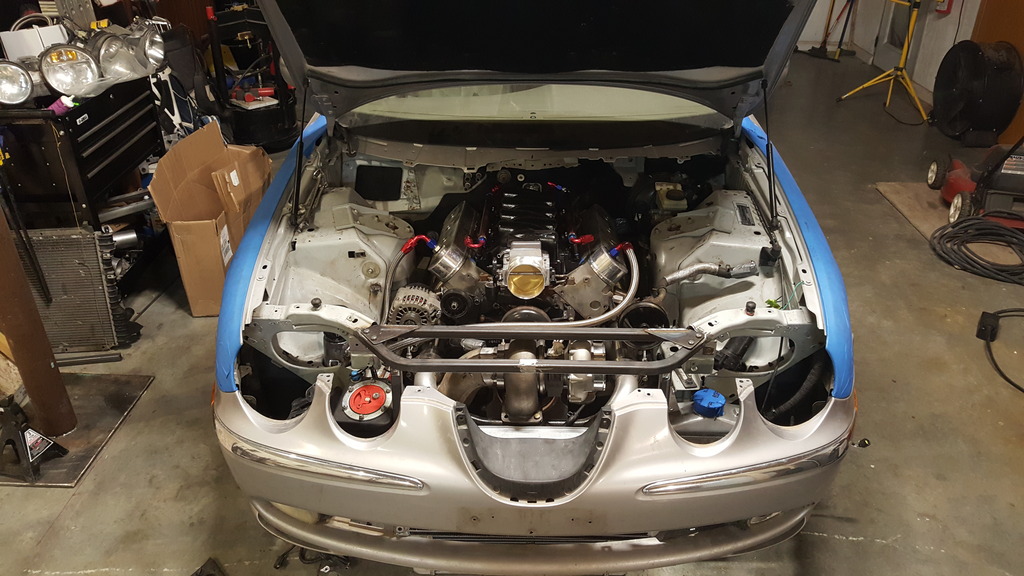
I got the 4.0 wrestled outta there and the new motor sat into place. While doing so I quickly ran into my first of many space issues... as I assumed it would, the oil pan ran right into the rack. I sprung for a fabricated aluminum pan and just kept on working while I waited for it to show up on my doorstep.
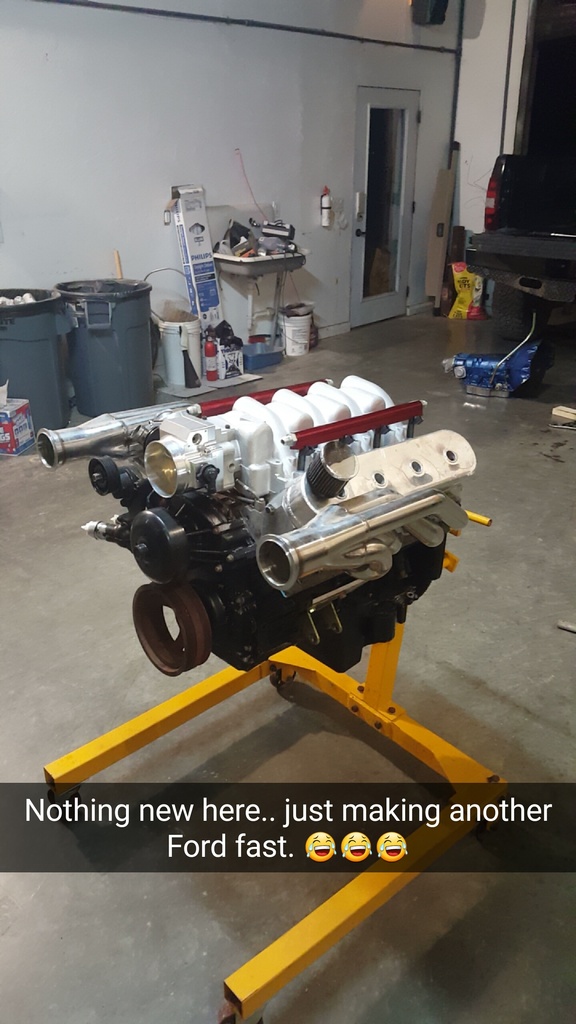
After A LOT of cutting, trimmings and multiple hotside ideas, this is just about where I currently sit on the project. I will have to get some more up to date pictures this evening, but the engine and trans are right where I want them with nothing hanging below the car, oil pan is on, hotside is nearly fully welded, accessories are in the midst of being mounted, and I'm still playing around with routing the downpipe.
After picking this car up for what i thought was going to be a quick and easy flip, i started to play around with the idea of swapping this car. After a little research, i quickly found that no one makes any kits to do it, and I could only find one person that has actually started to tackle an actual S Type. I did however run across a Lincoln LS that looked to be done correctly and turned out pretty nice. Everyone else said this was impossible and that it would take sooo much to make everything work. I don't care. I like a challenge I guess.
So, I fully developed the plan, pulled a motor I had sitting in another car, started buying some parts, and ripped into the old Jaguar.
The plan:
5.3 w/ right around 100k on it
Early model 4L80E with the harness upgrade of course.
Engine & trans controlled by two Microsquirt units
VS Racing 88/83 turbo
VS Racing WG and BOV
Siemens Deka 80 lb/hr injectors from VSR
Twin Walbro 450 E85 fuel pumps
A2W intercooler with heat exchanger for daily street driving and ice box for the track and Mexico of course.
Factory IRS will be retained but the 8" open rear diff will be swapped to an 8.8" LSD. If the 28 spline axles or 8" ring gear give up after being tortured, a custom rear suspension will be in line along with a 31+ spline solid 8.8".
Reworked hubs all around with 5x4.5" bolt pattern incorporated in lieu of the funky 5x108mm pattern to widen the spectrum of wheel options.
Plus bunches of other jazz I can't remember...
I am trying to retain as many of the interior functions as possible to keep this car comfortable since I want it to be capable of daily driver duty. This will include AC, power steering, power seats and steering wheel with memory, factory stereo and navigation, etc.. However, I am not even going to attempt communicating with the Jag's indecipherable CANbus systems, so it will be lacking functional ABS and traction control.. big deal. I hate that shitt anyways lol.
Anyways... on to the pictures and whatnot!


I got the 4.0 wrestled outta there and the new motor sat into place. While doing so I quickly ran into my first of many space issues... as I assumed it would, the oil pan ran right into the rack. I sprung for a fabricated aluminum pan and just kept on working while I waited for it to show up on my doorstep.


After A LOT of cutting, trimmings and multiple hotside ideas, this is just about where I currently sit on the project. I will have to get some more up to date pictures this evening, but the engine and trans are right where I want them with nothing hanging below the car, oil pan is on, hotside is nearly fully welded, accessories are in the midst of being mounted, and I'm still playing around with routing the downpipe.


The following users liked this post:
techmeltz (03-11-2024)

 06-23-2016, 04:51 PM
#4
Thanks though guys. I appreciate the compliments!
06-30-2016, 12:07 PM
#5
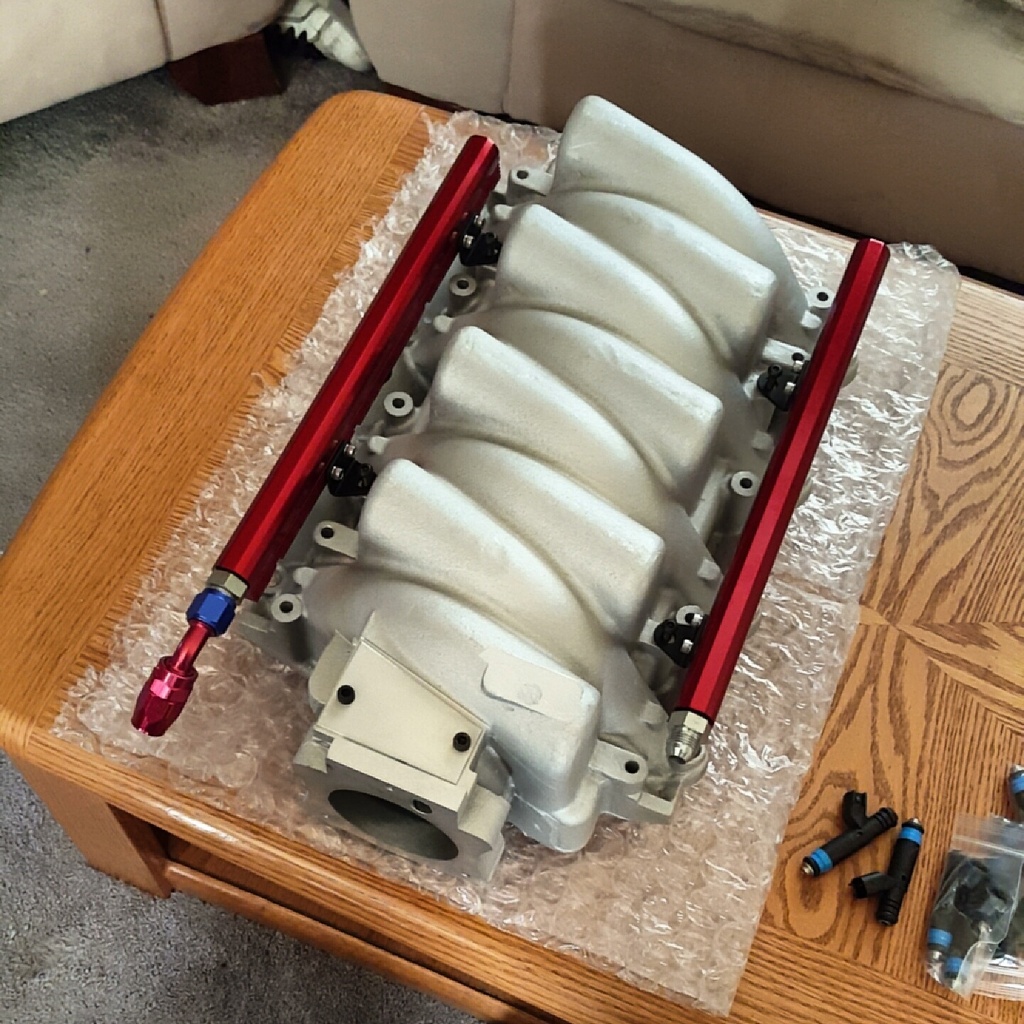
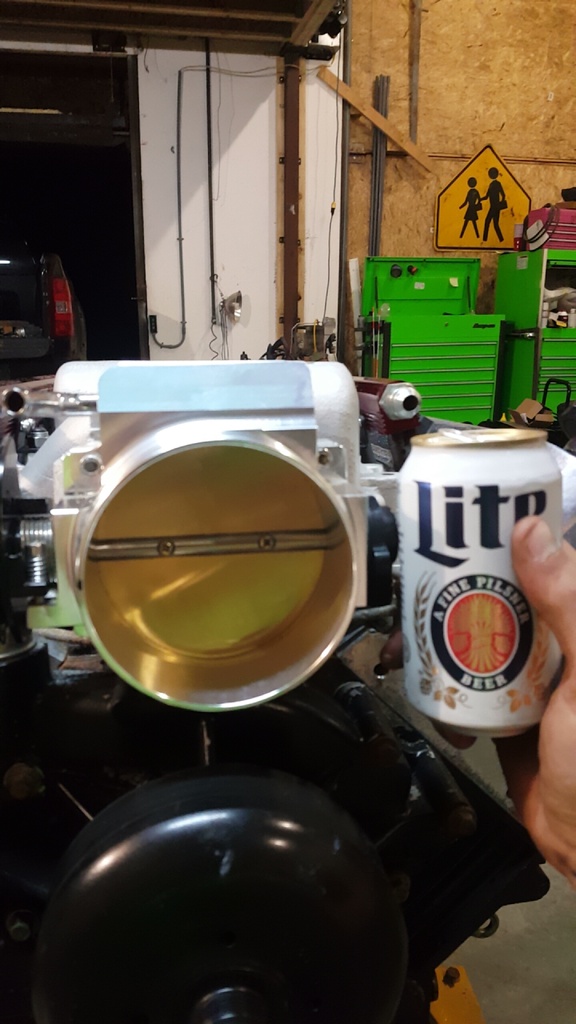
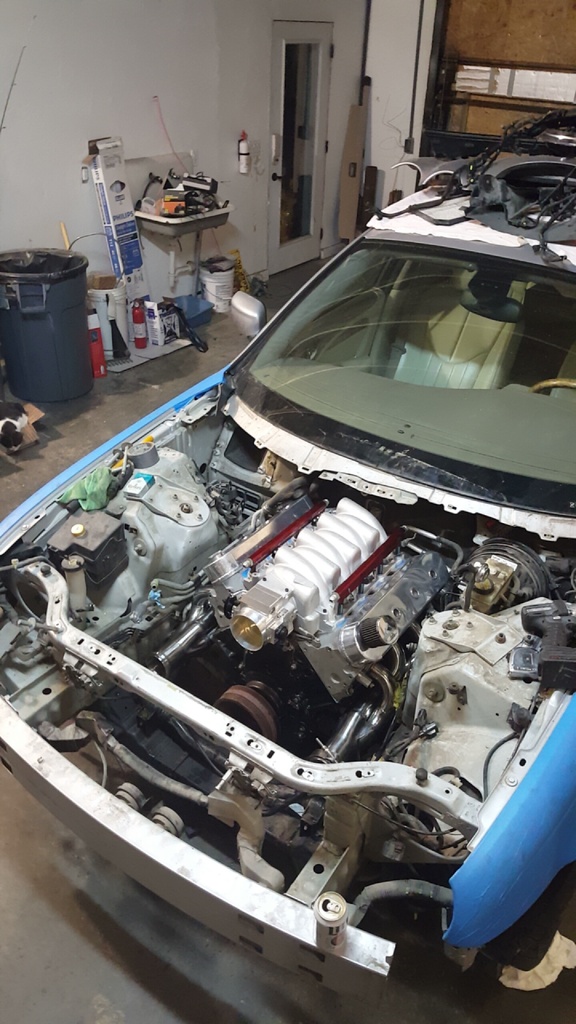
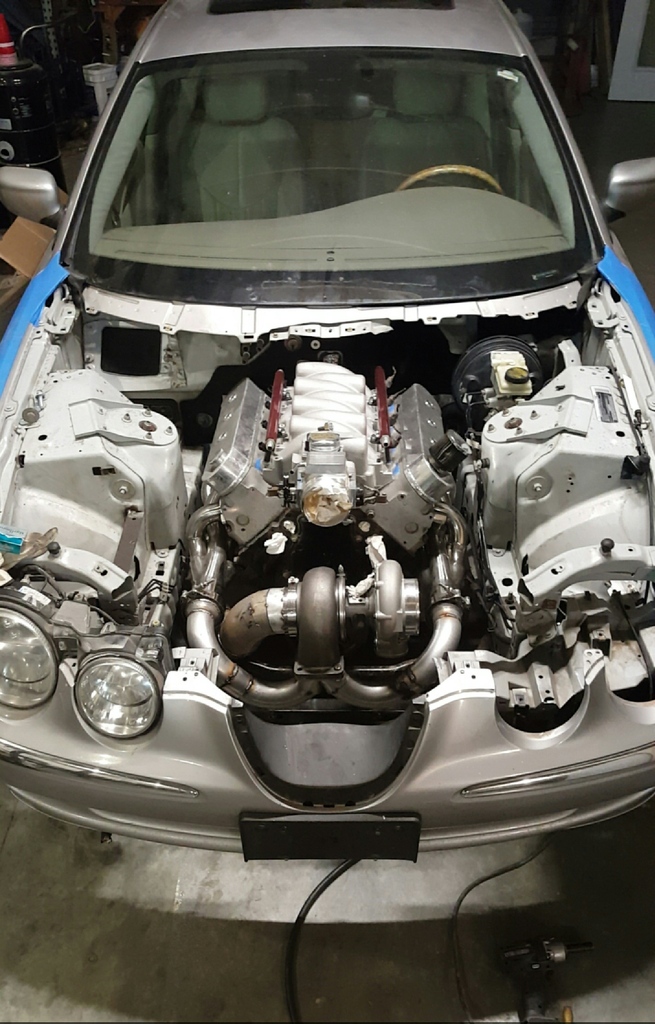
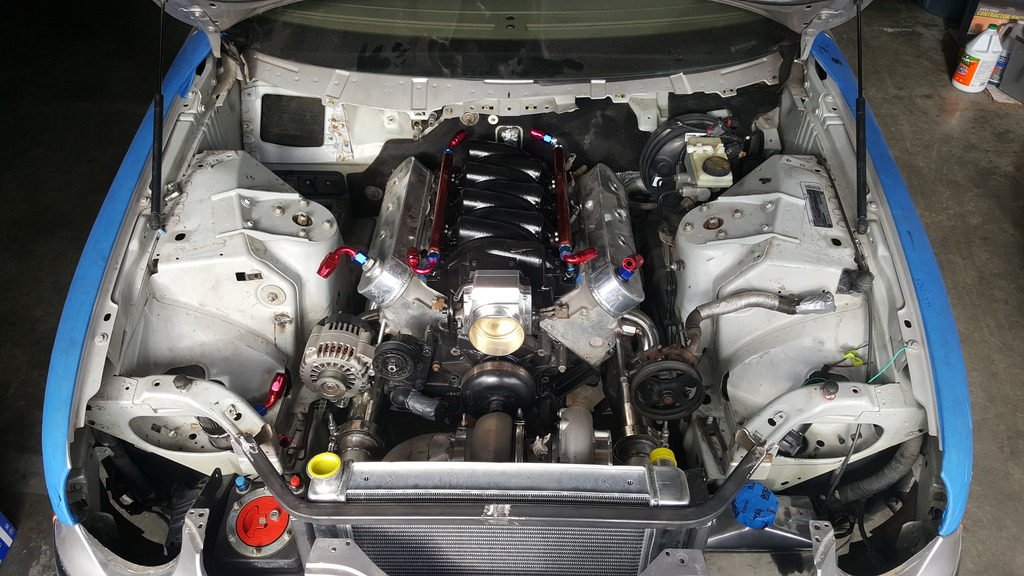
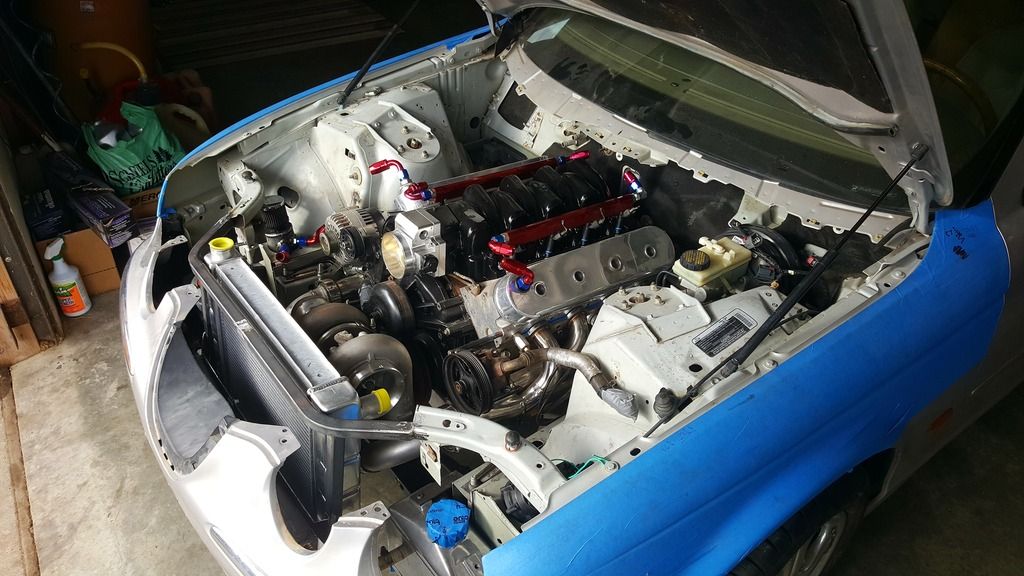
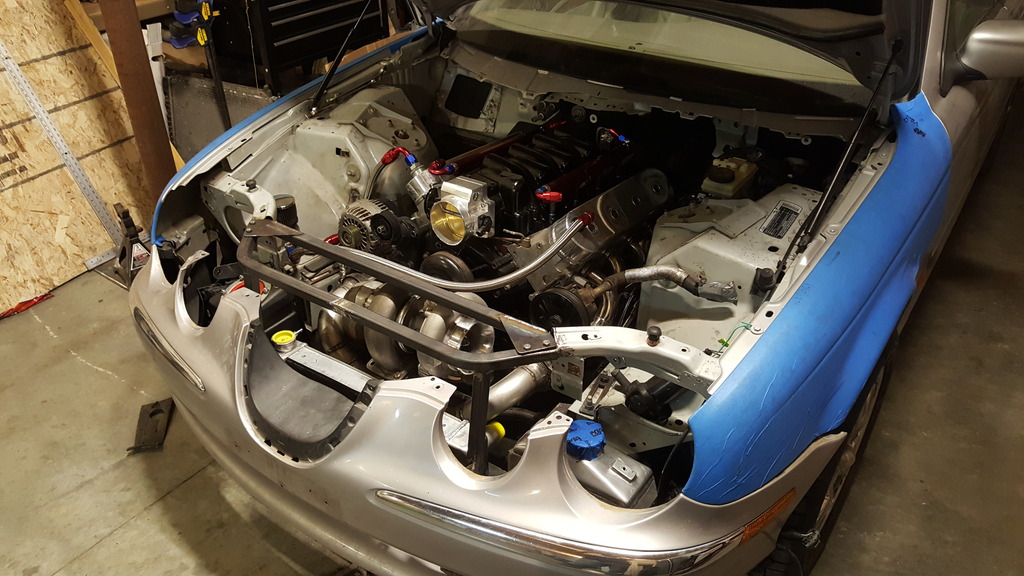
Jaguar progress the past few days... Intercooler mounted, radiator support is nearing completion with the radiator and heat exchanger sitting basically where they need to be and the bumper actually fits lol, accessories sitting in place with brackets started, painted intake, fittings found for evap and fuel, hotside fully welded, ice box location is up in the air, and charge pipes are made, but waiting for my couplers to arrive before paint.
Today, I'm going to finish up the rad support, build the finalized motor mounts, and mount this ice box after finding an official spot for it.
THEN! hopefully this weekend we can fire this bitch off after plumbing and wiring!! She's getting close, and I can't wait!
Today, I'm going to finish up the rad support, build the finalized motor mounts, and mount this ice box after finding an official spot for it.
THEN! hopefully this weekend we can fire this bitch off after plumbing and wiring!! She's getting close, and I can't wait!


 07-01-2016, 07:26 AM
#7

this is great. Love the chassis choice, they never get any love. Will be a real sleeper when it's done!
How did you change the bolt pattern on the 5x10⁸ hubs? Simple redrill?
How did you change the bolt pattern on the 5x10⁸ hubs? Simple redrill?
Trending Topics
07-02-2016, 06:58 PM
#8
Thanks for the compliments fellas, I appreciate it. It's a hell of a job on this car since there's no information on the swap anywhere cause very few have tried it, or atleast from what I can find. It's fun though, and it definitely challenges my creativity which I love.
That's what the plan is. Everyone is always scared of doing it, but I have a shitty harbor freight drill press and I've done it successfully on a few other cars of my own. I usually make a jig out of flat plate that is fastened utilizing the existing studs/lugs with a tube welded to it to guide the bit just to ensure everything is 100% square and concentric. Then just fasten the hub, rotors and jig all together and have fun drilling for a couple hours. I value my own time at about $15/hr, so $45ish that I don't actually spend is better than a couple hundred to have someone else do it for me or even way more to have custom wheels made for me.
That's what the plan is. Everyone is always scared of doing it, but I have a shitty harbor freight drill press and I've done it successfully on a few other cars of my own. I usually make a jig out of flat plate that is fastened utilizing the existing studs/lugs with a tube welded to it to guide the bit just to ensure everything is 100% square and concentric. Then just fasten the hub, rotors and jig all together and have fun drilling for a couple hours. I value my own time at about $15/hr, so $45ish that I don't actually spend is better than a couple hundred to have someone else do it for me or even way more to have custom wheels made for me.
07-02-2016, 07:07 PM
#9
I waterjet a couple of these and use them to drill 8.8 ford to chevy bolt pattern. Total cost is about $20 and they can be reused.
I can drill each axle and rotor in less than 20 minutes
http://www.rottenleonard.com/Menu.html
I can drill each axle and rotor in less than 20 minutes
http://www.rottenleonard.com/Menu.html
07-02-2016, 07:23 PM
#10
I waterjet a couple of these and use them to drill 8.8 ford to chevy bolt pattern. Total cost is about $20 and they can be reused.
I can drill each axle and rotor in less than 20 minutes
http://www.rottenleonard.com/Menu.html
I can drill each axle and rotor in less than 20 minutes
http://www.rottenleonard.com/Menu.html
07-02-2016, 07:25 PM
#11
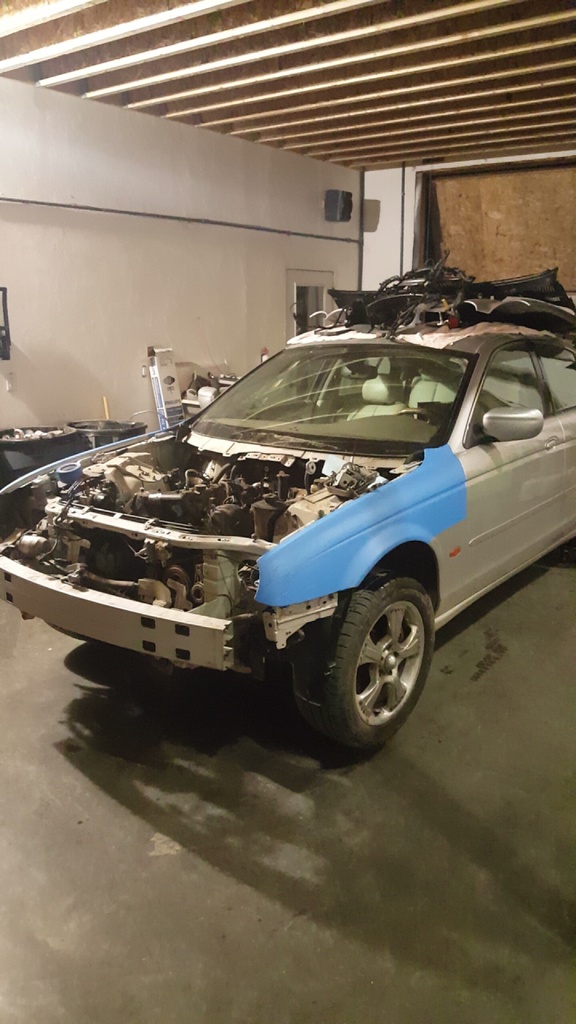
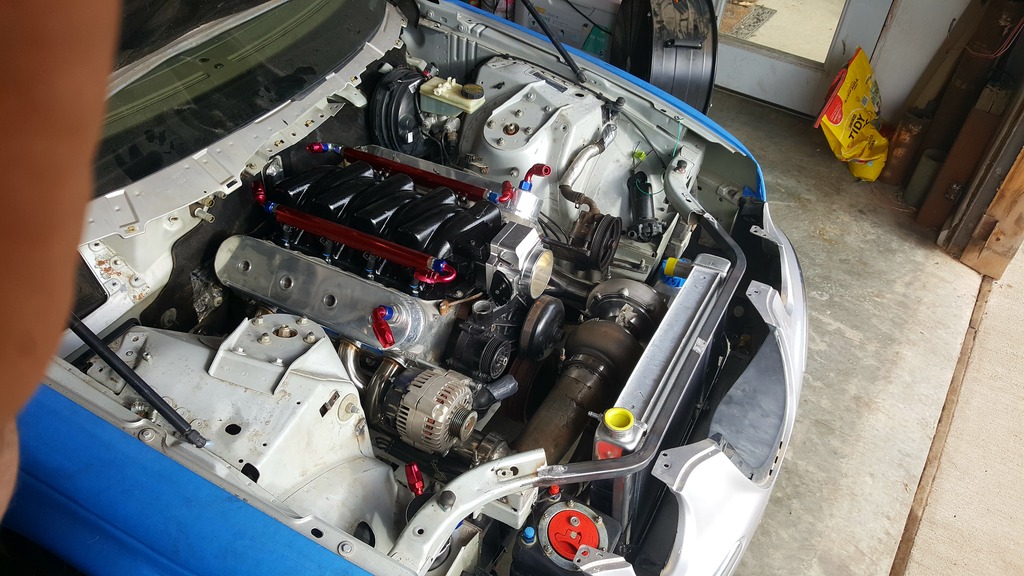
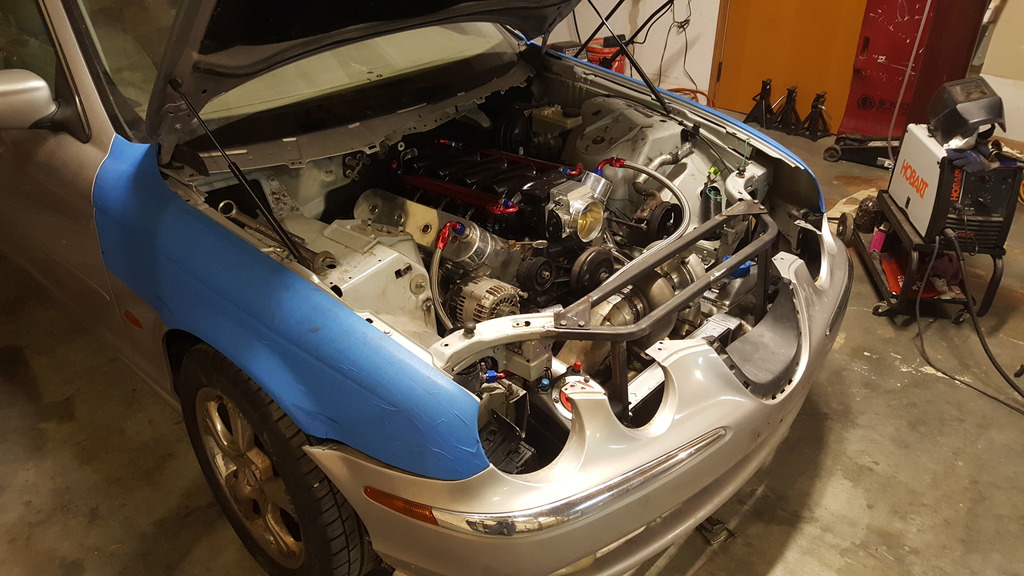
Anyways... I also got some good work and good pictures of the Jag done yesterday and lastnight. Pretty tore up and its sad to say.. but I'm actually kinda sore from going hard on it until about 3am, so I decided to take the day off until after dinner time today. Hopefully everything will be ready for paint by the end of tomorrow.


 07-02-2016, 07:25 PM
#12
Key thing is the center hole must be same size as your jag hub. Other drill holes must be ecentric. Gimme a minute to upload a youtube vid of my waterjet axle drill jig.
I need to get mine assembled. Heard any good jokes about the toilet seat grill ?
I need to get mine assembled. Heard any good jokes about the toilet seat grill ?
Last edited by aknovaman; 07-02-2016 at 07:45 PM.
07-04-2016, 04:06 PM
#13
Staging Lane

Join Date: Sep 2012
Location: England
Posts: 88
Likes: 0
Received 0 Likes
on
0 Posts
yes! I've been waiting for someone to do one of these! these were quite popular over here a few years ago and if I hadn't started my car (all those years ago) I probably would've been scouring exchange and mart for one of these with a blown engine to chop up haha!
Can I put in a request for some loud burnouts once you're ready please?
Can I put in a request for some loud burnouts once you're ready please?
07-27-2016, 06:24 AM
#15
Registered User

Join Date: Jul 2016
Posts: 5
Likes: 0
Received 0 Likes
on
0 Posts
DAMM guy that is a fantastic piece of work you have done there , I am planning ti do the same with a few changes , I have a 3.0 and I am only going for the LS3 swap no turbo , I hope I can pick your brain on a couple things if possible....


