
LQ4/4L80 swap 1969 Mercedes
 01-17-2017, 06:44 AM
#101
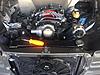
Looks like we're running different types of MAF's. My intake tube is aluminum and also sits right behind the fan (pic below - MAF right beside the throttle body motor). I haven't seen intake air temps any greater than 10F higher than ambient. Does your filter have access to intake air at ambient temps from behind the grill or under the car?


 01-18-2017, 12:38 PM
#102
Teching In
Very cool build!
I was initially going to look for a 108/109 body to do something like this, but have since decided to swap a small-block into my W126 500SE.
I was initially going to look for a 108/109 body to do something like this, but have since decided to swap a small-block into my W126 500SE.
01-23-2017, 10:51 PM
#104
Staging Lane
Thread Starter

Looks like we're running different types of MAF's. My intake tube is aluminum and also sits right behind the fan (pic below - MAF right beside the throttle body motor). I haven't seen intake air temps any greater than 10F higher than ambient. Does your filter have access to intake air at ambient temps from behind the grill or under the car?
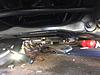
While driving I should get airflow from under the front sheetmetal/bumper. On the dyno only getting what the shops fans are getting to it.
But the temp sensor is right in the airflow from the radiator, so will be better to move it.
01-23-2017, 10:53 PM
#105
Staging Lane
Thread Starter
01-23-2017, 10:56 PM
#106
Staging Lane
Thread Starter
Thanks Doug.
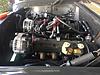
I've been working on my to do list from dyno day. I've received the proper adapters to install the water temp sender and the oil pressure sender for the gauges. I've replaced the questionable AN fitting going to the remote oil filter and fixed that leak. Also fabricated a shroud for the radiator fan, hope that solves the higher than wanted engine temp. Still have to relocate the intake air temp sensor and weld in another O2 sensor bung for dyno diagnostics.
The steering is my biggest issue. What I put together with the Cavalier rack was good enough to drive around the block and get on and off the dyno, but sucks!
The turning radius is so bad it's probably not practical. I was always concerned about the leverage put on the center bolt location with the tie rods 20" apart. Valid concern as there is movement.
So back to the drawing board. I just ordered a rear steer unit from Flaming River along with their special U-joint and tie rods ends needed. The pivot points are about 1 1/2" farther outbound than stock, so it will take some more effort to get set right to minimize bumpsteer. The good thing about this unit is that the tie rods are at each end of the rack, so gives me more space for install. The bad thing is the price, a good $900 for the require parts. Then I'm going to fabricate new steering arms that locate the tie rod connnection closer to the center of the wheel to get the full turning radius back.
We will have guests from the mainland for the next week, so no updates for a bit.
Hope to be able to drive it to the dyno, this time, within 30 days. Also anxious about the dyno numbers.
01-23-2017, 10:58 PM
#107
Thx - yeah, 440hp in 2980 lbs is fun....specially when it idles at 650 rpm all Honda-like.
My point was the my temp sensor/maf is right in the rad airstream too, but I'm seeing much lower temps. Perhaps it's the moving down the road vs shop fan, although in my experience having the hood open expels lots of heat. Can't wait to see yours headed down the road.
My point was the my temp sensor/maf is right in the rad airstream too, but I'm seeing much lower temps. Perhaps it's the moving down the road vs shop fan, although in my experience having the hood open expels lots of heat. Can't wait to see yours headed down the road.
01-24-2017, 12:51 AM
#108
Teching In
Pros are no more CIS, no more 722.3 4-speed auto, better AC compressor... list goes on!
The car is one of my daily drivers, so I want to swap in something domestic that's easier to take care of and parts availability is not a concern.
Either way, this is very cool, and a serious motivator!
03-07-2017, 01:33 AM
#110
Staging Lane
Thread Starter
Thanks for your interest.
I have had a rough time trying to locate the rack and parts to connect the steering shaft to the rack. After three orders I finally found a combination that works smoothly.
After a few geometry calculations I shortened the steering arms by the correct amount to achieve the same turning radius with only 6" of travel from the rack.
Saturday I dropped the car back on the ground, roughly adjusted the toe-in/out and drove the car out of the garage for its first bath in 7 months.
As I'm in the process of completely changing out the electrical system, I'm not ready for a test drive.
But now that it's clean, along with the garage, I realize I need to make some more serious changes. The engine and the rack are too close to the ground. My newer Mercedes has 5 1/2" of clearance at the lowest point, the oil pan and rack on this project are at 4 1/4". I basically set the engine height to slip under the stock brake booster, I see now that was a mistake. I've spent a frustrating month+ working on the steering, so I'm going to spend time completing the wiring upgrade and some other odds and ends.
I think I can raise the engine an inch by adding a steel shim under the motor mount and the same for the trans mount without any other changes except a new smaller diameter brake booster. I'm also looking at some more changes to the rack install that might get the steering geometry back to stock.
Right now I'm enjoying the challenge of schematics and soldering.
 03-07-2017, 06:26 AM
#111
Is the new rack/steering arm set up giving you a decent Ackermann angle as well? I've done some experimenting with shorter steering arms to give "quicker" steering on mine - but it totally screwed up the Ackermann which results in some interesting unintended side effects.
03-07-2017, 11:09 AM
#112
TECH Resident

May I recommend a hydroboost (hydraulic) unit to replace the vacuum booster, which is much smaller? In my old truck, I wanted a modern driving experience in terms of ergonomics, so I moved the pedals around, changed the pedal geometry as well as steering wheel placement.
In the truck, the brake master and booster is mounted under the body and to the frame. A larger diameter booster wasn't an option, but braking feel, power and boost, frankly sucked. I read about hydroboost setup and tried it.
The amount of boost and firm pedal is awesome (I even run an upsized master cylinder for lower pedal travel and improved modulation). Years ago, it was pointed out to me that NASA studies indicate modulation with our legs improves with reduced braking pedal travel / displacement. Counter intuitive, but if you look at modern (probably old, too) race cars, their pedal travel is very small.
A little extra plumbing is required, but well worth it. For my power steering pump return from the booster, I just added a stainless barbed Tee from McMaster of the right size. I run good quality stainless hose clamps and good quality rubber lines (like Mercedes OEM).
I have a thread on here about the booster I used and modifications to the hydroboost unit. it was a new OEM Delco unit from Amazon for about $125 (+ / - $25). The high pressure lines were about $200 that I assembled myself with Eaton, I think (of which Aeroquip is a subsidiary). Normal AN lines aren't appropriate for 2000 psi applications.
Hope that might help.
Messing with steering geometry is tricky.
Are the new rack arms the same length as the lower control arms?
Doug
 03-07-2017, 06:20 PM
#114
Is the new rack/steering arm set up giving you a decent Ackermann angle as well? I've done some experimenting with shorter steering arms to give "quicker" steering on mine - but it totally screwed up the Ackermann which results in some interesting unintended side effects.
crank dat ackerman! drift drift drift stance stance stance vape

sorry couldnt help. been looking at e34's on stanceworks.com
03-09-2017, 12:11 PM
#115
Staging Lane
Thread Starter
Thanks all for your comments and questions!
As the projects stands, many issues need to be addressed with steering geometry, engine height, and related interference. The engine and rack are a little over 1" low for proper ground clearance, Ackerman might be off a touch, and due to the current rack setup the tie rod is about 1 1/2" shorter than the lower control arm. I have used hydroboost on another Jeep project before with good success, looking at that as an option here too, thanks. These are all issues that can be overcome. Researching parts and planning now.
But many items to work on and the above has been bogging down my time and spirit!
Since the engine is properly tuned and broke in and I have a "usable" steering system, I can at least move the car around enough to work on other fun things like wiring!
I bought a new universal wiring kit and am in the process of changing out all of the wiring. So far I have completed both the rear and front sections. Everything is complete now except for the dash and underdash. I am unsoldering the old wire from the lighting/accessory connectors, soldering back the new wire and for harness protection wrapping with a heavy cloth tape. I also removed the cable/lever hood release and replaced with a heavy duty solenoid to further clean up the engine compartment and interior. (FYI, button to activate will be located out of reach while driving and I have a remote manual pull in case the solenoid fails)
In a couple of days I should have the electrical done enough to actually drive the car enough to further troubleshoot before ordering parts and starting new changes.
03-14-2017, 02:37 AM
#117
Staging Lane
Thread Starter

I built a bracket today to hold the ECU and have a plan formulated on all the rest of the relay banks and new electronic controls I'm adding.
So now that the hood latch is connected along with the horn, brake lights and turn signals I'm going to take it for a spin around the block, maybe Wednesday.
Still plotting out the engine and steering moves, looking at options.
Talked to Flaming River about what parts they can sell me to make this work. They are USELESS AND UNHELPFULL! They sell this kit for a Chevelle that has what they call a TrackBar.

This would help me increase the length of the tie rods. But they won't sell me the parts. I asked what would happen if I bought the whole kit, was in an accident, and needed a couple of replacement parts. He said that wasn't the case, but if it was, I would have to pull the rack and ship it to them to replace the parts. Very frustrating. So looks like more work for me.
03-22-2017, 02:51 AM
#120
Staging Lane
Thread Starter
Thanks for your comments and replies.
Even though Flaming River was of no help, a little digging gives some answers.
I removed one of the boots and unscrewed the control arm from the shaft. Will be easy to fabricate a track bar to bolt onto each end and retain the boots. The track bar will allow me to pick my own tie rod length so I can keep to stock height and length. I ordered tubing and tube inserts to match the 14 x 1.5 mm threads of the tie rod ends, left and right threads to make my own tie rods. Unfortunately the only place I could find these was in the UK.
Of course I can't work on the steering until I solve the issue with the engine/trans installed height. I've been kind of putting this off as I hate to go backwards, but my mental picture was worse than the reality. Over the last two days I removed the master cylinder/brake booster, exhaust system (good thing I made it where it just slides off the isolation brackets after unbolting from the manifolds), and unbolted it from the mounts, modified the trans mount, welded up 1 1/4" "shims" for the front motor mounts, and have everything back as before less the exhaust. Now the bottom of the oil pan is flush with the crossmembers. In total I raised the engine 1 1/4" at the front mounts and the tail,of the trans by 7/8".
No downside to the move, except for the master cylinder. But several positive items. Under the hood the new height looks more right.


