LQ4 into a 3rd Gen/1972 Nova


 04-01-2013, 09:33 PM
#1222

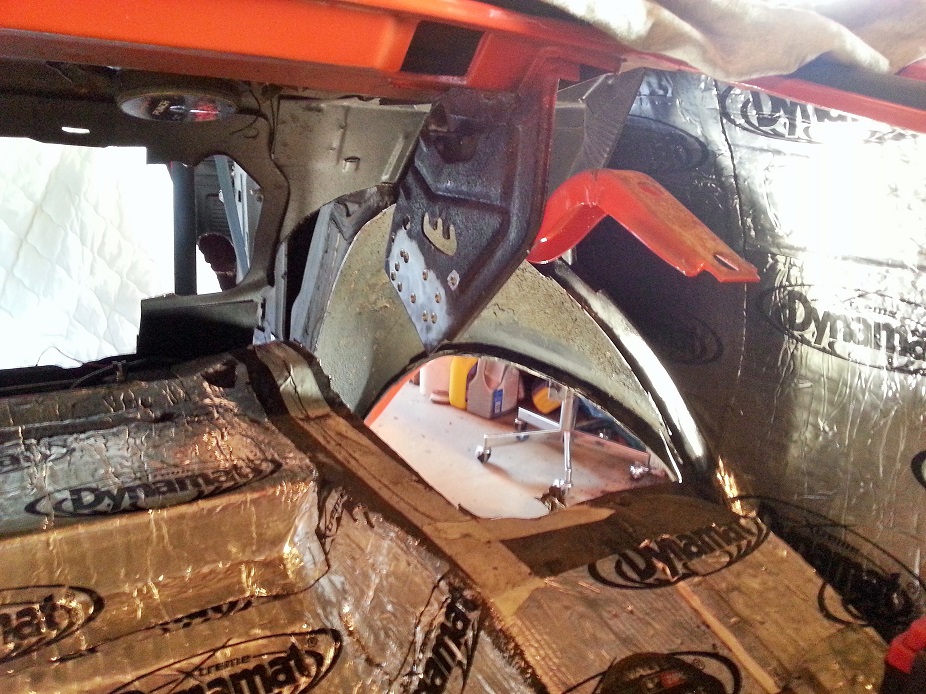
Not too much to report. Been real busy so haven't spent any time on the car in the last 2 or so months. But finally started on the mini-tub this past weekend. Scraping the old Dynamat off the areas to cut/strip sucked. I got the old tubs out and started trimming the trunk pan back into the framerails to clear room for the new DSE tubs. Don't have too many pics so far.

Vice grips on the leg of the torsion bar for more leverage..

Screwdriver between the top of the torsion bar and underneath the package tray, so push down on the screwdriver to unseat the bottom notch after the vicegrips have been rotated enough to unhook the bar off the top notch (in this case it's clockwise, sorry couldn't make a curvy arrow in MS Paint)..

Orientation of the bar un-preload-twisted..

Removing the sound deadening.. annoying...

Stripping the paint to find the spot welds to drill out, there were a lot of them on mine, and all over the place..

3/8" drill bit seemed the right size to knock out just about all of the spot welds..

Inner tubs cut out! Definitely no going back now. DSE says to trim the stock tub out of the car right at where the tub joins the floorpan, then scribe a line afterwards that's 2.5" inboard, however with the bulkiness of the only cutting tool I have for the job, my 4.5" angle grinder, I couldn't follow the tub/floorpan joint closely, so I used good masking tape to mark the 2.5" line, then cut the old tubs out however my angle grinder would fit in the tight spaces, then final cut along the 2.5" line once the tube was out and there was more room to work in.

Vice grips on the leg of the torsion bar for more leverage..
Screwdriver between the top of the torsion bar and underneath the package tray, so push down on the screwdriver to unseat the bottom notch after the vicegrips have been rotated enough to unhook the bar off the top notch (in this case it's clockwise, sorry couldn't make a curvy arrow in MS Paint)..
Orientation of the bar un-preload-twisted..
Removing the sound deadening.. annoying...
Stripping the paint to find the spot welds to drill out, there were a lot of them on mine, and all over the place..
3/8" drill bit seemed the right size to knock out just about all of the spot welds..
Inner tubs cut out! Definitely no going back now. DSE says to trim the stock tub out of the car right at where the tub joins the floorpan, then scribe a line afterwards that's 2.5" inboard, however with the bulkiness of the only cutting tool I have for the job, my 4.5" angle grinder, I couldn't follow the tub/floorpan joint closely, so I used good masking tape to mark the 2.5" line, then cut the old tubs out however my angle grinder would fit in the tight spaces, then final cut along the 2.5" line once the tube was out and there was more room to work in.
04-02-2013, 09:43 AM
#1224

Epic!
Curious to see what kind of extra fab work you suggest...I know you dont like to follow the "standard" directions and prefer to make your own improvements...shows you are a TRUE engineer!
Curious to see what kind of extra fab work you suggest...I know you dont like to follow the "standard" directions and prefer to make your own improvements...shows you are a TRUE engineer!
04-02-2013, 02:54 PM
#1225
Haha thanks guys. Wouldn't say my progress has been particularly zippy as of recent, seeing as the car hasn't got any attention over the last couple months, but over two afternoons this weekend I'm happy with where I'm at. Hoping to bandsaw the frame closeouts & gussets at work this week and final trim sheetmetal this weekend and maybe start welding in the reinforcements.
04-03-2013, 08:15 AM
#1226
Get plenty of pics of the frame modifications....I am a little unclear as to how that all gets modified to fit the tires. I have seen tons of pictures but would like to see a fab guy like you go through it and give some feedback on how it goes and what you think about the structural integrity after the modification.
04-09-2013, 10:51 AM
#1228
When I first started, I was under the impression the whole torsion bar bracket/hinge needed to be removed to be trimmed for the new tubs.. including cutting it off of the stock tubs and unbolting/cutting it out of the under-rear-glass area. I did not realize that it was intermediately spot welded below the torsion-bar-notch area of the bracket. In hindsight, it's still ok, because I JUST barely fit under the package tray when cutting/cleaning the metal in there.. I for sure wouldn't fit if the torsion bars were still in there. 6'2" & 200lbs isn't the nimblest size when doing extended trunk work, haha.
 04-21-2013, 05:24 PM
#1230
Launching!
iTrader: (1)

Join Date: Aug 2009
Location: Ky
Posts: 270
Likes: 0
Received 0 Likes
on
0 Posts
I hear you on the vague part. I had to order some more parts from them and tried to send the CD back for credit. LOL The viewing screen is small and they spent maybe 7-8mins describing and showing you what to do. The tubs are nice, but the instructional part is lacking.
Car is looking great man.
Car is looking great man.
04-21-2013, 06:36 PM
#1232

I am surprised DSE doesn't have very detailed instructions. I would of expected it from them.
04-22-2013, 09:18 AM
#1233

Hi Joe,
Actually there instruction Suck !!
I can offer you a few words of advise. Make sure you cut back a little more then you think you need as it will allow you to put the inner fender in with ease. Which is very important because if you have it tight the inner fender will buldge in which will reduce the tire size you plan to run.
If you want shoot me an email with your phone number and I will call you back tell you what we've learned. Trust me it has saved a few people and I am always willing to help.
mr2879sy @ aol.com
Marty-mj
04-22-2013, 06:00 PM
#1234
Their instructions aren't terrible, just not great. It's a 1-page sheet and a DVD.. of which is shot in a small resolution and the shots of what needs to be trimmed and where are quick.. so it's hard trying to pause it and decipher lines on a grainy/pixelized freezeframe. I ended up just giving up and doing all the exploratory cutting myself. I appreciate the offer of assistance, and will take you up on it if I hit any snags, but so far things are lining up well, just taking forever to trim little bits at a time so I don't have to make any unnecessary patch panels.
At my (arguably lower than most) ride height (tucking 1.5" of 18" rim in the back), with a wheel spacer, my 305 sidewall has 1/2" clearance to the outer fenderwell, and there's a decent inch at least of room between the inner tire sidewall and the mocked-up DSE tub. From the looks of it, a 335 should fit, but might rub under hard body roll and bump. A 315 would be a breeze to fit and shouldn't rub under any conditions. I've cut into the framerails considerably, but am happy with how the bracing is turning out.
At my (arguably lower than most) ride height (tucking 1.5" of 18" rim in the back), with a wheel spacer, my 305 sidewall has 1/2" clearance to the outer fenderwell, and there's a decent inch at least of room between the inner tire sidewall and the mocked-up DSE tub. From the looks of it, a 335 should fit, but might rub under hard body roll and bump. A 315 would be a breeze to fit and shouldn't rub under any conditions. I've cut into the framerails considerably, but am happy with how the bracing is turning out.
04-22-2013, 06:50 PM
#1235
I was under the impression that DSE supplied templates and such for the frame and trunk pan, and even the metal for said frame. Is that not the case? If not- with all due respect- what the hell is a fabricator extraordinaire such as yourself wasting $400 on tubs you could easily create using stockers and sheet metal?
04-22-2013, 07:12 PM
#1237
They provide templates via a PDF you have to print out, but I noticed several of the bits, particularly the sheetmetal closeup panel between the framerail and the over-axle-trunk-floor-hump didn't offer full metal coverage. I purchased the setup knowing that I was in it for the stamped tubs, and anything more than that would be extra. You have to cut out all the metal bits yourself, and so I'm ok with making my own templates anyways, as I didn't end up cutting the metal to DSE's spec, as well as the car-to-car variance can get pretty decent I bet.
And turns out there was some rust that was almost exclusive to the inner tubs, on both sides. So even if I were to go thru all the extra effort of precise initial cutting in an effort to keep the stock tubs reusable, I'd have to repair them, not to mention clean it all up, which would've been a pain. My patience is wearing thin the longer I work on these things, haha.
And turns out there was some rust that was almost exclusive to the inner tubs, on both sides. So even if I were to go thru all the extra effort of precise initial cutting in an effort to keep the stock tubs reusable, I'd have to repair them, not to mention clean it all up, which would've been a pain. My patience is wearing thin the longer I work on these things, haha.
 04-22-2013, 08:49 PM
#1239