The build thread for my fire burnt, blown up 06 Z06
 11-26-2014, 07:42 AM
#1

I haven't had a build thread in a very long time. One of my projects that has been eating most of my time is my 2006 Z06 Corvette. Some of you already know about it and have probably seen the many times I have tried to sell it.... But I have finally decided to keep it and move forward with the build.
Last edited by Jeremy@RPMTransmissions; 11-26-2014 at 01:22 PM.
 11-26-2014, 07:43 AM
#2
The car is a California car, usually a good thing, but not when it lived all 43,000 miles on the road course. The car was tracked often by its first owner and seen all the major road courses in California. One day the owner was airing the car out down the straightaway and the car decided to drop a valve at a very high RPM. The car immediately erupts into flames from the gaping hole in the block. The owner gets the car stopped and pulls the hood release and nothing happens. In a last ditch effort to save the car he empties his entire fire extinguisher into the wiper cowl....
So insurance pays off on the car. The engine is destroyed, the hood, firewall and all plastic pieces on the driver side of the engine bay are toast. The fire also escaped from the exhaust and burnt the rear bumper of the car. The car goes up for sale on ebay. A friend of mine buys the car and ships it here to Indiana.
Here is one of the Ebay photos of the car. It looked pretty good on the outside but the damage was much more extensive. Lets just say it photographed well lol.

Last edited by Jeremy@RPMTransmissions; 11-26-2014 at 01:18 PM.
11-26-2014, 07:43 AM
#3
He proceeds to to a minor tear down of the car removing the engine and most of the burnt bits in the engine bay and sells off all the good/aftermarket parts on the car. He gets in over his head with a huge big budget build. He gets tired of spending money on the car and he and I work out a deal in early 2012. I tell him I need some time to get my ducks in a row and I will pay his car payment for a few months while I get things in order. Another friend/coworker of mine hears of the deal and starts undermining the sale trying to buy the car to the point where the current owner starts to hassle me about the sale after only 2 weeks. I tell him to sell it to the other guy. The other guy buys the car and LITERALLY puts the car in a SHED and lets it sit there for nearly a full year without opening the doors on it. That owner gets into a bind and needs to sell it.
So in February of 2013 I get the car bought and start the journey.
This is the day I drug it out of the shed and brought it home.

I get the car home and proceed ripping it apart.


Here is the major damage to the firewall and the repair process. This part of the fire wall was as thin as a t-shirt. I cleaned the area the best I could and removed as much burnt fiber as I could and laid on a small amount of fiberglass in the worst area and built up many layers of resin. I tried to keep the original shape the best I could but I had to keep in mind that this repair will never be seen once the engine is in the car.


http://s490.photobucket.com/user/OWN...ml?sort=6&o=13


Here is the car seeing daylight for the first time in over a year. Time for a long overdue bath.


To add a little flash to the car I had the upper and lower a-arms and spindles micro polished. Its hard to photograph.

Since the original hood was toasted I had to get a new one. So I opted for something different. I went with the "Monster" ZR1 hood with no window to mimic the L88 hood of the late 60s.


Here is a picture of my second hand FAST 102 intake putting in a hard days work at RPM Transmissions....

Here is my Haltech 112mm carbon killer bee air intake.

Since my car was motorless when purchased I had to start on the hunt for an engine. I found this gem up in Detroit at one of our suppliers shops. It is a prototype C5R/C6R block. It has thick liners and billet main caps just like the C5R blocks but it is designed around the Gen4 architecture. It came with bronze lifter bushings on the intake lifters. I went ahead and installed them on all 16 lifters. I filled the motor with a Manley forged 4.100" crank, Manley 4340 H-beam rods, and Wiseco 2618 dome pistons yielding a 13.5:1 static compression ratio (8.5:1 dynamic). The cam is a Flow Tech Inductions custom grind with 260/272 degrees duration and .660" of lift, Comp pushrods and stock rockers arms that have been micro polished and cryo treated with a set of BTR trunion upgrades. The heads are West Coast Cylinder Heads Stage 3 ported LS7 castings with stock titanium intake and inconel exhaust valves.


 11-26-2014, 07:45 AM
#4
By this point I have completed everything I can easily do at home. Rodney (my boss) was gracious enough to let me bring it into the shop and use a lift for a little while to do the hard stuff.


The under side of the car was exponentially worse than I expected. Oil, dirt, soot from the fire, grass and sticks from off track adventures.... you name it. It was all there. I spent an entire day cleaning the under side of the car front to back.
Before

After

Here is a better shot of the polished front suspension.

Here we go fitting the oil pan and checking pickup clearance, installing my Improved Racing oil cooler thermostat and plumbing the lines.


I gave some new life to the tired old FAST 102 intake. The white paint is a taste of things to come. I will paint the letters in later once the motor is permanently in the car.

A big thanks to Steve Addison, the owner of Monster Clutch Co. for the hookup on one of their new LT1R twin disk clutches to flog.

Here I have installed my 2" American Racing headers and QuickTime SFI bellhousing to keep my feet in place if that Monster Clutch decides to exit the picture.

Here I am dropping the cradle out of the car and getting ready to install the engine up into the chassis.


This is all for now. This is where I am at currently in the build. I will post more pictures as the assembly continues.


Trending Topics
11-26-2014, 02:02 PM
#8
TECH Addict
iTrader: (1)
Join Date: Sep 2007
Location: Orange Park Fl
Posts: 2,206
Likes: 0
Received 0 Likes
on
0 Posts

My buddy Rick Addison is bringing you guys his Vette next week for a Tranny\diff. Orange 07 widebody with Procharged 402.
Get it right for him please !!!
Pitt
Get it right for him please !!!
Pitt
12-03-2014, 06:30 PM
#12
TECH Fanatic
Just amazed to what alot of people can do with their hands with cars. That's alot of work and patience! Great work! It's gonna look bad *** when you're done!
12-08-2014, 12:30 PM
#14
Thanks again guys. I've been making a little bit of progress.
As many of you probably know our cars are notorious for killing slave cylinders. Monster Clutch Co. has addressed one of the issue with the failure. The plastic bearing retainer on them is known to melt and seize on bearing support tube.
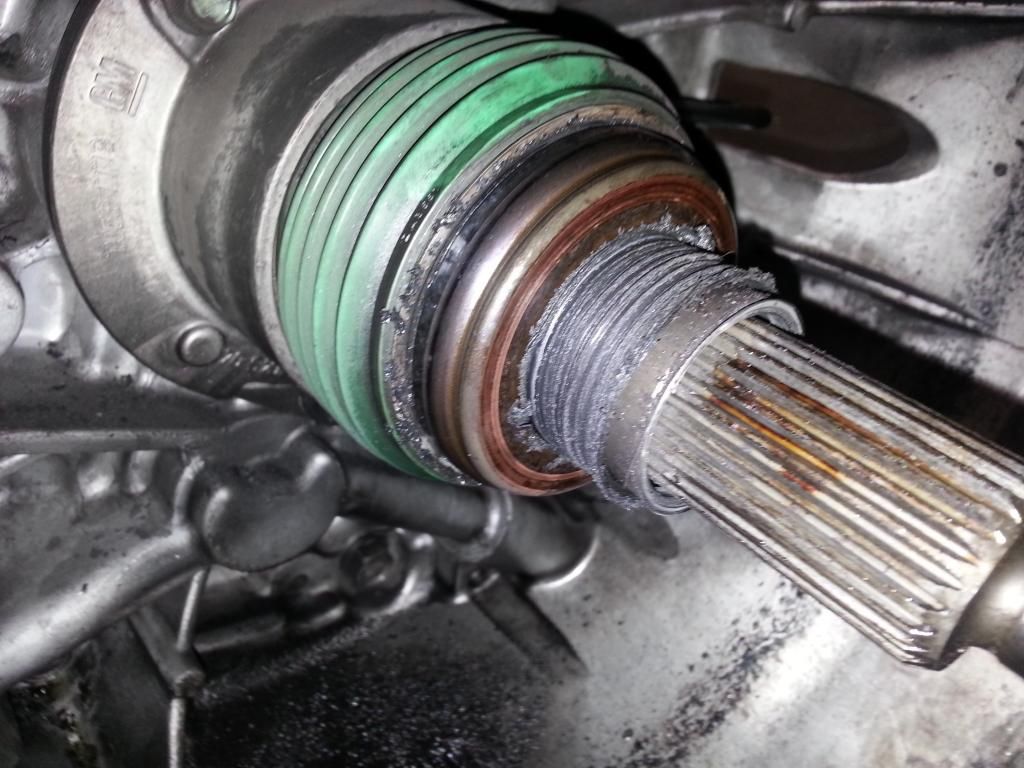
Monster has solved this problem with their billet bearing retainer.

It is a simple replacement and swaps directly in place of the factory plastic one.


To install it you simply compress the spring by sliding the plastic retainer down. Then pry the locking ring out of the end of the tub and this will release the plastic retainer. Take the plastic retainer and throw it in the trash.


Then you slide the billet bearing retainer on. Hammer the retaining ring back in place and after fighting with the green rubber dust boot for 5 mins to get it back in the groove you're done.
 12-08-2014, 12:31 PM
#15
Here in the engine in for the last time. Now the tedious task of routing wires, lines and making everything fit without getting burnt on the headers.


Here I just finished clearancing the Nick Williams 102mm throttle body to clear the Mezier water pump. It was a tight fit requiring a good bit of machining on the throttle body. The milled heads didn't help matters.


Here I just finished clearancing the Nick Williams 102mm throttle body to clear the Mezier water pump. It was a tight fit requiring a good bit of machining on the throttle body. The milled heads didn't help matters.
 12-08-2014, 12:31 PM
#16
This is my newest go fast goodie. The boss had this stashed away for a special use. It was my lucky day because he chose my car to use it on. It is a Drive Shaft Shop 3.5" couplerless piece. We installed it with ceramic torque tube bearings to help improve high RPM shifting.


