
'99 WS6 LQ408 build. Update: 11.4 @ 125
 09-27-2014, 01:28 AM
#1
I have a pile of photos so figured now would be a good time to make a build thread. I lost a lot of pics after my last phone crashed so theres a gap in the timeline.
Its a '99 WS6. The track I go to has a super high DA and not the best quality. All work/welding/fabricating/tuning/adjusting suspension done by myself minus building the bottom end and custom Viper blue paintjob.
Engine:
LQ 408, Eagle rotating assembly, AFR 225 heads, Scorpion 1.7 roller rockers, hardened pushrods, PRC 650 springs, custom grind Crane cam, all ARP studs and bolts, LS7 lifters, LS2 lifter trays, LS2 timing chain, Nick Williams 90mm throttle body, Edelbrock Pro Flo XT LS2 intake, Melling oil pump, Rx catch can, 25% underdrive pulley
Fuel:
42# injectors, Speed Inc fuel rails and braided lines, Racetronix fuel pump and wire harness, stock hard lines. 60% duty cycle on 91 oct, 92% on e85
Drivetrain:
Rebuilt T-56, Monster stage 3 clutch, billet flywheel, Pro 5.0 shifter, PTS steel driveshaft, Moser 9", 4.11 gears, lower control arm relocation brackets
Intake and exhaust:
Cone filter right on TB, Kooks 1 7/8 with 3.5" collectors, Kooks 3.5" Y pipe, 3.5" pipe to 5" bullet muffler and turn down before axle.
Wheels and tires:
15x4 Weld RTS and 165 tires
15x10 Weld RTS and 275 MT ET Street pros with 325/50R15 Hoosier DRs about to go on.
Suspension:
Viking front double adjustable coil overs, 300# springs, Spohn solid motor mounts, Poly trans mount, MWC adjustable offset LCAs, UMI adjustable tunnel mount torque arm, Wolfe Racecraft 2.5" spring mount and mini tubs, 150# rear springs, cheap Autozone rear shocks, UMI adjustable panhard bar, BMR rear sway bar, Spohn weld on sub frame connectors.
Also have, but not installed yet, MWC k member, upper and lower control arms, tubular spindles, solid motor mounts, Strange front drag brakes and rotors, braided lines, Burkhart 5lb steering column and steering wheel, manual steering rack, Flaming River manual steering rack, LNC-2000, and Hoosier 325/50R15 DRs
Random things:
Kirkey seats with home made brackets, battery relocated to spare tire well, MWC tubular bumper supports, so on and so on blah blah unimportant things
Removed:
basically everything not needed
Race weight as of fall 2013, 3,450 lbs. Need to recheck it again after suspension is complete. Guesstimating 3,200 lbs.
Last edited by Jc803; 11-10-2015 at 12:12 AM.
 09-27-2014, 01:34 AM
#2
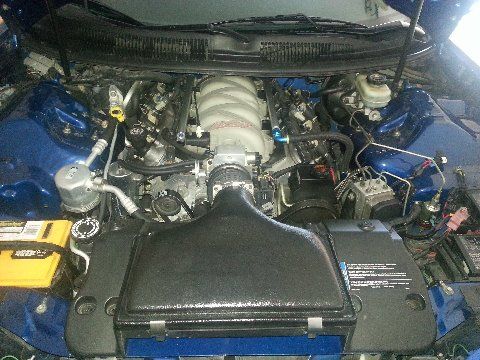
Aug 2013. Only things done to car are built 408 bottom end, AFR heads, FAST intake, Kooks long tubes, catback, tune, some gauges, 9" rear, LCAs, and thats about it. Interior is 100% stock. Car is full weight (technically over full weight with iron block and Moser 9")


Last edited by Jc803; 11-06-2015 at 02:43 AM.
09-27-2014, 01:43 AM
#3
Removed AC, heat, HVAC box, MAF sensor and retuned in custom 1 bar speed density with HP tuners. Theres not a coupling from piping to intake in this pic just to show that you can do it with a 3" piece of PVC pipe from Lowes.
TIPS: Remove the whole dash and everything to remove the HVAC box. Dont try to take shortcuts like I did, like trying to saw everything into tiny pieces to get it all out without removing the dash. It will be faster in the long run.
Also, theres a never ending debate of which type of tuning is better, MAF or speed density (MAP). I do all the tuning on my cars so I can tell you from experience, that on a nicely modified all motor LS, with big cubes and big cam, I highly recommend the speed density tune. The car runs smoother, idles much better, and I picked up noticeable power. Personally I think the guys that disagree and think MAF tunes are better either 1. Dont have that much done to their car, 2. Dont know anything about tuning, only know what they read online, or 3. Try to tune in speed density using the factory OS. If you do switch to SD then spend the extra $100 and get the HP Tuners Custom 1 Bar Operating System.
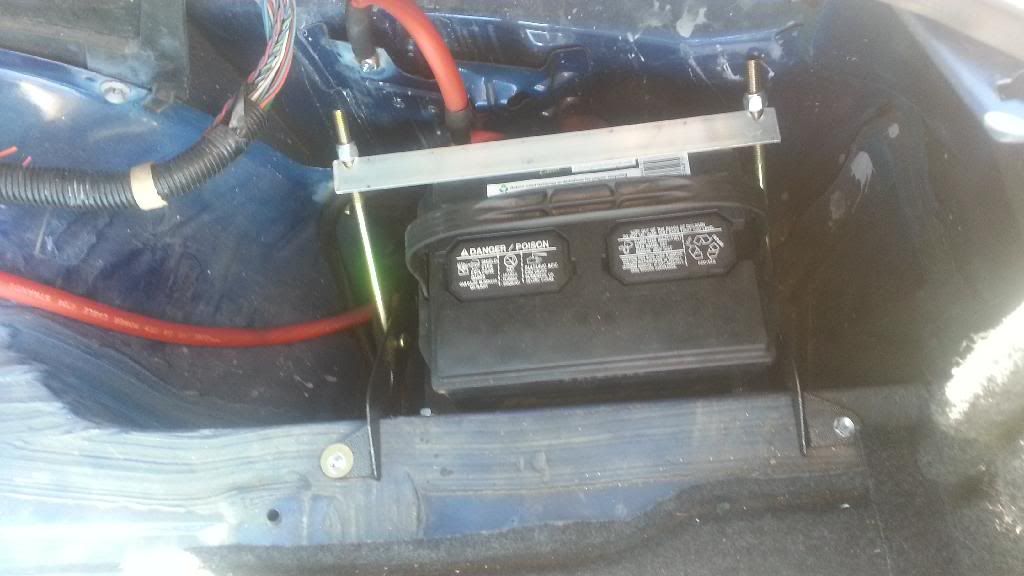
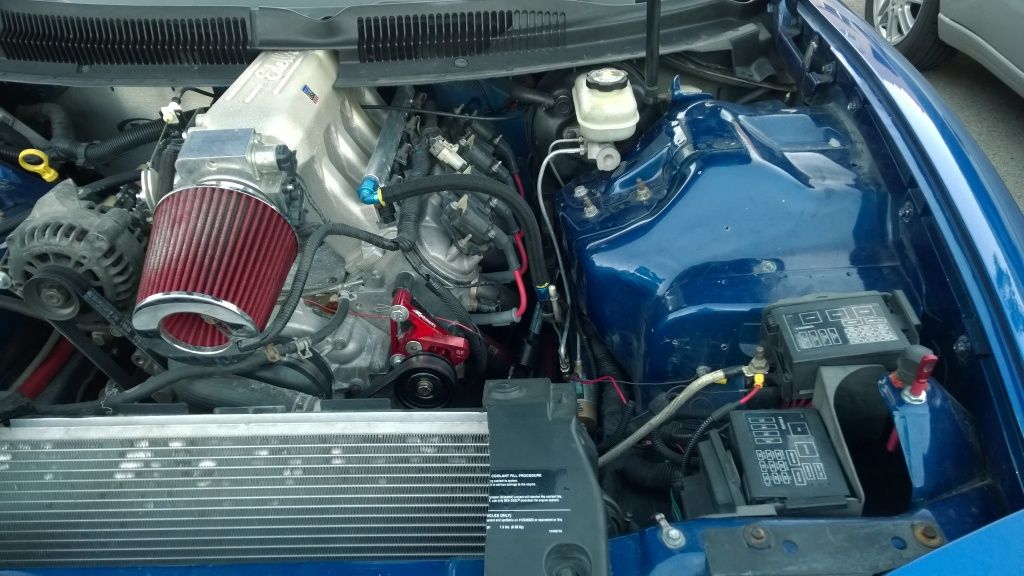
For the battery relocate I bought the bracket from UMI, then used 1 gauge wire from a audio store for the main power and negative. The negative wire is run straight down. Underneath where the battery is, there is a rubber grommet, just cut a whole in it and fasten the other end of the negative between the right side exhaust hanger and frame. Many people run the power wire underneath the whole car and run a million tie downs but I'm too lazy for that, plus I was afraid of it getting snagged and/or rusting, so I ran in inside through the side plastic then under the carpet then through the HVAC delete plate. Bought a in line fuse box and 250 amp fuse from the same audio store and tied that into the power wire right where the right wheel tub is. The power wire ends right where the battery used to be under the hood. Bought a distribution block from the same audio store. Ran 2 gauge wire to the starter, then 4 gauge wire to the alternator, and another 4 gauge to the fuse box by the ABS. If you do it this way be sure the wire is very clear of the headers or they will melt the wire. Then I ran two 1 gauge negative wires from the engine block to the frame, one on each side.
ATTENTION: wanted to make sure you see this. In the pic there is a red wire going from the battery to the body. That is in fact a NEGATIVE wire. I just had extra power wire and figured 2 Negatives wouldnt hurt. ITS NOT NEEDED THOUGH. After a while I took it off and left it off and the car starts and charges exactly the same. So only the negative running underneath to the frame is needed.
TIP: In this pic I'm using the factory style battery only because it was basically new. I recommend taking the UMI battery tray to autozone and fitting a top post battery. If you use the factory style battery the positive terminal bolt will seriously be 1/8" from touching the body. If it touches you're screwed and may have a burnt to the ground 3,600 lb paper weight.
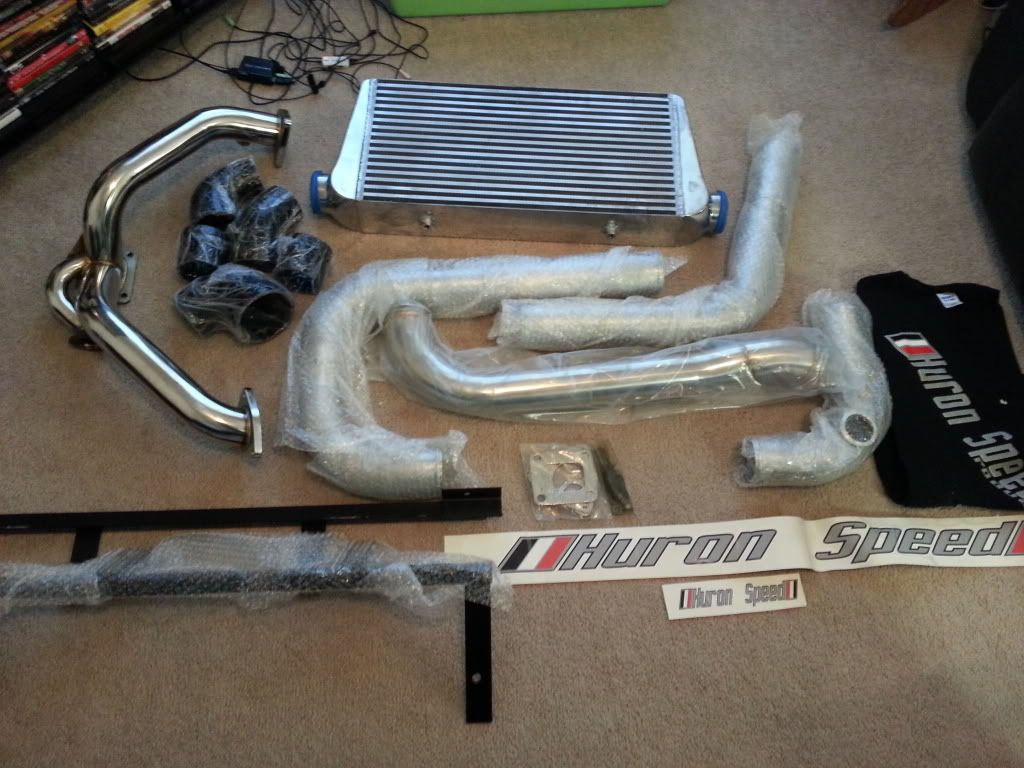
Bought a Huron Speed t4 kit but soon after decided not to use it. Part because I made a personal goal to run 10s all motor on 91 octane with a six speed, and part because I want a t6 kit now after I hit my goal
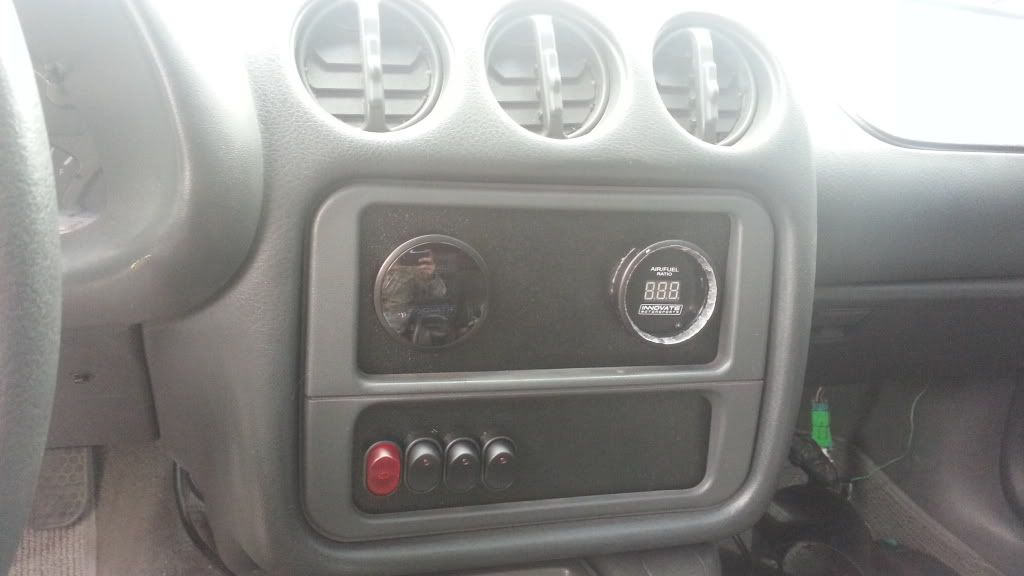
Removed radio, installed 6liter eater panel, removed ignition switch and put everything on a switch panel.
Reason for this isnt to be cool with push button ignition. With the lightweight steering column in the future it must be done. This took some time because you have to be either a genius or on the 4th gen engineering team to figure the wiring out. (Edit: 12OCT2015, To this day I still dont have turn signals working). Be sure to find a really good wiring diagram. That or spend hours on google trying to find one like I did. And remember, if you kept your wipers, and hazards, and turn signals, and horn, then you're going to have a few more switches than I do.
TIP: I have multiple wires going to each switch besides the starter. That way you dont have 101 switches.
Also, do not put a rocker switch for the starter like I did. You want a momentary push button switch. The rocker worked fine for me but after a few friends got in it and left the switch (starter) turned on and was revving it/driving it with it still on, I had to change it to a push button switch. Even the guy at the dyno left it turned on and took the starter to red line.
TIPS: Remove the whole dash and everything to remove the HVAC box. Dont try to take shortcuts like I did, like trying to saw everything into tiny pieces to get it all out without removing the dash. It will be faster in the long run.
Also, theres a never ending debate of which type of tuning is better, MAF or speed density (MAP). I do all the tuning on my cars so I can tell you from experience, that on a nicely modified all motor LS, with big cubes and big cam, I highly recommend the speed density tune. The car runs smoother, idles much better, and I picked up noticeable power. Personally I think the guys that disagree and think MAF tunes are better either 1. Dont have that much done to their car, 2. Dont know anything about tuning, only know what they read online, or 3. Try to tune in speed density using the factory OS. If you do switch to SD then spend the extra $100 and get the HP Tuners Custom 1 Bar Operating System.

For the battery relocate I bought the bracket from UMI, then used 1 gauge wire from a audio store for the main power and negative. The negative wire is run straight down. Underneath where the battery is, there is a rubber grommet, just cut a whole in it and fasten the other end of the negative between the right side exhaust hanger and frame. Many people run the power wire underneath the whole car and run a million tie downs but I'm too lazy for that, plus I was afraid of it getting snagged and/or rusting, so I ran in inside through the side plastic then under the carpet then through the HVAC delete plate. Bought a in line fuse box and 250 amp fuse from the same audio store and tied that into the power wire right where the right wheel tub is. The power wire ends right where the battery used to be under the hood. Bought a distribution block from the same audio store. Ran 2 gauge wire to the starter, then 4 gauge wire to the alternator, and another 4 gauge to the fuse box by the ABS. If you do it this way be sure the wire is very clear of the headers or they will melt the wire. Then I ran two 1 gauge negative wires from the engine block to the frame, one on each side.
ATTENTION: wanted to make sure you see this. In the pic there is a red wire going from the battery to the body. That is in fact a NEGATIVE wire. I just had extra power wire and figured 2 Negatives wouldnt hurt. ITS NOT NEEDED THOUGH. After a while I took it off and left it off and the car starts and charges exactly the same. So only the negative running underneath to the frame is needed.
TIP: In this pic I'm using the factory style battery only because it was basically new. I recommend taking the UMI battery tray to autozone and fitting a top post battery. If you use the factory style battery the positive terminal bolt will seriously be 1/8" from touching the body. If it touches you're screwed and may have a burnt to the ground 3,600 lb paper weight.

Bought a Huron Speed t4 kit but soon after decided not to use it. Part because I made a personal goal to run 10s all motor on 91 octane with a six speed, and part because I want a t6 kit now after I hit my goal

Removed radio, installed 6liter eater panel, removed ignition switch and put everything on a switch panel.
Reason for this isnt to be cool with push button ignition. With the lightweight steering column in the future it must be done. This took some time because you have to be either a genius or on the 4th gen engineering team to figure the wiring out. (Edit: 12OCT2015, To this day I still dont have turn signals working). Be sure to find a really good wiring diagram. That or spend hours on google trying to find one like I did. And remember, if you kept your wipers, and hazards, and turn signals, and horn, then you're going to have a few more switches than I do.
TIP: I have multiple wires going to each switch besides the starter. That way you dont have 101 switches.
Also, do not put a rocker switch for the starter like I did. You want a momentary push button switch. The rocker worked fine for me but after a few friends got in it and left the switch (starter) turned on and was revving it/driving it with it still on, I had to change it to a push button switch. Even the guy at the dyno left it turned on and took the starter to red line.

Last edited by Jc803; 10-14-2015 at 08:00 PM.
09-27-2014, 01:47 AM
#4
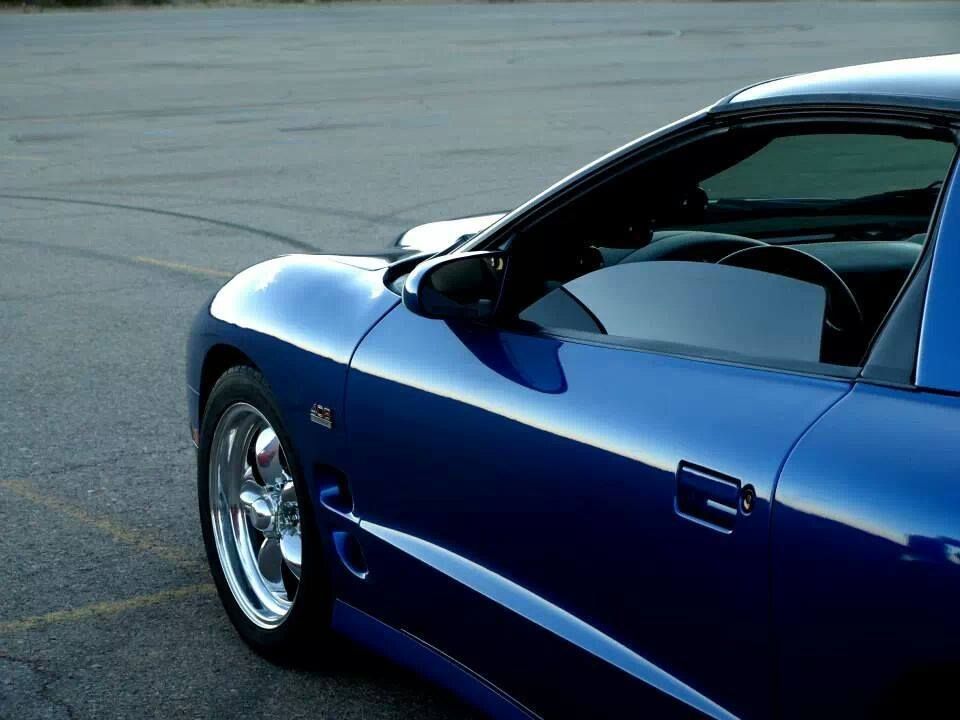
Got my wheels matching. 15x4" fronts, 15x10" rear. Rears have the stock 7.5" backspace since the 9" rear is stock length. Rear tires pictured here are 275/60R15 MT ET Street Pro.
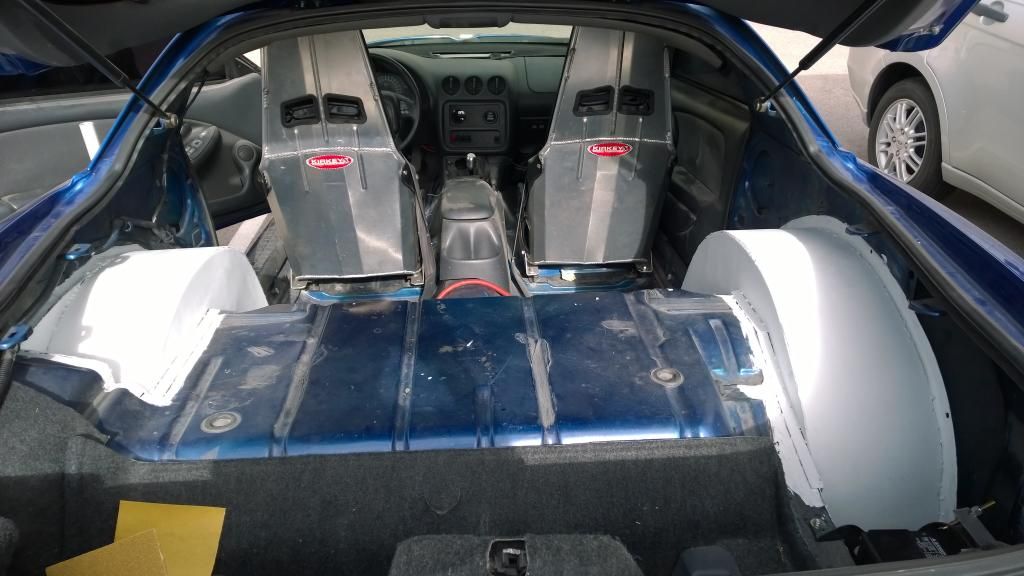
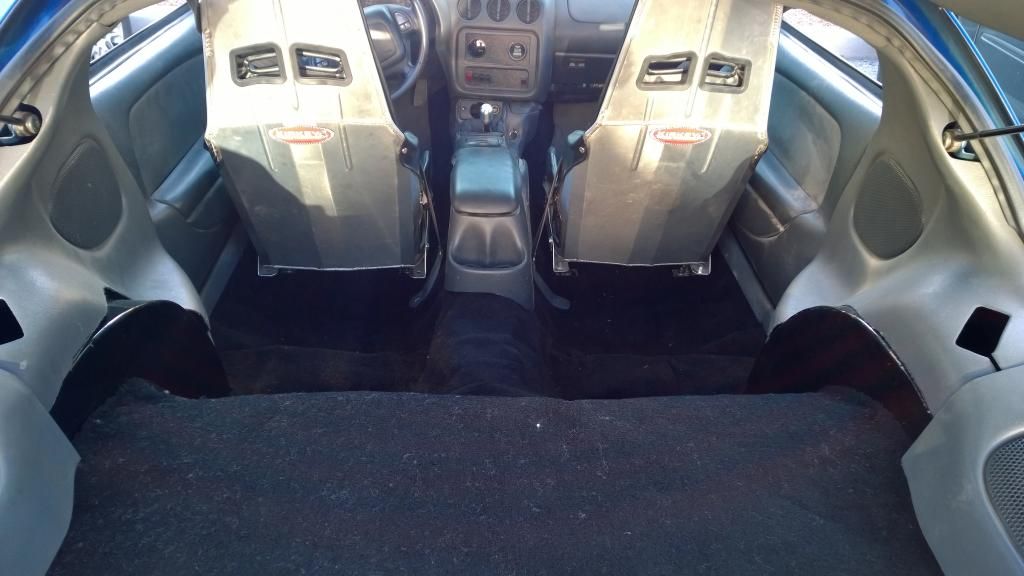
Installed Kirkey seats with my home made brackets. Cant remember exactly but the brackets from seat to floor were like 100 something dollars a piece, plus you couldnt adjust height with them so I made my own. Bought the metal from Lowes. Make sure you do a lot of measuring and actually sit in them before welding everything together.
TIP: Put a phone book under the seat then add magazines or newspaper to get the perfect height. Plus that will hold the seat still to be able to make your tack welds.
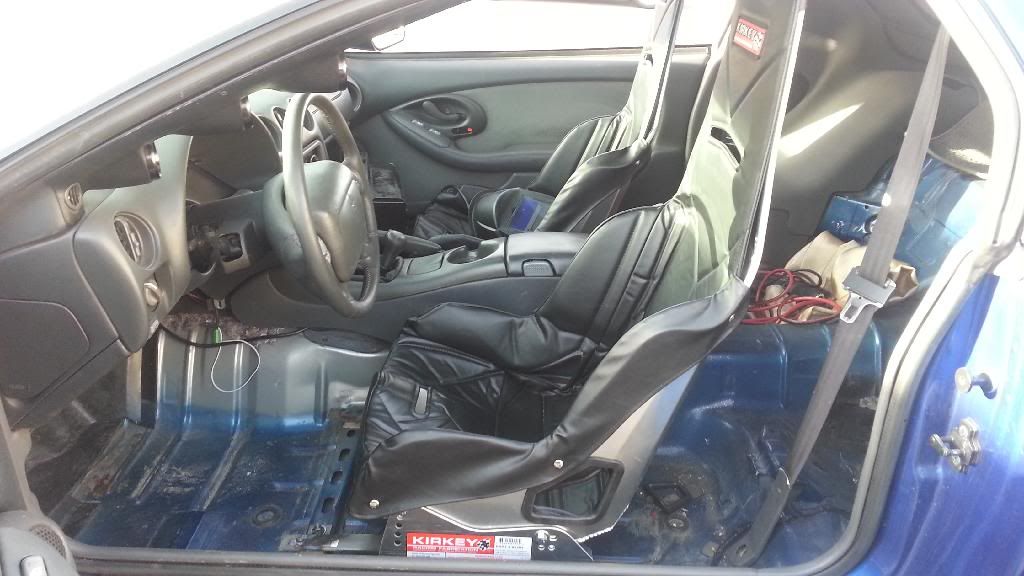
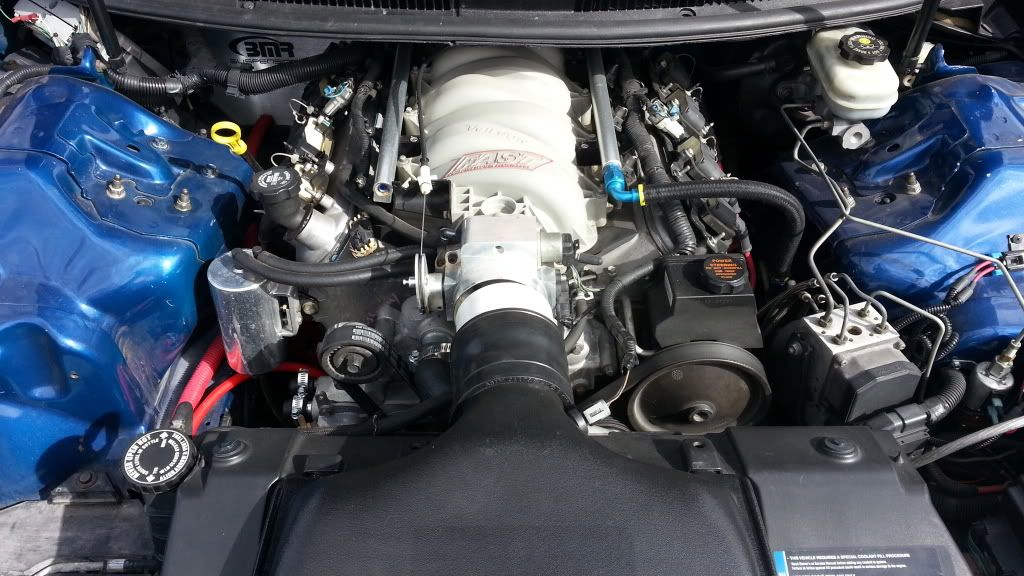
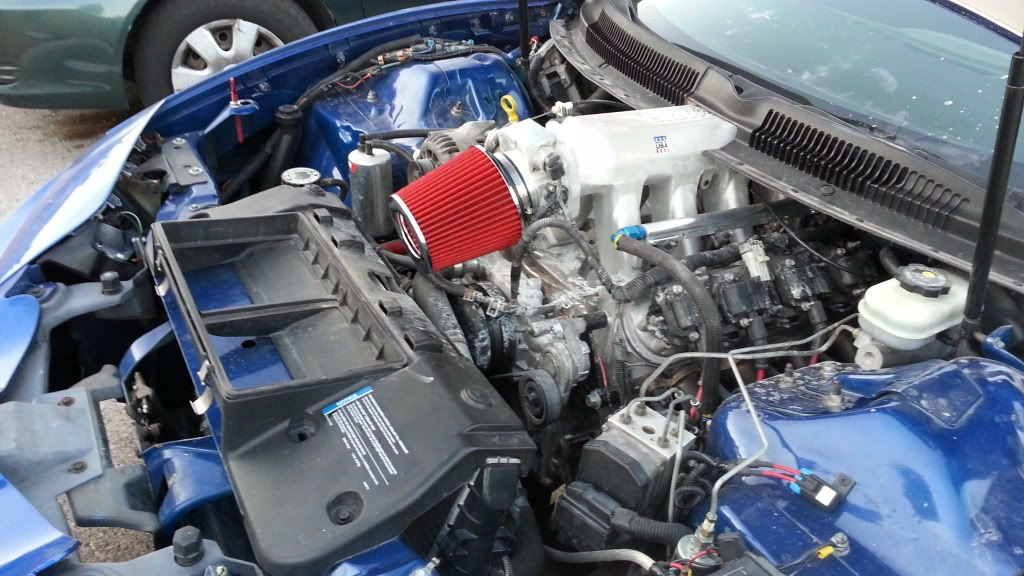
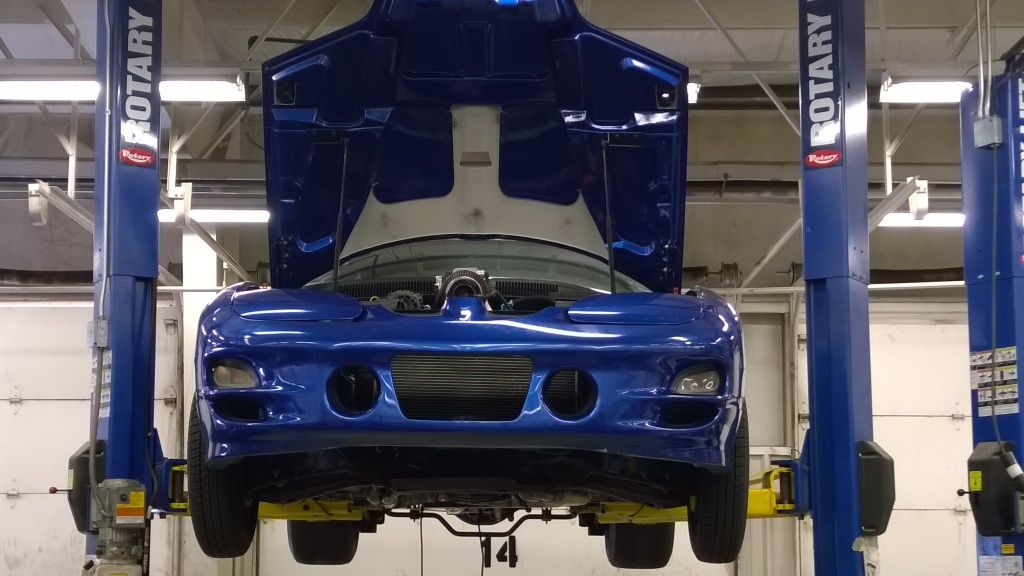
Removed FAST intake, installed Edelbrock intake, removed power steering and wiper blades and motor. Purpose of these mods are, the Edelbrock Pro Flo XT intake is great for boost. And even NA its good because of the high rpm HP for the track. Its not so good for a 100% street driven car though. Also it just looks cool.
I removed the power steering for a few reasons. Its one less part to replace over time, dont have to worry about PS leaks anymore, its one less thing the engine is turning which frees up a HP or two, its less weight, and it makes the engine bay look even cleaner. Its win/win/win/win. Also I have a Flaming River manual steering rack that needs to go in.
Removing the wiper blades and motor was because thats more weight to lose and every pound adds up. Plus I plan on running a fiberglass cowl hood so it would be in the way. "But what if it rains, what are you going to do then?" I'm asked all the time. Well, I'm not an idiot. I check the forecast and if its going to rain that day, I dont drive the car. I shouldnt be driving in the rain on slicks anyways.

Installed Kirkey seats with my home made brackets. Cant remember exactly but the brackets from seat to floor were like 100 something dollars a piece, plus you couldnt adjust height with them so I made my own. Bought the metal from Lowes. Make sure you do a lot of measuring and actually sit in them before welding everything together.
TIP: Put a phone book under the seat then add magazines or newspaper to get the perfect height. Plus that will hold the seat still to be able to make your tack welds.

Removed FAST intake, installed Edelbrock intake, removed power steering and wiper blades and motor. Purpose of these mods are, the Edelbrock Pro Flo XT intake is great for boost. And even NA its good because of the high rpm HP for the track. Its not so good for a 100% street driven car though. Also it just looks cool.
I removed the power steering for a few reasons. Its one less part to replace over time, dont have to worry about PS leaks anymore, its one less thing the engine is turning which frees up a HP or two, its less weight, and it makes the engine bay look even cleaner. Its win/win/win/win. Also I have a Flaming River manual steering rack that needs to go in.
Removing the wiper blades and motor was because thats more weight to lose and every pound adds up. Plus I plan on running a fiberglass cowl hood so it would be in the way. "But what if it rains, what are you going to do then?" I'm asked all the time. Well, I'm not an idiot. I check the forecast and if its going to rain that day, I dont drive the car. I shouldnt be driving in the rain on slicks anyways.

Last edited by Jc803; 10-12-2015 at 12:50 AM.
09-27-2014, 01:53 AM
#5
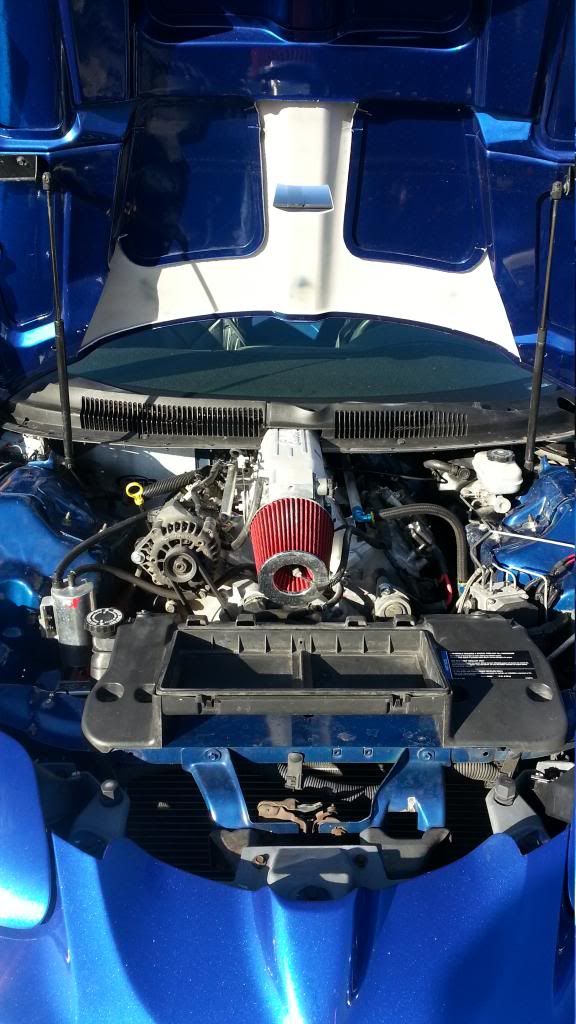
Trimmed hood to fit TB, also cut the rear cowl out, believe it or not it runs almost 20 degrees cooler now. The throttle body could fit but you would have to turn it upside down which requires you to weld on a new throttle cable bracket, and also extend the wires to the sensor. That was too much work for me so I just cut a nice even hole in the hood.
EDIT: 12OCT2015. The MWC K member I installed lowered the engine enough to where cutting a hole in your hood is not required. At least with solid motor mounts. I wouldnt suggest finding out with poly mounts. If you dont mind cutting a WS6 hood then I still suggest cutting the rear of the hood out for more air flow. Its a huge improvement in cooling. I'm probably the only one that is "crazy" enough to try it so you probably wont find any more info on it, so just take my word on it.
Knocked a hole through tunnel with torque arm. Only tip I have for this you have one of two options (or do both). A. Look into the MWC torque arm that mounts at the top of the rear end and gives you more clearance or B. Dont lower your car too much...... or C. Never launch your car hard at the track but whats the fun in that....

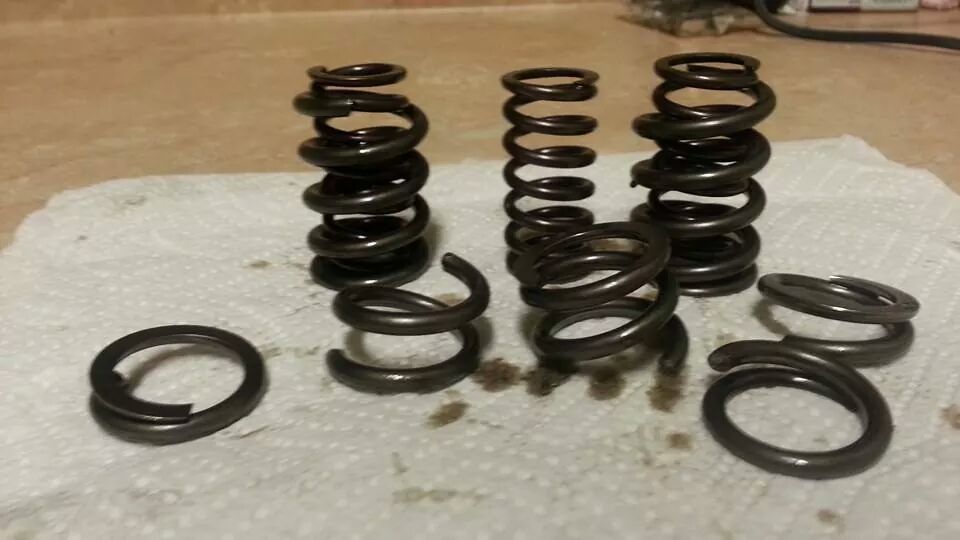
Broke a few valve springs.
Serious TIP: I will always buy double springs like these. If you notice all of the outer springs broke. 3 to be exact. And the inner springs kept going. Car ran like crap, but none of the valves dropped which saved my engine. If these had been single springs they would have broke, dropped some valves, and I'd be building a new engine.
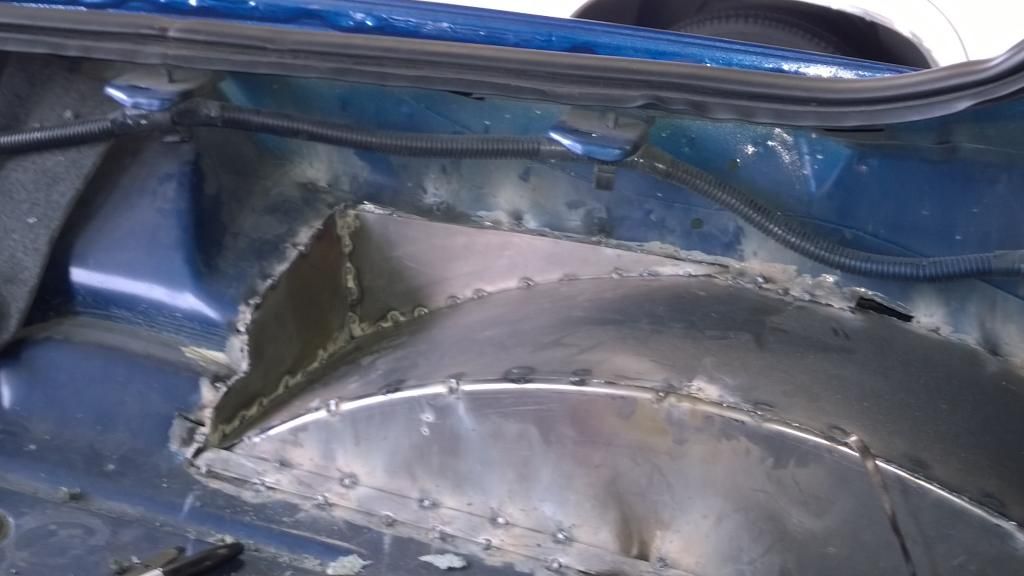
Installed mini tubs. That was a 1 1/2 week long project. Too much work to go into detail. The only tips I have is, buy or borrow a plasma cutter. Make small cuts at a time. Buy the pre cut sheet metal from Wolfe Racecraft. If you dont know what you're doing, just pay someone to. If you dont have the money to pay someone, then buy a sledge hammer and beat the living crap out of the inner fenders.
EDIT: 12OCT2015. The MWC K member I installed lowered the engine enough to where cutting a hole in your hood is not required. At least with solid motor mounts. I wouldnt suggest finding out with poly mounts. If you dont mind cutting a WS6 hood then I still suggest cutting the rear of the hood out for more air flow. Its a huge improvement in cooling. I'm probably the only one that is "crazy" enough to try it so you probably wont find any more info on it, so just take my word on it.

Knocked a hole through tunnel with torque arm. Only tip I have for this you have one of two options (or do both). A. Look into the MWC torque arm that mounts at the top of the rear end and gives you more clearance or B. Dont lower your car too much...... or C. Never launch your car hard at the track but whats the fun in that....

Broke a few valve springs.
Serious TIP: I will always buy double springs like these. If you notice all of the outer springs broke. 3 to be exact. And the inner springs kept going. Car ran like crap, but none of the valves dropped which saved my engine. If these had been single springs they would have broke, dropped some valves, and I'd be building a new engine.

Installed mini tubs. That was a 1 1/2 week long project. Too much work to go into detail. The only tips I have is, buy or borrow a plasma cutter. Make small cuts at a time. Buy the pre cut sheet metal from Wolfe Racecraft. If you dont know what you're doing, just pay someone to. If you dont have the money to pay someone, then buy a sledge hammer and beat the living crap out of the inner fenders.


Last edited by Jc803; 10-12-2015 at 01:07 AM.
09-27-2014, 02:06 AM
#6
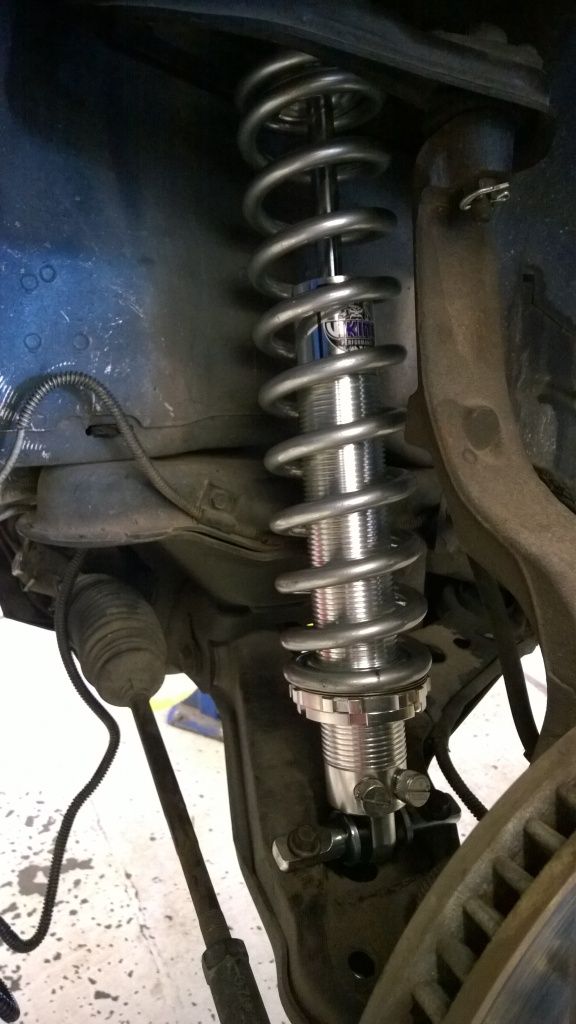
Removed lowering springs and Bilstein shocks, installed Viking double adjustable shocks and 300# springs. You dont have to be an expert at adjusting suspension to get these to improve your times. Just play with the settings and find what you like. Count the "clicks" from 0 and write everything down that way next time you go to the track you can set everything up quickly. I have a certain way I have them set up on the street and another for the track.
Also, I cant tell the difference between $5 and $25 toilet paper. I'm sure there is a slight difference, but I just want something to wipe my a** with. If you're like me then look into Viking shocks. When you compare the price of them to QA1 and the others you'll see what I mean.
Removed ABS block, ran new lines, relocated line lock lower, tucked all wires, and trimmed factory radiator support getting ready fab my own aluminum intake box. Making new brake lines is my absolute least favorite thing to do on a car. If you're like me, prepare to flare the ends multiple times before they stop leaking. Some I get on the first try, some takes 5 tries.
TIP: And after you're starting to flare that same line for the 5th time you're going to be sweating and cussing and in a hurry and you're going to flare that damn line so good it wont leak for a lifetime.......just to realize you didnt put the threaded end on first before the flare. Dont worry 6th times a charm.
Also, please dont use the corner of a desk or anything 90 degrees to bend your lines. You'll kink them. Even bending by hand can kink the line if you dont do it right. Autozone sells hand held benders for like $5.
And keep in mind not to put any lines where they can get snagged while driving or can flop around because they will come loose.
Installed Aerocatch hood pins and MWC bumper supports front and rear, removed hood latch and bracket, so much room now for future intercooler.
The hood pins look pretty scary if its your first time. Dont worry its easy and self explanatory. Almost impossible to fudge up. The Aerocatch pins even come with a template to use for cutting. The best tool to use for this is a Dremel and lots of patience. I'll do 20 hood pins before I make 1 brake line.
The MWC bumper supports are cool and light weight. Once installed you cant even see them unless you stand upside down. Dont try to install these with the bumpers still on. I know its a pain in the butt and seems like it takes forever to take the bumpers off just to quickly fasten the supports in with 4 bolts each in 2 minutes, but you have to. Trust me I've tried, front and rear. You cant. At least not on Trans Ams. Cant speak for Camaros.
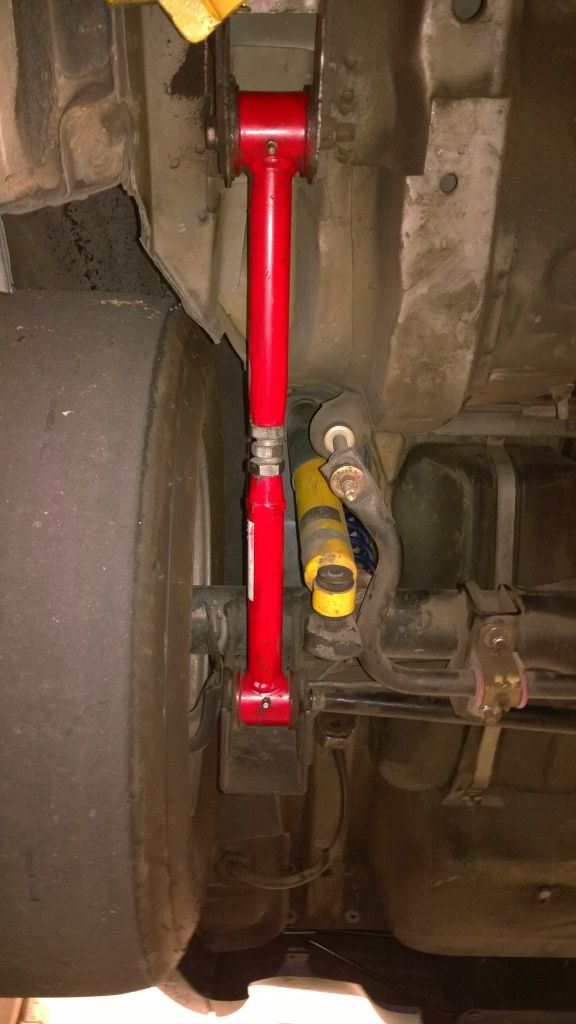
Removed old LCAs for new MWC offset LCAs. Heres a good comparison. (pics are before mini tubs). If you're wondering why I went with offset LCAs, the truth is because I wanted to switch to solid ends, not primarily for the extra tire space. The 325/50R15s will fit either way (275s are in the picture). BUT, I was thinking for the future. One day I'd like to narrow my rear probably 3"s and run a 5.5" backspace instead of a 4.5" backspace, meaning my wheel and tire will be pulled in 1 more inch to completely clear and tuck the fender. Thats when the offset LCAs will come to use.
Also, I cant tell the difference between $5 and $25 toilet paper. I'm sure there is a slight difference, but I just want something to wipe my a** with. If you're like me then look into Viking shocks. When you compare the price of them to QA1 and the others you'll see what I mean.

Removed ABS block, ran new lines, relocated line lock lower, tucked all wires, and trimmed factory radiator support getting ready fab my own aluminum intake box. Making new brake lines is my absolute least favorite thing to do on a car. If you're like me, prepare to flare the ends multiple times before they stop leaking. Some I get on the first try, some takes 5 tries.
TIP: And after you're starting to flare that same line for the 5th time you're going to be sweating and cussing and in a hurry and you're going to flare that damn line so good it wont leak for a lifetime.......just to realize you didnt put the threaded end on first before the flare. Dont worry 6th times a charm.
Also, please dont use the corner of a desk or anything 90 degrees to bend your lines. You'll kink them. Even bending by hand can kink the line if you dont do it right. Autozone sells hand held benders for like $5.
And keep in mind not to put any lines where they can get snagged while driving or can flop around because they will come loose.

Installed Aerocatch hood pins and MWC bumper supports front and rear, removed hood latch and bracket, so much room now for future intercooler.
The hood pins look pretty scary if its your first time. Dont worry its easy and self explanatory. Almost impossible to fudge up. The Aerocatch pins even come with a template to use for cutting. The best tool to use for this is a Dremel and lots of patience. I'll do 20 hood pins before I make 1 brake line.
The MWC bumper supports are cool and light weight. Once installed you cant even see them unless you stand upside down. Dont try to install these with the bumpers still on. I know its a pain in the butt and seems like it takes forever to take the bumpers off just to quickly fasten the supports in with 4 bolts each in 2 minutes, but you have to. Trust me I've tried, front and rear. You cant. At least not on Trans Ams. Cant speak for Camaros.

Removed old LCAs for new MWC offset LCAs. Heres a good comparison. (pics are before mini tubs). If you're wondering why I went with offset LCAs, the truth is because I wanted to switch to solid ends, not primarily for the extra tire space. The 325/50R15s will fit either way (275s are in the picture). BUT, I was thinking for the future. One day I'd like to narrow my rear probably 3"s and run a 5.5" backspace instead of a 4.5" backspace, meaning my wheel and tire will be pulled in 1 more inch to completely clear and tuck the fender. Thats when the offset LCAs will come to use.


Last edited by Jc803; 10-12-2015 at 01:32 AM.
09-27-2014, 02:19 AM
#7
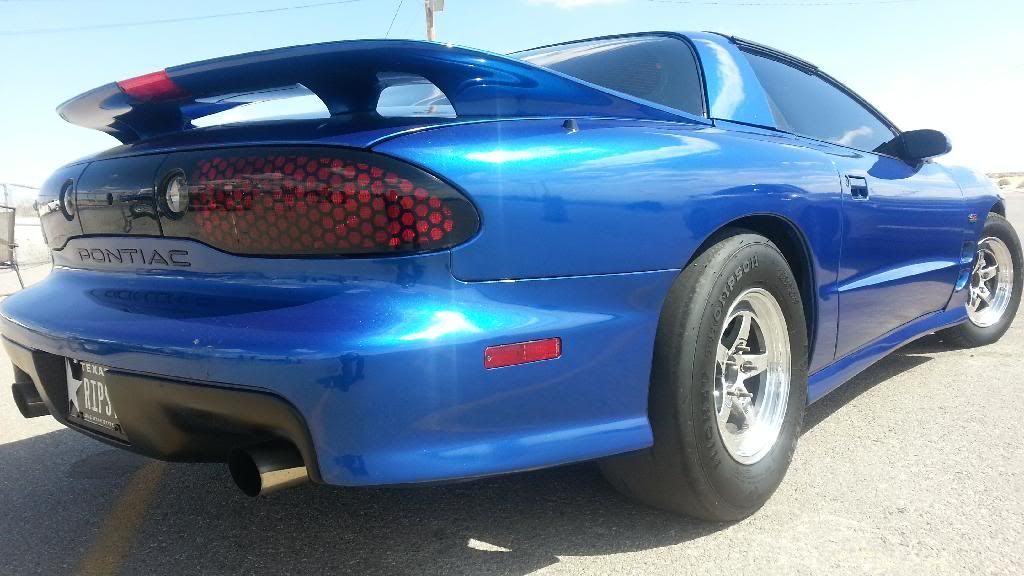
New tires are here, putting them on tomorrow. 325/50R15 Hoosier Drag radials.
EDIT: 12OCT2015, These tires are pretty good on the street. But I will say that even with half the amount of mods I had when I ran the 275 MT ET Street Pro, I had a better 60 ft. Averaged about .2 quicker on them. And that was before the full front and rear suspension (keep reading you'll see what I've added since then). It could be the extra power and still running the T56. It could be the less weight. It could be the complete suspension screwing me somehow. But all I know for a fact is with half the mods I still had a better 60ft with the 275 Mickey Thompsons. If I had a set of both tires right now I'd test them back to back but I'm done with drag radials. Going slicks soon.

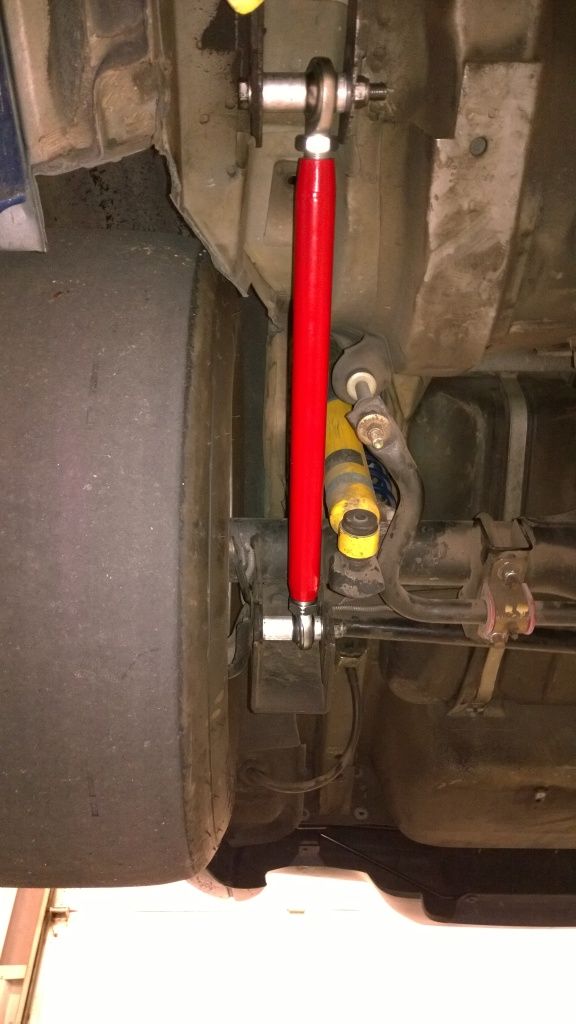
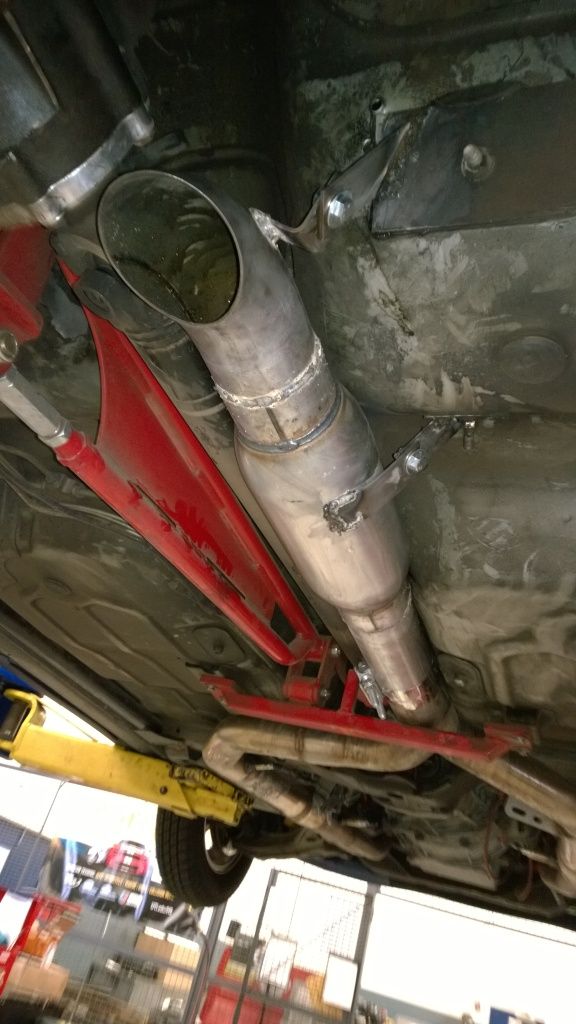
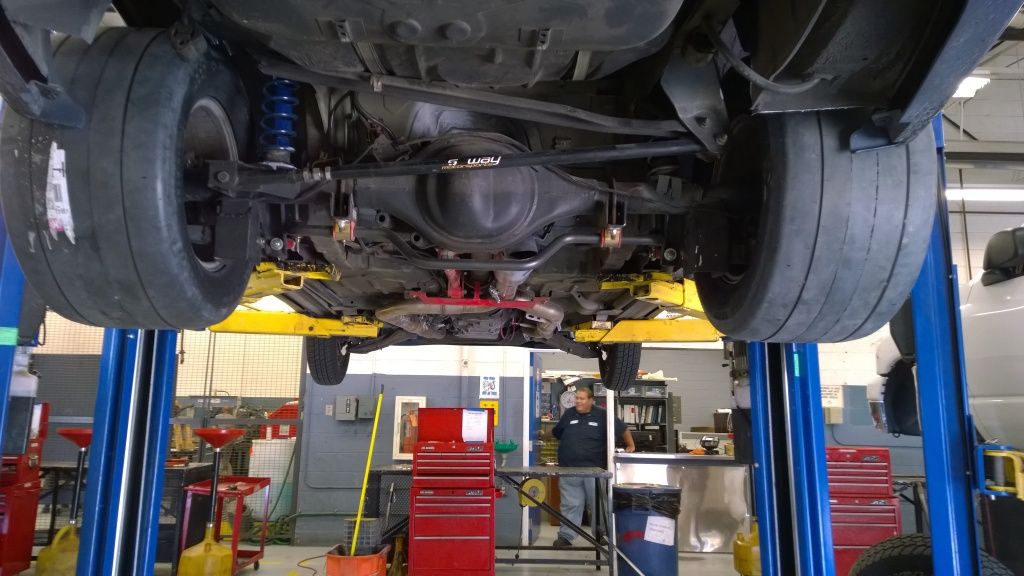
Went from stock exhaust, to Magnaflow, it was too quiet then installed SLP Loudmouth catback, it was too restrictive going from a 3.5" Y pipe to 3" catback, it was also extra weight, so then I fabbed up some 3.5" pipe going from the 3.5" Y, to 5" bullet muffler to 3.5" turndown before axle. It has so much clearance it actually sits higher than the axle housing so there is 0 chance of it hitting anything. If anything hits its going to be the torque arm brace.
Basically all the parts I still have to install minus the tubular bumper supports, springs, shocks, and LCAs
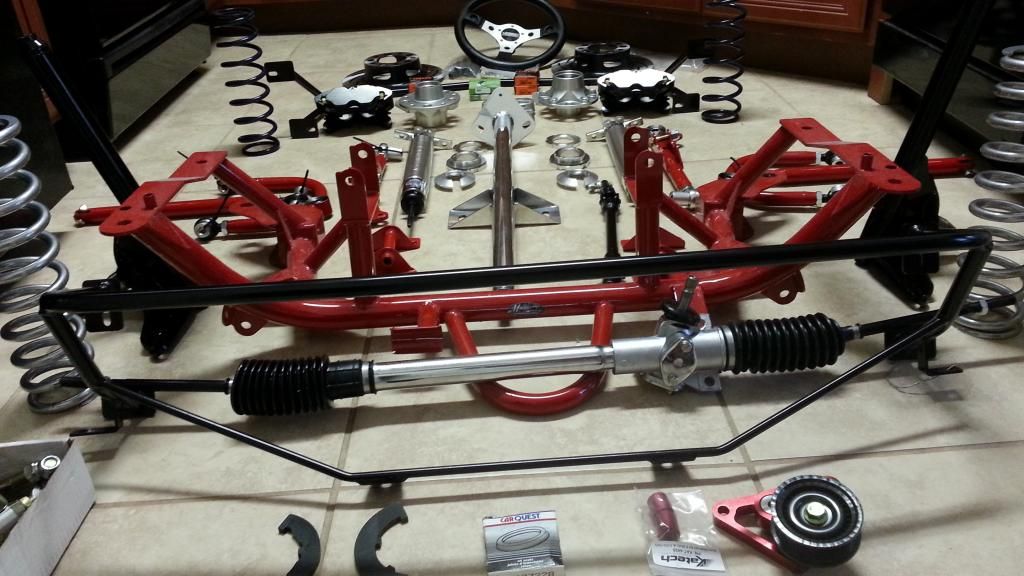
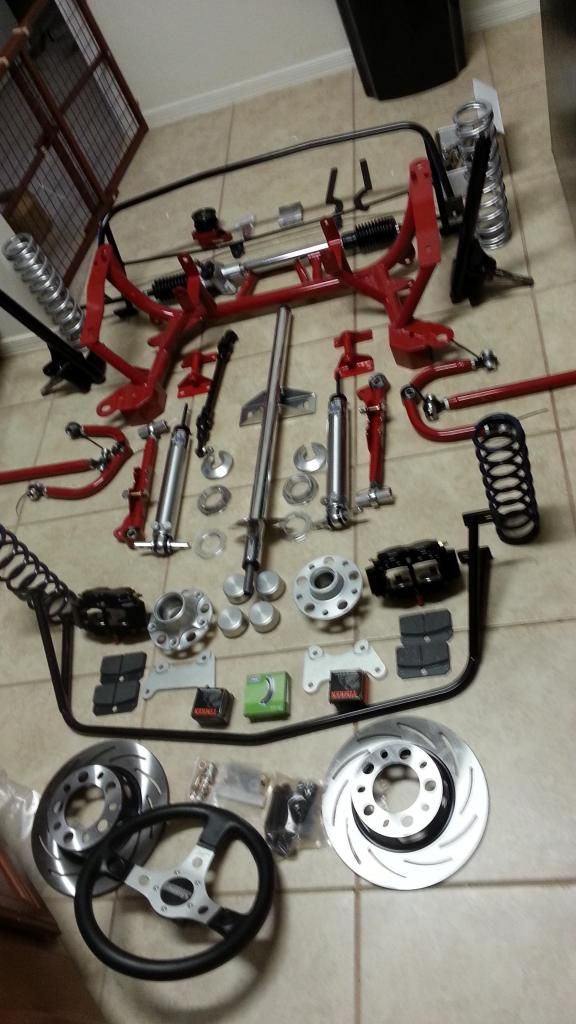
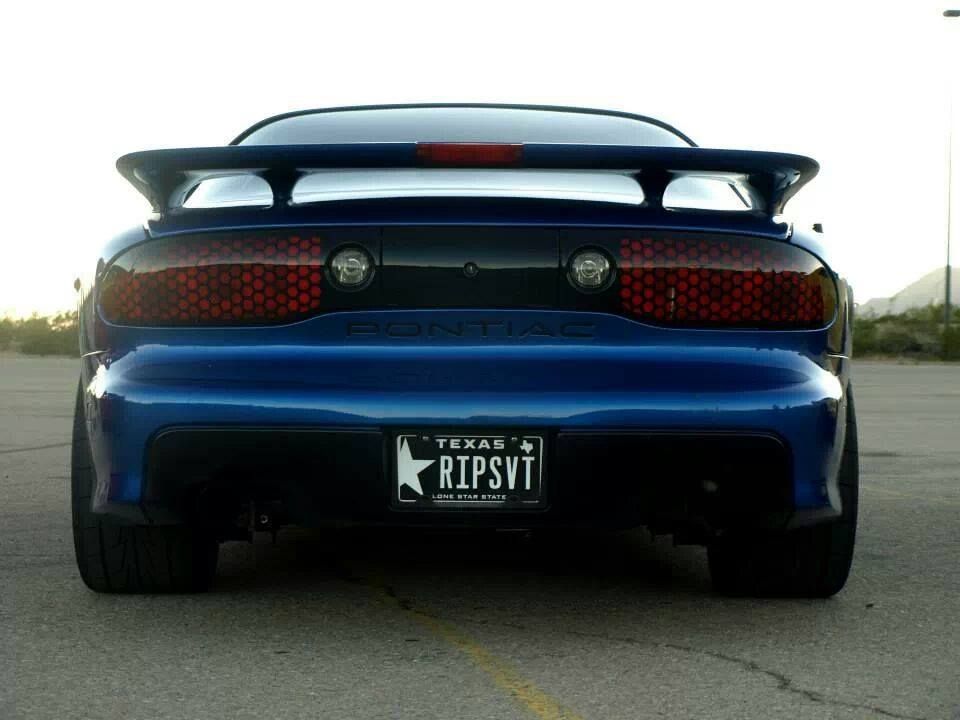
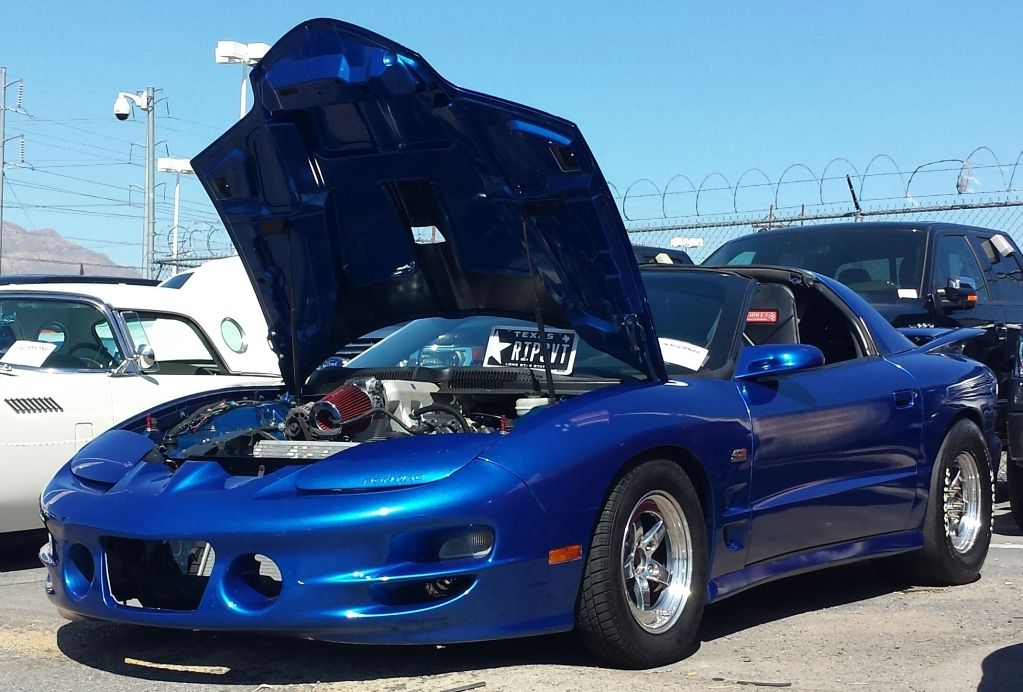
Photo finish, for now, until tomorrow and I'm right back at it again. My wife washing the WS6, because thats how I roll lol. Expect a photo shoot soon after I wrap up a few more mods.
EDIT: 12OCT2015, photo shoots are BAD. Bad luck, bad karma, bad everything. Never taking another picture of my wife and car together ever again. Sorry but I'm not. Nope. Never. Keep reading you'll see...

EDIT: 12OCT2015, These tires are pretty good on the street. But I will say that even with half the amount of mods I had when I ran the 275 MT ET Street Pro, I had a better 60 ft. Averaged about .2 quicker on them. And that was before the full front and rear suspension (keep reading you'll see what I've added since then). It could be the extra power and still running the T56. It could be the less weight. It could be the complete suspension screwing me somehow. But all I know for a fact is with half the mods I still had a better 60ft with the 275 Mickey Thompsons. If I had a set of both tires right now I'd test them back to back but I'm done with drag radials. Going slicks soon.

Went from stock exhaust, to Magnaflow, it was too quiet then installed SLP Loudmouth catback, it was too restrictive going from a 3.5" Y pipe to 3" catback, it was also extra weight, so then I fabbed up some 3.5" pipe going from the 3.5" Y, to 5" bullet muffler to 3.5" turndown before axle. It has so much clearance it actually sits higher than the axle housing so there is 0 chance of it hitting anything. If anything hits its going to be the torque arm brace.

Basically all the parts I still have to install minus the tubular bumper supports, springs, shocks, and LCAs


Photo finish, for now, until tomorrow and I'm right back at it again. My wife washing the WS6, because thats how I roll lol. Expect a photo shoot soon after I wrap up a few more mods.
EDIT: 12OCT2015, photo shoots are BAD. Bad luck, bad karma, bad everything. Never taking another picture of my wife and car together ever again. Sorry but I'm not. Nope. Never. Keep reading you'll see...

Last edited by Jc803; 10-12-2015 at 01:41 AM.
Trending Topics

 09-28-2014, 07:32 PM
#11
TECH Veteran
Love the color of your car bro. On the valvesprings I'll look no further than Mr.Tooley 660 platinum spring.
09-29-2014, 09:19 PM
#12
Thanks for the compliments guys. I have no clue how much the paint cost. The previous owner had it done and thats pretty much the only reason I bought the car. I was nice and stockish when I got it, full weight, ac, and interior, show quality in fact, and I've pretty much "ruined" it by turning it into a race car. They did a great job though completely striping the car down and painting everything inside and out.
BIGsmokey10, I'd love to fine out how great the MWC front end is but they are taking their sweet time. I ordered everything in the beginning of July, finally received everything and the end of August, they welded the tubular spindles wrong and the brakes wouldnt even fit on them so I sent them back over a month ago now and I emailed them last week and they havent even started making the new ones yet. I'd love to make it to the track at least one more time this year.....
BIGsmokey10, I'd love to fine out how great the MWC front end is but they are taking their sweet time. I ordered everything in the beginning of July, finally received everything and the end of August, they welded the tubular spindles wrong and the brakes wouldnt even fit on them so I sent them back over a month ago now and I emailed them last week and they havent even started making the new ones yet. I'd love to make it to the track at least one more time this year.....
09-29-2014, 09:24 PM
#13
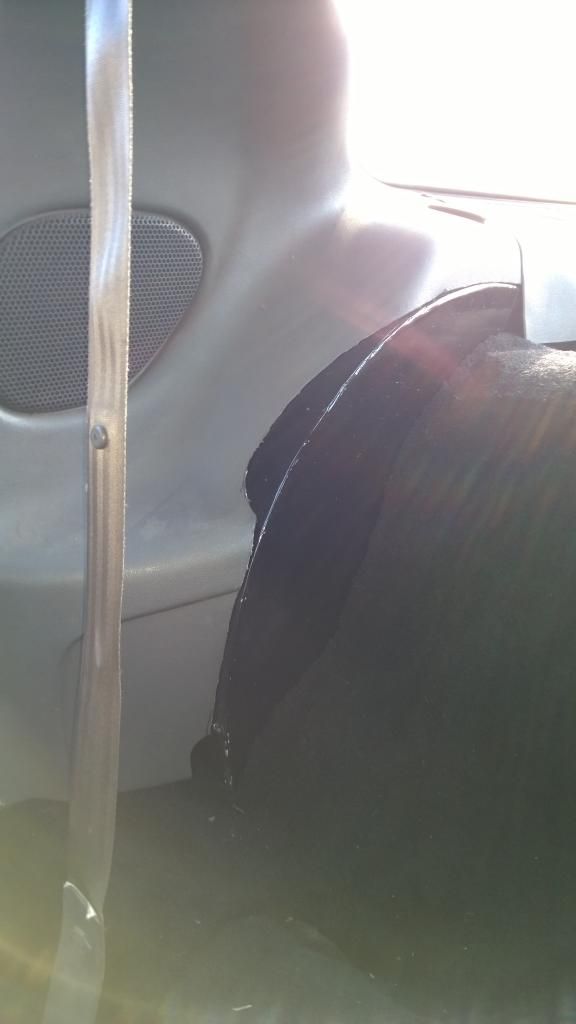
I finally put the 325 Hoosiers on. Here you can see I still have plenty of room left over with the mini tubs. Just enough for me to get the axles shorted, get new wheels, and tuck the whole tire under the fenders
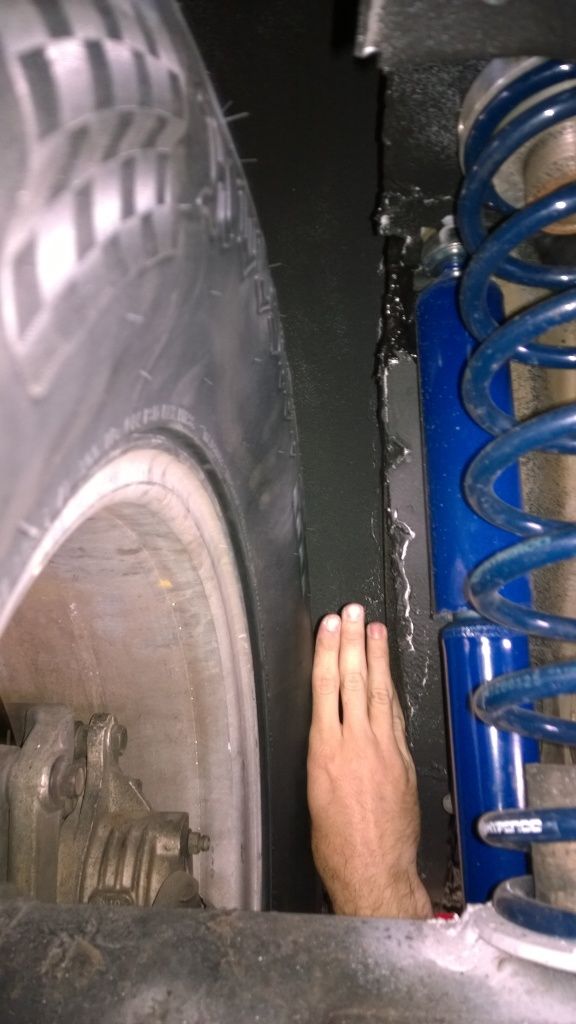
I also installed a LNC-2000. Found a nice little hole to tuck it into, trying to keep the engine bay looking clean. Also I drilled a very small hole into the plastic on top so I can fit the screwdriver through while looking through the vent to adjust RPM settings even with the hood still closed
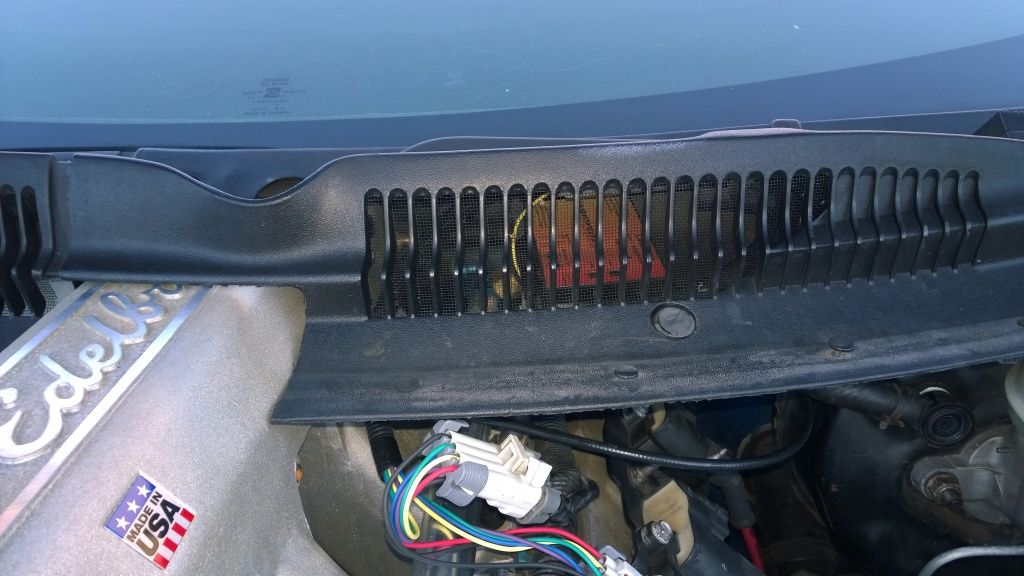


I also installed a LNC-2000. Found a nice little hole to tuck it into, trying to keep the engine bay looking clean. Also I drilled a very small hole into the plastic on top so I can fit the screwdriver through while looking through the vent to adjust RPM settings even with the hood still closed
 09-29-2014, 09:31 PM
#14
I am having a problem though. As soon as I got the LNC-2000 in, wired it up, and took it for a test spin I F'ed something up the first time I did a "no lift shift" with it. I nailed it in 1st, shifted from first to 2nd with the gas still planted and did the same from 2nd to 3rd. Then when I got back down to cruising speed I noticed a small vibration. Gave it a little gas and also noticed a slight decrease in power. I'm not sure if something is messed up in the motor or if its the vibration thats making it slower.
What do you guys think? Any test you can think of that I can do to keep from having to pull the trans out? The trans still shifts fine, theres no noise or grinding, clutch still feels fine and no noise, honestly I cant tell if there is noise coming from the rear end because the car is so loud, the engine isnt knocking or anything. I've got to figure this out and fix it before the 17th because I have $300 to win
What do you guys think? Any test you can think of that I can do to keep from having to pull the trans out? The trans still shifts fine, theres no noise or grinding, clutch still feels fine and no noise, honestly I cant tell if there is noise coming from the rear end because the car is so loud, the engine isnt knocking or anything. I've got to figure this out and fix it before the 17th because I have $300 to win
09-29-2014, 10:08 PM
#15
Launching!
iTrader: (1)
Join Date: Aug 2009
Location: Louisiana
Posts: 298
Likes: 0
Received 0 Likes
on
0 Posts

Always something right when your at the end.It could be a number of things to try.Does the vibration come and go when you engage and disengage the clutch pedal?
My 408 sounds like a diesel under the hood,but runs fine.The rotating assembly is just loud.
My 408 sounds like a diesel under the hood,but runs fine.The rotating assembly is just loud.
09-29-2014, 11:42 PM
#16
Yea I spend just about as much time fixing things as I do mods... Not too upset though, not running at the track till I get the tubular spindles back from MWC, and knowing them thats going to be months....
Vibration is only while maintaining speed around 2000 rpm and up, and also while accelerating. No vibration while clutch is pushed in, neutral, and idling (I think, its hard to tell with the cam and solid motor mounts and suspension).
Tomorrow I'm going to do a cylinder power balance test with HP Tuners and pull the pushrods to see if any are bent. I'm just praying its not a bent valve or rod
Nice SS BTW, looking at your sig that pretty neat that we have the same set up and same times
09-30-2014, 08:30 AM
#19
TECH Regular
iTrader: (3)
Join Date: Apr 2012
Location: michigan
Posts: 447
Likes: 0
Received 0 Likes
on
0 Posts
Thanks for the compliments guys. I have no clue how much the paint cost. The previous owner had it done and thats pretty much the only reason I bought the car. I was nice and stockish when I got it, full weight, ac, and interior, show quality in fact, and I've pretty much "ruined" it by turning it into a race car. They did a great job though completely striping the car down and painting everything inside and out.
BIGsmokey10, I'd love to fine out how great the MWC front end is but they are taking their sweet time. I ordered everything in the beginning of July, finally received everything and the end of August, they welded the tubular spindles wrong and the brakes wouldnt even fit on them so I sent them back over a month ago now and I emailed them last week and they havent even started making the new ones yet. I'd love to make it to the track at least one more time this year.....
BIGsmokey10, I'd love to fine out how great the MWC front end is but they are taking their sweet time. I ordered everything in the beginning of July, finally received everything and the end of August, they welded the tubular spindles wrong and the brakes wouldnt even fit on them so I sent them back over a month ago now and I emailed them last week and they havent even started making the new ones yet. I'd love to make it to the track at least one more time this year.....
 09-30-2014, 11:34 AM
#20
I do have a picture actually. They welded the angle wrong. You can see from the pic its crooked as hell. I have the caliper bracket bolted on but the caliper wouldn't go on, and even if I could get it on it wouldn't be aligned to the rotor.

Also I've already found the problem. I've been reading about guys using a helicoil to fix the problem and supposedly its stronger than the aluminum threads. Read that its a m8x1.25" coil thread so someone correct me if I'm wrong. Also any other tips would be helpful, seems like I only have one shot to get this right
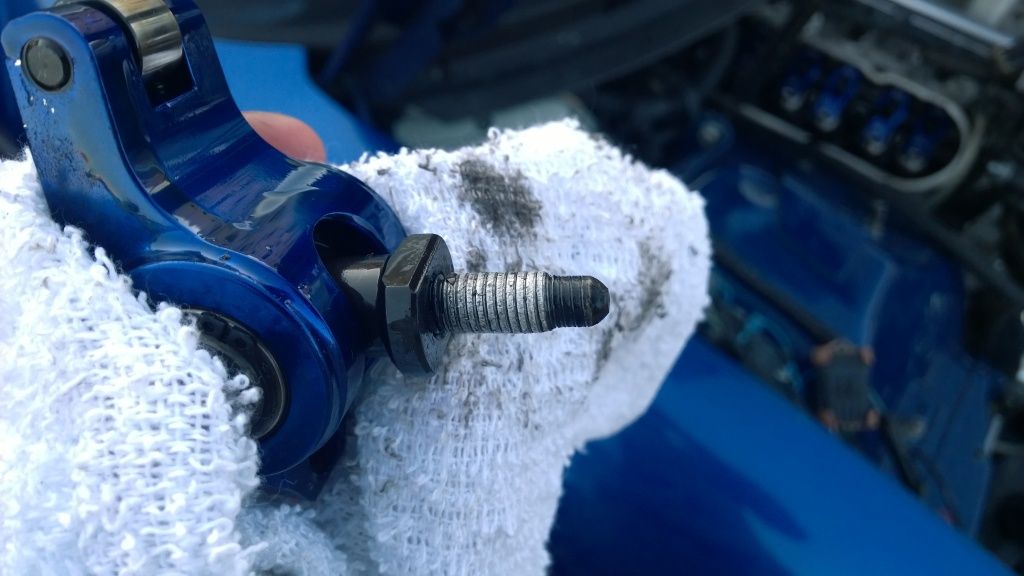
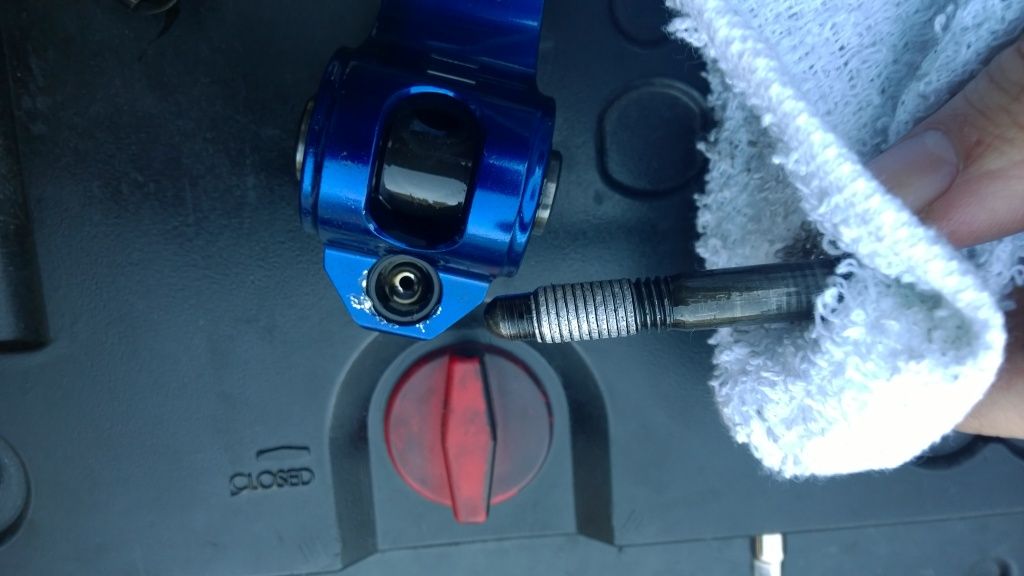

Also I've already found the problem. I've been reading about guys using a helicoil to fix the problem and supposedly its stronger than the aluminum threads. Read that its a m8x1.25" coil thread so someone correct me if I'm wrong. Also any other tips would be helpful, seems like I only have one shot to get this right


Last edited by Jc803; 09-30-2014 at 01:16 PM.