Snowball of a build - Turbo LSx Rx7
 01-13-2014, 08:21 AM
#1
Launching!
Thread Starter
iTrader: (5)

Join Date: Aug 2012
Location: IA
Posts: 255
Likes: 0
Received 0 Likes
on
0 Posts
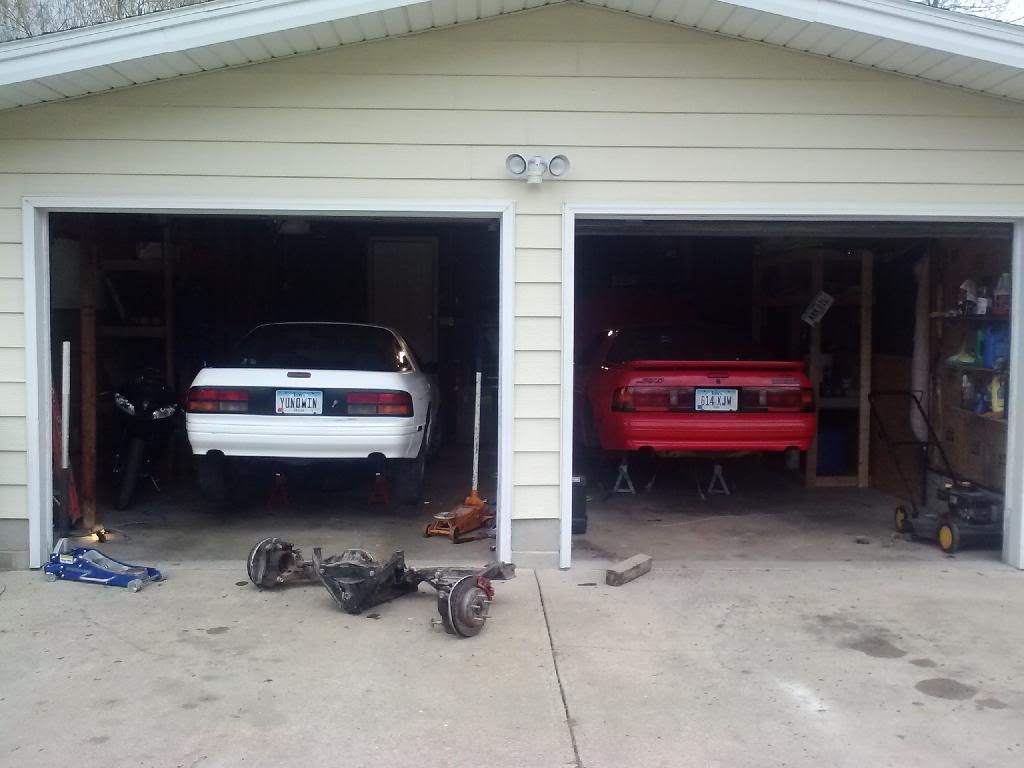
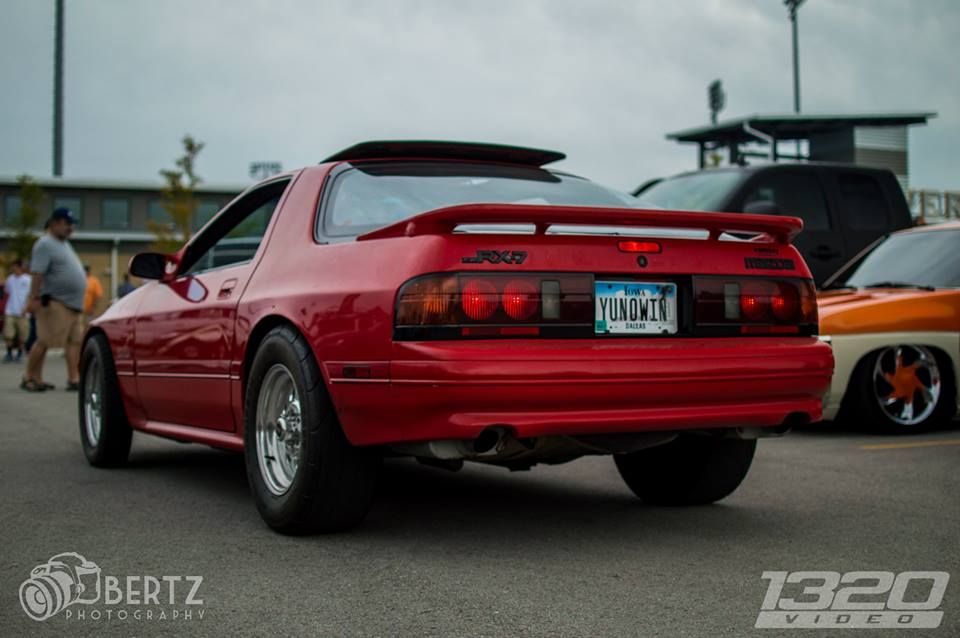
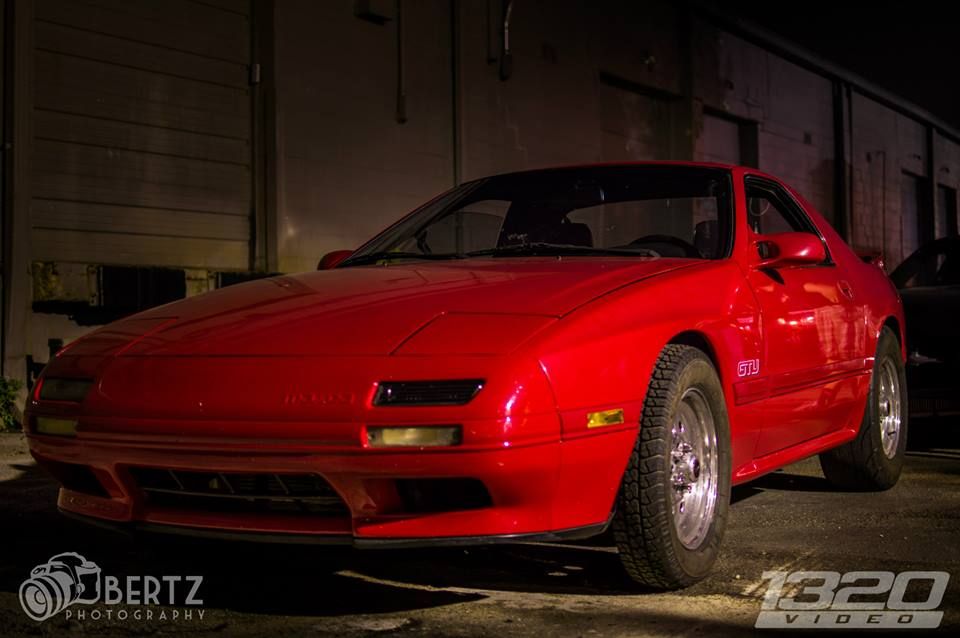
I figured its about time to post some progress and changes that i have made over the winter. The Shell was bought last spring/summer. The car is a 1990 Mazda RX7 GTU. It had the locked up motor and had very low original miles. The interior and exterior of the car was in near perfect condition besides the door dings. All in all it was a great find. Here is the car as it was purchased:
Once home in the garage, i swapped in the drive line from my previous project car (86 LSx Swapped RX7). The driveline included the Ford 8.8 IRS with 3.73 gears, Drive Shaft Shop Axles, TH350, and the turbo two brakes and hubs.
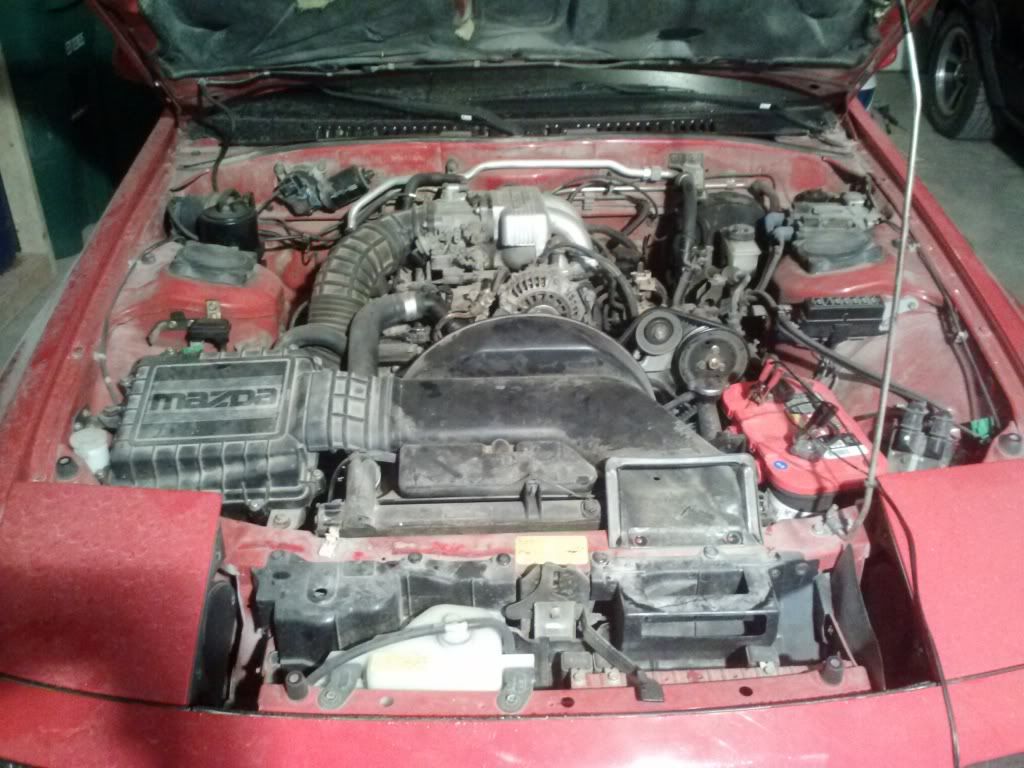
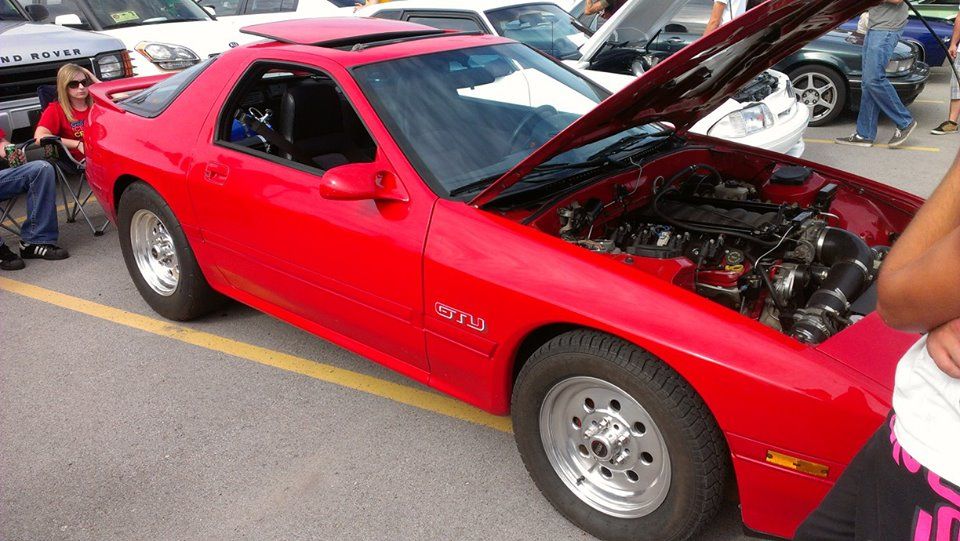
Once the driveline was in the new car, I think pulled the old rotary out and installed the LQ4. At this time It was a stock bottom end LQ4 with a Comp Cams 232/234 .595 .598 cam. On top was a Ls1 intake (eventually a FAST 76) and ported and milled 862 heads. It was also spraying a 150 shot when feeling frisky. For fuel an AEM 320 LPH pump was installed along with Ford green top 42# injectors and Holley fuel rails to run E85.
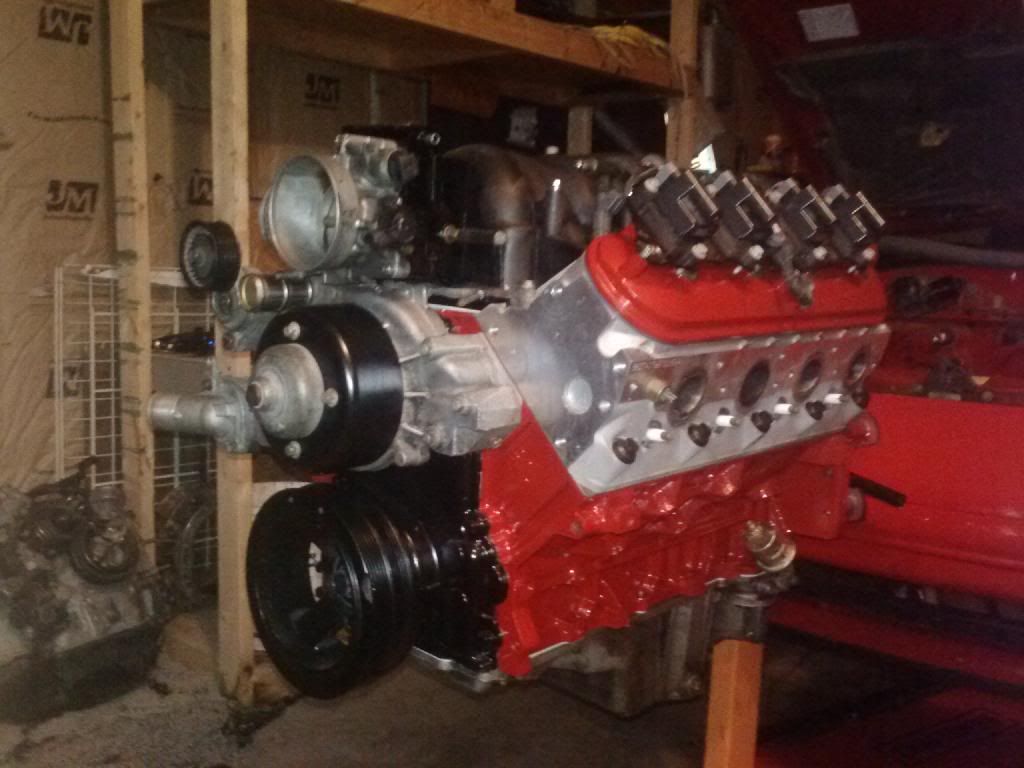
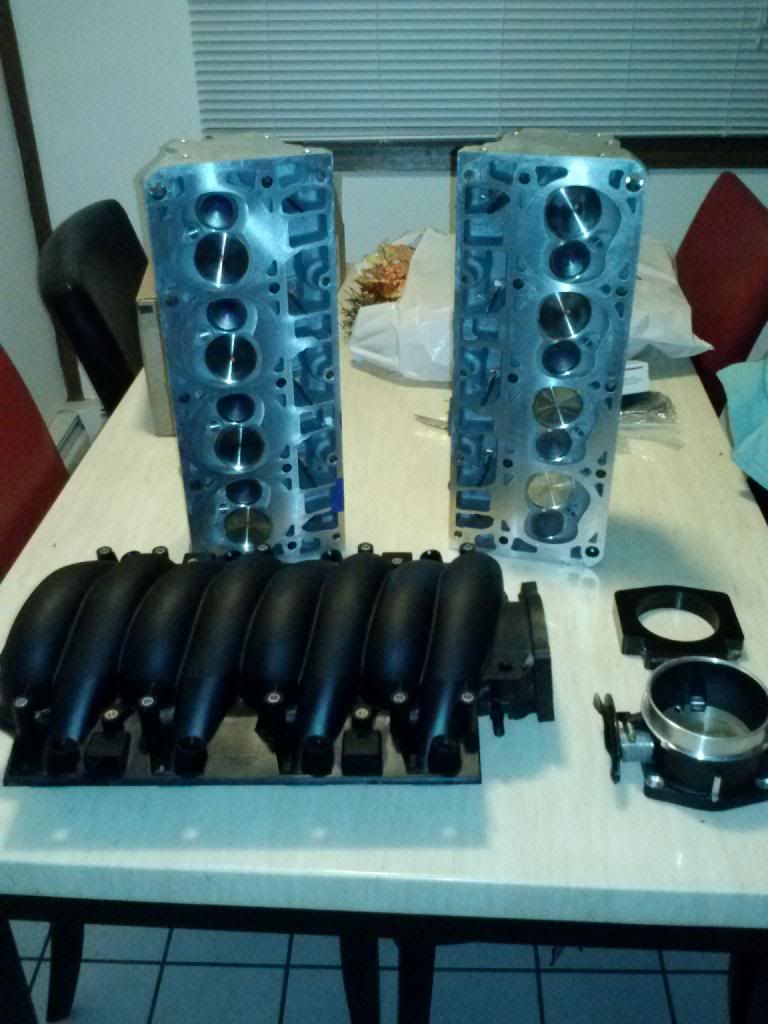
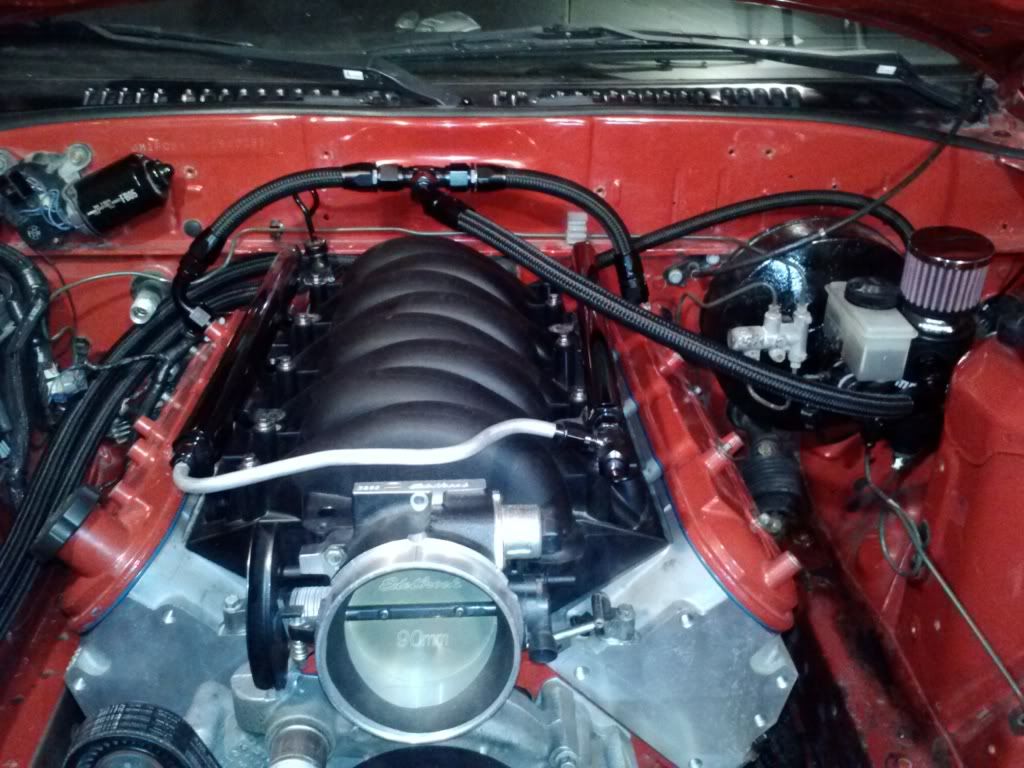
This setup did well and i dont really have any complaints. But like all car guys i decide i wanted more. I figured a topend swap and some headers would get me a bit more power and i wiould be pleased. I purchased a set of new LS3 heads and intake along with a 90mm throttle body.
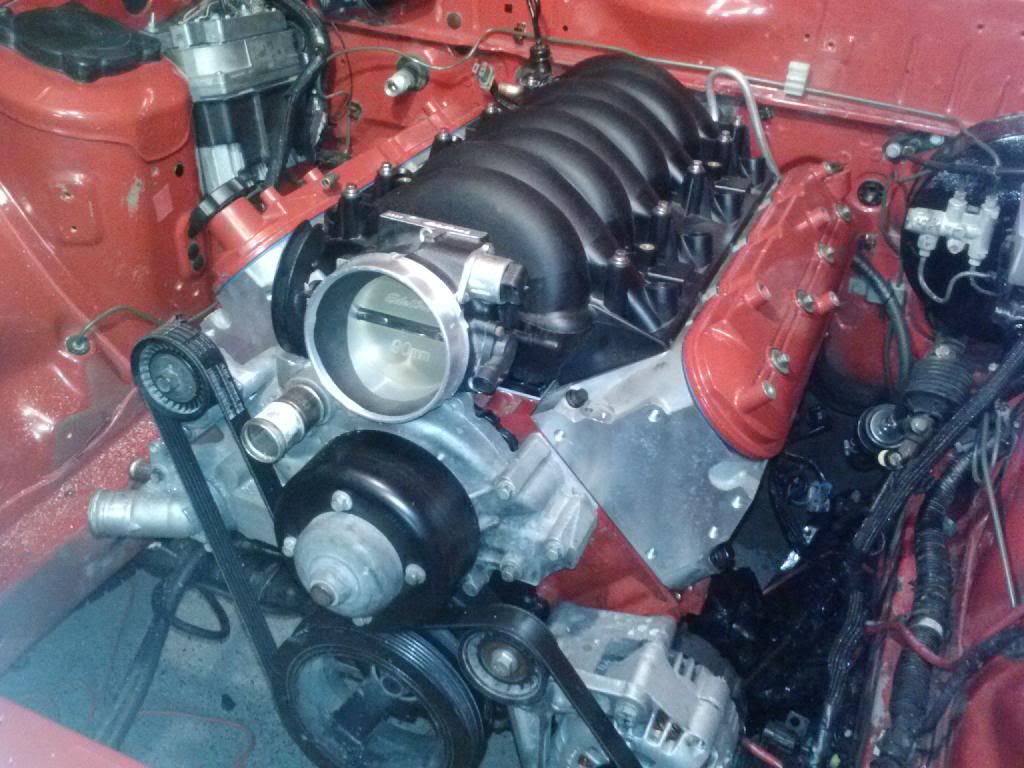
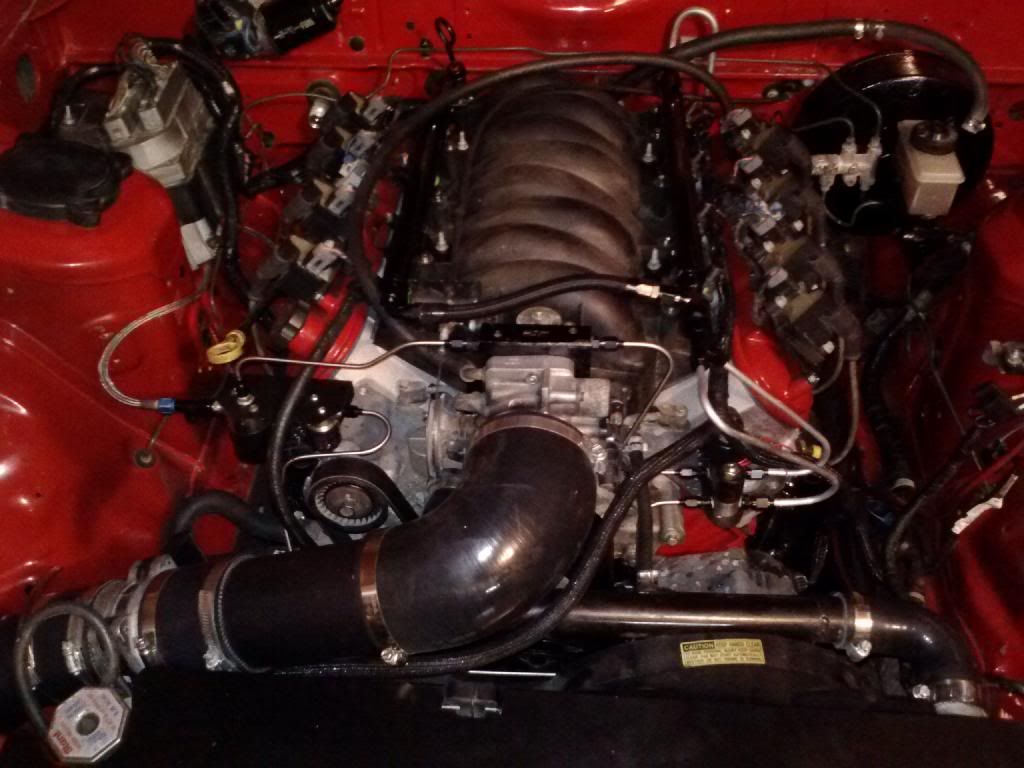
After installing the new topend i decided to clean up the engine bay a bit and did a wire tuck for the factory mazda harness along with moving the under hood fuse box. Also a catch can was installed.
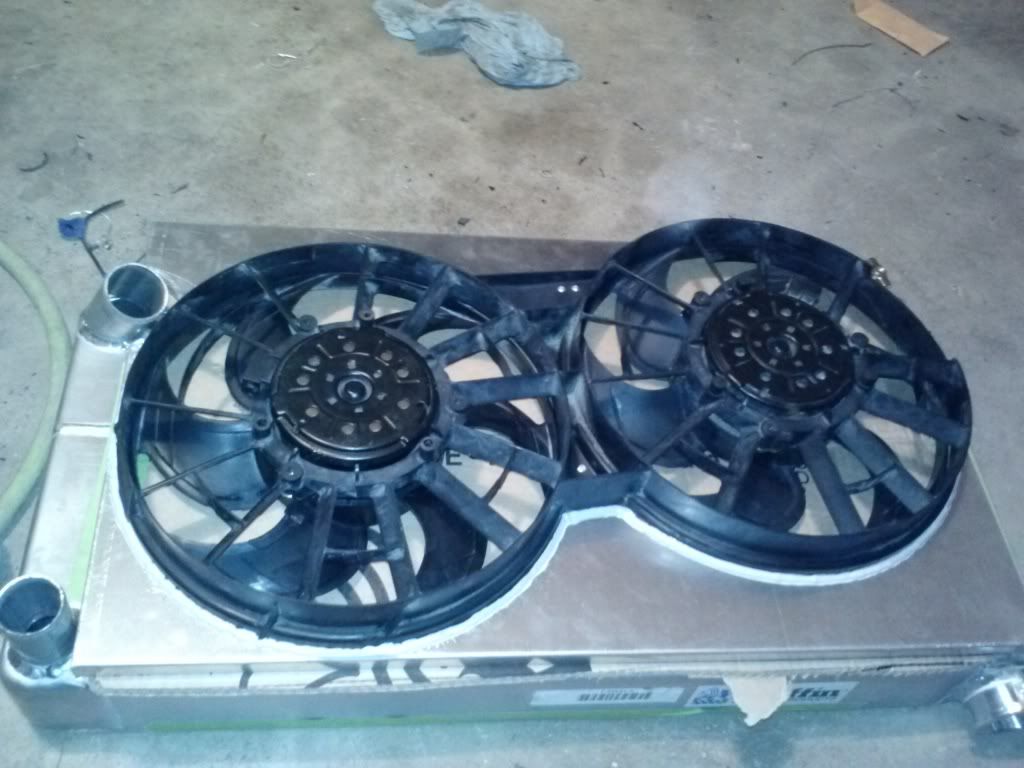
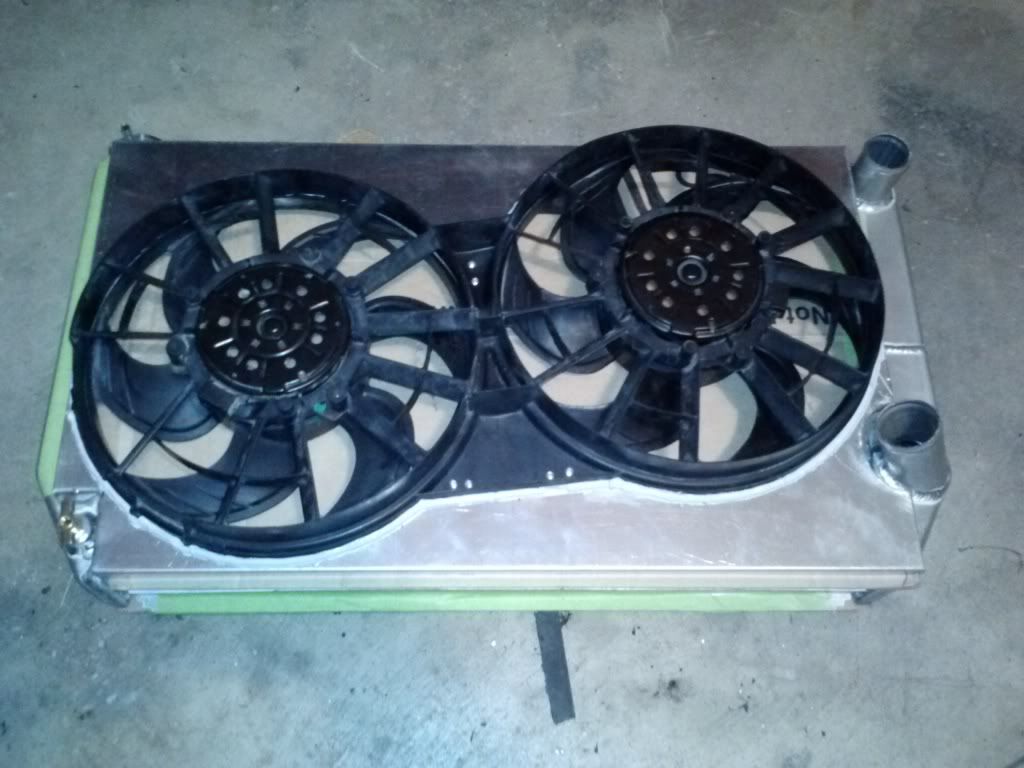
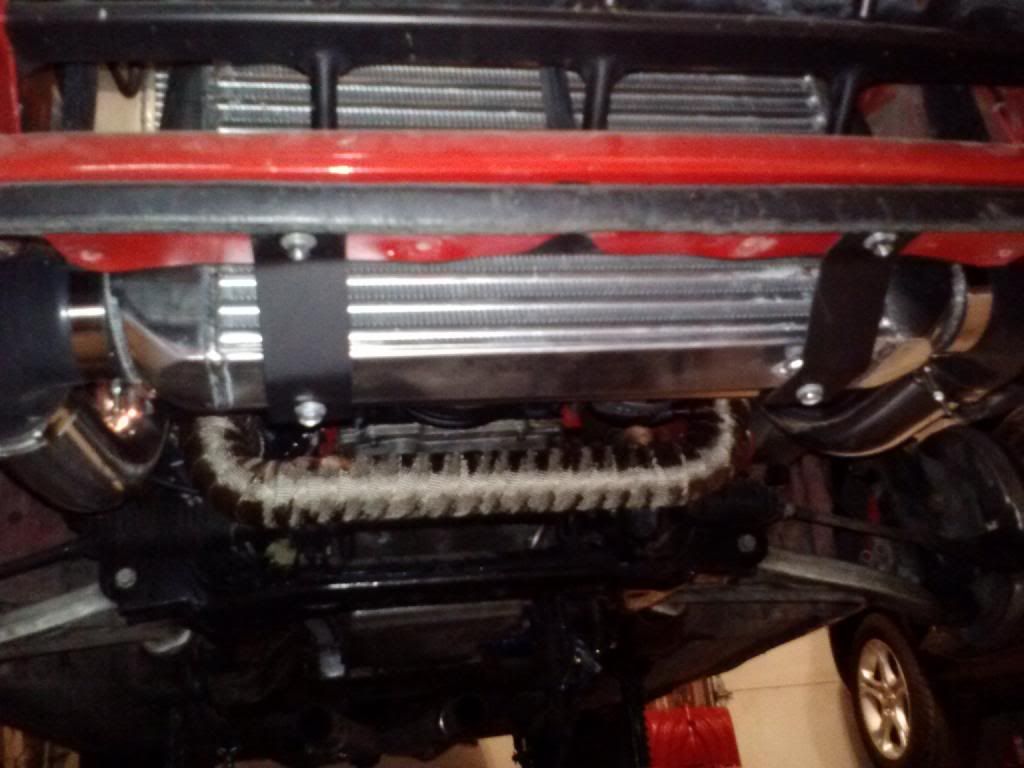
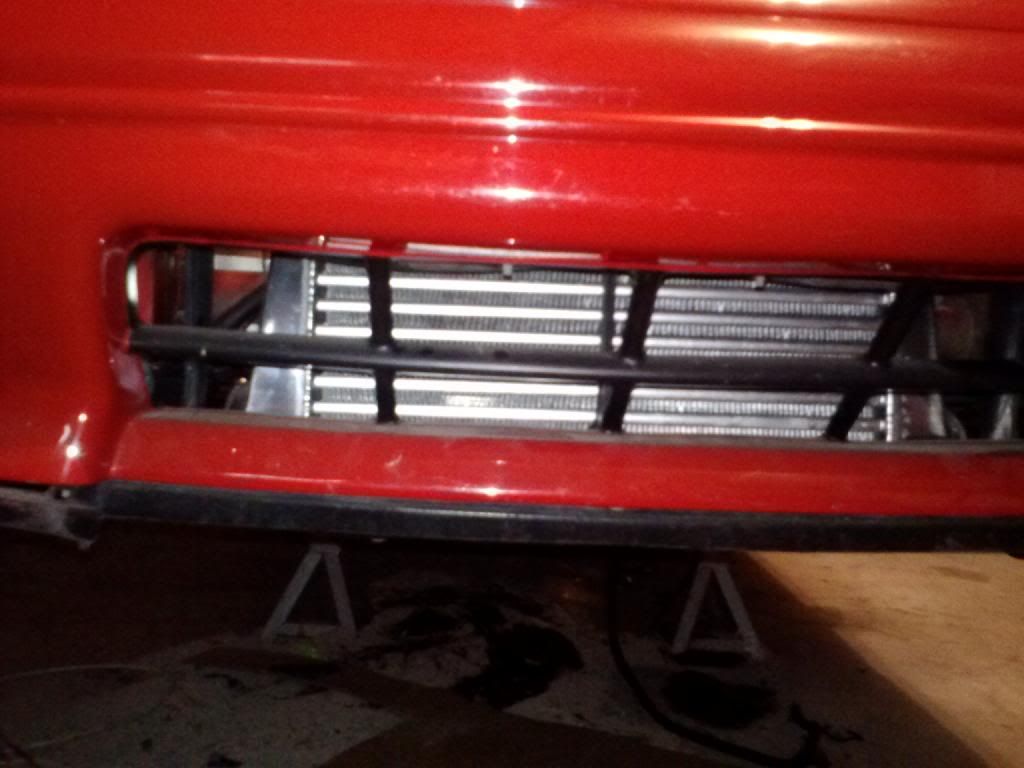
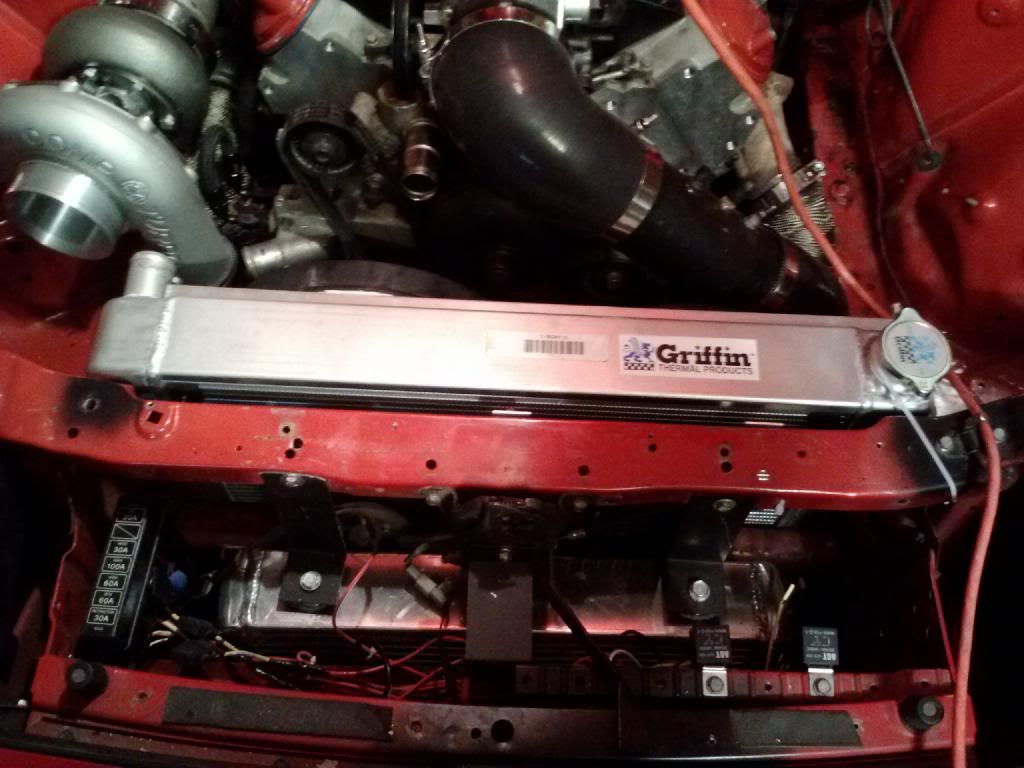
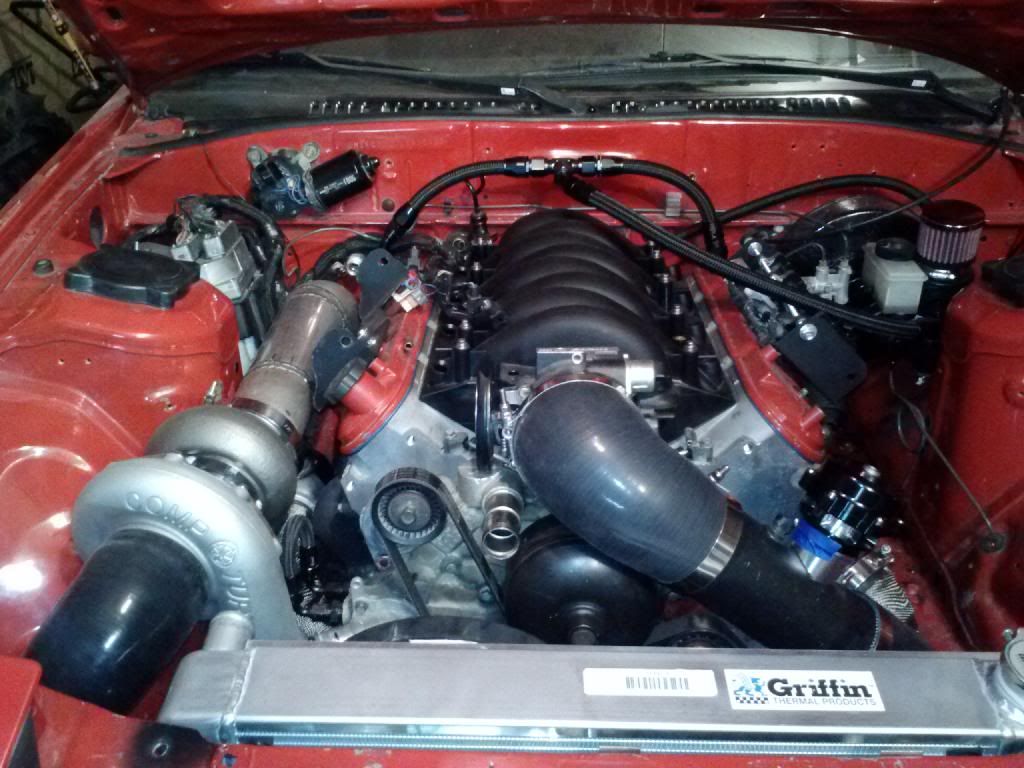
Now all of this was exciting, but somewhere along the lines i decided i was not spending nearly enough money. So, this is when i decided to go turbo. I began to figure out all the details on how i would route all of the piping and where things would be mounted. I had to change up the radiator to move the outlets to the passanger side of the car. However with a new radiator the new fans did not fit it right. So, this lead me to have to build a new fan shroud to use with the ford fans.
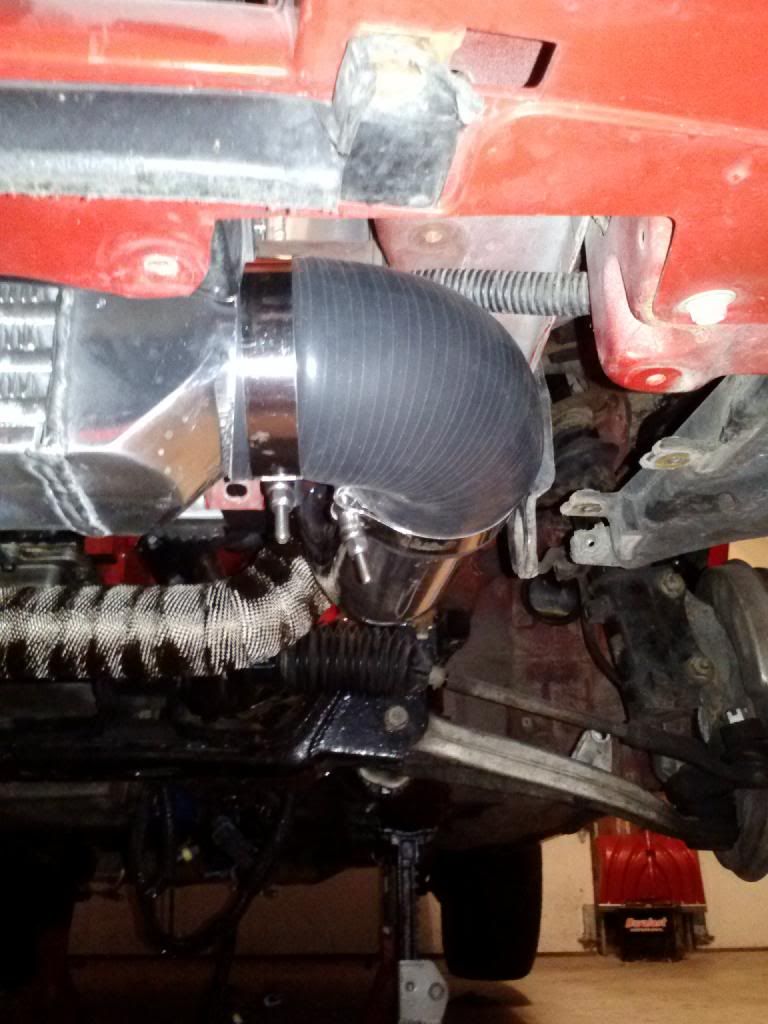
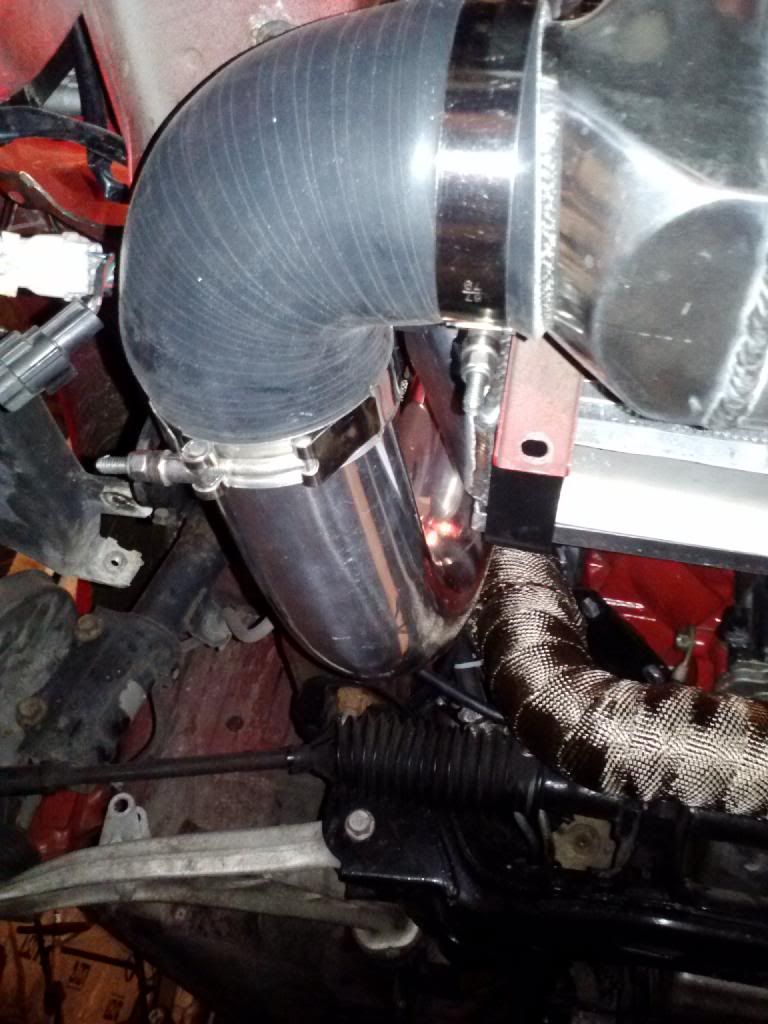
After finishing up the fan situation i ordered some turbo parts and started building up the hot side for the turbo kit. I used a truck manifold on the drivers side and a Fbody manifold on the passenger side. This would put them int he right locations and get them heading the correct direction for the piping i was going to create. The piping is 2.5" off each v-banded manifold joining at the passenger side and going up to the turbo. The wastegate (Precision 46mm) is mounted just after the piping merges into one and is planned to route back into the downpipe.
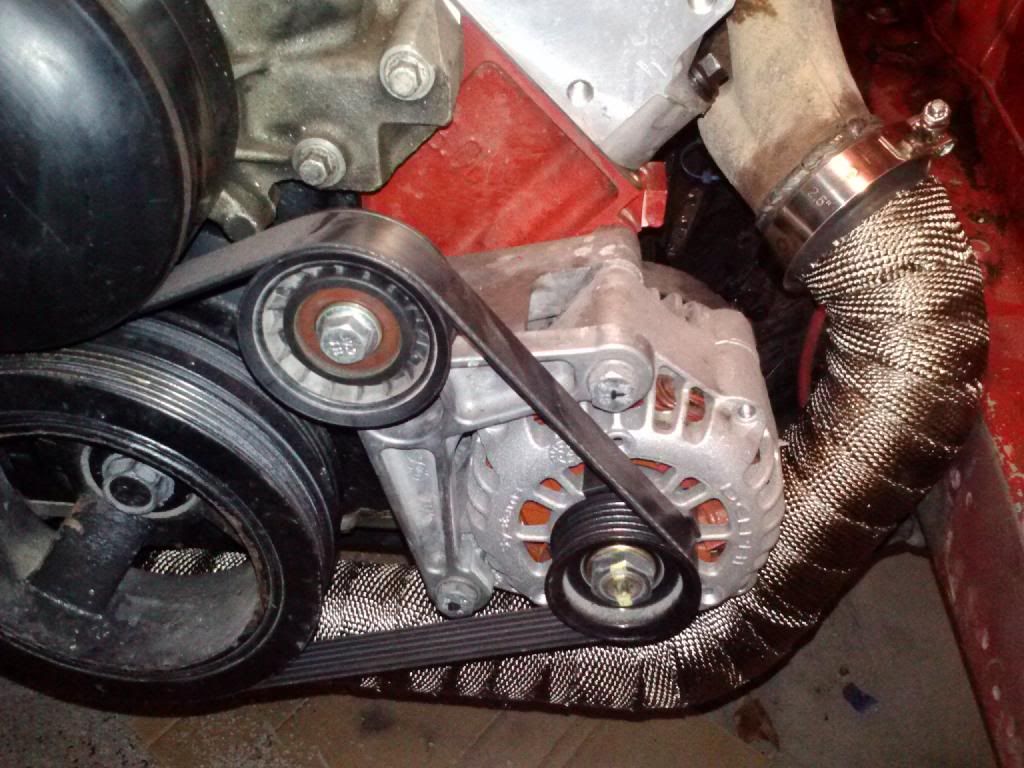
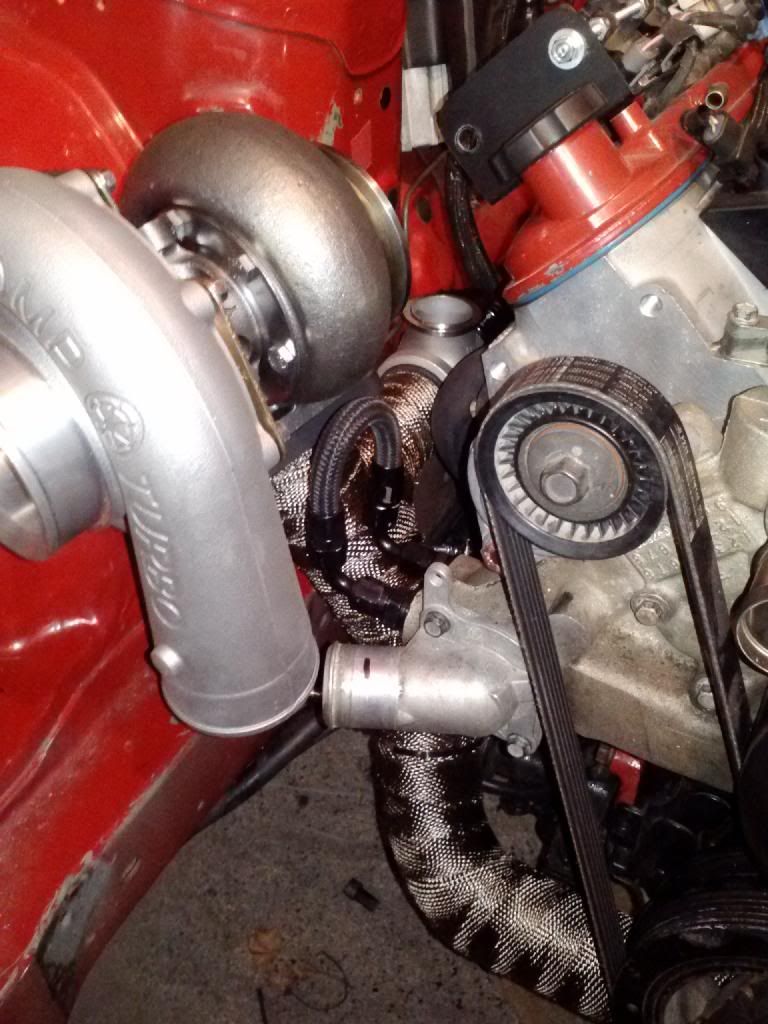
Everything fit quite snug in the bay. One of my main goals is not have to cut out any support or make any major changes to the structure of the vehicle. Thus i chose my turbo placement. The turbo that i chose was a journal bearing Comp Turbos CT43 8079 with a 3.5" DP and a 1.15 A/r. I was very impressed with the quality of the turbo once it arrived and it should reach my goal nicely.
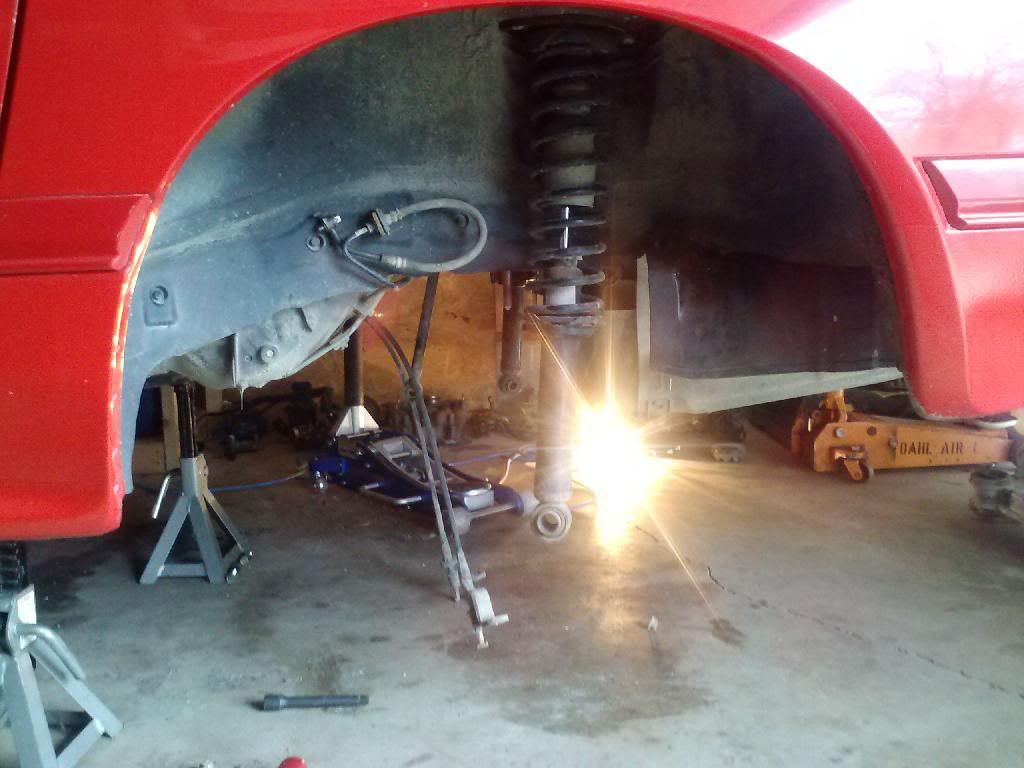
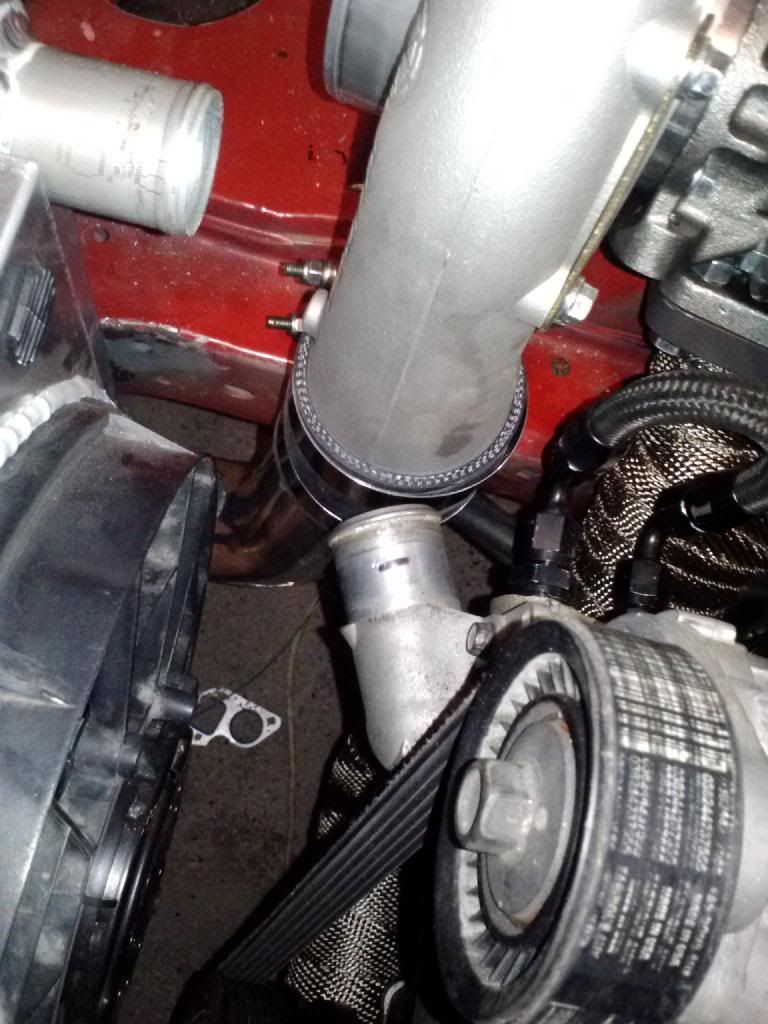
Once the turbo was bolted on to the new hotside, the DP was started to be fabricated. This is still a work in progress. The WG still needs to be routed into the DP. Again a tight fit but i believe it will still be a clean look when complete
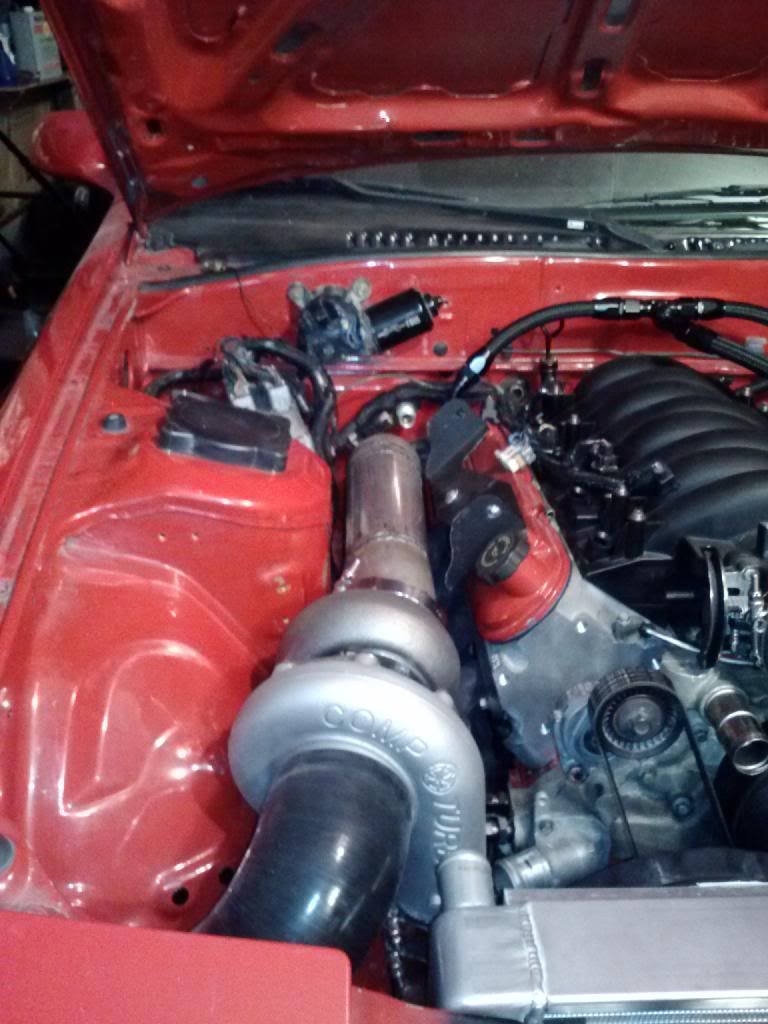
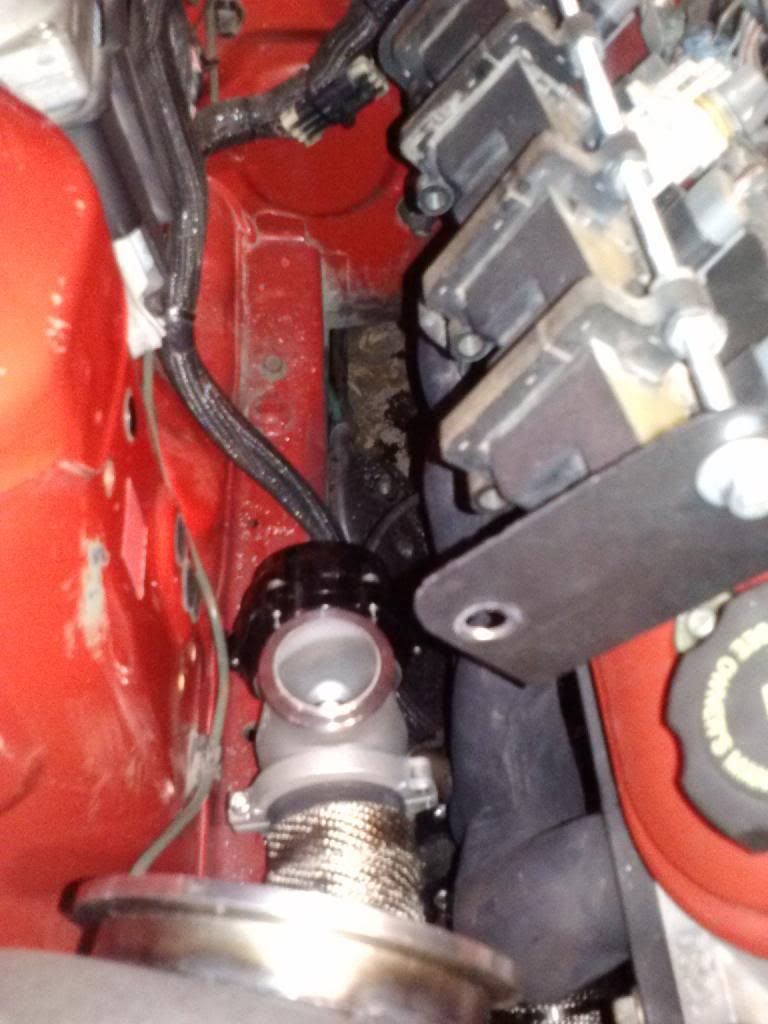
Now the cold side has also been mocked up and put into place. I am running a Ebay intercooler that most of the LS guys are running. however its a smaller 24" core. Its 3" piping off the turbo and after the intercooler it transitions to 3.5" piping into the intake. Ignore the black section of pipe in the pics. I am waiting on a 3.5" aluminum straight section and just used something i had around for mock up. The 50mm RPS BOV will be welded into this straight section when it arrives.
Here are some pics of the cold side and some other random pics to show where i am at currently with the build. i am sure there will be more info and pics to come and i am sure there is a ton of info i have left out.


Once home in the garage, i swapped in the drive line from my previous project car (86 LSx Swapped RX7). The driveline included the Ford 8.8 IRS with 3.73 gears, Drive Shaft Shop Axles, TH350, and the turbo two brakes and hubs.


Once the driveline was in the new car, I think pulled the old rotary out and installed the LQ4. At this time It was a stock bottom end LQ4 with a Comp Cams 232/234 .595 .598 cam. On top was a Ls1 intake (eventually a FAST 76) and ported and milled 862 heads. It was also spraying a 150 shot when feeling frisky. For fuel an AEM 320 LPH pump was installed along with Ford green top 42# injectors and Holley fuel rails to run E85.


This setup did well and i dont really have any complaints. But like all car guys i decide i wanted more. I figured a topend swap and some headers would get me a bit more power and i wiould be pleased. I purchased a set of new LS3 heads and intake along with a 90mm throttle body.


After installing the new topend i decided to clean up the engine bay a bit and did a wire tuck for the factory mazda harness along with moving the under hood fuse box. Also a catch can was installed.

Now all of this was exciting, but somewhere along the lines i decided i was not spending nearly enough money. So, this is when i decided to go turbo. I began to figure out all the details on how i would route all of the piping and where things would be mounted. I had to change up the radiator to move the outlets to the passanger side of the car. However with a new radiator the new fans did not fit it right. So, this lead me to have to build a new fan shroud to use with the ford fans.


After finishing up the fan situation i ordered some turbo parts and started building up the hot side for the turbo kit. I used a truck manifold on the drivers side and a Fbody manifold on the passenger side. This would put them int he right locations and get them heading the correct direction for the piping i was going to create. The piping is 2.5" off each v-banded manifold joining at the passenger side and going up to the turbo. The wastegate (Precision 46mm) is mounted just after the piping merges into one and is planned to route back into the downpipe.


Everything fit quite snug in the bay. One of my main goals is not have to cut out any support or make any major changes to the structure of the vehicle. Thus i chose my turbo placement. The turbo that i chose was a journal bearing Comp Turbos CT43 8079 with a 3.5" DP and a 1.15 A/r. I was very impressed with the quality of the turbo once it arrived and it should reach my goal nicely.
Once the turbo was bolted on to the new hotside, the DP was started to be fabricated. This is still a work in progress. The WG still needs to be routed into the DP. Again a tight fit but i believe it will still be a clean look when complete

Now the cold side has also been mocked up and put into place. I am running a Ebay intercooler that most of the LS guys are running. however its a smaller 24" core. Its 3" piping off the turbo and after the intercooler it transitions to 3.5" piping into the intake. Ignore the black section of pipe in the pics. I am waiting on a 3.5" aluminum straight section and just used something i had around for mock up. The 50mm RPS BOV will be welded into this straight section when it arrives.
Here are some pics of the cold side and some other random pics to show where i am at currently with the build. i am sure there will be more info and pics to come and i am sure there is a ton of info i have left out.


 01-13-2014, 10:35 AM
#3
Launching!
Thread Starter
iTrader: (5)
Join Date: Aug 2012
Location: IA
Posts: 255
Likes: 0
Received 0 Likes
on
0 Posts
Thanks for the compliment. Yeah shoot me your questions and i will do what i can to help ya out. I sure know i have had my fair share of help along the way.
 01-13-2014, 11:21 AM
#5
Launching!
Thread Starter
iTrader: (5)
Join Date: Aug 2012
Location: IA
Posts: 255
Likes: 0
Received 0 Likes
on
0 Posts
I am still in the process of building the turbo kit. The turbo somehow eveolved into my winter project. I need to finnish up the exhaust out the back of the car and finnish the piping to get the wastegate dumped back into the DP. Then it all comes off and gets heat wrapped. Also need to upgrade the fuel system to handle the extra flow that the turbo will need. I plan on running 15psi. I am shooting for 700whp but i am not sure if i will make it to that point on 15psi. We will see how hard i push it but with the shortblock being stock, i am trying to resist the urge to crank it up.

Trending Topics
01-13-2014, 01:55 PM
#8
Launching!
Thread Starter
iTrader: (5)
Join Date: Aug 2012
Location: IA
Posts: 255
Likes: 0
Received 0 Likes
on
0 Posts
The radiator is a 27.5 x 15.5 x 2.5 Griffen Radiator. The old setup used a Howe brand but i had to get a rad that moved both the inlet and outlet to the Pass. side of the car. Here is a link the the rad i am running now:
http://www.summitracing.com/parts/gr...41-x/overview/
The fans themselves are out of a Ford Contour. The shroud they come intalled in did not fit the new radiator setup. So i cut off and removed the fans from the factory shroud and build a new one out of aluminum. Then i fastened the Ford fans to the Alum. shroud and now we have the finnished product.
Stock Contour fans:
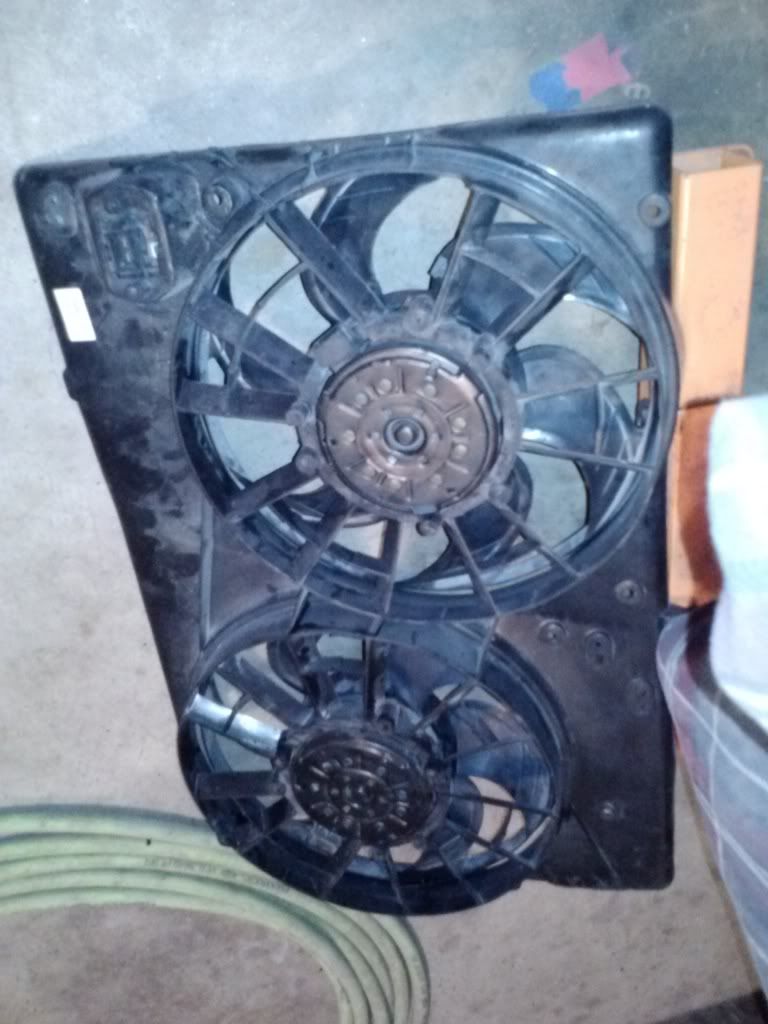
Mounted to the new shroud that wsa build:
01-13-2014, 04:13 PM
#10
Launching!
Thread Starter
iTrader: (5)
Join Date: Aug 2012
Location: IA
Posts: 255
Likes: 0
Received 0 Likes
on
0 Posts
That i did. I could no longer use the Howe because of how the radiator was setup (ins and outs). The Griffin was the exact size that i needed with the exact ports i needed where i needed them to get around the piping. I'm unsure of how i could have sized it any better to make it physically fit and work the way i needed even if i ordered a custom setup from Howe. Which then the only difference would be Brand. The Howe never did me wrong in the old setup, but being that the Griffen was an off the shelf and shipped the same day, i went with it to speed the build along. It should do the trick just as well.
01-13-2014, 05:34 PM
#12
Launching!
Thread Starter
iTrader: (5)
Join Date: Aug 2012
Location: IA
Posts: 255
Likes: 0
Received 0 Likes
on
0 Posts
Live and learn i suppose. We will see how this one does. If it fails to keep it cool or i have some issues with it then it shouldn't be to difficult to swap it out to something different.
 01-14-2014, 07:54 AM
#15
Launching!
Thread Starter
iTrader: (5)
Join Date: Aug 2012
Location: IA
Posts: 255
Likes: 0
Received 0 Likes
on
0 Posts
Glad to see there is some interest in the build. Hopefully it will not dissapoint.
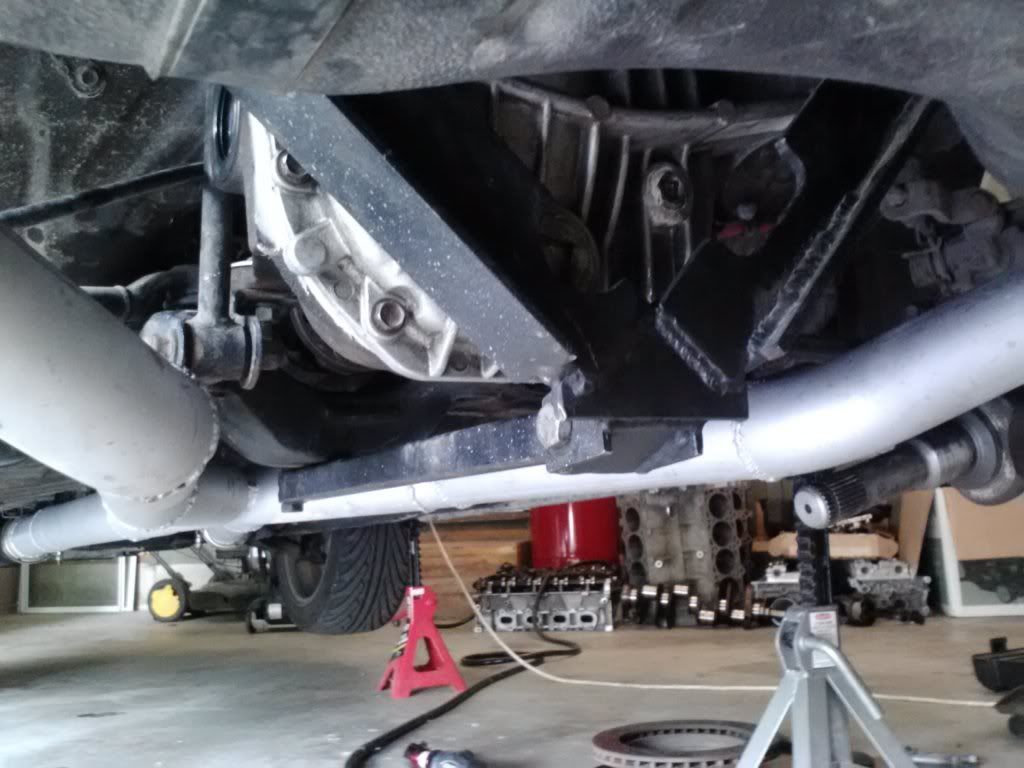
Last night i got the WG routed back into the DP. I really wanted to run a flex connector in the tube, however it was to short to allow me to do that so its a solid connection. Now i need to do some clearancing of the subframe. Where the DP drops down and out of the bay it fits perfectly, untill i put a v-band on the end. Then the V-band hits the left over metal from a pinch weld on the subframe and will not slide past for install. I will see what i can do on this tongiht most likely and hopefully get this downpipe done and move on to a different part of the build.
Last night i got the WG routed back into the DP. I really wanted to run a flex connector in the tube, however it was to short to allow me to do that so its a solid connection. Now i need to do some clearancing of the subframe. Where the DP drops down and out of the bay it fits perfectly, untill i put a v-band on the end. Then the V-band hits the left over metal from a pinch weld on the subframe and will not slide past for install. I will see what i can do on this tongiht most likely and hopefully get this downpipe done and move on to a different part of the build.
01-14-2014, 09:07 AM
#16
TECH Senior Member
iTrader: (7)

Great project!
You built the car that I wanted to build 6 years ago�
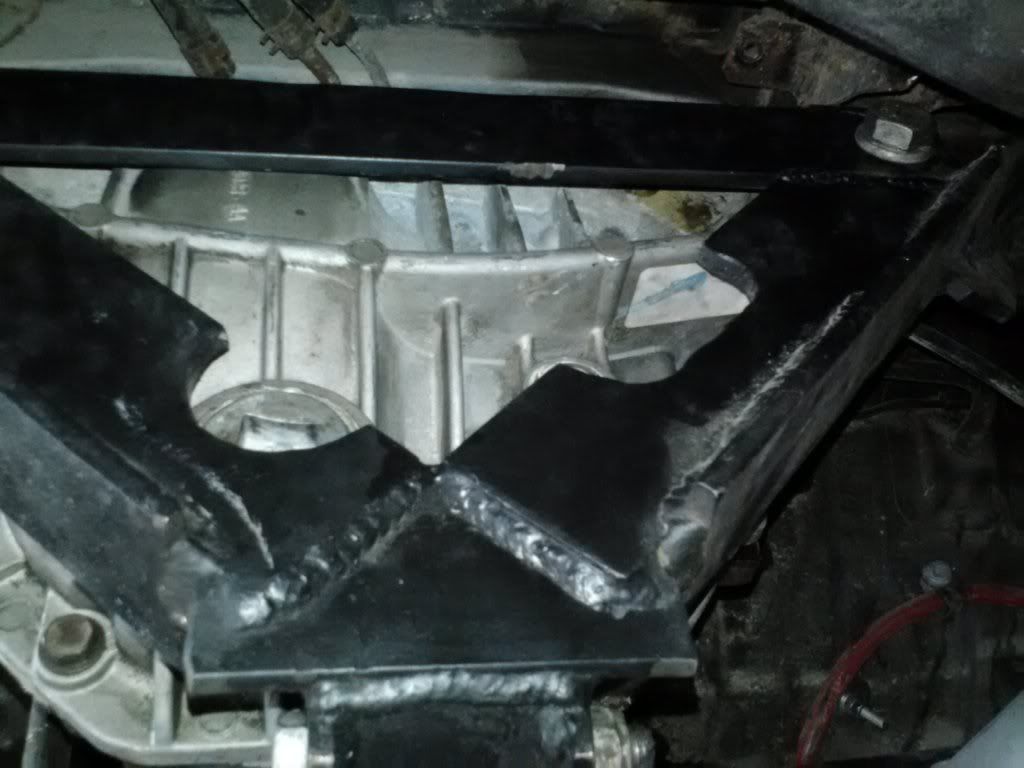
Can you post most pictures of the rear end? Where did this car come from?
The 8.8 IRS cradle looks like a copy of the cradles that I used to make and sell for the FCs.


Andrew
You built the car that I wanted to build 6 years ago�
Can you post most pictures of the rear end? Where did this car come from?
The 8.8 IRS cradle looks like a copy of the cradles that I used to make and sell for the FCs.
Andrew
 01-14-2014, 09:37 AM
#17
Launching!
Thread Starter
iTrader: (5)
Join Date: Aug 2012
Location: IA
Posts: 255
Likes: 0
Received 0 Likes
on
0 Posts
Your right, that does look really similer. Did you make them and sell them, or did you fab them up for a few cars that came your way? The cradle came out of a car that i purcahsed localy (Des Moines IA). However, i know the guy i bought it from bought it from someone who lived jsut across the border in IL. Thats all i know for owner info on that car.
The car that is currently being used in this build i bought off a local that had it stored away in his shop. It was a "one owner" car that had the original locked up rotary in it. Still had all the receipts and service records with it. Story was that an elderly person owned it and passed away. The family let it sit. From sitting so long it locked up so they just took it to a junk yard. The shop i got it from saw it sitting at the yard and scooped it up same day. Since then it had just been collecting dust in his shop untill i bought it to use as a clean shell for my build.
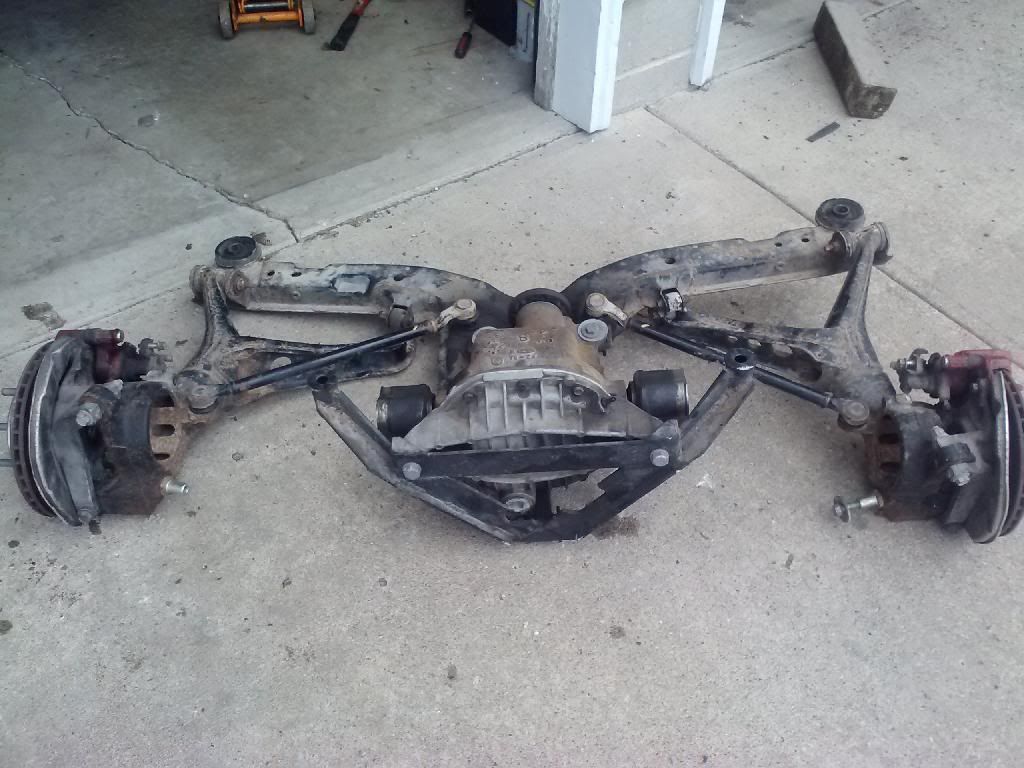
This is the car that the cradle came out of:
And pictures of the Cradle - sorry for the pic quality, its wha ti had in my photbucket:
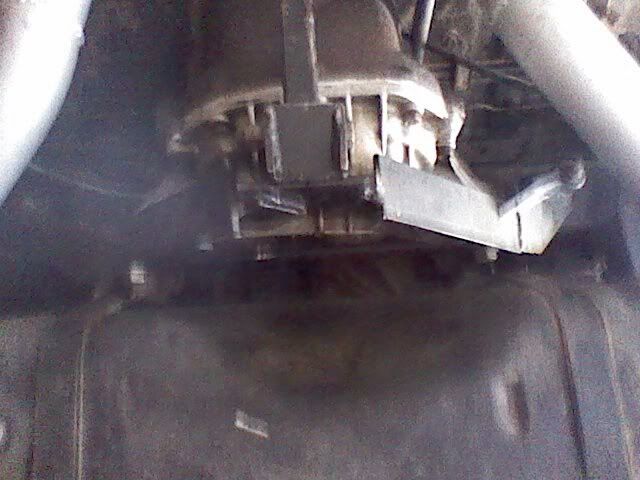
The car that is currently being used in this build i bought off a local that had it stored away in his shop. It was a "one owner" car that had the original locked up rotary in it. Still had all the receipts and service records with it. Story was that an elderly person owned it and passed away. The family let it sit. From sitting so long it locked up so they just took it to a junk yard. The shop i got it from saw it sitting at the yard and scooped it up same day. Since then it had just been collecting dust in his shop untill i bought it to use as a clean shell for my build.
This is the car that the cradle came out of:

And pictures of the Cradle - sorry for the pic quality, its wha ti had in my photbucket:


Last edited by Phish806; 01-14-2014 at 09:46 AM.
01-14-2014, 09:43 AM
#18
TECH Senior Member
iTrader: (7)
That's not mine, but it is basically the same design. Imitation is the sincerest form of flattery�LOL
I did 3 group buys of 10 units back in 2005-2006, so there are about 30 cradles out there. I designed it to be a bolt in deal, but people had to send me their rear crossmember for modifications. I then sent them back their crossmember, cradle, and some solid aluminum bushings for the front diff mount.
**edit** after looking at the pics more carefully, that design is different in terms of how the front of the diff case mounts. Mine bolted to the rod that ran under the hosing. I did this to transfer all pinion motion force to a place on the rear crossmember that was strongest. Their design has the from mount towards the rear and puts the pinion force through the single strut rod.
01-14-2014, 09:54 AM
#19
Launching!
Thread Starter
iTrader: (5)
Join Date: Aug 2012
Location: IA
Posts: 255
Likes: 0
Received 0 Likes
on
0 Posts
That was the first thing i noticed about yours. How the front was mounted. I will get some differnet pics of mine to see more clearly how thigns are done. When it comes time i may have to modify mine off of your pics. A little bit more strength never hurt anything. So far it has not shown up as an issue though - which i am very pleased with. However i wsa not putting down as much power either. I did find that the axle was a weak point since i did snap one of those.


